

Page 1
BASIC 10T/DTS
#02040
© Güde GmbH & Co. KG - Birkichstrasse 6 - D-74549 Wolpertshausen - Deutschland
Deutsch D 3
Originalbetriebsanleitung
HOLZSPALTER
English GB 9
Translation of original operating instructions
WOOD SPLITTER
Français F 15
Traduction du mode d’emploi d’origine
FENDEUSE DE BÛCHES
Čeština CZ 21
Překlad originálního návodu k provozu
ŠTÍPAČ ŠPALKŮ
Slovenčina SK 27
Preklad originálneho návodu na prevádzku
ŠTIEPAČKA KLÁTOV
Nederlands NL 33
Vertaling van de originele gebruiksaanwijzing
HOUTSPLIJTER
Italiano I 39
Traduzione del Manuale d’Uso originale
SPACCATRICE DEI TRONCHI
Magyar H 45
Az eredeti használati utasítás fordítása
RÖNKHAÍÓ
Slovenščina SLO 51
Prevod originalnih navodil za uporabo
Cepilec drv
Hrvatski HR 57
Prijevod originalnih uputa za uporabu.
Uređaj za cijepanje drva
Bosanski BIH 63
Prijevod originalnih uptstava za upotrebu.
Uređaj za cijepanje
Româneşte RO 69
Traducerea manualului de exploatare original.
Despicător butuci
Български BG 75
Превод на оригиналната инструкция
Устройство за цепене на трупи
Page 2
4
A
2
A
6
7
A
1
5
A
B
10
3
1
14
12
9
8
4
2
5
6
13
11
7
15
16
17
1
2
8
Page 3

Kennzeichnungen auf dem Gerät
Erklärung der Symbole
In dieser Anleitung und/oder auf dem Gerät werden folgende
Symbole verwendet:
Produktsicherheit:
Produkt ist mit den
einschlägigen Normen der
Europäischen Gemeinschaft
konform
Verbote:
Verbot, allgemein
(in Verbindung mit anderem
Piktogramm)
Hineinfassen verboten
Am Netzstecker ziehen
verboten
Vor Regen und Nässe
schützen
Maschine darf nur von einer
Person bedient werden
Warnung:
Warnung/Achtung Warnung! Stolpergefahr!
ausreichenden
Sicherheitsabstand einhalten!
Warnung! Einklemmgefahr!
Warnung! Herumfliegende
Teile!
Warnung! Handverletzung
durch das Spaltkreuz!
Warnung vor gefährlicher
elektrischer Spannung
ACHTUNG! Vor dem Betrieb
Bedienungsanleitung lesen!
Gebote:
Vor Gebrauch Bedienungs-
anleitung lesen
Augen- und Gehörschutz
benutzen!
Sicherheits-
handschuhe benutzen
Sicherheitsschuhe benutzen!
Umweltschutz:
Abfall nicht in die Umwelt
sondern fachgerecht
entsorgen.
Verpackungs-material aus
Pappe kann an den dafür
vorgesehen Recycling-Stellen
abgegeben werden.
Schadhafte und/oder zu
entsorgende elektrische oder
elektronische Geräte müssen
an den dafür vorgesehen
Recycling-Stellen abgegeben
werden.
Interseroh Recycling
Verpackung:
Vor Nässe schützen!
Vorsicht zerbrechlich!
Packungsorientierung Oben.
Technische Daten:
Netzanschluß Motorleistung
Drehzahl Spaltdruck
Max. Spaltdurchmesser Max. Spaltgutlänge
Tischgröße ca. Gewicht
Sonstiges:
Vor dem Betrieb 1 Minute das
Öl durch drücken eines
Sicherheitsbügel erwärmen.
Beim Einschalten des
Spalters einen Bedienarm
gedrückt halten!
Drehrichtung
D
Lesen Sie bitte diese Bedienungsanleitung sorgfältig durch, bevor Sie das Gerät in Betrieb nehmen.
A.V. 2 Nachdrucke, auch auszugsweise, bedürfen der Genehmi gung. Technische Änderungen vorbehalten.
Abbildungen beispielhaft! Dies ist eine Original Bedienungsanleitung.
Page 4

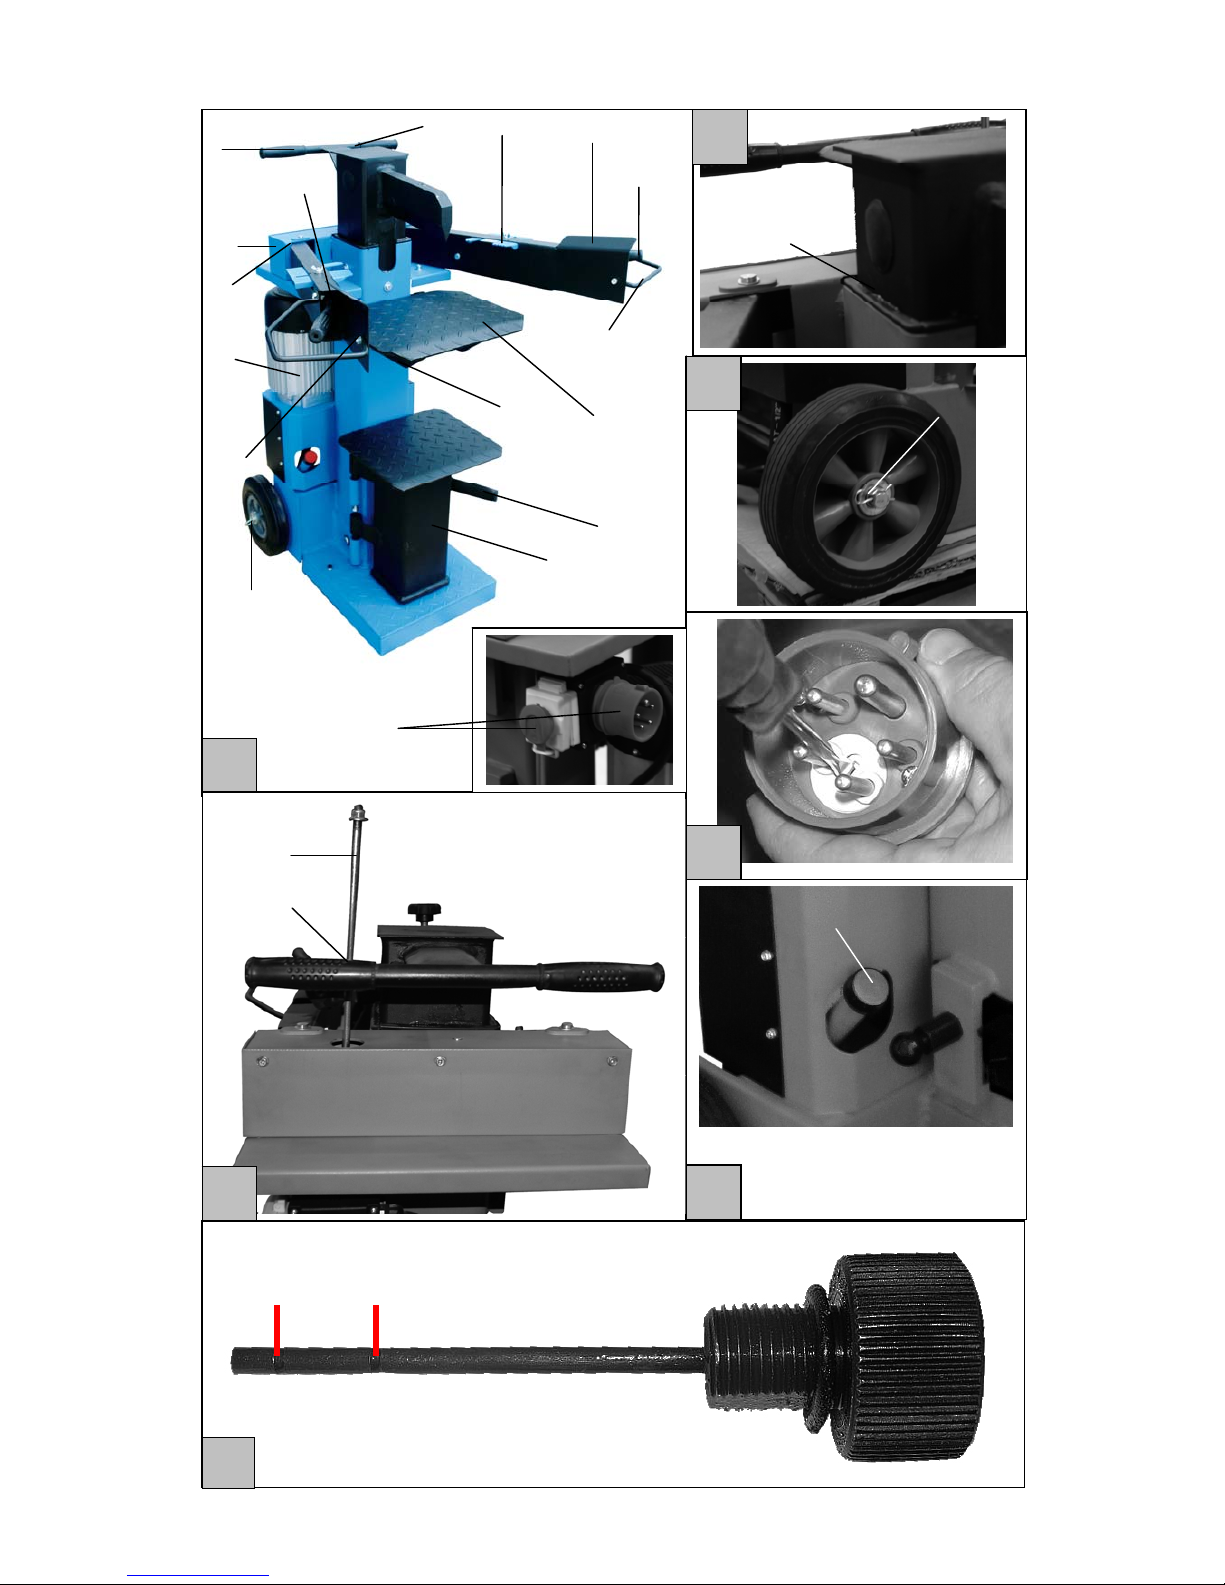
Gerätebeschreibung (Abb. 1)
1. Handgriff
2. Spaltmesser
3. Spannpratze
4. Bedienarm
5. Griffschutz
6. Tischhalterung (vorne)
7. Tischverriegelung
8. Spalttisch
9. Räder
10. Schalter / Stecker
11. Hubeinstellstange
12. Motor
13. Schutzbügel
14. Schaltwippe (untere Verkleidung)
15. Blechlaschen
16. Hebel für Schwenktisch
17. Schwenktisch
Gerät
Holzspalter Basic 10T/DTS
Schwere Stahlkonstruktion, Spaltmesser aus Spezialstahl,
alle Stahlteile mit hochwertiger Pulverbeschichtung, ProfiHydraulikpumpe für harten Einsatz, Tiefeinschub mit
zusätzlichem Schwenktisch und abnehmbarem
Basistisch. Motor mit Thermo Überlastschutz.
Bestimmungsgemäße Verwendung
Der Holzspalter ist nur für den Betrieb durch 1 Person
ausgelegt. Es dürfen nie zwei oder mehrere Personen an einer
Maschine arbeiten.
Der Holzspalter ist ausschließlich zum Zerkleinern von
Brennholz in Faserrichtung bestimmt.
Die Anweisung bezüglich Montage, Betrieb, Wartung,
Reparatur und dgl. sind dringend einzuhalten, um Gefahren
auszuschließen und Schäden zu vermeiden.
Beim Spalten ist unbedingt darauf zu achten, dass das zu
spaltende Holz nur auf dem Riffelblech der Bodenplatte oder
auf dem Riffelblech vom Spalttisch aufliegt.
Es dürfen mit dieser Maschine keine anderen Arbeiten
verrichtet werden, als die Arbeiten, für die die Maschine
gebaut ist und die in der Bedienungsanleitung beschrieben
werden. Jeder darüber hinausgehende Gebrauch gilt als
nicht bestimmungsgemäß. Für daraus resultierende
Schäden oder Verletzungen haftet der Hersteller nicht.
Bitte beachten Sie das dieses Gerät bestimmungsgemäß
nicht für den gewerblichen Einsatz konstruiert sind.
Gewährleistung
Die Gewährleistung erstreckt sich ausschließlich auf Mängel,
die auf Material- oder Herstellungsfehler zurückzuführen sind.
Bei Geltendmachung eines Mangels im Sinne der
Gewährleistung ist der original Kaufbeleg mit Verkaufdatum
beizufügen.
Von der Gewährleistung ausgeschlossen sind unsachgemäße
Anwendungen, wie z. B. Überlastung des Gerätes,
Gewaltanwendung, Beschädigungen durch Fremdeinwirkung
oder durch Fremdkörper. Nichtbeachtung der Gebrauchs- und
Aufbauanleitung und normaler Verschleiß sind ebenfalls von
der Gewährleistung ausgeschlossen.
Technische Daten
Anschluss: 400 V~50 Hz
Motorleistung: 4000 W P1 / S6 40%
Motordrehzahl: 1440 min
-
1
max. Spaltdruck: 10 Tonnen
max. Zylinderhub: 510 mm
Vorlaufgeschwindigkeit: 0,03 m/s
Rücklaufgeschwindigkeit: 0,15 m/s
Hydrauliktank: 8 l (Ölsorte: HLP 46)
Spaltgutlängen: 1350 mm
Spaltsäule: 120 mm x 120 mm
Max. Spaltdurchmesser: ca. 400 mm
Tischgröße: Ca. 380 x 300 mm
Gewicht: 177 kg
Artikel-Nr. 02040
Sicherheitshinweise
Allgemeines
Die Anweisungen aus dieser Bedienungsanleitung und den
angebrachten Sicherheitshinweisen auf dem Gerät hinsichtlich
Bedienung, Wartung und Reparatur sind aus
sicherheitstechnischen Gründen unbedingt zu beachten und
einzuhalten.
Bedienpersonal
Die Benutzung eines Holzspalters kann mit Gefahren
verbunden sein. Es dürfen deshalb nur eingewiesene und
erfahrene Personen damit umgehen und arbeiten. Das
Bedienpersonal muß eng anliegende Kleidung sowie
Schutzschuhe tragen.
Arbeitsbereich
Zum sicheren Holzspalten ist es dringend erforderlich, daß der
Arbeitsbereich eben und trittfest ist, und daß eine
ausreichende Bewegungsfreiheit gewährleistet ist. Zum Anund Abtransport des Spalters ist es erforderlich, daß die Wege
frei von Stolperstellen sind. Für eine ausreichende
Beleuchtung des Arbeitsplatzes ist zu sorgen.
Sorgen Sie dafür, dass sich keine weiteren Personen
während des Betriebs im Arbeitsbereich aufhalten, bzw.
ausreichenden Sicherheitsabstand einhalten.
Arbeitsvorbereitung
Bei Reparatur- oder Wartungsarbeiten, sowie beim Verlassen
des Holzspalters, ist die Stromzufuhr durch Drücken des roten
Knopfes am Schalter und durch Ziehen des Netzsteckers zu
unterbrechen. Die Stromzufuhr nur durch das Schalten in
Aus-Stellung zu unterbrechen ist nicht ausreichend.
GÜDE Holzspalter werden grundsätzlich mit gehärteten
Spaltmessern ausgeliefert. Sollte jedoch durch Spalten von
Holz mit unsichtbaren Fremdkörpern wie Beton, Stahl usw.
eine leichte Verformung der Schneide des Spaltmessers
sichtbar werden, so sind diese durch Abschleifen oder Abfeilen
zu beseitigen. Desweiteren erhöht eine konstante
„Scharfhaltung“ des Schneidemessers die Arbeitsleistung.
TIP: Spaltmesser hin und wieder einfetten (bei
Problemhölzern).
Vor der ersten Inbetriebnahme sind die
Sicherheitseinrichtungen (insbesondere die Zwei-HebelBedienung) auf Ihre Funktion zu prüfen.
ACHTUNG! Vergewissern Sie sich vor jeder
Inbetriebnahme, dass der Spalttisch fest und sicher am
Spalter befestigt ist.
Page 5
Entsorgung
Die Entsorgungshinweise ergeben sich aus den Piktogrammen
die auf dem Gerät bzw. der Verpackung aufgebracht sind.
Eine Beschreibung der einzelnen Bedeutungen finden Sie im
Kapitel „Kennzeichnung“.
Entsorgung der Transportverpackung
Die Verpackung schützt das Gerät vor Transportschäden. Die
Verpackungsmaterialien sind in der Regel nach
umweltverträglichen und entsorgungstechnischen
Gesichtspunkten ausgewählt und deshalb recycelbar. Das
Rückführen der Verpackung in den Materialkreislauf spart
Rohstoffe und verringert das Abfallaufkommen.
Verpackungsteile (z.B. Folien, Styropor®) können für Kinder
gefährlich sein. Es besteht Erstickungsgefahr!
Bewahren Sie Verpackungsteile außerhalb der Reichweite von
Kindern auf und entsorgen Sie sie so schnell wie möglich.
Anforderungen an den Bediener
Der Bediener sollte vor Gebrauch des Gerätes aufmerksam
die Bedienungsanleitung gelesen haben.
Qualifikation
Außer einer ausführlichen Einweisung durch eine sachkundige
Person ist keine spezielle Qualifikation für den Gebrauch des
Gerätes notwendig.
Mindestalter
Das Gerät darf nur von Personen betrieben werden, die das
18. Lebensjahr vollendet haben. Eine Ausnahme stellt die
Benutzung als Jugendlicher dar, wenn die Benutzung im Zuge
einer Berufsausbildung zur Erreichung der Fertigkeit unter
Aufsicht eines Ausbilders erfolgt
Inspektion Wartung (Abb. 2+7+8)
Sicherheitshinweise für die Inspektion und Wartung:
Nur ein regelmäßig gewartetes und gut gepflegtes Gerät kann
ein zufriedenstellendes Hilfsmittel sein. Wartungs- und
Pflegemängel können zu unvorhersehbaren Unfällen und
Verletzungen führen.
• Verwenden Sie für alle Reinigungsarbeiten niemals
scharfe Reinigungsmittel. Dies kann zu
Beschädigungen oder Zerstörung des Gerätes
führen.
• Netzstecker ziehen.
• Reparatur- und Wartungsarbeiten an der elektrischen
Anlage nur von Elektro-Fachkräften ausführen lassen.
• Sämtliche Schutz- und Sicherheitseinrichtungen müssen
nach abgeschlossenen Reparatur- und
Wartungsarbeiten sofort wieder montiert werden.
Wir empfehlen Ihnen (Abb. 2):
• Spaltmesser
Das Spaltmesser ist ein Verschleißteil, das bei Bedarf
nachgeschliffen werden muß. Dies erhöht die
Spaltleistung und schont den Spalter. Tipp:
Spaltmesser einfetten!
• Zweihand-Schutzeinrichtung
Die kombinierte Halte- und Schalteinrichtung muß
leichtgängig bleiben. Gelegentlich mit wenigen Tropfen
Öl schmieren.
• Spaltsäule
Fetten Sie die Spaltsäule vor jedem Einsatz, das
erhöht die Lebensdauer der Gleitbacken (Abb. 2/A).
Fahren Sie hierzu die Spaltsäule komplett heraus und
tragen Sie handelsübliches Mehrzweck-Fett auf allen 4
Seiten der Spaltsäule gleichmäßig auf.
• Bewegliche Teile
Spaltmesserführungen sauberhalten (Schmutz,
Holzspäne, Rinden usw.) Gleitschienen mit Fett
schmieren.
• Hydraulik
Hydraulische Anschlüsse und Verschraubungen auf
Dichtheit und Verschleiß prüfen. Eventuell die
Schraubverbindungen nachziehen.
Hydraulikölstand kontrollieren (Abb. 7+8):
Den Füllstand des Hydrauliköls nur im kalten
Zustand, mit ausgestecktem Netzkabel und eingefahrener
Spaltsäule überprüfen.
Am Ölmessstab befinden sich zwei Kerben, die unterste Kerbe
(Abb. 8/1) stellt die Grenze für die Mindestmenge an
Hydrauliköl im Tank dar, die obere Kerbe (Abb. 8/2) für die
Maximalmenge.
• Drehen Sie den Ölmessstab (Abb. 7/A) komplett aus
der Öffnung heraus.
• Entfernen Sie das Öl vom Messstab mit einem
fusselfreien Tuch.
• Drehen Sie den Ölmessstab nun wieder komplett in die
Öffnung hinein.
• Drehen Sie dann die Einfüllschraube mit Messtab
wieder heraus und kontrollieren Sie, ob die Obergrenze
des Hydrauliköls zwischen den beiden oben genannten
Kerben liegt.
Jährlich einen Ölwechsel durchführen (Abb. 7+8):
• Ölablassschraube (Abb. 7/A) herausdrehen.
• Altöl auffangen (je nach Modell unterschiedliche Menge)
• Altöl umweltgerecht entsorgen
• Ölablaßschraube wieder eindrehen. Keine Schmutzteile
in den Ölbehälter gelangen lassen.
• Hydrauliköl einfüllen, bis zur oberen Kerbe des
Messstabes (Abb. 8/2)
• Holzspalter einige Male leer betätigen.
Empfohlenes Hydrauliköl: DIN ISO HLP 46
Güde Artikel-Nr. 42004
Viskosität: 46
Ölvolumen: (siehe Technische Daten)
Öl immer nur im eingefahrenen Zustand der
Spaltsäule einfüllen
Hydraulik:
Die Hydraulik-Schläuche und Verbindungen müssen bei
ca. 4 Betriebsstunden auf ihre Dichtigkeit überprüft werden
und –wenn erforderlich- nachgezogen werden.
Funktionsprüfung
Der Hydraulik-Holzspalter wird betriebsfertig ausgeliefert. Vor
jedem Einsatz sollte diese Funktionsprüfung gemacht werden.
• Beide Schaltgriffe nach unten und Spaltmesser nach
unten bis ca. 5 cm über den Tisch fahren lassen
• Jeweils einen Schaltgriff loslassen, Spaltmesser bleibt in
der gewählten Position stehen
Montage der Bedienarme, Räder und des
Tisches (Abb. 1 und 4)
Bedienarme montieren Abb. 1
Bedienarm (Abb. 1/4) in die Schaltwippe (Abb. 1/14) einführen,
von oben mit Bolzen, Scheibe und Splint sichern. Nun den
Bedienarm (Abb. 1/4) nach der beschriebenen Methode auf
der anderen Seite befestigen. Die Schutzbügel (Abb. 1/13) an
beide Bedienarme mit je 2 Sechskantschrauben (Abb. 1/3)
montieren.
TIPP: Vorher die Blechlaschen und Muttern (Abb. 1/15)
oben und unten einfetten!
Räder montieren Abb. 4
Montieren Sie auf beiden Seiten ein Laufrad und sichern beide
mit einem Splint (A).
Tischmontage/Schwenktisch Abb. 1
Setzen Sie die Tischplatte in die Halterung (Abb. 1/6), durch
gleichzeitiges Ziehen des Tischverriegelungshebels ein.
Zum Schwenken des Schwenktisches den Hebel nach unten
drücken. Bei Benutzung des Schwenktisches darauf achten,
dass der Hebel immer arretiert ist.
Page 6

Hubeinstellung (Abb. 5)
Bei Holzstücken unter ca. 50 cm und größeren
Stückzahlen ist es möglich, die Arbeitsleistung
durch Verkürzen des Spaltmesserrücklaufs zu steigern.
Gehen Sie wie folgt vor:
Stellen Sie ein kurzes Holzstück auf den Spalttisch und fahren
Sie das Spaltmesser bis ca. 2 cm an das Holzstück heran und
schalten den Spalter aus (roten Knopf am Schalter und
Netzstecker ziehen). Jetzt können Sie mittels der
angebrachten Stange (Abb. 5/B) den Rücklauf verkürzen,
indem Sie diese mittels der Feststellschraube in der
gewünschten Höhe (Abb. 5/A) fixieren.
Einsatzbereich
Das Gerät ist ausschließlich zum Bearbeiten von Brennholz
zugelassen. Das Spaltmaterial muß folgende Maße aufweisen:
- Mindestdurchmesser: 125 mm
Maximaldurchmesser: 400 mm
- Es ist ausschliesslich das Bearbeiten des Spaltgutes in
Faserrichtung erlaubt.
- Es besteht die Gefahr, daß sich astiges Spaltgut beim
Spaltvorgang verklemmt.
- Ein Entfernen verklemmter Holzstücke ist durch Klopfen
an das Spaltgut zulässig.
- Das Heraussägen ist verboten!
Stromanschluss/Hydraulik (Abb. 1+6+7)
Netzanschluss (Abb. 1/10)
Entsprechend den Bestimmungen der
Berufsgenossenschaften „CE“ usw., sind alle Spalter mit
Unterspannungsauslösung im Schalter ausgestattet. Dies
verhindert ein selbstständiges Wiederanlaufen bei
Stomunterbrechungen durch Stromausfall, unbeabsichtigtes
Ziehen des Steckers, defekte Sicherung usw. Grundsätzlich
muß das Gerät wieder durch Drücken des grünen
Einschaltknopfes neu eingeschaltet werden.
Ein bewußtes Festhalten bzw. Blockieren des
Einschaltknopfes bei fehlender Nulleitung, führt automatisch
zum Ausfall des Schalters. In diesem Fall, der nachträglich
überprüfbar ist, erlischt die Garantie.
Hydraulik
Die Hydraulik-Schläuche und Verbindungen müssen bei
ca. 4 Betriebsstunden auf ihre Dichtigkeit überprüft
werden und –wenn erforderlich- nachgezogen werden.
Nur bei 400 Volt-Geräten: Unbedingt auf Drehrichtung
(siehe Motorpfeil) des Motors achten, da ein Betrieb in die
falsche Drehrichtung die Ölpumpe beschädigt. In diesem
Fall erlischt jeglicher Garantieanspruch. Wenn
erforderlich, Drehrichtung durch Umpolung des Steckers.
Siehe Abb. 6!
Hydrauliköl/Tank
Für alle Spalter kann handelsübliches Hydrauliköl nachgefüllt
werden (z.BHLP 46 oder ein anderes Fabrikat mit gleicher
Viskosität). Ein Wechsel des Öl´s ist nicht erforderlich.
Entlüften Sie den Tank durch herausschrauben und
wieder Eindrehen der Einfüllschraube (Abb. 7/A) vor
jedem Betrieb.
Betrieb
Achtung: Achten Sie darauf, dass das Spaltgut
möglichst rechtwinklig geschnitten ist und satt auf dem
Spalttisch aufliegt. Schräg abgeschnittenes oder extrem
astiges Spaltgut kann wegrutschen bzw. die Bedienarme
verbiegen.
Setzen Sie das Spaltgut immer nur auf den dafür
vorgesehenen Plattformen (Tischen) auf (niemals auf den
Rahmen). Dies kann den Spalter beschädigen.
1. Motor durch Drücken des grünen Einschaltknopfes
einschalten. Achtung: auf Motorlaufrichtung achten!
2. Bei niedrigen Temperaturen den Spalter 15 min. im
Leerlauf stehen lassen, bis sich das Öl entsprechend
erwärmt hat.
3. Spaltgut auf den Tisch stellen und mittels Spannpratzen
am Hebel festhalten.
4. Durch das Drücken beider Hebel nach unten wird der
Spaltvorgang ausgelöst. (Sobald das Spaltmesser in das
Holz eindringt die Hebel, bei gleichzeitigem Druck nach
unten, leicht nach aussen schwenken. Dabei wird
verhindert, dass die Halteblechte (arme) verbogen
werden.)
5. Nach Beendigung des Spaltvorganges mindestens einen
Hebel anheben, die Spaltsäule läuft automatisch nach
oben.
Es ist strengstens untersagt, den Holzspalter mit zwei
Personen zu bedienen, indem eine Person das Holz hält
und die zweite Person die Spannpratzen betätigt.
Transporthinweise
Transport
Alle Holzspalter sind mit großen Rädern ausgestattet. Um
einen Transport vorzunehmen fassen Sie mit der einen Hand
an den Bügel der Spaltsäule und mit der anderen Hand an den
Bügel oberhalb des Motors und kippen den Spalter leicht zu
sich hin. In dieser Stellung kann der Spalter mühelos gerollt
werden.
Um ein Auslaufen des Hydrauliköls zu verhindern, Spalter
niemals liegend transportieren.
Beim Transport ist das Spaltmesser immer ganz nach
unten zu fahren.
Restgefahren und Schutzmaßnahmen
Warnung!!!
Das Außer-Kraft-Setzen, Verändern, Blockieren, Abbauen,
Umbauen oder Anbauen von etwaigen Teilen an
Sicherheits- und Schutzeinrichtungen der Maschine ist
strengstens untersagt und kann bei Nichtbeachtung
schwere bzw. lebensgefährliche Verletzungen, nach sich
ziehen.
Für Sach- oder Personenschäden die durch derartige
Nachlässigkeiten entstehen kann der Hersteller nicht
haftbar gemacht werden.
Des Weiteren erlischt bei einer oben angesprochenen
Nachlässigkeit unmittelbar jeglicher Garantieanspruch
gegenüber dem Hersteller.
Der Spalter darf nur von einer Person betrieben werden.
Halten Sie den Spalter und den Arbeitsbereich während
des Betriebs stets frei von Holzresten, die Sicherheits
oder Bedienteile blockieren oder beeinträchtigen könnten.
Service
Sie haben technische Fragen? Eine Reklamation?
Benötigen Ersatzteile oder eine Bedienungsanleitung?
Auf unserer Homepage www.guede.com im Bereich Service
helfen wir Ihnen schnell und unbürokratisch weiter. Bitte helfen
Sie uns Ihnen zu helfen. Um Ihr Gerät im Reklamationsfall
identifizieren zu können benötigen wir die Seriennummer
sowie Artikelnummer und Baujahr. Alle diese Daten finden Sie
auf dem Typenschild. Um diese Daten stets zur Hand zu
haben, tragen Sie diese bitte unten ein.
Seriennummer:
Artikelnummer:
Baujahr:
Tel.: +49 (0) 79 04 / 700-360
Fax: +49 (0) 79 04 / 700-51999
E-Mail: support@ts.guede.com
Page 7
EG-Konformitätserklärung
Hiermit erklären wir,
Güde GmbH & Co. KG
Birkichstraße 6
74549 Wolpertshausen
Germany
Dass die nachfolgend bezeichneten Geräte aufgrund ihrer Konzipierung und Bauart sowie in den von uns in Verkehr gebrachten
Ausführungen den einschlägigen, grundlegenden Sicherheits- und Gesundheitsanforderungen der EG-Richtlinien entsprechen.
Bei einer nicht mit uns abgestimmten Änderung der Geräte verliert diese Erklärung ihre Gültigkeit.
Bezeichnung der Geräte: Holzspalter Basic 10T/DTS
Artikel-Nr.: 02040
Datum/Herstellerunterschrift: 07.03.2012
Angaben zum Unterzeichner: Geschäftsführer, Hr. Arnold
Technische Dokumentation: J. Bürkle FBL; QS
Einschlägige EG-Richtlinien:
2004/108/EG
2006/42/EG
Angewandte harmonisierte Normen:
EN 609-1/A2:2009
EN 61000-3-3:1995+A1+A2
EN 61000-3-2:2006
EN 55014-2:1997+A1
EN 55014-1:2006
Lärmwertangabe:
Lwa: 85,2 dB
Lpa: 69,9 dB
Fehlersuche
Probleme
mögliche Ursachen
Abhilfe
Der Motor läuft nicht an
1. Kein Strom an der Steckdose
2. Elektrische Verlängerungsleitung defekt
3. Falsche Anschlussleitung
4. Schalter Kondensator defekt
1. Netzsicherung prüfen
2. Netzstecker ziehen, prüfen, austauschen
3. Anschluss 5 adrig, bei 2,5 mm
2
Querschnitt
4. Maschine von Elektro-Fachkraft überprüfen lassen
Falsche
Motordrehrichtung
1. Falschanschluss 1. Phasenwender in Gerätestecker mit Schraubendreher
drehen
Keine
Spaltmesserbewegung
1. Zweihandschalt und-Auslösehebel
nachstellen
1. Ölstand prüfen
Steuerventil defekt Austausch nur durch Service
Spalter hat keine Leistung
1. Falsche Drehrichtung
2. Zu wenig Hydrauliköl
3. Auslösestange verbogen; Hydraulikstössel
am Ventil wird nicht ganz eingedrückt
4. Holz hat viele Äste und das Spaltmesser
bleibt stecken
5. Bedienarm verbogen
1. Drehrichtung durch Fachmann ändern
2. Hydrauliköl nachfüllen
3. Alle Schrauben am Auslösegestänge kontrollieren
Zugstange (Abb. 10/B) nachstellen, damit der
Hydraulikstößel am Ventil ganz eingedrückt wird.
4. Spaltmesser einfetten.
5. Bedienarm in die Ausgangsposition zurückbringen.
Grüner Einschaltknopf hält
nicht nach Eindrücken
1. Defekte Sicherung usw.
2. 2-Phasenlauf
1. Kabel überprüfen
Hydraulikpumpe pfeift,
Spaltmesser läuft
ruckartig
1. Ölverlust, Bodenverschmutzung
2. Zu wenig Hydrauliköl im Tank
1. Verschraubung nachziehen
Schläuche austauschen
2. Hydrauliköl nachfüllen
Page 8
Mechanische Restgefahren
Gefährdung Beschreibung Schutzmaßnahme(n) Restgefahr
Quetschen Während des Spaltvorgangs kann es
durch Absenken des hydraulischen
Messers zu Quetschungen oder
Abtrennungen von Körperteilen
kommen.
Es besteht die Gefahr, dass das
Spaltgut sich verklemmt. Bitte beachten
Sie, dass das Holz beim Herauslösen
stark unter Spannung steht und ihre
Finger im Spaltriss gequetscht werden
können.
Grundsätzlich die 2-Hand-Sicherheitsbedienung
verwenden. Nicht in den Spaltvorgang
eingreifen.
Niemals zu Zweit an der Maschine arbeiten
Verklemmtes Holz nur herausschlagen.
Vorsichtig vor herabfallendem Holz, dieses
kann ihre Füße verletzen.
Ein abgenutztes oder
beschädigtes
Hilfsmittel muss
unverzüglich ersetzt
werden.
Auf umstehende
Personen Acht
geben!
Stets
Sicherheitsschuhe
zum Arbeiten tragen
Scheren Während des Spaltvorgangs kann es
durch Absenken des hydraulischen
Messers zu Quetschungen oder
Abtrennungen von Körperteilen
kommen.
Grundsätzlich die 2-Hand-Sicherheitsbedienung
verwenden. Nicht in den Spaltvorgang
eingreifen.
Ein abgenutztes oder
beschädigtes
Hilfsmittel muss
unverzüglich ersetzt
werden.
Verletzungen
allgemein
Bei Bearbeitung von trockenen Hölzern
kann eine schlagartige Spaltung
schwere Verletzungen zur Folge haben.
Holzteile die während eines
Spaltvorgangs entstehen, können
herunterfallen und speziell Füße der
arbeitenden Person verletzen.
Die Spaltkeilverlängerung kann in den
Tisch fahren und Maschinenschäden
sowie schwere Verletzungen
verursachen.
Niemals in den Spaltvorgang eingreifen.
Stets ausreichenden Sicherheitsabstand halten.
Die Maschine stets behutsam und bedacht
bedienen.
Tragen Sie stets die vorgeschriebene
Schutzkleidung und arbeiten sie bedacht.
Tragen Sie bei der Arbeit mit dem Gerät immer
eine Schutzbrille.
Tragen Sie stets die vorgeschriebene
Schutzkleidung und arbeiten sie bedacht.
Tragen Sie auch stets die zur vorgeschriebenen
Schutzkleidung gehörenden Sicherheitsschuhe.
Vor dem Arbeiten mit der Spaltkeilverlängerung
stets den Tisch entfernen
Ein abgenutztes oder
beschädigtes
Hilfsmittel muss
unverzüglich ersetzt
werden.
Stets auf umstehende
Personen achten.
Erfassen,
Aufwickeln
Weite Kleidung oder Schmuck oder
langes Haar kann von beweglichen
Teilen erfasst werden.
Tragen Sie stets anliegende Kleidung und
keinen Schmuck schützen Sie ihre Haar mit
einem Haarnetz.
Elektrische Restgefahren
Gefährdung Beschreibung Schutzmaßnahme(n) Restgefahr
Direkter
elektrischer
Kontakt
Ein defektes Kabel oder Stecker kann
zum Stromschlag führen.
Lassen Sie defekte Kabel oder Stecker immer
vom Fachmann austauschen. Verwenden Sie
das Gerät nur an einem Anschluss mit
Fehlerstromschutzschalter (FI)
Zuleitungskabel vor
jedem Gebrauch
kontrollieren
Indirekter
elektrischer
Kontakt
Verletzung durch spannungsführende
Teile bei geöffneten elektrischen oder
defekten Bauteilen
Immer bei Wartungsarbeiten Netzstecker
ziehen. Nur an FI-Schalter betreiben
Gefährdungen durch Lärm
Gefährdung Beschreibung Schutzmaßnahme(n) Restgefahr
Gehörschädigungen
Längeres Arbeiten mit dem Gerät, kann
zu Gehörschädigungen führen.
Tragen Sie stets einen Gehörschutz.
Vernachlässigung ergonomischer Grundsätze
Gefährdung Beschreibung Schutzmaßnahme(n) Restgefahr
Nachlässiger
Gebrauch
persönlicher
Schutzaus-rüstung
Bedienung des Gerätes ohne die
entsprechende Schutzausrüstung kann
zu schweren äußeren sowie inneren
Verletzungen führen.
Tragen Sie stets die vorgeschriebene
Schutzkleidung und arbeiten sie bedacht.
Unangemes-sene
örtliche
Beleuchtung
Mangelhafte Beleuchtung stellt ein
hohes Sicherheitsrisiko dar.
Sorgen Sie bei der Arbeit mit dem Gerät immer
für ausreichende Beleuchtung.
Sonstige Gefährdungen
Gefährdung Beschreibung Schutzmaßnahme(n) Restgefahr
Herausge-worfene
Gegenstände oder
Flüssigkeiten
Beim Spalten können mechanische
Partikel Ihre Augen verletzen.
Tragen Sie bei der Arbeit mit dem Gerät immer
eine Schutzbrille.
Page 9
Marking on the appliance
Symbols explanation
The following symbols are used in these Operating Instructions
and/or on the appliance:
Product safety:
Product corresponds to
appropriate EU standards
Prohibitions:
General prohibition
(in connection with any other
icon)
No touching inside
No pulling the plug
Protect against rain and
moisture
Machine may only be
operated by one person
Warning:
Warning/caution Warning! Risk of trip!
Keep sufficient safety
distance!
Warning! Risk of getting
pressed!
Warning! Flying items!
Warning! Hand injury by
splitting cross!
Warning against dangerous
voltage!
CAUTION! Please read the
Operating Instructions before
operating the machine!
Commands:
Read the Operating
Instructions before using the
appliance
Use protective glasses and
head-phones!
Use safety gloves Use safety shoes!
Environment protection:
Dispose waste professionally
so as not to harm the
environment.
Packing cardboard material
may be delivered to collecting
centres for recycling.
Any faulty and/or disposed
electric or electronic devices
must be delivered to
appropriate collection centres.
Interseroh-Recycling system
with serial number
Package:
Protect against moisture!
Caution – fragile!
This side up.
Technical specifications:
Connection Engine power
Revolutions Splitting force
Max. diameter of the cut wood Max. length of the split wood
Table size app. Weight
Before operation, heat oil for 1
minute by pressing one
protective handle.
Keep one operating arm
pressed down when starting
the splitter!
Rotation direction
GB
Please read carefully these Operating Instructions before putting the appliance into operation.
A.V. 2 Any reprints, even partial, are subject to approval. Technical changes reserved. Pictures just for illustration purposes!
These are the original Operating Instructions.
Page 10
Appliance description (pic. 1)
1. Handle
2. Splitting knife
3. Clamping plate
4. Operating arm
5. Handle cover
6. Table holder (front)
7. Table blocking
8. Splitter table
9. Wheels
10. On/off / outlet
11. Lift adjustment rod
12. Engine
13. Protecting casing
14. Switching cradle (bottom cover)
15. Sheet clutch
16. Turn table lever
17. Turn table
Appliance
Basic 10T/DTS log splitter
Heavy steel design. Splitting knife out of special steel. All steel
parts with high-quality powder paint. Professional hydraulic
pump to be used in difficult conditions. Deep telescopic part
with additional turn table and removable basic table.
Engine with overheating fuse.
Use as designated
The log splitter has been designed to be operated by 1 person.
Two or more persons must never work with the appliance.
The log splitter has exclusively been designed to split wood
along fibres. Installation, maintenance, repair, etc. instructions
must strictly be followed to prevent risks and damage.
When splitting, it is necessary to make sure the split wood is
only fitted on the grooved sheet of the supporting plate or on
the grooved sheet of the splitter table.
The machine cannot be used for works other than for which
the machine has been designed and that are specified in the
Operating Instructions.
Any other use is a use in conflict with the designation. The
manufacturer will not be liable for any consequential damage
and injuries. Please be sure to know that the machine has not
been designed for industrial purposes.
Warranty
The warranty exclusively applies to material or manufacturing
defects. The original proof of purchase with the purchase date
must be submitted when lodging a claim in the warranty period.
The warranty does not include any unauthorised use, e.g.
appliance overloading, violent use, damage by a third party or
foreign item. The failure to follow the Operating Instructions
and assembly instructions and common wear and tear are not
covered by the warranty either.
Technical specifications
Connection: 400 V~50 Hz
Engine power: 4000 W P1 / S6 40%
Engine speed: 1440 rev per min.
Max. splitting force: 10 tons
Max. splitting lift: 510 mm
Forward movement speed: 0.03 m per second
Backward movement speed: 0.15 m per second
Hydraulic oil tank: 8 l (oil type: HLP 46)
Cut wood length: 1350 mm
Splitter post: 120 mm x 120 mm
Max. split wood diameter: app. 400 mm
Table dimensions: app. 380 x 300 mm
Weight: 177 kg
Article No. 02040
Safety instructions
General
For safety reasons, safety instructions mentioned in these
Operating Instructions and instructions on the appliance
regarding the operation, maintenance and repairs must be
respected and followed.
Operating personnel
Risks may be associated with using the log splitter.
Therefore, only trained and experienced persons may
handle and work with the appliance. The operator must
wear tight, close-fitting clothing and protective shoes.
Place of work
To ensure safe wood splitting, it is necessary that the place of
work is level and enables stability keeping and sufficient free
movement. All obstacles must be removed from access paths
for carrying the splitter. Appropriate lighting of the place of
work must be provided.
Make sure there are no persons in the place of work
when operating the appliance or, more precisely, they
keep a sufficient safety distance.
Work preparation
Electric current supply must be interrupted by unplugging the
appliance and pressing the red button for repairs or servicing
the log splitter. Interrupting the electric current supply just
by putting the switch to OFF is not enough. GÜDE log
splitters are always supplied with hardened splitting knives.
However, if slight deformation of the knife edge after splitting
wood containing invisible foreign items, e.g. out of concrete,
steel, etc., it must be removed by a file or grinding off. Keeping
the splitting knife sharp at all times increases the operating
power.
TIP: Lubricate the splitting knife with grease from time to
time (for problem wood).
Before the splitter is put into operation for the first
time, it is necessary to check the safety devices (two-lever
operation, in particular).
CAUTION! Before the appliance is to be put into
operation, make sure the splitter table is fitted safely on
the splitter.
Disposal
The disposal instructions are based on icons placed on the
machine or its package. The description of the meanings can
be found in the “Marking“ section.
Transport package disposal
The package protects the machine against damage during
transport. Packing materials are usually chosen depending on
their environmental friendliness and disposal method and can
therefore be recycled. Returning the package to material
circulation saves raw materials and reduces waste disposal
costs. Parts of packages (e.g. foils, styropor®) can be
dangerous to children. Risk of suffocation! Keep parts of the
package away from children and dispose them as soon as
possible.
Operator requirements
The operator must carefully read the Operating Instructions
before using the appliance.
Qualification
No special qualification is necessary for using the appliance
apart from detailed instruction by an expert.
Minimum age
The appliance can only be operated by persons over 18 years
of age. An exception includes youngsters operating the
appliance within their professional education to achieve
necessary skills under trainer's supervision.
Page 11

Inspections and servicing (pic. 2+7+8)
Safety instructions for inspections and servicing:
Only a regularly serviced and treated appliance may be a
satisfactory aid. Inadequate servicing and maintenance may
lead to unforeseen accidents and injuries.
• Never use aggressive cleaning agents to clean the
appliance. That could damage or destroy the
appliance.
• Unplug the appliance.
• Have any repairs and servicing of the electrical
equipment provided by electricians only.
• All protective and safety equipment must be immediately
refitted after repairs and servicing works are finished.
The following is recommended (pic. 2):
• Splitting knife
The splitting knife is a component that is subject to quick
wear and must be ground down additionally if necessary.
That will increase the splitting output and protect the
splitter. Tip: lubricate the splitting knife with fat!
• Two-hand protective equipment
The combined holding and clamping equipment must run
easily. From time to time, lubricate it with a few drops of
oil.
• Splitting post
Every time the appliance is to be used, lubricate the
splitting post with fat. That will increase the service life of
the sliding jaws (pic. A/2). Pull the splitting post out to the
full extent and equally apply multi-purpose fat to all 4
sides of the splitting post.
• Movable parts
Keep the splitting knife guide clean (remove any dirt,
splinters, bark, etc.). Slide rails to be lubricated with fat.
• Hydraulic equipment
Hydraulic connections screwing should be checked for
leaking and wear. Tighten the screwing if necessary.
Checking the hydraulic oil level (pic. 7+8):
Check the hydraulic oil level only when in a cold
condition, feeder cable disconnected and splitting post
pulled in.
On the oil level dipstick there are two notches – the lower (pic.
8/1) is the minimum hydraulic oil limit level in the tank and the
upper notch (pic. 8/2) is the maximum limit.
• Unscrew the oil level dipstick (pic. 7/A) from the
opening.
• Wipe the oil from the dipstick with a non-felt cloth.
• Re-screw the dipstick in the opening.
• Unscrew the filling screw with the dipstick again and
check whether the hydraulic oil upper limit is between
both notches.
Change the oil once a year (pic. 7+8):
• Unscrew the oil drain plug (pic.7/A).
• Catch the waste oil (every model with different amount)
• Dispose the waste oil in an environment-friendly manner
• Re-screw the oil drain plug. No particles of dirt may get
in the oil tank.
• Add the hydraulic oil up to the upper notch on the dipstick
(pic. 82)
• Try the wood splitter with no load several times.
Recommended hydraulic oil: DIN ISO HLP 46
Güde Art. No. 42004
Viscosity: 46
Oil amount: (see Technical specifications)
Oil to be added only when the splitting post is in the
engaged position.
Hydraulic equipment:
Hydraulic hoses and couplings must be checked after app. 4
hours of operation whether tight and must be tightened if
necessary.
Checking the appliance whether it is working properly
The hydraulic wood splitter is supplied in a ready-to-operate
state. The following functional checks need to be carried out
every time the appliance is to be used.
• Let both switching handles go down and the splitting knife
as low as app. 5 cm above the table
• Lower one switching handle at a time – the splitting knife
will remain in the selected position
Installation of operating arms, wheels and
table (pic. 1+4)
Installation of operating arms - pic. 1
Put the operating arm (pic. 1/4) to the switching cradle (pic.
1/14) and secure with a screw, pad and pin from above. Now
fit the operating arm (pic. 1/4) as described on the other page.
Install the protecting casings (pic. 1/13) on both operating
arms using 2 hexagonal screws (pic. 1/3).
TIP: Lubricate the sheet clutches and nuts (pic. 1/15) with
grease from above and from below before!
Installation of wheels - pic. 4
Install the turn wheel on both sides and secure them with a pin
(A).
Table/turn table installation - pic. 1
Put the table desk in the holder (pic. 1/6) and pull the stop
lever at the same time.
To turn the turn table, press the lever down. When using the
turn table, make sure the lever is always locked.
Lift adjustment (pic. 5)
The operating power may be increased for logs smaller than
app. 50 cm and in case of more logs by shortening the
backward movement of the splitting knife.
Proceed as follows:
Put a short log on the splitter table and move the splitting knife
to app. 2 cm above the log. Switch off the splitter
(red button on the splitter and unplug the appliance). Now you
can shorten the backward movement using the attached rod
(pic. 5/B) by fixing the rod in the required height using the
adjusting screw (pic. 5/A).
Area of use
The appliance may only be used for splitting firewood. The
split material must have the following dimensions:
- Minimum diameter: 125 mm
Maximum diameter: 400 mm
- Splitting wood along fibres is allowed only.
- Risk of getting squeezed when splitting branchy wood.
- The squeezed piece of wood can be released by tapping
the log.
- Cutting the split log out is prohibited!
Electrical/hydraulic connection (pic. 1+7)
Connection to network (pic. 1/10)
Based on provisions of field professional organisations "CE”,
all splitters have been fitted with an undervoltage release in
the switch. This prevents appliance self-starting in case supply
is interrupted as a result of power failure, unintentional
unplugging, defective fuse, etc. The appliance must
necessarily be switched on by pressing the green switch
button. Intentional holding or blocking the switch button with a
neutral conductor missing leads to automatic switch outage. In
such a case that may subsequently be identified, the warranty
will not apply.
Page 12

Hydraulic equipment
Tightness must be checked for hydraulic hoses and
connections after app. 4 operating hours and tightened if
necessary.
Only for 400 V appliances: The engine rotation direction
(see the arrow on the appliance) must be respected as
running with wrong rotation direction may damage the oil
pump. In such a case, all claims arising from the warranty
will not apply. If necessary, have the rotation direction
changed by reversing the plug polarity. See pic. 6!
Hydraulic oil/tank
Common hydraulic oil (e.g. HLP 46 or oil with the same
viscosity of another manufacturer) may be added to all
splitters. Oil change not necessary.
Bleed the tank every time the appliance is to be used by
unscrewing and re-screwing of the filling screw (pic. 7/A).
Operation
Caution: Make sure wood is cut at right angle if
possible and tightly sits on the splitter table. Sideways-cut
or extremely branchy wood may slide off or bend the
operating arms.
Put the wood to the designated platforms (tables)
(never on the frame) at all times. This may damage the
splitter.
1. Start the engine by pressing the green switch button.
Caution: make sure the engine rotation direction is
appropriate!
2. When the temperature is low, let the splitter run idle
for app. 15 minutes to enable the oil to warm up to an
appropriate temperature.
3. Put the split material on the table and hold it using the
clamping plates on the lever.
4. Splitting will start by pressing both levers down (as soon
as the splitting knife gets into the wood, tip the lever
slightly out while pressing down. This will prevent the
holding sheets (arms) from getting bent.
5. After splitting is finished, lift at least one lever and the
splitter post will automatically go up.
Operating the log splitter by two persons with one holding
the wood and the other pressing the clamping plates is
strictly prohibited.
Transport instructions
Transport
All log splitters have been fitted with big wheels. To transport
the splitter, grab the splitter post handle with one hand and the
handle above the engine by the other hand and tilt slightly the
splitter to you. In this position, the splitter may easily be moved.
To prevent hydraulic oil leak, the splitter must never be
moved when laying.
Lower the splitting knife down to full extent when moving
the appliance.
Residual risks and protective measures
Warning!!!
Putting out of operation, change, blocking, disassembly
changeover or installation of all parts on safety and
protective components of the appliance are strictly
prohibited. It may lead to serious or life-threatening
injuries if not adhered to.
The manufacturer cannot be hold liable for any material
and personal damage arisen as a result of such
negligence.
Any warranty claim towards the manufacturer will not
apply to all the negligence referred to above.
The splitter may only be operated by one person. When
operating the device, remove any wood remains that could
block or negatively affect the safety and operating
elements from around the splitter and the place of your
work.
Maintenance
Do you have any technical questions? A claim? Do you
need spare parts or the Operating Instructions?
You will be helped quickly and without needless bureaucracy
at our webpage www.guede.com in the Services section.
Please help us be able to assist you. To identify your machine
when claimed, we need to know its serial No., order No, and
year of production. All these details can be found on the type
label. Enter the details below for future reference.
Serial No.
Order No.
Year of production:
Tel. +49 (0) 79 04 / 700-360
Fax: +49 (0) 79 04 / 700-51999
Email: support@ts.guede.com
Page 13
EU Declaration of Conformity
We,
Güde GmbH & Co. KG
Birkichstraße 6
74549 Wolpertshausen
Germany
herewith declare that the following appliance complies with the appropriate basic safety and health requirements of the EU
Directives based on its design and type, as brought into circulation by us.
In case of alternation of the machine, not agreed upon by us, this declaration will lose its validity.
Machine description: Basic 10T/DTS log splitter
Article No. 02040
Date/authorised signature: 07.03.2012
Title of signatory: Managing Director, Mr Arnold
Technical documentation: J. Bürkle FBL; QS
Applicable EU Directives:
2004/108/EG
2006/42/EG
Applicable harmonised standards:
EN 609-1/A2:2009
EN 61000-3-3:1995+A1+A2
EN 61000-3-2:2006
EN 55014-2:1997+A1
EN 55014-1:2006
Noise:
Lwa: 85,2 dB
Lpa: 69,9 dB
Troubleshooting
Problems
Possible causes
Remedy
Engine not starting
1. No current in the outlet
2. Defective extension cable
3. Wrong feeder cable
4. Defective switch, condenser
1. Check the network protection
2. Pull out the plug – check it and replace it if
necessary
3. Connection with 5 cores with a cross section of
2.5 mm
2
4. Have the appliance checked by an electrician
Wrong engine running
direction
1. Wrong connection 1. Turn the phase changer in the appliance plug
using a screwdriver
Splitting knife not moving
1. Two-hand switching lever adjustment 1. Check the oil level
Defective control valve must be replaced in a
service centre only
Splitter has no power
1. Wrong rotation direction
2. Too little hydraulic oil
3. Starting rod is bent; the hydraulic
lifter is not pressed to the full extent
4. Wood with too many knots - splitting
knife gets jammed
5. Operating arm is bent
1. Change the rotation direction
2. Add hydraulic oil
3. Check all screws on the starting rod
mechanism
Adjust the pull rod (pic. 10/B); by this,
the hydraulic lifter will be pressed to the full
extent.
4. Lubricate the splitting knife with fat.
5. Return the operating arm to the starting position.
After being pressed, the
green switching button not
staying in place
1. Defective fuse, etc.
2. 2 phase running
1. Check the cable
Hydraulic pump whistling;
splitting knife running jerky
1. Oil loss, surface is dirty
2. Too little hydraulic oil in the tank
1. Tighten the screwing
Replace the hoses
2. Add hydraulic oil
Page 14
Mechanical residual risks
Risk Description Protective measure(s) Residual risk
Jamming Parts of body may get jammed or
amputated when splitting as a
result of hydraulic knife lowering.
Risk of split wood getting
squeezed. Please be advised that
the wood is heavily strung when
being removed and your fingers
may get squeezed in the split
crack.
Two-hand safety operation to be applied only.
Do not intervene in the splitting process.
Never work with the appliance in two people.
Squeezed wood to be knocked out only. Watch
out for falling wood as your legs could get
injured.
Any worn-out or
damaged assistance
must immediately be
replaced.
Pay attention to
bystanders!
Safety shoes to be
worn when work ing
at all times.
Cutting Parts of body may get jammed or
amputated when splitting as a
result of hydraulic knife lowering.
Two-hand safety operation to be applied only.
Do not intervene in the splitting process.
Any worn-out or
damaged assistance
must immediately be
replaced.
General
injuries
When processing dry wood,
intensive splitting may result in
serious injuries.
Wood logs created during the
splitting process may fall down and
injure especially the legs of the
operator.
The splitting wedge extension may
run in the table and thus cause
appliance damage or serious
injuries of persons.
Never intervene in the splitting process.
A sufficient safety distance to be kept at all
times.
The appliance to be operated carefully and
cautiously at all times.
Specified protective clothing to be worn at all
times. Work carefully.
Protective glasses to be worn at all times when
working with the appliance.
Specified protective clothing to be worn at all
times. Work cautiously.
Safety shoes to be worn along with the specified
protective clothing at all times.
The table to be disassembled at all times before
working with the splitting wedge extension.
Any worn-out or
damaged assistance
must immediately be
replaced.
Pay attention to
bystanders!
Getting caught,
wound
Loose clothing, jewels and long
hair may get caught by the moving
parts.
Closefitting clothing to be worn at all times; do
not wear jewels and protect your hair with a
hairnet.
Electrical residual risks
Risk Description Protective measure(s) Residual risk
Direct electrical
contact
A defective cable or plug may be
the cause of electric shock.
Have any defective cables or plugs replaced by
an expert at all times. Use the appliance only
with a safety switch against stray current (FI).
Check the feeder
cable every time the
appliance is to be
used
Indirect
electrical
contact
Electric shock by conductive parts
at exposed electrical or defective
design components
Unplug the appliance for servicing.
Use the appliance only with a safety switch
against stray current (FI).
Exposure to noise
Risk Description Protective measure(s) Residual risk
Hearing
damage
Long work with the appliance may
damage hearing.
Headphones to be worn at all times.
Neglecting the ergonomic principles
Risk Description Protective measure(s) Residual risk
Negligent use
of personal
protective aids
Operating the appliance without
appropriate protective aids may
cause serious external and internal
injuries.
Specified protective clothing to be worn at all
times. Work cautiously.
Inappropriate
local lighting
Insufficient lighting represents a
high safety risk.
Appropriate lighting to be provided at all times
when working with the appliance.
Other risks
Risk Description Protective measure(s) Residual risk
Thrown-away
items or spraying liquids
Mechanical parts may injure your
eyes when splitting.
Protective glasses to be worn at all times when
working with the appliance.
Page 15
Symboles sur l‘appareil
Explication des symboles
Dans la notice et/ou sur l’appareil figurent les symboles
suivants:
Sécurité du produit:
Produit répond aux normes
correspondantes de la CE
Interdictions:
Interdiction générale (en
combinaison avec un autre
pictogramme)
Défense d’introduire les mains
à l’intérieur
Défense de tirer sur la fiche
Protéger de la pluie et de
l’humidité
L’appareil peut être manipulé
uniquement par une seule
personne
Avertissement:
Avertissement/attention
Avertissement! Danger de
trébuchement!
Respectez la distance de
sécurité
Avertissement: danger de
coincement
Avertissement! Objets volants!
Avertissement! Blessure des
mains par le coin de fendage!
Avertissement – tension
électrique dangereuse
ATTENTION! Lisez le mode
d’emploi avant utilisation!
Consignes:
Lisez le mode d’emploi avant
l’utilisation.
Portez des lunettes de
protection et un casque
antibruit!
Portez des gants de
protection!
Utilisez des chaussures de
sécurité!
Protection de l’environnement:
Liquidez les déchets de
manière à ne pas nuire à
l’environnement.
Déposez l’emballage en
carton au dépôt pour
recyclage.
Déposez les appareils
électriques ou électroniques
défectueux et/ou destinés à
liquidation au centre de
ramassage correspondant.
Système Interseroh-
Recycling avec numéro de
fabrication
Emballage:
Protégez de l’humidité!
Attention – fragile!
Sens de pose.
Caractéristiques techniques:
Fiche Puissance du moteur
Rotations Puissance de fendage
Diamètre maximal du bois
fendu
Longueur maximale du bois
fendu
Taille approximative de la
table
Poids
Avant l’utilisation, chauffez
l’huile en appuyant 1 minute
sur un arc de protection.
Lors de la mise en marche de
la fendeuse, maintenez un
bras de manipulation abaissé!
Sens de rotation
F
Avant de mettre l’appareil en marche, veuillez lire attentivement ce mode d’emploi.
A.V. 2 Toute réimpression, même partielle, nécessite une autorisation. Modifications techniques réservées.
Images d’illustration! Ceci est un mode d’emploi original.
Page 16
Description de la machine (fig. 1)
1. Poignée
2. Coin
3. Bride de serrage
4. Bras de manipulation
5. Capot de la poignée
6. Support de table (à l‘avant)
7. Blocage de la table
8. Table de la fendeuse
9. Roues
10. Interrupteur / fiche
11. Barre pour le réglage de la levée
12. Moteur
13. Arc de protection
14. Berceau d’enclenchement (capot inférieur)
15. Accouplement en tôle
16. Levier pour table rotative
17. Table rotative
Appareil
FENDEUSE DE BÛCHES BASIC 10T/DTS
Construction robuste en acier, coin diviseur en acier spécial,
toutes les parties en acier avec peinture en poudre de qualité,
pompe hydraulique professionnelle pour l’utilisation dans des
conditions difficiles, pièce télescopique profonde avec table
rotative auxiliaire et table principale amovible. Moteur avec
protection contre la surchauffe.
Utilisation en conformité avec la destination
La fendeuse de bûches est dimensionnée uniquement pour
être utilisée par une seule personne. La manipulation de la
machine à deux ou plusieurs est interdite.
La fendeuse de bûches est destinée exclusivement au
fendage du bois le long de la fibre.
Le mode de montage, de fonctionnement, d’entretien et de
réparation, etc. doit être strictement respecté, ceci afin d’éviter
les risques et éviter les dommages.
Il est absolument nécessaire de veiller lors du fendage à ce
que le bois à fendre soit placé uniquement sur la tôle cannelée
de la plaque d’appui ou sur la tôle cannelée de la table de
fendage.
Il est interdit d’utiliser cet appareil pour d’autres travaux que
ceux pour lesquels l’appareil a été conçu et qui sont décrits
dans le mode d’emploi.
Toute autre utilisation est considérée comme contraire à la
destination. Le fabricant décline toute responsabilité pour des
dommages consécutifs à une telle utilisation. Notez que nos
appareils ne sont pas conçus pour l’utilisation industrielle.
Garantie
La garantie s’applique exclusivement sur des défauts
provoqués par un défaut de matériel ou un défaut de
fabrication. Lors de la réclamation pendant la durée de la
garantie, il est nécessaire de joindre de certificat d’achat
comportant la date d’achat.
La garantie n’inclut pas l’utilisation incompétente telle que –
surcharge de la machine, utilisation de la force,
endommagement par une tierce personne ou un objet
étranger. Le non respect du mode d’emploi et du mode de
montage ainsi que l’usure normale de la machine ne sont pas
non plus inclus dans la garantie.
Caractéristiques techniques
Fiche: 400 V~50 Hz
Puissance du moteur: 4000 W P1 / S6 40%
Tours du moteur: 1440 t/min
Puissance de fendage maxi: 10 tonnes
Levée maxi lors du fendage: 510 mm
Vitesse d’avancement: 0,03 m/s
Vitesse de recul : 0,15 m/s
Réservoir d’huile hydraulique: 8 l (type d‘huile: HLP 46)
Longueurs du bois fendu: 1350 mm
Colonne de fendage: 120 mm x 120 mm
Diamètre maximal du bois
fendu:
environ 400 mm
Dimensions de la table: Environ 380 x 300 mm
Poids: 177 kg
N° de commande. 02040
Consignes de sécurité
Généralités
Pour des raisons de sécurité, il est nécessaire de respecter les
consignes de sécurité figurant dans ce mode d’emploi et les
consignes figurant sur la machine relatives à la manipulation,
l’entretien et aux réparations de la machine.
Opérateur
L’utilisation de la fendeuse de bûche peut être liée à des
risques. Par conséquent, seules les personnes formées et
expérimentées sont autorisées à manipuler la machine.
L’opérateur doit porter un vêtement adhérent et des
chaussures de sécurité.
Lieu de travail
Pour un fendage sûr, il est nécessaire que la surface du lieu
de travail soit plane et permette le maintien de la stabilité et
une liberté de mouvement suffisante. Lors du déplacement de
la fendeuse, il est nécessaire de supprimer tout obstacle des
voies d’accès. Assurez un bon éclairage du lieu de travail.
Veillez à ce que personne ne se trouve sur le lieu de
travail ou que les personnes présentes respectent une
distance de sécurité suffisante.
Préparation du travail
Lors des réparations et l’entretien et lorsque vous quittez la
fendeuse de bûches, il est nécessaire de couper l’amenée de
courant électrique en appuyant sur le bouton rouge sur
l’interrupteur et en retirant la fiche de la prise. La coupure de
l’amenée de courant uniquement en mettant l’interrupteur
en position ARRÊT n’est pas suffisante. Les fendeuses de
bûches GÜDE sont livrées avec des coins durcis. Néanmoins,
si vous constatez une légère déformation du coin après avoir
fendu du bois contenant des éléments étrangers en béton,
acier, etc., supprimez-la à l’aide d’une lime ou en la polissant.
Le maintien du coin de fendage en état affûté augmente le
rendement.
CONSEIL : graissez occasionnellement le coin avec de la
graisse (en cas de bois à problème).
Avant la première mise en marche de la fendeuse de
bûche, il est nécessaire de contrôler le fonctionnement
des dispositifs de sécurité (surtout pour la manipulation à
deux leviers).
ATTENTION ! Assurez-vous avant chaque mise en
marche que la table de fendage est bien fixée sur la
fendeuse.
Page 17
Liquidation
Les consignes de liquidation résultent des pictogrammes
indiqués sur l’appareil ou sur l’emballage. La description des
significations individuelles se trouve dans le chapitre
« Indications sur l’appareil ».
Liquidation de l’emballage de transport
L’emballage protège l’appareil de l’endommagement lors du
transport. En général, le matériel d’emballage est choisi de
façon à ce qu’il réponde aux règles de protection de
l’environnement et de liquidation des déchets, par conséquent,
il peut être recyclé. La remise de l’emballage dans le circuit de
matières permet d’économiser des matières premières et de
réduire les déchets. Des parties de l’emballage (telles que
films, styropore) peuvent être dangereux pour les enfants.
Danger d’étouffement! Rangez les parties de l’emballage
hors de portée des enfants et liquidez-les le plus rapidement
possible.
Exigences à l’égard de l‘opérateur
L’opérateur doit lire attentivement la notice avant d’utiliser
l’appareil.
Qualification
Mis à part l’instruction détaillée par un spécialiste, aucune
autre qualification spécifique n’est requise.
Âge minimal
L’appareil peut être utilisé uniquement par des personnes de
plus de 18 ans. Exception faite des adolescents manipulant
l’appareil dans le cadre de l’enseignement professionnel sous
la surveillance du formateur.
Révisions et entretien (fig. 2+7+8)
Consignes de sécurité relatives aux révisions et à
l’entretien:
Seul un appareil régulièrement entretenu et soigné peut être
un outil satisfaisant. Un entretien et des soins insuffisants
peuvent engendrer des accidents et blessures imprévisibles.
• N’utilisez jamais pour le nettoyage des produits de
nettoyage agressifs. Vous pourriez endommager ou
détruire la machine.
• Retirez la fiche de la prise.
• Confiez les réparations et l’entretien du dispositif
électrique uniquement à un électricien.
• Tous les dispositifs de protection et de sécurité doivent
être remontés immédiatement après les réparations et
l’entretien.
Recommandations (fig. 2):
• Coin
Le coin est une pièce à usure rapide qui doit être
éventuellement affûté postérieurement. Cela permet
d’augmenter sa puissance de fendage et de protéger la
fendeuse. Conseil: appliquez de la graisse sur le coi!
• Dispositif de protection bimanuel
La marche du dispositif de maintien et de commutation
doit être facile. Graissez-le occasionnellement en
appliquant quelques gouttes d’huile.
• Colonne de fendage
Avant toute utilisation, graissez la colonne de fendage,
ceci permet d’augmenter la durée de vie des mâchoires
de glissement (fig. 2/A). Sortez complètement la colonne
de fendage et appliquez uniformément sur toutes les 4
parties de la colonne de fendage une graisse à usage
multiple.
• Parties mobiles
Maintenez le guidage du coin propre (saletés, échardes,
écorce, etc.), graissez les lattes de glissement.
• Dispositif hydraulique
Contrôlez l’étanchéité et l’usure des raccords et
boulonnages hydrauliques. Serrez éventuellement les
boulonnages.
Contrôle du niveau d’huile hydraulique (fig. 7+8):
Contrôlez le niveau d’huile hydraulique uniquement
à froid, avec le câble d’alimentation retiré et la colonne de
fendage rentrée.
La jauge d’huile comporte deux repères, le repère inférieur (fig.
8/1) représente la limite pour la quantité minimale d’huile
hydraulique dans le réservoir, le repère supérieur (fig. 8/2)
pour la quantité maximale.
• Dévissez complètement la jauge d‘huile (fig. 7/A) de
l’orifice.
• Séchez l’huile de la jauge à l’aide d’un chiffon qui ne
peluche pas.
• Revissez complètement la jauge dans l’orifice.
• Dévissez à nouveau la vis de remplissage avec la
jauge et contrôlez si la limite supérieure d’huile
hydraulique se trouve entre les deux repères indiqués.
Une fois par an, procédez au remplacement de l’huile (fig.
7+8):
• Dévissez la vis de vidange d’huile (fig. 7/A).
• Recueillez l’huile usée (la quantité varie en fonction du
modèle).
• Liquidez l’huile usée de façon écologique.
• Revissez la vis de vidange d’huile. Attention ! Le
réservoir d’huile doit être exempte de toute impureté.
• Versez de l’huile hydraulique jusqu’au repère supérieur
sur la jauge (fig. 8/2)
• Faites fonctionner la fendeuse de bûches plusieurs fois à
vide.
Huile hydraulique recommandée : DIN ISO HLP 46
N° de commande Güde : 42004
Viscosité : 46
Quantité d’huile : (voir Caractéristiques
techniques)
Complétez l’huile uniquement lorsque la colonne de
fendage se trouve en position rentrée.
Dispositif hydraulique:
L’étanchéité des tuyaux et raccords hydrauliques doit être
contrôlée après environ 4 heures de fonctionnement et ces
pièces doivent être resserrées si nécessaire.
Contrôle des fonctions
La fendeuse de bûches hydraulique est livrée prête à l’emploi.
Avant toute utilisation, contrôlez les fonctions suivantes.
• Laissez les deux leviers de commande descendre
complètement et le coin jusqu’à environ 5 cm au-dessus
de la table
• Lâchez alternativement un levier de commande, le coin
reste dans la position choisie
Montage des bras de manipulation, des roues
et de la table (fig. 1 et 4)
Montage des bras de manipulation - fig. 1
Insérez le bras de manipulation (fig. 1/4) dans le berceau de
commutation (fig. 1/14) et bloquez-le par-dessus à l’aide d’une
vis, d‘une rondelle et d’une goupille. À présent, fixez le bras de
manipulation (fig. 1/4) selon la méthode décrite de l’autre côté.
Montez les arcs de protection (fig. 1/13) sur les deux bras de
manipulation à l’aide des deux vis hexagonales (fig. 1/3).
CONSEIL : graissez avant le dessus et le dessous des
raccords en tôle et écrous (fig. 1/15) !
Montage des roues – fig. 4
Montez sur les deux côtés les roues rotatives et bloquez-les à
l’aide d’une goupille (A).
Montage de la table /table rotative - fig. 1
Insérez la plaque de la table dans le support (fig. 1/6) et tirez
en même temps sur le levier de blocage.
Pour tourner la table rotative, abaissez le levier. Veillez à ce
que le levier soit toujours bloqué lors de l’utilisation de la table
rotative.
Page 18
Réglage de la levée (fig. 5)
En cas de fendage des tronçons dont la longueur est inférieure
à 50 cm et en cas d’un plus grand nombre de tronçons, il est
possible d’augmenter le rendement en raccourcissant le
mouvement de recul du couteau fendeur.
Procédez comme suit:
Placez un tronçon court sur la table de la fendeuse et
descendez le coin jusqu’à 2 cm au-dessus du tronçon. Arrêtez
la fendeuse (bouton rouge sur l’interrupteur et retirez la fiche
de la prise). À présent, vous pouvez raccourcir le mouvement
de recul à l’aide de la barre fixée (fig. 5/B) en la fixant à l’aide
de la vis de blocage (fig. 5/A) à la hauteur souhaitée.
Domaine d’utilisation
La machine peut être utilisée uniquement pour le fendage du
bois de chauffage. Le matériel à fendre doit avoir les
dimensions suivantes:
- Diamètre minimal: 125 mm
Diamètre maximal: 400 mm
- Le bois doit être fendu en suivant la fibre.
- Le fendage d’un bois noueux représente un risque de
coincement.
- Pour libérer un morceau de bois coincé, tapez sur le
tronçon.
- Il est interdit d’essayez de sortir le tronçon coincé en le
découpant !
Branchement électrique/hydraulique
(fig. 1+6+7)
Branchement au secteur (fig. 1/10)
En conformité avec les dispositions des organismes des
professions „CE“ etc., toutes les fendeuses sont équipées d’un
déclencheur à basse tension dans l’interrupteur. Il évite la mise
en marche automatique de la machine en cas de coupure
d’alimentation consécutive à une coupure de courant, retrait de
la fiche de la prise, fusible défectueux, etc. Il est nécessaire de
remettre la machine en marche en appuyant à nouveau sur le
bouton vert.
Le maintien ou le blocage volontaire du bouton en l’absence
d’un conducteur neutre provoque automatiquement la coupure
de l’interrupteur. Dans ce cas, impossible à identifier
postérieurement, la garantie perd la validité.
Dispositif hydraulique
Après environ 4 heures de fonctionnement, il est
nécessaire de contrôler l’étanchéité des tuyaux et
raccords hydrauliques et resserrer si nécessaire.
Uniquement pour machines de 400 V: Il est nécessaire de
respecter le sens des rotations du moteur (voir flèche sur
le moteur), car la marche dans une mauvaise direction
peut endommager la pompe à l’huile. Dans ce cas, tous
les droits émanant de la garantie sont perdus. Si
nécessaire, faites modifier le sens des rotations en
changeant les pôles de la fiche par un professionnel. Voir
fig. 6!
Huile hydraulique/réservoir
Pour toutes les fendeuses convient l’huile hydraulique
ordinaire (par exemple, HLP 46 ou l’huile d’un autre fabricant
avec la même viscosité). Le remplacement d’huile n’est pas
nécessaire.
Purgez le réservoir avant chaque fonctionnement en
dévissant et revissant la vis de remplissage (fig. 7/A).
Fonctionnement
Attention : Veillez à ce que le bois soit fendu si
possible à l’angle droit et repose bien sur la table de
fendage. Le bois fendu en biais ou un bois très noueux
peut glisser ou plier les bras de manipulation.
Posez toujours le bois uniquement sur les surfaces
prévus à cet effet (tables), jamais sur le cadre, sinon vous
risquez d’endommager la fendeuse.
1. Mettez le moteur en marche en appuyant sur le bouton
vert de mise en marche. Attention : Respectez le sens
des rotations du moteur !
2. Lors des températures basses, laissez la fendeuse
tourner environ 15 minutes au ralenti pour que l’huile
chauffe à la température correspondante.
3. Posez le matériel à fendre sur la table et maintenez-le à
l’aide des cales de serrage sur le levier.
4. Pour commencer la fente, abaissez les deux leviers. (Dès
que le coin pénètre dans le bois, basculez légèrement le
levier vers l’extérieur tout en l’abaissant. Ceci permet
d’éviter que les tôles de maintien (bras) ne plient.
5. A la fin de fendage, levez au minimum un levier, la
colonne de la fendeuse monte automatiquement.
La manipulation de la fendeuse de bûche par deux
personnes, lorsque une maintient le bois et l’autre agit sur
les cales de serrage, est strictement interdite.
Consignes de transport
Transport
Toutes les fendeuses de bûches sont équipées de grandes
roues. Pour transporter la fendeuse de bûches, saisissez
d’une main la poignée située sur la colonne de la fendeuse et
de l’autre la poignée située au-dessus du moteur et basculez
légèrement la fendeuse en arrière. Dans cette position, le
transport de la fendeuse est facile.
Pour éviter des fuites d’huile hydraulique, ne transportez
jamais la fendeuse en position couchée.
Lors du transport, abaissez complètement le coin.
Dangers résiduels et mesures de protection
Avertissement !!!
Toute mise hors service, modification, démontage,
transformation ou montage de toutes les pièces sur les
dispositifs de sécurité et de protection est strictement
interdite. Le non respect de cette consigne peut engendrer
des blessures graves ou mortelles.
Le fabricant ne répond pas des dommages matériels et
personnels consécutifs à une telle négligence.
Toute négligence indiquée ci-dessus entraîne la perte de
la garantie.
La fendeuse doit être manipulée par une seule personne.
Supprimez les restes de bois pouvant bloquer ou
influencer négativement les éléments de sécurité et de
manipulation des environs de la fendeuse et du lieu de
travail.
Service
Vous avez des questions techniques? Une réclamation?
Vous avez besoin de pièces détachées ou d’un mode
d’emploi? Nous vous aiderons rapidement et sans
bureaucratie inutile par l’intermédiaire de nos pages Web
www.guede.com dans la rubrique Service. Aidez-nous pour
que nous puissions vous aider. Pour identifier votre appareil en
cas de réclamation, nous avons besoins du numéro de série,
numéro de produit et l’année de fabrication. Toutes ces
informations se trouvent sur la plaque signalétique. Pour avoir
ces informations toujours à porté de main, veuillez les inscrire
ici:
Numéro de série:
N° de commande:
Année de fabrication:
Tél.: +49 (0) 79 04 / 700-360
Fax: +49 (0) 79 04 / 700-51999
E-mail: support@ts.guede.com
Page 19
Déclaration de conformité CE
Nous,
Güde GmbH & Co. KG
Birkichstraße 6,
74549 Wolpertshausen,
Allemagne
Déclarons par la présente que les appareils indiqués ci-dessous répondent du point de vue de leur conception, construction ainsi
que de leur réalisation mise sur le marché, aux exigences fondamentales correspondantes des directives de la CE en matière de
sécurité et d’hygiène.
Cette déclaration perd sa validité après une modification de l’appareil sans notre approbation préalable.
Désignation de l’appareil: Fendeuse de bûches Basic 10T/DTS
N° de commande: 02040
Date/Signature du fabricant: 15.07.2010
Titre du Signataire: Monsieur Arnold, Gérant
Documents techniques : J. Bürkle FBL; QS
Directives correspondantes de la CE :
2004/108/EG
2006/42/EG
Normes harmonisées utilisées :
EN 609-1/A2:2009
EN 61000-3-3:1995+A1+A2
EN 61000-3-2:2006
EN 55014-2:1997+A1
EN 55014-1:2006
Niveau sonore :
Lwa: 85,2 dB
Lpa: 69,9 dB
Recherche des pannes
Problèmes
Causes probables
Mesures
Moteur ne démarre pas
1. Pas de courant dans la prise
2. Rallonge défectueuse
3. Câble d’alimentation défectueux
4. Interrupteur, condensateur défectueux
1. Contrôlez la protection du réseau
2. Retirez la fiche, contrôlez, remplacez
3. Raccord 5 conducteurs, avec section de 2,5 mm
2
4. Faites contrôlez la machine par un électricien
Sens des rotations du
moteur incorrect
1. Branchement incorrect 1. Tournez le convertisseur de phases dans la fiche de la
machine à l’aide d’un tournevis
Coin ne bouge pas
1. Changement de la position du levier de
commande de la commutation bimanuelle
1. Contrôlez le niveau d’huile
La soupape de commande défectueuse doit être
remplacée uniquement par un atelier de réparations
Manque de puissance de
la fendeuse de bûches
1. Sens des rotations du moteur incorrect
2. Manque d’huile hydraulique
3. Barre de descente courbée; le lèvesoupape hydraulique n’est pas
complètement enfoncé
4. Bois avec beaucoup de noeuds, le coin
de fendage coince
5. Bras de manipulation courbé
1. Modifiez le sens des rotations
2. Complétez l’huile hydraulique
3. Contrôlez toutes les vis sur le mécanisme à barre
de descente
Changez la position de la barre de traction (fig.
10/B), cela permettra d’enfoncer complètement le lèvesoupape hydraulique.
4. Graissez le coin de fendage.
5. Remettez le bras de manipulation à la position initiale.
Le bouton de mise en
marche vert ne tient pas
après l’enfoncement
1. Protection défectueuse, etc.
2. Marche à 2 phases
1. Contrôlez le câble
La pompe hydraulique
siffle, le coin de fendage
marche par à-coups
1. Perte d’huile, encrassement du sol
2. Manque d’huile hydraulique dans le
réservoir
1. Serrez la vis
Remplacez les tuyaux
2. Complétez de l’huile hydraulique
Page 20
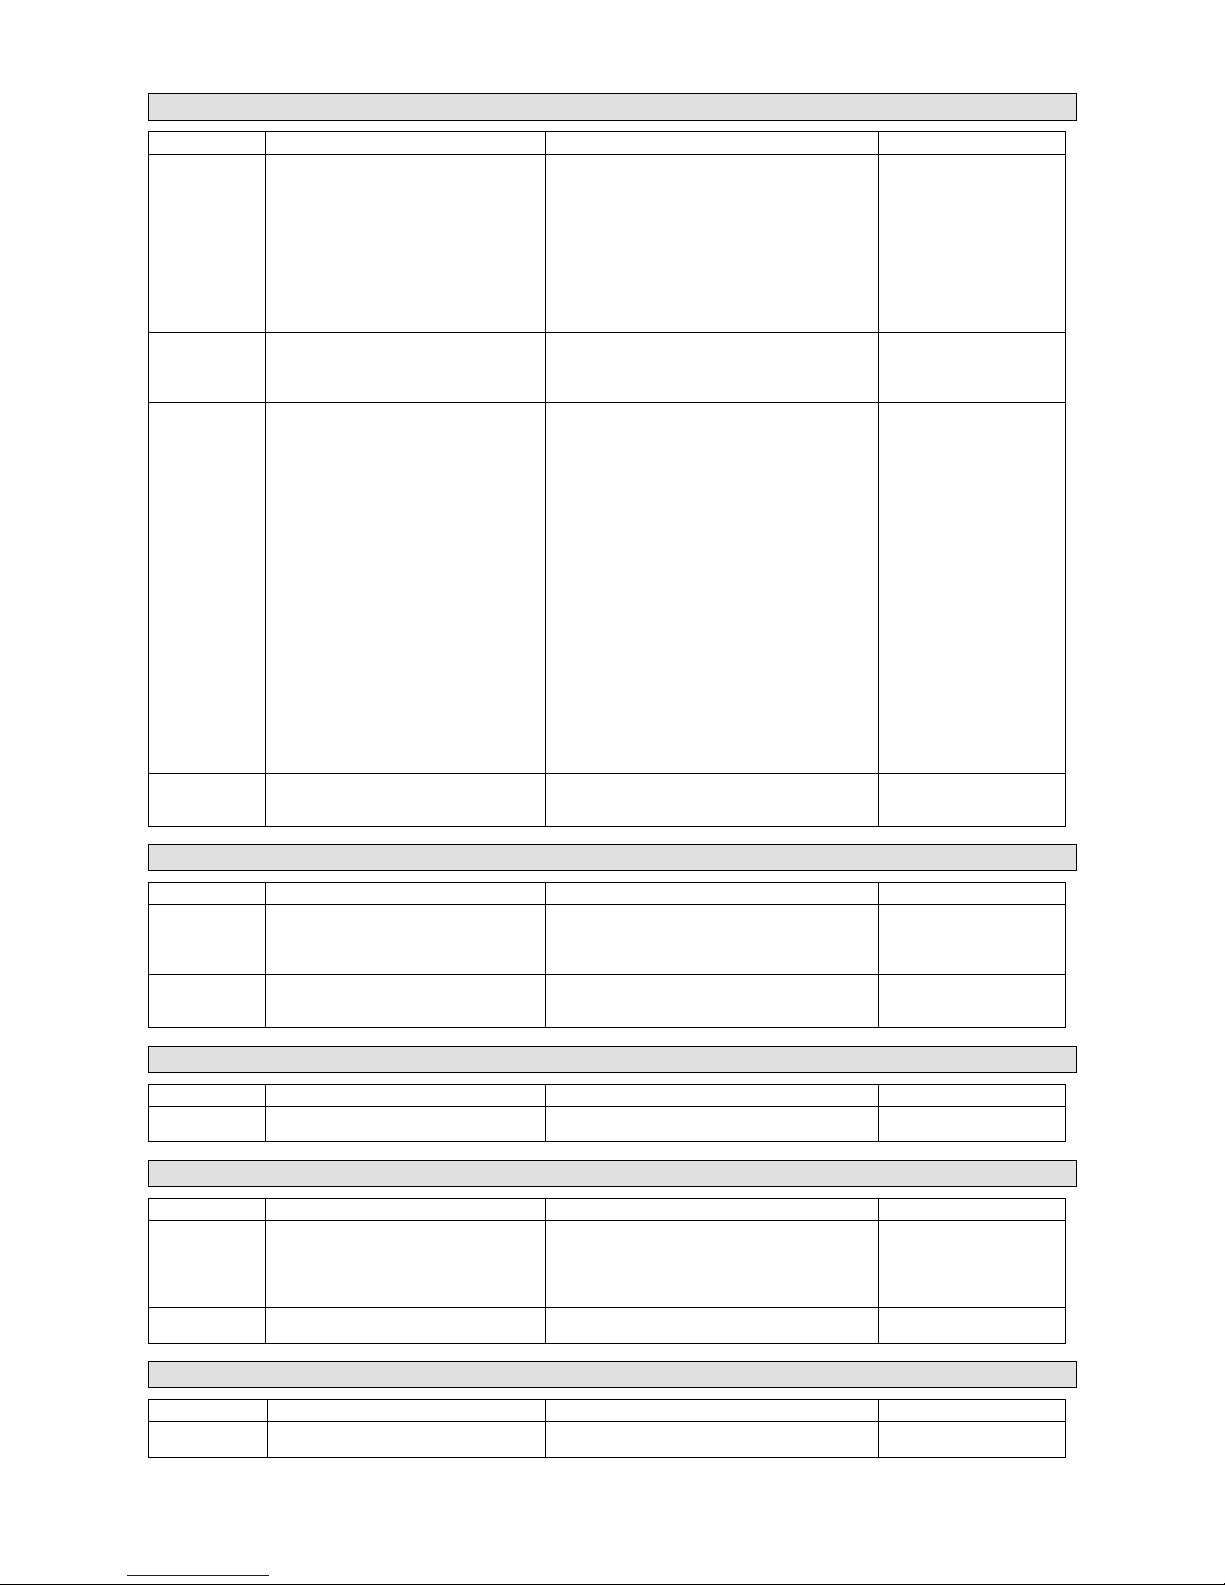
Dangers résiduels mécaniques
Risque Description Mesure(s) de sécurité Danger résiduel
Coincement La descente du coin hydraulique
pendant le fendage du bois peut
provoquer le coincement ou
l’amputation des parties du corps.
Le matériel à fendre peut coincer.
Attention, le bois se trouve sous une
forte pression, vous pourriez vous
coincer les doigts dans la fente.
Utilisez toujours les éléments de sécurité à
deux mains. Ne mettez jamais la main dans la
zone de fendage.
Ne manipulez jamais l’appareil à deux.
Décoincez le bois coincé. Attention aux chutes
de bois, il pourrait blesser vos pieds.
Les accessoires usés ou
endommagés doivent
être immédiatement
remplacés.
Faites attention aux
personnes se trouvant à
proximité !
Portez des chaussures
de sécurité.
Amputation La descente du coin hydraulique
pendant le fendage du bois peut
provoquer le coincement ou
l’amputation des parties du corps.
Utilisez toujours les éléments de sécurité à
deux mains. Ne mettez jamais la main dans la
zone de fendage.
Les accessoires usés ou
endommagés doivent
être immédiatement
remplacés.
Blessures
d’ordre général
Lors du traitement du bois sec, le
fendage violant peut provoquer des
blessures graves.
Les morceaux de bois après le fendage
peuvent tomber et blesser en particulier
les pieds du manipulateur.
Le prolongement du coin fendeur peut
entrer dans la table et endommager la
machine ou provoquer des blessures
graves des personnes.
Ne mettez jamais la main dans la zone de
fendage.
Maintenez toujours une distance de sécurité
suffisante.
Manipulez l’appareil avec précaution et avec
discernement.
Portez toujours des vêtements de protection et
travaillez avec prudence.
Lors de la manipulation de l’appareil, portez des
lunettes de protection.
Portez toujours une tenue de protection
prescrite et soyez prudent.
Portez toujours des chaussures de sécurité
prescrites.
Avant de travailler avec la rallonge du coin
fendeur, démontez toujours la table (voir page
12)
Les accessoires usés ou
endommagés doivent
être immédiatement
remplacés.
Faites attention aux
personnes se trouvant à
proximité.
Accrochage,
enroulement
Vêtements larges, bijoux ou cheveux
peuvent s’accrocher aux parties
mobiles.
Portez toujours un vêtement adhérent et
protégez vos cheveux par un filet.
Dangers résiduels électriques
Risque Description Mesure(s) de sécurité Danger résiduel
Contact
électrique
direct
Câble ou fiche défectueux peut
provoquer une électrocution.
Faites remplacer un câble ou une fiche
endommagé par un spécialiste. Utilisez
l’appareil uniquement avec un interrupteur
différentiel (FI).
Contrôlez le câble
d’alimentation avant
chaque utilisation.
Contact
électrique
indirect
Blessures provoquées par des pièces
conductrices des pièces de
construction ouvertes ou défectueuses.
Avant tout entretien, retirez la fiche de la prise.
Utilisez l’appareil uniquement avec un
interrupteur différentiel (FI).
Dangers du bruit
Risque Description Mesure(s) de sécurité Danger résiduel
Lésions de
l‘ouïe
Un travail prolongé avec l’appareil peut
endommager l’ouïe.
Portez toujours un casque de protection.
Manquement aux principes ergonomiques
Risque Description Mesure(s) de sécurité Danger résiduel
Utilisation
négligée des
accessoires
personnels de
protection.
Manipulation de l’appareil sans
accessoires de protection adéquats
peut conduire aux blessures externes
ou internes graves.
Portez toujours une tenue de protection
adéquate, soyez prudents.
Éclairage local
insuffisant
Un éclairage insuffisant représente un
grand risque.
Assurez toujours un éclairage suffisant lors de
la manipulation de l’appareil.
Autres dangers
Risque Description Mesure(s) de sécurité Danger résiduel
Objets ou
liquides éjectés
Lors du fendage, les particules
mécaniques peuvent blesser vos yeux.
Portez toujours des lunettes de protection.
Page 21
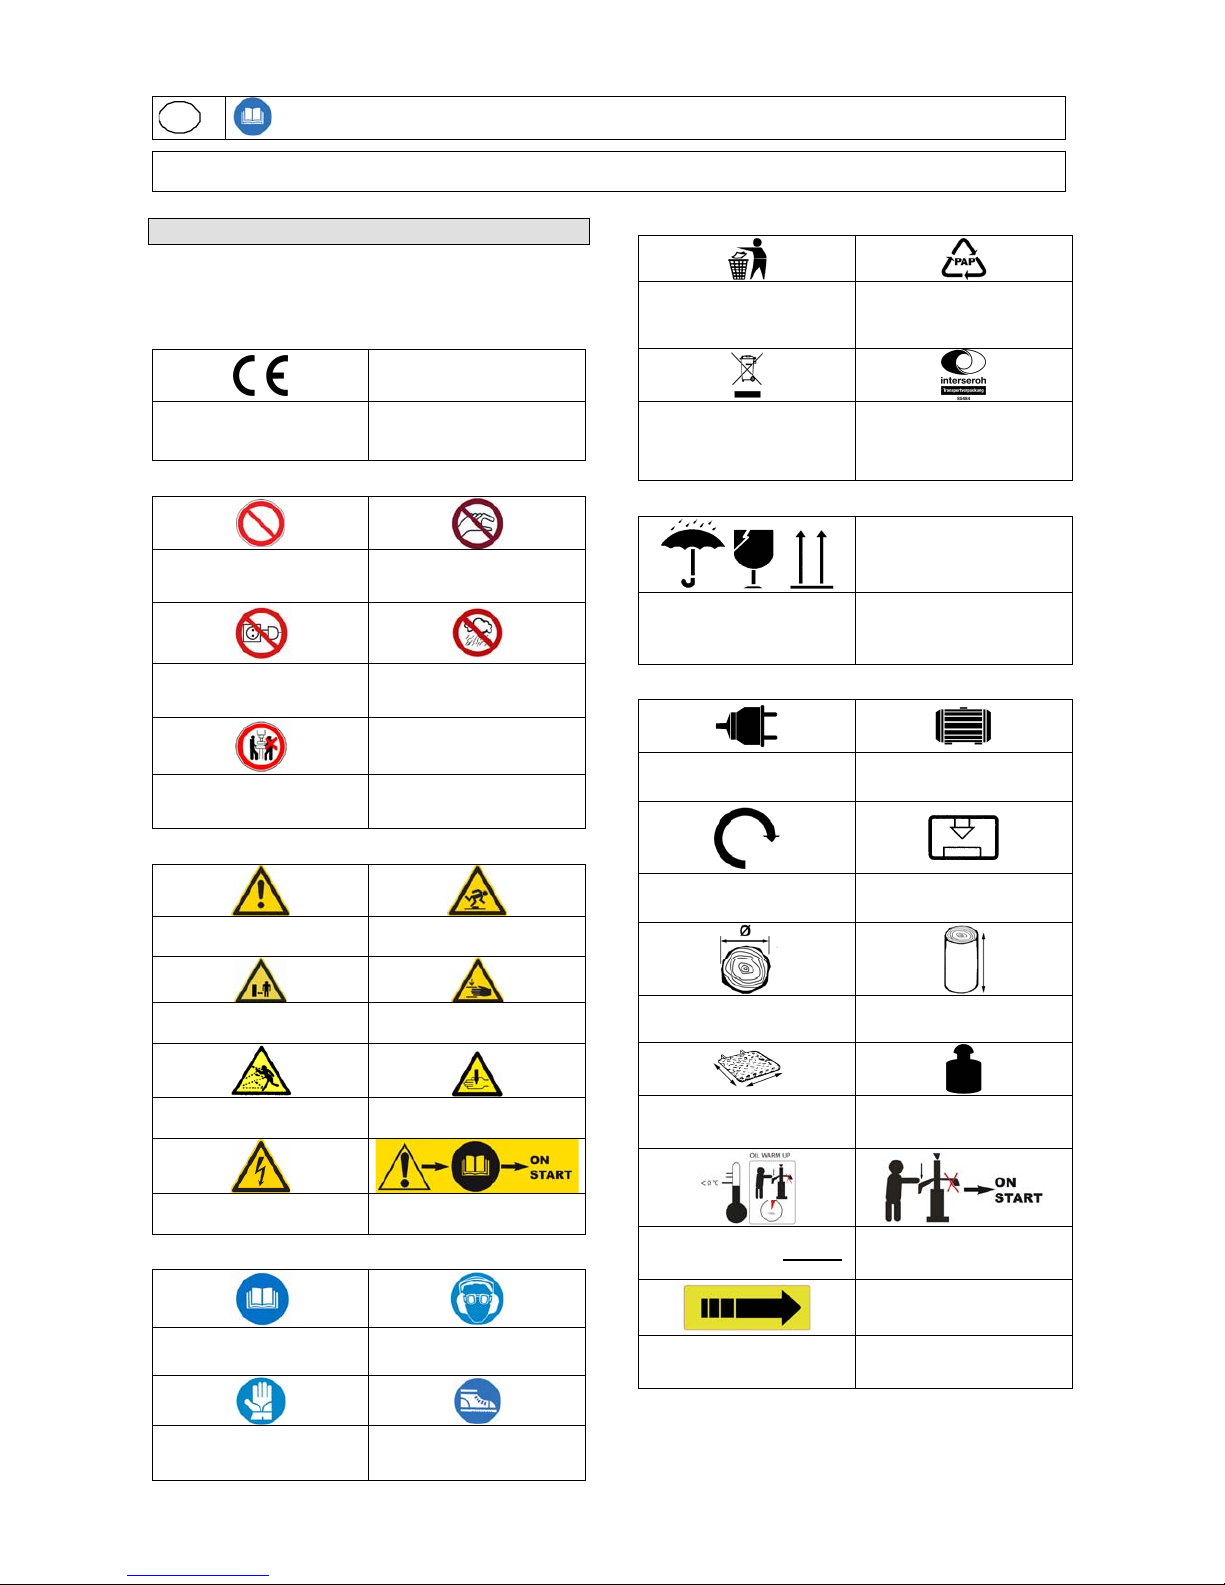
Označení na přístroji
Vysvětlení symbolů
V tomto návodu a/nebo na přístroji jsou použity následující
symboly:
Bezpečnost produktu:
Produkt odpovídá příslušným
normám EU
Zákazy:
Všeobecný zákaz
(ve spojení s jiným
piktogramem)
Zákaz sahání dovnitř
Zákaz tahání za zástrčku
Chraňte před deštěm a
vlhkem
Stroj smí obsluhovat pouze
jedna osoba
Výstraha:
Výstraha/pozor
Výstraha! Nebezpečí
klopýtnutí!
Dodržujte dostatečný
bezpečnostní odstup!
Výstraha! Nebezpečí sevření!
Výstraha! Poletující předměty!
Výstraha! Poranění rukou
štípacím křížem!
Výstraha před nebezpečným
elektrickým napětím
POZOR! Před provozem si
přečtěte návod k obsluze!
Příkazy:
Před použitím si přečtěte
návod k obsluze
Používejte ochranné brýle a
sluchátka!
Používejte bezpečnostní
rukavice
Používejte bezpečnostní
obuv!
Ochrana životního prostředí:
Odpad zlikvidujte odborně tak,
abyste neškodili životnímu
prostředí.
Obalový materiál z lepenky
lze odevzdat za účelem
recyklace do sběrny.
Vadné a/nebo likvidované
elektrické či elektronické
přístroje musí být odevzdány
do příslušných sběren.
Systém Interseroh- Recycling
s výrobním číslem
Obal:
Chraňte před vlhkem!
Pozor – křehké!
Obal musí směřovat nahoru.
Technické údaje:
Přípojka Výkon motoru
Otáčky Štípací síla
Max. průměr štípaného dřeva Max. délka štípaného dřeva
Velikost stolu cca Hmotnost
Před provozem zahřívejte olej
1 minutu stlačením jednoho
ochranného oblouku.
Při zapnutí štípače držte
stlačené jedno obslužné
rameno!
Směr otáčení
CZ
Dříve než uvedete přístroj do provozu, pročtěte si prosím pečlivě tento návod k obsluze.
A.V. 2 Dotisky, a to i částečné, vyžadují schválení. Technické změny vyhrazeny.
Ilustrační obrázky! Toto je originální návod k obsluze.
Page 22
Popis přístroje (obr. 1)
1. Rukojeť
2. Štípací nůž
3. Upínací příložka
4. Obslužné rameno
5. Kryt rukojeti
6. Držák stolu (vpředu)
7. Zablokování stolu
8. Stůl štípače
9. Kola
10. Spínač / zástrčka
11. Tyč pro nastavení zdvihu
12. Motor
13. Ochranný oblouk
14. Spínací kolébka (spodní kryt)
15. Plechová spojka
16. Páka pro otočný stůl
17. Otočný stůl
Přístroj
Štípač špalků Basic 10T/DTS
Těžká ocelová konstrukce, štípací nůž ze speciální oceli,
všechny ocelové díly s kvalitním práškovým nátěrem,
profesionální hydraulické čerpadlo pro použití ve ztížených
podmínkách, hluboký zásuvný díl s přídavným otočným
stolem a snímatelným základním stolem. Motor s pojistkou
proti přehřátí.
Použití v souladu s určením
Štípač špalků je dimenzován jen pro provoz s 1 osobou. Na
stroji nesmí nikdy pracovat dvě a více osob. Štípač špalků je
určen výhradně ke štípání dřeva po vlákně. Pokyn k montáži,
provozu, údržbě, opravě apod. je třeba striktně dodržovat, aby
byla vyloučena rizika a zabránilo se škodám. Při štípání je
třeba dbát bezpodmínečně na to, aby štípané dřevo bylo
usazeno pouze na rýhovaném plechu opěrné desky nebo na
rýhovaném plechu stolu štípače.
S tímto strojem nelze vykonávat jiné práce, než pro jaké byl
tento stroj zkonstruován a jež jsou popsány v návodu k
obsluze. Každé jiné použití je použití v rozporu s určením. Za
následné škody a úrazy výrobce neručí. Dbejte prosím na to,
že tento přístroj není konstruován pro průmyslové použití.
Záruka
Záruka se vztahuje výlučně na vady, způsobené vadou
materiálu nebo výrobní vadou.
Při reklamaci v záruční době je třeba přiložit originální doklad o
koupi s datem koupě.
Do záruky nespadá neodborné použití jako např. přetížení
přístroje, násilné použití, poškození cizí osobou nebo cizím
předmětem. Nedodržení návodu k použití a návodu k montáži
a normální opotřebení rovněž nespadá do záruky.
Technické údaje
Přípojka: 400 V~50 Hz
Výkon motoru: 4000 W P1 / S6 40%
Otáčky motoru: 1440 ot./min
Max. štípací síla: 10 tun
Max. zdvih při štípání: 510 mm
Rychlost posuvu vpřed: 0,03 m/s
Rychlost posuvu vzad: 0,15 m/s
Nádrž hydraulického oleje: 8 l (druh oleje: HLP 46)
Délky štípaného dřeva: 1350 mm
Štípací sloup: 120 mm x 120 mm
Max. průměr štípaného dřeva: cca 400 mm
Rozměry stolu: Cca 380 x 300 mm
Hmotnost: 177 kg
Obj. č. 02040
Bezpečnostní pokyny
Obecně
Z důvodů bezpečnosti je nutno respektovat a dodržovat
bezpečnostní pokyny uvedené v tomto návodu k obsluze a
pokyny na přístroji týkající se obsluhy, údržby a oprav stroje.
Obslužný personál
Používání štípače špalků může být spojeno s riziky. Proto
s ním smějí manipulovat a pracovat pouze vyškolené a
zkušené osoby. Obslužný personál musí nosit úzký,
přiléhavý oděv a ochrannou obuv.
Pracoviště
Pro bezpečné štípání dřeva je velmi nutné, aby pracoviště bylo
rovné a umožňovalo udržení stability a dostatečnou volnost
pohybu. Při přinášení a odnášení štípače je třeba z
přístupových cest odstranit veškeré překážky. Je nutno zajistit
dostatečné osvětlení pracoviště.
Zajistěte, aby se během provozu nezdržovaly na
pracovišti žádné osoby resp., aby dodržovaly dostatečný
bezpečnostní odstup.
Příprava práce
Při opravách či údržbě a při opuštění štípače špalků je třeba
stisknutím červeného knoflíku na spínači a vytažením zástrčky
ze sítě přerušit přívod elektrického proudu. Přerušení přívodu
elektrického proudu pouhým přepnutím vypínače do
polohy VYPNUTO není dostatečné. Štípače špalků GÜDE se
dodávají zásadně s tvrzenými štípacími noži. Pokud byste
však po štípání dřeva obsahujícího neviditelná cizí tělíska
např. z betonu, oceli atd. zjistili lehkou deformaci břitu nože,
odstraňte ji pilníkem nebo obroušením. Neustálé udržování
štípacího nože v ostrém stavu zvyšuje pracovní výkon.
TIP: Štípací nůž občas namažte tukem (v případě
problémového dřeva).
Před prvním uvedením štípače do provozu je třeba
prověřit funkci bezpečnostních zařízení (zejména
dvoupákové obsluhy.
POZOR! Před každým uvedením do chodu se ujistěte,
že štípací stůl je na štípači bezpečně upevněn.
Likvidace
Pokyny pro likvidaci vyplývají z piktogramů umístěných na
přístroji resp. obalu. Popis jednotlivých významů najdete
v kapitole „Označení“.
Likvidace přepravního obalu
Obal chrání přístroj před poškozením při přepravě. Obalové
materiály jsou zvoleny zpravidla podle jejich šetrnosti vůči
životnímu prostředí a způsobu likvidace a lze je proto
recyklovat. Vrácení obalu do oběhu materiálu šetří suroviny a
snižuje náklady na likvidaci odpadů. Části obalu (např. fólie,
Styropor®) mohou být nebezpečné pro děti. Existuje riziko
udušení! Části obalu uschovejte mimo dosah dětí, a co
nejrychleji zlikvidujte.
Požadavky na obsluhu
Obsluha si musí před použitím přístroje pozorně přečíst návod
k obsluze.
Kvalifikace
Kromě podrobného poučení odborníkem není pro používání
přístroje nutná žádná speciální kvalifikace.
Minimální věk
Na přístroji smí pracovat jen osoby, jež dosáhly 18 let.
Výjimku představuje využití mladistvých, pokud se toto děje
během profesního vzdělávání za účelem dosažení dovednosti
pod dohledem školitele
Page 23
Prohlídky a údržba (obr. 2+7+8)
Bezpečnostní pokyny pro prohlídky a údržbu:
Jen pravidelně udržovaný a ošetřovaný přístroj může být
uspokojivou pomůckou. Nedostatečná údržba a péče může
vést k nepředvídaným nehodám a úrazům.
• K čištění nepoužívejte nikdy agresivní čisticí
prostředky. Může to poškodit nebo zničit přístroj.
• Vytáhněte zástrčku ze zásuvky.
• Opravy a údržbu elektrického zařízení nechte provést
jen elektrikáři.
• Všechna ochranná a bezpečnostní zařízení musí být po
skončení oprav a údržby ihned namontována zpět.
Doporučujeme Vám (obr. 2):
• Štípací nůž
Štípací nůž je rychle opotřebitelný díl, který musí být v
případě potřeby dodatečně zbroušen. To zvýší štípací
výkon a chrání štípač. Tip: štípací nůž namažte tukem!
• Obouruční ochranné zařízení
Kombinované přidržovací a spínací zařízení musí mít
lehký chod. Příležitostně namažte několika kapkami
oleje.
• Štípací sloup
Před každým použitím namažte štípací sloup tukem,
tím zvýšíte životnost kluzných čelistí (obr. 2/A). Štípací
sloup celý vysuňte a na všechny 4 strany štípacího
sloupu naneste rovnoměrně víceúčelový tuk.
• Pohyblivé části
Vedení štípacího nože udržujte v čistotě (špína, třísky,
kůra atd.). Kluzné lišty namažte tukem.
• Hydraulické zařízení
Hydraulické přípojky a šroubení kontrolujte z hlediska
těsnosti a opotřebení. Šroubení případně dotáhně
te.
Kontrola stavu hydraulického oleje (obr. 7+8):
Stav hydraulického oleje kontrolujte jen ve
studeném stavu, s vytaženým napájecím kabelem a
zasunutým štípacím sloupem.
Na olejové měrce se nacházejí dva zářezy, nejspodnější zářez
(obr. 8/1) přestavuje mez pro minimální množství
hydraulického oleje v nádrži, vrchní zářez (obr. 8/2) pro
maximální množství.
• Olejovou měrku (obr. 7/A) kompletně vyšroubujte z
otvoru.
• Olej z měrky setřete neplstnatým hadrem.
• Měrku opět kompletně zašroubujte do otvoru.
• Poté plnicí šroub s měrkou opět vyšroubujte a
zkontrolujte, zda se horní mez hydraulického oleje
nachází mezi oběma uvedenými zářezy.
Jednou ročně proveďte výměnu oleje (obr. 7+8):
• Vyšroubujte šroub pro vypouštění oleje (obr. 7/A).
• Vyjetý olej zachyťte (každý model má jiné množství)
• Vyjetý olej ekologicky zlikvidujte
• Šroub pro vypouštění oleje opět zašroubujte. Do olejové
nádrže se nesmí dostat žádné částečky nečistot.
• Hydraulický olej nalijte až po horní zářez na měrce
(obr. 8/2)
• Štípač špalků několikrát vyzkoušejte naprázdno.
Doporučený hydraulický olej: DIN ISO HLP 46
Obj. č. Güde 42004
Viskozita: 46
Množství oleje: (viz Technické údaje)
Olej doplňujte pouze, je-li sloupek štípače v
zasunuté poloze
Hydraulické zařízení:
Hydraulické hadice a spoje musí být
po cca 4 provozních hodinách zkontrolovány z hlediska své
těsnosti a v případě potřeby dotaženy.
Kontrola funkce
Hydraulický štípač dřeva se dodává provozuschopný. Před
každým použitím je třeba provést tuto kontrolu funkce.
• Obě spínací rukojeti nechte sjet dolů a štípací nůž dolů až
cca 5 cm nad stůl
• Pusťte vždy jednu spínací rukojeť, štípací nůž zůstane
stát ve zvolené poloze
Montáž obslužných ramen, kol a stolu
(obr. 1+4)
Montáž obslužných ramen - obr. 1
Obslužné rameno (obr. 1/4) zaveďte do spínací kolébky (obr.
1/14) a shora zajistěte šroubem, podložkou a závlačkou. Nyní
připevněte obslužné rameno (obr. 1/4) podle popsané metody
na druhé straně. Ochranné oblouky (obr. 1/13) na obou
obslužných ramenech namontujte vždy pomocí 2
šestihranných šroubů (obr. 1/3).
TIP: Před tím namažte shora i zdola tukem plechové
spojky a matice (obr. 1/15)!
Montáž kol - obr. 4
Namontujte na obou stranách otáčecí kolo a obě zajistěte
závlačkou (A).
Montáž stolu/otočného stolu - obr. 1
Desku stolu vsaďte do držáku (obr. 1/6) a současně zatáhněte
za blokovací páku. K otáčení otočného stolu tlačte páku dolů.
Při použití otočného stolu dbejte na to, aby byla páka vždy
zaaretována.
Nastavení zdvihu (obr. 5)
U špalků menších než cca 50 cm a v případě většího
počtu špalků je možné zvýšit pracovní výkon zkrácením
zpětného pohybu štípacího nože.
Postupujte takto:
Na stůl štípače postavte krátký špalek a štípacím
nožem sjeďte až cca 2 cm nad špalek. Štípač vypněte
(červený knoflík na spínači a vytáhněte zástrčku ze
zásuvky). Nyní můžete zkrátit pomocí připevněné tyče (obr.
5/B) zpětný pohyb, a to tak, že tuto tyč budete pomocí
stavěcího šroubu (obr. 5/A) fixovat v požadované výšce.
Oblast použití
Přístroj je dovoleno používat výhradně ke štípání palivového
dříví. Štípaný materiál musí mít tyto rozměry:
- Minimální průměr: 125 mm
Maximální průměr: 400 mm
- Je dovoleno výhradně štípání dřeva po vlákně.
- V případě sukovitého materiálu hrozí při štípání
nebezpečí jeho zaseknutí.
- Uvolnění zaseknutého kusu dřeva se provede klepáním
na špalek.
- Je zakázáno štípaný špalek vyřezávat!
Elektrické/hydraulické zapojení (obr. 1 a 7)
Zapojení do sítě (obr. 1/10)
V souladu s ustanoveními oborových profesních organizací
„CE“ atd. jsou všechny štípače vybaveny podpěťovou spouští
ve spínači. Ta zabraňuje samočinnému rozběhu stroje v
případě přerušení napájení v důsledku výpadku v síti,
neúmyslného vytažení zástrčky, vadné pojistky atd. Přístroj je
zásadně nutno opět zapnout stisknutím zeleného zapínacího
knoflíku.
Vědomé přidržení resp. zablokování zapínacího knoflíku při
chybějícím nulovém vodiči vede automaticky k výpadku
spínače. V tomto případě, který lze následně identifikovat,
zaniká záruka.
Hydraulické zařízení
U hydraulických hadic a spojů je třeba po cca 4
provozních hodinách zkontrolovat těsnost a v případě
nutnosti je dotáhnout.
Page 24
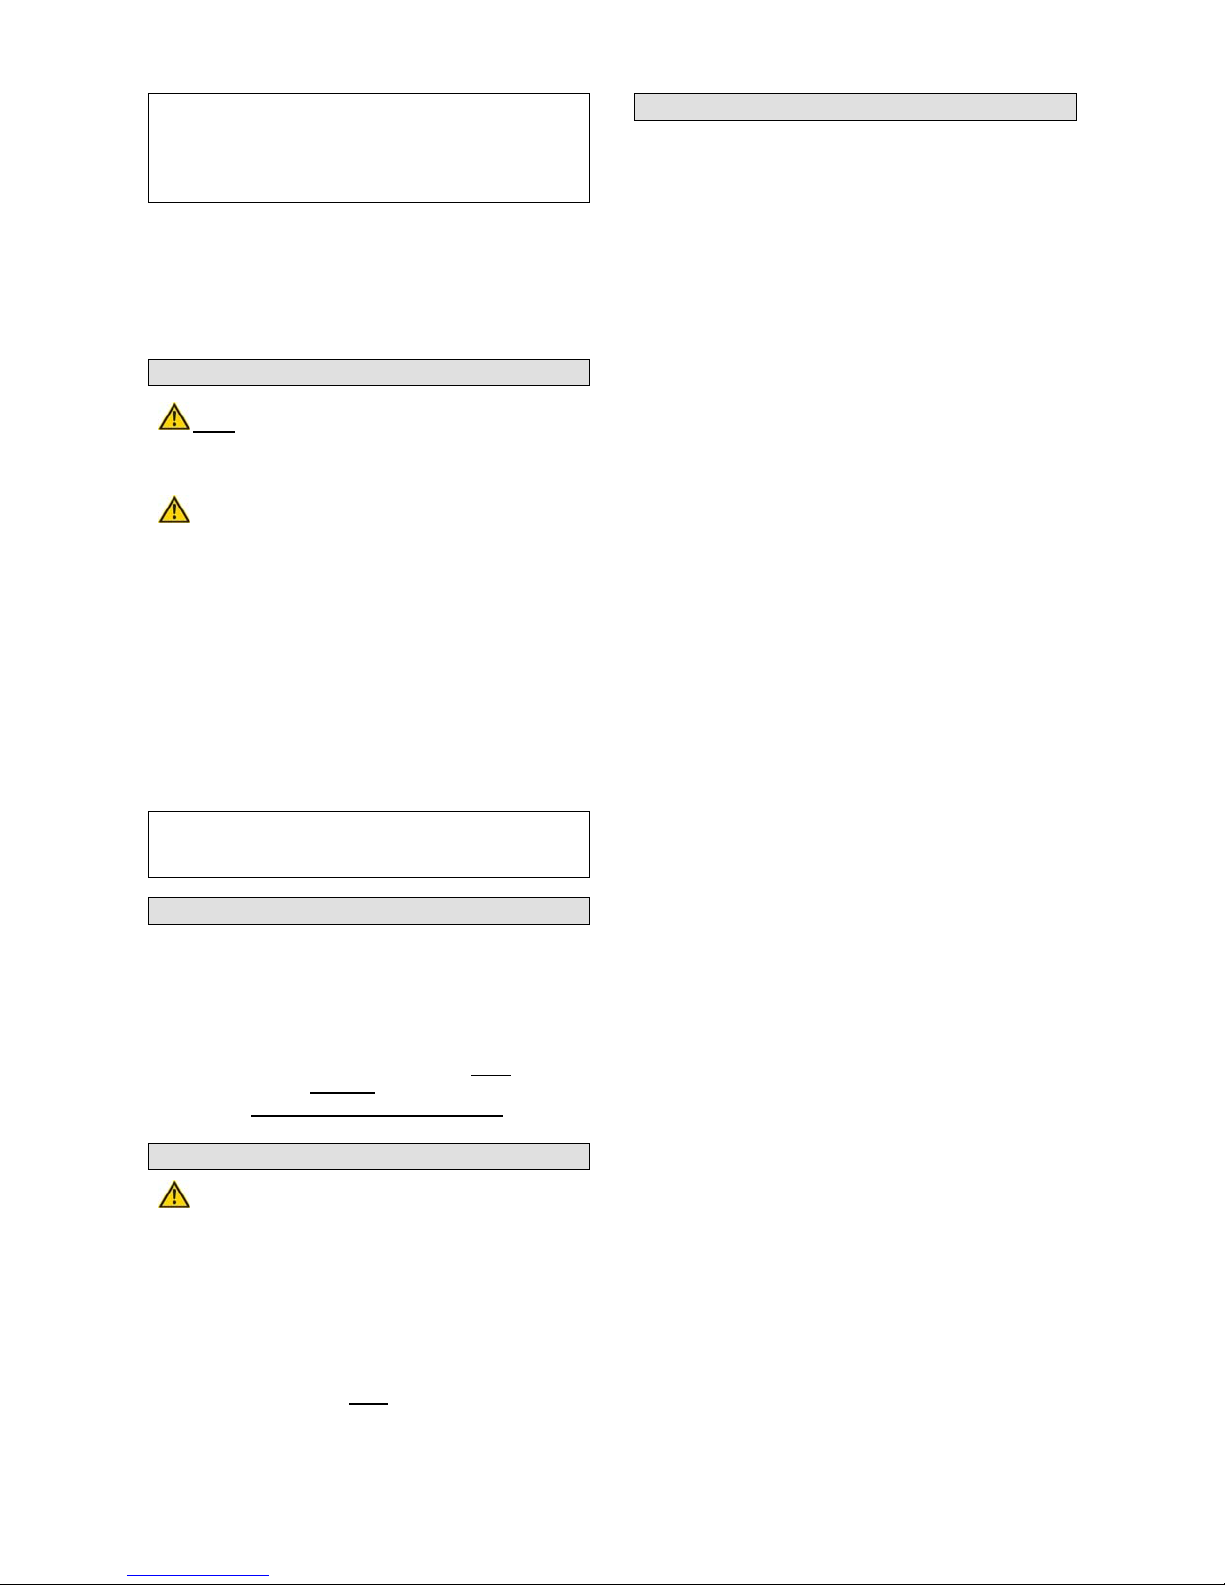
Pouze u přístrojů na 400 V: Je nutno dbát na směr otáčení
motoru (viz šipku na motoru), neboť chod se špatným
směrem otáčení může poškodit olejové čerpadlo. V
takovém případě zanikají veškeré nároky plynoucí ze
záruky. V případě potřeby nechte změnit směr otáčení
přepólováním zástrčky. Viz obr. 6!
Hydraulický olej/nádrž
Do všech štípačů lze plnit obvyklý hydraulický olej (např. HLP
46 nebo olej jiného výrobce o stejné viskozitě). Výměna oleje
není nutná.
Nádrž odvzdušněte před každým provozem
vyšroubováním a opětným zašroubováním plnicího
šroubu (obr. 7/A).
Provoz
Pozor: Dbejte na to, aby bylo dřevo řezáno pokud
možno v pravém úhlu a těsně dosedalo na štípací stůl.
Šikmo nařezané nebo extrémně sukovité dřevo může
sklouznout resp. ohnout obslužná ramena.
Dřevo pokládejte vždy jen na k tomu určené plošiny
(stoly) (nikdy ne na rám). To může štípač poškodit.
1. Stisknutím zeleného zapínacího knoflíku zapněte motor.
Pozor: dbejte na směr otáčení motoru!
2. Při nízkých teplotách nechte štípač po dobu cca 15
minut běžet na volnoběh, aby se olej zahřál na
odpovídající teplotu.
3. Štípaný materiál postavte na stůl a přidržte jej pomocí
upínacích příložek na páce.
4. Tlačením obou pák směrem dolů se zahájí štípání.
(Jakmile štípací nůž vnikne do dřeva, páku při
současném zatlačení dolů vyklopte lehce směrem ven.
Tak se zabrání tomu, aby se ohnuly přídržné plechy
(ramena).
5. Po ukončení štípání zvedněte alespoň jednu páku,
sloupek štípače se automaticky vysune nahoru.
Je přísně zakázáno, aby štípač špalků obsluhovaly dvě
osoby tak, že jedna by přidržovala dřevo a druhá působila
na upínací příložky.
Pokyny pro přepravu
Přeprava
Všechny štípače špalků jsou vybaveny velkými koly. Za
účelem přepravy štípače uchopte jednou rukou rukojeť na
štípacím sloupu a druhou rukou rukojeť nad motorem a štípač
lehce sklopte k sobě. V této poloze lze štípačem bez námahy
pojíždět.
Abyste zabránili úniku hydraulického oleje, nikdy
nepřepravujte štípač položený.
Při přepravě spusťte štípací nůž vždy zcela dolů.
Zbytková nebezpečí a ochranná opatření
Výstraha!!!
Vyřazení z funkce, změna, zablokování, demontáž,
přestavba či montáž všech dílů na bezpečnostních a
ochranných zařízeních stroje je striktně zakázána a může
mít při nedodržení za následek vážné resp. život ohrožující
úrazy.
Za materiální a personální škody vzniklé v důsledku
takovýchto nedbalostí nemůže ručit výrobce.
Dále zaniká u každé z výše uvedených nedbalostí
bezprostředně každý záruční nárok vůči výrobci.
Štípač smí obsluhovat jen jedna osoba. Z okolí štípače a
pracoviště odstraňujte během provozu zbytky dřeva, jež
by mohly zablokovat nebo negativně ovlivnit bezpečnostní
a obslužné prvky.
Servis
Máte technické otázky? Reklamaci? Potřebujete náhradní
díly nebo návod k obsluze?
Na naší domovské stránce www.guede.com Vám v oddílu
Servis pomůžeme rychle a nebyrokraticky. Prosím pomožte
nám pomoci Vám. Aby bylo možné Váš přístroj v případě
reklamace identifikovat, potřebujeme sériové číslo, objednací
číslo a rok výroby. Všechny tyto údaje najdete na typovém
štítku. Abyste měli tyto údaje vždy po ruce, zapište si je prosím
dole.
Sériové číslo:
Objednací číslo:
Rok výroby:
Tel.: +49 (0) 79 04 / 700-360
Fax: +49 (0) 79 04 / 700-51999
E-Mail: support@ts.guede.com
Page 25
Prohlášení o shodě EU
Tímto prohlašujeme my,
Güde GmbH & Co. KG
Birkichstraße 6
74549 Wolpertshausen
Germany
že koncepce a konstrukce níže uvedených přístrojů v provedeních, která uvádíme do oběhu, odpovídá příslušným základním
požadavkům směrnic EU na bezpečnost a hygienu.
V případě změny přístroje, která s námi nebyla konzultována, ztrácí toho prohlášení svou platnost.
Označení přístrojů: Štípač špalků Basic 10T/DTS
Obj. č.: 02040
Datum/podpis výrobce: 07.03.2012
Údaje o podepsaném: jednatel, pan Arnold
Technická dokumentace: J. Bürkle FBL; QS
Příslušné směrnice EU:
2004/108/EG
2006/42/EG
Použité harmonizované normy:
EN 609-1/A2:2009
EN 61000-3-3:1995+A1+A2
EN 61000-3-2:2006
EN 55014-2:1997+A1
EN 55014-1:2006
Hlučnost:
Lwa: 85,2 dB
Lpa: 69,9 dB
Vyhledávání poruch
Problémy
Možné příčiny
Náprava
Motor se nerozběhne
1. Žádný proud v zásuvce
2. Vadný prodlužovací kabel
3. Špatný napájecí kabel
4. Vadný spínač, kondenzátor
1. Zkontrolujte jištění sítě
2. Vytáhněte zástrčku, zkontrolujte, vyměňte
3. Přípojka 5 žil, při průřezu 2,5 mm
2
4. Stroj nechte zkontrolovat elektrikářem
Špatný směr otáčení
motoru
1. Špatné zapojení 1. Měnič fází otočte v zástrčce přístroje šroubovákem
Žádný pohyb štípacího
nože
1. Přestavení spouštěcí páky obouručního
spínání
1. Zkontrolujte stav oleje
Vadný řídicí ventil musí vyměnit jen servis
Štípač nemá žádný výkon
1. Špatný směr otáčení
2. Příliš málo hydraulického oleje
3. Ohnutá spouštěcí tyč; nedochází k
úplnému zatlačení hydraulického
zdvihátka ventilu
4. Dřevo má hodně suků a štípací nůž se
zasekává
5. Ohnuté obslužné rameno
1. Změňte směr otáčení
2. Doplňte hydraulický olej
3. Zkontrolujte všechny šrouby na spouštěcím
tyčovém mechanizmu
Přestavte tažnou tyč (obr. 10/B) , tím se
hydraulické zdvihátko na ventilu zcela vtlačí.
4. Štípací nůž namažte tukem.
5. Obslužné rameno vraťte do výchozí polohy.
Zelený zapínací knoflík po
stisknutí nedrží
1. Vadná pojistka atd.
2. Chod na 2 fáze
1. Zkontrolujte kabel
Hydraulické čerpadlo
píská,
štípací nůž má trhavý
chod
1. Ztráta oleje, znečištění podlahy
2. Příliš málo hydraulického oleje v nádrži
1. Dotáhněte šroubení
Vyměňte hadice
2. Doplňte hydraulický olej
Page 26
Mechanická zbytková nebezpečí
Ohrožení Popis Ochranné(á) opatření Zbytkové nebezpečí
Skřípnutí Během štípání může v důsledku
poklesu hydraulického nože dojít ke
skřípnutí či amputaci částí těla.
Existuje riziko, že se štípané dřevo
zasekne. Dbejte prosím na to, že dřevo
je při vyjímání silně napnuté a ve
štípací trhlině si můžete skřípnout prsty.
Používejte zásadně dvouruční bezpečnostní
obsluhu. Nezasahujte do štípacího procesu.
Nikdy nepracujte s přístrojem ve dvou
Zaseknuté dřevo jen vyrazte. Pozor před
padajícím dřevem, může Vám poranit nohy.
Opotřebená nebo
poškozená pomůcka
musí být neprodleně
nahrazena.
Dávejte pozor na
okolostojící osoby!
Při práci noste vždy
bezpečnostní obuv
Říznutí Během štípání může v důsledku
poklesu hydraulického nože dojít ke
skřípnutí či amputaci částí těla.
Používejte zásadně dvouruční bezpečnostní
obsluhu. Nezasahujte do štípacího procesu.
Opotřebená nebo
poškozená pomůcka
musí být neprodleně
nahrazena.
Obecné úrazy Při zpracování suchého dřeva může mít
prudké štípání za následek vážné
úrazy.
Špalky dřeva, které vznikají během
štípání, mohou spadnout a poranit
především nohy pracující osoby.
Prodloužení štípacího klínu může zajet
do stolu a způsobit tak poškození stroje
nebo vážné úrazy osob.
Nikdy nezasahujte do štípacího procesu.
Udržujte vždy dostatečný bezpečnostní odstup.
Přístroj obsluhujte vždy opatrně a obezřetně.
Noste vždy předepsaný ochranný oděv a
pracujte obezřetně.
Při práci s přístrojem noste vždy ochranné
brýle.
Noste vždy předepsaný ochranný oděv a
pracujte obezřetně.
Noste i k předepsanému ochrannému oděvu
patřící bezpečnostní obuv.
Před prací s prodloužením štípacího klínu
odmontujte vždy stůl
Opotřebená nebo
poškozená pomůcka
musí být neprodleně
nahrazena.
Dávejte vždy pozor na
okolostojící osoby.
Zachycení,
navinutí
Široký oděv, šperky a dlouhé vlasy
mohou být zachyceny pohyblivými
částmi.
Noste vždy přiléhavý oděv, nenoste šperky a
chraňte své vlasy síťkou.
Elektrická zbytková nebezpečí
Ohrožení Popis Ochranné(á) opatření Zbytkové nebezpečí
Přímý
elektrický
kontakt
Vadný kabel nebo zástrčka mohou být
příčinou úderu elektrickým proudem.
Vadné kabely nebo zástrčky nechte vždy
vyměnit odborníkem. Přístroj používejte jen s
ochranným vypínačem proti chybovému proudu
(FI)
Před každým použitím
zkontrolujte napájecí
kabel
Nepřímý
elektrický
kontakt
Úraz vodivými díly u odkrytých
elektrických nebo vadných
konstrukčních dílů
Při údržbě vždy vytáhněte zástrčku.
Provozujte jen s ochranným vypínačem proti
chybovému proudu (FI).
Ohrožení hlukem
Ohrožení Popis Ochranné(á) opatření Zbytkové nebezpečí
Poškození
sluchu
Dlouhodobá práce s přístrojem může
poškodit sluch.
Noste vždy sluchátka.
Zanedbání ergonomických zásad
Ohrožení Popis Ochranné(á) opatření Zbytkové nebezpečí
Nedbalé
používání
osobních
ochranných
pomůcek
Obsluha přístroje bez odpovídajících
ochranných pomůcek může způsobit
vážná vnější i vnitřní poranění.
Noste vždy předepsaný ochranný oděv a
pracujte obezřetně.
Nepřiměřené
lokální
osvětlení
Nedostatečné osvětlení představuje
vysoké bezpečnostní riziko.
Při práci s přístrojem zajistěte vždy dostatečné
osvětlení.
Ostatní ohrožení
Ohrožení Popis Ochranné(á) opatření Zbytkové nebezpečí
Odhozené
předměty či
stříkající
kapaliny
Při štípání mohou mechanické částečky
poranit Vaše oči.
Při práci s přístrojem noste vždy ochranné
brýle.
Page 27

Označenia na prístroji
Vysvetlenie symbolov
V tomto návode a/alebo na prístroji sú použité nasledujúce
symboly:
Bezpečnosť produktu:
Produkt ist mit den
einschlägigen Normen der
Europäischen Gemeinschaft
konform.
Zákazy:
Všeobecný zákaz
(v spojení s iným
piktogramom)
Zákaz siahania dovnútra
Zákaz ťahania za zástrčku
Chráňte pred dažďom
a vlhkom
Stroj smie obsluhovať iba
jedna osoba
Výstraha:
Výstraha/pozor
Výstraha! Nebezpečenstvo
potknutia sa!
Dodržujte dostatočný
bezpečnostný odstup!
Výstraha! Nebezpečenstvo
zovretia!
Výstraha! Poletujúce
predmety!
Výstraha! Poranenie rúk
štiepacím krížom!
Výstraha pred nebezpečným
elektrickým napätím
POZOR! Pred prevádzkou si
prečítajte návod na obsluhu!
Príkazy:
Pred použitím si prečítajte
návod na obsluhu
Používajte ochranné okuliare
a slúchadlá!
Používajte bezpečnostné
rukavice
Používajte bezpečnostnú
obuv!
Ochrana životného prostredia:
Odpad zlikvidujte odborne tak,
aby ste neškodili životnému
prostrediu.
Obalový materiál z lepenky je
možné odovzdať s cieľom
recyklácie do zberne.
Chybné a/alebo likvidované
elektrické či elektronické
prístroje sa musia odovzdať
do príslušných zberní.
Systém Interseroh-Recycling
s výrobným číslom
Obal:
Chráňte pred vlhkom!
Pozor – krehké!
Obal musí smerovať hore.
Technické údaje:
Prípojka Výkon motora
Otáčky Štiepacia sila
Max. priemer štiepaného
dreva
Max. dĺžka štiepaného dreva
Veľkosť stola cca Hmotnosť
Pred prevádzkou zahrievajte
olej 1 minútu stlačením
jedného ochranného oblúka.
Pri zapnutí štiepača držte
stlačené jedno obslužné
rameno!
Smer otáčania
SK
Skôr ako uvediete prístroj do prevádzky, prečítajte si, prosím, dôkladne tento návod na obsluhu.
A.V. 2 Dotlače, a to i čiastočné, vyžadujú schválenie. Technické zmeny vyhradené.
Ilustračné obrázky! Toto je originálny návod na obsluhu.
Page 28

Popis prístroja (obr. 1)
1. Rukoväť
2. Štiepací nôž
3. Upínacia príložka
4. Obslužné rameno
5. Kryt rukoväti
6. Držiak stola (vpredu)
7. Zablokovanie stola
8. Stôl štiepačky
9. Kolesá
10. Spínač/zástrčka
11. Tyč na nastavenie zdvihu
12. Motor
13. Ochranný oblúk
14. Spínacia kolíska (spodný kryt)
15. Plechová spojka
16. Páka pre otočný stôl
17. Otočný stôl
Prístroj
Štiepačka klátov Basic 10T/DTS
Ťažká oceľová konštrukcia, štiepací nôž zo špeciálnej ocele,
všetky oceľové diely s kvalitným práškovým náterom,
profesionálne hydraulické čerpadlo na použitie v sťažených
podmienkach, hlboký zásuvný diel s prídavným otočným
stolom a odoberateľným základným stolom. Motor s
poistkou proti prehriatiu.
Použitie v súlade s určením
Štiepačka klátov je dimenzovaná len na prevádzku s 1 osobou.
Na stroji nesmie nikdy pracovať dve a viac osôb.
Štiepačka klátov je určená výhradne na štiepanie dreva po
vlákne. Pokyny na montáž, prevádzku, údržbu, opravu a pod.
je potrebné striktne dodržiavať, aby sa vylúčili riziká a
zabránilo sa škodám. Pri štiepaní je potrebné dbať
bezpodmienečne na to, aby štiepané drevo bolo usadené iba
na ryhovanom plechu opornej dosky alebo na ryhovanom
plechu stola štiepačky.
S týmto prístrojom nie je možné vykonávať iné práce, než na
aké bol tento prístroj skonštruovaný a ktoré sú opísané v
návode na obsluhu. Každé iné použitie je použitie v rozpore s
určením. Za následné škody a úrazy výrobca neručí. Dbajte,
prosím, na to, že tento prístroj nie je konštruovaný na
priemyselné použitie.
Záruka
Záruka sa vzťahuje výlučne na nedostatky, spôsobené chybou
materiálu alebo výrobnou chybou. Pri reklamácii v záručnej
lehote je potrebné priložiť originálny doklad o kúpe s dátumom
kúpy. Do záruky nespadá neodborné použitie, ako napr.
preťaženie prístroja, násilné použitie, poškodenie cudzou
osobou alebo cudzím predmetom. Nedodržanie návodu na
použitie a návodu na montáž a normálne opotrebenie tiež
nespadá do záruky.
Technické údaje
Prípojka: 400 V ~ 50 Hz
Výkon motora: 4000 W P1/ S640 %
Otáčky motora: 1440 ot./min.
Max. štiepacia sila: 10 ton
Max. zdvih pri štiepaní: 510 mm
Rýchlosť posuvu vpred: 0,03 m/s
Rýchlosť posuvu vzad: 0,15 m/s
Nádrž hydraulického oleja: 8 l (druh oleja: HLP 46)
Dĺžky štiepaného dreva: 1350 mm
Štiepací stĺp: 120 mm × 120 mm
Max. priemer štiepaného
dreva:
cca 400 mm
Rozmery stola: Cca 380 x 300 mm
Hmotnosť: 177 kg
Obj. č. 02040
Bezpečnostné pokyny
Všeobecne
Z dôvodov bezpečnosti je nutné rešpektovať a dodržiavať
bezpečnostné pokyny uvedené v tomto návode na obsluhu a
pokyny na prístroji týkajúce sa obsluhy, údržby a opráv stroja.
Obslužný personál
Používanie štiepačky klátov môže byť spojené s rizikami.
Preto s ňou smú manipulovať a pracovať len vyškolené a
skúsené osoby. Obslužný personál musí nosiť úzky,
priliehavý odev a ochrannú obuv.
Pracovisko
Pre bezpečné štiepanie dreva je veľmi nutné, aby pracovisko
bolo rovné a umožňovalo udržanie stability a dostatočnú
voľnosť pohybu. Pri prinášaní a odnášaní štiepačky je
potrebné z prístupových ciest odstrániť všetky prekážky. Je
nutné zaistiť dostatočné osvetlenie pracoviska.
Zaistite, aby sa počas prevádzky nezdržiavali na
pracovisku žiadne osoby, resp., aby dodržiavali
dostatočný bezpečnostný odstup.
Príprava práce
Pri opravách či údržbe a pri opustení štiepačky klátov je
potrebné stlačením červeného gombíka na spínači a
vytiahnutím zástrčky zo siete prerušiť prívod elektrického
prúdu. Prerušenie prívodu elektrického prúdu iba
prepnutím vypínača do polohy VYPNUTÉ nie je
dostatočné. Štiepačky klátov GÜDE sa dodávajú zásadne
s tvrdenými štiepacími nožmi. Ak by ste však po štiepaní dreva
obsahujúceho neviditeľné cudzie telieska, napr. z betónu,
ocele atď., zistili ľahkú deformáciu ostria noža, odstráňte ju
pilníkom alebo obrúsením. Neustále udržiavanie štiepacieho
noža v ostrom stave zvyšuje pracovný výkon.
TIP: Štiepací nôž občas namažte tukom (v prípade
problémového dreva).
Pred prvým uvedením štiepačky do prevádzky je
potrebné preveriť funkciu bezpečnostných zariadení
(najmä dvojpákovej obsluhy).
POZOR! Pred každým uvedením do chodu sa uistite,
že štiepací stôl je na štiepačke bezpečne upevnený.
Likvidácia
Pokyny na likvidáciu vyplývajú z piktogramov umiestnených na
prístroji, resp. obale. Popis jednotlivých významov nájdete
v kapitole „Označenia“.
Likvidácia prepravného obalu
Obal chráni prístroj pred poškodením pri preprave. Obalové
materiály sú zvolené spravidla podľa ich šetrnosti voči
životnému prostrediu a spôsobu likvidácie a je možné ich preto
recyklovať. Vrátenie obalu do obehu materiálu šetrí suroviny a
znižuje náklady na likvidáciu odpadov. Časti obalu (napr. fólia,
Styropor®) môžu byť nebezpečné pre deti. Existuje riziko
udusenia! Časti obalu uschovajte mimo dosahu detí, a čo
najrýchlejšie zlikvidujte.
Požiadavky na obsluhu
Obsluha si musí pred použitím prístroja pozorne prečítať
návod na obsluhu.
Kvalifikácia
Okrem podrobného poučenia odborníkom nie je na používanie
prístroja nutná žiadna špeciálna kvalifikácia.
Minimálny vek
Na prístroji smú pracovať len osoby, ktoré dosiahli 18 rokov.
Výnimku predstavuje využitie mladistvých, ak sa to deje počas
profesijného vzdelávania s cieľom dosiahnutia zručnosti pod
dohľadom školiteľa.
Page 29

Prehliadky a údržba (obr. 2+7+8)
Bezpečnostné pokyny pre prehliadky a údržbu:
Len pravidelne udržiavaný a ošetrovaný prístroj môže byť
uspokojivou pomôckou. Nedostatočná údržba a starostlivosť
môže viesť k nepredvídaným nehodám a úrazom.
• Na čistenie nepoužívajte nikdy agresívne čistiace
prostriedky. Môže to poškodiť alebo zničiť prístroj.
• Vytiahnite zástrčku zo zásuvky.
• Opravy a údržbu elektrického zariadenia nechajte
vykonať len elektrikárovi.
• Všetky ochranné a bezpečnostné zariadenia musia byť
po skončení opráv a údržby ihneď namontované späť.
Odporúčame vám (obr. 2):
• Štiepací nôž
Štiepací nôž je rýchlo opotrebiteľný diel, ktorý musí byť v
prípade potreby dodatočne zbrúsený. To zvýši štiepací
výkon a chráni štiepačku. Tip: štiepací nôž namažte
tukom!
• Obojručné ochranné zariadenie
Kombinované pridržiavacie a spínacie zariadenie musí
mať ľahký chod. Príležitostne namažte niekoľkými
kvapkami oleja.
• Štiepací stĺp
Pred každým použitím namažte štiepací stĺp tukom,
tým zvýšite životnosť klzných čeľustí (obr. 2/A). Štiepací
stĺp celý vysuňte a na všetky 4 strany štiepacieho stĺpa
naneste rovnomerne viacúčelový tuk.
• Pohyblivé časti
Vedenie štiepacieho noža udržujte v čistote (špina,
triesky, kôra atď.). Klzné lišty namažte tukom.
• Hydraulické zariadenie
Hydraulické prípojky a závitové diely kontrolujte z
hľadiska tesnosti a opotrebovania. Závitové diely
prípadne dotiahnite.
Kontrola stavu hydraulického oleja (obr. 7+8):
Stav hydraulického oleja kontrolujte len v studenom
stave, s vytiahnutým napájacím káblom a zasunutým
štiepacím stĺpom.
Na olejovej mierke sa nachádzajú dva zárezy, najspodnejší
zárez (obr. 8/1) prestavuje medzu pre minimálne množstvo
hydraulického oleja v nádrži, vrchný zárez (obr. 8/2) pre
maximálne množstvo.
• Olejovú mierku (obr. 7/2) kompletne vyskrutkujte z
otvoru.
• Olej z mierky zotrite neplstnatou handrou.
• Mierku opäť kompletne zaskrutkujte do otvoru.
• Potom plniacu skrutku s mierkou opäť vyskrutkujte a
skontrolujte, či sa horná medza hydraulického oleja
nachádza medzi oboma uvedenými zárezmi.
Raz ročne vykonajte výmenu oleja (obr. 7+8):
• Vyskrutkujte skrutku na vypúšťanie oleja (obr. 7/A).
• Vytečený olej zachyťte (každý model má iné množstvo).
• Vytečený olej ekologicky zlikvidujte.
• Skrutku na vypúšťanie oleja opäť zaskrutkujte. Do
olejovej nádrže sa nesmú dostať žiadne čiastočky
nečistôt.
• Hydraulický olej nalejte až po horný zárez na mierke (obr.
8/2).
• Štiepačku klátov niekoľkokrát vyskúšajte naprázdno.
Odporúčaný hydraulický olej: DIN ISO HLP 46
Obj. č. Güde 42004
Viskozita: 46
Množstvo oleja: (pozrite Technické údaje)
Olej doplňujte, iba ak je stĺpik štiepačky v zasunutej
polohe
Hydraulické zariadenie:
Hydraulické hadice a spoje musia byť
po cca 4 prevádzkových hodinách skontrolované z hľadiska
svojej tesnosti a v prípade potreby dotiahnuté.
Kontrola funkcie
Hydraulická štiepačka dreva sa dodáva prevádzkyschopná.
Pred každým použitím je potrebné vykonať túto kontrolu
funkcie.
• Obe spínacie rukoväti nechajte zísť dole a štiepací nôž
dole až cca 5 cm nad stôl
• Pustite vždy jednu spínaciu rukoväť, štiepací nôž zostane
stáť vo zvolenej polohe
Montáž obslužných ramien, kolies a stola (obr.
1 a 4)
Montáž obslužných ramien – obr. 1
Obslužné rameno (obr. 1/4) zaveďte do spínacej kolísky (obr.
1/14) a zhora zaistite skrutkou, podložkou a závlačkou. Teraz
pripevnite obslužné rameno (obr. 1/4) podľa opísanej metódy
na druhej strane. Ochranné oblúky (obr. 1/13) na oboch
obslužných ramenách namontujte vždy pomocou 2
šesťhranných skrutiek (obr. 1/3).
TIP: Pred tým namažte zhora i zdola tukom plechové
spojky a matice (obr. 1/15)!
Montáž kolies – obr. 4
Namontujte na oboch stranách otáčacie koleso a obe zaistite
závlačkou (A).
Montáž stola/otočného stola – obr. 1
Dosku stola vsaďte do držiaka (obr. 1/6) a súčasne zatiahnite
za blokovaciu páku.
Na otáčanie otočného stola tlačte páku dole. Pri použití
otočného stola dbajte na to, aby bola páka vždy zaaretovaná.
Nastavenie zdvihu (obr. 5)
Pri klátoch menších než cca 50 cm a v prípade väčšieho
počtu klátov je možné zvýšiť pracovný výkon skrátením
spätného pohybu štiepacieho noža.
Postupujte takto:
Na stôl štiepačky postavte krátky klát a štiepacím
nožom zíďte až cca 2 cm nad klát. Štiepačku vypnite
(červený gombík na spínači a vytiahnite zástrčku zo
zásuvky). Teraz môžete skrátiť pomocou pripevnenej tyče (obr.
5/B) spätný pohyb, a to tak, že túto tyč budete pomocou
nastavovacej skrutky (obr. 5/A) fixovať v požadovanej výške.
Oblasť použitia
Prístroj je dovolené používať výhradne na štiepanie palivového
dreva. Štiepaný materiál musí mať tieto rozmery:
- Minimálny priemer: 125 mm
Maximálny priemer: 400 mm
- Je dovolené výhradne štiepanie dreva po vlákne.
- V prípade uzlovitého materiálu hrozí pri štiepaní
nebezpečenstvo jeho zaseknutia.
- Zaseknutý kus dreva sa uvoľní klepaním na klát.
- Je zakázané štiepaný klát vyrezávať!
Elektrické/hydraulické zapojenie (obr. 1+6+7)
Zapojenie do siete (obr. 1/10)
V súlade s ustanoveniami odborových profesijných organizácií
„CE“ atď. sú všetky štiepačky vybavené podpäťovou spúšťou v
spínači. Tá zabraňuje samočinnému rozbehu stroja v prípade
prerušenia napájania v dôsledku výpadku v sieti,
neúmyselného vytiahnutia zástrčky, chybnej poistky atď.
Prístroj je zásadne nutné opäť zapnúť stlačením zeleného
zapínacieho gombíka.
Vedomé pridržanie, resp. zablokovanie zapínacieho gombíka
pri chýbajúcom nulovom vodiči vedie automaticky k výpadku
spínača. V tomto prípade, ktorý je možné následne
identifikovať, zaniká záruka.
Page 30

Hydraulické zariadenie
Pri hydraulických hadiciach a spojoch je potrebné po cca
4 prevádzkových hodinách skontrolovať tesnosť a
v prípade nutnosti ich dotiahnuť.
Iba pri prístrojoch na 400 V: Je nutné dbať na smer
otáčania motora (pozrite šípku na motore), pretože chod
so zlým smerom otáčania môže poškodiť olejové
čerpadlo. V takom prípade zanikajú všetky nároky plynúce
zo záruky. V prípade potreby nechajte zmeniť smer
otáčania prepólovaním zástrčky. Pozrite obr. 6!
Hydraulický olej/nádrž
Do všetkých štiepačiek je možné plniť zvyčajný hydraulický
olej (napr. HLP 46 alebo olej iného výrobcu s rovnakou
viskozitou). Výmena oleja nie je nutná.
Nádrž odvzdušnite pred každou prevádzkou
vyskrutkovaním a opätovným zaskrutkovaním plniacej
skrutky (obr. 7/A).
Prevádzka
Pozor: Dbajte na to, aby bolo drevo rezané pokiaľ
možno v pravom uhle a tesne dosadalo na štiepací stôl.
Šikmo narezané alebo extrémne uzlovité drevo môže
skĺznuť, resp. ohnúť obslužné ramená.
Drevo ukladajte vždy len na plošiny (stoly) určené na
tento účel (nikdy nie na rám). To môže štiepačku poškodiť.
1. Stlačením zeleného zapínacieho gombíka zapnite motor.
Pozor: dbajte na smer otáčania motora!
2. Pri nízkych teplotách nechajte štiepačku počas cca
15 minút bežať na voľnobeh, aby sa olej zahrial na
zodpovedajúcu teplotu.
3. Štiepaný materiál postavte na stôl a pridržte ho pomocou
upínacích príložiek na páke.
4. Tlačením oboch pák smerom dole sa začne štiepanie.
(Hneď ako štiepací nôž vnikne do dreva, páku pri
súčasnom zatlačení dole vyklopte ľahko smerom von.
Tak sa zabráni tomu, aby sa ohli prídržné plechy
(ramená).
5. Po ukončení štiepania zdvihnite aspoň jednu páku, stĺpik
štiepačky sa automaticky vysunie nahor.
Je prísne zakázané, aby štiepačku klátov obsluhovali dve
osoby tak, že jedna by pridržiavala drevo a druhá pôsobila
na upínacie príložky.
Pokyny na prepravu
Preprava
Všetky štiepačky klátov sú vybavené veľkými kolesami. S
cieľom prepravy štiepačky uchopte jednou rukou rukoväť na
štiepacom stĺpe a druhou rukou rukoväť nad motorom a
štiepačku ľahko sklopte k sebe. V tejto polohe je možné
štiepačkou bez námahy pohybovať.
Aby ste zabránili úniku hydraulického oleja, nikdy
neprepravujte štiepačku položenú.
Pri preprave spustite štiepací nôž vždy celkom dole.
Zvyškové nebezpečenstvá a ochranné
opatrenia
Výstraha!!!
Vyradenie z funkcie, zmena, zablokovanie, demontáž,
prestavba či montáž všetkých dielov na bezpečnostných a
ochranných zariadeniach stroja je striktne zakázaná a
môže mať pri nedodržaní za následok vážne, resp. život
ohrozujúce úrazy.
Za materiálne a personálne škody vzniknuté v dôsledku
takýchto nedbalostí nemôže ručiť výrobca.
Ďalej zaniká pri každej z vyššie uvedených nedbalostí
bezprostredne každý záručný nárok voči výrobcovi.
Štiepačku smie obsluhovať len jedna osoba. Z okolia
štiepačky a pracoviska odstraňujte počas prevádzky
zvyšky dreva, ktoré by mohli zablokovať alebo negatívne
ovplyvniť bezpečnostné a obslužné prvky.
Servis
Máte technické otázky? Reklamáciu? Potrebujete náhradné
diely alebo návod na obsluhu?
Na našej domovskej stránke www.guede.com vám v oddiele
Servis pomôžeme rýchlo a nebyrokraticky. Pomôžte nám,
prosím, aby sme mohli pomôcť vám. Aby bolo možné váš
prístroj v prípade reklamácie identifikovať, potrebujeme sériové
číslo, objednávacie číslo a rok výroby. Všetky tieto údaje
nájdete na typovom štítku. Aby ste mali tieto údaje vždy
poruke, zapíšte si ich, prosím, dole.
Sériové číslo:
Objednávacie číslo:
Rok výroby:
Tel.: +49 (0) 79 04 / 700-360
Fax: +49 (0) 79 04 / 700-51999
E-mail: support@ts.guede.com
Page 31

Vyhlásenie o zhode EÚ
Týmto vyhlasujeme my,
Güde GmbH & Co. KG
Birkichstraße 6
74549 Wolpertshausen
Germany
že koncepcia a konštrukcia nižšie uvedených prístrojov vo vyhotoveniach, ktoré uvádzame do obehu, zodpovedá príslušným základným
požiadavkám smerníc EÚ na bezpečnosť a hygienu.
V prípade zmeny prístroja, ktorá s nami nebola konzultovaná, stráca toho vyhlásenie svoju platnosť.
Označenie prístrojov: Štiepačka klátov Basic 10T/DTS
Obj. č.: 02040
Dátum/podpis výrobcu: 07.03.2012
Údaje o podpísanom: konateľ, pán Arnold
Technická dokumentácia: J. Bürkle FBL; QS
Príslušné smernice EÚ:
2004/108/EG
2006/42/EG
Použité harmonizované normy:
EN 609-1/A2:2009
EN 61000-3-3:1995+A1+A2
EN 61000-3-2:2006
EN 55014-2:1997+A1
EN 55014-1:2006
Hlučnosť:
Lwa: 85,2 dB
Lpa: 69,9 dB
Vyhľadávanie porúch
Problémy
Možné príčiny
Náprava
Motor sa nerozbehne
1. Žiadny prúd v zásuvke
2. Chybný predlžovací kábel
3. Zlý napájací kábel
4. Chybný spínač, kondenzátor
1. Skontrolujte istenie siete
2. Vytiahnite zástrčku, skontrolujte, vymeňte
3. Prípojka 5 žíl, pri priereze 2,5 mm
2
4. Stroj nechajte skontrolovať elektrikárom
Zlý smer otáčania motora
1. Zlé zapojenie 1. Menič fáz otočte v zástrčke prístroja skrutkovačom
Žiadny pohyb štiepacieho
noža
1. Prestavenie spúšťacej páky obojručného
spínania
1. Skontrolujte stav oleja
Chybný riadiaci ventil musí vymeniť len servis
Štiepačka nemá žiadny
výkon
1. Zlý smer otáčania
2. Príliš málo hydraulického oleja
3. Ohnutá spúšťacia tyč; nedochádza k
úplnému zatlačeniu hydraulického
zdvíhadla ventilu
4. Drevo má veľa uzlov a štiepací nôž sa
zasekáva
5. Ohnuté obslužné rameno
1. Zmeňte smer otáčania
2. Doplňte hydraulický olej
3. Skontrolujte všetky skrutky na spúšťacom tyčovom
mechanizme
Prestavte ťažnú tyč (obr. 10/B), tým sa hydraulické
zdvíhadlo na ventile celkom vtlačí.
4. Štiepací nôž namažte tukom.
5. Obslužné rameno vráťte do východiskovej polohy.
Zelený zapínací gombík
po stlačení nedrží
1. Chybná poistka atď.
2. Chod na 2 fázy
1. Skontrolujte kábel
Hydraulické čerpadlo
píska, štiepací nôž má
trhavý chod
1. Strata oleja, znečistenie podlahy
2. Príliš málo hydraulického oleja v nádrži
1. Dotiahnite skrutkový spoj
Vymeňte hadice
2. Doplňte hydraulický olej
Page 32

Mechanické zvyškové nebezpečenstvá
Ohrozenie Popis Ochranné opatrenie(ia) Zvyškové
nebezpečenstvá
Priškripnutie Počas štiepania môže v dôsledku
poklesu hydraulického noža dôjsť k
priškripnutiu či amputácii častí tela.
Existuje riziko, že sa štiepané drevo
zasekne. Dbajte, prosím, na to, že
drevo je pri vyberaní silne napnuté a v
štiepacej trhline si môžete priškripnúť
prsty.
Používajte zásadne dvojručnú bezpečnostnú
obsluhu. Nezasahujte do štiepacieho procesu.
Nikdy nepracujte s prístrojom vo dvojici
Zaseknuté drevo len vyrazte. Pozor pred
padajúcim drevom, môže vám poraniť nohy.
Opotrebená alebo
poškodená pomôcka
musí byť bezodkladne
nahradená.
Dávajte pozor na
okolostojace osoby!
Pri práci noste vždy
bezpečnostnú obuv
Porezanie Počas štiepania môže v dôsledku
poklesu hydraulického noža dôjsť k
priškripnutiu či amputácii častí tela.
Používajte zásadne dvojručnú bezpečnostnú
obsluhu. Nezasahujte do štiepacieho procesu.
Opotrebená alebo
poškodená pomôcka
musí byť bezodkladne
nahradená.
Všeobecné
úrazy
Pri spracovaní suchého dreva môže
mať prudké štiepanie za následok
vážne úrazy.
Kláty dreva, ktoré vznikajú počas
štiepania, môžu spadnúť a poraniť
predovšetkým nohy pracujúcej osoby.
Predĺženie štiepacieho klina môže zájsť
do stola a spôsobiť tak poškodenie
stroja alebo vážne úrazy osôb.
Nikdy nezasahujte do štiepacieho procesu.
Udržujte vždy dostatočný bezpečnostný odstup.
Prístroj obsluhujte vždy opatrne a obozretne.
Noste vždy predpísaný ochranný odev a
pracujte obozretne.
Pri práci s prístrojom noste vždy ochranné
okuliare.
Noste vždy predpísaný ochranný odev a
pracujte obozretne.
Noste aj k predpísanému ochrannému odevu
patriacu bezpečnostnú obuv.
Pred prácou s predĺžením štiepacieho klina
odmontujte vždy stôl
Opotrebená alebo
poškodená pomôcka
musí byť bezodkladne
nahradená.
Dávajte vždy pozor na
okolostojace osoby.
Zachytenie,
navinutie
Široký odev, šperky a dlhé vlasy môžu
byť zachytené pohyblivými časťami.
Noste vždy priliehavý odev, nenoste šperky a
chráňte svoje vlasy sieťkou.
Elektrické zvyškové nebezpečenstvá
Ohrozenie Popis Ochranné opatrenie(ia) Zvyškové
nebezpečenstvá
Priamy
elektrický
kontakt
Chybný kábel alebo zástrčka môžu byť
príčinou úrazu elektrickým prúdom.
Chybné káble alebo zástrčky nechajte vždy
vymeniť odborníkom. Prístroj používajte len
s ochranným vypínačom proti chybovému
prúdu (FI)
Pred každým použitím
skontrolujte napájací
kábel
Nepriamy
elektrický
kontakt
Úraz vodivými dielmi pri odkrytých
elektrických alebo chybných
konštrukčných dieloch
Pri údržbe vždy vytiahnite zástrčku.
Prevádzkujte len s ochranným vypínačom proti
chybovému prúdu (FI).
Ohrozenie hlukom
Ohrozenie Popis Ochranné opatrenie(ia) Zvyškové
nebezpečenstvá
Poškodenie
sluchu
Dlhodobá práca s prístrojom môže
poškodiť sluch.
Noste vždy slúchadlá.
Zanedbanie ergonomických zásad
Ohrozenie Popis Ochranné opatrenie(ia) Zvyškové
nebezpečenstvá
Nedbalé
používanie
osobných
ochranných
pomôcok
Obsluha prístroja bez zodpovedajúcich
ochranných pomôcok môže spôsobiť
vážne vonkajšie i vnútorné poranenia.
Noste vždy predpísaný ochranný odev a
pracujte obozretne.
Neprimerané
lokálne
osvetlenie
Nedostatočné osvetlenie predstavuje
vysoké bezpečnostné riziko.
Pri práci s prístrojom zaistite vždy dostatočné
osvetlenie.
Ostatné ohrozenia
Ohrozenie Popis Ochranné opatrenie(ia) Zvyškové
nebezpečenstvá
Odhodené
predmety či
striekajúce
kvapaliny
Pri štiepaní môžu mechanické čiastočky
poraniť vaše oči.
Pri práci s prístrojom noste vždy ochranné
okuliare.
Page 33

Aanduidingen op het apparaat
Toelichting van de symbolen
In deze gebruiksaanwijzing en/of op dit apparaat worden de
volgende symbolen gebruikt:
Productveiligheid:
Het product is conform de
desbetreffende normen van
de Europese Gemeenschap
Verboden:
Verbod, algemeen
(in verbinding met ander
pictogram)
Ingrijpen verboden
Aan de netkabel trekken is
verboden!
Tegen regen en vocht
beschermen
De machine mag slechts door
één persoon bediend worden.
Waarschuwing:
Waarschuwing/Let op
Waarschuwing!
Struikelgevaar!
Voldoende veiligheidsafstand
houden!
Waarschuwing! Gevaar van
inklemmen!
Waarschuwing!
Rondvliegende delen!
Waarschuwing! Handletsel
door het splijtkruis!
Waarschuwing voor
gevaarlijke elektrische
spanning
LET OP! Vóór het gebruik
gebruiksaanwijzing lezen!
Aanwijzingen:
Voor gebruik
gebruiksaanwijzing lezen
Oog- en gehoorbeschermers
gebruiken!
Veiligheidshandschoenen
gebruiken
Veiligheidsschoenen
gebruiken!
Milieubescherming:
Afval niet in het milieu, maar
vakkundig verwijderen
Verpakkingsmateriaal van
karton bij de daarvoor
bestemde recyclingplaatsen
inleveren
Beschadigde en/of te
verwijderen elektrische of
elektronische apparaten bij de
daarvoor bestemde
recyclingplaatsen inleveren
Recyclingsysteem Interseroh
met producentnummer
Verpakking:
Tegen vocht beschermen!
Let op – breekbaar!
Verpakkingsoriëntering –
boven!
Technische gegevens:
Netaansluiting Motorvermogen
Toerental Splijtdruk
Max. splijtdiameter Max. lengte van splijtmateriaal
Tafelafmetingen ca. Gewicht
Voor het gebruik de olie
verwarmen door 1 minuut op
één van de veiligheidsbeugels
te drukken.
Bij het inschakelen van de
splijter één bedieningsarm
ingedrukt houden!
Draairichting!
NL
Vóór ingebruikneming van de machine deze gebruiksaanwijzing aandachtig doorlezen.
A.V. 2 Voor nadruk en uittreksels is toestemming vereist. Technische wijzigingen voorbehouden.
Afbeeldingen zijn bedoeld als voorbeelden! Dit is een originele gebruiksaanwijzing!
Page 34

Beschrijving van de machine (afb. 1)
1. Handgreep
2. Kloofmes
3. Klembek
4. Bedieningsarm
5. Greepbescherming
6. Tafelhouder (voorin)
7. Tafelvergrendeling
8. Splijttafel
9. Wielen
10. Schakelaar / Stekker
11. Slaginstelstang
12. Motor
13. Veiligheidsbeugel
14. Schakelwip (onderste bekleding)
15. Metalen verbindingsplaten
16. Hendel voor zwenktafel
17. Zwenktafel
Machine
Houtsplijter Basic 10T/DTS
Zwaar stalen constructie, kloofmes van speciaal staal, alle
stalen onderdelen hoogwaardig poeder gespoten,
professionele hydraulische pomp voor zwaar gebruik, diepe
slag met aanvullende zwenktafel en afneembare
basistafel. Motor met beveiliging tegen oververhitting.
Gebruik volgens de bepalingen
De houtsplijter is uitsluitend voor het bedienen door 1 persoon
geconstrueerd. Aan de machine mogen nooit twee of
meerdere personen werken. De houtsplijter is uitsluitend
bestemd voor het klein maken van brandhout en wel in de
draadrichting. De aanwijzingen betreffende montage, gebruik,
onderhoud en reparatie e.d. dienen opgevolgd te worden om
gevaren uit te sluiten en schaden te vermijden. Bij het splijten
dient er beslist op gelet te worden dat het te splijten hout enkel
tegen de tranenplaat van de bodemplaat of tegen de
tranenplaat van de splijttafel aanligt.
Met deze machine mogen geen andere werkzaamheden
verricht worden dan de werkzaamheden waarvoor de machine
is gebouwd en die in de gebruiksaanwijzing worden
beschreven. Ieder ander gebruik geldt als niet volgens deze
gebruiksregels. De producent is voor de eventuele hieruit
ontstane schades niet aansprakelijk. Let er op dat dit apparaat
niet voor industriële toepassing is geconstrueerd.
Garantie
De garantie heeft uitsluitend betrekking op onvolkomenheden
die op materiaal- of productiefouten zijn terug te voeren.
Bij een claim betreffende een onvolkomenheid, in de zin van
garantie, dient de originele aankoopfactuur met de
aankoopdatum bijgesloten te worden. Van garantie uitgesloten
zijn verkeerd gebruik, zoals bijv. overbelasting van het
apparaat, gebruik van geweld, beschadigingen door vreemde
invloeden of vreemde voorwerpen. Het niet naleven van
gebruik- en montageaanwijzingen en normale slijtage zijn
eveneens van garanties uitgesloten.
Technische gegevens
Aansluiting: 400 V~50 Hz
Motorvermogen: 4000 W P1 / S6 40%
Motortoerental: 1440 omw/min
Max. splijtdruk: 10 ton
Max. cilinderslag: 510 mm
Voorloopsnelheid: 0,03 m/s
Terugloopsnelheid: 0,15 m/s
Tank voor hydraulische olie: 8 l (oliesoort: HLP 46)
Lengtes splijtmateriaal: 1350 mm
Splijtzuil: 120 mm x 120 mm
Max. splijtdiameter: ca. 400 mm
Tafelafmeting: Ca. 380 x 300 mm
Gewicht: 177 kg
Artikel nr. 02040
Veiligheidsinstructies
Algemeen
De aanwijzingen uit deze gebruiksaanwijzing en de
aangebrachte veiligheidsaanwijzingen op de machine
betreffende de bediening, onderhoud en reparatie zijn om
veiligheidstechnische redenen beslist te respecteren en na te
komen.
Bedieningspersoneel
Het gebruik van een houtsplijter kan gevaren opleveren.
Daarom mogen slechts aangewezen personen daarmee
omgaan en werken. Het bedieningspersoneel moet strakke
kleding en veiligheidsschoeisel dragen.
Werkgebied
Voor veilig splijten van hout is het dringend vereist dat de
werkomgeving vlak en slipvrij is en dat een voldoende
bewegingvrijheid is gewaarborgd. Voor aan- en afvoer van
splijtmateriaal naar de splijter is het vereist dat de wegen vrij
zijn van struikelmogelijkheden. Zorg voor voldoende verlichting
van de werkomgeving.
Zorg daarvoor dat geen andere personen tijdens het
gebruik in de werkomgeving aanwezig zijn, resp.
voldoende veiligheidsafstand houden.
Werkvoorbereiding
Bij reparatie- en onderhoudswerkzaamheden evenals bij het
verlaten van de houtsplijter moet de stroomtoevoer door het
drukken op de rode knop aan de schakelaar en door het
uitnemen van de netstekker onderbroken worden. De
stroomtoevoer enkel door het schakelen in UIT positie te
onderbreken is niet voldoende. GÜDE houtsplijters worden
principieel met geharde kloofmessen geleverd. Indien toch
door het splijten van hout met onzichtbare vreemde lichamen,
zoals beton, staal enz., een lichte beschadiging aan de snede
van het kloofmes zichtbaar is, dan is dit door afslijpen of
afvijlen te verwijderen. Verder verhoogt een constante
“scherphouding” van het kloofmes de werkprestatie.
TIP: Kloofmes regelmatig invetten (bij problematische
houtsoorten).
Vóór de eerste inbedrijfneming moeten de
veiligheidsinrichtingen (voornamelijk de bediening met
twee hendels) op hun functie gecontroleerd worden.
LET OP! Controleer voor iedere inbedrijfneming of de
splijttafel vast en veilig aan de splijter is bevestigd.
Verwijdering
De verwijderinginstructies zijn met pictogrammen aangegeven
die op het apparaat, resp. op de verpakking, te vinden zijn.
Een beschrijving van de afzonderlijke betekenissen is in het
hoofdstuk “Aanduiding” te vinden.
Verwijdering van de transportverpakking
De verpakking beschermt het apparaat tegen
transportschades. De verpakkingsmaterialen zijn meestal
volgens milieuvriendelijke en verwijderingtechnische
standpunten gekozen en derhalve recyclebaar. Het retour
brengen van de verpakking in de materiaalomloop spaart
grondstoffen en verlaagt de afvalhoeveelheden.
Verpakkingsdelen (bijv. folies, styropor) kunnen voor kinderen
gevaarlijk zijn. Er bestaat verstikkingsgevaar! Bewaar de
verpakking buiten het bereik van kinderen en verwijder deze
zo snel mogelijk.
Eisen aan de bedienende persoon
De bedienende persoon moet, voor het gebruik van de
machine, de gebruiksaanwijzing goed gelezen hebben.
Kwalificatie
Behalve een uitvoerige instructie door vakkundig
verkooppersoneel is er geen speciale kwalificatie voor het
gebruik van het apparaat nodig.
Page 35

Minimale leeftijd
Het apparaat mag slechts door personen gebruikt worden van
18 jaar of ouder. Uitzondering hierop is het gebruik door
jeugdige personen bij een beroepsopleiding ter verkrijging van
vaardigheid en indien dit onder toezicht van een opleider
plaats vindt.
Inspectie en onderhoud (afb. 2+7+8)
Veiligheidsinstructies voor inspectie en onderhoud
Enkel een regelmatig onderhouden en een goed verzorgde
machine kan een tot tevredenheid werkend hulpmiddel zijn.
Onderhoud- en verzorgingsfouten kunnen tot onvoorziene
ongevallen en letsels leiden.
• Gebruik voor alle reinigingswerkzaamheden nooit
scherpe reinigingsmiddelen. Dit kan tot
beschadigingen of vernieling van de machine leiden.
• Netstekker uitnemen.
• Reparatie- en onderhoudswerkzaamheden aan de
elektrische installatie slechts door vaklieden laten
uitvoeren.
• Alle bescherming- en veiligheidsinrichtingen moeten na
voltooide reparatie of onderhoudswerkzaamheden
onmiddellijk weer gemonteerd worden.
Wij adviseren (afb. 2):
• Kloofmes
Het kloofmes is een slijtonderdeel dat naar behoefte
nageslepen moet worden. Dit verhoogt de splijtprestatie
en spaart de splijter. Tip: Kloofmes invetten!
• Met twee handen te bedienen veiligheidsinrichting
De gecombineerde houd- en schakelinrichting moet
lichtlopend blijven. Af en toe met weinig oliedruppels
smeren.
• Splijtzuil
Vet de splijtzuil voor elk gebruik in; het verhoogt de
levensduur van de geleideschoenen (afb. 2/A). Rij
hiervoor de splijtzuil volledig uit en breng een universeel
vet op alle 4 kanten van de splijtzuil gelijkmatig op.
• Bewegende onderdelen
Geleidingen van het splijtmes schoon houden (vuil,
houtsplinters enz.). Geleiderails met vet insmeren.
• Hydrauliek
Hydraulische aansluitingen en schroefverbindingen op
dichtheid en slijtage controleren. Zo nodig de
schroefverbindingen aandraaien.
Stand hydraulische olie controleren (afb. 7+8):
Vulstand van de hydraulische olie enkel in koude
toestand, met uitgenomen voedingskabel en ingetrokken
splijtzuil controleren.
In de oliepeilstok bevinden zich twee inkepingen; de onderste
inkeping (afb. 8/1) geeft voor de tank de minimale hoeveelheid
hydraulische olie aan, de bovenste inkeping (afb. 8/2) staat
voor de maximale hoeveelheid.
• Draai de oliepeilstok (afb. 7/A) geheel uit de opening
uit.
• Verwijder de olie van de oliepeilstok met een niet-
pluizende doek.
• Draai de oliepeilstok nu weer volledig in de opening in.
• Draai daarna de vulschroef met peilstok er weer uit en
controleer of de bovengrens van de hydraulische olie
tussen de beide bovengenoemde inkepingen is.
Jaarlijks een olieverversing uitvoeren (afb. 7+8):
• De olieaftapplug (afb. 7/A) er uitdraaien.
• Oude olie opvangen (afhankelijk van model van de
machine, verschillende hoeveelheden).
• Oude olie op milieuvriendelijke wijze verwijderen.
• De olieaftapplug opnieuw indraaien. Geen vuil in de
olietank laten komen.
• Hydraulische olie vullen, tot de bovenste inkeping van de
peilstok (afb. 8/2).
• Houtsplijter enkele malen zonder splijtmateriaal bedienen.
Aanbevolen hydraulische olie: DIN ISO HLP 46
Güde artikel nr. 42004
Viscositeit: 46
Olie-inhoud: zie “Technische gegevens”
Olie altijd enkel in ingereden positie van de splijtzuil
aanvullen!
Hydrauliek:
De hydraulische slangen en verbindingen moeten na
ca. 4 bedrijfsuren op dichtheid gecontroleerd worden en –
indien noodzakelijk – aangedraaid worden.
Functietest
De hydraulische houtsplijter wordt gebruiksklaar geleverd.
Vóór ieder gebruik zou deze functietest uitgevoerd moeten
worden.
• Beide schakelgrepen naar beneden drukken en splijtmes
naar beneden, tot ca. 5 cm boven de tafel, laten zakken.
• Telkens één schakelgreep loslaten, het splijtmes moet in
de gekozen positie blijven staan.
Montage van de bedieningsarmen, wielen en
tafel (afb. 1 en 4)
Bedieningarmen monteren - afb. 1
Bedieningsarm (afb. 1/4) in de schakelwip (afb. 1/14) invoeren,
van boven met bouten, schijf en splitpen borgen. Nu de
bedienarm (afb. 1/4), volgens de beschreven wijze, aan de
andere kant bevestigen. De veiligheidsbeugel (afb. 1/13) aan
beide bedieningsarmen iedere met 2 zeskantschroeven (afb.
1/13) monteren.
TIP: Vooraf de metalen verbindingsplaten en moeren
(afb. 1/15) boven en beneden invetten!
Wielen monteren - afb. 4
Monteer op beide kanten een loopwiel en borg beide met een
splitpen (A).
Tafelmontage/zwenktafel - afb. 1
Plaats het tafelblad in de houder (afb. 1/6) door het gelijktijdig
trekken aan de tafelvergrendelhendel.
Voor het zwenken van de zwenktafel de hendel naar beneden
drukken. Bij gebruik van de zwenktafel er op letten dat de
hendel altijd vergrendeld is.
Slaginstelling (afb. 5)
Bij houtstukken tot 50 cm en grotere aantallen is het mogelijk
de werkprestatie door verkorten van de terugloop van het
kloofmes te verhogen.
Ga als volgt te werk:
Zet een kort houtstuk op de splijttafel en ga met het kloofmes
tot ca. 2 cm tot het houtstuk en schakel de splijter uit (op de
rode knop op de schakelaar drukken en de netstekker
uitnemen). Nu kunt u middels de geplaatste stang (afb. 5/B) de
terugloop afkorten doordat u deze middels de vastzetschroef
op de gewenste hoogte (afb. 5/A) vastzet.
Gebruiksgebied
De machine is uitsluitend voor het bewerken van brandhout
goedgekeurd. Het splijtmateriaal moet de volgende afmetingen
hebben:
- Minimale doorsnede: 125 mm
Maximale doorsnede: 400 mm
- Het is uitsluitend toegestaan splijtmateriaal in de
draadrichting te bewerken.
- Er bestaat gevaar dat het splijtmateriaal bij het
splijtproces vast blijft zitten.
- Voor verwijdering van vastzittende houtstukken is slaan
op het splijtmateriaal toegestaan.
- Uitzagen is verboden!
Page 36

Stroomaansluiting/Hydrauliek (afb. 1+6+7)
Netaansluiting (afb. 1/10)
In overeenstemming met de bepalingen van de officiële
ongevallenverzekering „CE“ enz. zijn alle splijters, met een
onderspanninginschakeling in de schakelaar, uitgerust. Dit
verhindert een zelfstandige herstart bij stroomonderbrekingen
door stroomuitval, ongewenst uittrekken van de stekker,
defecte zekering enz. Principieel moet de machine weer door
drukken van de groene inschakelknop opnieuw aangezet
worden.
Een bewust vasthouden, resp. blokkeren van de
inschakelknop bij een ontbrekende nulleiding veroorzaakt
automatisch het uitvallen van de schakelaar. In dit geval, dat
achteraf controleerbaar is, vervalt de garantie.
Hydrauliek
De hydraulische slangen en verbindingen moeten na ca. 4
bedrijfsuren op dichtheid gecontroleerd worden en –
indien noodzakelijk – aangedraaid worden.
Enkel bij 400 volt machines: Absoluut op de draairichting
(zie motorpijl) van de motor letten, omdat het gebruik met
een verkeerde draairichting de oliepomp beschadigt. In dit
geval vervalt iedere garantieaanspraak. Indien nodig,
draairichting door ompolen van de stekker wijzigen. Zie
afb. 6!
Hydraulische olie/Tank
Voor alle splijters kan in de handel zijnde hydraulische olie
bijgevuld worden (bijv. HLP 46 of een ander fabrikaat met
gelijke viscositeit). Verversing van de olie is niet noodzakelijk.
Ontlucht de tank door uitschroeven en weer indraaien van
de vulschroef (afb. 7/A) voor ieder gebruik.
Gebruik
Let op: Let er op dat het splijtgoed zo veel mogelijk
rechthoekig gesneden is en goed tegen de splijttafel
opligt. Schuin afgesneden of splijtgoed met extreem vele
takken kan wegglijden, resp. de bedieningsarmen buigen.
Plaats het splijtgoed altijd slechts op de hiervoor
voorziene platforms (tafels) (nooit op het frame). Dit zou
de splijter kunnen beschadigen.
1. De motor door het drukken op de groene schakelknop
starten. Let op: op de draairichting van de motor
letten!
2. Bij lage temperaturen de splijter 15 min. in vrijloop
laten draaien, tot de olie op juiste temperatuur is.
3. Het splijtmateriaal op de tafel plaatsen en met de
spanklauwen aan de hendel, vasthouden.
4. Door het naar beneden drukken van beide hendels wordt
het splijtproces begonnen. (Zodra het kloofmes in het
hout indringt, bij gelijktijdige druk naar beneden, licht naar
buiten zwenken. Daarbij wordt verhinderd dat de
houdplaten (armen) worden gebogen).
5. Na het beëindigen van het splijtproces tenminste één
hendel omhoog brengen; de splijtzuil loopt automatisch
naar boven.
Het is streng verboden de houtsplijter door twee personen
te laten bedienen (terwijl een persoon het hout vasthoudt
en de tweede persoon de spanklauwen bedient).
Transportaanwijzingen
Transport
Alle houtsplijters zijn met grote wielen uitgerust. Om te
transporteren, neem met de ene hand de beugel van de
splijtzuil en met de andere hand de beugel boven de motor en
kantel de splijter licht naar u toe. In deze positie kan de splijter
moeiteloos verplaatst worden.
Om een lekkage van de hydraulische olie te verhinderen,
de splijter nooit liggend transporteren.
Tijdens het transport moet het kloofmes altijd geheel naar
beneden geplaatst zijn.
Overige gevaren en beschermende
maatregelen
Waarschuwing!!!
Het buiten werking stellen, wijzigen, blokkeren,
demonteren, verbouwen of aanbouwen van andere
onderdelen aan de veiligheids- en
beschermingsinrichtingen van de machine is ten
strengste verboden en kan bij niet nakomen zware, resp.
levensgevaarlijke letsels veroorzaken.
Voor materiele en persoonlijke schade, die door boven
genoemde wijzigingen e.d. ontstaan kan de producent niet
aansprakelijk gesteld worden.
Verder vervalt bij een boven genoemde nalatigheid per
direct elke garantieaanspraak tegenover de producent.
De splijter mag slechts door één persoon bediend worden.
Houd de splijter en de werkomgeving tijdens het gebruik
steeds vrij van houtresten die de veiligheid of
bedieningsonderdelen blokkeren of benadelen kunnen.
Service
Hebt u technische vragen? Een reclamatie? Hebt u
reserveonderdelen of een gebruiksaanwijzing nodig?
Op onze website www.guede.com in Service helpen wij u
snel en niet-bureaucratisch verder. Help ons om u te helpen,
a.u.b. Om uw apparaat in geval van reclamatie te kunnen
identificeren hebben wij het serienummer evenals
artikelnummer en productiejaar nodig. Deze gegevens vindt u
op het typeplaatje. Vul deze gegevens hieronder in om deze
altijd bij de hand te hebben.
Serienummer:
Artikelnummer:
Productiejaar:
Tel.: +49 (0) 79 04 / 700-360
Fax: +49 (0) 79 04 / 700-51999
E-mail: support@ts.guede.com
Page 37

EG-Conformiteitverklaring
Hiermede verklaren wij,
Güde GmbH & Co. KG
Birkichstraße 6
74549 Wolpertshausen
Germany
dat het navolgend genoemde apparaat, op grond van zijn ontwerp en bouwwijze, evenals de door ons in omloop gebrachte
uitvoeringen, aan de desbetreffende fundamentele veiligheids- en gezondheidverordeningen van de EG-richtlijnen voldoen.
Bij niet met ons overeengekomen wijzigingen aan het apparaat verliest deze verklaring haar geldigheid.
Benaming van het product: Houtsplijter Basic 10T/DTS
Artikel nr.: 02040
Datum/Handtekening fabrikant: 07.03.2012
Gegevens betr. ondertekende: bedrijfsleider, dhr. Arnold
Technische documentatie: J. Bürkle FBL; QS
Desbetreffende EG-Richtlijnen:
2004/108/EG
2006/42/EG
Gebruikte harmoniserende normen:
EN 609-1/A2:2009
EN 61000-3-3:1995+A1+A2
EN 61000-3-2:2006
EN 55014-2:1997+A1
EN 55014-1:2006
Opgave geluidsniveau:
Lwa: 85,2 dB
Lpa: 69,9 dB
Oplossen van storingen
Problemen
Mogelijke oorzaken
Oplossing
Motor start niet
1. Geen stroom aan het stopcontact.
2. Elektrische verlengkabel defect.
3. Onjuiste aansluitkabel.
4. Schakelaar condensator defect.
1. Netzekering controleren.
2. Netstekker uitnemen, controleren, vervangen.
3. Aansluiting vijfaderig, met 2,5 mm
2
doorsnede.
4. Machine door elektricien laten controleren.
Onjuiste draairichting van
de motor
1. Onjuiste aansluiting. 1. Fasewisselaar in de machinestekker met
schroevendraaier draaien.
Geen beweging van het
splijtmes
1. Schakeling met twee handen en
schakelhefboom bijstellen.
1. Oliestand controleren.
Stuurventiel defect. Vervanging uitsluitend door
service.
Splijter levert geen
vermogen
1. Onjuiste draairichting.
2. Te weinig hydraulische olie.
3. Uitschakelstang verbogen; hydraulische
stamper aan het ventiel wordt niet geheel
ingedrukt.
4. Hout heeft takken en het kloofmes blijft
steken.
5. Bedieningsarm is gebogen.
1. Draairichting door vakman laten veranderen.
2. Hydraulische olie aanvullen.
3. Alle schroeven aan het schakelstangenstelsel
controleren.
Trekstang (afb. 10/B) bijstellen zodat de
hydraulische stoter aan het ventiel geheel wordt
ingedrukt.
4. Kloofmes invetten.
5. Bedieningsarm in de uitgangspositie terugbrengen.
Groene inschakelknop
blijft niet ingedrukt
1. Defecte zekering enz.
2. Tweefasenloop.
1. Kabel controleren.
Hydraulische pomp fluit,
kloofmes beweegt
stootsgewijs
1. Olieverlies, bodemvervuiling.
2. Te weinig hydraulische olie in de tank.
1. Schroefverbinding aandraaien.
Slangen vervangen.
2. Hydraulische olie aanvullen.
Page 38

Mechanische gevaren
Bedreiging Beschrijving Beschermingsmaatregel(en) Restgevaar
Knellen Tijdens het splijtproces kan het door
neerlaten van het hydraulische mes tot
afknellen of afscheuren van
lichaamsdelen komen.
Er bestaat het gevaar dat het
splijtmateriaal klem gaat zitten. Let er
op dat het hout bij het losmaken sterk
onder spanning zit en uw vingers in
splijtscheuren geklemd kunnen raken.
Principieel de veiligheidsbediening met twee
hendels gebruiken. Niet in het splijtproces
ingrijpen.
Nooit met twee personen aan de machine
werken.
Geklemd hout enkel er uitslaan. Voorzichtig,
afvallend hout kan uw voeten verwonden.
Een versleten of
beschadigd hulpmiddel
moet onmiddellijk
vervangen worden.
Op in de omgeving zijnde
personen letten.
Altijd veiligheidsschoenen
dragen.
Schaarwerking Tijdens het splijtproces kan het door
neerlaten van het hydraulische mes tot
afknellen of afscheuren van
lichaamsdelen komen.
Principieel de veiligheidsbediening met twee
hendels gebruiken. Niet in het splijtproces
ingrijpen.
Een versleten of
beschadigd hulpmiddel
moet onmiddellijk
vervangen worden.
Algemene
letsels
Bij het bewerken van droog hout kan
een plotselinge splijting zware
verwondingen veroorzaken.
Houten delen, die tijdens de
splijtwerkzaamheden ontstaan, kunnen
vallen en speciaal de voeten van het
bedienende personeel verwonden.
De splijtwigverlenging kan in de tafel
snijden en zowel machineschade als
zware letsels veroorzaken.
Nooit in het splijtproces ingrijpen.
Altijd voldoende veiligheidsafstand houden.
De machine steeds voorzichtig en met
aandacht bedienen.
Draag steeds de voorgeschreven
beschermende kleding en werk met aandacht.
Draag bij werkzaamheden met het apparaat
een veiligheidsbril.
Draag steeds de voorgeschreven
beschermende kleding en werk met aandacht.
Draag ook altijd de bij de voorgeschreven
beschermende kleding behorende
veiligheidsschoenen.
Vóór het werken met de splijtwigverlenging
altijd de tafel verwijderen.
Een versleten of
beschadigd hulpmiddel
moet onmiddellijk
vervangen worden.
Op in de omgeving zijnde
personen letten.
Grijpen,
opwikkelen
Loshangende kleding, sieraden en lang
haar kunnen door draaiende delen
gegrepen worden.
Draag steeds strakke kledingstukken en geen
sieraden, bescherm uw haar door een haarnet.
Elektrische gevaren
Bedreiging Beschrijving Beschermingsmaatregel(en) Restgevaar
Direct
elektrisch
contact
Een defecte kabel of stekker kan tot
een elektrische schok leiden.
Laat defecte kabels of stekkers altijd door een
vakman vervangen. Gebruik de machine
slechts met een aansluiting aan een
veiligheidsschakelaar voor foutstroom (FI).
Voedingskabel voor ieder
gebruik controleren.
Indirect
elektrisch
contact
Letsels door spanninggeleidende
onderdelen bij geopende elektrische of
defecten bouwdelen.
Tijdens onderhoudswerkzaamheden de
netstekker uitnemen. Slechts met FI-schakelaar
aansluiten.
Bedreigingen door lawaai
Bedreiging Beschrijving Beschermingsmaatregel(en) Restgevaar
Gehoorbescha
digingen
Lange tijd achtereen met het apparaat
werken kan tot gehoorbeschadigingen
leiden.
Draag altijd een gehoorbeschermer.
Verwaarlozing van ergonomische beginselen
Bedreiging Beschrijving Beschermingsmaatregel(en) Restgevaar
Nalatig gebruik
van
persoonlijke
beschermende
uitrusting
Bediening van het apparaat zonder de
juiste beschermende uitrusting kan tot
zware verwondingen leiden.
Draag steeds de voorgeschreven
beschermende kleding en werk met aandacht.
Onjuiste
plaatselijke
verlichting
Gebrekkige verlichting stelt een hoog
risico voor.
Zorg bij het werken met de machine voor
voldoende verlichting.
Overige bedreigingen
Bedreiging Beschrijving Beschermingsmaatregel(en) Restgevaar
Uitgeworpen
voorwerpen of
vloeistoffen
Bij splijten kunnen mechanische
deeltjes uw ogen verwonden.
Draag bij werkzaamheden met het apparaat
een veiligheidsbril.
Page 39

Segnaletica sull’apparecchio
Spiegazione dei simboli
Sono riportati nel presente Manuale d’Uso, oppure applicati
sull’apparecchio, i seguenti simboli:
Sicurezza del prodotto:
Prodotto è conforme alle
relative norme CE
Divieti:
Divieto generale
(unito con altro pittogramma)
Divieto di mettere dentro le
mani
Vietato tirare il cavo!
Proteggere alla pioggia ed
umidità!
Ci può essere un solo
operatore della macchina!
Avviso:
Avviso/attenzione
Avviso! Pericolo
dell’inciampata!
Mantenere la distanza sicura
sufficiente!
Avviso! Pericolo di
schiacciamento!
Avviso! Oggetti lanciati!
Attenzione! Rischio di ferirsi
con tenaglia a croce!
Avviso alla pericolosa
tensione elettrica
ATTENZIONE! Prima di
avviare la macchina leggere il
manuale d‘istruzioni!
Direttive:
Prima dell’uso leggere il
Manuale d’Uso
Utilizzare gli occhiali di
protezione e le cuffie.
Utilizzare i guanti di
protezione.
Usare la calzatura di
protezione.
Tutela dell’ambiente:
Smaltire i rifiuti in modo
professionale, che non sia
inquinato l'ambiente.
Il materiale d’imballo di
cartone può essere
consegnato al Centro di
raccolta allo scopo di riciclo.
Gli apparecchi
elettrici/elettronici difettosi e/o
da smaltire devono essere
consegnati ai centri
autorizzati.
Sistema Interseroh-Recycling
con la matricola.
Imballo:
Proteggere all’umidità!
Attenzione – fragile!
L’imballo deve essere rivolto
verso alto.
Dati tecnici:
Attacco Potenza del motore
Giri Forza di spaccatura
Max. diametro della legna Max. lunghezza della legna
Grandezza approssimativa del
tavolo.
Peso
Prima dell’avviamento
riscaldare l’olio per 1 minuto,
spingendo un arco di
protezione.
All’avviamento della macchina
tenete in basso un braccio di
manipolazione!
Senso di rotazione
I
Prima di mettere l’apparecchio in funzione, leggere attentamente, per favore, il presente Manuale d’Uso.
A.V. 2 Le stampe supplementari, anche parziali, richiedono l’autoriz zazione. Sono riservate le modifiche tecniche.
Le figure sono illustrative! Originale del Manuale d'Uso.
Page 40

Descrizione dell’apparecchio (fig. 1)
1. Manico
2. Cuneo da spaccatura
3. Righello di fissaggio
4. Braccio di manovra
5. Carter del manico
6. Supporto della tavola (avanti)
7. Arresto della tavola
8. Tavola della spaccatrice
9. Ruote
10. Interruttore / presa
11. Barra di registrazione della corsa
12. Motore
13. Arco di protezione
14. Culla di collegamento (carter inferiore)
15. Giunto di lamiera
16. Leva per la tavola girevole
17. Tavola girevole
Apparecchio
Spaccatrice dei tronchi 10T/DTS
Struttura pesante dell’acciaio, cuneo da spaccatura dell’acciaio
speciale, tutte le parti metalliche con la verniciatura a polvere
di qualità, pompa idraulica professionale per l’uso nelle
condizioni peggiorate, elemento profondo inseribile con la
tavola girevole supplementare e con la tavola di base
estraibile. Motore protetto del termico.
Uso in conformità alla destinazione
La spacciatrice dei tronchi è destinata all’uso di 1 sola
persona. Con l’apparecchio devono MAI lavorare due e più
persone. La spacciatrice dei tronchi è destinata
esclusivamente alla spaccatura nel senso delle fibre della
legna. E’ indispensabile rispettare scrupolosamente le
istruzioni di montaggio, manutenzione, riparazione ecc., per
evitare i rischi e danni. Alla spaccatura è indispensabile
attendersi a che la legna da spaccare sia appoggiata solo sulla
lamiera nervata della piastra d’appoggio oppure sulla lamiera
nervata della tavola della spacciatrice.
Non è possibile eseguire con tal apparecchio i lavori diversi da
quelli, per i quali è stato costruito e chi sono descritti nel
Manuale d’Uso. Ogni alto uso non č conforme alla
destinazione. Il costruttore non assume la responsabilità dei
successivi danni e delle ferite. Tenere presente che i nostri
apparecchi non sono costruiti per l’uso industriale.
Garanzia
La garanzia include esclusivamente i difetti del materiale
oppure i difetti di produzione. All’eventuale contestazione nel
periodo di garanzia occorre allegare l'originale del documento
d'acquisto con la data. La garanzia non include l’uso profano
come per es. sovraccarico dell’apparecchio, manomissione,
danni dall’intervento estraneo oppure dagli oggetti estranei. La
garanzia non include idem non mantenimento del Manuale
d’Uso e Montaggio e l’usura normale.
Dati tecnici
Allacciamento:
400 V~50 Hz
Potenza del motore: 4000 W P1 / S6 40%
Giri del motore: 1440 giri/min
Max. forza di spaccatura: 10 tonn.
Max. corsa di spaccatura: 510 mm
Velocità d'avanzamento: 0,03 m/s
Velocità di scorrimento dietro: 0,15 m/s
Serbatoio d’olio idraulico: 8 l (l’olio tipo: HLP 46)
Lunghezza della legna da
spaccare:
1350 mm
Colonna di spaccatura: 120 mm x 120 mm
Max. diametro della legna: cca 400 mm
Dimensioni della tavola: cca. 380 x 300 mm
Peso: 177 kg
Cod. ord. 02040
Istruzioni di sicurezza
Generalità
Per lo scopo di sicurezza è necessario rispettare e mantenere
le istruzioni di sicurezza indicate nel presente Manuale d’Uso e
le istruzioni sull’apparecchio riguardanti alla manovra,
manutenzione e riparazioni dell’apparecchio.
Personale di manovra
L’utilizzo della spaccatrice dei tronchi può essere legato ai
rischi. Possono perciò manipolarlo e lavorare con lo
stesso solo le persone addestrate ed esperte. Il personale
della manovra deve utilizzare gli indumenti aderenti e le
scarpe antinfortunistiche.
Luogo di lavoro
Per la spaccatura di legno sicura è molto importante che l’area
di lavoro sia piana, consentente il mantenimento della stabilità
e la sufficiente libertà del movimento. Trasportando la
spaccatrice in qualsiasi posto, le vie devono essere prive da
tutti ostacoli. E’ necessario provvedere per la sufficiente
illuminazione dell’area di lavoro.
Assicurare che durante la funzione dell’apparecchio
non sostino nel luogo di lavoro le persone non adatte e/o
che stiano in distanza sufficientemente sicura.
Preparazione del lavoro
Durante le riparazioni oppure manutenzione ed abbandonando
la spaccatrice dei tronchi, occorre interrompere l’alimentazione
elettrica premendo il pulsante rosso sull’interruttore e
staccando la spina dalla presa elettrica. Non è sufficiente
interrompere l'alimentazione della corrente elettrica solo
mettendo l'interruttore alla posizione OFF. Le spaccatrici
dei tronchi GÜDE sono fornite esclusivamente dotate dei cunei
da spaccatura induriti. Verificata la leggera deformazione del
tagliente del cuneo dopo la spaccatura della legna contenente
i corpi estranei invisibili, ad es. cemento, acciaio etc., può
essere eliminata con la lima oppure rettifica. Il cuneo da
spaccatura mantenuto sempre tagliente aumenta la
prestazione dell’apparecchio.
Consiglio: Lubrificare qualche volta il cuneo con grasso
(nel caso di legno problematico).
Previa la prima messa in funzione della spaccatrice
occorre verificare la funzione dei dispositivi di sicurezza
(soprattutto con la manovra a due leve).
ATTENZIONE! Accertarsi prima di ogni messa in
funzione che la tavola da spaccatura è fissata sulla
spaccatrice con sicurezza.
Smaltimento
Le istruzioni per lo smaltimento derivano dai pittogrammi
attaccati sull’apparecchio e sull’imballo. La descrizione dei
singoli significati riporta il capitolo "Segnaletica”.
Smaltimento dell’imballo da trasporto
L’imballo protegge l’apparecchio contro i danni durante il
trasporto. I materiali d’imballo sono scelti a seconda la tutela
dell’ambiente ed il modo di smaltimento, perciò possono
essere riciclati. Il ritorno dell’imballo in circolazione dei
materiali risparmia le materie prime e diminuisce i costi di
lavorazione dei rifiuti. Le singole parti dell’imballo (es. fogli,
Styropor®) possono essere pericolosi per i bambini. Esiste il
pericolo di soffocamento! Tenere le parti dell’imballo fuori la
portata dei bambini e smaltirli prima possibile.
Page 41

Requisiti all'operatore
L’operatore è obbligato, prima di usare l’apparecchio, leggere
attentamente il Manuale d’Uso.
Qualifica
Oltre le istruzioni dettagliate del professionista, per uso
dell’apparecchio non è necessaria alcuna qualifica speciale.
Età minima
Con apparecchio possono lavorare solo le persone che hanno
raggiunto 18 anni. L’eccezione rappresenta lo sfruttamento dei
minorenni per lo scopo dell’addestramento professionale per
raggiungere la pratica sotto controllo dell‘istruttore.
Ispezioni e manutenzione (fig. 2+7+8)
Istruzioni di sicurezza per ispezioni e manutenzione:
Solo la macchina periodicamente mantenuta e curata può
essere l’aiutante soddisfacente. La manutenzione e cura
mancanti possono condurre agli incidenti e ferite inaspettabili.
• Per lavori di pulizia non utilizzare i mezzi aggressivi.
Potrebbero danneggiare oppure rovinare la
macchina.
• Sconnettere la spina dalla presa.
• Le riparazioni e la manutenzione dell’impianto elettrico
far fare solo dall’elettricista.
• Terminata la riparazione oppure manutenzione, tutti
dispositivi di protezione e di sicurezza devono essere
rimontati immediatamente al suo posto.
Vi consigliamo (fig. 2):
• Cuneo da spaccatura
Il cuneo da spaccatura è la parte di usura rapida che, in
caso di necessità, deve essere affilato ulteriormente. Ciò
aumenta la potenza di spaccatura e protegge la
spacciatrice. Consiglio: trattare del grasso il cuneo
spaccatura!
• Dispositivo bimanuale di protezione
Il dispositivo combinato di fissaggio e d’avviamento deve
la funzione facile. Trattarlo occasionalmente di alcune
gocce dell’olio.
• Colonna da spaccatura
Prima di ogni uso lubrificare con grasso la colonna della
spaccatrice; sarà aumentata la vita delle ganasce di
scorrimento (fig. 2/A). Far sporgere la colonna da
spaccatura e lubrificarla uniformemente con grasso
multiuso su tutti i 4 lati.
• Parti mobili
La guida del cuneo da spaccatura mantenere pulita
(sporco, schegge, scorza etc.). Le liste di scorrimento
trattare del grasso.
• Impianto idraulico
I raccordi idraulici e nipple controllare per la tenuta e
l’usura. Serrare nipple eventualmente.
Controllo stato dell’olio idraulico (fig. 7+8):
Lo stato dell’olio idraulico viene controllato freddo,
con cavo d’alimentazione sconnesso e la colonna da
spaccatura inserita.
Sull’astina di controllo si trovano due incisioni; l’incisione
inferiore (fig. 8/1) rappresenta il livello minimo dell’olio
idraulico, l’incisione superiore 8/2) livello massimo.
• Svitare ed estrarre completamente dal foro l’astina
d’indicazione livello (fig. 7/A).
• Asportare l’olio dall’astina con uno straccio.
• Riavvitare completamente l’astina nel foro.
• Svitare nuovamente la vite con astina e controllare, se il
livello dell’olio idraulico si trova fra le indicate incisioni.
Una volta all’anno eseguire il cambio dell’olio (fig. 7+8):
• Svitare la vite di scarico dell’olio (fig. 7/A).
• Raccogliere l’olio esaurito (ogni modello ha la quantità
diversa).
• L’olio esaurito smaltire ecologicamente.
• Avvitare la vite per lo scarico dell’olio. Nel serbatoio
dell’olio non devono penetrare le particelle
dell’impurità.
• Riempire l’olio idraulico fino all’incisione superiore
sull’astina (fig. 8/2)
• Provare alcune volte la spacciatrice a vuoto.
L’olio idraulico consigliato: DIN ISO HLP 46
Cod. ord. Güde 42004
Viscosità: 46
Quantità dell’olio: (Cfr. Dati tecnici)
Aggiungere l’olio, solo con la colonna della
spaccatrice in posizione d'inserimento!
Impianto idraulico:
I flessibili idraulici e raccordi devono essere controllati dopo
cca 4 ore d’esercizio per la tenuta e serrati in caso di
necessità.
Controllo di funzione
La spacciatrice idraulica dei tronchi è fornita pronta all’uso.
Prima di ogni uso occorre eseguire il seguente controllo di
funzione.
• Lasciare scendere giù gli entrambi e due manichi
d’avviamento e il cuneo da spaccatura, fino a cca 5 cm
sopra il tavolo.
• Lasciare sempre solo uno dei manichi d’avviamento; il
cuneo da spaccatura rimane fermo in posizione
desiderata.
Montaggio dei bracci di manovra, delle ruote e
della tavola (fig. 1 e 4)
Montaggio dei bracci di manovra – fig. 1
Inserire il braccio di manovra (fig. 1/4) nella culla di
collegamento (fig. 1/14) e fissare da sopra usando la vite, la
rondella e la copiglia. Montare quindi il braccio di manovra (fig.
1/4) secondo il metodo descritto sull’altra pagina. Gli archi di
protezione (fig. 1/13) su entrambi e due bracci di manovra
montare sempre usando le 2 viti a testa esagonale (fig. 1/3).
Consiglio: Previa ciò lubrificare con il grasso da sopra e
da sotto i raccordi di lamiera ed i dadi (fig. 1/15)!
Montaggio delle ruote - fig. 4
Montare su entrambi e due lati le ruote ed assicurarle con le
copiglie (A).
Montaggio della tavola/tavola girevole – fig. 1
Infilare la piastra della tavola nel supporto (fig. 1/6) e tirare
contemporaneamente la leva d'arresto.
Per girare la tavola girevole spingere giù la leva. All’uso della
tavola girevole attendersi a che la leva sia sempre bloccata.
Registrazione della corsa (fig. 5)
Con i tronchi meno di cca 50 cm e nel caso del numero
maggiore dei tronchi, è possibile aumentare la potenza
accorciando il ritorno del cuneo da spaccatura.
Procedere come segue:
Appoggiare sul tavolo della spaccatrice un tronco corto e far
scendere il cuneo da spaccatura fino a cca 2 cm sopra il
tronco. Spegnere la spaccatrice (pulsante rosso
sull’interruttore e sconnettere la spina dalla presa). E’ possibile
adesso, agendo sull’asta montata (fig. 5/B), accorciare il
retromovimento in modo che l'asta sarà fissata tramite la vite
d'arresto (fig. 5/A) in altezza desiderata.
Page 42

Campo dell’utilizzo
E’ ammissibile utilizzare l’apparecchio esclusivamente per la
lavorazione della legna. Il materiale da spaccare deve avere le
seguenti dimensioni:
- Diametro minimo: 125 mm
Diametro massimo: 400 mm
- E’ ammessa la spaccatura della legna solo nel senso
delle fibre.
- Nel caso del materiale nodoso c’è pericolo del suo
incuneamento durante la spaccatura.
- Allentamento del pezzo incuneato viene fatto battendo sul
tronco.
- E’ vietato tagliare il tronco incuneato!
Collegamento elettrico/idraulico (fig. 1 e 7)
Connessione alla rete (fig. 1/10)
In conformità alle istituzioni delle Organizzazioni “CE” per le
professioni del settore etc., tutte spaccatrici sono dotate
dell'attuatore a sottotensione nell’interruttore. Ciò impedisce
l’avviamento improvviso dell’apparecchio nel caso
d’interruzione dell’alimentazione causata dalla mancanza della
corrente, dal disinserimento della spina, fusibile difettoso etc.
L’apparecchio può essere attivato nuovamente solo premendo
il pulsante verde. La ritenuta volontaria/blocco del pulsante
d’avviamento con il conduttore neutro mancante porta
automaticamente al salto dell’interruttore. In tal caso,
successivamente identificabile, cade la garanzia.
Impianto idraulico
Dopo cca 4 ore dell’esercizio è necessario controllare la
tenuta dei flessibili idraulici e raccordi e, se bisogna,
serrarne.
Solo per gli apparecchi 400V: E’ necessario badare al
senso di rotazione del motore (vedi la freccia sul motore),
perché la marcia nel senso dei giri sbagliato può
danneggiare la pompa d’olio. In tal caso vengono annullati
tutti diritti derivanti dalla garanzia. In caso di necessità far
cambiare il senso di rotazione rovesciando i poli della
spina. Vedi fig. 6!
Olio idraulico / serbatoio
Tutte le spaccatrici possono essere fornite dell’olio idraulico
abituale (ad es. HLP 46, oppure l’olio dell’altro produttore con
la viscosità identica). Non è necessaria la sostituzione dell’olio.
Scaricare l’aria dal serbatoio prima di ogni uso svitando
ed avvitando la vite di riempimento (fig. 7/A).
Esercizio
Attenzione: Attendersi a che la legna da spaccare sia
tagliata possibilmente a rettangolo ed appoggi bene sulla
tavola da spaccatura. La legna tagliata male oppure
troppo annodata potrebbe scivolare oppure piegare i
bracci di manovra.
Appoggiare la legna solo sui piani (tavole) a ciò
destinate (mai sul telaio). La spaccatrice potrebbe subire i
danni.
1. Premendo il tasto verde d’avviamento accendere il
motore. Attenzione: attendersi al senso di rotazione
del motore!
2. In caso di basse temperature far funzionare a vuoto la
spaccatrice per tempo di cca 15 minuti finché l'olio si
riscalda alla temperatura adatta.
3. Appoggiare il materiale da spaccare sul tavolo e fissarlo
mediante gli accoppiamenti di fissaggio sulla leva.
4. Premendo entrambe le due leve in basso sarà iniziata la
spaccatura. Non appena il cuneo da spaccatura entra
nella legna, ribaltare la leva leggermente fuori
spingendola giù contemporaneamente. Si evita così che
si pieghino le lamiere d’arresto (bracci).
5. Terminata la spaccatura, alzare almeno una delle leve; la
colonna della spaccatrice andrà su automaticamente.
E’ severamente vietato che la spaccatrice dei tronchi sia
manovrata di due persone in modo tale, che una regge il
legno ed altra agisca agli accoppiamenti di fissaggio.
Istruzioni per il trasporto
Trasporto
Tute le spaccatrici dei tronchi sono dotate delle grandi ruote. In
fine al trasporto della spaccatrice prendere con una mano il
manicotto sulla colonna della spaccatrice e con la seconda
mano il manicotto sopra il motore, inclinare quindi la
spaccatrice verso se stesso. In tal posizione è possibile
manipolare la spaccatrice senza fatica.
Per evitare la perdita dell’olio idraulico, mai trasportare la
spaccatrice in posizione orizzontale.
Trasportandola abbassare sempre totalmente il cuneo da
spaccatura.
Pericoli residuali e misure di protezione
Avviso!!!
E’ severamente vietato escludere dalla funzione,
modificare, bloccare, smontare, cambiare qualsiasi parte
dei dispositivi di sicurezza e di protezione;
inadempimento di ciò può provocare le ferite pericolose
per la vita.
Il costruttore non assume la responsabilità dei danni
materiali e personali derivati da tale inosservanza.
Cade quindi per ogni trascuratezza sopra indicata ogni
diritto di garanzia verso il costruttore.
La spaccatrice può essere manovrata solo da unica
persona. Eliminare sempre dalla circostanza della
spaccatrice e dal luogo di lavoro durante l’esercizio tutti i
residui della legna che potrebbero bloccare oppure
degradare la funzione dei particolari di sicurezza e di
manovra.
Assistenza tecnica
Avete le domande tecniche? Contestazioni? Avete bisogno
dei ricambi oppure del Manuale d’Uso?
Sul nostro sito www.guede.com, nel settore Assistenza
tecnica, Vi aiuteremo velocemente ed in via non burocratica.
Ci dareste la mano, per favore, per poter aiutar Vi? Per poter
identificare il Vostro apparecchio nel caso di contestazione
abbiamo bisogno del numero di serie, cod. ord. e l’anno di
produzione. Tutte queste indicazioni troverete sulla targhetta
della macchina. Per avere questi dati sempre disponibili,
indicarli qui sotto, per favore:
N° serie:
Cod. ord.:
Anno di produzione:
Tel.: +49 (0) 79 04 / 700-360
Fax: +49 (0) 79 04 / 700-51999
E-Mail: support@ts.guede.com
Page 43

Dichiarazione di conformità CE
Dichiariamo con il presente noi,
Güde GmbH & Co. KG
Birkichstraße 6
74549 Wolpertshausen
Germania,
che la concezione e costruzione degli apparecchi sotto elencati, nelle realizzazioni che stiamo introducendo alla vendita, sono conforme
ai requisiti principali delle direttive CE sulla sicurezza ed igiene.
Nel caso della modifica dell’apparecchio da noi non autorizzata, la presente dichiarazione perde la propria validità.
Identificazione degli apparecchi: Spaccatrice dei tronchi 10T/DTS
Cod. ord.: 02040
Data/firma del Costruttore: 07.03.2012
Dati sul sottoscritto: Amministratore delegato, Sig. Arnold
Documentazione tecnica: J. Bürkle FBL; QS
Direttive CE applicabili:
2004/108/EG
2006/42/EG
Applicate norme armonizzate:
EN 609-1/A2:2009
EN 61000-3-3:1995+A1+A2
EN 61000-3-2:2006
EN 55014-2:1997+A1
EN 55014-1:2006
Rumorosità:
Lwa: 85,2 dB
Lpa: 69,9 dB
Ricerca dei guasti
Problemi
Possibili cause
Rimozione
Motore non parte
1. Manca la corrente nella presa
2. Cavo di prolunga difettoso
3. Cavo d’alimentazione difettoso
4. Interruttore, condensatore difettoso
1. Controllare l'interruttore di rete
2. Sconnettere la spina, controllare, sostituire
3. Allacciamento 5 fili con la sezione 2,5 mm
2
4. Far controllare l’apparecchio dall’elettricista
Scorretto senso dei giri
del motore
1. Connessione scorretta 1. Girare l'invertitore delle fasi nella spina
dell'apparecchio tramite il cacciavite.
Nessun movimento del
cuneo da spaccatura
1. Cambio posizione della leva di comando
dell’avviamento bimanuale
1. Controllare livello d’olio
Guasto della valvola di comando, far sostituire solo
dal CAT
La spacciatrice è senza la
potenza
1. Il senso dei giri scorretto.
2. Pochissimo l’olio idraulico
3. L’asta d’avviamento curvata, non avviene
la spinta totale dell’alzavalvola.
4. La legna molto annodata ed il cuneo da
spaccatura si blocca.
5. Braccio di manovra piegato.
1. Cambiare il senso dei giri.
2. Aggiungere l’olio idraulico
3. Controllare tutte le viti sul meccanismo
d’avviamento a barra
Spostare la barra di trazione (fig. 10/B); così
il pistoncino idraulico della valvola sarà spinto
dentro totalmente.
4. Trattare del grasso il cuneo spaccatura.
5. Portare il braccio di manovra in posizione iniziale.
Dopo essere premuto, il
pulsante verde non
rimane in posizione
1. Fusibile difettoso etc.
2. Marcia a 2 fasi.
1. Controllare il cavo
Pompa idraulica fischia,
il cuneo da spaccatura ha
corsa a scatti.
1. Perdita dell’olio, inquinamento del suolo
2. Livello dell’olio idraulico nel serbatoio
troppo basso
1. Serrare la filettatura
Cambiare i flessibili
2. Aggiungere l’olio idraulico
Page 44

Pericoli residuali meccanici
Pericolo Descrizione Azioni di protezione Pericolo residuale
Schiacciamento Durante la spaccatura, in discesa del
cuneo idraulico, può avvenire lo
schiacciamento oppure l’amputazione
delle parti di corpo.
C’è il pericolo dell’incuneamento della
legna da spaccare. Riguardare a
quello, che la legna dopo l’estrazione
rimane sotto la tensione alta e la
fessura può schiacciare le dita.
Utilizzare in ogni caso il dispositivo di manovra
bimanuale. Non intervenire al processo di
spaccatura.
Mai lavorare con apparecchio in due.
La legna incuneata solo battere. Attenzione alla
legna in caduta; può far male alle gambe.
L’attrezzo usurato oppure
difettoso deve essere
cambiato
immediatamente.
Attendersi alle persone
circostanti!
Durante lavoro utilizzare
la calzatura di sicurezza.
Taglio Durante la spaccatura, in discesa del
cuneo idraulico, può avvenire lo
schiacciamento oppure l’amputazione
delle parti di corpo.
Utilizzare in ogni caso il dispositivo di manovra
bimanuale. Non intervenire al processo di
spaccatura.
L’attrezzo usurato oppure
difettoso deve essere
cambiato
immediatamente.
Ferite in genere Lavorando la legna secca, la
spaccatura rapida può portare alle
gravi ferite.
I pezzi della legna originati nella
spaccatura possono cadere e far
male soprattutto ai piedi
dell’operatore.
La prolunga del cuneo da spaccatura
può battere contro il tavolo e causare
il danneggiamento dello stesso,
oppure la gravi ferite.
Mai intervenire al processo di spaccatura.
Mantenere sempre la distanza sufficiente.
Manovrare l’apparecchio sempre con
attenzione e pazienza.
Indossare sempre la tuta di protezione
prescritta e lavorare con attenzione.
Lavorando con apparecchio, usare sempre gli
occhiali di protezione.
Indossare sempre la tuta di protezione
prescritta e lavorare con attenzione.
Oltre la tuta da lavoro prescritta, utilizzare la
calzatura di sicurezza.
Prima di lavorare con la prolunga del cuneo da
spaccatura, smontare sempre la tavola.
L’attrezzo usurato oppure
difettoso deve essere
cambiato
immediatamente.
Attendersi alle persone
circostanti!
Afferramento,
avvolgimento
L’indumento largo, gioielli, capelli
possono essere presi dalle parti in
rotazione.
Portare sempre gli indumenti attillati, togliere i
gioielli e proteggere i capelli della retina.
Pericoli residuali elettrici
Pericolo Descrizione Azioni di protezione Pericolo residuale
Contatto
elettrico diretto
Il cavo oppure la presa difettosi
possono costituire la causa
dell’infortunio elettrico.
Il cavo e/o spina difettosi fa r sostituire sempre
da specialista. Utilizzare l’apparecchio solo con
interruttore di protezione alla corrente falsa
(F1).
Controllare il cavo
d’alimentazione prima di
ogni uso.
Contatto
elettrico
indiretto
Infortuni dalle parti conducenti e/o
elementi costruttivi difettosi.
Facendo la manutenzione sconnettere sempre
la spina. Utilizzare solo con interruttore di
protezione alla corrente falsa (FI).
Pericolo del rumore
Pericolo Descrizione Azioni di protezione Pericolo residuale
Danneggiamen
to dell’udito
Lavoro più lungo con apparecchio può
danneggiare l’udito.
Utilizzare sempre le cuffie.
Trascuratezza delle regole ergonomiche
Pericolo Descrizione Azioni di protezione Pericolo residuale
L’uso dei
mezzi di
protezione
personale
insufficiente
Utilizzo dell’apparecchio senza i mezzi
di protezione adatti può causare gravi
infortuni esterni ed interni.
Indossare sempre la tuta di protezione
prescritta e lavorare con attenzione.
Illuminazione
locale
insufficiente
Illuminazione insufficiente costituisce
alto rischio per la sicurezza.
Lavorando con apparecchio, assicurare sempre
l’illuminazione sufficiente.
Altri pericoli
Pericolo Descrizione Azioni di protezione Pericolo residuale
Oggetti gettati
e/o spruzzi dei
liquidi
Durante la spaccatura, i piccoli oggetti
meccanici possono ferire gli occhi.
Lavorando con apparecchio, usare sempre gli
occhiali di protezione.
Page 45

Jelzések a gépen
A jelzések magyarázata:
Ebben a használati utasításban és/vagy a gépen, az alábbi
jelzések vannak feltüntetve:
A gyártmány biztonsága:
A gyártmány megfelel az
illető EU normák
követelményeinek
Tilalmak:
Általános tilalom
(más piktogrammokkal együtt)
Tilos a gépbe nyúlni!
Tilos a kábelnél fogva kihúzni
a konektorból !
Védje eső és nyirkosság
ellen!!
A gépet kizárólag egy
személy kezelheti!
Figyelmeztetés:
Figyelmeztetés/vigyázz Vigyázz! Elbotlás veszélye!
Tartsa be a géptől a
biztonságos távolságot!
Vigyázz! Becsípés veszélye!
Vigyázz! Ehajított tárgyak
veszélye!
Figyelmeztetés! Kezek
sebesülési veszélye a hasító
kereszttel!
Figyelmeztetés veszélyes
villamos feszültség
VIGYÁZZ! Üzembehelyezés
előtt olvassa el a használati
utasítást!
Utasítások:
Használat előtt olvassa el a
használati utasítást!
Használat előtt ismerkedjen
meg a gép működésével
Viseljen védő szemüveget
fülvédőt!
Viseljen védő
munkakesztyüket!
Viseljen védő munkacipőt!
Környezetvédelem:
A hulladékot úgy semmisítse
meg, hogy ne ártson a
környezetnek.
A karton csomagolást át lehet
adni megsemmísítésre
speciális hulladékgyűjtőbe.
Hibás és/vagy rönkrement
villany, vagy elektromos
gépeket át kell adni az
illetékes hulladékgyűjtő
telepre.
Interseroh- Recycling
rendszer gyártási számmal
Csomagolás:
Védje nedvesség ellen!
Vigyázz – törékeny!
A csomagolást felállított
helyzetben tartsa!
Műszaki adatok:
Dugvilla A motor teljesítménye
Fordulatszám Hasító erő
A hasítandó fatönk max.
átmérője
A hasítandó fatönk max.
hossza
Az asztal mérete kb. Súly
Üzembehelyezés előtt,1
percig melegítse az olajat, az
egyik kezelő kar
lenyomásával!
A rönkhasító bekapcsolásakor
tartsa lenyomva a kezelő
karok egyikét!
Forgás irány
H
Mielőtt a gépet üzembehelyezi, kérem, olvassa el figyelmesen ezt a használati utasítást.
A.V. 2 Utánnyomást és részutánnyomást is jóvá kell hagyatni. Műszaki változások fenntartva.
Ez az eredeti használati utasítás!
Page 46

A gép leírása (1.ábra)
1. Markoló
2. Hasító kés
3. Tartó berendezés
4. Irányító kar
5. Markolófedél
6. Asztal tartó (elő)
7. Zablokování stolu
8. Hasító asztal
9. Kerekek
10. Kapcsoló / dugvilla
11. Löket beállító rúd
12. Motor
13. Védő berendezés
14. Tartó konzol (alsó burkolat)
15. Lemez csatlakozó
16. Ïrányítókar a fordítható asztalhoz
17. Fordítható asztal
Gép
Basic 10T/DTS rönkhasító
Nehéz, acél konstrukció, a hasító kés anyaga speciális acél,
az acél alkatrészek kiváló minőgű porfestéssel vannak ellátva,
professzionális hidraulikus szivattyú nehéz körülmények között
végzendő munkához, fordítható pót asztallal és leemelhető
alapasztallal ellátott mély, betolható rész. A motor
túlhevülés elleni biztosítékkal van ellátva.
Rendeltetés szerinti használat
A rönkhasító kizárólag egy kezelőszemélyre van dimenzálva.
Tilos a gépet egyszerre két, vagy több személynek kezelnie.
A rönkhasító kizárólag a faanyag rostok irányába való
vágására alkalmas. A szerelési, üzemeltetési, karbantartási,
javítási utasításokat szigorúan be kell tartani, hogy ki legyen
küszöbölve a kockázat és megakadályozza az esetleges károk
keletkezését. A fa hasításánál feltétlenül ügyeljen arra, hogy a
hasítandó fa kizárólag a hornyos lemezből készült tartó
berendezésbe, vagy a hasító asztal hornyos lemezére legyen
helyezve.
Tilos a géppel más munkát végezni, mint amire tervezve volt,
s melyeket a használati utasítás tartalmaz! Minden másféle
használat a rendeltetéssel ellenkező használatnak van
minősítve. A gyártó nem felelős az általános érvényességű
előírások, s a használati utasítás be nem tartása következtében
keletkezett károkért.
Jótállás
A jótállás kizárólag azokra a hibákra vonatkozik, melyeket az
anyag-, vagy a gyártási hiba idézett elő. A jótállási igény
benyújtása esetén mellékelje az eredeti, vásárlási dátummal
ellátott, számlát. A jótállás nem vonatkozik a szakszerűtlen
eljárás következtében beálló hibákra, pl. a berendezés
túlterhelése, erőszakos kezelése, a gép megrongálása idegen
behatás révén, vagy idegen tárgyakkal. Az esetben, ha a hibák
a használati, szerelési utasítás mellőzése, vagy normális
kopás eredményei, a jótállás erre sem vonatkozik.
Műszaki adatok
Csatlakozó: 400 V~50 Hz
Motorteljesítmény: 4000 W P1 / S6 40%
Motor fordulatszáma: 1440 ford./perc
Max. hasító erő: 10 tun
Max. hasító hengerlöket: 510 mm
Előrehaladási sebesség: 0,03 m/s
Hátrahaladási sebesség: 0,15 m/s
Hidraulikus olajtartály: 8 l (olajtipus: HLP 46)
A hasítandó rönk hossza: 1350 mm
Hasító oszlop: 120 mm x 120 mm
A hasítandó rönk max. átmérője: cca 400 mm
Az asztal méretei: Cca 380 x 300 mm
Súly: 177 kg
Megr.szám: 02040
Biztonsági utasítások
Általánosan
A gép üzembehelyezése előtt figyelmesen tanulmányozza át
a használati utasítást, s a gép kezelésékor feltétlenül tartsa be.
Kezelő személyzet
A rönkhasító használata bizonyos kockázattal jár. Ezért
kizárólag képzett és tapasztalt személyek dolgozhatnak,
vagy manipulálhatnak a géppel. A kezelő személyzet
testhez álló öltözéket és védő munkacipőt viseljen.
Munkahely
A biztonságos favágáshoz nélkülözhetetlen, hogy a
munkahely egyenes padlózatú legyen, mely lehetővé teszi
teste stabilitását és a szabad mozgást. A rönkhasító
áthelyezése alatt nagyon fontos, hogy ne legyenek útjában
akadályok. Kizárólag megfelelő megvilágítás mellett
dolgozhat.
Biztosítsa be, hogy munkahelyén ne tartózkodjanak
idegen személyek, resp. tartsák be a géptől a biztonságos
távolságot.
A munka előkészítése
Karbantartás, tisztítás és szerelés előtt, vagy ha a
rönkhasítótól eltávozik, kapcsolja ki a gépet az áramkörből a
dugvilla konektorból való eltávolításával. Nem elegendő az
áram megszakítására a gépen levő kapcsolót a
KIKAPCSOLVA helyzetbe tenni! A Güde rönkhasítók
általában edzett acélból készült hasító késekkel vannak
forgalmazva. Az esetben, ha ennek ellenére, nem látható
idegen anyagokat, pl. beton, acél, stb. tartalmazó tönk
hasítása után, a kés élén deformációt észlelne, távolítsa el
reszelő, vagy köszörű segítségével. A hasító kést tartsa éles
állapotban, ugyanis ezzel növeli a munka teljesítményét.
Ötlet: A hasító kést időnként kenje be zsiradékkal
(elősegíti a problematikus faanyag vágását).
A gép első és minden üzembehelyezése előtt,
feltétlenül ellenőrizze a biztonsági berendezés
üzemképességét (főleg kétkarú irányítás esetén).
VIGYÁZZ! Minden üzembehelyezés előtt ellenőrizze,
hogy a hasító asztal a rönkhasítóra biztonságosan fel
legyen erősítve.
Megsemmisítés
A berendezés megsemmisítése a gépen elhelyezett
piktogrammokból olvasható le. Az egyes jelzések értelmét a
„Jelzések“ fejezetben találja meg.
A csomagolás megsemmisítése
A csomagolás védi a gépet szállítás alatti megrongálódás
ellen. A csomagolás anyaga az ökológiai szempontok és
megsemmisítési lehetőségek szerint van kiválasztva, tehát
reciklálható. A csomagoló anyag körforgalomba való
visszatérése nyersanyagot spórol meg és csökkenti a hulladék
mennyiségét. A csomagoló anyag egyes részei (pl. fólia,
polisztirén), veszélyesek lehetnek gyerekek részére. Fulladás
veszélye fenyeget!
Követelmények a gép kezelőjére
A gép kezelője használat előtt figyelmesen olvassa el a
használati utasítást.
Szakképzettség
A gép használatához elegendő szakember felvilágosítása
resp. a használati utasítással való megismerkedés. Speciális
képzés nem szükséges
Minimális korhatár
A géppel kizárólag 18 éven felüli személyek dolgozhatnak.
Kivételt képez a fiatalkorúak foglalkoztatása szakképzés alatt,
az oktató felügyelete mellet, szakképzettség elsajátítása
érdekében.
Page 47

Szemle és karbantartás (2+7+8.ábra)
Kezelésre és karbantartásra vonatkozó biztonsági
utasítások:
Kizárólag rendszeresen karbantartott és kezelt gép lehet
megbízható segédeszköz. Elégtelen karbantartás és kezelés
előre nem látható balesetekhez és sérülésekhez vezethet.
• Tisztításhoz tilos agresszív tisztítószerek használata,
melyek megkárosíthatják, vagy tönkretehetik a
gépet.
• Távolítsa el a dugvillát a konektorból.
• Az elektromos berendezés javítását és karbantartását
kizárólag villamos szakember végezheti.
• Javítás és karbantartás után, a védő berendezéseket
azonnal vissza kell szerelni.
Tanácsaink (2.ábra):
• Hasító kés
A hasító kés gyorsan elkopó alkatrész, melyet szükség
esetén ki kell köszörülni. Ezzel növeli a hasító
teljesítményt és védi a rönkhasítót. TANÁCS: A hasító
kést időnként kenje be zsiradékkal!
• Kétkezes védő berendezés
A kombinált tartó és feszítő berendezésnek könnyen kell
járnia. Időnként kenje be néhány csepp olajjal.
• Hasító oszlop
A hasító oszlopot minden használat előtt kenje be
zsiradékkal, ezzel növeli a csúszó pofák (A./2.ábra)
élettartamát. A hasító oszlopot teljesen húzza ki és a
hasító oszlop mind a 4 oldalát, egyenletesen kenje be
univerzális zsiradékkal.
o Mozgó részek
A hasító kés vezetőt tartsa tisztán (szennyeződés,
szálkák, fakéreg, stb.nélkül). A csúszó léceket kenje be
zsiradékkal.
• Hydraulikus berendezés
A hydraulikus csatlakozókat és a csavarozást
ellenőrizze, hogy jól zárjanak és ne legyenek elkopva. A
csavarozást, szükség esetén, szorítsa be.
A hidraulikus olaj állapotának az ellenőrzése (7+8.ábra):
A hidraulikus olaj állapotát kizárólag hideg
állapotban ellenőrizze, ellenőrzés előtt távolítsa el a
tápkábelt az áramkörből és a hasító oszlopot tolja be.
Az olajmérő lécen 2 bevágás található. Az alsó bevágás
(8/1.ábra) a hidraulikus olaj minimális mértékét ábrázolja a
tartályban, a felső bevágás (8/2.ábra) a maximális
mennyiséget jelzi.
• Az olajmérő lécet (7/A.ábra) teljesen csavarozza ki a
nyílásból.
• Az olajmérő lécet törölje le tiszta, nem filces ruhával.
• Az olajmérő lécet teljesen csavarozza vissza a
nyílásba.
• Ezt követően a töltő kupakot a mérő léccel együtt, ismét
csavarozza ki és ellenőrizze, hogy a hidraulikus olaj
felső szintje a két bevágás között van-e.
Évente egyszer cserélje ki az olajat (7+8.ábra):
• Csavarozza le az olajkieresztő csavart (7/A.ábra).
• A kifolyó olajat engedje megfelelő edénybe (minden
tipusnál más az olaj mennyisége)
• A kifolyó olajat ökológikus módon semmisítse meg
• Az olaj kifolyása után a csavart újra csavarozza be. Az
olajtartályba nem szabad szennyeződési
részecskéknek kerülnie.
• A hidraulikus olajat töltse fel az olajmérő lécen lévő felső
bevágásig (8/2.ábra)
• A rönkhasítót néhányszor próbálja ki üresjáratban.
Ajánlott hidraulikus olaj: DIN ISO HLP 46
Güde megr. szám: 42004
Viszkózitás: 46
Olaj mennyiség: (Lásd. Műszaki adatok)
Az olajat kizárólag abban az esetben töltheti fel, ha a
rönkhasító oszlop behúzott állapotban van.
Hidraulikus berendezés:
A hidraulikus tömlőt és a csatlakozókat, minden 4 munkaóra
elteltével, ellenőrizni kell, be vannak-e szorítva, szükség
esetén szorítsa be.
Funkció ellenőrzés
A hidraulikus rönkhasítót üzemképes állapotban forgalmazzák.
Minden használat előtt ellenőrizze az alábbi funkciókat:
• Mindkét kapcsoló markolót hagyja lesüllyedni kb. 5 cm
asztal feletti magasságra.
• Váltakozva engedje el a markolókat, s a hasító kés az
illetékes helyzetben marad.
Irányítókarok, kerekek és az asztal
felszerelése(1.és 4.ábra)
Irányítókarok felszerelése - 1.ábra
Az irányítókart ( 1/4 ábra) vezesse be a tartó konzolon
elhelyezett furatba és fent erősítse le csavarral, alátéttel és
csapszeggel. Majd, a leírtak szerint erősítse fel az irányítókart
( 1/4.ábra) a másik oldalra is.
A két irányítókarra , a boltozatos védőket (1/13.ábra) két
hatszögű csavar (1/3.ábra) segítségével erősítse fel.
Ötlet: Ez előtt, a lemez csatlakozókat és az anyacsavart
(1/15.ábra),felülről és alulról, kenje be zsiradékkal.
A kerekek felszerelése - 4.ábra
Mindkét kereket szerelje fel és biztosítsa be csapszeggel (A).
Az asztal/ fordítható asztal felszerelése – 1.ábra
Az asztallapot heyezze a tartóba (1/6.ábra), s ezzel
egyidejüleg húzza be a blokkoló kart. Az esetben, ha az asztalt
meg akarja fordítani, a kart nyomja lefelé. A fordítható asztal
használatánál ügyeljen arra, hogy a kar minden esetben
aretálva legyen.
A löket beállítása (5.ábra)
Az 50 cm-nél kisebb, de nagyobb számú rönkök esetén, a
munka teljesítményét, a hasító kés ellenmozgási pályájának a
lerövidítésével növelheti.
Az alábbiak szerint járjon el:
A rönkhasító asztalára rövid rönköt állítson fel, s a hasító kést
állítsa be kb.2 cm-re a rönk fölé. A rönkhasítót kapcsolja ki
(a rönkhasítón lévő piros gomb segítségével és a dugvilla
konektorból való eltávolításával). Ezt követően, a
hozzáerősített rúd ( 5/B.ábra) segítségével csökkentheti az
ellenmozgást úgy, hogy a rudat a beállító csavar (5/A.ábra)
segítségével a kívánt helyen lerögzíti.
Használat
A berendezés kizárólag tüzifa hasítására használandó.
A hasítandó anyag megengedett méretei:
- Minimális átmérő: 125 mm
Maximális átmérő: 400 mm
- A fát kizárólag a szálak irányában szabad vágni.
- Az esetben, ha a fa görcsös, hasítás alatt beakadás
veszélye fenyeget.
- A beakadt fát, a rönkre való ütögetéssel szabadítsa ki
- Tilos a beakadt rönköt kivágni!
Elektromos/hidraulikus bekapcsolás
(1+6+7.ábra)
Áramkörbe való kapcsolás( 1/10.ábra)
A „CE“ szakmai szervezetek rendeletei alapján minden
rönkhasító el van látva kapcsolóba szerelt törpeáram
biztosítékkal, mely megakadályozza, hogy rövidzárlat,a
dugvilla véletlen kihúzása, hibás biztosítékok, stb. esetén, a
gép véletlenül bekapcsolódjon. A gépet, a zöld nyomógomb
segítségével lehet újra bekapcsolni.
Az esetben, ha a nullás vezeték hiányzik, a kapcsológomb
lenyomva tartása, resp. leblokkolása a kapcsoló automatikus
rövidzárlatához vezet. E helyzetzben, melyet későbben is be
lehet bizonyítani, elveszti jótállási jogait.
Page 48

Hydraulikus berendezések
A hidraulikus tömlőknél és csatlakozóknál, kb. 4
munkaóra után, ellenőrizni kell a tömítést, s szükség
esetén be kell szorítani.
Kizárólag a 400 V-os berendezéseknél: Ügyeljen a motor
forgásirányára (lásd a motoron lévő nyilakat),ugyanis
ellenkező irányú forgás az olajszivattyú
megrongálódásához vezet. Ebben az esetben elveszti
jótállási jogát. Szükség esetén, a forgásirányt, a dugvilla
pólusváltozásával kell megváltoztatni. Lásd. 6.ábra!
Hydraulikus olaj/tartály
Minden rönkhasítóba tölthet univerzális hidraulikus olajat (pl.
HLP 46, vagy hasonló viszkozitású olajat más gyártótól).
Olajcsere nem fontos.
A tartályt, minden üzembehelyezés előtt, légteleníteni kell
a töltő csavar ki-, s ezt követő, ismételt becsavarásával
( 7/A.ábra).
Üzemeltetés
Vigyázz: Ügyeljen arra, hogy , ha lehetséges,
vágáskor, a fára a fűrész derékszögben illeszkedjen rá, s a
fa biztonságosan ráilleszkedjen a hasító asztalra. Ferdén
vágott, vagy sok görcsöt tartalmazó fa lecsúszhat, esetleg
elhajlíthatja az irányító karokat.
A fát minden esetben helyezze az erre rendeltetett
helyre (asztal), soha ne a rámára. Ez a rönkhasító
megrongálódásához vezethet.
1. A zöld kapcsológomb segítségével kapcsolja be a motort.
Vigyázz: ügyeljen a motor forgásirányára!
2. Alacsony hőmérsékklet esetén hagyja a rönkhasítót
kb. 15 percig szabadfutásban, hogy az olaj
felmelegedjen a megfelelő hőmérsékletre.
3. A hasítandó anyagot helyezze az asztalra és tartsa a
karon lévő feszítő rátétek segítségével.
4. A két kar lefelé való nyomásával megkezdődik a hasítás.
(Mihelyt a hasító kés a fába kerül, a kart nyomja le és
egyidejüleg kissé hajtsa kifelé). Ezzel megakadályozza,
hogy a tartó lemezek meggörbüljenek (karok).
5. A hasítás befejezése után legalább az egyik kart emelje
fel, melynek eredményeként a rönkhasító oszlop
automatikusan felfelé húzódik.
Szigorúan tilos a rönkhasítót két személynek használni
úgy, hogy az egyik a fát tartsa, a másik a feszítő rátéteket
kezelje.
Szállítási utasítások
Szállítás
Minden rönkhasító nagy kerekekkel van ellátva. Az esetben,
ha a rönhasítót szállítani akarja, egyik kezével fogja meg a
hasító oszlop markolóját, másik kezével a motor feletti
markolót, s a rönkhasítót döntse kissé maga felé. Ebben a
helyzetben a rönkhasítóval, minden erőfeszítés nélkül,
haladhat.
Annak éredkében, hogy megakadályozza az olaj
kifolyását, soha nem szabad a rönkhasítót lefektetett
helyzetben szállítani.
Szállítás közben a hasító kést teljesen engedje le.
Maradékveszély és óvintézkedések
Figyelmeztetés!!!
Szigorúan tilos a gép biztonsági és védő berendezéseit
üzemen kívül helyezni, megváltoztatni, leblokkolni,
leszerelni , átszerelni, s ennek be nem tartása komoly,
resp. életveszélyes baleseteket idézhet elő.
Az anyagi, személyi károkért, melyek ilyen felelőtlen
viselkedés eredményei, a gyártó nem vállalhat
felelősséget, s az illető elveszti jótállási jogait.
A rönkhasítót kizárólag egy személy kezelheti. A
rönkhasító körül, a munkahelyen, üzemeltetés alatt,
távolítsa el a fa maradékait, melyek leblokkolhatják, vagy
negativ irányban befolyásolhatják a gép biztonsági és
irányító berendezéseit.
Szerviz
Vannak műszaki kérdései? Reklamáció? Szüksége van
pótalkatrészekre, vagy használati utasításra?
Honlapunkon www.guede.com a Szerviz fejezetben
gyorsan és bürokráciát kizárva segítségére leszünk.
Alternatív elérhetőségünk: E-mail:support@ts.guede.com
Segítsenek, hogy segíthessünk Önöknek. Ahhoz, hogy
esetleges reklamáció esetén berendezését identifikálhassuk,
szükségünk van a széria számra, megrendelési számra és a
gyártási évre. Ezeket az adatokat megtalálja gépe
típuscímkéjén. Annak érdekében, hogy ezek az adatok
állandóan a keze ügyében legyenek, kérem, írja be az alábbi
táblázatba.
Széria szám:
Termékszám:
Gyártási év:
Tel.: +49 (0) 79 04 / 700-360
Fax: +49 (0) 79 04 / 700-51999
E-Mail: support@ts.guede.com
Page 49

EU AZONOSSÁGI NYILATKOZAT
Ezennel, mi a
Güde GmbH & Co. KG
Birkichstraße 6
74549 Wolpertshausen
Germany
kijelentjük, hogy az alábbiakban megjelölt gépipari termék, koncepciója és tervezése, az általunk forgalomba kerülő kivitelezésben,
megfelel az EU illetékes biztonsági és higiéniai szabályzatok alapkövetelményeinek.
A gépen, a velünk való konzultáció nélkül végzett változások esetén, a jelen nyilatkozat érvényét veszti.
A gép jelzése: Basic 10T/DTS rönkhasító
Megr.szám: 02040
Dátum/a gyártó aláírása: 07.03.2012
Az aláíró személy adatai: Arnold úr, ügyvezető igazgató
Műszaki dokumentáció: J. Bürkle FBL; QS
Illetékes EU előírások:
2004/108/EG
2006/42/EG
Használt harmonizált normák:
EN 609-1/A2:2009
EN 61000-3-3:1995+A1+A2
EN 61000-3-2:2006
EN 55014-2:1997+A1
EN 55014-1:2006
Zajosság
Lwa: 85,2 dB
Lpa: 69,9 dB
Üzemzavarok megállapítása
Üzemzavar Lehetséges okok Eltávolítás
A motor nem indul meg
1. A konektorban nincs feszültség
2. Hibás hosszabbító kábel
3. Hibás tápkábel
4. Hibás kapcsoló, kondenzátor
1. Ellenőrizze az áramkör biztosítását.
2. Húzza ki a dugvillát, ellenőrizze, cserélje ki
3. 5 eres csatlakozó kábel, átmérője 2,5 mm
2
4. A gépet ellenőriztesse szakemberrel.
A motor rossz irányban
forog
1. Hibás bekapcsolás 1. A fázisváltót,a gép dugvillájában, csavarhúzó
segítségével fordítsa meg
A hasító kés nem mozog
1. A kétkezi indító kar át lett állítva 1. Ellenőrizze az olaj állapotát
A hibás szabályozó szelepet cseréltesse ki
szervizban
A rönkhasítónak nincs
teljesítmény e
1. Nem megfelelő forgásirány
2. Kevés a hidraulikus olaj
3. Az indító rúd el van görbülve; a szelep
hidraulikus emelője nincs teljesen
lenyomva
4. A faanyag nagyon görcsös, a hasító kés
beakad
5. Az irányító kar meg van hajlítva
1. Változtassa meg a forgásirányt
2. Töltse fel a hidraulikus olajat
3. Ellenőrizze az indító rúd mechanizmuson a
csavarokat
Állítsa át a húzó rudat (10/B.ábra), s így a
szelep hidraulikus emelője visszanyomódik.
4. A hasító kést kenje be zsiradékkal.
5. Az irányítókart helyezze a kiinduló helyzetbe.
A zöld kapcsológomb,
lenyomás után, nem
marad lenyomott
állapotban
1. Hibás biztosíték, stb.
2. 2 fázisos menet
1. Ellenőrizze a kábelt
A hidraulikus szivattyú
fütyülő hangot ad ki,
a hasító kés szaggatottan
jár
1. Olaj veszteség, szennyezett padlózat
2. A tartályban kevés a hidraulikus olaj
1. Szorítsa be a csavarokat
Cserélje ki a tömlőt
2. Töltse fel a hidraulikus olajat
Page 50

Mechanikai maradékveszélyek
Veszélyezte
tés
Leírás Óvintézkedések Maradékveszélyek
Becsípés
Hasítás közben, a hidraulikus
kések, a lefelé haladás
következtében, becsípheti, vagy
amputálhatja testrézszeit
Fennáll az a kockázat, hogy a rönk
beakad. Kérem, ügyeljen arra, hogy
a kiszabadított rönk magas
feszültség alatt áll, s így a
keletkezett nyílásba becsípheti az
ujjait.
A gépet kizárólag két kézzel kezelje.
Ne avatkozzon bele a hasító folyamatba.
Soha ne dolgozzon a géppel két személy.
A beakadt fát ütögetéssel szabadítsa ki.
Vigyázz, a leeső fa megsebesítheti a lábait.
Elkopott, vagy
megrongálódott
alkatrészeket azonnal ki
kell cserélni újra.
Vigyázz a közelben lévő
személyekre!
Munka közben viseljen
biztonságos munkacipőt
Vágás Hasítás közben, a hidraulikus
kések, a lefelé haladás
következtében, becsípheti, vagy
amputálhatja testrézszeit
Feltétlenül kétkezes biztonsági kezelést
végezzen.
Ne avatkozzon bele a hasító folyamatba
Elkopott, vagy
megrongálódott
alkatrészeket azonnal ki
kell cserélni újra.
Általános
balesetek
Szárazfa megdolgozásakor a gyors
hasítás komoly baleseteket idézhet
elő.
A fa hasítása közben keletkezett
darabok leeshetnek és
megsebesíthetik a kezelő személy
lábait.
A meghosszabbított hasító ék
beszaladhat az asztalba, ami a gép
megrongálódásához és a kezelő
személy komoly sérüléséhez
vezethet.
Ne avatkozzon bele a hasító folyamatba
Tartsa be a géptől a biztonságos távolságot.
A gépet mindig óvatosan és figyelmesen
kezelje.
Feltétlenül viselje az előírt munkaruhát és
dolgozzon figyelmesen.
Munka közben viseljen védő szemüveget.
Feltétlenül viselje az előírt munkaruhát és
dolgozzon figyelmesen.
Viselje az előírt munnkaruhához tartozó
munkacipőket is.
A meghosszabbított hasító ékkel való munka
előtt szerelje le az asztalt.
Elkopott, vagy
megrongálódott
alkatrészeket azonnal ki
kell cserélni újra.
Vigyázz a közelben lévő
személyekre!
Bekapás,
felcsavarás
Bőöltözékét, ékszereit, hosszú haját
a gép forgó részei bekaphatják.
Kizárólag testhez álló öltözéket viseljen, ne
viseljen ékszereket és hosszú haját fogja
hálóba.
Elektromos maradékveszélyek
Veszélyezte
tés
Leírás Óvintézkedések Maradékveszélyek
Közvetlen
kontaktus árammal
Hibás kábel, vagy dugvilla
áramütést okozhat.
A hibás kábeleket és dugvillát cseréltesse ki
szakemberrel. A gépet kizárólag hibaáram
elleni védőkapcsolóval használhatja (FI)
Minden használat előtt
ellenőrizni kell a tápláló
kábelt.
Nem közvetlen
kontaktus árammal
Fedetlen, vagy hibás konstrukciós
elemek áramvezető részei által
kiváltott áramütés
Karbantartás alatt feltétlenül távolítsa el a
dugvillát a konektorból .
A gépet kizárólag hibaáram elleni
védőkapcsolóval használhatja (FI)
Veszélyeztetés zajjal
Veszélyezte
tés
Leírás Óvintézkedések Maradékveszélyek
Hallószervek
megrongálása
Hosszú idejű munka a géppel
megrongálhatja hallását.
Viseljen fűlvédő berendezést.
Az ergonómiei elvek mellőzése
Veszélyezte
tés
Leírás Óvintézkedések Maradékveszélyek
A személyi védő
segélyeszközök
viselésének az
elhanyagolása
A gép kezelése a megfelelő
személyi védőeszközök viselése
nélkül komoly belső és külső
sebesülésekhez vezethet.
Viselje az előírt megfelelő személyi
védőeszközöket és dolgozzon figyelmesen.
Megfelelőtlen helyi
megvilágítás
Az elégtelen helyi megvilágítás,
rossz látási viszonyok, magas
biztonsági veszéllyel járnak.
A géppel folytatott munka közben megfelelő
világítást, ill. látási viszonyokat biztosítson be.
További veszélyeztetések
Veszélyezte
tés
Leírás Óvintézkedések Maradékveszélyek
Elhajított tárgyak
és fröccsenő
folyadékok
Hasítás közben a felszabadult
mechanikus részecskék
megsérthetik a szemeit.
A géppel való munka közben viseljen védő
szemüveget.
Page 51

Oznake na napravi
Legenda simbolov
V tem navodilu za uporabo ali na stroju se nahajajo sledeči
simboli:
Varnost izdelka:
Naprava odgovarja
standardom EU
Prepovedi:
Splošna prepoved
(skupaj z drugim ideogramom)
Ne dotikajte se z rokami
notranjih delov
Ne vtiča za kabel Zaščitite pred vlago in dežjem
Napravo lahko uporabljajo le
ena sama oseba.
Opozorilo:
Opozorilo/previdno Opozorilo! Nevarnost spotike!
Upoštevajte ustrezno
varnostno razdaljo!
Opozorilo! Nevarnost
stiskanja!
Opozorilo! Leteči predmeti!
Opozorilo! Poškodbe rok s
cepilnim križem!
Opozorilo pred nevarnostjo
električnega udara.
POZOR! Pred uporabo
natančno preberite navodila
za uporabo
Ukazi:
Pred uporabo natančno
preberite navodilo za uporabo
Uporabljajte zaščitna očala in
zaščito za sluh!
Uporabljajte varnostne
delovne rokavice.
Uporabljajte varnostne čevlje!
Varovanje bivanjskega okolja:
Odpadke odvrzite odgovorno -
ne škodujte bivanjskemu
okolju
Kartonski ovitek je namenjen
za reciklažo, zato ga odnesite
v surovino.
Poškodovane in/ali dotrajane
električne naprave oddajte v
surovino ali odložite na
ustrezno mesto.
System Interseroh- Recycling
s serijsko številko
Ovitek:
Zavarujte pred vlago!
Pozor – krhko!
Ovitek mora stati navpično.
Tehnični podatki:
Priključek Zmogljivost motorja
Vrtljaji Cepilna moč
Maks. premer cepljenega lesa Maks. dolžina cepljenega lesa
Velikost mize ca. Teža
Pred uporabo ogrevajte olje 1
minuto – pritisnite en zaščitni
lok.
Ob vklopu cepilne naprave
pritisnite in držite mehansko
roko.
Smer vrtenja
SLO
Pred uvedbo naprave v pogon natančno preberite priložena navodila za uporabo.
A.V. 2 Ponatis priročnika ali njegovih posameznih delov je možen po dogovoru s proizvajalcem. Tehnične spremembe
pridržane. Ilustrativne slike! To so originalna navodila za uporabo.
Page 52

Opis naprave (slika 1)
1. Ročaj
2. Rezilo
3. Pritrdilna plošča
4. Delovni mehanizem
5. Pokrov ročaja
6. Držaj mize (spredaj)
7. Fiksiranje mize
8. Miza cepilnika
9. Kolesa
10. Stikalo / vtič
11. Vzvod za nastavitev dviga
12. Motor
13. Zašpitni lok
14. Stikalna zibelka (spodnji pokrov)
15. Pločevinasta sklopka
16. Ročica za vrtljivo mizo
17. Vrtljiva miza
Naprava
Cepilnik polen Basic 10T/DTS
Masivna jeklena konstrukcija, cepilno rezilo iz posebnega
jekla, vsi jekleni deli so premazani s kakovostno praškasto
barvo, profesionalna hidravlična črpalka za uporabo v oteženih
pogojih dela, globok premični del z dodatno vrtljivo mizo in
temeljno mizo, ki se jo da sneti. Motor z varovalko proti
pregrevanju.
Uporaba v skladu z namenom
Cepilnik polen je dimenzioniran samo za delovanje z 1 osebo.
Nikoli ne smejo uporabljati stroja dve ali več oseb hkrati.
Cepilnik je namenjen izključno za cepljenje drv po vlaknu.
Dosledno upoštevajte napotke za montažo, delovanje,
vzdrževanje, ker se boste s tem preprečili morebitne
nevarnosti in posledične škode. Pri cepljenju pazite, da bo
cepljen les nameščen samo na valoviti pločevini prislonske
plošče oz. na valoviti pločevini delovne mize cepilnika.
Ta naprava služi izključno za dela, za katera je bila
skonstruirana in ki so opisana v teh navodilih za uporabo.
Vsakršna uporaba v drug namen je prepovedana. Proizvajalec
ne odgovarja za posledične škode. Ne pozabite, da naši izdelki
niso konstruirani za industrijsko pač pa samo za privatno rabo.
Garancija
Garancija velja samo za tovarniške napake oz. napake na
materialih, iz katerih je naprava izdelana.
Za morebitna popravila v okviru garancije vedno priložite
veljaven račun, ki mora vsebovati datum prodaje in podpis
prodajalca. Garancija ne velja, v kolikor napravo uporablja
strokovno neusposobljena oseba, ali če pride do okvare zaradi
nestrokovnega posega v napravo ali v stiku s tujki.
Neupoštevanje navodil za uporabo in montažo ter obraba
naprave z običajno uporabo prav tako ne spada v sklop
garancije.
Tehnični podatki
Priključek: 400 V~50 Hz
Zmogljivost motorja: 4000 W P1/ S640%
Vrtljaji motorja: 1440 vrt./min
Maks. cepilna moč: 10 ton
Maksimalni dvig med cepljenjem. 510 mm
Hitrost premika naprej: 0,03 m/s
Hitrost premika nazaj: 0,15 m/s
Rezervoar za hidravlično olje: 8 l (vrsta olja: HLP 46)
Dolžina cepljenih polen: 1350 mm
Cepilni steber: 120 mm x 120 mm
Maks. premer cepljenega lesa: ca. 400 mm
Dimenzije delovne mize: Ca. 380x300 mm
Teža: 177 kg
Kataloška številka: 02040
Varnostni napotki
Splošne informacije
Predvsem zaradi vaše varnosti boste morali upoštevati tudi
varnostne napotke, ki so zajeti v tem navodilu za uporabo ter
opozorila na napravi, ki jih boste potrebovali pri uporabi,
vzdrževanju in popravljanju stroja.
Strežno osebje
Uporaba te naprave je povezana z veliko nevarnostmi.
Zato jo lahko uporabljajo le izurjene osebe, ki imajo
z uporabo le-te dovolj izkušenj. Strežno osebje naj
uporablja ozko in prilegajočo obleko in zaščitne čevlje.
Delovni prostor
Za varno cepljenje drv je zelo pomembno, da je delovni prostor
raven in mora biti dovolj velik, da osebam omogoča prosto
gibanje. Pri prenašanju in odnašanju naprave vedno odnesite
s seboj ostanke materiala, tako da ne ovirajo na poteh.
Delovno mesto mora biti dobro osvetljeno.
Vse druge osebe (v kolikor po dogovoru ne stojijo v
varni razdalji) imajo vstop na delovno mesto prepovedan.
Priprava dela
Preden zapustite napravo, oz. pred vzdrževanjem ali
popravljanjem vedno pritisnite na rdeči gumb na stikalu in
izvlecite vtič iz vtičnice na zidu – prekinite dovod el. energije.
Samoten izklop s stikalom v položaj IZKLJUČENO ni
dovolj. Naprave GÜDE se dobavljajo izključno s trdimi
cepilnimi rezili. V kolikor cepite drva, ki vsebujejo tujke kot npr.
kosi betona, jekla itd. jih vedno najprej odstranite;
poškodovano rezilo zbrusite s pilo a z brusilnim strojem. Rezila
naprave naj bodo vedno ostra, da bo delovna zmogljivost
stroja zadovoljiva.
NAMIG: Rezilo občasno namažite z mazivom (posebej pri
rezanju tršega ali problematičnega lesa).
Pred prvo uvedbo naprave v pogon preverite
delovanje varnostnih naprav (predvsem pri dvoročni
uporabi).
POZOR! Pred vsakršno uvedbo naprave v pogon se
prepričajte, da je cepilna miza na napravi trdno privita.
Odstranjevanje
Napotki za odstranjevanje izhajajo iz ideogramov, ki se
nahajajo na napravi oziroma na ovitku. Njihov pomen je
razložen v poglavju »Oznake na napravi«.
Način odstranjevanja ovitka
Ovitek ščiti napravo, da se med transportom ne poškoduje.
Ovitek izbiramo glede na način njegove ponovne uporabe ali
načina odlaganja. Večinoma je embalaža namenjena za
reciklažo. Ponovna uporaba ovitka kot surovine zmanjšuje
stroške nastale z odstranjevanjem odpadkov. Deli ovitka (npr.
folije , Styropor
®
), so lahko nevarni za otroke. Obstaja
nevarnost zadušitve! Dele ovitka shranjujte izven dosega
majhnih otrok; čimprej jih odstranite.
Zahteve, ki jih mora spolnjevati uporabnik
Uporabnik je pred uporabo naprave dolžan natančno prebrati
navodilo za uporabo.
Izobrazba
Za uporabo ni potrebna nobena posebna izobrazba, razen
strokovnih napotkov v zvezi z uporabo naprave.
Minimalna starost
Mladoletniki lahko uporabljajo napravo, ko dopolnijo 18. leto
starosti. Izjema so mladoletniki, ki se kot vajenci udeležijo del z
namenom, da se naučijo pravilne uporabe; morajo pa biti pod
stalnim nadzorom učitelja.
Page 53

Pregledi in vzdrževanje (slika 2+7+8)
Varnostni napotki za preglede in vzdrževanje:
Le redno vzdrževana in dobro negovana naprava lahko
zanesljivo služi svojemu namenu. Nezadostno ali neredno
vzdrževanje in nega lahko povzroči nepričakovane nezgode ali
poškodbe.
• Za čiščenje nikoli ne uporabljajte jedka čistilna
sredstva. Lahko poškodujete ali uničite napravo.
• Izvlecite vtič iz vtičnice.
• Popravila in vzdrževanje električne opreme naj izvaja
izključno le za to usposobljena oseba (električar).
• Vse zaščitne in varnostne naprave montirajte na svoje
mesto takoj, ko dokončate servisna ali vzdrževalna dela
na napravi.
Priporočamo Vam (slika 2):
• Rezilo
Cepilni nož je hitro potrošni del (se obrabi), ki se ga po
potrebi mora zadostno nabrusiti. To poveča zmogljivost
cepljenja in varuje napravo. Namig: Cepilni klin
namažite z mazivom!
• Zaščitna naprava za obe roki
Kombiniran sistem za držanje in vpenjanje mora delovati
nemoteno. Občasno namažite z nekaj kapljicami olja.
• Cepilni steber
• Pred vsako uporabo namažite steber naprave, da s tem
podaljšate življenjsko dobo drsnih čeljusti (slika 2/A).
Cepilni steber postavite ven i na vse 4 strani cepilnega
stebra nanesite univerzalno mazivo.
• Premični deli
Napeljava cepilnega noža mora biti čista (umazanija,
iveri, skorja itd.) Drsne letve namažite z mazivom.
• Hidravlični sistem
Hidravlične priključke in vijačne spoje preverite če so
zatesnjeni ali obrabljeni. Vijačne spoje po potrebi privijte.
Kontrola stanja hidravličnega olja (slika 7+8):
Stanje hidravličnega olja preverjajte, kadar je
naprava hladna in z izvlečenim priključkom ter spuščenim
cepilnim stebrom.
Na oljni merici se nahajata dve zarezi, spodnja (slika 8/1)
predstavlja mejo za minimalno količino hidravličnega olja v
rezervoarju, zgornja zareza (slika 8/2) za maksimalno količino.
• Oljno merico (slika 7/A) popolnoma odvijte iz odprtine.
• Olje iz merice obrišite z mehko krpo, ki ne pušča muck.
• Merico ponovno navijte v odprtino do konca.
• Nato polnilni vijak z merico ponovno odvijte in preverite,
če se zgornja meja hidravličnega olja nahaja med
obema navedenima zarezama.
Enkrat na leto zamenjajte olje (slika 7+8):
• Vijak za dolivanje olja je popustite (slika 7/A).
• Izrabljeno olje prestrezite (vrsta olja se od modela do
modela razlikuje)
• Dotrajano olje odstranite na ekološki način!
• Vijak za izpuščanje olja ponovno privijte. V oljni
rezervoar ne sme pasti nobena nečistoča.
• Hidravlično olje nalijte do zgornje zareze na merici (slika
8/2)
• Cepilec drv večkrat na prazno preizkusite, če deluje.
Priporočeno hidravlično olje: DIN ISO HLP 46
Kataloška številka Güde: 42004
Viskoznost: 46
Količina olja: (glej Tehnične
podatke)
Olje dolivajte le, če je steber naprave pospravljen!
Hidravlični sistem:
Hidravlične cevi in spoji morajo biti približno po 4 delovnih urah
preverjene če so zatesnjene; zategnite jih, če je potrebno.
Preverjanje delovanja:
Hidravlični cepilec za les se dobavlja v montiran za takojšnjo
uporabo. Pred vsako uporabo preverite tovrstno kontrolo
delovanja.
• Oba stikalna ročaja pustite, da se spustita dol in cepilni
nož približno 5 cm nad mizo
• Vedno spustite en stikalni ročaj, cepilni nož se bo
zaustavil v izbranem položaju.
Montaža delovnega mehanizma, koles in mize
(glej sliko 1 in 4)
Montaža delovnega mehanizma – slika 1
Upravljalna roka (slika 1/4) napeljite v stikalno zibelko (slika
1/14) in zgoraj fiksirajte z vijakom, podložko in razcepko. Sedaj
pritrdite upravljalno roko (slika 1/4) tako, kot je opisano na
drugi strani. Zaščitni loki (sika 1/13) na obeh upravljalnih rok
montirajte vedno s pomočjo 2 šestkotnih vijakov (slika 1/3).
NAMIG: Predtem od zgoraj in od spodaj namažite z
mazivom pločevinaste spojke in matice (slika 1/15)!
Montaža koles – slika 4
Montirajte na obeh straneh vrtljivo kolo in obe fiksirajte z
razcepko (A).
Montaža mize/vrtljive mize - slika 1
Ploščo mize namestite v nosilec (slika 1/6) istočasno povlecite
ročaj za blokiranje.
Da obrnete vrtljivo mizo pritiskajte ročico navzdol. Pri uporabi
vrtljive mize pazite na to, da bo ročica vedno pravilno fiksirana.
Nastavitev dviga (slika 5)
Za večjo količino manjših polen (pod 50 cm),
lahko povečate delovno zmogljivost naprave,
če skrajšate povratno smer rezila.
Ravnajte takole:
Na mizo naprave položite kratek kos lesa in cepilni
klin spustite približno 2 cm nad poleno. Izklopite cepilnik
(rdeči gumb na stikalu in izvlecite vtič iz
vtičnice). Sedaj lahko skrajšate s pomočjo pritrjene palice
(slika 5/B) povratni sunek tako, da lahko palico s pomočjo
ustavljalnega vijaka (slika 5/A) fiksirate na zahtevani višini.
Področje uporabe
Naprava služi in je njena uporaba dovoljena izključno za
obdelovanje lesenega kuriva. Material, ki ga cepite mora imeti
sledeče dimenzije:
- Minimalni premer: 125 mm
Maksimalni premer: 400 mm
- Dovoljeno je le cepljenje drva po vlaknih.
- Če les vsebuje grče, obstaja nevarnost, da se pri
cepljenju lahko stroj zagozdi.
- Da izbijete zagozden komad lesa, tolcite z drugim
predmetom ali kladivom nanj.
- Rezanje zagozdenega lesa na komade je prepovedano!
Priključitev električnih/hidavličnih delov (slika
1 in 7)
Priključitev na omrežje (slika 1/10)
V skladu z določili strokovnih ogranizacij »CE« itd., so vse
naprave opremljene s podnapetostnim varovalom v stikalu. To
preprečuje samodejni zagon stroja v primeru, če se prekine
tokokrog zaradi pomanjkanja električnega toka, pri izpadu vtiča
iz vtičnice, okvari na varovalki itd.. V teh primerih morate
napravo vedno ponovno vključiti s pritiskom na gumb za vklop.
V kolikor pritisnete na stikalo za vklop in ga držite dalj časa (če
je napaka na prevodniku »0«) se stikalo takoj samodejno spet
izklopi. V tem primeru, ki je dokazljiv, preneha veljati garancija.
Hidravlični sistem
Hidravlične cevi in spoje preverite po približno 4 urah
delovanja naprave in jih privijte (zatesnite), če je potrebno.
Page 54

Samo za naprave 400 V: Obvezno preverite smer vrtenja
motorja (glejte puščico na motorju), kajti delovanje v
nasprotni smeri zelo škoduje oljni črpalki. V tem primeru
preneha veljati vsaka garancija in pravice, ki izhajajo iz
nje. Po potrebi spremenite smer vrtenja z zamenjavo
kablov na vtiču. Glej sliko 6!
Hidravlično olje / rezervoar
V vse naprave lahko nalivate običajno hidravlično olje (npr.
HLP 46 ali mazivo drugega proizvajalca enake viskoznosti).
Zamenjava olja ni potrebna.
Iz rezervoarja izpustite zrak pred vsako uporabo – odvijte
in ponovno privijte s polnilnim vijakom (slika 7/A).
Delovanje
Opozorilo: Pri tem pa les po možnosti režite pod
pravim kotom, tako da se natančno prilega na cepilno
mizo. Poševno narezan in zelo grčav les lahko zdrsne
oziroma upogne delovni mehanizem.
Les odlagajte vedno le na za to namenjeno ploskev
(mizo), ne na okvir naprave. S tem se cepilnik lahko
poškoduje.
1. Z zelenim gumbom vključite motor. Opozorilo: poskrbite
za pravilno smer vrtenja motorja.
2. Pri nižjih temperaturah pustite cepilnik 15 minut
delovati na prazno, da se olje ogreje na želeno
temperaturo.
3. Cepljen material postavite na mizo in ga s pomočjo
pritrdilnih deščic pridržite na vzvodu.
4. Pritisnite obe ročici navzdol in pričnice s cepljenjem.
(Takoj, ko cepilni klin prodre v les, vzvod potisnite
navzdol in na rahlo nagnite navzven. S tem boste
preprečili upogib pritrdilnih plošč (ramen).
5. Po končanem cepljenju dvignite vsaj eno ročico, stebrič
naprave se samodejno premakne navzgor.
Naprave ne smeta uporabljati dve osebi naenkrat; v
nobenem primeru ne sme ena oseba držati materiala
druga pa ga fiksirati s pritrdilnimi deščicami.
Napotki glede transporta
Transport
Vse naprave so opremljene z velikimi kolesi. Če želite napravo
premestiti, primite z eno roko ročaj na stebru naprave, z drugo
roko pa ročaj nad motorjem in napravo rahlo nagnite proti sebi.
V tem položaju lahko napravo brez težav premikate.
Da preprečite iztekanje hidravličnega olja, nikoli ne
premeščajte odložene naprave.
Pri premeščanju spustite rezilo povsem navzdol.
Sekundarne nevarnosti in varnostni ukrepi
Opozorilo !!!
Strogo so prepovedani posegi, ki bi lahko posledično
negativno vplivali na zdravje uporabnika, predvsem zaradi
morebitnih poškodb, ki jih povzročajo. Le-ti so: nepravilno
delovanje, spreminjanje, blokiranje, demontiranje,
rekonstrukcija, montaža dodatnih delov na varnostni
sistem stroja itd..
Za telesne poškodbe in materialne škode, nastale zaradi
zgoraj navedenih posegov, proizvajalec ne odgovarja.
Iz istih tj. zgoraj navedenih vzrokov pa ne velja niti
garancija, ki jo sicer za svoje izdelke daje proizvajalec.
Cepilnik lahko uporablja le ena sama oseba. Delovno
okolje naprave mora biti vedno čisto: redno odstranjujte
ostanke lesa in polena, ki bi lahko negativno vplivali na
varno delovanje in upravljanje naprave.
Servis
Ali imate tehnična vprašanja? Reklamacijo? Ali potrebujete
rezervne dele ali nova navodila za uporabo?
Na naši spletni strani www.guede.com Vam bomo v oddelku
Servis hitro pomagali. Pomagajmo si vzajemno in hitro. Da
lahko Vašo napravo v primeru reklamiranja identificiramo,
pošljite nam serijsko številko, kataloško št. in leto izdelave.
Vse te podatke boste našli na tipski etiketi izdelka. Vse
navedene podatke prosim vnesite tu, da jih imate pri roki:
Serijska številka:
Kataloška številka:
Leto izdelave:
Telefon: +49 (0) 79 04 / 700-360
Telefaks: +49 (0) 79 04 / 700-51999
E-pošta: support@ts.guede.com
Page 55

Izjava o ustreznosti EU
S tem izjavljamo,
Güde GmbH & Co. KG
Birkichstraße 6
74549 Wolpertshausen
Nemčija
da koncepcija in zgradba spodaj navedenih naprav v izvedbah, ki jih uvajamo na trg, odgovarja osnovnim zahtevam smernic EU za
varnost in higieno.
V primeru spremembe naprave, o kateri se niste posvetovali z nami, ta izjava izgubi svojo veljavnost.
Oznake na napravah: Cepilnik polen Basic 10T/DTS
Kat. št. 02040
Datum/podpis proizvajalca: 07.03.2012
Podatki o podpisniku: direktor, gospod Arnold
Tehnična dokumentacija: J. Bürkle FBL; QS
Ustrezne smernice EU:
2004/108/EG
2006/42/EG
Uporabljeni usklajeni standardi:
EN 609-1/A2:2009
EN 61000-3-3:1995+A1+A2
EN 61000-3-2:2006
EN 55014-2:1997+A1
EN 55014-1:2006
Hrupnost:
Lwa: 85,2 dB
Lpa: 69,9 dB
Morebitne okvare
Težave
Možni vzroki
Rešitev
Motor se ni vključil.
1. V vitčnici ni toka
2. Podaljševalni kabel je poškodovan
3. Nepravilen električni nabel
4. Stikalo ali kondenzator v okvari
1. Preverite varovalko omrežja
2. Izvlecite vtič iz vtičnice, preverite in zamenjajte z
novo
3. Priključek 5 žil, pri prerezu 2,5 mm
2
4. Stroj pustite da ga preveri električar
Napačna smer vrtenja
motorja
1. Napačna priključitev 1. Izmenjevalec faz obrnite v vtičnici naprave z
izvijačem
Cepilni nož se ne premika
1. Premestitev vzvoda z obojeročnim
stikalom.
1. Preverite stanje olja
Upravljalni ventil je pokvarjen, popravilo
prepustite serviserju
Cepilnik ne izkazuje
zahtevane moči
1. Napačna smer vrtenja
2. Premalo hidravličnega olja
3. Ročica za zagon je upognjena, ne dotika
se povsem hidravlične komponente
ventila.
4. Les ima veliko grč, cepilni klin se zatika.
5. Delovni mehanizem je upognjen
1. Spremenite smer vrtenja.
2. Dolijte hidravlično olje
3. Preverite vse vijake na dvižnem mehanizmu
Premestite vlečni drog (slika 10/B), s tem se
hidravlična dvigalka na ventilu povsem zloži.
4. Cepilni klin namažite z mazivom.
5. Delovni mehanizem vrnite v izhodiščni položaj.
Zeleni gumb za vklop ne
deluje.
1. Varovalka je pregorela, itd.
2. Delovanje v 2 fazah
1. Preglejte kabel
Hidravlična črpalka piska,
rezilo ne deluje
enakomerno.
1. Izguba olja, umazana tla
2. Premalo olja v rezervoarju.
1. Privijte vijačne spoje
Zamenjajte cevi
2. Dolijte hidravlično olje
Page 56

Sekundarne nevarnosti – mehanske poškodbe
Nevarnost Opis Varnostni ukrep (-i) Druge nevarnosti
Poškodbe
zaradi
stisnjenja
Med cepljenjem lahko zaradi
premikanja hidravličnega rezila pride do
poškodb na posameznih delih telesa.
Obstaja nevarnost, da se les, ki ga
cepite, zagozdi. Ne pozabite, da je les
pri izvzemanju lahko zelo napet in da
obstaja nevarnost poškodb na prstih.
Načeloma vedno uporabljajte varnostno
upravljanje za delo z obema rokama. Ne
posegajte neposredno v proces cepljenja.
Nikoli ne uporabljajte delujoče naprave skupaj z
drugo osebo.
Če se zagozdi, les izbijte ven. Pazite se
padajočih delov lesa, da si ne poškodujete nog.
Obrabljen ali poškodovan
pripomoček nemudoma
zamenjajte z novim.
Poskrbite za varnost
oseb, ki so v bližini!
Pri delu vedno
uporabljajte zaščitno
obutev.
Rezanje Med cepljenjem lahko zaradi
premikanja hidravličnega rezila pride do
poškodb na posameznih delih telesa.
Načeloma vedno uporabljajte varnostno
upravljanje za delo z obema rokama. Ne
posegajte neposredno v proces cepljenja.
Obrabljen ali poškodovan
pripomoček nemudoma
zamenjajte z novim.
Splošne
poškodbe
Pri obdelovanju suhega lesa, lahko s
cepljenjem drv povzročite hude
poškodbe.
Kosi lesa in polen, ki odpadajo pri
cepljenju lahko poškodujejo noge
osebe, ki dela s strojem.
Podaljšek cepilnega klina lahko prodre
do mize in poškoduje stroj ter povzroči
hude poškodbe.
Nikoli ne posegajte v proces cepljenja.
Stojte v varni razdalji.
Napravo uporabljajte vedno previdno in
premišljeno.
Vedno uporabljajte predpisano obleko in
ravnajte previdno.
Pri delu z napravo vedno uporabljajte zaščitna
očala.
Vedno uporabljajte predpisano obleko in
ravnajte previdno.
Uporabljajte zaščitno obleko in varno zaščitno
obutev.
Preden se lotite dela s klinom, vedno
demontirajte mizo
Obrabljen ali poškodovan
pripomoček nemudoma
zamenjajte z novim.
Poskrbite za varnost
oseb, ki so v bližini.
Zatikanje,
navitje
Ohlapna obleka ali nakit se lahko
zataknejo v delujoče dele naprave.
Vedno nosite prilegajočo se obleko, glavo si
pokrijte z mrežico za lase, nakit pa snemite.
Sekundarna nevarnost električnega udara
Nevarnost Opis Varnostni ukrep (-i) Druge nevarnosti
Neposreden
stik z
električnim
tokom
Poškodovan kabel ali vtič so lahko
vzrok za poškodbe zaradi električnega
udara.
Poškodovan kabel ali vtič mora zamenjati
strokovnjak. Napravo uporabljajte le skupaj z
zaščitnim stikalom, ki varuje uporabnika pred
nihanjem toka (FI).
Pred vsakršno uporabo
preverite električni kabel
Posredni stik z
električnim
tokom
Poškodbe s prevodniki v odprtih
električnih ali poškodovanih
konstrukcijskih delih.
Pred vzdrževanjem naprave vedno izvlecite vtič
iz vtičnice na zidu.
Uporabljajte le skupaj z zaščito zaščitno stikalo
proti nihanju napetosti (FI)!
Nevarnost zaradi hrupa
Nevarnost Opis Varnostni ukrep (-i) Druge nevarnosti
Poškodbe
sluha
Uporaba naprave brez uporabe
ustreznih zaščitnih pripomočkov, lahko
poškoduje sluh.
Vedno uporabljajte zaščitne slušalke.
Zanemarjanje ergonomskih načel
Nevarnost Opis Varnostni ukrep (-i) Druge nevarnosti
Malomarna
uporaba
osebnih
zaščitnih
sredstev.
Uporabnik se lahko hudo poškoduje, v
kolikor pri delu ne uporablja varnostne
in zaščitne opreme.
Vedno uporabljajte predpisano obleko in
ravnajte previdno.
Neprimerna
lokalna
osvetlitev
V premalo osvetljenem prostoru obstaja
večja nevarnost poškodb.
Pri delu z napravo vedno poskrbite, da bo
delovni prostor dobro osvetljen.
Druge nevarnosti
Nevarnost Opis Varnostni ukrep (-i) Druge nevarnosti
Odbiti predmeti
ali brizgajoče
tekočine
Pri cepljenju lahko leteči mehanski delci
poškodujejo vid.
Pri delu z napravo vedno uporabljajte zaščitna
očala.
Page 57

Oznake na uređaju
Značenje simbola
U ovom naputku i/ili na stroju koriste se slijedeći simboli ideogrami:
Sigurnost proizvoda:
Proizvod ispunjava zahtjeve
odgovarajućih normi EU
Zabrane:
Opća zabrana
(zajedno sa drugim
ideogramom)
Ne dirajte unutarnje dijelove
golim rukama.
Ne vucite za kabao! Čuvajte od kiše i vlage!
Uređaj može koristiti samo
jedna osoba.
Upozorenje:
Upozorenje/Pažnja
Upozorenje! Opasnost od
spotaknuća!
Održavati sigurnosno
odstojanje!
Upozorenje! Opasnost od
stezanja dijelova tijela!
Upozorenje! Leteći predmeti!
Upozorenje! Ozljede ruku
križem za cijepanje.
Upozorenje na opasnost od
ozljeda uslijed strujnog udara
UPOZORENJE! Prije rada s
uređajem pažljivo pročitajte
ovaj naputak za uporabu.
Naredbe:
Prije rada sa strojem pažljivo
pročitajte ovaj naputak za
uporabu.
Upotrebljavajte zaštitne
naočale i zaštitu za sluh!
Koristite sigurnosne rukavice
Upotrebljavati sigurnosnu
obuću!
Zaštita životne sredine:
Osigurajte stručnu likvidaciju
otpada kako ne bi došlo do
oštećenja okoliša.
Ambalažu od ljepenke
odnesite u odgovarajući
centar za skupljanje i
reciklažu otpada.
Električne ili elektronske
uređaje u kvaru i/ili likvidirane
uređaje odnesite u
odgovarajuće centre za
skupljanje otpada.
System Interseroh- Recycling
sa proizvodnim brojem
Ambalaža:
Zaštitite od vlage.
Pozor! Krhki tovar!
Ambalaža mora biti okrenuta
prema gore.
Tehnički podaci:
Priključak Snaga motora
Obrtaji Snaga cijepanja
Maks. promjer cijepanog drva
Maks. dužina cijepanog
materijala
Veličina stola približno Težina
Prije upotrebe zagrijajte ulje 1
minutu – pritisnite na jedan
zaštitni luk.
Prilikom uključenja uređaja
držite jednu mehansku
polugu.
Smjer okretanja
HR
Prije prvog stavljanja stroja u rad neophodno je pročitati sve informacije i upute navedene u Naputku za
uporabu
A.V. 2 Dodatno tiskani materijali, i djelomične dopune, zahtijevaju odobrenje. Pridržano pravo na tehničke izmjene.
Slike služe samo za ilustraciju! Ovo je originalni naputak za upotrebu.
Page 58

Popis uređaja (vidi sliku 1)
1. Rukohvat
2. Nož za cijepanje
3. Komad za pričvršćivanje
4. Rame za rukovanje
5. Poklopac rukohvata
6. Držač stola (prednji)
7. Blokiranje stola
8. Stol uređaja za cijepanje
9. Kotači
10. Prekidač / utičnica
11. Motka za podešavanje podizaja
12. Motor
13. Zaštitni luk
14. Kontaktna kolijevka (donji poklopac)
15. Limena sklopka
16. Poluga za obrtni stol
17. Obrtni tol
Uređaj
Uređaj za cijepanje Basic 10T/DTS
Teška čelična konstrukcija, nož za cijepanje od posebnog
čelika, svi čelični dijelovi sa kvalitetnim praškastim premazom,
profesionalna hidraulička crpka za upotrebu u težim uvjetima,
duboki pomični dio sa dodatnim okretnim stolom i
osnovnim stolom, koji se može skinuti. Motor s osiguračem
protiv pregrijevanja.
Korištenje uređaja sukladno njegovoj namjeni
Uređaj je dimenzioniran samo za rad sa 1 osobom. Na uređaju
ne smiju nikad raditi dvije ili više osoba.
Uređaj je namijenjen isključivo za cijepanje drva po vlaknima.
Obavjezno se pridržavajte naputaka za montažu, rad i
održavanje, kako bi bili isključeni rizici i da se spriječe štete.
Prilikom cijepanja bezuvjetno pazite, da se cijepano drvo
namjesti samo lim ploče ili na lim stola ovog uređaja.
Ovim uređajem ne mogu se vršiti drugi radovi, nego oni, za
koje je ovaj uređaj predviđen i koji su opisani u uputama za
korištenje. Svaka druga primjena je protivna namjeni uređaja.
Proizvođač ne snosi odgovornost za štete i ozljede pri radu s
postrojenjem. Vodite računa o tome da naši proizvodi nisu
namijenjeni za industrijsku upotrebu.
Jamstvo
Jamstvo se odnosi samo na nedostatke, koji su nastali zbog
kvarnog materijala ili putem proizvodnje. Neophodno je, da se
prilikom reklamacije dopremi i račun, koji mora biti potpisan od
strane prodavača i obilježen datumom te pečatom
prodavaonice. U okvir jamstva ne spadaju kvarovi, koji bi
nastali putem nepravilne uporabe kao npr.: preopterećenje
stroja, rukovanje silom odnosno zbog štetnog dodira sa
stranim predmetima. Nepoštivanje ovog naputka za uporabu i
montažu, te normalna istrošenost prilikom upotrebe uređaja,
također ne spada u sklop jamstva.
Tehnički podaci
Priključak:
400 V~50 Hz
Snaga motora: 4000 W P1/ S640%
Obrtaji motora: 1440 obr./min.
Maksimalna jačina cijepanja: 10 tona
Maks. podizaj kod cijepanja: 510 mm
Brzina pomicanja napred: 0,03 m/s
Brzina pomicanja natrag: 0,15 m/s
Spremnik hidrauličkog ulja: 8 l (vrsta ulja: HLP 46)
Duljina cijepanog drva: 1350 mm
Stub za cijepanje: 120 mm x 120 mm
Maks. promjer drva: oko 400 mm
Dimenzije stola: Oko 380 x 300 mm
Težina: 177 kg
Kataloški broj 02040
Mjere sigurnosti
Opće informacije
Radi sigurnosti na radu neophodno je respektirati i pridržavati
se sigurnosnih uputa navedenih u ovom Naputku za korištenje
te upute za rukovanje, održavanje i popravke stroja.
Osoblje stroja
Korištenje stroja za cijepanje drva je povezano sa
određenim rizicima. Zbog toga smiju sa strojem rukovati
samo iskusni djelatnici sa odgovarajućom kvalifikacijom i
obukom. Osoblje stroja mora nositi pri radu usku odjeću i
zaštitne radne čizme.
Radno mjesto
Radi sigurnosti na radu kod cijepanja drva neophodno je
osigurati savršeno ravno radno mjesto radi stabilnosti i
dovoljnog prostora pri radu. Kod premještanja i pohrane stroja
neophodno je ukloniti sa pristupnih putova sve moguće
prepreke. Neophodno je osigurati dovoljno osvjetljenje radnog
prostora.
Prilikom rada uređaja spriječite pristup na radilište
drugim osobama – odnosno moraju se zadržavati samo na
sigurnoj udaljenosti.
Priprema rada
Kod popravaka ili radova na održavanju stroja i kod napuštanja
stroja za cijepanje drva neophodno je prekinuti napajanje
stroja električnom strujom, i to pritiskom crvenog gumba na
prekidaču, i izvaditi utikač priključnog kabla iz utičnice.
Prekidanje dovoda električne struja stavljanje prekidača u
položaj ISKLJUČENO nije dovoljno. Strojevi za cijepanje
drva GÜDE isporučuju se isključivo sa tvrdim noževima. Ako
nakon cijepanja drva koje sadržava nevidljiva strana tijela npr.
od betona, čelika itd. utvrdite deformaciju oštrice noža za
cijepanje, obradite oštricu turpijom ili brušenjem. Redovito
brušenje noža za cijepanja povećava radni kapacitet.
SAVIJET: Stroj za cjepanje podmažite mazivom (u slučaju
problematičnog drva).
Prije prvog stavljanja stroja u rad provjerite funkciju
sigurnosnog uređaja (prije svega obije funkcijske poluge).
UPOZORENJE! Prije svakog stavljanja uređaja u
pogon provjerite, da li je stol za cijepanje sigurno fiksiran.
Likvidacija
Upute za likvidaciju ovog uređaja proizlaze iz navedenih
ideograma, koji se nalaze na njegovom kućištu i na omotaču.
Objašnjenja značenja pojedinačnih ideograma ćete naći u
poglavlju „Oznake na uređaju“.
Likvidacija transportne ambalaže
Ambalaža štiti uređaj od oštećenja tijekom prijevoza. Materijal
ambalaže odabran je s obzirom na zaštitu okoliša i način
likvidacija, što znači da materijal ambalaže može biti recikliran.
Vraćanjem ambalaže u novi ciklus ponovne upotrebe štitite
sirovine i doprinosite smanjenju troškova likvidacije i
postupanja s otpadom. Dijelovi ambalaže (npr. folije
Styropor®) mogu biti opasne za djecu. Postoji opasnost od
gušenja! Dijelove ambalaže čuvajte van dosega djece i što
prije likvidirajte.
Preporuke prije upotrebe
Prije upotrebe uređaja mora korisnik pažljivo pročitati ove
upute za korištenje.
Kvalifikacija
Osim detaljne upute od strane stručnjaka u vezi korištenja
ovog uređaja nije potrebna druga kvalifikacija.
Minimalna starost osoblja stroja
Sa uređajem smiju raditi samo osobe koje su napunile 18
godina. Jedina iznimka jest rad maloljetnih osoba, uz uvjet da
ove osobe rade s uređajem u okviru praktičnih vježbi pod
nadzorom stručnog voditelja obuke.
Page 59

Pregledi i održavanje (slika 2+7+8)
Sigurnosne upute za tehničke preglede i održavanje:
Samo redovito održavan uređaj može biti dobar pomoćnik pri
radu. Nedovoljno održavanje i njega mogu uzrokovati
nepredvidive nezgode i ozljede.
• Za čišćenje nikad ne koristite agresivna sredstva za
čišćenje. To može uzrokovati oštećenje ili uništenje
stroja.
• Izvadite utikač priključnog kabla iz utičnice.
• Popravke i radove na održavanju električnih dijelova
smiju izvoditi samo stručno osposobljeni električari.
• Nakon završetka popravka ili radova na održavanju
neophodno je ponovo montirati sve zaštitne i sigurnosne
elemente uređaja.
Preporučujemo da (slika 2):
• Nož za cijepanje
Nož za cijepanje je potrošni materijal koji je neophodno
dobro izbrusiti prema potrebi. To će povećati snagu i
zaštiti uređaj za cijepanje. Savjet: Nož za cijepanje
podmažite mazivom.
• Zaštitni uređaj za obje ruke
Neophodno je osigurati lagani hod kombiniranog
dvoručnog zaštitnog elementa. Prema potrebi podmazati
s nekoliko kapljica ulja.
• Stub za cijepanje
• Prije svakog korištenja podmažite stupac stroja, time
ćete produžiti radni vijak kliznih čeljusti (slika 2/A). Stub
za cijepanje izvucite i na sve četiri strane stuba za
cijepanje ravnomjerno nanesite univerzalno mazivo.
• Pomični dijelovi
Vođice rezila za cijepanje moraju biti čiste (prljavština,
iveri, kora itd.). Klizne letve podmažite mazivom.
• Hidraulički uređaj
Hidrauličke priključke i vijčane spojeve provjerite, da li su
zabrtvljeni i da nisu istrošeni. Vijčane spojeve prema
potrebi zavrnite.
Kontrola stanja hidrauličkog ulja (slika 7+8):
Stanje hidrauličkog ulja provjeravajte samo dok je
hladno; utikač mora biti izvučen iz utičnice, klin za
cijepanje mora biti namješten.
Na mjeraču za ulje se nalaze dva zareza, najniži zarez (slika
8/1) predstavlja granicu za minimalnu količinu hidrauličkog ulja
u rezervoaru, gornji zarez (slika 8/2) za maksimalnu količinu.
• Mjerilo razine ulja (slika 7/A) kompletno odvrnite iz
otvora.
• Ulje iz mjerice obrišite glatkom krpom.
• Mjericu opet kompletno odvrnite u otvore.
• Poslije toga vijak za punjenje s mjericom ponovo
odvrnite i provjerite, da li se gornja granica hidrauličkog
ulja nalazi između oba navedena zareza.
Jedanput godišnje zamijenite ulje novim (slika 7+8):
• Popustite vijak za ispuštanje ulja (slika br. 7/A).
• Potrošeno ulje nalijte u posebnu posudu (svaki model ima
drukčiji volumen)
• Istrošeno ulje likvidirajte na ekološki način!
• Vijak za ispuštanje ulja ponovo zavrnite. U rezervoar za
ulje ne smije prodrijeti nikakva prljavština.
• Hidrauličko ulje nalijte do gornjeg zareza na mjerici (slika
8/2)
• Uređaj za cijepanje drva isprobajte najprije u praznom
hodu.
Preporučeno hidrauličko ulje: DIN ISO HLP 46
Kataloški broj Güde 42004
Viskoznost: 46
Količina ulja: (vidi Tehničke podatke)
Ulje dopunjavajte samo ako je stupac u uvučenom
položaju!
Hidraulički uređaj:
Hidrauličke cijevi i spojevi moraju biti nakon približno 4 radna
sata prekontrolirani; pregledajte zabrtvljenost i u slučaju
potrebe zavrnite.
Kontrola funkcija
Hidraulički uređaj prodaje se u funkcionalnom stanju. Prije
svake uporabe neophodno je provjeriti kontrolu funkcije.
• Oba rukohvata pustite, da se spuste dolje, isto važi za
nož do visine 5 cm iznad stola
• Uvijek spustite jedan priključni rukohvat, nož za cijepanje
će se zaustaviti u odabranoj poziciji
Montaža ramena stroja za cijepanje, kotača i
stola (slika 1 i 4)
Montaža ramena za rukovanje - slika 1
Rame stroja (slika 1/4) namijestite u kontaktnu kolijevku (slika
1/14) i odozgo fiksirajte vijkom, podloškom i štiftom. Sada
fiskirajte rame (slika 1/4) kao što je opisana metoda na drugoj
strani. Zaštitni lukovi (slika 1/13) sa obje strane opslužnog
ramena montirajte uvijek pomoću 2 šestorokutna vijka (slika
1/3).
SAVIJET: Prije toga podmažite limene spojke mazivom
limene spojnice i matice (slika 1/15)!
Montaža kotača (slika 4
Zatim na objema stranama montirajte okretni kotač i osigurajte
ga rascjepkom (A).
Montaža stola/okretnog stola - slika 1
Ploču stola stavite u pripremljene držače (slika 1/6) i
istovrjemeno povucite za polugu.
Za okretanje okretnog stola potisnite polugu prema dolje.
Prilikom primjene okretnog stola pazite na to, da bude poluga
uvijek fiksirana.
Podešavanje dizanja (slika 5)
Kod komada drva manjih od cca 50 cm, a u slučaju većeg
broja drvenih komada moguće je povećati radni kapacitet
skraćenjem povratnog kretanja noža za cijepanje.
Postupajte na slijedeći način:
Na stol stroja za cijepanje stavite kratak komad drva i siđite sa
nožem oko 2 cm iznad komada drva. Isključite stroj
(pritisnite crveno dugme na prekidaču i izvucite utikač
priključnog kabla iz
utičnice). Sada možete skratiti pomoću fiksirane motke (slika
povratno kretanje, i to tako da ćete fiksirati ovu šipku
vijka za zaustavljanje (slika 5/A) fiksirati u traženoj visini.
Područje uporabe
Uređaj služi isključivo za obradu drva za loženje. Materijal koji
se cjepa, mora imati slijedeće dimenzije:
- minimalan promjer: 125 mm
maksimalan promjer: 400 mm
- Drvo se cijepa u smjeru vlakna.
- Kod drva sa kvrgama postoji opasnost od blokiranja u
stroju za cijepanje.
- Vađenje blokiranog komada drva se vrši pokucanjem na
drvo.
- Zabranjeno je izrezivati cijepani komad drva!
Električno / hidrauličko priključenje (slika 1 i 7)
Priključenje na el. mrežu (slika 1/10)
Prema odredbama propisa strukovnih organizacija „CE“ itd.,
svi strojevi za cijepanje drva su obvezatno opremljeni
podnaponskom zaštitom u prekidaču. Podnaponska zaštita
sprječava samovoljno pokretanje stroja nakon ispada
električne struje odnosno nakon ponovnog uspostavljanja
napona u mreži, u slučaju nehotičnog vađenja utikača iz
utičnice, u slučaju ispada osigurača itd. Stroj može biti
uključen isključivo pritiskom na zeleni gumb.
Page 60

Ako namjerno držite gumb pritisnutim ili ako ga blokirate bez
nultog provodnika dovodi automatski do isklapanje sklopke. U
takvom slučaju, koji se može naknadno provjeriti, korisnik
stroja gubi pravo na jamstvo.
Hidraulički uređaj
Kod hidrauličnih crijeva i spojnica neophodno je nakon 4
sata rada provjeriti njihovu zabrtvljenost i prema potrebi
spojnice zategnuti.
Važi samo za uređaje 400 V: U svakom slučaju provjerite
ispravan smjer vrtnje motora (vidi strelicu navedenu na
motoru), jer kod rada sa neispravnim smjerom vrtnje
dolazi do oštećenja uljne crpke. U tom slučaju garancija
prestane važiti. U slučaju potrebe zamijenite smjer
okretanja izmjenom polova na utikaču. Vidi sliku br. 6!
Hidrauličko ulje / rezervoar
Svi strojevi za cijepanje drva mogu biti punjeni uobičajenim
hidrauličkim uljem (npr. HLP 46 ili uljem druge vrste iste
viskoznosti). Zamjena ulja nije neophodna.
Spremnik odzračite prije svakog korištenja stroja, i to
odvijanjem i ponovnim vraćanjem vijka na otvoru za
punjenje (slika 7/A).
Rad
Upozorenje: Drvo uvijek cijepite, po mogućnosti, pod
pravim kutom, s time da drvo mora dobro nalijegati uz
površinu stola. Kosi komadi drva odnosno kvrgavo drvo
može pasti sa stola odnosno deformirati ramena stroja za
cijepanje.
Drvo uvijek polažite samo na površine koje su za to
namijenjene (stolove) (ni u kom slučaju na okvir). Tako
može doći do oštećenja uređaja.
1. Uključite motor pritiskom na zeleno dugme. Upozorenje:
Pazite na smjer okretanja!
2. Kod niskih temperatura ostavite stroj za cijepanje oko
15 u praznom hodu da se ulje zagrije na ispravnu
temperaturu.
3. Materija (drvo) za cijepanje položite na stol i pridržavajte
ga pomoću pridržnih graničnika na poluzi.
4. Pritiskom na obje poluge počinje cijepanje. (Čim nož za
cijepanje uđe drvnu masu, lagano potegnite polugu
prema vani, uz istovremeno pritiskanje prema dole. Time
ćete spriječiti savijanje limova (ramena) za usmjeravanje
komada drva.
5. Nakon završetka cijepanja podignite najmanje jednu
polugu, stupac stroja za cijepanje se automatski dože
prema gore.
Strogo je zabranjeno da sa strojem za cijepanje rade svije
osobe na način da jedna osoba pridržava drvo a drugi ga
pritišće na graničnike.
Upute za transport
Prijevoz stroja
Svi strojevi za cijepanje drva su opremljeni velikim kotačima.
U svrhu premještanja stroja jednom rukom uhvatite dršku na
stupcu stroja iznad motora i stroj lagano nagnite prema vama.
U ovom položaju možete stroj bez problema premještati na
kotačima.
Da biste spriječili istjecanje hidrauličkog ulja, nikad stroj
ne premještajte u ležećem položaju.
Prilikom prijevoza stroja spustite nož skroz dole.
Sekundarna opasnost i zaštitne mjere
Upozorenje!!!
Isključivanje iz rada, promjene, blokiranje, demontiranje,
pregradnja ili montiranje svih vrsta dijelova sigurnosnih i
zaštitnih elemenata stroja strogo je zabranjeno;
nepoštivanje ove upute može uzrokovati ozbiljne ozljede
opasne po život.
Proizvođač ne snosi odgovornost za materijalne štete i
ozljede osoba nastale uslijed nepoštivanja ovih uputa.
Pored toga, u svim gore navedenim slučajevima
nepoštivanja uputa kupac gubi sva prava iz jamstva prema
proizvođaču stroja.
Uređaj može koristiti samo jedna osoba. Tijekom rada sa
strojem redovito uklanjajte ostatke drva koji mogu
blokirati odnosno na drugi način negativno djelovati na
sigurnosne i radne dijelove stroja.
Servis
Da li imate tehnička pitanja ? Reklamaciju? Da li Vam
trebaju rezervni dijelovi ili upute za uporabu?
Na našem home page www.guede.com u odjeljenju
„Servis“ ćemo Vam pružiti pomoć brzo i bez nepotrebne
birokracije. Pomozite nam kako bismo Vam mogli pomoći.
Radi identifikacije Vašeg aparata u slučaju reklamacije
potreban nam je serijski broj, broj narudžbe i godina
proizvodnje. Sve ove podatke naći ćete na tipskoj pločici. Kako
biste ove podatke uvijek imali pri ruci, napišite je molim ovdje:
Serijski broj:
Kataloški broj:
Godina proizvodnje:
Telefon: +49 (0) 79 04 / 700-360
Fax: +49 (0) 79 04 / 700-51999
E-mail: support@ts.guede.com
Page 61

Izjava o sukladnosti EU
Temeljem ove izjave, mi,
Güde GmbH & Co. KG
Birkichstraße 6
74549 Wolpertshausen
Njemačka
proglašavamo da dole navedeni uređaji, u pogledu njihove koncepcije i konstrukcije kao i u pogledu izvedbi koje smo uveli u promet,
ispunjavaju odgovarajuće osnovne zahtjeve u vezi sigurnosti i zdravlja prema smjernicama EU.
Ako dođe do izmjene uređaja bez naše suglasnosti, ova Izjava postaje nevažećom.
Oznaka uređaja: Uređaj za cijepanje Basic 10T/DTS
Kat br.: 02040
Datum/Potpis proizvođača: 07.03.2012
Podaci o potpisanoj osobi direktor, gospodin Arnold
Tehnička dokumentacija: J. Bürkle FBL; QS
Primjenjive smjernice EU:
2004/108/EG
2006/42/EG
Primijenjeni harmonizirani standardi :
EN 609-1/A2:2009
EN 61000-3-3:1995+A1+A2
EN 61000-3-2:2006
EN 55014-2:1997+A1
EN 55014-1:2006
Buka:
Lwa: 85,2 dB
Lpa: 69,9 dB
Utvrđivanje kvarova
Problemi
Mogući uzroci
Rješenje
Motor se ne pali.
1. U utičnici nema struje
2. Produžni kabao je oštećen
3. Loš električni kabel
4. Loši prekidač, kondenzator
1. Provjeriti osiguranje mreže
2. Izvucite utikač, provjerite, zamijenite
3. Priključak 5-žilni, pri prosjeku 2,5 mm
2
4. Uređaj mora pregledati električar
Nepravilan smjer
okretanja motora
1. Nepravilno priključenje 1. Izmjenjivač faza okrenite u utičnici uređaja s
odvrtačem
Nož za cijepanje se ne
kreće
1. Premještanje poluge za podešavanje
funkcije za obje ruke
1. Provjerite stanje ulja
Oštećen je upravljački ventil – zamjena
moguća je u servisu
Uređaj ne postiže
potrebnu snagu
1. Nepravilan smjer okretanja
2. Premalo hidrauličnog ulja
3. Savijena šipka; ne dolazi do potpunog
pritiskanja mehanizma za podizanje
ventila.
4. Drvo je kvrgavo, kvrge uzrokuju blokadu
noža tijekom cijepanja.
5. Rame za rukovanje je sagnuto
1. Promjena smjera okretanja
2. Dopunite hidrauličko ulje
3. Provjerite sve vijke na šipkastom mehanizmu
za puštanje
Pomjerite vučnu šipku (slika 10/B) , time se
hidraulička dizalica na ventilu sasvim sklopi.
4. Nož za cijepanje podmažite mazivom.
5. Rame za rukovanje namjestite u polazni
položaj.
Zeleni gumb nakon
uključivanja ne ostaje
pritisnut.
1. Ispad osigurač itd.
2. Rad na 2 faze
1. Provjerite kabel
Hidraulička crpka pišti,
nož za cijepanje ne radi
pravilno
1. Gubitak ulja, prljav pod
2. Preniska razina ulja u spremniku za ulje
1. Zavrnite vijčani spoj
Zamijenite cijevi
2. Dopunite hidrauličko ulje
Page 62

Mehanička sekundarna opasnost
Opasnost Opis Zaštitna(e) mjera(e) Sekundarna opasnost
Ozljede prstiju Tijekom sječenja može kao posljedica
pada hidravličkog noža doći do povreda
dijelova tijela.
Postoji opasnost da će drvo kod
cijepanja u stroju zaglaviti. Ne
zaboravite, da je drvo kod izvlačenja
pod velikom silom natezanja i u
naprslinama koje nastaju prilikom
sječenja možete povrijediti prste.
U svakom slučaju koristite dvoručno sigurnosno
upravljanje. Nikad ne intervenirajte u proces
cijepanja drva.
Nikad ne koristite uključen stroj zajedno sa
drugom osobom.
Blokirani komad drva oslobađajte samo
izbijanjem. Čuvajte se od drveta koje pada,
može Vam povrijediti noge.
Istrošeni ili oštećeni alat
mora biti odmah
zamijenjen novim.
Pazite na osobe, koje se
nalaze u blizini!
Prilikom rada nosite
uvijek zaštitne naočale.
Povrede
sječenjem
Tijekom sječenja može kao posljedica
pada hidravličkog noža doći do povreda
dijelova tijela.
U svakom slučaju koristite dvoručno sigurnosno
upravljanje. Nikad ne intervenirajte u proces
cijepanja drva.
Istrošeni ili oštećeni alat
mora biti odmah
zamijenjen novim.
Opće ozljede Kod obrade suhog drva može doći do
ozbiljnih ozljeda uslijed previše
intenzivnog cijepanja.
Drveni komadi, koji nastaju prilikom
cijepanja, mogu pasti dole i oštetiti
noge korisnika.
Produžetak klina za cijepanje može
udariti o stol i prouzrokovati štetu na
stroju i ozljede.
Nikad ne intervenirajte u proces cijepanja drva.
Uvijek stojite u sigurnoj udaljenosti od stroja.
Sa strojem uvijek radite oprezno i sa pažnjom.
Pri radu uvijek nosite odgovarajuću zaštitnu
odjeću i radite vrlo oprezno.
Prilikom rada sa uređajem nosite uvijek zaštitne
naočale.
Pri radu uvijek nosite odgovarajuću zaštitnu
odjeću i radite vrlo oprezno.
Koristite zaštitno odijelo i sigurnosnu obuću.
Prije radova sa produženim klinom demontirajte
uvijek stol.
Istrošeni ili oštećeni alat
mora biti odmah
zamijenjen novim.
Uvijek pazite na osobe,
koje se nalaze u blizini.
Hvatanje,
namotanje
Široka odjeća, duga kosa ili nakiti mogu
biti zahvaćeni pokretnim dijelovima
uređaja.
Nosite uvijek tijesnu odjeću, bez nakita, kosu
zaštitite mrežicom za kosu.
Sekundarna opasnost električnog udara
Opasnost Opis Zaštitna(e) mjera(e) Sekundarna opasnost
Neposredan
kontakt sa
dijelovima pod
naponom
Oštećen kabao ili utikač može dovesti
do udara električnom strujom.
Oštećene kablove ili utikače mora zamijeniti
stručnjak. Uređaj koristite samo sa zaštitnim
prekidačem za prekostrujnu zaštitu (FI).
Prije svakog korištenja
rampe provjerite sve
dijelove.
Neposredan
kontakt sa el.
strujom.
Ozljede uslijed kontakta sa provodnim
dijelovima kod otvorenih električnih ili
pokvarenih konstrukcijskih dijelova.
Prilikom održavanja uvijek izvucite utikač.
Upotrebljavajte samo uz FI (zaštitni prekidač
protiv variranja struje)!
Opasnost od buke
Opasnost Opis Zaštitna(e) mjera(e) Sekundarna opasnost
Oštećenje
sluha
Duži rad sa ovim uređajem dovodi do
oštećenja sluha.
Zbog toga uvijek nosite zaštitne slušalice.
Nepoštivanje ergonomskih načela
Opasnost Opis Zaštitna(e) mjera(e) Sekundarna opasnost
Nemarno
korištenje
sredstava za
osobnu zaštitu
Osoblje bez odgovarajućih zaštitnih
sredstava može pretrpjeti ozbiljne
unutarnje ili vanjske ozljede.
Pri radu uvijek nosite odgovarajuću zaštitnu
odjeću i radite vrlo oprezno.
Nedovoljno
lokalno
osvjetljenje
Nedostatno osvjetljenje predstavlja
veliki sigurnosni rizik.
Prilikom rada sa aparatom osigurajte uvijek
dostatno osvjetljenje.
Ostale vrste opasnosti
Opasnost Opis Zaštitna(e) mjera(e) Sekundarna opasnost
Odbačeni
predmeti ili
tekućine koje
mogu brizgati.
Prilikom cijepanja drva može doći do
ozljede Vaših očiju sitnim česticama
drva.
Prilikom rada sa uređajem nosite uvijek zaštitne
naočale.
Page 63

Znaci na uređaju
Značenje simbola
U ovom upustvu i/ili na uređaju nalaze se slijedeći simboli ideogrami:
Bezbjednost proizvoda:
Proizvod ispunjava naređenja
odgovarajućih direktiva EU
Zabrane:
Opća zabrana
(zajedno sa drugim
ideogramom)
Ne dirajte unutarnje dijelove
golim rukama.
Ne vucite za kabel! Čuvajte od kiše i vlage!
Uređaj može koristiti samo
jedna osoba.
Upozorenje:
Upozorenje/Pažnja
Upozorenje! Opasnost od
spotaknuća!
Održavajte sigurnosno
odstojanje!
Upozorenje! Opasnost od
stezanja dijelova tijela!
Upozorenje! Leteći predmeti!
Upozorenje! Ozljede ruku
križem za cijepanje.
Upozorenje na opasnost od
ozljeda zbog strujnog udara
UPOZORENJE! Prije
upotrebe ovog uređaja
pažljivo pročitajte ova
uputstva za upotrebu.
Naredbe:
Prije korištenja ovog uređaja
pažljivo pročitajte ovaj
naputak za uporabu.
Upotrebljavajte zaštitne
naočale i zaštitu za sluh!
Koristite sigurnosne rukavice
Upotrebljavati sigurnosnu
obuću!
Zaštita životne okoline:
Osigurajte stručnu likvidaciju
otpada kako ne bi došlo do
oštećenja okoliša.
Kartonsku ambalažu odnesite
u reciklažu ili u odgovarajući
centar za skupljanje otpada.
Električne ili elektronske
uređaje u kvaru i/ili stare
uređaje odnesite u
odgovarajuće centre za
skupljanje otpada.
Systém Interseroh- Recycling
sa serijskim brojem
Ambalaža:
Čuvajte od utjecaja vlage!
Pažnja – lomljivo!
Ambalaža mora biti okrenuta
prema gore.
Tehnički podaci:
Priključak Snaga motora
Okretaji Snaga cijepanja
Maks. promjer drva za
cijepanje.
Maks. dužina cijepanog
materijala
Veličina stola približno Težina
Ostalo:
Prije upotrebe zagrijajte ulje 1
minutu – pritisnite na jedan
zaštitni luk.
Prilikom uključenja uređaja
držite jednu mehansku
polugu.
Smjer okretanja
BIH
Prije prvog stavljanja uređaja u pogon neophodno je pročitati sve informacije i uputstva navedene u
ovom Priručniku za korištenje.
A.V. 2 Dodatno štampani materijali, i djelomične dopune, podliježu odobrenju. Pridržana su prava na tehničke izmjene naših
uređaja. Slike služe samo u ilustrativne svrhe! Ovo je originalno uputstvo za upotrebu.
Page 64

Popis uređaja (vidi sliku 1)
1. Rukohvat
2. Nož za cijepanje
3. Komad za pričvršćivanje
4. Rame za rukovanje
5. Poklopac rukohvata
6. Držač stola (prednji)
7. Blokiranje stola
8. Stol uređaja za cijepanje
9. Kotači
10. Prekidač / utičnica
11. Motka za podešavanje podizaja
12. Motor
13. Zaštitni luk
14. Kontaktna kolijevka (donji poklopac)
15. Limena sklopka
16. Poluga za obrtni stol
17. Obrtni stol
Uređaj
Uređaj za cijepanje Basic 10T/DTS
Teška čelična konstrukcija, nož za cijepanje od posebnog
čelika, svi čelični dijelovi sa kvalitetnim praškastim premazom,
profesionalna hidraulička pumpa za upotrebu u težim
uslovima, duboki pomični dio sa dodatnim okretnim stolom
i osnovnim stolom, koji se može skinuti. Motor s
osiguračem protiv pregrijevanja.
Korištenje uređaja u skladu sa njegovom
namjenom
Uređaj je dimenzioniran samo za rad sa 1 osobom. Na uređaju
ne mogu nikad raditi dvije ili više osoba. Uređaj je namijenjen
samo za cijepanje drva po vlaknima. Obavjezno se
pridržavajte uputstva za montažu, rad i održavanje, kako bi bili
isključeni rizici i da se spriječe štete. Prilikom cijepanja
bezuslovno pazite, da se cijepano drvo namjesti samo lim
ploče ili na lim stola ovog uređaja. Ovim uređajem ne mogu se
vršiti drugi radovi, nego oni, za koje je ovaj uređaj predviđen i
koji su opisani u uputama za korištenje. Svaki drugi način
upotrebe je protivan namjeni uređaja. Proizvođač ne odgovara
za štete i ozljede nastale prilikom korištenja uređaja. Vodite
računa o tome, da naši proizvodi nisu namijenjeni za
industrijsku upotrebu.
Garancija
Garancija se odnosi samo na kvarove, koji su nastali zbog
lošeg materijala ili putem proizvodnje. Neophodno je, da se
prilikom reklamacije dopremi i račun, koji mora biti potpisan od
strane prodavača i obilježen datumom te pečatom
prodavaonice. U okvir garancije ne spadaju kvarovi, koji bi
nastali putem nepravilne uporabe kao npr.: preopterećenje
stroja, rukovanje silom odnosno zbog štetnog dodira sa
stranim predmetima. Nepoštivanje ovih uputstava za upotrebu
i montažu, kao i normalna istrošenost prilikom upotrebe
uređaja, također ne spada u sklop garancije.
Tehnički podaci
Priključak: 400 V~50 Hz
Snaga motora: 4000 W P1/ S640%
Okretaji motora: 1440 okr./min.
Maksimalna jačina cijepanja: 10 tona
Maks. podizaj kod cijepanja: 510 mm
Brzina pomicanja naprijed: 0,03 m/s
Brzina pomicanja nazad: 0,15 m/s
Rezervoar za hidrauličko ulje: 8 l (tip ulja: HLP 46)
Dužina cijepanog drva: 1.350 mm
Stub za cijepanje: 120 mm x 120 mm
Maks. promjer drva: približno 400 mm
Dimenzije stola: Približno 380 x 300 mm
Težina: 177 kg
Kataloški broj: 02040
Bezbjednosne mjere
Opće informacije
Radi bezbjednosti na radu neophodno je respektirati i
pridržavati se sigurnosnih uputa navedenih u ovim Uputstvima
za korištenje te uputstvima za rukovanje, održavanje i servis
stroja.
Osoblje stroja
Korištenje stroja za cijepanje drva vezano je sa određenim
opasnostima. Zato mogu sa strojem rukovati samo iskusni
djelatnici sa odgovarajućom kvalifikacijom i obukom.
Osoblje stroja mora nositi pri radu usku odjeću i zaštitne
radne čizme.
Radilište
Zbog bezbjednosti na radu prilikom cijepanja drva neophodno
je osigurati savršeno ravno radno mjesto radi stabilnosti i
dovoljnog prostora pri radu. Prilikom premještanja i
skladištenja stroja neophodno je ukloniti sa pristupnih putova
sve realne prepreke. Neophodno je obezbjediti dovoljno
osvjetljenje radilišta.
Prilikom funkcije uređaja spriječite pristup na
radilište drugim osobama – odnosno moraju se zadržavati
samo na sigurnoj udaljenosti.
Priprema rada
Prilikom popravaka ili radova na održavanju stroja i kod
napuštanja stroja za cijepanje drva neophodno je prekinuti
napajanje stroja električnom strujom, i to pritiskom crvenog
gumba na prekidaču, i izvaditi utikač priključnog kabla iz
utičnice. Prekidanje priključka električne struje stavljanje
prekidača u položaj ISKLJUČENO nije dovoljno. Uređaji za
cijepanje drva GÜDE isporučuju se isključivo sa tvrdim
noževima. Ukoliko poslije cijepanja drva koje sadržava
nevidljiva strana tijela npr. od betona, čelika itd. utvrdite
deformaciju oštrice noža za cijepanje, obradite oštricu turpijom
ili brusilicom. Redovito brušenje oštrice za cijepanje povećava
efikasnost.
SAVIJET: Uređaj za cijepanje podmažite mazivom (kod
problematičnog drva).
Prije prvog stavljanja stroja u rad provjerite stanje
sigurnosnog uređaja (prije svega obije funkcijske poluge).
UPOZORENJE! Prije svakog stavljanja uređaja u rad
provjerite, da li je stol za cijepanje pravilno fiksiran.
Likvidacija
Uputstva za likvidaciju ovog uređaja proizlaze iz navedenih
ideograma, koji se nalaze na njegovom kućištu na uređaju i na
ambalaži. Objašnjenja značenja pojedinačnih ideograma ćete
naći u poglavlju „Oznake na uređaju“.
Likvidacija originalne ambalaže
Originalna ambalaža štiti uređaj od oštećenja prilikom
prijevoza. Materijal ambalaže odabran je s obzirom na zaštitu
okoliša i način likvidacije, što znači da taj materijal može biti
recikliran. Vraćanjem ambalaže u novi ciklus (reciklažu) štitite
sirovine i doprinosite smanjenju troškova likvidacije i rukovanja
s otpadom. Dijelovi ambalaže (npr. folije Styropor®) mogu biti
opasne za djecu. Postoji opasnost od gušenja! Ambalažu
čuvajte van dosega djece ili je što prije likvidirajte.
Preporuke prije korištenja
Prije korištenja uređaja mora korisnik pažljivo pročitati ova
uputstva za korištenje.
Kvalifikacija
Osim detaljnih uputstava od strane stručnjaka u vezi korištenja
ovog uređaja nije potrebna druga kvalifikacija.
Minimalna starost osoblja, koje koristi uređaj
Uređaj mogu koristiti samo osobe koje su napunile 18 godina.
Jedina iznimka je rad maloljetnih osoba, pod uslovom da ove
osobe rade s uređajem u okviru praktičnih vježbi pod
nadzorom stručnog voditelja.
Page 65

Pregledi i održavanje (slika 2+7+8)
Bezbjednosna uputstva za tehničke preglede i održavanje:
Samo redovito održavan uređaj može biti dobar pomoćnik pri
radu. Nedovoljno održavanje i njega mogu uzrokovati
nepredvidive nezgode i ozljede.
• Za čišćenje nikad ne upotrebljavajte nagrizna
sredstva za čišćenje. To može uzrokovati oštećenje
ili uništenje uređaja.
• Izvadite utikač kabla iz utičnice!
• Samo stručno osposobljeni električari mogu popravljati i
održavati električne dijelove uređaja.
• Poslije završetka popravke ili održavanja uređaja
neophodno je ponovo montirati sve zaštitne i sigurnosne
elemente.
Preporučujemo da (sllika 2):
• Nož za cijepanje
Nož za cijepanje je potrošni materijal koji je neophodno
povremeno dobro naoštriti. To će povećati snagu i zaštiti
uređaj za cijepanje. Savijet: Nož za cijepanje
podmažite mazivom.
• Zaštitni uređaj za obje ruke
Neophodno je obezbjediti besprijekoran rad
kombiniranog dvoručnog zaštitnog elementa. Prema
potrebi podmažite s nekoliko kapi ulja.
• Stub za cijepanje
Prije svake uporabe podmažite stub mazivom,
time ćete povećati životni vijek čeljusti (slika 2/A). Stub
izvucite i na sve četiri strane ravnomjerno nanesite
univerzalno mazivo.
• Pomični dijelovi
Vođice rezila za cijepanje moraju biti čiste (prljavština,
iveri, kora itd.). Klizne letve podmažite mazivom.
• Hidraulički uređaj
Hidrauličke priključke i vijčane spojeve provjerite, da li su
zaptiveni i da nisu istrošeni. Vijčane spojeve prema
potrebi zavrnite.
Kontrola stanja hidrauličkog ulja (slika 7+8):
Stanje hidrauličkog ulja provjeravajte samo dok je
hladno; utikač mora biti izvučen iz utičnice, klin za
cijepanje mora biti namješten.
Na uljnom mjeraču se nalaze dva zareza, najniži zarez (slika
8/1) predstavlja granicu za minimalnu količinu hidrauličkog ulja
u rezervoaru, gornji zarez (slika 8/2) za maksimalnu količinu.
• Mjerilo razine ulja (slika 7/A) kompletno odvrnite iz
otvora.
• Ulje iz mjerice obrišite glatkom krpom.
• Mjericu opet kompletno odvrnite u otvore.
• Poslije toga vijak za punjenje s mjericom ponovo
odvrnite i provjerite, da li se gornja granica hidrauličkog
ulja nalazi između oba navedena zareza.
Jedanput godišnje zamijenite ulje novim (slika 7+8):
• Odvrnite vijak za ispuštanje ulja (slika 7/A).
• Potrošeno ulje nalijte u posebnu posudu (svaki model ima
drukčiji volumen)
• Staro ulje likvidirajte na ekološki način!
• Vijak za ispuštanje ulja ponovo zavrnite. U rezervoar za
ulje ne smije prodrijeti nikakva prljavština.
• Hidrauličko ulje nalijte do gornjeg zareza na mjerici (slika
8/2)
• Uređaj za cijepanje drva isprobajte najprije u praznom
hodu.
Preporučeno hidrauličko ulje: DIN ISO HLP 46
Kataloški broj Güde 42004
Viskozitet: 46
Količina ulja: (vidi Tehničke podatke)
Ulje dopunjavajte samo, ako je stupac u uvučenom
položaju.
Hidraulički uređaj:
Hidrauličke cijevi i spojevi moraju biti
poslije približno 4 radna sata prekontrolisani; pregledajte
zaptvenost i u slučaju potrebe zavrnite.
Kontrola funkcija
Hidraulički uređaj prodaje se u funkcionalnom stanju. Prije
svake uporabe neophodno je provjeriti kontrolu funkcije.
• Oba rukohvata pustite, da se spuste dolje, isto važi za
nož do visine 5 cm iznad stola
• Uvijek spustite jedan priključni rukohvat, nož za cijepanje
će se zaustaviti u odabranoj poziciji
Montaža ramena uređaja za cijepanje, kotača i
stola (slika 1+4)
Montaža ramena za rukovanje - slika 1
Rame stroja (slika 1/4) namijestite u kontaktnu kolijevku (slika
1/14) i odozgo fiksirajte vijkom, podloškom i štiftom. Sada
fiskirajte rame (slika 1/4) kao što je opisana metoda na drugoj
strani. Zaštitni lukovi (slika 1/13) sa obje strane opslužnog
ramena montirajte uvijek pomoću 2 šestorokutna vijka (slika
1/3).
SAVIJET: Prije toga nadmažite limene spojke mazivom
limene spojnice i matice (slika 1/15)!
Montaža kotača (slika 4
Poslije toga na obje strane montirajte okretni kolut i učvrstite
ga rascjepkom (A).
Montaža stola/okretnog stola - slika 1
Ploču stola namjestite u pripremljene držače (slika 1/6) i
istovrjemeno povucite za polugu. Za okretanje okretnog stola
potisnite polugu prema dolje. Prilikom primjene okretnog stola
pazite na to, da bude poluga uvijek fiksirana.
Podešavanje podizanja (slika 5)
Kod komada drva manjih od 50 cm, a u slučaju većeg broja
drvenih komada moguće je povećati radni kapacitet uređaja
skraćenjem
povratnog kretanja noža za cijepanje.
To se vrši na slijedeći način:
Na stol uređaja za cijepanje stavite kratak komad drva i
spustite nož za oko 2 cm iznad komada drva. Uređaj isključite
(pritisnite na crveno dugme na prekidaču i izvucite utikač
priključnog kabla iz utičnice). Sada možete skratiti pomoću
fiksirane motke (slika povratno kretanje, i to tako da fiksirate
ovu šipku vijka za zaustavljanje (slika 5/A) na traženoj visini.
Područje upotrebe
Ovaj uređaj služi isključivo za obradu drva za loženje. Materijal
koji se cijepa, mora imati slijedeće dimenzije:
- minimalan promjer: 125 mm
maksimalan promjer: 400 mm
- Drvo se cijepa u smjeru njegovih vlakna.
- Kod drva sa kvrgama postoji opasnost od blokiranja
uređaja.
- Blokiran komad drva izvucite kucanjem na drvo.
- Zabranjeno je izrezivati cijepani komad drva!
Električno / hidrauličko priključenje (slika 1 i 7)
Priključenje na el. mrežu (slika 1/10)
Prema odredbama propisa stručnih organizacija „CE“ itd., svi
strojevi za cijepanje drva obvezno su opremljeni
podnaponskom zaštitom u prekidaču. Podnaponska zaštita
sprječava samovoljno pokretanje uređaja poslije ispada
električne struje odnosno poslije ponovnog uspostavljanja
napona u mreži, u slučaju slučajnog vađenja utikača iz
utičnice, u slučaju ispada ili kvara osigurača itd.. Uređaj može
biti uključen isključivo pritiskom na zeleno dugme.
Ako namjerno držite gumb pritisnut ili ako ga blokirate bez
nultog provodnika dovodi automatski do isklapanje sklopke. U
tom slučaju, koji se može naknadno provjeriti, korisnik stroja
gubi pravo na garanciju.
Page 66

Hidraulički uređaj
Kod hidrauličnih crijeva i priključaka neophodno je, da se
poslije 4 sata rada provjeri njihova zabrtvljenost i da se
spojnice prema potrebi zategnu.
Važi samo za uređaje 400 V: U svakom slučaju provjerite
ispravan smjer vrtnje motora (vidi strelicu navedenu na
motoru), pošto kod rada sa neispravnim smjerom vrtnje
dolazi do oštećenja uljne pumpe. U tom slučaju garancija
ne važi. U slučaju potrebe zamijenite smjer okretanja
izmjenom polova na utikaču. Vidi sliku br. 6!
Hidrauličko ulje / rezervoar
Svi strojevi za cijepanje drva mogu biti punjeni uobičajenim
hidrauličkim uljem (npr. HLP 46 ili uljem druge vrste iste
viskoznosti). Zamjena ulja nije neophodna.
Prije svake upotrebe ispraznite vazduh iz uređaja, i to
odvijanjem i ponovnim vraćanjem vijka na otvoru za
punjenje (slika 7/A).
Rad
Upozorenje: Drvo uvijek cijepite, ako je moguće, pod
pravim uglom, s time da drvo mora dobro nalijegati uz
površinu stola. Kosi komadi drva odnosno kvrgavo drvo
može pasti sa stola odnosno deformirati ramena stroja za
cijepanje.
Drvo uvijek polažite samo na površine koje su za to
namijenjene (tj. stolove) (nikad ne na okvir). Time može
doći do oštećenja uređaja.
1. Uključite motor – pritisnite na zeleno dugme.
Upozorenje: Pazite na smjer vrtnje!
2. Kod niskih temperatura ostavite uređaj za cijepanje
oko 15 u praznom hodu da se ulje zagrije na ispravnu
temperaturu.
3. Materijal (drvo) za cijepanje stavite na stol i pridržavajte
ga pomoću pridržnih graničnika na poluzi.
4. Pritiskom na obje poluge počinje cijepanje. (Čim nož za
cijepanje uđe drvo, lagano povucite polugu prema vani,
uz istovremeno pritiskanje prema dole. Time ćete
spriječiti savijanje limova (ramena) za usmjeravanje
komada drva.
5. Nakon završetka cijepanja podignite najmanje jednu
polugu, stupac stroja za cijepanje se automatski podigne
prema gore.
Strogo je zabranjeno da sa strojem za cijepanje rade dvije
osobe na način da jedna osoba pridržava drvo a drugi ga
pritišće na graničnike.
Uputstva za transport
Prijevoz uređaja
Svi uređaji za cijepanje drva opremljeni su velikim kotačima.
Zbog premještanja stroja jednom rukom uhvatite dršku na
stupcu stroja iznad motora i stroj lagano nagnite prema sebi. U
tom položaju možete uređaj jednostavno premještati na
kotačima.
Kako biste spriječili istjecanje hidrauličkog ulja, nikad
uređaj ne premještajte u ležećem položaju.
Prilikom prijevoza uređaja spustite nož skroz dole.
Sekundarna opasnost i zaštitne mjere
Upozorenje!!!
Isključivanje, promjene, blokiranje, demontiranje,
pregradnja ili montiranje svih vrsta dijelova sigurnosnih i
zaštitnih elemenata na uređaju strogo je zabranjeno;
nepoštivanje ovog uputstva može uzrokovati ozbiljne
ozljede opasne po život.
Proizvođač ne snosi odgovornost za materijalne štete i
ozljede osoba nastale uslijed nepoštivanja ovih uputstva.
Osim toga, u svim gore navedenim slučajevima
nepoštivanja uputa kupac gubi prava iz jamstva prema
proizvođaču stroja.
Uređaj može koristiti samo jedna osoba. Tijekom rada sa
strojem redovito uklanjajte ostatke drva koji mogu
blokirati odnosno na drugi način negativno djelovati na
sigurnosne i radne dijelove stroja.
Servis
Da li imate tehnička pitanja ? Reklamaciju? Da li Vam
trebaju rezervni dijelovi ili nova uputstva za upotrebu?
Na našim stranicama www.guede.com u odjeljenju „Servis“
pružamo pomoć brzo i bez suvišne birokracije. Pomozite nam
kako bismo mi Vama mogli pomoći. Radi identifikacije Vašeg
uređaja za slučaj reklamacije neophodan nam je serijski broj,
broj narudžbe i godina proizvodnje. Sve gore spomenute
podatke naći ćete na tipskoj etiketi. Da biste ove podatke
uvijek imali pri ruci, zapišite ih molim tu:
Serijski broj:
Kataloški broj/broj narudžbe:
Godina proizvodnje:
Telefon: +49 (0) 79 04 / 700-360
Telefaks: +49 (0) 79 04 / 700-51999
E-mail: support@ts.guede.com
Page 67

Izjava o sukladnosti EU
Temeljem ove izjave, mi,
Güde GmbH & Co. KG
Birkichstraße 6
74549 Wolpertshausen
Njemačka
proglašavamo, da dolje navedeni uređaji, u smislu njihove koncepcije i konstrukcije kao i u pogledu izvedbi koje smo uveli u promet,
ispunjavaju odgovarajuće osnovne direktive bezbjednosti i zdravlja prema smjernicama EU.
Ako dođe do promjena na uređaju bez naše suglasnosti, ova Izjava postaje nevažećom.
Oznaka uređaja: Uređaj za cijepanje Basic 10T/DTS
Kat br.: 02040
Datum/Potpis proizvođača: 07.03.2012
Podaci o potpisanoj osobi gospodin Arnold, Direktor
Tehnička dokumentacija: J. Bürkle FBL; QS
Primjenjive smjernice EU:
2004/108/EG
2006/42/EG
Primijenjeni harmonizirani standardi :
EN 609- 1/A2:2009
EN 61000-3-3:1995+A1+A2
EN 61000-3- 2:2006
EN 55014-2:1997+A1
EN 55014-1:2006
Buka:
Lwa: 85,2 dB
Lpa: 69,9 dB
Utvrđivanje kvarova
Poteškoće
Mogući uzroci
Rješenje
Motor se ne pali.
1. U utičnici nema struje
2. Produžni kabel je oštećen
3. Loši električni kabel
4. Loši prekidač, kondenzator
1. Provjeriti osiguranje mreže
2. Izvucite utikač, provjerite, zamijenite
3. Priključak 5-žilni, pri prosjeku 2,5 mm
2
4. Uređaj mora pregledati električar
Nepravilan smjer
okretanja motora
1. Nepravilno priključenje 1. Izmjenjivač faza okrenite u utičnici uređaja s
odvrtačem
Nož za cijepanje se ne
kreće
1. Premještanje poluge za podešavanje
funkcije za obje ruke
1. Provjerite stanje ulja
Oštećen je upravljački ventil – zamjena moguća je u
servisu
Uređaj ne postiže
potrebnu snagu
1. Nepravilan smjer vrtnje
2. Premalo hidrauličnog ulja
3. Savijena šipka; ne dolazi do potpunog
pritiskanja mehanizma za podizanje
ventila.
4. Drvo je kvrgavo, kvrge uzrokuju blokadu
noža tijekom cijepanja.
5. Rame za rukovanje je sagnuto
1. Promjena smjera okretanja
2. Dopunite hidrauličko ulje
3. Provjerite sve vijke na šipkastom mehanizmu za
puštanje
Pomjerite vučnu šipku (slika 10/B) , time se
hidraulička dizalica na ventilu sasvim sklopi.
4. Nož za cijepanje podmažite mazivom.
5. Rame za rukovanje namjestite u polazni položaj.
Zeleni gumb nakon
uključivanja ne ostaje
pritisnut.
1. Ispad osigurač itd.
2. Rad na 2 faze
1. Provjerite kabel
Hidraulička pumpa pišti,
nož za cijepanje ne radi
pravilno
1. Gubitak ulja, prljavi pod
2. Preniska razina ulja u spremniku za ulje
1. Zavrnite vijčani spoj
Zamijenite cijevi
2. Dopunite hidrauličko ulje
Page 68

Mehanička sekundarna opasnost
Opasnost Opis Zaštitna(e) mjera(e) Sekundarna opasnost
Ozljede prstiju Tijekom sječenja može kao posljedica
pada hidrauličkog noža doći do povreda
dijelova tijela.
Postoji opasnost da će drvo prilikom
cijepanja u uređaju zaglaviti. Ne
zaboravite, da je drvo kod izvlačenja
pod velikim pritiskom natezanja i u
naprslinama koje nastaju prilikom
sječenja može doći do povreda prstiju.
U svakom slučaju koristite dvoručno sigurnosno
upravljanje. Nikad ne intervenišite u proces
cijepanja drva.
Nikad ne koristite uključen stroj zajedno sa
drugom osobom.
Blokirani komad drva vadite samo izbijanjem.
Čuvajte se od drveta koje pada, može doći do
povrjeda nogu.
Istrošeni ili oštećeni alat
mora biti odmah
zamijenjen novim.
Pazite na osobe, koje se
nalaze u blizini!
Prilikom rada koristite
uvijek zaštitne naočale.
Povrede
sječenjem
Tijekom sječenja može kao posljedica
pada hidrauličkog noža doći do povreda
dijelova tijela.
U svakom slučaju koristite dvoručno sigurnosno
upravljanje. Nikad ne intervenišite u proces
cijepanja drva.
Istrošeni ili oštećeni alat
mora biti odmah
zamijenjen novim.
Opće ozljede Kod obrade suhog drva može doći do
ozbiljnih ozljeda uslijed previše
intenzivnog cijepanja.
Drveni komadi, koji nastaju prilikom
cijepanja, mogu pasti dole i oštetiti
noge korisnika.
Produžetak klina za cijepanje može
udariti o stol i prouzrokovati štetu na
uređaju i ozljede.
Nikad ne intervenišite u proces cijepanja drva.
Uvijek stojite u sigurnoj udaljenosti od stroja.
Sa uređajem uvijek radite oprezno i sa
pažnjom.
Pri radu uvijek koristite odgovarajuću zaštitnu
odjeću i radite vrlo oprezno.
Prilikom rada sa uređajem nosite uvijek zaštitne
naočale.
Pri radu uvijek koristite odgovarajuću zaštitnu
odjeću i radite vrlo oprezno.
Koristite zaštitno odijelo i sigurnosnu obuću.
Prije radova sa produženim klinom demontirajte
uvijek stol.
Istrošeni ili oštećeni alat
mora biti odmah
zamijenjen novim.
Uvijek pazite na osobe,
koje se nalaze u blizini.
Hvatanje,
namatanje
Široka odjeća, duga kosa ili nakit mogu
biti zahvaćeni pokretnim dijelovima
uređaja.
Korisite uvijek tijesnu odjeću, bez nakita, kosu
zaštitite mrežicom za kosu.
Sekundarna opasnost električnog udara
Opasnost Opis Zaštitna(e) mjera(e) Sekundarna opasnost
Neposredan
kontakt sa
dijelovima pod
naponom
Oštećen kabao ili utikač može dovesti
do udara električnom strujom.
Oštećene kablove ili utikače može zamijeniti
samo stručnjak. Uređaj koristite isključivo
sa zaštitnim prekidačem za prekostrujnu zaštitu
(FI).
Prije svakog korištenja
provjerite sve dijelove.
Neposredan
dodir sa el.
strujom.
Ozljede uslijed kontakta sa provodnim
dijelovima kod otvorenih električnih ili
pokvarenih konstrukcijskih dijelova.
Prilikom održavanja uvijek izvucite utikač.
Upotrebljavajte samo uz FI (zaštitni prekidač
protiv variranja struje)!
Opasnost od buke
Opasnost Opis Zaštitna(e) mjera(e) Sekundarna opasnost
Oštećenje
sluha
Duži rad sa ovim uređajem dovodi do
oštećenja sluha.
Zbog toga uvijek nosite zaštitne slušalice.
Nepoštivanje ergonomskih propisa
Opasnost Opis Zaštitna(e) mjera(e) Sekundarna opasnost
Nemarno
korištenje
sredstava
osobne zaštite
Osoblje bez odgovarajućih zaštitnih
sredstava može pretrpjeti ozbiljne
unutarnje ili vanjske ozljede.
Pri radu uvijek koristite odgovarajuću zaštitnu
odjeću i radite vrlo oprezno.
Nedovoljno
lokalno
osvjetljenje
Nedostatno osvjetljenje predstavlja
veliki rizik bezbednosti.
Prilikom rada sa uređajem osigurajte uvijek
dostatno osvjetljenje.
Ostale vrste opasnosti
Opasnost Opis Zaštitna(e) mjera(e) Sekundarna opasnost
Odbačeni
predmeti ili
tekućine koje
mogu brizgati.
Prilikom cijepanja drva može doći do
ozljede Vaših očiju sitnim česticama
drva.
Prilikom rada sa uređajem nosite uvijek zaštitne
naočale.
Page 69

Marcări pe utilaj
Explicare simboluri
În prezentul mod de operare și/sau pe utilaj sunt folosite
următoarele simboluri:
Securitate produs:
Produsul corespunde normelor
UE aferente
Interdicții:
Interdicție generală
(împreună cu o altă pictogramă)
Este interzis a se pune mâna
înăuntru
Interdicţia de a trage de ştecher!
Ocrotiţi împotriva ploii şi a
umezelii!
Utilajul poate fi operat numai de
o singură persoană
Avertisment:
Avertisment/atenție
Avertisment împotriva
pericolului de împiedicare!
Respectați o distanță sigură de
securitate !
Avertisment! Pericol de
prindere!
Avertisment! Obiecte proiectate!
Avertisment! Rănirea mâinilor cu
pana de despicare!
Avertisment împotriva
pericolului prezentat de
tensiunea electrică
ATENȚIE! Înainte de operare,
citiți modul de utilizare!
Comenzi:
Înainte de operare, citiți modul
de utilizare
Folosiți ochelari de protecție și
protecții ale auzului!
Folosiți mănuși de protecție
Folosiți încălțăminte de
securitate!
Ocrotirea mediului ambiant:
Lichidaţi deşeurile în mod
profesional astfel, ca să evitaţi
poluarea mediul ambiant.
Ambalajul din carton poate fi
predat la punctele de colectare
în scopul reciclării.
Aparatele electrice sau
electronice defecte şi /sau
lichidate trebuie să fie predate la
puncte de colectare
corespunzătoare. .
Sistem Interseroh- Recycling cu
număr de fabricație
Ambalaj:
Protejați de umezeală!
Atenție – fragil!
Direcția de orientare a
ambalajului - în sus.
Date tehnice:
Cuplă Putere motor
Turații Putere de despicare
Diametru max. a lemnului
despicat
Lungimea max. a lemnului de
despicat
Mărime masă cca Greutate
Altele:
Î
nainte de operare,încălziți
uleiul 1 minut prin apăsarea unui
arc de protecție.
Î
nainte de a conecta
despicătorul, țineți apăsat un
braț de deservire!
Direcție de rotire
RO
Vă rugăm ca, înainte de a pune în funcțiune utilajul, să citiți cu atenție acest mod de utilizare.
A.V. 2 Reproducerea, chiar și parțială, trebuie aprobată. Modificări tehnice rezervate. Figuri ilustrative!
Acesta este originalul modului de operare.
Page 70

Descriere utilaj (fig. 1)
1. Mâner
2. Lamă de despicare
3. Element de fixare
4. Braț de deservire
5. Protecție mâner
6. Susținător masă (în față)
7. Blocare masă
8. Masă despicător
9. Roți
10. Despicător / ștecher
11. Tijă pentru fixarea cursei
12. Motor
13. Arc de protecție
14. Punte de conectare (protecție posterioară)
15. Cuplă tablă
16. Manetă pentru masa turnantă
17. Masă turnantă
Utilaj
Despicător butuci Basic 10T/DTS
Construcție grea din oțel, lamă de despicare din oțel special, toate
componentele din oțel tratate cu vopsea de pulbere, pompă
hidraulică profesională pentru operare în condiții dificile, piesă
adâncă, încastrabilă cu masă turnantă suplimentară. Motorul cu
siguranță împotriva supraîncălzirii.
Utilizare conform destinației
Despicătorul de butuci este dimensionat pentru operarea unei
singure persoane. Este interzis a se lucra pe utilaj în două sau mai
multe persoane. Despicătorul de butuci este destinat în exclusivitate
pentru despicarea lemnului de-a lungul fibrei. Trebuie respectate cu
strictețe instrucțiunile pentru montaj, operare, întreținere, reparații,
etc., astfel ca să fie excluse riscurile și să se evite daunele. În timpul
despicării trebuie avut neapărat în vedere ca lemnul în lucru să fie
amplasat numai pe tabla moletată a suprafeței de sprijin sau pe
tabla moletată de pe masa despicătorului. Cu acest utilaj nu pot fi
efectuate alte lucrări decât cele pentru care a fost construit și care
sunt descrise în modul de operare. Orișice altă utilizare este
contradictorie destinației. Producătorul nu-și asumă
responsabilitatea eventualelor daune ulterioare. Aveți, vă rog, în
vedere faptul că acest utilaj nu a fost construit pentru utilizare
industrială.
Garanție
Garanţia se referă în exclusivitate la defectele de material sau de
producţie. Revendicarea reclamaţiei în perioada de garanţie se
efectuează prin prezentarea documentului original de cumpărare cu
data achiziţionării. Garanţia nu se aplică în cazul operării
neprofesionale ca de ex. suprasolicitarea utilajului, operare forţată,
deteriorare de o persoană străină sau de un obiect străin.
Nerespectarea modului de utilizare şi a modului de montare ca şi
uzura normală sunt excluse din garanţie.
Date tehnice
Cuplă: 400 V~50 Hz
Putere motor: 4000 W P1 / S6 40%
Rotații motor: 1440 rpm
Putere max. de despicare: 10 tone
Cursă max. la despicare: 510 mm
Viteză avans înainte: 0,03 m/s
Viteză avans înapoi: 0,15 m/s
Rezervor ulei hidraulic: 8 l (ulei de tip: HLP 46)
Lungime lemn de despicat: 1350 mm
Stâlp de despicare: 120 mm x 120 mm
Diametru max. lemn de despicat: cca 400 mm
Dimensiuni masă: Cca 380 x 300 mm
Greutate: 177 kg
Comandă nr. 02040
Instrucțiuni de securitate
Generalități
Din motive de securitate este necesară respectarea instrucțiunilor
de securitate cuprinse în prezentul mod de operare ca și
instrucțiunile de pe utilaj referitoare la deservire, întreținere și
reparațiile utilajului.
Personalul de deservire
Utilizarea despicătorului de butuci poate aduce cu sine o serie de
riscuri. De aceea, cu utilajul poate să manipuleze și să lucreze
numai persoane instruite și cu experiență. Personalul de deservire
trebuie să poarte haine înguste, pe corp și încălțăminte de
protecție.
Locul de muncă
Pentru a despica lemne în condiții de securitate este foarte
important ca locul de muncă să se afle pe o suprafață plană, să
permită menținerea stabilității și o libertate de mișcare suficientă.
Atunci când se aduce și se duce la loc despicătorul trebuie ca de pe
căile de acces să se înlăture toate obstacolele. Trebuie asigurată o
iluminare adecvată a locului de muncă
.
Asigurați ca în timpul lucrului să nu se găsească la locul de
muncă nici o altă persoană, respectiv să se respecte o distanță de
siguranță suficientă.
Pregătirea pentru lucru
În caz de reparații sau lucrări de întreținere sau ori de câte ori
părăsiți despicătorul de butuci trebuie apăsat butonul roșu de pe
comutator și scos ștecherul din priză pentru a întrerupe aducția
curentului electric. Nu este suficientă întreruperea curentului
electric numai prin trecere comutatorului în poziția DECONECTAT.
Despicătoare le de butuci GÜDE se livrează numai cu lame de
despicat călite. Dacă însă după despicarea lemnului care conține
corpuri străine invizibile, de ex. din ciment, oțel, etc. veți constata o
ușoară deformare a tăișului lamei, înlăturați-o cu o pil
ă sau prin
șlefuire. Menținerea permanentă a lamei de despicat în stare
ascuțită case să crească randamentul lucrului.
SUGESTIE: Ungeți din când în când lama de despicat cu grăsime (în
cazul lemnului problematic).
Înaintea primei puneri în funcțiune a despicătorului trebuie
verificate instalațiile de securitate (în deosebi deservirea cu două
manete).
ATENȚIE! Înaintea fiecărei puneri în funcțiune convingeți-vă
că masa de despicat este fixată bine pe despicător.
Lichidare
Instrucţiunile de lichidare reies din pictogramele amplasate pe utilaj,
respectiv pe ambalaj. Descrierea semnificaţiilor le veţi găsi la
capitolul „Marcare“.
Lichidarea ambalajului de transport
Ambalajul protejează utilajul în timpul transportului împotriva
deteriorărilor. Materialele de ambalaj sunt utilizate de regulă în
funcţie de modul lor de încadrare faţă de mediul ambiant şi a
modului de lichidare, de aceea acestea pot fi reciclate.
Înapoierea ambalajelor în circuitul de materiale economiseşte
materiile prime şi reduce cheltuielile pentru lichidarea deşeurilor.
Părţi ale ambalajului (de ex. folie, polistiren) pot prezenta pericol
pentru copii. Există riscul de asfixiere!
Depozitați părți ale ambalajului înafara accesului copiilor la el şi
lichidaţi-le cât mai repede.
Exigențe de deservire
Operatorul trebuie ca, înainte de a se folosi de utilaj, să citească cu
atenție modul de deservire.
Page 71

Calificare
În scopul operării utilajului, în afară de o instruire amănunţită din
partea unei persoane calificate, nu este necesară nici o altă calificare
specială.
Vârsta minimă
Utilajul poate fi operat de persoane care au împlinit vârsta de 18
ani. Excepţie o fac minorii în cadrul pregătirii lor profesionale pentru
a obţine deprinderi, aceasta doar sub supravegherea instructorului.
Revizii și mentenanță (fig. 2+7+8)
Instrucțiuni de securitate pentru revizii și mentenanță:
Numai un utilaj întreținut și îngrijit permanent poate să fie de un
real folos. O întreținere insuficientă poate duce la daune
imprevizibile și la accidente.
• Nu folosiți niciodată detergenți agresivi. Pot să deterioreze
sau să distrugă utilajul.
• Scoateți ștecherul din priză.
• Reparațiile și întreținerea instalației electrice trebuie
efectuate numai de electricieni.
• După încheierea reparațiilor și lucrărilor de întreținere, toate
instalațiile de protecție și de securitate trebuie imediat
reinstalate pe utilaj.
Vă recomandăm (fig. 2):
• Lama de despicat
Lama de despicat este o piese consumabilă rapid cere
trebuie, la nevoie, din nou șlefuit. Aceasta majorează
randamentul la despicare ți protejează despicătorul. Sugestie:
ungeți cu grăsime lama de despicat!
• Instalație de protecție pentru operare cu ambele mâini
Instalația combinată de ținere și conectare trebuie să
funcționeze ușor. Ungeți uneori cu câteva picături de ulei.
• Coloană de despicare
Înainte fiecărei utilizări ungeți coloana de despicare cu
grăsime, veți prelungi astfel durata de viață a fălcilor
glisante (fig. . 2/A). Scoateți în întregime coloana de
despicare și aplicați uniform pe toate cele 4 părți un strat
de grăsime multifuncțională.
• Părți mobile
Men
țineți în curățenie ghidajul lamei de despicat (impurități,
așchii, coajă, etc.). Ungeți cu grăsime șinele glisante.
• Instalația hidraulică
Controlați racordurile hidraulice și îmbinările cu șuruburi sub
aspectul etanșeității și a uzurii. Eventual strângeți îmbinările
cu șuruburi.
Controlul uleiului hidraulic (fig. 7+8):
Controlați nivelul uleiului hidraulic numai în stare rece, cu
cablul de alimentare scos și cu coloana de despicare îngropată.
Pe joja de ulei se găsesc două semn, semnul cel mai de jos (fig. 8/1)
marchează cantitatea minimă de ulei hidraulic din rezervor, semnul
de sus (fig. 8/2) cantitatea maximă.
• Deșurubați complet joja de ulei (fig. 7/A) din orificiu.
• Ștergeți cu o cârpă joja de ulei.
• Reînșurubați complet joja de ulei la loc.
• După care deșurubați din nou joja de ulei și verificați dacă
limita superioară a uleiului hidraulic se află între cele două
semne.
Schimbați uleiul o dată pe an (fig. 7+8):
• Deșurubați șurubul pentru evacuarea uleiului (fig. 7/A).
• Captați uleiul uzat (fiecare model conține altă cantitate)
• Lichidați pe cale ecologică uleiul uzat.
• După evacuarea uleiului, reînșurubați șurubul. Nu se admite
ca în rezervorul de ulei să pătrundă impurități.
• Turnați ulei hidraulic în rezervor până la semnul de sus de pe
jojă (fig. 8/2)
• Probați de câteva ori în gol despicătorul de butuci.
Ulei hidraulic recomandat: DIN ISO HLP 46
Nr. comandă Güde 42004
Viscozitate: 46
Cantitate ulei: (v. Datele tehnice)
Completați uleiul hidraulic numai cu coloana de despicare în
poziție îngropată
Instalație hidraulică:
Furtunul și racordurile hidraulice trebuie controlate după circa 4 ore
de funcționare, aceasta sub aspectul etanșeității, în caz de
necesitate trebuie strânse.
Verificare funcționalitate
Despicătorul hidraulic de lemne se livrează în stare de operare.
Înaintea fiecărei utilizări trebuie efectuată această verificare a
funcționalității.
• Coborâți ambele manete de conectare și lama de despicare
până la circa 5 cm deasupra mesei
• Dați drumul la una din manete, lama de despicare rămâne în
poziția aleasă
Montajul brațelor de deservire, roților și al mesei
(fig. 1+4)
Montajul brațelor de deservire - fig. 1
Aduceți brațul de deservire (fig. 1/4) la puntea de conectare (fig.
1/14) și blocați de sus cu șurub, șaibă și șplint. Fixați acum brațul de
deservire (fig. 1/4) cu metoda descrisă pe verso. Montați arcurile de
protecție (fig. 1/13) pe ambele brațe de deservire cu 2 șuruburi
hexagonale (fig. 1/3).
TIP: Înainte, ungeți cu grăsime de sus și de jos racordurile de tablă
și piulițele (fig. 1/15)!
Montajul roților - fig. 4
Montați de fiecare parte câte o roată, fixați cu un șplint (A).
Montajul mesei/a mesei rotative - fig. 1
Introduceți placa mesei în suport (fig. 1/6) trăgând în același timp
maneta de blocare. Pentru a roti masa rotativă apăsați maneta în
jos. Atunci când veți folosi masa rotativă fiți atenți ca maneta să fie
întotdeauna blocată.
Reglare cursă (fig. 5)
La butucii de dimensiuni inferioare de cca 50 cm și în cazul unui
număr mai mare de butuci se poate majora randamentul lucrului
reducând mișcarea de întoarcere a lamei de despicat.
Procedați astfel:
Puneți pe masa despicătorului un butuc și veniți cu lama de despicat
până la cca 2 cm deasupra butucului. Deconectați despicătorul
(butonul roșu de pe comutator și scoateți ștecherul din priză). Acum,
cu ajutorul tijei (fig. 5/B) puteți scurta deplasarea de întoarcere
aceasta fixând tija la înălțimea dorită cu șurubul de blocare (fig. .
5/A).
Domeniu de utilizare
Utilajul poate fi folosit în exclusivitate la despicarea lemnelor de foc.
Materialul despicat trebuie să aibă aceste dimensiuni:
- Diametru minim: 125 mm
Diametru maxim: 400 mm
- Se permite despicarea lemnului numai de-a lungul fibrei.
- În cazul unui material cu noduri, există la despicare pericolul
de înțepenire a acestuia.
- Degajarea bucății de lemn înțepenite se face bătând butucul.
- Este interzis a decupa butucul de despicat!
Page 72

Conectare electrică/hidraulică (fig. 1 a 7)
Conectarea la rețea (fig. 1/10)
În conformitate cu prevederile organizațiilor profesionale de
specialitate „CE“ etc., toate despicătoarele sunt dotate cu demaror
la tensiune minimă în comutator. Acesta împiedică pornirea de la
sine, necontrolată, a utilajului în cazul întreruperilor alimentării ca
urmare a căderilor de rețea, scoaterii neintenționate a ștecherului
din priză, a unei siguranțe defecte, etc. Utilajul trebuie repornit de
fapt prin apăsarea butonului verde de pornire.
Ținerea conștientă, respectiv blocarea butonului de pornire în
absența conductorului de nul duce automat la deconectarea
comutatorului. În acest caz care este depistabil, garanția se
anulează.
Instalația hidraulică
La furtunurile și racordurile hidraulice este necesar ca după circa 4
ore de operare să se verifice etanșeitatea, în caz de necesitate
acestea trebuie strânse.
Numai pentru utilajele de 400 V: Estre necesar a se avea în vedere
direcția de rotire a motorului (v. săgeta de pe motor), aceasta
pentru că funcționarea în direcție greșită poate deteriora pompa
cu ulei. Într-un astfel de caz se anulează toate eventualele
revendicări rezultate din garanție. În caz de necesitate schimbați
sensul de rotire prin inversarea polarității ștecherului. V. fig. 6!
Ulei/rezervor hidraulic
La toate despicătoarele se poate completa ulei hidraulic comun (de
ex. HLP 46 sau ulei de la un alt producător de aceeași viscozitate).
Înlocuirea uleiului nu este necesară.
Aerați rezervorul înaintea fiecărei utilizări prin deșurubarea și
reînșurubarea la loc a șurubului de umplere (fig. 7/A).
Funcționare
Atenție: Acordați atenție ca lemnul, pe cât posibil, să fie tăiat
în unghi drept și să se așeze cât mai aproape pe masa de despicat.
Lemnul tăiat oblic sau bucata de lemn cu extrem de multe noduri
poate să alunece și, respectiv, poate îndoi brațele de deservire.
Amplasați lemnul întotdeauna numai pe suprafețele
destinate acestui scop (mese) (niciodată nu pe cadru). Aceasta ar
putea deteriora despicătorul.
1. Prin apăsarea butonului verde, porniți motorul. Atenție:
acordați atenție sensului de rotire a motorului!
2. La temperaturi scăzute, lăsați despicătorul să funcționeze în
gol pentru ca uleiul să de încălzească la temperatura
corespunzătoare.
3. Puneți materialul de despicat pe masă și apucați-l pentru a-l
prelucra cu ajutorul elementelor de prindere.
4. Prin apăsarea ambelor manete în jos începe operația de
despicare. Imediat ce lama de despicat va pătrunde în lemn,
continuați să apăsați maneta în jos răsturnând-o în același
timp spre în afară. Astfel se va evita îndoirea brațelor de
susținere din tablă.
5. După terminarea despicării ridicați cel puțin o manetă, coloana
utilajului se va retrage automat în sus.
Este strict interzis ca despicătorul de butuci să fie deservit de două
persoane astfel ca una să țină lemnul iar cealaltă să acționeze
elementele de prindere.
Instrucțiuni privind transportul
Transportul
Toate despicătoarele de butuci sunt prevăzute cu roți mari. În scopul
deplasării despicătorului apucați cu o mână mânerul de pe coloana
de despicare, iar cu cealaltă mână maneta de deasupra motorului și
trageți ușor despicătorul în spre dumneavoastră. În această poziție
se poate deplasa despicătorul fără ca să depuneți un efort deosebit.
Pentru ca să evitați pierderi de ulei hidraulic, nu deplasați
niciodată despicătorul în poziția culcat.
În timpul deplasării coborâți întotdeauna lama de despicare cât
mai jos.
Pericole remanente și măsuri de protecție
Avertisment!!!
Este strict interzis a se scoate din funcțiune dar și blocarea,
demontarea, reconstrucția sau montajul tuturor componentelor pe
instalațiile de protecție de pe utilaj, nerespectarea acestor
instrucțiuni putând duce la accidente grave, care să pună viața în
pericol.
Producătorul nu poate garanta daunele materiale și personale ivite
în urma unui astfel de comportament.
De asemeni se anulează fiecare revendicare de garanție față de
producător în cazul nerespectărilor de mai sus.
Despicătorul poate fi deservit numai de o singură persoană.
Înlăturați din preajma despicătorului și a locului de muncă resturile
de lemn care ar putea bloca sau influența negativ elementele de
securitate li de deservire.
Servis
Aveţi întrebări de ordin tehnic? Reclamaţii? Aveţi nevoie de piese
de schimb sau de manualul de deservire?
Pe site-ul nostru www.guede.com la secţia Service, vă vom ajuta
repede şi nebirocratic . Vă rugăm să ne ajutaţi să vă ajutăm. Pentru
a putea, în caz de reclamaţii, identifica utilajul dumneavoastră,
avem nevoie de numărul seriei, numărul comenzii şi anul de
producţie. Toate aceste date le
veţi găsi pe plăcuţa de tip. Pentru ca
să aveţi la îndemână aceste date, vă rugăm să le notaţi mai jos.
Număr serie:
Număr comandă:
An de producţie:
Tel.: +49 (0) 79 04 / 700-360
Fax: +49 (0) 79 04 / 700-51999
E-Mail: support@ts.guede.com
Page 73

Declarație de conformitate UE
Prin prezenta declarăm noi, ,
Güde GmbH & Co. KG
Birkichstraße 6
74549 Wolpertshausen
Germania
că concepţia şi construcţia utilajelor de mai jos, în execuţia în care sunt date în circulaţie, corespunde exigenţelor de bază ale directivelor UE
referitoare la siguranţă şi igienă.
În cazul unei modificări pe utilaj care nu a fost consultată cu noi, această declaraţie îşi pierde valabilitatea.
Denumire utilaje: Despicător butuci Basic 10T/DTS
Comandă nr.: 02040
Data/semnătura producătorului: 07.03.2012
Date despre semnatar: director, domnul Arnold
Documentație tehnică: J. Bürkle FBL; QS
Directive UE aferente:
2004/108/EG
2006/42/EG
Norme armonizate aplicate:
EN 609-1/A2:2009
EN 61000-3-3:1995+A1+A2
EN 61000-3-2:2006
EN 55014-2:1997+A1
EN 55014-1:2006
Nivel de zgomot:
Lwa: 85,2 dB
Lpa: 69,9 dB
Depistare defecte
Probleme
Cauze posibile
Remediere
Motorul nu pornește
1. Lipsește curent în priză
2. Cablu prelungitor defect
3. Cablu de alimentare necorespunzător
4. Comutator, condensator defect
1. Verificați tensiunea
î
n rețea
2. Scoateți ștecherul, verificați, înlocuiți
3. Cupla cu 5 conductori la o secțiune de 2,5 mm
2
4. Dați unui electrician să verifice utilajul
Sens greșit de rotire a
motorului
1. Cuplare eronată 1. Inversați cu o șurubelniță convertizorul de faze în ștecherul
utilajului
Nu se înregistrează nici o
mișcare la lama de despicare
1. A se reface maneta de conectare cu ambele
mâini
1. Verificați stare ulei
Supapă de comandă defectă, a se înlocui numai la service
Despicătorul nu are nici un
randament
1. Sens de rotire eronat
2. Prea puțin ulei hidraulic
3. Tija de demarare îndoită; nu are loc
retragerea completă a mecanismului
hidraulic de ridicare de pe supapă
4. Lemnul are multe noduri, lama de despicare
se înțepenește
5. Brațul de deservire este îndoit
1. Inversați direcția de rotire
2. Completați uleiul hidraulic
3. Verificați toate îmbinările cu șuruburi de pe mecanismul
de demarare cu tijă
Refaceți tija de tragere (fig. 10/B), astfel
se va împinge cu totul mecanismul hidraulic de pe
supapă.
4. Ungeți cu grăsime lama de despicare.
5. Aduceți brațul de deservire la poziția inițială.
Butonul verde, după
apăsare, nu ține
1. Siguranță, etc., defectă
2. Mers în 2 faze
1. Verificați cablul
Pompa hidraulică fluieră,
lama de despicare
funcționează întrerupt
1. Pierderi de ulei, pardoseală poluată
2. Prea puțin ulei hidraulic în rezervor
1. Strângeți șuruburile
Înlocuiți furtunul
2. Completați uleiul hidraulic
Page 74

Pericole mecanice remanente
Pericol Descriere Măsură (i) de protecție Pericol remanent
Prindere,
strângere
Î
n timpul despicării, ca urmare a coborârii
lamei de despicare, poate fi prinsă sau
amputată o parte a corpului.
Există riscul de înțepenire a lemnului
despicat. Acordați atenție faptului că la
scoatere lemnul este puternic tensionat iar
în fisura de despicare puteți să vă prindeți
degetele.
Folosiți numai deservirea sigură cu ambele mâini.
Nu interveniți în procesul de despicare.
Nu lucrați niciodată pe utilaj în două persoane
Scoateți lemnul înțepenit numai prin împingere.
Atenție la lemnul în cădere, poate să vă rănească
picioarele.
Accesoriul uzat sau defect
trebuie înlocuit fără
întârziere.
Fiți atenți la persoanele din
jur!
În timpul lucrului purtați
întotdeauna încălțăminte
de protecție
Tăiere
În timpul despicării, ca urmare a coborârii
lamei de despicare, poate fi prinsă sau
amputată o parte a corpului.
Folosiți numai deservirea sigură cu ambele mâini.
Nu interveniți în procesul de despicare.
Accesoriul uzat sau defect
trebuie înlocuit fără
întârziere.
.
Accidente cu
caracter general
Prelucrarea lemnului uscat, prin despicare
bruscă, poate avea ca urmări accidente
grave.
Bucățile de lemn care se formează în
timpul despicării pot cădea și răni mai ales
picioarele persoanei care lucrează.
Prelungirea penei de despicat poate
pătrunde în masă, provocând astfel
deteriorarea utilajul sau accidente grave
persoanelor.
Nu interveniți niciodată în procesul de despicare.
Mențineți întotdeauna o distanță sigură de utilaj.
Întotdeauna deserviți utilajul cu atenție și
precauție.
Purtați întotdeauna îmbrăcăminte de protecție
adecvată și lucrați cu precauție.
Purtați întotdeauna ochelari de protecție atunci
când lucrați pe utilaj.
Purtați întotdeauna îmbrăcăminte de protecție
adecvată și lucrați cu precauție.
Purtați întotdeauna la îmbrăcămintea prescrisă și
încălțăminte de securitate adecvată.
Înainte de a lucra cu pana de despicare prelungită,
demontați întotdeauna masa.
Accesoriul uzat sau defect
trebuie înlocuit fără
întârziere.
Acordați întotdeauna
atenție persoanelor din jur.
Prindere,
înfășurare
Hainele largi, bijuteriile și părul lung pot fi
prinse de piesele în mișcare.
Purtați întotdeauna haine strânse pe corp, nu
purtați bijuterii și prindeți-vă părul cu un fileu.
Pericole electrice remanente
Pericol Descriere Măsură (i) de protecție Pericol remanent
Contact electric
direct
Cablu defect sau ștecherul pot fi cauză de
electrocutare.
Dați întotdeauna la înlocuit cablurile defecte unui
specialist. Operați utilajul numai cu întrerupător de
protecție împotriva curentului eronat (FI)
Î
nainte de fiecare utilizare
verificați cablul de
alimentare
Contact electric
indirect
Accidentare cu piesele conductoare ale
componentelor electrice de construcție
descoperite sau defecte
La lucrări de întreținere, scoateți întotdeauna
ștecherul din priză.
Operați utilajul numai cu întrerupător de protecție
împotriva curentului eronat (FI).
Periclitare cu zgomot
Pericol Descriere Măsură (i) de protecție Pericol remanent
Deteriorarea
auzului
Lucrul de lungă durată pe utilaj poate
deteriora auzul.
Purtați întotdeauna cască de protecție.
Neglijarea principiilor ergonomice
Pericol Descriere Măsură (i) de protecție Pericol remanent
Folosire
neglijentă a
echipamentului
de protecție
Personalul de deservire fără echipament de
protecție adecvat, poate provoca
accidentări interne și externe grave.
Purtați întotdeauna echipamentul de protecție
prescris și lucrați cu precauție.
Iluminare locală
neadecvată
O iluminare insuficientă prezintă un înalt
risc de siguranță.
Asigurați-văîntotdeauna o iluminare suficientă
atunci când lucrați pe utilaj.
Alte periclitări
Pericol Descriere Măsură (i) de protecție Pericol remanent
Obiecte
proiectate sau
lichide care
țâșnesc
Î
n timpul despicării, particule mecanice vă
pot răni ochii.
La lucrul pe utilaj purtați întotdeauna ochelari de
protecție.
Page 75

Обозначения на уреда
Пояснение на символите
В това упътване и/или на уреда са използвани следните
символи:
Безопасност на продукта:
Продукта отговаря на
съответните норми на ЕС
Забрани:
Забрана всеобща
(свързана с друг пиктограм)
Забранено е пипането вътре
Забранено е дърпането за
щепсела
Пазете пред дъжд и влага
Машината може да се
обслужва само от един
човек
Предупреждение:
Предупреждение/внимание
Предупреждение! Опасност
за спъване!
Спазвайте достатъчно
безопасно разстояние!
Предупреждение! Опасност
от притискане!
Предупреждение! Летящи
предмети!
Предупреждение!
Нараняване на ръцете от
цепещия кръст!
Предупреждение пред
опасно електрическо
напрежение
ВНИМАНИЕ! Преди работа
прочетете упътването за
обслужване!
Нареждания:
Преди употреба прочетете
упътването за обслужване
Използвайте предпазни
очила и слушалки!
Използвайте предпазни
ръкавици
Използвайте защитни
обувки!
Опазване на жизнената среда:
Отпадъците ликвидирвайте
професионално, така че да
не вредите на жизнената
среда.
Опаковъчния материал от
картон можете да
предадете за цел
рециклация във вторични
суровини.
Дефектни и/или
ликвидирани електрически
или електронни уреди
трябва да бъдат предадени
в съответните сборни
пунктове.
Система Interseroh-
Recycling с фабричен номер
Опаковка:
Пазете пред влага!
Внимание - чупливо!
Опаковката трябва да бъде
ориентирана нагоре!
Технически данни:
Присъединение Мощност на мотора
Обороти Сила на цепене
Макс. диаметър на цепеното
дърво
Макс. дължина на цепеното
дърво
Големина на масата прибл. Тегло
Други:
Преди работа загрейте
маслото в продължение на
1 минута с натискане на
едната защитна дъга.
При включване на цепещото
устройство дръжте едното
обслужващо рамо
натиснато!
Посока на въртене
BG
Преди да въведете уреда в действие, моля прочетете старателно това упътване за обслужване.
A.V. 2 Добавки, и то и частични, изискват одобрение. Техническите промени са запазени.
Илюстрационни картинки! Това е оригинално упътване за обслужване.
Page 76

Описание на уреда (карт. 1)
1. Дръжка
2. Цепещ нож
3. Стягаща плоча
4. Обслужващо рамо
5. Покритие на дръжката
6. Държач на масата (отпред)
7. Блокиране на масата
8. Маса на цепещото устройство
9. Колела
10. Включвател / щепсел
11. Прът за регулиране на хода
12. Мотор
13. Защитна дъга
14. Включваща люлка (долен капак)
15. Ламаринен съединител
16. Лост за въртящата маса
17. Въртяща се маса
Уред
Устройство за цепене на трупи Basic 10T/DTS
Тежка стоманена конструкция, цепещ нож от специална
стомана, всички стоманени части с висококачествено
прахово покритие, професионална хидравлична помпа за
употреба в затруднени условия, дълбока прибираща
част с допълнителна въртяща се маса и сменяема
основна маса. Мотор с предпазител срещу прегряване.
Употреба в съответствие с
предназначението
Устройството за цепене на трупи е проектирано за работа
само с 1 човек. С машината не е разрешено да работят
двама и повече души. Устройството за цепене на трупи е
предназначено изключително за цепене на дърва по
дължина на влакното. Инструкцията зя монтаж,
експлоатация, поддръжка, ремонт и подобни трябва
стриктно да
се спазват, за да се елиминират рисковете и
да се предотвратят вреди. По време на цепене е
необходимо задължително цепеното дърво да бъде
постявяно само върху жлебовата ламарина на подпорната
плоча или на жлебовата ламарина на масата на цепещото
устройство.
С тази машина не могат да се извършват други дейности,
освен тези, за които тази машина е била проектирана и
които са описани в упътването за обслужване. Всяка друга
употреба се счита за употреба в противоречие с
предназначението. За последвали вреди и злополуки
производителя не гарантира. Моля, обърнете внимание на
това
, че този уред не е проектиран за промишлена
употреба.
Гаранция
Гаранцията се отнася изключително за дефекти на
материала или фабрични дефекти.
При упражняване на рекламации в гаранционния срок
прибавете оригинален документ от закупуването с дата на
покупката.
От право на гаранция са изключени непрофесионална
употреба като напр. претоварване на машината, употреба
със сила, увреждане от чуждо лице или от чужд предмет.
Неспазване на упътването за употреба и упътването за
монтаж и нормалното износване също са изключени от
гаранция.
Технически данни
Присъединение: 400 V~50 Hz
Мощност на мотора: 4000 W P1 / S6 40%
Обороти на мотора: 1440 об./мин
Макс. сила на цепене: 10 тона
Макс. ход при цепене: 510 мм
Скорост на придвижване напред: 0,03 м/с
Скорост на придвижване назад: 0,15 м/с
Резервоар за хидравлично масло:
8 л
(тип масло: HLP 46)
Дължини на цепеното дърво: 1350 мм
Цепеща колона: 120 мм x 120 мм
Макс. диаметър на цепеното
дърво:
прибл. 400 мм
Размери на масата: прибл. 380 x 300 мм
Тегло: 177 кг
Заявка № 02040
Инструкции за безопасност
По принцип
По причини за безопасност е необходимо да се
съблюдават и спазват инструкциите за безопасност
посочени в това упътване за обслужване и инструкциите
върху уреда, които се отнасят до обслужването,
поддръжката и ремонта на машината.
Обслужващ персонал
Използването на устройството за цепене на трупи
може да бъде свързано с
рискове. Затова с него могат
да манипулират и работят само обучени и опитни
хора. Обслужващия персонал трябва да носи тясно,
плътно облекло и защитни обувки.
Работно място
За безопасно цепене на дърва е много необходимо,
работното място да е равно и да дава възможност за
запазване на стабилност и достатъчна
свобода на
движение. При пренасяне и отнасяне на устройството за
цепене е необходимо от пътищата за достъп да бъдат
отстранени всички препятствия. Необходимо е на
работното място да се осигури достатъчно осветление.
Осигурете, по време на работа на работното място
да не се задържат никакви хора респ., да спазват
достатъчно безопасно разстояние.
Подготовка за работа
При ремонти или поддръжка и при напускане на
устройството за цепене на трупи е необходимо с
натискане на червеното копче на включвателя и
изваждане на щепсела
от мрежата да се прекъсне
захранването с електрически ток. Прекъсването на
захранването с електрически ток със самотно
превключване на изключвателя в положение
ИЗКЛЮЧЕНО не е достатъчно. Устройствата за цепене
на трупи GÜDE задължително се доставят с кален цепещ
нож. Ако обаче след цепене на дърва съдържащи
невидими чужди тела напр. от бетон
, стомана и т.н.
установите лека деформация на острието на ножа,
отстранете ги с пила или с наточване.Непрекъснатото
поддържане на цепещия нож в остро състояние повишава
работната мощност.
TIP: От време на време намажете цепещия нож с грес
(в случай на проблемно дърво).
Преди първоначалното пускане на цепещото
устройството в действие е необходимо да се провери
функцията на съоръженията за безопасност (особено
двулостовото обслужване.
ВНИМАНИЕ! Преди всяко пускане в движение се
убедете, че цепещата маса е закрепена здраво върху
цепещото устройство.
Page 77

Ликвидация
Инструкциите за ликвидация произлизат от пиктограмите,
които са разположени на уреда, респ. на опаковката.
Описанието на отделните значения ще намерите в раздел
„Обозначения“.
Ликвидация на транспортната опаковка
Опаковката пази уреда от увреждане по време на
транспортиране. Опаковъчните материали са подбрани
обикновено според тяхната пестеливост спрямо околната
среда и начина
на ликвидация и затова могат да се
рециклират. Връщането на опаковките в обръщение на
материалите пести суровини и понижава разходите за
ликвидация на отпадъците. Части от опаковката напр.
фолии, Студопор®) могат да представляват опасност за
децата. Съществува опасност от задушаване!
Частите от опаковката съхранявайте на места без достъп
за деца,
и ги ликвидирайте колкото се може по-бързо.
Изисквания за обслужване
Обслужващия преди употребата на уреда трябва
внимателно да прочете упътването за обслужване.
Квалификация
Освен подробно поучение от специалист за използването
на уреда не е необходима никаква специална
квалификация.
Минимална възраст
С уреда могат да работят само лица, които са навършили
18 години. Изключение прави използването от
непълнолетни, само ако това става по време на
професионално обучение с цел постигане на умение под
надзора на обучаващо лице.
Прегледи и поддръжка (карт. 2+7+8)
Инструкции за безопасност за прегледи и поддръжка:
Само редовно поддържан и обслужван уред може да бъде
задоволяващо помогало. Недостатъчна поддръжка и
грижа могат да доведат до неочаквани аварии и
злополуки
.
• Никога не използвайте за чистене агресивни
чистещи средства. Това може да повреди или
унищожи уреда.
• Извадете щепсела от щепселната кутия.
• Оставете само на електротехник да извърши
ремонти и поддръжка на електрическото устройство.
• Всички предпазни съоръжения и съоръжения за
безопасност трябва след приключване на ремонта и
поддръжката веднага да бъдат монтирани обратно.
Препоръчваме Ви (карт. 2):
• Цепещ нож
Цепещия нож е бързо износваща се част, която в
случай на нужда трябва да се подостри достатъчно.
Това повишава цепещата мощност и предпазва
цепещото устройство. Тип: намажете цепещия нож
с грес!
• Устройство за безопасност за две ръце
Комбинираното придържащо и стягащо устройство
трябва да притежава лек
ход. От време на време
смазвайте с няколко капки масло.
• Цепеща колона
Преди всяка употреба намажете цепещата калона с
грес, с това ще увеличите животоспособността на
плъзгащите челюсти (карт. 2/A). Извадете изцяло
цепещата колона и на всички 4 страни на цепещата
колона нанесете равномерно многофункционална
грес.
• Подвижни части
Поддържайте ръководенето на
цепещия нож чисто
(мръсотия, трески, кора и т.н.). Намажете плъзгащите
шини с грес.
• Хидравлично устройство
Контролирайте хидравличните връзки и завинтвания
от гледна точка за плътност и износване. Евентуално
дотегнете завинтванията.
Проверка на състоянието на хидравличното масло
(карт. 7+8):
Контролирайте състоянието на хидравличното
масло само в студено състояние, с изваден захранващ
кабел и прибрана цепеща колона.
На пробката за масло се намират две резки, най-долната
резка (карт. 8/1) предсталява граница за минималното
количество хидравлично масло в резервоара, горната
резка (карт. 8/2) за максималното количество.
• Развинтете изцяло пробката за масло (карт. 7/A) от
отвора.
• Избършете маслото от пробката с некосмат парцал.
• Завинтете отново изцяло пробката в отвора
.
• След това отново развинтете болта за пълнене с
пробката и проверете, дали горната граница на
хидравличното масло се намира между двете
посочени резки.
Веднъж годишно извършете смяна на маслото (карт.
7+8):
• Развинтете болта за източване на маслото (карт. 7/A).
• Съберете използваното масло (всеки модел има
друго количество)
• Изхвърлете използваното масло екологично.
• Завинтете отново болта за източване на масло. В
резервоара за масло не трябва да достигнат
никакви частици на нечистота.
• Налейте хидравлично масло чак до горната
резка на
пробката (карт. 8/2)
• Изпробвайте устройството за цепене на трупи
няколко пъти напразно.
Препоръчано хидравлично масло: DIN ISO HLP 46
Заявка № Güde 42004
Вискозитет: 46
Количество масло: (виж Технически данни)
Допълвайте масло само, когато колонката на
цепещото устройство е в прибрано положение
Хидравлично устройство:
Хидравличните маркучи и съединения трябва прибл. след
4 работни часа да се проверят от гледна точка за своята
плътност и в случай на необходимост да се дотегнат.
Контрол на функцията
Хидравличното устройство за цепене на дърва се доставя
в работоспособно състояние. Преди всяка употреба е
необходимо да се извърши тази контролна функция.
• Оставете двете стягащи дръжки да слязат надолу и
цепещия нож надолу прибл. до 5 см над масата
• Пуснете винаги едната стягаща дръжка, цепещия нож
ще остане да стои
в избраното положение.
Монтаж на обслужващите рамена, колела и
масата (карт. 1+4)
Монтаж на обслужващите рамена - карт. 1
Поставете обслужващото рамо (карт. 1/4) в
превключващата люлка (карт. 1/14) и осигурете отгоре с
болта, подложката и щифта. Закрепете сега
обслужващото рамо (карт. 1/4) според описания метод на
другата страна. Монтирайте предпазните дъги (карт. 1/13)
на двете обслужващи рамена винаги с помоща на 2 шестоъгълни болта (карт. 1/3).
ТИП: Преди това намажете с грес отгоре и отдолу
ламаринените съединители и гайки (карт. 1/15)!
Монтаж на колелата - карт. 4
Монтирайте на двете страни въртящето се колело и
осигурете и двете с щифта (A).
Page 78

Монтаж на масата/въртящата маса - карт. 1
Поставете плочата на масата в държача (карт. 1/6) и
едновременно дръпнете блокиращия лост. За завъртане
на въртящата маса натискайте лоста надолу. При
използване на въртящата маса внимавайте за това, лоста
винаги да бъде заключен.
Регулиране на хода (карт. 5)
За трупи по-малки от прибл. 50 см и в случай на по-голямо
количество трупи е възможно работната мощност да се
повиши със скъсяване на обратното движение на цепещия
нож.
Направете следните стъпки:
Поставете на масата на цепещото устройство късо дърво
и слезте с цепещия нож до прибл. 2 см над дървото.
Изключете устройството за цепене (червеното копче на
включвателя и извадете щепсела от щепселната кутия).
Сега можете с помоща на прикрепения прът (карт. 5/B) да
скъсите обратния ход, и то така, че
ще фиксирате този
прът с помоща на настройващия болт (карт. 5/A) в
желаната височина.
Област на употреба
Разрешено е уреда да се използва само за цепене на
дърва за горене. Цепения материал трябва да притежава
тези размери:
- Минимален диаметър: 125 мм
Максимален диаметър: 400 мм
- Разрешено е цепене на дърва само по дължина на
влакното.
- В случай на чепат материал при цепене съществува
зяплаха от неговото заклещване.
-
Освобождаването на заклещеното парче дърво се
извършва с чукане на трупчето.
- Забранено е цепените трупи да се издълбават!
Електрическо/хидравлично включване
(карт. 1 и 7)
Включване в мрежата (карт. 1/10)
В съответствие с разпоредбите на специализираните
професионални организации „CE“ и т.н. всички устройства
за цепене са оборудвани със задействане с понижено
напрежение в превключвателя. То предотвратява
спонтанното задействане на машината в случай на
прекъсване на захранването в резултат на срив в мрежата,
неумишлено изваждане на щепсела,
дефектни
предпазители и т.н. Устройството задължително трябва
отново да се включи с натискане на зеленото включващо
копче. Умишлено задържане респ. блокиране на
включващото копче при липсващ нулев проводник
автоматично води до отпадане на включвателя. В този
случай , който впоследствие може да се идентифицира,
гаранцията се анулира.
Хидравлично устройство
При хидравличните маркучи и връзки е необходимо
прибл. след 4 работни часа да се провери плътността
и в случай на необходимост да се дотегнат.
Само в устройствата на 400 V: е необходимо да се
следи за посоката на въртене на мотора (виж
стрелката на мотора), тъй като движение с погрешна
посока на въртене може да повреди маслената помпа.
В такъв случай погасят всички права произтичащи от
гаранцията. В случай на необходимост оставете
посоката на въртене да бъде сменена със замяна на
полюсите на щепсела. Виж карт. 6!
Хидравлично масло/резервоар
Във всички устройства за цепене може да се налива
обикновено хидравлично масло (напр. HLP 46 или масло
от друг производител със същия вискозитет). Смяна на
маслото не е необходима.
Обезвъздушете резервоара преди всяка експлоатация
с развинтване и повторно завинтване на болта за
пълнене (карт. 7/A).
Работа
Внимание: Внимавайте за това, по възможност
дървото да бъде рязано под прав ъгъл и да досяда
плътно на цепещата маса. Диагонално нарязано или
изключително чепато дърво може да се плъзне респ.
да огъне обслужващите рамена.
Поставяйте дървото винаги само на определените
за това платформи (маси) (никога не на рамата). Това
може да повреди устройството за цепене.
1. С натискане на зеленото копче за включване ще
включите мотора.
Внимание: внимавайте за посоката на въртене на
мотора!
2. При ниски температури оставете устройството за
цепене в продължение
прибл. на 15 минути да
работи на свободен ход, за да се загрее маслото
на съответната температура.
3. Поставете материала за цепене на масата и го
придържайте с помоща на стягащите пластини на
лоста.
4. С натискане на двата лоста по посока надолу след
това се започва цепенето. (Веднага след като
цепещия нож
проникне в дървото,едновременно с
натискане на лоста надолу обърнете леко по посока
навън. Така се избягва това, придържащите ламарини
(рамена).да се огънат.
5. След приключване на цепенето повдигнете поне
единия лост, колонката на устройството за цепене
автоматично излиза нагоре.
Строго е забранено, устройството за цепене на трупи
да се обслужва от двама души, така че единия
придържа дървото а другия работи със стягащите
плочи.
Инструкции за транспортиране
Транспортиране
Всички устройства за цепене са оборудвани с големи
колела. За целите на транспортиране на устройството за
цепене хванете с една ръка дръжката на цепещата колона
и с другата ръка дръжката над мотора и леко наклонете
цепещото устройство към себе си. В това положение
устройството за цепене може да се
придвижва без усилие.
За да избегнете изтичане на хидравличното масло,
никога не транспортирайте устройството за цепене
легнало.
При транспортиране спуснете цепещия нож винаги
изцяло долу.
Остатъчни опасности и предпазни мерки
Предупреждение!!!
Извеждане от функция, промяна, блокиране,
демонтаж, преустройка или монтаж на всички части на
съоръженията за безопасност и предпазните
съоръжения на машината е строго забранено и при
неспазване може да доведе до сериозни респ. живота
заплашващи злополуки.
За материални и персонални вреди възникнали в
резултат на такива небрежности производитела не
може да гарантира.
Също така във всяка от посочените небрежности
незабавно се прекратява всеки гаранционен иск
спрямо производителя.
Устройството за цепене може да обслужва само един
човек. От близост до устройството за цепене и
работното място отстранявайте по време на работа
остатъците от дърва, които биха могли да блокират
или негативно да повлияят на елементите за
безопасност и обслужващите елементи.
Page 79

Сервиз
Имате ли технически въпроси? Рекламации?
Необходими ли Ви са резервни части или упътване за
обслужване?
На нашата страница www.guede.com в отдел Сервиз ще
ви помогнем бързо и без излишна бюрокрация. Помогнете
ни моля за да можем да Ви помагаме. За да можем да
идентифицираме Вашия уред в случай на
рекламация, ни
е необходимо да знаем неговия сериен номер, номера на
продукта и година на производство. Всички тези данни ще
намерите на типовата табелка. За да имате тези данни
под ръка постоянно, запишете ги, моля, по-долу
Сериен номер:
Заявка номер:
Година на производство:
Тел.: +49 (0) 79 04 / 700-360
Факс: +49 (0) 79 04 / 700-51999
E-Mail: support@ts.guede.com
Декларация за сходство с ЕС
С това декларираме ние,
Güde GmbH & Co. KG
Birkichstraße 6
74549 Wolpertshausen
Германия
че концепцията и конструкцията на долупосочените уреди
в изпълнения, които пускаме в обръщение, отговарят на
съответните изисквания на инструкциите на ЕС за
безопасност и хигиена.
В случай на изменение на уреда, което не е било
консултирано с нас, тази декларация губи своята
валидност.
Обозначение на уредите:
Устройство за цепене на трупи
Basic 10T/DTS
Заявка №: 02040
Дата/подпис на производителя: 07.03.2012г.
Данни за подписания: изп. директор, госп.
Арнолд
Техническа документация: J. Bürkle FBL; QS
Съответни наредби на ЕС:
2004/108/EG
2006/42/EG
Използвани хармонизирани норми:
EN 609-1/A2:2009
EN 61000-3-3:1995+A1+A2
EN 61000-3-2:2006
EN 55014-2:1997+A1
EN 55014-1:2006
Шум:
Lwa: 85,2 dB
Lpa: 69,9 dB
Търсене на повреди
Проблеми
Възможни причини
Отстраняване на нередностите
Мотора не се задвижва
1. В щепселната кутия няма ток
2. Дефектен удължителен кабел
3. Дефектен захранващ кабел
4. Дефектен включвател, кондензатор
1. Проверете защитата на мрежата
2. Извадете щепсела, проверете, сменете
3. Присъединение 5 жила, при сечение 2,5 мм
2
4. Оставете машината да бъде проверена от
електротехник
Погрешна посока на
въртене на мотора
1. Погрешно свързан 1. Обърнете преобразувателя на фазите в щепсела
на уреда с отверка
Липсва движение на
цепещия нож
1. Преустройство на лоста за включване с
две ръце
1. Проверете състоянието на маслото
Дефектния управляващ вентил трябва да се
смени само в сервиз
Устройството за цепене
не развива мощност
1. Погрешна посока на въртене
Прекалено малко хидравлично масло
2. Огънат прът за спускане; не се стига
до пълно натискане на хидравличното
повдигаче на вентила
3. Дървото има много чепове и цепещия
нож засяда
4. Огънато обслужващо рамо
1. Сменете посоката на въртене
2. Допълнете хидравлично масло
3. Проверете всички болтове върху пускащия
прътов механизъм
Преустройте
теглещия прът (карт. 10/B), с това
хидравличния ексцентрик на вентила изцяло ще
се запъхне.
4. Намажете цепещия нож с грес.
5. Върнете обслужващото рамо в изходно
положениие.
Зеления бутон за
включване след
натискане не държи
1. Дефектен предпазител и т.н.
2. Ход на 2 фази
1. Проверете кабела
Хидравличната помпа
пищи,
Цепещия нож има
скубещ ход
1. Загуба на масло, замърсяване на пода
2. В резервоара има прекалено малко
хидравлично масло
1. Дотегнете завинтването
Сменете маркучите
2. Допълнете хидравлично масло
Page 80

Механични остатъчни опасности
Заплаха Описание Предпазни мерки Остатъчни опасности
Прищипване По време на цепене може да се
стигне при спускане на
хидравличния нож до прищипване
или ампутация на части от тялото.
Съществува опасност, че цепеното
дърво ще се заклещи. При
освобождаване вземете моля в
предвид, че дървото е под силно
налягане и че може да стегне
Вашите пръсти в цепената
пукнатина.
По принцип използвайте двуръчно
обслужване за безопасност. Не се
намесвайте в процеса на цепене.
Никога не работете двама на машината
Избийте заклещеното дърво. Внимавайте за
падащи парчета дърва, които могат да
наранят краката Ви.
Износено или
повредено помагало е
необходимо незабавно
да се подмени.
Обърнете внимание за
околостоящи хора
!
При работа винаги
носете защитни обувки.
Отрязване По време на цепене може да се
стигне при спускане на
хидравличния нож до прищипване
или ампутация на части от тялото.
По принцип използвайте двуръчно
обслужване за безопасност. Не се намесвайте в процеса на цепене.
Износено или
повредено помагало е
необходимо незабавно
да се подмени.
Общи
наранявания
При обработване на сухо дърво
при прекалено рязко цепене може
да се стигне до тежки наранявания.
Парчетата дърва, които възникват
по време на цепене, могат да
паднат и да наранят особено
краката на работещия човек.
Продължението на цепещия клин
може да се вреже в масата и
така
да причини повреждане на
машината или тежки наранявания
на хора.
Никога не се намесвайте в процеса на
цепене.
Винаги поддържайте достатъчно безопасно
разстояние.
Обслужвайте машината винаги внимателно
и предпазливо.
Винаги носете предписаното предпазно
облекло и работете внимателно.
При работа с устройството, винаги носете
предпазни очила.
Винаги носете предписаното предпазно
облекло и работете внимателно.
Към предписаното предпазно облекло
носете и принадлежащите защитни обувки.
Преди работа с продължението на цепещия
клин винаги отстранете масата.
Износено или
повредено помагало е
необходимо незабавно
да се подмени.
Обърнете внимание за
околостоящи хора.
Захващане,
навиване
Широко облекло, бижута и дълги
коси могат да бъдат захванати от
подвижните части.
Носете винаги плътно облекло и не носете
бижута. Пазете своите коси с мрежа за коса.
Електрически остатъчни опасности
Заплаха Описание Предпазни мерки Остатъчни опасности
Пряк
електрически
контакт
Дефектния кабел или щепсел
могат да бъдат причина за удар от
електрически ток.
Винаги оставете специалист да подмени
дефектните кабели или щепсели.
Използвайте уреда само с предпазен
изключвател против погрешен ток (FI)
Преди всяка употреба
проверете захранващия
кабел
Непряк
електрически
контакт
Злополука от проводими части в
откритите електрически или
дефектни компоненти
При поддръжка винаги извадете щепсела.
Използвайте само с предпазен изключвател
против погрешен ток (FI).
Заплаха от шум
Заплаха Описание Предпазни мерки Остатъчни опасности
Увреждане на
слуха
Продължителната работа с уреда
може да увреди слуха.
Винаги носете слушалки.
Пренебрегване на ергономичните правила
Заплаха Описание Предпазни мерки Остатъчни опасности
Небрежно
използване на
личните
предпазни
помагала
Експлоатацията на уреда без
адекватни предпазни средства
може да предизвика сериозни
вътрешни и външни наранявания.
Винаги носете предписаното предпазно
облекло и работете внимателно.
Неадекватно
локално
осветление
Недостатъчното осветление
представлява висок риск за
сигурността.
При работа с устройството, осигурете винаги
достатъчно осветление.
Други заплахи
Заплаха Описание Предпазни мерки Остатъчни опасности
Отхвърлени
предмети или
пръскащи течности
При цепене механичните
частици могат да наранят
вашите очи.
При работа с устройството, винаги носете
предпазни очила.
Page 81

Page 82

Page 83

Page 84

GÜDE GmbH & Co. KG
Birkichstrasse 6
74549 Wolpertshausen
Deutschland
Tel.: +49-(0)7904/700-0
Fax.: +49-(0)7904/700-250
eMail: info@guede.com
www.guede.com
 Loading...