

Page 1
M8 x 12
M8 x 16
X47
X1
X16
X16
M5
M8
X19
X21
M5 x 10
Support
N11
320x200
N11
320x220
M8 x 60
d100
d100
X2
X2
X2
X28
A E D C B I H G F K J
X2
g
k
1 2 4
3 6 5 8 7
3
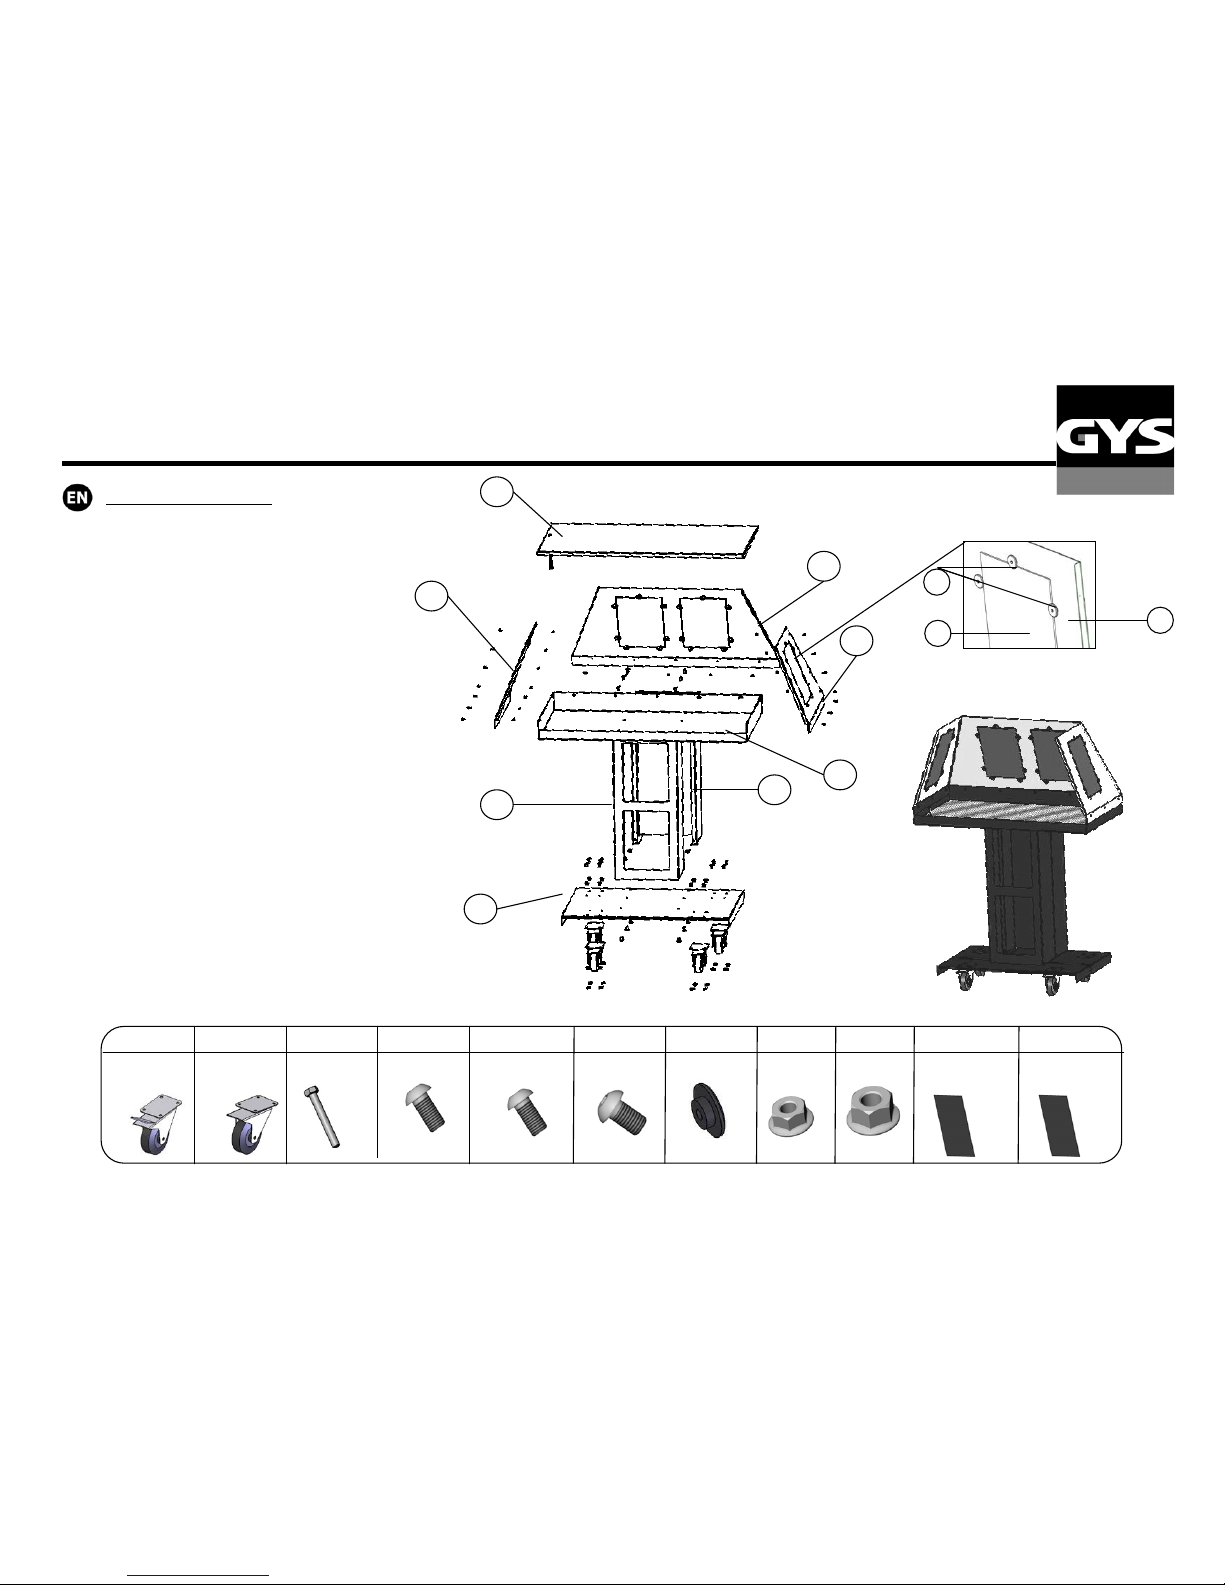
ASSEMBLY INSTRUCTION
▪ Totally unpack the product and check that no
parts are missing.
▪ Take the base (8) and fix 2 wheels with brake
(on the front) (a) using 8 screws (f) and 8 screw
nuts (i) then fix 2 wheels (b) using 8 screws (e)
and 8 screw nuts (f)
▪ Take the 2 halves of the column (5 and 6) and fix
them together using 4 screws (e) and 4 screw
nuts (f), then fix them to the base (8) using 6
screws (i)
▪ Take the plate (7) and fix it on the column using
6 screws (e).
▪ Fix a screw (c) and a screw nut (i) on the
punched working table (1) then position it on the
plate.
▪ Take the Flanks (4; 3; 2) and fix them on the
plate using the screws (d) and screw nuts (h).
▪ Take the glass panels (j) and fix them on the
front flank (2) using the supports (g) and screws
(d)
▪ Take the glass panels (k) and fix them on the
side flanks (3 and 4) using the suppo rt (g) and the
screws (d)
WELDING BOOTH /CABINE DE SOUDURE /
CABINA DE SOLDADURA / СВАРОЧНЫЙ СТОЛ
D6 - 03072015
Page 2
INSTRUCTION DE MONTAGE
▪ Déballer entièrement le produit et
vérifier qu’il y a toutes les pièces
▪ Prendre le pied (8) et lui fixer 2
roues à frein (a) (vers l’avant)
avec 8 vis (f) et 8 écr ous (i) puis
2 roues (b) avec 8 vis (f) et 8
écrous (i)
▪ Prendre les 2 moitiés de la
colonne (5 et 6) et les assembler
avec 4 vis (e) et 4 écrous (i),
puis les assembler au pied (8)
avec 6 vis (e)
▪ Prendre le plateau (7) et le fixer
avec 6 vis (e) sur la colonne.
▪ Fixer une vis (c) et un écrou (i)
sur la table de travail perforée (1)
puis la positionner dans le plateau
▪ Prendre les Flancs (4 ; 3 ; 2) et
les fixer sur la table avec les vis
(d) et les écrous (h).
▪ Prendre les verres (j) et les fixer
sur le flanc avant (2) avec les
supports (g) et les vis (d)
▪ Prendre les verres (k) et les fixer
sur les flancs latéraux (3 et 4)
avec les supports (g) et les vis
(d)
GUIA DE MONTAJE
▪ Desembalar en su totalidad el
producto y comprobar que todas
las piezas están presentes
▪ Colocar las 2 ruedas con freno
(a) (parte delantera) al pie (8) y
fijarlas con los 8 tornillos (f) y
las 8 tuercas (i) y luego las 2
ruedas (b) con los 8 tornillos (f)
y las 8 tuercas (i)
▪ Ensamblar las 2 mitades de la
columna (5 y 6) con los 4 tornillos
(e) y las 4 tuercas (i), luego
ensamblar este conjunto al pie
(8) con los 6 tornillos (e)
▪ Fijar la bandeja (7) a la columna
con los 6 tornillos (e).
▪ Fijar con un tornillo (c) y una
tuerca (i) la mesa perforada (1)
a la bandeja
▪ Fijar los costados (4 ; 3 ; 2) a la
mesa con los tornillos (d) y las
tuercas (h).
▪ Fijar los vidrios (j) al costado
delantero (2) con los soportes
(g) y los tornillos (d)
▪ Fijar los vidrios (k) a los costados
laterales (3 y 4) con los soportes
(g) y las tuercas (d)
ИНСТРУКЦИЯ ПО СБОРКЕ
▪ Полностью распакуйте изделие
и проверьте наличие всех
деталей
▪ К основанию (8) прикрепите 2
тормозных колеса (a) (спереди)
с помощью 8 винтов (f) и 8 гаек
(i) затем 2 колеса (b) с
помощью 8 винтов (f) и 8 гаек
(i)
▪ Соедините 2 половины ножки
(5 и 6) с помощью 4 винтов (e)
и 4 гаек (i), затем соедините
ножку с основа-нием (8) с
помощью 6 винтов (e)
▪ Закрепите поддон (7) на ножке
с помощью 6 винтов (e).
▪ Зафиксируйте винт (c) и гайку
(i) на перфорированной
столешнице (1) затем вставьте
ее в поддон
▪ Зафиксируйте боковые стойки
(4 ; 3 ; 2) на столешнице с
помощью винтов (d) и гаек (h).
▪ Закрепите стекла (j) на
передней стойке (2) с помощью
подпорок (g) и винтов (d)
▪ Закрепите стекла (k) на
боковых стойках (3 et 4) с
помощью подпорок (g) и
винтов (d
)
 Loading...