

FR
EN
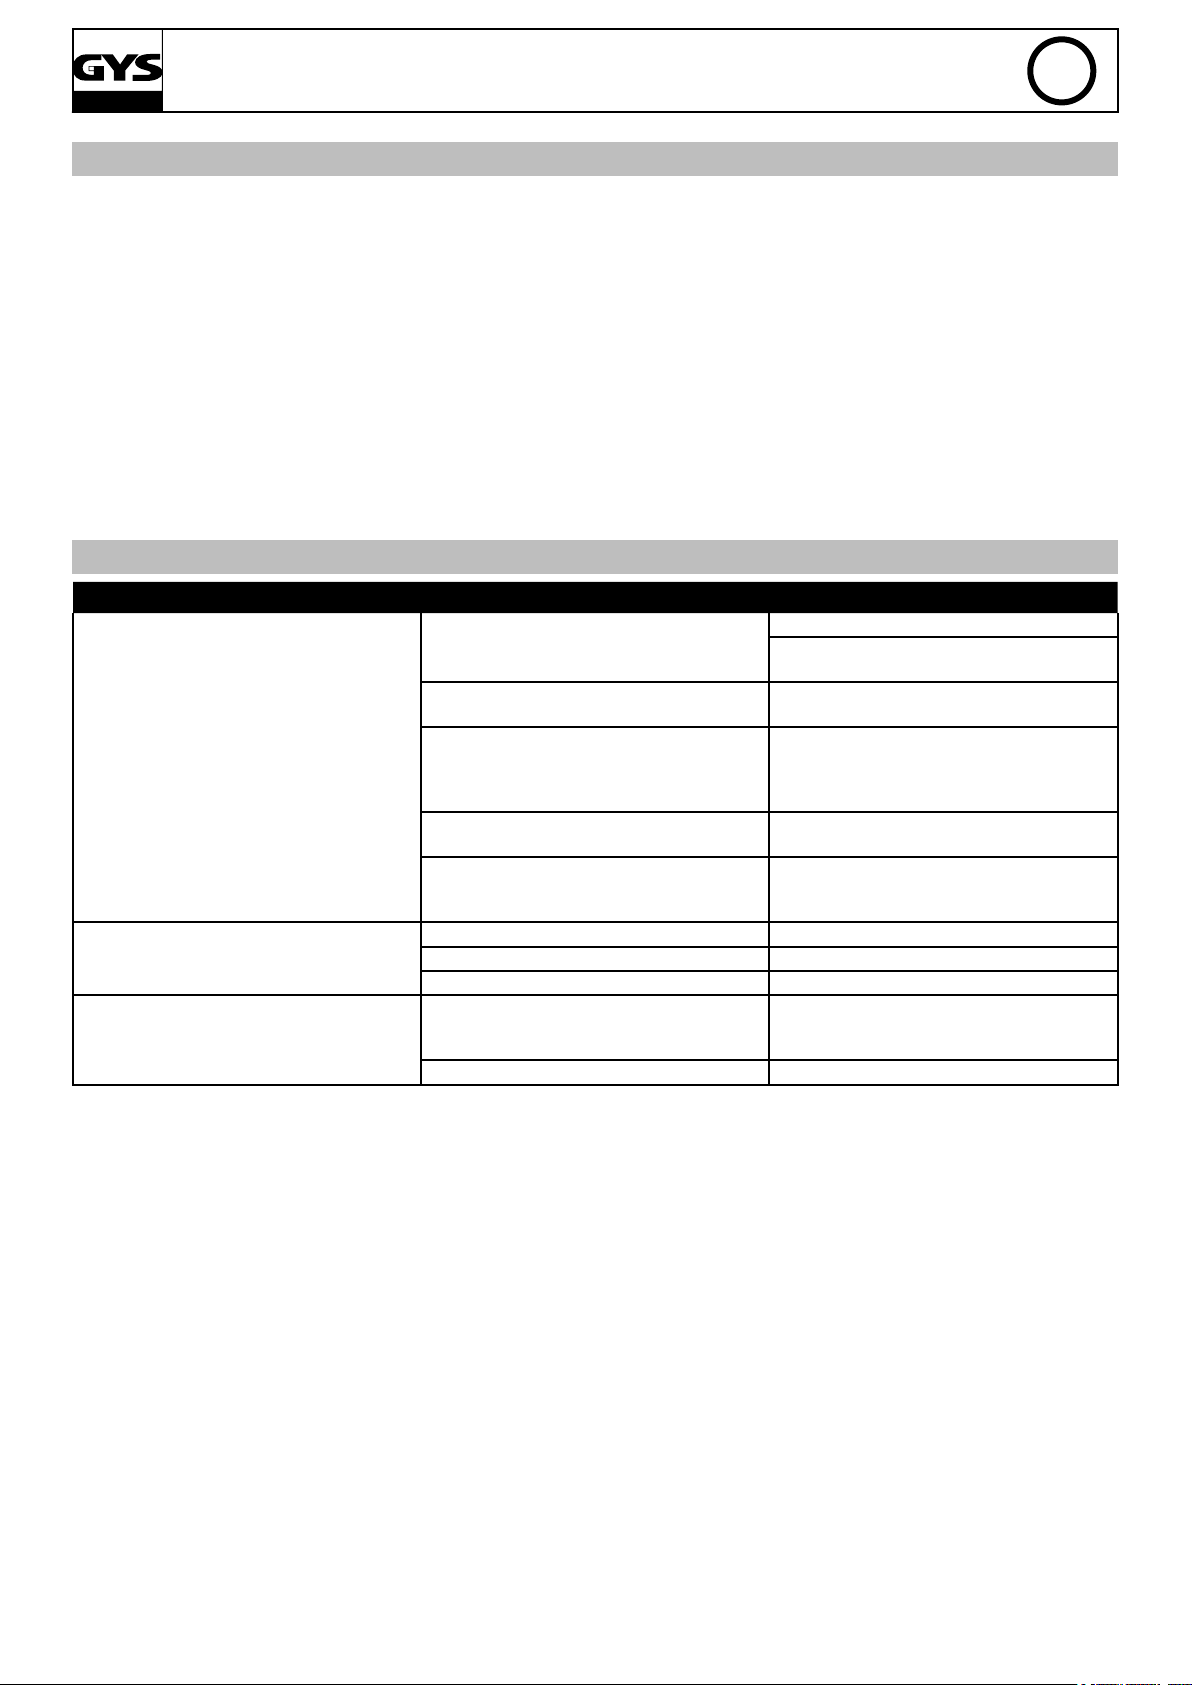
2-5 / 26-28
6-9 / 26-28
NEOSTART 320
NEOSTART 420
NEOSTART 620
DE
ES
RU
CN
V6_23/12/2014
10-13 / 26-28
14-17 / 26-28
18-21 / 26-28
22-25 / 26-28
www.gys.fr
NEOSTART 320 / 420 / 620
Ce manuel d’utilisation comprend les indications sur le fonctionnement de votre appareil et les précautions à suivre
pour votre sécurité. Merci de le lire attentivement avant la première utilisation et de le conserver soigneusement pour
toute relecture future.
DESCRIPTION GÉNÉRALE
Les appareils NEOSTART sont destinés à la recharge et au démarrage des batteries au plomb à l’électrolyte liquide 12V
(6 éléments) et 24V (12 éléments) :
Recharge Démarrage
Neostart 320 40 - 400 Ah 35 - 120 Ah
Neostart 420 25 - 600 Ah 35 - 160 Ah
Neostart 620 45 - 900 Ah 45 - 200 Ah
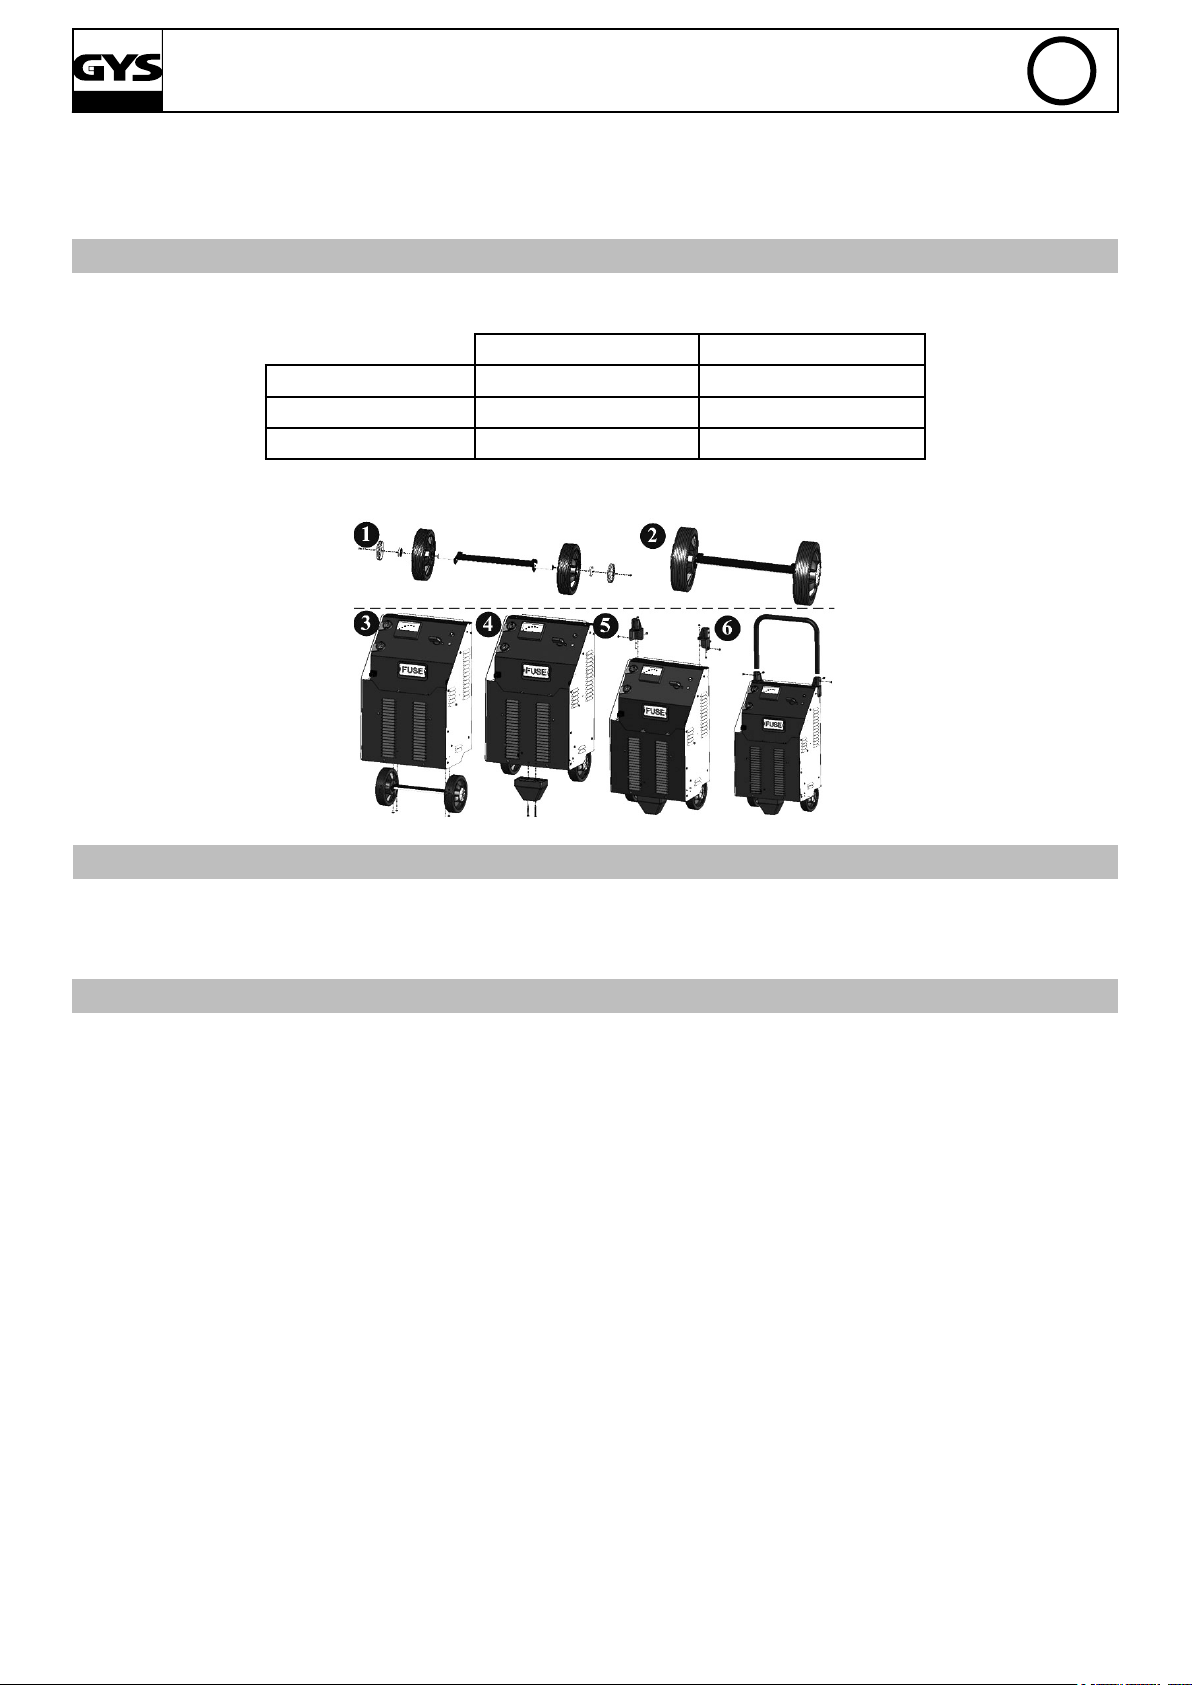
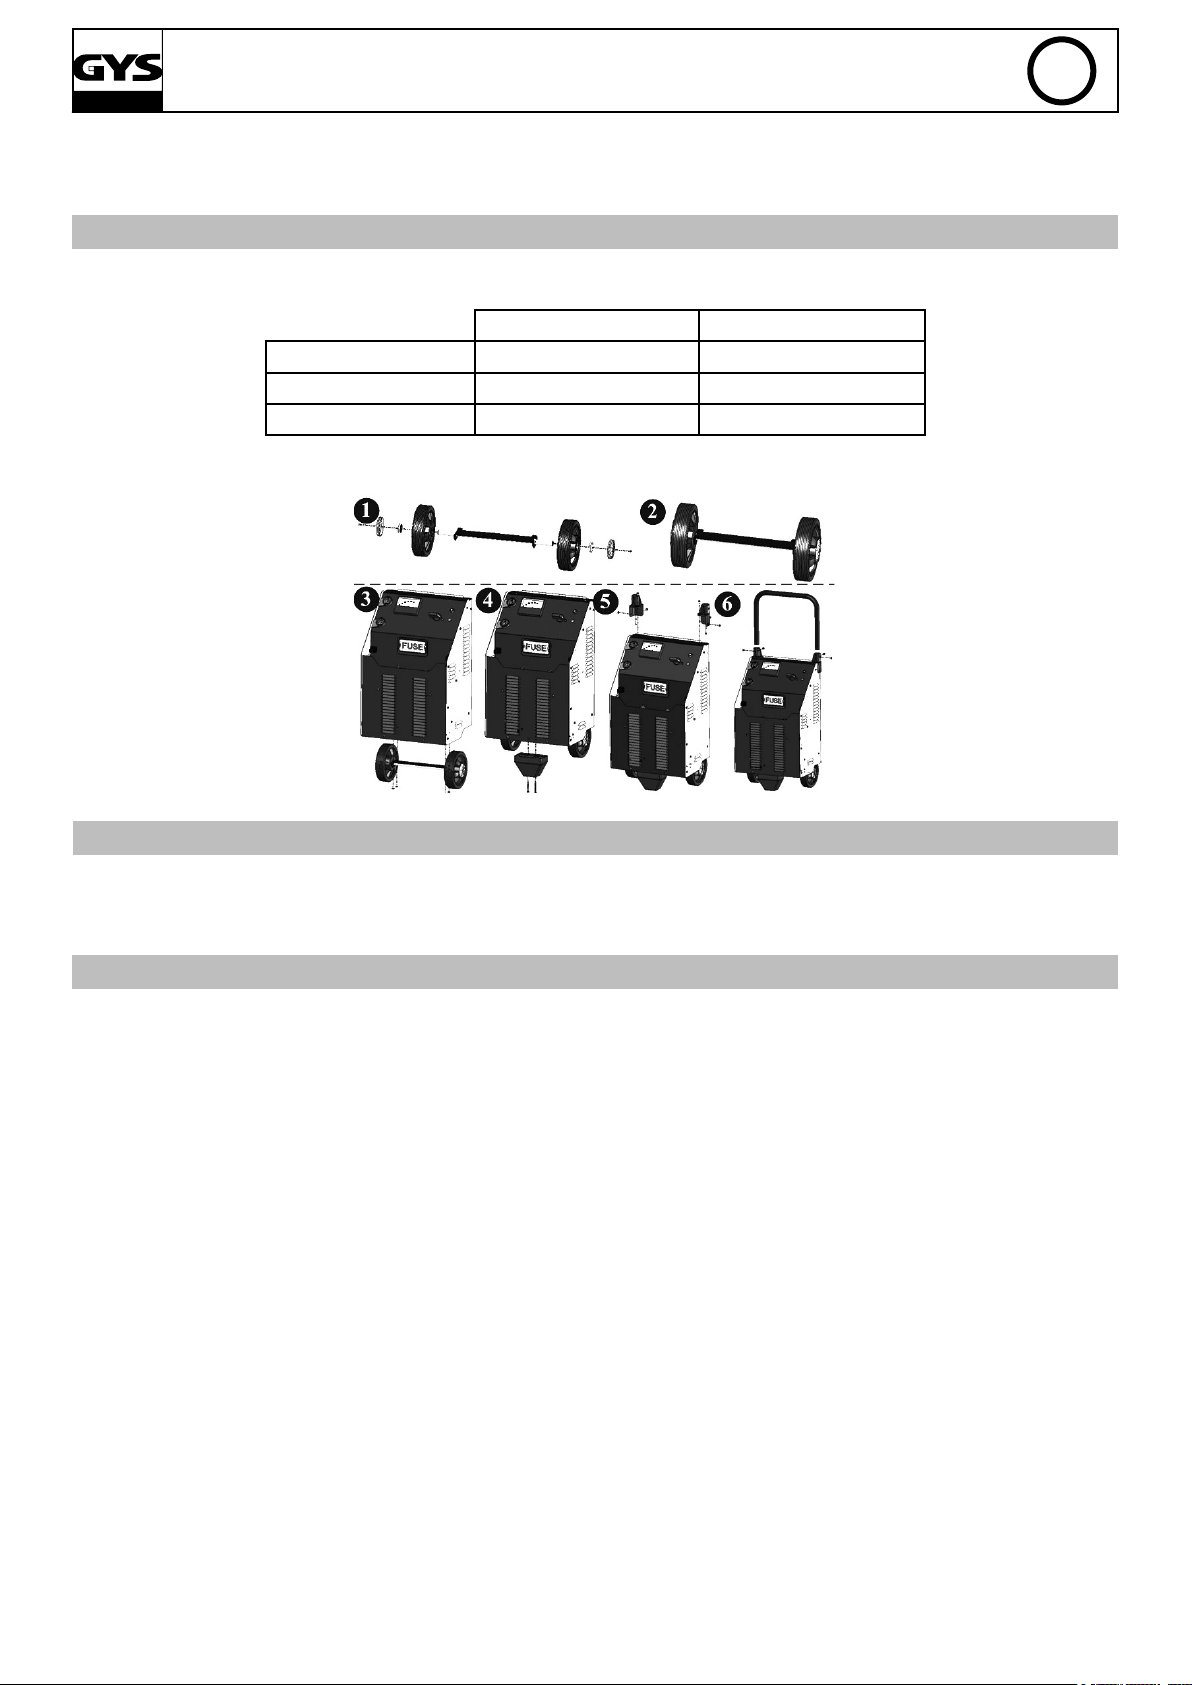
Montage de la poignée et des roues (seulement pour le NEOSTART 420 et 620) :
FR
ALIMENTATION ÉLECTRIQUE
Vérier que l’alimentation et ses protections (fusible et/ou disjoncteur) sont compatibles avec le courant nécessaire en
utilisation. L’appareil doit être placé de façon telle que la che de prise de courant soit accessible.
Ils doivent être reliés à une prise 230V monophasée AVEC terre protégée par un disjoncteur 16A.
RACCORDEMENT ET DÉBRANCHEMENT
IMPORTANT ! Avant tout raccordement à une batterie, vérier que l’appareil n’est pas connecté au réseau d’alimentation
et que le commutateur est sur OFF (s’il existe).
D’autre part, vérier la polarité de votre batterie.
Attention : les câbles ne doivent pas être pincés ou en contact avec des surfaces chauffantes ou coupantes.
Démarrage et charge d’une batterie installée sur le véhicule :
Dans le cas où le pôle négatif de la batterie est branché sur le châssis
• Brancher la pince rouge sur le pôle + de la batterie.
• Brancher la pince noire sur le châssis du véhicule, de façon à ce qu’elle soit éloignée des canalisations de combustible
et de la batterie.
• Brancher l’appareil au réseau d’alimentation.
• Après utilisation, mettre le commutateur sur OFF (s’il existe), déconnecter d’abord le chargeur du réseau d’alimentation
puis débrancher la pince noire et enn la pince rouge.
Certains véhicules ont le pôle positif de la batterie branché sur le châssis, dans ce cas :
• Brancher la pince noire sur le pôle négatif de la batterie.
• Brancher la pince rouge sur le châssis du véhicule, de façon à ce qu’elle soit éloignée des canalisations de combustible
et de la batterie.
• Brancher l’appareil au réseau d’alimentation.
• Après utilisation, mettre le commutateur sur OFF (s’il existe), déconnecter d’abord le chargeur du réseau d’alimentation
puis débrancher la pince rouge et enn la pince noire.
Charge d’une batterie non-connectée au véhicule :
• Brancher la pince rouge sur le pôle positif de la batterie et la pince noire sur le pôle négatif de la batterie.
• Après utilisation, mettre le commutateur sur OFF (s’il existe), déconnecter d’abord le chargeur du réseau d’alimentation
puis débrancher la pince rouge et enn la pince noire.
2
NEOSTART 320 / 420 / 620
UTILISATION EN MODE CHARGEUR
Précautions préalables
• Choisir un local abrité et sufsamment aéré ou spécialement aménagé.
• Enlever les bouchons de la batterie (si celle-ci en est munie) et assurez-vous que le niveau de liquide (électrolyte)
est sufsant. Dans le cas contraire ajouter de l’eau déminéralisée et nettoyer soigneusement les bornes et cosses de la
batterie.
• Vérier que la capacité de la batterie en Ampère-heure et la tension en Volt sont compatibles avec votre chargeur.
Surveillance et état de charge
ATTENTION : ces appareils sont de type traditionnel. La charge de batteries nécessitera une surveillance et cette charge
ne s’arrêtera que lorsque l’opérateur placera le commutateur sur la position «OFF» ou déconnectera l’appareil de la
prise secteur.
Lorsque la batterie est chargée, une ébullition du liquide (électrolyte) contenu dans la batterie débute. Il est conseillé
d’interrompre la charge au début de ce phénomène pour éviter d’endommager la batterie.
Par ailleurs, si la batterie est connectée sur un véhicule, une charge prolongée sans surveillance est susceptible
d’endommager l’électronique embarquée. De même qu’une batterie sulfatée refusant la charge provoquera les mêmes
risques dés le début du branchement.
La n de la charge se détecte soit par la position de l’aiguille de l’ampèremètre lorsque celle-ci se trouve entre 0 et 10A
soit par un temps de charge supérieur à 10H.
Batterie hermétique
Pour charger une batterie hermétique, il est nécessaire d’être extrêmement prudent. Il faut procéder lentement à la
charge tout en contrôlant constamment la tension aux bornes de la batterie. Il est conseillé d’interrompre la charge
lorsque la tension atteint 14,4V pour une batterie 12V et 28,8V pour une batterie 24V. Cette tension est mesurable à
l’aide d’un testeur de batterie ou voltmètre.
FR
Charge
Une fois que vous avez connecté le chargeur sur la batterie en suivant les recommandations (voir raccordement et
débranchement),
Pour le NEOSTART 320 :
- mettre le commutateur en position CHARGE ou BOOST 1 en respectant la capacité de la batterie.
Attention : En mode Boost 1, la protection thermique est susceptible d’être activée en début de charge si la batterie
est fortement déchargée.
CHARGE (12-24V) BOOST 1 (12-24V)
Neostart 320 40 - 160 Ah (11A) 90 - 400 Ah (27A)
Pour le NEOSTART 420 et 620 :
- mettre le commutateur en position CHARGE 1 ou CHARGE 2 en respectant la capacité de la batterie.
CHARGE 1 (12-24V) CHARGE 2 (12-24V)
Neostart 420 25 - 90 Ah (6A) 90 - 300 Ah (20A)
Neostart 620 45 - 140 Ah (10A) 140 - 450 Ah (30A)
Après utilisation suivre les recommandations de débranchement.
Charge de plusieurs batteries simultanément
Vous pouvez charger plusieurs batteries simultanément en les connectant en parallèle. Les bornes positives reliées à la
pince rouge et les bornes négatives reliées à la pince noire. Ces batteries ou regroupement de batteries doivent être de
même tension 12 ou 24V.
La charge en série n’est pas recommandée.
3
NEOSTART 320 / 420 / 620
UTILISATION EN MODE DÉMARREUR
Précautions préalables
• Ne pas déconnecter la batterie du véhicule. Le branchement de la batterie peut entraîner la perte d’information et une
éventuelle impossibilité de redémarrage.
Démarrage
Une fois que vous avez connecté le démarreur sur la batterie en suivant les recommandations (voir raccordement
et débranchement), il peut être nécessaire d’effectuer une précharge an d’apporter l’énergie indispensable pour un
démarrage.
Pour effectuer la précharge mettre le commutateur sur la position «BOOST 2» pour le NEOSTART 320 et «BOOST» pour
le NEOSTART 420 et 620.
NEOSTART 320 :
Instantané Précharge 5 min
Neostart
320
NEOSTART 420 et 620 :
Neostart 420 35 - 80 Ah 80 - 160 Ah
Neostart 620 45 - 100 Ah 100 - 200 Ah
12 V 35 - 60 Ah 60 - 120 Ah
24 V 35 - 45 Ah 45 - 90 Ah
Instantané Précharge 5 min
FR
Pour effectuer le démarrage mettre le commutateur sur la position «START». Rendez-vous au poste de contrôle du
véhicule. En tournant la clé, vous activez la fonction démarreur. Cette fonction doit être arrêtée dès le démarrage du
véhicule. Il est idéal de travailler à 2 pour que la personne proche du NEOSTART puisse enclancher la position START
au dernier moment et stopper l’appareil dès que le véhicule a démarré.
Si votre moteur ne démarre pas, attendre 2 minutes entre 2 tentatives de démarrage. La durée de la tentative doit être
de 3 sec maximum.
Nb : Un véhicule qui ne démarre pas peut avoir un problème autre qu’une batterie en mauvais état : alternateur, bougie
de préchauffage,…
Après utilisation suivre les recommandations de débranchement.
PROTECTIONS
Cet appareil a été conçu avec un maximum de protections :
• Les pinces de charge sont entièrement isolées.
• Un fusible assure la protection contre l’inversion de polarité et les courts-circuits :
- Neostart 420 et 620 : ref. 054547, calibre 200 A (type SIBA V-Fuse / open type)
- Neostart 320 : ref. 054639, calibre 150 A (type Littlefuse BF1 / 32V)
Le remplacement demande une intervention manuelle.
• Un disjoncteur, en face avant, assure la protection contre les surcharge du transfomateur ou le démarrage en position
charge. Si celui-ci disjoncte, un ré-enclenchement manuel est nécessaire.
• La protection thermique est assurée par un thermostat (refroidissement environ 1/4h). Le voyant vert s’éteint en cas
de surchauffe.
BATTERIES SULFATÉES OU ENDOMMAGÉES
Les NEOSTART ne détectent pas les batteries sulfatées ou endommagées.
• Votre batterie est profondément endommagée si en charge, l’aiguille de l’ampèremètre dévie rapidement vers des
intensités très élevées. Votre batterie est dénitivement hors d’usage.
• dans le cas d’une batterie sulfatée : mettre l’appareil sur l’allure la plus forte «BOOST» pour le Neostart 420 et 620 ou
«BOOST 2» pour le Neostart 320 et surveiller régulièrement si l’ampèremètre indique un courant de charge. Dés que le
courant de charge s’élève, se positionner sur la charge adaptée à la batterie. Si il n’y a pas d’amélioration au bout de 5
heures, la batterie est dénitivement hors d’usage.
Attention - Cette opération doit impérativement être effectuée avec la batterie déconnectée du véhicule !
4
NEOSTART 320 / 420 / 620
FR
CONSEILS ET AVERTISSEMENTS
• MISE EN GARDE ! Gaz explosif, éviter les ammes et les étincelles. Pendant la charge, la batterie doit être placée dans
un endroit bien aéré.
• Protéger l’appareil de la pluie et l’humidité
• Si le câble d’alimentation est endommagé, il doit être remplacé par le fabricant, son service après vente ou une
personne de qualication similaire, an d’éviter un danger.
• Le fusible externe peut être remplacé et le disjoncteur peut être ré-enclenché par l’utilisateur.
• En aucun cas cet appareil ne doit être utilisé pour charger des piles ou des batteries non-rechargeables.
• Respecter impérativement l’ordre de raccordement indiqué.
• Produit faisant l’objet d’une collecte sélective, ne pas jeter dans une poubelle domestique.
• Cet appareil n’est pas prévu pour être utilisé par des personnes (y compris les enfants) dont les capacités physiques,
sensorielles ou mentales sont réduites, ou des personnes dénuées d’expérience ou de connaissance, sauf si elles ont pu
bénicier, par l’intermédiaire d’une personne responsable de leur sécurité, d’une surveillance ou d’instructions préalables
concernant l’utilisation de l’appareil.
• Ne pas ouvrir l’appareil. Toute modication non effectuée par un technicien de la société fabriquante entraîne une
annulation de la garantie.
• Vérier que la tension disponible correspond à celle indiquée sur la plaque signalétique du chargeur de batterie.
ANOMALIES, CAUSES, REMÈDES
Anomalies Causes Remèdes
L’ampèremètre de l’appareil ne dévie pas. Problème d’alimentation secteur Vérier votre alimentation secteur
Vérier si l’appareil est sur la position
chargeur
Pinces en court-circuit ou inversion de
polarité
La batterie que vous souhaitez charger est
défaillante
Erreur tension (12 -24 V) Vérier que le commutateur est la bonne
Suite à une utilisation intensive, votre
appareil s’est mis en coupure thermique
L’aiguille de l’ampèremètre monte au delà
de 20A alors que le réglage du commutateur
est au minimum.
L’appareil disjoncte Vous effectuez des démarrages en laissant
La batterie est profondément déchargée Maintenir la charge en conservant le réglage
Erreur de tension (12 - 24 V) Vérier que le commutateur est sur la bonne
La batterie a des éléments en court-circuit Changer la batterie
votre appareil sur la position « charge »
Vous chargez une batterie de 12V en
position 24V.
Vérier si les fusibles ne sont pas fondus et
que le disjoncteur est enfoncé.
Contrôler à l’aide d’un voltmètre la
tension à ses bornes. Si cette tension
monte instantanément à plus de 2,5V par
élément la batterie peut être sulfatée ou
endommagée
position (12 ou 24V)
Patientez 1/4h pour laisser l’appareil refroidir
minimum.
position (12 ou 24V)
Positionner impérativement le commutateur
de l’appareil sur la position « démarreur »
sous peine d’endommager votre appareil.
Réenclencher le disjoncteur
Mettre le commutateur sur la position 12V.
CONDITIONS DE GARANTIE
- La garantie couvre tout défaut ou vice de fabrication pendant 1 an, à compter de la date d’achat (pièces et main
d’œuvre).
- La garantie ne couvre pas les erreurs de tension, incidents dus à un mauvais usage, chute, démontage ou toute
autre avarie due au transport.
- La garantie ne couvre pas l’usure normale des pièces (Ex. : câbles, pinces, etc.).
En cas de panne, retournez l’appareil à la société GYS (port dû refusé), en y joignant :
- Le justicatif d’achat datée (facture, ticket …)
- Une note explicative de la panne.
Après la garantie, notre SAV assure les réparations après acceptation d’un devis.
Contact SAV :
Société GYS -134 Bd des Loges
BP 4159-53941 Saint-Berthevin Cedex
5
NEOSTART 320 / 420 / 620
This user manual includes information to operate your device and precautions for your safety. To get the best of your
equipment please read carefully before use.
GENERAL DESCRIPTION
NEOSTART devices are designed for charging and starting 12V (6 element) and 24V (12 element) lead acid batteries
(electrolyte):
Charging Starting
Neostart 320 40 - 400 Ah 35 - 120 Ah
Neostart 420 25 - 600 Ah 35 - 160 Ah
Neostart 620 45 - 900 Ah 45 - 200 Ah
Assembly - handle and wheels (only for NEOSTART 420 and 620) :
EN
POWER SUPPLY
Check that the power and protection (fuse and / or circuit breaker) are compatible with the current required. The
appliance must be positioned so that the plug socket is accessible.
They must be connected to a single phase 230V socket with EARTH protected by a 16A circuit breaker.
CONNECTION AND DISCONNECTION
IMPORTANT! Before connecting to a battery, check that the device is not connected to the power supply and the switch
is OFF (if any).
Secondly, check the polarity of your battery.
Warning: The cables must not be pinched or in contact with hot or sharp surfaces
Starting and Charging a battery connected on the vehicle:
Where the negative pole of the battery is connected to the vehicle chassis
• Connect the red clamp to the positive pole of the battery.
• Connect the black clamp to the vehicle chassis, ensure it is not close to fuel lines and the battery.
• Connect the device to the mains.
• After use, turn the switch to OFF (if any), then disconnect the charger from the mains supply then disconnect the black
clamp and nally the red clamp.
Some vehicles have the positive pole of the battery connected to the chassis, in this case:
• Connect the black clamp to the negative terminal of the battery.
• Connect the red clamp to the vehicle chassis, ensure it is not close to fuel lines and battery.
• Connect the device to the mains.
• After use, turn the switch to OFF (if any), then disconnect the charger from the mains supply then disconnect the red
clamp and nally the black clamp.
Charging a battery not connected to the vehicle:
• Connect the red clamp to the positive battery terminal and then the black clamp to the negative terminal of the battery.
• After use, turn the switch to OFF (if any), then disconnect the charger from the mains supply then disconnect the red
6
NEOSTART 320 / 420 / 620
clamp and nally the black clamp.
USE IN CHARGING MODE
Precautions before use
• Choose a sufciently ventilated area
• Remove the caps on the battery (if any) and make sure the water level (electrolyte) is sufcient. Otherwise add
deionized water and carefully clean the battery terminals.
• Check that the battery capacity in amps/hour and voltage in volts are compatible with your charger.
Monitoring and state of charge
CAUTION: Charging batteries require monitoring and the charge will only stop when the operator switches the Neostart
to "OFF" or disconnects the device from the mains.
When the battery is charged, the liquid (electrolyte) in the battery starts to "boil". It is recommended to stop the charge
at the beginning of this phenomenon to avoid damaging the battery.
Moreover if the battery is connected to a vehicle, a prolonged load unsupervised can damage the vehicle electronics. As
well as sulphated battery refusing the load will cause the same risks directly from connecting the charger to the battery.
The end of the load is detected by the needle position of the ammeter when it is between 0 and 10A or by a time greater
than 10H load.
Sealed battery
To charge a sealed battery, it is necessary to be extremely careful. The charge must be applied slowly whilst constantly
monitoring the battery voltage. It is recommended to stop the charge when the voltage reaches 14.4V for a 12V battery
and 28.8V for a 24V battery. This voltage can be measured using a voltmeter or battery tester.
EN
Charge
Once the charger is connected to the battery as recommended (see connection and disconnection),
For the NEOSTART 320 :
- Turn the switch to the CHARGE or BOOST 1 position according to the battery capacity.
Warning : In Boost 1 mode thermal protection might be activated at the beginning of the charge if the battery is deeply
discharged.
CHARGE (12-24V) BOOST 1 (12-24V)
Neostart 320 40 - 160 Ah (11A) 90 - 400 Ah (27A)
For the NEOSTART 420 and 620 :
- Turn the switch to the CHARGE 1 or CHARGE 2 position according to the battery capacity.
CHARGE 1 (12-24V) CHARGE 2 (12-24V)
Neostart 420 25 - 90 Ah (6A) 90 - 300 Ah (20A)
Neostart 620 45 - 140 Ah (10A) 140 - 450 Ah (30A)
After use follow the recommended instructions for disconnection.
Charging multiple batteries simultaneously
You can charge multiple batteries simultaneously connecting them in parallel. Connect the positive terminals to the red
clamp and the negative terminals to the black clamp. These batteries or group of batteries must all be the same voltage,
12 or 24V.
Charging in series is not recommended.
7
NEOSTART 320 / 420 / 620
USE IN STARTING MODE
Precautions before use
• Do not disconnect the battery from the vehicle. Disconnecting the battery may result in loss of information and a
possible inability to restart.
Starting
Once you have connected the starter to the battery as recommended (see connection), it may be necessary to precharge
the battery to provide the energy needed for starting. To perform a precharge turn the switch on the "BOOST 2" position
for the NEOSTART 320 and on the "BOOST" position for the NEOSTART 420 and 620.
NEOSTART 320 :
Instantaneously 5 min precharge
Neostart
320
NEOSTART 420 and 620 :
Neostart 420 35 - 80 Ah 80 - 160 Ah
Neostart 620 45 - 100 Ah 100 - 200 Ah
12 V 35 - 60 Ah 60 - 120 Ah
24 V 35 - 45 Ah 45 - 90 Ah
Instantaneously 5 min precharge
EN
To perform the precharge set the switch to the "BOOST" position.
To start a vehicle turn the switch to the "START" position. Go to the vehicle driver side. By turning the key you activate
the starter function. This function must be stopped as soon the vehicle start. It is ideal to work with two people. The
one close to the NEOSTART can turn the switch to the START position at the last moment and stops the device once
the vehicle has started.
If your engine does not start, wait 2 minutes between two start attempts. The attempt must last a maximum of 3 sec.
Nb: A vehicle that will not start can be a problem other than a battery in poor condition. It could come from many other
causes.
After use follow the recommended instructions for disconnection.
PROTECTION
This device has been designed with maximum protection:
• The charging clamps are fully insulated.
• A fuse provides proctection against reverse polarity and short circuits :
- Neostart 420 and 620 : ref. 054547, 200A fuse (SIBA-V Fuse / open type)
- Neostart 320 : ref. 054639, 150A fuse (Littlefuse BF1 / 32V type)
• A circuit breaker on the front panel provides protection against overload or starting the battery with the switch on the
"Charge" position. If it breaks, a manual reset is required.
• Thermal protection is provided by a thermostat (cooling approximately 1/4h). The green light goes off in case of
overheating.
SULPHATED OR DAMAGED BATTERIES
NEOSTART does not detect sulphated or damaged batteries.
• Your battery is deeply damaged if in charge, the ammeter needle deects rapidly to very high intensities. Your battery
is permanently out of use.
• In the case of a sulphated battery: turn the device on the highest speed "BOOST" for the NEOSTART 420 and 620
or "BOOST 2" for the NEOSTART 320 and regularly monitor if the ammeter shows a charging current. As soon as the
charging current increases, put the switch onto the suitable charging mode for the battery. If there is no improvement
after 5 hours, the battery is permanently out of use.
Caution - This procedure must be done with the battery disconnected from the vehicle!
8
NEOSTART 320 / 420 / 620
EN
WARNING
• WARNING! Explosive gas , avoid ames and sparks . During charging, the battery should be placed in a ventilated
area.
• Protect the unit from rain and moisture
• If the power cable is damaged it must be replaced by the manufacturer , its after sales or a similarly qualied person
to avoid hazard.
• External fuse can be replaced and the circuit breaker can be engaged by the user.
• Under no circumstances this appliance should be used to charge accu;ulators or non rechargeable batteries.
• Respect the connection sequence indicated .
• Product subject to separate collection , do not dispose in domestic waste .
• This appliance is not intended for use by persons (including children) with reduced physical , sensory or mental
capabilities, or lack of experience or knowledge, unless they could benit by through a person responsible for their
safety, supervision or instruction concerning use of the appliance .
• Do not open the device. Modications not performed by a manufacturer's technician leads to void the warranty .
• Check that the available voltage corresponds to the one indicated on the nameplate of the charger.
TROUBLESHOOTING
Anomalies Causes Remedies
The ammeter does not move. Power supply problem Check the power supply
Check the machine is switched to the charge
position
"Polarity reversal or clamp in short
circuit"
The battery is faulty Check with a voltmeter the voltage on the
Volage error (12 -24 V) Check the switch is on the correct selection
Following intensive use, the machine has
switched off due to thermal protection to
cool down.
The ammeter indicates more than 20A
whereas the selector adjustment is at the
minimum
The machine trips You are starting whilst in the “charge” mode
The battery is deeply discharged Keep charging but only at a low output
Voltage error (12 - 24 V) Check the switch is set correctly (12 or 24V)
Some battery elements are in short-circuit Change the battery
of the machine
A 12V battery is charged on the 24V output Put the switch on the 12V position
Check the fuses is intact and if the circuitbreaker is engaged
terminals. If the voltage rises instantly at
more than 2.5V per element, the battery
may be damaged or sulphated.
(12 or 24V)
Wait for 15 min to allow cooling
Switch to the “start” position otherwise it
could damaged the machine. Reset the
circuit breaker
9

NEOSTART 320 / 420 / 620
Wir freuen uns, dass Sie sich für ein Markengerät der Firma GYS entschieden haben und danken Ihnen für das
entgegengebrachte Vertrauen. Um das Gerät optimal nutzen zu können, lesen Sie bitte die Betriebsanleitung sorgfältig
durch.
BESCHREIBUNG
Die NEOSTART wurden konzipiert, um 12V (6 Elemente) und 24V (12 Elemente) Bleibatterien mit üssigem Elektrolyt
zu laden und starten.
Wiederauaden Start
Neostart 320 40 - 400 Ah 35 - 120 Ah
Neostart 420 25 - 600 Ah 35 - 160 Ah
Neostart 620 45 - 900 Ah 45 - 200 Ah
Montage von Griff und Rädern (nur für die NEOSTART 420 und 620):
DE
NETZANSCHLUSS
Überprüfen Sie, ob Stromversorgung und Schutzeinrichtungen (Netzabsicherung) zum Betrieb des Gerätes ausreichend
sind.
ANSCHLUSS UND TRENNEN
WICHTIG! Vor dem Anschluss an die Batterie ist sicherzustellen, dass das Gerät nicht an das Spannungsnetz angeschlossen
ist und der Schalter auf OFF steht (falls vorhanden).
Darüber hinaus ist die Polarität der Batterie zu prüfen.
Achtung: Die Kabel unter keinen Umständen abknicken oder direktem Kontakt mit heißen oder scharfkantigen
Oberächen aussetzen.
Laden und Starten einer am Fahrzeug angeschlossenen Batterie:
Bei Massepunkt = Minuspol der Batterie:
• Die rote Anschlussklemme mit dem Pluspol der Batterie verbinden.
• Die schwarze Anschlussklemme an einer blanken Stelle der Karosserie, in ausreichendem Abstand zu Brennstofeitungen
und Batterie, anklemmen.
• Das Gerät am Stromnetz anschließen.
• Nach Gebrauch den Schalter auf OFF stellen (falls vorhanden). Erst das Ladegerät vom Stromnetz trennen, danach die
schwarze Klemme. Zuletzt die rote Klemme abklemmen.
Bei Massepunkt = Pluspol der Batterie:
• Die schwarze Anschlussklemme mit dem Pluspol der Batterie verbinden.
• Die rote Anschlussklemme an einer blanken Stelle der Karosserie, in ausreichendem Abstand zu Brennstofeitungen
und Batterie, anklemmen.
• Das Gerät am Stromnetz anschließen.
• Nach Gebrauch den Schalter auf OFF stellen (falls vorhanden). Erst das Ladegerät vom Stromnetz trennen, danach die
schwarze Klemme. Zuletzt die rote Klemme abklemmen.
Laden einer nicht im Fahrzeug angeschlossenen Batterie:
• Die rote Anschlussklemme mit dem Pluspol und die schwarze Anschlussklemme an den Minuspol anschließen.
• Nach Gebrauch den Schalter auf OFF stellen (falls vorhanden). Erst das Ladegerät vom Stromnetz trennen, danach die
rote Klemme. Zuletzt die schwarze Klemme abklemmen.
10

NEOSTART 320 / 420 / 620
GEBRAUCH IM LADEMODUS
Sicherheitshinweise
• Benutzen Sie die Geräte nur in gut belüfteten, trockenen Innenräumen.
• Falls vorhanden, entfernen Sie die Batteriezellendeckel und prüfen Sie den Flüssigkeitsstand. Falls nötig mit destilliertem
Wasser auffüllen. Reinigen Sie Batteriekontakte und –pole.
• Vergewissern Sie sich, dass Kapazität (in Ampere-Stunden) und Spannung (in Volt) der Batterie mit der Kapazität des
Ladegerätes übereinstimmen.
Überwachung und Ladestatus
Achtung! Bei diesen Geräten handelt es sich um traditionelle Geräte, die eine manuelle Ladungsüberwachung erfordern.
Bei Überladung der Batterie beginnt die sogenannte Gitterkorrosion, welche sich durch „Gasen“ bemerkbar macht. Hierbei
wird das in der Schwefelsäure bendliche Wasser elektrolytisch zersetzt; aus dem dabei entstehenden Sauerstoff und
Wasserstoff bildet sich hochexplosives Knallgas. Es ist daher absolut notwenig den Ladevorgang sofort nach Vollladung
der Batterie zu beenden, um mögliche Schäden an Batterie oder Bordelektronik zu verhindern und weitere Gefahren zu
auszuschließen.
Sie erkennen das Ende des Ladevorgangs, wenn sich die Amperemeter-Nadel zwischen 0 und 10A bendet oder die
Ladezeit von 10 Stunden überschritten wird.
Wartungsfreie Batterien
Beim Laden von wartungsfreien Batterien ist äußerste Vorsicht geboten: Der Ladevorgang darf nur langsam und unter
ständiger Überwachung erfolgen. Es wird empfohlen den Vorgang zu beenden, wenn 14,4V (bei 12V Batterien) bzw.
28,8V (bei 24V Batterien) erreicht sind. Die Spannung kann mit einem Voltmeter oder Batterietester gemessen werden.
DE
Laden
Sobald das Gerät den Anweisungen entsprechend an der Batterie angeschlossen wurde (s. Abschnitt "Anschluss und
Trennen"), stellen Sie den Schalter auf Position Charge 1 oder Charge 2, je nach Batteriekapazität.
Für das NEOSTART 320:
- stellen Sie den Schalter auf Position CHARGE oder BOOST 1, je nach Batteriekapazität.
Achtung: Im Modus Boost 1 ist der thermische Schutz möglicherweise aktiv, wenn die Batterie tief entladen ist.
CHARGE (12-24V) BOOST 1 (12-24V)
Neostart 320 40 - 160 Ah (11A) 90 - 400 Ah (27A)
Für die NEOSTART 420 und 620:
- stellen Sie den Schalter auf Position CHARGE 1 oder CHARGE 2, je nach Batteriekapazität.
CHARGE 1 (12-24V) CHARGE 2 (12-24V)
Neostart 420 25 - 90 Ah (6A) 90 - 300 Ah (20A)
Neostart 620 45 - 140 Ah (10A) 140 - 450 Ah (30A)
Folgen Sie nach Gebrauch des Gerätes den entsprechenden Anweisungen des Abschnittes "Anschluss und Trennen".
Paralleler Ladevorgang mehrerer Batterien
In Parallelschaltung können mehrere Batterien gleichzeitig geladen
werden. Schließen Sie die rote Zange am Pluspol und die schwarze Zange am Minuspol der Batterie an. Batterien in
Parallelschaltung müssen alle die gleiche Spannung haben.
Laden in Reihenschaltung wird nicht empfohlen.
11

NEOSTART 320 / 420 / 620
GEBRAUCH IM STARTMODUS
Sicherheitshinweise
• Klemmen Sie unter keinen Umständen die Batterie vom Fahrzeug ab! Das Abklemmen kann Informationsverlust
verursachen und allenfalls einen weiteren Startversuch verhindern.
Starten
Sobald das Gerät den Anweisungen entsprechend an der Batterie angeschlossen wurde (s. Abschnitt "Anschluss und
Trennen"), ist gegebenenfalls ein Vorladen der Batterie notwendig, um über ausreichend Energie für den Gerätegebrauch
zu verfügen. Um einen Vorladevorgang zu beginnen, stellen Sie den Schalter auf "BOOST 2" für das NEOSTART 320 und
auf "BOOST" für die NEOSTART 420 und 620.
NEOSTART 320 :
Sofort Vorladen 5 Min.
Neostart
320
NEOSTART 420 und 620 :
Neostart 420 35 - 80 Ah 80 - 160 Ah
Neostart 620 45 - 100 Ah 100 - 200 Ah
12 V 35 - 60 Ah 60 - 120 Ah
24 V 35 - 45 Ah 45 - 90 Ah
Sofort Vorladen 5 Min.
DE
Um einen Vorladevorgang zu beginnen, stellen Sie den Schalter auf "BOOST".
Um einen Startvorgang zu beginnen, stellen Sie den Schalter auf "START".
Nehmen Sie auf dem Fahrersitz des Fahrzeuges Platz. Mit Starten des Motors starten Sie ebenfalls die Starterfunktion.
Springt der Motor an, muss das Gerät sofort ausgeschaltet werden. Es empehlt sich daher zu zweit zu arbeiten.
Sollte der Motor nicht anspringen, wiederholen Sie nach 2-minütiger Wartezeit den Vorgang. Warten Sie 2 Minuten
zwischen jedem weiteren Startversuch. Der Startversuch selbst darf maximal 3 Sek. lang sein.
Hinweis: Springt der Motor auch nach mehreren Zündversuchen nicht an, liegt das Problem entweder an einer entladenen
Batterie (-> Auaden) oder wird anderweitig verursacht (Mechanik, Elektronik, Batteriedefekt,...).
Folgen Sie nach Gebrauch des Gerätes den entsprechenden Anweisungen des Abschnittes "Anschluss und Trennen".
SCHUTZFUNKTIONEN
Ihr Gerät wurde mit einer Vielzahl von Schutzfunktionen ausgestattet:
• Vollisolierte Ladeklemmen
• Schutz vor Verpolung und Kurzschluss: Eine Sicherung schützt das Gerät.
- NEOSTART 420 und 620: Art.-Nr. 054547, 200 A (Typ SIBA V-Fuse/open type)
- NEOSTART 320: Art.-Nr. 054639, 150 A (Typ Littlefuse BF1 /32 V)
Manueller Austausch.
• Schutz vor Überhitzung des Trafos bzw. Überladung der Batterie im Lademodus wird durch einen Schutzschalter auf
der Gerätevorderseite gewährleistet. Bei Auslösung muss dieser manuell wieder eingeschaltet werden.
• Thermischer Schutz: Das Gerät ist mit einem Thermostat ausgestattet (1/4 Std. Abkühlzeit). Bei Überhitzung erlischt
die grüne Thermoschutzanzeige.
SULFATIERTE ODER BESCHÄDIGTE BATTERIEN
Die NEOSTART erkennen nicht, ob Batterien sulfatiert oder beschädigt sind.
• Ihre Batterie ist schwer beschädigt, wenn die Amperemeter-Nadel bereits zu Beginn des Ladevorgangs auf eine hohe
Stromstärke schnellt. Die Batterie kann nicht mehr verwendet werden.
• Bei sulfatierten Batterien: Stellen Sie den höchstmöglichen Ladestrom "BOOST" für die NEOSTART 420 und 620 oder
"BOOST 2" für das NEOSTART 320 ein und starten Sie den Ladevorgang. Prüfen Sie regelmäßig, ob das Amperemeter
einen Ladestrom anzeigt. Steigt dieser, schalten Sie umgehend auf einen für Ihre Batterie angepassten Ladestrom
zurück. Sollte der Ladestrom auch nach 5 Std. nicht angestiegen sein, ist Ihre Batterie mit großer Wahrscheinlichkeit
irreparabel beschädigt.
Achtung! Führen Sie diesen Vorgang ausschließlich bei abgeklemmter Fahrzeugbatterie durch!
12

NEOSTART 320 / 420 / 620
DE
HINWEISE UND WARNUNGEN
• Explosionsgefahr: Während des Ladevorgangs können explosive Gase entstehen. Sorgen Sie daher stets für ein gut
belüftetes Umfeld. Vermeiden Sie Funken, offenes Licht und heiße und glühende Gegenstände in der Nähe von Batterien.
• Schützen Sie das Gerät gegen Regen und Feuchtigkeit.
• Ist das Ladegerät und/ oder Kabelleitungen defekt/ beschädigt, geben Sie das Ladegerät zur Reparatur zum Hersteller
bzw. zur Serviceleistung an einen Fachbetrieb.
• Externe Schmelzsicherung und Schutzschalter auf der Gerätevorderseite müssen bei Auslösung manuell ausgetauscht
werden.
• Versuchen Sie niemals defekte oder nicht auadbare Batterien zu laden.
• Halten Sie sich an die in dieser Anleitung beschriebene Anschlussreihenfolge des Gerätes.
• Produkt für selektives Einsammeln (Sondermüll). Werfen Sie es daher nicht in die häusliche Mülltonne!
• Dieses Gerät ist kein Spielzeug! Schützen Sie es vor unbefugtem Gebrauch.
• Öffnen Sie unter keinen Umständen eigenständig das Gerätegehäuse. Jegliche Reperaturarbeiten und Veränderungen
müssen durch die Serviceabteilung des Herstellers vorgenommen werden, andernfalls erlischt Ihr Garantieanspruch.
• Vergewissern Sie sich, dass die Netzspannung mit dem auf dem Typenschild des Gerätes aufgedruckten Spannungswert
übereinstimmt.
BETRIEBSSTÖRUNG, URSACHEN, ABHILFEN
Betriebsstörung Ursachen Abhilfen
Das Amperemeter schlägt nicht aus. Kein oder schlechter Netzkontakt. Überprüfen Sie den Netzanschluss.
Überprüfen Sie, ob sich das Gerät im
Lademodus bendet.
Kurzschluss oder Verpolung der Klemmen. Überprüfen Sie den Zustand der
Die zu ladende Batterie ist stark beschädigt. Überprüfen Sie mit einem Voltmeter, ob
Spannungsfehler (12V oder 24V). Achten Sie auf die richtige Spannungswahl (12
Intensive Verwendung des Gerätes führt zu
thermischer Überlastung.
Bei Minimum- Stellung des Drehknopfes steigt
die Stromanzeige über 20A.
Das Gerät schaltet sich ab. Sie versuchen das Fahrzeug zu starten, obwohl
Die Batterie ist tiefentladen. Ladung mit Minimaleinstellung weiterführen.
Spannungsfehler (12V oder 24V). Achten Sie auf die richtige Spannungswahl (12
Kurzschluss durch Batterie. Tauschen Sie die Batterie aus.
sich das Gerät im Lademodus bendet.
Auaden einer 12V Batterie mit 24V Spannung. Achten Sie auf die richtige Spannungswahl
Schutzsicherung und kontrollieren Sie, ob der
Schutzschalter eingeschaltet ist.
Spannung an den Batteriepolen herrscht.
Beträgt die Spannung über 2,5V pro Element,
ist die Batterie sulfatiert oder beschädigt.
oder 24V).
Warten Sie ca. 1/4 Std. bis sich das Gerät
abgekühlt hat.
oder 24V).
Stellen Sie den Drehknopf umgehend auf
« START », um eine Beschädigung Ihres
Gerätes zu verhindern und schalten Sie den
Schutzschalter wieder ein.
(12V).
HERSTELLERGARANTIE
Die Garantieleistung des Herstellers erfolgt ausschließlich bei Fabrikations- oder Materialfehlern, die binnen 12
Monate nach Kauf angezeigt werden (Nachweis Kaufbeleg). Nach Anerkenntnis des Garantieanspruchs durch den
Hersteller bzw. seines Beauftragten erfolgen eine für den Käufer kostenlose Reparatur und ein kostenloser Ersatz von
Ersatzteilen. Der Garantiezeitraum bleibt aufgrund erfolgter Garantieleistungen unverändert.
Ausschluss:
Die Garantieleistung erfolgt nicht bei Defekten, die durch unsachgemäßen Gebrauch, Sturz oder harte Stöße sowie
durch nicht autorisierte Reparaturen oder durch Transportschäden, die infolge des Einsendens zur Reparatur,
hervorgerufen worden sind. Keine Garantie wird für Verschleißteile (z. B. Kabel, Klemmen, Vorsatzscheiben etc.) sowie
bei Gebrauchsspuren übernommen.
Das betreffende Gerät bitte immer mit Kaufbeleg und kurzer Fehlerbeschreibung ausschließlich über den Fachhandel
einschicken. Die Reparatur erfolgt erst nach Erhalt einer schriftlichen Akzeptanz (Unterschrift) des zuvor vorgelegten
Kostenvoranschlags durch den Besteller. Im Fall einer Garantieleistung trägt GYS ausschließlich die Kosten für den
Rückversand an den Fachhändler.Este manual de uso incluye indicaciones sobre el funcionamiento de su aparato y las
precauciones a seguir para su seguridad. Lea atentamente este documento antes del primer uso y consérvelo para
una futura lectura.
13

NEOSTART 320 / 420 / 620
DESCRIPCIÓN GENERAL
Los aparatos NEOSTART están diseñados para la recarga y el arranque de baterías al plomo y electrolito líquido de 12
(6 elementos) y 24V (12 elementos) :
Recarga Arranque
Neostart 320 40 - 400 Ah 35 - 120 Ah
Neostart 420 25 - 600 Ah 35 - 160 Ah
Neostart 620 45 - 900 Ah 45 - 200 Ah
Montaje del soporte de transporte y de las ruedas (solo con el NEOSTART 420 y 620):
ES
ALIMENTACIÓN ELÉCTRICA
Compruebe que la red eléctrica y sus protecciones (fusible y/o disyuntor) sean compatibles con la corriente necesaria
para su uso. El aparato debe colocarse de forma que la toma de corriente sea accesible.
Se debe conectar a une toma monofásica de 230V CON toma de tierra protegida por una disyuntor de 16A.
CONEXIÓN Y DESCONEXIÓN
IMPORTANTE Antes de conectar a una batería, compruebe que el aparato no esté conectado a una red eléctrica y que
el conmutador esté en posición OFF (si hubiera). Compruebe también la polaridad de su batería.
Asimismo, compruebe la polaridad de su batería.
ATENCIÓN: Los cables no deben estar torcidos o en contacto con supercies calientes o cortantes.
Arranque y carga de una batería instalada sobre el vehículo:
Cuando el polo negativo de la batería está conectado al chasis
• Conecte la pinza roja al polo + de la batería.
• Conecte la pinza negra al chasis del vehículo, de manera que esté alejada de las canalizaciones de combustibles y de
la batería.
• Conecte el aparato a la red eléctrica.
• Después del uso, coloque el conmutador en OFF (si hubiera), desconecte primero el cargador de la red eléctrica, luego
desconecte la pinzar negra y nalmente la pinza roja.
Ciertos vehículos tienen el polo positivo de la batería conectado al chasis, en este caso :
• Conecte la pinza negra al polo negativo de la batería.
• Conecte la pinza negra al chasis del vehículo, de manera que esté alejada de las canalizaciones de combustibles y de
la batería.
• Conecte el aparato a la red eléctrica.
• Después del uso, coloque el conmutador en OFF (si hubiera), desconecte primero el cargador de la red eléctrica, luego
desconecte la pinzar roja y nalmente la pinza negra.
Carga de una batería no conectada al vehículo :
• Conecte la pinza roja en el polo positivo de la batería y la pinza negra sobre el polo negativo de la batería.
• Después del uso, coloque el conmutador en OFF (si hubiera), desconecte primero el cargador de la red eléctrica, luego
desconecte la pinzar roja y nalmente la pinza negra.
14

NEOSTART 320 / 420 / 620
USO EN MODO CARGADOR
Precauciones previas
• Úselo en un lugar resguardado y sucientemente aireado o especialmente preparado.
• Quite los tapones de la batería (si hubiera) y asegúrese de que el nivel de líquido (electrolito) sea suciente. En caso
contrario, añada agua desmineralizada y limpie minuciosamente los bornes y los terminales de batería.
• Compruebe que la capacidad de la batería en amperios-hora y la tensión en voltios sea compatible con su cargador.
Vigilancia y estado de la carga
Cuidado: estos aparatos son de tipo tradicional. La carga de baterías requiere una vigilancia, ya que esta no se detiene
hasta que el usuario ponga el conmutador en OFF o desconecte el aparato de la toma de corriente.
Cuando la batería está cargada, se produce el inicio de la ebullición del líquido (electrolito) de su interior. Se recomienda
interrumpir la carga cuando comience este fenómeno para evitar que la batería se dañe.
Además, si la batería estuviera conectada a un vehículo, una carga prolongada sin vigilancia podría dañar los dispositivos
electrónicos conectados. Asimismo, una batería sulfatada conllevaría los mismos riesgos desde el inicio de la conexión.
El n de la carga se detecta mediante la posición de la aguja del ampermetro, cuando se encuentra entre 0 y 10A, o
tras un tiempo de carga superior a 10 horas.
Batería hermética
Para cargar una batería hermética se debe ser extremadamente prudente. Hay que proceder lentamente a la hora de
cargar, controlando constantemente los bornes de la batería. Se aconseja interrumpir la carga cuando la tensión alcance
14,4V para una batería de 12V y 28,8V para una batería de 24V. Esta tensión se puede medir con un téster de baterías
o un voltímetro.
ES
Carga
una vez que se haya conectado el cargador a la batería siguiendo las recomendaciones (véase la sección Conexión y
desconexión),
Con el NEOSTART 320 :
- ponga el conmutador en posición Carga o Boost 1 teniendo en cuenta la capacidad de batería.
Atención: En modo Boost 1, la protección térmica puede activarse al inicio de la carga si la batería está profundamente
descargada.
Carga (12-24V) BOOST 1 (12-24V)
Neostart 320 40 - 160 Ah (11A) 90 - 400 Ah (27A)
Con el NEOSTART 420 y 620:
- ponga el conmutador en posición Carga 1 o Carga 2 teniendo en cuenta la capacidad de batería.
Carga 1 (12-24V) Carga 2 (12-24V)
Neostart 420 25 - 90 Ah (6A) 90 - 300 Ah (20A)
Neostart 620 45 - 140 Ah (10A) 140 - 450 Ah (30A)
Tras su uso, siga las recomendaciones de desconexión.
Carga de varias baterías simultáneamente
Puede cargar varias baterías de forma simultánea conectándolas en paralelo. Los bornes positivos deben conectarse a
la pinza roja y los bornes negativos a la pinza negra. Las baterías deben tener la misma tensión, 12 o 24V.
Sin embargo, la carga en serie no está recomendada.
15

NEOSTART 320 / 420 / 620
USO EN MODO ARRANCADOR
Precauciones previas
• No desconecte la batería del vehículo. La conexión de la batería puede conllevar una pérdida de información y una
eventual imposibilidad de volver a arrancar.
Arranque
Cuando haya conectado el arrancador a la batería, siguiendo las recomendaciones (Ver Conexión y desconexión), es
necesario realizar una precarga para aportar la energía indispensable para el arranque.
Para realizar la precarga, ponga el conmutador en posición «BOOST 2» con el NEOSTART 320 y en «BOOST» con el
NEOSTART 420 y 620.
NEOSTART 320 :
Instantáneo Precarga 5 min
Neostart
320
NEOSTART 420 y 620 :
Neostart 420 35 - 80 Ah 80 - 160 Ah
Neostart 620 45 - 100 Ah 100 - 200 Ah
12 V 35 - 60 Ah 60 - 120 Ah
24 V 35 - 45 Ah 45 - 90 Ah
Instantáneo Precarga 5 min
ES
Para realizar la precarga, ponga el conmutador en posición «BOOST».
Para realizar el arranque, ponga el conmutador en la posición «START». Sitúese delante del panel de control del vehículo.
Girando la llave, activará la función del arrancador. Cuando el vehículo arranque, se deberá detener esta función. Lo
ideal es realizarlo entre 2 personas, para que la que esté junto al Neostart pueda seleccionar la posición START en el
último momento y detener el aparato cuando el vehículo haya arrancado.
Si su motor no arranca, espere dos minutos para realizar el segundo intento. La duración de cada intento debe ser de
3 segundos máximo.
Nota : Un vehículo que no arranca puede tener un problema que no tenga que ver con una batería en mal estado:
alternador, bujía, etc
Tras su uso, siga las instrucciones de desconexión.
PROTECCIONES
Este aparato ha sido diseñado todas las protecciones posibles :
• Las pinzas de carga están completamente aisladas.
• Un fusible provee protección contra inversiones de polaridad y cortocircuitos.
- Neostart 420 y 620 : ref. 054547, calibre 200 A (tipo SIBA V-Fuse / open type)
- Neostart 320 : ref. 054639, calibre 150 A (tipo Littlefuse BF1 / 32V)
Reemplazarlo requiere una intervención manual.
• Un disyuntor, en la parte de delante, protege contra la sobrecarga del transformador o el arranque en posición de
carga. Si el disyuntor salta, se necesita reactivarlo manualmente.
• Un termostato protege contra el sobrecalentamiento del aparato (el enfriamiento requiere 1/4h). La luz del indicador
verde se apaga cuando ocurre un sobrecalentamiento.
BATERÍAS SULFATADAS O DAÑADAS
Los NEOSTART no detectan las baterías sulfatadas o dañadas.
• Cuando la aguja del ampermetro se desvíe rápidamente hacia intensidades muy elevadas, signicará que su batería
está demasiado dañada. Está batería demasiado dañada no podrá volver a usarse.
• En el caso de una batería sulfatada : ponga el aparato en el marcha más fuerte de BOOST con el NEOSTART 40 y
620 o BOOST 2 con el NEOSTART 320 y compruebe regularmente si el ampermetro indica una corriente de carga. En
cuanto la corriente de carga se eleve, seleccione la carga adaptada a la batería. Si no hubiera mejora tras 5 horas, la
batería no puede usarse.
Atención – Esta operación debe realizarse con la batería desconectada del vehículo.
16

NEOSTART 320 / 420 / 620
ES
CONSEJOS Y ADVERTENCIAS
• ¡PRECAUCIÓN! Gas explosivo, evite las llamas y las chispas alrededor del aparato. Durante la carga, la batería debe
ponerse en un lugar aireado.
• Proteja el aparato de la lluvia y de la humedad.
• Si se daña el cable de alimentación, deberá ser reemplazado por el fabricante, su servicio post-venta o una persona
cualicada, para evitar todo peligro.
• El usuario puede reemplazar el fusible externo y el disyuntor.
• En ningún caso se debe usar este aparato para cargar pilas o baterías no recargables.
• Se deben respetar imperativamente las indicaciones de conexión.
• Este producto no se debe tirar a la basura doméstica.
• Este aparato no está diseñado para ser utilizado por personas cuyas capacidades físicas, sensoriales o mentales estén
reducidas, o personas sin experiencia alguna o conocimiento sobre su uso, excepto si lo hacen bajo la vigilancia de una
persona que no cumpla lo anterior, o si han seguido instrucciones previas.
• No abra el aparato. Cualquier modicación realizada que no haya sido efectuada por un técnico del fabricante supone
la anulación de la garantía.
• Compruebe que la tensión disponible corresponde a la de tabla de indicaciones del cargador.
ANOMALÍAS, CAUSAS Y SOLUCIONES
Anomalías Causas Soluciones
El ampermetro del aparato no se mueve. Problema de la red eléctrica Compruebe su red eléctrica
Compruebe que el aparato esta en modo
cargador
Las pinzas están cortocircuitadas o en
inversión de polaridad
La batería que desea cargar está defectuosa Compruebe la tensión de los bornes
Error de tensión (12 -24 V) Compruebe que el conmutador esté en la
Tras un uso intensivo, su aparato se ha
puesto en interrupción térmica
La aguja del ampermetro sobrepasa los 20A,
pero la conguración del conmutador está al
mínimo.
El aparato hace saltar el disyuntor Está efectuando arranques con el aparato en
La batería está considerablemente
descargada
Error de tensión (12 - 24 V) Compruebe que el conmutador esté en la
La batería tiene elementos en cortocircuito Cargue la batería
modo Carga
Está cargando una batería de 12V en
posición 24V..
Compruebe que los fusibles no estén
fundidos y que el disyuntor esté activo.
con un voltímetro. Si la tensión sube
instantáneamente a más de 2,5V en cada
uno, es posible que la batería esté dañada o
sulfatada.
posición correcta (12 ou 24V)
Espere 1/4h a que se enfríe
Mantenga la carga con la conguración
mínima.
posición correcta (12 ou 24V)
Ponga el conmutador del aparato en modo
Arrancador. De seguir en modo Carga, su
aparato podría dañarse. Desbloquee el
disyuntor
Ponga el conmutador en posición 12V.
17

NEOSTART 320 / 420 / 620
Настоящая инструкция по использованию включает в себя рекомендации по функционированию аппарата
и меры предосторожности для вашей безопасности. Пожалуйста, внимательно прочтите ее перед первым
использованием и сохраните, чтобы при надобности перечитать.
ОБЩЕЕ ОПИСАНИЕ
Аппараты NEOSTART предназначены для зарядки и запуска свинцовых АКБ с жидким электролитом 12В (6
элементов) и 24В (12 элементов) :
Перезарядка Запуск
Neostart 320 40 - 400 Ah 35 - 120 Ah
Neostart 420 25 - 600 Ah 35 - 160 Ah
Neostart 620 45 - 900 Ah 45 - 200 Ah
Монтирование ручки и колес (только для аппаратов NEOSTART 420 и 620) :
RU
ЭЛЕКТРИЧЕСКОЕ ПИТАНИЕ
Проверьте, что питание и его защиты (плавкий предохранитель и/или прерыватель) совместимы с током,
необходимым для работы аппарата. Аппарат должен быть помещен таким образом, чтобы вилка была доступна.
Он должен быть подключен к однофазной сети 230В С ЗАЗЕМЛЕНИЕМ, защищенной предохранителем 16A.
ПОДКЛЮЧЕНИЕ И ОТКЛЮЧЕНИЕ
ВНИМАНИЕ! Прежде чем подключать аккумулятор убедитесь, что аппарат не подключен к электросети и что
переключатель (если он есть) находится в положении OFF (ВЫКЛ).
Проверьте также полярность вашего аккумулятора.
Внимание : кабели не должны быть защемлены или контактировать с нагревающимися или режущими
поверхностями.
Запуск и зарядка аккумуляторной батареи (АКБ), установленной на автомобиле:
В случае, если отрицательный полюс АКБ подключен к шасси автомобиля
• Подсоедините красный зажим к полюсу + АКБ.
• Подсоедините черный зажим к шасси автомобиля таким образом, чтобы он находился как можно дальше от
топливных шлангов и от АКБ.
• Подключите аппарат к сети электропитания.
• После использования, поставьте переключатель (если он есть) в положение OFF, затем отключите зарядное
устройство от сети, далее отсоедините черный зажим, после чего – красный.
На некоторых автомобилях к шасси подключен положительный полюс АКБ. В этому случае :
• Подсоедините черный зажим к отрицательному полюсу батареи.
• Подсоедините красный зажим к шасси автомобиля, так чтобы он был удален от топливных шлангов и от АКБ.
• Подключите аппарат к сети электропитания.
• После использования, поставьте переключатель (если он есть) в положение OFF, затем отключите зарядное
устройство от сети, далее отсоедините красный зажим, после чего – черный.
Зарядка АКБ, не подключенной к автомобилю:
• Подсоедините красный зажим к положительному полюсу батареи и черный зажим к отрицательному полюсу
батареи.
• После использования, поставьте переключатель (если он есть) в положение OFF, затем отключите зарядку от
сети, далее отсоедините красный зажим, после чего – черный.
18

NEOSTART 320 / 420 / 620
ИСПОЛЬЗОВАНИЕ В РЕЖИМЕ ЗАРЯДКИ
Меры предосторожности
• Помещение должно быть крытым, хорошо проветриваемым или специально оборудованным.
• Снимите пробки АКБ (если они есть) и убедитесь в том, что уровень жидкости (электролита) достаточный. В
противном случае добавьте деминерализованной воды и тщательно очистите клеммы и наконечники АКБ.
• Проверьте, что емкость АКБ в Ампер-часах и напряжение в Вольтах соответствуют зарядному устройству.
Надзор и состояние зарядки
ВНИМАНИЕ : эти аппараты - традиционные. Зарядка АКБ требует наблюдения и она остановится только тогда,
когда оператор поставит переключатель в положение «OFF» или отключит аппарат от сети.
Когда АКБ заряжена начинается процесс кипения содержащейся в ней жидкости (электролита). Рекомендуем
остановить зарядку в начале этого процесса, чтобы не повредить АКБ.
К тому же, в случае если АКБ подключена к автомобилю, длительная зарядка без надзора может повредить
бортовые электронные приборы. Таким же образом сульфатированная АКБ, не принимающая заряд, вызовет те
же риски сразу после подключения.
Конец зарядки определяется либо положением стрелки амперметра, находящейся между 0 и 10A, либо
продолжительностью зарядки свыше 10 часов.
Герметичные аккумуляторы
При зарядке герметичной АКБ необходимо быть предельно осторожным. Действуете медленно, постоянно
контролируя напряжение на клеммах АКБ. Рекомендуется остановить зарядку, когда напряжение достигнет
14,4В для 12-вольтовой АКБ и 28,8В для 24-вольтовой АКБ. Это напряжение можно измерить с помощью тестера
или вольтметра.
RU
Зарядка
Как только вы подключили зарядное устройство к АКБ, следуя указаниям (см. подключение и отключение),
Для аппарата NEOSTART 320 :
- поставьте переключатель в положение CHARGE (ЗАРЯД) или BOOST 1, соблюдая емкость АКБ.
Внимание: В режиме Boost 1 если батарея сильно разряжена в начале зарядки может инициироваться
термозащита.
Заряд (12-24V) BOOST 1 (12-24V)
Neostart 320 40 - 160 Ah (11A) 90 - 400 Ah (27A)
Для аппаратов NEOSTART 420 и 620 :
- поставьте переключатель в положение CHARGE 1 (ЗАРЯД 1) или CHARGE 2 (ЗАРЯД 2), соблюдая емкость
АКБ.
Заряд 1 (12-24V) Заряд 2 (12-24V)
Neostart 420 25 - 90 Ah (6A) 90 - 300 Ah (20A)
Neostart 620 45 - 140 Ah (10A) 140 - 450 Ah (30A)
После использования следуйте указаниям по отключению аппарата.
Заряжает одновременно несколько АКБ
Вы можете зарядить несколько АКБ одновременно, подключив их параллельно. Положительные клеммы
подсоединены к красному зажиму и отрицательные клеммы подсоединены к черному зажиму. Эти АКБ или
объединение АКБ должны иметь одинаковое напряжение 12 или 24В.
Серийное подключение не рекомендуется.
19

NEOSTART 320 / 420 / 620
ИСПОЛЬЗОВАНИЕ В РЕЖИМЕ ПУСКА
Меры предосторожности
• Не отключайте АКБ от автомобиля. Подключение АКБ может привести к потере настроек и в некоторых случаях
невозможность завести двигатель.
Запуск
После подключения пускового устройства к батарее, следуя указаниям (см. § подключение и отключение),
может понадобиться совершить предварительную зарядку, чтобы подать энергию, необходимую для запуска.
Для осуществления предварительной зарядки поставьте переключатель в положение "BOOST 2" для аппарата
NEOSTART 320 и "BOOST" для аппаратов NEOSTART 420 и 620.
NEOSTART 320 :
Мгновенный предварительная зарадка 5 мин
Neostart
320
NEOSTART 420 и 620 :
Neostart 420 35 - 80 Ah 80 - 160 Ah
Neostart 620 45 - 100 Ah 100 - 200 Ah
12 V 35 - 60 Ah 60 - 120 Ah
24 V 35 - 45 Ah 45 - 90 Ah
Мгновенный предварительная зарадка 5 мин
RU
Для предварительной зарядки поставьте переключатель в положение «BOOST».
Для запуска поставьте переключатель в положение «START». Сядьте за руль автомобиля. Повернув ключ
контакта, вы активируете функцию запуска. Эта функция должна быть остановлена сразу после запуска
двигателя. Идеально было бы работать вдвоем, чтобы человек радом с аппаратом NEOSTART смог включить
положение START в последний момент и остановить аппарат, как только автомобиль завелся.
Если двигатель не заводится, подождите 2 минуты перед тем, как совершить следующую попытку. Попытка не
должна длиться более 3 секунд.
Nb : Автомобиль, который не заводится может иметь иную проблему, чем АКБ в плохом состоянии : альтернатор,
свечи накаливания,…
После использования следуйте рекомендациям по отключению.
ЗАЩИТЫ
Этот аппарат разработан с максимальным количеством защит :
• Зажимы зарядки полностью изолированы.
• Плавкий предохранитель обеспечивает защиту против инверсии полярности и коротких замыканий :
- Neostart 420 и 620 : арт. 054547, калибр 200 A (type SIBA V-Fuse / open type)
- Neostart 320 : fhn. 054639, калибр 150 A (type Littlefuse BF1 / 32V)
Замена требует ручного вмешательства.
• Прерыватель, расположенный на передней панели, обеспечивает защиту от перенапряжения трансформатора
или запуска в положении зарядки. Если он прервется, то понадобится повторное включение вручную.
• Термозащита обеспечивается термореле (охлаждение примерно 1/4 часа). При перегреве зеленая лампочка
выключается.
СУЛЬФАТИРОВАННЫЕ ИЛИ ПОВРЕЖДЕННЫЙ АКБ.
Аппараты NEOSTART не определяют сульфатированные или поврежденные АКБ.
Батарея сильно повреждена, если при зарядке стрелка амперметра быстро отклоняется в сторону высоких токов.
Аккумуляторная батарея окончательно вышла из строя.
• в случае сульфатированной АКБ : поставьте аппарат на самую большую скорость «BOOST» для аппаратов
Neostart 420 и 620 или «BOOST 2» для Neostart 320 и регулярно следите, чтобы амперметр показывал ток
зарядки. Как только ток зарядки начинает расти, поставьте аппарат на зарядку, соответствующую АКБ. Если по
истечение 5 часов не наблюдается улучшения, то аккумуляторная батарея окончательно вышла из строя.
Внимание: эта операция должна обязательно быть осуществлена при отключенной от автомобиля АКБ!
20

NEOSTART 320 / 420 / 620
RU
СОВЕТЫ И ПРЕДОСТЕРЕЖЕНИЯ
• ПРЕДУПРЕЖДЕНИЕ ! Взрывчатый газ, избегайте пламени и искр. Во время зарядки АКБ должна быть помещена
в хорошо проветриваемом месте.
• Берегите аппарат от дождя и влаги.
• Если шнур питания поврежден, то он должен быть заменен производителем, его сервисной службой или
компетентным специалистом во избежании опасности.
• Пользователь может сам заменить внешний плавкий предохранитель и заново включить прерыватель.
• Ни в коем случае не используйте этот аппарат для зарядки батареек или неперезаряжаемых АКБ.
• В обязательном порядке соблюдайте указанный порядок подключения.
• Этот аппарат подлежит утилизации, не выбрасывать в общий мусоросборник.
• Этот аппарат не предназначен для использования людьми (в том числе и детьми) с ограниченными физическими,
чувствительными или умственными способностями или людьми, не имеющими опыт или знания, кроме случаев,
когда они совершают это под наблюдением и по советам лица, отвечающего за их безопасность.
• Не вскрывайте аппарат. Любое изменение, не произведенное техническим специалисттом компании
производителя, влечет за собой отмену гарантии.
• Проверьте, что напряжение соответствует тому, что указано на зарядном устройстве.
НЕИСПРАВНОСТИ, ИХ ПРИЧИНЫ И УСТРАНЕНИЕ
Неисправности Причины Устранение
Стрелка амперметр аппарата не
отклоняется.
Стрелка амперметра зашкаливает за 20A
в то время, как переключатель настроен
на минимум.
Аппарат прерывается Вы совершаете запуски аппаратом в
проблема сетевого питания Проверьте сетевое питание
Проверьте, что аппарат в положении
зарядки
Зажимы закорочены или инверсия
полярности
АКБ, которую вы хотите зарядить,
неисправна
Ошибка напряжения (12 - 24 В) Проверьте, что переключатель в
В аппарате включилась термозащита
вследствие интенсивного использования
АКБ сильно разряжениа Продолжайте зарядку при минимальных
Ошибка напряжения (12 - 24 В) Проверьте, что переключатель в
Элементы АКБ закорочены Замените АКБ
положении « зарядка »
Вы заряжаете АКБ 12В в положении 24В. Поставьте переключатель в положение
Проверьте, что плавкие предохранители
не расплавились и что прерыватель
вдавлен.
Проверьте с помощью вольтметра
напряжение на клеммах. Если это
напряжение мгновенно поднимаетмя
свыше 2,5В на элемент, АКБ может быть
сульфатирована или повреждена
правильном положении (12 или 24В)
Подождите 1/4 часа, чтобы дать аппарату
остыть
настройках
правильном положении (12 или 24В)
Обязательно поставьте переключатель
аппарата в положение « запуска » во
избежание повреждения аппарата.
Повторно включите прерыватель
12В.
21

NEOSTART 320 / 420 / 620
此使用说明手册涵盖充电器运行指导以及安全防范指示。请在首次使用前仔细阅读该手册并小心保管以备后续参阅。
概述
NEOSTART系列是一款专用于12V(6组)及24V(12组)铅酸蓄电池充电及(机动车)起动时的充电设备。
充电 起动
Neostart 320 40 - 400 Ah 35 - 120 Ah
Neostart 420 25 - 600 Ah 35 - 160 Ah
Neostart 620 45 - 900 Ah 45 - 200 Ah
NEOSTART系列是一款专用于12V(6组)及24V(12组)铅酸蓄电池充电及(机动车)起动时的充电设备。
手柄及滚轮安装(仅适用于NEOSTART 420及620):
CN
供电电源
确保电源及其防护(保险丝 和/或 断路器)与所须使用的电流兼容。
充电器应当摆放在其电源插头容易拔插的地方。
充电器应当与一个230V单相接地的插座连接,插座须由一个16A的断路器保护。
连接与断开
注意! 在进行任何与电池连接的操作之前,确认充电器未与电源连接,且旋扭处于OFF档(如有)。
同时,确认电池的正负极性。
注意: 请勿夹住电缆或使电缆变形,也勿使电缆与高温或尖锐物的表面接触。
起动并为安装在汽车上的车载蓄电池充电:
当电池的负极连接汽车底盘时
0 将红色夹钳与电池的+(正)极连接。
0 将黑色夹钳与汽车底盘连接,并确保夹钳远离易燃物品的通道和电池。
0 将充电器连接到电源。
0 使用完毕后,将旋扭调到OFF档(如有),首先断开充电器与电源连接,然后断开黑色夹钳,最后断开红色夹钳。
有些款式的汽车底座连接的是电池的正极,这种情况下:
0 将黑色夹钳与电池负极连接。
0 将红色夹钳与汽车底盘连接,并确保夹钳远离易燃物品的通道或电池。
0 将充电器连接到电源。
0 使用完毕后,将旋扭调到OFF档(如有),首先断开充电器与电源连接,然后断开红色夹钳,最后断开黑色夹钳。
为未安装在汽车上的蓄电池充电:
0 将红色夹钳与电池正极连接,黑色夹钳与电池的负极连接。
0 使用完毕后,将旋扭调到OFF档(如有),首先断开充电器与电源的连接,然后断开红色夹钳,最后断开黑色夹钳。
22
22

NEOSTART 320 / 420 / 620
充电模式下的使用说明
准备事项
0 选择通风良好或特别改造过的有遮蔽防护的场所。
0 拔下蓄电池的塞子(如有配备)并确保电解液液位是满的。如液位未满,则补充一些软化水,并仔细将电池接线柱和
接线片清洁干净。
0 确保电池容量(安培小时)及电压(伏)与您选购的充电器兼容。
监控及充电情况
注意: 此款设备是传统型充电器。电池的充电过程中须要有人进行监控,且仅在操作员将旋扭调到OFF档,或拔掉充电
器电源插座时,充电器才停止工作。
当电池充满时,蓄电池中的液体(电解液)便会开始产生气泡。请在产生气泡现象前终止充电,避免对电池造成损坏。
此外,若电池与汽车已经连接,在无人监视的情况下对电池进行延长充电时间将有可能导致内置电子元器件的损坏。而
且,被硫化后的蓄电池会充不进电,由此导致在一开始接线时就损坏电池的风险。
当电流表的指针指向0-10A之间,或者充电时间达到10小时以上,就可以结束充电过程。
密封型蓄电池
当对密封型蓄电池充电时,必须非常小心。 要不断检测蓄电池接线柱之间的电压,缓慢的进行充电。当电压达到14.4
伏(针对12V的蓄电池)或28.8伏(针对24V的蓄电池)时,请终止充电。此电压值可以用蓄电池检测仪或电压表测得。
CN
充电
一旦您已将充电器与蓄电池根据以上指导要求连接后(参阅连接与断开部分的指示)
针对NEOSTART 320
- 根据不同的电池容量,将旋扭转到相应的CHARGE(充电)档 或 BOOST 1(快充1)档。
注意:在Boost 1(快充1)模式下,如果电池已被严重放电,可能会在充电的初始阶段启动过热保护。
充电 (12-24V) 快充1 (12-24V)
Neostart 320 40 - 160 Ah (11A) 90 - 400 Ah (27A)
针对NEOSTART 420和620
- 根据不同的电池容量,将旋扭转到相应的CHARGE 1(充电1)或CHARGE 2(充电2)档。
充电1 (12-24V) 充电2 (12-24V)
Neostart 420 25 - 90 Ah (6A) 90 - 300 Ah (20A)
Neostart 620 45 - 140 Ah (10A) 140 - 450 Ah (30A)
使用完毕后,请遵照指示断开所有连接。
同时为几台电池充电
您可以将几台电池并联后同时进行充电。接线柱正极与红色夹钳连接,接线柱负极与黑色夹钳连接。这些电池或这一组
电池应当使用相同的12V或24V电压.
请勿使用串联方式进行同时充电。
23
23

NEOSTART 320 / 420 / 620
起动模式下的使用说明
准备事项
请勿将电池与汽车断开。电池的连接可能导致数据丢失以及不能重新起动的风险。
起动
一旦您已将起动器与蓄电池根据以上指导连接后(参阅连接与断开部分的指示),可能需要进行一次预充电,使其能够
为一次起动提供足够的电量。
要进行预充电需要将旋扭切换到 BOOST 2(快充2)档(适用于NEOSTART 320)或 BOOST(快充)档(适用于NEOSTART
420和620)。
NEOSTART 320 :
瞬间充电 预充电 5 分钟
Neostart
320
NEOSTART 420 和 620 :
Neostart 420 35 - 80 Ah 80 - 160 Ah
Neostart 620 45 - 100 Ah 100 - 200 Ah
12 V 35 - 60 Ah 60 - 120 Ah
24 V 35 - 45 Ah 45 - 90 Ah
瞬间充电 预充电 5分钟
CN
要进行起动时需将旋扭切换到(START)起动档,然后进入汽车驾驶室,转动车钥匙时,打开起动器功能。此功能必须
在汽车发动后关闭。最好由2名人员操作,这样可由1名人员在驾驶室内先转动钥匙,另1名接近NEOSTART充电器的人员
就在最后时刻切换到START起动档,然后在汽车发动起来后立即关闭。
若汽车发动机未发动起来,请等待2分钟后再进行第二次尝试。每次发动的时间不能超过3秒钟。
注意:汽车未发动成功也可能是由电池以外的其他设备或元件损坏引起,例如:交流发电机,预热塞等。
使用完毕后,请遵照指示断开所有连接。
安全防护
该设备最大程度的进行了安全保护的设计:
0 充电夹为完全绝缘。
0 保险丝(熔丝)对正反极接错以及短路进行保护。
- 针对Neostart 420和620 参考号ref. 054547(200A / SIBA V-Fuse / open type)。
- 针对Neostart 320 参考号ref. 054639(150A / Littlefuse BF1 / 32V)。
熔丝需要通过手动方式更换。
0 在设备正面位置有一个断路开关,对变压器进行过载保护或对在Charge(充电)档位下误操作起动功能进行保护。
0 过热保护由一个恒温器控制。(冷却过程需要约15分钟)。绿色指示灯在发生过热情况时熄灭。
发生硫化或损坏的电池
NEOSTART不能用于检测电池是否发生硫化或已损坏。
0 如果充电时,电流表的指针迅速偏向大电流数值,那么您的电池已经严重损坏,且彻底不能使用。
0 如果电池发生硫化现象:将充电器调节到BOOST(快充)的最强一档(适用于Neostart 420 和 620)或 BOOST 2(快
充2)档(适用于Neostart 320),并且定时查看电流表是否有显示一个充电电流。当充电电流显示升高,则将档位切
换到适用于该电池规格的充电档位。如果5小时后仍未有变化,表明电池彻底损坏且不能使用。
注意 - 该操作必须在电池未与汽车连接的情况下进行!
24
24

NEOSTART 320 / 420 / 620
CN
建议与警告
0 警告!内含易爆气体,请远离火苗和火花。充电期间,电池应当放置于通风良好的地方。
0 防止充电器遭淋雨及避免潮湿环境。
0 如果电源线损坏,以防危险,必须由工厂、售后服务部或者一名有类似资质的人员进行更换。
0 外部熔断器的熔丝替换以及断路开关的重置可由用户自行完成。
0 无论如何不得用该充电器对干电池或不可充电电池进行充电。
0 必须严格遵照指导说明中的连接顺序进行连接。
0 对于有选择性回收的产品,请勿扔至家用垃圾桶中。
0 该设备不适合以下人群使用:行为、感观或精神能力有缺陷者,或缺乏使用知识或经验者。除非有第三者在场愿意对
其人身安全负责的前提下,对其进行监督及事先进行相关设备的使用指导后才可让其使用。
0 请勿拆开充电器设备。任何未经原生产厂商技术人员进行的设备改动都将导致保修期限的取消。
0 确保现场可用电压与电池充电器警示铭牌上标注的相符。
故障原因及解决方案
故障 原因 解决方案
充电器的电流表指针不发生偏移
(无动作)
旋扭设定在最小值时,
电流表指针超过20A
设备断路开关起跳 您可能将充电器调节在<charge>
区域电源电压问题 检查您所在区域的电源电压。
检查充电器是否在充电档。
夹钳短路或
正负极发生反向错误
待充电电池已损坏 用电压表检测接线柱间的电压。
电压错误(12-24V) 检查旋扭处于正确的档位(12或24V)
高强度使用后,充电器发生
过热中断保护
电池严重放电 保持在最小设定值下充电。
电压错误(12-24V) 检查旋扭处于正确的档位(12或24V)
蓄电池有短路的电池组 更换电池组
充电档时进行过起动操作。
您可能用24V的档位
对12V的电池充电.
检查熔丝是否熔断
断路开关是否已按下
如果测得的每组电池的电压值瞬
达到2.5V以上,电池则可能已经
发生硫化或损坏。
等待15分钟让设备冷却
必须将旋扭调到
《START》起动档否则可能会
引起设备损坏。
重新按下断路器开关。
将旋扭调至12V档位。
25
25

NEOSTART 320 / 420 / 620
DÉCLARATION DE CONFORMITÉ
La société GYS atteste que les appareils NEOSTART 320 - NEOSTART 420 - NEOSTART 620 sont fabriqués conformément aux
exigences des directives :
basse tension ‣ 2006/95/CE du 12/12/2006 et CEM ‣ 2004/108/CE du 15/12/2004 - 03/05/1989
Cette conformité est établie par le respect des normes harmonisées :
EN60335-2-29
EN55014-1 et EN55014-2
EN61000-3-2 et EN61000-3-3
Le marquage CE a été déposé en 2014
DECLARATION OF CONFORMITY
GYS certies that the chargers – starters described in this manual: NEOSTART 320 - 420 - 620 are manufactured in compliance
with the the following European directives requirements:
Low Voltage Directive: 2006/95/CE du 12/12/06 and EMC Directive: 2004/108/CE du 15/12/2004- 03/05/1989.
It therefore complies with the following harmonized standards:
EN 60335-2-29
EN 55014-1 and EN 55014-2
EN 61000-3-2 and EN 61000-3-3
Marking dates CE: 2014
KONFORMITÄTSERKLÄRUNG
GYS erklärt, dass die in dieser Betriebsanleitung beschriebenen Start- und Ladegeräte NEOSTART 320, 420 und
NEOSTART 620 in ihrer Konzeption und Bauart sowie in der von GYS in Verkehr gebrachten Ausführung den grundlegenden
Sicherheitsanforderungen der nachfolgend genannten EG-Richtlinien entsprechen:
EG - Niederspannungs-Richtlinie: 2006/95/EG vom 12/12/06 und EG - EMV-Richtlinie: 2004/108/EG vom 15/12/2004- 03/05/1989,
EN 60335-2-29,
EN 55014-1 und EN 55014-2,
EN 61000-3-2 und EN 61000-3-3.
CE Kennzeichnung: 2014
DECLARACIÓN DE CONFORMIDAD
La empresa GYS atesta que el cargador – arrancador descrito en este manual NEOSTART 320 - 420 - 620 Está fabricado en
conformidad con las exigencias de las normas directivas europeas siguientes :
Directiva Baja Tensión: 2006/95/CE del 12/12/06 y directiva CEM: 2004/108/CE del 15/12/2004- 03/05/1989.
Para estas razones, está en conformidad con las normas harmonizadas:
EN 60335-2-29
EN 55014-1 y EN 55014-2
EN 61000-3-2 y EN 61000-3-3
Fecha de marcado CE: 2014.
ДЕКЛАРАЦИЯ СООТВЕТСТВИЯ
Компания GYS подтверждает, что зарядное устройство – тестер – пусковое устройство, описанное в настоящей инструкции
: NEOSTART 320 / 420 / 620 произведено в соответствии с требованиями следующих европейских директив :
Директива по Низкому Напряжению : 2006/95/CE от 12/12/06 и Директива CEM : 2004/108/CE от 15/12/2004- 03/05/1989.
Для этого они соответствуют гармонизированным нормам :
EN 60335-2-29
EN 55014-1 и EN 55014-2
EN 61000-3-2 и EN 61000-3-3
Маркировка CE: 2014.
合格声明(符合性声明)
GYS公司特此证明以下设备 NEOSTART 320 - NEOSTART 420 - NEOSTART 620型号皆严格遵照以下指令的要求制造:
0 12/12/2006颁布的2006/95/CE低电压指令
0 15/12/2004 - 03/05/1989期间制订及修订的2004/108/EC的EMC电磁兼容指令。
此份合格声明遵照以下协调标准确立:
EN60335-2-29 EN55014-1 et EN55014-2
EN61000-3-2 et EN61000-3-3
CE标志于2014年使用
26
Nicolas BOUYGUES
Président Directeur Général
Société GYS, 134 BD des Loges, 53941 Saint-Berthevin, FRANCE.
GYS China, 6666 Songze road-Quingpu, Shanghai 201700

LED
input 230AV 50Hz
N1
N2
N3
N4
S1
S2
T1
AC1
AC2
+
-
D1
F4
+24V
0V
+12V
Cicuit CEM
PCB
JP1
JP2
JP3 M6
+
~
~
-
12
34
56
78
910
S1
N
P
GND
transformer thermal protector
circuit Breaker
F1
F2
rectifier thermal protector
F3
NEOSTART 320 / 420 / 620
SCHÉMA ÉLECTRIQUE / CIRCUIT DIAGRAM / SCHALTPLAN / DIAGRAMA ELECTRICO /
ЭЛЕКТРИЧЕСКАЯ СХЕМА / 电路图
NEOSTART 420/620 :
NEOSTART 320 :
CLAVIER DE COMMANDE / CONTROL PANEL / BEDIENFELD / TABLA DE MANDOS /
ПАНЕЛЬ УПРАВЛЕНИЯ / 控制面板
1
2
4
Branchement pince pour batterie 24V /
Output for 24V battery / Anschluss für
1
3
5
24V Batterie / Borne para batería 24V /
Клемма для 24В Батарей / 24V输出接线端
Ampèremètre / Ammeter / Amperemeter /
2
Amperímetro / Амперметр / 电流表
6
Commutateur / Switch / Schalter /
3
Conmutador / Переключатель / 旋扭
Disjoncteur / Circuit breaker
4
/ Schutzschalter / Disyuntor /
родохранитель / 断路器开关
Voyant de protection thermique / Thermal
protection LED / Thermoschutzanzeige /
5
Piloto de protección térmica / Индикатор
термозащиты / 过热保护指示灯
Branchement pince pour batterie 12V /
Output for 12V battery / Anschluss für
6
12V Batterie / Borne para batería 12V /
Клемма для 12В Батарей / 12V输出接线端
1
6
2
4
3
5
27

NEOSTART 320 / 420 / 620
ICONES / SYMBOLS / ZEICHENERKLÄRUNG / ICONOS / CИMBOЛЫ / 符号图标
Attention ! Lire le manuel d’instruction avant utilisation / Caution ! Read the user manual /
Achtung! Lesen Sie die Betriebsanleitung / Cuidado, lea el manual de uso antes del empleo /
Внимание ! Читайте инструкцию перед использованием / 注意!请在使用前仔细阅读该说明
手册
Appareil conforme aux Directives Européennes / The device complies with European Directive /
Gerät entspricht europäischen Richtlinien / El aparato cumple con las directivas europeas /
Устройство соответствует европейским нормам / 设备符合欧盟相关指令
Conforme aux normes GOST (Russie). / Conform to GOST / PCT (Russia) standards. / in
Übereinstimmung mit der Norm GOST/PCT. / En conformidada con la normas GOST (PCT)
(Rusia). / Соответствует стандарту России (РСТ). / 符合GOST(俄罗斯)认证标准
Protégé contre l’accès aux parties dangereuses avec un doigt, et contre les chutes verticales de
gouttes d’eau / Protected against rain and against ngers access to dangerous parts / Geschützt
IP 21
gegen Regen und das Berühren gefährlicher Teile mit den Fingern. / protegido contra el acceso a
partes peligrosas con el dedo, y contra las caídas verticales de gotas de agua / Аппарат защищен
от доступа пальцев в опасные зоны и от вертикального падения капель воды / 防止用手指
接触危险部位,防止淋雨。
Pour usage intérieur, ne pas exposer à la pluie / For interior use, do not expose to the rain / Vor
Nässe und Feuchtigkeit schützen! / Para un uso en interior, no exponer a la lluvia. / Использовать
в помещении – не выставлять под дождь. / 请在室内使用,勿使设备暴露淋雨。
Attention gaz explosifs, éviter la formation de ammes et d’étincelles. / Warning contains explosive
gas, keep away from ames or source of sparks. / Achtung! Von explosiven Gasen, Flammen und
Funkenquellen fernhalten! / Cuidado: gases explosivos, evitar la formación de llamas o chispas.
/ Осторожно со взрывчатыми газами, избегайте пламени и искр. / 注意:内有易爆气体,请
远离火苗和火花。
Utiliser le chargeur à l’abri de la pluie et de la foudre dans un local abrité et sufsamment aéré
ou spécialement aménagé. / Charger should be used in an area sheltered from elements, and in
a ventilated area. / Verwenden Sie das Gerät ausschließlich in einer vor Regen und Feuchtigkeit
geschützen und gut belüfteten Umgebung. / Utilizar el cargador en una zona protegida de la
lluvia y del rayo, en un local cubierto y sucientemente ventilado o especialmente acondicionado
/ Зрядное устройство должно использоваться в специально оборудованном, хорошо
проветриваемым и защищенным от дождя помещении. / 在通风良好、避雨、有避雷设施的有
遮蔽防护或特别改造过的场所使用充电器。
Fusible / Fuse / Sicherung / Fusible / Плавкий предохранитель -
(NEOSTART 320 : 150A / NEOSTART 420-620 : 200A) / 熔丝 - (200A)
Produit faisant l’objet d’une collecte sélective- Ne pas jeter dans une poubelle domestique. /
Waste Electrical and Electronic Equipment, separate waste collection required, Do not throw in a
domestic bin / Für die Entsorgung Ihres Gerätes gelten besondere Bestimmungen (Sondermüll).
Es darf nicht mit dem Hausmüll entsorgt werden. / Este aparato es objeto de una recolección
selectiva. No tirar en una basura doméstica. / Устройство требует специальной утилизации.
Не выбрасывать с бытовыми отходами. / 属于有选择性回收的产品,请勿扔至家用垃圾桶中。
28
Courant continu / Direct current / Gleichstrom / Corriente continua / Постоянный ток / 直流电
Information sur la température (protection thermique) / Temperature information (thermal
protection) / Information zur Temperatur (Thermoschutz) / Información de la temperatura
(protección térmica) / Информация о температуре (термозащита) / 温度信息(过热保护)
 Loading...