

Page 1
FR
2-5 / 30-31
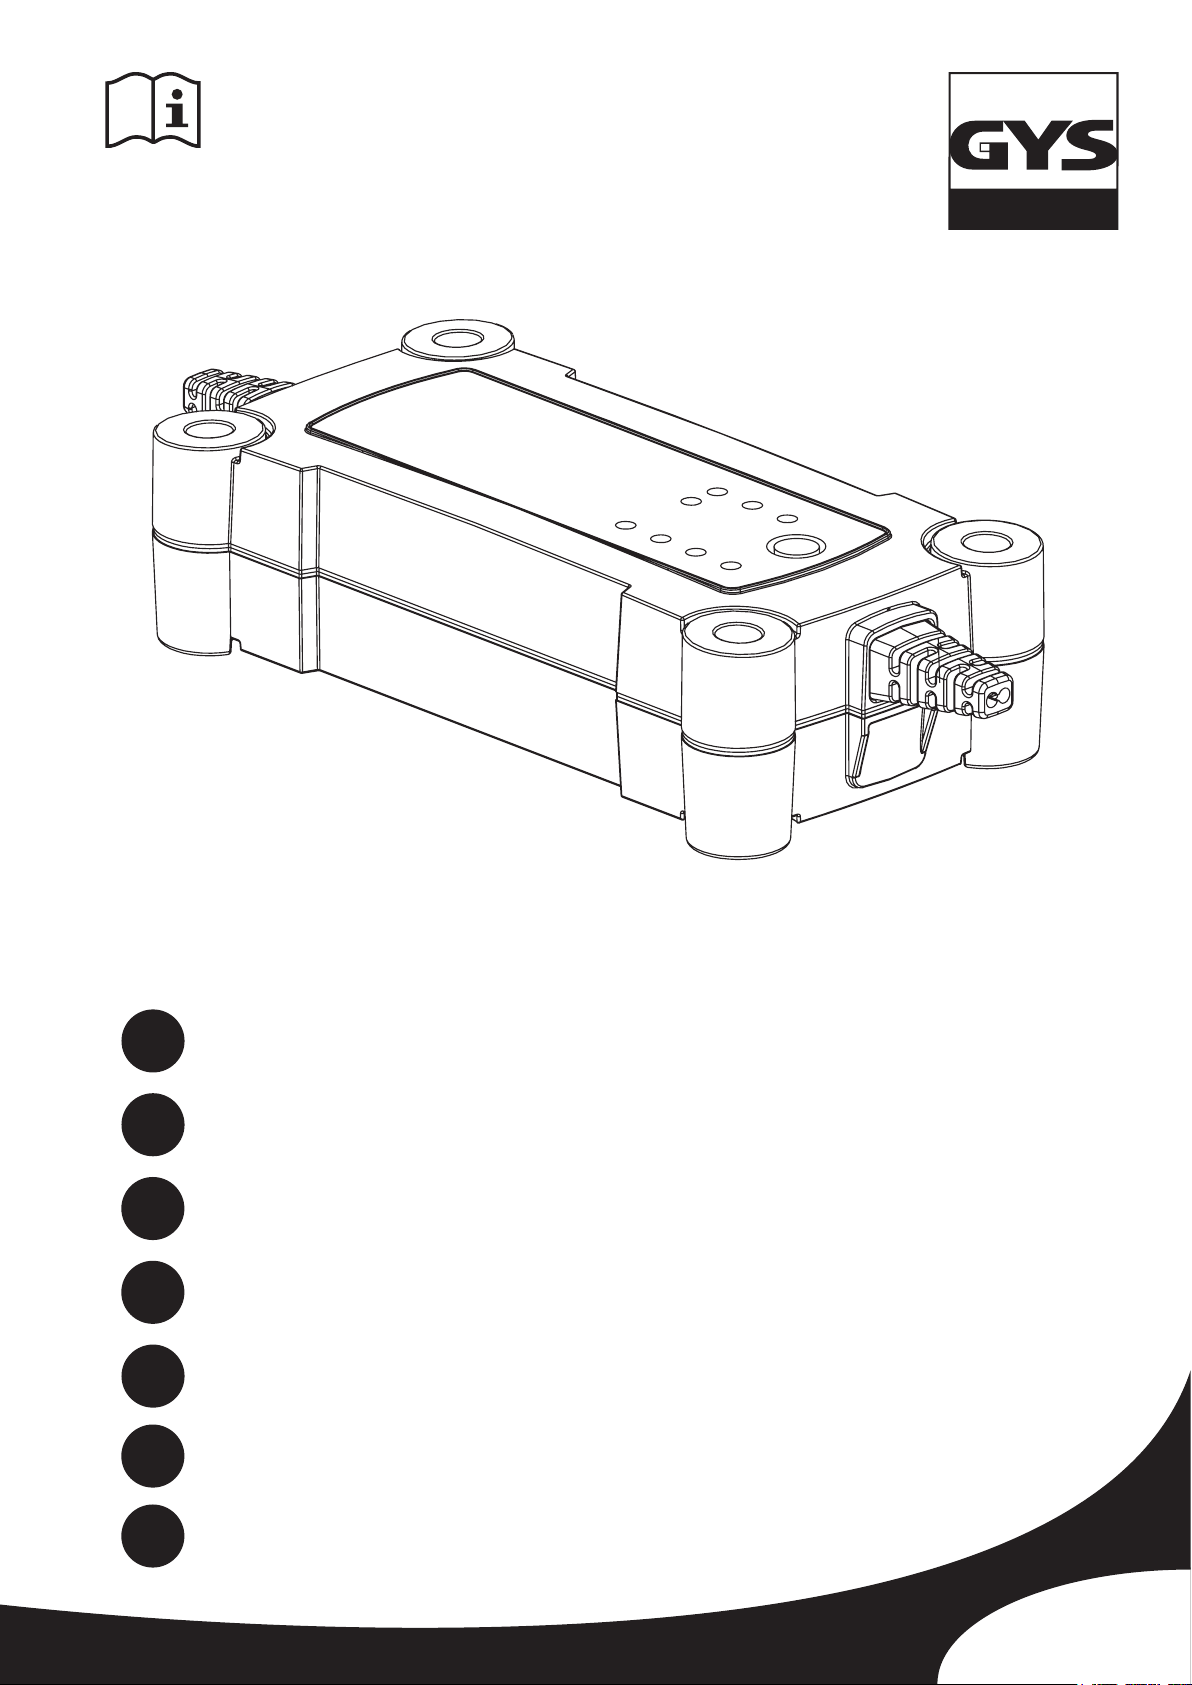
GYSFLASH HERITAGE 6 A
EN
DE
ES
RU
IT
NL
73502_V2_27/07/2017
6-9 / 30-31
10-13 / 30-31
14-17 / 30-31
18-21 / 30-31
22-25 / 30-31
26-29 / 30-31
www.gys.fr
Page 2
INSTRUCTIONS DE SÉCURITÉ
Ce manuel d’utilisation comprend des indications sur le
fonctionnement de votre appareil et les précautions à suivre pour
votre sécurité.
Merci de le lire attentivement avant la première utilisation et de le
conserver soigneusement pour toute relecture future.
Cet appareil doit être utilisé uniquement pour faire de la recharge
dans les limites indiquées sur l’appareil et le manuel. Il faut respecter
les instructions relatives à la sécurité. En cas d’utilisation inadéquate
ou dangereuse, le fabricant ne pourra être tenu responsable.
Cet appareil peut être utilisé par des enfants âgés d’au moins 8 ans
et par des personnes ayant des capacités physiques, sensorielles
ou mentales réduites ou dénuées d’expérience ou de connaissance,
s’ils (si elles) sont correctement surveillé(e)s ou si des instructions
relatives à l’utilisation de l’appareil en toute sécurité leur ont été
données et si les risques encourus ont été appréhendés. Les enfants
ne doivent pas jouer avec l’appareil. Le nettoyage et l’entretien
par l’usager ne doivent pas être effectués par des enfants sans
surveillance.
GYSFLASH HERITAGE 6 A
FR
A n’utiliser en aucun cas pour charger des piles ou des batteries
non-rechargeables.
Le mode de fonctionnement automatique ainsi que les restrictions
applicables à l’utilisation sont expliqués ci-après dans ce mode
d’emploi.
Risque d’explosion et d’incendie!
Une batterie en charge peut émettre des gaz explosif.
• Pendant la charge, la batterie doit être placée dans un emplacement
bien aéré.
• Éviter les flammes et les étincelles. Ne pas fumer.
Connexion / déconnexion :
• Déconnecter l’alimentation avant de brancher ou de débrancher
les connexions sur la batterie.
• La borne de la batterie non reliée au châssis doit être connectée
la première. L’autre connexion doit être effectuée sur le châssis loin
de la batterie et de la canalisation de combustible. Le chargeur de
batterie doit alors être raccordé au réseau.
• Après l’opération de charge, débrancher le chargeur de batterie
du réseau puis retirer la connexion du châssis et enfin la connexion
de la batterie, dans l’ordre indiqué.
Raccordement :
• Appareil de classe II
2
Page 3
GYSFLASH HERITAGE 6 A
FR
• Le raccordement au réseau d’alimentation doit être effectué
conformément aux règles d’installation nationales.
Entretien :
• Si le câble d’alimentation est endommagé, il doit être remplacé
par le fabricant, son service après-vente ou des personnes de
qualification similaire afin d’éviter un danger.
Réglementation :
• Appareil conforme aux directives européennes.
• La déclaration de conformité est disponible sur notre site internet.
• Marque de conformité EAC (Communauté économique
Eurasienne)
Mise au rebut :
• Ce matériel fait l’objet d’une collecte sélective. Ne pas jeter dans
une poubelle domestique.
DESCRIPTION GENERALE
Votre Gysash a été spécialement conçu pour recharger la plupart des batteries au plomb avec ou sans entretien, couramment
utilisées pour les voitures et pour de nombreux autres véhicules. Ces batteries peuvent être de plusieurs types ex: GEL (électrolyte
gélié), AGM (électrolyte imprégné), WET, MF (Maintenance Free), CA (Calcium)...
Le Gysash Heritage 6 A est parfaitement adapté à la charge de :
- batteries 6V (3 éléments de 2V) de 1,2Ah à 125Ah et jusqu’à 170Ah pour du maintien de charge,
- batteries 12V (6 éléments de 2V) de 1,2Ah à 125Ah et jusqu’à 170Ah pour du maintien de charge
MISE EN ROUTE
1. Brancher le chargeur sur la batterie avec l’accessoire souhaité (pinces, cosses, etc).
2. Brancher le chargeur sur la prise secteur (réseau monophasé 220-240Vac 50-60Hz).
3. Sélectionner le mode en appuyant sur le bouton . Après environ cinq secondes, la charge se lance automatiquement.
4. Durant la charge, l’appareil indique l’état d’avancement de la charge. Lorsque le voyant clignote, la batterie est prête à
démarrer le moteur. Et lorsque le voyant reste allumé, la batterie est entièrement chargée.
5. La charge peut être interrompue à tout moment en débranchant la prise secteur ou en appuyant sur le bouton
6. Après l’opération de charge, débrancher le chargeur du réseau puis retirer les connexions de la batterie.
MODES DE CHARGE
• Description des Modes et des Options :
Mode CHARGE 6V (7.3V / 6A) :
Mode destiné à la charge et au maintien de charge des batteries au plomb 6V. Cycle de charge automatique en 8
étapes.
Mode CHARGE 12V (14.6V / 6A) :
Mode destiné à la charge et au maintien de charge des batteries au plomb 12V. Cycle de charge automatique en 8
étapes.
.
Option « Petite batterie » (0.8A) :
Option limitant le courant de charge à 0.8A an de préserver les petites batteries lors de la charge. Cette
option est à activer lorsque la batterie à charger possède une capacité nominale inférieure à 15Ah.
Option REFRESH :
Option permettant d’ajouter une étape supplémentaire (étape 7) au cycle de charge an de reconditionner les batteries ayant été fortement déchargées.
: il est recommandé de ne pas activer cette option pour la charge de batteries scellées.
Conseil : Vérier et compléter, si nécessaire, le niveau d’eau de la batterie après une charge avec Refresh.
3
Page 4
GYSFLASH HERITAGE 6 A
indicator light
FR
• Courbe de charge :
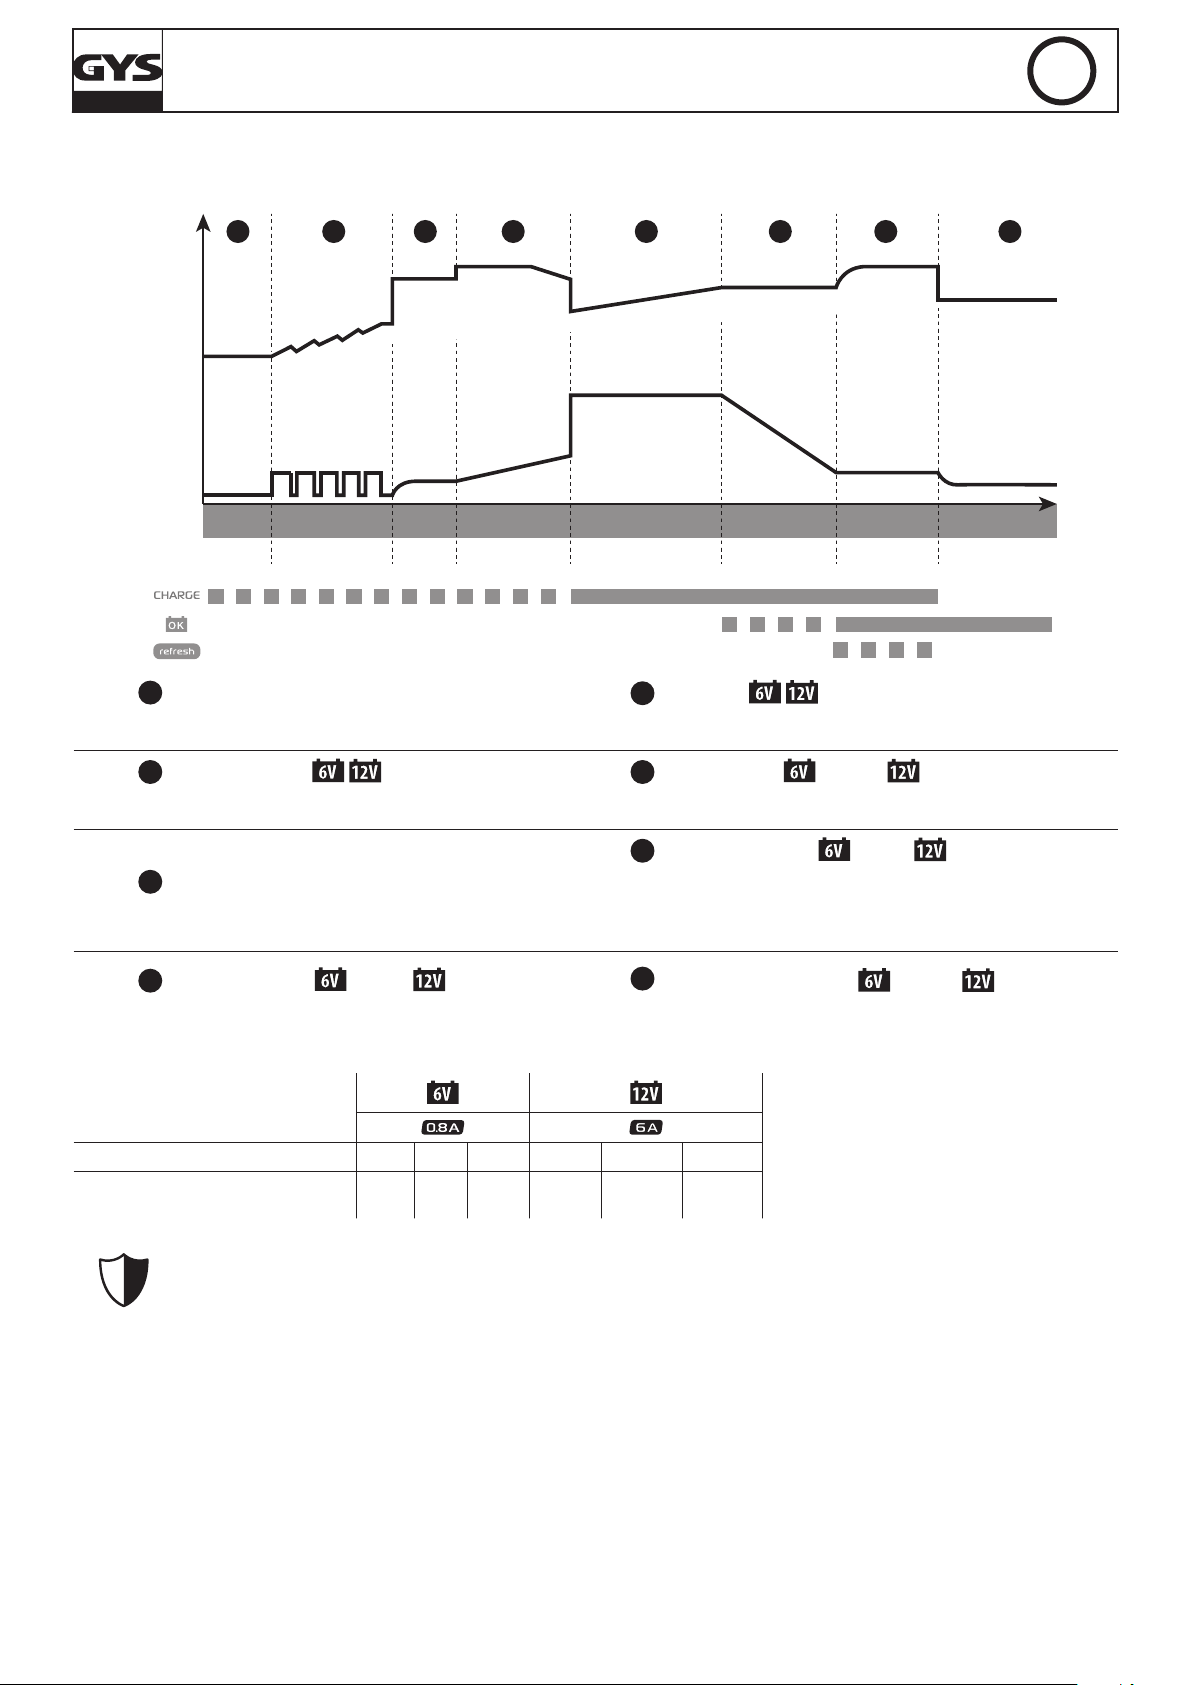
Le GYSFLASH Heritage 6 A utilise une courbe de charge évoluée en huit étapes qui garantit les performances optimales de votre
batterie.
1 2 3 4 5 6 7
U
I
Analyse Récupération Test Désulfatation Charge Absorption
< 1s Max 5h Max 12h Max 20h Max 8h no limit< 1s
Étape 1 : Analyse
Analyse de l’état de la batterie (niveau de charge, inversion
de polarité, mauvaise batterie connectée…)
Étape 2 : Récupération (
3A-0.5A*)
Algorithme de récupération des éléments endommagés
suite à une décharge profonde.
8
Étape 5 : Charge (
Refresh
(si option active)
1h - 4h
6A-0.8A*
)
Maintien de
charge
Charge rapide à courant maximum permettant d’atteindre 80% du
niveau de charge.
Étape 6 : Absorption ( 7.3V / 14.6V)
Charge à tension constante pour amener le niveau de charge à
100%.
Étape 3 : Test
Test de batterie sulfatée
Étape 7 : Refresh (option
Si l’option Refresh a été sélectionnée, le chargeur va alors injecter
un courant supplémentaire an de créer du gaz qui va permettre
de mélanger l’électrolyte et ainsi reconditionner les cellules de la
7.9V / 15.8V)
batterie. Durant cette phase, la batterie peut perdre un peu d’eau.
Étape 4 : Désulfatation ( 7.9V / 15.8V)
Algorithme de désulfatation de la batterie.
Étape 8 : Maintien de charge ( 6.7V / 13.6V)
Maintien du niveau de charge de la batterie à son maximum.
*avec option « Petite batterie »
• Temps de charge estimé
Capacité de la batterie 2 Ah 8 Ah 15 Ah 20 Ah 50 Ah 125 Ah
Temps de charge 20% >>> 80%
2 h 6 h 11 h 3 h 6 h 14 h
• Protections :
Le GYSFLASH Heritage 6 A possède un ensemble de dispositifs le protégeant contre les courts circuits et inversions
de polarités. Il dispose d’un système qui évite toute étincelle lors du branchement du chargeur sur la batterie. Ce
chargeur est à double isolation et est compatible avec l’électronique des véhicules.
Le GYSFLASH Heritage 6 A est équipé d’un capteur de température intégré qui lui permet d’adapter son courant de charge en fonction de la température ambiante an d’éviter toute surchauffe de l’électronique interne.
4
Page 5
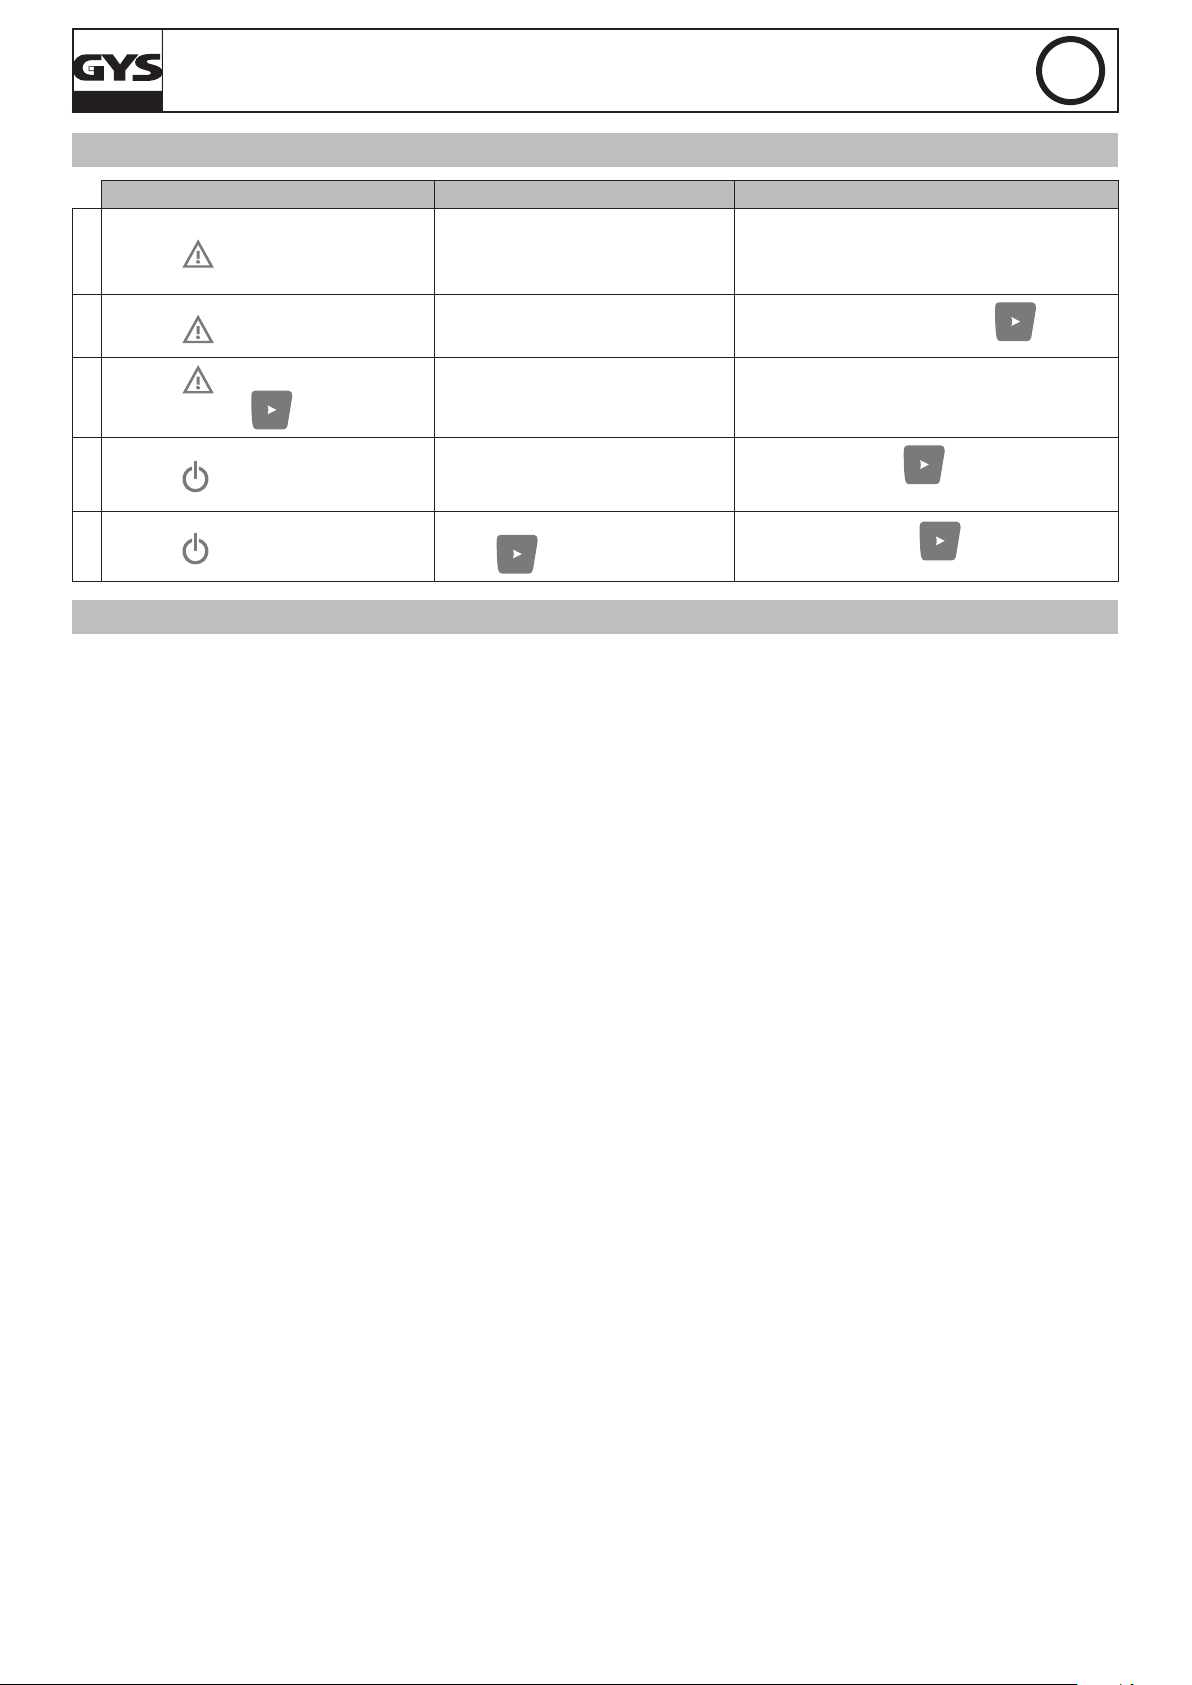
ANOMALIES, CAUSES, REMÈDES
Anomalies Causes Remèdes
1
Le voyant clignote.
GYSFLASH HERITAGE 6 A
• Inversion de polarité
• Tension batterie trop élevée
• Pinces en court-circuit
• Vérier que les pinces sont correctement connectées.
• Vérier que le mode sélectionné correspond bien
à la tension nominale de la batterie.
FR
2
Le voyant est allumé.
Le voyant reste allumé même après un
3
appui sur le bouton .
4
Le voyant clignote.
5
Le voyant reste allumé.
Echec lors de la charge, batterie non
récupérable.
Défaut thermique.
Chargeur en veille.
Charge interrompue en appuyant sur le
bouton .
Changer de batterie et appuyer sur pour
relancer une charge.
Température environnante trop élevée (>50°C),
aérer le local et laisser le chargeur se refroidir.
Appuyer sur le bouton ou connecter une
batterie au chargeur pour sortir de la veille.
Appuyer de nouveau sur pour relancer la
charge.
CONDITIONS DE GARANTIE
La garantie couvre tous défauts ou vices de fabrication pendant 2 ans, à compter de la date d’achat (pièces et main d’œuvre).
La garantie ne couvre pas :
• Toutes autres avaries dues au transport.
• L’usure normale des pièces (Ex. : câbles, pinces, etc.).
• Les incidents dus à un mauvais usage (erreur d’alimentation, chute, démontage).
• Les pannes liées à l’environnement (pollution, rouille, poussière).
En cas de panne, retourner l’appareil à votre distributeur, en y joignant :
- un justicatif d’achat daté (ticket de sortie de caisse, facture….)
- une note explicative de la panne.
5
Page 6
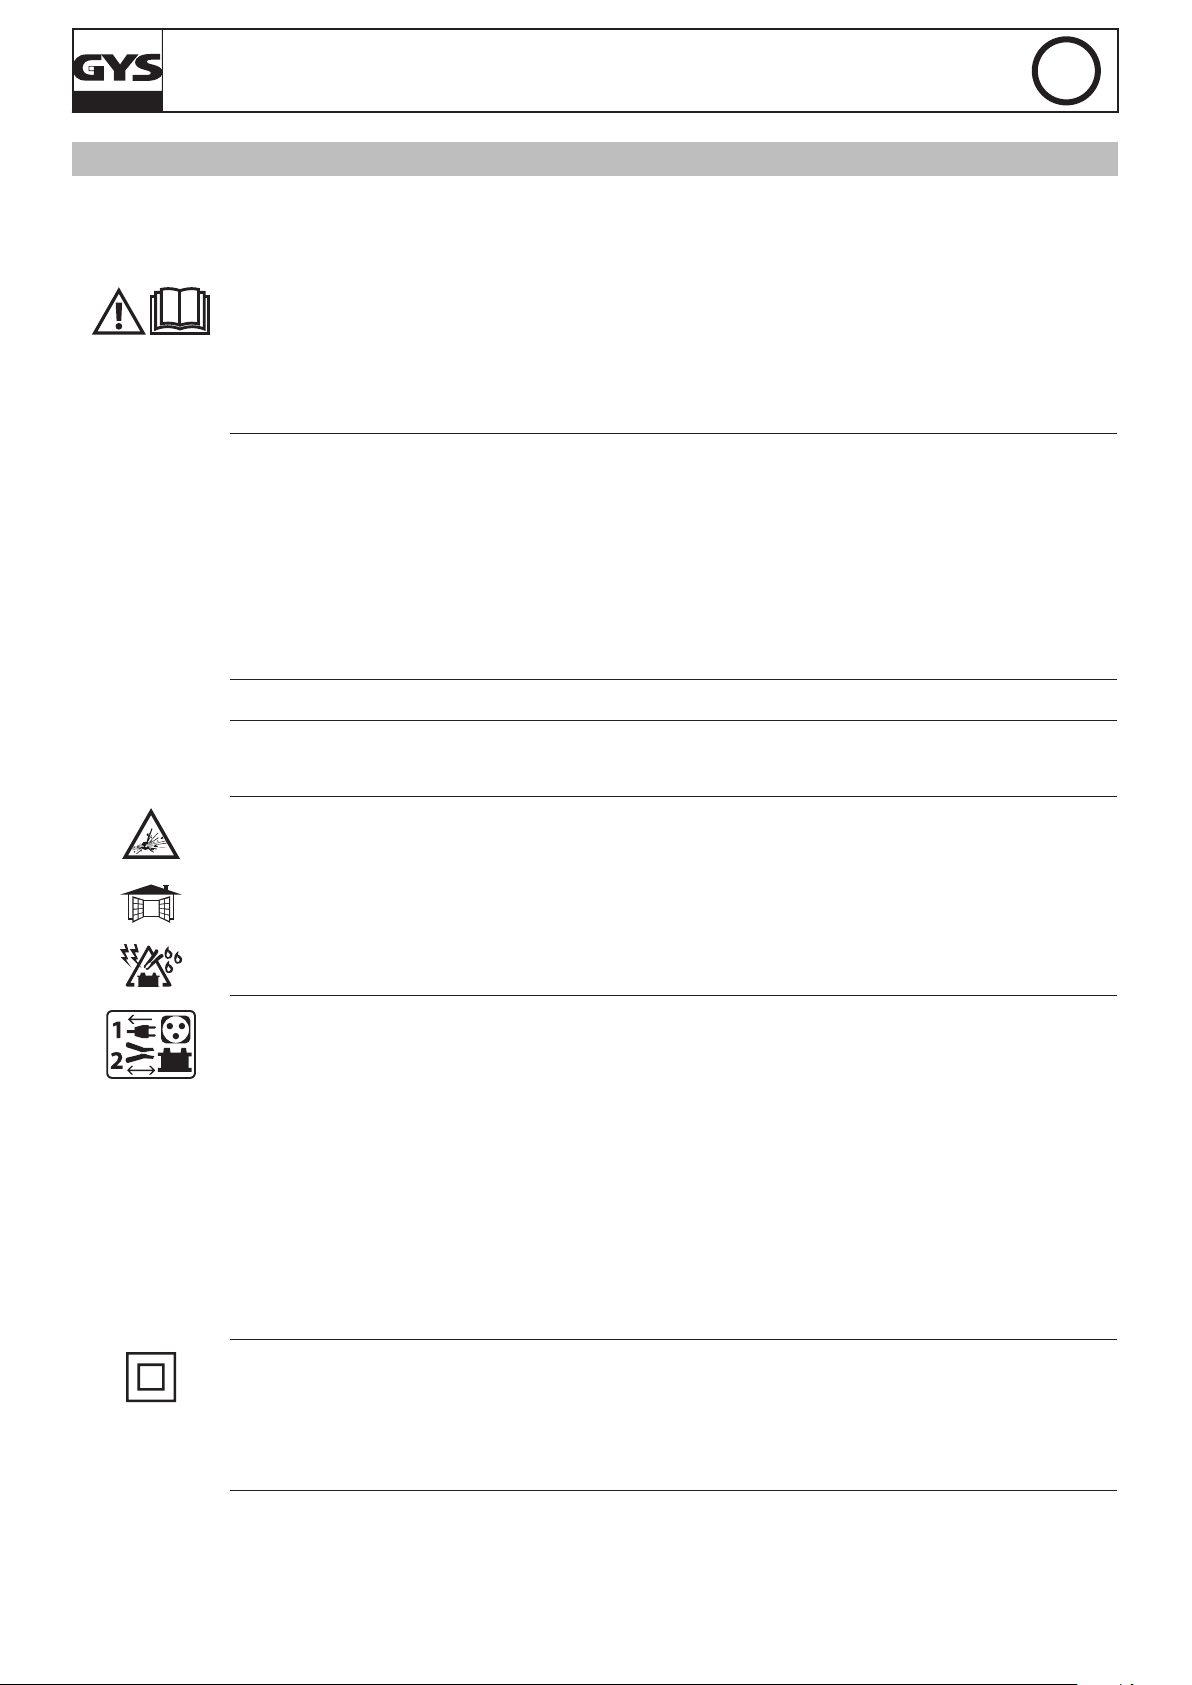
SAFETY INSTRUCTIONS
This manual contains safety and operating instructions.
Read it carefully before using the device for the first time and keep
it in a safe place for future reference.
This machine should only be used for charging operations comprised
within the limits indicated on the machine and in the instruction
manual. The operator must respect the safety precautions. In case of
inedaquate or unsafe use, the manufacturer cannot be held liable.
This unit can be used by children aged of at least 8 years and by
people with reduced physical, sensory or mental capabilities or
lack of experience or knowledge, if they are properly monitored
or if instructions for using the equipment safely was given to them
and if they have been made aware of the risks. Children must no
play with the product. Cleaning and maintenance should not be
performed by unsupervised children.
GYSFLASH HERITAGE 6 A
EN
Do not use to charge small batteries or non rechargeable batteries.
The operating mode of the automatic charger and the restrictions
applicable to its use are explained below in this manual.
Fire and explosion risks!
A charging battery can emit explosive gases.
• During the charge, the battery must be placed in a well ventilated
area.
• Avoid flames and sparks. Do not smoke.
Connection / disconnection:
• Ensure that the charger’s power supply is disconnected before
plugging or unplugging the connections on the battery.
• Always ensure the Red clamp is connected to the «+» battery
terminal first. If it is necessary to connect the black clamp to the
vehicle chassis, make sure it is a safe distance from the battery and
the fuel/exhaust pipe. The charger must be connected to the mains.
• After charging, disconnect the charger from the mains, then
disconnect the clamp from the car body and then disconnect the
clamp from the battery, in the indicated order.
Connection:
• Class II device
• The connection to the power supply must be carried out in
compliance with national standards.
6
Page 7
GYSFLASH HERITAGE 6 A
EN
Maintenance:
• If the power cable is damaged, it must be replaced by the
manufacturer, its after sales service or an equally qualified person
to prevent danger.
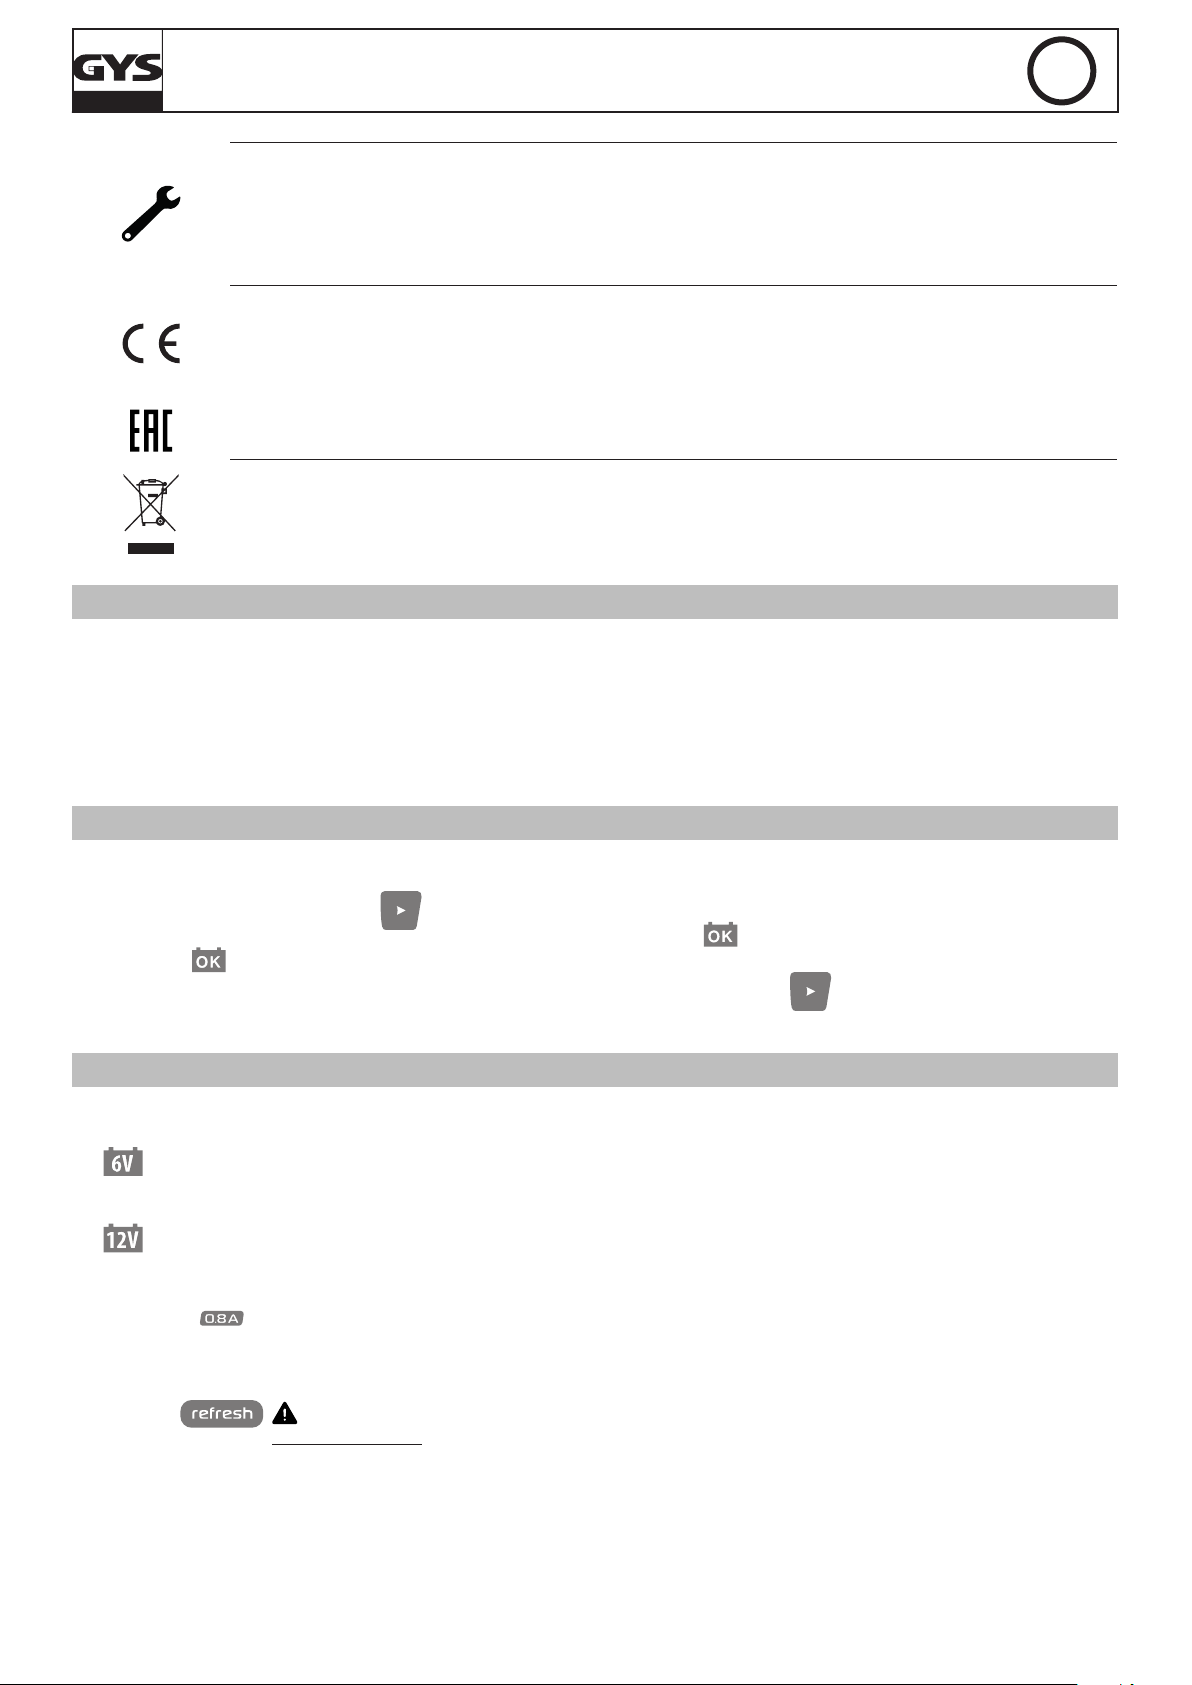
Regulations:
• Machine compliant with European directives.
• The certificate of compliance is available on our website.
• EAC Conformity marking (Eurasian Economic Community)
Waste management:
• This product should be disposed of at an appropriate recycling
facility. Do not throw away in a domestic bin.
GENERAL DESCRIPTION
Your Gysash is ideal to charge most lead-acid batteries, often used for cars and many other vehicles. The GYSFLASH can be used
safely for : GEL (gel electrolyte), AGM (Absorbant Glass Mat), EFB ( Enhanced Flooded Battery), WET, MF (Maintenance Free), CA
(Calcium)...
The Gysash Heritage 6A is designed to charge :
- 6V batteries (3*2V elements) from 1.2Ah to 125Ah and yo to 170Ah for maintenance charge,
- 12V batteries (6*2V elements) from 1,2Ah to 125Ah and up to 170Ah for maintenance charge.
START UP
1. Connect the charger to the battery using the proper accessory (clamps, lugs, etc...).
2. Plug the charger to the mains (single phase 220-240Vac 50-60Hz).
3. Select the mode by pressing button . After roughly 5 seconds, the charge starts automatically.
4. During the charge, the device indicates the charge progress. When indicator blinks, the battery is ready to start the vehicle.
Once indicator stays on, the battery is fully charged.
5. The charge can be interrupted at any time by unplugging the mains plug or pressing button
6. After charging, disconnect the charger from the mains, then disconnect the charger’s connections from the battery.
CHARGE MODES
• Modes and Options description :
CHARGE Mode (7.3V / 6A) :
Mode designed to charge and maintain (oating charge) 6V lead-acid batteries. 8 step automatic maintenance cycle.
CHARGE Mode (14.6V / 6A) :
Mode designed to charge and maintain (oating charge) 12V lead-acid batteries. 8 step automatic maintenance cycle.
«Small battery» opttion (0.8A) :
This limits the charging current to 0.8A to safely charge small batteries. Activate this option to charge
small batteries (< 15 Ah).
REFRESH Option :
Option which add an extra step (step 7) to the charge cycle to restore deeply discharged batteries.
: this option is not recommended for charging sealed batteries.
Recommendation : Check the battery’s water level and if necessary, perform with a Refresh charge.
.
7
Page 8
GYSFLASH HERITAGE 6 A
indicator light
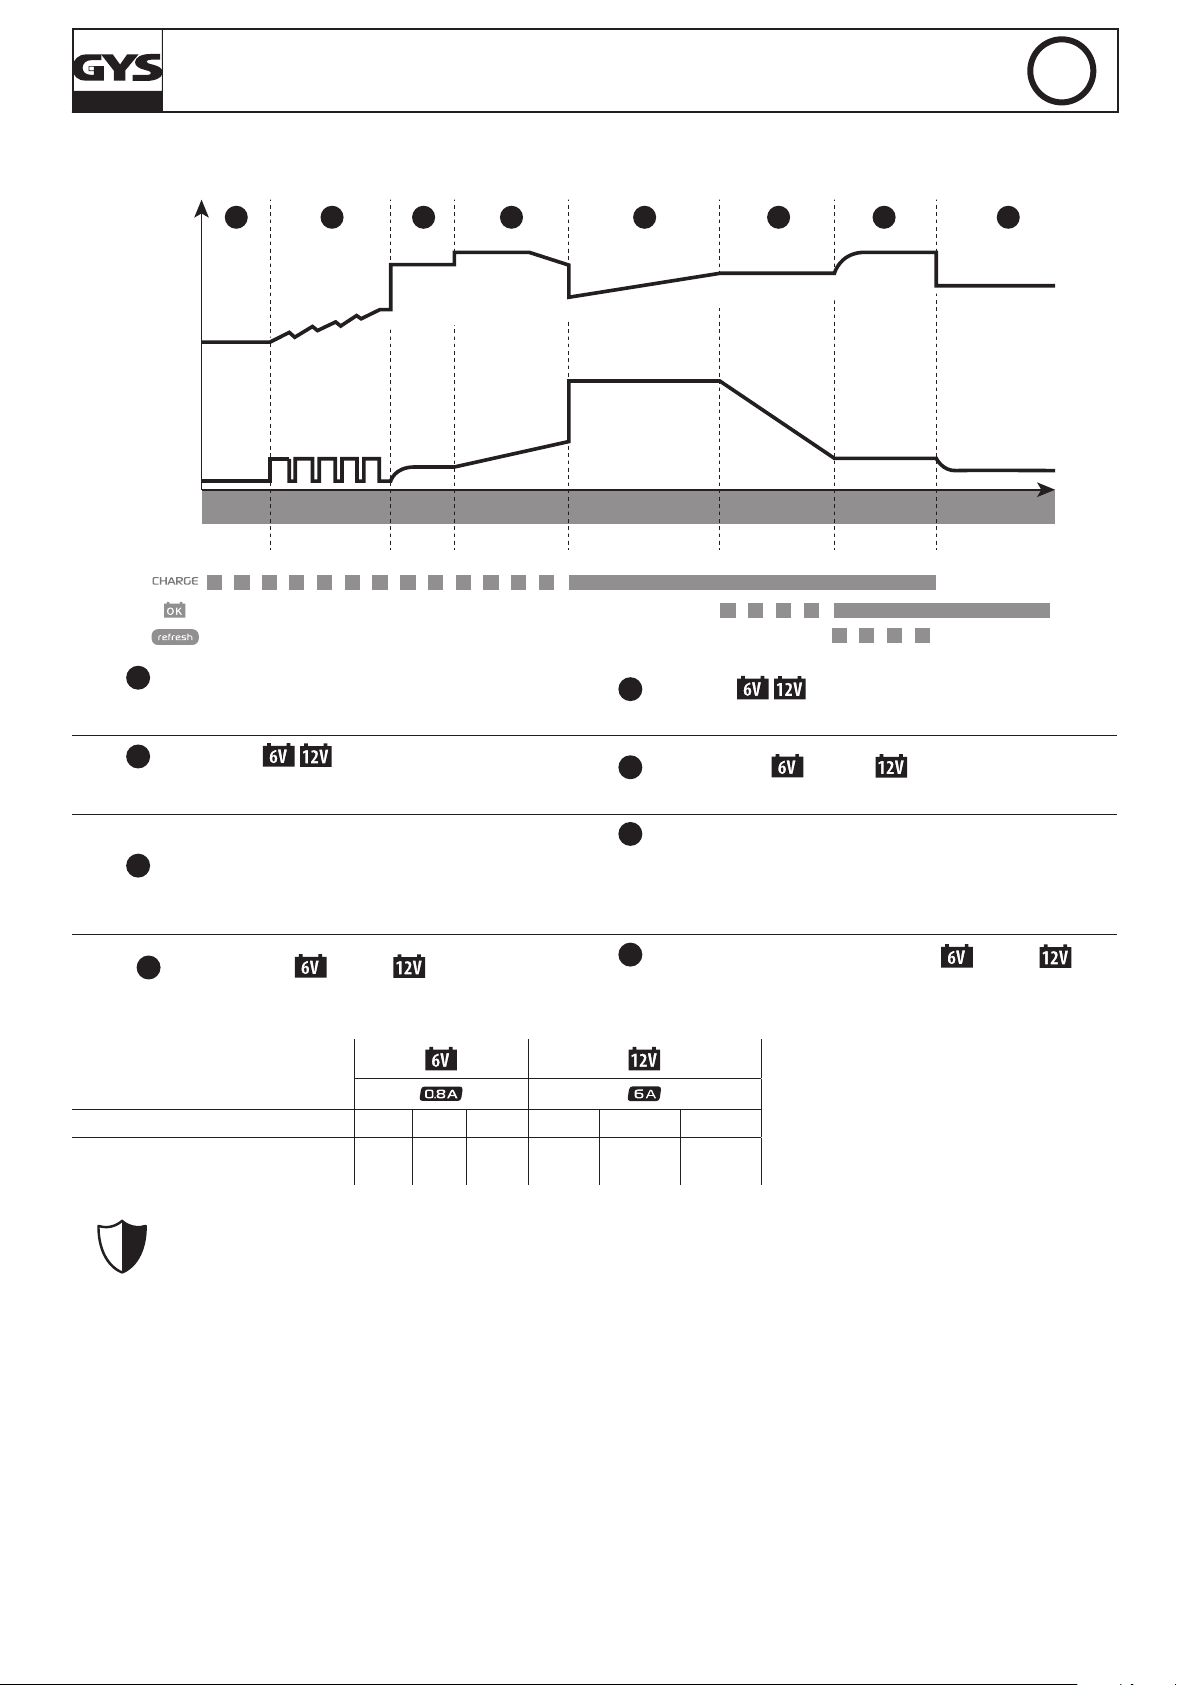
• Charging curve :
The GYSFLASH Heritage 6A uses an 8 step charging curve which guarantees optimal performance for your battery.
EN
1 2 3 4 5 6 7
U
I
Analysis Recovery Test Desulfation Charge Absorption
< 1s Max 5h Max 12h Max 20h Max 8h no limit< 1s
Step 1 : Analysis
Analyses the battery state (charge level, polarity inversion,
wrong battery…)
Step 2 : Recovery (
3A-0.5A*)
Recovering damaged elements due to a prolonged deep
discharge.
8
Step 5 : Charge (
Refresh
(If option activated)
1h - 4h
6A-0.8A*
)
Floating
Maximum current fast charge to reach an 80% charge level.
Step 6 : Absorption ( 7.3V / 14.6V)
Constant voltage charge to reach a 100% charge level.
Step 7 : Refresh (option 15.8V)
Step 3 : Test
Sulfated battery test
If the refresh option has been selected, the charger will inject an
additional current that will generate some gas, thus reconditionning the battery’s cells. During this phase, the battery may loose a
bit of water.
Étape 4 : Desulfation ( 7.9V / 15.8V)
Battery desulfation algorithm.
Step 8 : Floating/maintenance charge ( 6.7V /
13.6V)
Maintains battery charge level at its maximum.
*with « small battery » option active
• Estimated charge time
Battery capacity 2 Ah 8 Ah 15 Ah 20 Ah 50 Ah 125 Ah
Charging time 20% >>> 80% 2 h 6 h 11 h 3 h 6 h 14 h
• Protections :
The GYSFLASH Heritage 6A has several features to protect it against short-circuits or polarity inversions. It has an
anti-spark feature which prevents sparks whilst connecting the device to the battery. This charger has double insulation and is safe to use with the battery in situ as it will protect the vehicle’s on-board electronics.
The GYSFLASH Heritage 6A is tted with an integrated temperature probe that ensures that the charging current is adapted to the
ambient temprature to prevent internal electronics’ overheating.
8
Page 9
TROUBLESHOOTING
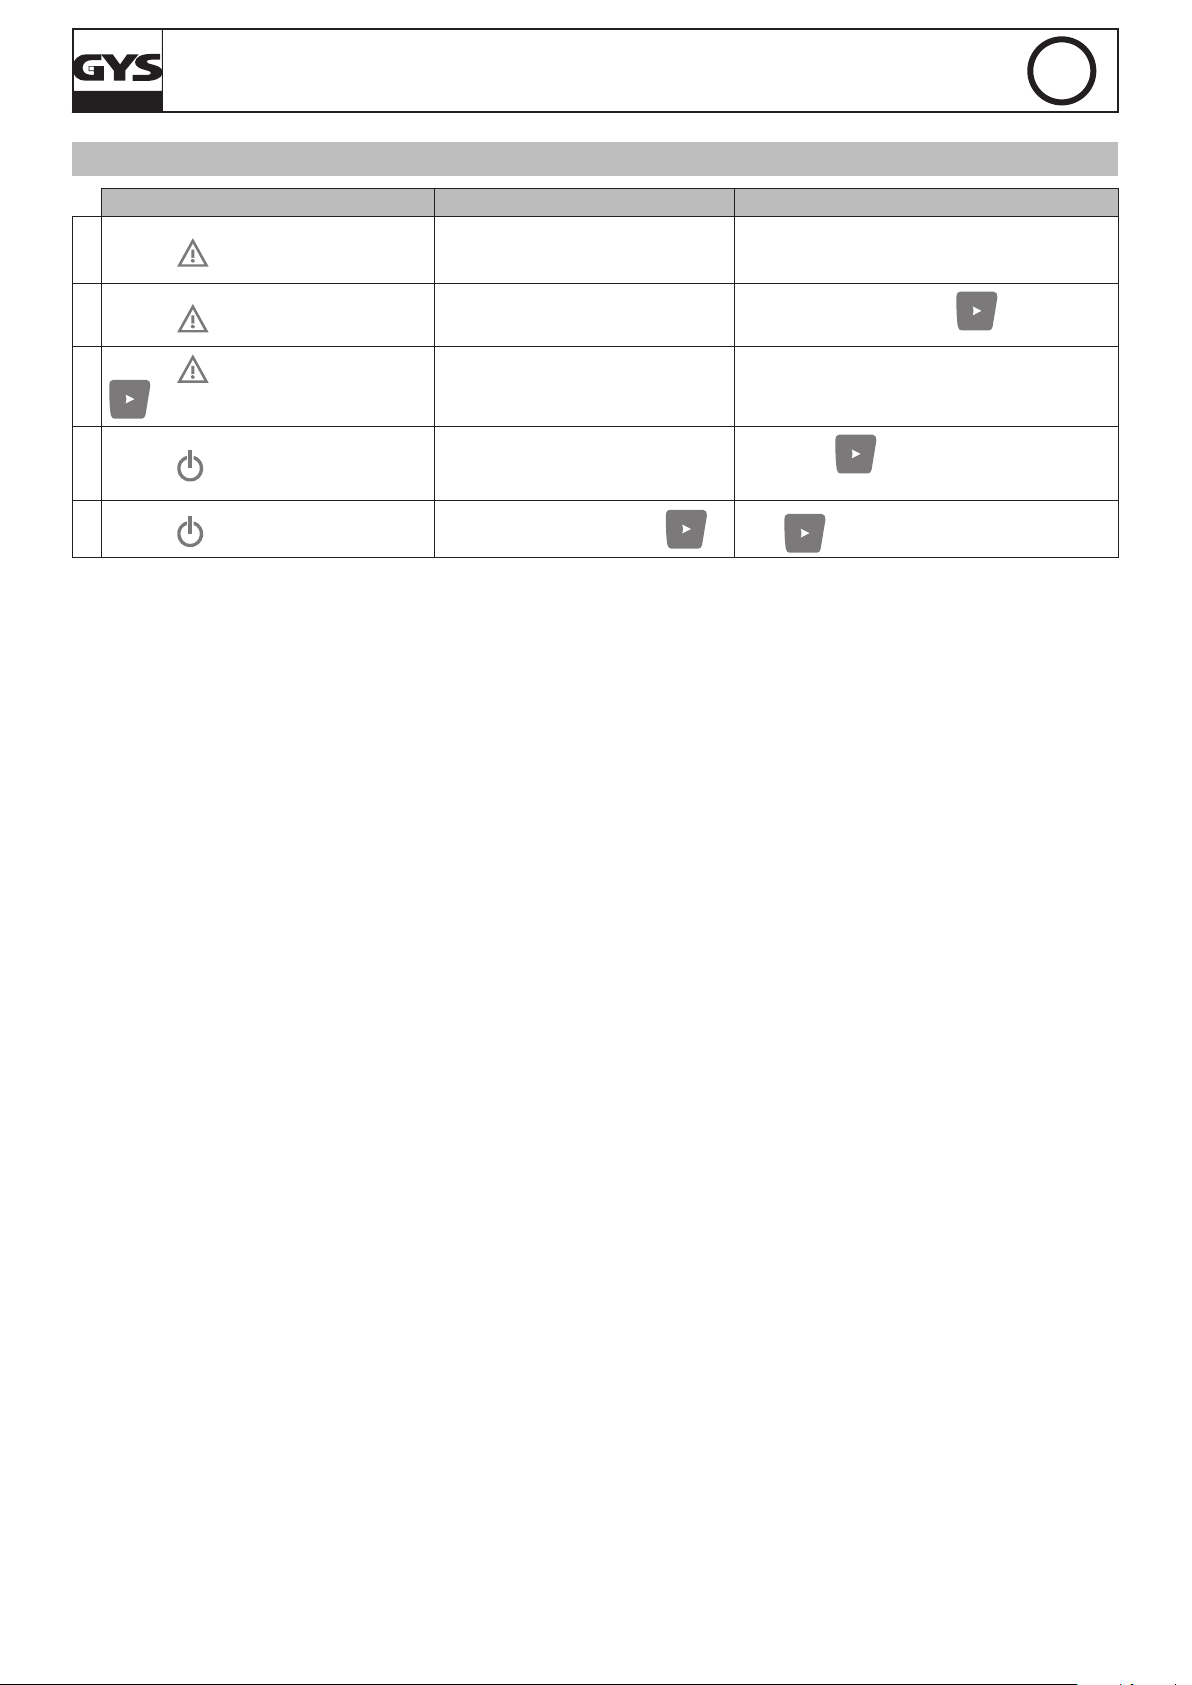
Abnormalities Causes Solutions
1
Indicator blinks.
GYSFLASH HERITAGE 6 A
• Polarity reversal
• Battery voltage is too high
• Clamps in short-circuit"
• Check that the clamps are properly connected.
• Check that the selected voltage matches the
battery voltage (6, 12 or 24V).
EN
2
Indicator is on.
Indicator stays on even after pressing
3
.
4
Indicator blinks.
5
Indicator stays on.
Charge failure, battery non recoverable.
Thermal protection.
Charger in sleep mode.
Charge interrupted by pressing .
Change the battery and press to restart a
charge.
Ambient temperature is too high (>50°C), cool the
room and let the charger cool down.
Press button or connect a battery to the charger to exit sleep mode.
Press again to restart the charge.
9
Page 10
SICHERHEITSHINWEISE
Diese Betriebsanleitung enthält Sicherheits- und Betriebshinweise.
Bitte lesen Sie diese Anleitung aufmerksam durch, bevor Sie das
Gerät zum ersten Mal benutzen und bewahren Sie diese sorgfältig
auf.
Dieses Gerät darf ausschließlich zum Starten und/oder zur
Spannungsversorgung für die in der Anleitung oder auf dem Gerät
genannten Anforderungen genutzt werden. Die Sicherheitshinweise
müssen in jedem Fall beachtet werden. Im Fall einer unangemessenen
oder gefährlichen Verwendung kann der Hersteller nicht haftbar
gemacht werden.
Schützen Sie das Gerät vor unbefugtem Gebrauch. Dieses Gerät
eignet sich nicht für die Verwendung durch kleine Kinder oder
Personen,
die die Bedienungsanleitung nicht lesen oder verstehen können,
sorgen Sie bitte für ausreichend Schutz und Kontrolle bei Benutzung
des Gerätes.
GYSFLASH HERITAGE 6 A
DE
Laden Sie nie defekte oder nicht aufladbare Batterien.
Der Automatik-Modus sowie die Einschränkungen bei der Benutzung
werden nachfolgend in der Betriebsanleitung erklärt.
Explosions- und Brandgefahr!
Während des Ladevorgangs können explosive Gase entstehen.
• Während des Ladevorgangs muss die Batterie in einem gut
belüfteten Bereich plaziert werden.
• Vermeiden Sie Funken und Flammen. Rauchen Sie nicht!
Verbinden/Trennen:
• Trennen Sie das Gerät vom Spannungsnetz bevor Sie Kabel und
Zangen anschließen oder trennen.
• Versichern Sie sich immer, dass die rote Klemme zuerst mit dem
«+» Pol der Batterie verbunden wird. Falls es nötig ist die schwarze
Klemme mit der Fahrzeugkarosserie zu verbinden, versichern
Sie sich, dass es einen Sicherheitsabstand von der Batterie zum
Benzintank/Aufspuff gibt. Achten Sie während der Ladung auf
einen frei zugänglichen Netzanschluss.
• Beachten Sie am Ende des Ladevorgangs folgendes: Trennen
Sie erst das Gerät vom Stromnetz und entfernen Sie dann erst die
Klemmen von der Batterie.
10
Anschluss:
• Klasse II-Gerät
Page 11
GYSFLASH HERITAGE 6 A
DE
• Der Anschluss an die Spannungsversorgung muss den nationalen
Vorschriften entsprechen.
Wartung:
• Ist das Ladegerät und/oder die Kabel defekt/beschädigt, geben
Sie das Ladegerät zur Reparatur zum Hersteller bzw. an einen
geeigneten Fachbetrieb.
Richtlinien:
• Das Gerät entspricht den europäischen Richtlinien und Normen.
• Die Konformitätserklärung finden Sie auf unsere Webseite.
• EAC-Konformitätszeichen (Eurasische Wirtschaftsgemeinschaft).
Entsorgung:
• Produkt für getrennte Entsorgung (Elektroschrott). Werfen Sie es
daher nicht in die Mülltonne!
BESCHREIBUNG
Das GYSFLASH eignet sich zum Laden verschiedenster Blei-Säure-Batterien. Das GYSFLASH Heritage 6 A eignet sich zum Laden
verschiedenster Batterien, z.B.: GEL , AGM, WET, MF (Maintenance Free), CA (Calcium)...
Das GYSFLASH Heritage 6 A ist zum Laden folgender Batterien geeignet:
- 6V-Batterien (3 2V-Teile) von 1,2Ah bis 125Ah und bis 170Ah zur Ladungserhaltung,
- 12V-Batterien (6 2V-Teile) von 1,2Ah bis 125Ah und bis 170Ah zur Ladungserhaltung.
START
1. Das Ladegerät an die Batterie mit dem gewünschten Zubehör (Klemmen, Hülse etc.) anschließen.
2. Das Ladegerät an die Netzsteckdose anschließen (220-240Vac 1-ph. 50-60Hz).
3. Den Modus mit der Taste auswählen. Nach ca. fünf Sekunden startet die Ladung automatisch.
4. Während der Ladung wird der Ladefortschritt angezeigt. Blinkt die Kontrollleuchte , ist die Batterie so weit aufgeladen, dass
der Motor gestartet werden kann. Leuchtet die Kontrollleuchte konstant, ist die Batterie voll aufgeladen.
5. Die Ladung kann jederzeit mit Ziehen des Netzsteckers oder mit der Taste
6. Nach dem Ende der Ladung das Ladegerät abschalten und die Polklemmen trennen.
LADEMODUS
• Beschreibung der Modi und Optionen:
LADEMODUS 6V (7,3V / 6A):
Lade- und Erhaltungsladung für 6V-Blei-Säure-Batterien. Automatischer Ladezyklus in 8 Stufen.
abgebrochen werden.
LADEMODUS 12V (14,6V / 6A):
Ladung und Erhaltungsladung für Blei-Säure-Batterie 12V. Automatischer Ladezyklus in 8 Stufen.
«Kleine Batterie» Option (0,8A):
Option, die den Ladestrom zum Schutz kleiner Batterien auf 0,8A beschränkt. Diese Option ist für Batterien mit eine Nennkapazität unter 15Ah geeignet.
REFRESH Option :
Option, die eine zusätzliche Stufe (7. Stufe) in den Ladezyklus einfügt, um stark entladene Batterien wieder aufzuladen.
: Diese Option ist für wartungsfree Batterien nicht empfehlenswert.
Tipp : Den Wasserstand nach einer Ladung mit Refresh Option prüfen und wenn nötig nachfüllen.
11
Page 12
GYSFLASH HERITAGE 6 A
indicator light
DE
• Ladekurve:
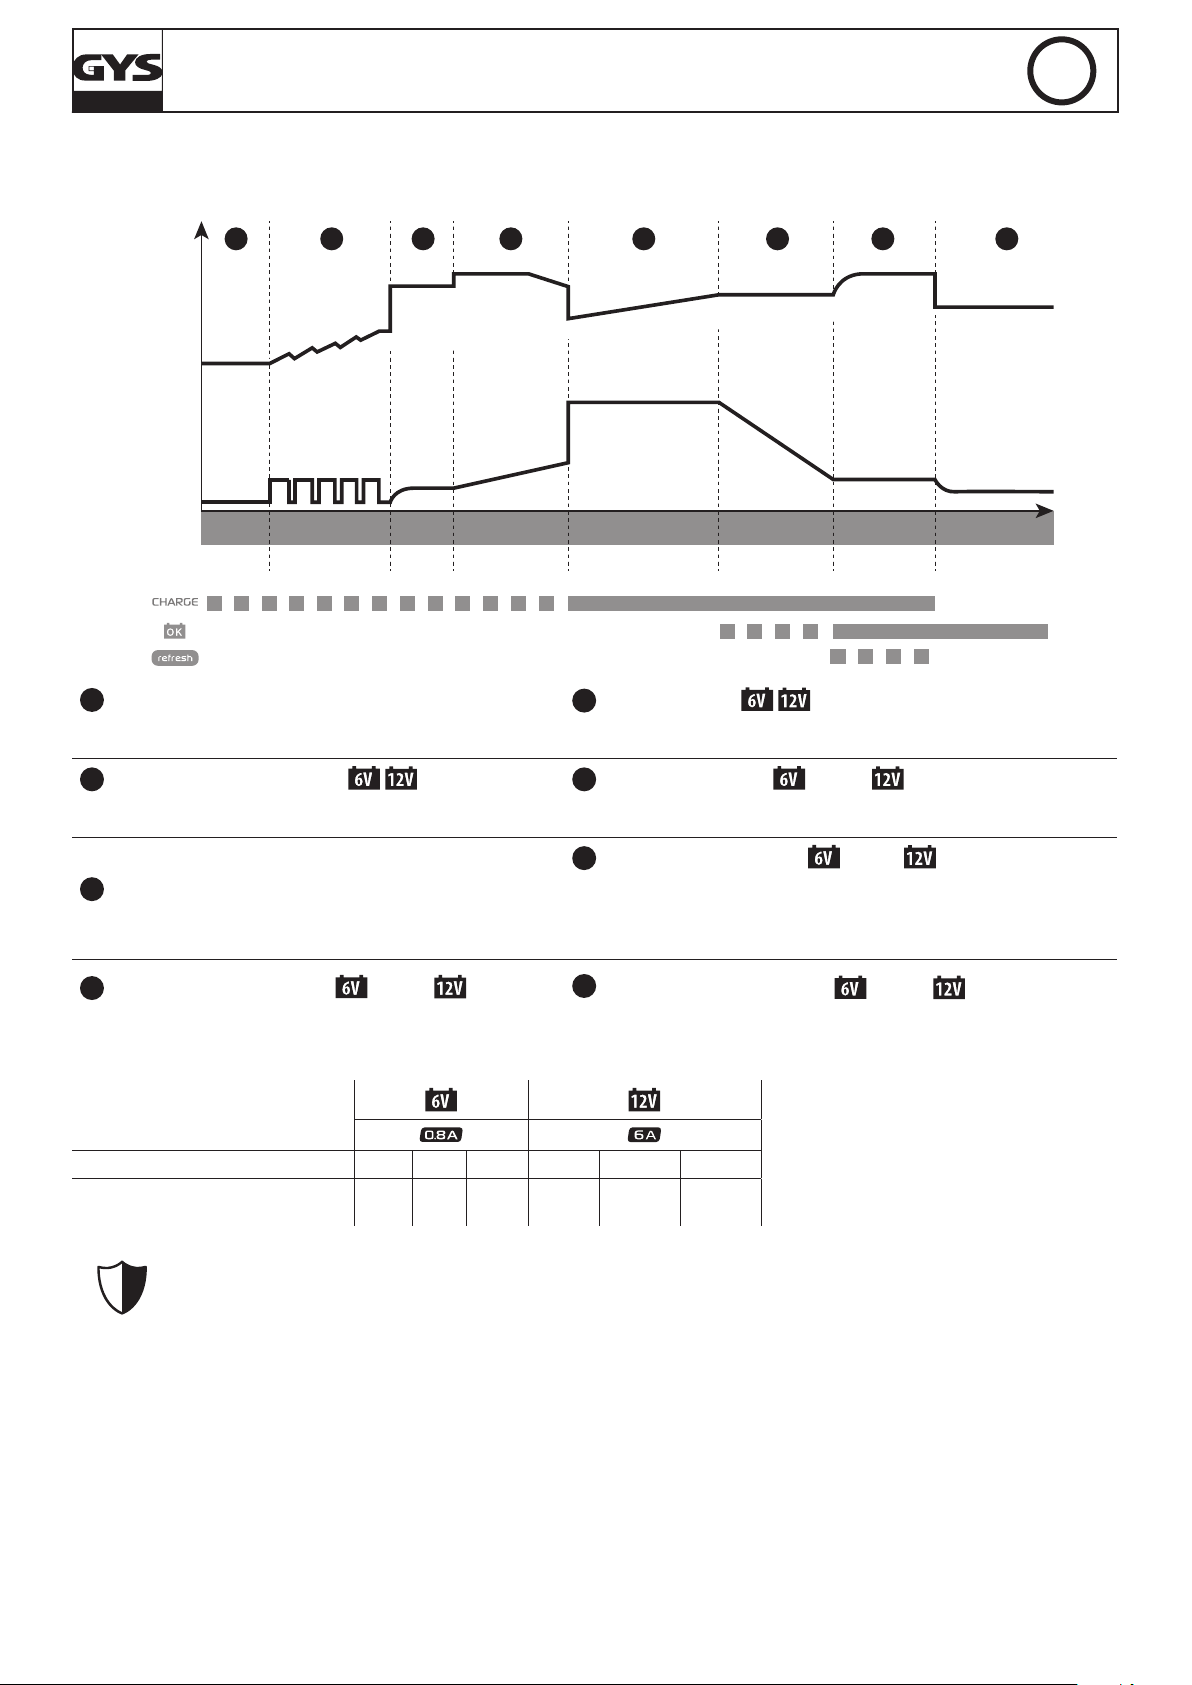
Das GYSFLASH Heritage 6 A besitzt eine achtstuge, weiterentwickelte Ladekurve, die die optimale Leistung Ihrer Batterie gewährleistet.
1 2 3 4 5 6 7
U
I
CC Test Recovery Test Desulfatierung Charge Absorption
< 1s Max 5h Max 12h Max 20h Max 8h no limit< 1s
Stufe: Analyse
1
Analyse des Batteriezustands (Ladezustand, Verpolung,
falsch verbundene Batterie...
Stufe: Wiederherstellung (
2
3A-0.5A*)
Wiederherstellungsfunktion für eine tiefenentladene Batterie.
8
Stufe: Ladung (
5
Refresh
(option aktiviert)
1h - 4h
6A-0.8A*
Erhaltungsladung
)
Schnelle Ladung mit Maximalstrom bis die Batterie zu 80% aufgeladen ist.
Stufe: Absorption ( 7.3V / 14.6V)
6
Ladung mit konstanter Spannung bis die Batterie zu 100% aufgeladen ist.
3
Stufe: Test
Test auf sulfatierte Batterie.
Stufe: Refresh (option
7
Ist die Refresh Option ausgewählt, erzeugt das Ladegerät einen
zusätzlichen Strom, um in der Batterie Gas zu erzeugen, das die
Elektrolytmischung und die Wiederbelebung der Batteriezellen In
7.9V / 15.8V)
dieser Phase kann die Batterie ein wenig Wasser verlieren.
Stufe: Desulfutarierung ( 7.9V / 15.8V)
4
Desulfutarierung der Batterie.
8
Stufe: Erhaltungsladung ( 6.7V / 13.6V)
Maximale Ladungserhaltung.
*mit Option «kleine Batterie»
• Geschätzte Ladezeit
Batteriekapazität 2 Ah 8 Ah 15 Ah 20 Ah 50 Ah 125 Ah
Ladedauer 20% >>> 80% 2 h 6 h 11 h 3 h 6 h 14 h
• Schutz:
Das GYSFLASH HERITAGE 6A ist gegen Kurzschlüsse und Verpolung geschützt. Das Gerät ist gegen die Entstehung
elektrische Funken beim Anschluss des Geräts geschützt. Es besitzt eine doppelte Isolierung und beinußt die
Fahrzeugelektronik nicht.
Das GYSFLASH HERITAGE 6A besitzt einen Temperatursensor, der die Überhitzung der internen Elektronik vermeidet.
12
Page 13
FEHLER, URSACHEN, HILFSMITTEL
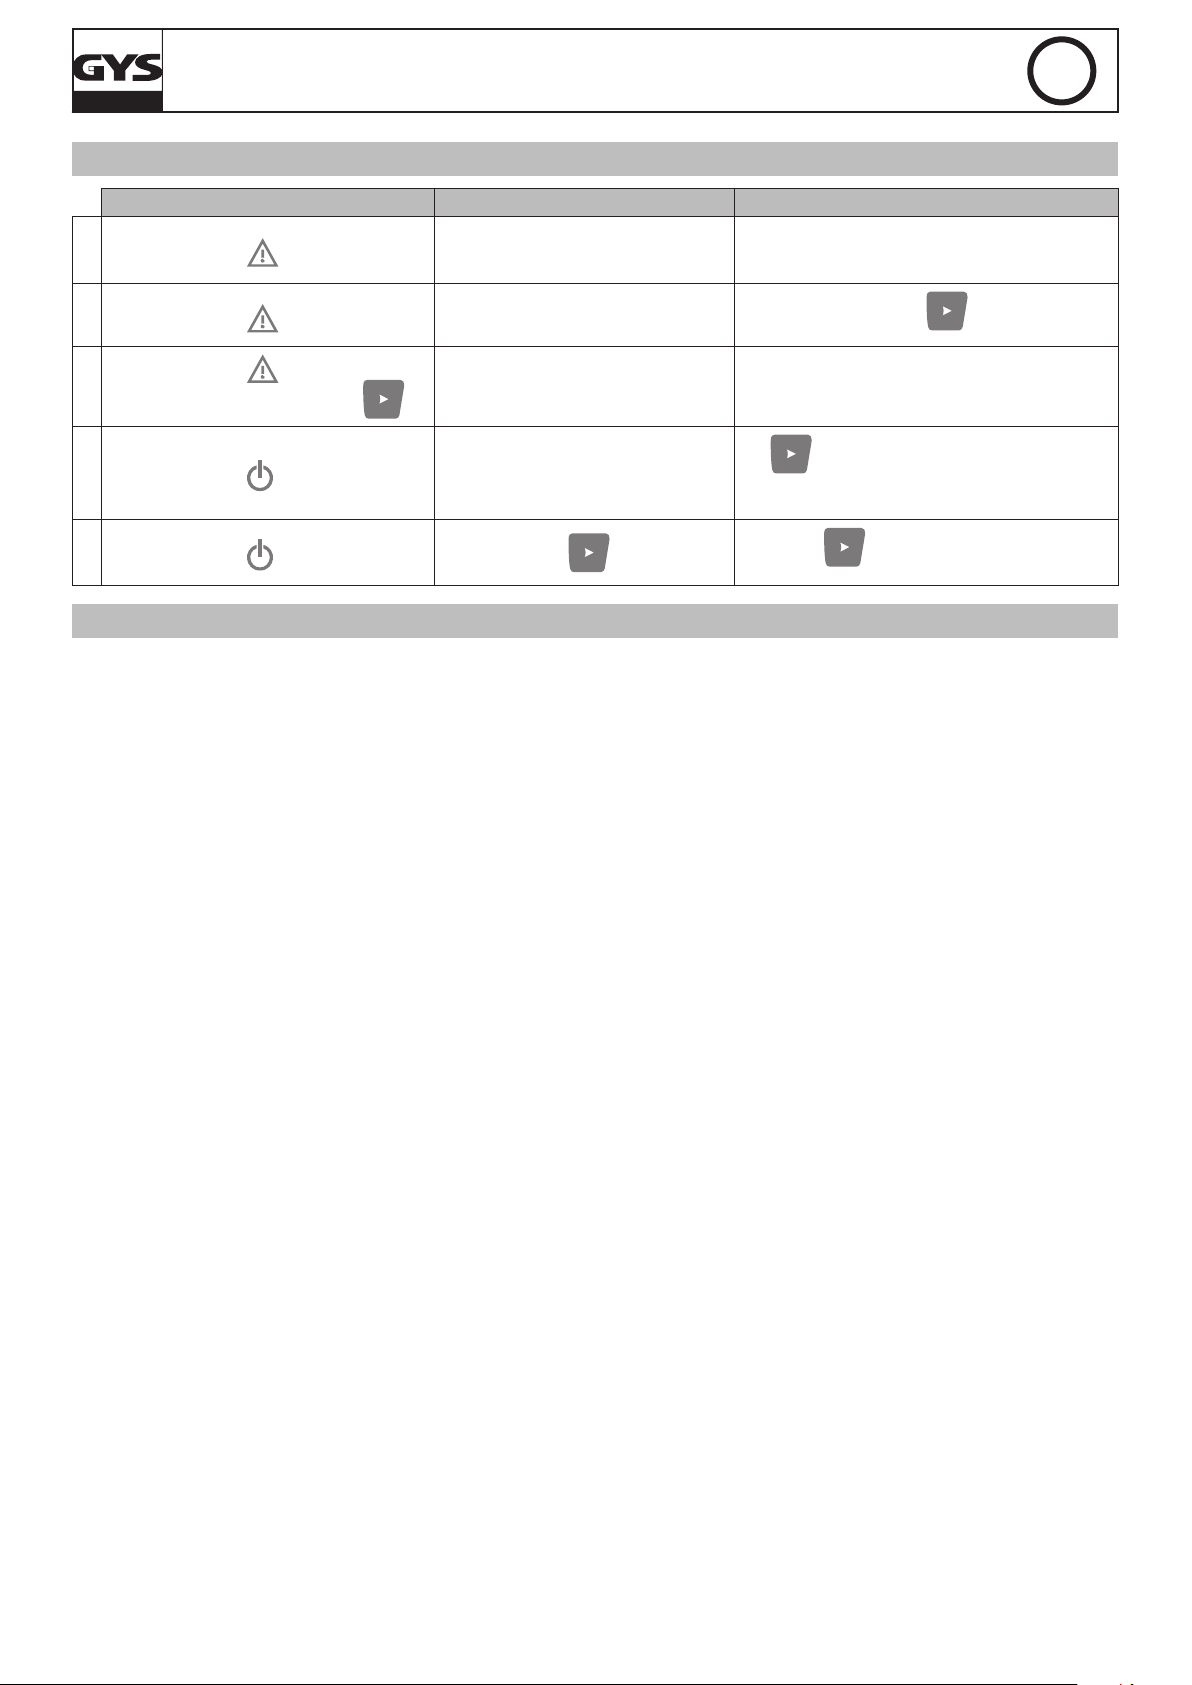
Fehler Ursachen Hilfsmittel
1
Die Kontrollleuchte blinkt.
GYSFLASH HERITAGE 6 A
• Verpolung
• Batteriespannung zu hoch
• Klemmen im Kurzschluss
• Richtigen Anschluss der Klemmen prüfen.
• Prüfen, ob der ausgewählte Modus der Nennspannung der Batterie entspricht.
DE
2
Die Kontrollleuchte leuchtet.
Die Kontrollleuchte leuchtet weiter, sel-
3
bst nach einem Druck auf die Taste .
4
Die Kontrollleuchte blinkt.
5
Die Kontrollleuchte leuchtet weiter.
Ladefehler, nicht mehr auadbare
Batterie.
Thermischer Fehler.
Ladegerät im Standby-Modus.
Ladung mit Taste unterbrochen.
Batterie austauschen und drücken, um neu
zu laden.
Umgebungstemperatur zu hoch (>50°C), den Raum
lüften und das Ladegerät sich abkühlen zu lassen.
Auf drücken oder eine Batterie an das
Ladegerät anschließen, um den Standby-Modus zu
verlassen.
Wieder auf drücken, um die Ladung fortzusetzen.
HERSTELLERGARANTIE
Die Garantieleistung des Herstellers erfolgt ausschließlich bei Fabrikations- oder Materialfehlern, die binnen 24 Monate nach Kauf
angezeigt werden (Nachweis Kaufbeleg). Nach Anerkennung des Garantieanspruchs durch den Hersteller bzw. seines Beauftragten erfolgen eine für den Käufer kostenlose Reparatur und ein kostenloser Ersatz von Ersatzteilen. Der Garantiezeitraum bleibt
aufgrund erfolgter Garantieleistungen unverändert. Die Garantie erfolgt nicht bei Defekten, die durch unsachgemäßen Gebrauch,
Sturz oder harte Stöße sowie durch nicht autorisierte Reparaturen oder durch Transportschäden, die in Folge des Einsendens zur
Reparatur, hervorgerufen worden sind. Keine Garantie wird für Verschleißteile (z.B. Kabel, Klemmen, Vorsatzscheiben usw.) sowie
bei Gebrauchsspuren übernommen. Das betreffende Gerät bitte immer mit Kaufbeleg und kurzer Fehlerbeschreibung ausschließlich
über den Fachhandel einschicken. Die Reparatur erfolgt erst nach Erhalt einer schriftlichen Akzeptanz (unterschrift) des zuvor
vorgelegten Kostenvoranschlags durch den Besteller. Im Fall einer Garantieleistung trägt GYS ausschließlich die Kosten für den
Rückversand an den Fachhändler.
13
Page 14
INSTRUCCIONES DE SEGURIDAD
Este manual de uso incluye indicaciones sobre el funcionamiento
de su aparato y las precauciones a seguir para su seguridad.
Lea atentamente este documento antes del primer uso y consérvelo
para una futura lectura.
Este aparato se debe utilizar solamente para realizar la recarga
dentro de los límites indicados en el aparato y el manual. Se deben
respetar las instrucciones relativas a la seguridad: En caso de uso
inadecuado o peligroso, el fabricante no podrá considerarse
responsable.
Este aparato se puede utilizar por niños de al menos 8 años y
por personas con capacidades físicas, sensoriales o mentales
reducidas o sin experiencia o conocimiento, siempre y cuando estén
correctamente vigilados o si han recibido instrucciones respecto al
uso del aparato con toda seguridad y si los riesgos que conllevan
se hayan comprendido. Los niños no deben jugar con el aparato.
Los niños sin vigilancia no deben limpiar ni efectuar mantenimiento
alguno del aparato.
GYSFLASH HERITAGE 6 A
ES
En ningún caso se debe usar este aparato para cargar pilas o
baterías no recargables.
El modo de funcionamiento automático y las restricciones de uso
están explicadas en este manual.
Riesgo de explosión y de incendio!
• Una batería en carga puede emitir gases explosivos.
• Durante la carga, la batería debe ponerse en un lugar aireado.
• Evite las llamas y las chispas. No fume.
Conexión / desconexión :
• Desconecte la alimentación eléctrica antes de conectar o
desconectar las conexiones sobre la batería.
• El borne de la batería no conectado al chasis debe conectarse
primero. La otra conexión se debe efectuar en el chasis, lejos de
la batería y de la canalización de combustible. El cargador de
baterías debe conectarse después a la red eléctrica.
• Tras la operación de carga, desconecte el cargador de la red
eléctrica, retire la conexión del chasis y la conexión de la batería,
en este orden.
14
Conexión eléctrica :
• Aparato de clase II
Page 15
GYSFLASH HERITAGE 6 A
ES
• La conexión a la red eléctrica se debe efectuar conforme a las
reglas de instalación nacionales.
Mantenimiento:
• Si se daña el cable de alimentación, deberá ser reemplazado
por el fabricante, su servicio post-venta o una persona cualificada,
para evitar todo peligro.
Normativa:
• Aparato conforme a las directivas europeas.
• La declaración de conformidad está disponible en nuestra
página Web.
• Marca de conformidad EAC (Comunidad económica
Euroasiática)
Desecho :
• Este material es objeto de una recogida selectiva. No lo deposite
en un contenedor doméstico.
DESCRIPCIÓN GENERAL
Su GYSFLASH ha sido especialmente diseñado para recargar la mayoría de baterías al plomo con o sin mantenimiento, utilizadas
de forma corriente en los automóviles y otros vehículos. Estas baterías pueden ser de varios tipos, por ejemplo: GEL (electrolito
gelicado), AGM (electrolito impregnado), WET, MF (Maintenance Free), CA (Calcio)...
El Gysash Heritage 6A se adapta perfectamente a la carga de:
- baterías de 6V (3 elementos de 2V) de 1,2 Ah a 125 Ah y hasta 170 Ah para el mantenimiento de carga,
- baterías de 12V (6 elementos de 2V) de 1,2 Ah a 125 Ah y hasta 170 Ah para el mantenimiento de carga.
PUESTA EN MARCHA
1. Conecte el cargador a la batería con el accesorios de su preferencia (pinzas, terminales, etc).
2. Conecte el cargador sobre la toma de corriente (red monofásica 220-240Vac 50-60Hz).
3. Seleccione el modo presionando sobre el botón . Tras aproximadamente cinco segundos, la carga se inicia automáticamente.
4. Durante la carga, el aparato indica el estado de avance de esta. Cuando el indicador parpadea, la batería está lista para
arrancar el motor. Y cuando el indicador sigue encendido, la batería está completamente cargada.
5. La carga se puede interrumpir en todo momento desconectando el aparato de la red eléctrica o presionando el botón
6. Tras la operación de carga, desconecte el cargador de la red eléctrica y luego retire la conexión de la batería.
MODOS DE CARGA
• Descripción de los modos y de las opciones:
Modo CARGA 6V (7.3V / 6A):
Modo destinado a la carga y al mantenimiento de carga de baterías al plomo de 6V. Ciclo de carga automático en 8
etapas.
Modo CARGA 12V (14.6V / 6A):
Modo destinado a la carga y al mantenimiento de carga de baterías al plomo de 12V. Ciclo de carga automático en 8
etapas.
.
Opción «Pequeña batería» (0,8A):
Opción que limita la corriente de carga a 0.8A para preservar las baterías pequeñas durante la carga. Esta
opción se activa cuando la batería a cargar posee una capacidad nominal inferior a 15Ah.
Opción REFRESH :
Opción que permite añadir una etapa adicional (etapa 7) al ciclo de carga para reacondicionar baterías
que se han descargado mucho.
: Se recomienda no activar esta opción para la carga de baterías selladas.
Consejo: Compruebe y complete, si es necesario, el nivel de agua de la batería tras una carga con
Refresh.
15
Page 16
GYSFLASH HERITAGE 6 A
indicator light
ES
• Curva de carga :
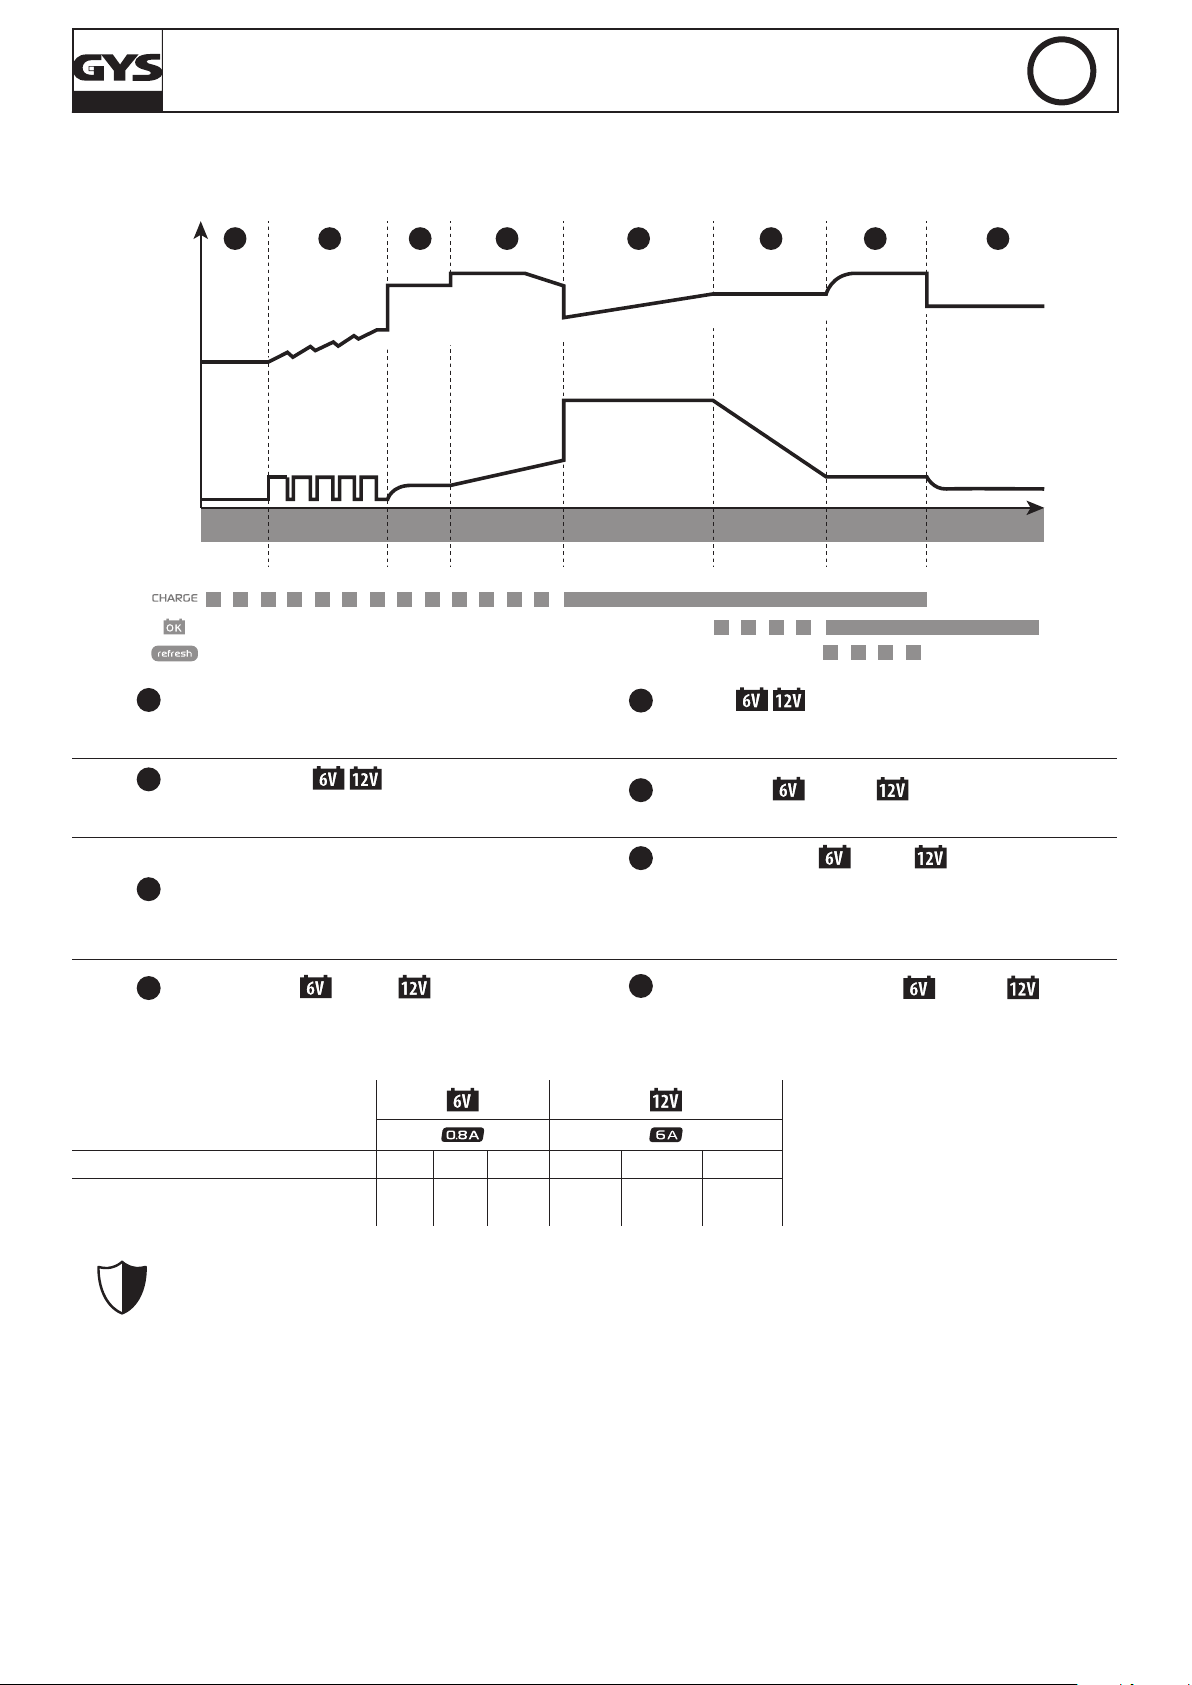
El GYSFLASH Heritage 6A utiliza una curva de carga evolucionada de ocho etapas que garantiza el rendimiento óptimo de su
batería.
1 2 3 4 5 6 7
U
I
Análisis Recuperación Test Desulfatación Carga Absorción
< 1s Max 5h Max 12h Max 20h Max 8h no limit< 1s
Etapa 1 : Análisis
Análisis del estado de la batería (nivel de carga, inversión
de polaridad, batería conectada incorrecta…)
Etapa 2 : Recuperación (
3A-0.5A*)
Algoritmo de recuperación de los elementos dañados tras
una descarga profunda y prolongada
8
Etapa 5 : Carga (
Refresh
(Si opción activada)
1h - 4h
6A-0.8A*
)
Mantenimiento
de carga
Carga rápida con corriente máxima que permite llegar al 80% del
nivel de carga.
Etapa 6 : Absorción ( 7.3V / 14.6V)
Carga con voltaje constante para llevar el nivel de carga a 100%.
Etapa 3 : Test
Test de batería sulfatada
Etapa 7 : Refresh (opción
Si la opción Refresh se selecciona, el cargador inyectará una
corriente suplementaria para crear gas, lo cual permitirá mezclar el
electrolito y reacondicionar las celdas de la batería. Durante esta
7.9V / 15.8V)
fase, la batería puede perder un poco de agua.
Etapa 4 : Desulfatado ( 7.9V / 15.8V)
Algoritmo de desulfatación de la batería.
Etapa 8 : Mantenimiento de carga ( 6.7V / 13.6V)
Mantenimiento del nivel de carga de la batería a su máximo nivel.
*con opción «batería pequeña»
• Tiempo de carga estimada
Capacidad de la batería 2 Ah 8 Ah 15 Ah 20 Ah 50 Ah 125 Ah
Tiempo de carga 20% >>> 80% 2 h 6 h 11 h 3 h 6 h 14 h
• Protecciones:
El GYSFLASH Heritage 6A posee un conjunto de dispositivos que le protegen contra los cortocircuitos y la inversión
de polaridad. Dispone de un sistema anti chispas que evita las chispas cuando se conectar el cargador a la batería.
Este cargador es de doble aislamiento y es compatible con la electrónica de los vehículos.
El GYSFLASH Heritage 6A está equipado con un sensor de temperatura integrado que le permite adaptar su corriente de carga en
función de la temperatura ambiente para evitar cualquier sobrecalentamiento de la electrónica interna.
16
Page 17
GYSFLASH HERITAGE 6 A
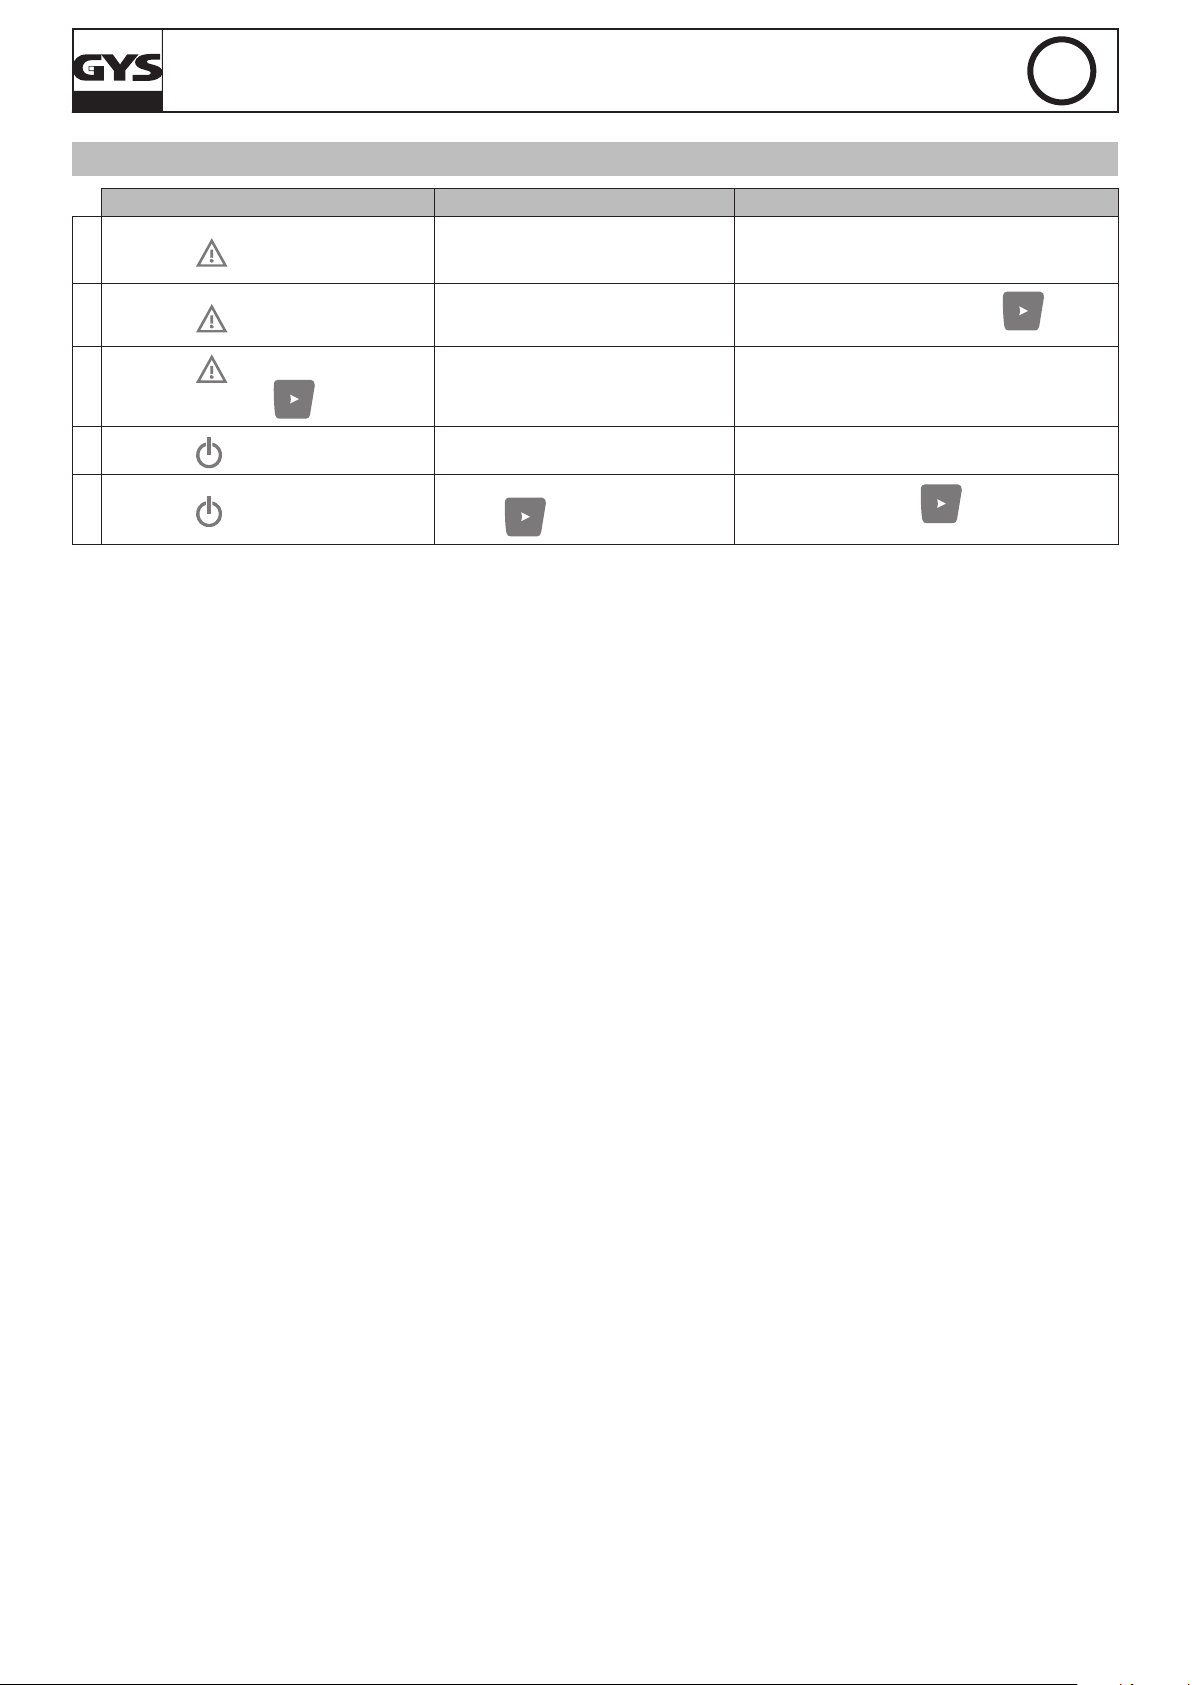
ANOMALÍAS, CAUSAS Y SOLUCIONES
Anomalías Causas Soluciones
1
El indicador parpadea.
• Inversión de polaridad
• Voltaje de batería demasiado elevado
• Pinzas en cortocircuito
ES
• Compruebe que las pinzas estén bien conectadas.
• Compruebe que el modo seleccionado corresponde a la tensión nominal de la batería.
2
El indicador está encendido.
El indicador sigue encendido incluso
3
tras presionar el botón .
4
El indicador parpadea.
5
El indicador sigue encendido.
Fallo en la carga, batería no recuperable.
Fallo térmico
Cargador en espera (standby)
Carga interrumpida presionando sobre
el botón .
Cambiar de batería y presione sobre para
reiniciar una carga.
Temperatura ambiente demasiado elevada (>50°C),
airear el local y dejar que el cargador se enfríe.
Conecte una batería al cargador para salir del modo
de espera (standby).
Presione de nuevo sobre para reiniciar la
carga.
17
Page 18
ПРАВИЛА БЕЗОПАСНОСТИ
Данная инструкция описывает функционирование вашего
устройства и меры предосторожности в целях обеспечения
вашей безопасности.
Пожалуйста, прочтите ее перед первым использованием и
сохраните, чтобы при надобности перечитать.
Этот аппарат должен быть использован исключительно для
зарядки в рамках, указанных на аппарате и в инструкции.
Соблюдайте правила безопасности. В случае неадекватного
или опасного использования производитель не несет
ответственности.
Этот аппарат может быть использован детьми старше 8 лет,
а также лицами с ограниченными физическими, умственными
возможностями или ограниченным сенсорным восприятием, а
также не обладающими опытом и знаниями, при условии, что
за ними надлежащим образом следят или если с ними провели
инструктаж по безопасному использованию аппарата и если
все возможные риски были предусмотрены. Дети не должны
играть с устройством. Чистка и уход не должны производится
детьми без надлежащего присмотра.
GYSFLASH HERITAGE 6 A
RU
Ни в коем случае не используйте это устройство для зарядки
батареек или незаряжаемых батарей.
Автоматический режим, а также ограничения при его
использовании, описаны далее в этой инструкции.
Риск пожара и взрыва!
При заряде батарея может выпустить взрывоопасный газ.
• Во время зарядки АКБ должна быть помещена в хорошо
проветриваемом месте.
• Избегайте пламени и искр. Не курить.
Подключение / отключение :
• Отключите подачу питания перед тем, как подключить или
отключить соединения к батарее.
• Сначала подключите клемму АКБ, не соединенную с шасси.
Второе подсоединение должно быть осуществлено на шасси
как можно дальше от АКБ и от трубопроводов топливной
системы. Затем, подключите зарядное устройство к сети.
• После зарядки отключите зарядное устройство от сети,
затем отсоедините зажим от шасси и, наконец, зажим от
аккумулятора. Действуйте в указанном порядке.
18
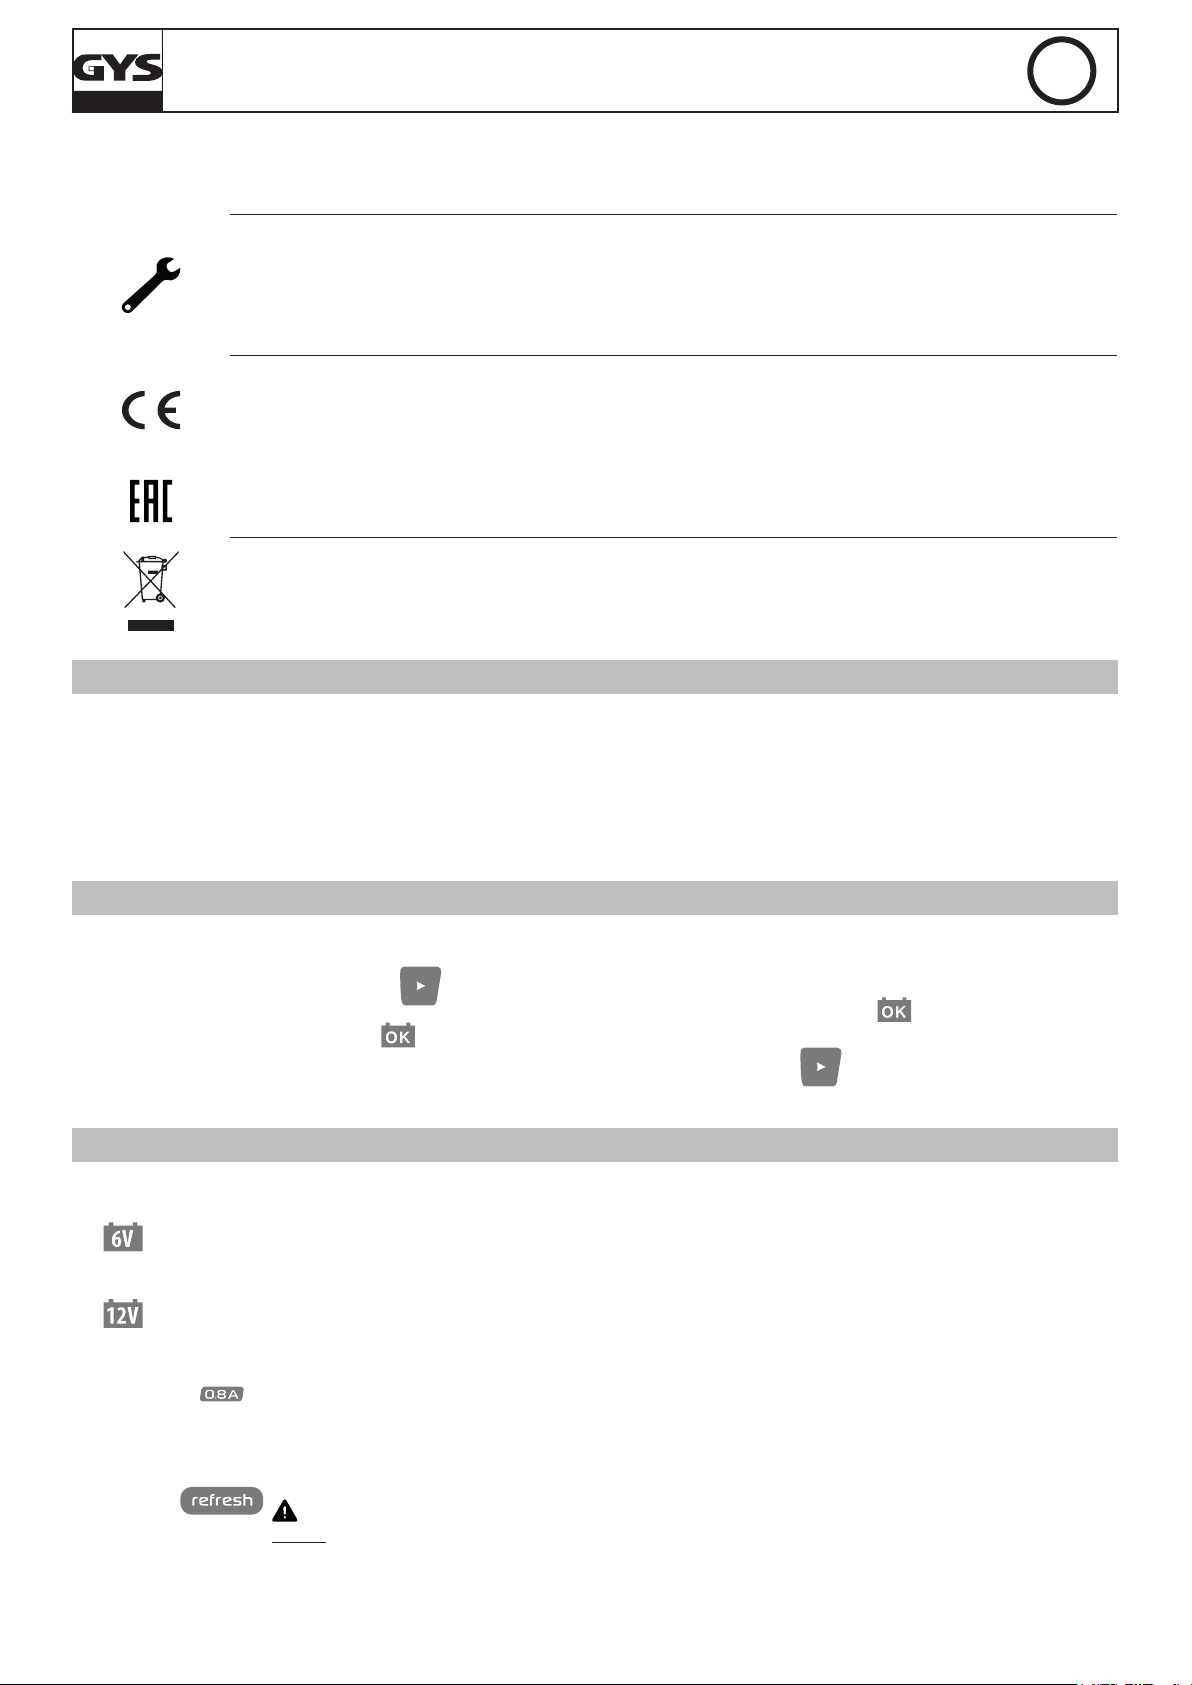
Подключение :
• Аппарат класса II
Page 19
GYSFLASH HERITAGE 6 A
RU
• Подключение к электросети должно быть произведено в
соответствии с нормами страны.
Обслуживание :
• Если шнур питания поврежден, он должен быть
заменен производителем, его сервисной службой или
квалифицированным специалистом во избежание опасности.
Регламентация :
• Аппарат соответствует директивам Евросоюза.
• Декларация соответствия есть на нашем сайте.
• Знак соответствия EAC (Евразийское экономическое
сообщество)
Утилизация:
• Этот аппарат подлежит переработке. Не выбрасывать в
общий мусоросборник.
ОПИСАНИЕ
GYSFLASH разработан для для зарядки большинства свинцово-кислотных батарей с или без обслуживания, используемых
для автомобилей и многих других транспортных средств. Эти аккумуляторы могут быть разного типа, например: GEL
(гелиевый электролит), AGM (пропитка жидким электролитом), WET, MF (необслуживаемые), CA (Кальций)...
Gysash Heritage 6А прекрасно подходит для зарядки следующих АКБ:
- аккумуляторы 6В (3 элемента по 2В) ёмкостью от 1,2Aч до 125Aч и до 170Aч для подпитки,
- аккумуляторы 12В (6 элементов по 2В) ёмкостью от 1,2Aч до 125Aч и до 170Aч для подпитки.
ВКЛЮЧЕНИЕ
1. Подключите зарядное устройство к АКБ с помощью желаемого аксессуара (зажимы, наконечники и прочее).
2. Подключите зарядное устройство к сети (однофазное питание 220-240Vac 50-60Hz).
3. Выберите режим с помощью кнопки . По истечении около пяти секунд зарядка начнется автоматически.
4. Во время заряда аппарат показывает состояние повышения уровня заряда. Когда индикатор мигает, АКБ готова к
запуску двигателя. Когда индикатор горит, АКБ полностью зарядилась.
5. Зарядку можно в любой момент прервать, отключив сетевой шнур или нажав на кнопку
6. После зарядки отключите зарядное устройство от сети, затем отсоедините зажимы от АКБ.
РЕЖИМЫ ЗАРЯДКИ
• Описание Режимов и Опций:
Режим ЗАРЯДКИ 6В (7.3В / 6A) :
Этот режим предназначен для зарядки и подпитки свинцовых АКБ 6В. Автоматический цикл зарядки в 8
этапов.
Режим ЗАРЯДКИ 12В (14.6В / 6A) :
Этот режим предназначен для зарядки и подпитки свинцовых АКБ 12В. Автоматический цикл зарядки в 8
этапов.
Опция « Небольшой аккумулятор» (0.8A) :
Опция, ограничивающая ток зарядки 0.8A с тем, чтобы сберечь небольшие аккумуляторы во время
зарядки. Эту опцию нужно включить, когда АКБ, которую требуется зарядить имеют номинальную
ёмкость меньше 15Aч.
Опция REFRESH :
Опция, позволяющая добавить дополнительный этап (этап 7) к циклу зарядки для сильно
разряженных АКБ.
: Рекомендуется НЕ активировать эту опцию для зарядки герметичных АКБ.
Совет: Проверьте и при надобности дополните уровень воды АКБ после зарядки с опцией Refresh.
.
19
Page 20
GYSFLASH HERITAGE 6 A
indicator light
RU
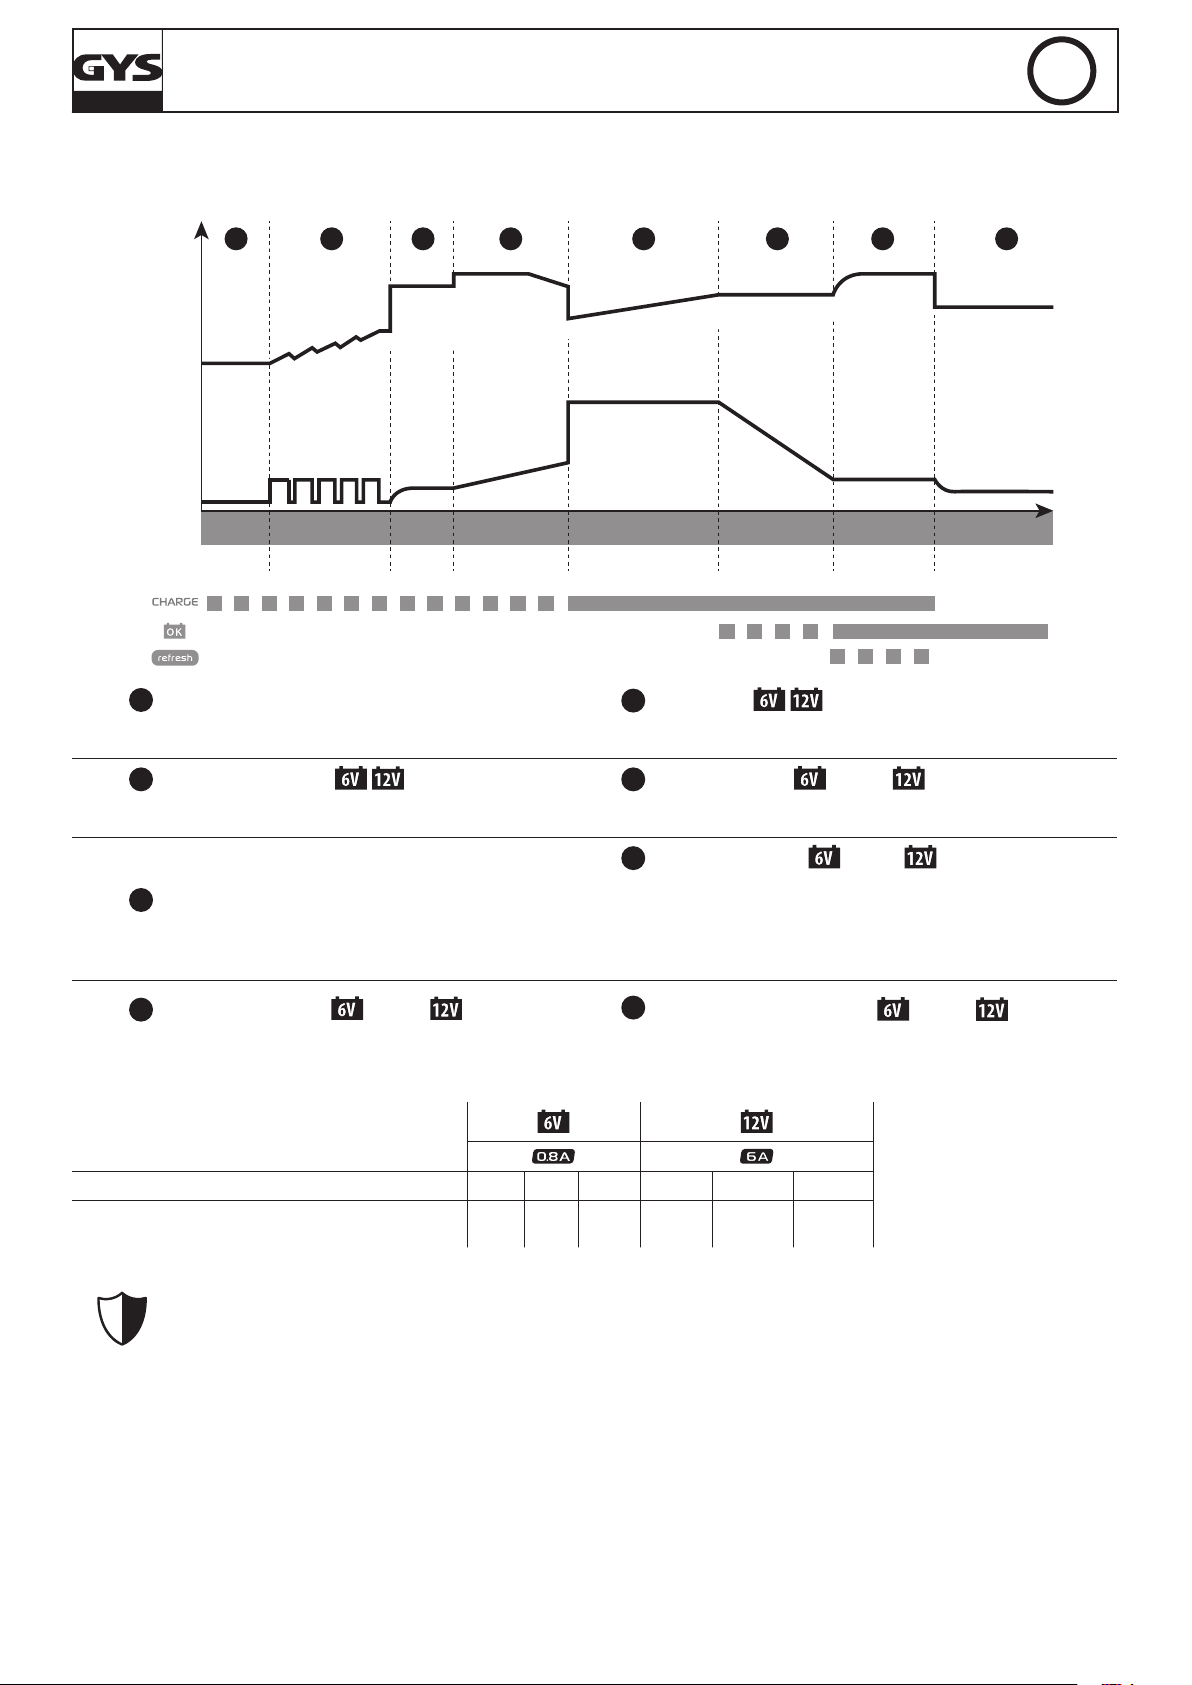
• Кривая зарядки :
GYSFLASH Heritage 6А заряжает по развернутой кривой, состоящей из восьми этапов, гарантирующей оптимальные рабочие
характеристики вашей АКБ.
1 2 3 4 5 6 7
U
I
Анализ Восстановление Тес т Десульфатация Зарядка Поглощение
< 1s Max 5h Max 12h Max 20h Max 8h no limit< 1s
Этап 1 : Анализ
Анализ состояния АКБ (уровень заряда, инверсия
полярностей, подключение неправильной АКБ…)
Этап 2 : Восстановление (
3A-0.5A*)
Алгоритм восстановления элементов, поврежденных
вследствие глубокой разрядки.
8
Этап 5 : Зарядка (
Refresh
(если опция включена)
1h - 4h
6A-0.8A*
)
Поддержание
заряда
Быстрая зарядка на максимальном токе, позволяющая достичь
80% уровня зарядки.
Этап 6 : Поглощение ( 7.3B / 14.6B)
Зарядка при постоянном напряжении, чтобы довести уровень
заряда до 100%.
Этап 7 : Refresh (опция
7.9B / 15.8B)
Если выбрана опция Refresh, то зарядное устройство подаст
Этап 3 : Тест
Тестирование сульфатированной АКБ
дополнительный ток, способствующий образованию газа,
который позволит перемешать электролит и восстановить
элементы АКБ. На этом этапе из АКБ может испариться
немного воды.
Этап 4 : Десульфатация ( 7.9B / 15.8B)
Алгоритм десульфатации АКБ.
Этап 8 : Поддержание заряда ( 6.7B / 13.6B)
Поддержание уровня заряда АКБ на максимальном уровне.
*с опцией «Небольшой аккумулятор»
• Предполагаемое время зарядки
Емкость АКБ 2 Ah 8 Ah 15 Ah 20 Ah 50 Ah 125 Ah
Время зарядки 20% >>> 80% 2 h 6 h 11 h 3 h 6 h 14 h
• Защиты :
Gysash Heritage 6A имеет целый ряд защитных механизмов против коротких замыканий и инверсий
полярности. Он оснащен противоискровой защитой, предотвращающей искрение при подсоединении
зарядного устройства к АКБ. Это зарядное устройство имеет двойную изоляцию и совместим с бортовой
электроникой автомобилей.
GYSFLASH Heritage 6 A имеет встроенный температурный датчик, позволяющим изменять ток зарядки в зависимости от
температуры окружающей среды во избежании перегрева внутренней электроники.
20
Page 21
GYSFLASH HERITAGE 6 A
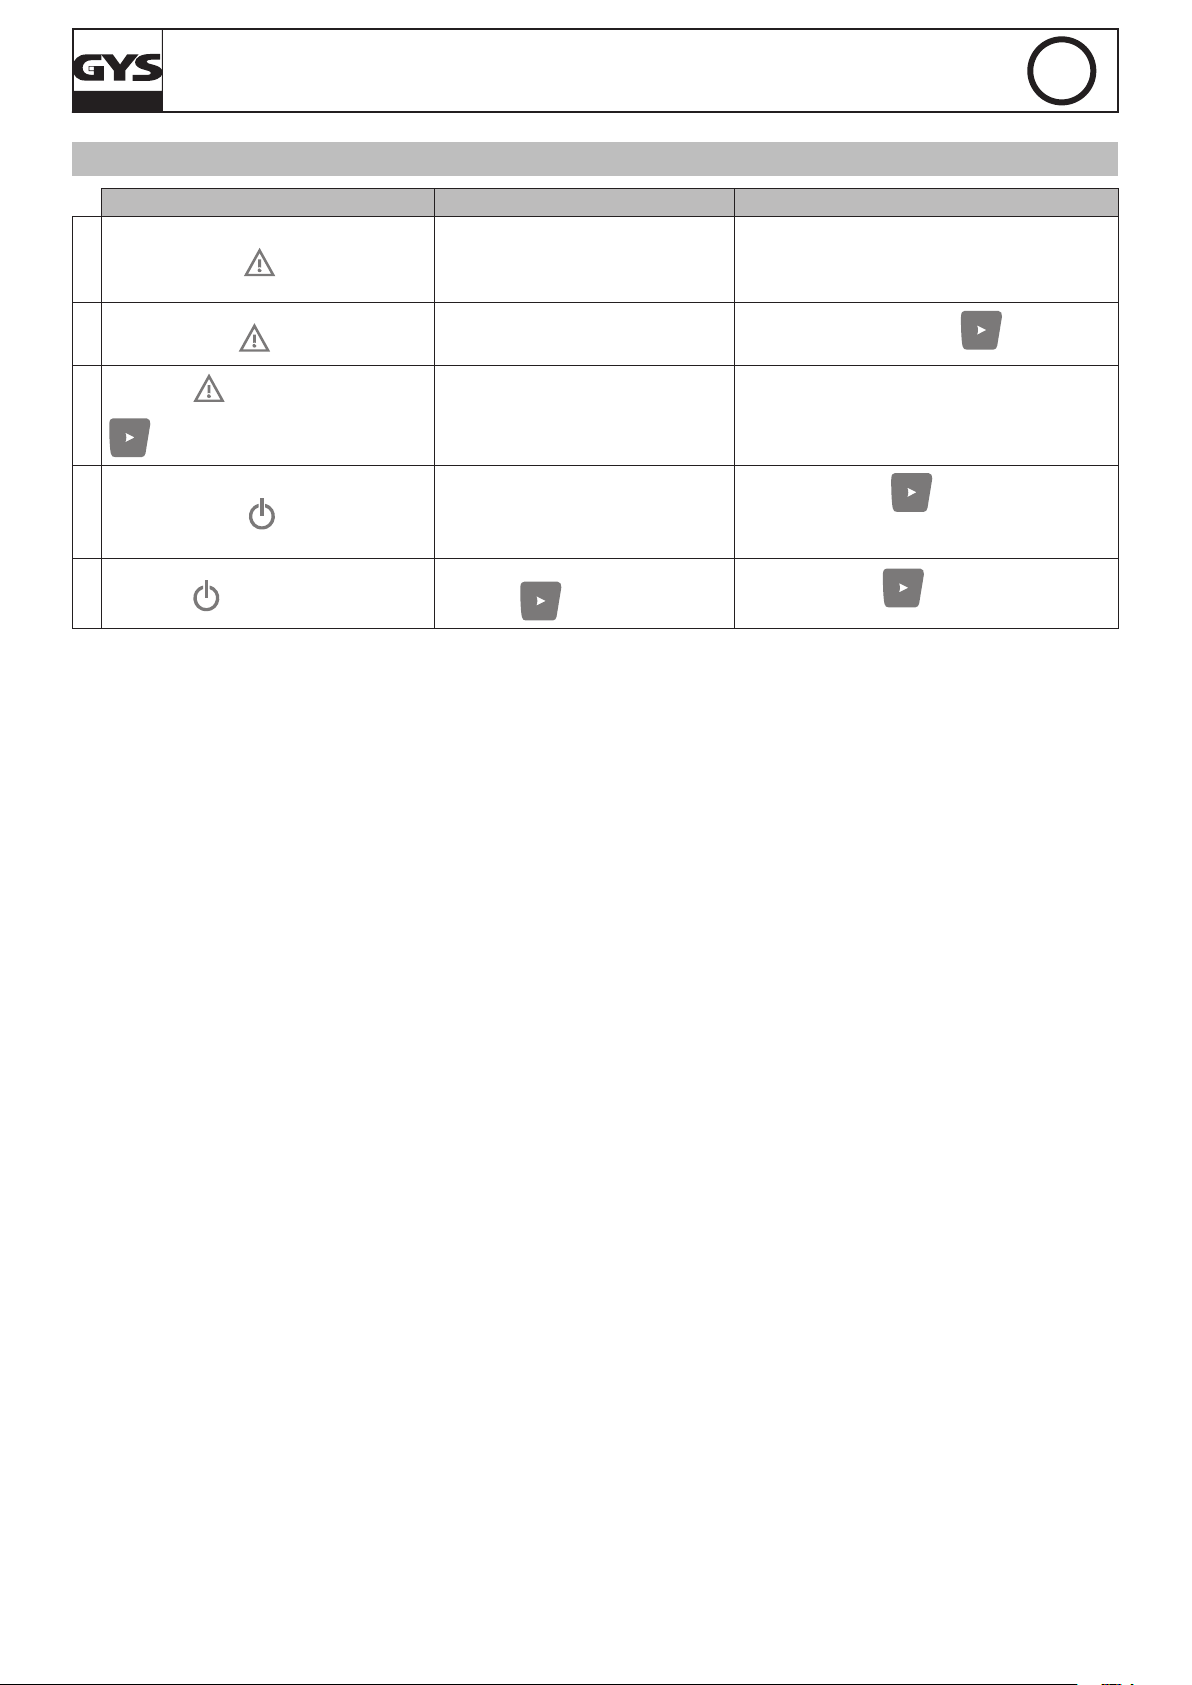
НЕИСПРАВНОСТИ, ИХ ПРИЧИНЫ И УСТРАНЕНИЕ
Неисправности Причины Устранение
1
Мигает индикатор .
• Инверсия полярности
• Напряжение АКБ слишком высокое
• Закорочены зажимы
RU
• Проверьте, что зажимы правильно
подсоединены.
• Проверьте, что выбранный режим
соответствует номинальному напряжению АКБ.
2
Горит индикатор .
Индикатор продолжает гореть,
несмотря на то, что вы нажали кнопку
3
.
4
Мигает индикатор .
5
Индикатор продолжает гореть.
Ошибка при зарядке, АКБ
восстановлению не подлежит.
Проблема с температурой.
Зарядное устройство в режиме
ожидания.
Зарядку можно прервать нажатием
на кнопку .
Замените АКБ и нажмите на , чтобы снова
запустить цикл зарядки.
Слишком высокая температура окружающей
среды (>50°C). Проветрите помещение и дайте
зарядному устройству остыть.
Нажмите на кнопку или подсоедините АКБ
к зарядному устройству, чтобы выйти из режима
ожидания.
Снова нажмите на , чтобы заново
запустить зарядку.
21
Page 22
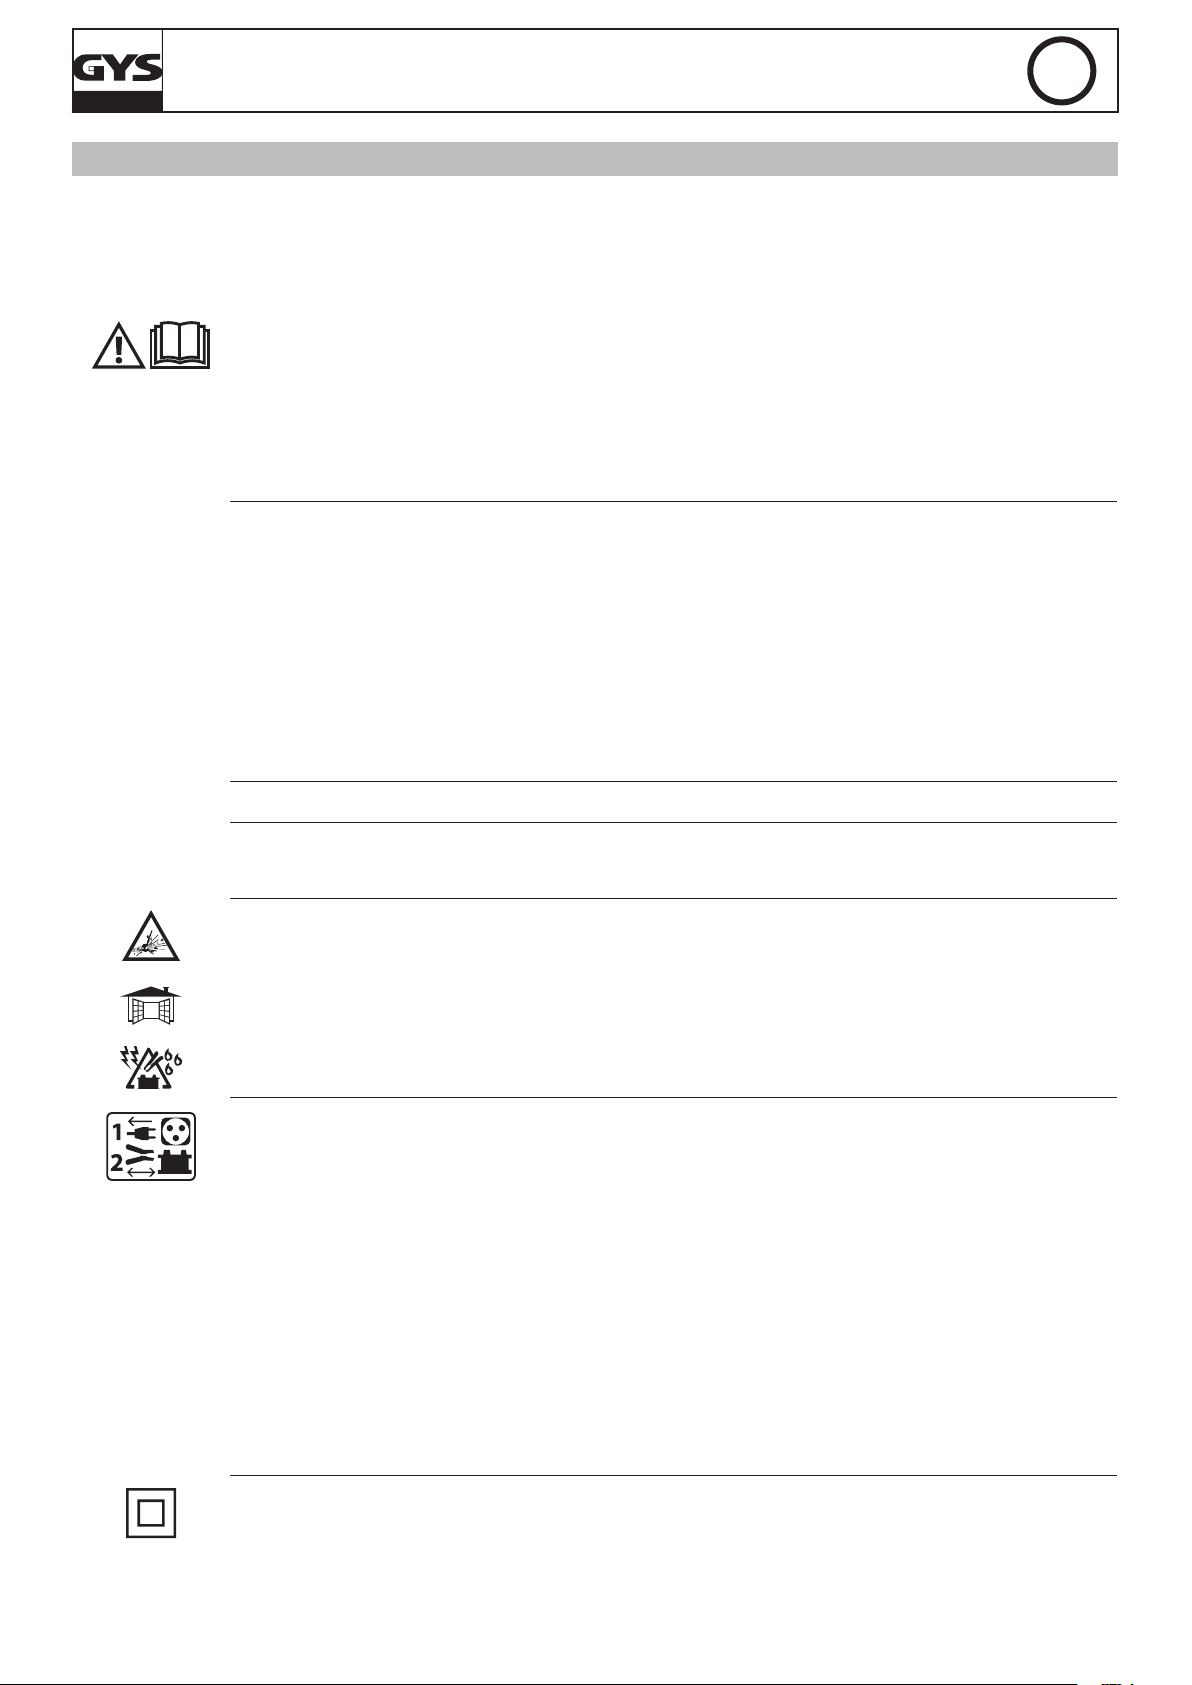
ISTRUZIONI DI SICUREZZA
Questo manuale descrive il funzionamento del carica-batterie e le
precauzioni da seguire per vostra sicurezza.
Leggere attentamente prima dell’uso e conservare con cura per
poterlo consultare successivamente.
Questo dispositivo deve essere usato solo per ricaricare o mantenere
la carica entro i limiti indicati sul dispositivo stesso e sul manuale.
Bisogna rispettare le istruzioni relative alla sicurezza. In caso di uso
inadeguato o pericoloso, il fabbricante non potrà essere ritenuto
responsabile.
Questo dispositivo può essere usato da bambini di età superiore
a 8 anni, da persone con capacità fisiche, sensoriali o mentali
ridotte e da persone senza esperienza o conoscenze, se esse
sono correttamente sorvegliate o se le istruzioni relative all’uso
del dispositivo in sicurezza gli sono state trasmesse e che i rischi
intrapresi sono stati presi in considerazione. I bambini non devono
giocare con il dispositivo. La pulizia e manutenzione non devono
essere effettuate da bambini non sorvegliati.
GYSFLASH HERITAGE 6 A
IT
Non usare in nessun caso per caricare pile o batterie non ricaricabili.
Il modo di funzionamento automatico così come le restrizioni
applicabili all’uso sono spiegate di seguito su questo manuale.
Rischio di esplosione e d’incendio!
Una batteria in carica può emettere dei gas esplosivi.
• Durante la carica, la batteria deve essere messa in un luogo ben
ventilato.
• Evitare fiamme e scintille. Non fumare.
Collegamento / scollegamento:
• Scollegare l’alimentazione prima di collegare o scollegare i
collegamenti della batteria.
• Il terminale della batteria non collegato al telaio deve essere
collegato per primo. L’altro collegamento deve essere effettuato
sul telaio lontano dalla batteria e dal serbatoio del carburante.
Il caricatore del carica batterie deve essere collegato alla rete
elettrica.
• Dopo l’operazione di carica, scollegare il caricabatterie
dalla rete, in seguito ritirare la connessione dal telaio e infine la
connessione dalla batteria, nell’ordine indicato.
22
Collegamento:
• Apparecchio di classe II
Page 23
GYSFLASH HERITAGE 6 A
IT
• Il collegamento alla rete di alimentazione deve essere fatto in
conformità con le regole d’installazione nazionali.
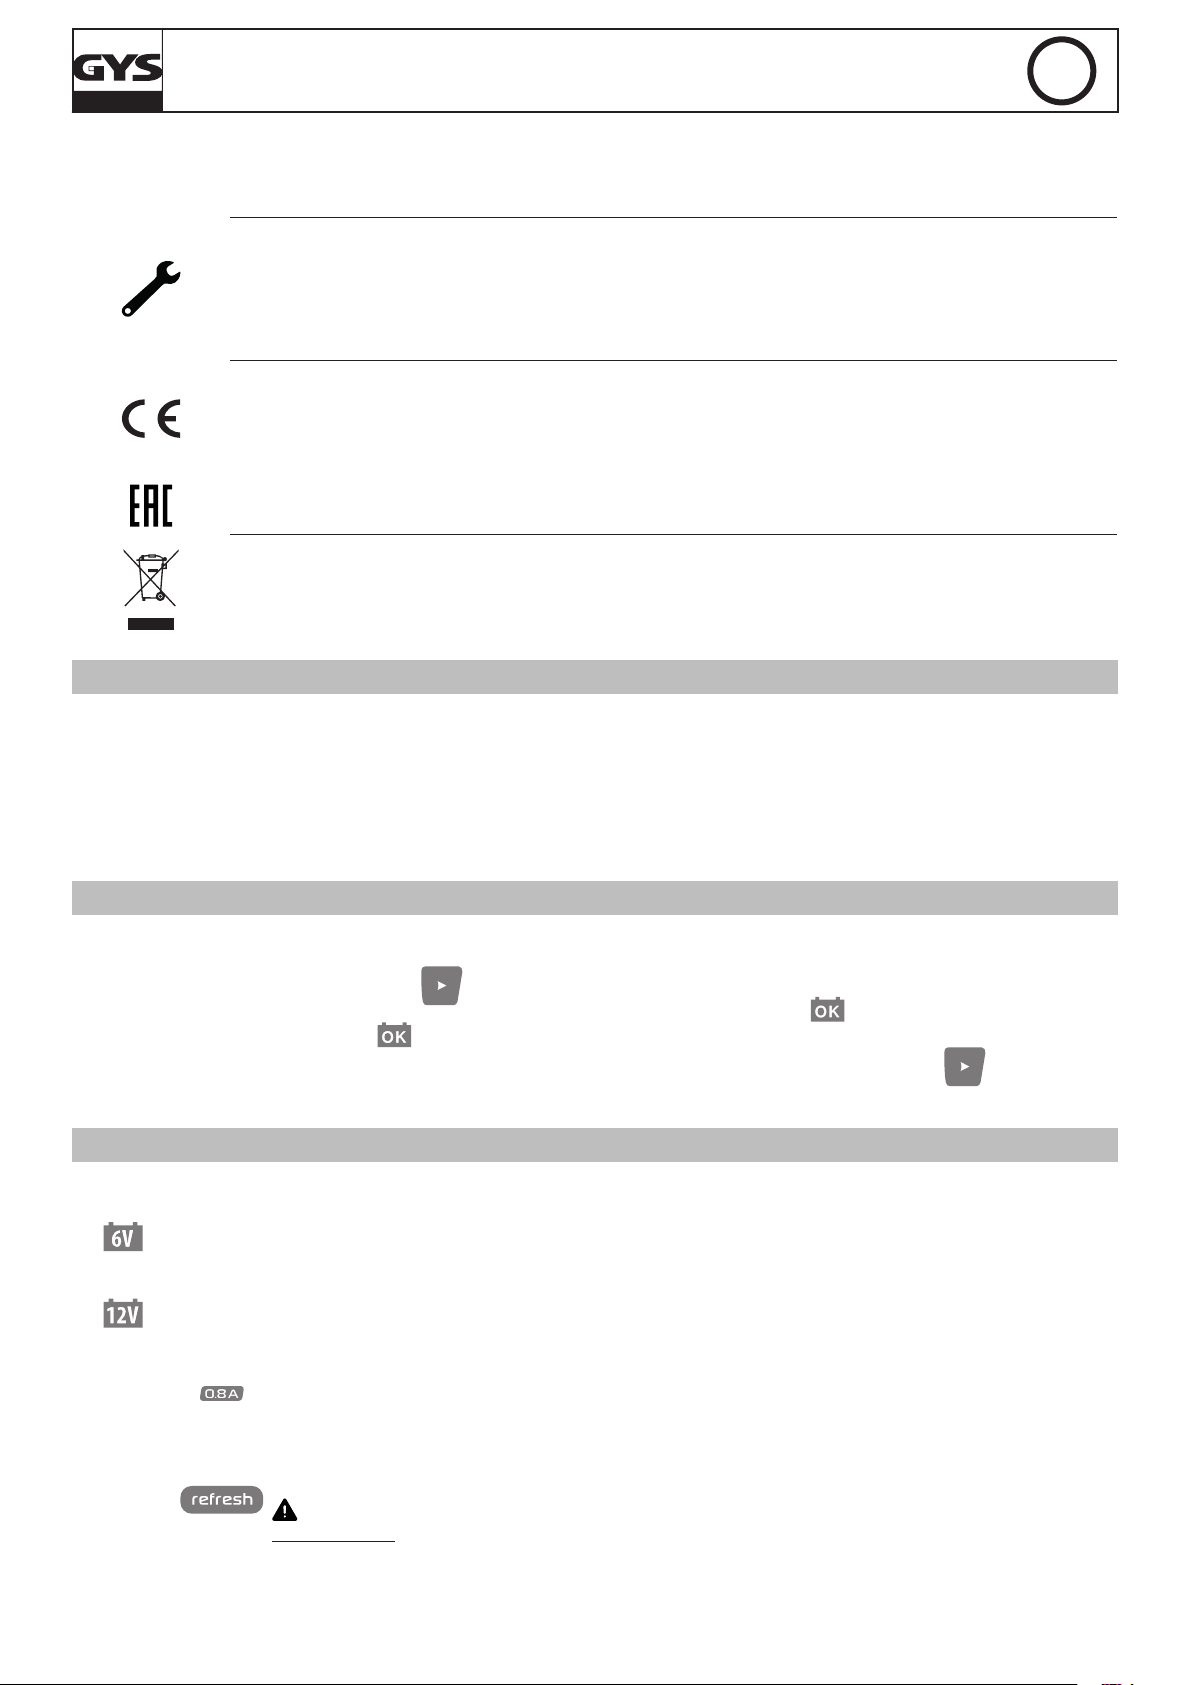
Manutenzione:
• Se il cavo corrente è danneggiato, deve essere sostituito dal
fabbricante, dal suo servizio post vendita o da persone di qualifica
simile per evitare ogni pericolo.
Regolamentazione:
• Apparecchio conforme alle direttive europee.
• La dichiarazione di conformità è disponibile sul nostro sito internet.
• Marca di conformità EAC (Comunità Economica Eurasiatica)
Scarto:
• Questo materiale è soggetto alla raccolta differenziata. Non
deve essere smaltito con i rifiuti domestici.
DESCRIZIONE GENERALE
Gysash è stato specialmente progettato per ricaricare la maggior parte delle batterie al piombo con o senza manutenzione,
correntemente usate per le macchine e per diversi altri veicoli Queste batterie possono essere di vario tipo es.: GEL (elettrolito
gelicato), AGM (elettrolito impregnato), WET, MF (Senza Manutenzione), CA (Calcio)...
Gysash Heritage 6 A è perfettamente adatto alla carica di :
- batterie 6V (3 elementi da 2V) da 1,2Ah a 125Ah e no a 170Ah per il mantenimento della carica,
- batterie 12V (6 elementi da 2V) da 1,2Ah a 125Ah e no a 170Ah per il mantenimento della carica.
AVVIAMENTO
.l Collegare il caricabatterie alla batteria con l’accessorio scelto (morsetti, connettori a occhiello, ecc.).
2. Collegare il caricabatterie alla presa (rete monofase 220-240Vac 50-60Hz).
3. Scegliere la modalità premendo sul tasto . Dopo circa cinque secondi, la carica si avvia automaticamente.
4. Durante la carica, il dispositivo indica lo stato di avanzamento della carica. Quando la spia lampeggia, la batteria è pronta
ad avviare il motore. E quando la spia rimane accesa, la batteria è completamente carica.
5. La carica può essere interrotta in qualsiasi momento scollegando la spina dalla presa oppure premendo sul tasto
6. Dopo l’operazione di carica, scollegare il caricabatterie dalla rete, in seguito ritirare le connessioni dalla batteria.
MODALITA’ DI CARICA
• Descrizione dei Modi di carica e delle opzioni:
Modalità CARICA 6V (7.3V / 6A) :
Modalità destinata alla carica e al mantenimento della carica delle batterie al piombo 6V. Ciclo di carica automatico in
8 tappe.
.
Modalità CARICA 12V (14.6V / 6A) :
Modalità destinata alla carica e al mantenimento della batterie al piombo 12V. Ciclo di carica automatico in 8 tappe.
Opzione « Piccola batteria » (0.8A) :
Opzione che limita la corrente di carica a 0.8A per preservare le piccole batterie durante la carica. Questa
opzione è da attivare quando la batteria da caricare ha una capacità nominale inferiore a 15Ah.
Opzione REFRESH :
Opzione che permette di aggiungere una tappa supplementare (tappa 7) al ciclo, per ricondizionare le
batterie fortemente scariche.
: si raccomanda di non attivare questa opzione per le batterie sigillate.
Suggerimento : Vericare e ripristinare, se necessario, il livello d’acqua della batteria dopo una carica con
Refresh.
23
Page 24
GYSFLASH HERITAGE 6 A
indicator light
IT
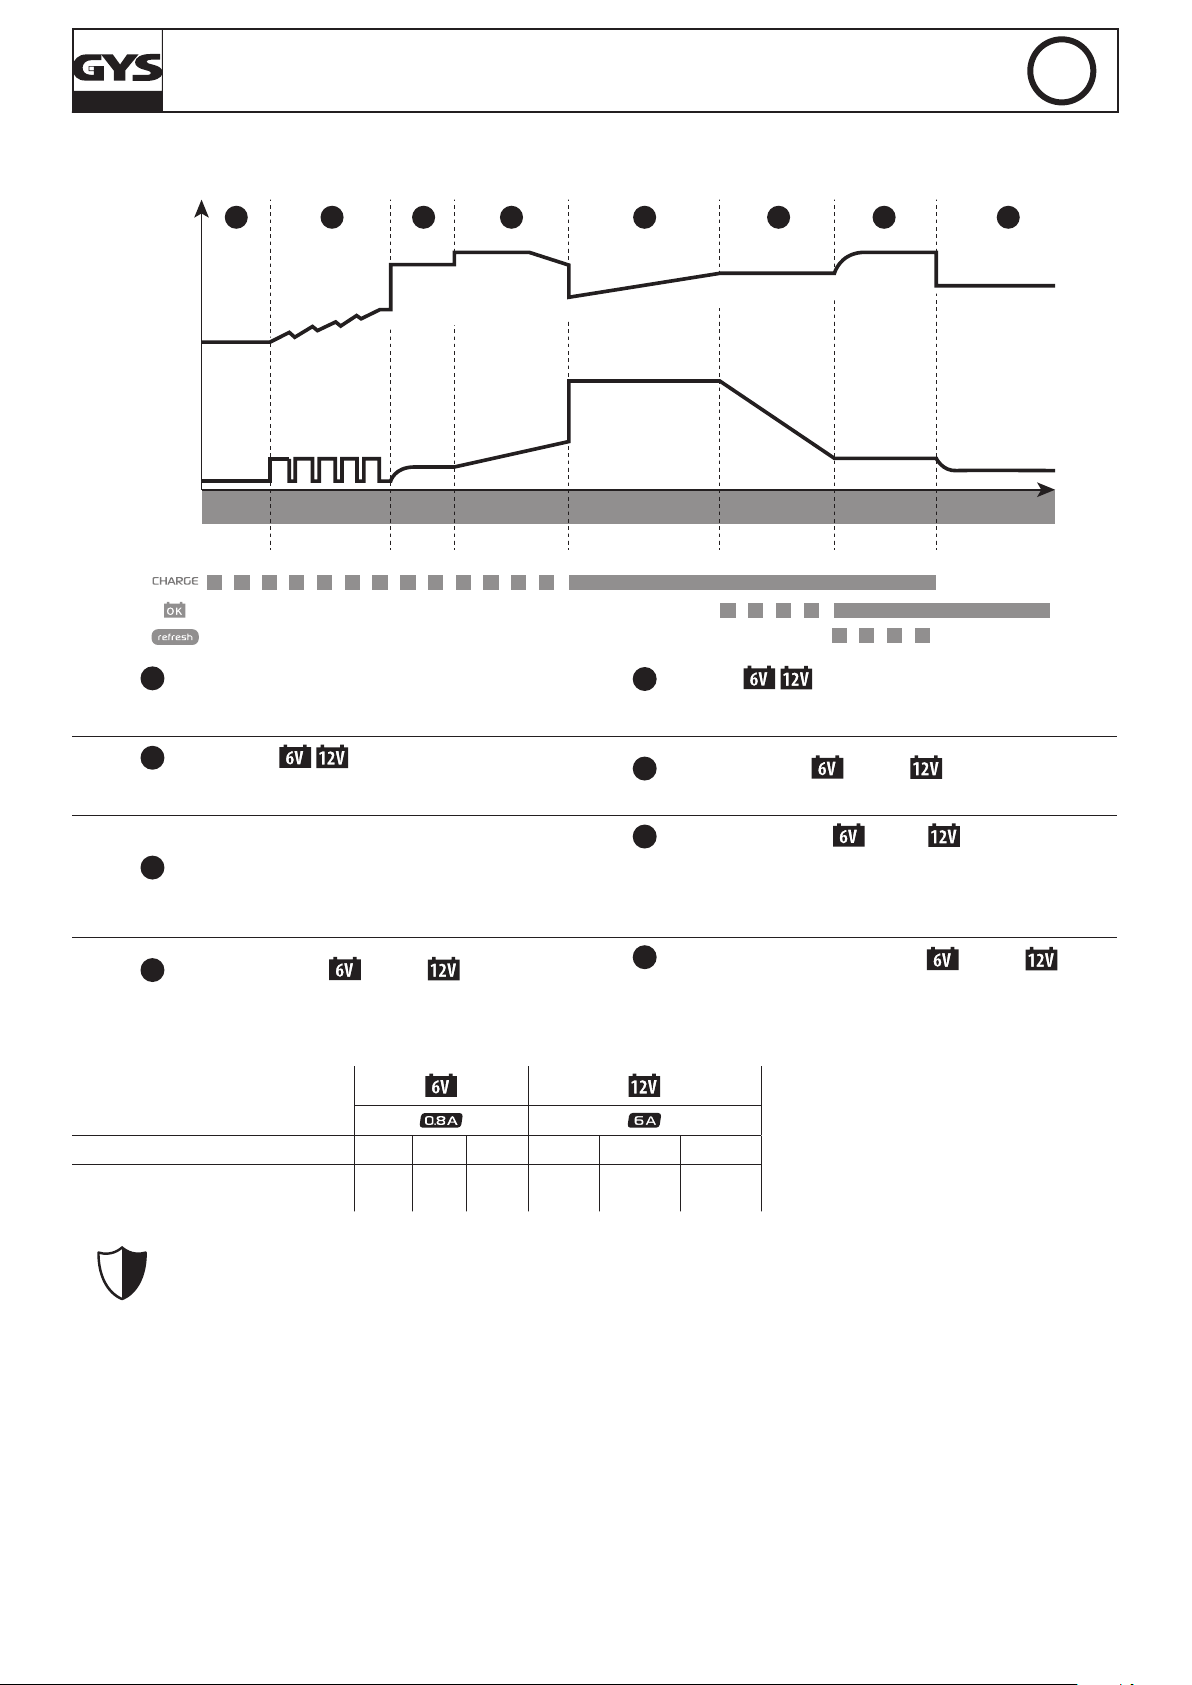
• Curva di carica :
GYSFLASH Heritage 6 A utilizza una curva di carica evoluta in otto tappe che garantisce le prestazioni ottimali della vostra batteria.
1 2 3 4 5 6 7
U
I
Analisi Ricupero Test Desolfatazione Carica Assorbimento
< 1s Max 5h Max 12h Max 20h Max 8h no limit< 1s
Tappa 1 : Analisi
Analisi dello stato della batteria (livello di carica, inversione
di polarità, batteria sbagliata collegata…)
Tappa 2 : Recupero (
3A-0.5A*)
Algoritmo di ricupero degli elementi danneggiati in seguito
ad una scarica profonda.
8
Tappa 5 : Carica (
Refresh
(se opzione attiva)
1h - 4h
6A-0.8A*
Carica oating
)
Carica rapida a corrente massima che permette di raggiungere
l’80% del livello di carica.
Tappa 6 : Assorbimento ( 7.3V / 14.6V)
Carica a tensione costante per portare il livello di carica al 100%.
Tappa 3 : Test
Test di batteria solfatata
Tappa 7 : Refresh (opzione
Se l’opzione Refresh è stata selezionata, il caricabatteria fornirà
una corrente supplementare per creare del gas che permetterà
di mescolare l’elettrolito e ricondizionare le cellule della batteria.
7.9V / 15.8V)
Durante questa fase, la batteria può perdere un po’ d’acqua.
Tappa 4 : Desolfatazione ( 7.9V / 15.8V)
Algoritmo di desolfatazione della batteria.
Tappa 8 : Mantenimento della carica ( 6.7V /
13.6V)
Mantenimento del livello di carica della batteria al suo massimo.
*con opzione « Piccola batteria »
• Tempo di carica stimato
Capacità della batteria 2 Ah 8 Ah 15 Ah 20 Ah 50 Ah 125 Ah
Tempo di carica 20% >>> 80% 2 h 6 h 11 h 3 h 6 h 14 h
• Protezioni :
GYSFLASH Heritage 6 A possiede un insieme di dispositivi che lo proteggono dai corto-circuiti e le inversioni di polarità. Dispone di un sistema che evita ogni scintilla durante il collegamento del caricabatterie alla batteria. Il caricabatterie è a doppio isolamento ed è compatibile con l’elettronica dei veicoli.
GYSFLASH Heritage 6 A possiede un sensore di temperatura integrato che gli permette di adattare la corrente di carica a seconda
della temperatura ambiente per evitare il surriscaldamento dell’elettronica interna.
24
Page 25
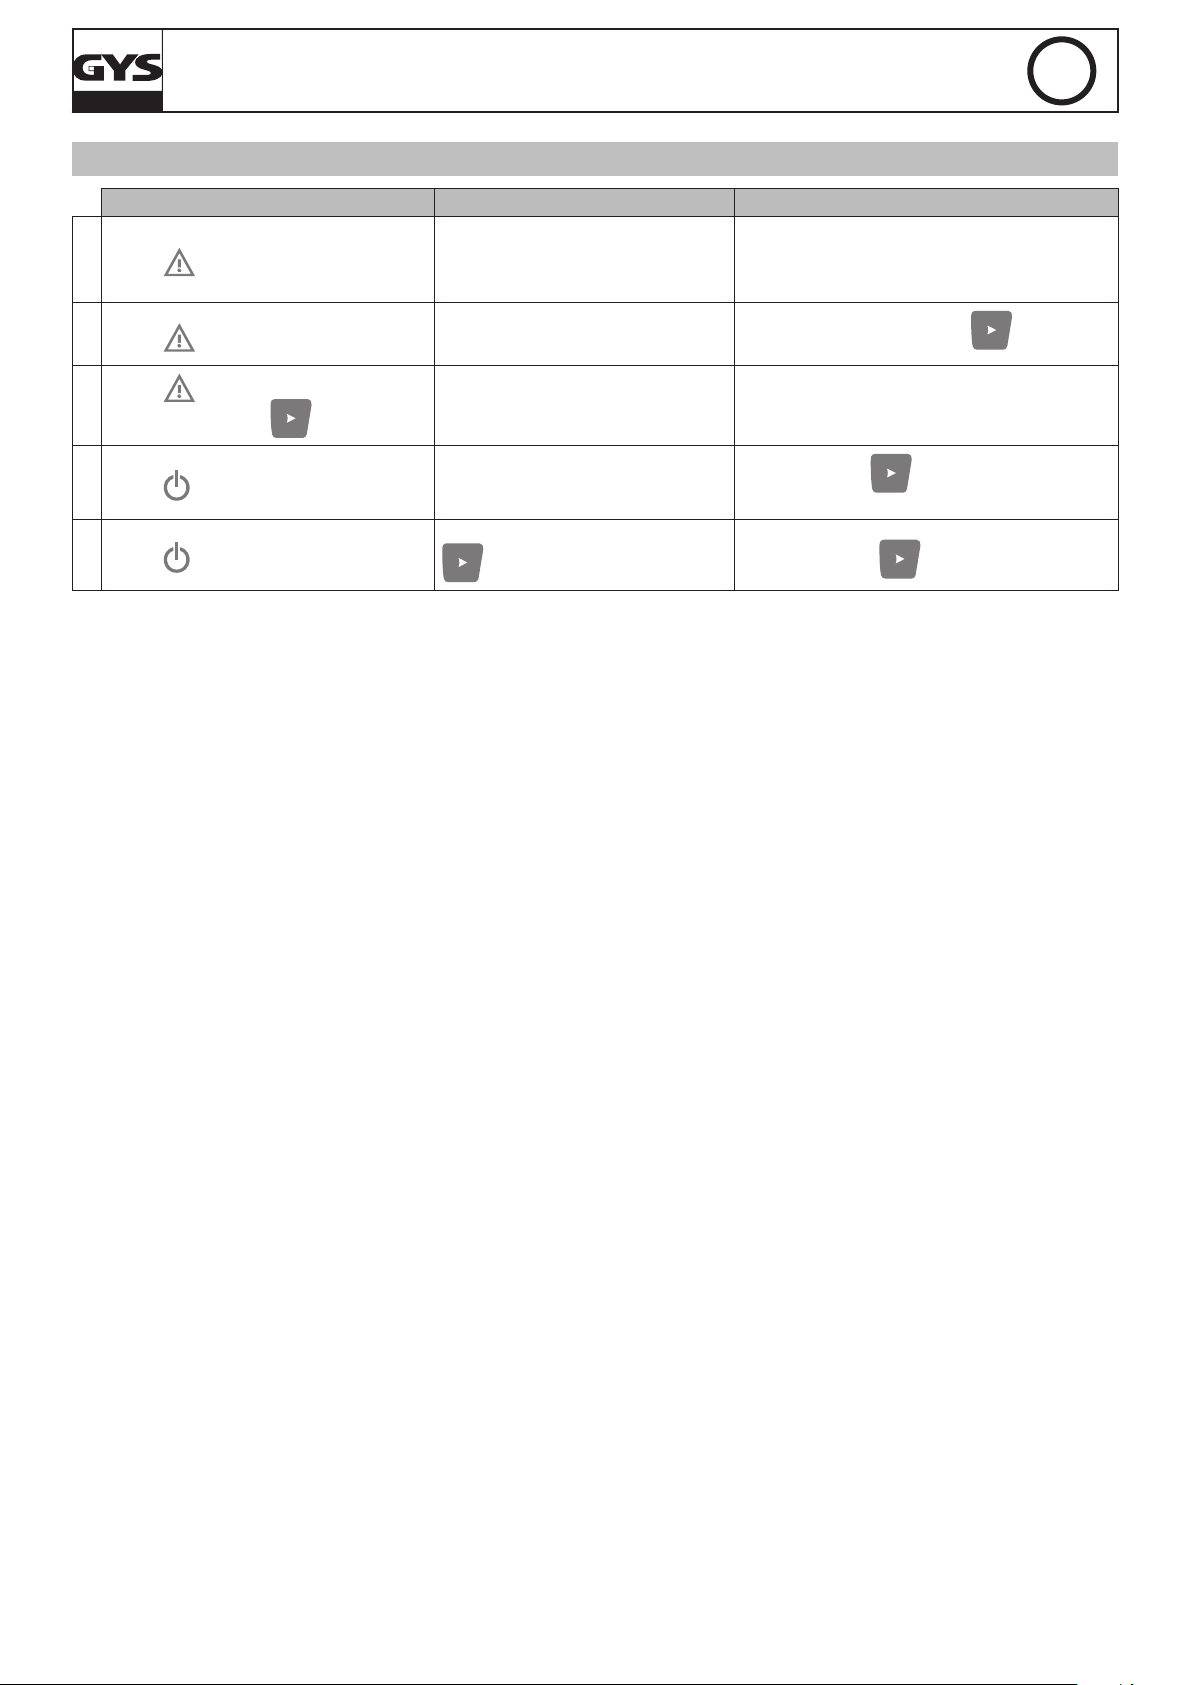
ANOMALIE, CAUSE, RIMEDI
Anomalie Cause Rimedi
1
La spia lampeggia.
GYSFLASH HERITAGE 6 A
• Inversione di polarità
• Tensione batteria troppo elevata
• Morsetti in corto circuito
• Vericare che i morsetti siano correttamente
collegati.
• Vericare che la modalità selezionata corrisponda
alla tensione nominale della batteria.
IT
2
La spia è accesa.
La spia resta accesa anche dopo una
3
pressione sul pulsante .
4
La spia lampeggia.
5
La spia resta accesa.
Fallimento durante la carica, batteria
irrecuperabile.
Difetto termico.
Caricabatteria in standby.
Carica interrotta premendo sul tasto
.
Cambiare batteria e premere su per rilanciare
una carica.
Temperatura circostante troppo elevata (>50°C),
aerare il locale e lasciar raffreddare il caricabatteria
Premere sul tasto o collegare una batteria al
caricabatterie per uscire dallo standby.
Premere ancora su per riavviare la carica.
25
Page 26
GYSFLASH HERITAGE 6 A
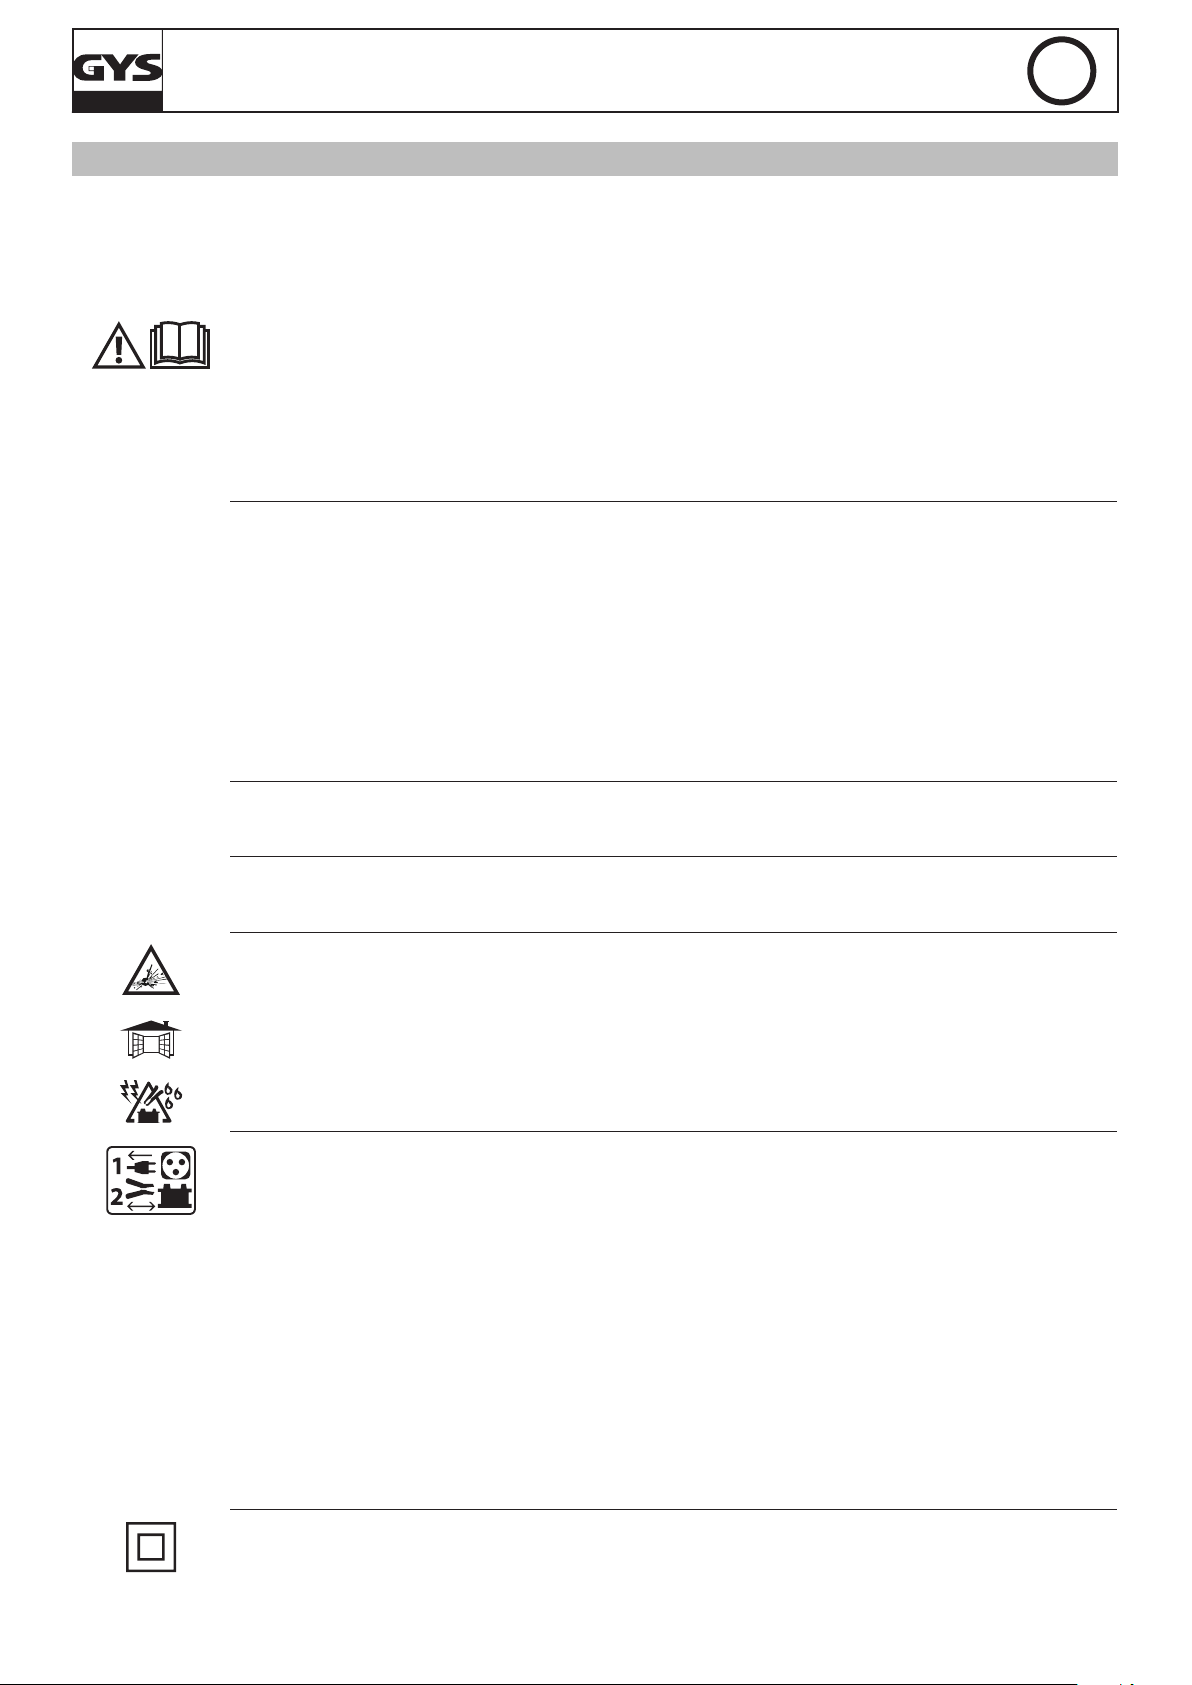
BELANGRIJKE VEILIGHEIDSINSTRUCTIES
In deze handleiding vindt u aanwijzingen voor het functioneren
van uw toestel en de veiligheids- en voorzorgsmaatregelen.
Leest u dit document aandachtig door voor u het apparaat in
gebruik neemt. Bewaar dit document als naslagwerk.
Dit apparaat kan alleen gebruikt worden als oplader, en uitsluitend
volgens de instructies vermeld op het apparaat en in de handleiding.
Volg altijd nauwkeurig de veiligheidsinstructies op. Bij onjuist of
gevaarlijk gebruik kan de fabrikant van dit product niet aansprakelijk
gesteld worden.
Dit apparaat kan worden gebruikt door kinderen vanaf 8 jaar
en door personen met lagere lichamelijke, zintuiglijke of mentale
vaardigheden of met gebrek aan ervaring of kennis, enkel en alleen
als ze goed begeleid worden, of als hen de noodzakelijke instructies
voor een absoluut veilig gebruik van het apparaat gegeven zijn, en
als de eventuele risico’s goed begrepen worden. Kinderen mogen
niet met het apparaat spelen. Schoonmaak en onderhoud mogen
niet gedaan worden door kinderen zonder toezicht.
NL
Niet geschikt voor het opladen van niet-oplaadbare batterijen of
accu's.
De automatische modus en de gebruiksbeperkingen van het
apparaat worden in deze handleiding beschreven.
Ontploffings- en brandgevaarlijk!
Een opladende accu kan explosief gas uitstoten.
• Plaats de accu tijdens het opladen in een goed geventileerde
ruimte.
• Voorkom vlammen en vonken. Niet roken.
Aansluiten / Afsluiten :
• Sluit de stroomvoorziening af alvorens de accu aan te sluiten of
los te koppelen.
• De aansluitklem van de accu die niet is aangesloten op een
chassis moet als eerst aangekoppeld worden. De andere verbinding
moet plaats vinden op de chassis, ver van de accu en van de
brandstofkanalisering. De acculader moet vervolgens op het net
aangesloten worden.
• Koppel na het laden eerst de acculader van de netspanning los.
Koppel daarna de connectie van het chassis los, en pas daarna de
connectie met de accu. Respecteer de juiste volgorde.
26
Aansluiten :
• Apparaat klasse II
Page 27
GYSFLASH HERITAGE 6 A
NL
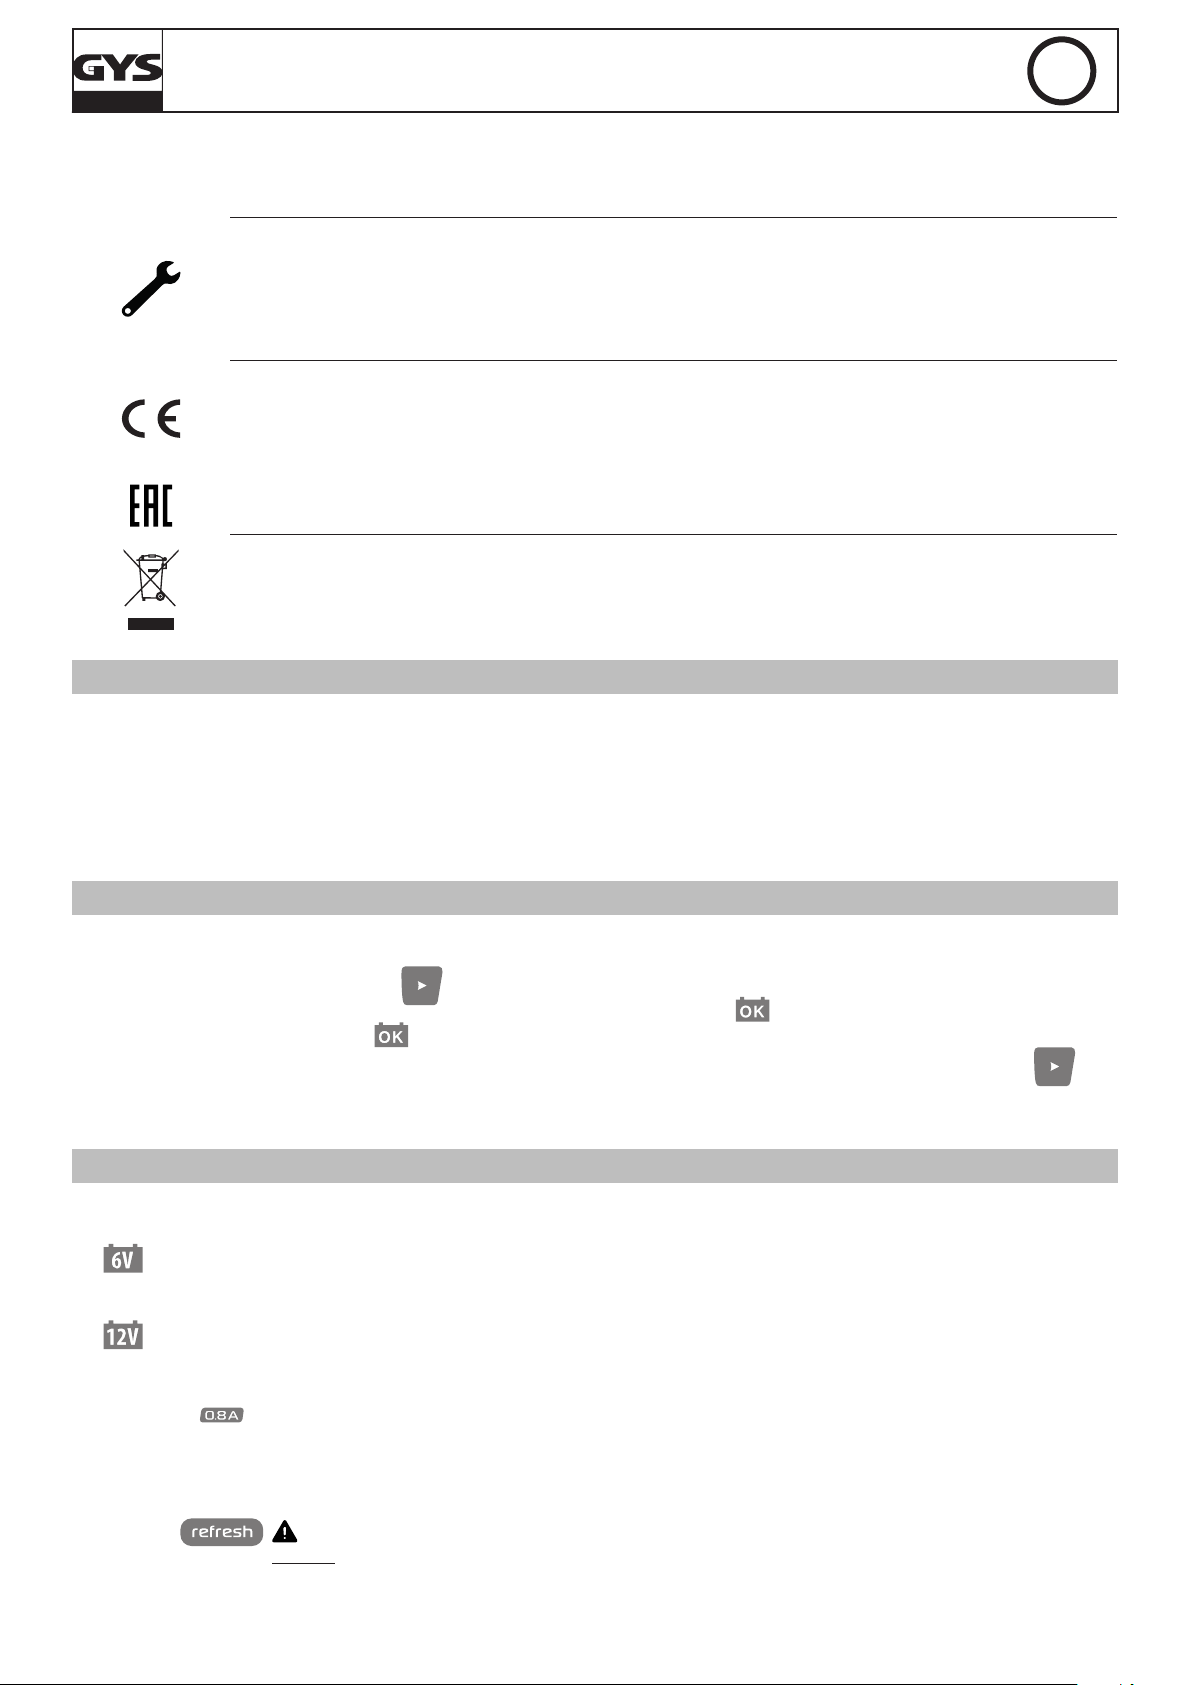
• De aansluiting op de netspanning moet conform de nationale
regelgeving gebeuren.
Onderhoud :
• Als de voedingskabel beschadigd is moet deze vervangen worden
door de fabrikant, diens reparatie-dienst of een gelijkwaardig
gekwalificeerde technicus, om ieder gevaar te vermijden.
Richtlijnen :
• Apparaat voldoet aan de Europese richtlijnen.
• De conformiteitsverklaring is te vinden op onze internetsite.
• EAC merk (Euraziatische Economische Gemeenschap).
Afvalverwerking :
• Afzonderlijke inzameling vereist. Niet met het huishoudelijke
afval wegwerpen.
ALGEMENE BESCHRIJVING
Uw Gysash is speciaal ontworpen voor het opladen van de meeste lood-accu’s, met onderhoud of onderhoudsvrij, die gebruikt
worden in auto’s en in veel andere voertuigen. Dit kunnen verschillende types accu’s zijn, bijvoorbeeld : GEL (gegeleerde elektro-
lyt), AGM (geïmpregneerde elektrolyt), WET, MF (Maintenance Free) CA (Calcium)......
De Gysash Heritage 6 A is perfect geschikt voor het opladen van :
- 6V accu’s (3 elementen van 2V) van 1,2 Ah tot 125 Ah en tot 170 Ah voor het druppel-laden
- 12V accu’s (6 elementen van 2V) van 1,2 Ah tot 125 Ah en tot 170 Ah voor het druppel-laden.
OPSTARTEN
1. Sluit de accu-lader aan op de accu met behulp van de gekozen hulpmiddelen (klemmen, kabelschoenen enz.).
2. Sluit de acculader aan op een stopcontact (enkel fase netwerk, 220-240Vac 50-60 Hz).
3. Kies de module met een druk op knop . Het opladen start automatisch na ongeveer vijf seconden.
4. Tijdens het opladen geeft het apparaat het laadniveau aan. Wanneer het lampje knippert, is de accu gereed om de motor
op te starten. En wanneer het lampje blijft branden is de accu volledig opgeladen.
5. Het laden kan op ieder gewenst moment onderbroken worden, door de stekker uit het stopcontact te halen of door op knop
drukken.
6. Koppel, na aoop van het laadproces, eerst de acculader van de netspanning af. Koppel daarna de aansluitingen van de accu los.
LAAD MODULES
• Beschrijving Modules en Opties :
LAAD module 6V (7.3V / 6A) :
Module bestemd voor het laden en druppel-laden van 6V lood-accu’s. Automatische laad-cyclus in 8 stappen.
te
LAAD module 12V (14.6V / 6A) :
Module bestemd voor het laden en druppel-laden van 12V lood-accu’s. Automatische laad-cyclus in 8 stappen.
Optie « Kleine accu » (0.8A) :
Optie die de laadstroom beperkt tot 0.8A, om zo de kleinere accu tijdens het laden te sparen. Deze optie
moet geactiveerd worden wanneer de accu een nominale capaciteit heeft van minder dan 15Ah.
REFRESH optie :
Optie waarmee een extra etappe aan de laadcyclus toegevoegd kan worden (etappe 7), om sterk ontladen accu’s weer te herstellen.
: het wordt aanbevolen om deze functie niet te gebruiken voor het opladen van verzegelde accu’s.
Advies : Controleer het waterniveau van de accu en vul dit indien nodig bij na het opladen met de Refresh
optie.
27
Page 28
GYSFLASH HERITAGE 6 A
indicator light
NL
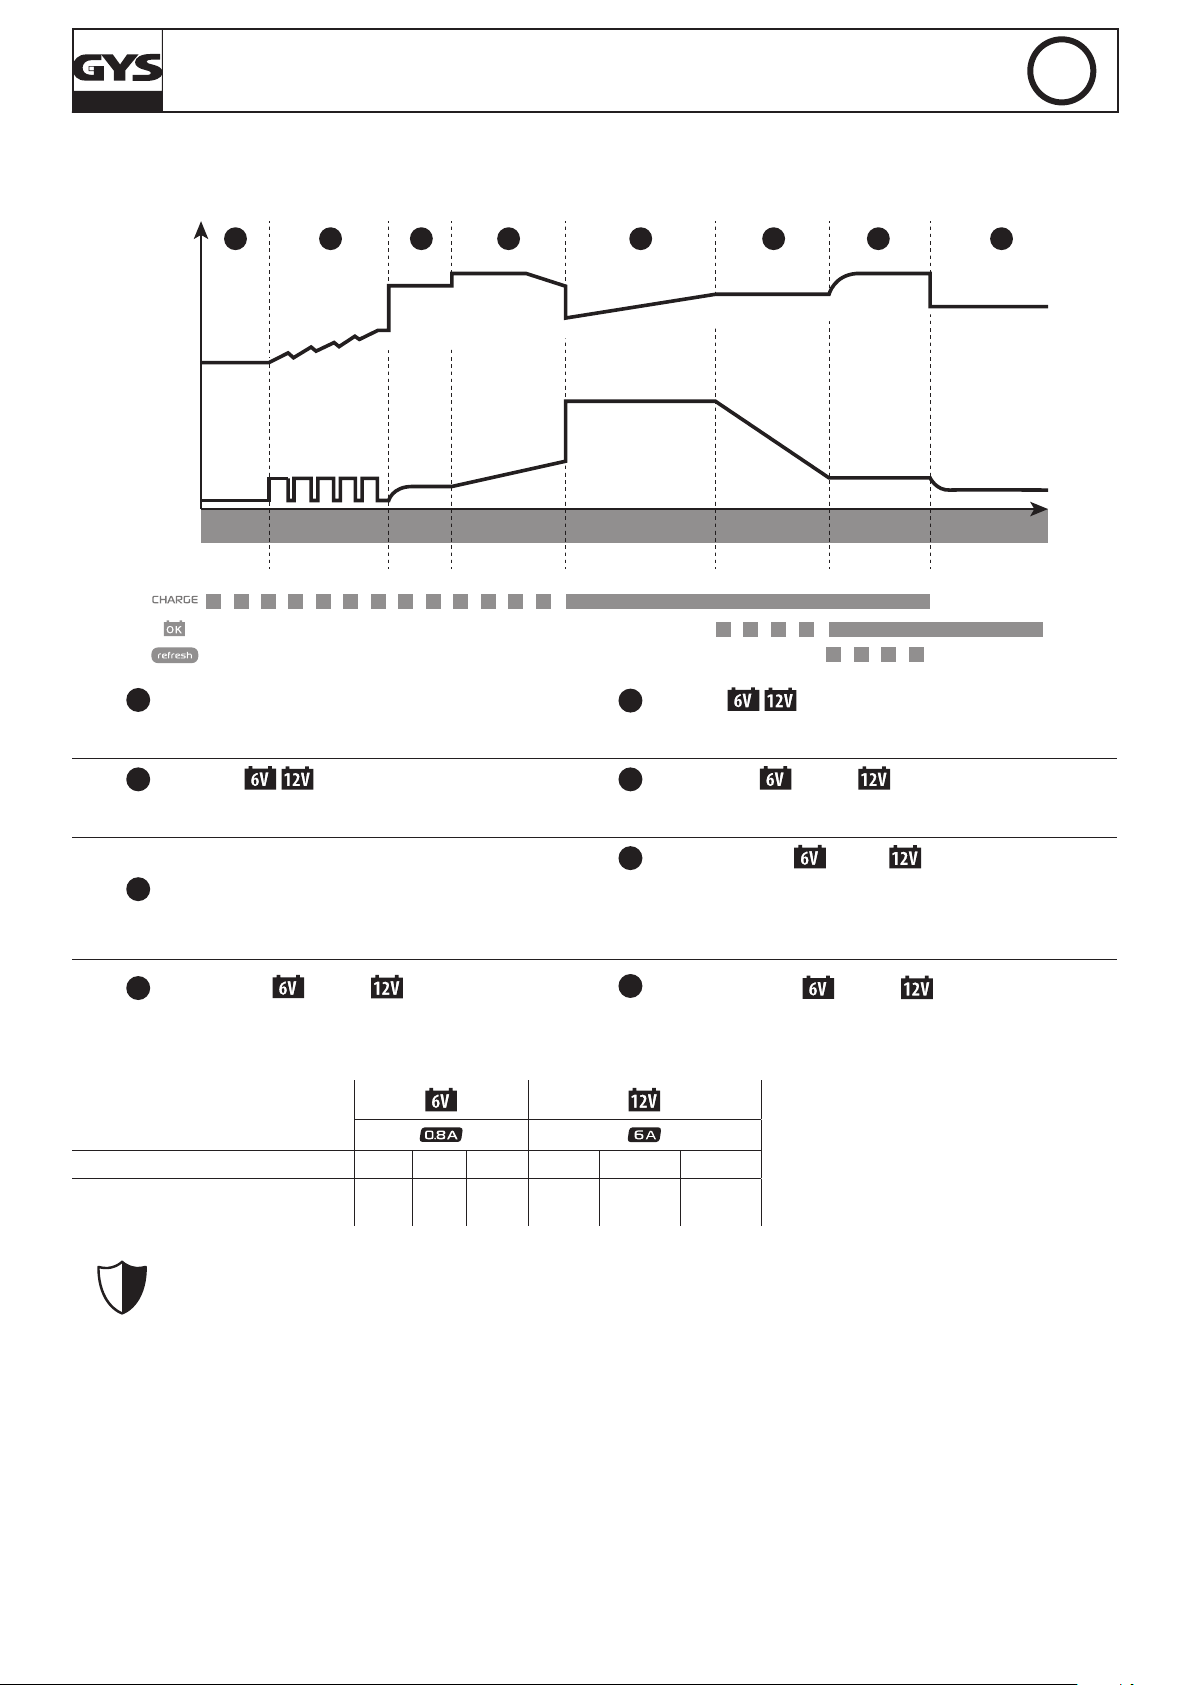
• Laadcurve :
De GYSFLASH Heritage 6 A gebruikt een geëvolueerde laadcurve in acht stappen, die de maximale prestaties van uw accu garandeert.
1 2 3 4 5 6 7
U
I
Analyse Herstel Test Desulfatie Opladen Absorptie
< 1s Max 5h Max 12h Max 20h Max 8h no limit< 1s
Stap 1 : Analyse
Analyse van de staat van de accu (laadniveau, ompoling,
verkeerde accu aangesloten...)
Stap 2 : Herstel (
3A-0.5A*)
Algoritme van het herstel van de beschadigde elementen
als gevolg van diepe ontlading.
8
Stap 5 : Laden (
Refresh
(si option active)
1h - 4h
6A-0.8A*
)
Druppellaadfunc-
tie
Snel laden met optimale stroom, voor het bereiken van 80% van
het laadniveau.
Stap 6 : Absorptie ( 7.3V / 14.6V)
Laden met constante spanning, om de accu voor 100% op te
laden.
Stap 3 : Test
Test gesulfateerde accu.
Stap 7 : Refresh (optie
Als voor de Refresh optie is gekozen, zal de acculader extra stroom
injecteren, en een gas creëren dat het mogelijk maakt de elektrolyt te mengen en zo de cellen van de accu te herstellen. Tijdens
7.9V / 15.8V)
deze fase kan de accu een beetje water verliezen.
Stap 4 : Desulfatie ( 7.9V / 15.8V)
Algoritme van de desulfatie van de accu.
Stap 8 : Druppel-laden ( 6.7V / 13.6V)
Handhaving van het maximum laadniveau van de accu.
*met de optie « Kleine accu »
• Geschatte laadtijd
Capaciteit van de accu 2 Ah 8 Ah 15 Ah 20 Ah 50 Ah 125 Ah
Laadtijd 20% >>> 80% 2 h 6 h 11 h 3 h 6 h 14 h
• Beveiligingen :
De GYSFLASH Heritage 6 A beschikt over een reeks beveiligingen die het apparaat beschermen tegen kortsluiting
en polariteitsomwisseling. Het apparaat beschikt over een systeem dat vonkvorming tijdens het aankoppelen van de
acculader op de accu voorkomt. De lader heeft een dubbele isolatie en is compatibel met de elektronica van auto’s.
De GYSFLASH Heritage 6 A is uitgerust met een ingebouwde temperatuur sensor, die het apparaat in staat stelt om de laadstroom
aan te passen aan de omgevingstemperatuur, om zodoende oververhitting van de interne elektronica te voorkomen.
28
Page 29
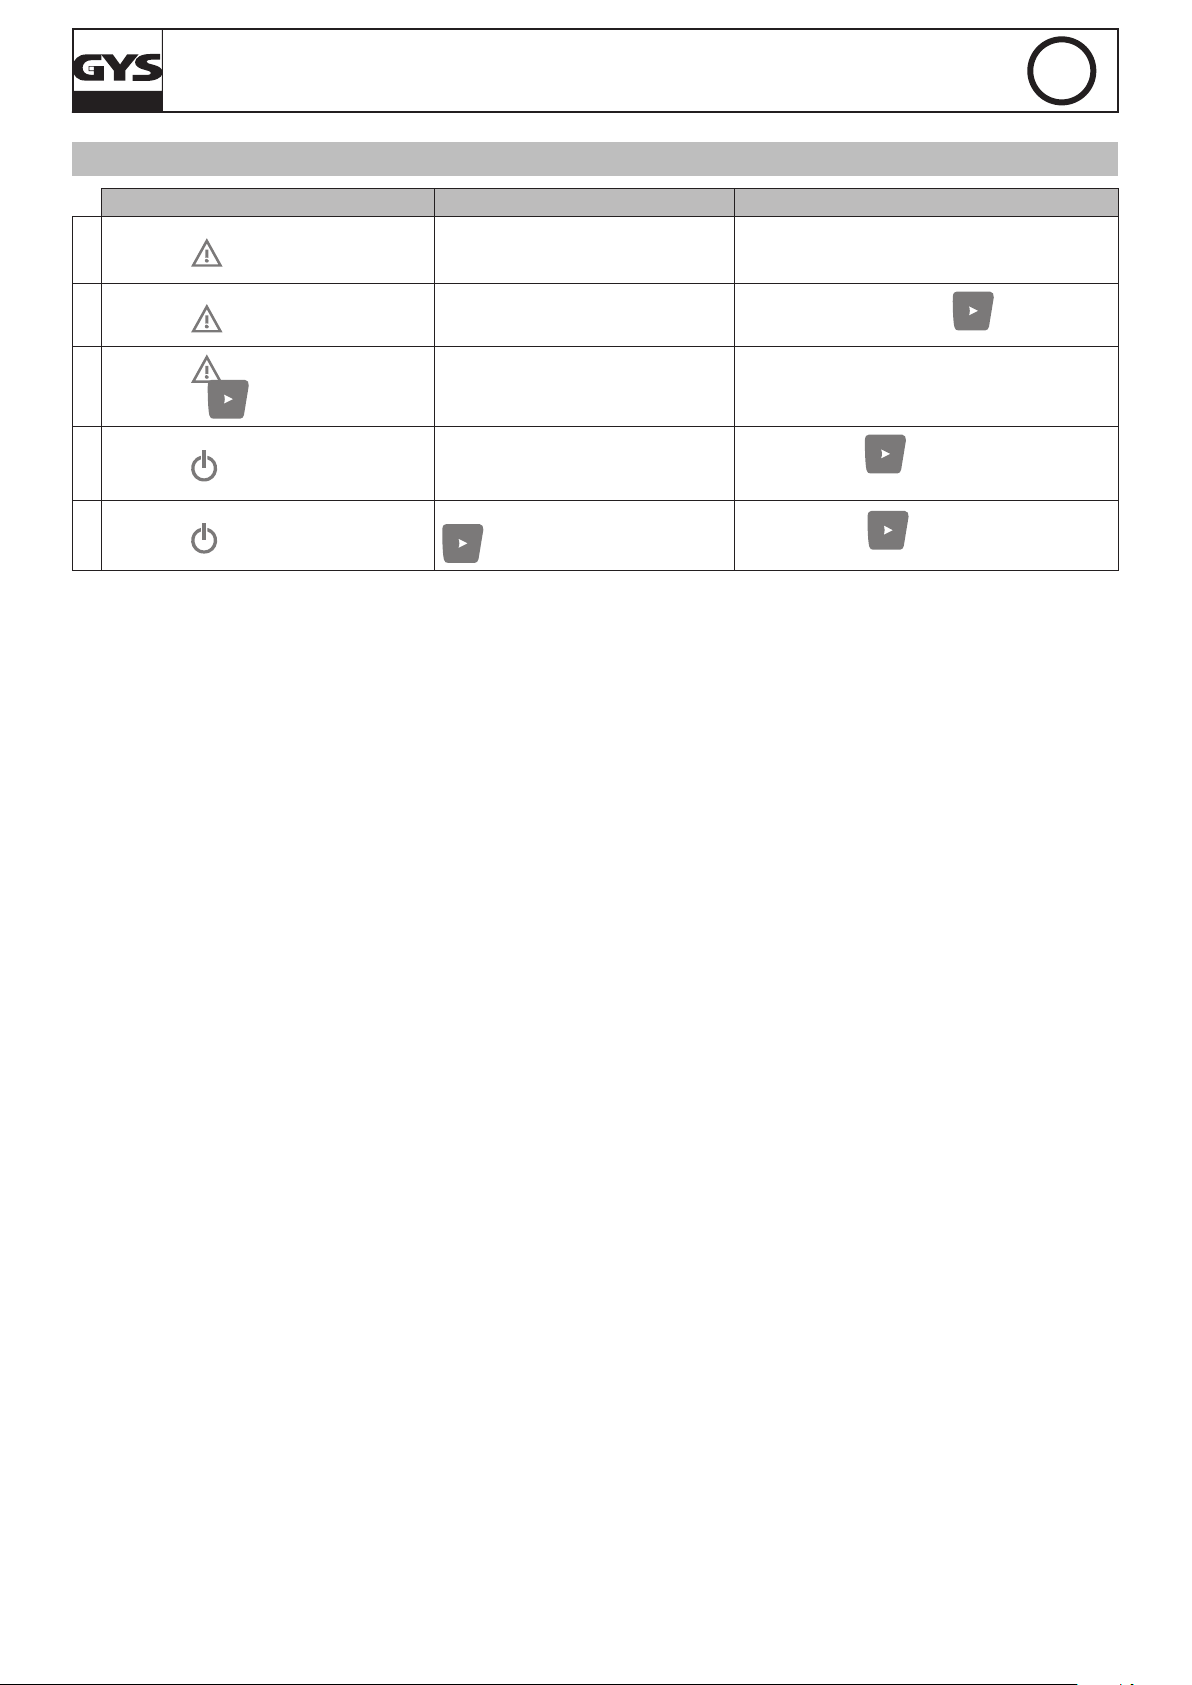
GYSFLASH HERITAGE 6 A
AFWIJKINGEN, OORZAKEN, OPLOSSINGEN
Afwijkingen Oorzaken Oplossingen
1
Het lampje knippert.
• Ompoling
• Te hoge accu-spanning
• Kortsluiting klemmen
NL
• Controleer of de klemmen goed aangesloten zijn.
• Controleer of de gekozen module overeenkomt
met de nominale spanning van de accu.
2
Het lampje brandt.
Het lampje blijft branden, zelfs na een
3
druk op knop .
4
Het lampje knippert.
5
Het lampje blijft branden.
Opladen mislukt, accu onherstelbaar
beschadigd.
Thermische fout.
Acculader op stand by.
Opladen onderbroken door op de knop
te drukken.
Verwissel de accu en druk op om het laden
weer op te starten.
Te hoge omgevingstemperatuur (>50°C), ventileer
het vertrek en laat de lader afkoelen.
Druk op de knop of sluit een accu op de acculader aan om de standby module te verlaten.
Druk opnieuw op om het laden weer op te
starten.
29
Page 30
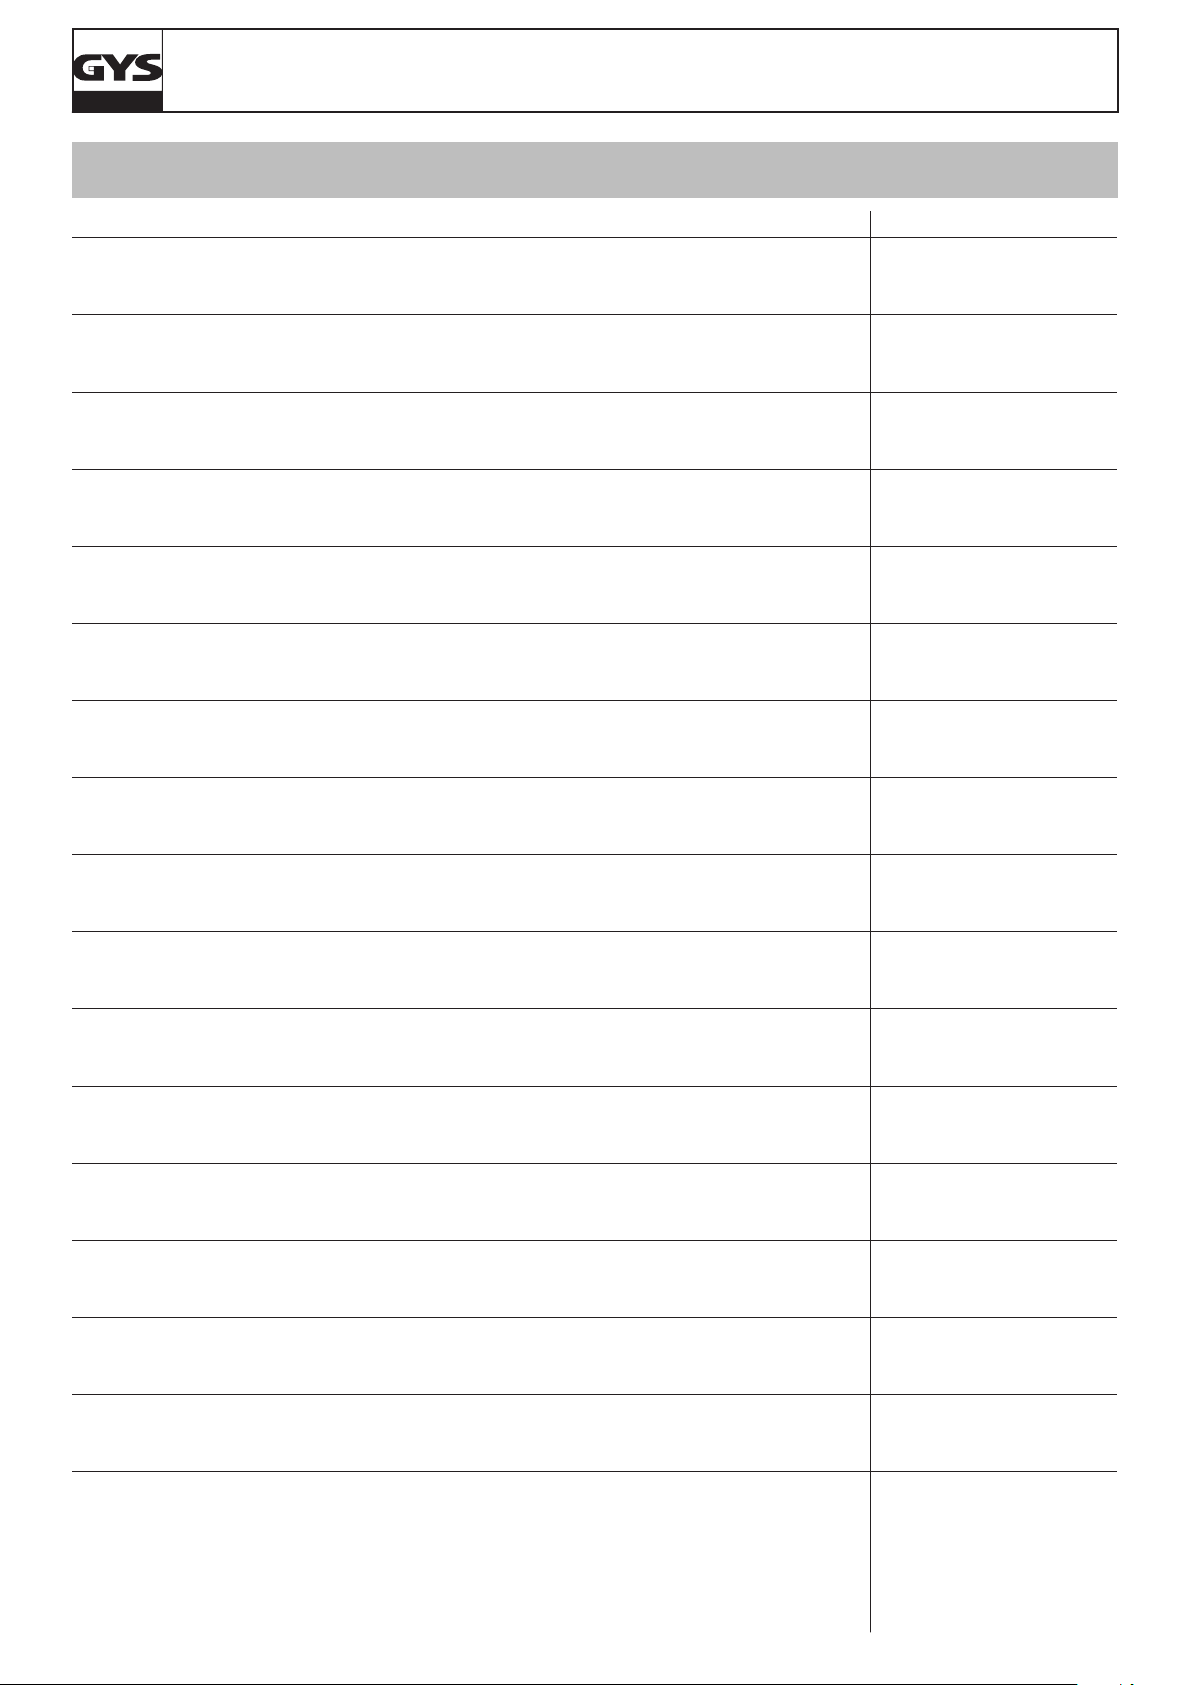
GYSFLASH HERITAGE 6 A
TABLEAU TECHNIQUE / TECHNICAL TABLE / TECHNISCHE DATEN / TABLA TÉCNICA / ТАБЛИЦА С
ТЕХНИЧЕСКИМИ ХАРАКТЕРИСТИКАМИ / TABELLA TECNICA / TECHNISCHE TABEL
Gysash Heritage 6 A
Référence modèle
Reference
Art.-Nr. des Modells
Referencia del modelo
Tension d’alimentation assignée
Rated power supply voltage
Netzspannung
Tensión de red asignada
Puissance assignée
Rated power
Netzleistung
Potencia asignada
Tensions de sortie assignées
Rated output voltage
Ausgangsspannung
Tensiones de salida asignadas
Courant de sortie assignée
Rated output current
Ausgangsstrom
Corriente de salida asignada
Capacité assignée de batterie
Rated battery capacity
Batterie-Kapazität
Capacidad asignada de batería
Consommation batteries au repos
Battery consumption when idle
Verbrauch im Ruhezustand
Consumo de baterías en reposo
Ondulation
Ripple
Welligkeit
Ondulación
Courbe de charge
Charging curve
Ladekennlinie
Curva de carga
Température de fonctionnement
Operating temperature
Betriebstemperatur
Temperatura de funcionamiento
Température de stockage
Storage temperature
Lagertemperatur
Temperatura de almacenado
Indice de protection
Protection rating
Schutzart
Índice de protección
Classe de protection
Protection class
Schutzklasse
Clase de protección
Niveau de bruit
Noise level
Störpegel
Nivel de ruido
Poids
Weight
Gewicht
Peso
Dimensions (L x H x P)
Dimensions (L x H x D)
Abemssungen (L x H x T)
Dimensiones (L x A x A)
Normes
Standards
Normen
Normas
30
Артикул модели
Referentie model
Riferimento modello
Номинальное напряжение питания
Nominale voedingsspanning
Tensione di alimentazione nominale
Номинальная мощность
Nominale vermogen
Potenza nominale
Номинальные выходные напряжения
Uitgaande nominale spanning
Tensione di uscita nominale
Номинальный выходной ток
Uitgaande nominale spanning
Corrente di uscita nominale
Номинальная емкость батареи
Nominale accu capaciteit
Capacità nominale della batteria
Потребление АКБ в нерабочем состоянии
Accu verbruik in ruststand
Consumo batterie in riposo
Колебание
Golving
Ondulazione
Кривая зарядки
Laadcurve
Curva di carica
Рабочая температура
Werktemperatuur
Temperatura di funzionamento
Температура хранения
Opslagtemperatuur
Temperatura di stoccaggio
Степень защиты
Beschermingsklasse
Grado di protezione
Класс защиты
Beschermingsklasse
Classe di protezione
Уровень шума
Geluidsniveau
Livello di rumore
Вес
Gewicht
Peso
Размеры (Д x В x Ш)
Afmetingen (L x H x B)
Dimensioni (L x H x D)
Нормы
Normen
Norme
190 x 100 x 52 mm
029538
~ 220-240 VAC
50 / 60 Hz
90W
6 VDC
12 VDC
6A
1.2 – 125Ah
(max. 170Ah)
< 0.5mA
< 150mV rms
IUOU
-20°C – +50°C
-20°C – +80°C
IP65
Class II
< 50dB
0.72 Kg
EN 60335-1
EN 60335-2-29
EN 62233
CEI EN 60529
EN 50581
EN 55014-1
EN 55014-2
CEI 61000-3-2
CEI 61000-3-3
Page 31
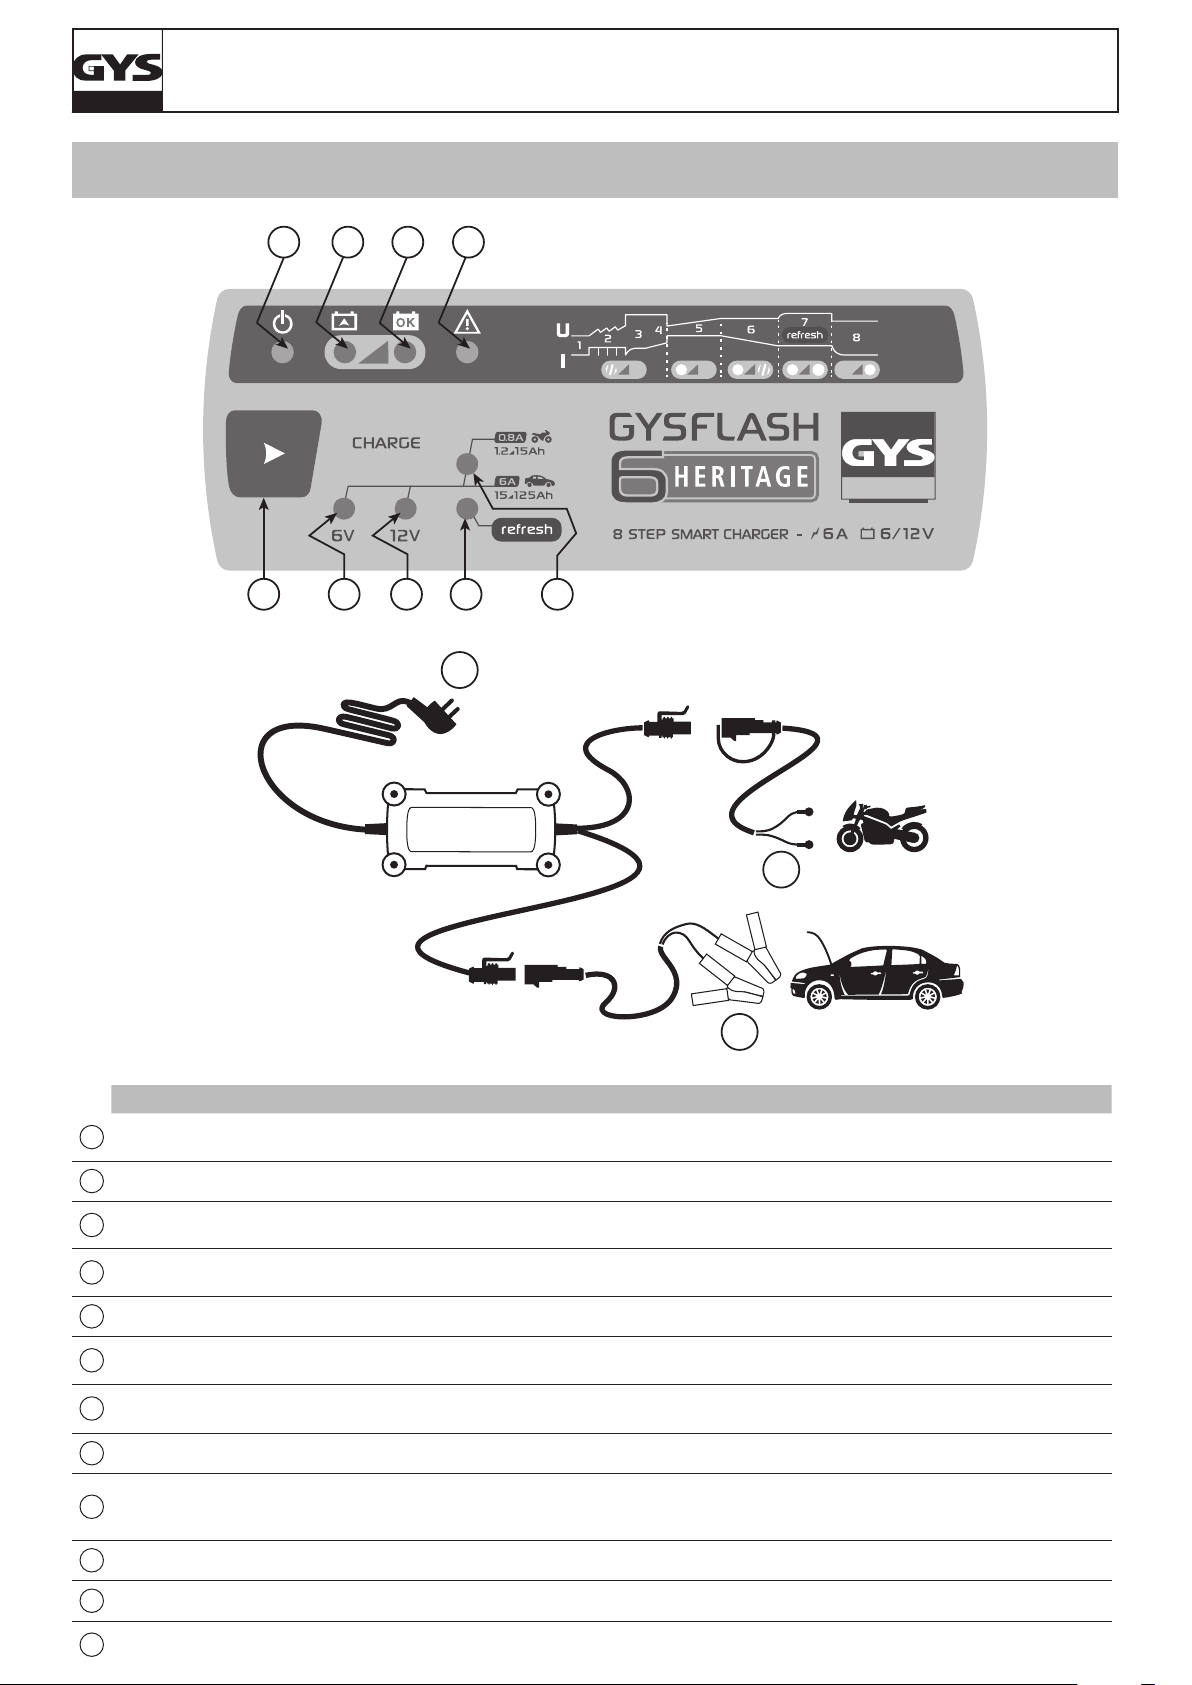
GYSFLASH HERITAGE 6 A
PLASTRON / CONTROL PANEL STICKER / FRONTSEITE / TECLADO / ПАНЕЛЬ УПРАВЛЕНИЯ /
TASTIERA DI COMMANDO / VOORSTUK
2 3 4 5
1 6 7 8 9
12
FR EN DE ES RU IT NL
1
2
3
4
5
Bouton
de sélection
Veille Sleep mode STAND BY En espera Режим ожидания Veglia Stand by
Charge en cours Charging Ladefortschritt
Charge teminée Charge nished Auaden beendet Carga terminada
Défaut Fault Fehler Fallo Ошибка Predenito Fout
Selection button Auswahl-Taste
En proceso de
Botón de
selección
carga
11
10
Кнопка выбора Tasto di selezione Selectie knop
Идет зарядка Carica in corso Opladen is bezig
Зарядка
закончена
Carica terminata Opladen klaar
6
Mode Charge 6V
7
Mode Charge 12V
8
Option Refresh Refresh option Refresh-Option Opción Refresh Опция Refresh Opzione Refresh Optie Refresh
9
10
11
12
Option
«Petite batterie»
Pinces de charge Charge clamps Ladeklemme Pinzas de carga Зажимы зарядки Morsetti di carica Laad klemmen
Oeillets de charge Charge terminals Ladeöse Terminal de carga Ушки зарядки Occhiello di carica Contact ringetjes
Prise secteur Mains plug Netzstecker
6V
Charge mode
12V
Charge mode
«Small battery»
option
6V
Charge-Modus
12V
Charge-Modus
«Kleine Batterie»
Option
Modo Carga
6V
Modo Carga
12V
Opción «Pequeña
batería»
Clavija de
corriente
Режим Зарядки
6В
Режим Зарядки
12В
Опция «
Небольшой
аккумулятор »
Сетевая вилка Spina Stopcontact
Modo Carica 6V Modus Laden 6V
Modo Carica 12V Modus laden 12V
Opzione «piccola
batteria»
Optie «Kleine
accu»
31
 Loading...