

Page 1
FR
2-11 / 72-76
GYSFLASH 50.24 HF
EN
DE
ES
RU
NL
IT
73502-V9-15/07/2019
12-21 / 72-76
22-31 / 72-76
32-41 / 72-76
42-51 / 72-76
52-61 / 72-76
62-71 / 72-76
www.gys.fr
Page 2
INSTRUCTIONS DE SÉCURITÉ
Ce manuel d’utilisation comprend des indications sur le fonctionnement
de votre appareil et les précautions à suivre pour votre sécurité.
Merci de le lire attentivement avant la première utilisation et de le
conserver soigneusement pour toute relecture future.
Cet appareil doit être utilisé uniquement pour faire de la recharge ou
l’alimentation dans les limites indiquées sur l’appareil et le manuel. Il
faut respecter les instructions relatives à la sécurité. En cas d’utilisation
inadéquate ou dangereuse, le fabricant ne pourra être tenu responsable.
Appareil est destiné à un usage à l’intérieur. Il ne doit pas être exposé
à la pluie.
Cet appareil peut être utilisé par des enfants âgés d’au moins 8 ans
et par des personnes ayant des capacités physiques, sensorielles ou
mentales réduites ou dénuées d’expérience ou de connaissance, s’ils
(si elles) sont correctement surveillé(e)s ou si des instructions relatives à
l’utilisation de l’appareil en toute sécurité leur ont été données et si les
risques encourus ont été appréhendés. Les enfants ne doivent pas jouer
avec l’appareil. Le nettoyage et l’entretien par l’usager ne doivent pas
être effectués par des enfants sans surveillance.
GYSFLASH 50.24 HF
FR
A n’utiliser en aucun cas pour charger des piles ou des batteries nonrechargeables.
Ne pas utiliser l’appareil, si le cordon d’alimentation ou la fiche de
secteur sont endommagés.
Ne jamais charger une batterie gelée ou endommagée.
Ne pas couvrir l’appareil.
Ne pas placer le chargeur à proximité d’une source de chaleur et à
des températures durablement élevées (supérieurs à 50°C).
Le mode de fonctionnement automatique ainsi que les restrictions
applicables à l’utilisation sont expliqués ci-après dans ce mode d’emploi.
Risque d’explosion et d’incendie!
• Une batterie en charge peut émettre des gaz explosif.
• Pendant la charge, la batterie doit être placée dans un emplacement
bien aéré.
• Éviter les flammes et les étincelles.
• Protéger les surfaces de contacts électriques de la batterie à l’encontre
des courts-circuits.
Risque de projection d’acide !
• Porter des lunettes et des gants de protection
2
Page 3
GYSFLASH 50.24 HF
FR
• En cas de contact avec les yeux ou la peau, rincer immédiatement à
l’eau et consulter un médecin sans tarder.
Connexion / déconnexion :
• Déconnecter l’alimentation avant de brancher ou de débrancher les
connexions sur la batterie.
• La borne de la batterie non reliée au châssis doit être connectée la
première. L’autre connexion doit être effectuée sur le châssis loin de la
batterie et de la canalisation de combustible. Le chargeur de batterie
doit alors être raccordé au réseau.
• Après l’opération de charge, débrancher le chargeur de batterie du
réseau puis retirer la connexion du châssis et enfin la connexion de la
batterie, dans l’ordre indiqué.
Raccordement :
• Cet appareil doit être raccordé à un socle de prise de courant relié
à la terre.
• Le raccordement au réseau d’alimentation doit être effectué
conformément aux règles d’installation nationales.
Entretien :
• Si le câble d’alimentation est endommagé, il doit être remplacé par
un câble ou un ensemble spécial disponible auprès du fabricant ou de
son service après-vente.
• L’entretien doit être effectué que par une personne qualifiée.
• Avertissement ! Débrancher toujours la fiche de la prise secteur avant
d’effectuer des travaux sur l’appareil.
• L’appareil ne nécessite aucune maintenance particulière.
• Si le fusible interne est fondu, il doit être remplacé par le fabricant,
son service après-vente ou des personnes de qualification similaire afin
d’éviter un danger.
• N’utiliser en aucun cas des solvants ou autres produits nettoyants
agressifs.
Réglementation :
• Appareil conforme aux directives européennes.
• La déclaration de conformité est disponible sur notre site internet.
• Marque de conformité EAC (Communauté économique Eurasienne)
Mise au rebut :
• Ce matériel fait l’objet d’une collecte sélective. Ne pas jeter dans
une poubelle domestique.
3
Page 4
GYSFLASH 50.24 HF
DESCRIPTION GÉNÉRALE
Le GYSFLASH 50.24 HF est une alimentation stabilisée de forte puissance basée sur la technologie SMPS (Switch Mode Power Supply). Conçu pour
soutenir les batteries (liquide/AGM/gel) en 6V, 12V et 24V des véhicules en phase de diagnostique, il garantit aussi une qualité de charge idéale
pour l’entretien des modèles les plus évolués. Ce chargeur peut recevoir des câbles de sortie jusqu’à 2x8 m en 16 mm². Le changement des câbles
batterie nécessite un réétalonnage (cf. page 8). Il est considéré comme un appareil xe et non comme un appareil mobile.
Cet appareil dispose de 5 modes dont 2 modes cachés :
• Mode Charge :
- Automobile (par défaut) : dédié à la recharge des batteries de démarrage de type plomb (scellée, Liquide, AGM…) ou lithium (LiFePO4) de 10 Ah
à 600 Ah en 6V/12V/24V.
- Traction : pour recharger les batteries de traction à électrolyte liquide ou gel (plomb, plomb Calcium, plomb Calcium-Argent, AGM…) de 50 Ah à
450 Ah en 6V/12V/24V. Ce mode est activable dans le menu conguration.
• Modes alimentation « Diag + » : Il subvient aux besoins d’énergie jusqu’à 50 A pour assurer à la batterie la compensation de courant utilisé
pour tester les gros consommateurs (ventilation moteur, lève-vitre, suspension électriques, etc.).
Le mode « Diag+ » permet de dénir précisément la tension à délivrer durant cette phase.
• Mode alimentation « Showroom » : assure à la batterie une compensation de courant lors de l’utilisation des accessoires électriques d’un
véhicule de démonstration (lève vitre, chauffage, rétroviseurs, …). Dans ce mode, la tension peut être dénie précisément suivant le besoin.
• Mode Change batterie : Compense les besoins électriques an d’éviter la perte de la mémoire du véhicule lors d’un remplacement de batterie.
Par défaut, ce mode est inactif et n’apparait pas dans la liste des modes.
• Mode Power Supply : Mode destiné aux personnes expérimentées. Par défaut il est inactif et n’apparait pas dans la liste des modes. Ce mode
permet de se servir du chargeur comme d’une alimentation stabilisée de forte puissance dont la tension régulée et le courant maximum sont
réglables.
FR
Ce chargeur est équipé d’une fonction de redémarrage automatique permettant, en mode Charge auto et traction, Showroom et Power Supply, de
relancer automatiquement le chargeur en cas de coupure de courant.
La fonction «
démonstrateurs de véhicules.
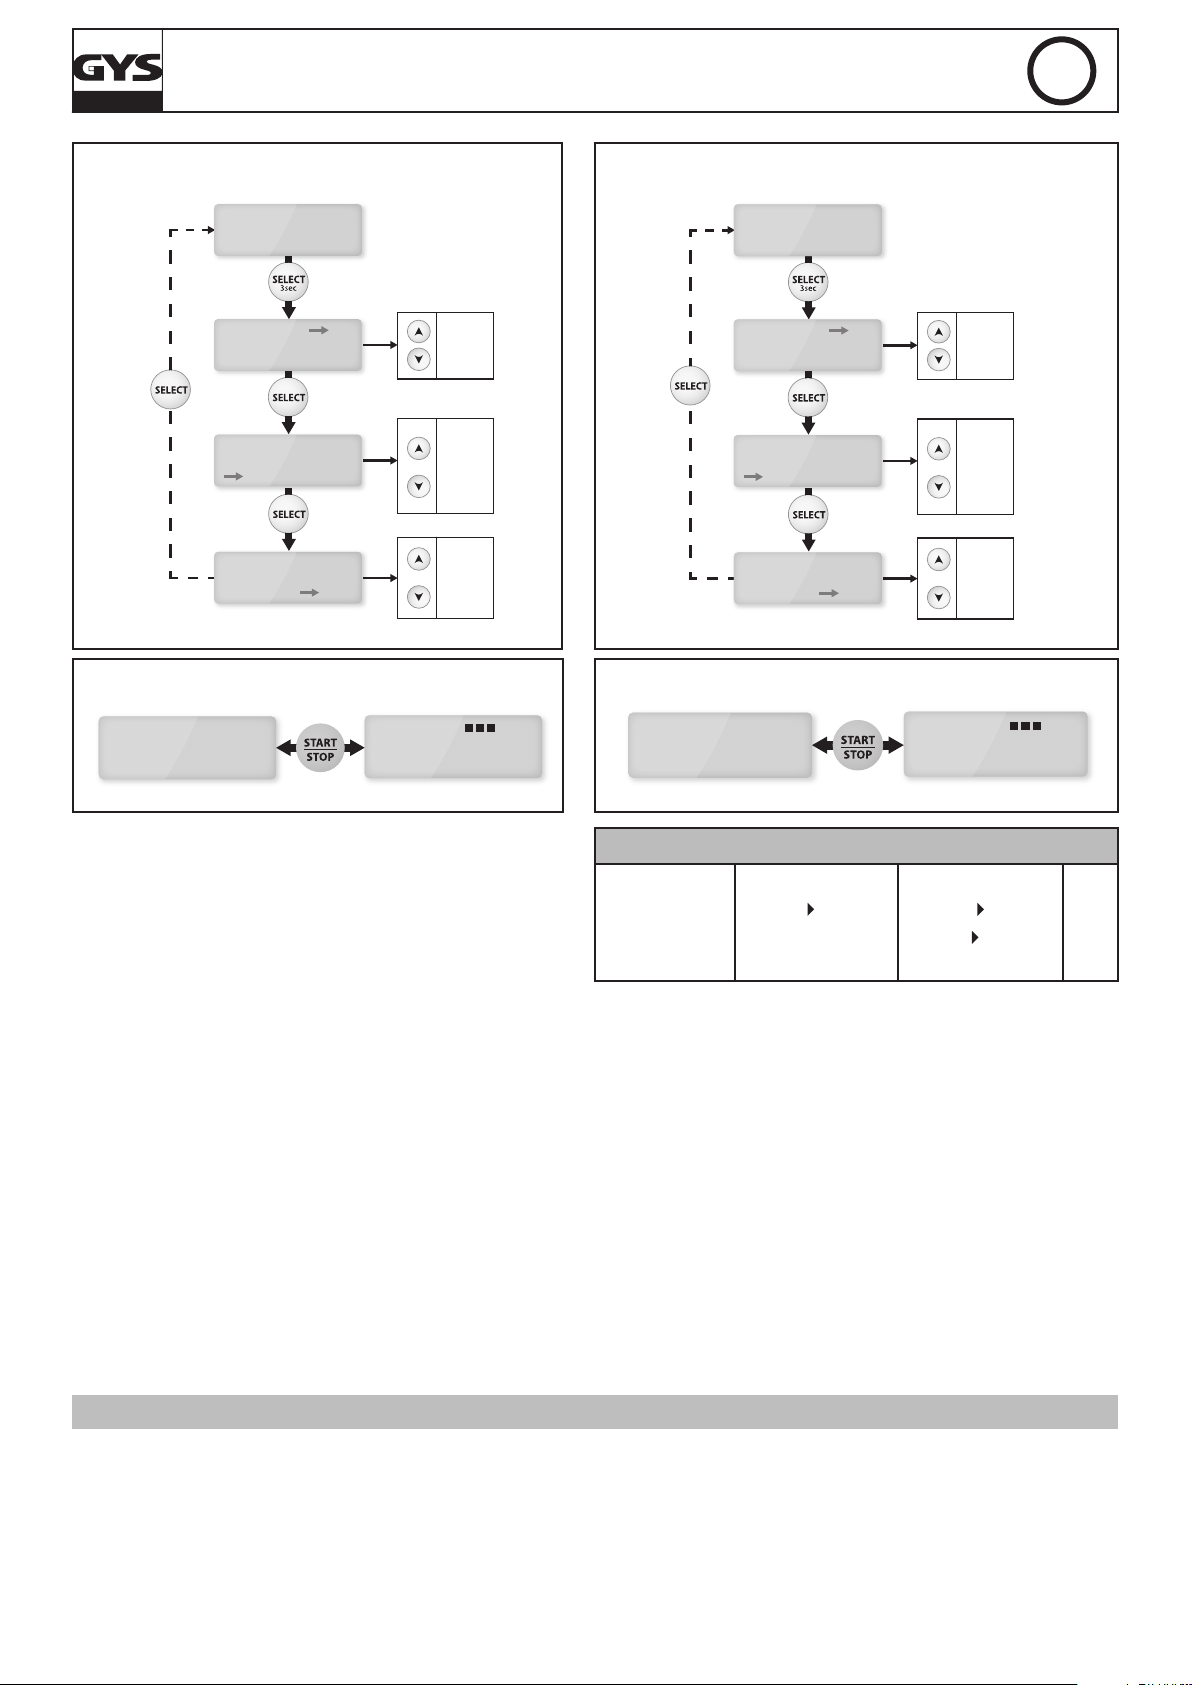
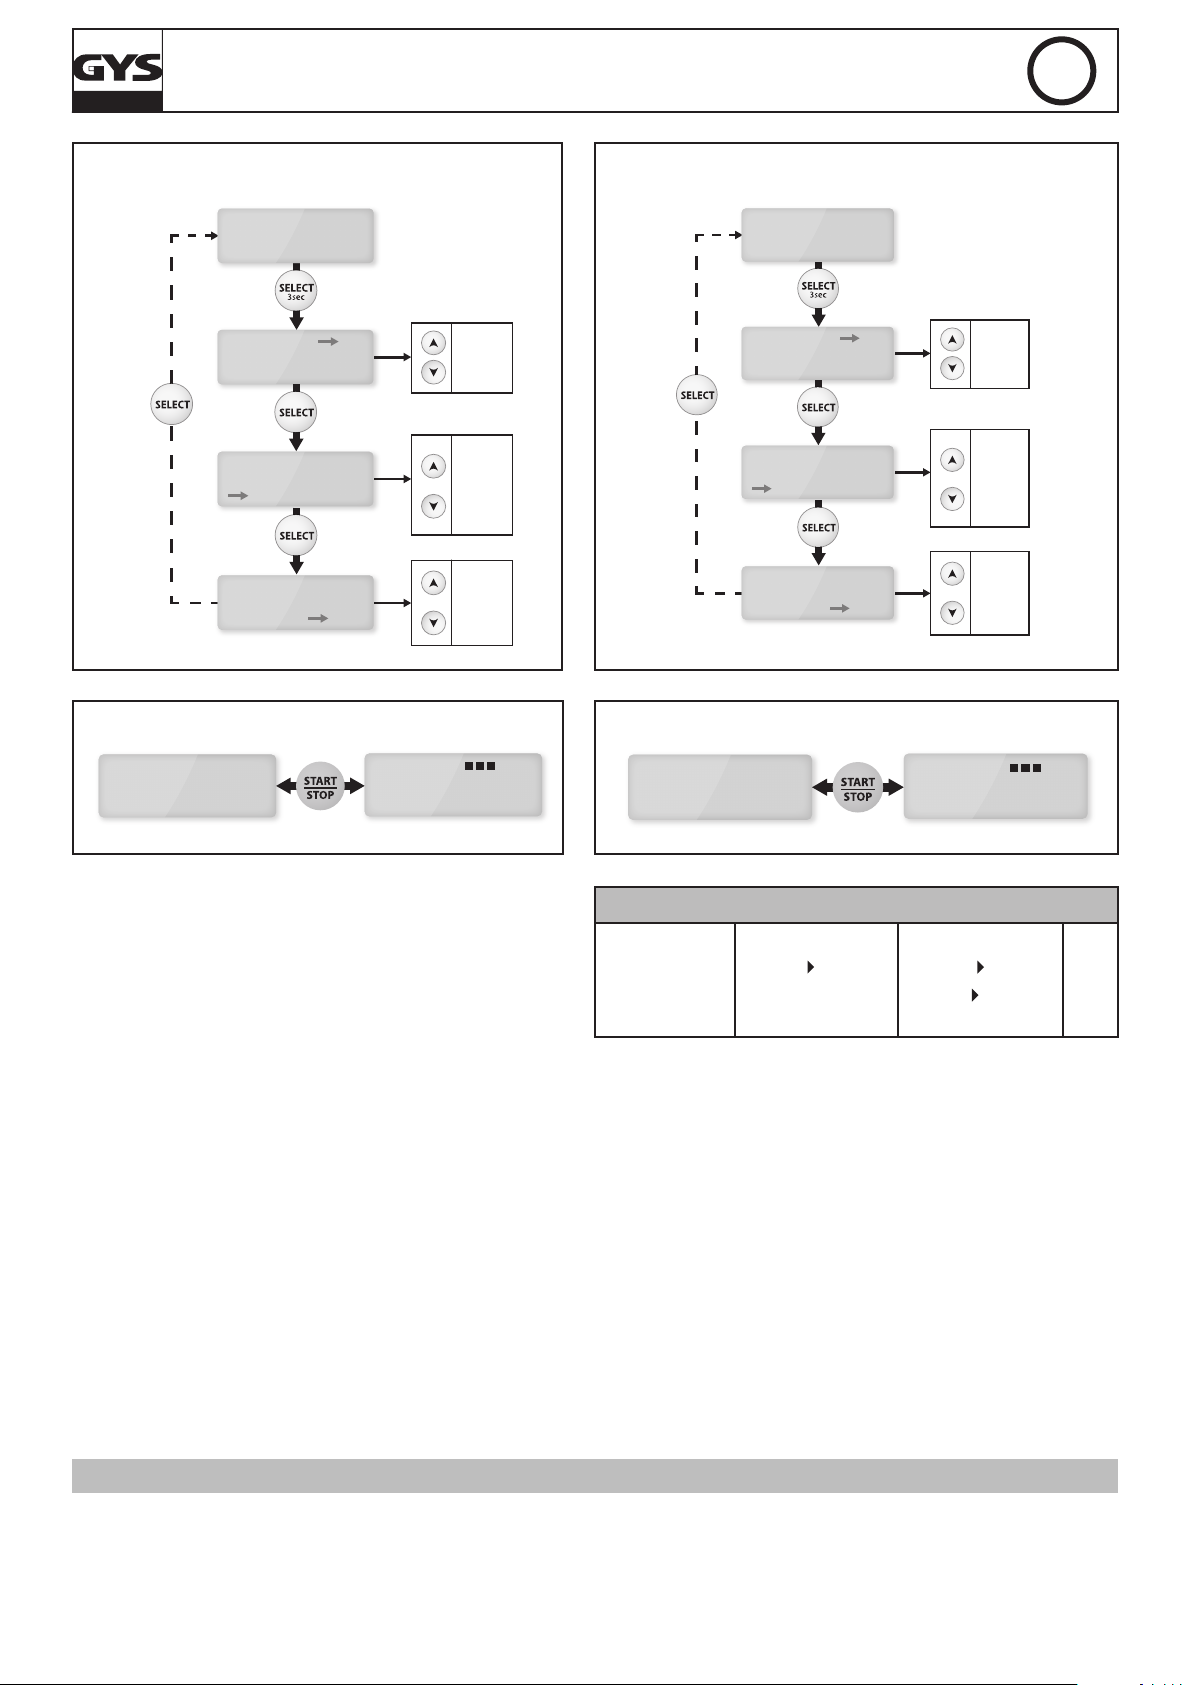
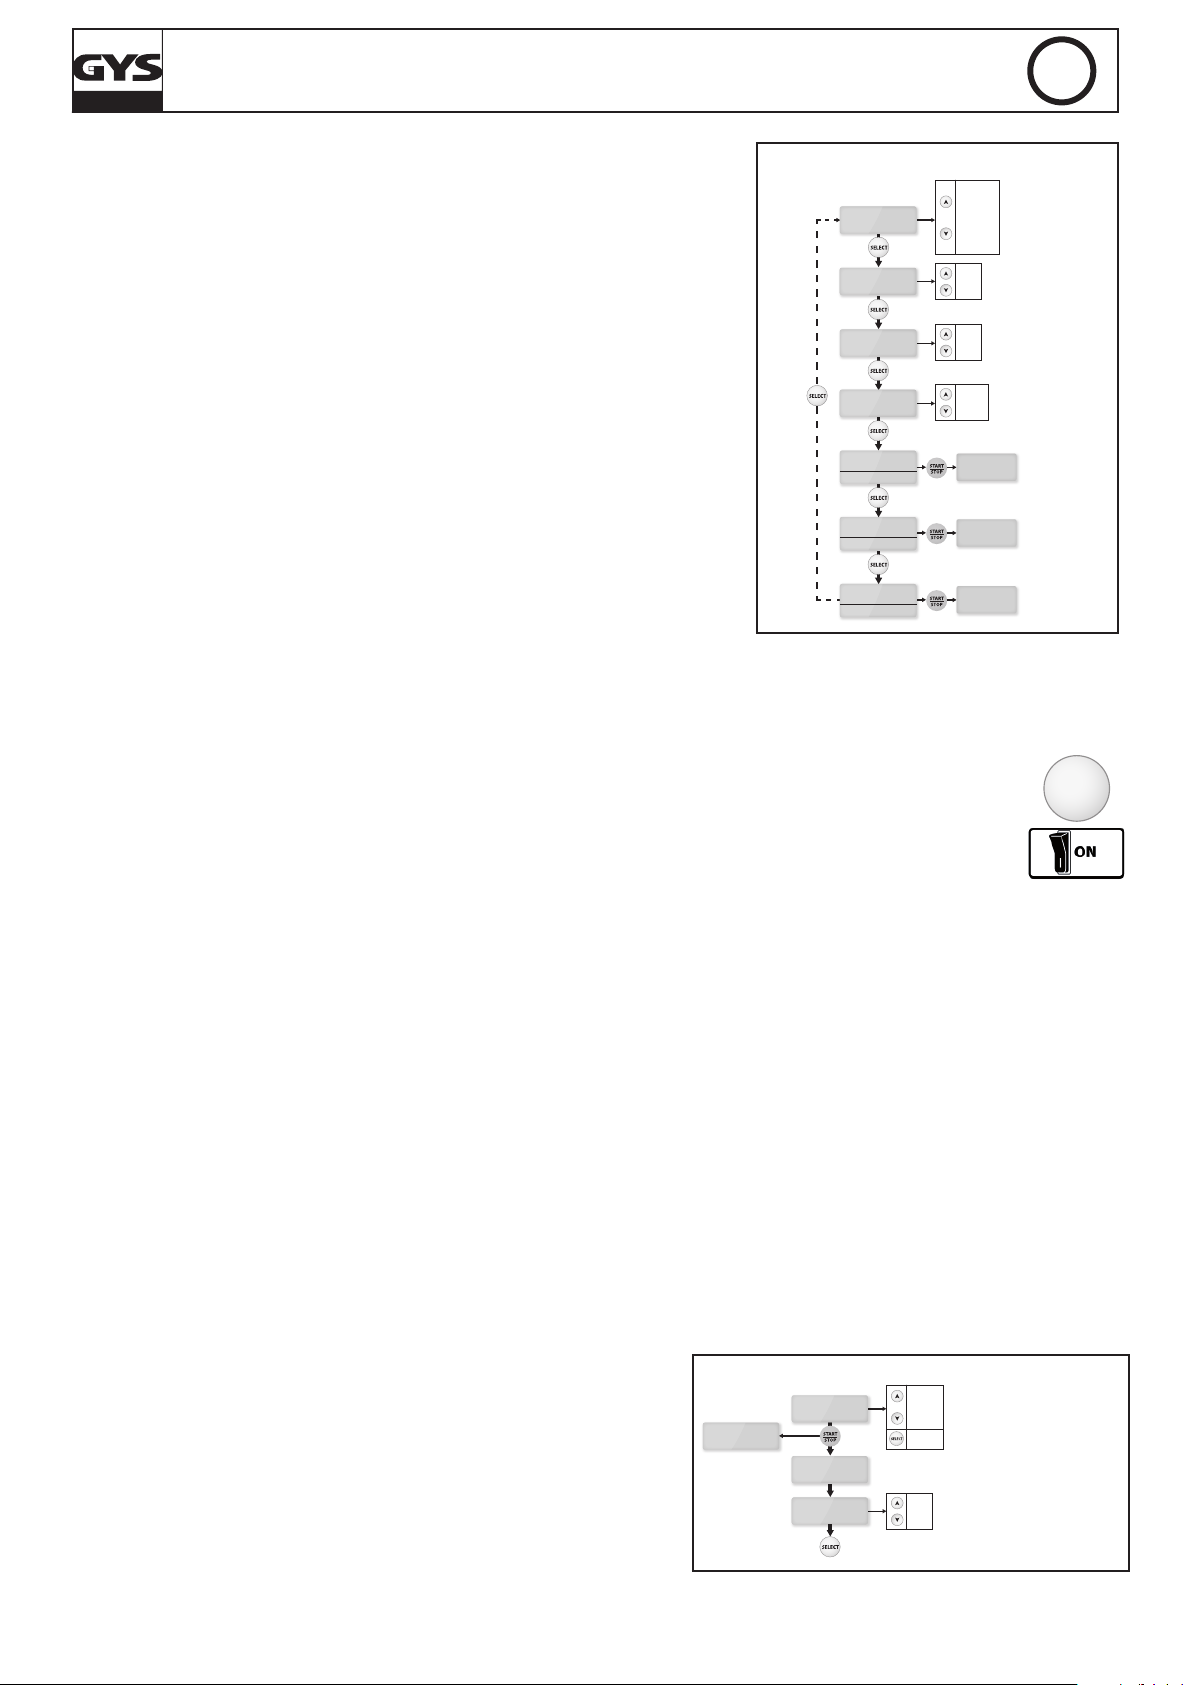
MISE EN ROUTE ET NAVIGATION
1
2
3
•
Le bouton mode vous permettra d’accéder aux différents menus :
• Pour atteindre le menu conguration appuyer 3 secondes sur
le bouton mode :
MODE CHARGE (AUTOMOBILE & TRACTION)
Par défaut, la charge est conguré en charge automobile. Le type de charge (automobile ou traction) peut-être modié dans le menu conguration.
Le produit autorise la recharge de la batterie seule ou connectée du véhicule. Respecter l’ordre de mise en route.
Réglage de la Charge :
Avant de débuter la charge, assurez-vous que la charge est correctement paramétrée (tension de la batterie, courbe de charge et capacité de la
batterie).
Dans ce mode, plusieurs courbes de charge sont disponibles :
• Easy : courbe simpliée adaptée à toutes les batteries au plomb et qui ne nécessite pas de connaitre la capacité de la batterie. Toutefois pour une
optimisation maximale de la charge, il est recommandé, lorsque cela est possible, d’utiliser les courbes de charge liquide ou gel/AGM.
• Liquide : courbe de charge pour les batteries ouvertes, avec bouchon (Plomb, plomb calcium, plomb calcium argent…).
Pour cette courbe, la capacité de la batterie en Ah doit être renseignée.
• Gel/AGM : courbe de charge pour les batteries étanches (batterie gel, sans entretien, AGM…). Pour cette courbe, la capacité de la batterie en
Ah doit être renseignée.
• LFP/LiFePO4 : courbe de charge pour les batteries au Lithium de type LFP (Lithium Fer Phosphate). Pour cette courbe, la capacité de la batterie
en Ah doit être renseignée.
• Expert : courbe de charge de type IU0I0U personnalisable via le menu «Avanced Menu» et réservée aux personnes expérimentées (cf : page 9).
Par défaut, cette courbe est inactive et n’apparait pas dans la liste des courbes du mode CHARGE. La courbe Expert est disponible seulement dans
le mode charge automobile.
ATTENTION : Suivant le réglage de la courbe Expert (cf. page 9), il peut être nécessaire de débrancher la batterie du véhicule
avant de commencer la charge an de protéger l’électronique du véhicule.
4
Lock Showroom
Brancher le chargeur sur la prise secteur. Tension secteur monophasée 230V ± 15% (50/60Hz).
Positionner l’interrupteur sur « ON ».
Afchage pendant 3s « GYSFLASH 50.24 HF Vx.x »
Choisir ensuite le mode souhaité. Le chargeur se positionnera par défaut sur la dernière conguration utilisée.
», si elle est activée, restreint le chargeur au mode Showroom uniquement, an de faciliter son utilisation pour les
Charge (ou Traction) > Diag+ > Showroom >
MODE
MODE
(Change Batterie*) (> Power Supply*)
défaut.
3 sec - Conguration
*caché par
Page 5
GYSFLASH 50.24 HF
Easy
Liquide
Gel/AGM
LFP/LiFePO4
Expert
10Ah
20Ah
...
600Ah
CHARGE 12V
Gel/AGM 80Ah
12V
80Ah
12V
80Ah
CHARGE
Gel/AGM
CHARGE
Gel/AGM
CHARGE 12V
Gel/AGM
6V
12V
24V
80Ah
liquide
gel/AGM
50Ah
60Ah
...
450Ah
TRACTION 12V
gel/AGM
80Ah
12V
80Ah
12V
80Ah
TRACTION
gel/AGM
TRACTION
gel/AGM
TRACTION 12V
gel/AGM
6V
12V
24V
80Ah
RÉGLAGE MODE CHARGE AUTOMOBILE RÉGLAGE MODE CHARGE TRACTION
FR
MISE EN ROUTE DE LA CHARGE AUTOMOBILE
CHARGE
gel/AGM
10%
80Ah
U=12.5V
Q=2.5Ah
10%CHARGE
I=10A
00h22
MISE EN ROUTE DE LA CHARGE TRACTION
TRACTION
gel/AGM
10%
80Ah
U=12.5V
Q=2.5Ah
10%TRACTION
I=10A
00h22
TEMPS DE CHARGE TRACTION
6V/12V/24V
50 Ah 250 Ah
~ 8h*
*Au besoin, le temps de charge peut être réduit en entrant une capacité
légèrement supérieur à la capacité nominale de la batterrie (maximum
+20%). Exemple : pour une batterie de 100 Ah, régler le chargeur sur
110 Ah permet de réduire le temps de charge d’environ 45 minutes.
Mise en route :
• Brancher les pinces : rouge sur le (+) et noir sur le (-) de la batterie.
• Appuyer sur START/STOP pour débuter la charge.
• Durant la charge, le produit afche le pourcentage d’avancement de la charge et alternativement la tension, le courant,
les ampères-heures injectés et le temps écoulé.
• Appuyer de nouveau pour interrompre la charge.
NB : En n de charge AUTOMOBILE (100%), le chargeur maintient le niveau de charge de la batterie en appliquant une
tension de oating.
Précaution : Vérier le niveau de l’électrolyte pour les batteries ouvertes. Compléter les niveaux si nécessaire avant la charge.
Lors d’une charge sur véhicule, il est conseillé de réduire au minimum la consommation électrique du véhicule (éteigner les feux, couper le contact, fermer les portes, ...) an de ne pas perturber le processus de charge.
Ne pas lancer de charge type traction sur une batterie automobile.
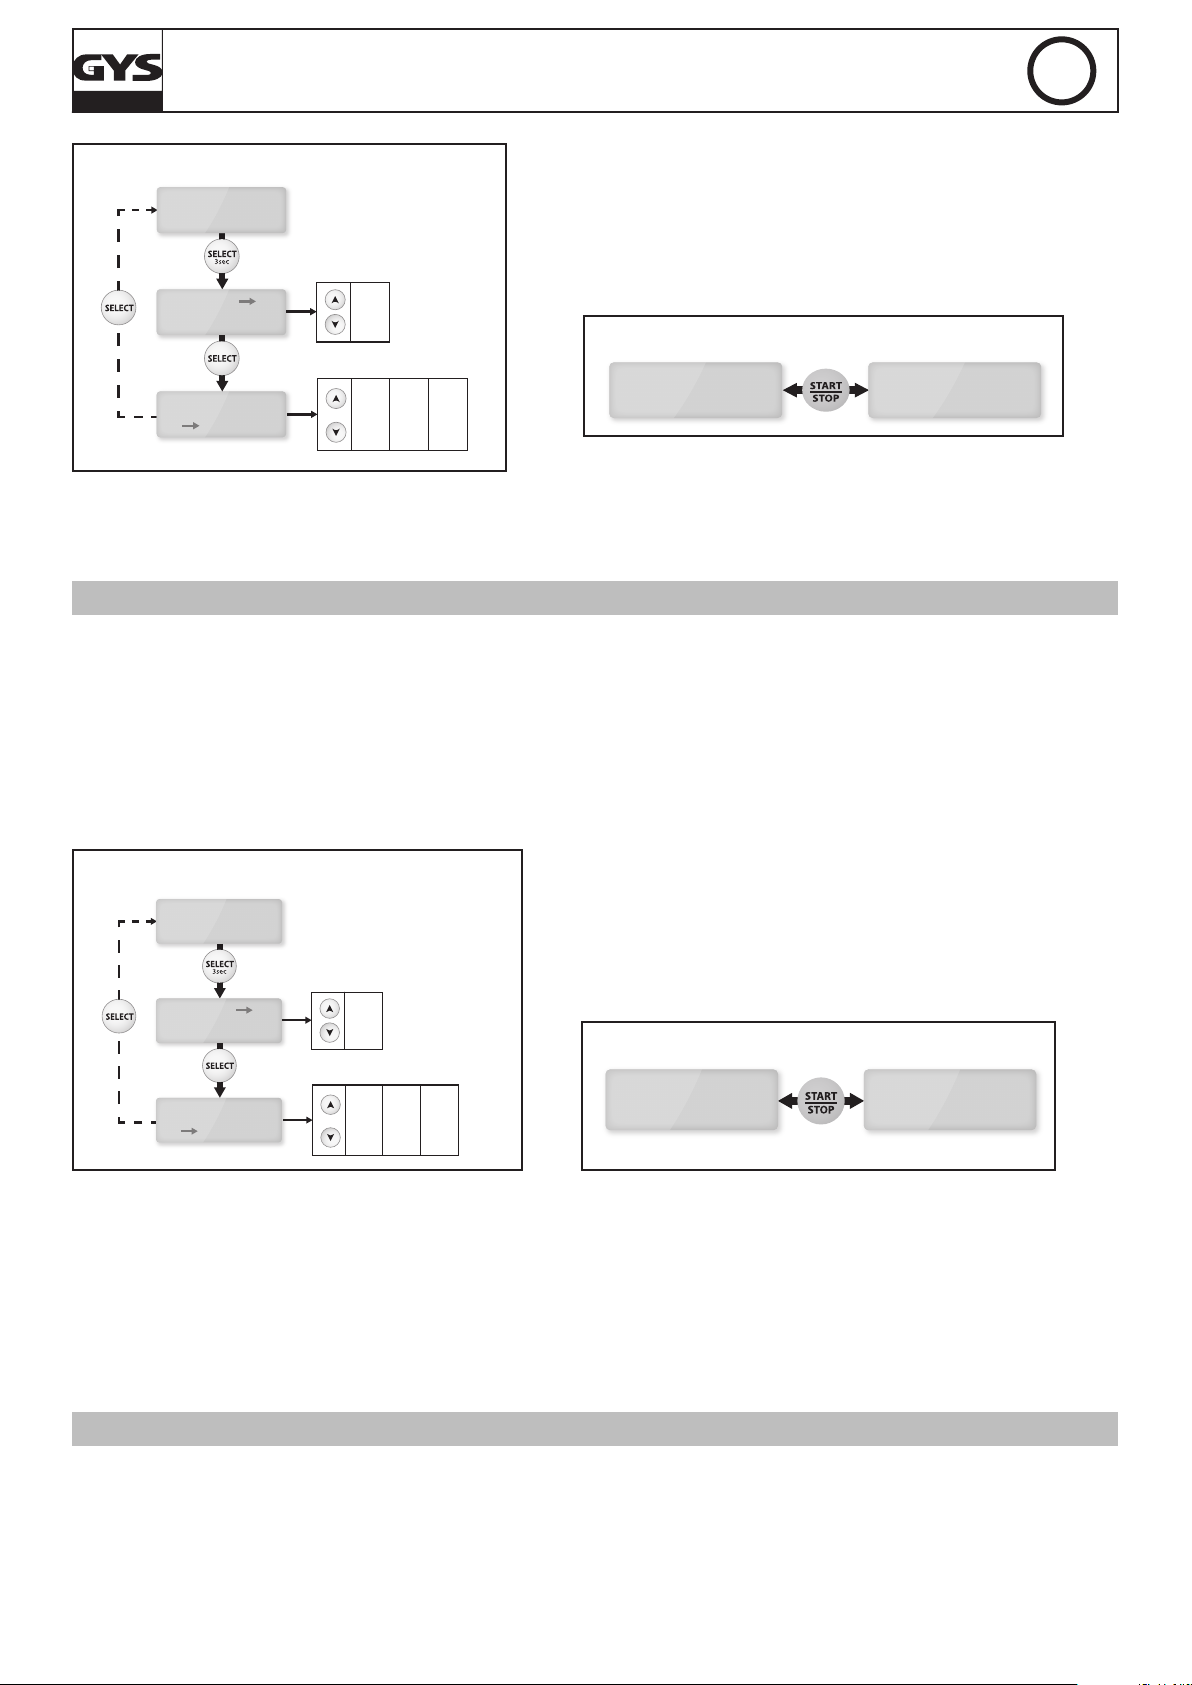
MODE ALIMENTATION DIAG+
Véhicules à l’arrêt, le GYSFLASH compense le courant utilisé jusqu’à 50A pour tester les gros consommateurs : ventilation moteur,
lève-vitre, suspension électriques etc… en délivrant une tension stabilisée :
- 12V à 14,8V (pour batterie 12V).
- 24V à 29,6V (pour batterie 24V).
- 6V à 7,4V (pour batterie 6V).
Réglage de la tension :
Après avoir sélectionné la tension nominale de la batterie, il est possible de congurer la tension par pas de 0,1 selon les préconisations du constructeur.
250 Ah 450 Ah
9h 14h
50 HF
5
Page 6
GYSFLASH 50.24 HF
I=12A
DIAG+
U=13.5V
DIAG+
U=13.5V
12V 12V
SHOWROOM
13.5V
I=12A
SHOWROOM
U=13.5V
12V12V
FR
RÉGLAGE MODE DIAG +
Mise en route :
• Brancher les pinces : rouge sur le (+) et noir sur
DIAG+
U=13.5V
12V
le (-) de la batterie.
• Appuyer sur Start/Stop pour lancer le mode.
• Durant l’utilisation, le courant consommé et la
tension instantanée s’afchent.
MISE EN ROUTE DIAG +
DIAG+
DIAG+
U=13.5V
U=27.2V
12V
24V
6V
12V
24V
6.0V
6.1V
7.4V
12.0V
24.0V
12.1V
...
14.8V
24.1V
...
29.6V
...
Précaution : Un courant afché supérieur à 10 A signie que votre batterie est déchargée. Votre GYSFLASH va alors délivrer un
courant de recharge. Vérier qu’il n’y a pas de consommateur sur le véhicule. Attendre que l’intensité passe sous les 10 A pour lancer
votre opération de diagnostique.
MODE ALIMENTATION SHOWROOM
Véhicules à l’arrêt, le GYSFLASH compense le courant utilisé jusqu’à 50A pour tester les gros consommateurs : chauffage, lève-vitre,
tableau de bord, etc… d’un véhicule de démonstration en délivrant une tension stabilisée réglable :
- 12V à 14,8V (pour batterie 12V).
- 24V à 29,6V (pour batterie 24V).
- 6V à 7,4V (pour batterie 6V).
Réglage de la tension :
Après avoir sélectionné la tension nominale de la batterie, il est possible de congurer la tension par pas de 0,1 selon les préconisations du constructeur.
RÉGLAGE MODE SHOWROOM
Mise en route avec batterie :
• Brancher les pinces : rouge sur le (+) et noir sur
SHOWROOM
U=13.5V
12V
le (-) de la batterie.
• Appuyer sur Start/Stop pour lancer le mode.
• Durant l’utilisation, le courant consommé et la
tension instantanée s’afchent.
SHOWROOM
U=13.5V
SHOWROOM
U=27.2V
12V
24V
6V
12V
24V
6.0V
6.1V
7.4V
MISE EN ROUTE SHOWROOM
12.0V
24.0V
12.1V
...
14.8V
24.1V
...
29.6V
...
Mise en route sans batterie (non-recommandé):
Il est possible de lancer l’alimentation sans batterie en appuyant sur START/STOP pendant 3 secondes.
L’indication « no battery » s’afche alors durant 1 seconde avant de lancer l’alimentation.
Attention : une inversion de polarité peut être néfaste pour l’électronique du véhicule.
Précaution :
Un courant afché supérieur à 10A signie que votre batterie est déchargée. Votre GYSFLASH va alors délivrer un courant de recharge. Vérier qu’il n’y a pas de consommateur sur le véhicule. Attendre que l’intensité passe sous les 10A pour utiliser les organes
électriques du véhicule.
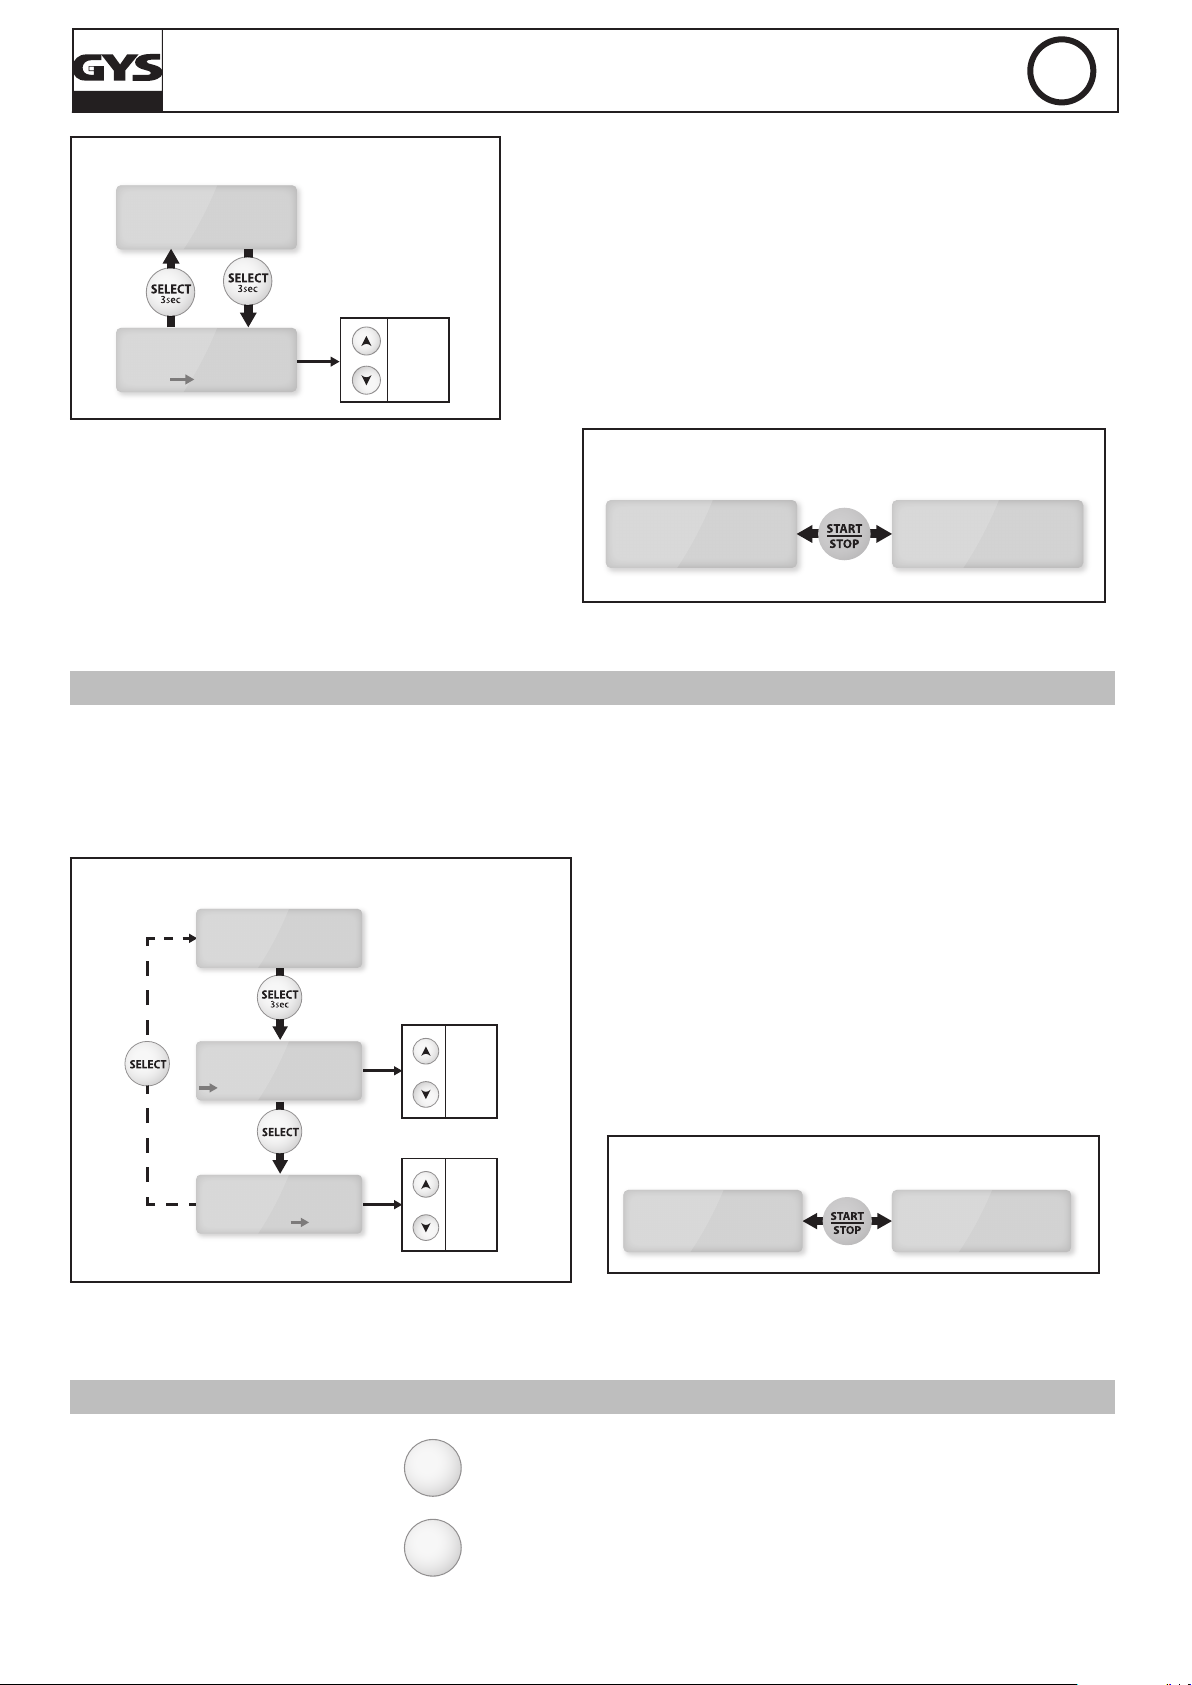
MODE CHANGE BATTERIE (OPTIONNEL)
Le GYSFLASH assure l’alimentation stabilisée des besoins électriques du véhicule pendant le changement de la batterie an de sauvegarder les mémoires.
Sélection de la tension :
Il est possible de choisir entre 6 V, 12 V et 24 V pour le changement de batterie :
6
Page 7
RÉGLAGE MODE CHANGE BATTERIE
POWER SUPPLY
U=19.6V I<50A
POWER SUPPLY
U=19.6V I=10A
CHANGE BATTERIE
12V
GYSFLASH 50.24 HF
Mise en route :
• Connecter :
1 : la pince rouge sur l’extrémité de la cosse connectée au
(+) de la batterie, de telle sorte que le remplacement de la
batterie soit possible sans que la pince ne se détache.
2 : la pince noire sur le châssis du véhicule.
FR
CHANGE BATTERIE
12V
• Appuyer sur START/STOP pour lancer le mode.
• Durant l’utilisation, le courant consommé et la ten-
sion instantanée s’afchent.
• Remplacer votre batterie, en respectant les polarités.
Lors de la manipulation, attention à ne pas déconnecter les pinces du chargeur sous risque de perdre les
mémoires de l’électronique.
Attention : une inversion de polarité peut être néfaste pour l’électronique du véhicule.
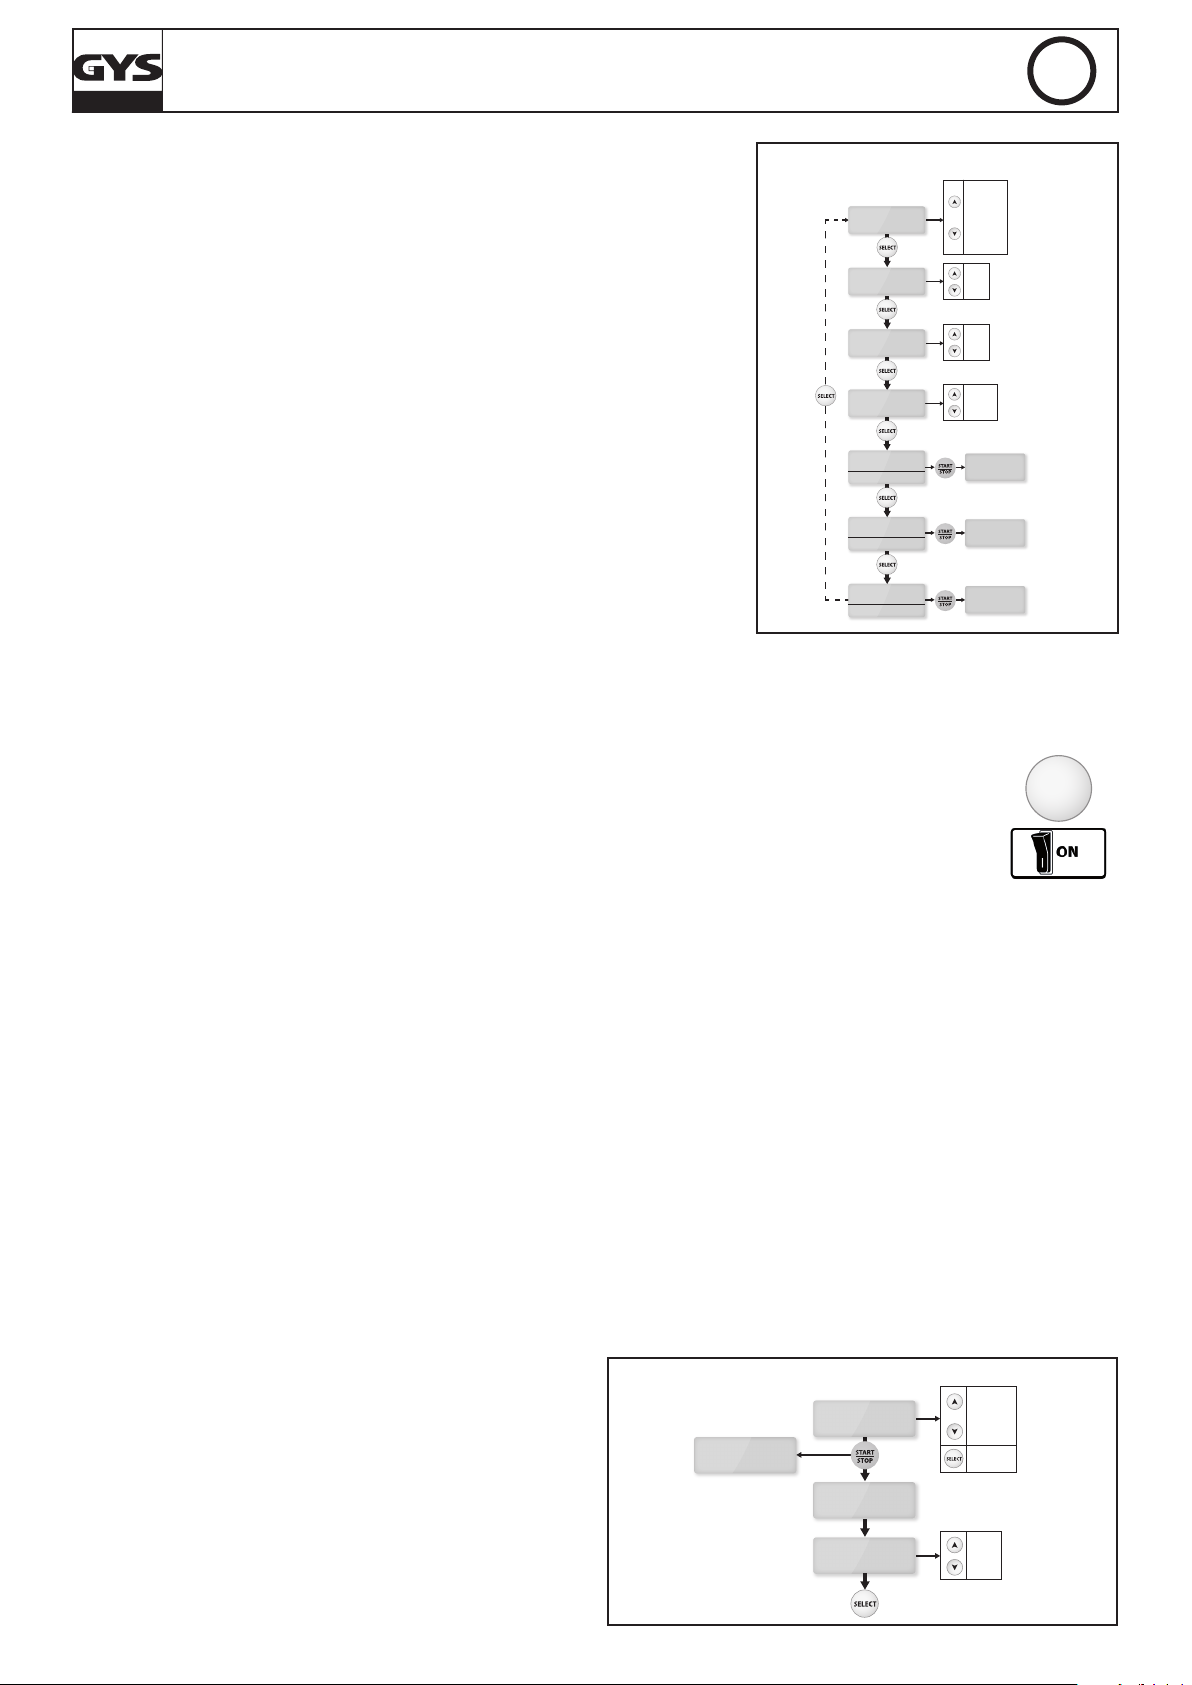
MODE POWER SUPPLY (OPTIONNEL)
Ce mode destiné aux utilisateurs expérimentés permet d’utiliser le chargeur comme une alimentation stabilisée de forte puissance
dont la tension de régulation et le courant maximum débité sont réglables. Par défaut, ce mode est inactif et n’apparait pas dans la
liste des modes. Il est activable via le menu «Advanced Menu» (cf : page 9).
Réglage de la tension de régulation et de la limitation de courant :
La tension de régulation peut être réglée de 2.0 à 30.0V et le courant maximum débité de 2 à 50A :
6V
12V
24V
MISE EN ROUTE CHANGE BATTERIE
CHANGE BATTERIE
CHANGE BATTERIE
U=12.9V I=26AU=12V
RÉGLAGE MODE POWER SUPPLY
POWER SUPPLY
U=13.5V I<50A
Mise en route :
POWER SUPPLY
U=19.6V I<50A
2.0V
2.1V
...
30.0V
• Appuyer sur Start/Stop pour lancer le mode.
• Durant l’utilisation, le courant consommé et la
tension instantanée s’afchent.
MISE EN ROUTE POWER SUPPLY
MODE
2A
3A
...
50A
3 sec - Mode
POWER SUPPLY
U=19.6V I<35A
REMARQUE : Contrairement aux autres modes, en mode Power Supply, le chargeur ne compense pas la chute de tension
dans les câbles. Dans ce cas, la tension afchée à l’écran correspond à la tension en sortie du chargeur (et non à la tension
sur les pinces).
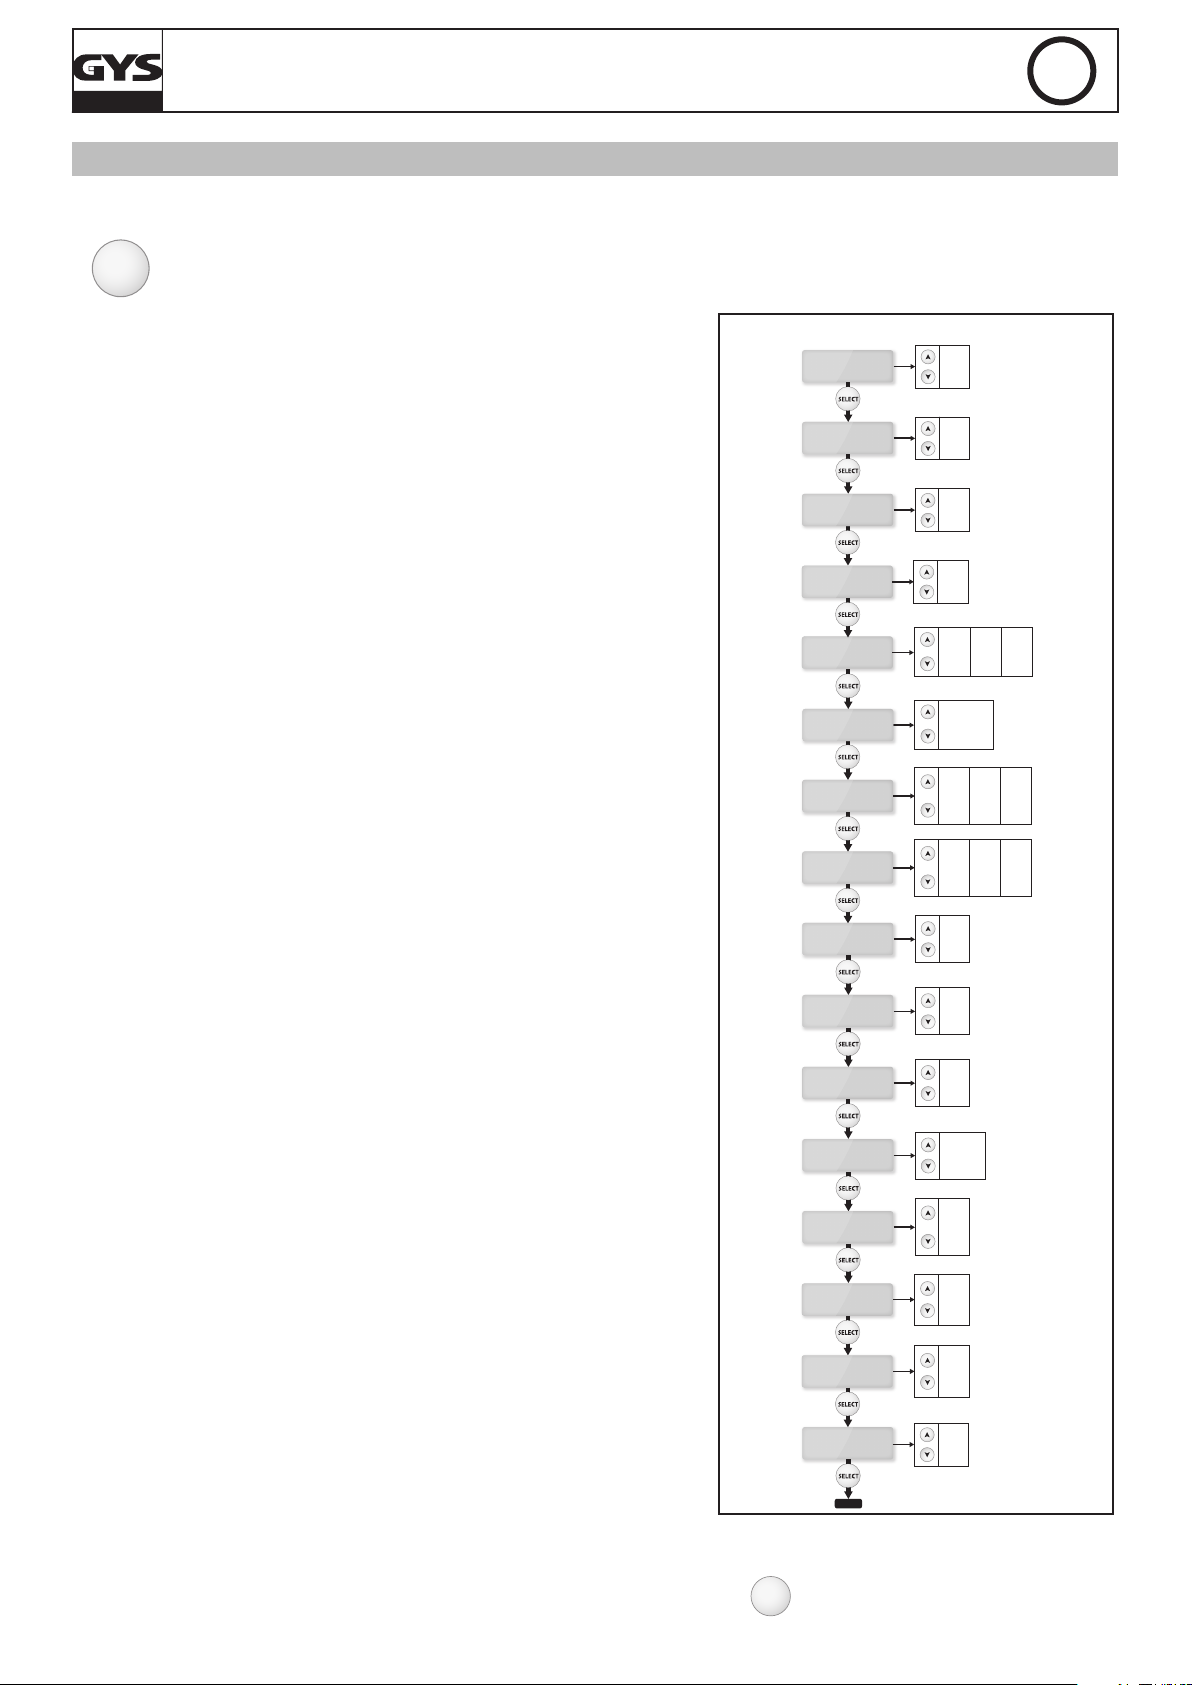
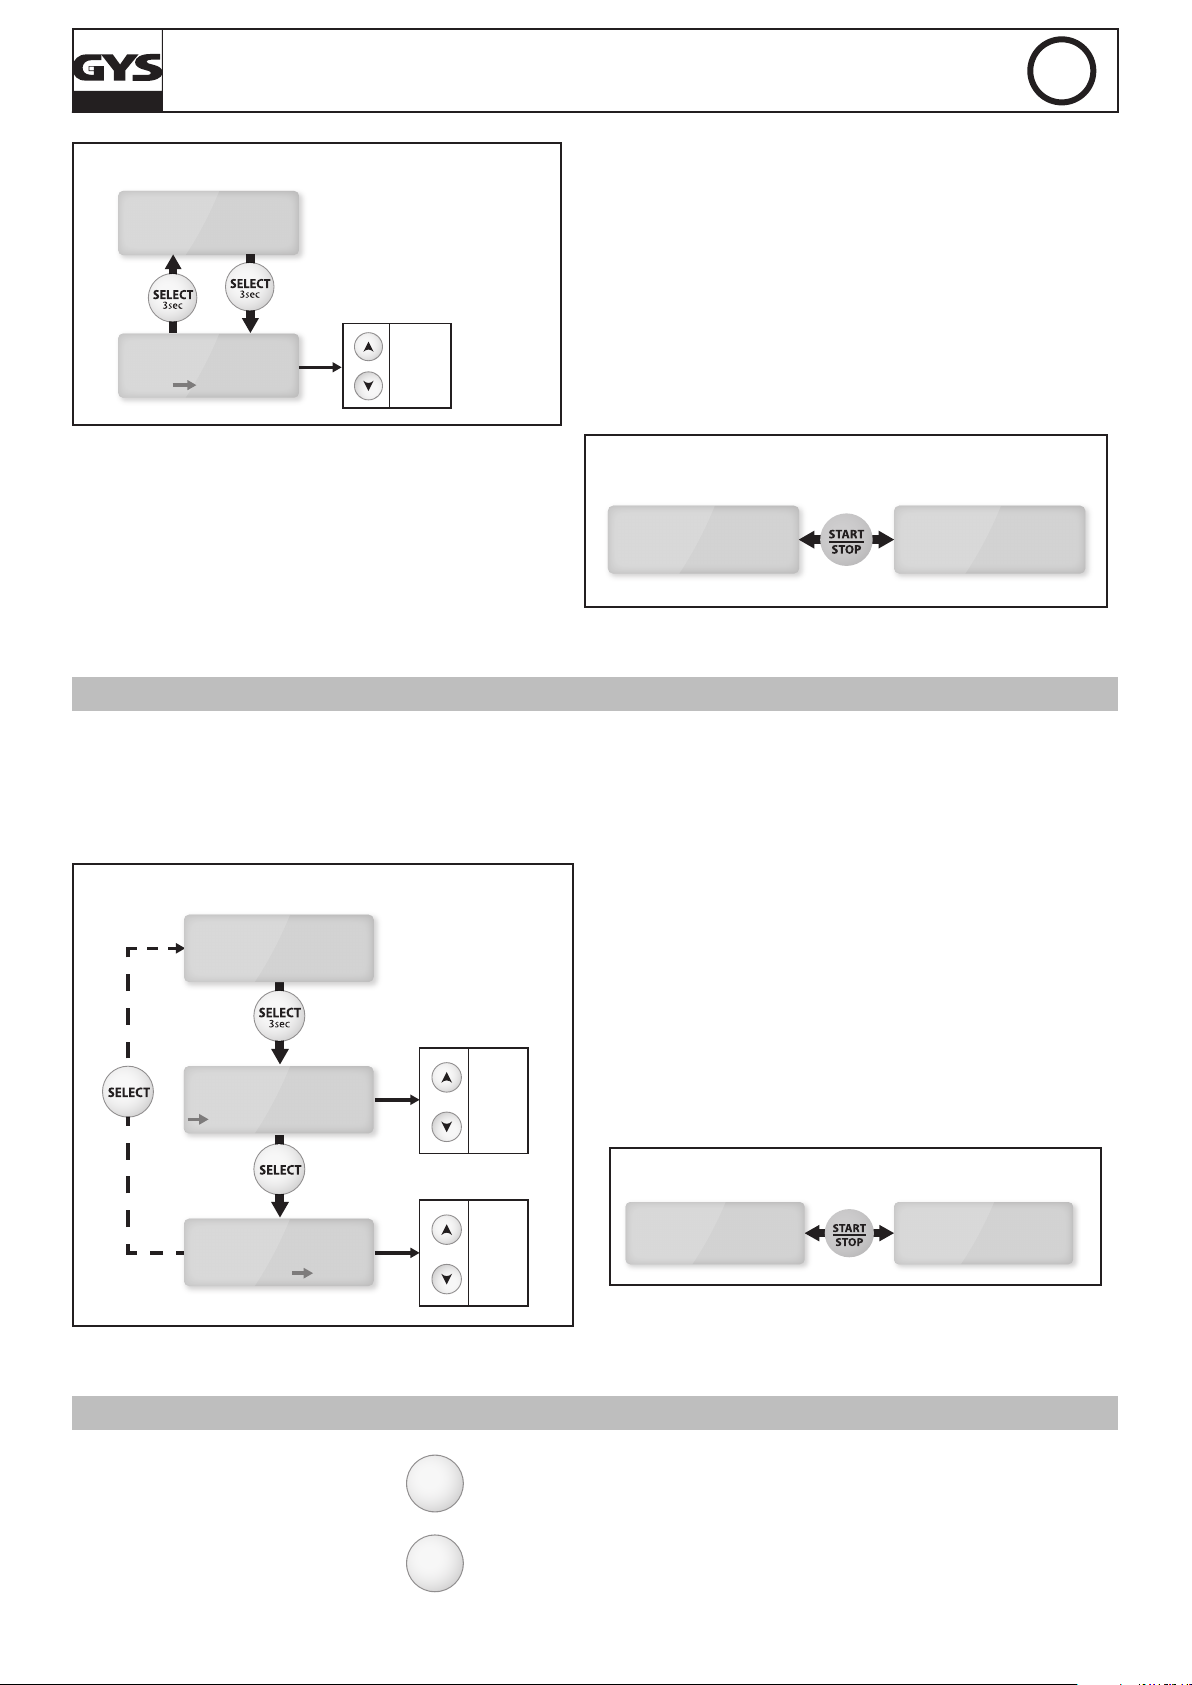
MENU CONFIGURATION
Accès au menu conguration :
Pour naviguer dans les sous menus
de conguration appuyer sur Select :
SELECT
langues > redémarrage > lock showroom > Type de charge > contrôle
des câbles > ADVANCED MENU > Reset Memory
7
Page 8
GYSFLASH 50.24 HF
CONFIGURATION
Francais
CONFIGURATION
redemarrage: OFF
Y (yes)
N (no)
ON
OFF
English
Francais
Deutsch
Nederlands
Espanol
Portugues
Italiano
Russian
...
CONFIGURATION
Test câbles:
Appuyer sur START
CONFIGURATION
lock showroom: N
CONFIGURATION
Advanced Menu:
Appuyer sur START
CONFIGURATION
Reset Memory:
Appuyer sur START
Contrôle des
câbles
Advanced menu
Reset Memory
automo.
traction
CONFIGURATION
charge: automo.
FR
Sous-menu :
MODE CONFIGURATION
• Langues :
Ce menu permet de choisir la langue de l’afcheur (utiliser les èches
pour changer de langues).
• Redémarrage automatique :
Le redémarrage automatique ne fonctionne qu’en mode
« showroom », « charge » et « Power Supply ». Cette fonctionnalité
permet, en cas de coupure de courant, le redémarrage automatique du
chargeur ainsi que la reprise de charge.
Pour activer la fonction «Redémarrage automatique», sélectionner
« Conguration | Redémarrage : ON ».
• Lock Showroom :
Permet de verrouiller l’appareil sur le mode Showroom.
(Évite les erreurs de manipulations). Pour activer la fonction «Lock
Showroom», sélectionner « Conguration | Lock Showroom : Y ».
Raccourci Lock Showroom :
Il est possible d’activer la fonction Lock Showroom sans entrée dans le menu conguration.
• Eteindre l’appareil (interrupteur sur la position OFF)
• Appuyer sur MODE
• Basculer l’interrupteur en position ON, tout en conservant l’appui sur MODE. Afchage
pendant 3s « GYSFLASH 50.24 HF Vx.x »
• Rester appuyé sur MODE jusqu’à ce que le produit afche « lock showroom: Y »
MODE
• Type de charge :
Il est possible de choisir le type de charge souhaité :
- Charge automobile (automo.) pour recharger les batteries de démarrage.
- Charge traction (traction) pour recharger les batteries de traction.
• Contrôle des câbles :
Ce mode doit être utilisé lors de toutes modications de câbles de sortie. Le GYSFLASH peut recevoir des câbles
jusqu’à 2x8m en 16mm².
OK : L’étalonnage s’est effectué correctement.
FAIL : Un problème est survenu lors de l’étalonnage des câbles. Dans ce cas, l’étalonnage est réinitialisé sur
le réglage usine. Vérier que les câbles sont en bon état et correctement mis en court-circuit et recommencer
l’opération.
• Advanced Menu (code 1-9-6-4) :
Ce menu est réservé aux personnes expérimentées.
Pour y accéder, entrer le code ci-dessus (Select pour changer de chiffre et Start/Stop pour valider le code).
Pour plus de détails, cf. page 9.
• Reset Memory (code 1-9-6-4) :
Ce menu est destiné, via le code ci-dessus, à
réinitialiser les paramètres du chargeur comme à
la sortie usine. Vos réglages personnels sont alors
supprimés.
RESET MEMORY
RESET MEMORY
Error Code
Display 1s
RESET MEMORY
Code: 0000
Code NOK
Code OK
(1964)
RESET MEMORY
Code OK
RESET MEMORY
Reset all ?
0
1
...
9
Changement
de chire
Yes
No
8
Page 9
GYSFLASH 50.24 HF
ADVANCED MENU
Ce menu permet de congurer les paramètres avancés du chargeur.
Pour passer d’un paramètre à l’autre appuyer sur Select :
FR
SELECT
Activation «Change batterie» >Activation «Power Supply» > Activation «Expert Curve» (> Réglage des paramètres «Expert Curve»)
• Activation du Mode CHANGE BATTERIE :
Pour activer le mode CHANGE BATTERIE, sélectionner «ADVANCED MENU» |
Change Bat. : ON». Ainsi, ce mode sera accessible dans la liste des modes.
• Activation du Mode POWER SUPPLY :
Pour activer le mode POWER SUPPLY, sélectionner «ADVANCED MENU» | Power
Supply : ON». Ainsi, ce mode sera accessible dans la liste des modes.
• Activation de la courbe «EXPERT» :
Pour activer la courbe «EXPERT», sélectionner «ADVANCED MENU» |
expert curve : ON». Ainsi cette courbe sera disponible en mode CHARGE
dans la liste des courbes de charges.
• Réglage des paramètres de la courbe «EXPERT» :
Si la courbe de charge «EXPERT» est activée, il est alors possible de dénir
les paramètres de la courbe (type IU0I0U) :
- Unominal : tension nominale de batterie (6V, 12V ou 24V).
- Ucharge : tension de charge réglable de 6.0 à 30.0V (étape 7).
- Icharge : Courant de charge réglable de 10A à 200A par 100Ah de
capacité spéciée (étape 6).
- Urecovery : tension de récupération réglable jusqu’à 30.0V. Si la valeur
«OFF» est sélectionnée, la fonction de récupération est désactivée (étape
2 et 4).
- Uoating : tension de maintien réglable en fonction de la valeur
Unominal sélectionné. Si la valeur «OFF» est sélectionné, la fonction de
maintien est désactivée (étape 9).
- T recovery : temps maximum de la phase de récupération des cellules
en court-circuit réglable de 1h à 24h (étape 2).
- T refresh : Durée de la phase de rafraîchissement réglable de
1h à 12h. Si la valeur «OFF» est sélectionné, la fonction de
rafraîchissement est désactivée (étape 8).
- T desulfat : temps maximum de la phase de désulfatation réglable de
1h à 24h (étape 4).
- T ch_max : Temps de charge maximale (étape 7 et 6).
ADVANCED MENU
ADVANCED MENU
Change bat.: OFF
ADVANCED MENU
Power Supply: OFF
ADVANCED MENU
expert curve: OFF
OFF
ON
EXPERT CURVE
Unominal: 12V
EXPERT CURVE
Ucharge: 14.3V
EXPERT CURVE
Ichrg: 20A/100Ah
EXPERT CURVE
Urecovery: OFF
EXPERT CURVE
Uoating: OFF
EXPERT CURVE
T recovery: 5h
EXPERT CURVE
T desulfat: 12h
EXPERT CURVE
Tch_max: 16h
EXPERT CURVE
Tch_min: 0h
EXPERT CURVE
T refresh: 5h
ON
OFF
ON
OFF
ON
OFF
6V
12V
24V
6.0V
6.1V
...
8.0V
10A/100Ah
11A/100Ah
...
200A/100Ah
OFF
Uch
...
29.9V
30.0V
OFF
6.0V
6.1V
...
Uch
1h
2h
...
24h
1h
2h
...
24h
1h
2h
...
36h
0h
1h
...
Tch_max
OFF
1h
2h
...
12h
12.0V
12.1V
16.0V
OFF
Uch
29.9V
30.0V
OFF
12.0V
12.1V
Uch
24.0V
24.1V
...
...
30.0V
OFF
Uch
...
...
29.9V
30.0V
OFF
24.0V
24.1V
...
...
Uch
- T ch_min : Temps de charge minimum (étape 7 et 6).
EXPERT CURVE
U refresh: 17.0V
- Urefresh : Tension maximale lors d’un rafraîchissement (étape 8).
- OCP (Protection de surcharge) : Pourcentage maximum de la capa-
cité nominale qui peut être injecté avant la protection.
aAttention :
Pour la charge sur véhicule, une tension Urecovery ou
Urefresh trop élevé peut endommager l’électronique du véhicule.
EXPERT CURVE
OCP: 200%
ADVANCED MENU
Save? No
Nous conseillons dans ce cas, de ne pas régler ces paramètres audelà de 15.0V.
RETURN
Pour enregistrer et valider les nouveaux réglages, sélectionner «ADVANCED MENU» | save? Yes»
Appuyer sur le bouton « MODE » pour sortir du menu « Conguration ».
MODE
Uch
30.9V
31.0V
100%
245%
250%
Yes
No
...
...
9
Page 10
GYSFLASH 50.24 HF
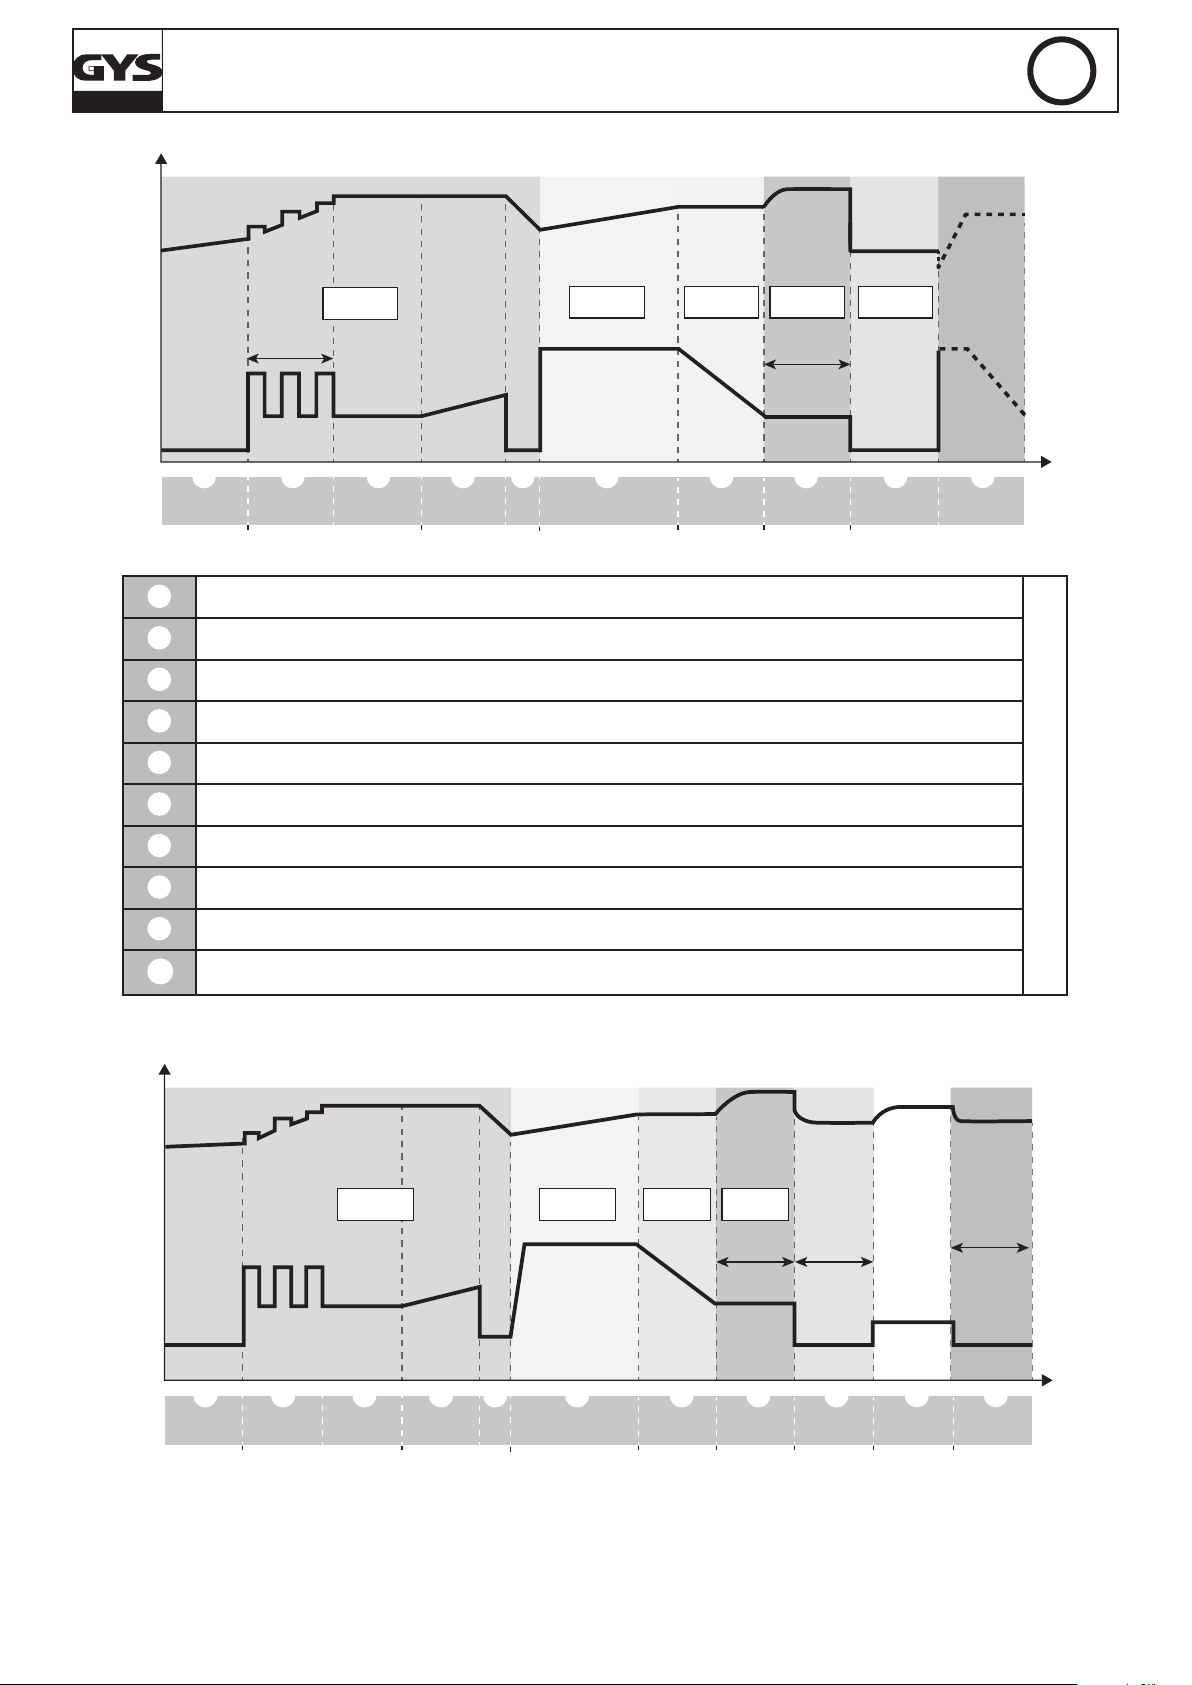
Description de la courbe de charge Expert (IU0I0U)
FR
U
U=Ucharge
Trefresh
I=Irefresh
max.
T
recovery
Recovery
U=Urecovery
Phase I Phase U0 Phase I0
I=Icharge
I
1 2 3 4 5 6 7 8 9
Test Test Charge Absorption Floating
Analyse batterie
1
Récupération des éléments endommagés suite à une décharge profonde prolongée
2
Test batterie sulfatée
3
Désulfatation/Récupération de la batterie
4
Vérication de la récupération de la batterie
5
Shorted cell
Recovery
0% 10% 20% 80% 95% 100%
Sulphation
Test
Desulphation
Refresh
U=Uoating
Phase U
10
New charge
cycle
U
Charge de la batterie à 80%
6
Charge de la batterie à 95%
7
Rafraichissement des cellules de la batterie
8
Charge de maintenance
9
10
Recommence un cycle de charge pour un maintien des performances = Entretien
Description de la courbe de charge Traction (IUI0)
U=Urecovery
Recovery Phase I
I=Icharge
U=Ucharge
Phase U
I
Phase I0
Trefresh Trest
I=Irefresh
I=Iequa
max 48h
before new
charging cycle
CHARGE AUTOMOBILE
10
1 2 3 4 5 6 7 8 9
Shorted cell
Test Test Charge Absorption Rest
Recovery
0% 10% 20% 80% 90% 95% 98% 100%
Sulphation
Test
Desulphation
Refresh
10
Equalization
11
End of
charge
Page 11
GYSFLASH 50.24 HF
Analyse batterie
1
Récupération des éléments endommagés suite à une décharge profonde prolongée
2
Test batterie sulfatée
3
Désulfatation/Récupération de la batterie
4
Vérication de la récupération de la batterie
5
Charge de la batterie à 80%
6
Charge de la batterie à 90%
7
Rafraichissement des cellules de la batterie
8
Phase de repos des cellules
9
10
Égalisation des cellules de la batterie
11
Batterie chargée à 100% (reprise de charge après 48h)
FR
CHARGE TRACTION
PROTECTIONS
Cet appareil est protégé contre les courts-circuits, inversions de polarité. Il dispose d’un système anti-étincelle qui évite toutes étincelles lors du branchement du chargeur sur la batterie. Sans tension aux pinces, il ne délivre pas de courant par sécurité.
Ce chargeur est protégé contre les erreurs de manipulation par un fusible interne 80A (ref. 054653).
ANOMALIES, CAUSES, REMÈDES
ANOMALIES CAUSES REMÈDES
1
2
3
4
5
6
7
8
9
10
11 L’appareil n’afche rien
Afchage clignotant :
« #erreur (+)<-->(-) »
+ signal sonore
Afchage clignotant :
« #erreur U>Umax »
+ signal sonore
Afchage clignotant :
« #erreur batterie »
+ signal sonore
Afchage clignotant :
« >50A »
+ signal sonore
Le GYSFLASH délivre un fort courant
(supérieur à 10A) alors que vous
n’avez pas encore lancé votre outil de
diagnostic
Afchage durant 1sec :
« no battery »
+ signal sonore
L’appareil est bloqué en mode
Showroom
L’afcheur indique :
« #erreur T(°C) »
+ signal sonore
L’afcheur indique :
« #erreur IHM »
+ signal sonore
L’afcheur indique :
« #erreur fusible »
+ signal sonore
Inversion de polarité sur les pinces Brancher la pince rouge au (+) et la pince noire au (-) de la batterie.
Tension de batterie trop élevée Chargeur non adapté (ex : batterie 24V au lieu de 12V).
Batterie est en court-circuit ou endommagée. Batterie à remplacer.
Batterie non connectée ou pinces en court-circuit Vérier le branchement des pinces de charge.
Erreur sur la selection de tension batterie Chargeur non adapté.
Consommation excessive par rapport à la puissance
du chargeur
De nombreux consommateurs sont actifs sur le
véhicule.
Batterie déchargée
Le mode Showroom est en fonctionnement
« no battery »
Lock Showroom actif
Ventilateur défectueux Contacter le revendeur.
Exposition prolongée au soleil
Problème électronique Contacter le revendeur.
Mauvaise manipulation
Fusible d’entrée HS
Réseau électrique défectueux
Arrêter certains consommateurs pour arriver à une situation normale.
Fonctionnement normal du GYSFLASH. Couper les consommateurs pour vérier
que la batterie ne soit pas trop déchargée (voir cause n°2).
Votre batterie est profondément déchargée, le GYSFLASH délivre un courant pour
la recharger. Attendre que le courant soit sous les 10A pour lancer le diagnostique.
Showroom sans batterie : fonctionnement normal du GYSFLASH.
Pour désactiver la fonction « no battery », appuyer sur START/STOP, et
ré-appuyer de nouveau sur START/STOP pour lancer le mode Showroom avec
batterie.
Fonctionnement normal du GYSFLASH.
Se référer au menu conguration pour désactiver la fonction.
Ne pas laisser l’appareil au soleil.
Laisser le produit allumé jusqu’à ce que le défaut disparaisse. (Possibilité d’arrêter
le signal sonore en appuyant sur START/STOP).
Changer le fusible interne par une personne qualiée
(réf. 054653 : 80A).
Changer le fusible d’entrée par une personne qualiée
(fusible temporisé 10A 5x20).
Vérier que la tension du réseau électrique est comprise entre 180 et 260 V.
11
Page 12
SAFETY INSTRUCTIONS
This manual contains safety and operating instructions.
Read it carefully before using the device for the first time and keep
it in a safe place for future reference.
This machine should only be used for charging operations comprised
within the limits indicated on the machine and in the instruction
manual. The operator must respect the safety precautions. In case of
inadaquate or unsafe use, the manufacturer cannot be held liable.
The machine is designed to be used indoors. Must not be exposed
to the rain.
This appliance can be used by children aged from 8 years and
above and persons with reduced physical, sensory or mental
capabilities, or lack of experience and knowledge if they have been
given supervision or instruction concerning use of the appliance in
a safe way and understand the hazards involved. Children shall not
play with the appliance. Cleaning and user maintenance shall not
be made by children without supervision.
GYSFLASH 50.24 HF
EN
Do not use to charge small batteries or non rechargeable batteries.
Do not use the charger if the mains cable or the plug is damaged.
Never use on a frozen or damaged battery.
Do not cover the device.
Do not place the unit near a heat source and long lasting high
temperatures (above 50 ° C).
The automatic mode and the restrictions applicable to its use are
detailed in the following instruction manual.
Fire and explosion risks!
• A charging battery can emit explosive gases.
• During the charge, the battery must be placed in a well ventilated
area.
• Avoid flames and sparks.
• Protect the batterie’s electrical contact surfaces against shortcircuits.
12
Risk of acid projections !
• Wear protective goggles and gloves.
• In case of contact with the eyes or skin, rinse well with water and
see a doctor as soon as possible.
Page 13
GYSFLASH 50.24 HF
EN
Connection / disconnection :
• Disconnect the power supply before plugging or unplugging the
connections to/from the battery.
• Always ensure the Red clamp is connected to the «+» battery
terminal first. ▪ If it is necessary to connect the black clamp to the
vehicle chassis, make sure it is a safe distance from the battery and
the fuel/exhaust pipe. The charger must be connected to the mains.
• After charging, disconnect the charger from the mains, then
disconnect the clamp from the car body and then disconnect the
clamp from the battery, in the indicated order.
Connection:
• The charger must be connected to an EARTHED power supply.
• The connection to the power supply must be carried out in
compliance with national standards.
Maintenance:
• If the power supply cable is damaged, it must be replaced by a
cable or a special set, available from the manufacturer or its after
sales team.
• Maintenance should only be carried out by a qualified person.
• Warning ! Always disconnect from the mains before performing
maintenance on the device.
• The device does not require any specific maintenance.
• If the internal fuse is melted, it must be replaced by the manufacturer,
its after sales service or an equally qualified person to prevent
danger.
• Do not use solvents or any agressive cleaning products.
Regulations:
• Machine compliant with European directives.
• The certificate of compliance is available on our website.
• EAEC Conformity marking (Eurasian Economic Community).
Waste management:
• This product should be disposed of at an appropriate recycling
facility. Do not throw away in a domestic bin.
13
Page 14
GYSFLASH 50.24 HF
GENERAL DESCRIPTION
The GYSFLASH 50.24 HF provides a high powered stabilised power supply incorporating SMPS (Switch Mode Power Supply) technology.
Designed to sustain 6V/12V/24V battery (liquid/AGM/gel) for vehicles during diagnostic work, this device will also ensure an ideal charging
cycle for battery maintenance for the most modern vehicles and battery types. This charger can be tted with cables up to 2x8m in 16mm².
Changing charging cables requires recalibration (see page 18). It is considered a xed device not a mobile product.
These devices have 5 modes including 2 that are hidden:
• Charge Mode:
- Automobile (default): for charging lead (sealed, liquid, AGM...) or lithium (LiFePO4) starter batteries from 10 Ah to 600 Ah at 6V/12V/24V.
- Traction: to charge liquid or gel electrolyte batteries (lead, lead Calcium, lead Calcium-silver, AGM...) from 50 Ah to 450 Ah in 6V/12V/24V.
It can be activated via the conguration menu.
• Supply mode « Diag + »: It supplies up to 30A to ensure compensation of current used by high-energy consumers (engine fan, window
regulator, electronic suspension, etc). In this mode the voltage can be precisely adjusted.
• Supply mode « Showroom »: ensure current compensation when using electrical features of a demonstration vehicle (window regulator, heating, morrors, etc) enabling permanent display of the vehicle. In this mode the voltage can be precisely adjusted.
• « Change battery » mode: Ensures a stabilised power supply to the vehicle during battery replacement to preserve memory settings.
By default this mode is inactive and doesn’t appear in the mode list.
• « Power Supply » mode: This mode is intented for experimented user only. By default this mode is inactive and doesn’t appear in the
mode list. This mode enables to use the charger as a powerful stabilised power supply with regulated voltage and adjustable maximum
current.
This device has an automatic restart feature enabling in Charge, Showroom and Power Supply modes to automatically restart the device in
case of power cut.
The function «
Lock Showroom
», if activated, restricts the device to Showroom Mode only, to facilitate its use for vehicles demonstrators.
EN
START UP
Connect the charger to the mains. Single phase voltage 230V ± 15% (50/60Hz).
1
Turn the switch to «ON».
2
For 3s the display will show «GYSFLASH 50.24 HF Vx.x»
Then, choose the appropriate mode. By default, the charger will be on the last used conguration.
3
Charge (or traction)> Diag+ > Showroom >
•
The «Mode» key enables access to several menus :
• To access the «conguration» menu press the «mode» key for 3s :
CHARGE MODE (AUTOMOTIVE & TRACTION)
By default, the charge is congured in automotive charge. The type of charge (automotive or traction) can be modied via the conguration
menu. This product will charge the battery safely even if the battery is still in the vehicle. Ensure that the correct sequences are followed.
Charge conguration:
Before starting to charge the battery, ensure that the charger has been correctly set (battery voltage, charging curve and battery capacity).
Several charging curves are available :
• Easy: simplied curve, suitable for every lead battery and which for it is not required to know the battery capacity. However for an opti-
mized charge, it is recommended when possible to use the liquid or gel/AGM batteries charging curves.
• Liquid: charging curve for vented battery (lead, lead calcium, lead calcium-silver, etc). For this charging curve the battery capacity in
Ah must be selected.
• Gel/AGM: charging curve for sealed battery (gel, maintenance free, AGM…). For this charging curve the battery capacity in Ah must be
selected. For this charging curve the battery capacity in Ah must be selected.
• LFP/LiFePO4: charging curve for LFP (Lithium Iron Phosphate) type lithium batteries. For this charging curve the battery capacity in Ah must
be selected.
• Expert: charging curve type IU0I0U intented for experimented user (see page 19). The Expert cruve is only available in the automotive
mode. The conguration of the Expert curve can be modify via the advanced menu by entering a code.
WARNING: According to the conguration of the expert curve (see page 19), it can be necessary to disconnect vehicle’s battery before
starting the charge in order to protect the electronic of the vehicle.
MODE
MODE
(Change Battery*) (> Power Supply*)
*hidden by default.
3 sec - Conguration
14
Page 15
GYSFLASH 50.24 HF
easy
liquid
gel/AGM
LFP/LiFePO4
expert
10Ah
20Ah
...
600Ah
CHARGE 12V
gel/AGM
80Ah
12V
80Ah
12V
80Ah
CHARGE
gel/AGM
CHARGE
gel/AGM
CHARGE 12V
gel/AGM
6V
12V
24V
80Ah
gel/AGM
liquid
50Ah
60Ah
...
450Ah
TRACTION 12V
gel/AGM
80Ah
12V
80Ah
12V
80Ah
TRACTION
gel/AGM
TRACTION
gel/AGM
TRACTION 12V
gel/AGM
6V
12V
24V
80Ah
EN
AUTOMOTIVE CHARGE MODE
CONFIGURATION
STARTING THE AUTOMOTIVE CHARGE
TRACTION CHARGE MODE CONFIGURATION
STARTING THE TRACTION CHARGE
CHARGE
gel/AGM
10%
80Ah
U=12.5V
Q=2.5Ah
10%CHARGE
I=10A
00h22
TRACTION
gel/AGM
10%
80Ah
U=12.5V
Q=2.5Ah
10%TRACTION
I=10A
00h22
TRACTION CHARGING TIME
6V/12V/24V
50 Ah 250 Ah
~ 8h*
*If needed, the charging time can be reduced by entering a capacity
slightly above the rated capacity of the battery (maximum + 20%). E.g.:
For a 100Ah battery, setting the charger on 110Ah allows to reduce the
charging time by around 45min.
Start up:
• Connect the clamps : red to the (+) and black to the (-) of the battery.
• Push the START/STOP key to start charging.
• During the charge, the product displays the processing percentage of the charge and alternatively voltage, current, injected ampere hours and elapsed time.
• Push the START/STOP key again to stop the charge.
NB: When the AUTOMOTIVE charge ends (100%), if the battery remains connected the charger maintains the charge level
of the battery by applying a oating voltage.
Precaution: Check the electrolyte level. Fill it up if necessary before charging.
When charging on vehicle, it is recommended to reduce the electrical consumption of the vehicle to a minimum (switch off the lights,
close the doors...) in order to do not disturb the charging process.
Do not start a traction charge on an automotive battery.
250 Ah 450 Ah
9h 14h
50 HF
DIAG+ MODE
On a stationary vehicle the charger supplies up to 50A to test high-energy consumers: engine fan, window regulator, electronic suspension, etc... By supplying a steady voltage:
- 12V to 14.8V (for 12V battery)
- 24V to 29.6V (for 24V battery)
- 6V to 7.4V (for 6V battery)
15
Page 16

GYSFLASH 50.24 HF
I=12A
DIAG+
U=13.5V
DIAG+
U=13.5V
12V 12V
SHOWROOM
13.5V
I=12A
SHOWROOM
U=13.5V
12V12V
EN
Voltage adjustment
After selected the battery voltage, it is possible to adjust the voltage by 0.1V step according to manufacturer’s specications.
DIAG+ MODE CONFIGURATION
Start up :
• Connect the clamps : red to the (+) and black to
DIAG+
U=13.5V
12V
the (-) of the battery.
• Push the START/STOP key to start the mode.
• During use the current consumed and the instantaneous voltage are displayed.
DIAG+
DIAG+
12V
U=13.5V
24V
U=27.2V
6V
12V
24V
6.0V
6.1V
7.4V
STARTING DIAG+
12.0V
24.0V
12.1V
...
14.8V
24.1V
...
29.6V
...
Precaution: If the screen displays a current greater than 10A, it indicates the battery is discharged. The device will start charging
automatically Check all electrical consumers are switched off on the vehicle. Wait until the current falls below 10A and then re-launch
the diagnostic.
SHOWROOM MODE
On a stationary vehicle, the charger supplies up to 50A to test high-energy consumers (engine fan, window regulator, electronic
suspension, etc…) by supplying a steady voltage adjustable:
- 12V to 14.8V (for 12V battery)
- 24V to 29.6V (for 24V battery)
- 6V to 7.4V (for 6V battery)
Voltage adjustment:
After selected the battery voltage, it is possible to adjust the voltage by 0.1V step according to manufacturer’s specications.
SHOWROOM MODE CONFIGURATION
Start up with battery :
• Connect the clamps : red to the (+) and black
SHOWROOM
U=13.5V
12V
to the (-) of the battery.
• Push the START/STOP key to start the mode.
• During use the current consumed and the instantaneous voltage are displayed.
SHOWROOM
U=13.5V
SHOWROOM
U=27.2V
12V
24V
6V
12V
24V
6.0V
6.1V
7.4V
STARTING SHOWROOM
12.0V
24.0V
12.1V
...
14.8V
24.1V
...
29.6V
...
Start without battery (not recommended)
Possibility to launch the mode without the battery by pressing the START/STOP key for 3 seconds.
The indictation « no battery » displays for 1 second before supplying the power.
Warning: polarity reversal can damage the vehicle electronics.
Precaution
If the screen displays a current higher than 10A, it indicates the battery is discharged. The device will start charging automatically.
Check all electrical consumers are switched off on the vehicle. Wait until the current falls below 10A before using any electical functions of the car.
CHANGE BATTERY MODE
This charger will maintain a stabilised power supply to the vehicle during battery replacement to preserve memory settings. By default
this mode is inactive and doesn’t appear in the mode list. It can be activated via the Advanced menu (see page 19).
Voltage selection
It can be set to operate on 6V, 12V or 24V for changing the battery :
16
Page 17
GYSFLASH 50.24 HF
POWER SUPPLY
U=19.6V I<50A
POWER SUPPLY
U=19.6V I=10A
BATTERY CHANGE MODE CONFIGURATION
CHANGE BATTERY
12V
EN
Start up :
• Connect
1 : Red clamp to the (+) of the battery / battery terminal,
in such a way that the battery can be changed without
disconnecting the clamp.
2 : Black clamp to the vehicle chassis or earth.
CHANGE BATTERY
12V
• Push the START/STOP key to start the mode.
• During use the current consumed and the instantaneous voltage are displayed.
• When changing the battery ensure the polarity is
correct. While exchanging the batteries, be careful
not to disconnect the charger clamps to avoid loss of
electronic data.
Warning: polarity reversal can damage the vehicle electronics.
POWER SUPPLY MODE (OPTIONAL)
This mode is intended for expert users only. This mode enables the charger to be used as a stabilised power supply, with regulated
voltage and adjustable maximum current. By default this mode is inactive and doesn’t appear in the mode list. It can be activated
via the Advanced menu (see page 19).
Adjustment of the voltage regulation and current limitation :
The voltage regulation can be adjusted from 2V to 30V and the maximum current from 2A to 50A:
6V
12V
24V
STARTING BATTERY CHANGE
CHANGE BATTERY
CHANGE BATTERY
U=12.9V I=26AU=12V
POWER SUPPLY MODE CONFIGURATION
POWER SUPPLY
U=13.5V I<50A
Start up:
• Push the START/STOP key to start the mode.
POWER SUPPLY
U=19.6V I<50A
2.0V
2.1V
...
30.0V
• During use the current consumed and the instantaneous voltage are displayed.
STARTING POWER SUPPLY
POWER SUPPLY
U=19.6V I<35A
NOTE: Unlike the other modes, when in Power Supply mode, the charger does not compensate cables voltage drop.
In this mode, the voltage displayed is the charger output voltage (and not the voltage on the clamps).
CONFIGURATION MENU
Access to conguration menu :
MODE
2A
3A
...
50A
3 sec - Mode
To browse in the sub menu press the
«Select» key :
SELECT
languages > restart > lock showroom > charge type > cable check >
ADVANCED MENU > Reset Memory
17
Page 18
GYSFLASH 50.24 HF
SETTINGS
English
SETTINGS
restart: ON
Y (yes)
N (no)
ON
OFF
English
Francais
Deutsch
Nederlands
Espanol
Portugues
Italiano
Russian
...
SETTINGS
Cables Testing:
Press START
SETTINGS
lock showroom: N
SETTINGS
Advanced Menu:
Press START
SETTINGS
Reset Memory:
Press START
Cables testing
Advanced menu
Reset Memory
automo.
traction
SETTINGS
charge: automo.
EN
Submenu:
CONFIGURATION MODE
• Languages:
This menu enables to select the language (use the arrows to change the
language).
• Automatic restart:
Automatic restart only works with «Showroom» , «Charge» and «Power
Supply» Mode. This feature enables the charger to restart automatically
and to restart charging after a cut in power.
To activate the «Automatic restart» feature « Conguration | Restart :
ON ».
• Lock Showroom:
To lock the device in Showroom Mode (To avoid misuse).
To activate the «Lock Showroom» feature « Conguration | Lock
Showroom : Y ».
Shortcut to Lock Showroom:
The «Lock Showroom» feature can be activated without accessing the conguration menu.
• Turn off the device (main switch in OFF position)
• Push the MODE key
• Turn on the switch, while the MODE key is still pressed. Within 3s the display will show «GYSFLASH 50.24 HF Vx.x»
• Hold the MODE key until the screen displays «lock showroom: Y»
MODE
• Charge type:
It is possible to choose the type of charge wanted:
- Automotive charge (automo.) to charge starter batteries.
- Traction charge (traction) to charge traction batteries.
• Cables check:
This mode must be used each time the cables are changed. This charger can be tted with cables up to 2x8m
in 16mm².
OK : The calibration was successful.
FAIL : A problem occurred during the calibration. In this case, the calibration is reset to the factory setting.
Check that the cables are in good condition and properly put in short-circuit and repeat the procedure.
• Advanced Menu (code 1-9-6-4) :
This menu is intended for expert user only.
To access this menu, enter in the code («Select» key to change the digit selection and «Start/Stop» key to conrm
the code).
For more details, see next page.
• Reset Memory (code 1-9-6-4) :
This menu is intented to factory reset the charger settings by
entering the code above. Any personal parameters are deleted.
RESET MEMORY
RESET MEMORY
Display 1s
Code: 0000
Code NOK
Code OK
(1964)
RESET MEMORY
Code OK
RESET MEMORY
Reset all ?
RESET MEMORY
Error Code
0
1
...
9
Change the
code number
Yes
No
18
Page 19

GYSFLASH 50.24 HF
ADVANCED MENU
This menu controls the advanced parameters of the charger.
To move from one parameter to another push the Select key :
EN
SELECT
Activation «Change battery» > Activation «Power Supply» > Activation «Expert Curve» (> Adjusment of the
«Expert Curve» parameters)
• CHANGE BATTERY mode activation:
To activate the CHANGE BATTERY mode, select «ADVANCED MENU |
Change bat: ON». Now this mode will be accessible from the mode list.
• POWER SUPPLY mode activation:
To activate the POWER SUPPLY mode, select «ADVANCED MENU | Power
Supply: ON». Now this mode will be accessible from the mode list.
• «EXPERT» curve activation:
To activate the «RECOV» curve, select «ADVANCED MENU | Expert curve:
ON». Now this curve will be available in the charging curves list from the
CHARGE mode.
• Parameters adjustment of the «Expert» curve:
If the charging curve is activated, the charging curve parameters can be
adjusted (type IU0I0U):
- Unominal: Battery nominal voltage (6V, 12V or 24V).
- Ucharge: Charge voltage adjustable from 6.0 to 30.0V (Step 7).
- Icharge: Charging current adjustable from 10A to 200A per 100Ah of
specied capacity (Step 6).
- Urecovery: Recovery voltage adjustable up to 30.0V.
If the value «OFF» is selected the recovery function is inactive (Step 2
and 4).
- Uoating: Floating voltage adjustment.
If the value «OFF» is selected the oating function is inactive (Step 9).
- Trecovery: Maximum time for shorted cells recovery, adjustable from
1h to 24h (Step 2).
ADVANCED MENU
ADVANCED MENU
Change bat.: OFF
ADVANCED MENU
Power Supply: OFF
ADVANCED MENU
expert curve: OFF
OFF
ON
EXPERT CURVE
Unominal: 12V
EXPERT CURVE
Ucharge: 14.3V
EXPERT CURVE
Ichrg: 20A/100Ah
EXPERT CURVE
Urecovery: OFF
EXPERT CURVE
Uoating: OFF
EXPERT CURVE
T recovery: 5h
EXPERT CURVE
T desulfat: 12h
10A/100Ah
11A/100Ah
...
200A/100Ah
29.9V
30.0V
ON
OFF
ON
OFF
ON
OFF
6V
12V
24V
6.0V
12.0V
6.1V
8.0V
6.0V
6.1V
24.0V
12.1V
24.1V
...
...
...
16.0V
30.0V
OFF
OFF
Uch
OFF
Uch
24h
24h
OFF
Uch
Uch
...
...
...
29.9V
29.9V
30.0V
30.0V
OFF
OFF
12.0V
24.0V
12.1V
24.1V
...
...
...
Uch
Uch
1h
2h
...
1h
2h
...
- Trefresh: Time for the refreshing phase adjustable from 1h to 12h. If
the value «OFF» is selected, the refresh function is not activated (Step 8).
- T desulfat : Maximum time of the desulfation phase adjustable from 1h
to 24h (Step 4).
- T ch_max: Maximum charging time (Step 7 and 6).
- T ch_min: Minimum charging time (Step 7 and 6).
- Urefresh: Maximum voltage during refresh (Step 8).
- OCP (Over Charge Protection): Maximum percentage of the nominal
capacity that can be injected before protection.
aWarning:
When charging in-situ, a «Urecovery» or «Urefresh» too high
might damage the electronics of the vehicle. We advise NOT to
adjust these settings above 15V.
To save and validate the new settings, select «ADVANCED MENU» | save? Yes»
Push the «MODE» key to exit the «Conguration» menu.
EXPERT CURVE
Tch_max: 16h
EXPERT CURVE
Tch_min: 0h
EXPERT CURVE
T refresh: 5h
EXPERT CURVE
U refresh: 17.0V
EXPERT CURVE
OCP: 200%
ADVANCED MENU
Save? No
RETURN
1h
2h
...
36h
0h
1h
Tch_max
OFF
1h
2h
...
12h
Uch
...
30.9V
31.0V
100%
...
245%
250%
Yes
No
...
19
Page 20
GYSFLASH 50.24 HF
Automotive charging curve description (IU0I0U)
EN
U
U=Ucharge
Trefresh
I=Irefresh
max.
T
recovery
Recovery
U=Urecovery
Phase I Phase U0 Phase I0
I=Icharge
I
1 2 3 4 5 6 7 8 9
Test Test Charge Absorption Floating
1
2
3
4
5
Shorted cell
Recovery
0% 10% 20% 80% 95% 100%
Battery analysis
Recovering damaged elements from an extended deep discharge
Sulphated battery test
Sulphated battery recovery
Checking the battery recovery
Sulphation
Test
Desulphation
Refresh
U=Uoating
Phase U
10
New charge
cycle
U
Battery charged to 80%
6
Battery charged to 95%
7
Battery cells refresh
8
Maintenance charge
9
10
Starts a charge cycle for maintaining performance = maintenance
Traction charging curve description (IUI0)
U=Urecovery
Recovery Phase I
I=Icharge
I
U=Ucharge
Phase U
Phase I0
Trefresh Trest
I=Irefresh
I=Iequa
max 48h
before new
charging cycle
AUTOMOTIVE CHARGE
20
1 2 3 4 5 6 7 8 9
Shorted cell
Test Test Charge Absorption Rest
Recovery
0% 10% 20% 80% 90% 95% 98% 100%
Sulphation
Test
Desulphation
Refresh
10
Equalization
11
End of
charge
Page 21
GYSFLASH 50.24 HF
Battery analysis
1
Recovering damaged elements from an extended deep discharge
2
Sulphated battery test
3
Sulphated battery recovery
4
Checking the battery recovery
5
Battery charged to 80%
6
Battery charged to 90%
7
Battery cells refresh
8
Cells break time
9
10
Battery cells equalization
11
Battery charged to 100% (charge resumption after 48h)
EN
TRACTION CHARGE
PROTECTIONS
This device is protected against short-circuits and polarity inversions. It has an anti-spark feature which prevents sparks whilst
connecting this charger to the battery. This charger will not deliver current if there is no battery detected (no voltage in the clamps).
The charger is tted with an internal 80A fuse (ref. 054653), to protect against misuse.
TROUBLESHOOTING
TROUBLESHOOTING CAUSES REMEDIES
1
2
3
4
5
Screen ashing :
« #error (+)<-->(-) »
+ alarm beep
Screen ashing :
« #error U>Umax »
+ alarm beep
Screen ashing :
« #battery error »
+ alarm beep
Screen ashing :
« >50A »
+ alarm beep
The charger delivers a high current
(greater than 10A) before the dia-
gnostic tool has been activated.
The polarity has been reversed on the clamps Connect the red clamp to the (+) and the black clamp to the (-) of the battery.
Battery voltage too high Charger not suitable.
Battery in short-circuit or damaged Change the battery.
Battery not connected or clamps in short-circuit Check clamps connection.
Error on the battery voltage selection Charger not suitable.
Consumption exceeds the output of the charger Turn off electrical consumers to reduce power demand
Several consumers are active on the vehicle
Battery discharged
The charger works to specication. Turn off consumers to check the battery is
not too discharged (see cause n°2).
Battery deeply discharged, the charger delivers current to charge it. Wait until
the output current is below 10A to start the diagnostic.
6
7
8
9
10
11
Displays for 1s :
« no battery »
+ alarm beep
The device is locked in Showroom
The device does not display
mode
Screen displays :
« #error T(°C) »
+ alarm beep
Screen displays :
« #error IHM »
+ alarm beep
Screen displays :
« #error fuse »
+ alarm beep
anything
«Showroom mode is working on « no battery »
Lock Showroom active
Faulty fan Contact your distributor.
Sun exposure
Electronic fault Contact your distributor.
Mishandling
Input fuse faulty
Faulty electrical network
Showroom without battery : the charger operating normally.
To deactivate the «no battery» function, press the «START/STOP» key, and then
press the «START/STOP» key again to start the Showroom mode with battery.
The charger works to specication.
See conguration menu to deactivate the function.
Do not leave the device exposed to sunlight.
Leave the device ON until the fault disappears. (The alarm beep can be stopped
Possibility to stop the alarm beep by pressing the START/STOP key).
Internal fuse must be changed by a qualied person
(ref. 054653: 80A).
Input fuse must be changed by a qualied person
(temporised fuse 10A 5x20).
Check the voltage of the electrical network is between 180V and 260V.
21
Page 22
SICHERHEITSANWEISUNGEN
Diese Betriebsanleitung enthält Sicherheits- und Betriebshinweise.
Bitte lesen Sie diese Anleitung aufmerksam durch, bevor Sie das
Gerät zum ersten Mal benutzen und bewahren Sie diese sorgfältig
auf. Dieses Gerät darf ausschließlich zum Laden und/oder zur
Spannungsversorgung für die in der Anleitung oder auf dem Gerät
genannten Anforderungen genutzt werden. Die Sicherheitshinweise
müssen in jedem Fall beachtet werden. Im Fall einer unangemessenen
oder gefährlichen Verwendung kann der Hersteller nicht haftbar
gemacht werden.
Schützen Sie das Gerät vor Feuchtigkeit und Nässe.
Schützen Sie das Gerät vor unbefugtem Gebrauch. Kinder unter 8
Jahren düfen nicht mit diesem Gerät spielen. Befinden sich Kinder
oder Personen mit eingeschränkten körperlichen oder geistigen
Fähigkeiten sowie Personen ohne explizite Erfahrung im Umgang
mit dem Produkt in der Nähe des Gerätes, sorgen Sie bitte für
ausreichend Schutz und Kontrolle bei Benutzung des Gerätes.
GYSFLASH 50.24 HF
DE
Laden Sie nie defekte oder nicht aufladbare Batterien.
Benutzen Sie das Gerät nicht, wenn der Stecker, die Klemmen oder
das Zubehör defekt ist.
Laden Sie niemals eine beschädigte oder gefrorene Batterie.
Decken Sie das Gerät während der Nutzung nicht ab.
Lagern Sie das Gerät nicht in der Nähe einer Wärmequelle oder
bei dauerhaft hohen Temperaturen (über 50°C).
Der Einsatz des Automatik-Modus inklusive der Beschränkungen
wird in dieser Bedienungsanleitung beschrieben.
Explosions- und Brandgefahr! Während des Ladevorgangs können
explosive Gase entstehen.
• Während des Ladevorgangs muss die Batterie in einem gut
belüfteten Bereich plaziert werden.
• Vermeiden Sie Funken und Flammen. Rauchen Sie nicht!
• Schützen Sie die Pole der Batterie vor Kurzschlüssen.
22
Es besteht die Gefahr von Säurespritzern!
• Tragen Sie eine Schutzbrille und Handschuhe.
• Bei Kontakt der Batteriesäure mit den Augen oder der Haut
gründlich mit Wasser nachspülen und sofort einen Arzt aufsuchen.
Page 23
GYSFLASH 50.24 HF
DE
Verbinden/Trennen
• Trennen Sie das Gerät vom Spannungsnetz bevor Sie Kabel und
Zangen anschließen oder trennen.
• Versichern Sie sich immer, dass die rote Klemme zuerst mit dem
«+» Pol der Batterie verbunden wird. Falls es nötig ist die schwarze
Klemme mit der Fahrzeugkarosserie zu verbinden, versichern
Sie sich, dass es einen Sicherheitsabstand von der Batterie zum
Benzintank/Aufspuff gibt. Achten Sie während der Ladung auf
einen frei zugänglichen Netzanschluss.
• Beachten Sie am Ende des Ladevorgangs folgendes: Trennen
Sie erst das Gerät vom Stromnetz und entfernen Sie dann erst die
Klemmen von der Batterie.
Anschluss:
• Beachten Sie die Anschlussreihenfolge.
• Der Anschluss an die Stromversorgung muss den nationalen
Vorschriften entsprechen.
Wartung:
• Ist das Netzkabel defekt/beschädigt, lassen Sie es unverzüglich
von dem Hersteller bzw. dem Kundenservice austauschen.
• Die Wartung und Reparatur darf nur von entsprechend geschultem
und qualifiziertem Fachpersonal durchgeführt werden.
• Achtung! Alle Kontrollarbeiten oder Wartungen dürfen nur
duchgeführt werden, wenn das Gerät ausgeschaltet und die
Stromversorgung unterbrochen ist.
• Das Gerät benötigt keine besondere Wartung.
• Ist die interne Sicherung geschmolzen, dann muss diese entweder
vom Hersteller, seinem Kundendienst oder einer ähnlich qualifizierten
Person getauscht werden, um Gefährdungen zu vermeiden.
• Benutzen Sie niemals Lösungsmittel oder anderen aggressiven
Reinigungsprodukte.
Richtlinien:
• Das Gerät entspricht den europäischen Richtlinien und Normen.
• Die Konformitätserklärung finden Sie auf unsere Webseite.
• EAC-Konformitätszeichen (Eurasische Wirtschaftsgemeinschaft)
Entsorgung:
• Produkt für selektives Einsammeln (Sondermüll). Werfen Sie es
daher nicht in den Hausmüll!
23
Page 24

GYSFLASH 50.24 HF
BESCHREIBUNG
Das GYSFLASH 50.24 HF ist eine leistungsstarke Gleichspannungsquelle mit SMPS Technologie (Switch Mode Power Supply), konzipiert um
die Leistung von 6 V, 12 V und 24 V Batterien (üssig/AGM/Gel) während der Diagnose aufrecht zu erhalten. Es sichert eine optimale Ladequalität für die Wartung von Batterien der neuesten Technologie. An diesem Batterieladegerät können Ladestromkabel bis 2 x 8m in 16 mm²
angeschlossen werden. Bei jedem Kabelwechsel muss eine Neukalibrierung vorgenommen werden (siehe Seite 28). Das GYSFLASH 50.24
HF wird als stationäres und nicht als mobiles Gerät betrachtet.
Das Gerät verfügt über 5 Modi, darunter zwei «versteckten» Modi:
• «Ladung» Modus:
- Automobil (Standard): zum Laden von Blei- (versiegelt, üssig, AGM...) oder Lithium (LiFePO4) Starterbatterien von 10 Ah bis 600 Ah bei
6V/12V/24V.
- Traktionsbatterien: um Traktionsbatterien mit Säure- oder Gel-Elektrolyt (Blei, Blei-Kalzium, Blei Kalzium- Silber, AGM, usw) von 50 bis
450Ah in 6 V/12 V/24 V.
• «Diag +» Modi: das GYSFLASH 50.24 HF stützt und versorgt die Bordbatterie während der Diagnose bei Motorstillstand an sämtlichen
elektronischen Verbrauchern bis 50 A (Motorkühlung, Fensterheber, Bordelektronik, usw).
Die Spannung an der Batterie kann in diesem Modus nach Spezikation des jeweiligen Herstellers eingestellt werden.
• «Showroom» Modus: versorgt die Batterie während der Präsentation eines Vorführwagens mit allen Verbrauchern (Fensterheber,
Heizung, Außenspiegel,....) mit Strom. Die Spannung an der Batterie kann in diesem Modus nach Spezikation des jeweiligen Herstellers
eingestellt werden.
• «Batterie tauschen» Modus: sichert während des Ausbaus der Batterie eine stabile Bordnetzspannug um den Verlust von Speicherin-
formationen zu vermeiden. In der Standardeinstellung ist der Modus nicht aktiviert und erscheint nicht in der Liste der Modi.
• «Power Supply» Modus: Für erfahrene Anwender geeignet. In der Standardeinstellung ist er nicht aktiviert und erscheint nicht in der
Liste der Modi. Dieser Modus ermöglicht die Benutzung des Ladegeräts als leistungsstarke Gleichspannungsquelle, deren Spannung und
gelieferter Maximalstrom einstellbar sind.
DE
Die Geräte verfügen über eine automatische Neustartfunktion, so dass im Falle eines Stromausfalls z.B. der «Ladung» Modus, «Showroom»
Modus oder «Power Supply» Modus neugestartet wird. Die Funktion «Lock Showrom» (Showroom Sperre) beschränkt die Einstellmöglich-
keiten auf ein Minimum, um Fehlbedienungen bei KFZ-Vorführungen zu vermeiden.
NETZANSCHLUSS - INBETRIEBNAHME
Schließen Sie das Batterieladegerät an die Netzspannung an. 230V±15% (50/60Hz).
1
Schalten Sie auf «ON».
2
Es erscheint 3 Sekunden lang «GYSFLASH 50.24 HF Vx.x» auf dem Display.
Stellen Sie den gewünschten Modus ein. Wird der Modus nicht ausgewählt, greift das Gerät auf die zuletzt benutzten
3
Einstellungen zurück.
• Drücken Sie den «Mode» Knopf um in folgendes Menü zu
gelangen:
• Um in die Einstellungen zu gelangen, halten Sie den Knopf 3
sek. gedrückt:
LADUNG MODUS (STARTER- & TRAKTIONSBATTERIEN)
Das Gerät ist standardmäßig eingestellt für Starterbatterien. Der Ladetyp (Starter- oder Traktionsbatterien) kann im Menü Einstellungen
geändert werden. Das Gerät ermöglicht das gefahrlose Auaden der Batterie, auch wenn diese im Fahrzeug verbleibt.
Bitte beachten Sie die folgenden Punkte:
Ladeeinstellung:
Bevor Sie mit der Ladung beginnen, stellen Sie sicher, dass das Ladegerät korrekt eingestellt ist (Batteriespannung, Ladekurve und
Batteriekapazität).
Es sind verschiedene Ladekurven wählbar:
• Easy: vereinfachte Ladekurve, geeignet für alle Bleibatterien und für Batterien, deren Kapazität man nicht kennt. Für eine optimale
Ladung ist es jedoch besser, wenn man die Liquid- oder Gel/AGM-Ladekurve nutzt. Die Easy-Ladekurve ist nur für Starterbatterien geeignet.
• Nass: Ladekurve für ventilregulierte Batterien (Blei, Blei-Kalzium, Blei-Kalzium-Silber,etc…). Für diese Ladekurve muss die Batteriekapazität in Ah ausgewählt werden.
• Gel/AGM: Ladekurve für wartungsfreie Batterien (Gel, AGM…). Für diese Ladekurve muss die Batteriekapazität in Ah ausgewählt
werden.
• LFP/LiFePO4: Ladekurve für Lithium-Batterien vom Typ LFP (Lithium-Eisen-Phosphat). Für diese Ladekurve muss die Batteriekapazität in Ah
ausgewählt werden.
• Expert: IU0I0U-Ladekurve durch das Menü "ADVANCED MENU" und nur von erfahrenen Anwendern einstellbar (siehe Seite 29).
Bei der Standardeinstellung ist diese Ladekurve inaktiviert und erscheint nicht in der Liste der Ladekurven im Lademodus. Die Expert-
24
Ladekurve ist nur für Starterbatterien geeignet.
MODE
MODE
Landung (oder Traktion) > Diag+ > Showroom
(>Batterie tauschen*) (> Power Supply*) *bei der
Standardeinstellung «versteckt».
3 sec - Einstellungen
Page 25

GYSFLASH 50.24 HF
easy
nass
gel/AGM
LFP/LiFePO4
expert
10Ah
20Ah
...
600Ah
LADUNG 12V
gel/AGM 80Ah
12V
80Ah
12V
80Ah
LADUNG
gel/AGM
LADUNG
gel/AGM
LADUNG 12V
gel/AGM
6V
12V
24V
80Ah
gel/AGM
nass
50Ah
60Ah
...
450Ah
TRAKTION 12V
gel/AGM
80Ah
12V
80Ah
12V
80Ah
TRAKTION
gel/AGM
TRAKTION
gel/AGM
TRAKTION 12V
gel/AGM
6V
12V
24V
80Ah
DE
ACHTUNG: Bei einem Ladevorgang mit der Experte-Kurve (siehe S.29) kann es erforderlich sein, die
Batterie abzuklemmen, um die Fahrzeugelektronik zu schützen.
EINSTELLUNG «LADUNG VON STARTERBATTE-
RIEN» MODUS
START DER LADUNG
VON STARTERBATTERIEN
LADUNG
gel/AGM
10%
80Ah
U=12.5V
Q=2.5Ah
10%LADUNG
I=10A
00h22
EINSTELLUNG «LADUNG VON STARTERBATTE-
RIEN» MODUS
START DER LADUNG VON TRAKTIONSBATTERIEN
TRAKTION
gel/AGM
10%
80Ah
U=12.5V
Q=2.5Ah
10%TRAKTION
I=10A
00h22
LADEZEIT TRAKTIONSBATTERIE
6V/12V/24V
50 Ah 250 Ah
~ 8h*
*Bei Bedarf kann die Ladezeit durch die Eingabe einer Kapazität, die leicht
höher als die Nennkapazität der Batterie liegt, reduziert werden (Maximum
+20%). Beispiel: für eine Batterie 100 Ah stellen Sie das Ladegerät auf 110
Ah und dadurch reduzieren Sie die Ladezeit um ungefähr 45 min.
Erste Schritte:
• Verbinden Sie die Ladeklemmen: rot (+) und schwarz (-) mit der Batterie.
• Drücken Sie auf den EIN-AUS-Schalter. Der Ladevorgang beginnt.
• Während des Ladens zeigt das Gerät abwechselnd den Ladenfortschritt in Prozent (%), die Spannung, den Strom, die
Ampere-Stunde und die vergehende Zeit.
NB: Wenn die Batterie vollständig geladen ist (100 %) und angeschlossen bleibt, bleibt der Ladezustand der Batterie durch
den "Floating Modus" von Starterbatterien erhalten.
Während des Ladens sollte der Stromverbrauch des Fahrzeuges auf einen Minimum reduziert werden (Fernlicht ausschalten, den
Motor ausschalten, Türen schließen), um den Ladevorgang nicht zu stören.
Vorsicht: Prüfen Sie gegebenenfalls den Säuregehalt der Batterie vor dem Ladevorgang.
«DIAG+» MODI
Während der Diagnose bei Motorstillstand hält das GYSFLASH die Stromversorgung der Bordbatterie für elektrische Verbraucher
(Motorkühlung, Fensterheber, Bordelektronik, usw.) bis 30 A aufrecht. Es hält eine konstante Spannung von:
- 12 V bis 14,8 V (für 12 V Batterie)
- 24 V bis 29,6 V (für 24 V Batterie)
- 6 V bis 7,4 V (für 6 V Batterie)
250 Ah 450 Ah
9h 14h
50 HF
Spannungseinstellung:
Die Spannung an der Batterie kann in Schritten von 0,1 V nach Spezikation des jeweiligen Herstellers eingestellt werden.
25
Page 26

GYSFLASH 50.24 HF
I=12A
DIAG+
U=13.5V
DIAG+
U=13.5V
12V 12V
SHOWROOM
13.5V
I=12A
SHOWROOM
U=13.5V
12V12V
DE
EINSTELLUNG «DIAG +» MODUS
Erste Schritte:
• Verbinden Sie die Ladeklemmen: rot (+) und
DIAG+
U=13.5V
12V
schwarz (-) mit der Batterie.
• Drücken Sie den START/STOP Knopf.
• Die Stromaufnahme und die mom. Spannung
wird angezeigt.
DIAG+
DIAG+
12V
U=13.5V
24V
U=27.2V
6V
12V
24V
6.0V
6.1V
7.4V
START DIAG +
12.0V
24.0V
12.1V
...
14.8V
24.1V
...
29.6V
...
Vorsicht: Ist der angezeigte Strom höher als 10A ist die Batterie entladen. Das GYSFLASH wird automatisch einen Ladevorgang
beginnen. Prüfen Sie, ob alle elektrischen Verbraucher im Fahrzeug ausgeschaltet sind. Warten Sie, bis der Strom unter 10 A liegt,
ehe Sie die Diagnose durchführen.
"SHOWROOM" MODUS
Während der Diagnose bei Motorstillstand hält das GYSFLASH die Stromversorgung der Bordbatterie für elektrische Verbraucher
(Motorkühlung, Fensterheber, Bordelektronik, usw.) bis 50 A aufrecht. Es hält eine konstante Spannung von:
- 12 V bis 14,8 V (für 12 V Batterie)
- 24 V bis 29,6 V (für 24 V Batterie)
- 6 V bis 7,4 V (für 6 V Batterie).
Spannungseinstellung:
Die Spannung an der Batterie kann in Schritten von 0,1 V nach Spezikation des jeweiligen Herstellers eingestellt werden.
EINSTELLUNG «SHOWROOM» MODUS
Anschluss an die Batterie:
• Verbinden Sie die Ladeklemmen: rot (+) und
SHOWROOM
U=13.5V
12V
schwarz (-) mit der Batterie.
• Drücken Sie den START/STOP Knopf.
• Die Stromaufnahme und die mom. Spannung
wird angezeigt.
SHOWROOM
U=13.5V
SHOWROOM
U=27.2V
12V
24V
6V
12V
24V
6.0V
6.1V
7.4V
START SHOWROOM
12.0V
24.0V
12.1V
...
14.8V
24.1V
...
29.6V
...
Anschluss ohne Batterie (nicht empfohlen):
Es ist möglich das Fahrzeug ohne Batterie mit Strom zu versorgen, indem Sie den START/STOP Knopf für 3 Sekunden drücken. Auf
dem Display erscheint für 1 Sekunde "No battery" bevor das Fahrzeug vesorgt wird.
Achtung: Eine Verpolung kann die Fahrzeugelektronik schädigen.
Vorsicht:
Ist der angezeigte Strom höher als 10A ist die Batterie entladen. Das GYSFLASH wird automatisch den Ladevorgang beginnen. Prüfen
Sie, ob alle elektrischen Verbraucher im Fahrzeug ausgeschaltet sind. Warten Sie, bis der Strom unter 10 A sinkt, ehe Sie die Fahrzeugelektronik nutzen.
"BATTERIE TAUSCHEN" MODUS (OPTIONAL)
Das GYSFLASH versorgt das Bordnetz mit einer stabilen Spannung, während des Batteriewechsels, um den Verlust von Speicherinhalten zu
vermeiden.
Einstellung der Spannung:
Beim GYSFLASH 50.24 HF ist es möglich zwischen 6 V, 12 V oder 24 V zu wählen:
26
Page 27

EINSTELLUNG «BATTERIE
POWER SUPPLY
U=19.6V I<50A
POWER SUPPLY
U=19.6V I=10A
TAUSCHEN» MODUS
BATTERIE TAUSCHEN
12V
GYSFLASH 50.24 HF
Erste Schritte:
• Anschluss:
1. Schwarze Klemme an eine blanke Stelle der Karosserie.
2. Rote Klemme so an den positiven Batterieanschluss, dass
die Batterie ohne Entfernen der Klemme ausgebaut werden
kann.
DE
BATTERIE TAUSCHEN
12V
• Drücken Sie den START/STOP Knopf.
• Der momentan verbrauchte Strom und die momentane Spannung werden angezeigt.
• Achten Sie beim Tausch der Batterie auf die richtige
Polarität und vermeiden Sie ein Lösen der Zangen, da
sonst Datenverlust droht.
Achtung: Eine Verpolung kann die Fahrzeugelektronik schädigen.
"POWER SUPPLY" MODUS (STROMVERSORGUNG) (OPTIONAL)
Der Modus für erfahrene Anwender ermöglicht die Benutzung des Ladegeräts als leistungsstarke Gleichspannungsquelle, deren Spannung und gelieferter Maximalstrom einstellbar ist. Bei der Standardeinstellung ist dieser Modus inaktiv und erscheint nicht in der Liste
der Modi. Durch das Menü "ADVANCED MENU" ist er einstellbar (siehe Seite 29).
Einstellung der Spannung und der Begrenzung des Stroms:
Die Spannung kann zwischen 2 und 30 V eingestellt werden und der gelieferte Maximalstrom zwischen 2 und 50 A:
6V
12V
24V
START BATTERIE TAUSCHEN
BATTERIE TAUSCHEN
BATTERIE TAUSCHEN
U=12.9V I=26AU=12V
EINSTELLUNG «POWER SUPPLY» MODUS
POWER SUPPLY
U=13.5V I<50A
Erste Schritte:
• Drücken Sie den START/STOP Knopf.
• Die Stromaufnahme und die mom. Spannung wird
angezeigt.
POWER SUPPLY
U=19.6V I<50A
2.0V
2.1V
...
30.0V
START POWER SUPPLY
50A
MODE
SELECT
2A
3A
...
3 sec - Modus
Sprachen > Neustart > Lock Showroom > Ladetyp > Kabel überprüfen
> ADVANCED MENU > Reset Memory
POWER SUPPLY
U=19.6V I<35A
BEMERKUNG: Im Gegensatz zu den anderen Modi, wird beim «Power Supply» Modus nicht der Spannungsabfall in den
Kabeln ausgeglichen. In dem Fall entspricht die Spannung auf dem Display der Ausgangsspannung vom Gerät (und nicht die
Spannung an den Klemmen).
MENÜ EINSTELLUNGEN
Zugang zum Menüpunkt «Einstellungen»:
Um in die Untermenüs zu gelangen,
drücken Sie den «Select» Knopf:
27
Page 28

GYSFLASH 50.24 HF
EINSTELLUNGEN
Deutsch
EINSTELLUNGEN
neustart: ON
Y (yes)
N (no)
ON
OFF
English
Francais
Deutsch
Nederlands
Espanol
Portugues
Italiano
Russian
...
EINSTELLUNGEN
Kabel Überprüfen:
START drücken
EINSTELLUNGEN
lock showroom: N
EINSTELLUNGEN
Advanced Menu:
START drücken
EINSTELLUNGEN
Reset Memory:
START drücken
KABEL
ÜBERPRÜFEN
Advanced menu
Reset Memory
automo.
traktion
EINSTELLUNGEN
ladung: automo.
DE
Untermenü:
EINSTELLUNG MODUS
• Sprachen:
Dieses Menü ermöglicht die Auswahl der Sprache (mittels der Pfeile).
• Automatischer Neustart:
ie Funktion automatischer Neustart funktioniert nur im «Showroom» «La-
dung» oder «Power Supply» Modus. Diese Funktion ermöglicht im Falle
eines Stromausfalls den automatischen Neustart des Ladegeräts sowie
den automatischen Neustart des Ladevorgangs. Die „automatischer
Neustart“-Funktion aktivieren Sie mit „Einstellung – Neustart: ON“.
• «Lock Showroom» (Showroom Sperre):
Um den «Showroom» Modus zu sperren («Tastensperre», um Missbrauch
zu vermeiden). Die „Lock Showroom“-Funktion aktivieren Sie mit „Einstellung – Lock Showroom: Y“.
Abkürzung für die Showroom Sperre:
Die «Showroom Sperre» kann auch ohne in das Menü Einstellungen zu gehen, aktiviert werden:
• Schalten Sie das Gerät aus (Drücken Sie den «AUS» Schalter).
• Drücken Sie den «Mode» Schalter.
• Schalten Sie das Gerät mit gedrücktem « Mode » Schalter wieder ein. Das Display zeigt 3
Sekunden lang «GYSFLASH 50.24 HF Vx.x» an.
• Halten Sie den «Mode» Schalter gedrückt, bis angezeigt wird : «lock showroom: Y».
MODE
• Ladetyp:
Der Ladetyp kann ausgewählt werden:
- Ladung Starterbatterie (automo.) zur Ladung von Starterbatterien.
- Ladung Traktionsbatterie (traction) zur Ladung von Traktionsbatterien.
• Kabelkalibrierung:
Dieses Tool muss bei jedem Tausch der Kabel genutzt werden. Das GYSFLASH kann mit Kabeln bis zu 2 x 8 m
in 16 mm² ausgestattet werden.
OK : Die Kalibrierung war erfolgreich.
FAIL : Es gibt ein Problem während der Kalibrierung. In diesem Fall, wurde die Kalibrierung auf Werkseinstel-
lungen zurückgesetzt. Prüfen Sie den Kabelzustand, schließen Sie Zangen kurzfristig kurz und wiederholen Sie
den Vorgang.
• Advanced Menu (code 1-9-6-4) :
Dieses Menü ist nur für erfahrene Anwendern geeignet.
Zugriff zum Menü, den obenstehenden Code eingeben («Select» zur Änderung der Zahl und «Start/Stop» zur
Bestätigung des Codes).
Für zusätzliche Infos, siehe Seite 29.
• Reset Memory (code 1-9-6-4) :
Dieses Menü kann mit dem obenstehenden Code die
Einstellungen des Ladegerät auf Werkeinstellungen
zurücksetzen. Ihre persönlichen Einstellungen werden gelöscht.
RESET MEMORY
RESET MEMORY
Error Code
Display 1s
RESET MEMORY
Code: 0000
Code NOK
Code OK
(1964)
RESET MEMORY
Code OK
RESET MEMORY
Reset all ?
0
1
...
9
Änderung
der Zahl
Yes
No
28
Page 29

GYSFLASH 50.24 HF
DE
ADVANCED MENU
Das Menü erlaubt die Konguration der erweiterten Einstellungen. Um zwischen den Einstellungen umzuschalten, auf die Taste
"Select" drucken:
SELECT
Aktivieren «Batteriewechsel-Modus» > Aktivieren «Power Supply» > Aktivieren «Expert Curve» (> Konguration
der Einstellungen «Expert Curve»)
• Aktivierung des Batteriewechsel-Modus:
Zur Aktivierung des Batteriewechsel-Modus wählen Sie den « Advanced Menu »
aus. Batteriewechsel: ON. Dieser Modus wird daher auf die Modus-Liste verfüg-
bar sein.
• Aktivierung des «Power Supply» Modus:
Um den Stromversorgungs Modus zu aktivieren, «ADVANCED MENU»
auswählen| Stromversorgung: «ON». Dadurch steht dieser Modus in der Liste
der Modi zur Verfügung.
• Aktivierung der Kurve «EXPERT»:
Um die Ladekurve»EXPERT» zu aktivieren, «ADVANCED MENU» auswählen|
Expert Kurve : «ON». Dadurch steht diese Kurve bei dem Lademodus in der
Liste der Ladekurve zur Verfügung.
• Konguration der Einstellungen der Kurve «EXPERT»:
Wenn die Ladekurve «EXPERT» aktiviert ist, ist es möglich die Einstellungen der
Kurve zu kongurieren (Typ IU0I0U):
- Unominal : Nennspannung der Batterie (6V, 12V oder 24V)
- Ucharge : Ladespannung zwischen 6.0V und 30.0V einstellbar (Ladestufe 7).
- Icharge: Von 10A bis 200A einstellbarer Ladestrom ab einer Batteriekapazi-
tät von 100Ah (Stufe 6).
- Urecovery : Wiederbelebungsspannung einstellbar bis 30 V. Wenn
«OFF» eingegeben ist, ist die Wiederbelebungssfunktion inaktiv (Ladestufe 2
und 4).
- Uoating : Erhaltungsspannung einstellbar, je nach eingegebenem
Unominam Wert. Wenn «OFF» eingegeben ist, ist die Erhaltungsfunktion
inaktiv (Ladestufe 9).
- T recovery : maximale Zeit der Wiederbelebung der Zellen im
Kurzschluss - einstellbar zwischen 1 und 24 Stunden (Ladestufe 2).
- T refresh : Dauer der Regenerierungsphase - einstellbar zwischen 1
und 12 Stunden. Wenn «OFF» eingegeben ist, ist die Aktualisierungssfunktion
inaktiv (Ladestufe 8).
- T desulfat: einstellbare, maximale Zeit der Desulfatierungsphase zwischen
1 bis 24 Stunde (Ladestufe 8).
- T ch_max: maximale Ladezeit (Ladestufe 7 und 6).
- T ch_min: minimale Ladezeit (Ladestufe 7 und 6).
- Urefresh: maximale Spannung während einer Aktualisierungszeit (Ladestufe
8).
- OCP (Überlastungsschutz): einstellbarer, maximaler Prozentsatz der
Batteriekapazität bevor Schutzabschaltung (Ladestufe 8).
ADVANCED MENU
ADVANCED MENU
Change bat.: OFF
ADVANCED MENU
Power Supply: OFF
ADVANCED MENU
expert curve: OFF
OFF
ON
EXPERT CURVE
Unominal: 12V
EXPERT CURVE
Ucharge: 14.3V
EXPERT CURVE
Ichrg: 20A/100Ah
EXPERT CURVE
Urecovery: OFF
EXPERT CURVE
Uoating: OFF
EXPERT CURVE
T recovery: 5h
EXPERT CURVE
T desulfat: 12h
EXPERT CURVE
Tch_max: 16h
EXPERT CURVE
Tch_min: 0h
EXPERT CURVE
T refresh: 5h
EXPERT CURVE
U refresh: 17.0V
EXPERT CURVE
OCP: 200%
ON
OFF
ON
OFF
ON
OFF
6V
12V
24V
6.0V
6.1V
...
8.0V
10A/100Ah
11A/100Ah
...
200A/100Ah
OFF
Uch
...
29.9V
30.0V
OFF
6.0V
6.1V
...
Uch
1h
2h
...
24h
1h
2h
...
24h
1h
2h
...
36h
0h
1h
...
Tch_max
OFF
1h
2h
...
12h
Uch
...
30.9V
31.0V
100%
...
245%
250%
12.0V
12.1V
16.0V
OFF
Uch
29.9V
30.0V
OFF
12.0V
12.1V
Uch
24.0V
24.1V
...
...
30.0V
OFF
Uch
...
...
29.9V
30.0V
OFF
24.0V
24.1V
...
...
Uch
aACHTUNG:
eine zu hohe «Urecovery» oder «Urefresh» Spannung die Elektronik des
Beim Laden einer Batterie im eingebauten Zustand, kann
ADVANCED MENU
Save? No
Fahrzeuges beschädigen. In diesem Fall sollte diese Parameter nicht
über 15 V gestellt werden.
RETURN
Zum Speichern und Aktivieren der neuen Einstellungen, „ADVANCED MENU“ auswählen
|speichern? Ja“.
Drücken Sie « Mode », um das Einstellungsmenü zu verlassen.
Yes
No
29
Page 30

GYSFLASH 50.24 HF
«Expert» Ladekurve (IU0I0U)
DE
U
U=Ucharge
Trefresh
I=Irefresh
max.
T
recovery
Recovery
U=Urecovery
Phase I Phase U0 Phase I0
I=Icharge
I
1 2 3 4 5 6 7 8 9
Test Test Charge Absorption Floating
1
2
3
4
5
Shorted cell
Recovery
0% 10% 20% 80% 95% 100%
Analyse der Batterie
Wiederherstellung- aufgrund einer Tiefentladung- beschädigter Zellen
Sulfatierungstest
Desulfatierung/ Wiederbelebung der Batterie
Battery Recovery Test
Sulphation
Test
Desulphation
Refresh
U=Uoating
Phase U
10
New charge
cycle
U
Ladung bis 80%
6
Ladung bis 95%
7
Regenierung des Batteriezellen
8
Erhaltungsladung
9
10
Wiederholt einen Ladezyklus, um die Leistung zu erhalten = Wartung
«Traktion» Ladekurve (IUI0)
U=Urecovery
Recovery Phase I
I=Icharge
U=Ucharge
Phase U
I
1 2 3 4 5 6 7 8 9
Shorted cell
Test Test Charge Absorption Rest
Recovery
0% 10% 20% 80% 90% 95% 98% 100%
Sulphation
Test
Desulphation
Phase I0
Trefresh Trest
I=Irefresh
Refresh
I=Iequa
10
Equalization
max 48h
before new
charging cycle
11
End of
charge
LADUNG STARTERBATTERIEN
30
Page 31

Analyse der Batterie
1
Wiederherstellung- aufgrund einer Tiefentladung- beschädigter Zellen
2
Sulfatierungstest
3
Desulfatierung/ Wiederbelebung der Batterie
4
Battery Recovery Test
5
Ladung bis 80%
6
Ladung bis 90%
7
Regenierung des Batteriezellen
8
Erhaltungsladung
9
10
Kapazitätsangleichung der Zellen
11
100% aufgeladenen Batterie (Wiederaufnahme der Ladung nach 48 Stunden)
SCHUTZFUNKTIONEN
GYSFLASH 50.24 HF
DE
LADUNG TRAKTIONSBATTERIE
Das GYSFLASH 50.24 HF ist gegen Kurzschlüsse und Verpolung abgesichert. Es verfügt über ein Funkenschutz-System, welches
Funkenbildung beim Anschluss der Klemmen an die Batterie verhindert. Aus Sicherheitsgründen sind die Klemmen spannungsfrei,
wenn das Gerät nicht an eine Batterie angeschlossen ist. Das GYSFLASH 50.24 HF ist mit einer internen 80 A Sicherung ausgestattet
(Art.-Nr.: 054653), die das Gerät bei falscher Handhabung schützt.
BETRIEBSSTÖRUNG, URSACHEN, ABHILFEN
BETRIEBSSTÖRUNGEN URSACHEN ABHILFEN
1
2
3
4
5
6
7
8
9
10
11 Das Display zeigt nichts an.
Das Display zeigt an:
« #fehler (+)<-->(-) »
+ Warnton
Das Display zeigt an:
« #fehler U>Umax »
+ Warnton
Das Display zeigt an:
« #Batterie-Fehler »
+ Warnton
Das Display zeigt an:
« >50A »
+ Warnton
Das GYSFLASH liefert einen zu
hohen Ladestrom (höher als 10
A). Während der Ladung ist kein
Diagnosemodus möglich.
Das Display zeigt 1 Sek. lang:
« no battery »
+ Warnton
Der "Showroom" Modus ist
gesperrt.
Das Display zeigt an:
« #fehler T(°C) »
+ Warnton
Das Display zeigt an:
« #fehler IHM »
+ Warnton
Das Display zeigt an:
« #fehler fuse »
+ Warnton
Inversion de polarité sur les pinces
Die Batteriespannung ist zu hoch. Ladegerät ist nicht für die Batterie geeignet (24 V anstatt 12 V).
Die Batterie hat einen Kurzschluss oder ist
beschädigt.
Die Batterie ist nicht verbunden
oder die Klemmen sind kurzgeschlossen.
Eine 6V Batterie ist angeschlossen. Das Ladegerät ist nicht kompatibel.
Ein zu hoher Vebraucher ist eingeschaltet. Schalten Sie den Verbraucher aus.
Viele Verbraucher im Fahrzeug sind eingeschaltet.
Batterie entladen.
Der «Showroom» Modus ist aktiv « no battery ».
«Lock Showroom» ist aktiviert.
Fehlerhafter Ventilator. Kontaktieren Sie Ihren Händler oder den Hersteller.
Das Gerät stand zu lange in der Sonne.
Fehler in der Elektronik. Kontaktieren Sie Ihren Händler bzw. Hersteller.
Falsche Handhabung.
Eingangsicherung defekt.
Fehlerhafte Netzspannung.
Schließen Sie die rote Klemme an den (+) und die schwarze an den (-) Pol der
Batterie an.
Batterie ersetzen.
Überprüfen Sie die Verbindung der Batterieklemmen.
Stellen Sie sicher, dass alle Verbraucher ausgeschaltet/getrennt sind, um zu
prüfen, ob die Batterie nicht zu sehr entladen ist (Ursache Nr. 2).
Wenn Ihre Batterie tiefentladen ist, liefert das GYSFLASH einen Ladestrom, um
das Wiederauaden zu ermöglichen. Bitte warten Sie, bis der Ladestrom unter
10 A sinkt, um die Fahrzeugdiagnose starten zu können.
«Showroom» Modus ohne Batterie: normale Benutzung des GYSFLASH.
So deaktivieren Sie die Funktion « no battery », Drücken Sie START/STOP,
danach drücken Sie die START/STOP Taste nochmal, um den «Showroom»
Modus mit Batterie zu starten.
Normale Funktion des GYSFLASH. Gehen Sie in die Einstellungen, um die Funk-
tion zu deaktivieren.
Lassen Sie das Gerät nicht zu lange in der Sonne stehen. Lassen Sie das Gerät
eingeschaltet, bis die Warnmeldung erlischt (der Warnton kann durch das Drüc-
ken des START/STOP Knopfes deaktiviert werden).
Lassen Sie die Sicherung durch eine qualizierte Person wechseln
(Art.-Nr.: 054653: 80 A).
Lassen Sie die Eingangssicherung durch eine qualizierte Person wechseln
(Sicherung 10 A 5 x 20).
Versichern Sie sich, ob die Netzspannung zwischen 180 und 260 V liegt.
31
Page 32

INSTRUCCIONES DE SEGURIDAD
Este manual de uso incluye indicaciones sobre el funcionamiento de
su aparato y las precauciones a seguir para su seguridad.
Lea atentamente este documento antes del primer uso y consérvelo
para una futura lectura.
Este aparato se debe utilizar solamente para realizar la recarga o la
alimentación eléctrica dentro de los límites indicados en el aparato
y el manual. Se deben respetar las instrucciones relativas a la
seguridad: En caso de uso inadecuado o peligroso, el fabricante no
podrá considerarse responsable.
Aparato destinado a un uso en interior. No se debe exponer a la
lluvia.
Este aparato se puede utilizar por niños de al menos 8 años y
por personas con capacidades físicas, sensoriales o mentales
reducidas o sin experiencia o conocimiento, siempre y cuando estén
correctamente vigilados o si han recibido instrucciones respecto al
uso del aparato con toda seguridad y si los riesgos que conllevan
se hayan comprendido. Los niños no deben jugar con el aparato.
Los niños sin vigilancia no deben limpiar ni efectuar mantenimiento
alguno del aparato.
GYSFLASH 50.24 HF
ES
En ningún caso se debe usar este aparato para cargar pilas o baterías
no recargables.
No utilice el aparato si el cable de suministro de corriente o la clavija
están dañados.
No cargue nunca una batería helada o dañada.
No cubra el aparato.
No colocar el aparato cerca de una fuente de calor y a temperaturas
muy elevadas (superiores a 50ºC).
El modo de funcionamiento automático y las restricciones aplicables
a su uso se explican en el siguiente manual.
Riesgo de explosión y de incendio.
Una batería en carga puede emitir gases explosivos.
• Durante la carga, la batería debe ponerse en un lugar aireado.
• Evite las llamas y las chispas. No fume.
32
• Proteja las superficies de contactos eléctricos de la batería contra
cortocircuitos.
Riesgo de proyección de ácido.
• Lleve gafas y guantes de protección.
Page 33

GYSFLASH 50.24 HF
ES
• En caso de contacto con los ojos o la piel, aclare con agua
abundantemente y consulte con un médico sin demora.
Conexión / desconexión:
Desconecte la alimentación eléctrica antes de conectar o desconectar
las conexiones sobre la batería.
• El borne de la batería no conectado al chasis debe conectarse primero.
La otra conexión se debe efectuar en el chasis, lejos de la batería y de la
canalización de combustible. El cargador de baterías debe conectarse
después a la red eléctrica.
• Tras la operación de carga, desconecte el cargador de la red eléctrica,
retire la conexión del chasis y la conexión de la batería, en este orden.
Conexiones:
• Este aparato debe conectarse a una toma de corriente conectado
a tierra.
• La conexión a la red eléctrica se debe efectuar conforme a las
reglas de instalación nacionales.
Mantenimiento:
• Si se daña el cable de alimentación, deberá ser reemplazado por
un cable o conjunto especial disponibles en el fabricante o su servicio
pos-venta.
• El mantenimiento solo debe realizarlo una persona cualificada.
• ¡Advertencia! Desconecte siempre la clavija de la corriente antes
de trabajar sobre el aparato.
• El aparato no requiere ningún mantenimiento particular.
• Si el fusible interno se funde, deberá ser reemplazado por el
fabricante, su servicio post-venta o una persona cualificada, para
evitar todo peligro.
• No utilice en ningún caso disolventes u otros productos de limpieza
agresivos.
Normativa:
• Aparato conforme a las directivas europeas.
•
La declaración de conformidad está disponible en nuestra página
Web.
• Marca de conformidad EAC (Comunidad económica Euroasiática)
Desecho:
• Este material es objeto de una recogida selectiva. No lo deposite
en un contenedor doméstico.
33
Page 34

GYSFLASH 50.24 HF
DESCRIPCIÓN GENERAL
El GYSFLASH 50.24 HF es una fuente de alimentación eléctrica estabilizada de gran potencia basadas en la tecnología SMPS (Switch Mode
Power Supply). Está diseñado para baterías (líquido, AGM y gel) de 6V, 12V y 24V en vehículos en fase de diagnóstico. Garantiza una calidad de carga ideal para el mantenimiento de los modelos más avanzados. Este cargador puede utilizar cables de salida de hasta 2x8m de
16mm². El cambio de los cables de la batería requiere recalibrar el aparato (véase página 38). Está considerado como un aparato jo y no
como un aparato móvil.
Este aparato dispone de 5 modos, de los cuales 2 están ocultos:
• Modo Carga :
- Automóvil (por defecto): para cargar baterías de arranque de plomo (selladas, líquidas, AGM...) o de litio (LiFePO4) de 10 Ah a 600 Ah a
6V/12V/24V.
- Tracción : para recargar las baterías de tracción al electrolito líquido o gel (plomo, plomo-calcio, plomo-calcio-plata, AGM…) con capacidad
de 50 Ah a 450 Ah en baterías de 6V/12V/24V. Este modo se activa en el menú conguración.
• Modo alimentación « Diag + » : Cubre la necesidad de energía hasta 50A para asegurar una compensación de corriente utilizada
cuando se comprueban los dispositivos electrónicos (ventilación del motor, elevalunas, suspensión eléctrica, etc.).
El modo « Diag+ » permite denir con precisión la tensión que se libera durante esta fase.
• Mode alimentation « Showroom » : provee a la batería una compensación de corriente cuando se utilizan accesorios eléctricos en
un vehículo de demostración (elevalunas, calefacción, retrovisores, ...). En este modo, la tensión puede denirse con precisión según la
necesidad.
• Modo Cambio de Batería: Compensa las necesidades eléctricas para evitar la pérdida de la memoria del vehículo cuando se reemplaza
la batería. Por defecto, este modo está inactivo y no aparece en la lista de modos.
• Modo Power Supply : Modo dirigido a usuarios experimentados. Por defecto está inactivo y no aparece en la lista de modos. Este
modo permite servirse del cargador como si fuera una fuente de suministro eléctrico estable de gran potencia con tensión regulada y
corriente máxima ajustables.
ES
El cargador está equipado de una función de reinicio automático que le permite reiniciar la carga en caso de interrupción de corriente en
modo Carga (automóvil y tracción), Showroom y Power Supply.
La función «
culos.
PUESTA EN MARCHA Y USO
1
2
3
• El botón Mode le permitirá acceder a los diferentes menús :
• Para llegar al menú de conguración, presione durante tres
segundos el botón Mode:
MODO CARGA (AUTOMOVIL Y TRACCION)
Por defecto, la carga está congurada en carga automóvil. El tipo de carga (automóvil o tracción) se puede modicar en el menú de conguración. El producto puede recargar una batería sola o conectada del vehículo. Se debe respetar el orden de la puesta en marcha.
Ajuste de la carga:
Antes de comenzar la carga, asegúrese de que la carga está correctamente congurada (tensión de la batería, curva de la carga y capacidad
de la batería).
en este modo hay varias curvas de carga disponibles:
• Easy : curva simplicada adaptada a todas las baterías al plomo y que no requiere conocer la capacidad de la batería. En cualquier caso,
para una optimización de la carga, se recomienda utilizar las curvas de carga líquida o gel/AGM siempre que sea posible.
• Líquido : curva de carga para las baterías abiertas, con tapón (plomo, plomo-calcio, plomo-calcio-plata...). Para esta curva, se debe
indicar la capacidad de la batería en Ah.
• gel/AGM : curva de carga para las baterías selladas (batería de gel, sin mantenimiento, AGM…). Para esta curva, se debe indicar la
capacidad de la batería en Ah.
• LFP/LiFePO4: curva de carga para baterías de litio tipo LFP (Lithium Iron Phosphate). Para esta curva, se debe indicar la capacidad de la batería en Ah.
• Expert : curva de carga de tipo IU0I0U personalizable mediante el menú «Avanced Menu» y reservado a las personas experimen-
tadas (véase página 39). Por defecto, esta curva está inactiva y no aparece en la lista de curvas del modo Carga. La curva Expert
está disponible solamente en el modo de carga automóvil. ATENCIÓN: Según el ajuste de la curva Expert (ver página 39), puede
34
ser necesario desconectar la batería del vehículo antes de comenzar la carga para proteger los dispositivos electrónicos del vehículo.
Lock Showroom
Conecte el cargador en la toma de corriente. Tensión de red eléctrica monofásica de 230V ± 15%
(50/60Hz)
Ponga el interruptor en ON.
Durante tres segundos, se indica « GYSFLASH 50.24 HF Vx.x »
Elija tras el indicador el modo deseado. El cargador se situará por defecto en la última conguración utilizada.
» afecta solo al modo Showroom cuando está activada, para facilitar su uso para los que muestran los vehí-
Carga (o Tracción) > Diag+ > Showroom >
MODE
MODE
(Cambio de Batería*) (> Power Supply*)
*oculto por defecto.
3 segundos - Conguración
Page 35

GYSFLASH 50.24 HF
Easy
Liquido
Gel/AGM
LFP/LiFePO4
Expert
10Ah
20Ah
...
600Ah
CARGA 12V
Gel/AGM 80Ah
12V
80Ah
12V
80Ah
CARGA
Gel/AGM
CARGA
Gel/AGM
CARGA 12V
Gel/AGM
6V
12V
24V
80Ah
gel/AGM
liquido
50Ah
60Ah
...
450Ah
TRACCION 12V
gel/AGM
80Ah
12V
80Ah
12V
80Ah
TRACCION
gel/AGM
TRACCION
gel/AGM
TRACCION 12V
gel/AGM
6V
12V
24V
80Ah
ES
CONFIGURACIÓN EN MODO CARGA
AUTOMÓVIL
PUESTA EN MARCHA DE
LA CARGA DE AUTOMÓVIL
CARGA
Gel/AGM
12V
80Ah
CARGA
U=12.5V
Q=2.5Ah
10%
I=10A
00h22
CONFIGURACIÓN EN MODO CARGA TRACCIÓN
PUESTA EN MARCHA DE LA CARGA DE TRACCIÓN
TRACCION
Gel
12V
80Ah
TRACCION
U=12.5V
Q=2.5Ah
10%
I=10A
00h22
TIEMPO DE CARGA TRACCIÓN.
6V/12V/ 24V
50 Ah 250 Ah
~ 8h*
*Si se desea, se puede reducir el tiempo de carga insertando una capacidad ligeramente superior a la capacidad nominal de la batería (máximo
+20%). Ejemplo: para una batería de 100 Ah, ajustar el cargador a
110Ah permite reducir el tiempo de carga en alrededor de 45min.
Puesta en marcha:
• Conecte la pinza roja en el polo positivo y la pinza negra sobre el polo negativo de la batería.
• Presione START/STOP para iniciar la carga.
• Durante la carga, el producto indica el porcentaje de avance de la carga y de forma alterna, la tensión, la corriente, el
amperaje/hora inyectado y el tiempo transcurrido.
• Presione de nuevo para interrumpir la carga.
Nota: Al nal de la carga (100%), el cargador mantiene el nivel de carga de la batería aplicando una tensión tipo oating.
Precaución: Compruebe el nivel del electrolito en baterías abiertas. Restablezca el nivel si fuese necesario antes de la carga.
Cuando se carga sobre el vehículo, se aconseja reducir al mínimo el consumo eléctrico del vehículo (apagar los
faros, cortar el contacto...) para no alterar el proceso de carga.
MODO SUMINISTRO ELÉCTRICO DIAG+
En vehículos parados, el Gysash compensa la corriente utilizada hasta 50A al comprobar dispositivos electrónicos de mayor consumo
como la ventilación del motor, el elevalunas, la suspensión eléctrica, etc, suministrando una tensión estable:
- de 12V a 14,8V (para baterías de 12V).
- de 24V a 29,6V (para baterías de 24V).
- de 6V a 7,4V (para baterías de 6V).
250 Ah 450 Ah
9h 14h
50 HF
Ajuste de la tensión:
Tras haber seleccionado la tensión nominal de la batería, se puede congurar la tensión por secuencias de 0,1 según las recomendaciones
del fabricante.
35
Page 36

GYSFLASH 50.24 HF
I=12A
DIAG+
U=13.5V
DIAG+
U=13.5V
12V 12V
SHOWROOM
13.5V
I=12A
SHOWROOM
U=13.5V
12V12V
ES
CONFIGURACIÓN EN MODO DIAG +
Puesta en marcha:
• Conecte la pinza roja en el polo positivo y la pinza
DIAG+
U=13.5V
12V
negra sobre el polo negativo de la batería.
• Presione START/STOP para iniciar el proceso en
este modo.
• Durante su uso, se indican la corriente consumida
DIAG+
U=13.5V
12V
6V
12V
24V
y la tensión instantánea.
PUESTA EN MARCHA DEL MODO DIAG+
6.0V
12.0V
DIAG+
U=27.2V
24V
6.1V
7.4V
...
12.1V
...
14.8V
24.0V
24.1V
...
29.6V
Precaución: Si se indica una corriente superior a 10A, esto signicará que su batería está descargada. Su Gysash suministrará una cor-
riente de recarga. Compruebe que no haya dispositivos encendidos en el vehículo. Espere a que la intensidad pase por debajo de 10A para
iniciar la operación de diagnóstico.
MODO SUMINISTRO SHOWROOM
En vehículos parados, el Gysash compensa la corriente utilizada hasta 50A al comprobar los dispositivos electrónicos como la calefacción,
el elevalunas, la suspensión eléctrica, etc, suministrando una tensión estable a los vehículos de demostración:
- de 12V a 14,8V (para baterías de 12V)
- de 24V a 29,6V (para baterías de 24V).
- de 6V a 7,4V (para baterías de 6V).
Ajuste de la tensión:
Tras haber seleccionado la tensión nominal de la batería, se puede congurar la tensión por secuencias de 0,1 según las recomendaciones
del fabricante.
AJUSTE DEL MODO SHOWROOM
Puesta en marcha:
• Conecte la pinza roja en el polo positivo y la pinza negra
SHOWROOM
U=13.5V
12V
sobre el polo negativo de la batería.
• Presione START/STOP para iniciar el proceso en este
modo.
• Durante su uso, se indican la corriente consumida y la
SHOWROOM
U=13.5V
12V
6V
12V
24V
tensión instantánea.
PUESTA EN MARCHA DEL MODO SHOWROOM
6.0V
12.0V
SHOWROOM
U=27.2V
24V
6.1V
7.4V
...
Puesta en marcha sin batería (no recomendada):
Se puede iniciar el suministro eléctrico sin batería presionando sobre START/STOP durante 3 segundos.
La indicación « no battery » se mostrará durante un segundo antes de iniciar el suministro eléctrico.
CUIDADO: una inversión de polaridad puede tener repercusiones negativas en los dispositivos electrónicos del vehículo.
Precaución:
Si se indica una corriente superior a 10A, esto signicará que su batería está descargada. Su Gysash suministrará una corriente de recarga.
Compruebe que no haya dispositivos encendidos en el vehículo. Espere a que la intensidad pase por debajo de 10A antes de utilizar los
dispositivos eléctricos del vehículo.
12.1V
...
14.8V
24.0V
24.1V
...
29.6V
MODO CAMBIO DE BATERÍA (OPCIONAL)
El Gysash asegura un suministro eléctrico estable para las necesidades del vehículo durante el cambio de batería para poder proteger las
memorias. Por defecto, este modo está inactivo y no aparece en la lista de modos. Se puede activar mediante el menú de conguración
Expert (veáse página 39).
Ajuste de la tensión:
Se puede elegir entre 6V, 12V y 24V para el cambio de batería:
36
Page 37

GYSFLASH 50.24 HF
POWER SUPPLY
U=19.6V I<50A
POWER SUPPLY
U=19.6V I=10A
CONFIGURACIÓN DEL MODO CAMBIO
DE BATERÍA
CAMBIO BATERÍA
12V
ES
Puesta en marcha :
• Conecte :
1 : la pinza roja en una de las extremidades de los bornes
de la batería en el polo positivo, de manera que se pueda
reemplazar la batería sin que se desconecte la pinza.
2 : la pinza negra en el chasis del vehículo.
CAMBIO BATERÍA
12V
• Presione START/STOP para iniciar el proceso en este
modo.
• Durante su uso, se indican la corriente consumida y
6V
12V
24V
PUESTA EN MARCHA DEL
MODO CAMBIO DE BATERÍA
la tensión instantánea.
• Reemplace su batería respetando las polaridades.
CAMBIO BATERÍA
CAMBIO BATERÍA
Durante la manipulación, vigile que las pinzas del
cargador no se desconecten, ya que podría perder la
U=12.9V I=26AU=12V
memoria de los dispositivos electrónicos.
CUIDADO: una inversión de polaridad puede tener repercusiones negativas en los dispositivos electrónicos del
vehículo.
MODO POWER SUPPLY (OPCIONAL)
Este modo destinado a usuarios experimentados permite utilizar el cargador como una fuente de suministro eléctrico estable de gran
potencia con tensión y corriente máxima ajustables. Por defecto, este modo está inactivo y no aparece en la lista de modos. Se puede
activar mediante el menú «Advanced Menu» (véase página 39).
Ajuste de la tensión de regulación y de la limitación de corriente:
La tensión de regulación se puede ajustar de 2.0 a 30.0V y la corriente máxima suministrada de 2 a 50A:
CONFIGURACIÓN DEL MODO POWER SUPPLY
POWER SUPPLY
U=13.5V I<50A
Puesta en marcha con batería:
• Durante su uso, se indican la corriente consumida
y la tensión instantánea.
POWER SUPPLY
U=19.6V I<50A
2.0V
2.1V
...
30.0V
PUESTA EN MARCHA DEL MODO POWER SUPPLY
POWER SUPPLY
U=19.6V I<35A
2A
3A
...
50A
NOTA: A diferencia de los otros modos, en modo Power Supply el cargador no compensa la bajada de tensión en
los cables. En este caso, la tensión que se indica en la pantalla corresponde a la tensión de salida del cargador (y no
a la tensión en las pinzas).
MENÚ DE CONFIGURACIÓN
Acceso al menú de conguración:
MODE
3 segundos - Mode
Para navegar por el menú
de conguración presione Select:
SELECT
Langues (Idiomas) > rearranque > lock showroom > tipo de carga >
comprobar cables > ADVANCED MENU > Reset Memory
37
Page 38

GYSFLASH 50.24 HF
CONFIGURACIÓN
Espanol
CONFIGURACIÓN
rearranque: OFF
Y (yes)
N (no)
ON
OFF
English
Francais
Deutsch
Nederlands
Espanol
Portugues
Italiano
Russian
...
CONFIGURACIÓN
Comprobar Cables:
Pulse START
CONFIGURACIÓN
lock showroom: N
CONFIGURACIÓN
Advanced Menu:
Pulse START
CONFIGURACIÓN
Reset Memory:
Pulse START
Comprobar
Cables
Advanced menu
Reset Memory
automo.
tracción
CONFIGURACIÓN
carga: automo.
ES
Sub-menú :
MODO CONFIGURACIÓN
• Idiomas :
Este menú permite elegir el idioma del indicador (utilice las echas para
cambiar de idioma).
• Rearranque automático :
El rearranque automático funciona solo en modo « Showroom », « Carga
» y « Power Supply ». Esta función permite que se reinicie la carga y el
dispositivo en caso de corte de corriente eléctrica.
Para activar la función «Reinicio automático», seleccione
« Conguración | rearranque : ON ».
• Lock Showroom :
Permite bloquear el aparato en el modo Showroom.
(Evita errores de manipulación). Para activar la función «Lock Showroom»,
seleccione « Conguración | Lock Showroom : Y ».
Acceso directo a Lock Showroom :
Se puede activar la función Lock Showroom sin entrar en el menú conguración.
• Apagar el aparato (interruptor en posición OFF)
• Presione MODE
• Ponga el interruptor en posición ON, presionando al mismo tiempo MODE. Durante tres segundos, se indica « GYSFLASH 50.24 HF Vx.x »
• Presionar MODE hasta que el producto indique « lock showroom: Y »
MODE
• Tipo de carga :
Se puede elegir el tipo de carga deseada:
- Caurga automóvil para recargar las baterías de arranque.
- Carga de tracción para recargar baterías de tracción.
• Comprobar cables :
Este modo se debe utilizar cuando se realiza cualquier modicación de los cables de salida. El Gysash puede
utilizar cable de hasta 2x8m de 16mm².
OK : La calibración se ha realizado correctamente.
FAIL : Ha ocurrido un problema durante la calibración de los cables. En este caso, se reinicia la calibración
con la conguración de fábrica por defecto. Compruebe que los cables estén en buen estado y correctamente
puestos en cortocircuito y vuelva a comenzar la operación.
• Advanced Menu (código 1-9-6-4) :
Este menú está reservado a las personas experimentadas.
Para acceder, inserte el código mencionado (Select para cambiar de cifra y Start/Stop para validar el código).
RESET MEMORY
RESET MEMORY
Display 1s
Code: 0000
Code NOK
RESET MEMORY
Code OK
RESET MEMORY
Reset all ?
RESET MEMORY
Error Code
Code OK
(1964)
Cambio
de cifra
Yes
No
0
1
...
9
Para más detalles, véase la página 39.
• Reset Memory (código 1-9-6-4) :
Este menú tiene como nalidad cambiar los parámetros del cargador como cuando salió de fábrica,
mediante el código mencionado. Todas sus conguraciones se borrarán.
38
Page 39

GYSFLASH 50.24 HF
ADVANCED MENU
Este menú permite congurar los parámetros avanzados del cargador.
Para pasar de un parámetro a otro, presione Select:
ES
SELECT
Activación «Cambio Batería» > Activación «Power Supply» > Activación «Expert Curve» (> Conguración de los
parámetros «Expert Curve»)
• Activación del Modo CAMBIO BATERÍA :
Para activar el modo CAMBIO DE BATERÍA, seleccione «ADVANCED MENU»
| Change bat. : ON». De esta manera, este modo sera accesible desde la
lista de modos.
• Activación de la curva «EXPERT» :
Para activar la curva «EXPERT», seleccione «ADVANCED MENU» | Expert
curve : ON». De esta manera, estará disponible en modo Carga en la lista
de curvas de carga.
• Conguración de los parámetros de la curva «EXPERT»:
Si la curva de carga «EXPERT» se activa, se puede denir los parámetros
de la misma (typo IU0I0U) :
- Unominal : tensión nominal de baterías (6V, 12V o 24V).
- Ucharge : tensión de carga ajustable de 6.0V a 30.0V (Paso 7).
- Icharge : Corriente de carga ajustable de 10A a 200A por 100Ah de
capacidad especíca (Paso 6).
- Urecovery : tensión de recuperación ajustable hasta 30.0V. Si se
selecciona el valor «OFF», la función de recuperación se desactiva (Paso
2 y 4).
- Uoating : tensión de mantenimiento ajustable en función del valor
Unominal seleccionado. Si se selecciona el valor «OFF», la función de
mantenimiento se desactiva (Paso 9).
- T recovery : tiempo máximo de la fase de recuperación de las células
en cortocircuito ajustable de 1h a 24h (Paso 2).
- T refresh : Duración de la fase de condicionamiento ajustable de 1h a
12h. Si se selecciona el valor «OFF», la función de condicionamiento se
desactiva (Paso 8).
ADVANCED MENU
ADVANCED MENU
Change bat.: OFF
ADVANCED MENU
Power Supply: OFF
ADVANCED MENU
expert curve: OFF
OFF
ON
EXPERT CURVE
Unominal: 12V
EXPERT CURVE
Ucharge: 14.3V
EXPERT CURVE
Ichrg: 20A/100Ah
EXPERT CURVE
Urecovery: OFF
EXPERT CURVE
Uoating: OFF
EXPERT CURVE
T recovery: 5h
EXPERT CURVE
T desulfat: 12h
EXPERT CURVE
Tch_max: 16h
ON
OFF
ON
OFF
ON
OFF
6V
12V
24V
6.0V
6.1V
...
8.0V
10A/100Ah
11A/100Ah
...
200A/100Ah
OFF
Uch
...
29.9V
30.0V
OFF
6.0V
6.1V
...
Uch
1h
2h
...
24h
1h
2h
...
24h
1h
2h
...
36h
12.0V
12.1V
16.0V
29.9V
30.0V
12.0V
12.1V
24.0V
24.1V
...
...
30.0V
OFF
OFF
Uch
Uch
...
...
29.9V
30.0V
OFF
OFF
24.0V
24.1V
...
...
Uch
Uch
- T desulfat : tiempo máximo de la fase de desulfatación ajustable de 1h
a 24h (Paso 4).
- T ch_max : Tiempo de carga máxima (Paso 7 y 8).
- T ch_min : Tiempo de carga mínima (Paso 7 y 8).
- Urefresh : Tensión máxima durante un condicionamiento (Paso 8).
- OCP (Protección de sobrecarga) : Porcentaje máximo de la capaci-
dad nominal que se puede inyectar antes de la protección.
aAtención : Cuando la batería está conectada al vehículo, una
tensión Urecovery o Urefresh demasiado elevada puede dañar los
dispositivos electrónicos del vehículo. En este caso, le aconsejamos que no ajuste estos parámetros por encima de 15.0V.
Para registrar y validar los nuevos ajustes, seleccione «ADVANCED MENU»> | save? Yes»
Presione el botón MODE para salir del menú Conguración.
EXPERT CURVE
Tch_min: 0h
EXPERT CURVE
T refresh: 5h
EXPERT CURVE
U refresh: 17.0V
EXPERT CURVE
OCP: 200%
ADVANCED MENU
Save? No
RETURN
0h
1h
...
Tch_max
OFF
1h
2h
...
12h
Uch
...
30.9V
31.0V
100%
...
245%
250%
Yes
No
39
Page 40

GYSFLASH 50.24 HF
Descripción de la curva de carga de Expert (IU0I0U)
ES
U
U=Ucharge
Trefresh
I=Irefresh
max.
T
recovery
Recovery
U=Urecovery
Phase I Phase U0 Phase I0
I=Icharge
I
1 2 3 4 5 6 7 8 9
Test Test Charge Absorption Floating
1
2
3
4
5
Shorted cell
Recovery
0% 10% 20% 80% 95% 100%
Análisis de la batería
Recuperación de los elementos dañados tras una descarga profunda y prolongada
Comprobación batería sulfatada
Desulfatación/recuperación de la batería
Comprobación de la recuperación de la batería.
Sulphation
Test
Desulphation
Refresh
U=Uoating
Phase U
10
New charge
cycle
U
Carga de la batería a 80%.
6
Carga de la batería a 95%.
7
Condicionamiento de las células de la batería
8
Carga de mantenimiento
9
10
Recomienza un ciclo de carga para un mantenimiento del rendimiento = Mantenimiento
Descripción de la curva de carga de tracción (IUI0)
U=Urecovery
Recovery Phase I
I=Icharge
U=Ucharge
Phase U
I
1 2 3 4 5 6 7 8 9
Shorted cell
Test Test Charge Absorption Rest
Recovery
0% 10% 20% 80% 90% 95% 98% 100%
Sulphation
Test
Desulphation
Phase I0
Trefresh Trest
I=Irefresh
Refresh
I=Iequa
10
Equalization
max 48h
before new
charging cycle
11
End of
charge
CARGA AUTOMÓVIL
40
Page 41

GYSFLASH 50.24 HF
Análisis de la batería
1
Recuperación de los elementos dañados tras una descarga profunda y prolongada
2
Comprobación batería sulfatada
3
Desulfatación/recuperación de la batería
4
Comprobación de la recuperación de la batería.
5
Carga de la batería a 80%.
6
Carga de la batería a 90%.
7
ES
Condicionamiento de las células de la batería
8
Fase de reposos de las células
9
10
Igualización de las células de la batería
11
Batería cargada a 100% (puesta en carga tras 48h)
CARGA TRACCIÓN
PROTECCIONES
Este aparato está protegido contra los corto-circuitos y las inversiones de polaridad. Dispone de un sistema anti chispas que evita las
chispas cuando se conectar el cargador a la batería. Si no hay tensión en las pinzas, estas no liberan corriente.
Este cargador está protegido por un fusible interno de 80A (ref. 054653), contra los errores de manipulación.
ANOMALÍAS, CAUSAS Y SOLUCIONES
ANOMALÍAS CAUSAS SOLUCIONES
1
2
3
4
Indicación parpadeante:
« #error (+)<-->(-) »
+ señal sonora"
Indicador intermitente :
« #erreur U>Umax »
+ señal sonora"
Indicación parpadeante:
« #error bateria »
+ señal sonora"
Indicación parpadeante:
« >30A »
+ señal sonora"
Inversión de polaridad en las pinzas
Tensión de la batería demasiado elevada Cargador no adaptado (ej.: batería de 24V en lugar de 12V).
Batería en cortocircuito o dañada. Se debe reemplazar la batería.
Batería no conectada o pinzas en cortocircuito. Compruebe la conexión de las pinzas de carga.
Error en la selección de la tensión de la batería Cargador no adaptado.
Consumo excesivo en comparación a la potencia
del cargador
Conecte la pinza roja en el polo positivo y la pinza negra en el negativo de la
batería.
Apague algunos dispositivos para disminuir el consumo eléctrico.
El GYSFLASH suministra una cor-
riente fuerte (superior a 10A) pero
5
usted no ha iniciado su dispositivo
de diagnósticos.
Indicación durante un segundo:
6
7
8
9
10
11 El aparato no indica nada
« no battery »
+ señal sonora"
El aparato está bloqueado en modo
Showroom
"Indicación:
« #error T(°C) »
+ señal sonora"
"Indicación:
« #error IHM »
+ señal sonora"
Indicación:
« #error fusible »
+ señal sonora
Hay varios dispositivos activos en el vehículo.
Batería descargada
El modo Showroom está en funcionamiento
« no battery »
Lock Showroom activo
Ventilador defectuoso Contacte su distribuidor.
Exposición prolongada al sol
Problema electrónico Contacte su distribuidor.
Mala manipulación
Fusible de entrada HS
Red eléctrica defectuosa
Funcionamiento normal del GYSFLASH Detenga los dispositivos eléctricos para
comprobar que la batería no esté demasiado descargada (ver causa nº 2).
Su batería esta muy descargada, el GYSFLASH suministra una corriente para
recargarla. Esperar que la corriente esté por debajo de los 10A para iniciar el
diagnóstico.
Showroom sin batería : funcionamiento normal del GYSFLASH.
Para desactivar la función « no battery », presione START/STOP y vuelva a
presionar START/STOP para iniciar el modo Showroom con batería.
Funcionamiento normal del GYSFLASH.
Diríjase al menú de conguración para desactivar la función.
No deje el aparato bajo el sol.
Deje el aparato encendido hasta que el defecto desaparezca. (La señal sonora
se puede detener presionando START/STOP).
Una persona cualicada debe cambiar el fusible interno
(ref. 054653: 80A).
Una persona cualicada debe cambiar el fusible de entrada
(fusible temporizado 10A 5x20).
Compruebe que la tensión de la red eléctrica esté comprendida entre 180 y 260V.
41
Page 42

ПРАВИЛА БЕЗОПАСНОСТИ
Данная инструкция описывает функционирование вашего
устройства и меры предосторожности в целях обеспечения
вашей безопасности.
Пожалуйста, прочтите ее перед первым использованием и
сохраните, чтобы при надобности перечитать.
Этот аппарат должен быть использован только для зарядки
или питания в рамках, указанных на аппарате и в инструкции.
Соблюдайте правила безопасности. В случае неадекватного
или опасного использования производитель не несет
ответственности.
Аппарат предназначен для использования в помещении. Не
выставлять под дождь.
Этот аппарат может быть использован детьми старше 8 лет,
а также лицами с ограниченными физическими, умственными
возможностями или ограниченным сенсорным восприятием, а
также не обладающими опытом и знаниями, при условии, что
за ними надлежащим образом следят или если с ними провели
инструктаж по безопасному использованию аппарата и если
все возможные риски были предусмотрены. Дети не должны
играть с устройством. Чистка и уход не должны производится
детьми без надлежащего присмотра.
GYSFLASH 50.24 HF
RU
Ни в коем случае не используйте это устройство для зарядки
батареек или незаряжаемых батарей.
Не используйте аппарат если сетевой шнур или вилка
повреждены.
Никогда не заряжайте поврежденный или замерзший
аккумулятор.
Не покрывайте аппарат.
Не устанавливать аппарат рядом с источником тепла и не
подвергать высоким температурам (выше 50°C) в течении
длительного периода.
Автоматический режим, а также ограничения использования
описаны в данной инструкции по эксплуатации.
Риск пожара и взрыва!
При заряде батарея может выпустить взрывоопасный газ.
• Во время зарядки АКБ должна быть помещена в хорошо
проветриваемом месте.
42
• Избегайте пламени и искр. Не курить.
Защитите поверхности батареи от электрического контакта во
избежание короткого замыкания.
Риск кислотных брызг!
Page 43

GYSFLASH 50.24 HF
RU
• Носите защитные очки и перчатки.
• В случае контакта с глазами или кожей, промойте обильно
водой и проконсультируйте врача без промедления.
Подключение / отключение :
• Отключите подачу питания перед тем как подключать или
отключать соединения к батарее.
• Сначала подключите клемму АКБ, не соединенную с шасси.
Второе подсоединение должно быть осуществлено на шасси
как можно дальше от АКБ и от трубопроводов топливной
системы. Затем, подключите зарядное устройство к сети.
• После зарядки отключите зарядное устройство от сети,
затем отсоедините зажим от шасси и, наконец, зажим от
аккумулятора. Действуйте в указанном порядке.
Подключение:
• Это устройство должно быть в розетку с заземлением.
• Подключение к электросети должно быть произведено в
соответствии с законами страны.
Уход:
• Если шнур питания поврежден, он должен быть заменен
на шнур или набор включающий шнур поставляемый
производителем или его сервисной службой.
• Техническое обслуживание должно производиться только
квалифицированным специалистом.
• Внимание! Отключите аппарат от розетки до начала
ремонтных работ.
• Аппарат не требует специфического обслуживания.
• Если предохранитель расплавился, он должен быть
заменен производителем, его сервисной службой или
квалифицированным специалистом во избежание опасности.
• Ни в коем случае не использовать растворители или другие
коррозийные моющие средства.
Нормы и правила:
• Аппарат соответствует директивам Евросоюза.
• Декларация соответствия есть на нашем сайте.
• Знак соответствия EAC (Евразийское соответствие качества)
Утилизация:
• Этот аппарат подлежит переработке. Не выбрасывать в
общий мусоросборник.
43
Page 44

GYSFLASH 50.24 HF
ОПИСАНИЕ
Аппарат GYSFLASH 50.24 HF стабилизированный источник питания большой мощности, основанный на технологии SMPS (Switch Mode
Power Supply). Этот аппарат разработан для подпитки АКБ автомобилей (с жидким / гелевым электролитом/AGM) на 6В/12В/24В при
проведении диагностики. Он также гарантирует идеальное качество зарядки для технического обслуживания новейших моделей
АКБ. На GYSFLASH можно адаптировать кабели до 2 x 8 м сечением 16 мм². Замена кабелей АКБ требует перекалибровки (см.
стр.48). Это стационарный, а не переносной аппарат.
Этот аппарат предлагает 5 режимов 2 из которых скрытые:
• Режим Зарядки:
- Автомобильный (по умолчанию): для зарядки свинцовых (герметичных, жидкостных, AGM...) или литиевых (LiFePO4) стартерных
аккумуляторов от 10 Ач до 600 Ач при 6 В/12В/24В.
- Тяга: для зарядки таговых батарей с жидким или гелевым электролитом (свинец, свинец Кальций, свинец Кальций-Серебро,
AGM…) емкостью от 50Ач до 450Ач при 6В/12В/24В. Этот режим можно активировать с помощью меню конфигурации.
• Режимы питания « Diag + » : Аппараты GYSFLASH поддерживают энергетические потребности до 50 A для компенсации
используемого батареей тока для тестирования больших потребителей (вентиляция двигателя, стеклоподъёмник, электрические
подвески и т.д.). В этом режиме напряжение может быть определено более точно в зависимости от потребностей.
• Режим питания « Showroom » : для компенсации тока АКБ во время использования электрических аксессуаров выставочного
автомобиля (стеклоподъёмник, отопление, зеркало заднего обзора …).
В этом режиме напряжение может быть определено более точно в зависимости от потребностей.
• Режим Замены АКБ : Компенсирует электроэнергетические потребности во избежание потери настроек автомобиля во время
замены АКБ. По умолчанию этот режим спящий и не появляется в списке режимов.
• Режим Power Supply : Режим предназначен для опытных специалистов. По умолчанию этот режим спящий и не появляется
в списке режимов. Этот режим позволяет пользоваться зарядным устройством, как стабилизированным источником питания
большой мощности, напряжение и максимальный ток которого можно настроить.
RU
Это зарядное устройство имеет функцию автоматического повторного запуска, которая позволяет в режиме Зарядки, Showroom и
Power Supply автоматически повторно запустить зарядное устройство в случае отключения электричества.
Функция «
Showroom для упрощения его использования демонстратором автомобилей.
ЗАПУСК И НАВИГАЦИЯ
1
2
3
• Кнопка режима позволяет доступ к различным меню :
• Для входа в меню конфигурации нажмите в течение 3
секунд на кнопку режима:
РЕЖИМ ЗАРЯДКИ (АВТОМОБИЛЬ & ТЯГА)
По умолчанию, зарядка настроена на заряд АКБ автомобиля. Тип заряда (автомобиль или тяга) может быть настроена в меню
конфигурации. Аппарат может заряжать АКБ отдельно или подсоединенную к автомобилю. Соблюдайте порядок запуска.
Настройка зарядки:
Перед тем, как начать зарядку убедитесь в том, что параметры зарядки введены правильно (напряжение и емкость АКБ и кривая зарядки).
В этом режиме, устройство предлагает несколько кривых зарядки:
• Easy: упрощенная кривая, подходящая ко всем свикцовым АК, и которая не требует информации по емкости АКБ. Тем не
менее для максимальной оптимизации зарядки рекомендуется использовать кривые зарядки жидкость или гель/AGM (когда это
возможно). Кривая Easy доступна только в режиме зарядки автомобиля.
• жидкостный электролит: кривая зарядки для открытых АКБ, АКБ с пробками (свинец, свинец кальций, свинец кальций
серебро…). Для этой кривой необходимо ввести емкость АКБ в Ач.
• гель/AGM: кривая зарядки для герметичных аккумуляторов (гелевые, необслуживаемые, AGM…). Для этой кривой необходимо
ввести емкость АКБ в Ач.
• LFP/LiFePO4: кривая зарядки литиевых батарей типа LFP (литиевый фосфат железа). Для этой кривой необходимо ввести
емкость АКБ в Ач.
• Expert: кривая зарядки типа IU0I0U может быть настроена с помощью меню «Avanced Menu» самыми опытными пользователями
(см: стр.50). По умолчанию эта кривая неактивна и не появляется в списке кривых режима ЗАРЯДКА. Кривая Expert доступна
только в режиме зарядки автомобиля. ВНИМАНИЕ: В соответствии с настройкой кривой Expert (см стр. 49), может возникнуть
44
необходимость отсоединить АКБ от автомобиля до начала зарядки чтобы защитить бортовую электронику автомобиля.
Lock Showroom
Подключите зарядное устройство к сети. Однофазное напряжение сети 230В ± 15% (50/60Hz).
Поставьте прерыватель в положение «ON».
Дисплей афиширует «GYSFLASH 50.24 HF Vx.x» в течение 3х секунд.
Затем выберите нужный режим. По умолчанию зарядное устройство настраивается на последнюю заданную
конфигурацию.
», в случае, если она активирована, ограничивает зарядное устройство исключительно режимом
Зарядка (или Тяга) > Diag+ > Showroom >
MODE
MODE
(Замена АКБ*) (> Power Supply*)
*скрыт по умолчанию.
3 сек - Конфигурация
Page 45

GYSFLASH 50.24 HF
easy
liquid
гель/AGM
LFP/LiFePO4
expert
10Ah
20Ah
...
600Ah
ZARJADKA 12V
gel/AGM
80Ah
12V
80Ah
12V
80Ah
ZARJADKA
gel/AGM
ZARJADKA
gel/AGM
ZARJADKA 12V
gel/AGM
6V
12V
24V
80Ah
gel/AGM
liquid
50Ah
60Ah
...
450Ah
TYAGOVAYA 12V
gel/AGM
80Ah
12V
80Ah
12V
80Ah
TYAGOVAYA
gel/AGM
TYAGOVAYA
gel/AGM
TYAGOVAYA 12V
gel/AGM
6V
12V
24V
80Ah
RU
НАСТРОЙКА РЕЖИМА СТАРТОВЫЙ ЗАРЯД
ЗАПУСК СТАРТОВОГО РЕЖИМА
ZARJADKA
gel/AGM
10%
80Ah
U=12.5V
Q=2.5Ah
10%ZARJADKA
I=10A
00h22
НАСТРОЙКА РЕЖИМА ТЯГОВОГО ЗАРЯДА
ЗАПУСК ТЯГОВОГО РЕЖИМА
TYAG OVAYA
gel/AGM
10%
80Ah
U=12.5V
Q=2.5Ah
10%TYAG OVAYA
I=10A
00h22
ВРЕМЯ ТЯГОВОГО ЗАРЯДА
6B/12B/24B
50 Ah 250 Ah
~ 8h*
*В случае необходимости, время заряда может быть снижено с
помощью введения более высокой номинальной емкости аккумулятора
(максимум +20%). Например: для АКБ от 100 Ач, настройка устройства
на 110 Ач позволит уменьшить время заряда на 45 минут.
Включение:
• Подсоедините зажимы: красный к положительному полюсу (+) АКБ, а черный - к отрицательному полюсу (-).
• Нажмите на START/STOP для начала зарядки.
• Во время заряда, аппарат показывает процентное повышение уровня заряда, а также, поочередно, напряжение,
ток, введенные ампер-часы и истекшее время.
NB : В конце зарядки (стартовый) зарядное устройство поддерживает заряд батареи с помощью напряжения oating.Меры
предосторожности : в случае с открытыми АКБ, проверьте уровень электролита. При надобности долейте жидкости перед
зарядкой.
Во время заряда АКБ без отсоединения от автомобиля, рекомендуется снизить до минимума электропотребление
автомобиля (выключить фары, выключить зажигание, закрыть двери, ...) чтобы не нарушать процесс зарядки.
Не применяйте режим заряда тяговых батарей на АКБ автомобиля.
РЕЖИМ ПИТАНИЯ DIAG+
Для стоящих на месте автомобилей : аппараты GYSFLASH поддерживают энергетические потребности до 50 A для компенсации
используемого батареей тока для тестирования больших потребителей: вентиляция двигателя, стеклоподъёмник,
электрические подвески и т.д., генерируя стабилизированное напряжение:
- 12В при 14,8В (для АКБ 12В).
- 24В при 29,6В (для АКБ 24В).
- 6В при 7,4В (для АКБ 6В).
Настройка напряжения :
После выбора номинального напряжения батареи,у вас есть возможность конфигурировать напряжение шагами 0,1, согласно
требованиям производителя.
250 Ah 450 Ah
9h 14h
50 HF
45
Page 46

GYSFLASH 50.24 HF
I=12A
DIAG+
U=13.5V
DIAG+
U=13.5V
12V 12V
SHOWROOM
13.5V
I=12A
SHOWROOM
U=13.5V
12V12V
RU
НАСТРОЙКА РЕЖИМА DIAG +
Запуск:
• Подсоедините зажимы: красный к
DIAG+
U=13.5V
12V
положительному полюсу
• Нажмите на START/STOP, чтобы запустить режим.
• Во время использования на дисплее афишируются
потребляемый ток и мгновенное напряжение.
DIAG+
DIAG+
12V
U=13.5V
24V
U=27.2V
6V
12V
24V
6.0V
6.1V
7.4V
ЗАПУСК РЕЖИМА DIAG +
12.0V
24.0V
12.1V
...
14.8V
24.1V
...
29.6V
...
Меры предосторожности: Если на экране значение тока более 10А, это значит, что ваша АКБ разряжена. В этом случае,
GYSFLASH начнет генерировать ток зарядки. Проверьте, что потребители автомобиля отключены. Дождитесь, когда ток
будет ниже 10 A для начала диагностики.
РЕЖИМ ПИТАНИЯ SHOWROOM
Для стоящих на месте автомобилей : аппарат GYSFLASH поддерживают энергетические потребности до 50A для тестирования
больших потребителей выставочного автомобиля: отопление, стеклоподъёмник, приборная доска и т.д., генерируя
регулируемое стабилизированное напряжение :
- 12В при 14,8В (для АКБ 12 В)
- 24В при 29,6В (для АКБ 24В).
- 6В при 7,4В (для АКБ 6В).
Настройка напряжения :
После выбора номинального напряжения батареи,у вас есть возможность конфигурировать напряжение шагами 0,1, согласно
требованиям производителя.
НАСТРОЙКА РЕЖИМА SHOWROOM
Запуск:
• Подсоедините зажимы: красный к (+), а черный к (-)
SHOWROOM
U=13.5V
12V
АКБ.
• Нажмите на START/STOP, чтобы запустить режим.
• Во время использования на дисплее афишируются
потребляемый ток и мгновенное напряжение.
SHOWROOM
U=13.5V
SHOWROOM
U=27.2V
12V
24V
6V
12V
24V
6.0V
6.1V
7.4V
ЗАПУСК РЕЖИМА SHOWROOM
12.0V
24.0V
12.1V
...
14.8V
24.1V
...
29.6V
...
Запуск без АКБ (не рекомендовано):
Питание без АКБ можно запустить нажатием на START/STOP в течение 3 секунд.
В этом случае дисплей афиширует « no battery » в течение 1 секунды перед тем, как начать подпитку.
Внимание: инверсия полярности может быть пагубной для электронных устройств автомобиля.
Меры предосторожности:
Если на экране значение тока более 10А, это значит, что ваша АКБ разряжена. В этом случае, GYSFLASH начнет генерировать
ток зарядки. Проверьте, что потребители автомобиля отключены. Дождитесь, когда ток будет ниже 10 A перед тем, как
использовать электротехнические устройства автомобиля.
РЕЖИМ ЗАМЕНЫ АКБ (ОПЦИЯ)
Аппарат GYSFLASH обеспечивает стабилизированное питание для поддержания энергетических потребностей автомобиля во
время замены АКБ для сохранения настроек. По умолчанию этот режим спящий и не появляется в списке режимов. Режим
можно активировать с помощью меню «Advanced Menu» (см. стр.49).
Настройка напряжения:
Можно выбрать 6 В, 12 В или 24 В для замены АКБ:
46
Page 47

GYSFLASH 50.24 HF
POWER SUPPLY
U=19.6V I<50A
POWER SUPPLY
U=19.6V I=10A
НАСТРОЙКА РЕЖИМА ЗАМЕНЫ АКБ
ZAMENA AKB
12V
RU
Запуск:
Подсоедините :
1: красный зажим к кончику наконечника,
подсоединенного к (+) АКБ, таким образом, чтобы он
крепко держался и не соскочил при замене АКБ.
2: черный зажим к шасси автомобиля.
ZAMENA AKB
12V
6V
12V
24V
• Нажмите на START/STOP, чтобы запустить режим.
• Во время использования на дисплее афишируются
ЗАПУСК РЕЖИМА ЗАМЕНЫ АКБ
потребляемый ток и мгновенное напряжение.
• Замените АКБ, соблюдая полярность. При замене
АКБ будьте осторожны не отключить зажимы
от зарядного устройства во избежание потери
ZAMENA AKB
ZAMENA AKB
U=12.9V I=26AU=12V
настроек электронных приборов.
Внимание: инверсия полярности может быть пагубной для электронных устройств автомобиля.
РЕЖИМ POWER SUPPLY (ОПЦИЯ)
Этот режим позволяет опытным специалистам пользоваться зарядным устройством, как стабилизированным источником
питания большой мощности, регулирующее напряжение и максимальный генерируемый ток которого можно настроить. По
умолчанию этот режим спящий и не появляется в списке режимов. Режим можно активировать с помощью меню «Advanced
Menu» (см. стр.49).
Настройка регулирующего напряжения и ограничения тока :
Напряжение регулирования можно настроить от 2.0 до 30.0 В, а минимальный выдаваемый ток от 2 до 50 A:
НАСТРОЙКА РЕЖИМА POWER SUPPLY
POWER SUPPLY
U=13.5V I<50A
Включение с АКБ:
• Нажмите на START/STOP, чтобы запустить pежим.
• Во время использования на дисплее афишируются
потребляемый ток и мгновенное напряжение.
ЗАПУСК РЕЖИМА POWER SUPPLY
POWER SUPPLY
U=19.6V I<50A
POWER SUPPLY
U=19.6V I<35A
2.0V
2.1V
...
30.0V
2A
3A
...
50A
ПРИМЕЧАНИЕ: В отличии от других режимов, в режиме Power Supply, зарядное устройство не компенсирует снижение
напряжения в кабелях. В этом случае, напряжение на экране соответствует напряжению на выходе из зарядного
устройства (а не напряжению на зажимах).
МЕНЮ КОНФИГУРАЦИИ
Доступ к меню конфигурации:
MODE
3 сек - Режим
Чтобы перемещаться в подменю
конфигурации, нажмите на Select:
SELECT
языки > перезапуск > lock showroom > Тип зарядки > проверка
кабелей > ADVANCED MENU > Сброс Памяти
47
Page 48

GYSFLASH 50.24 HF
NASTROJKI
Russian
NASTROJKI
restart: ON
Y (yes)
N (no)
ON
OFF
English
Francais
Deutsch
Nederlands
Espanol
Portugues
Italiano
Russian
...
NASTROJKI
Test Kabelja:
nazhat' START.
NASTROJKI
lock showroom: N
NASTROJKI
Advanced Menu:
nazhat' START
NASTROJKI
Reset Memory:
nazhat' START
Test
Kabelja
Advanced menu
Reset Memory
startov
tyagov
NASTROJKI
Zaryad: automo.
RU
Подменю:
РЕЖИМ КОНФИГУРАЦИИ
• Языки:
Это меню позволяет выбрать язык дисплея (выбор языка
осуществляется с помощью стрелок).
• Автоматический перезапуск:
Автоматический перезапуск работает только в режимах «showroom»
и «зарядка». Эта функция позволяет автоматический перезапуск
аппарата в случае выключения электропитания.
Для включения функции «Автоматический перезапуск», выбрать:
«Конфигурация | Перезапуск: ON».
• Lock Showroom :
Позволяет заблокировать устройство на режиме Showroom.
(Против ошибочных действий).
Для включения функции «Lock Showroom», выбрать:
«Конфигурация | Lock Showroom: Y ».
Быстрый доступ к Lock Showroom :
Функцию Lock Showroom можно включить, не заходя в меню конфигурации.
• Выключите аппарат (прерыватель в положении OFF)
• Нажмите на MODE
• Поставьте прерыватель в положение ON, продолжая нажимать на кнопку MODE. Дисплей
афиширует «GYSFLASH 50.24 HF Vx.x» в течение 3х секунд.
• Продолжайте нажимать на кнопку MODE до тех пор, пока не появится сообщение « lock
showroom: Y »
MODE
• Тип зарядки:
Есть возможность выбрать тип желаемой зарядки:
- Заряд АКБ автомобиля (startov.) для заряда аккумуляторов запуска.
- Тяговый заряд (тyagov.) для заряда тяговых АКБ.
• Проверка кабелей:
Этот режим должен использоваться при любой модификации выходных кабелей. На GYSFLASH можно
адаптировать кабели до 2 x 8 м сечением 16 мм².
OK : Калибровка выполнена правильно.
FAIL : Во время калибровки кабелей возникла проблема. В этом случае калибровка производится,
основываясь на заводские настройки. Проверьте, что кабели в исправном состоянии и закорочены
надлежащим образом, и повторите операцию.
• Advanced Menu (код доступа 1-9-6-4) :
Это меню для опытных специалистов.
Для доступа нажмите вышеуказанный код (Select для выбора цифр и Start/Stop для подтверждения кода).
Подробную информацию см. на стр.50.
• Сброс Памяти (код доступа 1-9-6-4):
В этом меню, доступном с помощью вышеуказанного
кода, можно сбросить параметры зарядного устройства
и вернуться к заводским настройкам. В этом случае
происходит отмена ваших личных настроек.
СБРОС ПАМЯТИ
RESET MEMORY
Display 1s
Code: 0000
Code NOK
RESET MEMORY
Code OK
RESET MEMORY
Reset all ?
RESET MEMORY
Error Code
Code OK
(1964)
0
1
...
9
Изменение
цифр
Yes
No
48
Page 49

GYSFLASH 50.24 HF
ADVANCED MENU
С помощью этого меню можно настроить дополнительные параметры зарядного устройства.
Для перехода от одного параметра к следующему нажмите на Select:
RU
SELECT
Включение «замены акб» > Включение «Power Supply» >Включение «Expert Curve» (> Настройка
параметров «Expert Curve»)
• Включение Режима ЗАМЕНЫ АКБ :
Для включения режима ЗАМЕНЫ АКБ, выберите «ADVANCED MENU» |
Change bat. : ON». Таким образом этот режим будет доступен в списке
режимов.
• Включение Режима POWER SUPPLY :
Для включения режима POWER SUPPLY, выберите «ADVANCED MENU» |
Power Supply : ON». Таким образом этот режим будет доступен в списке
режимов.
• Активация кривой «EXPERT» :
Для активации кривой «EXPERT», выберите «ADVANCED MENU» | expert
curve : ON». Таким образом эта кривая будет доступна в режиме ЗАРЯДКА
в списке кривых зарядки.
• Настройка параметров кривой «EXPERT» :
Если кривая зарядки «EXPERT» активирована, то тогда возможно
определить параметры кривой (тип IU
0I0
U) :
- Unominal : номинальное напряжение АКБ (6В, 12В или 24В).
- Ucharge : номинальное напряжение регулируемое от 6.0 до 30.0В (Этап 7).
- Icharge : Ток зарядки, регулируемый от 10A до 200A на 100Aч
номинальной емкости (этап 6).
- Urecovery : напряжение восстановления регулируемое до 30.0В. Если
выбрано «OFF», то функция восстановления отключена (Этап 2 и 4).
- Uoating : напряжение подпитки, регулируемое в зависимости от
выбранной величины Unominal.. Если выбрано «OFF», то функция
восстановления отключена (Этап 9).
- T recovery : максимальное время в процессе восстановления ячеек
в коротком замыкании регулируемое от 1ч до 24ч (Этап 2).
- T refresh : Длительность процесса обновления регулируемое от
1ч до 12ч. Если выбрано «OFF», то функция обновления отключена
(Этап 8).
- T desulfat: максимальное время десульфатации регулируемое в
пределах от 1ч до 24ч (Этап 4).
- T ch_max: Максимальное время заряда (Этап 7 и 8).
ADVANCED MENU
ADVANCED MENU
Change bat.: OFF
ADVANCED MENU
Power Supply: OFF
ADVANCED MENU
expert curve: OFF
OFF
ON
EXPERT CURVE
Unominal: 12V
EXPERT CURVE
Ucharge: 14.3V
EXPERT CURVE
Ichrg: 20A/100Ah
EXPERT CURVE
Urecovery: OFF
EXPERT CURVE
Uoating: OFF
EXPERT CURVE
T recovery: 5h
EXPERT CURVE
T desulfat: 12h
EXPERT CURVE
Tch_max: 16h
EXPERT CURVE
Tch_min: 0h
EXPERT CURVE
T refresh: 5h
ON
OFF
ON
OFF
ON
OFF
6V
12V
24V
6.0V
6.1V
...
8.0V
10A/100Ah
11A/100Ah
...
200A/100Ah
OFF
Uch
...
29.9V
30.0V
OFF
6.0V
6.1V
...
Uch
1h
2h
...
24h
1h
2h
...
24h
1h
2h
...
36h
0h
1h
...
Tch_max
OFF
1h
2h
...
12h
12.0V
12.1V
16.0V
OFF
Uch
29.9V
30.0V
OFF
12.0V
12.1V
Uch
24.0V
24.1V
...
...
30.0V
OFF
Uch
...
...
29.9V
30.0V
OFF
24.0V
24.1V
...
...
Uch
- T ch_min: Минимальное время заряда (Этап 7 и 8).
EXPERT CURVE
U refresh: 17.0V
- Urefresh: Максимальное напряжение во время обновления (Этап 8).
- OCP (Защита от перегрузки): Максимальная процентная доля
номинальной емкости которая может быть введена перед защитой.
aВнимание: Для зарядки АКБ в автомобиле, слишком
высокое напряжение Urecovery или Urefresh может повредить
EXPERT CURVE
OCP: 200%
ADVANCED MENU
Save? No
электронику автомобиля.. В этом случае мы советуем на
настраивать этот параметр не выше чем 15.0В.
RETURN
Для сохранения и подтверждения новых настроек выберите «ADVANCED MENU» | save? Yes»
Нажмите на кнопку « MODE » чтобы выйти из меню « Conguration ».
30.9V
31.0V
100%
245%
250%
Uch
...
...
Yes
No
49
Page 50

U
0% 10% 20% 80% 95% 100%
GYSFLASH 50.24 HF
Описание кривой заряда Expert (IU0I0U)
U=Urecovery
U=Ucharge
RU
U=Uoating
Phase I Phase U0 Phase I0
I=Icharge
Trefresh
I=Irefresh
max.
T
recovery
Recovery
I
1 2 3 4 5 6 7 8 9
Test Test Charge Absorption Floating
Shorted cell
Recovery
1 Анализ аккумулятора.
2 Восстановление элементов, поврежденных вследствие глубокой продолжительной разрядки.
3 Тестирование сульфатированной АКБ.
4 Десульфатация/Восстановление АКБ
5 Проверка восстановления АКБ.
6 Зарядка АКБ на 80%
7 Зарядка АКБ на 95%
8 Обновление ячеек аккумулятора
9 Зарядка обслуживания
10 Повторяет цикл зарядки для поддержания рабочих характеристик = Обслуживание
Sulphation
Test
Desulphation
Refresh
Phase U
10
New charge
cycle
ЗАРЯД АВТОМОБИЛЬ (СТАРТОВЫЙ)
U
Описание кривой заряда Тяговый (IUI0)
U=Urecovery
Recovery Phase I
I=Icharge
U=Ucharge
Phase U
I
1 2 3 4 5 6 7 8 9
Shorted cell
Test Test Charge Absorption Rest
Recovery
0% 10% 20% 80% 90% 95% 98% 100%
Sulphation
Test
Desulphation
Phase I0
Trefresh Trest
I=Irefresh
Refresh
I=Iequa
10
Equalization
max 48h
before new
charging cycle
11
End of
charge
50
Page 51

GYSFLASH 50.24 HF
RU
1 Анализ аккумулятора.
2 Восстановление элементов, поврежденных вследствие глубокой продолжительной разрядки.
3 Тестирование сульфатированной АКБ.
4 Десульфатация/Восстановление АКБ
5 Проверка восстановления АКБ.
6 Зарядка АКБ на 80%
7 Зарядка АКБ на 90%
8 Обновление ячеек аккумулятора
ТЯГОВЫЙ ЗАРЯД
9 Фаза отдыха ячеек
10 Выравнивание ячеек батареи
11 Зарядка АКБ на 100% (возобновление заряда после 48ч)
ЗАЩИТЫ
Этот аппарат защищен против коротких замыканий и инверсии полярности. Он оснащен противоискровой защитой,
предотвращающей искрение при подсоединении зарядного устройства к АКБ. При отсутствии напряжения на зажимах они, в
целях безопасности, не генерируют тока.
Это зарядное устройство защищено внутренним плавким предохранителем 80A (арт. 054653) против ошибочных действий.
НЕИСПРАВНОСТИ, ИХ ПРИЧИНЫ И УСТРАНЕНИЕ
НЕИСПРАВНОСТИ ПРИЧИНЫ УСТРАНЕНИЕ
1
2
3
4
5
6
7
8
9
10
11 Никакой индикации на дисплее.
Мигает дисплей :
« #oshibka (+)<-->(-) »
+ звуковой сигнал
Мигает дисплей:
« #oshibka U>Umax »
+ звуковой сигнал
Мигает дисплей :
« #oshibka AKB »
+ звуковой сигнал
Мигает дисплей :
« >50A »
+ звуковой сигнал
GYSFLASH выдает высокий ток
(свыше 10 A) в то время, как вы
еще не запустили инструмент
диагностики.
Дисплей показывает в течение
Аппарат блокирован в режиме
1 сек. :
« no battery »
+ звуковой сигнал
Showroom
Дисплей показывает :
« #oshibka T(°C) »
+ звуковой сигнал
Дисплей показывает :
« #oshibka IHM »
+ звуковой сигнал
Дисплей показывает :
« #oshib.predochr. »
+ звуковой сигнал
Инверсия полярности на зажимах Подсоедините красный зажим к (+) АКБ, а черный к (-).
Напряжение АКБ слишком высокое Зарядное устройство не подходит (например: АКБ 24В вместо 12В).
АКБ закорочена или повреждена. Заменить АКБ.
АКБ не подключена или зажимы закорочены Проверьте подсоединение зарядных зажимов.
Ошибка в выборе напряжения аккумулятора Зарядное устройство не подходит.
Потребление слишком большое относительно
мощности зарядного устройства.
Слишком много потребителей автомобиля
активированы.
АКБ разряжена
Режим Showroom работает в « no battery »
Lock Showroom активирован
Неисправный вентилятор Свяжитесь с дистрибьютором.
Длительное пребывание на солнце
Проблема с электроникой Свяжитесь с дистрибьютором.
Неправильное обращение
Вышел из строя предохранитель на входе
Сеть питания неисправна
Отключите часть потребителей, чтобы достичь нормальной ситуации.
Нормальное функционирование GYSFLASH. Отключите потребители, чтобы
проверить, что АКБ не слишком сильно разряжена (см. причину n°2).
АКБ очень сильно разряжена. GYSFLASH выдает ток зарядки. Дождитесь
тока ниже 10 А перед тем, как запустить фазу диагностики.
Showroom без АКБ : нормальное функционирование GYSFLASH.
Для активации функции « no battery » нажмите на START/STOP и затем
снова на START/STOP для запуска режима Showroom с АКБ.
Нормальное функционирование GYSFLASH.
Функция отключается с помощью меню конфигурации.
Не оставляйте аппарат на солнце.
Не отключайте аппарат, пока неисправность не исчезнет. (Звуковой сигнал
можно отключить нажатием на START/STOP).
Внутренний плавкий предохранитель должен быть заменен компетентным
специалистом
(арт. 054653 : 80 A).
Плавкий предохранитель на входе должен быть заменен компетентным
специалистом (плавкий предохранитель с задержкой срабатывания 10A
5x20).
Проверьте, что напряжение электросети находится между 180 и 260 В.
51
Page 52

BELANGRIJKE VEILIGHEIDSINSTRUCTIES
In deze handleiding vindt u aanwijzingen voor het functioneren van uw
toestel en de veiligheids- en voorzorgsmaatregelen.
Leest u dit document aandachtig door voor u het apparaat in gebruik
neemt. Bewaar dit document als naslagwerk.
Dit apparaat kan uitsluitend gebruikt worden als oplader of als
stroomvoorziening, volgens de instructies vermeld op het apparaat en
in de handleiding. Volg altijd nauwkeurig de veiligheidsinstructies op.
Bij onjuist of gevaarlijk gebruik kan de fabrikant van dit product niet
aansprakelijk gesteld worden.
Dit apparaat is bestemd voor gebruik binnen. Niet blootstellen aan
regen.
Dit apparaat kan niet worden gebruikt door kinderen jonger dan 8
jaar of door personen met lagere lichamelijke, zintuiglijke of mentale
vaardigheden. Bij gebrek aan ervaring of kennis mag het apparaat
alleen onder goede begeleiding gebruikt worden, of als hen de
noodzakelijke instructies voor een absoluut veilig gebruik van het
apparaat gegeven zijn, en als de eventuele risico’s goed begrepen
worden. Kinderen mogen niet met het apparaat spelen. Schoonmaak
en onderhoud mogen niet gedaan worden door kinderen.
GYSFLASH 50.24 HF
NL
Niet geschikt voor het opladen van niet-oplaadbare batterijen of accu’s.
Gebruik het apparaat niet als de stroomkabel of de stekker defect zijn.
Probeer nooit een bevroren of een defecte accu op te laden.
Het apparaat niet bedekken.
De oplader niet dichtbij een warmtebron plaatsen en niet blootstellen
aan blijvend hoge temperatuur (hoger dan 50°C).
De automatische modus en de gebruiksrestricties worden hierna in
deze handleiding uiteengezet.
Ontploffings- en brandgevaarlijk!
• Een opladende accu kan explosieve gassen uitstoten.
• Plaats de accu tijdens het opladen in een goed geventileerde ruimte.
• Voorkom vlammen en vonken.
• Scherm de elektrische delen van de accu af om kortsluiting te
voorkomen.
52
Let op : zuur-projectie gevaar.
• Draag altijd een veiligheidsbril en veiligheidshandschoenen.
Page 53

GYSFLASH 50.24 HF
NL
• In geval van oog- of huidcontact, meteen met water afspoelen en
onmiddellijk een arts raadplegen.
Aansluiten / Afsluiten :
• Koppel de stroomvoorziening af alvorens de accu aan te sluiten of
los te koppelen.
• De aansluitklem van de accu die niet is aangesloten op een chassis
moet als eerst aangekoppeld worden. De andere verbinding moet plaats
vinden op de chassis, ver van de accu en van de brandstofkanalisering.
De acculader moet vervolgens op het net aangesloten worden.
• Koppel na het laden eerst de acculader van de netspanning los.
Koppel daarna de connectie van het chassis los, en pas daarna de
connectie met de accu. Respecteer de juiste volgorde.
Aansluiten :
• Dit apparaat moet aangesloten aan de netspanning met een geaard
stopcontact.
• De aansluiting op de netspanning moet conform de nationale
regelgeving gebeuren.
Onderhoud :
• Als de voedingskabel beschadigd is, dient deze vervangen te worden
door een door de fabrikant van het apparaat geleverde voedingskabel.
• Het onderhoud dient uitsluitend door een gekwalificeerde
onderhoudsmonteur te gedaan te worden.
• Waarschuwing ! Altijd de stekker uit het stopcontact halen alvorens
eventuele onderhoudswerkzaamheden te verrichten.
• Dit apparaat behoeft geen speciaal onderhoud.
• Als de interne zekering beschadigd is, dient deze vervangen te
worden door de fabrikant, zijn reparatie dienst of een gelijkwaardig
gekwalificeerde technicus, om ieder gevaar te vermijden.
• Nooit oplosmiddelen of andere agressieve schoonmaakmiddelen
gebruiken.
Richtlijnen :
• Apparaat voldoet aan de Europese richtlijnen.
• De conformiteitsverklaring is te vinden op onze internetsite.
• EAC merk (Euraziatische Economische Gemeenschap).
Afvalverwerking :
• Afzonderlijke inzameling vereist. Niet met het huishoudelijke afval
wegwerpen.
53
Page 54

GYSFLASH 50.24 HF
ALGEMENE OMSCHRIJVING
De GYSFLASH 50.24 HF is een krachtig gestabiliseerd netvoedingssysteem, gebaseerd op de SMPS (Switch Mode Power Supply) technologie. Speciaal ontworpen om auto accus (vloeibaar/AGM/gel) in 6V, 12 V en 24V te ondersteunen tijdens reparaties, maar biedt ook
optimale laadkwaliteit bij het onderhoud van meer geavanceerde modellen. De oplader kan worden aangesloten aan kabels tot 2x8 m in
16 mm². Na het verwisselen van de accu-kabels moet er geijkt worden (zie pagina 58). Dit apparaat moet op een vaste plek geplaatst
worden.
Dit apparaat heeft 5 modes (waarvan 2 verborgen modes) :
• Oplaadmodus :
- Auto (standaard): voor het opladen van lood (verzegeld, vloeibaar, AGM...) of lithium (LiFePO4) startaccu’s van 10 Ah tot 600 Ah bij
6V/12V/24V.
- Traktie : om vloeibare of gel elektrolyt traktie-accu’s (lood, calcium lood, calcium-zilver lood, AGM), van 50 Ah tot 450 Ah in
6V/12V/24V) op te laden Deze modus kan geactiveerd worden in het menu instellingen.
• Modus «Diag +» : Levert energie tot aan 50 A, en voorziet de accu van de nodige energie om stroomgrootverbruikers zoals
motorventilatoren te testen. Met «Diag+» modus kan precies de te leveren spanning aangegeven worden.
•« Showroom » modus : voorziet de accu van de nodige stroomcompensatie bij gebruik van elektrische auto-onderdelen tijdens
een demonstratie (raam openen, verwarming, achteruitkijkspiegels....). In deze modus kan de spanning met precisie naar behoefte
geregeld worden.
• Modus accu verwisselen : compenseert de stroombehoeften, om geheugenverlies tijdens het verwisselen van de accu te voorkomen.
Deze modus is standaard uitgeschakeld en verschijnt niet in de keuzelijst.
• Power Supply modus : bestemd voor ervaren gebruikers. Is standaard uitgeschakeld en verschijnt niet in de keuzelijst. Deze
modus maakt het mogelijk om de lader te gebruiken als gestabiliseerde voedingsbron met hoog vermogen. De gereguleerde spanning
en de maximale stroom zijn af te stellen.
NL
Deze oplader is uitgerust met een automatische restart, waarmee in de oplaadmodus, Showroom modus en Power Supply modus, de
oplader automatisch opgestart kan worden in geval van stroomstoring.
De functie « Lock Showroom » kan, wanneer geactiveerd, het gebruik van de oplader beperken tot de Showroom modus, om demons-
traties in showrooms te vergemakkelijken.
OPSTART EN GEBRUIK
Sluit de acculader aan op de netspanning. Netspanning monofase 230V ± 15% (50/60Hz).
1
Zet de schakelaar op «ON».
2
Weergave «GYSFLASH 50.24 HF Vx.x» gedurende 3 seconden.
Kies vervolgens de gewenste modus. De lader positioneert zich automatisch op de laatst gebruikte instelling.
3
•
Met behulp van de knop «modus» krijgt u toegang tot de ver-
schillende menus :
• Druk 3 seconden op de «modus» knop om naar het menu
«instellingen» te gaan.
OPLAAD MODUS (AUTO’S & TRAKTIE)
De oplaadmodus staat ingesteld op het laden van auto’s. De oplaadmodus(auto’s of traktie) kan veranderd worden in het instellingen
menu.
Met dit product kan de accu apart opgeladen worden, of aangesloten aan een auto. Respecteer nauwkeurig de opstart procedure.
Afstellen van het opladen :
Verzeker u er voor het opstarten van dat de installatie correct ingesteld is (spanning van de accu, oplaadcurve en capaciteit van de accu).
Deze modus biedt verschillende oplaadcurves :
• Easy: vereenvoudigde curve, geschikt voor alle loodaccu’s. Het is niet noodzakelijk om het vermogen van de accu te kennen. Voor een
optimale oplaadprocedure wordt echter aanbevolen, indien mogelijk, de liquide of gel /AGM oplaadprocedure op te volgen.
• Vloeibaar : oplaadcurve voor open accu’s, met dop (Lood, calcium lood, calcium - lood- zilver....).
Bij deze oplaadprocedure moet het vermogen van de accu in Ah ingegeven worden.
• Gel/AGM: oplaadprocedure voor verzegelde accus (gel accus, zonder onderhoud, AGM...). Bij deze oplaadprocedure moet het vermogen van de accu in Ah ingegeven worden.
• LFP/LiFePO4: laadcurve voor lithiumbatterijen van het LFP-type (lithium-ijzerfosfaat). Bij deze oplaadcurve moet het vermogen
van de accu in Ah ingegeven worden.
• Expert: oplaadprocedure type IU0I0U, aan te passen via het menu «Advanced Menu» en bestemd voor ervaren gebruikers. (zie pagina
59).
Deze oplaadprocedure is standaard geblokkeerd en verschijnt niet automatisch in de lijst. De oplaadcurve Expert is alleen te vinden in
de modus «opladen auto’s».
54
MODE
MODE
Opladen (of traktie) > Diag+ > Showroom>
(Accu* verwisselen) (Power Supply*) *standaard
verborgen.
3 sec - Instellingen
Page 55

GYSFLASH 50.24 HF
Easy
Liquid
Gel/AGM
LFP/LiFePO4
Expert
10Ah
20Ah
...
600Ah
LADEN 12V
Gel/AGM 80Ah
12V
80Ah
12V
80Ah
LADEN
Gel/AGM
LADEN
Gel/AGM
LADEN 12V
Gel/AGM
6V
12V
24V
80Ah
liquid
gel/AGM
50Ah
60Ah
...
450Ah
TRAKTIE 12V
gel/AGM
80Ah
12V
80Ah
12V
80Ah
TRAKTIE
gel/AGM
TRAKTIE
gel/AGM
TRAKTIE 12V
gel/AGM
6V
12V
24V
80Ah
NL
WAARSCHUWING : Bij de procedure Expert (zie pagina 60) kan het noodzakelijk zijn om de accu van het voertuig af te
koppelen, alvorens het laden op te starten, dit om het elektronische systeem van het voertuig geen schade toe te brengen.
AFSTELLING OPLAADMODUS AUTO’S AFSTELLING MODUS TRAKTIE
OPSTART OPLAADMODUS AUTO’S
LADEN
gel/AGM
10%
80Ah
U=12.5V
Q=2.5Ah
10%LADEN
I=10A
00h22
TRAKTIE
gel/AGM
OPSTART MODUS TRAKTIE
10%
80Ah
U=12.5V
Q=2.5Ah
10%TRAKTIE
I=10A
00h22
LAADTIJD TRAKTIE
6V/12V/24V
50 Ah 250 Ah
~ 8h*
*Indien nodig kan de oplaadtijd verkort worden door het ingebrachte
vermogen iets hoger te maken dan het nominale vermogen van de accu
(maximaal +20%). Voorbeeld voor een 100 Ah accu : de oplader afstellen op 110 Ah verkort de laadtijd met ongeveer 45 minuten.
Opstart :
• De klemmen aansluiten : de rode op de (+) en de zwarte op de (-) van de accu.
• Druk op START/STOP om het laden op te starten.
• Tijdens het opladen toont de display van de oplader het oplaadniveau, en afwisselend de spanning, de stroom, de ampères
en de oplaadtijd.
• Druk opnieuw om het opladen te stoppen.
NB : Aan het eind van de laadprocedure AUTOMOBILE (100%) handhaaft de oplader het maximale laadniveau met behulp
van het oating system.
Voorzorgsmaatregel: Controleer het elektrolyt niveau voor de open accu’s. Indien nodig, het niveau bijvullen voor het
opladen.
Voor het opladen van een voertuig wordt aangeraden het energieverbruik tot het minimum te beperken (lichten uitdoen,
contact afzetten, deuren sluiten...), om de laadprocedure niet te hinderen.
De traktie laadprocedure niet toepassen op een auto accu.
VOEDINGSMODUS DIAG+
Voor stilstaande voertuigen compenseert de GYSFLASH de energie tot 50A, voldoende om grootverbruikers van stroom zoals mo-
torventilatoren, electrische ramen enz te testen..... Het apparaat geeft een gestabiliseerde spanning af :
- 12V tot 14,8V (voor 12V accu’s) .
- 24V tot 29,6V (voor 24V accu’s).
- 6V tot 7,4V (voor 6V accu’s).
250 Ah 450 Ah
9h 14h
50 HF
55
Page 56

GYSFLASH 50.24 HF
I=12A
DIAG+
U=13.5V
DIAG+
U=13.5V
12V 12V
SHOWROOM
13.5V
I=12A
SHOWROOM
U=13.5V
12V12V
NL
Afstellen van de spanning :
Na de nominale accu spanning te hebben gekozen, is het mogelijk om de spanning in te stellen met een precisie van 0,1, volgens de
aanbevelingen van de fabrikant.
AFSTELLING MODUS DIAG+
Opstart :
• De klemmen aansluiten : de rode op de (+) en
DIAG+
U=13.5V
12V
de zwarte op de (-) van de accu.
• Druk op START/STOP om de modus op te starten.
• Tijdens het gebruik zijn stroomverbruik en span-
DIAG+
U=13.5V
12V
6V
12V
24V
ning zichtbaar.
OPSTARTEN DIAG+
6.0V
12.0V
DIAG+
U=27.2V
24V
6.1V
7.4V
...
12.1V
...
14.8V
24.0V
24.1V
...
29.6V
Voorzorgsmaatregel : Wanneer de aangegeven stroomwaarde hoger is dan 10A, betekent dit dat uw accu ontladen is. Uw GYSFLASH begint dan op te laden. Controleer of er geen stroomverbruiker aangesloten is. Wacht tot de intensiteit onder de 10A komt,
alvorens uw reparatiewerkzaamheden te beginnen.
VOEDINGSMODUS SHOWROOM
Voor stilstaande voertuigen levert de GYSFLASH tot 50A, voor het testen van grootverbruikers van stroom zoals verwarming,
elektrische ramen, dashboard enz..... van een demonstratie voertuig. Het apparaat levert een gestabiliseerde spanning, regelbaar
van 12V tot 14,8V (voor 12V accu’s).
- 24V tot 29,6V (voor 24V accu’s).
- 6V tot 7,4V (voor 6V accu’s).
Afstellen van de spanning :
Na de nominale accu spanning te hebben gekozen, is het mogelijk om de spanning in te stellen met een precisie van 0,1, volgens
de aanbevelingen van de fabrikant.
AFSTELLING SHOWROOM MODUS
Opstart met accu :
• De klemmen aansluiten : de rode op de (+) en
SHOWROOM
U=13.5V
12V
de zwarte op de (-) van de accu.
• Druk op START/STOP om de modus op te
starten.
• Tijdens het gebruik zijn stroomverbruik en span-
SHOWROOM
U=13.5V
12V
6V
12V
24V
ning zichtbaar.
OPSTARTEN SHOWROOM
6.0V
12.0V
SHOWROOM
U=27.2V
24V
6.1V
7.4V
...
12.1V
...
14.8V
24.0V
24.1V
...
29.6V
Opstarten zonder accu (niet aanbevolen) :
Het is mogelijk om de voedingsbron zonder accu op te starten, door 3 seconden op START/STOP de drukken.
De aanwijzing « no battery »wordt 1 seconde voor het opstarten van de voedingsbron zichtbaar
Let op : een ompoling kan schadelijk zijn voor het elektronisch systeem van het voertuig.
Voorzorgsmaatregel :
Wanneer de aangegeven stroomwaarde hoger is dan 10A, betekent dit dat uw accu ontladen is. Uw GYSFLASH begint dan op te
laden. Controleer of er geen stroomverbruiker aangesloten is. Wacht tot de intensiteit onder de 10A komt, alvorens de elektrische
onderdelen van het voertuig te gebruiken.
MODUS ACCU VERVANGEN (FACULTATIEF)
De GYSFLASH garandeert een gestabiliseerde energiebron tijdens het vervangen van de accu, om zo eventueel geheugenverlies te
voorkomen.
Selectie van de spanning :
Keuzemogelijkheid tussen 6V, 12V en 24V om de accu te vervangen :
56
Page 57

GYSFLASH 50.24 HF
POWER SUPPLY
U=19.6V I<50A
POWER SUPPLY
U=19.6V I=10A
NL
AFSTELLEN MODUS ACCU VER-
VANGEN
ACCU VERVANGEN
12V
ACCU VERVANGEN
12V
• Druk op START/STOP om de modus op te starten.
• Tijdens het gebruik zijn stroomverbruik en spanning
zichtbaar.
• Vervang uw accu, en let op de juiste polariteit.
Let tijdens het hanteren goed op dat de klemmen aan
de oplader gekoppeld blijven, zodat de elektronische
gegevens bewaard blijven.
Let op : een ompoling kan schadelijk zijn voor het elektronisch systeem van het voertuig.
6V
12V
24V
Opstarten :
• Aansluiten :
1 : de rode klem op het uiteinde van de +pool van de accu,
zodanig dat de accu vervangen kan worden zonder dat de
klem loslaat.
2 : de zwarte klem aan het chassis van het voertuig.
OPSTART ACCU VERVANGEN
ACCU VERVANGEN
ACCU VERVANGEN
U=12.9V I=26AU=12V
POWER SUPPLY MODUS (FACULTATIF)
Deze modus, bestemd voor de ervaren gebruiker, maakt het mogelijk om de lader te gebruiken als gestabiliseerde voedingsbron
met hoog vermogen. De gereguleerde spanning en de maximale stroom zijn af te stellen. Deze modus is standaard uitgeschakeld en
verschijnt niet in de keuzelijst. De modus is te activeren via het «Advanced Menu» (zie : p. 59).
Afstellen van de spanningsregeling en beperking van de stroom :
De spanning kan worden geregeld van 2.0 tot 30.0V, en de maximaal geleverde stroom van 2 tot 50A :
AFSTELLING MODUS POWER SUPPLY
POWER SUPPLY
U=13.5V I<50A
Gebruik :
POWER SUPPLY
U=19.6V I<50A
2.0V
2.1V
...
30.0V
• Druk op START/STOP om de modus op te starten.
• Tijdens het gebruik zijn stroomverbruik en spanning zichtbaar.
OPSTART POWER SUPPLY
POWER SUPPLY
U=19.6V I<35A
2A
3A
...
50A
WAARSCHUWING : In tegenstelling tot in de andere modes, compenseert de oplader in de modus Power Supply niet het
spanningsverlies in de kabels. In dit geval komt de op de display aangegeven spanning overeen met de spanning aan de
uitgang van de oplader (en niet met de spanning op de klemmen).
CONFIGURATIE MENU
Toegang tot het conguratie menu
Druk op Select om te navigeren in het
conguratie menu.
MODE
SELECT
3 seconde - Modus
talen > opnieuw opstarten > lock showroom > Type de charge >
controle kabels > ADVANCED MENU > Reset Memory
57
Page 58

GYSFLASH 50.24 HF
CONFIGURATIE
Nederlands
CONFIGURATIE
Restart: OFF
Y (yes)
N (no)
ON
OFF
English
Francais
Deutsch
Nederlands
Espanol
Portugues
Italiano
Russian
...
CONFIGURATIE
Test kabels:
Druk op START
CONFIGURATIE
lock showroom: N
CONFIGURATIE
Advanced Menu:
Druk op START
CONFIGURATIE
Reset Memory:
Druk op START
Controle
kabels
Advanced menu
Reset Memory
auto
traktie
CONFIGURATIE
laden: auto
NL
Onder-menu:
CONFIGURATUE MODUS
•Talen :
Met dit keuzemenu kan de taal geselecteerd worden (gebruik de pijlen
om een andere taal te kiezen).
• Automatische Restart :
De automatische restart functioneert alleen in de « Showroom », «
Charge » en de « Power Supply » modes. Met deze functie kan, in geval
van stroomstoring, de oplader automatisch heropstarten, en kan het laadproces hervat worden.
Om de functie «Automatisch herstarten» te activeren, kies
« Conguratie | restart : ON ».
• Lock Showroom :
Kan het apparaat blokkeren op de Showroom modus.
(Vermijdt verkeerde handelingen)
Om de functie «Lock Showroom», te activeren, kies
« Conguratie | Lock Showroom : Y ».
Snelkoppeling Lock Showroom :
Het is mogelijk de functie Lock Showroom te activeren zonder het keuze menu in te gaan.
• Schakel het apparaat uit (schakelaar op OFF positie)
• Druk op MODUS
• Zet de schakelaar op ON, en blijf MODE ingedrukt houden. De display toont gedurende 3
seconden « GYSFLASH 50.24 HF Vx.x »
• Blijf MODE ingedrukt houden, tot « lock showroom: Y » verschijnt.
MODE
• Oplaadmogelijkheden :
Het is mogelijk de gewenste oplaadmanier te kiezen :
- Auto’s (automo.) om startaccu’s op te laden.
- Opladen van traktie (traktie), om traktie accu’s op te laden.
• Controle van de kabels :
Deze modus moet gebruikt worden bij iedere verandering van de kabels. De GYSFLASH kan gekoppeld worden
aan 2x8m in 16mm² kabels.
OK : De ijking is correct verricht.
FAIL : Er is een probleem geconstateerd bij het ijken van de kabels. In dat geval wordt de ijking gereset.
Controleer of de kabels in goede staat zijn en of ze correct aangesloten zijn. Herstart de procedure.
• Advanced Menu (code 1-9-6-4) :
Dit menu is bestemd voor ervaren gebruikers.
Geef de volgende code in om toegang tot dit menu te krijgen (Select om het cijfer te veranderen en Start/Stop om
de code te valideren).
Voor meer details, zie pagina 60.
• Geheugen reset (code 1-9-6-4) :
Dit menu is bestemd, met behulp van de bovenstaande code, om de instellingen van de oplader te
resetten. Uw persoonlijke instellingen worden dan
geannuleerd.
RESET MEMORY
RESET MEMORY
Error Code
Display 1s
RESET MEMORY
Code: 0000
Code NOK
Code OK
(1964)
RESET MEMORY
Code OK
RESET MEMORY
Reset all ?
0
1
...
9
Verandering
van cijfer
Yes
No
58
Page 59

GYSFLASH 50.24 HF
ADVANCES MENU
Met dit menu kunnen de geavanceerde instellingen gewijzigd worden.
Druk op Select om in het menu te navigeren.
NL
SELECT
Activeren «Change batterie» >Activation «Power Supply» > Activation «Expert Curve» (> Afstellen instellingen
«Expert Curve»)
• Activeren modus CHANGE BATTERIE :
Om de CHANGE BATTERIE modus te activeren : kies «ADVANCED MENU» |
Change Bat. : ON» Zo wordt de modus toegankelijk in de keuzelijst.
• Activeren modus POWER SUPPLY :
Om de POWER SUPPLY modus te activeren : kies «ADVANCED MENU» |
Power Supply : ON». Zo wordt de modus toegankelijk in de keuzelijst.
• Activeren «EXPERT» modus :
Om de «EXPERT» modus te activeren : kies «ADVANCED MENU» | «EXPERT» : ON». Deze procedure is te vinden in de modus CHARGE, in de
keuzelijst oplaadprocedures.
• Regelen van de instellingen van de «EXPERT» modus :
Wanneer de opstartprocedure «EXPERT» geactiveerd wordt, is het moge-
lijk om de instellingen van de procedure (type IU0I0U) te deniëren.
- Unominal : nominale accu spanning (6V, 12V ou 24V).
- Ucharge : laadspanning af te stellen van 6.0 tot 30.0V (etappe 7).
- Icharge: De laadstroom kan ingesteld worden van 10A tot 200A per
100Ah gespeciceerd vermogen (stap 6).
- Urecovery : recuperatie spanning regelbaar tot 30.0V. Als «OFF» is
gekozen, is de recuperatie functie uitgeschakeld (etappe 2 en 4).
- Uoating : onderhoudsspanning regelbaar, afhankelijk van de gekozen
nominale waarde. . Als «OFF» is gekozen, is de onderhoudsfunctie uitgeschakeld (etappe 9).
- T recovery : Maximale tijd die de cellen nodig hebben om weer op te
laden, afstelbaar van 1 uur tot 24 uur (etappe 2).
ADVANCED MENU
ADVANCED MENU
Change bat.: OFF
ADVANCED MENU
Power Supply: OFF
ADVANCED MENU
expert curve: OFF
OFF
ON
EXPERT CURVE
Unominal: 12V
EXPERT CURVE
Ucharge: 14.3V
EXPERT CURVE
Ichrg: 20A/100Ah
EXPERT CURVE
Urecovery: OFF
EXPERT CURVE
Uoating: OFF
EXPERT CURVE
T recovery: 5h
EXPERT CURVE
T desulfat: 12h
ON
OFF
ON
OFF
ON
OFF
6V
12V
24V
6.0V
6.1V
...
8.0V
10A/100Ah
11A/100Ah
...
200A/100Ah
OFF
Uch
...
29.9V
30.0V
OFF
6.0V
6.1V
...
Uch
1h
2h
...
24h
1h
2h
...
24h
12.0V
12.1V
16.0V
29.9V
30.0V
12.0V
12.1V
24.0V
24.1V
...
...
30.0V
OFF
OFF
Uch
Uch
...
...
29.9V
30.0V
OFF
OFF
24.0V
24.1V
...
...
Uch
Uch
- T refresh : Afkoelperiode, afstelbaar van 1 uur tot 12 uur. Als «OFF» is
gekozen, is de afkoelfunctie uitgeschakeld (etappe 8).
- T desulfat : maximale tijd nodig voor desulfatie, regelbaar van 1 uur
tot 24 uur (etappe 4).
- T ch_max : Maximale laadtijd (etappe 7 en 6).
- T ch_min : Minimale laadtijd (etappe 7 en 6).
- Urefresh : Maximale spanning tijdens afkoelperiode (etappe 8).
EXPERT CURVE
Tch_max: 16h
EXPERT CURVE
Tch_min: 0h
EXPERT CURVE
T refresh: 5h
EXPERT CURVE
U refresh: 17.0V
36h
Tch_max
OFF
12h
Uch
30.9V
31.0V
- OCP (Bescherming tegen overbelasting) : Maximale percentage
van de nominale capaciteit die kan worden gegenereerd voor de bescherming.
aLet op :
Bij het laden op het voertuig kan een te hoge Urecovery
of Urefresh spanning het elektronische systeem van het voertuig
beschadigen. We raden u in dit geval aan om deze functies niet
EXPERT CURVE
OCP: 200%
ADVANCED MENU
Save? No
100%
245%
250%
Yes
hoger dan 15.0V in te stellen.
RETURN
Om de nieuwe instellingen in te geven en op te slaan, selecteert u «ADVANCED MENU» | save? Yes»
Druk op de « MODE » knop om uit het « Conguratie » menu te gaan.
1h
2h
...
0h
1h
...
1h
2h
...
...
...
No
59
Page 60

U
GYSFLASH 50.24 HF
Omschrijving van de Expert laadcurve (IU0I0U)
U=Urecovery
U=Ucharge
NL
U=Uoating
Phase I Phase U0 Phase I0
I=Icharge
Trefresh
I=Irefresh
max.
T
recovery
Recovery
I
1 2 3 4 5 6 7 8 9
Test Test Charge Absorption Floating
1
2
3
4
5
6
7
8
Shorted cell
Recovery
0% 10% 20% 80% 95% 100%
Analyse van de accu
Herstel van de beschadigde elementen als gevolg van een diepe en langdurige ontlading
Test van een gesulfateerde accu
Desulfatie/Herstel van de accu
Controle van het accu herstel
80% geladen accu
95% geladen accu
Afkoeling van de cellen van de accu
Sulphation
Test
Desulphation
Refresh
Phase U
10
New charge
cycle
OPLADEN AUTO’S
U
Druppelladen
9
10
Start een nieuwe laadcyclus op om de kwaliteit van de prestaties te waarborgen = Onderhoud
Omschrijving van de traktie laadcurve (IUI0)
U=Urecovery
Recovery Phase I
I=Icharge
U=Ucharge
Phase U
I
1 2 3 4 5 6 7 8 9
Shorted cell
Test Test Charge Absorption Rest
Recovery
0% 10% 20% 80% 90% 95% 98% 100%
Sulphation
Test
Desulphation
Phase I0
Trefresh Trest
I=Irefresh
Refresh
I=Iequa
10
Equalization
max 48h
before new
charging cycle
11
End of
charge
60
Page 61

GYSFLASH 50.24 HF
Analyse van de accu
1
Herstel van de beschadigde elementen als gevolg van een totale en langdurige ontlading.
2
Test van een gesulfateerde accu
3
Desulfatie/Herstel van de accu
4
Controle van het accu herstel
5
80% geladen accu
6
90% geladen accu
7
NL
Afkoeling van de cellen van de accu
8
RUSTFASE CELLEN
9
10
Egalisatie van de cellen van de accu.
11
Accu 100% opgeladen (herstart laden na 48 uur)
OPLADEN TRAKTIE
BEVEILIGING
Dit apparaat is beveiligd tegen kortsluiting en ompoling. Hij heeft een anti-vonk systeem dat de vonkvorming voorkomt bij het aankoppelen van de acculader op de accu. In verband met de veiligheid, levert het apparaat geen stroom als er geen spanning op de
klemmen staat. Deze oplader is beveiligd tegen foute handelingen met een interne 80A zekering (ref. 054653).
AFWIJKINGEN, OORZAKEN, OPLOSSINGEN
AFWIJKINGEN OORZAKEN OPLOSSINGEN
1
2
3
4
Scherm knippert :
« #fout (+)<-->(-) »
+ geluidssignaal
Scherm knippert :
« #fout U>Umax »
+ geluidssignaal
Scherm knippert :
« #fout accu »
+ geluidssignaal
Scherm knippert :
« >50A »
+ geluidssignaal
Ompoling van de klemmen Koppel de rode klem op (+) en de zwarte klem op (-) van de accu.
De accuspanning is te hoog Lader is ongeschikt (b.v. accu 24V in plaats van 12V).
Uw accu is in kortsluiting of beschadigd. Vervang accu.
Accu niet aangesloten of kortsluiting
van de klemmen
Fout in de keuze van de accu spanning Oplader niet geschikt.
Buitengewoon hoog energieverbruik ten opzichte
van het vermogen van de oplader
Controleer de aansluiting van de klemmen.
Schakel enkele elementen uit om het energieverbruik omlaag te brengen.
De GYSFLASH geeft een hoge
stroom af (hoger dan 10A), nog
5
voordat u uw onderhoudsgereed-
schap heeft aangesloten.
Scherm toont gedurende 1 sec :
6
7
8
9
10
11 Het apparaat toont niets
« no battery »
+ geluidssignaal.
Het apparaat is geblokkeerd op
Showroom modus.
Scherm toont :
« #fout T(°C) »
+ geluidssignaal
Scherm toont :
« #fout IHM »
+ geluidssignaal
Scherm toont :
« #fout zekering »
+ geluidssignaal
Meerdere stroomverbruikers staan aan in het
voertuig.
Accu is ontladen.
De Showroom modus staat op « no battery »
Lock Showroom actief
Ventilator defect Neem contact op met de after sales dients.
Langdurige blootstelling aan de zon
Elektronisch probleem Neem contact op met de after sales dients.
Verkeerde handeling Laat een bekwaam persoon de interne zekering vervangen (ref. 054653 : 80A).
Ingangszekering defect
Probleem in de stroomvoorziening
Normaal functioneren van de GYSFLASH. Schakel de stroomverbruikers uit om
te controleren of de accu niet te diep ontladen is (zie oorzaak n°2).
De accu is zeer leeg, de GYSFLASH begint op te laden. Wacht tot de stroom intensiteit onder de 10A komt, alvorens uw reparatiewerkzaamheden te beginnen.
Showroom zonder accu : Normaal gedrag van de GYSFLASH.
Om de functie « no battery » te desactiveren, druk op START/STOP, druk nogmaals op START/STOP om de functie SHOWROOM met accu op te starten.
Normaal functioneren van de GYSFLASH.
Ga naar het conguratie menu om de functie te desactiveren.
Laat het apparaat niet in de zon staan.
Laat het apparaat aanstaan totdat het defect verdwijnt. (Door op START/STOP
te drukken kan het geluidssignaal afgezet worden).
Laat een bevoegde onderhoudsmonteur de zekering (vertraagde zekering 10A
5x20) vervangen.
Controleer of de spanning van het elektrisch netwerk tussen de 180 en 260V is.
61
Page 62

ISTRUZIONI DI SICUREZZA
Questo manuale descrive il funzionamento del carica-batterie e le
precauzioni da seguire per vostra sicurezza.
Leggerlo attentamente prima dell’uso e conservarlo con cura per
poterlo consultare successivamente.
Questo dispositivo deve essere usato solo per ricaricare o mantenera la
carica nelle limiti indicate sul dispositivo stesso e sul manuale. Bisogna
rispettare le istruzioni relative alla sicurezza. In caso di uso inadeguato
o pericoloso, il fabbricante non potrà essere ritenuto responsabile.
Dispositivo da usare all’interno. Non deve essere esposto alla pioggia.
Questo dispositivo può essere usato da bambini di età superiore a
8 anni, da persone con capacità fisiche, sensoriali o mentali ridotte
e da persone senza esperienza o conoscenze, purchè esse siano
correttamente sorvegliate o se le istruzioni relative all’uso del dispositivo
in sicurezza siano state loro trasmesse e qualora i rischi intrapresi siano
stati presi in considerazione. I bambini non devono giocare con il
dispositivo. La pulizia e la manutenzione non devono essere effettuate
da bambini non sorvegliati.
GYSFLASH 50.24 HF
IT
Non usare in nessun caso per caricare pile o batterie non ricaricabili.
Non usare il dispositivo se il cavo di alimentazione o la presa sono
danneggiati.
Non caricare mai una batteria ghiacciata o danneggiata.
Non coprire il dispositivo.
Non spostare il dispositivo nelle vicinanze di fonti di calore e temperature
spesso elevate (superiori a 50°C).
La modalità automatica di funzionamento, così come le restrizioni d’uso
applicabili sono descritti di seguito in questo manuale.
Rischio di esplosione e d’incendio!
• Una batteria in carica può emettere dei gas esplosivi.
• Durante la carica, la batteria deve essere messa in un luogo ben
ventilato.
• Evitare fiamme e scintille.
• Proteggere le superficie della batteria da corto-circuiti.
62
Rischio di proiezioni acide!
• Indossare occhiali e guanti di protezione
• In caso di contatto con gli occhi o con la pelle, sciacquare
immediatamente con acqua e consultare un medico senza tardare.
Page 63

GYSFLASH 50.24 HF
IT
Connessione / Sconnessione:
• Scollegare l’alimentazione prima di collegare o scollegare le
connessioni della batteria.
• Il terminale della batteria non collegato al telaio deve essere
collegato per primo. L’altro collegamento deve essere effettuato sul
telaio lontano dalla batteria, dalla canaletta del carburante e dal
serbatoio. Il caricabatterie deve essere collegato alla rete elettrica.
• Dopo l’operazione di carica, scollegare il caricabatterie dalla rete,
in seguito ritirare la connessione dal telaio e infine la connessione dalla
batteria, nell’ordine indicato.
Collegamento:
• Questo dispositivo deve essere collegato ad una presa di corrente
con messa a terra.
• Il collegamento alla rete di alimentazione deve essere fatta in
conformità con le regole d’installazione nazionali.
Manutenzione:
• Se il cavo di alimentazione è danneggiato, esso deve essere sostituito
da un cavo o da un insieme speciale disponibile presso il fabbricante
o il suo servizio post-vendita.
• La manutenzione deve essere effettuata da una persona qualificata.
• Avvertenze ! Scollegare sempre la schede dalla presa elettrica prima
di effettuare ogni manipolazione sul dispositivo.
• Il dispositivo non ha bisogno di nessuna manutenzione particolare.
• Se il fusibile interno è fuso, esso deve essere sostituito dal fabbricante,
dal suo servizio post-vendita o da persone di qualifica simile per evitare
pericoli.
• Non usare in nessun caso solventi o altri prodotti pulenti aggressivi.
RRegolamentazione:
•Apparecchio conforme alle Direttive Europee.
• La dichiarazione di conformità è disponibile sul nostro sito internet.
• Marchio di conformità EAC (Comunità Economica Eurasiatica)
Smaltimento :
• Questo materiale è soggetto alla raccolta differenziata. Non deve
essere smaltito con i rifiuti domestici.
63
Page 64

GYSFLASH 50.24 HF
DESCRIZIONE GENERALE
Il GYSFLASH 50.24 HF è un rifornimento stabilizzato di forte potenza basato sulla tecnologia SMPS (Switch Mode Power Supply). Concepito per
sostenere batterie (liquide/AGM/gel) in 6V, 12V e 24V dei veicoli in fase di diagnosi, garantisce anche una qualità di carica ideale per la manuten-
zione dei modelli più evoluti. Questo carica batterie può ricevere connettori d’uscita no a 2x8 m in 16 mm². Il cambio dei cavi batteria necessita di
ricalibratura (cf. pag. 68). Questo dispositivo è considerato sso e non mobile.
Questo dispositivo dispone di 5 modalità di cui 2 è nascosta:
• Modalità Carica :
- Automobile (default): per caricare batterie di avviamento al piombo (sigillate, liquide, AGM.....) o al litio (LiFePO4) da 10 Ah a 600 Ah a 6V/12V/24V.
- Trazione: per ricaricare le batterie di trazione ad elettrolito liquido o gel (piombo, piombo Calcio, piombo Calcio-Argento, AGM…) da 50 Ah a 450Ah
in 6V/12V/24V. Questo modo è attivabile nel menù congurazione.
• Modalità alimentazione « Diag + » : Questa modalità sopperisce ai bisogni d’energia no a 50 A per assicurare alla batteria la compensazione
della corrente utilizzata per testare i grssi consumatori (ventilazione motore, alzacristalli, sospensioni elettroniche, etc.) durante la diagnostica sul
veicolo. La modalità « Diag+ » permette di denire precisamente la tensione da rilasciare durante questa fase.
• Modalità alimentazione « Showroom » : assicura alla batteria una compensazione di corrente quando si utilizzano gli accessori elettrici di un
veicolo di dimostrazione (alzacristalli, riscaldamento, retrovisori, …), permettendo così una presentazione permanente del veicolo.
• Modalità Cambio batteria : Compensa il fabbisogno elettrico per evitare la perdita di memoria del veicolo nel momento della sostituzione della
batteria. Questa modalità è pre-denita come inattiva e non appare nella lista delle modalità.
• Modalità Power Supply : Modalità destinata a persone esperte. Questa modalità risulta automaticamente inattiva e non appare nella lista
delle modalità. Questa modalità permette di servirsi del caricabatteria come rifornimento stabilizzato di forte potenza iin cui la tensione regolata e
la corrente massima sono regolabili.
Questo carica batterie è dotato di una funzione di riavvio automatico che permette, nella modalità Carica auto e trazione, e in modalità Showroom
e Power Supply , di rilanciare automaticamente la carica in caso di interruzione di corrente.
La funzione «
dimostratori di veicoli.
Lock
Showroom », se viene attivata, limita il caricabatterie unicamente alla modalità Showroom, per facilitare il suo utilizzo per i
IT
ACCENSIONE E USO
Collegare il carica batterie alla presa di corrente. Tensione settore monofase 230V ± 15% (50/60Hz).
1
Posizionare l’interruttore su «ON».
2
Visualizzazione per 3s « GYSFLASH 50.24 HF Vx.x »
Scegliere la modalità desiderata. Il caricabatterie si posiziona automaticamente sull’ultima congurazione utilizzata.
3
Carica (o Trazione) > Diag+ > Showroom
• Il tasto mode permette l’accesso ai differenti menù:
• Per raggiungere il menù congurazione premere per 3 sec
Il tasto mode :
MODO CARICA (AUTOMOBILE & TRAZIONE)
La carica è congurata automaticamente in carica automobile. Il tipo di carica (automobile o trazione) può essere modicata nel menù congurazione. Il prodotto autorizza la carica della batteria sola o collegata al veicolo. Rispettare le seguenti istruzioni.
Regolazione della Carica :
Prima di dare inizio alla carica, assicuratevi che la carica sia correttamente parametrata (tensione della batteria, curva di carica e capacità della
batteria).
In questa modalità sono disponibili diverse curve :
• Easy : curva semplicata adatta a qualsiasi batteria di avviamento al piombo senza dover conoscere la capacità della batteria. Per ottimizzare al
massimo la carica, si consiglia, se possibile, di usare le curve di carica liquida o gel/AGM.
• Liquida : curva di carica per batterie aperte, con coperchio (Piombo, piombo calcio, piombo calcio argento…). Per questa curva, la capacità
della batteria in Ah deve essere inserita.
• Gel/AGM : curva di carica per batterie sigillate (batteria gel, senza manutenzione, AGM…). Per questa curva, la capacità della batteria in Ah deve
essere inserita.
• LFP/LiFePO4: curva di carica per le batterie al litio LFP (Litio Ferro Fosfato). Per questa curva, la capacità della batteria in Ah
deve essere inserita.
• Expert : curva di carica di tipo IU0I0U personalizzabile nel menù «Avanced Menù» e riservata alle persone con esperienza (cf: pag. 69). Questa
curva è automaticamente denita come inattiva e non appare sulla lista delle curve del modo CARICA. La curva Expert è disponibile soltanto nel
modo carica automobile.
ATTENZIONE: A seconda della regolazione della curva Expert (cf. pag. 69), potrebbe essere necessario scollegare la batteria dal
veicolo prima di cominciare la carica per proteggere le parti elettroniche del veicolo.
MODE
MODE
(>Cambio Batteria*) (> Power Supply*)
per impostazione.
3 sec - Congurazione
*nascosta
64
Page 65

GYSFLASH 50.24 HF
Easy
Liquida
Gel/AGM
LFP/LiFePO4
Expert
10Ah
20Ah
...
600Ah
CARICA 12V
Gel/AGM 80Ah
12V
80Ah
12V
80Ah
CARICA
Gel/AGM
CARICA
Gel/AGM
CARICA 12V
Gel/AGM
6V
12V
24V
80Ah
liquida
gel/AGM
50Ah
60Ah
...
450Ah
TRAZIONE 12V
gel/AGM
80Ah
12V
80Ah
12V
80Ah
TRAZIONE
gel/AGM
TRAZIONE
gel/AGM
TRAZIONE 12V
gel/AGM
6V
12V
24V
80Ah
IT
REGOLAZIONE MODO CARICA AUTOMOBILE REGOLAZIONE MODALITA’ CARICA TRAZIONE
ACCENSIONE DELLA CARICA AUTOMOBILE
CARICA
gel/AGM
10%
80Ah
U=12.5V
Q=2.5Ah
10%CARICA
I=10A
00h22
ACCENSIONE DELLA CARICA TRAZIONE
TRAZIONE
gel/AGM
10%
80Ah
U=12.5V
Q=2.5Ah
10%TRAZIONE
I=10A
00h22
TEMPO DI CARICA TRAZIONE
6V/12V/24V
50 Ah 250 Ah
~ 8h*
*A seconda della necessità, il tempo di carica può essere ridotto se si
inserisce una capacità di carica leggermente superiore alla capacità nominale della batteria (massimo +20%). Esempio: per una batteria da
100 Ah, regolare il carica batterie su 110 Ah permette di ridurre il tempo
di carica di circa 45 minuti.
Avviamento :
• Collegare i morsetti: rosso su (+) e nero su (-) della batteria.
• Premere su START/STOP per iniziare la carica.
• Durante la carica, il prodotto mostra la percentuale di avanzamento della carica e alternativamente la tensione, la corrente, gli ampere-ora iniettati e il tempo trascorso.
• Premere ancora per interrompere la carica.
NB: A ne carica AUTOMOBILE (100%), il carica batterie mantiene il livello di carica della batteria applicando una tensione
di oating.
Precauzioni : Vericare il livello dell’elettrolito per le batterie aperte. Se necessario, riempire no a livello prima della carica.
Durante la carica su un veicolo, si consiglia di ridurre al minimo la consommazione elettrica del veicolo (spegnere i fari, spegnere il
veicolo, chiudere le porte, ...) per non disturbare il processo di carica.
Non lanciare la carica di tipo trazione su una batteria di automobile.
250 Ah 450 Ah
9h 14h
50 HF
MODALITA’ E ALIMENTAZIONE DIAG+
Veicoli fermi, il caricabatterie compensa la corrente utilizzata no a 30A (e 15A sotto 24V) per testare i grandi consumatori : ventilazione motore, alzacristalli, sospensioni elettroniche etc… rilasciando una tensione stabilizzata :
- 12V a 14,8V (per batteria 12V).
- 24V a 29,6V (per batteria 24V).
- 6V a 7,4V (per batteria 6V).
Regolazione della tensione :
Dopo aver selezionato la tensione nominale della batteria, è possibile congurare la tensione per passi di 0,1 a seconda delle istruzioni
fornite dal fabbricante.
65
Page 66

GYSFLASH 50.24 HF
I=12A
DIAG+
U=13.5V
DIAG+
U=13.5V
12V 12V
SHOWROOM
13.5V
I=12A
SHOWROOM
U=13.5V
12V12V
IT
REGOLAZIONE MODO DIAG +
Accensione con batteria:
• Collegare i morsetti: rosso su (+) e nero su (-)
DIAG+
U=13.5V
12V
della batteria.
• Premere su Start/Stop per iniziare la modalità.
• Durante l’utilizzo, appaiono corrente consumata
e tensione istantanea.
DIAG+
DIAG+
12V
U=13.5V
24V
U=27.2V
6V
12V
24V
6.0V
6.1V
7.4V
ACCENSIONE DIAG +
12.0V
24.0V
12.1V
...
14.8V
24.1V
...
29.6V
...
Precauzioni : Una corrente visualizzata superiore a 10 A signica che la vostra batteria è scarica. Il GYSFLASH rilascerà automaticamente una corrente di ricarica. Vericare che non ci siano consumatori accesi sul veicolo. Aspettare che l’intensità passi sotto i 10
A per lanciare l’operazione di diagnosi.
MODALITA’ ALIMENTAZIONE SHOWROOM
Veicoli fermi, il caricabatterie compensa la corrente utilizzata no a 50A per testare i grandi consumatori : riscaldamento, alzacristalli,
quadro comandi, etc… di un veicolo di dimostrazione rilasciando una tensione stabilizzata regolabile :
- 12V a 14,8V (per batteria 12V).
- 24V a 29,6V (per batteria 24V).
- 6V a 7,4V (per batteria 6V).
Regolazione della tensione :
Dopo aver selezionato la tensione nominale della batteria, è possibile congurare la tensione per passi di 0,1 a seconda delle istruzioni
fornite dal fabbricante.
REGOLAZIONE MODALITA’ SHOWROOM
Avviamento :
• Collegare i morsetti: rosso su (+) e nero su (-) della
SHOWROOM
U=13.5V
12V
batteria.
• Premere su Start/Stop per iniziare la modalità.
• Durante l’utilizzo, appaiono corrente consumata e tensione istantanea.
SHOWROOM
U=13.5V
SHOWROOM
U=27.2V
12V
24V
6V
12V
24V
6.0V
6.1V
7.4V
ACCENSIONE SHOWROOM
12.0V
24.0V
12.1V
...
14.8V
24.1V
...
29.6V
...
Accensione senza batteria (non consigliato):
È possibile lanciare l’alimentazione senza batteria premendo su START/STOP per 3 secondi.
L’indicazione «no battery» appare allora per 1 secondo prima di lanciare l’alimentazione.
Attenzione: un’inversione di polarità potrebbe avere effetti nefasti per l’elettronica del veicolo.
Precauzioni :
Una corrente visualizzata superiore a 10 A signica che la vostra batteria è scarica. Il GYSFLASH rilascerà automaticamente una
corrente di ricarica. Vericare che non ci siano consumatori accesi sul veicolo. Aspettare che l’intensità passi sotto i 10 A per lanciare
l’operazione di diagnosi.
MODALITA’ CAMBIO BATTERIA (OPZIONE)
Questo caricabatterie assicura l’alimentazione stabilizzata del fabbisogno elettrico del veicolo durante il cambio della batteria per
salvaguardare le memorie.
Selezione della tensione :
E’ possibile scegliere tra 6 V, 12 V e 24 V per il cambio della batteria :
66
Page 67

GYSFLASH 50.24 HF
POWER SUPPLY
U=19.6V I<50A
POWER SUPPLY
U=19.6V I=10A
REGOLAZIONE MODALITA’ CAMBIO
BATTERIA
CAMBIO BATTERIA
12V
IT
Accensione :
• Connettere :
1 : il morsetto rosso sull’estremità del connettore ad
occhiello collegato al (+) della batteria, in modo tale che la
sostituzione della batteria sia possibile senza che il morsetto
si stacchi.
2 : il morsetto nero sul telaio del veicolo.
CAMBIO BATTERIA
12V
• Premere su START/STOP per attivare la modalità.
• Durante l’utilizzo, appaiono corrente consumata e
tensione istantanea.
• Sostituire la batteria, rispettando le polarità. Durante
la manipolazione, attenzione a non scollegare i morsetti dal carica batterie altrimenti si rischia la perdita
della memoria elettronica.
Attenzione: un’inversione di polarità potrebbe avere effetti nefasti per l’elettronica del veicolo.
MODALITA’ POWER SUPPLY (OPZIONE)
Questa modalità destinata agli utenti esperti permette l’uso del carica batterie come una fonte di alimentazione stabile potente la
quale tensione di regolazione e la corrente massima fornite sono regolabili. Questa modalità è pre-denita come inattiva e non appare
nella lista delle modalità. È attivabile dal menù «Advanced Menù» (cf : pag. 69).
Regolazione della tensione di regolazione e della limitazione di corrente :
La tensione di regolazione può essere regolata da 2.0 a 30.0V e la corrente massima rilasciata da 2 a 50A :
6V
12V
24V
ACCENSIONE CAMBIO BATTERIA
CAMBIO BATTERIA
CAMBIO BATTERIA
U=12.9V I=26AU=12V
REGOLAZIONE MODALITA’ POWER SUPPLY
POWER SUPPLY
U=13.5V I<50A
Accensione con batteria :
POWER SUPPLY
U=19.6V I<50A
2.0V
2.1V
...
30.0V
• Premere su Start/Stop per iniziare la modalità.
• Durante l’utilizzo, appaiono corrente consumata e
tensione istantanea.
ACCENSIONE POWER SUPPLY
POWER SUPPLY
U=19.6V I<35A
NOTA: Contrariamente alle altre modalità, nella modalità Power Supply il caricabatterie non compensa la caduta di tensione
dei cavi. In questo caso, la tensione visualizzata sullo schermo corrisponde alla tensione in uscita del carica batterie (e non
alla tensione sui morsetti).
MENÙ CONFIGURAZIONE
Accesso al menù congurazione :
Per navigare nei sottomenù
di congurazione premere Select :
2A
3A
...
50A
MODE
SELECT
3 sec - Modalità
lingue > riavvio > lock showroom > Tipo di carica > controllo cavi >
ADVANCED MENU > Reset Memory
67
Page 68

GYSFLASH 50.24 HF
CONFIGURAZIONE
Italiano
CONFIGURAZIONE
riavvio: OFF
Y (yes)
N (no)
ON
OFF
English
Francais
Deutsch
Nederlands
Espanol
Portugues
Italiano
Russian
...
CONFIGURAZIONE
Test cavi:
Premere START
CONFIGURAZIONE
lock showroom: N
CONFIGURAZIONE
Advanced Menu:
Premere START
CONFIGURAZIONE
Reset Memory:
Premere START
Controllo
cavi
Advanced menu
Reset Memory
automo.
trazione
CONFIGURAZIONE
carica: automo.
IT
Sottomenù:
MODALITA’ CONFIGURA-
• Lingue :
Questo menù permette di scegliere la lingua dello schermo (utilizzare le
frecce per scegliere la lingua).
• Riavvio automatico :
Il riavvio automatico funziona soltanto in modalità
«showroom», « carica » e « Power Supply ». Questa funzione permette,
nel caso di interruzione di corrente, il riavvio automatico del caricabatterie
e della carica.
Questa funzione è già impostata attiva => Schermo « Congurazione |
Riavvio : ON ».
• Lock Showroom :
Permette di bloccare il dispositivo in modalità Showroom.
(Evita gli errori di manipolazione) Questa funzione è già impostata attiva
=> Schermo « Congurazione | Lock Showroom : Y ».
Scelta rapida Lock Showroom :
E’ possibile attivare la funzione Lock Showroom senza entrare nel menù congurazione.
• Spegnere l’apparecchio (interruttore su OFF)
• Premere su MODE
• Spostare l’interruttore in posizione ON, conservando la pressione su MODE. Visualizzazione per
3s « GYSFLASH 50.24 HF Vx.x »
• Mantenere la pressione su MODE nchè appare « lock showroom: Y »
ZIONE
MODE
• Tipo di carica charge :
E’ possibile di scegliere il tipo di carica auspicato:
- Carica automobile (automo.) per ricaricare le batterie di avviamento.
- Carica trazione (traction) per ricaricare le batterie di trazione.
• Controllo dei cavi :
Questo modo deve essere usato durante ogni modica dei connettori d’uscita. Il GYSFLASH può ricevere
connettori d’uscita no a 2x8m in 16mm².
OK: La calibratura è stata effettuata correttamente.
FAIL: Un problema è stato riscontrato durante la calibratura dei cavi. In questo caso, la calibratura è reinizia-
lizzata sulla calibratura originale. Vericare che i cavi siano in buone condizioni e correttamente messi in corto
circuito, e riavviare l’operazione.
• Menù Avanzato (codice 1-9-6-4) :
Questo menù è riservato a persone esperte.
Per accedervi, inserire il codice sopracitato (Select per cambiare la cifra e Start/Stop per validare il codice).
Per maggiori dettagli, cf. pag. 70.
• Reset Memory (codice 1-9-6-4) :
Questo menù è destinato, grazie al codice sovrastante, a ripristinare i parametri del carica batterie
come gli originali all’uscita della fabbrica. Le regolazione personali sono rimosse.
RESET MEMORY
RESET MEMORY
Error Code
Display 1s
RESET MEMORY
Code: 0000
Code NOK
Code OK
(1964)
RESET MEMORY
Code OK
RESET MEMORY
Reset all ?
0
1
...
9
Cambio
cifra
Yes
No
68
Page 69

GYSFLASH 50.24 HF
RETURN
ADVANCED MENU
Questo menù permette la congurazione dei parametri avanzati del carica batterie.
Per passare da un parametro all’altro premere su Select:
IT
SELECT
Attivazione «Cambio Batteria» >Attivazione «Power Supply» > Attivazione «Expert Curve» (> Regolazione dei
parametri «Expert Curve»)
• Attivazione del Modo CAMBIO BATTERIA:
Per attivare il modo CAMBIO BATTERIA, scegliere «ADVANCED MENU» |
Cambio Bat. : ON». Così, questa modalità sarà accessibile sulla lista delle
modalità.
• Attivazione del Modo POWER SUPPLY:
Per attivare il modo POWER SUPPLY, scegliere «ADVANCED MENU | Power
Supply: ON». Così, questa modalità sarà accessibile sulla lista delle modalità.
• Attivazione della curva «EXPERT»:
Per attivare la curva «EXPERT», selezionare «ADVANCED MENU | expert
curve: ON». Così questa curva sarà disponibile in modalità CARICA sulla
lista delle curve di carica.
• Regolazione dei parametri della curva «EXPERT»:
Se la curva di carica «EXPERT» è attivata, è dunque possibile denire i
parametri della curva (tipo IU0I0U):
- Unominal : tensione nominale della batterie (6V, 12V o 24V).
- Ucharge : tensione di carica regolabile da 6,0 a 30,0V. (tappa 7).
- Icharge : Corrente di carica regolabile da 10A a 200A per 100Ah di
capacità specicata (tappa 6).
- Urecovery : tensione di recupero regolabile no a 30.0V. Se «OFF» è
selezionato, la funzione recupero è disattivata (tappa 2 e 4).
- Uoating : tensione di mantenimento regolabile in funzione del valore
Unominal selezionato. Se «OFF» è selezionato, la funzione di mantenimento è disattivata (tappa 9).
- T recovery : tempo massimo della fase di recupero delle cellule in
corto-circuito regolabile da 1h a 24h (tappa 2).
- T refresh :
Durata della fase di raffreddamento regolabile da 1h a 12h. Se
«OFF» è selezionato, la funzione di raffreddamento è disattivata (tappa 8).
- T desulfat: tempo massimo della fase di desolfatazione regolabile fra
1h e 24h (tappa 4).
- T ch_max : Tempo di carica massima (tappa 7 e 6).
ADVANCED MENU
ADVANCED MENU
Change bat.: OFF
ADVANCED MENU
Power Supply: OFF
ADVANCED MENU
expert curve: OFF
OFF
ON
EXPERT CURVE
Unominal: 12V
EXPERT CURVE
Ucharge: 14.3V
EXPERT CURVE
Ichrg: 20A/100Ah
EXPERT CURVE
Urecovery: OFF
EXPERT CURVE
Uoating: OFF
EXPERT CURVE
T recovery: 5h
EXPERT CURVE
T desulfat: 12h
EXPERT CURVE
Tch_max: 16h
EXPERT CURVE
Tch_min: 0h
EXPERT CURVE
T refresh: 5h
ON
OFF
ON
OFF
ON
OFF
6V
12V
24V
6.0V
6.1V
...
8.0V
10A/100Ah
11A/100Ah
...
200A/100Ah
OFF
Uch
...
29.9V
30.0V
OFF
6.0V
6.1V
...
Uch
1h
2h
...
24h
1h
2h
...
24h
1h
2h
...
36h
0h
1h
...
Tch_max
OFF
1h
2h
...
12h
12.0V
12.1V
16.0V
29.9V
30.0V
12.0V
12.1V
24.0V
24.1V
...
...
30.0V
OFF
OFF
Uch
Uch
...
...
29.9V
30.0V
OFF
OFF
24.0V
24.1V
...
...
Uch
Uch
- T ch_min : Tempo di carica minimo (tappa 7 e 6).
- Urefresh : Tensione massima durante rinfrescamento (tappa 8).
- OCP (Protezione da sovraccarica) : Percentuale massima della capa-
cità nominale che può essere iniettata prima della protezione.
aAttenzione :
Per la carica sul veicolo, se tensione Urecovery o
Urefresh troppo elevate, l’elettronica del veicolo potrebbe essere
danneggiata. Si consiglia in tale caso di regolare questi parametri
non oltre 15.0V.
Per registrare e validare le nuove impostazioni scegliere «ADVANCED MENU» | save? Yes»
Premere sul tasto « MODE » per uscire dal menu « Conguration ».
MODE
EXPERT CURVE
U refresh: 17.0V
EXPERT CURVE
OCP: 200%
ADVANCED MENU
Save? No
Uch
30.9V
31.0V
100%
245%
250%
...
...
Yes
No
69
Page 70

GYSFLASH 50.24 HF
0% 10% 20% 80% 90% 95% 98% 100%
Descrizione della curva di carica Expert (IU0I0U)
IT
U
U=Ucharge
Trefresh
I=Irefresh
max.
T
recovery
Recovery
U=Urecovery
Phase I Phase U0 Phase I0
I=Icharge
I
1 2 3 4 5 6 7 8 9
Test Test Charge Absorption Floating
1
2
3
4
5
Shorted cell
Recovery
0% 10% 20% 80% 95% 100%
Analisi batteria
Recupero degli elementi danneggiati in seguito ad una scarica profonda prolungata
Test batteria solfatata
Desolfatazione/Recupero della batteria
Verica del recupero della batteria
Sulphation
Test
Desulphation
Refresh
U=Uoating
Phase U
10
New charge
cycle
U
Carica della batteria all’ 80%
6
Carica della batteria al 95%
7
Raffreddamento delle cellule della batteria
8
Carica di manutenzione
9
10
Ricomincia un ciclo di carica per il mantenimento delle performance = Manutenzione
Descrizione della curva di carica Traction (IUI0)
U=Urecovery
Recovery Phase I
I=Icharge
U=Ucharge
Phase U
I
1 2 3 4 5 6 7 8 9
Shorted cell
Test Test Charge Absorption Rest
Recovery
Sulphation
Test
Desulphation
Phase I0
Trefresh Trest
I=Irefresh
Refresh
I=Iequa
10
Equalization
max 48h
before new
charging cycle
11
End of
charge
CARICA AUTOMOBILE
70
Page 71

GYSFLASH 50.24 HF
Analisi batteria
1
Recupero degli elementi danneggiati in seguito ad una scarica profonda prolungata
2
Test batteria solfatata
3
Desolfatazione/Recupero della batteria
4
Verica del recupero della batteria
5
Carica della batteria all’ 80%
6
Carica della batteria al 90%
7
IT
Raffreddamento delle cellule della batteria
8
Fase di riposo delle cellule
9
10
Pareggiamento delle cellule della batteria
11
Batteria carica al 100% (riavvio della carica dopo 48h)
CARICA TRAZIONE
PROTEZIONI
Questo dispositivo è protetto dai corto-circuiti e dalle inversioni di polarità. Dispone di un sistema anti-scintille che evita scintille
durante il collegamento alla batteria. Senza tensione sui morsetti, non rilascia nessuna corrente per ragioni di sicurezza.
Questo carica batterie è protetto da un fusibile interno da 80A (ref. 054653), contro gli errori di manipolazione.
ANOMALIE, CAUSE, RIMEDI
ANOMALIE CAUSE RIMEDI
Visualizzazione lampeggiante:
1
2
3
4
«#errore (+)<-->(-)»
+ segnale sonoro
Visualizzazione del lampeggiante:
«#errore U>Umax»
+ segnale sonoro
Visualizzazione lampeggiante:
«#errore batteria»
+ segnale sonoro
Visualizzazione lampeggiante :
« >50A »
+ segnale sonoro
Inversione di polarità sui morsetti Collegare il morsetto rosso sul (+) e il morsetto nero sul (-) della batteria.
Tensione della batteria troppo elevata Carica non adatta (es.: batteria 24V invece di 12V).
Batteria in corto circuito o danneggiata. Batteria da sostituire.
Batteria non collegata oppure morsetti in corto
circuito.
Errore sulla scelta della tensione della batteria Caricabatterie non adatto.
Consumo eccessivo in rapporto alla potenza del
caricabatterie
Vericare il collegamento dei morsetti di carica.
Spegnere alcuni elementi consumatori per arrivare ad una situazione normale.
Il GYSFLASH rilascia una forte cor-
5
rente (superiore a 10A) quando la
diagnosi non è stata ancora lanciata
6
7
8
9
10
11 Il dispositivo non visualizza nulla
Visualizzazione per 1sec:
« no battery »
+ segnale sonoro
Il dispositivo è bloccato in modo
Showroom
Lo schermo indica:
«#errore temp(°C)»
+ segnale sonoro
Lo schermo indica:
«#errore IHM »
+ segnale sonoro
Lo schermo indica:
« #errore fusibile »
+ segnale sonoro
Diversi elementi consumatori sono attivi sul
veicolo.
Batteria scarica
La modalità Showroom è attiva
« no battery »
Lock Showroom attivo
Ventilatore diffettoso Contattare il distributore.
Esposizione prolungata al sole
Problema elettronico Contattare il distributore.
Manipolazione impropria
Fusibile d’entrata fuori servizio
Rete elettrica difettosa
Funzionamento normale del GYSFLASH. Spegnere gli elementi consumatori per
assicurarsi che la batteria non sia troppo scarica (vedere causa n°2).
La vostra batteria è profondamente scarica, il GYSFLASH rilascia una corrente
per ricaricarla. Aspettare che la corrente sia inferiore a 10A per lanciare la
diagnosi.
Showroom senza batteria: funzionamento normale del GYSFLASH.
Per disattivare la funzione «no battery», premere su START/STOP, e premere
ancora su START/STOP per iniziare la modalità Showroom con batteria.
Funzionamento normale del GYSFLASH.
Riferirsi al menù congurazione per disattivare la funzione.
Non esporre il dispositivo al sole.
Lasciare il prodotto acceso no alla sparizione dell’errore. (Possibilità di fermare
il segnale sonoro premendo su START/STOP).
Far cambiare il fusibile interno da una persona qualicata
(rif. 054653: 80A).
Far cambiare il fusibile d’entrata da una persona qualicata
(fusibile temporizzato 10A 5x20).
Vericare se la tensione della rete elettrica è compresa fra 180 e 260 V.
71
Page 72

GYSFLASH 50.24 HF
GARANTIE
La garantie couvre tous défauts ou vices de fabrication pendant 2 ans, à compter de la date d’achat (pièces et main d’oeuvre).
La garantie ne couvre pas :
• Toutes autres avaries dues au transport.
• L’usure normale des pièces (Ex. : câbles, pinces, etc.).
• Les incidents dus à un mauvais usage (erreur d’alimentation, chute, démontage).
• Les pannes liées à l’environnement (pollution, rouille, poussière).
En cas de panne, retourner l’appareil à votre distributeur, en y joignant :
- un justicatif d’achat daté (ticket de sortie de caisse, facture….)
- une note explicative de la panne.
WARRANTY
The warranty covers faulty workmanship for 2 years from the date of purchase (parts and labour).
The warranty does not cover:
• Transit damage.
• Normal wear of parts (eg. : cables, clamps, etc..).
• Damages due to misuse (power supply error, dropping of equipment, disassembling).
• Environment related failures (pollution, rust, dust).
In case of failure, return the unit to your distributor together with:
- The proof of purchase (receipt etc ...)
- A description of the fault reported
HERSTELLERGARANTIE
Die Garantieleistung des Herstellers erfolgt ausschließlich bei Fabrikations- oder Materialfehlern, die binnen 24 Monate nach Kauf
angezeigt werden (nachweis Kaufbeleg). Nach Anerkenntnis des Garantieanspruchs durch den Hersteller bzw. seines Beauftragten
erfolgen eine für den Käufer kostenlose Reparatur und ein kostenloser Ersatz von Ersatzteilen. Die Garantiezeitraum bleibt aufgrund
erfolgter Garantieleistungen unverändert.
Ausschluss:
Die Garantieleistung erfolgt nicht bei Defekten, die durch unsachgemäßen Gebruach, Sturz oder harte Stöße sowie durch nicht
autorisierte Reparaturen oder durch Transportschäden, die infolge des Einsendens zur Reparatur, hervorgerufen worden sind. Keine
Garantie wird für Verschleißteile (z. B. Kabel, Klemmen, Vorsatzscheiben usw.) sowie bei Gebruachsspuren übernommen.
Das betreffende Gerät bitte immer mit Kaufbeleg und kurzer Fehlerbeschreibung ausschließlich über den Fachhandel einschicken.
Die Reparatur erfolgt erst nach Erhalt einer schriftlichen Akzeptanz (unterschrift) des zuvor Kostenvoranschlags durch den Besteller.
Im Fall einer Garantieleistung trägt der Hersteller ausschließlich die Kosten für den Rückversand an den Fachhändler.
GARANTÍA
La garantía cubre todos los defectos o vicios de fabricación durante 2 años, a partir de la fecha de compra (piezas y mano de obra)
La garantía no cubre:
• Todas las otras averías resultando del transporte
• El desgaste normal de las piezas (cables, pinzas…)
• Los incidentes resultando de un mal uso (error de alimentación, caída, desmontaje)
• Los fallos relacionados con el entorno (polución, oxidación, polvo…)
En caso de fallo, regresen la maquina a su distribuidor, adjuntando:
• Un justicativo de compra con fecha (recibo, factura…)
• Una nota explicativa del fallo.
ГАРАНТИЯ
Гарантия распространяется на любой заводской дефект или брак в течение 2х лет с даты покупки изделия (запчасти и
рабочая сила).
Гарантия не распространяется на:
• Любые поломки, вызванные транспортировкой.
• Нормальный износ деталей (Например : кабели, зажимы и т.д.).
• Случаи неправильного использования (ошибка питания, падение, разборка).
• Случаи выхода из строя из-за окружающей среды (загрязнение воздуха, коррозия, пыль).
При выходе из строя, обратитесь в пункт покупки аппарата с предъявлением следующих документов:
- документ, подтверждающий покупку (с датой): кассовый чек, инвойс....
- описание поломки.
72
Page 73

GYSFLASH 50.24 HF
GARANTIE
De garantie dekt alle gebreken en fabricagefouten gedurende twee jaar vanaf de aankoopdatum (onderdelen en arbeidsloon).
De garantie dekt niet :
• Alle overige schade als gevolg van vervoer.
• De gebruikelijke slijtage van onderdelen (Bijvoorbeeld : kabels, klemmen, enz.).
• Incidenten als gevolg van verkeerd gebruik (verkeerde elektrische voeding, vallen, ontmanteling).
• Gebreken ten gevolge van de gebruiksomgeving (vervuiling, roest, stof).
In geval van storing moet het apparaat teruggestuurd worden naar uw distributeur, samen met:
- Een gedateerd aankoopbewijs (betaalbewijs, factuur ...).
- Een beschrijving van de storing.
GARANZIA
La garanzia copre qualsiasi difetto di fabbricazione per 2 anni, a partire dalla data d’acquisto (pezzi e mano d’opera).
La garanzia non copre:
• Danni dovuti al trasporto.
• La normale usura dei pezzi (Es. : cavi, morsetti, ecc.).
• Gli incidenti causati da uso improprio (errore di alimentazione, cadute, smontaggio).
• I guasti legati all’ambiente (inquinamento, ruggine, polvere).
In caso di guasto, rinviare il dispositivo al distributore, allegando:
- la prova d’acquisto con data (scontrino, fattura...)
- una nota esplicativa del guasto.
73
Page 74

GYSFLASH 50.24 HF
SPÉCIFICATIONS TECHNIQUES / TECHNICAL FEATURES / TECHNISCHE EIGENSCHAFTEN / ESPECIFICACIONES
TÉCNICAS/ ТЕХНИЧЕСКИЕ СПЕЦИФИКАЦИИ / TECHNISCHE SPECIFICATIES
Tension d’alimentation assignée
Rated input voltage
Netzspannung
Tensión de red asignada
Номинальное напряжение питания
Puissance assignée
Rated power
Bemessungsstrom
Potencia asignada
Номинальная мощность
Rendement
Efciency
Wirkungsgrad
Rendimiento
Производительность
Fusible d’entrée
Input fuse
Eingangssicherung
Fusible de entrada
Входной плавкий предохранитель
Tensions de sortie assignées
Rated output voltage
Bemessungsspannung
Tensiones de salida asignadas
Номинальные выходные напряжения
Plage de tension
Voltage range
Spannungsbereich
Rango de tensión
Диапазон напряжения
Courant de sortie assignée
Rated output current
Nennstrom
Corriente de salida asignada
Номинальный выходной ток
Fusible de sortie
Output fuse
Ausgangsicherung
Fusible de salida
Выходной плавкий предохранитель
Type de batterie
Battery type
Batteriearte
Tipo de batería
Тип аккумулятора
Capacité assignée de batterie
Rated battery capacity
Nennkapazität der Batterie
Capacidad asignada de batería
Номинальная емкость батареи
Nombre d’éléments par batterie
Number of elements per battery
Anzahl der Zellen pro Batterie
Número de elementos por batería
Количество элементов в батарее
Consommation batteries au repos
Battery consumtion when idle
Rückstrom
Consumo de baterías en reposo
Потребление АКБ в нерабочем состоянии
Courbe de charge
Charging curve
Ladekennlinie
Curva de carga
Кривая зарядки
Température de fonctionnement
Operating temperature
Betriebstemperatur
Temperatura de funcionamiento
Рабочая температура
Nominale voedingsspanning
Tensione di alimentazione nominale
Nominale vermogen
Potenza nominale
Opbrengst
Rendimento
Zekering
Fusibile d’entrata
Uitgaande nominale spanning
Tensione di uscita nominale.
Spanningsbereik
Intervallo di tensione
Uitgaande nominale spanning
Corrente di uscita nominale
Zekering
Fusibile d’uscita
Accu soort
Tipo di batteria
Nominale accu capaciteit
Capacità nominale della batteria
Aantal elementen per accu
Numero di elementi per batteria
Accu verbruik in ruststand
Consumo batterie in riposo
Laadcurve
Curva di carica
Werktemperatuur
Temperatura di funzionamento
220-240VAC ~ 50/60Hz
1600W
94%
10
T A
(5x20)
6 V DC
12 V DC
24 V DC
2 – 31V
50A
80A
Plomb / Lithium-ion LFP
Lead / Lithium-ion LFP
Blei / Lithium-Ionen LFP
Plomo / Ión-litio LFP
Свинец / Литий-ионный LFP
Lood/lithium-ion LFP
LFP al piombo / agli ioni di litio
10 – 600 Ah
6
< 1mA
IU0U
0°C – +40°C
Température de stockage
Storage temperature
Lagertemperatur
Temperatura de almacenado
Температура хранения
Indice de protection
Protection rating
Schutzart
Índice de protección
Степень защиты
74
Opslagtemperatuur
Temperatura di stoccaggio
Beschermingsklasse
Indice di protezione
-20°C – +80°C
IP21
Page 75

GYSFLASH 50.24 HF
Classe de protection
Protection class
Schutzklasse
Clase de protección
Класс защиты
Poids
(cables secteur et de charge compris)
Weight (including mains cables and charging cables)
Peso (cables de corriente y de carga incluidos)
Вес (включая кабели питания и заряда)
Gewicht
(inkl. Stecker- und Ladekabel)
Dimensions (L x H x P)
Dimensions (L x H x D)
Abmessungen (B x H x T)
Dimensiones (L x A x A)
Размеры (Д x В x Ш)
Normes
Standards
Norm
Normas
Нормы
FACE AVANT / FRONT / FRONTSEITE / DELANTERA / ПЕРЕДНЯЯ ПАНЕЛЬ / VOORKANT / FRONTALE
Beschermingsklasse
Classe di protezione
Gewicht van het toestel (incl. kabels)
Peso (cavi alimentazione e di carica compresi)
Afmetingen (L x H x B)
Dimensioni (L x H x P)
Normen
Norme
Class I
6.0Kg
300 x 105 x 292 mm
EN 60335-1
EN 60335-2-29
EN 62233
CEI EN 60529
EN 50581
EN 55014-1
EN 55014-2
CEI 61000-3-2
CEI 61000-3-3
FR : Bouton Mode
1
EN : Button Mode
DE : Mode Knopf
ES : Botón Modo
RU : Кнопка Mode
NL : Modus knop
5
2
1
3
4
IT : Tasto Mode
FR : Boutons + ou -
2
EN : Buttons + or -
DE : + oder - Knöpfe
ES : Botones + o -
RU : Кнопки + или -
NL : Knop + of IT : Tasti + o -
FR : Bouton Select
3
EN : Button Select
DE : Select Knopf
ES : Botón Select
RU : Кнопка Select
NL : Select knop
IT : Tasto Select
FR : Bouton Start/Stop
4
EN : Button Start/Stop
DE : Start/Stop Knopf
ES : Botón Start/Stop
RU : Кнопка Start/Stop
NL : Start/Stop knop
IT : Tasto Start/Stop
FR : Afcheur
5
EN : Display
DE : Display
ES : Pantalla
RU : Индикатор
NL : Weergavescherm
IT : Schermo
COMBINAISON BATTERIES / BATTERIES COMBINATION / BATTERIEKOMBINATIONEN / COMBINACION
BATERIAS / КОМБИНАЦИЯ АККУМУЛЯТОРОВ / COMBINAZIONE BATTERIE
75
Page 76

GYS SAS
1, rue de la Croix des Landes
CS 54159
53941 SAINT-BERTHEVIN Cedex
France
 Loading...