

Page 1
N° 75549 – V13.1 -13/01/2017
FR – 2-5 / 30-33
EN – 6-9 / 30-33
DE – 10-13 / 30-33
ES – 14-17 / 30-33
NL – 18-21 / 30-33
RU – 22-25 / 30-33
IT – 26-29 / 30-33
Page 2
2/33
Ce manuel d'utilisation comprend des indications sur le fonctionnement de votre appareil et les précautions
à suivre pour votre sécurité. Merci de le lire attentivement avant première utilisation et de le conserver
soigneusement pour toute relecture future.
DESCRIPTION GENERALE
Le GYSFLASH a été développé pour recharger la plupart des batteries au plomb avec ou sans entretien,
couramment utilisées pour les voitures et pour de nombreux autres véhicules. Ces batteries peuvent être de
plusieurs types ex: GEL (électrolyte gélifié), AGM (élec trolyte imprégné), WET, MF (Maintenance Free), CA
(Calcium).
Le GYSFLASH 7A a été conçu pour la recharge des batteries 12V (6 éléments de 2V) de 1,2 Ah à 130 Ah, ou
pour le maintien en charge des batteries 12V de 1,2 à 230 Ah.
Le GYSFLASH 4A a été conçu pour la recharge des batteries 12V (6 éléments de 2V) de 1,2 Ah à 70 Ah, ou
pour le maintien en charge des batteries 12V de 1,2 à 130 Ah.
SECURITE
Ne pas tenter de recharger des piles ou batteries non rechargeables.
Si le câble d'alimentation est endommagé, il doit être remplacé par le fabricant, son service après
vente ou une personne de qualification similaire afin d'éviter un danger.
Respecter le calibre du fusible indiqué sur l'appareil
Ne pas couvrir le chargeur pendant l’utilisation
Avant la charge lire les instructions. Déconnecter l’alimentation avant de brancher ou de
débrancher les connexions sur la batterie. Mise en garde : Gaz explosif, éviter les flammes et les
étincelles. Assurer une aération suffisante pendant la charge.
Produit faisant l'objet d'une collecte sélective. Ne pas jeter dans une poubelle domestique.
Cet appareil n’est pas prévu pour être utilisé par des personnes (y compris des enfants) dont les
capacités physiques ou mentales sont réduites, ou des personnes dénuées d’expérience ou de
connaissance, sauf si elles ont pu bénéficier, par l’intermédiaire d’une personne responsable de
leur sécurité, d’une surveillance ou d’instructions préalables concernant l’utilisation de l’appareil.
Les enfants ne doivent pas jouer avec l’appareil. Le nettoyage et l’entretien par l’usager ne doivent
pas être effectués par des enfants sans surveillance.
L’appareil doit être placé de façon telle que la fiche de prise de courant soit accessible.
BRANCHEMENTS
Charger une batterie installée sur le véhicule
a- Connecter le chargeur à la prise secteur.
b- Vérifier la polarité des bornes de la batterie. La borne positive (+) est habituellement plus large que
la borne négative.
c- Identifier la b orne de la batterie connectée au châssis du véhicule (masse). Habituellement, c'est la
borne négative.
d1- Recharge d'une batterie dont la borne négative de la batterie est reliée à la masse du véhicule:
(châssis)
- Connecter le câble rouge (+) à la borne positive de la batterie (+), puis le câble noir
(-) à la borne négative de la batterie ou au châssis du véhicule.
d2- Recharge d'une batterie dont la borne positive d e la batterie est reliée à la m asse du véhicule:
(châssis)
- Connecter le câble noir (-) à la borne né gative de la batterie et le câble rouge (+) à la borne
positive de la batterie ou au châssis du véhicule.
Charger une batterie non connectée au véhicule.
a- Connecter le chargeur à la prise secteur.
b- Connecter le câble rouge (+) à la borne positive de la batterie et le câble noir (-) à la borne
négative (-).
Page 3
3/33
Branchement à demeure grâce au câble à cosses (acc. n°15)
Attention: ne pas connecter le câble à cosses au chargeur lors du montage.
a- Connecter le fil rouge du câble à cosses sur la borne positive de la batterie
b- Connecter le fil noir du câble à cosses sur la borne négative de la batterie.
c- Fixer les câbles sur le châssis du véhicule. Attention : les câbles ne doivent pas être pincés ou en
contact avec des surfaces chauffantes ou coupantes.
d- C'est seulement après ce montage que vous pourrez raccorder le câble du chargeur.
Aprè s la charg e, il est conseillé de débrancher le chargeur de batterie de l'alimentation réseau, puis
retirer la connexion du châssis et enfin la connexion de la batterie, dans cet ordre. Dans le cas du
branchement à demeure, débrancher d'abord l'alimentation réseau, puis la connexion à la batterie.
FONCTIONNEMENT GENERAL
Le Gysflash vous propose 3 modes de charge.
ATTENTION : Les modes sont sélectionnables uniquement si l’appareil est connecté à la batterie.
Pour choisir votre mode se référer au tableau ci-dessous.
M
ODES
VOYANT
UTILISATION BATTERIE
CAPACITE
BATTERIE
SECOURS
(ex :alarme)
EN CYCLAGE*
(=charge/décharge ;
ex : balayeuse…)
AUTO/MOTO
(batterie avec
ou sans
entretien)
12V.
1,2 à 15 Ah
en condition
normale
GYSFLASH
4A
15 à 130
Ah
GYSFLASH
7A
15 à 230
Ah
en condition
de froid
* Remarque : pour la recharge des batteries étanches utilisées en cyclage, sélectionner la positio n « chaud »
MODES CHARGES
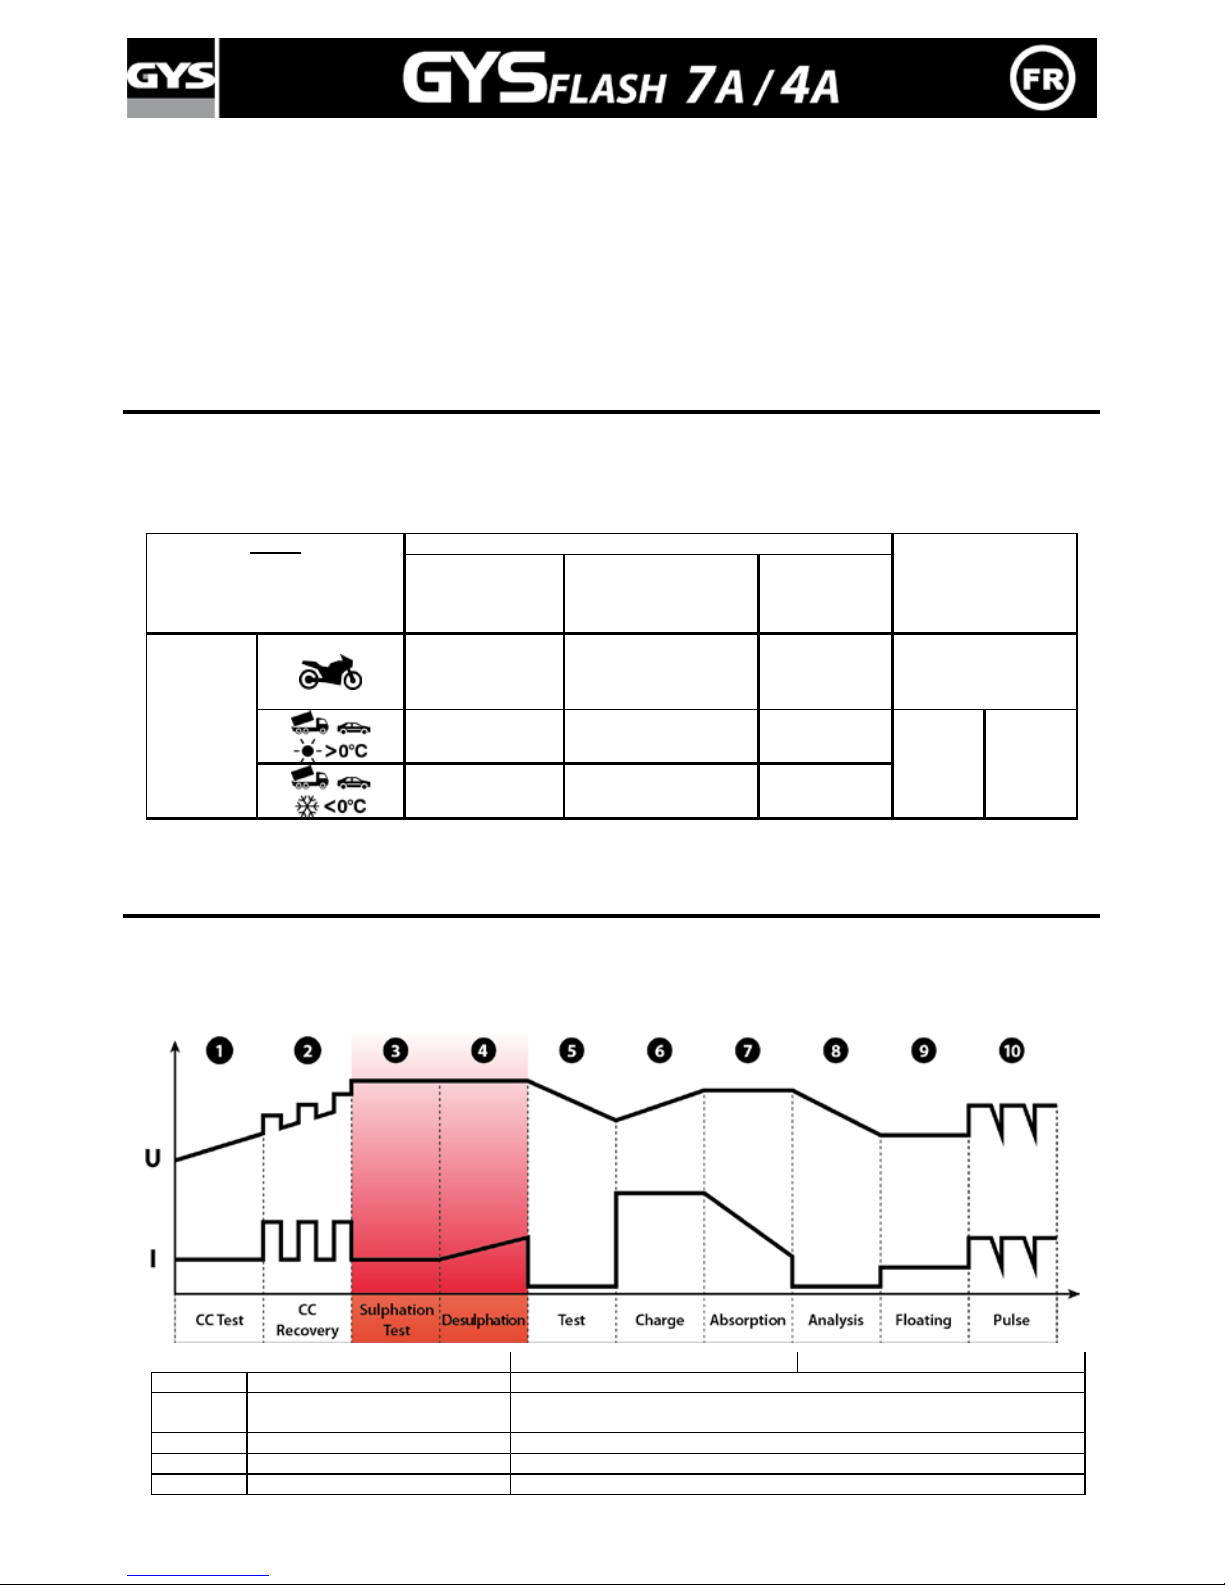
Les 3 modes suivent le diagramme de charge ci-dessous :
• Diagramme de charge et de maintenance
4A
7A
1
TEST Court Circuit
Test éléments en cour t c irc u it d e la batterie
2 Récupération
Récupération des éléments endommagés du à u n e d éc h ar ge profonde
prolongée
3
Test sulfatation
Test batterie sulfatée
4
Désulfatation
Désulfatation/R écu pération de la batterie
5
Test
Vérification de la récupération d e la batterie
Page 4
4/33
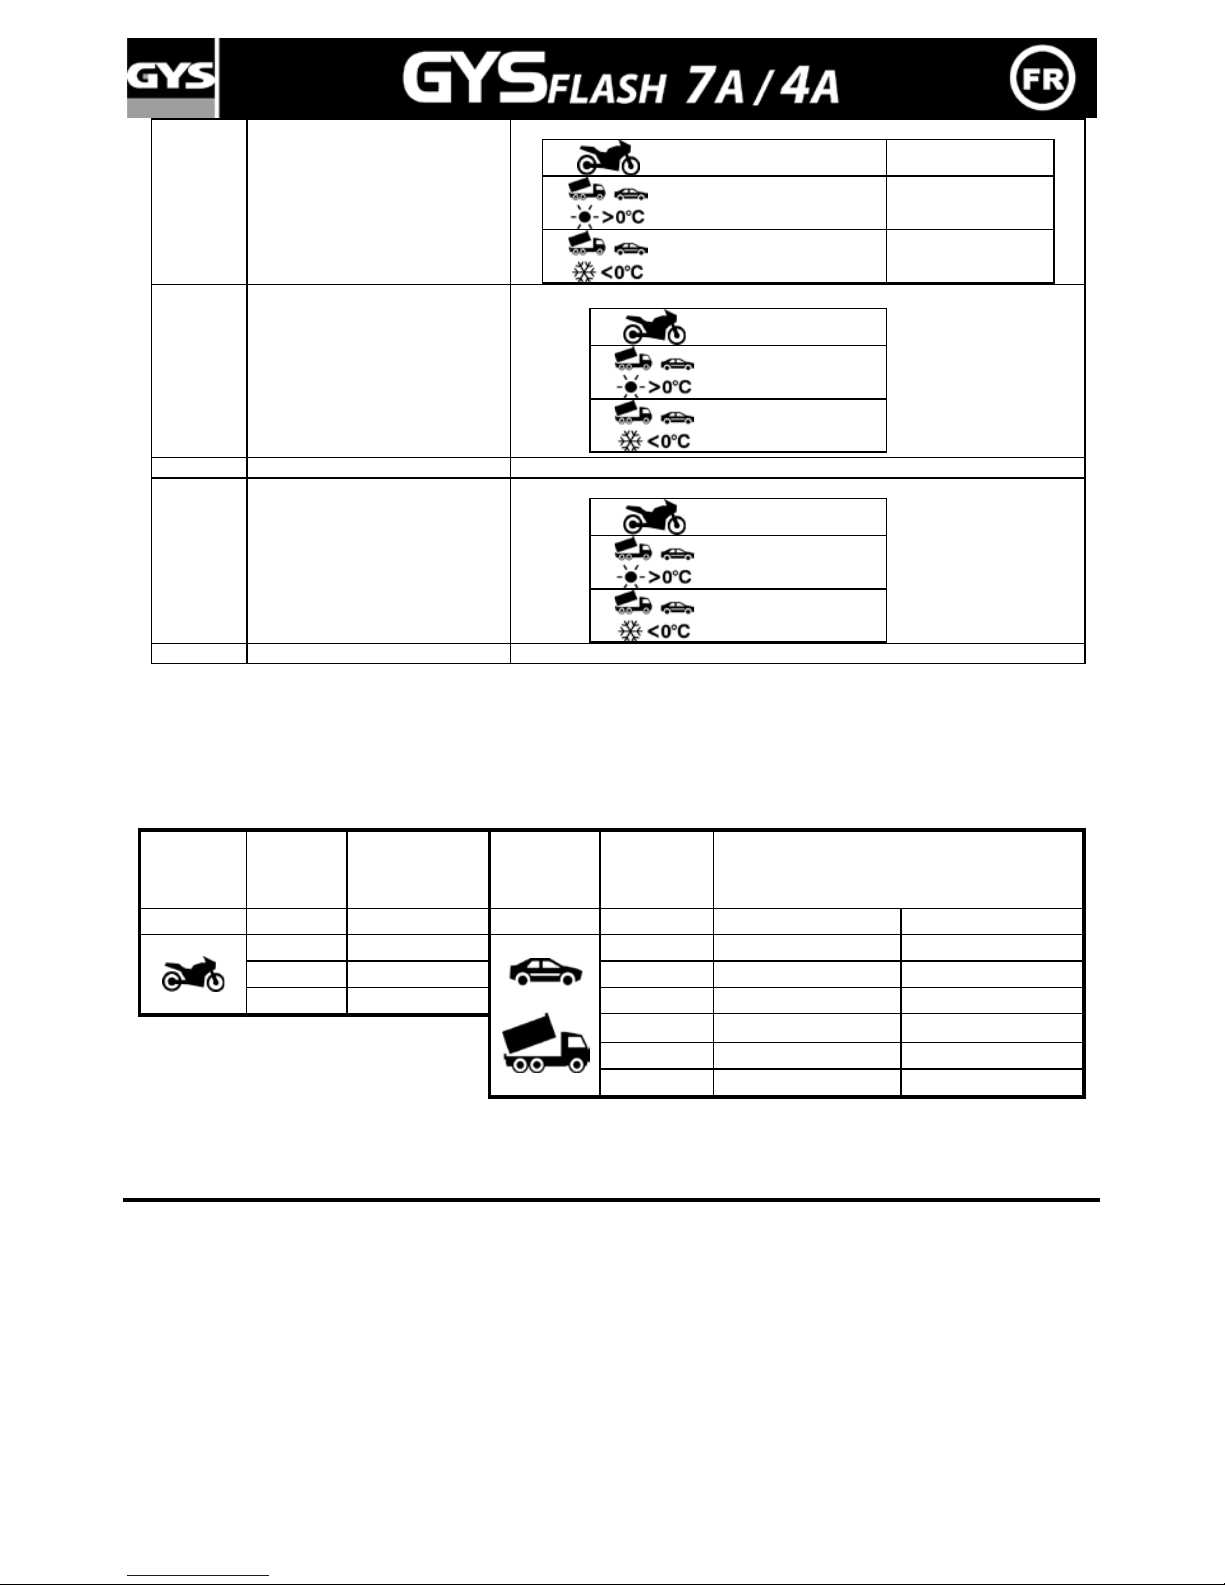
6 Charge
Charge de la batter ie à 80%
0,8A ± 10% 0,8A ± 10%
3,6A ± 10%
(4A max)
5A ± 10%
(7A max)
3,6A ± 10%
(4A max)
5A ± 10%
(7A max)
7 Absorption
Charge de la batter ie à 100%
14,4V ± 0,1V
14,4V ± 0,1V
14,7V ± 0,1V
8
Analyse
Analyse de la charge de la batterie
9 Floating
Charge de maintenance
13,6V ± 0,1V
13,6V ± 0,1V
13,8V ± 0,1V
10
Entretien
Recommence un cycle de charge pour un maintien des performances
• Signalétique des LED.
La led numéro 4 (voir f açade page 28) clignote pendant les phases 1 à 5. Elle reste allumée en continu
pendant les phases 6 à 8 et s’éteint à la phase 9. En phase 9, la led 5 s’allume.
• Temps de charge estimé
Véhicule
Capacité
Batterie (Ah
Temps de charge
de 20 % à 80%
(heures)
Véhicule
Capacité
Batterie (Ah)
Temps de ch a rge de 20 % à 80% (heures)
Gysflash
4A/7A
4A/7A
Gysflash
4A/7A
4A
7A
2
2H 20
3H30
2H
8
6H
70
11H
6H
15
11H30
100
Maintenance
9H
130
Maintenance
11h30
180 - Maintenance
230 - Maintenance
L’appareil redémarre la charge automatiquement en cas de coupure de courant. Il peut donc être branché à
demeure d’un véhicule, idéal pour l’hivernage, le bateau…
PROTECTION
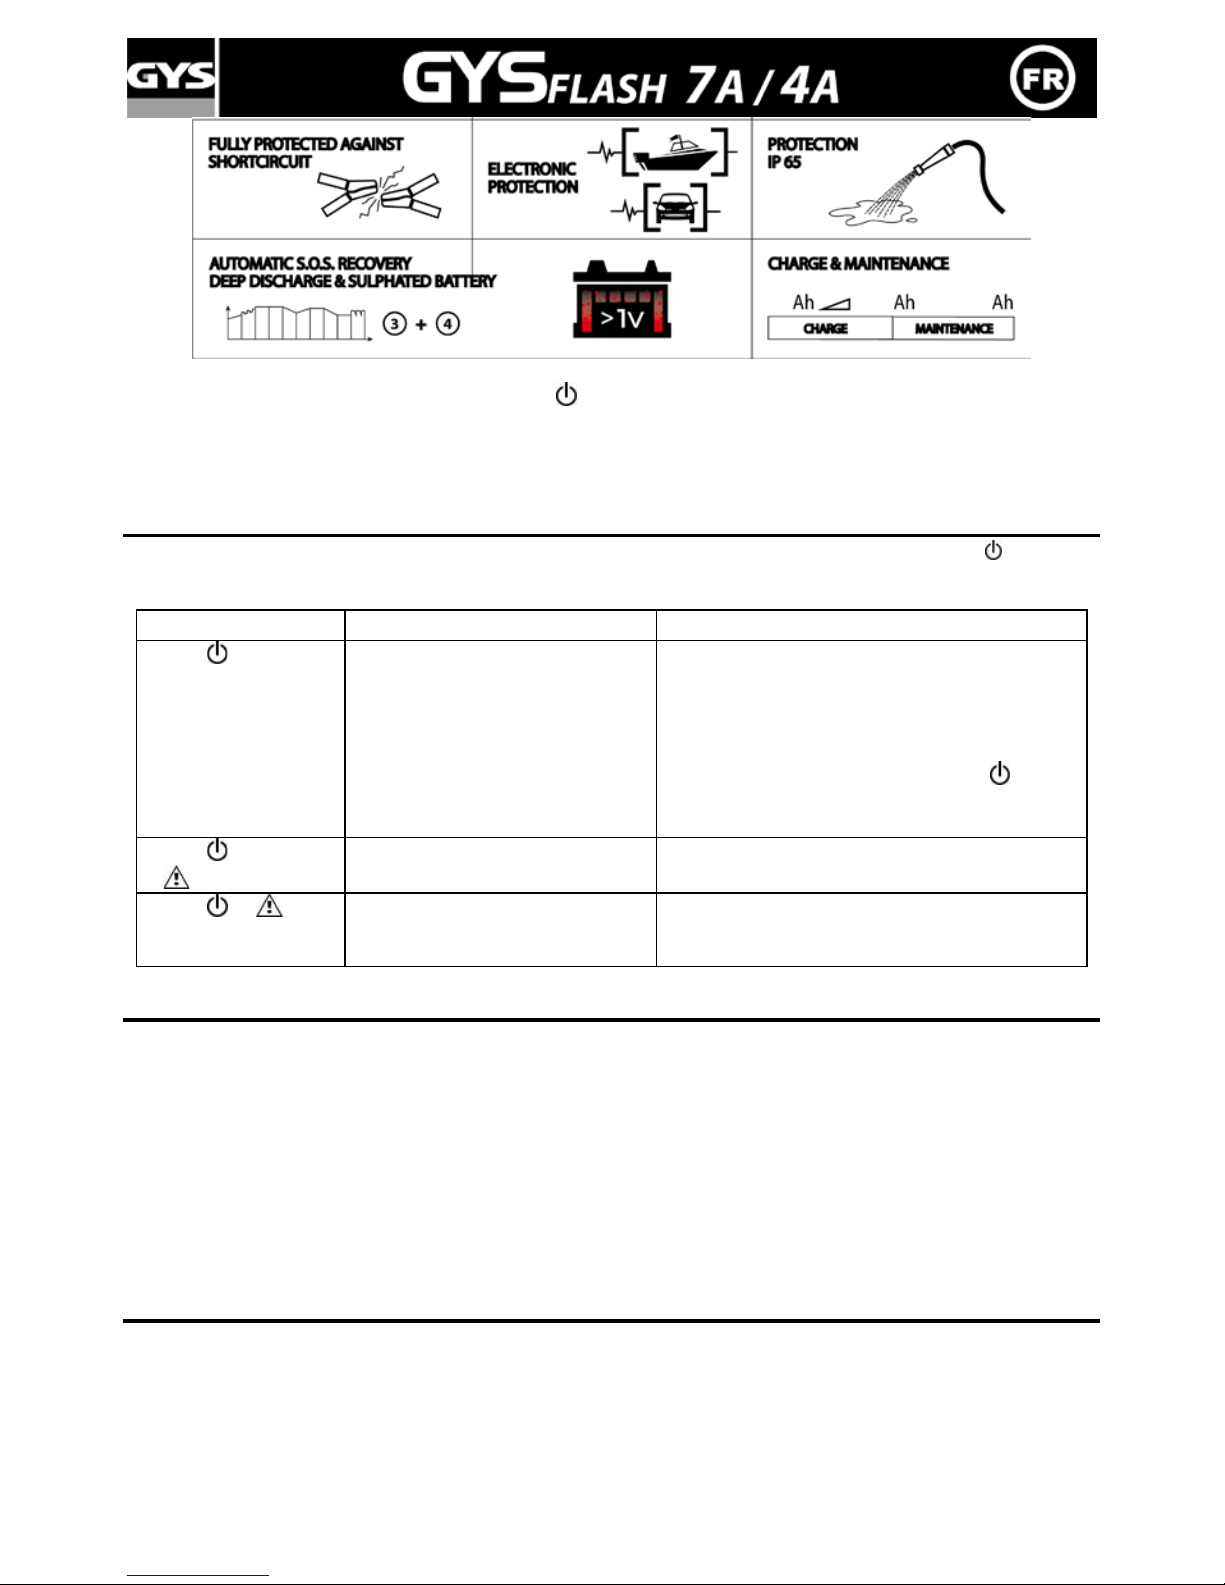
Le Gysflash possède un ensemble de dispositifs le protégeant contre les courts circuits et inversion de
polarité. Il dispose d’un système qui évite toute étincelle lors du branchement du chargeur sur la batterie. Ce
chargeur est à double isolation et est compatible avec l’électronique des véhicules.
Page 5
5/33
Il s’auto-protège (arrêt de la charge + affichage
si la tension de la batterie est en dessous de 1V±0.5V).
Le Gysflash possède un capteur de température. Durant toute la charge, si le chargeur devient trop chaud, il
réduit le courant de charge pour s'auto protéger. Lorsque la température ambiante redevient acceptable, le
Gysflash reprendra sa charge normale.
ANOMALIE, CAUSES, REMEDES
En cas de problème, le chargeur se met automatiquement en protection et allume le voyant ( ). Afin
d'éviter d'endommager la batterie, le système restera dans cette position jusqu'à ce que l'utilisateur
intervienne.
Problèmes
Causes
Remèdes
Voyant allumé
Court circuit
Circuit ouvert
Tension batterie
< 1V ± 0,5
1- Vérifier qu’il n’y a pas de consommation
normale ou anormale dans le circuit du
véhicule
2- Vérifier que les pinces sont
bien connectées
3- Après ces corrections, si le voyant
reste
allumé, la batterie sulfatée ou détériorée est à
remplacer.
Voyant allumé
et clignote
- Inversion de polarité
- Mauvaise tension de batterie
- Vérifier que les pinces sont bien connectées.
- Batterie de 24V connectée.
Voyant et
allumés
Détection d’une batterie non
récupérable.
Défaut thermique
Changer la batterie.
Température environnante trop importante,
aérer le local.
CONDITIONS DE GARANTIE
La garantie couvre tous défauts ou vices de fabrication pendant 1 an, à compter de la date d’achat
(pièces et main d’oeuvre).
La garantie ne couvre pas :
• Toutes autres avaries dues au transport.
• L’usure normale des pièces (Ex. : câbles, pinces, etc.).
• Les incidents dus à un mauvais usage (erreur d’alimentation, chute, démontage).
• Les pannes liées à l’environnement (pollution, rouille, poussière).
En cas de panne, retourner l’appareil à votre distributeur, en y joignant :
- un justificatif d’achat daté (ticket de sortie de caisse, facture….)
- une note explicative de la panne.
DECLARATION DE CONFORMITE
La société GYS atteste que le chargeur décrit dans ce manuel est fabriqué conformément aux exigences
des directives européennes suivantes :
- Directive basse tension: 2006/95/CE - 12/12/2006.
- Directive CEM : 2004/108/CE - 15/12/2004.
Ils sont pour cela conformes aux normes harmonisées :
- EN60335-1 - EN60335-2-29 – EN55014-1 - EN55014-2 – EN61000-3-2
- EN61000-3-3 – EN62233
XX
XXX
XXX
Page 6
6/33
This manual contains important safety and op erating instructions. Read this manual carefully before
using the charger for the first time and keep it in a safe place for future reference.
PRODUCT FEATURES
GYSFLASH is designed for charging a variety of SLA (Sealed Lead Acid) batteries, w idely used in cars
and other vehicles. GYSFLASH 7A is s uitable for WET/Flooded (Liquid Electrolyte), GEL ( Gelatine type
Electrolyte, absorbed into the p lates), AGM (Absorbed Glass Mat) and CA (Calcium) batteries.
GYSFLASH 7A charges 12V batteries ( 6 cells of 2 V) from 1.2 Ah to 130 Ah, or provide s a maintenance
charge for 12V batteries from 1.2 to 230 Ah.
GYSFLASH 4A char ges 12V batteries (6 cells of 2V) from 1.2 Ah to 70 Ah, or provides a maintenance
charge for 12V batteries from 1.2 to 130 Ah.
SAFETY INFORMATIO N
Do not attempt to charge non rechargeable batteries.
If the power cable is damaged, stop using the machine. Any repair must be c arried out by
GYS or an authorized repair agent in order to avoid danger.
Respect the fuse rating indicated on the charger.
Do not cover the charger while charging.
Always read the instructions carefully before c harging. Unplug the charger from the mains
before connecting or disconnecting the clamps from the terminals of the battery.
Attention: Explosive gas, avoid sparks and flames. Ensure tha t the unit is in a sufficien tly
ventilated area during charge.
Separate collection required. Do not dispose of in domestic refuse.
This device is not intended for us e by persons (incl uding children) with reduced physical or
mental capabilities, or la ck of exper ience and knowledg e, unless they have been given by a
person responsible for their safety, supervision or instructions concerning the use of the
device. Children should not p lay with the appliance. Cleaning and maintenance should not
be performed by unsupervised children.
During use the unit should be placed so that the mains socket is accessible.
CONNECTING
Charging of a permanently installed ba ttery in a vehicle
a- Plug the charger into the mains
b- Check polarity of batter y terminals. A positive (+) ba ttery terminal usually has a larger d iameter
than a negative one.
c- Identify the terminal of batter y which is connected to the chassi s (earth) - this is normally the
negative terminal.
d1- Charging a negative earthed battery:
Connect the red clamp to the positive ( +) terminal of the battery and the black clamp to the
negative (-) terminal of the battery or to the vehicle chassis.
d2- Charging of positive earthed battery:
- Connect the black clamp to the negative (-) terminal of the ba ttery and the red clamp to the
positive (+) terminal of the battery or to the vehicle chassis.
Charging a battery not connected to a vehicle
a- Plug the charger into the mains
b- Connect the red clamp to the positive (+) terminal of the battery and the b lack clamp to the
negative (-) terminal.
For permanent connection to the vehicle battery use the cab le with eyelet terminals = accessory
n°15)
Warning: Do not connect the cables to the battery terminals during installation.
a- Connect the red cable to the positive (+) battery terminal
b- Connect the black cable to the negative (-) battery te rminal
Page 7
7/33
c- Fix the cables to the vehicle chassis
Make sure that the cables are not being pinched or in contact with warm surfaces or sharp edges.
d- Then connect the charger cable.
After charging, disconnect the battery charger from the mains. Then remove the chassis
connections and the battery connections, in this order. When permanently connected to the
vehicle battery, first disconnect the battery charger from supply mains, then from the battery
connection.
SUGGESTED MODES AN D SELECTION
GYSFLASH has 3 charging modes
ATTENTION: The charging mode can be selected only if the device is connected to the battery.
To select your charging mode, please refer to the following table:
MODES
LED
BATTERY USE
BATTERY VOLTAGE
&
SIZE
EMERGENCY
(i.e. alarm)
DEEP CYCLING*
(=charging/discharging ;
i.e.: sweeper…)
AUTOMOBILE
(including
maintenance
free
batteries)
12V
1.2 to 15 Ah
Normal
condition
GYSFLASH
4A
15 to
130 Ah
GYSFLASH
7A
15 to
230 Ah
Cold
condition
* Remark: to cha rge sealed batteries used in deep cycle mode , select the « hot » mode.
CHARGING MODES
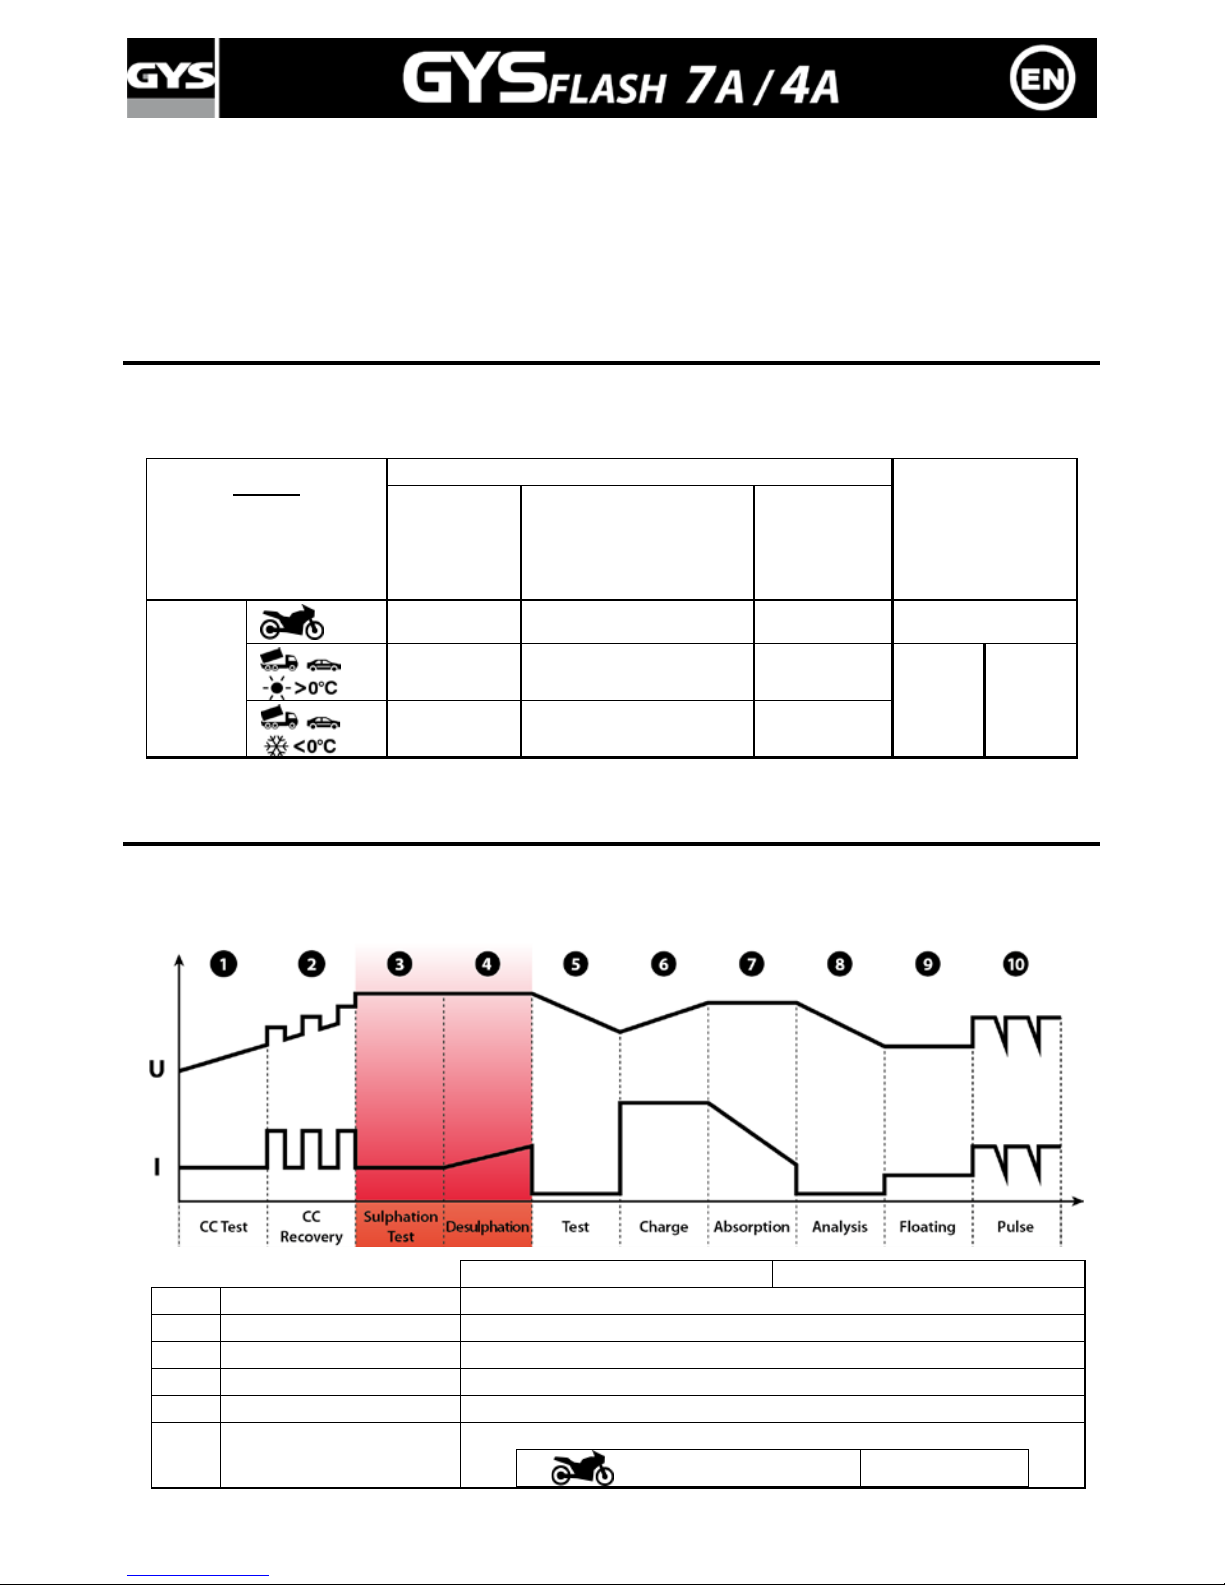
The three charging modes follow the diagram below. :
• Diagram showing charging curve
4A
7A
1
Short Circuit test
Test the cells in the battery for short circuits
2
Recovery mode
Recovers cells damaged deep and prolonged discharge
3
Sulphation test
Tests battery for sulphation
4
Desulphation
Desulphation and recovery of battery
5
Test
Check the recovery status of the battery
6 Charge
Charges the battery up to 80%
0,8A ± 10% 0,8A ± 10%
Page 8
8/33
3,6A ± 10%
(4A max)
5A ± 10%
(7A max)
3,6A ± 10%
(4A max)
5A ± 10%
(7A max)
7 Absorption
Charges the battery up to 100%
14.4V ± 0.1V
14.4V ± 0.1V
14.7V ± 0.1V
8
Analysis
Analyse the charge of the battery
9 Floating
Maintain the charge
13.6V ± 0.1V
13.6V ± 0.1V
13.8V ± 0.1V
10
Maintenance
Starts maintenance charge
• LED indications
The LED 4 (see schema page 28) flashes intermittently from stage1 to 5. Then it will be switched on
continuously from stage 6 to 8 and sw itch off for the stage 9. During the stage 9, the LED 5 will
switch on.
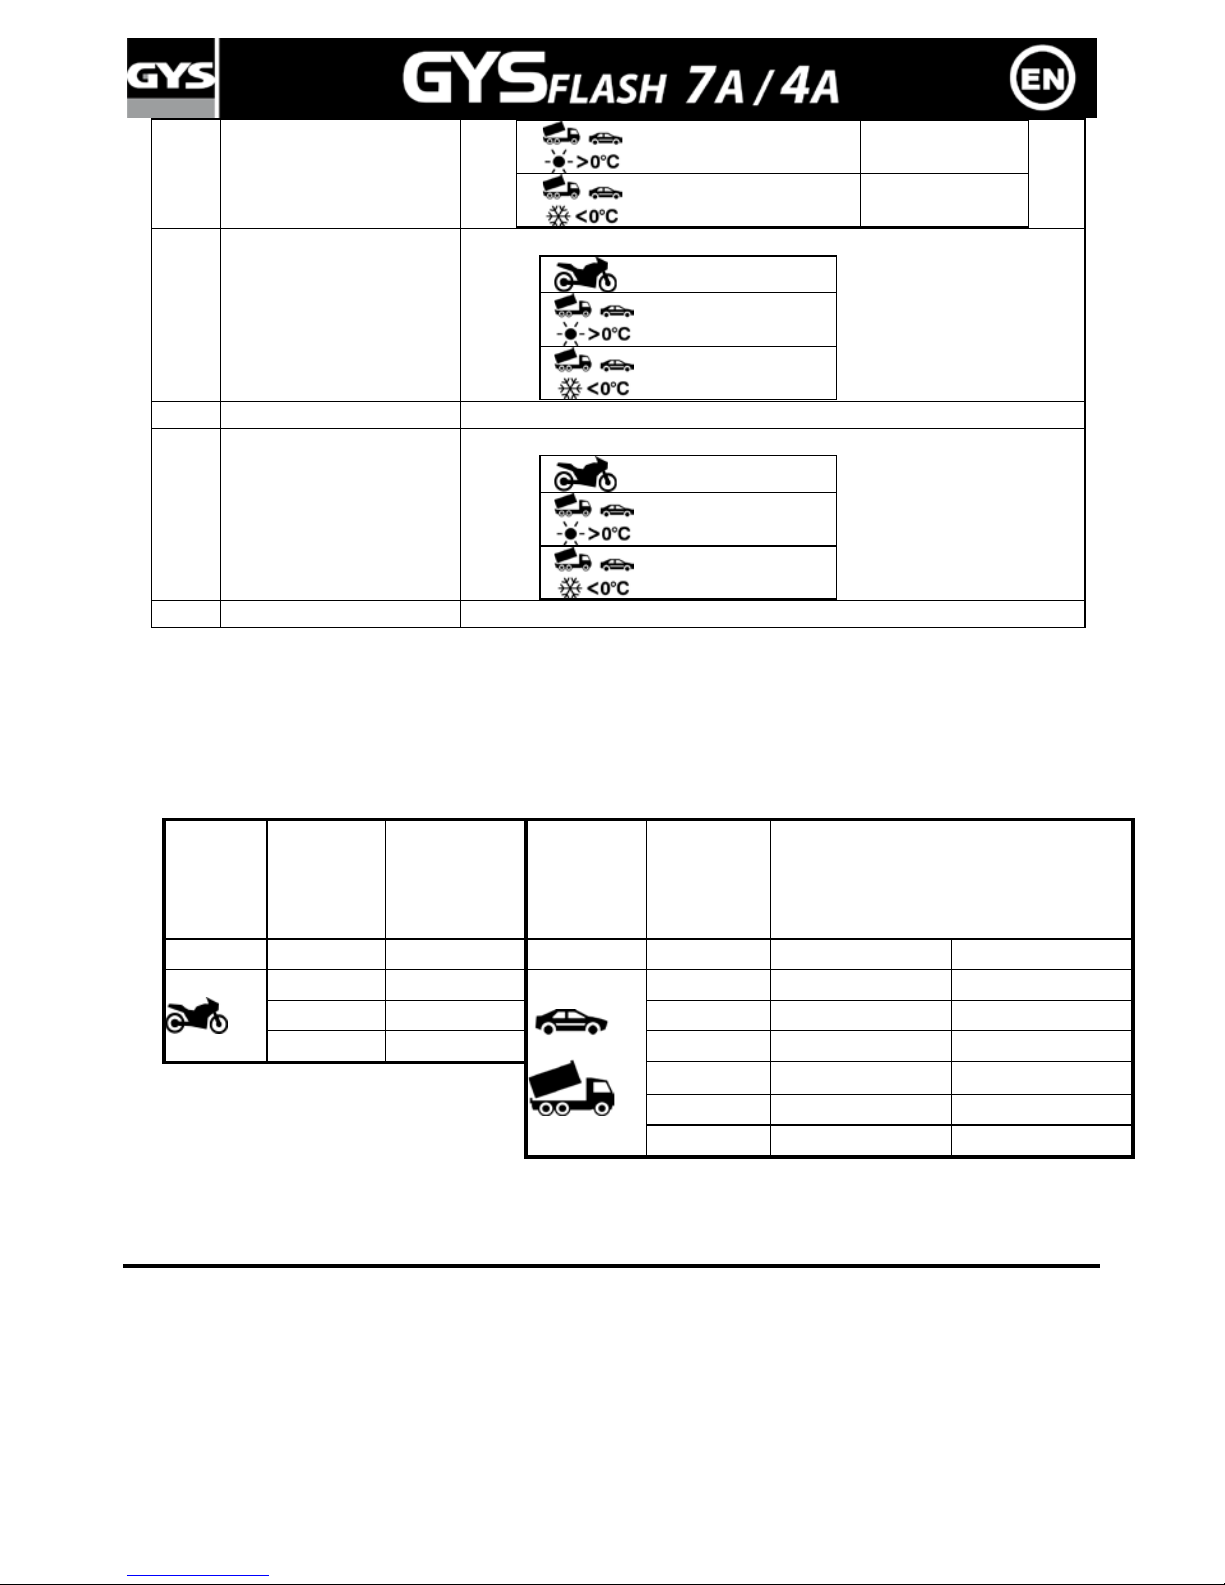
• Estimated time of charge
Vehicle
Battery
capacity (Ah
Time of
charge from
20 % to 80%
(hours)
Vehicle
Battery
capacity
(Ah)
Time of charge from 20 % to 80%
(hours)
Gysflash
4A/7A
4A/7A
Gysflash
4A/7A
4A
7A
2
2H 20
3H30
2H
8
6H
70
11H
6H
15
11H30
100
Maintenance
9H
130
Maintenance
11h30
180
-
Maintenance
230
-
Maintenance
The product restarts the charge automatically in the event if a power cut or power supply failure.
Hence, it is ideal to be connected permanently on the vehicle, for wintering cars, bikes, boats … »
PROTECTION
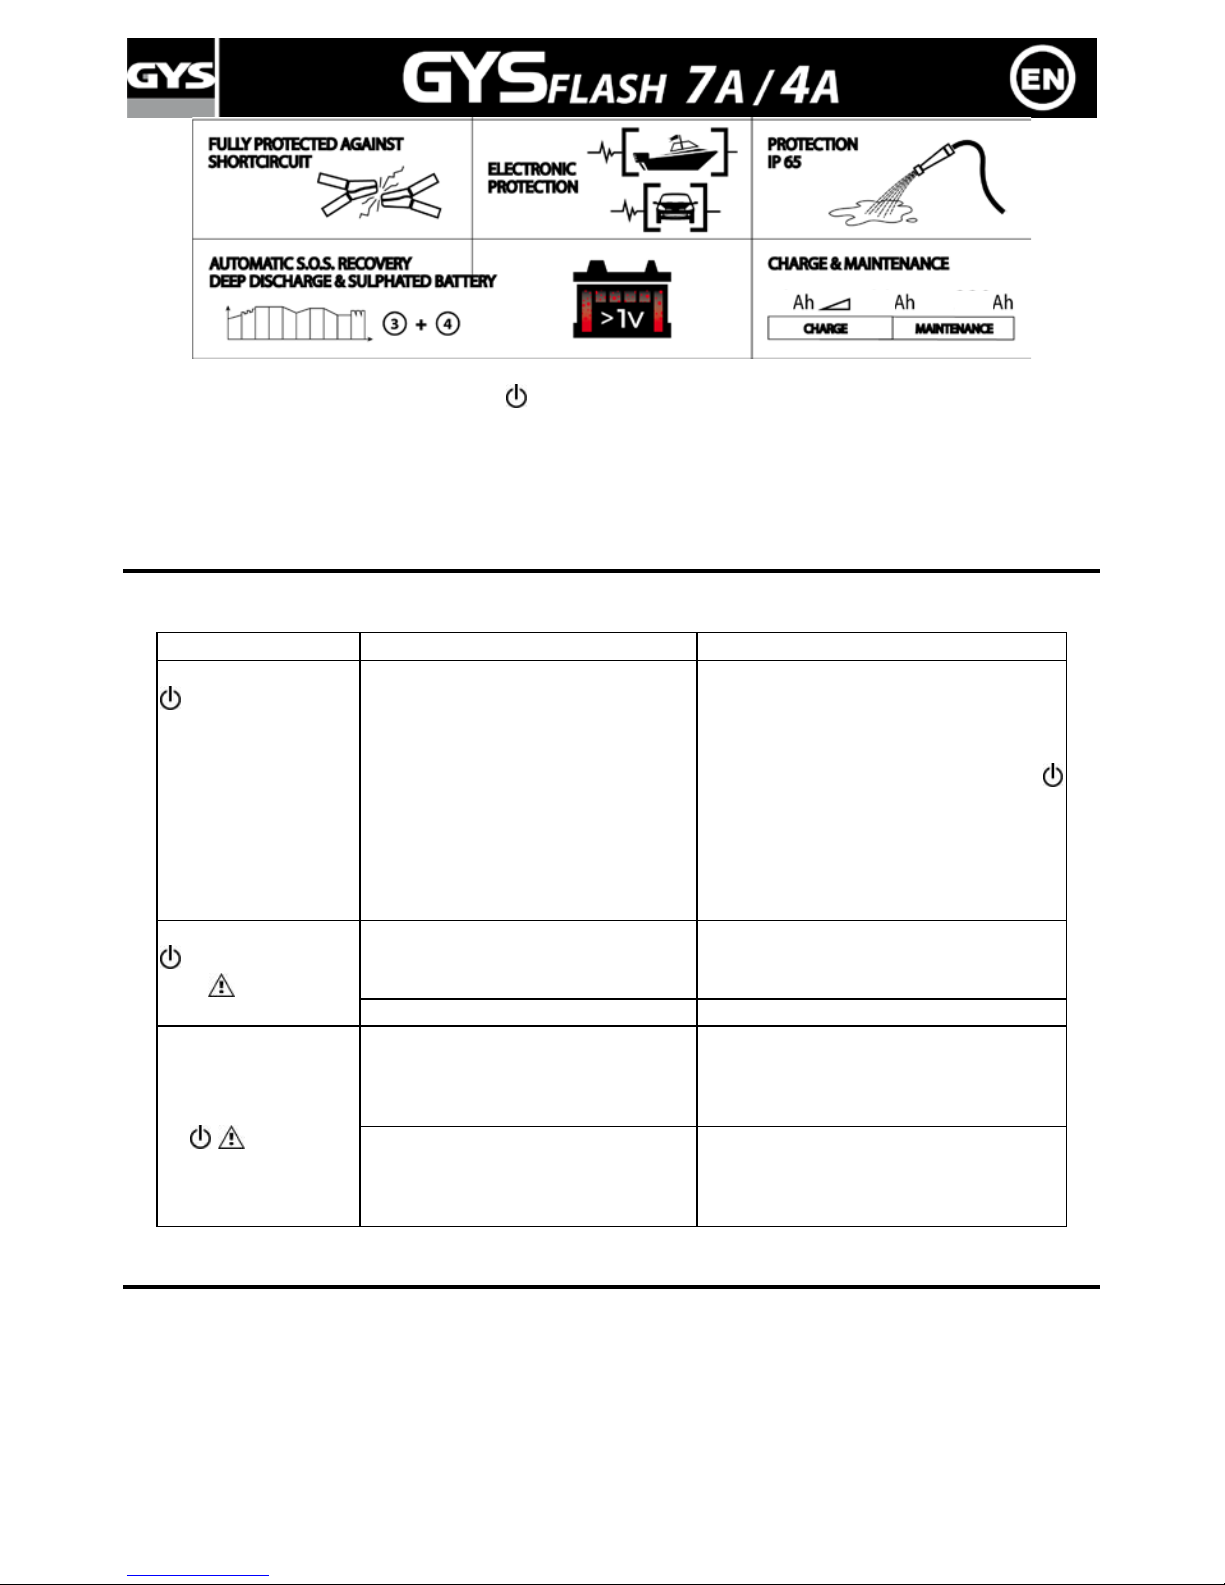
The GYSFLASH is protected against short circuits and polarity reversals. It also has an anti-spark
system to avoid sparks when connecting the clamps to the battery terminals. This charger has a
double insulation and is compatible with the onboard electronics of all vehicle s.
Page 9
9/33
It is autoprotected to stop c harging (+
w ill be displayed) if the vo ltage of the battery drop s below
1V±0.5V).
The GYSFLASH has a thermal sensor, and if the machine becomes too hot during the cha rge cycle, it
will automatically reduce the power of charge. When the temperature is acceptable, the GYSFLASH
will come back to its normal charging power.
PROBLEMS, CAUSES AND SOLUTIONS
In case of problem, the charger automatically switches on protection mode and the power
indicator illuminates. The system will remain in that position until the us e r intervenes.
Problem
Causes
Solutions
Power Indicator
Illuminates
Short circuit
Circuit open
Battery voltage
< 1V ± 0.5 (for a 12V battery)
1- Check that there is no v oltage loss
in the vehicle circuit
2-
Check that the clamps are well
connected
3- After corrections, if the
indicator is still on, the sulph
ated
or damaged battery should
be
replaced (nb: are you in 12V or 13.
6V
mode maximum? Please try the
recovery function)
Indicator is on
and
is flashing
Polarity reversal
Check that the clamps are correctly
connected
Wrong battery voltage
24V battery connected
Both indicators are
on
The unit has detected a battery
that can’t be recovered.
Change the battery.
Thermal fault
The temperature is too high, vent ilate
the area.
D
ECLARATION OF COMPLIANCE
GYS certifies that the product described on this manual is manufactured in compliance with the requirements
of the following European directives:
- Low Voltage Directive: 2006/ 95/ C E - 12/12/2006
- EMC Directive: 2004/108/CE, 15/12/2004,
It therefore complies with the following harmonized standards: EN60335-1 - EN60335-2-29 – EN55014-1 EN55014-2 – EN61000-3-2– EN61000-3-3 – EN62233.
XX
XXX
XXX
Page 10
10/33
Diese Bedienungsanleitung umfasst Hinweise über die verschiedenen Funktionen Ihres Gerätes und die
Sicherheitsmaßnahmen. Bitte lesen Sie die Bedienungsanleitung sorgfältig durch, bevor Sie das Gerät zum
ersten Mal einschalten. Bewahren Sie die Bedienungsanleitung für zukünftige Fragen sorgfältig auf.
ALLGEMEINE BESCHREIBUNG
Gysflash wurde entwickelt um die meisten Bleibatterien die gewöhnlich in Kraftfahrzeugen und in zahlreichen
anderen Fahrzeugen eingesetzt werden, mit oder ohne Wartung, zu laden. Batterie- Typen die an geschlossen
werden können: Flüssig (Flüssige Elektrolyt e ) , G EL (Gel Elektrolyte), AGM (Imprägnierte Elektrolyte), CA
(Calcium).
Gysflash 7A er wurde entwickelt um 12V Batterien (6 x 2V Elemente) von 1,2 Ah bis 130 Ah zu laden, oder
für die Erhaltungslademodi von 12V Batterien von 1,2 bis 230 Ah.
Gysflash 4A er wurde entwickelt um 12V Batterien (6 x 2V Elemente) von 1,2 Ah bis 70 Ah zu laden, oder für
die Erhaltungslademodi von 12V Batterien von 1,2 bis 130 Ah.
SICHERHEIT
Niemals für andere Zwecke einsetzen.
Keine Anwendung bei nichtaufladbaren Batterien.
Absicherungshinweise auf dem Gerät unbedingt beachten.
Keine Anwendung bei Netzkabelschaden.
Trennen Sie das Gerät vom Stromnetz bevor Sie Kabel und Zange n anschließen . Achtung : Vermeiden
Sie stets Feuer und Funkenflug und sorgen Sie während der Aufladung für gute Belüftung.
Gerät nicht aufmachen.
Das Gerät ist nicht für den Gebrauch durch Personen (einschl. Kindern) geeignet, deren physische und
mentale Fähigkeiten beschränkt sind oder über keine Erfahrung oder Kenntnisse verfügen – außer unter
Aufsicht oder nach Anweisung durch das zuständige Sicherheitspersonal. Das Gerät ist kein Spielzeug!
Die Reinigung und Wartung darf nicht von Kindern durchgeführt werden.
Entsorgung nur als Sondermüll - Elektroschrott, nicht als Hausmüll.
ANSCHLUSS
Ladung eingebauter Starterbatterien:
a- Schließen Sie das Gerät an das Stromnetz an.
b- Prüfen Sie die Polarität der Batterieanschlüsse. Der Pluspol hat meist größere Abmessungen als der
Minuspol.
c- Suchen Sie den Pol, welcher mit der Karosse verbunden ist. Normalerweise ist das der Minuspol.
d1- Ladung von Batterien mit geerdetem Minuspol:
• Verbinden sie das rote Kabel mit dem Pluspol (+) der Batterie und das schwarze Kabel (-) mit dem
Minuspol, oder mit einer unlackierten, blanken Stelle an der Karosserie.
d2- Ladung von Batterien, mit geerdetem Pluspol:
• Verbinden Sie das schwarze Kabel mit dem Minuspol (-) der Batterie und das rote Kabel (+) mit dem
Pluspol, oder mit einer unlackierten, blanken Stelle an der Karosserie.
Ladung ausgebauter Batterien:
a- Schließen Sie das Gerät an d as Stromnetz an.
b- Verbinden sie das rote Kabel (+) mit dem Pluspol (+) der Batterie und das schwarze Kabel (-) mit
dem Min uspol (-) der Batterie.
Dauerhafter Anschluss des Adapterkabels mit Ringkabelschuhen (Zubehör Nr. 15):
Warnung: Während der Montage soll das Gerät nicht mit dem Adapterkabel verbunden werden!
a- Verbinden sie das rote Kabel (+) mit dem Pluspol (+) der Batterie
b- Verbinden sie das schwarze Kabel (-) mit dem Minuspol (-) der Batterie
c- Fixieren sie das Kabel an einer gut zugänglichen Stelle des Chassis und stellen sie sicher, dass es
nicht mit heißen Teilen oder scharfen Kanten in Berührung kommt.
d- Anschließend nutzen die Kabelsteckverbindung.
Nach erfolgter Ladung trennen Sie das Ladegerät vom Netz:
Zuerst die Klemme von der Karosserie und dann die Klemme an der Batterie entfernen. Bitte beachten
Sie unbedingt die Reihenfolge.
Page 11
11/33
MODI UND MODUS AUSWAHL
Das Gysflash Gerät hat 3 ve rschiedene Modi zu Auswahl. (Die verschiedenen Modi können nur ausgewählt
werden, wenn das Gerät an der Batterie angeschlossen ist.) Um Ihren Modus zu wählen, benutzen Sie die
untenstehende Tabelle
M
ODI
KONTROLL-LICHT
B
ATTERIE NÜTZUNG
SPANNUNG &
BATTERIE-KAPAZITÄT
S
ICHERHEIT
(ex :alarme)
ZYKLUS
*
(=Lädt /
Entlädt)
F
AHRZEUG
(Batterie mit und
ohne Wartung)
12V.
1,2 bis 15 Ah
Bei über 0°C
GYSFLASH
4A
15 bis
130 Ah
GYSFLASH
7A
15 bis
230 Ah
Bei unter 0°C
* Bemerkung: Für wartungsfreie Batterien, über 0°C-Modus einstellen
LADEMODI
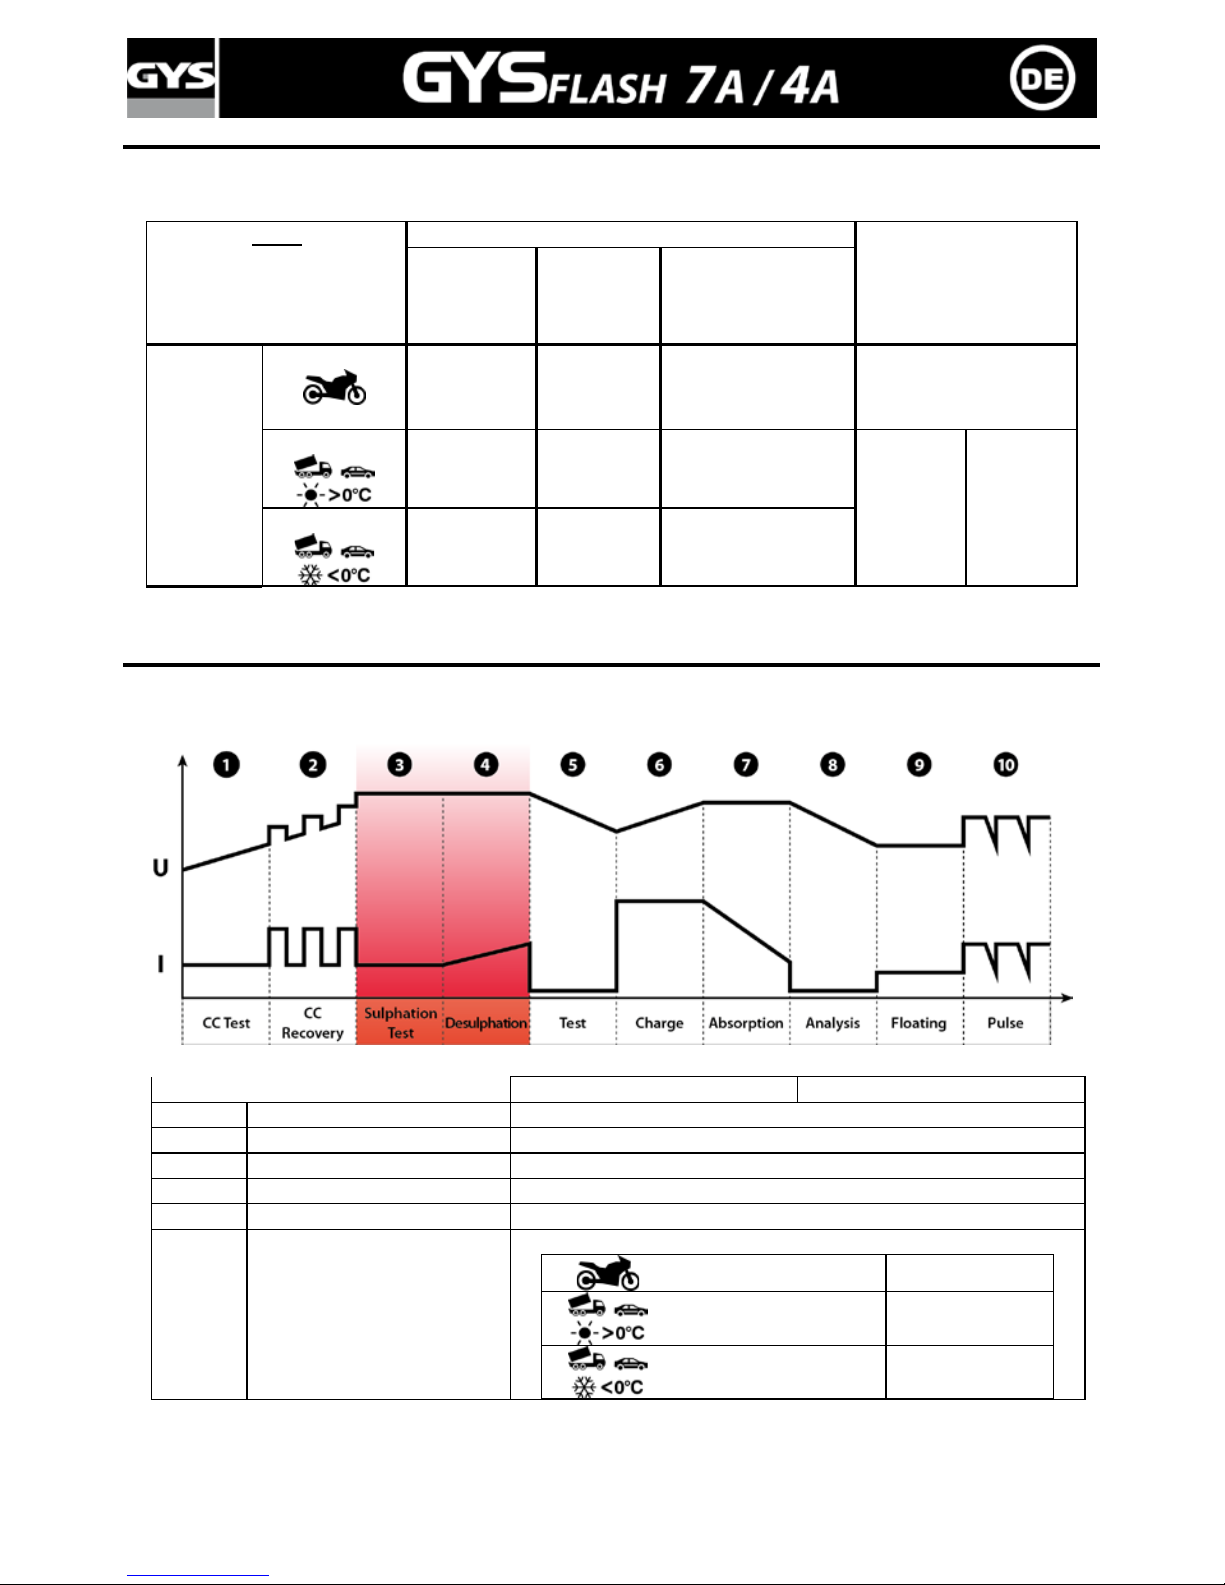
Die 3 Modi haben die gleiche Ladekennlinie wie unten :
• Ladekennlinie :
4A
7A
1
Kurzschlusstest
Testet auf Kurschlüsse der Zellen in der Batterie
2
Wiederherstellung
Wiederherstellung der Zellen nach einer langen Tiefentladung
3
Sulfatierungstest
Sulfatiereungstest der Batterie
4
Desulfatierung
Desulfatierung und Wiederherstellung der Batterie
5
Test
Überprüfung der Wiederherstellung der Batterie
6 Ladung
Ladung bis zu 80%
0,8A ± 10% 0,8A ± 10%
3,6A ± 10%
(4A max)
5A ± 10%
(7A max)
3,6A ± 10%
(4A max)
5A ± 10%
(7A max)
Page 12
12/33
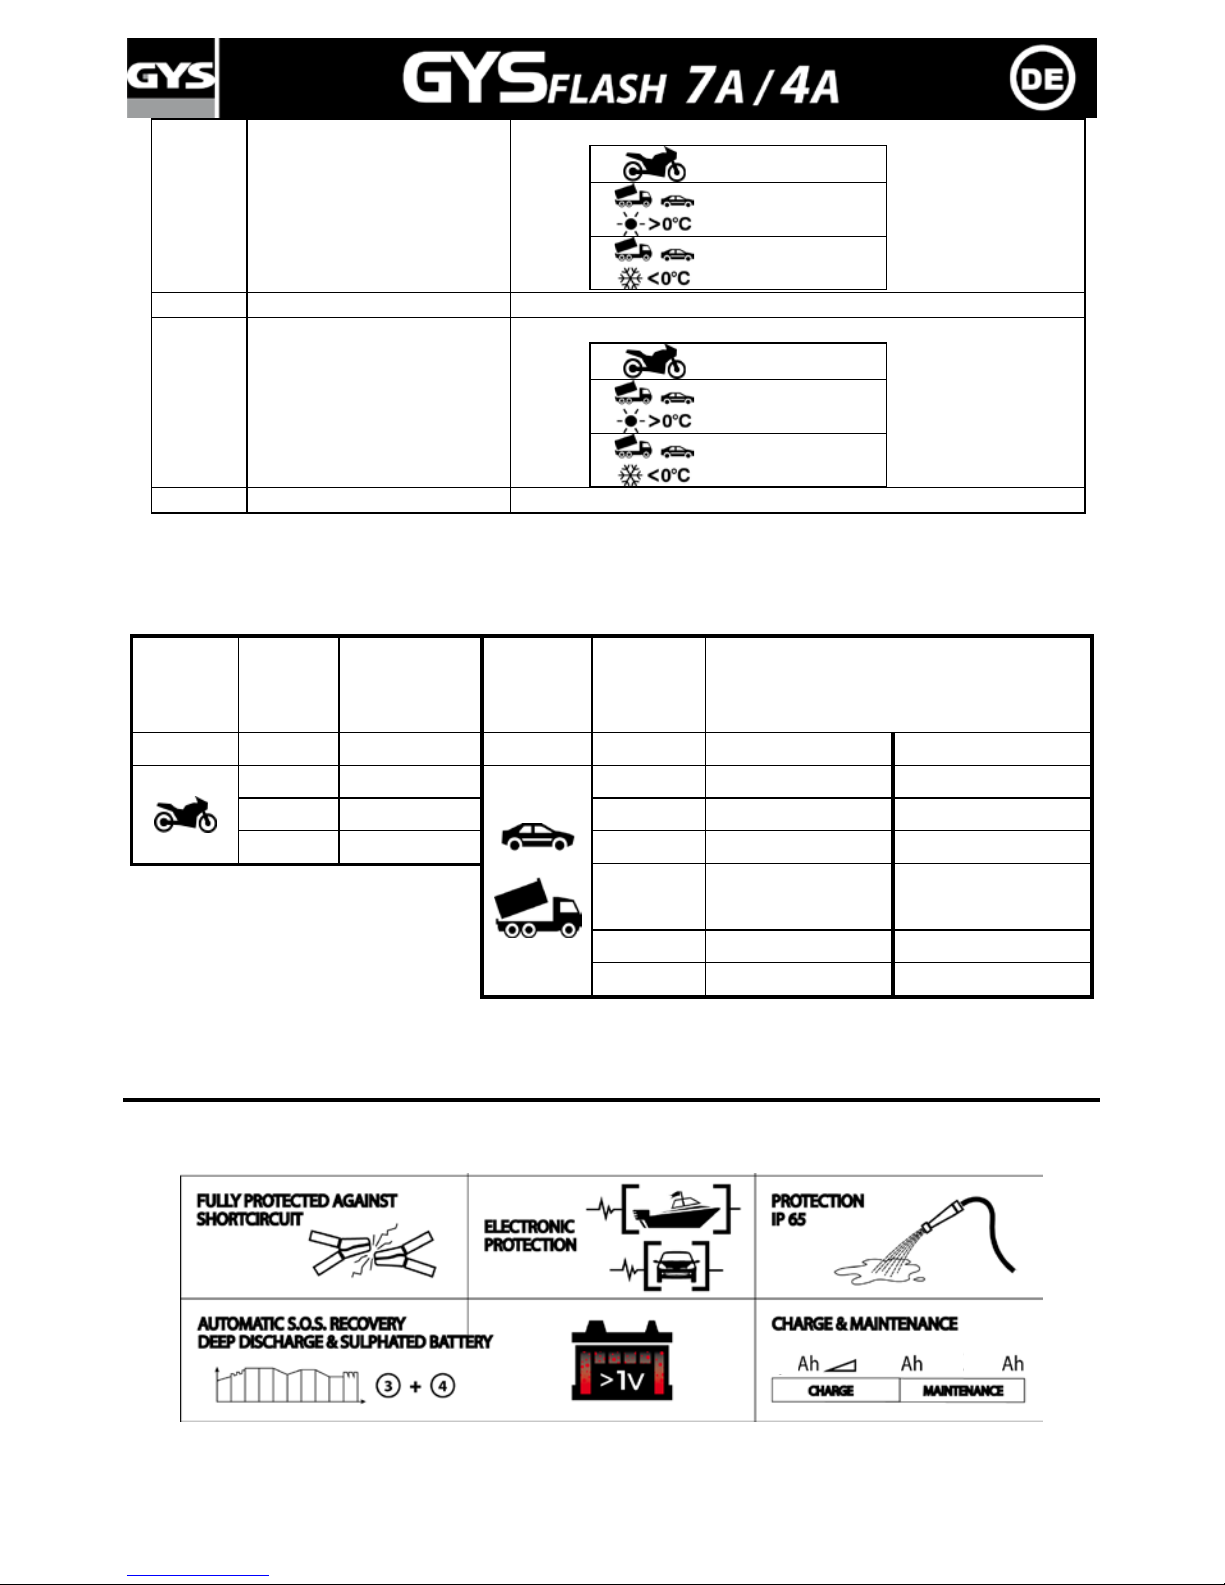
7 Absorption
Batterieladung bis 100%
14,4V ± 0,1V
14,4V ± 0,1V
14,7V ± 0,1V
8
Analyse
Analyse des Batterieladezustands
9 Floating
Erhaltungsladung
13,6V ± 0,1V
13,6V ± 0,1V
13,8V ± 0,1V
10
Erhaltung
Wiederholt einen Ladezyklus um die Leistung zu erhalten
• LED Anzeige:
Die LED 4 (siehe Abbildung Seite 28) blinkt während der Phasen 1 bis 5. Sie leuchtet kontinuierlich
während der Phasen 6 bis 8 und erlischt in der Phase 9. In der Phase 9 geht die LED 5 an.
• Ladezeit
Fahrzeug
Batterieka
pazität
(Ah)
Ladezeit von
20% bis 80%
(Stunden)
Fahrzeug
Batterieka
pazität
(Ah)
Ladezeit von 20% bis 80% (Stunden)
Gysflash
4A/7A
4A/7A
Gysflash
4A/7A
4A
7A
2
Ladung 2
20
Ladung 3:30
Ladung 2
8
Ladung 6
70
Ladung 11
Ladung 6
15
Ladung 11:30
100
Erhaltung
Ladung 9
130 Erhaltung
Ladung
11:30
180 - Erhaltung
230 - Erhaltung
Das Gerät startet den Ladevorgang automatisch neu bei einem Stromausfall. Es kann deswegen ständig am
Fahrzeug angeschlossen bleiben. Optimal für den Winter, Schiffe…
SCHUTZFUNKTION
Das Gysflash ist gegen Kurzschluss und Verpolung geschützt. Zusätzlich verfügt das Gerät über einen
Überhitzungsschutz und ist gegen Funkenbildung beim An- und Abklemmen geschützt. Dieses Ladegerät
verfügt über eine Doppel-Isolierung und ist mit der Elektronik aller Fahrzeugtyp kompatibel.
XX
XXX
XXX
Page 13
13/33
Das Gerät verfügt über eine automatische Tiefentladungserkennung ( leuchtet, wenn die Batteriespannung
unter 1V±0.5V ist).
Das Gysflash verfügt über einen Überhitzungsschutz. Während des Ladeprozesses wird die Ausgangsleistung
reduziert, wenn das Gerät überhitzt, um es vor Beschädigung zu schützen. Das Ladegerät erhöht die
Ausgangsleistung automatisch, wenn die Umgebungstemperatur sich normalisiert.
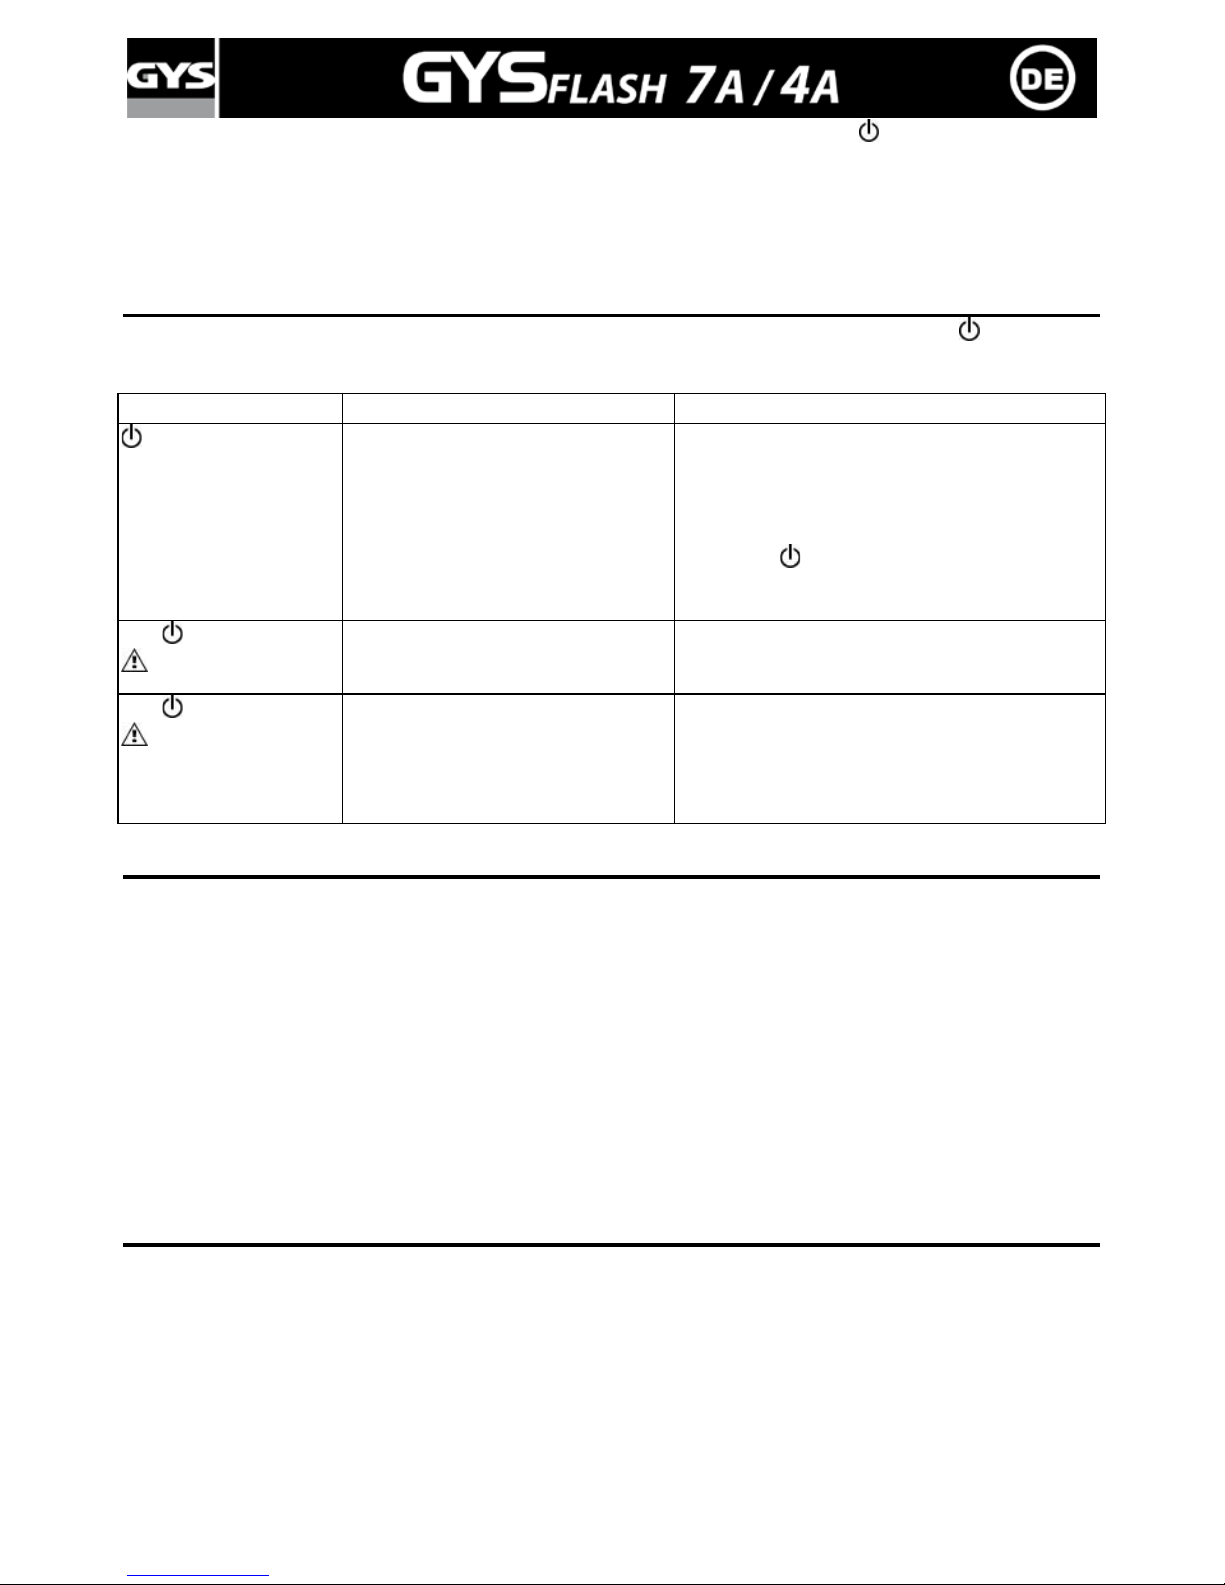
PROBLEME, URSACHEN, LÖSUNGEN
In Falle eines Problems stellt sich das Ladegerät automatisch in den Schutzmodus und zeigt an. Um eine
Beschädigung der Batterie zu vermeiden, bleibt das System solange in diesem Modus bis zu einer
Veränderung der Einstellungen.
Problem
Ursache
Lösungen
LED an
Kurzschluss
Offener Schluss
Batteriespannung
< 0,1V ± 0,5
1- Prüfen Sie ob sich bei dem Kurzschluss um
normalen oder anormalen Stromverbrauch
des Fahrzeugs handelt.
2- Prüfen Sie, ob die Zangen richtig
angeschlossen sind.
3- Falls die
LED noch an bleibt, ist die
Batterie entweder Sulfatiert oder kaputt
, und
sollte ausgetauscht werden.
LED leuchtet und
blinkt
Polaritätsverwechslung
Falsche Batteriespannung
Prüfen Sie ob die Zangen richtig angeschlossen
sind
24V Batterie angeschlossen.
LED und
leuchten
Batterie ist nicht wiederaufladbar.
Thermischer Fehler.
Wechseln Sie die Batterie.
Lufttemperatur zu hoch, den Raum lüften.
GARANTIE
Die Garantieleistung des Hersteller s erf o lg t aussc h ließlic h b e i Fabrika t ions- oder Materialfehlern, die binnen
12 Monate nach Kauf angezeigt werden (Nachweis Kaufbeleg). Nach Anerkennung des Garantieanspruchs
durch den Hersteller bzw. seines Beauftragten erfolgen eine für den Käufer kostenlose Reparatur und ein
kostenloser Ersatz von Ersatzteilen. Der Garantiezeitraum bleibt aufgrund erfolgter Garantieleistung en
unverändert.
Die Garantieleistung erfolgt nicht bei Defekten, die durch unsachgemäßen Gebrauch, Sturz oder harte Stöße
sowie durch nicht autorisierte Reparaturen oder durch Transportschäden, die in Folge des Einsendens zur
Reparatur, hervorgerufen worden sind. Keine Garantie wird für Verschleißteile (z.B. Kabel, Klemmen,
Vorsatzscheiben etc.) sowie bei Gebrauchsspuren übernommen. Das betreffende Gerät bitte immer mit
Kaufbeleg und kurzer Fehlerbeschreibung ausschließlich über den Fachhandel einschicken. Die Reparatur
erfolgt erst nach Erhalt einer schriftlichen Akzeptanz (Unterschrift) des z uvor vorgelegten Kostenvoranschlags
durch den Besteller. Im Fall einer Garantieleistung trägt GYS ausschließlich die Kosten für den Rückversand
an den Fachhändler.
KONFORMITÄTSERKLÄRUNG
GYS erklärt, dass das Batterieladegerät Gysflash 4A/7A richtlinienkonform mit folgenden europäischen
Bestimmungen hergestellt wurde:
- Niederspannungs- Richtlinie : 2006/95/CE - 12/12/2006
- EMV- Richt linie : 2004/ 108/ CE - 15/12/2004.
Dieses Gerät stimmt daher mit den erweiterten Normen überein:
- EN60335-1 - EN60335-2-29 – EN55014-1 - EN55014-2 – EN61000-3-2 - EN61000-3-3 – EN62233.
Page 14
14/33
Este manual contiene instrucciones sobre el funcionamiento de su aparato y las precauciones que seguir para
su seguridad. Por favor léalo antes de utilizar y consérvelo para poder leerlo de nuevo si es necesario.
DESCRIPCIÓN GENERAL
Gysflash fue concebido para cargar la mayoría de las b aterías al plomo con o sin mantenimiento, comúnmente
utilizadas para coches, o para varios otros vehículos.
Estas baterías pueden ser de varios tipos, por ej. : Líquido (electrólito líquido), gel (electrólito gelificado), AGM
(electrólito impregnado), CA (Calcium).
Gysflash 7A fue concebido para la carga de la mayoría de baterías 12V (6 elementos de 2V) de 1,2Ah hasta
130Ah, o por el mantenimiento en carga de batería s 12V de 1,2 hasta 230Ah.
Gysflash 4A fue concebido para la carga de la mayoría de baterías 12V (6 elementos de 2V ) de 1,2Ah hasta
70Ah, o por el mantenimiento en carga de baterías 12V de 1,2 hasta 130Ah.
SEGURIDAD
Nunca intentar de cargar pilas o baterías no recargables
Si el cable de alimentación está deteriorado, tiene que ser remplazado por el fabricante, su servicio
postventa o una persona con competencia similar para evitar cualquier peligro
Respectar el calibre del fusible indicado sobre la máquin a
Nunca cubrir el cargador durante su utilización
Antes de cargar, leer las instrucciones. Desenchufar la alimentación antes de conectar o desconectar
sobre la batería. Advertencia: Gas explosivo, evitar las llamas y chispas. Asegurar una aeración
suficiente durante la carga.
Este producto es objeto d e una recogida selectiva. No tirar a la basura domestica.
Este aparato no está previsto para ser utilizado por personas (incluido niños) cuyas capacidades físicas
o mentales sean reducidas, personas sin experiencia o conocimiento, salvo si se encuentran bajo la
supervisión de una persona responsable de su seguridad que provea vigilancia e instrucciones sobre
el uso del aparato. Los niños no deben jugar con este aparato. La limpieza y mantenimiento no deben
ser realizadas por niños sin vigilancia.
Este aparato tiene que colocarse de tal manera que su enchufe pueda ser accesible.
CONEXIONES
Cargar una batería colocada sobre el vehículo
a- El cargador puede conectarse a la toma de corriente.
b- Comprobar la polaridad de los bornes de la batería. Generalmente, el borne positivo (+) es más ancho
que el borne negativo (-).
c- Identificar el borne de la batería conectado con el chasis del vehiculo (masa). Normalmente, es el
borne negativo.
d1- Cargar una batería cuyo borne negativo está conectado con la masa del vehículo:
- conectar el cable rojo (+) con el borne positivo de la batería (+), después el cable negro con el borne
negativo (-) de la batería o con el chasis de vehículo.
d2- Cargar una batería cuyo borne positivo está conectado con la masa del vehículo:
- conectar el cable negro con el borne negativo y el cable rojo con el borne positivo (+) de la batería o
con el chasis del vehículo.
Cargar una b atería no conectada al vehículo
a- El cargador puede conectarse a la toma de corriente.
b- Conectar el cable rojo (+) c on el borne positivo (+) de la batería y el cable negro (-) con el bor ne
negativo (-).
Conexión permanente gracias a los cables terminales (accesorio n°15)
Cuidado : nunca conectar los cables terminales con el cargador durante el montaje
a- conectar el hilo rojo del cable terminal con el borne positivo de la batería
b- conectar el hilo negro del cable terminal con el borne negativo de la batería
c- fijar los cables al chasis del vehículo. Cuidado : los cables no deben ser pinzados o estar en contactos con
superficies calentadores o cortantes.
d- Solamente después de este montaje, podrá conectar el cable del cargador.
Page 15
15/33
Después de la carga, es recomendado desconectar el cargador de batería de la red, quitar la conexión del
chasis y por fin la conexión de la batería, siguiend o tal orden. En caso de conexión permanente, ante todo
desconectar la red, por fin la conexión de la batería.
MODOS PROPUESTOS Y SELECCIONES
El Gysflash le ofrece 3 modos de funcionamiento.
ADVERTENCIA: Se puede sele c c ionar los modos sólo cuando el equipo está conec tado a la batería.
Para elegir su modo, refiérase a la tabla justo abajo :
M
ODOS
VIDENTE
UTILIZACIÓN BATERÍA
TENSIÓN
&
CAPACIDAD BATERÍA
SEGURIDAD
(ej: alarma)
EN CICLO
*
(=carga/descarga ;
ej : barredora…)
AUTOMOVIL
(batería con o
sin
mantenimiento)
12V.
1,2 hasta 15 Ah
en condiciones
normales
GYSFLASH
4A
15 hasta
130 Ah
GYSFLASH
7A
15hasta
230 Ah
en condiciones
de frí o
* Nota : para la carga de las baterías impermeables utilizadas en ciclo, elegir la posición “calor”
MODOS CARGAS
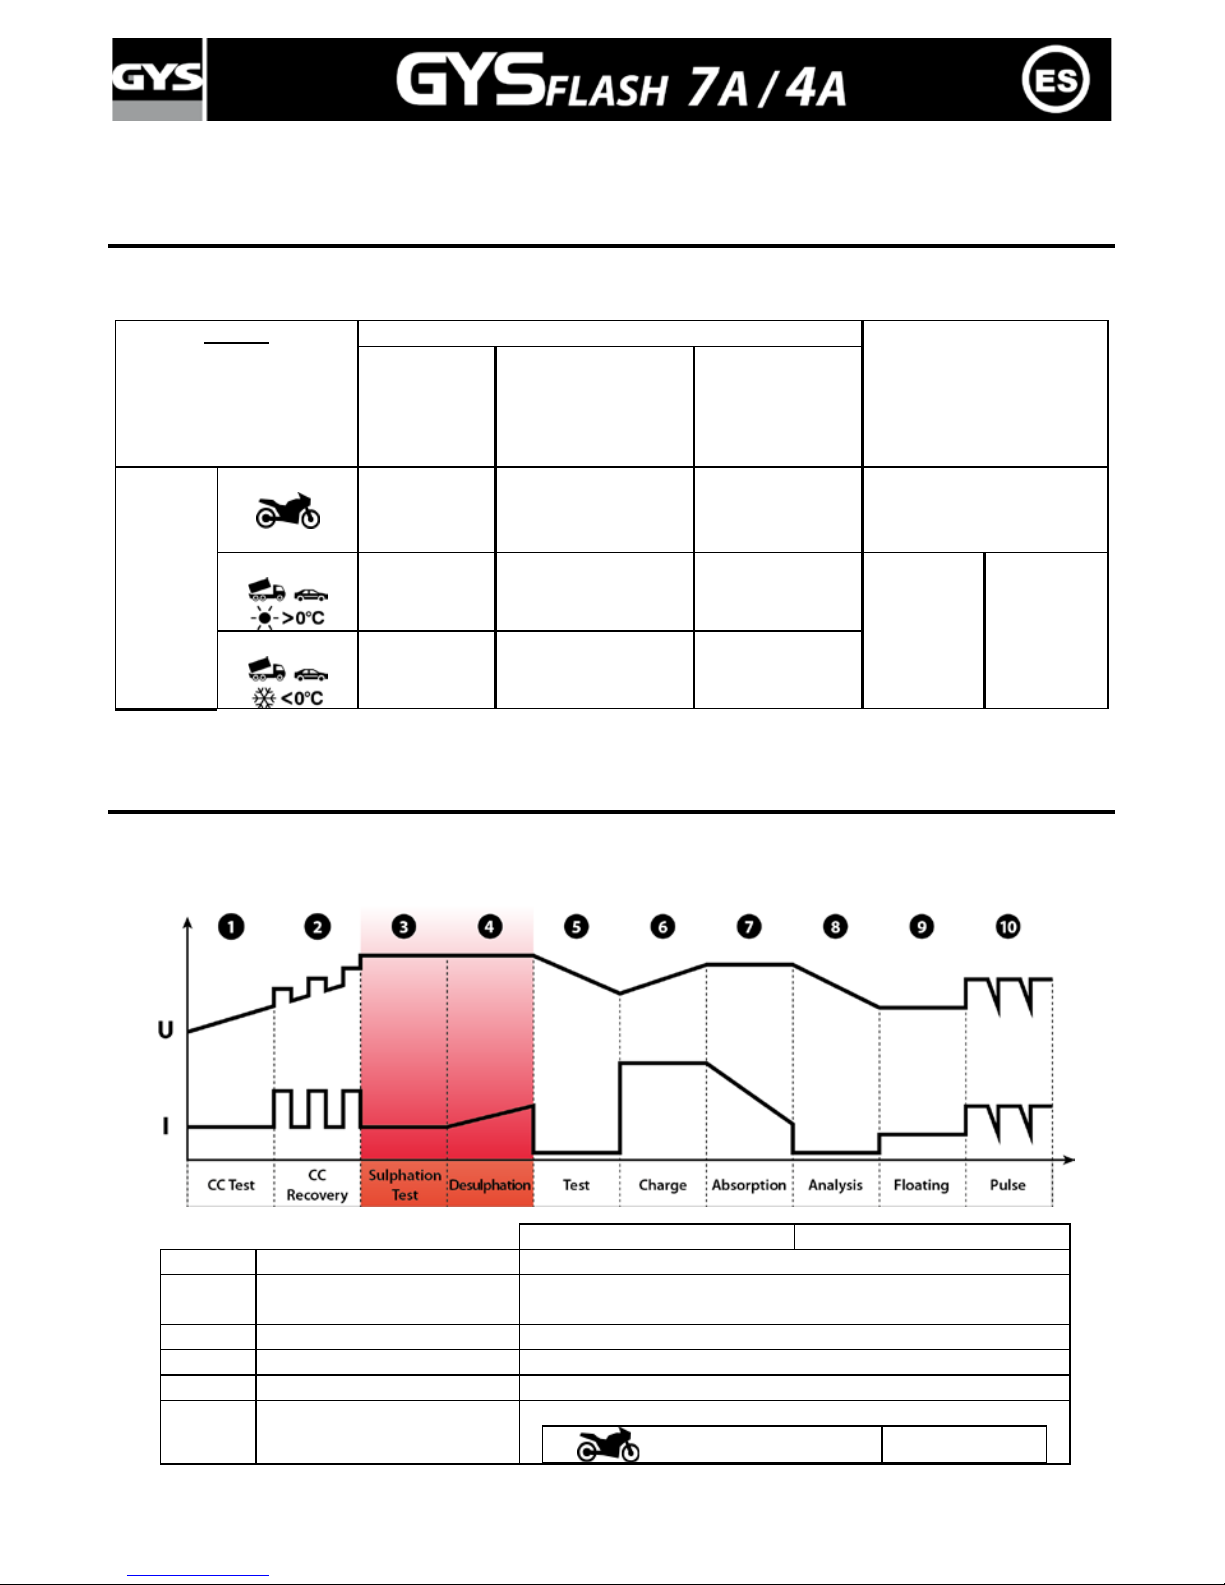
Los 3 modos siguen el diagrama de carga siguiente:
• Diagrama de carga y de mantenimiento
4A
7A
1
TEST Corto circuito
Test de los elementos en cortocircuito de la batería
2 Recuperación
Recuperación de elementos dañados debido a una
descarga profunda prolongada
3
Test de sulfatación
Test de batería sulfatada
4
Desulfatación
Desulfatación/Recuperación de la batería
5
Test
Comprobación de la recuperación de la batería
6 Carga
Carga de la batería a 80%
0,8A ± 10% 0,8A ± 10%
Page 16
16/33
3,6A ± 10%
(4A max)
5A ± 10%
(7A max)
3,6A ± 10%
(4A max)
5A ± 10%
(7A max)
7 Absorción
Carga de la batería a 100%
14,4V ± 0,1V
14,4V ± 0,1V
14,7V ± 0,1V
8
Análisis
Análisis de la carga de la batería
9 Floating
Carga de mantenimiento
13,6V ± 0,1V
13,6V ± 0,1V
13,8V ± 0,1V
10 Mantenimiento
Reanuda un ciclo de carga para un mantenimiento de las
prestaciones
• Señalización de las LED
La Led número 4 (ver cara frontal página 28) parpadea durante las fases de 1 a 5. Queda encendida en
continuo durante las fases de 6 a 8 y se apaga en la fase 9. En fase 9, la led 5 se enciende.
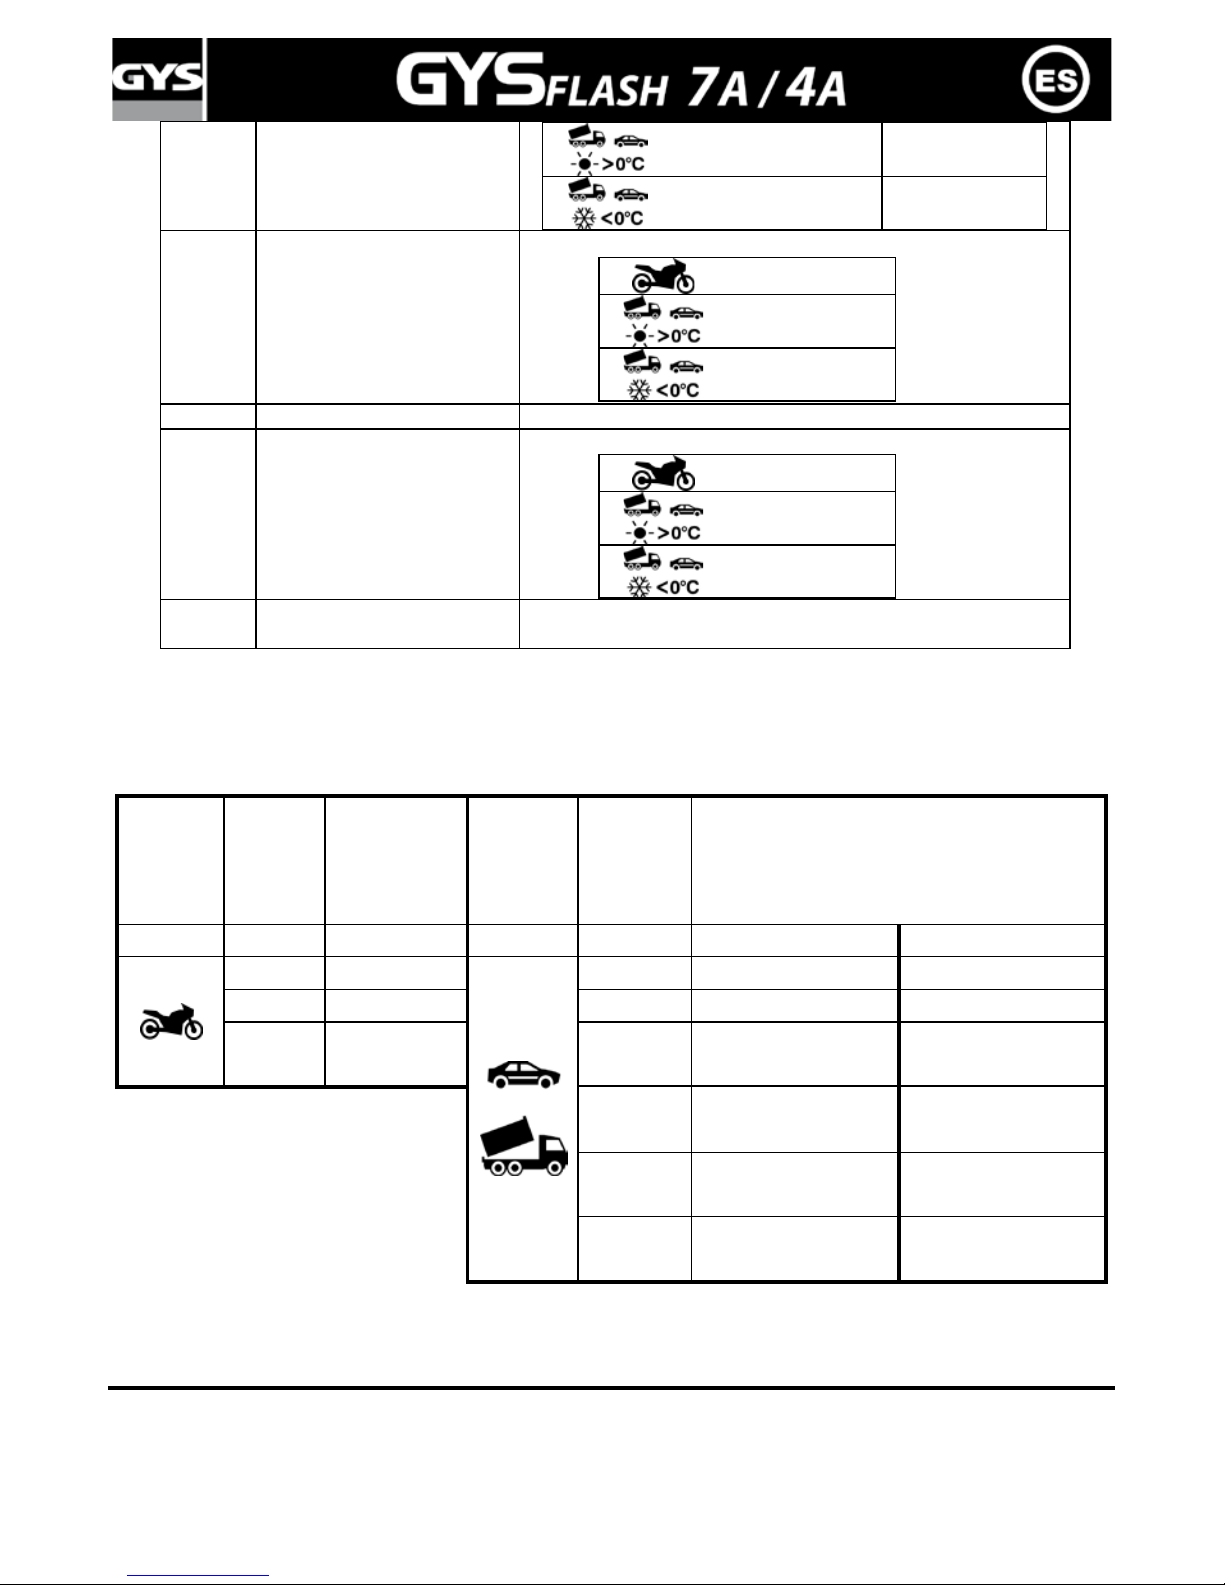
• Tiempo de carga estimado
Vehiculo
Capacidad
Batería
(Ah)
Tiempo de
carga de 20
% a 80%
(horas)
Vehiculo
Capacidad
Batería
(Ah)
Tiempo de carga de 20 % a 80%
(horas)
Gysflash
4A/7A
4A/7A
Gysflash
4A/7A
4A
7A
2
Carga 2H
20
3H30
Carga 2H
8
Carga 6H
70
11H
Carga 6H
15 C a rga 11H30 100
Mantenimient
o Carga 9H
130
Mantenimient
o Carga 11h30
180 -
Mantenimient
o
230 -
Mantenimient
o
El aparato reinicia la carga automática en caso de interrupción de corriente. Por lo tanto, se puede
conectar a un vehículo que se no se use durante temporadas, ideal para la época de invierno, el barco…
PROTECCIÓN
El Gysflash está protegido contra los corto circuitos; inversión de pol aridad. Dispo ne de un sistema anti-chispa
que evita cualquier chispa al enchufar el cargador sobre la batería. Este cargador tiene una doble aislación. Es
compatible con la electrónica de todos vehículos.
Page 17
17/33
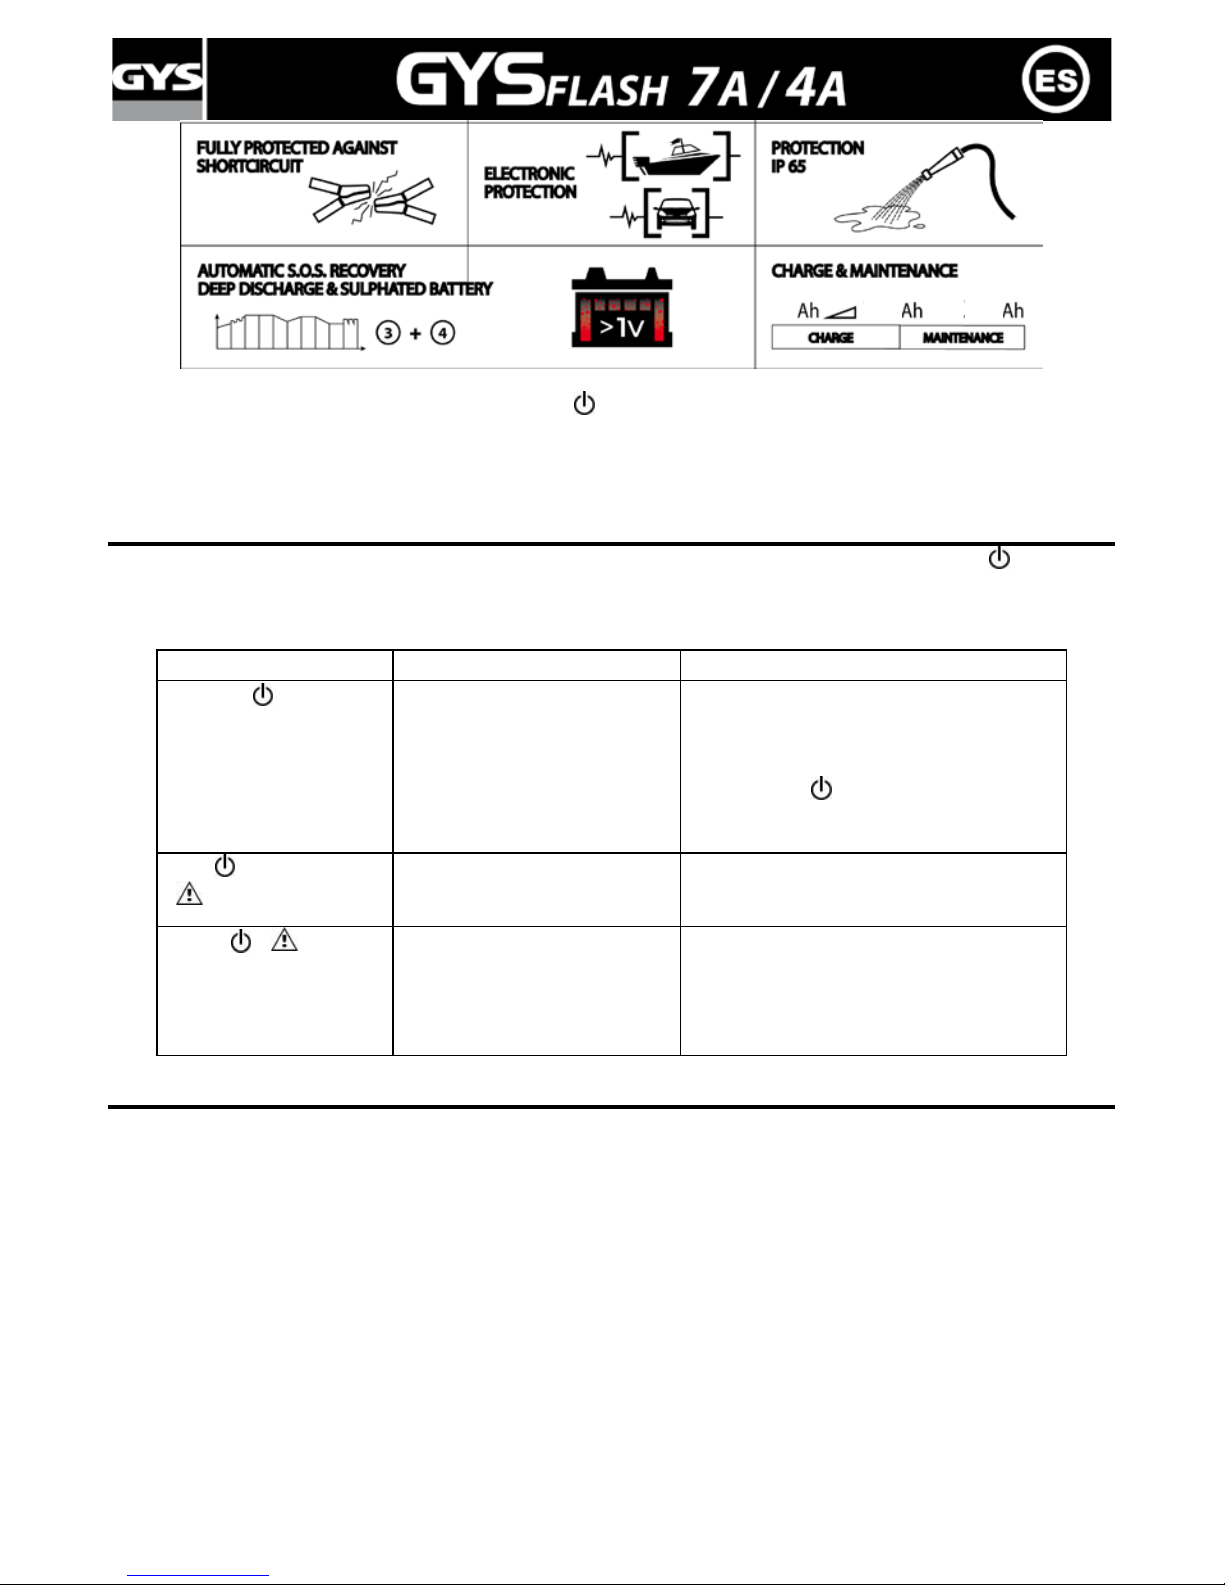
Se auto-protege (parada de la carga + visualización
si la tensión de la batería está debajo de 1V±0.5V).
El Gysflash está dotado de un captor de temperatura. Durante la carga, si el cargador está demasiado caliente,
reduce la corriente de carga para auto-protegerse. Cuando la temperatura ambiente está aceptable de nuevo,
Gysflash 7A retoma su carga normal.
ANOMALÍAS, CAUSAS, REMEDIOS
En caso de problema, el cargador se pone automáticamente en protección y enciende el indicador ( ). Con
el fin de evitar cualquier deterioración a la batería, el sistema quedará en esta p os ició n hasta la inte rvención
del usuario.
Problemas
Causas
Remedios
Indicador encendido
Corte circuito
Circuito abierto
Tensión batería
< 0,1V ± 0,5
1- Comprobar que no hay consumo normal
o anormal en le circuito del vehículo
2- Comprobar que las pinzas están bien
3- Después de efectuar estas corre
cciones,
si el indicador queda encendido, la
batería sulfatada o deteriorada sin duda
tiene que ser remplazada.
Piloto encendido
y
parpadeante
Inversión de polaridad
Mala tensión de batería
Comprobar que las pinzas están bien
conectadas
Batería de 24V conectada.
Pilotos y
encendidos
Detección de una batería no
recuperable.
Defecto térmico
Cambiar de batería.
Temperatura cercana demasiada
importante, ventilar el local.
DECLARACIÓN DE CONFORMIDAD
La empresa GYS atesta que los cargadores descritos en estas instrucciones de uso está fabricado en
conformidad con las directivas europeas siguientes :
- Directiva Baja Tensión : 2006/95/CE - 12/12/2006
- Directiva CEM : 2004/108/CE - 15/12/2004,
Es para eso en conformidad con las normas harmonizadas:
EN60335-1 - EN60335-2-29 – EN55014-1 - EN55014-2 – EN61000-3-2- EN61000-3-3 – EN62233
.
XX
XXX
XXX
Page 18
18/33
In deze gebruiksaanwijzing kunt u de aanwijzingen over het functioneren van uw toestel en de veiligheid
voorzorgsmaatregelen vinden. Dank u voor het aandachtig lezen van dit document vόόr het eerst gebruik en
voor het bewaren als naslagwerk.
ALGEMENE OMSCHRIJVING
De GYSFLASH is ontwikkeld voor het laden van de meeste lood-accu's met of zonder onderhoud, die gebruikt
worden voor auto's en veel andere voertuigen. De accu's kunnen van verschillende types zijn, bijvoorbeeld GEL
(gegeleerde elektrolyt), AGM (geïmpregneerd elektrolyt), WET, MF (Maintenance Free), CA (Calcium).
De GYSFLASH 7A is ontworpen <t1> voor het laden van de 12V accu's (6 x 2V elementen)van 1,2 Ah tot 130 Ah,
of voor het behoud van laadniveau van 12V accu's van 1,2 tot 230 Ah.
De GYSFLASH 4A is ontworpen voor het laden van de 12V accu's (6 x 2V elementen) van 1,2 Ah tot 70 Ah, of
voor het behoud van laadniveau van 12V accu's van 1,2<t7/> tot 130 Ah.
VEILIGHEID
Probeer niet om niet-oplaadbare batterijen of accu's op te laden.
Als de voedingskabel beschadigd is, dient deze vervangen te worden door de fabrikant , zij n reparat ie
dienst of een gekwalificeerde technicus, om gevaar te vermijden.
Gebruik de geschikte maat zekering die op de lader aangegeven staat.
Bedek de lader niet tijdens het gebruik.
Voor starten met laden lees de handleiding aandachtig door. Koppel de stroomvoorziening voor het
aansluiten of loskoppelen van de aansluitingen op de accu. Waarschuwing: Explosief gas, vermijd
vuur en vonken. Tijdens laden zorg voor voldoende ventilatie.
Afzonderlijke inzameling vere is t . Gooi het niet in het huisho udelij k a f va l.
Dit ap paraat is niet bedoeld voor gebruik door personen (inclusief kind eren) me t vermind erde
lichamelijke, zintuiglijke of geestelijke vermogens, of gebrek aan ervaring en kennis, tenzij ze de
instructies over het gebruik van het apparaat hebben ontvangen of onder toezicht zijn geplaatst van
een persoon die verantwoordelijk is voor hun veiligheid. De kinderen mogen niet met het toestel
spelen. De schoonmaak en het onderhoud mogen niet gedaan worden door kinderen zonder toezicht.
Het toestel dient zodanig aangesloten worden dat het mogelijk is deze, indien nodig, meteen uit te
kunnen schakelen.
AANSLUITING
Laden van een accu d ia aangesloten is op het voertuig
a- Sluit de acculader aan een voeding aansluiting.
b- Controleer de polariteit van de accupolen. De positieve pool (+) is in algemeen breder dan de
negatieve pool.
c- Identificeer de accupool die aangesloten is op een chassis van het voertuig (massa). Het is meestal de
negatieve pool.
d1- H et opladen van een accu waarvan de negatieve pool verbonden is aan de massa van het voertuig:
(chassis)
- Sluit de rode kabel (+) aan de positieve pool van de accu (+), en vervolgens de zwarte kabel
(-) aan de negatieve pool of het chassis van het voertuig.
d2 - H et opladen van een accu waarvan de positieve pool verbonden is aan de massa van het voertuig:
(chassis)
- Sluit de z warte ka bel (-) aan de negatieve pool van de accu en vervolgens de rode kabel (+) aan de
positieve pool van de accu of het chassis van het voertuig.
Het opladen van een accu die niet aangesloten is aan het voertuig.
a- -Sluit de acculader aan een voeding aansluiting.
b- Sluit de rode kabel (+) op de positieve pool van de accu en vervolgens de zwarte kabel (-) aan de
negatieve pool (-).
Makkelijk aansluiten via de kabels met accupoolklemm en (acc. n°15)
Page 19
19/33
Waarschuwing: bij de montage, de kabels met accupoolklemmen niet op de lader aansluiten.
a- Bevestig de rode kabel met accupoolklemmen op de positieve pool van de accu.
b- Bevestig de zwarte kabel met accupoolklemmen op de negatieve pool van de accu.
c- Bevestig de kabels aan de chassis van het voertuig. Let op: de kabels mogen niet worden afgekneld of in
contact met hete of scherpe oppervlakken komen.
d- Pas na deze montage kunt u de kabel aan de lader aansluiten.
Na het opladen, haa l eerst de lader uit het stopcontact, verwijder vervolgens de chassis-verbinding en
aan het einde de accu-verbinding. In het geval van aansluiting bij huis, haal eerst de stekker uit het
stopcontact en daarna de aansluiting op de accu.
ALGEMENE WERKING
De Gysflash heeft 3 laad modi.
WAARSCHUWING: De modi zijn geselecteerd indien het apparaat aan de accu aangesloten is.
Voor modi keuze, kijk naar de volgende tabel :
MODI
LICHTJE
ACCU GEBRUIK
CAPACITEIT
VAN ACCU
BACK-UP
(bij voorbeeld:
alarm)
IN CYCLAGE
*
(= laden / ontladen;
(voorbeeld: veger...)
AUTO/MOTOR
(accu met of
zonder
onderhoud)
12V.
1,2 à 15 Ah
in normale
omstandigheden
GYSFLASH
4A
15 tot 130
Ah
GYSFLASH
7A
15 tot
230 Ah
bij koud weer
* Opmerking: voor het laden van de gesloten accu's voor cyclisch gebruik, selecteer t de " warme " positie
LAAD MODUS
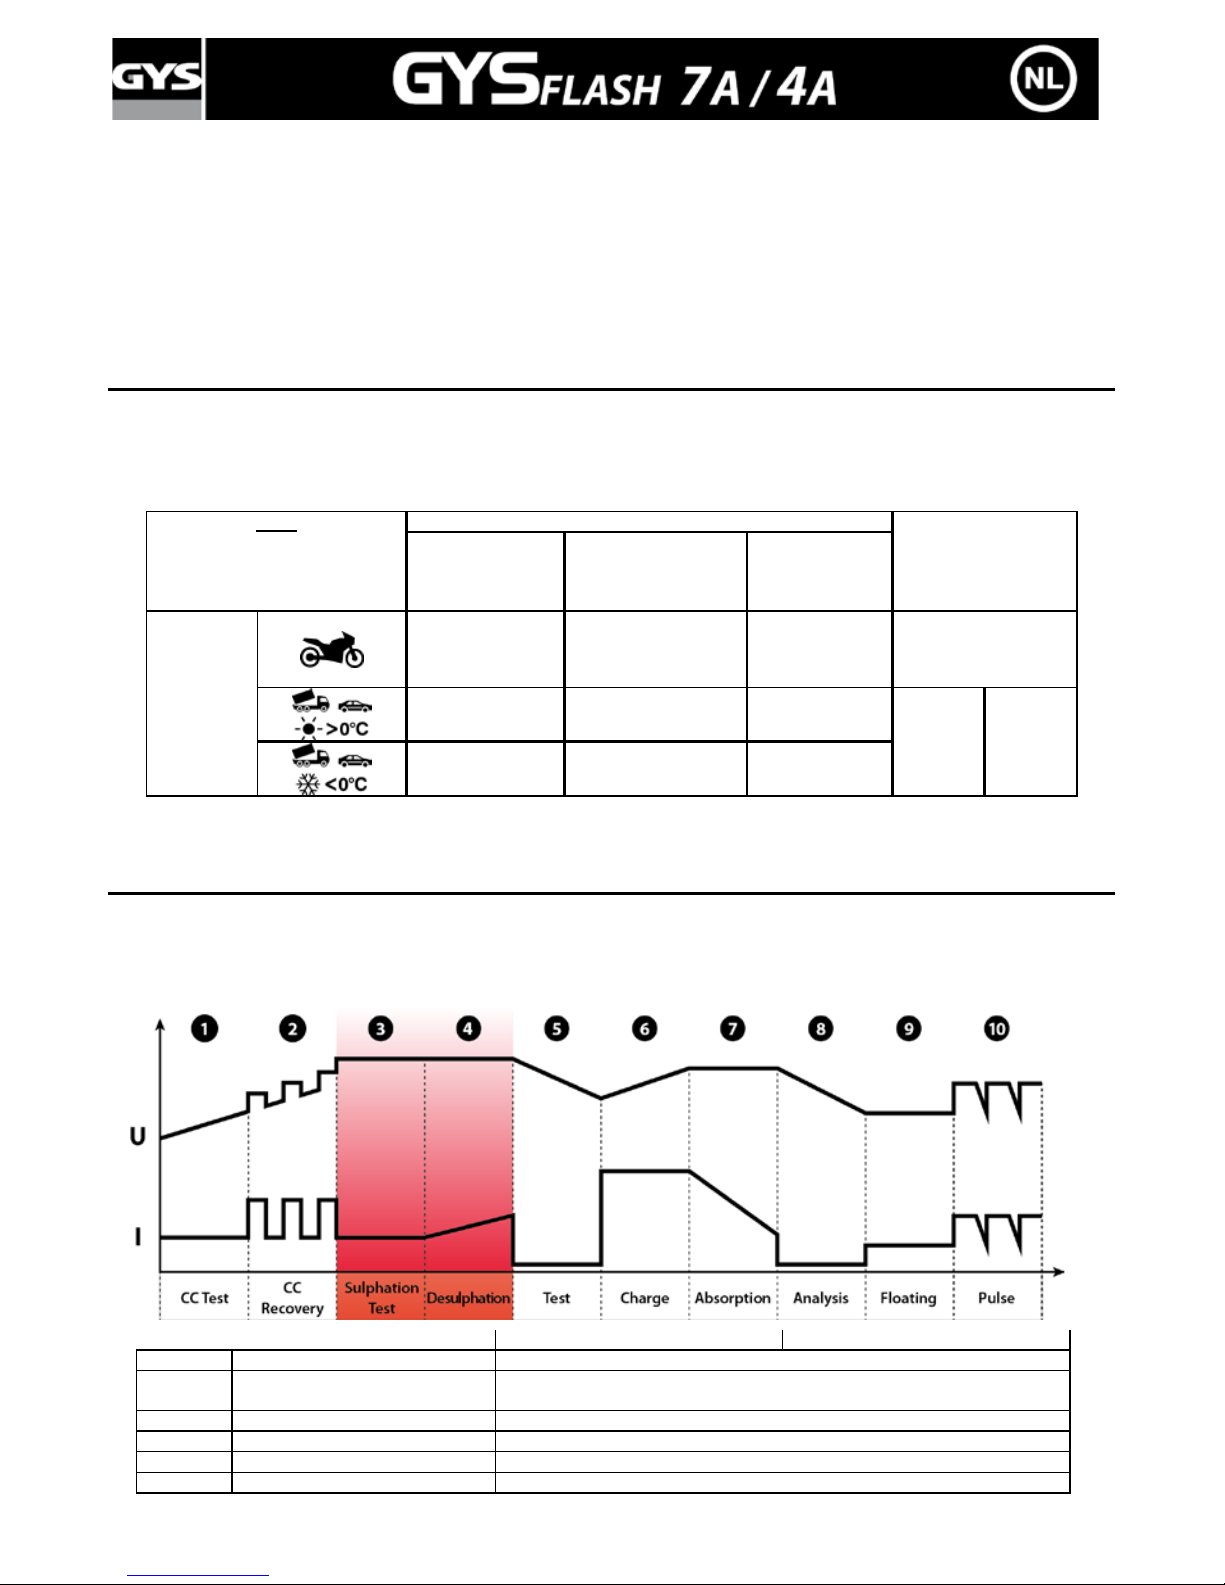
De 3 standen volgens de laad diagram hieronder:
• Laad en onderhoud diagram
4A
7A
1
Kortsluiting test
Test van de accu elementen die in kortsluit in g zijn
2 Herstel
Herstel van de beschadigde elementen als gevo lg v an een zeer d iep e
ontlading.
3
Sulfatatie test
Test van een gesulfateerde accu
4
Desulfatatie
Desulfatatie/Her st el v an een acc u
5
Test
Controle van het accu herstel
Page 20
20/33
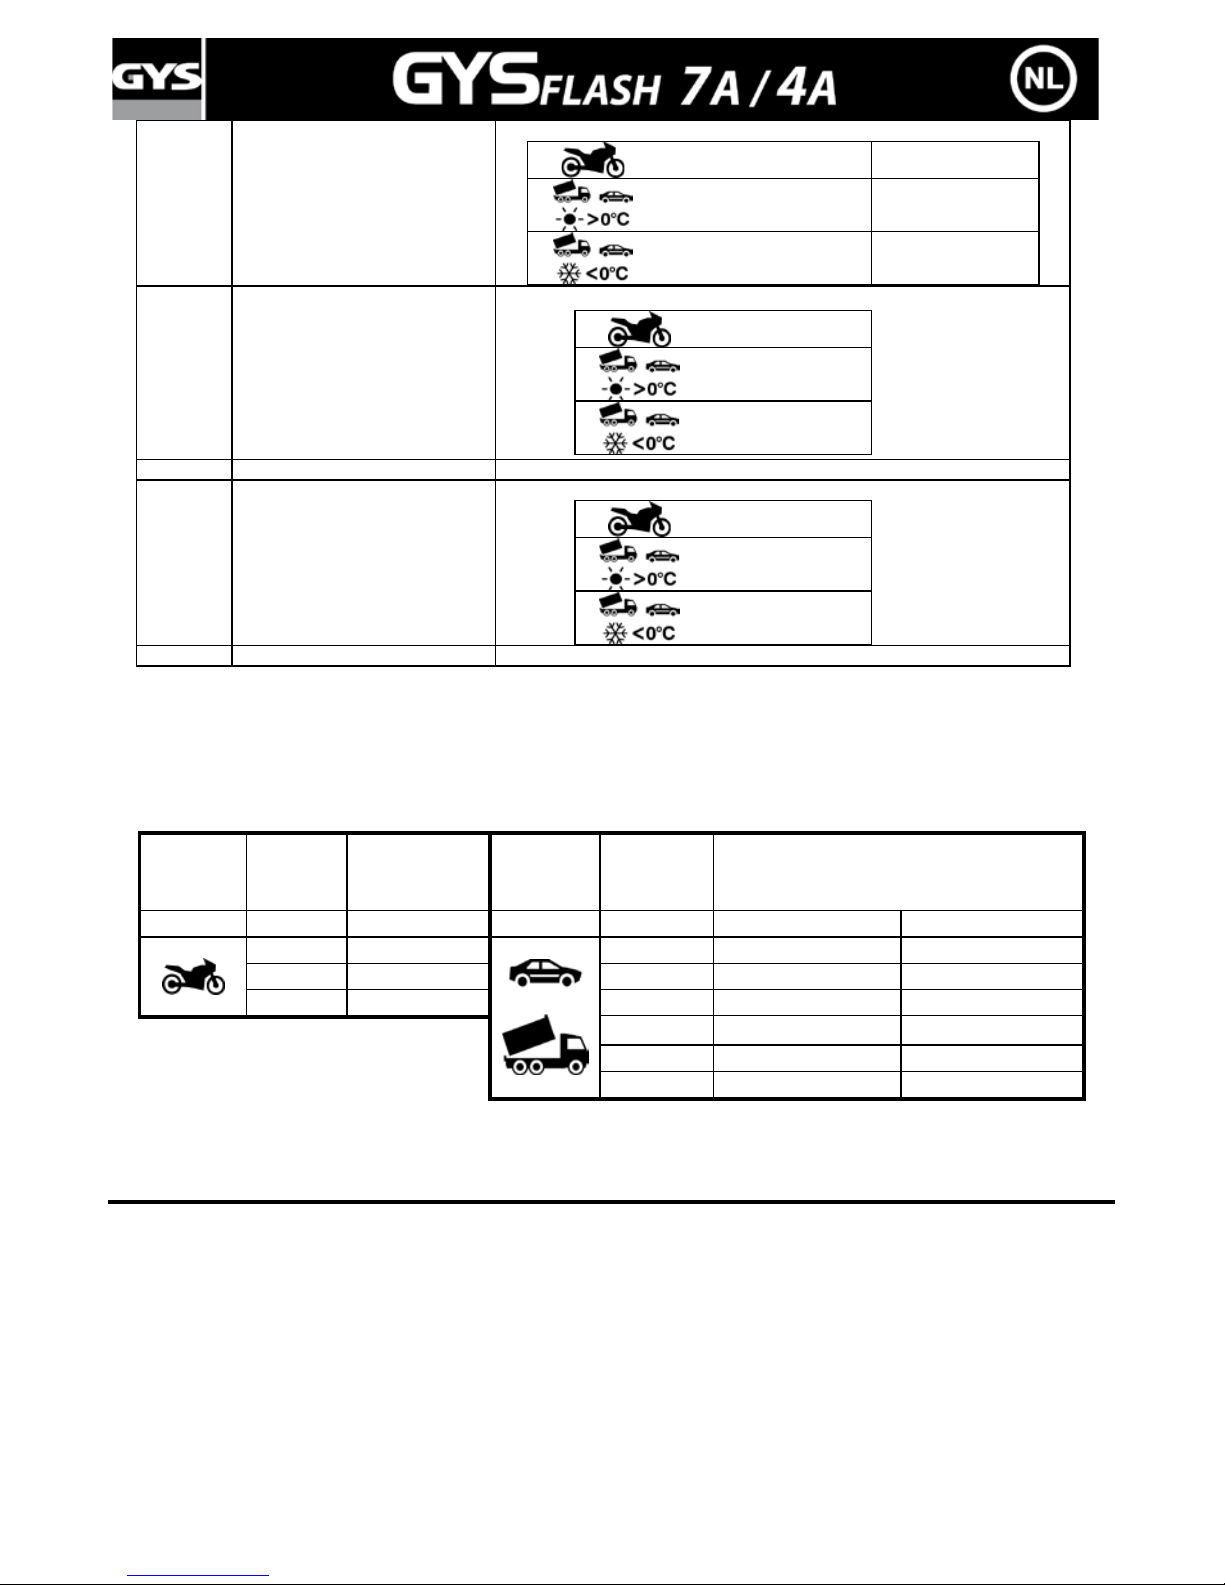
6
Laden
80% geladen accu
0,8A ± 10% 0,8A ± 10%
3,6A ± 10%
(4A max)
5A ± 10%
(7A max)
3,6A ± 10%
(4A max)
5A ± 10%
(7A max)
7 Absorptie
100% geladen accu
14,4V ± 0,1V
14,4V ± 0,1V
14,7V ± 0,1V
8
Analyse
Analyse van het laadniveau
9 Floating
Druppelladen
13,6V ± 0,1V
13,6V ± 0,1V
13,8V ± 0,1V
10
Onderhoud
Start een laadcyclus voor behouden van prestaties
• LED betekenis
De led nummer 4 (zie pagina 28) knippert tijdens de f asen 1-5. Het is brandt continu aan tijdens de fasen 6-8
en gaat uit in de fase 9. In fase 9, gaat de led 5 aan.
• Ingeschate laadtijd
Voertuig
Capaciteit
Accu (Ah)
Laad tijd van
20% tot 80%
(uren)
Voertuig
Capaciteit
Accu (Ah)
Laad tijd van 20% tot 80% (uren)
Gysflash
4A/7A
4A/7A
Gysflash
4A/7A
4A
7A
2
2u 20
3u30
2u
8
6u
70
11u
6u
15
11u30
100
Onderhoud
9u
130
Onderhoud
11u30
180 - Onderhoud
230 - Onderhoud
In geval van stroomuitval, herstart het apparaat automatisch het laden. Het kan dus permanent aangesloten
blijven aan een voertuig, ideaal voor overwinteren, de boot ...
THERMISCHE BEVEILIGING
De Gysflash heeft een reeks beveiligingen tegen kortsluiting en polarite it s omwisseling. Hij heeft een anti-vonk
systeem dat de vonkvorming voorkomt bij het aankoppelen van de acculader op de accu. Deze lader is dubbel
geïsoleerd en compatibel met on board elektronica van voertuigen .
Page 21
21/33
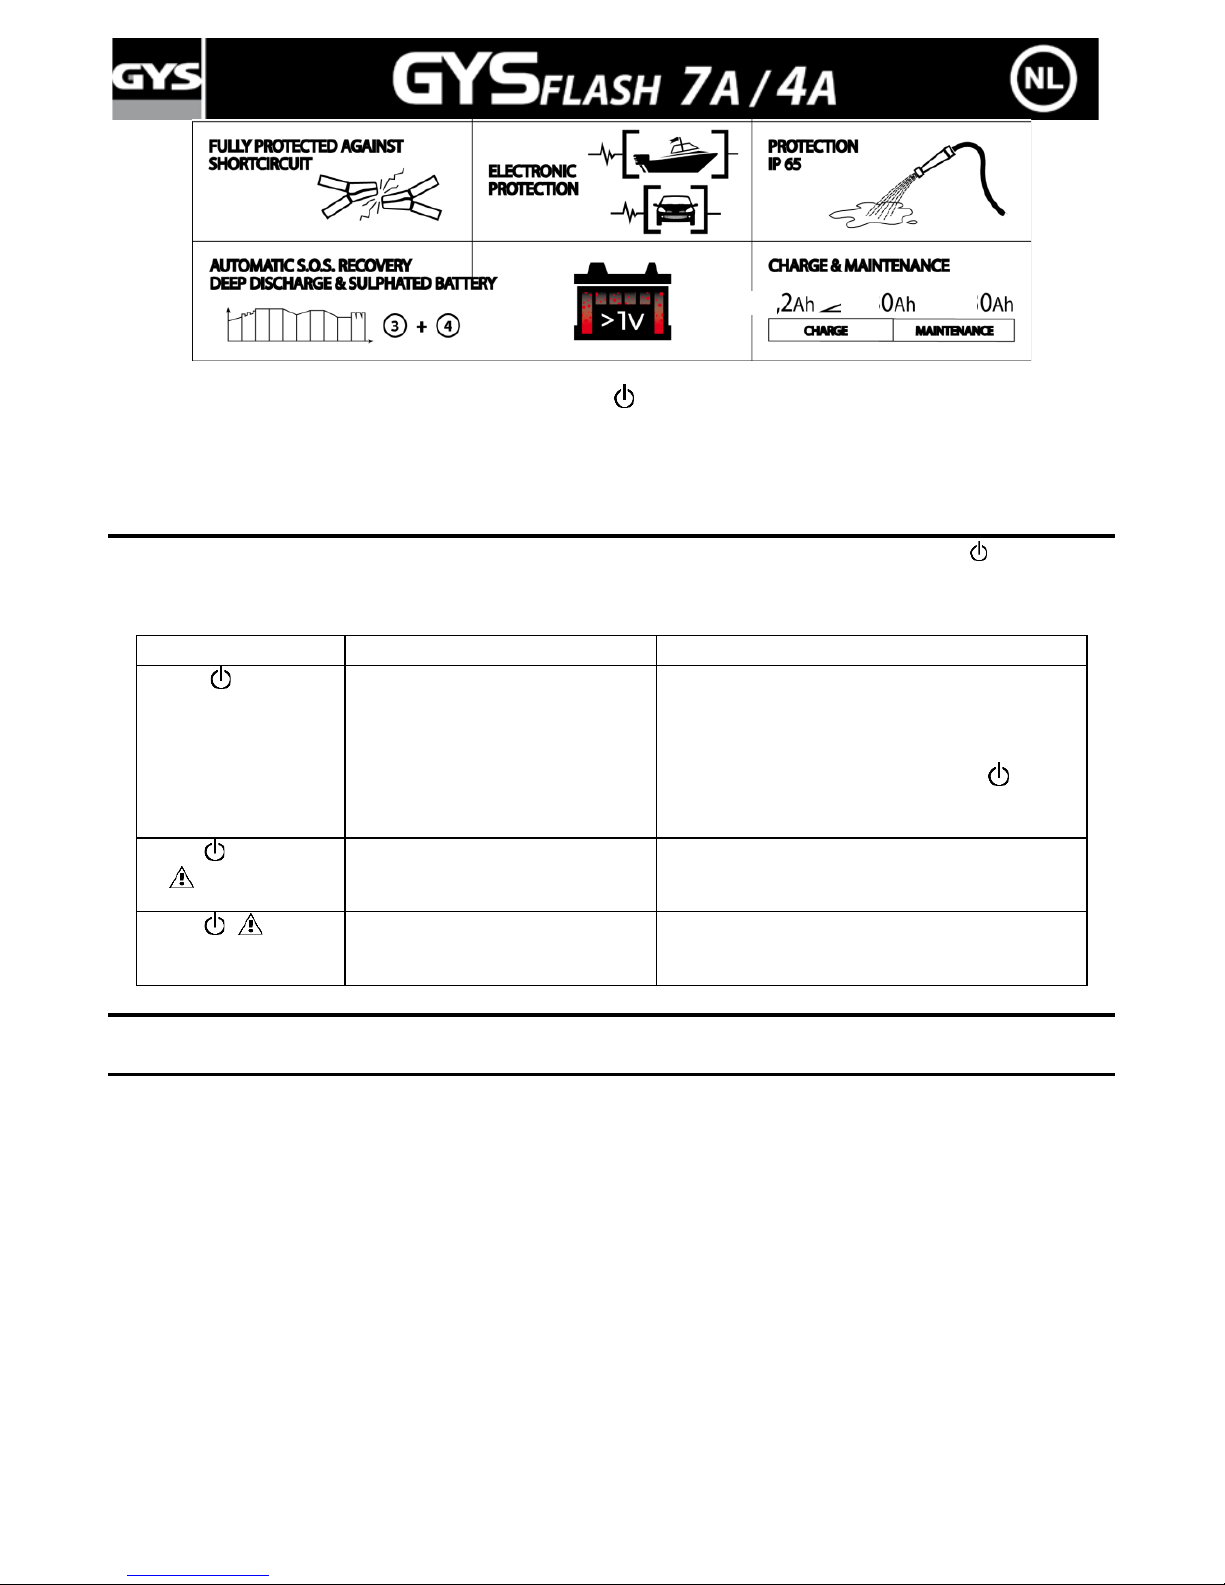
Het beschermt zichzelf (einde laden + beeldscherm als
de spanning van de accu onder 1V ± 0.5V komt).
De Gysflash heeft een temperatuur sensor. Als de lader te warm wordt gedurende het laden, vermindert hij de
laadstroom om zichzelf te beschermen. Zodra de omgevingstemperatuur weer aanvaardbaar wordt hervat de
Gysflash het normaal laden.
AFWIJKINGEN, OORZAKEN, OPLOSSINGEN
In geval van problemen, schakelt de lader automatisch over op beveiliging en de LED-verlichting ( )
brandt. Om schade aan de accu te voorkomen, zal het systeem in deze positie blijven totdat de gebruiker
ingrijpt.
Problemen
Oorzaken
Oplossingen
Lampje aanbrandt
Kortsluiting
Open circuit
Accu spanning
< 1V ± 0,5
1- Controleer of er geen normaal of afwijkend
gebruik is van het circuit van het voertuig
2- Controleer of de klemmen
goed aangesloten zijn
3- Na deze correcties, als het lampje
blijft
branden, dient u de gesulfateerde of
verslechterde accu te vervangen
Lampje brandt
en
knippert
- Polariteitomwisseling
- Verkeerde accu spanning
- Controleer of de klemmen goed aangesloten
zijn.
- 24V accu aangesloten
Lampje
Brandt
Detectie van een onherstelbare
accu.
Thermische fout
Vervang de accu.
Te hoge omgevingstemperatuur, ventileer de
kamer.
CERTIFICAAT VAN OVEREENSTEMMING
GYS verklaart dat de in deze handleiding beschreven lader is vervaardig d in overeenstemming met de eisen
van de volgende Europese richtlijnen:
- Lage spanning richtlijn: 2006/95 / CE - 12/12/2006
- EMC-richt lij n : 2004/ 108 / CE - 15/12/2004.
Daardoor zijn ze in overeenstemming met de geharmoniseerde normen:
- EN60335-1 - EN60335-2-29 – EN55014-1 - EN55014-2 – EN61000-3-2
- EN61000-3-3 – EN62233
XX
XXX
XXX
Page 22
22/33
Данная инструкция описывает функционирование вашего устройства и меры предосторожности в
целях обеспечения вашей безопасности. Пожалуйста, прочтите ее перед первым использованием и
сохраните, чтобы при надобности перечитать.
ОПИСАНИЕ
GYSFLASH разработан для для зарядки большинства свинцово-кислотных батарей с или без
обслуживания, используемых для автомобилей и многих других транспортных средств. Эти батареи
могут быть разного типа, например: GEL (электролит-гель), A GM (электролит-пропитка), WET, MF (без
обслуживания), CA (Кальций).
GYSFLASH 7A создан для зарядки батарей на 12В (6 элементов по 2В) от 1,2 Aч до 130 Aч, или для
подзарядки батарей 12В от 1,2 до 230 Ah.
GYSFLASH 4A создан для зарядки батарей на 12В (6 элементов по 2В
) от 1,2 Aч до à 70 Aч, или для
подзарядки батарей 12В от 1,2 до 130 Aч.
МЕРЫ
БЕЗОПАСНОСТИ
- Не пытайтесь зарядить батарейки или батарейки не перезаряжаемые.
- Если шнур питания поврежден, он должен быть заменен производителем, его сервисной службой или
квалифицированным специалистом во избежание опасности.
- Соблюдайте калибр предохранителя указанный на аппарате
- Не накрывайте аппарат во время использования
- Прочитайте инструкцию перед использованием. Отключите подачу питания перед тем как
подключать или отключать соединения к батарее. Внимание: Взрывчатый газ, избегайте пламени и
искр. Обеспечьте необходимую
вентиляцию во время зарядки.
- Этот аппарат подлежит утилизации. Не выбрасывайте его в домашний мусоропровод.
- Это устройство не должно быть использовано лицами (включая детей), чьи физические или
психические способности ограничены, или же лицами, не имеющими достаточно опыта или знаний,
кроме случаев, когда они это делают под надзором специалистов, отвечающих за их безопасность, или
были проинструктированы ими ранее относительно использования этого устройства. Дети не должны
играть с
устройством. Чистка и уход не должны производится детьми без надлежащего присмотра.
- Аппарат должен быть расположен так, чтобы вилка была доступна.
ПОДКЛЮЧЕНИЕ
Зарядка АКБ подключенного к автомобилю
a- Подключить зарядное устройство к электросети.
b- Проверьте полярность клемм аккумулятора. Положительный контакт (+), как правило, шире,
чем отрицательный.
c- Определите клемму, подключенную к кузову автомобиля (масса). Как правило, это
отрицательная клемма.
d1- Зарядка АКБ, отрицательная клемма которой подсоединена к массе автомобиля: (шасси)
- Подсоедините красный кабель (+) к положительной клемме АКБ (+), Затем подсоедините
черный кабель
(-) к отрицательной клемме АКБ или
к шасси автомобиля.
d2- Зарядка АКБ, положительная клемма которой подсоединена к массе автомобиля: (шасси)
- Подсоедините черный кабель (-) к отрицательной клемме АКБ, а красный кабель (+) к
положительной клемме АКБ или к шасси автомобиля.
Зарядка АКБ, не подключенной к автомобилю.
a- Подключить зарядное устройство к электросети.
b- Подсоедините красный кабель (+) к положительной клемме АКБ, а черный кабель (-) к
отрицательной клемме (-).
Подключение наглухо с
помощью кабеля с наконечниками (акс. n°15).
Внимание: не подсоединяйте кабель с наконечниками к зарядному устройству во время крепления.
Page 23
23/33
a- Подсоедините красный провод кабеля с наконечниками к положительной клемме АКБ.
b- Подсоедините черный провод кабеля с наконечниками к отрицательной клемме АКБ.
c- Закрепите кабели на шасси автомобиля. Внимание : кабели не должны быть защемлены или
контактировать с нагревающимися или режущими поверхностями.
d- И только после этого крепления можно будет подсоединить кабель зарядного устройства.
После зарядки следует отключить зарядное устройство от сети, затем отсоединить зажим от
шасси и, наконец, зажим от аккумулятора. Действуйте в указанном порядке. В случае крепления
наглухо отсоедините сначала аппарат от сети питание, затем соединение с АКБ.
ПРИНЦИП
РАБОТЫ
Аппарат Gysflash предлагает зарядку в 3 режимах.
ВНИМАНИЕ: режимы можно выбрать только когда аппарат подключен к АКБ.
Для выбора режима смотрите таблицу ниже.
РЕЖИМЫ
ИНДИКАТОР
ИСПОЛЬЗОВАНИЕ АКБ
ЕМКОСТЬ
БАТАРЕИ
ПОМОЩЬ
(НАПР :
АВАРИЙНЫЙ
СИГНАЛ
)
ЦИКЛИЧНОСТЬ*
=
ЗАРЯДКА/РАЗРЯДКА ;
НАПР :
ПОДМЕТАЛЬНАЯ
МАШИНА…)
АВТОМОБИЛЬ/МОТОЦИКЛ
(обслуживаемая или
необслуживаемая АКБ)
12B.
от 1,2 до 15 Ач
в нормальных условиях
GYSFLASH
4A
от 15 до
130 Aч
GYSFLASH
7A
от 15 до
230 Aч
в условиях холода
* Примечание : для зарядки герметичных батарей, использованных циклично, выберите положение «
тепло ».
РЕЖИМЫ ЗАРЯДКИ
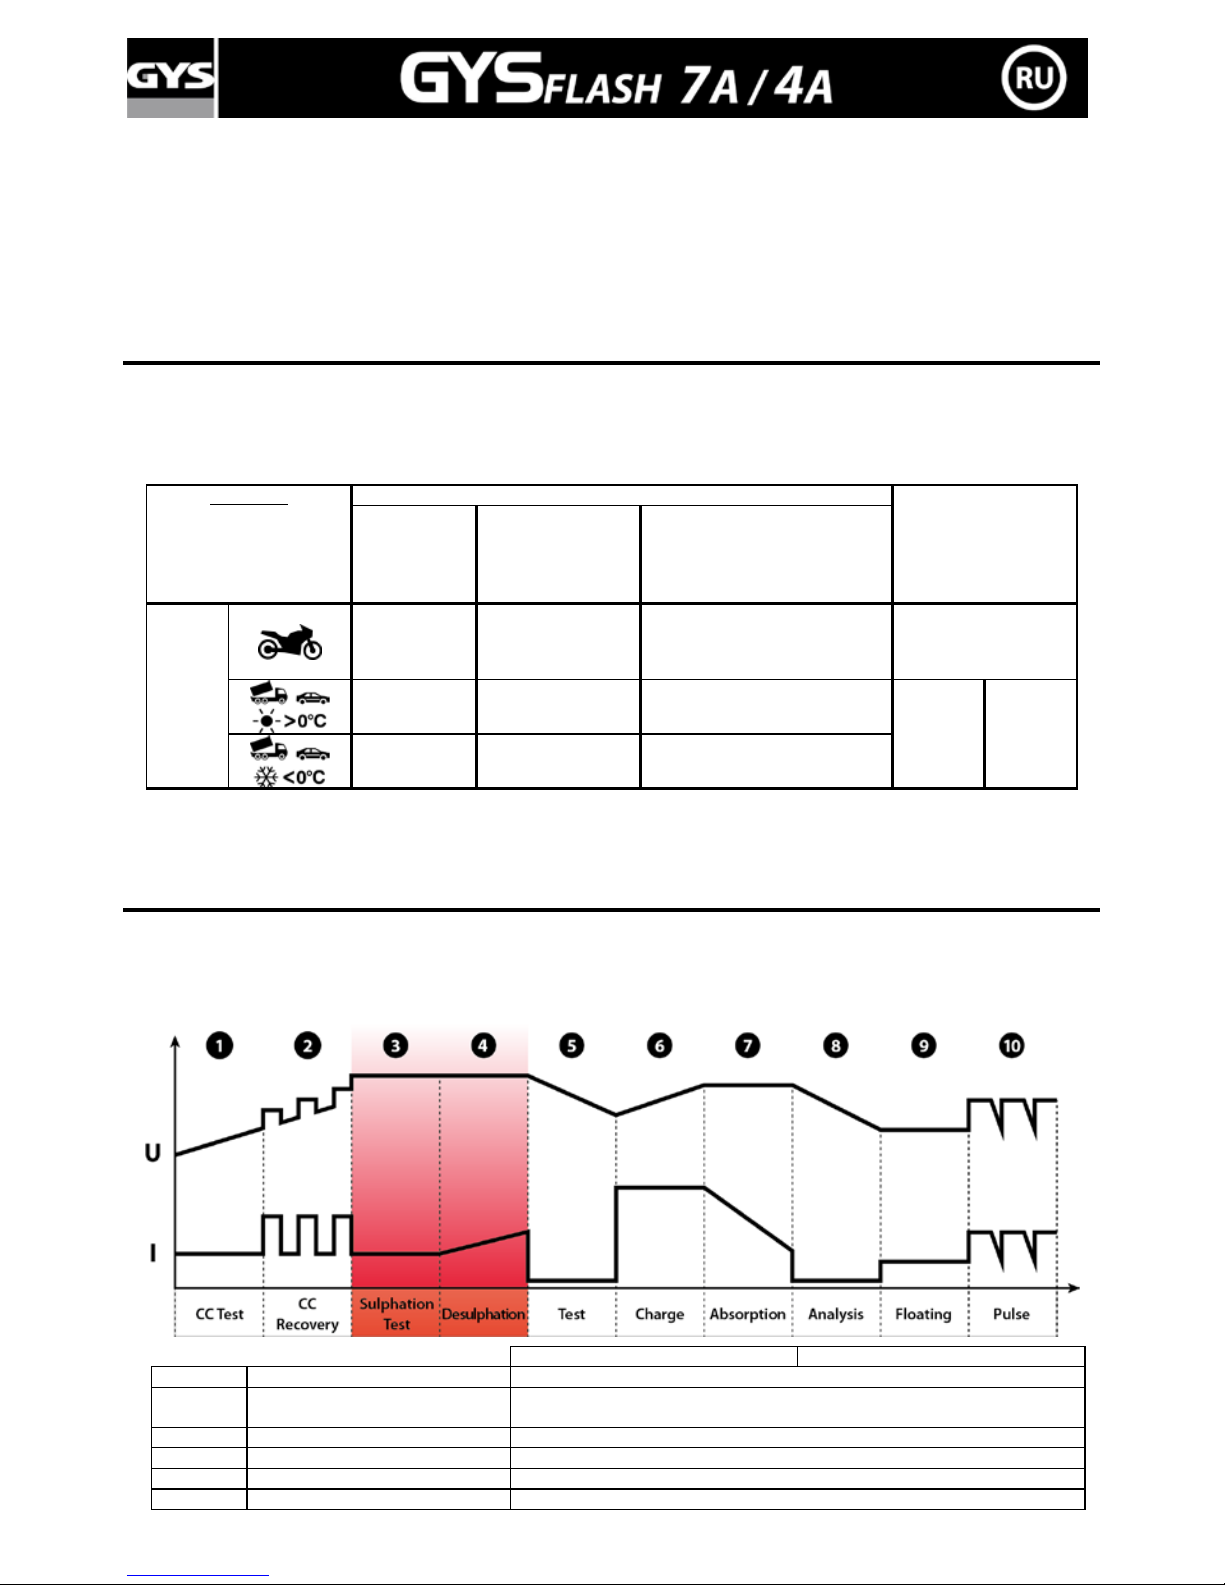
3 режима работают по нижеуказанным кривым зарядки:
• Кривая зарядки и обслуживания
4A
7A
1
ТЕСТ короткого замыкания
Тестирование закороченных элементов батареи.
2 Восстановление
Восстановление элементов, поврежденных вследствие глубокой
продолжительной разрядки.
3
Тест на сульфатирование
Тестирование сульфатированной АКБ.
4
Десульфатация
Десульфатация/Восстановление АКБ.
5
Тест
Проверка восстановления АКБ.
6
Зарядка
Зарядка АКБ на 80%
Page 24
24/33
0,8A ± 10% 0,8A ± 10%
3,6A ± 10%
(4A max)
5A ± 10%
(7A max)
3,6A ± 10%
(4A max)
5A ± 10%
(7A max)
7 Поглощение
Зарядка АКБ на 100%
14,4V ± 0,1V
14,4V ± 0,1V
14,7V ± 0,1V
8
Анализ
Анализ зарядки АКБ.
9 Floating (подзаряд)
Зарядка обслуживания
13,6V ± 0,1V
13,6V ± 0,1V
13,8V ± 0,1V
10
Обслуживание
Повторяет цикл зарядки для поддержания рабочих характеристик.
• Указания светодиодов.
Светодиод номер 4 (см. переднюю панель стр. 28) мигает с 1 по 5 фазу. Он продолжает не мигая
гореть с 6 по 8 фазу и выключается на 9 фазе. На 9 фазе загорается светодиод номер 5.
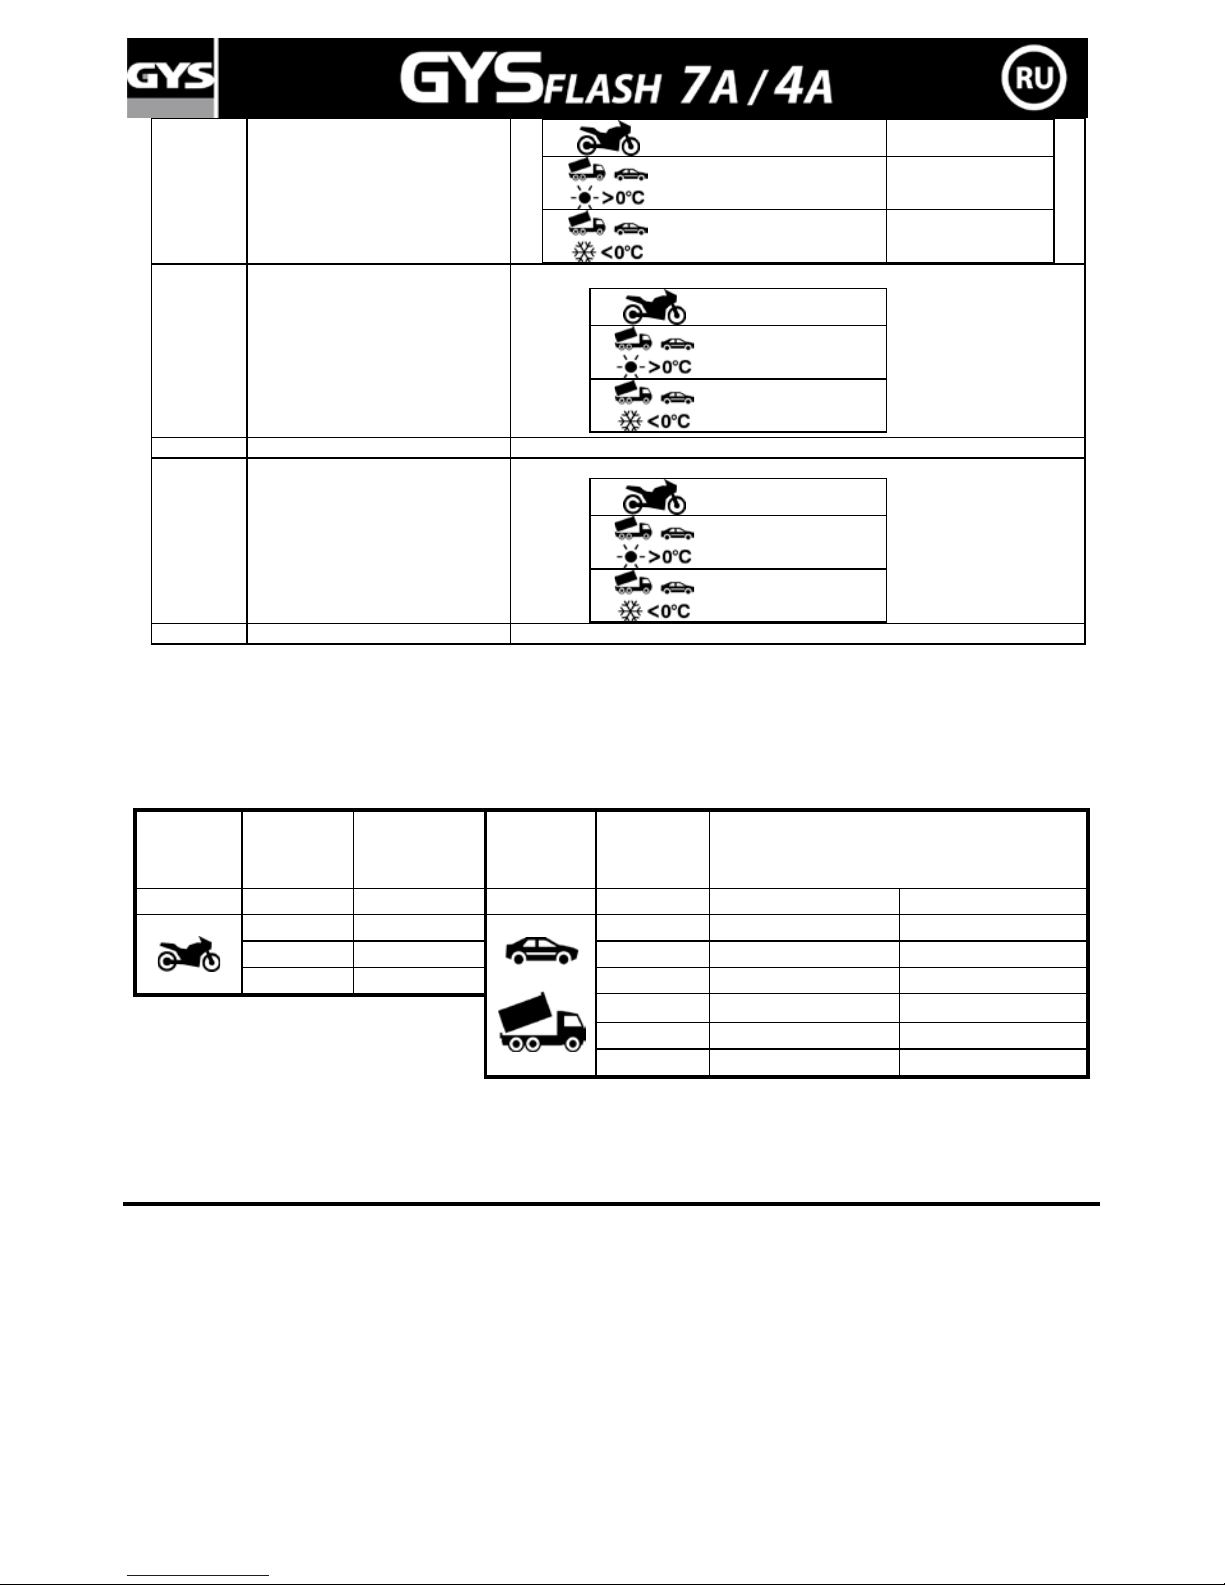
• Предполагаемое время зарядки
Автомобиль
Емкость
Батареи (Aч
)
Время зарядки
от 20% до
80% (часы)
Автомобиль
Емкость
Батареи (Aч)
Время зарядки от 20% до 80% (часы)
Gysflash
4A/7A
4A/7A
Gysflash
4A/7A
4A
7A
2
2H 20
3H30
2H
8
6H
70
11H
6H
15
11H30
100
Обслуживание
9H
130
Обслуживание
11h30
180 - Обслуживание
230 - Обслуживание
В случае отключение электричества аппарат автоматически продолжает зарядку после его
восстановления. Таким образом его можно наглухо подсоединить к автомобилю, что идеально для
зимовки, для катеров и т.д.
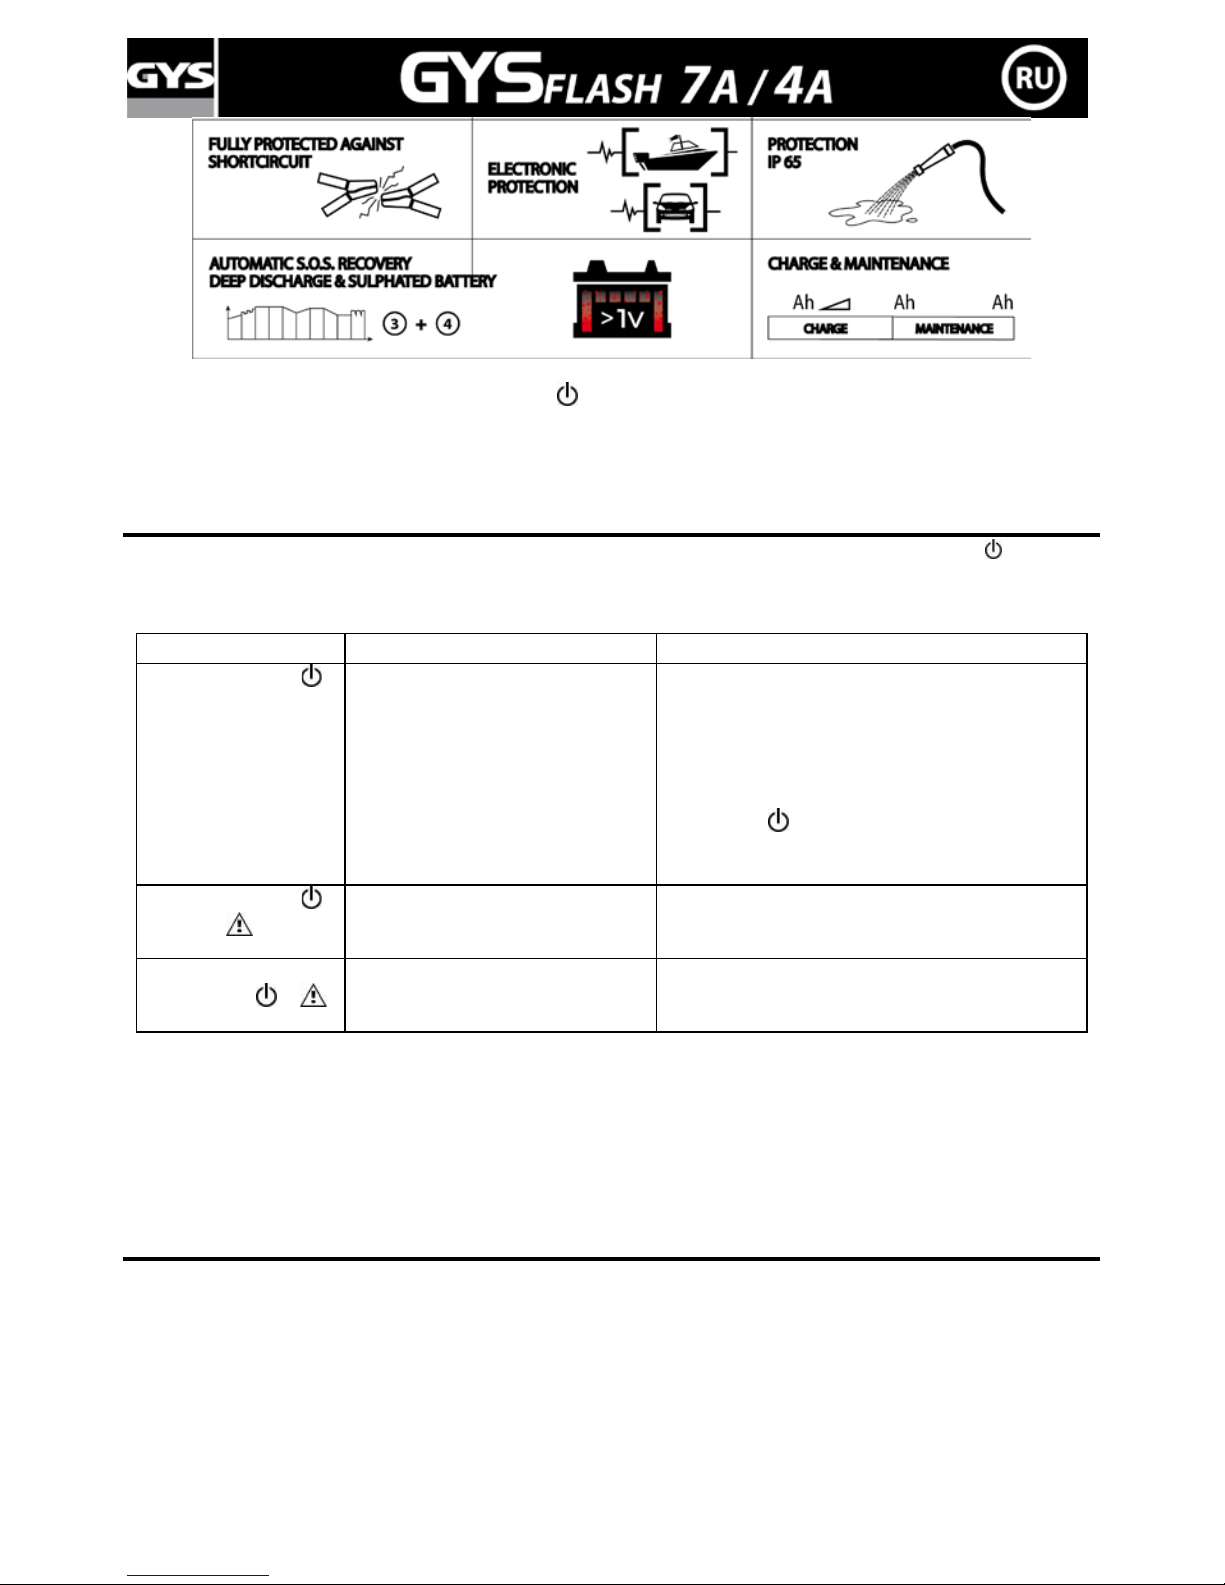
ЗАЩИТА
Gysflash имеет целый ряд защитных механизмов против коротких замыканий и инверсии полярности.
Он оснащен противоискровой защитой, предотвращающей искрение при подсоединении зарядного
устройства к АКБ. Это зарядное устройство имеет двойную изоляцию и совместим с бортовой
электроникой автомобилей.
Page 25
25/33
Самозащита (остановка зарядки + индикация
если напряжение АКБ ниже 1В±0.5В).
Gysflash оснащен температурным датчиком. Во время всей продолжительности зарядки, если зарядное
устройство слишком нагревается, оно понижает ток зарядки в целях самозащиты. Как только
температура окружающей среды станет приемлемой, Gysflash возобновит нормальную зарядку.
НЕИСПРАВНОСТИ, ИХ ПРИЧИНЫ И УСТРАНЕНИЕ
В случае проблемы зарядное устройство автоматически включает защиту и загорается индикатор
( ). Чтобы не повредить АКБ, система останется в этом положении до вмешательства
пользователя.
Неисправности
Причины
Устранение
Горит индикатор
Короткое замыкание
Разомкнутая цепь
Tension batterie
< Напряжение АКБ
< 1В ± 0,5
1- Проверьте, чтобы не было обычных и
необычных потребителей в цепи
автомобиля
2- Проверьте, что зажимы
Подсоединены
3- После того, как вы все исправите, если
индикатор
продолжает гореть, то АКБ
сульфатирована или повреждена и ее надо
заменить.
Горит индикатор
и мигает
- Инверсия полярности
- Неправильное напряжение
АКБ
- Проверьте, что зажимы правильно
подсоединены.
- Подсоединена АКБ 24В.
Горят
индикаторы и
Определение
невосстанавливаемой АКБ.
Проблема с температурой
Замените аккумулятор.
Слишком высокая температура окружающей
среды, проветрите помещение.
ДЕКЛАРАЦИЯ
О СООТВЕТСТВИИ
Компания GYS удостоверяет, что зарядное устройство, описанное в данной инструкции, произведено в
соответствии с требованиями следующих директив Евросоюза:
- Директива по низкому напряжению: 2006/95/CE от 12/12/2006.
- Директива по электромагнитной совместимости CEM : 2004/108/CE от 15/12/2004.
Для этого они соответствуют гармонизированным нормам:
- EN60335-1 - EN60335-2-29 – EN55014-1 - EN55014-2 – EN61000-3-2
- EN61000-3-3 – EN62233
XX
XXX
XXX
Page 26
26/33
Questo manuale descrive il funzionamento del carica-batterie e le precauzioni da seguire per la sicurezza.
Leggetelo attentamente prima dell'uso e conservatelo con cura per poterlo consultare in futuro
DESCRIZIONE GENERALE
Lo GYSFLASH è stato sviluppato per ricaricare la maggior parte delle batterie al piombo con o senza
manutenzione, normalmente utilizzate per le autovetture e per numerosi altri veicoli. Queste batterie possono
essere di diversi tipi es: GEL (elettrolito gelificato), AGM (elettrolito impregnato), WET, MF (Senza
manutenzione), CA (Calcio).
Lo GYSFLASH 7A è stato progettato per la ricarica di batterie 12V (6 element i da 2V) da 1,2 Ah a 130 Ah, o
per il mantenimento in carica delle batterie 12V da 1,2 a 230 Ah.
Lo GYSFLASH 4A è stato progettato p er la ricarica delle batterie 12V (6 elementi da 2V) da 1,2 Ah a 70 Ah, o
per il mantenimento in carica delle batterie 12V da 1,2 a 130 Ah.
SICUREZZA
Non provare a ricaricare pile e batterie non ricaric abili.
Se il cavo di alimentazione è danneggiato, esso d eve essere sostituito dal fabbricante, dal suo
servizio post vendita o da una persona con qualifiche simili, per evitare pericoli.
Rispettare il tipo di fusibile indicato sul dispositivo.
Non coprire il caricabetterie durante l’utilizzo
Prima della carica leggere le istruzioni. Scolleg a re l'a lim e nt a zione prima di collegare o scollegare le
connessioni sulla batteria. Attenzione : Gas esplosivo, evitare fiamme e scintille. Assicurare
un'aerazione sufficiente durante la carica.
Prodotto soggetto a raccolta differenziata. Non smaltire con i rifiuti domestici.
Questo dispositvo non è stato creato per essere usato da persone (bambini compresi) le cui
capacità fisiche o mentali sono ridotte, né da persone senza esperienza o conoscenze del soggetto,
tranne se esse sono sorvegliate da una persona responsabile per la loro sicurezza, che li guidi e li
istruisca sull'uso del dispositivo. I bamb in i no n devono giocar e con il dispositivo. La p u liz ia e la
manutenzione non devono essere effettuate da bambini non sorvegliati.
Il dispositivo deve essere posizionato in modo tale che la pres a sia facilmente raggiungibile
COLLEGAMENTI
Caricare una batteria installata sul veicolo
a- Connettere il caricabatterie alla presa di corrente.
b- Verificare la polarità dei terminali della batteria. Il termnale positivo (+) è di solito più largo di
quello negativo.
c- Iden tificare il terminale della batteria connesso al telaio del veicolo (massa ). Di solito è il terminale
negativo.
d1- Ricarica di una batteria il cui terminale negativo è collegato alla massa del veico lo: (telaio)
- Collegare il cavo rosso (+) al terminale positivo della batterie (+), poi il cavo nero
(-) al terminale negativo della batteria o al telaio del veicolo.
d2- Ricarica di una batteria il cui terminale positivo è collegato alla massa del veicolo: (tela io)
- Collegare il cavo nero (-) al terminale negativo della batteria e il cavo rosso (+) al terminale
positivo della batteria o al telaio del veicolo.
Caricare una batteria non collegata al veicolo.
a- Collegare il caricabatterie alla presa di corrente.
Collegare il cavo rosso (+) al terminale positivo de lla batter ia e il cavo nero (-) al terminale neg ativo
(-).
Collegamento permanente con il cavo ad occhiello (acc. n°15)
Attenzione: non connettere il cavo ad occhiello al caricabatterie durante il montaggio.
a- Collegare il cavo rosso ad occhiello al terminale positivo della batteria
b- Collegare il cavo nero ad occhiello al terminale negativo dell batter ia .
Page 27
27/33
c- Fissare i cavi sul telaio del ve icolo. Atte nzione: i cavi non devon o toccarsi, e n on devono essere messi in
contatto con superfici calde o taglienti.
d- Solo dopo il montaggio potrete collegare i cavi del caricabatterie.
Dopo la carica, si consiglia di scollegare il ca ricabat terie da ll'aliment azione, p oi toglier e il colle gam ento
al telaio infine la connessione alla batteria, in quest'ordine. Nel caso di collegamento fisso scollegare
prima l'alimentazione dalla rete , poi il collegamento alla batteria.
FUNZIONAMENTO GENERALE
Lo Gysflash vi propone 3 modalità di carica.
ATTENZIONE : Le modalità sono selezionabili solamente se l'ap parecchio è collegato alla
batteria.
Per scegliere la vostra modalità far riferimento alla tabella sotto riportata.
M
ODALITA
SPIA
UTILIZZO DELLA BATTERIA
CAPACITA
BATTERIA
SALVATAGGIO
(es :allarme)
IN CICLO*
(=carica/scarica ;
es : spazzatrice…)
AUTO/MOTO
(batteria con o
senza
manutenzione)
12V.
1,2 a 15 Ah
in condizione
normale
GYSFLASH
4A
15 a 130
Ah
GYSFLASH
7A
15 a 230
Ah
in condizione
di freddo
* Nota bene : per la ricarica delle batterie sigillate utilizzate n el ciclism o , selez ion a re la posizione « caldo »
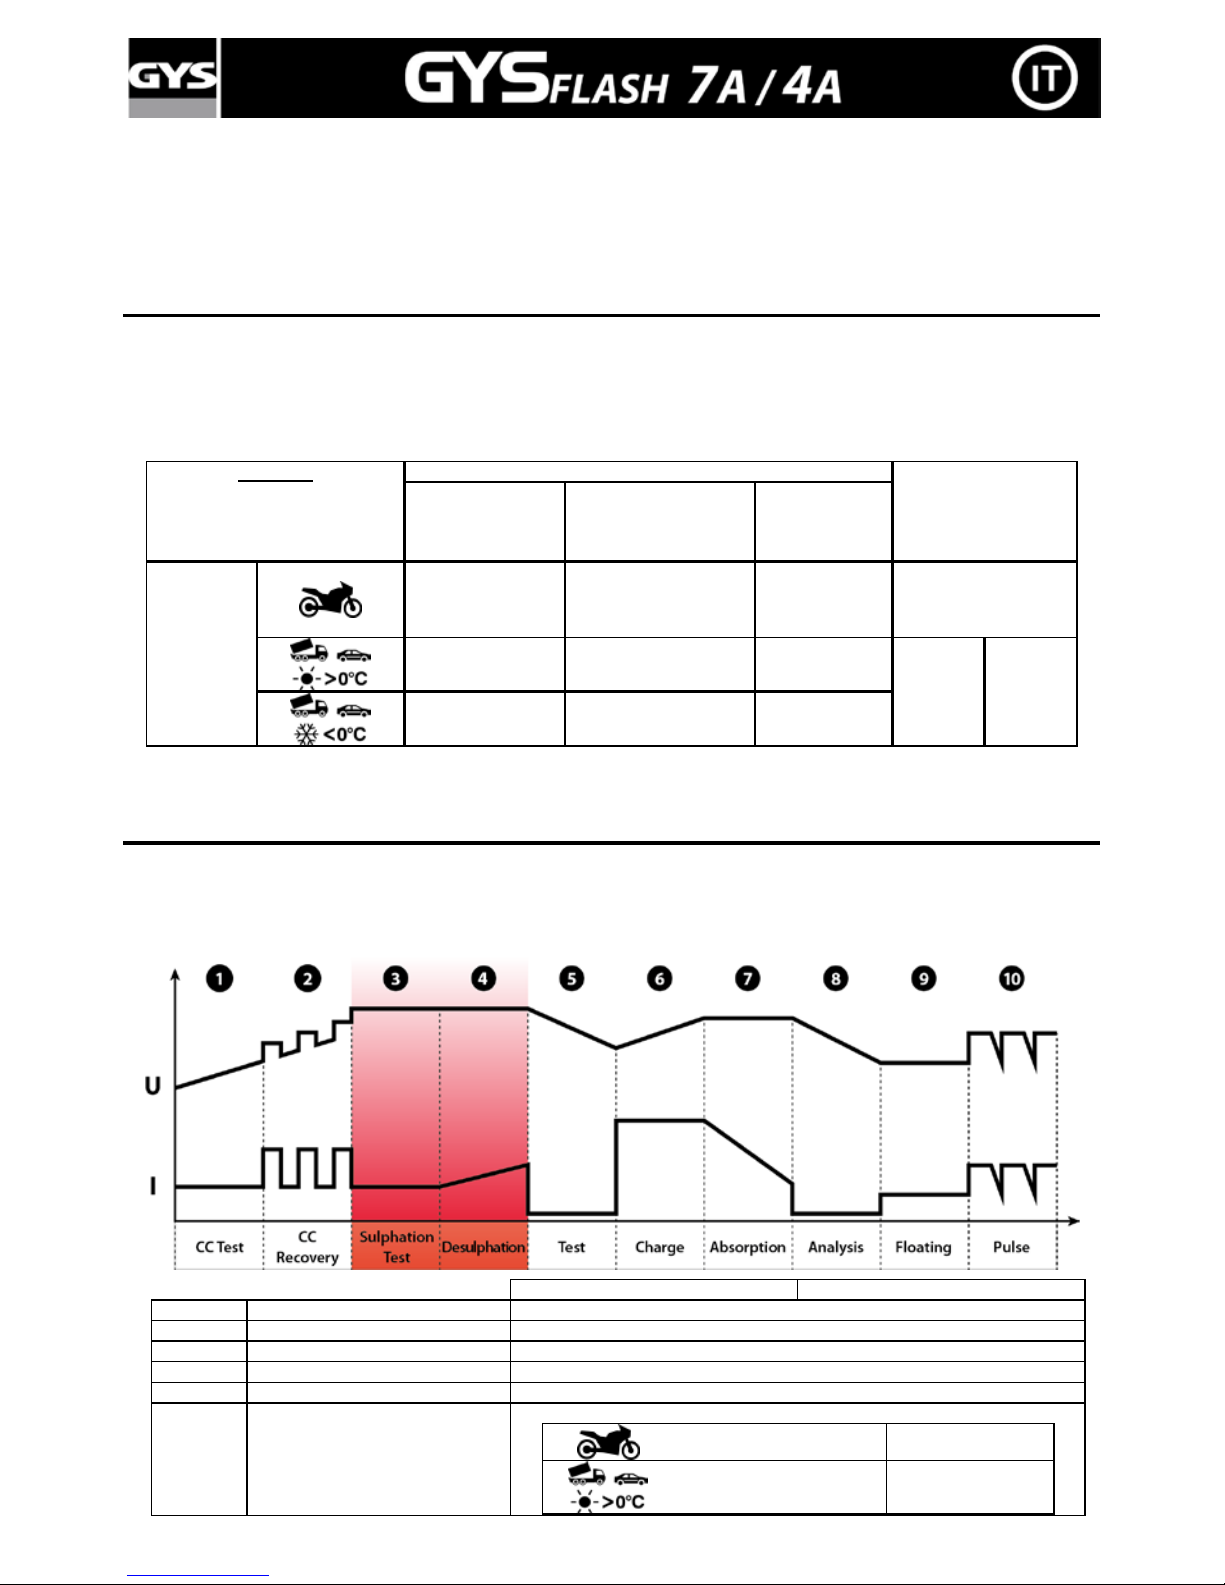
MODALITA CARICHE
Le 3 modalità seguono il diagramma sotto riportato :
• Diagramma di carica e di mantenimento
4A
7A
1
TEST Corto Ci rcuito
Test elementi in co r to circuito della batteria
2
Recupero
Recupero degli elementi danneggiati da una scarica profonda prolungata
3
Test solfatazione
Test batteria solfatata
4
Desolfatazione
Desolfatazione/R ec u p er o d ella batteria
5
Test
Verifica del recupero d ella batteria
6 Carica
Carica della batteria all' 80%
0,8A ± 10% 0,8A ± 10%
3,6A ± 10%
(4A max)
5A ± 10%
(7A max)
Page 28
28/33
3,6A ± 10%
(4A max)
5A ± 10%
(7A max)
7 Assorbimento
Carica della batteria al 100%
14,4V ± 0,1V
14,4V ± 0,1V
14,7V ± 0,1V
8
Analisi
Analisi della carica della batt er ia
9 Floating
Carica di manten im en to
13,6V ± 0,1V
13,6V ± 0,1V
13,8V ± 0,1V
10
Manutenzione
Inizia un ciclo di c ar ic a per il mantenimen t o delle prestazioni
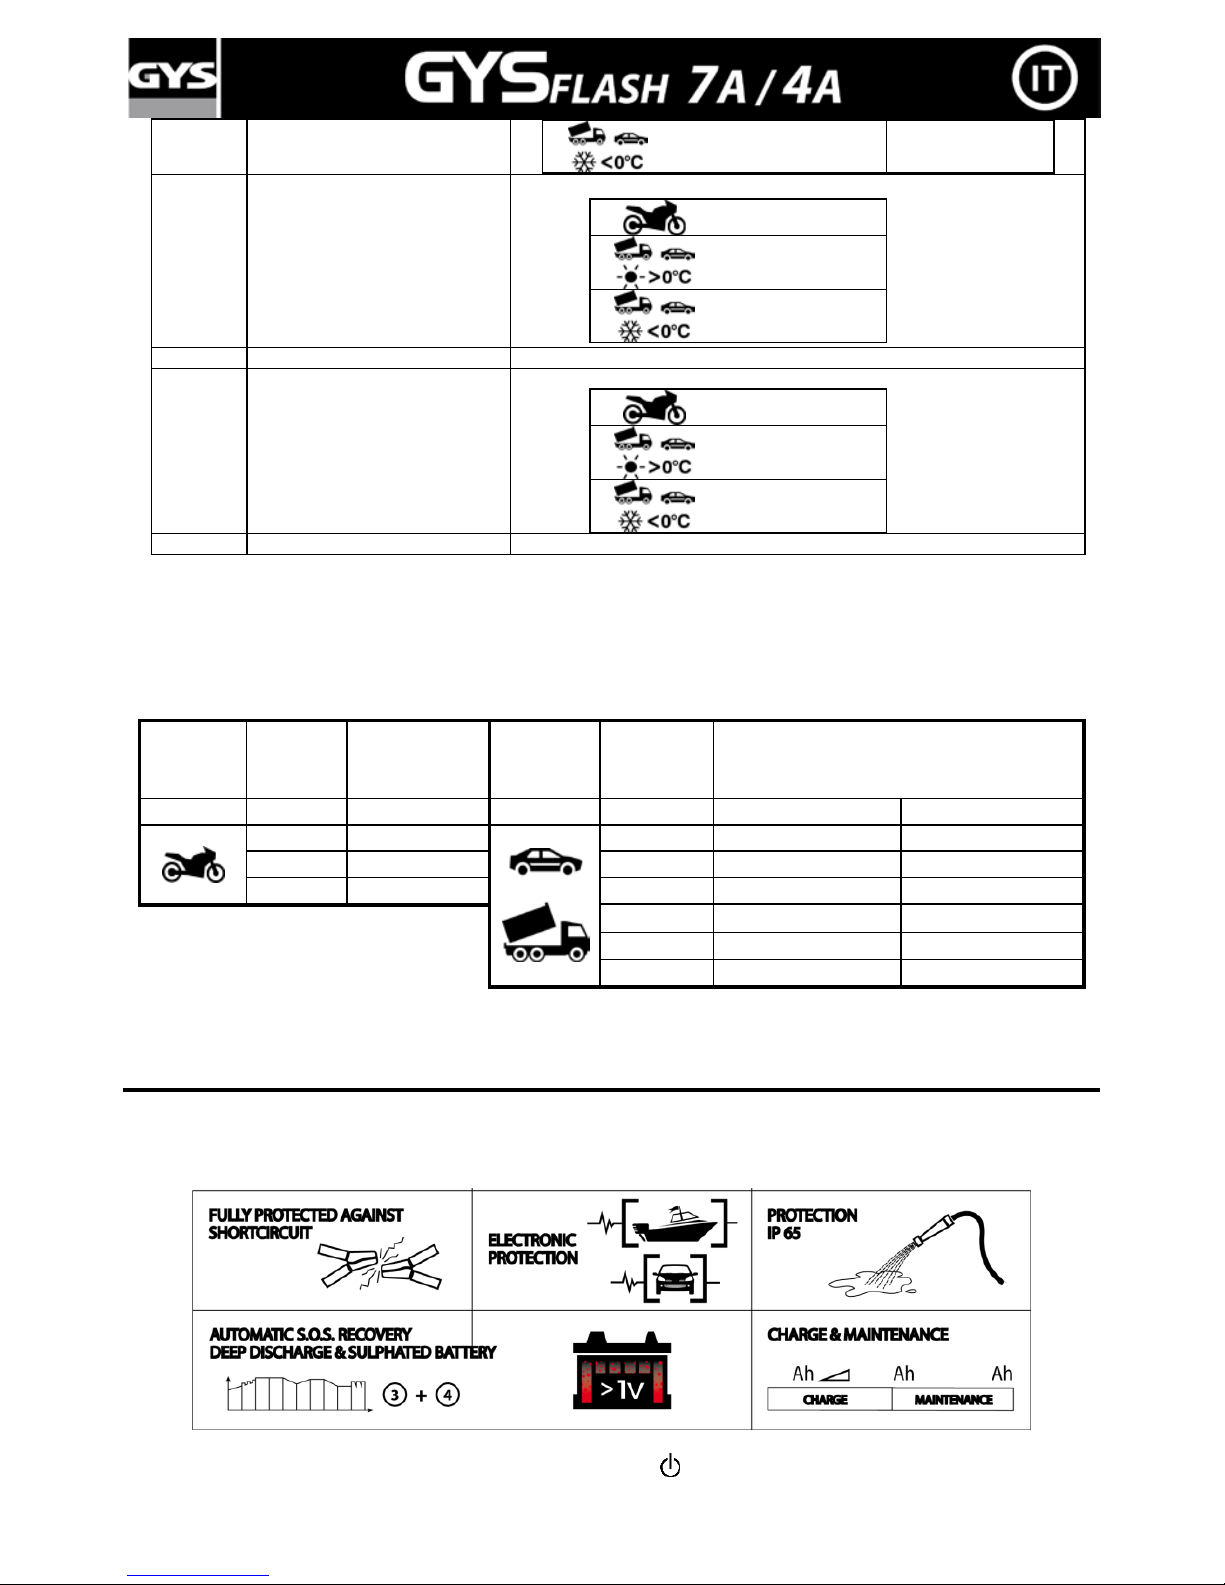
• Segnaletica dei LED.
Il led numero 4 (vedi parte anteriore pag. 28) lampeggia durante le fasi da 1 a 5. Reata fisso durante le
fasi da 6 a 8 e si spegne alla fase 9. In fase 9, il led 5 s’accende.
• Tempo di carica stimato
Veicolo
Capacità
Batteria (Ah
Tempo di carica
da 20 % a 80%
(ore)
Veicolo
Capacità
Batteria (Ah)
Tempo di carica da 20 % a 80% (ore)
Gysflash
4A/7A
4A/7A
Gysflash
4A/7A
4A
7A
2
2H 20
3H30
2H
8
6H
70
11H
6H
15
11H30
100
Mantenimento
9H
130
Mantenimento
11h30
180 - Mantenimento
230 - Mantenimento
L'apparecchio riavvia la carica automaticamente in caso di interruzione di corrente. Può esser e collegato
permanentemente ad un veicolo, ideale per il fermo invernale, ad una barca...
PROTEZIONE
Lo Gysflash possiede un insieme di dispositivi che lo proteggono dai corto-circuiti e dalle inversioni di polarit à .
Dispone di un sistema che evita qualsiasi scintilla al moment o del collegamen t o del caric a bat t e rie alla
batteria. Questo caricabatterie è a doppio isolamento ed è compatibile con l'elettronica dei veicoli.
Si auto protegge (arresto della carica + visualizzazione
se la tensione della batteria è inferiore ad
1V±0.5V).
XX
XXX
XXX
Page 29
29/33
Lo Gysflash possiede un sensore di temperatura. Per tutta la carica, se il caricabatterie diventa troppo caldo,
esso riduce la corrente di carica per auto proteggersi. Quan do la temperatura dell'ambiente ritorna
accettabile, lo Gysflash riprenderà la sua caricanormale.
ANOMALIE, CAUSE, RIMEDI
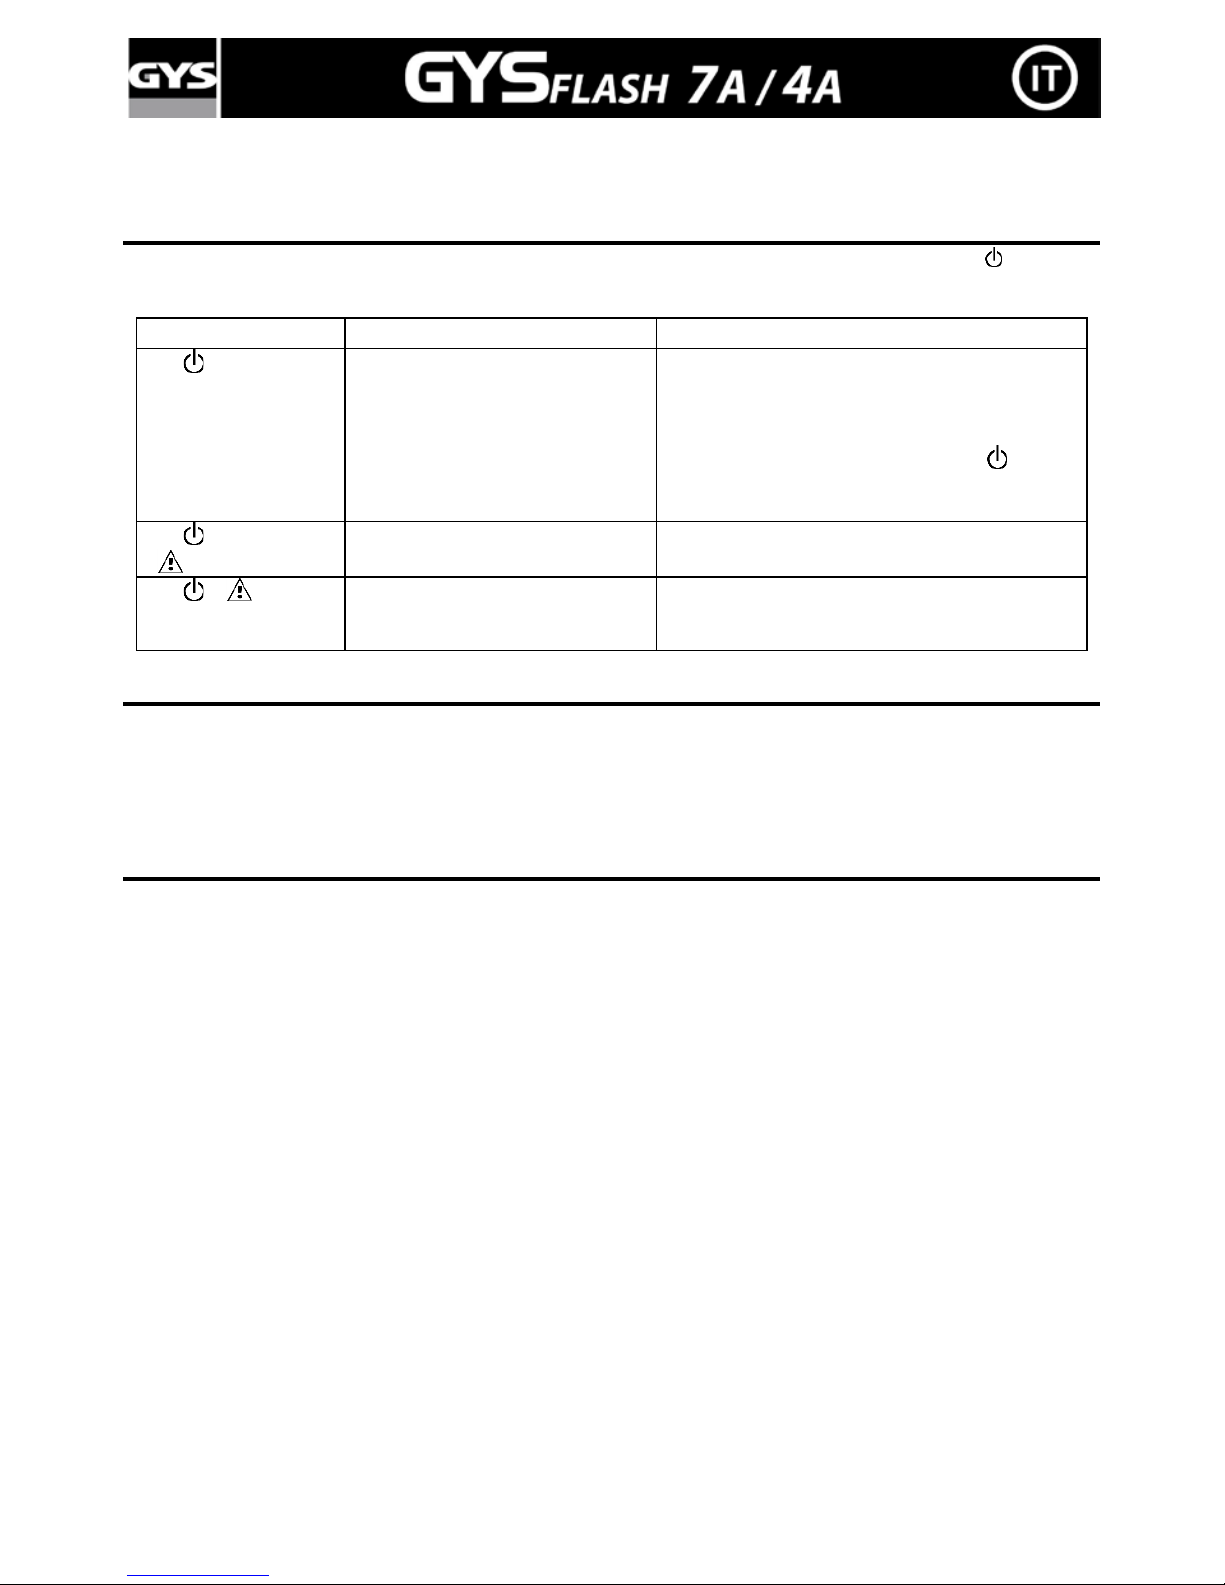
In caso di problemi, il caricabatterie si mette automaticamente in auto protezione e si accende la spia (
). Per evitare di danneggiare la batteria il sistema resterà in questa posizione fino all'intervento
dell'utilizzatore.
Problemi
Cause
Rimedi
Spia accesa
Corto circuito
Circuito aperto
Tensione batteria
< 1V ± 0,5
1- Verificare che non ci sia consumo normale o
anormale nel circuito del veicolo
2- Verificare che i morsetti siano
ben collegati
3- Dopo queste correzioni, se la spia
resta
accesa, la batteria solfatata o deteriorata è da
sostituire.
Spia accesa
e lampeggia
- Inversione di polarità
- Errata tensione della batteria
- Verificare che i morsetti siano ben collegati.
- Batteria da 24V collegata.
Spia e
accese
Individuazione di una batteria non
recuperabile.
Difetto termico
Cambiare la batteria.
Temperatura circostante trrroppo elevata,
aerare il locale.
DICHIARAZIONE DI CONFORMITÀ
La Società GYS attesta che il caricabatterie descritto in questo manuale è fabbricato conformemente alle
esigenze delle direttive europee seguenti :
- Direttiva bassa tensione: 2006/95/CE - 12/12/2006.
- Direttiva CEM : 2004/108/CE - 15/12/2004.
Sono pertanto in conformità alle normative armonizzate:
- EN60335-1 - EN60335-2-29 – EN55014-1 - EN55014-2 – EN61000-3-2
- EN61000-3-3 – EN62233
Page 30
30/33
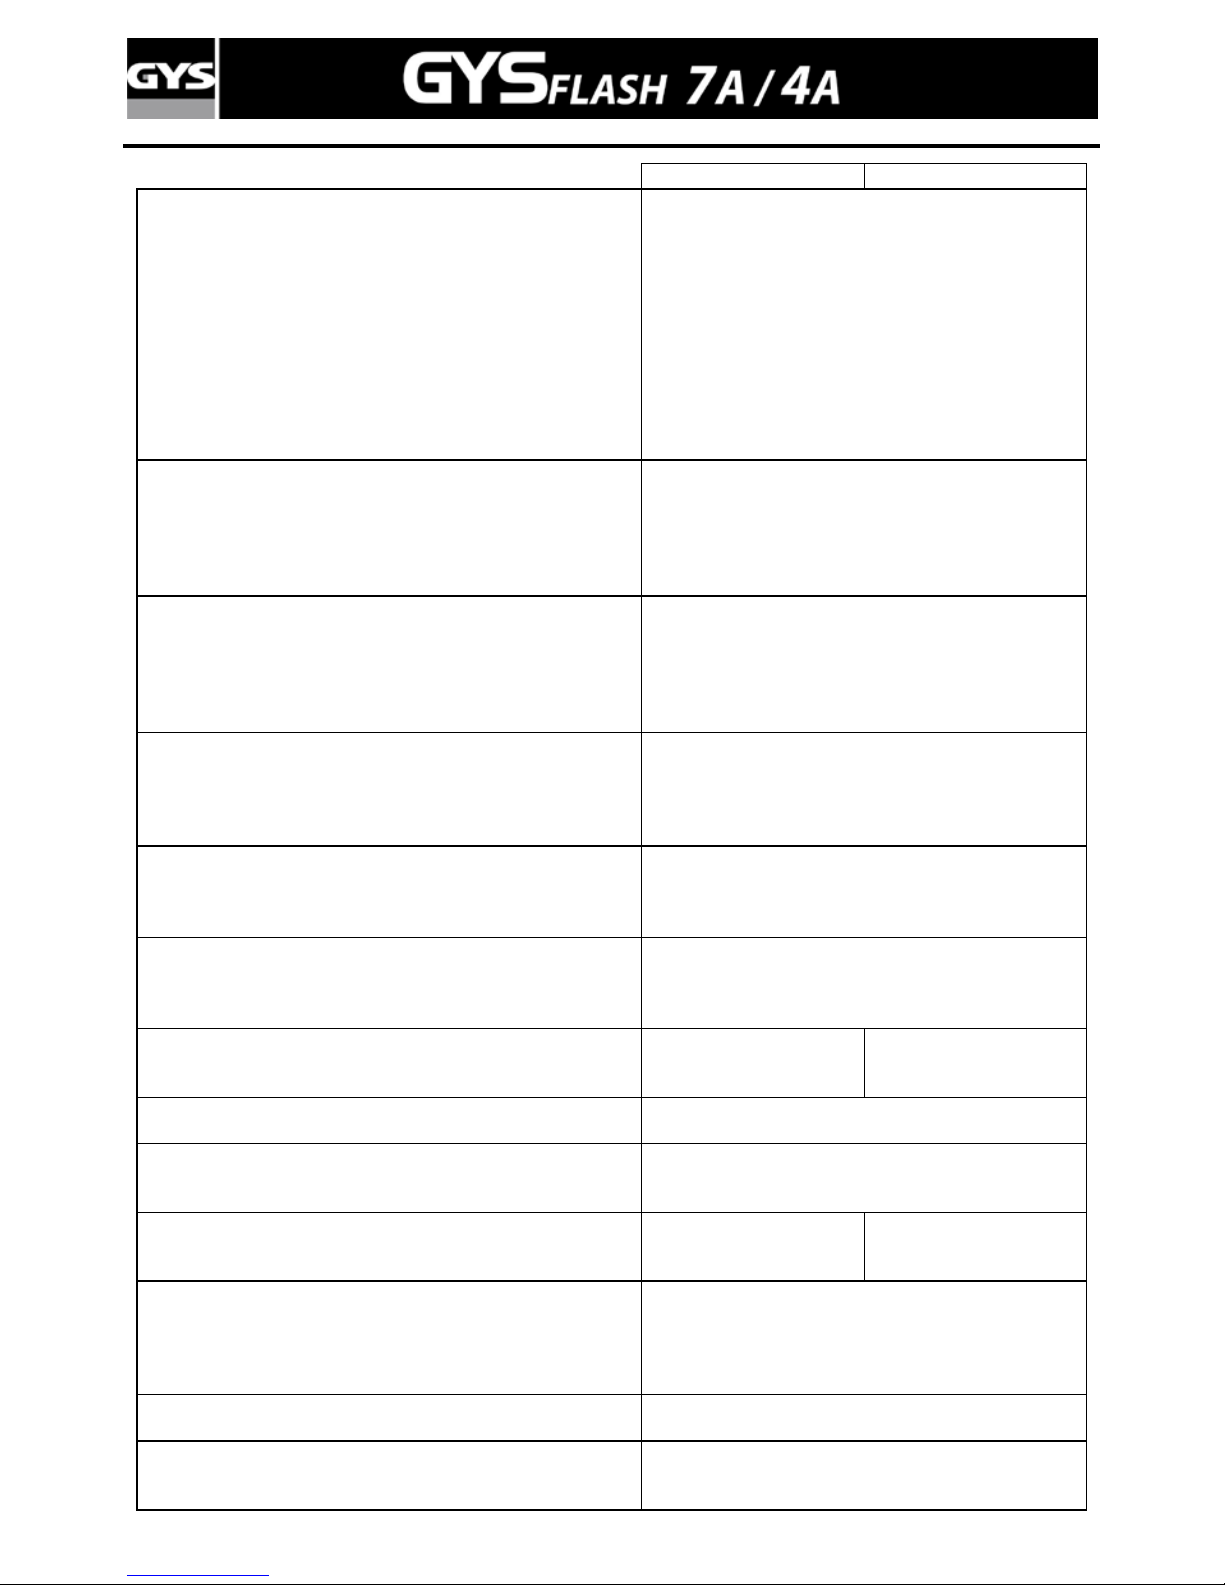
SPECIFICITES TECHNIQUES / TECHNICAL DATA / TECHNISCHE SPECIFICA T IES / ТЕХНИЧЕСКИЕ ХАРАКТЕРИСТИКИ
4A
7A
Type de batteries / Type of Batteries / Batteriearten /
Tipo de baterías / Accu soort / Тип АКБ / Tipi di batterie
Batterie au plomb 12V (électrolyte liquide, s ans
entretien, AGM, gel, calcium) / 1 2 V Lead-acid
batteries (WET, MF,AGM and GEL, Calcium) /
Bleibatterie 12V (mit Gel-Elektrolyt, wartungsfrei,
AGM, Gel, calcium) /Batería al plomo 12V (
electrólito líquido, sin mantenimiento, AGM, gel,
calcium) /
12V lood accu (vloeibare elektrolyt,
onderhoudsvrij, AGM, gel, calcium) / Свинцовая
АКБ 12В (с жидким электролитом,
необслуживаемая, AGM, гелиевая, кальций) /
Batteria al piombo 12V (elettrolito liquido, senza
manutenzione, AGM, gel, calcio)
Courbe de charge / Charging process / Ladekennlinie /
Curva de carga / Laadcurve / Кривая зарядки / Curva d i
carica
Selon les sélections, voir texte / Automatische
Spannungserkennung / Modi Auswahl abhängig,
siehe Text / Según las selecciones, ver el texto /
Afhankelijk van de selectie, zie tekst / В
зависимости от настроек, см. Текст /
A seconda
delle selezioni, vedi testo
Indice de protection / Housing Protection / Schutzklasse /
Índice de protección / Beschermingsklasse / Степень
защиты / Indice di protezione
IP65
Protégé contre la poussière et les projections
d'eau /Dust and Splash proof / Schutz vor Staub
und Spritzwasser) / Beschermt tegen regen en
vocht / Защищен от пыли и брызг воды /
Protetto contro la polvere e le proiezioni d'acqua
Niveau de bruit / Noise Level / Laustärke / Nivel de ruido
/ Geluidsniveau / Уровень шума / Livello di rumore
<50 dB
(relevé à une distance de 50cm / Test ed from a
distance of 50cm / aus einer Entfernung von
50cm / a los 50cm /
getest op een afstand van
50cm / rilevato ad una distanza di 50cm)
U1 : Tension d'entrée AC / Input Voltage AC/
Netzspannung / Tensión de entrada AC / U1 : Ingaande
spanning AC / U1 : Напряжение на входе AC /
U1 :
Tensione d'entrata AC
220-240V AC (+/- 15%), 50/60Hz
U2 : Tension de sortie / Output Voltage /
Ausgangsspannung / Tensión de salida / U2: Uitgaande
spanning / U2 : Напряжение на выходе /
U2 : Tensione
d'uscita
12V
I1 : Courant d'entrée / Input Current / Eingangsstrom /
Corriente de entrada / I1: Ingang stroom / I1 : Ток на
входе / I1 : Corrente d'entrata
0.5 A 1 A
Rendement / Efficiency / Wirkungsgrad / Rendimiento /
Opbrengst / Производительность / Rendimento
>89%
Tension de charge / Charging Voltage / Ladespannung /
Tensión de carga / Laadspanning / Напряжение зарядки
/ Tensione di carica
14,6V±0,1V or 15V±0,1V or 13,6V± 0,1V
I2 : Courant de charge / Charging Current / Ladestrom /
Corriente de carga / I2: Laadstroom / I2 : Ток зарядки /
I2 : Corrente di carica
3.6A±10% (4A max)
or 0,8A ± 10%
5.0A±10% (7A max)
or 0,8A ± 10%
Consommation Batteries au repos /
Back Current Drain /
Erhaltungsladung /
Consumo
baterías al descanso / Accu verbruik in de ruststand /
Потребление АКБ в нерабочем состоянии /
Consumo
batterie in riposo
< 1 mA
Ondulation / Ripple / Welligkeit / Ondulación / Golving /
Колебание / Ondulazione
Max 150mV
Temperature ambiante /
Ambient Temperature / Zugelassene Betriebstemperatur
/ Temperatura ambiente / Omgevingstemperatuur /
-20°C to +50°C /-4°F to +122°F,
Page 31
31/33
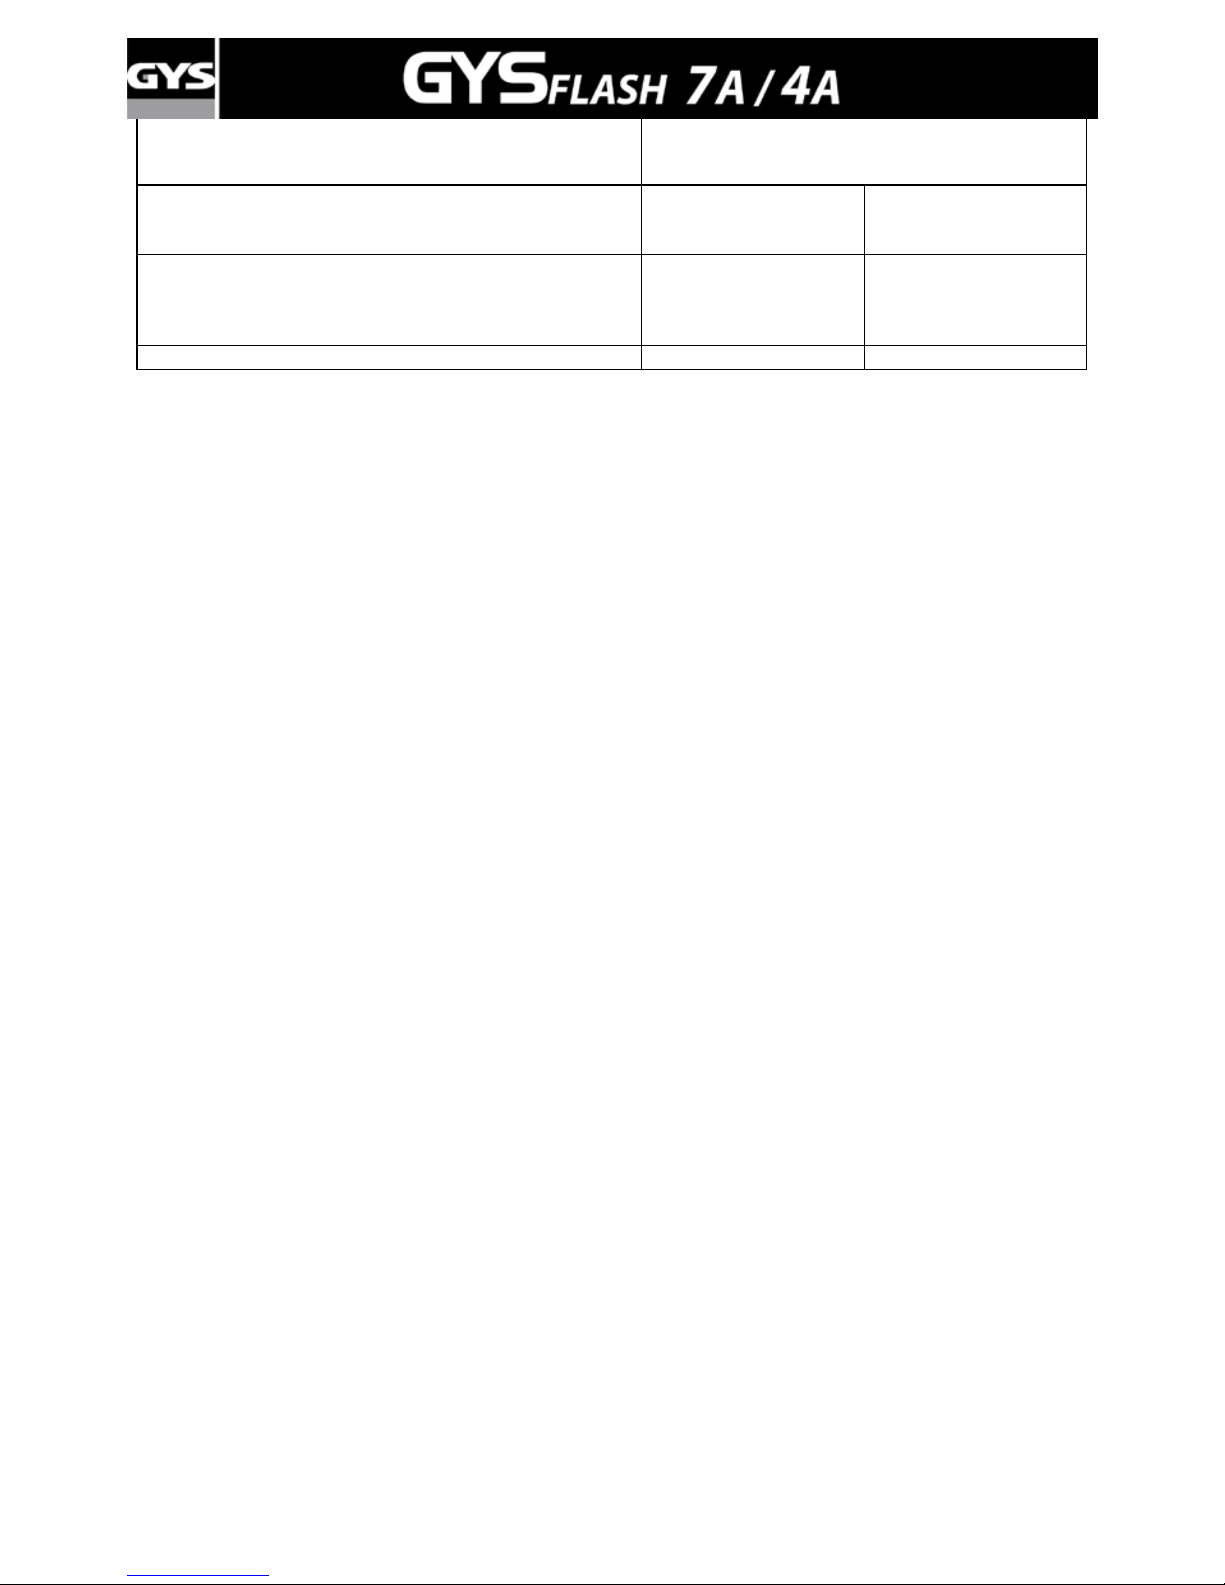
Температура окружающей среды / Temperatura
ambiente
Capacité batterie / Battery Capacity / Batterie Kapazität /
Capacidad de batería / Accu capaciteit / Емкость батареи
/ Capacità batteria
1,2 -> 130Ah 1,2 -> 230Ah
Dimensions (lxPxH) / Dimensions (LxWxH) /
Abmessungen (lxPxH) / Dimensiones (Lxlxa) /
Afmetingen (BxLxH) / Размеры (Д х Ш х В) / Dimensioni
(lxPxH)
170x90x51 mm 190x100x52 mm
Poids / Weight / Gewicht / Peso / Gewicht / Вес / Peso
0,4 kg
0,486 kg
Page 32
32/33
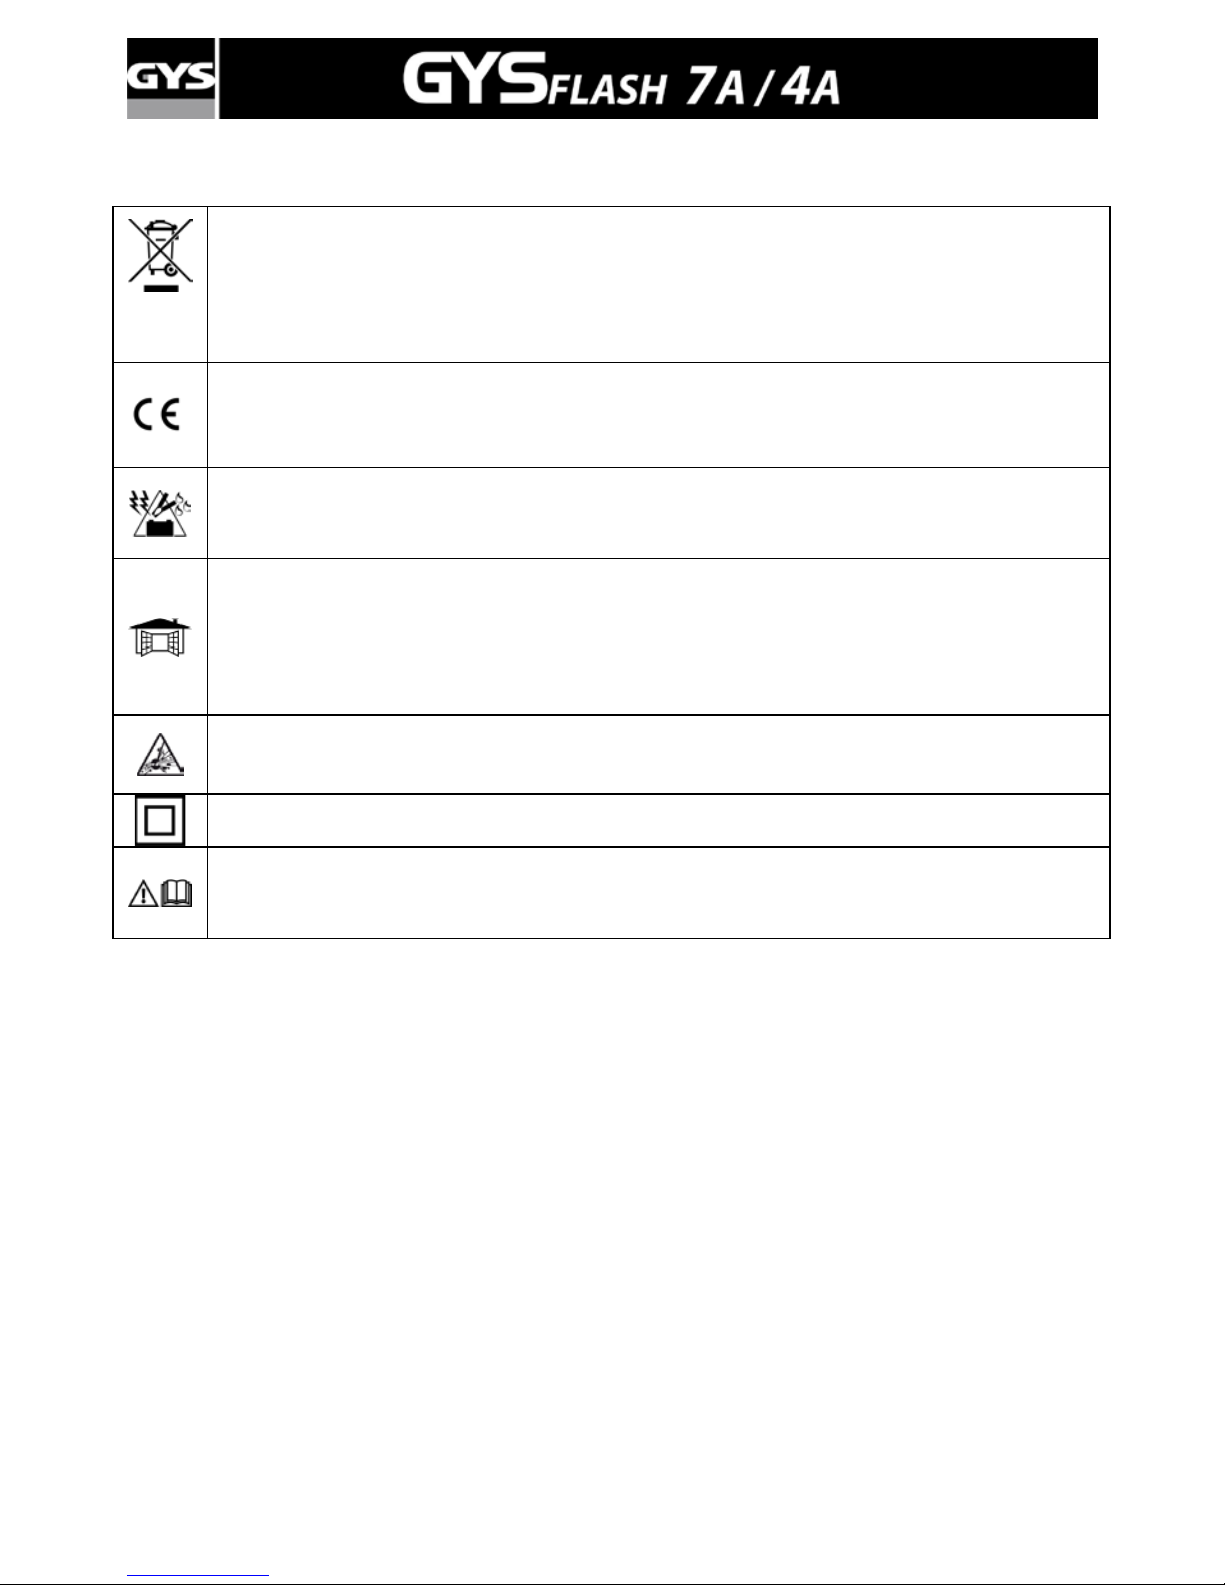
Produit faisant l'objet d'une collecte sélective- Ne pas jeter dans une poubelle domestique. /
Separate collection required – Do not throw in a domestic dustbin. / Dieses Produkt w ird als
Elektrogerät entsorgt. Bitte nicht zusammen mit Hausmüll entsorgen / Este aparato es objeto de una
recolección selectiva. No deb e ser tirado en en cubo doméstico. / Afzonderlijke inzameling vereist.
Gooi het niet in het huishoudelijk afval. /
Этот аппарат подлежит утилизации / Prodotto soggetto
alla raccolta differenziata
Appareil conforme aux directives européennes / The d evice complies with European Directive / Gerät
entspricht europäischen Richtlinien / El aparato está conforme a las normas europeas. / Het
apparaat is in overeenstemming met de Europese richtlijnen /
Аппарат соответствует директивам
Евросоюза / Appar ec chio conforme alle direttive europee
Risque de projection acide. Ne pas provoquer de flamme ou d’étincelle / Risk of acid spray / Gefahr von
Säurespritzern / Riesgo de proyección ácida. No originar llamas o chispas / Gevaar voor zuren projecties.
Geen vlam of vonk opwekken. /
Опасность кислотных брызг. Избегайте пламени и искр / Rischio di
proiezione acida. Non provocare fiamme o scintille
Choisir un local abrité et suffisamment aéré ou spécialement aménagé. / Choose a sheltered room
with appropriate airing. / Nur in geschützten und gut belüfteten Räumen benutzen / Elegir un lugar
cubierto, suficientemente ventilado o especialmente acondicionado. / Kies een beschutte, voldoende
geventileerde of speciaal aangepaste ruimte. /
Выберите крытое и хорошо проветриваемое
помещение или же специально оборудованное помещение. / Scegliere un posto al riparo e
sufficientemente ventilato o specialmente allestito.
Attention gaz explosifs / Warning contains explosive gas / Achtung! Schweißen kann Feuer oder
Explosionen verursachen / Atención: contiene gases explosivos / Let op explosief gas / Внимание риск взрывчатых газов / Attenzione gas esplosivo
Matériel de classe 2 / Class 2 device / 2-Klasse Gerät / Aparato de Clase 2 / Klasse 2 toestel /
Аппарат класса 2 / Materiale di classe 2
Attention ! Lire le manuel d’instruction avant utilisation / Caution ! Read the user manual / Achtung! Lesen
Sie die Bedienungsanleitung! / ¡ Cuidado ! Lear las instrucciones de uso / Let op! Voor gebruik lees
aandachtig de handleiding /
Внимание! Прочтите инструкцию перед использованием / Attenzione!
Leggere il manuale d'istruzione prima dell'utilizzo
Page 33
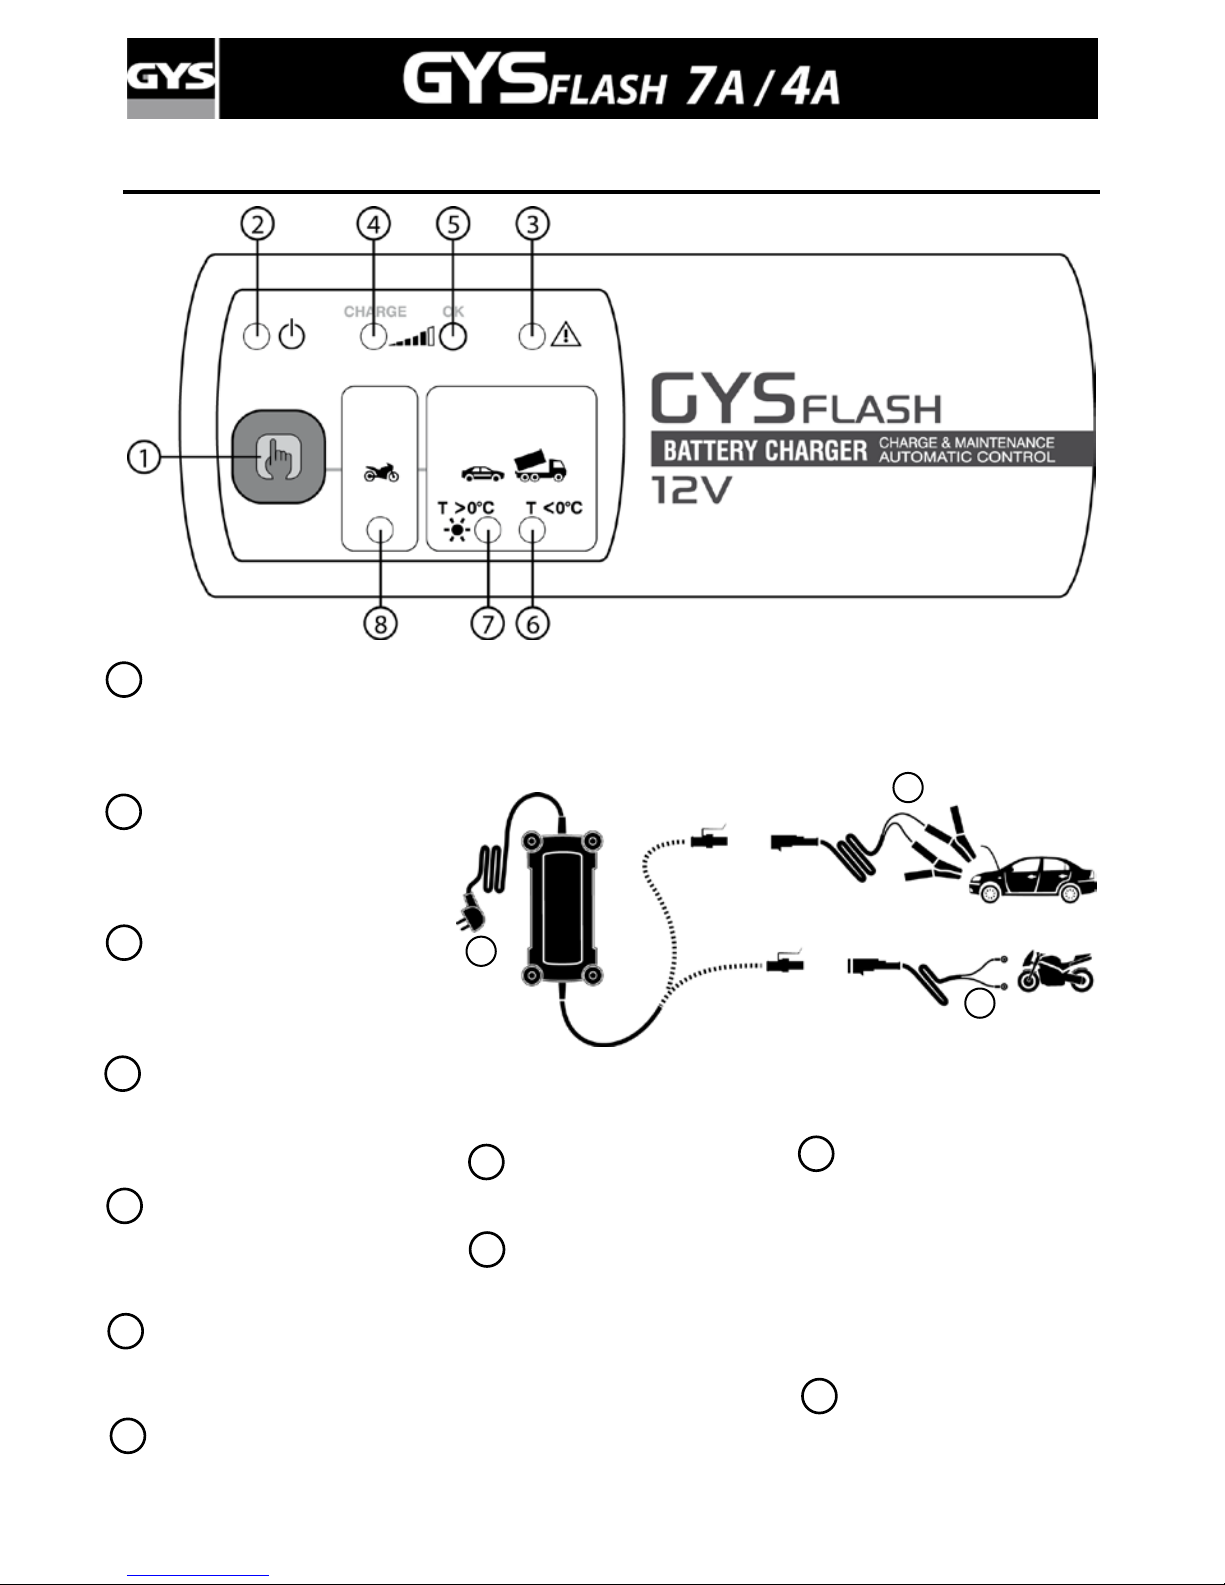
33/33
FAÇADE ET ACCESSOIRES / FRONT AND ACCESSORIES / BEDIENUNGSFELD UND ZUBEHÖR / INDICACIONES
–ACCESORIOS / VOORKANT EN ACCESSOIRES / ПЕРЕДНЯЯ ПАНЕЛЬ И АКСЕССУАРЫ
9
11
Bouton de sél ec tion / Mode
selection button / ModeUmschalter. /
Tecla de selección
/ Selectie knop / Кнопка выбора
/ Tasto di selezione
1
Voyant veille / protection
Standby indicator / Bereit Anzeige /
Indicador de stand-by / Standby
LED / Индикатор режима
ожидания / Spia s tandby
2
Erreur de polarité
Incorrect polarity/Fault
“falsche P o larität“
Error de polaridad / Polariteitsfout /
Ошибка полярности / Errore di polarità
3
En cours de charge
Charging in progress
Ladeanzeige
Carga en proceso / Aan het
laden / Идет зарядка / In carica
4
Charge terminée / Fully charged
/ Vollladung erreicht / Carga
efectuada /
Einde laden /
Зарядка закончена / Carica
terminata
5
Mode/Modus/ Modo/ Режим /
Modalità 12V <0°C / Modus 12V
<0°C
Mode /Modus/ Modo/ Режим /
Modalità
6
7
Câble secteur avec prise
Mains cable with power plug
Netzanschlussleitung mit Stecker
Cable con enchufe / Voedingskabel
met stekker / Сетевой шнур с
вилкой / Cavo corrente con presa
Câble de connexion fixe
Permanent connection cable
Ringkabelschuh
Cable de conexión fijo / Vaste
aansluitkabel. / Несъемный
соединительный кабель / Cavo
di connessione permanente
Pinces de charge
Quick clamps Ladeklemmen
Pinzas de carga / Laad
klemmen. / Зажимы
зарядки / Morsetti di carica
9
10
11
Mode / Modus / Modo/
Режим / Modalità 0,8A /
Modus 0,8A
8
10
 Loading...