

Page 1

FR
02-15 / 100-104
GYSFLASH
EN
DE
ES
RU
NL
IT
73502 V1 07/03/2024
16-29 / 100-104
30-43 / 100-104
44-57 / 100-104
58-71 / 100-104
72-86 / 100-104
87-100 / 100-104
107.24 CNT FV
Find more languages of user manuals
www.gys.fr
Page 2

Manuel d’utilisation
INSTRUCTIONS DE SÉCURITÉ
Ce manuel d’utilisation comprend des indications sur le
fonctionnement de votre appareil et les précautions à suivre pour
votre sécurité. Merci de le lire attentivement avant la première
utilisation et de le conserver soigneusement pour toute relecture
future. Cet appareil doit être utilisé uniquement pour faire de la
recharge ou de l’alimentation dans les limites indiquées sur l’appareil
et le manuel. Il faut respecter les instructions relatives à la sécurité.
En cas d’utilisation inadéquate ou dangereuse, le fabricant ne
pourra être tenu responsable.
Appareil est destiné à un usage à l’intérieur. Il ne doit pas être
exposé à la pluie.
Cet appareil peut être utilisé par des enfants âgés d’au moins
8 ans et par des personnes ayant des capacités physiques,
sensorielles ou mentales réduites ou dénuées d’expérience ou
de connaissance, s’ils (si elles) sont correctement surveillé(e)s
ou si des instructions relatives à l’utilisation de l’appareil en toute
sécurité leur ont été données et si les risques encourus ont été
appréhendés. Les enfants ne doivent pas jouer avec l’appareil. Le
nettoyage et l’entretien par l’usager ne doivent pas être eectués
par des enfants sans surveillance.
Notice originale
GYSFLASH 107.24 CNT FV
A n’utiliser en aucun cas pour charger des piles ou des batteries
non rechargeables.
Ne pas utiliser l’appareil, si le cordon d’alimentation ou la che de
secteur sont endommagés.
Ne pas utiliser l’appareil, si le cordon de charge est endommagé
ou présente un défaut d’assemblage, an d’éviter tout risque de
court-circuit de la batterie.
Ne jamais charger une batterie gelée ou endommagée.
Ne pas couvrir l’appareil.
Ne pas placer le chargeur à proximité d’une source de chaleur et à
des températures durablement élevées (supérieurs à 60°C).
Ne pas obstruer les ouvertures de ventilation.
Le mode de fonctionnement automatique ainsi que les restrictions
applicables à l’utilisation sont expliqués ci-après dans ce mode
d’emploi.
Risque d’explosion et d’incendie!
• Une batterie en charge peut émettre des gaz explosifs.
• Pendant la charge, la batterie doit être placée dans un emplacement
bien aéré.
• Éviter les ammes et les étincelles.
• Protéger les surfaces de contacts électriques de la batterie à
l’encontre des courts-circuits.
2
Page 3

Manuel d’utilisation
Ne pas laisser une batterie en cours de charge sans surveillance
sur une longue durée.
Risque de projection d’acide !
• Porter des lunettes et des gants de protection
• En cas de contact avec les yeux ou la peau, rincer
immédiatement à l’eau et consulter un médecin sans tarder.
Connexion / déconnexion :
• Déconnecter l’alimentation avant de brancher ou de débrancher
les connexions sur la batterie.
• La borne de la batterie non reliée au châssis doit être connectée
la première. L’autre connexion doit être eectuée sur le châssis
loin de la batterie et de la canalisation de combustible. Le
chargeur de batterie doit alors être raccordé au réseau.
• Après l’opération de charge, débrancher le chargeur de batterie
du réseau puis retirer la connexion du châssis et enn la
connexion de la batterie, dans l’ordre indiqué.
Notice originale
GYSFLASH 107.24 CNT FV
FR
Raccordement :
• Cet appareil doit être raccordé à un socle de prise de courant
relié à la terre.
• Le raccordement au réseau d’alimentation doit être eectué
conformément aux règles d’installation nationales.
Entretien :
• Si le câble d’alimentation est endommagé, il doit être remplacé
par un câble ou un ensemble spécial disponible auprès du
fabricant ou de son service après-vente.
• L’entretien doit être eectué que par une personne qualiée.
• Avertissement ! Débrancher toujours la che de la prise secteur
avant d’eectuer des travaux sur l’appareil.
• L’appareil ne nécessite aucune maintenance particulière.
• Si le fusible interne est fondu, il doit être remplacé par le
fabricant, son service après-vente ou des personnes de
qualication similaire an d’éviter un danger.
• N’utiliser en aucun cas des solvants ou autres produits
nettoyants agressifs.
Règlementation :
• Appareil conforme aux directives européennes.
• La déclaration de conformité est disponible sur notre site internet.
• Marque de conformité EAC (Communauté économique
Eurasienne)
• Matériel conforme aux exigences britanniques. La déclaration
de conformité britannique est disponible sur notre site (voir à la
page de couverture).
3
Page 4

Manuel d’utilisation
100 Ah
Notice originale
GYSFLASH 107.24 CNT FV
• Appareil conforme aux normes Marocaines.
• La déclaration Cم (CMIM) de conformité est disponible sur notre
site internet.
Mise au rebut :
• Ce matériel fait l’objet d’une collecte sélective. Ne pas jeter dans
une poubelle domestique.
DESCRIPTION GÉNÉRALE
Votre GYSFLASH est un chargeur professionnel multifonction de technologie Inverter. Conçu pour soutenir les batteries des
véhicules de démonstration ou lors des phases de diagnostic, il garantit également une qualité de charge idéale pour l’entretien
des modèles les plus évolués. Ce chargeur peut recevoir des câbles de sortie jusqu’à 8 m. Le changement des câbles de charge
nécessite un réétalonnage (cf. page 10). Il est considéré comme un appareil xe et non comme un appareil mobile.
D’origine votre GYSFLASH est livré avec une conguration comprenant 4 modes :
• Mode Charge : dédié à la recharge des batteries de démarrage de type plomb (scellée, Liquid, AGM…) ou lithium (LiFePO4).
• Mode alimentation | Diag+ : Subvient aux besoins en énergie lors des phases de diagnostic sur véhicule.
• Mode alimentation | Showroom : Assure la conservation de l’état de charge de la batterie et subvient au besoin en énergie lors
de l’utilisation des accessoires électriques d’un véhicule de démonstration.
• Mode Testeur : permet de vérier l’état de la batterie, d’évaluer le démarrage du véhicule ainsi que le fonctionnement de l’alternateur.
Votre GYSFLASH est SMART !
Les fonctionnalités d’origine de votre GYSFLASH peuvent être étendues en ajoutant des modes et des prols de charge spéciques
grâce à sa communication USB et à la conguration personnalisée (voir page 11).
Votre GYSFLASH ore également la possibilité de récupérer les données de plusieurs centaines de charges sur votre clé USB
pour les analyser sur tableur.
Des modules additionnels (type imprimante, communication Ethernet…) peuvent également se connecter au chargeur grâce à sa
prise module dédiée.
Fonction « Auto-Detect » :
Le Gysash est équipé de la fonction « Auto-Detect » qui permet de lancer automatiquement une
charge lorsqu’un contact est détecté en sortie du Gysash. (Pour activer/désactiver cette fonction
voir page 12)
Fonction « Auto-Restart » :
La fonction « Auto-Restart » ore la possibilité de relancer automatiquement l’alimentation en cas de coupure de courant.
(Pour activer/désactiver cette fonction voir page 11).
Auto - Detect
12.
5
Charge
v
MISE EN ROUTE
1. Brancher le chargeur sur la prise secteur.
2. Positionner l’interrupteur, situé à l’arrière du chargeur, sur « ON »
3. Sélectionner le mode souhaité (Charge -> Supply -> Test).
Pour accéder au Menu Conguration, appuyez sur le bouton .
NAVIGATION DANS LES MENUS ET RÉGLAGE DES MODES
1 Utiliser les èches pour se déplacer dans le menu ou pour modier la valeur ou l’état d’un paramètre.
Appuyer sur le bouton SELECT pour entrer dans un sous-menu, sélectionner un paramètre ou valider la
2
valeur d’un paramètre.
3 Appuyer sur le bouton RETOUR pour retourner dans le menu (ou sous-menu) précédent.
MODE CHARGE
1
3
5
Charge
- CHARGE
Pb
plomb
12 V
1 - Mode
2
2 - Groupe de charge
3 - Courbe de charge
4 - Tension nominale de la batterie
4
5 - Capacité nominale de la batterie
4
(disponible selon les courbes)
Page 5

Manuel d’utilisation
Notice originale
Type de charge Prol Tension de charge
normal
AGM
Pb-CHARGE
Li-CHARGE LFP/LiFePO4
• Démarrage de la charge :
liquide
Easy
2.40 V/cellule Batteries au plomb de types Gel, MF, EFB, SLA…
2.45 V/cellule
2.45 V/cellule Batteries au plomb ouvertes de type liquide avec bouchon.
2.40 V/cellule
3.60 V/cellule Batteries au Lithium de type LFP (Lithium Fer Phosphate).
GYSFLASH 107.24 CNT FV
La plupart des batteries au plomb de type AGM y compris START and STOP.
Toutefois certaines batteries AGM nécessitent une charge à tension plus faible
(Prol normal). Vérier le manuel de la batterie en cas de doute.
Prol dédié aux batteries au plomb qui adapte automatiquement le courant de
charge en fonction de la taille de la batterie.
Toutefois pour une optimisation maximale de la charge, il est recommandé, lorsque
cela est possible, d’utiliser les courbes de charge normale, AGM ou liquide.
FR
Pb - CHARGE
13.5
V
113
01:27:35 105.8
1- Courbe de charge appliquée
2- Tension de la batterie
3- Courant délivré par le chargeur
4- Temps écoulé
5- Ampère-heures injectés
6- Avancement du cycle de charge
A
Ah
8
5
1
2
4
v
Démarrage manuel
Pour lancer la charge, appuyer sur le bouton START/STOP.
1
Démarrage automatique
Si la fonction AUTO-DETECT est active, la charge
démarrera automatiquement au bout de 3 secondes
en présence d’une batterie.
Durant la charge, votre GYSFLASH indique le pourcentage d’avancement du
2
cycle de charge, la tension, le courant, les ampères-heures injectés ainsi que
le temps écoulé.
Appuyer sur le bouton START/STOP pour arrêter la
3
charge.
Précautions :
Lors d’une charge sur véhicule, il est conseillé de réduire au minimum la consommation électrique du véhicule (éteindre les feux,
couper le contact, fermer les portes, etc) an de ne pas perturber le processus de charge.
Vérier le niveau de l’électrolyte pour les batteries ouvertes. Compléter les niveaux si nécessaire avant la charge.
• Courbe de charge PLOMB :
Auto - Detect
12.
Charge
1 2 3 4 5 6 7
U
3
5
6
I
Analyse Récupération Test Désulfatation Charge Absorption
0%
Étape 1 : Analyse
Analyse de l’état de la batterie (niveau de charge,
inversion de polarité, mauvaise batterie connectée…)
Étape 2 : Récupération
Algorithme de récupération des éléments endommagés
suite à une décharge profonde.
Étape 3 : Test
Test de batterie sulfatée.
Étape 4 : Désulfatation
Algorithme de désulfatation de la batterie.
Étape 5 : Charge
Charge rapide à courant maximum permettant d’atteindre
80% du niveau de charge.
10% 20%
80%
Étape 6 : Absorption
Charge à tension constante pour amener le niveau de charge
à 100%.
Étape 7 : Refresh (uniquement pour le prol liquide)
Le chargeur injecte un courant supplémentaire an de créer
du gaz qui va permettre de mélanger l’électrolyte et ainsi
reconditionner les cellules de la batterie. Durant cette phase, la
batterie peut perdre un peu d’eau.
Étape 8 : Maintien de charge
Maintien du niveau de charge de la batterie à son maximum.
Refresh
(si option active)
95% 100%
Maintien de
charge
5
Page 6

Manuel d’utilisation
0%
2% 85% 95% 99% 100%
120 Ah
Courbe de charge LITHIUM LFP :
Notice originale
GYSFLASH 107.24 CNT FV
1 2 3 4 5 6 7
U
I
Analyse UVP Wake up Récupération Charge Test Complément
Étape 1 : Analyse
Analyse de l’état de la batterie (niveau de charge, inversion de
polarité, mauvaise batterie connectée…)
Étape 2 : UVP Wake up
Réactive les batteries en protection UVP (Under Voltage
Protection)
Étape 3 : Récupération
Algorithme de récupération suite à une décharge profonde.
Étape 4 : Charge
Charge rapide à courant maximum permettant d’atteindre 90%
du niveau de charge.
Étape 5 : Absorption
Charge à tension constante pour amener le niveau de charge à 95%.
Absorption
Étape 6 : Test
Test de conservation de charge.
Étape 7 : Complément
Charge à courant réduit permettant d’atteindre 100% du
niveau de charge.
Étape 8 : Égalisation / équilibrage
Équilibrage des cellules de la batterie
Étape 9 : Maintien de charge
Maintien du niveau de charge de la batterie à son maximum.
8
Equalising Battery System
Egalisation /
équilibrage
9
Maintien de charge
MODES ALIMENTATION : SHOWROOM / DIAG+
1
3
5
• Démarrage de l’alimentation :
Démarrage manuel
Pour lancer le mode supply, appuyer sur le bouton
START/STOP.
Démarrage automatique
1
Si la fonction AUTO-DETECT est active, l’alimentation
démarrera automatiquement au bout de 3 secondes en
présence d’une batterie ou d’un contact en sortie de
Gysash (exemple : véhicule sans batterie).
Durant le mode supply, le Gysash indique la tension, le courant, le temps
2
écoulé et les ampère-heures injectés.
Appuyer sur le bouton START/STOP pour arrêter la
3
charge.
Précautions :
Au démarrage du mode, un courant aché supérieur à 10 A signie que votre batterie est déchargée. Votre GYSFLASH va alors délivrer un courant de recharge. Vérier qu’il n’y a pas de consommateur électrique sur le véhicule. Attendre que l’intensité passe sous
les 10 A avant de lancer toute action sur le véhicule (utilisation des accessoires électriques du véhicule, opération de diagnostic, etc).
Supply
SHOWROOM
12 V
14.2
V
1- Mode
2
2- Cycle Supply
3- Tension nominale (disponible selon le mode)
4- Tension d’alimentation
4
5- Courant d’alimentation
SHOWROOM
14.2
01:27:35 105.8
1- Cycle Supply appliqué
2- Tension de la batterie
3- Courant délivré par le Gysash
4- Temps écoulé
5- Ampère-heures injectés
6- Avancement du cycle de charge
fonction charge intégrée est active)
Auto - Detect
2.
5
Supply
1
2
4
v
V
113
Ah
A
3
5
6
(si la
6
Page 7

Manuel d’utilisation
Notice originale
Fonctionnalités des modes alimentation :
Mode
SHOWROOM
Fonction
« sans batterie »
Fonction
« Charge intégrée »
Protection de
sous-tension anormale
GYSFLASH 107.24 CNT FV
Ajustement de la tension à réguler
Modèles 12 V
Modèles 24 V
Modèles 48 V
Modèles 12 V 12.7 V - 14.8 V
6.3 V - 7.2 V
12.7 V - 14.4 V
25.4 V - 28.8 V
38.1 V - 43.2 V
50.8 V - 57.6 V
FR
DIAG+
• Fonction « sans batterie » (non recommandée) :
Cette fonction permet d’utiliser le mode alimentation SHOWROOM en l’absence de batterie.
Pour cela, appuyer 3 secondes sur le bouton START/STOP. L’indication « Mode sans batterie » s’ache pendant 3 secondes avant de forcer l’alimentation.
Il est fortement déconseillé d’utiliser la fonction « sans batterie » si une batterie est présente.
Cette fonction désactive la fonction « Charge intégrée », ainsi que certaines protections comme la protection
de sous-tension anormale ou la détection de débranchement.
Dans cette conguration, une inversion de polarité peut être néfaste pour l’électronique du véhicule.
• Fonction « Charge intégrée » :
Le mode SHOWROOM (hors fonction « sans batterie ») intègre un algorithme de charge automatique adapté à tous les types de
batteries (plomb et lithium), an de garantir un niveau de charge optimal pour les véhicules de démonstration. Cette fonction est
parfaitement compatible avec la présence de consommateurs sur la batterie.
1 2 3 4
Modèles 24 V
Modèles 48 V
6
14.4 V - 17.2 V
25.4 V - 29.6 V
38.1 V - 44.4 V
50.8 V - 59.2 V
SHOWROOM
mode sans batterie
5
U
I
Analyse Charge Complément
Étape 1 : Analyse
Analyse de l’état de la batterie (niveau de charge, inversion
de polarité, mauvaise batterie connectée, etc).
Étape 2 : Charge
Charge rapide à courant maximum jusqu’à atteindre U1
(ex : 13.8 V en )
Étape 3 : Absorption
Charge sous tension constante U1 (ex : 13.8 V en ).
Durée maxi 1h.
Égalisation /
Equilibrage
Étape 4 : Complément
Augmentation progressive de la tension jusqu’à U2
(ex : 14.4 V en ).
Étape 5 : Égalisation / équilibrage
Maintien de la tension U2 (ex : 14.4V en ).
Durée maxi 2h.
Étape 6 : Mode alimentation
Application de la tension à réguler.
Durée maxi 2h.
Mode alimentationAbsorption
7
Page 8

Manuel d’utilisation
Notice originale
• Protection de sous-tension anormale :
Cette protection permet de prévenir des risques de court-circuit ou de batterie trop endommagée. Le chargeur stoppera automatiquement si la tension est anormalement faible durant plus de 10 minutes.
MODE TESTEUR
Navigation générale :
GYSFLASH 107.24 CNT FV
1 Utiliser les èches pour sélectionner le test à réaliser
2 Appuyer sur le bouton START/STOP pour démarrer le test
• Test TENSION :
Ce mode permet de visualiser la tension aux bornes des pinces de charge et d’utiliser ainsi
votre GYSFLASH comme un voltmètre, an de mesurer la tension de la batterie.
• Test DÉMARRAGE :
Ce mode a pour but d’évaluer l’état du système de démarrage d’un véhicule (démarreur + batterie) lors de la mise en route du
moteur. Ce test doit se faire batterie connectée au véhicule.
Utiliser les èches pour sélectionner la tension nominale de la batterie du
1
véhicule
2 Appuyer sur le bouton SELECT pour valider
3 Brancher les pinces sur la batterie du véhicule
Test
Test tension
Test demarrage
Test alternateur
Voltage Test
12.5
Test
Test tension
Test demarrage
Test alternateur
v
4 Démarrer le moteur en tournant la clé de contact
Le chargeur détecte automatiquement la tentative de démarrage du moteur et lance un
5
algorithme de calcul pour déterminer l’état du système de démarrage.
Test demarrage
Résultat de test : Le chargeur indique la valeur minimale de la tension de la batterie perçue
lors de la phase de démarrage du moteur, ainsi que l’état du système de démarrage sous forme
de jauge.
• Test ALTERNATEUR :
Ce mode sert à déterminer l’état de l’alternateur du véhicule. Ce test se réalise sur véhicule avec moteur tournant.
Utiliser les èches pour sélectionner la tension nominale de la batterie du
1
véhicule
2 Appuyer sur le bouton SELECT pour valider
Résultat de test : Le chargeur indique la valeur de la tension fournie par l’alternateur, ainsi que
l’état de l’alternateur sous forme de jauge.
Umin
Test tension
Test demarrage
Test alternateur
Test alternateur
12.5
Test
13.5
v
v
8
Page 9

Manuel d’utilisation
Nederlands
PROTECTIONS
Notice originale
GYSFLASH 107.24 CNT FV
Cet appareil est protégé contre les courts-circuits et inversions de polarité. Il dispose d’un système antiétincelle qui évite toutes
étincelles lors du branchement du chargeur sur la batterie. Sans tension aux pinces, il ne délivre pas de courant par sécurité. Ce
chargeur est protégé contre les erreurs de manipulation par un fusible interne.
MENU CONFIGURATION
Le menu conguration est accessible en appuyant sur le bouton .
Sélection langue
Langue
English
Francais
Sélection de la langue de l’écran, 19 langues sont disponibles.
Deutsch
FR
Date / Heure
Date/Heure
19/10/2022
13:30
Son
Traçabilité
Possibilité de dénir la date et l’heure de l’appareil.
Possibilité d’activer ou de désactiver le son du Gysash et du module externe lumineux.
Possibilité de visualiser ou de récupérer l’historique des 1000 dernières données de
charge.
Explorer les données
Exporter les données (.csv)
Possibilité de visualiser à l’écran les données recueillies au cours des 1000 dernières charges.
Possibilité d’exporter les données recueillies des 1000 dernières charges vers une
clé USB au format .CSV.
9
Page 10

Manuel d’utilisation
Calibration des câbles
Notice originale
1 Brancher la clé USB sur le Gysash
2 Entrer dans le sous-menu «Exporter DONNÉES».
3 Conrmer l’enregistrement des données de charge.
Le Gysash va alors copier les données de charge sur la clé USB sous forme de
4
chiers « .CSV ».
GYSFLASH 107.24 CNT FV
Calibration cables
Automatique
Manuel
Calibration automatique (recommandée)
Calibration cables
S’assurer que les parties métalliques des mâchoires sur lesquelles sont xés les câbles sont
bien en contact l’une avec l’autre.
L’étalonnage des câbles peut se faire soit en automatique (recommandée), soit en manuel.
Cette procédure permet de calibrer les câbles de charge de l’appareil, an que le Gysash
compense de manière optimale la chute de tension due aux câbles. Il est fortement recommandé de réaliser cette procédure à chaque remplacement de câbles ou si ces derniers
sont usés.
Pour eectuer le calibrage, il sut de court-circuiter les pinces de charge, puis de valider.
L’appareil calcule automatiquement la résistance du câble.
OK NOK NOK
Calibration manuelle (non recommandée)
Calibration cables
11.5 m
10
La résistance du câble peut être dénie manuellement.
Attention : cette valeur doit inclure la résistance interne du Gysash.
Page 11

Manuel d’utilisation
Paramètres avancés
Notice originale
GYSFLASH 107.24 CNT FV
Ce menu permet d’accéder aux fonctionnalités avancées de votre Gysash.
+ Option
+ Options
- Detect
Auto
- Restart
Auto
Activé Désactivé
Portabilité
Ce menu permet de dénir l’activation ou non des options Auto-Detect et
Auto-Restart.
Auto-detect option: Cette fonction permet de lancer automatiquement une
charge lorsqu’un contact est détecté en sortie du Gysash. Si l’option
«Auto-detect» est désactivée, la détection d’un contact en sortie ne se fera
qu’en mode «Auto-select» et les autre modes ne pourront être lancés que par
un START manuel.
Auto-restart option: Cette fonction permet de relancer automatiquement le
Gysash en cas de coupure de courant.
Ce menu permet d’importer, exporter ou initialiser la conguration du Gysash.
Votre GYSFLASH est équipé d’une connectivité USB qui permet d’étendre ses
fonctionnalités en créant des congurations personnalisées sur ordinateur qui
peuvent ensuite être téléchargées dans l’appareil par le biais d’une simple clé
USB. La conguration personnalisée vous permet d’ajouter, supprimer ou modier des modes et des prols de charge, an que votre chargeur s’adapte au
mieux à votre besoin.
FR
Restaurer CONFIG
Cette action permet de restaurer la conguration d’origine (usine) du Gysash suite à des modications
manuelles de modes ou de paramètres.
1 Entrer dans le sous-menu «Restauration CONFIG».
2 Conrmer la restauration de la conguration.
3 Le Gysash va alors restaurer sa conguration d’origine (usine)
Importer CONFIG (.gfc)
Cette action permet de télécharger une nouvelle conguration usine dans le Gysash.
La conguration en cours est alors écrasée.
Au préalable, s’assurer que le chier «.gfc» correspondant à la nouvelle conguration est bien pré-
1
sent sur la clé USB. Ce chier ne doit pas se situer dans un dossier ou sous-dossier de la clé USB.
2 Brancher la clé USB sur le Gysash.
3 Entrer dans le sous-menu «Importer CONFIG».
4 Sélectionner le chier à télécharger.
5 Conrmer le téléchargement du chier.
6 Le Gysash va alors télécharger la nouvelle conguration.
Exporter CONFIG (.gfc)
Cette action permet de télécharger la conguration en cours du Gysash sur une clé USB.
1 Brancher la clé USB sur le Gysash.
2 Entrer dans le sous-menu «Exporter CONFIG».
3 Conrmer la sauvegarde de la conguration.
4 Le Gysash va alors enregistrer sa conguration actuelle sur la clé USB.
11
Page 12

Manuel d’utilisation
Notice originale
Conguration personnalisée
Liste des modes et prols disponibles à la personnalisation :
MODE CHARGE
Types de
charge
Pb-
CHARGE
Li-CHARGE
TRACTION
Prols de
charge
normal
AGM
liquide
Easy
boost
recovery+
Ca/Ca recov
LFP/LiFePO4
Li-ion std
LFP cell+
Li-ion cell+
liquide
gel
Tension de
charge
2.40 V/cellule Prol de charge pour batteries au plomb de types Gel, MF, EFB, SLA…
Prol de charge pour la plupart des batteries au plomb de type AGM y compris START and
2.45 V/cellule
2.45 V/cellule Prol de charge pour batteries au plomb ouvertes de type liquide avec bouchon.
2.40 V/cellule
2.42 V/cellule
2.40 - 2.50 V/
cellule
2.45 - 2.66
V/ cellule
3.60 V/cellule Prol de charge pour batteries au Lithium de type LFP (Lithium Fer Phosphate)
4.20 V/cellule
3.60 V/cellule
4.20 V/cellule
2.42 V/cellule Prol de charge dédié aux batteries de traction de type plomb ouvert pour chariot élévateur.
2.35 V/cellule Prol de charge dédié aux batteries de traction de type gel pour chariot élévateur.
STOP.
Toutefois certaines batteries AGM nécessitent une charge à tension plus faible (Prol normal). Vérier le manuel de la batterie en cas de doute.
Prol de charge dédié aux batteries au plomb qui adapte automatiquement le courant de
charge en fonction de la taille de la batterie.
Toutefois pour une optimisation maximale de la charge, il est recommandé, lorsque cela est
possible, d’utiliser les courbes de charge normale, AGM ou liquide
Prol de charge à courant maximum pour batterie au plomb. Ce prol permet une charge
ultra rapide.
Attention : Ce type de charge doit rester occasionnel an de ne pas réduire la durée
de vie de la batterie.
Prol de charge destiné à la récupération de batteries au plomb très endommagées. La
récupération doit impérativement se faire batterie hors véhicule pour ne pas abimer l’électronique du véhicule et dans un endroit bien aéré.
Attention : Tension de récupération pouvant atteindre jusqu’ à 4.0 V/cellule.
Prol de charge destiné à la récupération de batterie au calcium. La récupération doit
impérativement se faire batterie hors véhicule pour ne pas abimer l’électronique du véhicule
et dans un endroit bien aéré.
Attention : Tension de récupération pouvant atteindre jusqu’ à 2.75 V/cellule.
Prol de charge pour batteries Lithium-ion standards à base de Manganèse ou Cobalt
(NMC, LCO, LMO, MCO…)
Prol de charge dédié aux cellules Lithium-ion de type LFP (Lithium Fer Phosphate) avec
sélection du nombre de cellules en série à charger.
Prol de charge dédié aux cellules Lithium-ion standards à base de Manganèse ou Cobalt
(NMC, LCO, LMO, MCO…) avec sélection du nombre cellules en série à charger.
GYSFLASH 107.24 CNT FV
MODES ALIMENTATION
SHOWROOM
DIAG+
CHANGE BAT.
MODE DÉMARRAGE
POWER SUPPLY
Li-SUPPLY/LFP
Li-SUPPLY/Li-ion
Assure la conservation de l’état de charge de la batterie et subvient au besoin en énergie lors de l’utilisation des
accessoires électriques d’un véhicule de démonstration.
Subvient aux besoins en énergie lors des phases de diagnostic sur véhicule.
Permet de conserver l’alimentation électrique du véhicule lors d’un remplacement de batterie, an de préserver la
mémoire des calculateurs du véhicule.
Attention : une inversion de polarité en cours d’utilisation peut être néfaste pour le chargeur et l’électronique du véhicule.
Aide au démarrage des véhicules thermiques. Permet de précharger la batterie et d’envoyer le courant maximum
du chargeur durant la phase de démarrage du moteur (Le chargeur s’interrompt automatiquement au bout de 30
minutes).
Permet de se servir du chargeur comme d’une alimentation stabilisée réglable de forte puissance. La tension à
réguler et la limitation de courant sont totalement ajustables.
Attention : une inversion de polarité en cours d’utilisation peut être néfaste pour le chargeur et l’électronique du véhicule.
Mode destiné à alimenter des cellules lithium-ion de type LFP (Lithium Fer Phosphate) avec sélection du nombre
de cellules en série, ajustement de la tension et du courant à appliquer.
Mode destiné à alimenter des cellules lithium-ion standards à base de Manganèse ou Cobalt (NMC, LCO, LMO,
MCO…) avec sélection du nombre de cellules en série, ajustement de la tension et du courant à appliquer.
GYS vous propose des congurations prédénies adaptées à chaque application.
Ces congurations sont disponibles sur la page du produit du site GYS :
12
Page 13

Manuel d’utilisation
Notice originale
GYSFLASH 107.24 CNT FV
Fichier de conguration
(gys.fr) Applications
1_gys_original.gfc Conguration initiale du chargeur
2_car_extended.gfc Fonctionnalités étendues pour le garagiste
3_showroom_only.gfc
4_pro_lithium.gfc Professionnel de la batterie au lithium
5_traction.gfc
6_full_version.gfc Version complète
Uniquement sur les modèles 24 V et 48 V.
*
DIAG+ (Pro) - Sélection 16 V possible.
Version simpliée pour concession et véhicule de
démonstration
Chariot élévateur, transpalette électrique, gerbeur…
Multi-chargeurs
Multi - Charger
OFF
Master
Master
Master
+ 1 Slave
+ 2 Slaves
+ 3 Slaves
Li-SUPPLY/LFP
DI-
VERS
Li-SUPPLY/Li-ion
MODE CHARGE MODES ALIMENTATION
Pb-CHARGE Li-CHARGE
normal
AGM
liquide
Easy
Boost
Recovery+
Ca / Ca recov
LFP/LiFePO4
Li-ion std
LFP cell+
TRAC-
TION
Li-ion cell+
liquide
SHOWROOM
gel
DIAG+
CHANGE BAT.
*
MODE DÉMARRAGE
POWER SUPPLY
Ce menu permet de dénir la conguration en mode Multi-chargeur (pour plus
de détails, voir notice du SHM -
025981
).
Sélectionner «OFF» pour une utilisation standard avec un seul Gysash.
FR
MODE TESTEUR
Information
Information
GYSFLASH 107.24
HW08.00
- SW01.00
22.11.069909.000000
Ce menu ache les informations relatives à votre Gysash :
- Nom de l’appareil
- Versions du matériel/logiciel
- Numéro de série
13
Page 14

Manuel d’utilisation
Notice originale
ARBORESCENCE DU MENU DE CONFIGURATION
Sélection langue
Sélection date/heure
Son On / O
GYSFLASH 107.24 CNT FV
Traçabilité
Calibration câble
Calibration cables
Automatique
Manuel
Paramètres avancés
Informations
Automatique ou Manuel
Explorer données
Exporter données
+ Options
Portabilité
Multi-chargeur
Restaurer CONFIG
Importer CONFIG
Exporter CONFIG
CONNECTIVITÉ MODULES
Votre GYSFLASH est équipé d’une prise type DB9 permettant de connecter diérents modules additionnels proposés par GYS
comme un module imprimante, Ethernet ou autres an d’étendre encore les possibilités de votre chargeur.
LISTE DES CODES ERREURS
Code erreur Signication Remèdes
Err01: Int_1 - Err02: Int_2
Err23: Int_3 - Err24: Int_4
Err03: Fuse_NOK Fusible de sortie HS Faire remplacer le fusible par une personne qualiée
Err04: T>Tmax Surchaue anormale Contacter le revendeur
Err05: (+) (-)
Err06: U>__V Surtension détectée aux bornes des pinces Débrancher les pinces
Err07: No_bat Batterie non connectée Vérier que la batterie est correctement connectée au chargeur
Err08: U<__V Tension de la batterie anormalement faible
Err09: U>__V Tension de la batterie anormalement élevée
Err10: U<2.0V Court-circuit détecté durant la charge Vérier le montage
Err11: Time_Out
Problème électronique
Chargeur défectueux
Inversion de polarité sur les pinces
Déclenchement de la limite de temps
Charge anormalement longue Batterie à remplacer
Contacter le revendeur
Brancher la pince rouge au (+) et la pince noire au (-) de la
batterie.
Vérier que le mode sélectionné est compatible avec la tension
de la batterie (ex. : batterie 6 V sur mode 24 V)
Procéder à la charge de la batterie via le mode CHARGE
Batterie à remplacer
Vérier que le mode sélectionné est compatible avec la tension
de la batterie (ex. : batterie 24 V sur mode 12 V)
Présence d’un consommateur sur la batterie perturbant la
charge
14
Page 15

Manuel d’utilisation
Notice originale
GYSFLASH 107.24 CNT FV
Err12: Q>___Ah
Err13: U<__V
Err14: Bat_UVP
Err15: U<__V Batterie trop faible
Err16: Bat_NOK Batterie HS Batterie à remplacer
Err17: Recov_NOK Échec de la récupération de la batterie Batterie à remplacer
Err18: U>0V
Err19: Cable_NOK Échec de la calibration des câbles
Err20: U<__V
Err21: U<__V ou Err22: U<__V
?
?
Err27: Cable_NOK
Err28: COM_NOK
Déclenchement de la protection de surcharge
Tension de la batterie anormalement faible
lors de la vérication de charge
Tension de la batterie anormalement faible
lors de l’UVP Wake up
Présence d’une tension aux bornes des
pinces lors de la calibration des câbles
Déclenchement de la protection de
sous-tension anormale
Tension de la batterie anormalement faible
lors du maintien en charge
Clé non-détectée Vérier que la clé USB est correctement branchée au chargeur
Aucun chier de conguration (.gfc) n’est
présent sur la clé
Fichier corrompu
Mode Multi-chargeurs :
Echec de la mise en parallèle des câbles
de charge
Mode Multi-chargeurs :
Echec de communication entre les chargeurs
Présence d’un consommateur sur la batterie perturbant la
charge
Batterie à remplacer
Batterie à remplacer
Présence d’un court-circuit, vérier le montage
Batterie à remplacer
Vérier que le mode sélectionné est compatible avec la tension
de la batterie (ex. : batterie 24 V sur mode 12 V)
Batterie à remplacer
Vérier le montage
Câbles de charge à remplacer
Mauvaise connexion, vérier le montage
Présence d’un court-circuit, vérier le montage
Batterie à remplacer
Présence d’un consommateur sur la batterie
Vérier que vos chiers sont bien présents à la racine de la clé
USB. Ne pas les mettre dans un dossier ou sous-dossier.
Le chier que vous souhaitez télécharger est corrompu. Supprimer et réinstaller le chier sur la clé.
Câbles de charge à remplacer.
Mauvaise connexion, vérier le montage (PHM).
Pour rebasculer en fonctionnement avec un seul chargeur,
sélectionner OFF pour la fonction Multi-chargeurs.
Pas de communication, vérier le montage du SHM et la conguration des chargeurs SLAVE X.
Pour rebasculer en fonctionnement avec un seul chargeur,
sélectionner OFF pour la fonction Multi-chargeurs.
FR
GARANTIE
La garantie couvre tous défauts ou vices de fabrication pendant 2 ans, à compter de la date d’achat (pièces et main d’oeuvre).
La garantie ne couvre pas :
• Toutes autres avaries dues au transport.
• L’usure normale des pièces (Ex. : câbles, pinces, etc.).
• Les incidents dus à un mauvais usage (erreur d’alimentation, chute, démontage).
• Les pannes liées à l’environnement (pollution, rouille, poussière).
En cas de panne, retourner l’appareil à votre distributeur, en y joignant :
- un justicatif d’achat daté (ticket de sortie de caisse, facture….)
- une note explicative de la panne.
15
Page 16
User manual
SAFETY INSTRUCTIONS
This manual contains safety and operating instructions. Please
read it carefully before using the device for the rst time and keep it
for future reference. This machine should only be used for charging
or power supply operations specied within the limits indicated
on the machine and in the instruction manual. The operator must
observe the safety precautions. In case of improper or unsafe use,
the manufacturer cannot be held liable.
The device is destined to be used indoors. Must not be exposed to
the rain.
This unit can be used by children aged 8 or over and by people
with reduced physical, sensory or mental capabilities or lack of
experience or knowledge, if they are properly monitored or if
instructions for using the equipment have safely been read and
potential risks understood. Children must not play with the product.
Cleaning and maintenance should not be performed by an
unsupervised child.
Translation of the original
instructions
GYSFLASH 107.24 CNT FV
Do not use to charge domestic batteries or non rechargeable
batteries.
Do not use the charger if the mains cable or plug is damaged.
Do not use the device if the charging cable appears to be damaged
or assembled incorrectly in order to avoid any risk of short circuiting
the battery.
Never use on a frozen or damaged battery.
Do not cover the device.
Do not place the unit near a heat source or expose to prolonged
high temperatures (above 60°C).
Do not obstruct the cooling vents.
The operating mode of the automatic charger and the restrictions
applicable to its use are explained later in this manual.
Fire and explosion risks!
• A battery can emit explosive gases when on charge.
• During the charge, the battery must be placed in a well ventilated
area.
16
• Avoid ames and sparks.
• Protect the electrical contact surfaces of the battery against short
circuits.
Do not leave a charging battery unattended for a long time.
Risk of acid dispersion!
• Wear protective goggles and gloves.
Page 17

User manual
• In case of contact with the eyes or the skin, rinse immediately with
Connection / disconnection :
• Disconnect the power supply before plugging or unplugging the
• Always ensure the Red clamp is connected to the «+» battery
• After charging, disconnect the charger from the mains, then
Connection :
• The charger must be connected to an earthed power supply.
Translation of the original
instructions
GYSFLASH 107.24 CNT FV
water and see a medical doctor as soon as possible.
connections to/from the battery.
terminal rst. If it is necessary to connect the black clamp to the
vehicle chassis, make sure it is a safe distance from the battery
and the fuel line. The charger must be connected to the mains.
disconnect the negative clamp from the car body and then
disconnect the positive clamp from the battery, in this order.
EN
• The connection to the power supply must be carried out in
compliance with national standards.
Maintenance :
• If the power supply cable is damaged, the replacement cable
must be obtained from the manufacturer or its service team.
• Maintenance should only be carried out by a qualied person.
• Warning ! Always disconnect from the mains before performing
maintenance on the device.
• The device does not require any specic maintenance.
• If the internal fuse is melted, it must be replaced by the manufacturer
(GYS dedicated sales service) or by an equally qualied person
to prevent any accidents.
• Do not use solvents or any agressive cleaning products.
Regulations :
• The Machine is compliant with European directives.
• The declaration of conformity is available on our website.
• EAEC Conformity marking (Eurasian Economic Community).
• Equipment in compliance with British requirements. The British
Declaration of Conformity is available on our website (see home
page).
• Equipment in conformity with Moroccan standards.
• The declaration Cم (CMIM) of conformity is available on our
website (see cover page).
Waste management:
• This product should be disposed of at an appropriate recycling
facility. Do not throw away in a household bin.
17
Page 18

User manual
100 Ah
Translation of the original
instructions
GYSFLASH 107.24 CNT FV
GENERAL DESCRIPTION
Your GYSFLASH is a professional multifunctional charger with Inverter technology. Designed to support the batteries of demonstration vehicles or during the diagnostic work, it also guarantees an ideal quality of charge for the maintenance of the most advanced
models. This charger can be tted with cables up to 8 m long. Changing the charging cables requires recalibration (see page 24).
It is considered a xed device not a mobile product.
Your GYSFLASH is supplied with a software that includes 4 dierent modes to choose from:
• Charging mode: dedicated to the charging of lead-acid (sealed, liquid, AGM...) or lithium (LiFePO4) starter batteries.
• Power mode | Diag+ : Supplies the energy required during diagnostic work on the vehicle.
• Power mode | Showroom : Maintains the charge of the battery and supplies the energy required when using the consumers of a
demonstration vehicle.
• Tester Mode: Used to check the state of the battery and test the vehicle starting system and alternator.
Your GYSFLASH is SMART!
The original features of your GYSFLASH can be extended by adding specic charging modes and proles using the USB port and
custom settings (see page 26).
Your GYSFLASH also oers the possibility to recover data from several hundred charging operations on your USB stick for analysis
on a spreadsheet.
Additional modules (such as printer, Ethernet port, etc.) can also be connected to the charger via its dedicated module socket.
Auto - Detect
«Auto-Detect» function:
The Gysash is equipped with the «Auto-Detect» function, which automatically starts a charge when
a contact is detected at the output of the Gysash (to activate/deactivate this function, see page 25).
12.
Charge
5
v
«Auto-Restart» function:
The «Auto-Restart» function automatically resumes the power supply in the event of a power cut.
(To activate/deactivate this function, see page 25).
START UP
1. Connect the charger to the mains.
2. Set the switch, located at the back of the charger, to «ON».
3. Select the desired mode (Charge -> Supply -> Test).
To access the Conguration Menu, press the button.
MENU NAVIGATION AND MODE SETTINGS
1 Use the arrows to move around the menu or to change the value or condition of a parameter.
2 Press the SELECT button to enter a sub-menu, select a parameter, or conrm a parameter value.
3 Press the back button to return to the previous menu (or sub-menu).
CHARGE MODE
18
1
3
5
Charge
- CHARGE
Pb
- acid
lead
12 V
1 - Mode
2
2 - Charging group
3 - Charging curve
4 - Nominal battery voltage
4
5 - Nominal battery capacity (curve permitting)
Page 19

User manual
Charge type: Prol Charging voltage
normal
AGM
Pb-CHARGE
Li-CHARGE LFP/LiFePO4
Starting the charge:
water
Easy
Translation of the original
instructions
2.40 V/cell Lead batteries of the types Gel, MF, EFB, SLA...
2.45 V/cell
2.45 V/cell Open liquid-type lead-acid batteries with cap.
2.40 V/cell
3.60 V/cell Lithium batteries type LFP (Lithium Ferro Phosphate)
GYSFLASH 107.24 CNT FV
Most AGM lead-acid batteries including START and STOP.
However, some AGM batteries require a lower voltage charge (Normal prole).
Check the battery manual if in doubt.
Prole dedicated to lead batteries that automatically adapts the charging current
according to the size of the battery.
However, for maximum charge optimization, it is recommended, when possible,
to use normal, AGM or liquid charge curves.
EN
Pb - CHARGE
13.5
V
113
01:27:35 105.8
1- Applied charging curve
2- Battery voltage
3- Current supplied by the charger
4- Elapsed time
5- Amp-hours delivered
6- Charge cycle progress
A
Ah
3
5
6
8
5
1
2
4
v
Manual start
To start the charge, press the START/STOP button.
1
Automatic start-up
If the AUTO-DETECT function is active, charging will start
automatically after 3 seconds if a battery is present.
During charging, your GYSFLASH will indicate the percentage of progress of
2
the charging cycle, voltage, current, amp-hours delivered, and time elapsed.
3 Press the START/STOP button to stop the charge.
Precautions:
When charging a vehicle, it is advisable to reduce the vehicle’s power consumption to a minimum (turn o the lights, switch o the
ignition, close the doors, etc.) so as not to disrupt the charging process.
Precaution: Check the electrolyte level for open batteries. If necessary, adjust levels before charging.
• Lead-acid charging curve:
Auto - Detect
12.
Charge
1 2 3 4 5 6 7
U
I
Analysis Recovery Test Desulfation Charge Absorption
0%
Step 1 : Analysis
Analyses the state of the battery (charge level, polarity inversion, wrong battery…)
Step 2 : Recovery
Recovering damaged elements after deep and prolonged
discharge.
Step 3 : Test
Sulfated battery test
Step 4 : Desulfation
Battery desulfation algorithm.
Step 5 : Charge
Fast charge at maximum current to reach 80% charge level.
10% 20%
80%
Step 6: Absorption
Constant voltage charge to reach 100% charge level.
Step 7: Refresh (only for liquid prole)
The charger supplies an additional current to create gas that
will allow the electrolyte to be mixed and thus reconditioning the
battery cells. During this phase, the battery may produce some
water.
Step 8 : Maintenance/Floating charge
Maintains battery charge level at its maximum.
Refresh
(only for liquid prole)
95% 100%
Maintenance/-
Floating charge
19
Page 20

User manual
120 Ah
LFP Lithium charging curve:
Translation of the original
instructions
GYSFLASH 107.24 CNT FV
1 2 3 4 5 6 7
U
I
Analysis UVP Wake up Recovery Charge Test Supplement
0%
2% 85% 95% 99% 100%
Step 1 : Analysis
Analyses the state of the battery (charge level, polarity inversion,
wrong battery…)
Step 2: UVP Wake up
Reactivates batteries in UVP protection (Under Voltage Protection)
Step 3: Recovery
Recovery algorithm following a deep discharge.
Step 4 : Charge
Maximum current fast charge to reach an 90% charge level.
Step 5: Absorption
Constant voltage charge to reach a 95% charge level.
Absorption
Step 6 : Test
Charge conservation test.
Step 7 : Supplement
Reduce current charge to reach 100% charge level.
Step 8: Equalization / Balancing
Balancing the battery cells
Step 9: Maintenance/Floating charge
Maintain the battery charge level at its maximum.
8
Equalizing Battery System
Equalization /
Balancing
9
Maintenance/
Floating charge
POWER SUPPLY MODES: SHOWROOM / DIAG+
1
3
5
• Starting the power supply:
Manual start
To start the supply mode, press the START/STOP button.
1
Automatic start-up
If the AUTO-DETECT function is active, power supply will
start automatically after 3 seconds if a battery or contact is
present on the Gysash output (e.g.: vehicle without battery).
During supply mode, the Gysash indicates the voltage, current, elapsed
2
time and ampere-hours delivered.
3 Press the START/STOP button to stop the charge.
Precautions :
When starting the mode, a current displayed above 10 A means that your battery is discharged. The device will start charging automatically Check that there is no electrical consumer on the vehicle. Wait until the current supplied drops below 10 A before starting
any action on the vehicle (use of the vehicle’s electrical accessories, diagnostic operation, etc.).
Supply
SHOWROOM
12 V
14.2
V
1- Mode
2
2- Cycle Supply
3- Nominal voltage (mode permitting)
4- Supply voltage
4
5- Supply current
1
5
2
4
v
Auto - Detect
2.
Supply
EPS
14.2 V113
01:27:35 105.8
1- Cycle Supply applied
2- Battery voltage
3- Current delivered by the Gysash
4- Elapsed time
5- Amp-hours delivered
6- Charge cycle progress (if the
grated charge function is active)
A
Ah
inte-
3
5
6
20
Page 21

User manual
Features of the power modes:
Mode
«No Battery»
function
Translation of the original
instructions
«Integrated charging»
function
Abnormal undervoltage
protection
GYSFLASH 107.24 CNT FV
Voltage adjustment
12 V models
SHOWROOM
DIAG+
• «No battery» function (not recommended):
This function allows you to use the SHOWROOM power mode when there is no battery. To
do this, press the START/STOP button for 3 seconds. The «No battery mode» indication is
displayed for 3 seconds before forcing the power supply.
It is strongly recommended not to use the «no battery» function if a battery is present.
This function disables the «Integrated charging» function, as well as some of the protections such as abnormal undervoltage protection or disconnection detection.
In this conguration, reverse polarity can damage the vehicle electronics.
24 V models
12 V models 12.7 V - 14.8 V
24 V models
48 V models
48 V models
6.3 V - 7.2 V
12.7 V - 14.4 V
25.4 V - 28.8 V
38.1 V - 43.2 V
50.8 V - 57.6 V
14.4 V - 17.2 V
25.4 V - 29.6 V
38.1 V - 44.4 V
50.8 V - 59.2 V
SHOWROOM
battery mode
EN
• «Integrated charging» function:
The SHOWROOM mode (outside of the «no battery» function) incorporates an automatic charging algorithm adapted to all types
of batteries (lead and lithium), in order to guarantee an optimal charge level for demonstration vehicles. This function is perfectly
compatible with the presence of consumers on the battery.
1 2 3 4
6
5
U
I
Analyse Charge Complément
Step 1: Analysis
Analysis of the battery condition (charge level, inversion, etc.)
polarity, wrong battery connected, etc).
Step 2: Charging
Fast charging at maximum current until U1 is reached
(ex: 13.8 V to )
Step 3: Absorption
Charge under constant voltage U1 (ex: 13.8 V in ).
Maximum duration 1 hour.
Step 4: Complement
Gradual increase of the voltage up to U2
(ex: 14.4 V to ).
Step 5: Equalization / Balancing
Maintaining the voltage U2 (ex: 14.4V at ).
Maximum duration 2 hours.
Step 6: Power supply mode
Application of the selected voltage.
Égalisation /
Equilibrage
Maximum duration 2 hours.
Mode alimentationAbsorption
21
Page 22

User manual
• Abnormal undervoltage protection:
This protection prevents the risk linked to possible short circuits or battery being too damaged. The charger will automatically stop if
the voltage is abnormally low for more than 10 minutes.
TESTER MODE
General navigation :
Translation of the original
instructions
GYSFLASH 107.24 CNT FV
1 Use the arrows to select the test to be performed
2 Press the START/STOP button to start the test
• Voltage test:
This mode allows you to view the voltage at the terminals of the charging clamps and thus use
your GYSFLASH as a voltmeter, in order to measure the battery voltage.
• Start-up test:
The purpose of this mode is to evaluate the state of a vehicle starting system (starter + battery) when the engine is turned on. This
test must be done with the battery connected to the vehicle.
1 Use the arrows to select the nominal voltage of the vehicle battery
2 Press the SELECT button to conrm
3 Connect the clamps to the vehicle battery
Test
Voltage Test
Engine start
Alternator Test
Voltage Test
T
12.5
Test
Voltage Test
Engine start
Alternator Test
T
est
v
est
4 Start the engine by turning the ignition key
The charger automatically detects the engine start attempt and runs a calculation algorithm
5
to determine the state of the start system.
Engine start Test
Test result: The charger indicates the minimum value of the battery voltage perceived during
the engine start phase, as well as the status of the start system in the form of a gauge.
• Alternator test :
This mode is used to determine the condition of the alternator in the vehicle. This test is performed on a vehicle with the engine
running.
1 Use the arrows to select the nominal voltage of the vehicle battery
2 Press the SELECT button to conrm
Test result: The charger indicates the voltage provided by the vehicle alternator, as well the
alternator status in the form of a gauge.
Umin
Voltage Test
Engine start
Alternator Test
Alternator
12.5
Test
13.5
T
Test
v
v
est
22
Page 23

User manual
Nederlands
Translation of the original
instructions
GYSFLASH 107.24 CNT FV
PROTECTIONS
This device is protected against short circuits and polarity reversals. It has an anti-spark system that prevents sparks when connecting the charger to the battery. The device will not deliver current if there is no battery detected (no voltage in the clamps). This
charger is protected against handling errors by an internal fuse.
CONFIGURATION MENU
The conguration menu can be accessed by pressing the button .
Language selection
Language
English
Francais
Selection of the onscreen language, 19 dierent options are available.
Deutsch
Date / Time
EN
Date/Time
19/10/2022
13:30
Sound
Traceability
Option to set the date and time on the device.
The audio of the Gysash and the external light module can be activated or deactivated.
You can view or retrieve the last 1,000 historical charging records.
Explore Data Possibility of displaying the data collected over the last 1,000 loads on screen.
Export data (.csv)
The data collected from the last 1,000 charges can be exported to a USB stick
in .CSV format.
23
Page 24

User manual
Cable calibration
Translation of the original
instructions
1 Connect the USB stick to the Gysash
2 Enter the «Export DATA» submenu.
3 Conrm that the charging data has been saved.
The Gysash will then copy the charging data to the USB stick in the form of a
4
«.CSV» le.
GYSFLASH 107.24 CNT FV
Cable calibration
Automatic
Manual
Automatic calibration (recommended)
Cable calibration
Be sure that the metal portions of the jaws to which the cables are attached are in proper
contact with each other.
Cables can be calibrated either automatically (recommended) or manually.
This procedure is used to calibrate the charging cables of the unit, so the Gysash can
eectively compensate for any voltage drop caused by the cables. We strongly recommend
that you carry out this procedure every time you replace your cables, or if they are getting
worn.
To calibrate, simply short-circuit the charging clamps and then conrm.
The device then automatically calculates the cable resistance.
OK NOK NOK
Manual calibration (not recommended)
Cable calibration
11.5 m
24
The cable resistance can be set manually.
Warning: this value must include the internal resistance of the Gysash.
Page 25

User manual
Translation of the original
instructions
Advanced settings
This menu gives you access to the advanced features of your Gysash.
+ Option
+ Options
- Detect
Auto
- Restart
Auto
This menu is used to select whether or not to activate the Auto-Detect and
Auto-Restart functions.
Auto-detect function: With this function, the Gysash automatically initiates a
charge when contact is detected on tAhe output. If this option («Auto-detect»)
is disabled, a contact on the output will only be detected using the «Auto-select» mode, and all other modes can only be initiated by a manual START.
Activated Deactivated
Auto-restart option: This function allows the Gysash to restart automatically in
the event of a power cut.
Portability
GYSFLASH 107.24 CNT FV
EN
This menu is used to import, export, or initialize congurations for the gysash.
Your GYSFLASH is equipped with USB connectivity that extends its functio-
nality by creating custom congurations on your computer that can then be
downloaded to the device via a simple USB stick. The custom conguration
allows you to add, delete or modify charging modes and proles, so that your
charger can be adapted to your needs.
Restore CONFIG
This operation restores the original (factory) conguration of the Gysash following any manual changes to
modes or parameters.
1 Enter «Restore CONFIG» submenu.
2 Conrm the restoration of the conguration.
3 The Gysash will then be restored to its original (factory) conguration.
Import CONFIG (.gfc)
This action downloads a complete new factory conguration to the Gysash.
The current conguration is then overwritten.
First, make sure that the».gfc» le corresponding to the new conguration is present on the USB
1
stick. This le must not be located in a folder or subfolder of the USB stick.
2 Plug the USB stick into the Gysash.
3 Enter the «Import CONFIG» submenu.
4 Select the relevant le to install.
5 Conrm le installation.
6 The Gysash will then install the new conguration.
Export CONFIG (.gfc)
This action downloads the current Gysash conguration to a USB stick.
1 Plug the USB stick into the Gysash.
2 Enter the «Export CONFIG» submenu.
3 Conrm that the conguration has been saved.
4 The Gysash will then save the current conguration to the USB stick.
25
Page 26

User manual
Translation of the original
instructions
Custom conguration
List of modes and proles available for customization:
CHARGE MODE
Charge
type:
Pb-
CHARGE
Li-CHARGE
TRACTION
Charge
proles
normal
AGM
water
Easy
boost
recovery+
Ca/Ca recov
LFP/LiFePO4
Li-ion std
LFP cell+
Li-ion cell+
water
gel
Charging voltage
2.40 V/cell Charging prole for lead batteries of the types Gel, MF, EFB, SLA...
2.45 V/cell
2.45 V/cell Charging prole for open liquid-type lead-acid batteries with plug.
2.40 V/cell
2.42 V/cell
2.40 - 2.50 V/cell
2.45 - 2.66
V/cell
3.60 V/cell Charging prole for Lithium batteries type LFP (Lithium Ferro Phosphate)
4.20 V/cell
3.60 V/cell
4.20 V/cell
2.42 V/cell Charging prole dedicated to open lead traction batteries for forklift trucks.
2.35 V/cell Charging prole dedicated to gel-type traction batteries for forklift trucks.
Charging prole for most AGM lead-acid batteries including START and STOP.
However, some AGM batteries require a lower voltage charge (Normal prole). Check the
battery manual if in doubt.
Charging prole dedicated to lead batteries that automatically adapts the charging current
according to the size of the battery.
However, for maximum charge optimization, it is recommended, when possible, to use
normal, AGM or liquid charge curves.
Maximum current charge for lead-acid battery. This type of charge is ultra-fast.
Warning : this type of charge must remain occasional in order to preserve battery
life.
Charging prole for the recovery of severely damaged lead batteries. It is essential to
recover the battery outside the vehicle to avoid damaging the vehicle electronics and in a
well ventilated area.
Caution: Recovery voltage up to 4.0 V/cell.
Charging prole for calcium battery recovery. The battery must be recovered outside the
vehicle to avoid damaging the vehicle’s electronics and in a well-ventilated area.
Caution: Recovery voltage can reach up to 2.75 V/cell.
Charging prole for standard lithium-ion batteries based on Manganese or Cobalt (NMC,
LCO, LMO, MCO...)
Charging prole dedicated to LFP (Lithium Ferro Phosphate) type lithium-ion cells with
selection of the number of cells in series to be charged.
Charging prole dedicated to standard lithium-ion cells based on Manganese or Cobalt
(NMC, LCO, LMO, MCO...) with selection of the number of cells in series to be charged.
GYSFLASH 107.24 CNT FV
POWER MODES
Showroom
DIAG+
CHANGE BAT.
STARTER MODE
POWER SUPPLY
Li-SUPPLY/LFP
Li-SUPPLY/Li-ion
Maintains the battery's state of charge and supplies power when using the electrical consumers of a demonstration vehicle.
Supplies energy requirements during the vehicle diagnostic work.
Allows to keep the vehicle power supply during battery replacement, in order to preserve the memory of the
vehicle's ECUs.
Caution: Reverse polarity during use can be harmful to the charger and vehicle electronics.
Starting aid for combustion vehicles. Allows the battery to be precharged and the charger to send the maximum
current during the engine starting phase (the charger stops automatically after 30 minutes).
Allows the charger to be used as an adjustable stabilized power supply with high power. The voltage to be regulated and the current limitation are fully adjustable.
Caution: Reverse polarity during use can be harmful to the charger and vehicle electronics.
Mode intended to supply lithium-ion cells of the LFP type (Lithium Ferro Phosphate) with selection of the number
of cells in series, adjustment of the voltage and current to be applied.
Mode intended to supply standard lithium-ion batteries based on Manganese or Cobalt (NMC, LCO, LMO, MCO...)
with selection of the number of cells in series, adjustment of the voltage and current to be applied.
26
Page 27

User manual
Translation of the original
instructions
GYS oers you predened congurations adapted to each application.
These settings are available on the product page of the GYS website:
Pb-CHARGE Li-CHARGE
Conguration le
(gys.fr)
Applications
GYSFLASH 107.24 CNT FV
CHARGE MODE POWER MODES
TRAC-
TION
MISCEL-
LANEOUS
EN
1_gys_original.gfc Initial conguration of the charger
2_car_extended.gfc Extensive features for garages
3_showroom_only.gfc
4_pro_lithium.gfc Professional of lithium battery
5_traction.gfc Forklift truck, electric pallet truck, stacker...
6_full_version.gfc Full version
Only on 24 V and 48 V models.
*
DIAG+ (Pro) - 16 V selection possible.
Simplied version for dealerships and demonstration vehicles
Multi-chargers
Multi - Charger
OFF
Master
Master
Master
+ 1 Slave
+ 2 Slaves
+ 3 Slaves
normal
AGM
water
Easy
Boost
Recovery+
Ca / Ca recov
LFP/LiFePO4
Li-ion std
LFP cell+
Li-ion cell+
water
SHOWROOM
gel
DIAG+
CHANGE BAT.
*
STARTER MODE
POWER SUPPLY
Li-SUPPLY/LFP
Li-SUPPLY/Li-ion
This menu is used to congure the Multi-charger mode (see page 36 for details).
Select «OFF» for normal use with a single Gysash.
TESTER MODE
Information
Information
GYSFLASH 107.24
HW08.00
- SW01.00
22.11.069909.000000
This menu displays information about your Gysash:
- Device name
- Hardware/software versions
- Serial number
27
Page 28

User manual
Translation of the original
instructions
CONFIGURATION MENU STRUCTURE
Language selection
Date/time selection
Sound On / O
GYSFLASH 107.24 CNT FV
Traceability
Cable calibration
Cable calibration
Automatic
Manual
Automatic or Manual
Informations
Automatic or Manual
Explore data
Export data
+ Options
Portability
Multi-charger
Restore CONFIG
Import CONFIG
Export CONFIG
CONNECTIVITY MODULES
Your GYSFLASH is equipped with a DB9 type socket allowing you to connect various additional modules oered by GYS such as a
printer, Ethernet or other module in order to further extend the possibilities of your charger.
LIST OF ERROR CODES
Error code Meaning Solutions
Err01: Int_1 - Err02: Int_2
Err23: Int_3 - Err24: Int_4
Err03: Fuse_NOK Output fuse out of order Have the fuse replaced by a qualied person
Err04: T>Tmax Abnormal overheating Contact the reseller
Err05: (+)(-)
Err06: U>__V Overvoltage detected at the clamp terminals Disconnect the clamps
Err07: No_bat Battery not connected Check that the battery is correctly connected to the charger
Err08: U<__V Abnormally low battery voltage
Err09: U>__V Abnormally high battery voltage
Electronic problem
Defective charger
The polarity has been reversed on the
clamps
Contact the reseller
Connect the red clamp to the (+) and the black clamp to the (-) of
the battery.
Check that the selected mode is compatible with the battery
voltage (e. g. : 6 V battery in 24 V mode)
Charge the battery via CHARGE mode
Battery to be replaced
Check that the selected mode is compatible with the battery
voltage (e. g. : 24 V battery in 12 V mode)
28
Page 29

User manual
Translation of the original
instructions
GYSFLASH 107.24 CNT FV
Err10: U<2.0V
Err11: Time_Out
Err12: Q>___Ah Tripping the overcharge protection
Err13: U<__V
Err14: Bat_UVP
Err15: U<__V Battery too low
Err16: Bat_NOK Battery out of order Battery to be replaced
Err17: Recov_NOK Battery recovery failure Battery to be replaced
Err18: U>0V
Err19: Cable_NOK Cable calibration failure
Err20: U<__V
Err21: U<__V or Err22: U<__V
?
?
Err27: Cable_NOK
Err28: COM_NOK
Short-circuit detected during the charge
process
Triggering the time limit Presence of a consumer on the battery disrupting the charge
Abnormally long charge Battery to be replaced
Abnormally low battery voltage when
checking the charge
Abnormally low battery voltage during UVP
Wake up
Presence of a voltage at the clamp terminals when calibrating the cables
Triggering of the abnormal undervoltage
protection
Abnormally low battery voltage during
charging
Key not detected Check that the USB key is correctly connected to the charger.
No conguration le (.gfc) is present on the
key
Corrupted le
Multi-charger mode :
Parallel charging cables fail
Multi-charger mode :
Communication failure between chargers
Check the assembly
Presence of a consumer on the battery disrupting the charge
Battery to be replaced
Battery to be replaced
Presence of a short circuit, check the assembly
Battery to be replaced
Check that the selected mode is compatible with the battery
voltage (e. g. : 24 V battery in 12 V mode)
Battery to be replaced
Check the assembly
Charging cables to be replaced
Incorrect connection, check the assembly
Presence of a short circuit, check the assembly
Battery to be replaced
Presence of a consumer on the battery
Check that your les are present at the root of the USB key. Do
not put them in a folder or sub-folder.
The le you wish to download is corrupted. Delete and reinstall
the le on the key.
Load cables to be replaced.
Poor connection, check assembly (PHM).
To switch back to single charger operation, select OFF for the
Multi-Charger function.
No communication, check SHM mounting and SLAVE X charger
conguration.
To switch back to single charger operation, select OFF for the
Multi-Charger function.
EN
WARRANTY
The warranty covers faulty workmanship for 2 years from the date of purchase (parts and labour).
The warranty does not cover:
• Transit damage.
• Normal wear of parts (eg. : cables, clamps, etc..).
• Damages due to misuse (power supply error, dropping of equipment, disassembling).
• Environment related failures (pollution, rust, dust).
In case of failure, return the unit to your distributor together with:
- The proof of purchase (receipt etc ...)
- A description of the fault reported
29
Page 30

Betriebsanleitung
SICHERHEITSANWEISUNGEN
Diese Betriebsanleitung enthält Sicherheits- und Betriebshinweise.
Bitte lesen Sie diese Anleitung aufmerksam durch, bevor Sie
das Gerät zum ersten Mal benutzen und bewahren Sie diese
sorgfältig auf. Dieses Gerät darf ausschließlich zum Laden und/
oder zur Spannungsversorgung für die in der Anleitung oder
auf dem Gerät genannten Anforderungen genutzt werden. Die
Sicherheitshinweise müssen in jedem Fall beachtet werden. Im
Fall einer unangemessenen oder gefährlichen Verwendung kann
der Hersteller nicht haftbar gemacht werden.
Gerät für den Innenbereich. Das Gerät muss vor Regen und
Feuchtigkeit geschützt werden.
Dieses Gerät kann von Personen ab 8 Jahren, und von
Personen mit eingeschränkten physischen, sensorischen oder
geistigen Fähigkeiten sowie von Personen ohne Erfahrungen
oder Kenntnissen benutzt werden, wenn sie durch eine für ihre
Sicherheit verantwortliche Person beaufsichtigt oder bezüglich
des Gebrauchs des Gerätes angeleitet werden. Das Gerät ist kein
Spielzeug! Die Reinigung und Wartung darf nicht von unbewachten
Kindern durchgeführt werden.
Übersetzung der
Originalbetriebsanleitung
GYSFLASH 107.24 CNT FV
Laden Sie nie defekte oder nicht auadbare Batterien.
Bei Beschädigung des Versorgungskabels oder des Steckers das
Gerät nicht benutzen.
Wenn das Ladekabel beschädigt ist oder ein Verbindungsfehler
auftritt, bitte das Gerät nicht benutzen, um jeglichen Kurzschluss
der Batterie zu vermeiden.
Laden Sie NIE eine eingefrorene oder beschädigte Batterie auf!
Das Gerät nicht bedecken.
Das Gerät darf nicht in unmittelbarer Nähe einer Wärmequelle und
bei dauerhaft hohen Temperaturen (> 60°C) eingesetzt werden.
Blockieren Sie nicht die Belüftungsönungen des Gerätes.
Der Automatik-Modus sowie die Einschränkungen bei der
Benutzung werden nachfolgend in der Betriebsanleitung erklärt.
Brand- und Explosionsgefahr!
• Beim Auaden einer Batterie können explosive Gase freigesetzt
werden.
• Während des Ladevorgangs muss die Batterie in einem gut
belüfteten Bereich plaziert werden.
30
• Vermeiden Sie Funken und Flammen.
• Schützen Sie die elektrischen Kontaktächen der Batterie gegen
Kurzschlüsse.
Lassen Sie nicht den Akku während des Ladevorganges ohne
Überwachung für eine längere Zeitspanne.
Page 31

Betriebsanleitung
Gefahr von Säurespritzern!
• Tragen Sie Schutzbrille und Schutzhandschuhe
• Bei Berührung mit den Augen sofort gründlich mit Wasser
ausspülen und Arzt konsultieren.
Verbinden / Trennen:
• Trennen Sie das Gerät vom Spannungsnetz bevor Sie Kabel und
Klemmen anschließen oder trennen.
• Versichern Sie sich immer, dass die rote Klemme zuerst mit
dem «+» Pol der Batterie verbunden wird. Falls es nötig ist die
schwarze Klemme mit der Fahrzeugkarosserie zu verbinden,
versichern Sie sich, dass es einen Sicherheitsabstand von der
Batterie zum Benzintank/Aufspu gibt. Achten Sie während der
Ladung auf einen frei zugänglichen Netzanschluss.
• Beachten Sie am Ende des Ladevorgangs folgendes: Trennen
Sie erst das Gerät vom Spannungsnetz und entfernen Sie dann
erst die Klemmen von der Batterie.
Anschluss:
• Dieses Gerät darf nur an einer vorschriftsmäßig mit dem
Schutzleiter verbundenen Steckdose angeschlossen werden.
• Der Anschluss an die Spannungsversorgung muss den nationalen
Vorschriften entsprechen.
Wartung:
• Ist das Ladegerät und/oder sind die Kabel defekt/beschädigt,
geben Sie das Ladegerät zur Reparatur zum Hersteller bzw. an
einen geeigneten Fachbetrieb.
• Die Wartung darf nur von einer qualizierten Person
vorgenommen werden.
Übersetzung der
Originalbetriebsanleitung
GYSFLASH 107.24 CNT FV
DE
• Achtung! Immer den Anschluss an der Netzversorgung trennen,
bevor sie Arbeiten am Gerät durchführen.
• Keine besondere Wartung ist für das Gerät erforderlich.
• Ist die interne Sicherung geschmolzen, dann muss sie durch
den Hersteller bzw. den Kundendienst oder einen geeigneten
Fachbetrieb ersetzt werden, um jegliche Gefahr zu vermeiden.
• Benutzen Sie nie Lösungsmittel oder andere aggressive Putzmittel.
Richtlinien:
• Das Gerät entspricht den europäischen Richtlinien und Normen.
• Die Konformitätserklärung ist auf unserer Internetseite verfügbar.
• EAC-Konformitätszeichen (Eurasische Wirtschaftsgemeinschaft)
• Das Gerät entspricht den britischen Richtlinien und Normen.
• Die Konformitätserklärung für Grossbritannien ist auf unserer
Internetseite verfügbar (siehe Titelseite).
31
Page 32

Betriebsanleitung
100 Ah
Übersetzung der
Originalbetriebsanleitung
GYSFLASH 107.24 CNT FV
• Das Gerät entspricht den marokkanischen Standards.
• Die Konformitätserklärung Cم (CMIM) ist auf unserer Webseite
verfügbar (siehe Titelseite).
Entsorgung:
• Produkt für getrennte Entsorgung (Elektroschrott). Werfen Sie es
daher nicht in die Mülltonne! Entsorgen Sie das Gerät über Ihre
kommunale Sammelstelle für Elektro-Altgeräte!
BESCHREIBUNG
Das GYSFLASH ist ein professionelles Multifunktion-Ladegerät mit Invertertechnologie. Es ist geeignet, um Fahrzeugbatteriene im
Showroom zu unterstützen und sichert eine optimale Ladequalität auch für Batterien der neuesten Technologie. Dieses Ladegerät
kann mit bis zu acht Meter langen Ladekabeln ausgestattet werden. Beim Kabeltausch muss eine Neukalibrierung durchgeführt
werden (siehe Seite 38). Es wird als stationäres Gerät und nicht als mobiles Gerät betrachtet.
Das GYSFLASH beinhaltet 4 Lademodi:
• Auademodus: für das Auaden von Blei-Säure- (üssig, AGM...) oder Lithium-Batterien (LiFePO4).
• DIAG + Modus: versorgt die Batterie mit Energie während der Fahrzeugdiagnose.
• Showroom-Modus: versorgt die Batterie während der Ausstellung im Vorführraum mit Strom.
• Test-Modus: ermöglicht den Ladezustand der Batterie und die Funktion der Lichtmaschine zu überprüfen.
Das GYSFLASH ist SMART!
Die Funktionen des GYSFLASH können erweitert werden, da man über die USB-Schnittstelle Modi und spezische Ladeprole
ergänzen und individuelle Einstellungen abspeichern kann (siehe S. 40).
Das GYSFLASH bietet auch die Möglichkeit, die Daten mehrerer tausend Ladevorgänge für weitere Analysen auf einem USB-
Stick zu speichern. Weitere Module (wie Drucker, Ethernet-Kommunikation, Tastatur, Lampe......) können am Gerät angeschlossen
werden.
Funktion „Auto-Detect“:
Gysash ist mit der Funktion „Auto-Detect“ ausgestattet, die automatisch einen Ladevorgang startet, wenn ein Kontakt am Ausgang des Gysash erkannt wird. (Zum Aktivieren/Deaktivieren dieser
Funktion siehe Seite 39)
Funktion „Auto-Restart“:
Die Funktion „Auto-Restart“ bietet die Möglichkeit, die Stromversorgung bei einem Stromausfall automatisch neu zu starten.
(Zum Aktivieren/Deaktivieren dieser Funktion siehe Seite 39).
INBETRIEBNAHME
1. Schließen Sie Gysash an die Netzsteckdose an.
2. Den Schalter auf „ON“ stellen.
3. Den gewünschten Modus (Charge -> Supply -> Test).
In das Einstellungsmenü gelangen Sie, wenn Sie für drei Sekunden lang die Taste wählen.
NAVIGATION IN DEN MENÜS UND EINSTELLUNG DER MODI
Auto - Detect
12.
Laden
5
v
Verwenden Sie die Pfeile, um sich im Menü zu bewegen oder um den Wert oder Status eines Parameters zu
1
ändern.
Drücken Sie die SELECT-Taste, um ein Untermenü aufzurufen, einen Parameter auszuwählen oder den
2
Wert eines Parameters zu bestätigen.
3 Drücken Sie auf die Taste ZURÜCK, um zum vorherigen Menü (oder Untermenü) zurückzukehren.
LADEMODUS
1
3
5
32
Laden
Pb-LADUNG
blei-saure
12 V
1 - Modus
2
2 - Ladegruppe
3 - Ladekurve
4 - Nennspannung der Batterie
4
5 - Nennkapazität der Batterie (wenn
die Kurve dies zulässt)
Page 33
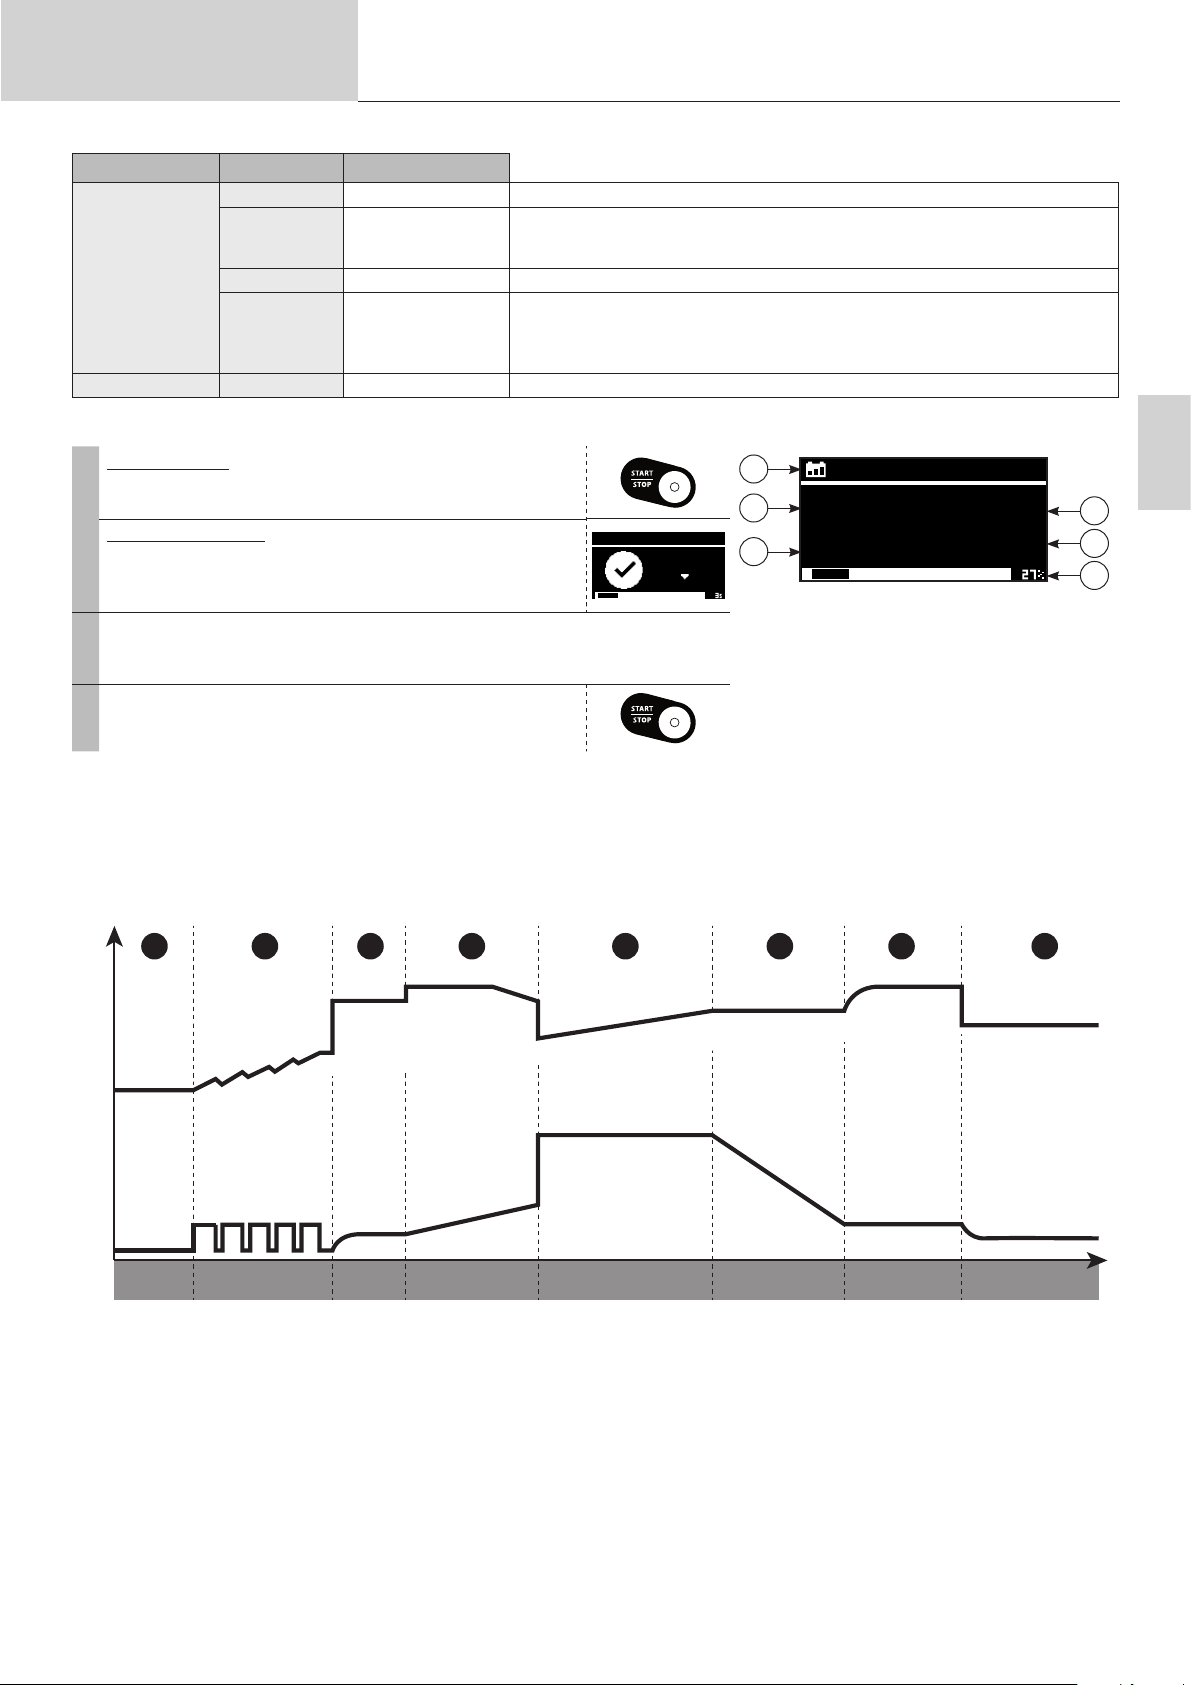
Betriebsanleitung
Ladetyp Prol Ladespannung
normal
AGM
Pb-CHARGE
Li-CHARGE LFP/LiFePO4
•• Starten des Ladevorgangs:
Manueller Start
Um die Auadung zu starten, drücken Sie die Taste
START/STOP.
1
Automatischer Start
Wenn die Funktion AUTO-DETECT aktiviert ist, startet der
Ladevorgang automatisch nach 3 Sekunden, wenn eine
Batterie angeschlossen ist.
Während des Ladevorgangs zeigt Ihr GYSFLASH den Fortschritt des Lade-
2
zyklus in Prozent, die Spannung, den Strom, die eingespeisten Amperestunden sowie die verstrichene Zeit an.
Drücken Sie die START/STOP-Taste, um den Ladevor-
3
gang zu beenden.
üssig
Easy
Übersetzung der
Originalbetriebsanleitung
2,40 V/Zelle Blei-Säure-Batterien (Gel, MF, EFB, SLA…)
2,45 V/Zelle
2,45 V/Zelle Oene üssige Blei-Säure-Batterien mit Deckel.
2,40 V/Zelle
3,60 V/Zelle Lithium Batterien, Typ LEP (Lithium Eisen Phosphat).
Die Mehrheit der AGM-Blei-Säure-Batterien inkl. START/STOP-Batterien.
Jedoch erfordern einige AGM-Batterien eine Auadung mit niedriegerer Spannung
(normales Prol). Bei Zweifeln lesen Sie die Bedienungsanleitung der Batterie.
Geeignetes Prol für Blei-Säure-Batterien, das entsprechend der Batteriekapazität
die Ladekurve automatisch anpasst.
Für eine maximale Optimierung des Ladevorgangs wird empfohlen, wenn möglich,
die normalen AGM oder üssigen Ladekurven zu benutzen.
Auto - Detect
12.
Laden
5
GYSFLASH 107.24 CNT FV
1
2
4
v
Pb-LADUNG
13.5
V
113
01:27:35 105.8
1 - Angewandte ladekurve
2 - Batteriespannung
3 - Gelieferter Strom für das Ladegerät
4 - Dauer des Ladevorgangs
5 - E
ingespeiste Ladung in Amperestunden
6 - Fortschritt des Ladezyklus
A
Ah
3
5
6
DE
Vorsichtsmaßnahmen:
Beim Laden eines Fahrzeugs sollten Sie den Stromverbrauch des Fahrzeugs auf ein Minimum reduzieren (Licht ausschalten, Zün-
dung ausschalten, Türen schließen usw.), um den Ladevorgang nicht zu beeinussen.
Überprüfen Sie bei oenen Batterien den Elektrolytstand. Füllen Sie den Elekrolytstand ggf. vor dem Laden auf.
• Ladekurve bei Blei-Säure-Batterien:
1 2 3 4 5 6 7
8
U
I
Analyse Wiederherstellung Test Desulfutarierung Ladung Absorption
0%
1. Stufe: Analyse
Analyse des Batteriezustands (Ladezustand, Verpolung, falsch
angeschlossene Batterie...)
2 Stufe: Wiederherstellung
Wiederherstellungsfunktion für eine tiefenentladene Batterie.
3. Stufe: Test
Test auf sulfatierte Batterie.
4. Stufe: Desulfutarierung
Desulfutarierung der Batterie.
5. Stufe: Ladung
Schnelle Ladung mit Maximalstrom bis die Batterie zu 80%
aufgeladen ist.
10% 20%
80%
6. Stufe: Absorption
Ladung mit konstanter Spannung bis die Batterie zu 100%
aufgeladen ist.
7. Stufe: Refresh (nur für üssige Batterien)
Ist die Refresh Option ausgewählt, erzeugt das Ladegerät einen
zusätzlichen Strom, um in der Batterie Gas zu erzeugen, das zu
einer besseren Elektrolytdurchmischung und somit zur Wiederbelebung der Batteriezellen führt. In dieser Phase kann die
Batterie ein wenig Wasser verlieren.
8. Stufe: Erhaltungsladung
Die Batterie wird in ihrem optimalen Ladezustand gehalten.
Refresh
(falls Option aktiv)
95% 100%
Erhaltungsla-
dung
33
Page 34

Betriebsanleitung
120 Ah
Lithium-Ladekurve (LFP):
Übersetzung der
Originalbetriebsanleitung
GYSFLASH 107.24 CNT FV
1 2 3 4 5 6 7
U
I
0%
Wiederher-
stellung
Ladung Test Vervollständigung
2% 85% 95% 99% 100%
Absorption
Analyse UVP Wake up
1. Stufe: Analyse
Analyse des Batteriezustands (Ladezustand, Verpolung, falsch
angeschlossene Batterie...)
Stufe 2: UVP Wake up
Reaktiviert die Batterien unter UVP-Schutz (Under Voltage
Protection)
3. Stufe: Wiederherstellung
Wiederherstellungsfunktion für eine tiefenentladene Batterie.
4. Stufe: Ladung
Schnelle Ladung mit Maximalstrom bis die Batterie zu 90%
aufgeladen ist.
5. Stufe: Absorption
Ladung mit konstanter Spannung bis die Batterie zu 95% aufgeladen ist.
8
Equalizing Battery System
Egalisierung /
Ausgleich
9
Erhaltungsladung
6. Stufe: Test
Test der Ladungserhaltung.
7. Stufe: Vervollständigung
Ladung mit Minimalstrom bis die Batterie zu 100% aufgeladen ist.
8. Stufe: Egalisierung / Ausgleich
Ausgleich der Batteriezellen
9. Stufe: Erhaltungsladung
Die Batterie wird in ihrem optimalen Ladezustand gehalten.
VERSORGUNGSMODI: SHOWROOM / DIAG+
1
3
5
• Starten der Einspeisung:
Manueller Start
Um den Modus „Supply“ zu starten, drücken Sie auf die
Taste START/STOP.
Automatischer Start
1
Wenn die Funktion AUTO-DETECT aktiv ist, startet der
Ladevorgang automatisch nach 3 Sekunden, wenn eine
Batterie oder ein Kontakt am Ausgang des Gysash vorhanden ist (Beispiel: Fahrzeug ohne Batterie).
Während des Modus „Supply“ zeigt Gysash die Spannung, den Strom, die
2
aktuelle Ladezeit und die eingespeiste Ladung in Amperestunden an.
Drücken Sie die START/STOP-Taste, um den Ladevor-
3
gang zu beenden.
Hinweis:
Beträgt der Strom beim Starten des Modus über 10A, ist die Batterie entladen. Das GYSFLASH lädt dann zuerst die Batterie auf.
Prüfen Sie, ob es keinen zusätzlichen Stromverbrauch im Fahrzeug gibt. Warten Sie bis der Ladestrom unter 10A sinkt, bevor Sie
die Bordelektronik benutzen oder eine Diagnose des Fahrzeugs durchführen.
Supply
SHOWROOM
12 V
14.2
V
1 - Modus
2
2 - Supply-Zyklus
3 - Nennspannung
4 - Versorgungsspannung
4
5 - Versorgungsstrom
Auto - Detect
2.
5
Supply
1
2
4
v
EPS
14.2 V113
01:27:35 105.8
1 - Angewandter Supply-Zyklus
2 - Batteriespannung
3 - Gelieferter Strom für Gysash
4 – Dauer des Ladevorgangs
5 – Eingespeiste Ladung in Amperestunden
6 - Fortschritt des Ladezyklus (w
integrierte Ladefunktion aktiv ist)
Ah
A
enn die
3
5
6
34
Page 35

Betriebsanleitung
Funktionen der Versogungsmodi:
Modus
«Ohne Batterie»
-Funktion
Übersetzung der
Originalbetriebsanleitung
«Integrierte Auade»
-Funktion
Schutz gegen anor-
male Unterspannung
GYSFLASH 107.24 CNT FV
Anpassung der zu regulierenden Spannung
Modelle 12 V
SHOWROOM
DIAG+
• «Ohne Batterie»-Funktion (nicht empfohlen):
Diese Funktion ermöglicht die Anwendung des SHOWROOM-Modus wenn keine Batterie
vorhanden ist. Dafür drücken Sie drei Sekunden lang die Taste START/STOP. Die Anzeige
«Ohne Batterie»-Modus erscheint für drei Sekunden, bevor die Versorgung erzwungen wird.
Diese Funktion darf nicht benutzt werden, wenn eine Batterie im Fahrzeug vorhanden ist.
Diese Funktion deaktiviert die «Integrierte Ladung»-Funktion sowie einige Schutzfunktionen wie z.B. den
Schutz gegen Unterspannung oder die Abschaltungserkennung.
In diesem Fall kann eine Verpolung die Bordelektronik beschädigen.
• «Integrierte Auade»-Funktion:
Der SHOWROOM-Modus (außer «Ohne Batterie»-Funktion) besitzt einen integrierten Ladealgorithmus, der sich allen Batterietypen
(Blei-Säure und Lithium) anpasst, um ein optimales Ladeniveau für Ausstellungsfahrzeuge zu gewährleisten. Diese Funktion lädt
die Batterie auch bei eingeschalteten Stromverbrauchern auf.
Modelle 24 V
Modelle 48 V
Modelle 12 V 12.7 V - 14.8 V
Modelle 24 V
Modelle 48 V
6.3 V - 7.2 V
12.7 V - 14.4 V
25.4 V - 28.8 V
38.1 V - 43.2 V
50.8 V - 57.6 V
14.4 V - 17.2 V
25.4 V - 29.6 V
38.1 V - 44.4 V
50.8 V - 59.2 V
SHOWROOM
kein Batteriebetrieb
DE
1 2 3 4
U
I
Analyse Ladung Ergänzung Ausgleich VersorgungsmodusAbsorption
1. Stufe: Analyse
Analyse des Batteriezustands (Ladezustand, Verpolung, falsch
angeschlossene Batterie...)
2. Stufe: Ladung
Schnelle Ladung mit Maximalstrom bis die Batterie U1 erreicht
(z.B. 13,8V bei Batterien).
3. Stufe: Absorption
Ladung mit konstanter Spannung bis U1 (z.B. 13,8V bei )
aufgeladen ist. Maximale Dauer: 1 Stunde
5
6
4. Stufe: Ergänzung
Erhöhung der Spannung bis U2
(z.B. 14,4V in ).
5. Stufe: Ausgleich
Spannungserhaltung bei U2 (z.B. 14,4V bei ).
Maximale Dauer: 2 Stunden
Stufe 6 : Versorgungsmodus
Anlegen der gewählten Spannung.
Maximale Dauer: 2 Stunden
35
Page 36

Betriebsanleitung
• Schutz gegen anormale Unterspannung:
Dieser Schutz ermöglicht, Kurzschlüsse und Beschädigung der Batterie zu vermeiden. Das Ladegerät schaltet automatisch ab,
wenn die Spannung mehr als 10 Minuten auällig niedrig ist.
TEST-MODUS
Navigation im Menü:
Übersetzung der
Originalbetriebsanleitung
GYSFLASH 107.24 CNT FV
Benutzen Sie die Pfeiltasten, um den durchzuführenden Test aus-
1
zuwählen.
Drücken Sie die Taste START/STOP, um den Test zu starten.
2
• Spannungstest:
Dieser Modus ermöglicht das GYSFLASH als Volt-Meter zu benutzen, um die Batteriespannung
zu messen.
• Starttest:
Dieser Modus ermöglicht, den Zustand des Startsystem des Fahrzeugs beim Starten des Motors zu überprüfen (Starter + Batterie).
Der Test muss mit angeschlossener Batterie durchgeführt werden.
Benutzen Sie die Pfeiltasten, um die Nennspannung der Batterie aus-
1
zuwählen.
2 Drücken Sie SELECT zur Bestätigung.
3 Schließen Sie die Klemmen an der Batterie an.
Test
Spannungstest
Motorstarttest
Lichtmaschinen Test
Spannungstest
12.5
Test
Spannungstest
Motorstarttest
Lichtmaschinen Test
v
4 Den Motor starten.
Das Ladegerät erkennt automatisch den Startversuch und führt ein Überprüfung des
5
Starters durch.
Motorstarttest
Testergebnis: das Gerät zeigt den Minimalwert der Batteriespannung bei dem Motorstart und
den Zustand des Starters als Balken an.
• Lichtmaschinentest:
Dieser Modus ermöglicht, den Zustand der Lichtmaschine zu prüfen. Dieser Test muss mit angeschaltetem Motor durchgeführt
werden.
Benutzen Sie die Pfeiltasten, um die Nennspannung der Batterie aus-
1
zuwählen.
2 Drücken Sie SELECT zur Bestätigung.
Testergebnis: Das Gerät zeigt die von der Lichtmaschine gelieferte Spannung und den Zustand der Lichtmaschine als Balken an.
Umin
Spannungstest
Motorstarttest
Lichtmaschinen Test
Lichtmaschinen Test
12.5
Test
13.5
v
v
36
Page 37

Betriebsanleitung
Übersetzung der
Originalbetriebsanleitung
GYSFLASH 107.24 CNT FV
SCHUTZ
Dieses Gerät ist gegen Kurzschlüsse und Verpolung geschützt. Das Gerät ist gegen die Entstehung elektrischer Funken beim
Anschluss des Geräts geschützt. Wenn keine Spannung an den Klemmen erkannt wird, wird kein Strom geliefert. Eine interne
Sicherung schützt vor Fehlern.
MENU CONFIGURATION (MENÜ KONFIGURATION)
Auf das Menü Konguration kann durch Drücken der Taste zugegrien werden .
Auswahl der Sprache
DE
Sprache
English
Francais
Deutsch
Nederlands
Datum/Uhrzeit
Datum/Uhrzeit
19/10/2022
13:30
Ton
Auswahl der Bildschirmsprache, es stehen 19 Sprachen zur Verfügung.
Möglichkeit, das Datum und die Uhrzeit des Geräts einzustellen.
Möglichkeit, den Ton des Gysash und des leuchtenden Außenmoduls ein- oder auszuschalten.
Rückverfolgbarkeit
Explore Data
Export data (.csv)
Möglichkeit, den Verlauf der letzten 1000 Ladedaten anzuzeigen oder abzurufen.
Möglichkeit, die in den letzten 1000 Ladungen gesammelten Daten auf dem
Bildschirm anzuzeigen.
Möglichkeit, die gesammelten Daten der letzten 1000 Ladungen auf einen USBStick
im Format .CSV zu exportieren.
37
Page 38

Betriebsanleitung
Kalibrierung der Kabel
Übersetzung der
Originalbetriebsanleitung
1 Schließen Sie den USB-Stick an das Gysash-Gerät an.
2 Gehen Sie in das Untermenü „Daten exportieren“.
3 Bestätigen Sie die Speicherung der Ladedaten.
4 Gysash kopiert dann die Ladedaten als „.CSV“-Dateien auf den USB-Stick.
GYSFLASH 107.24 CNT FV
Kabelkalibrierung
AutomatiK
Manuell
Automatische Kalibrierung (empfohlen)
Kabelkalibrierung
Achten Sie auf einen gutem Kontakt zwischen den Klemmen.
Die Kalibrierung der Kabel kann entweder automatisch (empfohlen) oder manuell erfolgen.
Mit diesem Verfahren können die Ladekabel des Geräts kalibriert werden, damit Gysash
den durch die Kabel verursachten Spannungsabfall optimal ausgleicht. Es wird dringend
empfohlen, diesen Vorgang bei jedem Kabelwechsel oder wenn die Kabel abgenutzt sind,
durchzuführen.
Um die Kalibrierung durchzuführen, schließen Sie einfach die Ladeklemmen kurz und
bestätigen Sie dann.
Das Gerät berechnet automatisch den Widerstand des Kabels.
OK NOK NOK
Manuelle Kalibrierung (nicht empfohlen)
Kabelkalibrierung
11.5 m
38
Der Widerstand des Kabels kann manuell eingestellt werden.
Achtung: Dieser Wert muss den Innenwiderstand des Gysashs
einschließen.
Page 39

Betriebsanleitung
Übersetzung der
Originalbetriebsanleitung
GYSFLASH 107.24 CNT FV
Erweiterte Parameter
Dieses Menü ermöglicht den Zugri auf die erweiterten Funktionen Ihres Gysash. Für den Zugri ist ein Administratorpasswort
erforderlich.
+ Option
+ Optionen
- Detect
Auto
- Restart
Auto
Aktiviert Deaktiviert
Tragbar
In diesem Menü können Sie festlegen, ob die Optionen Auto-Detect und Au-
to-Restart aktiviert werden sollen oder nicht.
Option Auto-detect: Mit dieser Funktion wird automatisch ein Ladevorgang
gestartet, wenn ein Kontakt am Ausgang des Gysash erkannt wird. Wenn die
Option „Auto-detect“ deaktiviert ist, wird ein Ausgangskontakt nur im Modus
„Auto-select“ erkannt und die anderen Modi können nur durch einen manuellen START gestartet werden.
Option Auto- Restart: Mit dieser Funktion wird Gysash bei einem Stromausfall
automatisch neu gestartet.
In diesem Menü können Sie die Gysash-Konguration importieren, exportieren oder initialisieren.
Das GYSFLASH besitzt einen USB-Anschluss, über den zusätzliche Funktionen eingespielt werden können und auf einem Computer erstellte personalisierte Einstellungen auf das Gerät übertragen werden können. Mit den
personalisierten Einstellungen können Sie Ladeprole hinzufügen, ändern
oder löschen, um das Ladegerät an Ihre speziellen Bedürfnisse anzupassen.
KONFIG herstellen
DE
Dieser Vorgang stellt die ursprüngliche (Werks-)Konguration des Gysash nach manuellen Änderungen
von Modi oder Einstellungen wieder her.
1 Gehen Sie in das Untermenü „Wiederherstellung der KONFIG“.
2 Bestätigen Sie die Wiederherstellung der Konguration.
3 Gysash stellt dann seine ursprüngliche (Fabrik-)Konguration wieder her.
KONFIG importieren (.gfc)
Mit diesem Vorgang wird eine neue Fabrik-Konguration in das Gysash-Netzteil hochgeladen.
Die aktuelle Konguration wird dann überschrieben.
Stellen Sie zuvor sicher, dass die „.gfc“-Datei, die der neuen Konguration entspricht, auf dem
1
USB-Stick vorhanden ist. Diese Datei muss sich im Hauptverzeichnis des USB-Stick benden.
2 Schließen Sie den USB-Stick an das Gysash-Gerät an.
3 Gehen Sie in das Untermenü „KONFIG importieren“.
4 Wählen Sie die Datei, die Sie herunterladen möchten.
5 Bestätigen Sie den Download der Datei.
6 Das Gysash-Gerät lädt die neue Konguration herunter.
39
Page 40

Betriebsanleitung
Übersetzung der
Originalbetriebsanleitung
KONFIG exportieren (.gfc)
Mit diesem Vorgang wird die aktuelle Konguration des Gysash auf einen USB-Stick heruntergeladen.
1 Schließen Sie den USB-Stick an das Gysash-Gerät an.
2 Gehen Sie in das Untermenü „KONFIG exportieren“.
3 Bestätigen Sie die Speicherung der Konguration.
4 Gysash speichert dann seine aktuelle Konguration auf dem USB-Stick.
Personalisierte Einstellung:
Liste der personalisierbaren Modi und Prole:
LADEMODUS
Ladetypen Ladeprols Ladespannung
2,40 V/Zelle Ladeprol für Blei-Säure-Batterien Typ Gel, MF, EFB, SLA…
2,45 V/Zelle
2,45 V/Zelle Ladeprol für oene üssige Blei-Säure-Batterien mit Deckel.
2,40 V/Zelle
2.42 V/Zelle
2,40 - 2,50 V/Zelle
2.45 - 2.66
V/Zelle
3,60 V/Zelle Ladeprol für Lithium-Batterien Typ LEP (Lithium Eisen Phosphat)
4,20 V/Zelle
3,60 V/Zelle
4,20 V/Zelle
2,42 V/Zelle Ladeprol für Antriebsbatterien Typ oene Blei-Säure für Stapler.
2,35 V/Zelle Ladeprol für Antriebsbatterien Typ Gel für Stapler.
Pb-
CHARGE
Li-CHARGE
ANTRIEBSBATTERIEN
normal
AGM
üssig
Easy
boost
Recovery
Ca/Ca recov
LFP/LiFePO4
Li-ion STD
LEP cell+
Li-ion cell+
üssig
Gel
GYSFLASH 107.24 CNT FV
Ladeprol für die Mehrheit der Blei-Säure-Batterien Typ AGM einschließlich START/STOP.
Jedoch erfordern einige AGM-Batterien eine Auadung mit niedriegerer Spannung (normales Prol). Bei Zweifel lesen Sie die Bedienungsanleitung der Batterie.
Geeignetes Prol für Blei-Säure-Batterien, das entsprechend der Batteriekapazität die
Ladekurve automatisch anpasst.
Für eine maximale Optimierung des Ladevorgangs wird empfohlen, wenn möglich, die
normalen, AGM oder üssigen Ladekurven zu benutzen.
Lademodus mit maximaler Leistung für Blei-Säure-Batterien. Dieser Modus ermöglicht
einen sehr schnellen Ladevorgang.
Achtung: Dieser Lademodus darf nur gelegentlich eingesetzt werden, damit die
Lebensdauer der Batterie nicht beeinträchtigt wird.
Ladeprol zur Wiederherstellung stark beschädigter Blei-Säure-Batterien. Für die Wiederherstellung muss die Batterie aus dem Fahrzeug entfernt werden und an einem gut
belüftetem Ort durchgeführt werden, um eine Beschädigung der Bordelektronik zu vermeiden.
Achtung: Die Wiederherstellungsspannung kann bis 4,0 V / Zelle erreichen.
Ladeprol, das für die Rückgewinnung von Kalziumbatterien bestimmt ist. Die Rückgewinnung muss unbedingt außerhalb des Fahrzeugs erfolgen, um die Elektronik des Fahrzeugs
nicht zu beschädigen, und an einem gut belüfteten Ort.
Achtung: Die Wiederauadungsspannung kann bis zu 2,75 V/Zelle betragen.
Ladeprol für Standard-Lithium-Ion-Batterien auf Mangan- oder Cobaltbasis (NMC, LCO,
LMO, MCO…)
Ladeprol für Lithium-Ion Zellen Typ LEP (Lithium Eisen Phosphat) mit Auswahl der aufzu-
ladenden Zellen in Serie.
Ladeprol für Standard-Lithium-Ion-Batterien auf Mangan- oder Cobaltbasis (NMC, LCO,
LMO, MCO…) mit Auswahl der Anzahl der aufzuladenden Zellen in Serie.
VERSORGUNGSMODUS
SHOWROOM
DIAG+
BAT. WECHSEL
MOTORSTARTMODUS
POWER SUPPLY
Li-SUPPLY/LEP
Li-SUPPLY/Li-ion
40
Versorgt die Batterie während der Ausstellung im Vorführraum mit Strom.
Versorgt die Batterie mit Energie während der Diagnose des Fahrzeugs.
Speist das Bordnetz während des Austauschs der Batterie, um einen Verlust der Daten der Bordelektronik zu vermeiden.
Achtung: Die Verpolung während des Gebrauchs kann zu Schäden am Ladegerät und an der Fahrzeugelektronik richtig trennen.
Starthilfe für Verbrennungsfahrzeuge. Ermöglicht das Vorladen der Batterie und das Senden des maximalen
Stroms durch das Ladegerät während der Startphase des Motors (das Ladegerät stoppt automatisch nach 30
Minuten).
Das Gerät kann als stabilisierte und regelbare Spannungsversorgung eingesetzt werden. Die Spannung und die
Strombegrenzung sind einstellbar.
Achtung: Die Verpolung während des Gebrauchs kann zu Schäden am Ladegerät und an der Fahrzeugelektronik richtig trennen.
Modus zur Versorgung von Lithium-Ion-Zellen Typ LEP (Lithium Eisen Phosphat) mit Auswahl der Anzahl der
Zellen in Serie, Anpassung der Spannung und des zu liefernden Stroms.
Modus zur Versorgung der Standard-Lithium-Ion-Batterien auf Mangan- oder Cobaltbasis (NMC, LCO, LMO,
MCO…) mit Auswahl der Anzahl der Zellen in Serie, Anpassung der Spannung und des zu liefernden Stroms.
Page 41

Betriebsanleitung
Übersetzung der
Originalbetriebsanleitung
GYS bietet vorgegebene Einstellungen, die für jede Anwendung angepasst sind.
Diese Kongurationen sind auf der Produktseite der GYS-Website verfügbar:
LADEMODUS VERSORGUNGSMODUS
Pb-CHARGE Li-CHARGE
Einstellungsdatei
(gys.fr)
Anwendungen
GYSFLASH 107.24 CNT FV
SONSTIGES
ANTRIE-
BSBATTE-
RIEN
1_gys_original.gfc Werkeinstellung des Ladegeräts
2_car_extended.gfc Erweiterte Einstellungen für den KFZ-Elektriker
3_showroom_only.gfc
4_pro_lithium.gfc Lithium-Batterien-Pro
5_traction.gfc Stapler, Gabelstapler...
6_full_version.gfc Komplette Version
Nur bei 24-V- und 48-V-Modellen.
*
DIAG+ (Pro) - 16-V-Auswahl möglich.
Vereinfachte Version für Autohäuser und Ausstellungsfahrzeuge
Multi-Ladegeräte
Multiladegerat
OFF
Master
Master
Master
+ 1 Slave
+ 2 Slaves
+ 3 Slaves
In diesem Menü wird die Konguration für den Modus Multi-Ladegeräte
festgelegt (weitere Informationen nden Sie auf Seite 55).
Wählen Sie „OFF“ für den Standardgebrauch mit nur einem Gysash.
normal
AGM
üssig
Easy
Boost
Recovery+
Ca / Ca recov
LFP/LiFePO4
Li-ion STD
LEP cell+
Li-ion cell+
üssig
SHOWROOM
Gel
DIAG+
BAT. WECHSEL
*
MOTORSTARTMODUS
POWER SUPPLY
Li-SUPPLY/LEP
Li-SUPPLY/Li-ion
TEST-MODUS
DE
Informationen
Informationen
GYSFLASH 107.24
HW08.00
- SW01.00
22.11.069909.000000
In diesem Menü werden Informationen zu Ihrem Gysash angezeigt:
- Name des Geräts
- Versionen des Geräts/der Software
- Seriennummer
41
Page 42

Betriebsanleitung
Übersetzung der
Originalbetriebsanleitung
BAUMSTRUKTUR DES MENÜS KONFIGURATION
Auswahl der Sprache
Auswahl Datum/Uhrzeit
Ton Ein / Aus
GYSFLASH 107.24 CNT FV
Rückverfolgbarkeit
Kabel-Kalibrierung
Kabelkalibrierung
AutomatiK
Manuell
Erweiterte Parameter
Informations
Automatisch oder manuell
Daten untersuchen
Daten exportieren
+ Options
Tragbar
Multi-Ladegerät
KONFIG wiederherstellen
KONFIG importieren
KONFIG exportieren
MODULKONNEKTIVITÄT
Ihr GYSFLASH ist mit einer SMC-Buchse ausgestattet, an die Sie verschiedene von GYS angebotene Zusatzmodule wie Drucker,
Ethernet oder andere anschließen können, um die Möglichkeiten Ihres Geräts noch zu erweitern.
LISTE DER FEHLERCODES
Fehlercode Bedeutung Lösung
Err01: Int_1 - Err02: Int_2
Err23: Int_3 - Err24: Int_4
Err03: Fuse_NOK Ausgangsicherung defekt. Die Sicherung durch qualiziertes Personal ersetzen lassen.
Err04: T>Tmax Anormale Überhitzung. Händler kontaktieren.
Err05: (+) (-)
Err06: U>__V
Err07: No_bat Batterie nicht angeschlossen. Prüfen, dass die Batterie korrekt am Gerät angeschlossen ist.
Err08: U<__V Sehr niedrige Batteriespannung.
Err09: U>__V Sehr hohe Batteriespannung.
"Elektronischer Fehler
Ladegerät defekt".
Verpolung der Klemmen.
Überspannung an den Polen der Klemmen
erkannt.
Händler kontaktieren.
Die rote Klemme am Pluspol (+) und die schwarze Klemme am
Minuspol (-) der Batterie anschließen.
Klemmen trennen.
Prüfen, dass der ausgewählte Modus mit der Spannung der
Batterie kompatibel ist (z.B. 6V Batterie im Modus 24V).
Die Batterieladung im Modus LADUNG durchführen.
Batterie ersetzen.
Prüfen, dass der ausgewählte Modus mit der Spannung der
Batterie kompatibel ist (z.B. 24V Batterie im 12V Modus)
42
Page 43

Betriebsanleitung
Err10: U<2.0V Kurzschluss während der Ladung erkannt. Anschlüsse prüfen.
Err11: Time_Out
Err12: Q>___Ah Auslösen des Überlastungsschutzes.
Err13: U<__V
Err14: Bat_UVP
Err15: U<__V Zu schwache Batterie.
Err16: Bat_NOK Batterie defekt. Batterie ersetzen.
Err17: Recov_NOK
Err18: U>0V
Err19: Cable_NOK Kalibrierung der Kabel fehlgeschlagen.
Err20: U<__V Auslösen des Unterspannungsschutz. Kurzschluss erkannt. Anschlüsse prüfen.
Err21: U<__V oder
Err22: U<__V
?
?
Err27: Cable_NOK
Err28: COM_NOK
Übersetzung der
Originalbetriebsanleitung
Auslösung der Zeitgrenze. Ein Stromverbraucher stört den Ladevorgang.
Anormale Ladungsdauer. Batterie ersetzen.
Ein Stromverbraucher stört den Ladevorgang.
Batterie ersetzen.
Anormal niedrige Batteriespannung bei der
Ladeprüfung.
Anormal niedrige Batteriespannung bei dem
UVP Wake up.
Wiederherstellung der Batterie
fehlgeschlagen.
Spannung erkannt an den Klemmen bei der
Kalibrierung der Kabel.
Anormal niedrige Batteriespannung
während der Ladungserhaltung.
USB-Stick wird nicht erkannt.
Keine ".gfc"-Datei auf dem Stick vorhanden.
Beschädigte Datei.
Multi-Ladegerät-Modus :
Ausfall des parallelen Ladekabels
Multi-Ladegerät-Modus :
Kommunikationsfehler zwischen Lade-
geräten
Batterie ersetzen.
Kurzschluss erkannt. Anschlüsse prüfen.
Batterie ersetzen.
Prüfen, dass der ausgewählte Modus mit der Spannung der
Batterie kompatibel ist (z.B. 24V Batterie im 12V Modus).
Batterie ersetzen.
Batterie ersetzen.
Anschlüsse prüfen.
Ladekabel ersetzen.
Fehlerhafte Verbindung prüfen.
Batterie ersetzen.
Ein Stromverbraucher stört den Vorgang.
Prüfen Sie, ob der USB-Stick korrekt am Ladegerät
angeschlossen ist.
Prüfen Sie, ob Ihre Dateien im USB-Hauptverzeichnis vorhanden
sind. Die Dateien dürfen sich nur im Hauptverzeichnis des USB-
Sticks benden.
Die heruntergeladene Datei ist beschädigt. Die Datei löschen
und erneut abspeichern.
Zu ersetzende Lastkabel.
Schlechte Verbindung, Baugruppe (PHM) prüfen.
Zum Zurückschalten auf Einzelladebetrieb, Wählen Sie OFF für
die Multi-Charger-Funktion.
Keine Kommunikation, überprüfen Sie die SHM-Baugruppe und
die Konguration des Ladegeräts SLAVE X.
Um wieder zum Betrieb mit einem einzelnen Ladegerät zu wechseln, wählen Sie OFF für die Multi-Charger-Funktion.
GYSFLASH 107.24 CNT FV
DE
GARANTIE
Die Garantieleistung des Herstellers erfolgt ausschließlich bei Fabrikations- oder Materialfehlern, die binnen 24 Monaten nach Kauf
angezeigt werden (Nachweis Kaufbeleg).
Die Garantieleistung erfolgt nicht bei:
• Durch Transport verursachten Beschädigungen.
• Normalem Verschleiß der Teile (z.B. : Kabel, Klemmen, usw.) sowie Gebrauchsspuren.
• Von unsachgemäßem Gebrauch verursachten Defekten (Sturz, harte Stöße, Demontage).
• Durch Umwelteinüsse entstandene Defekte (Verschmutzung, Rost, Staub).
Die Reparatur erfolgt erst nach Erhalt einer schriftlichen Akzeptanz (Unterschrift) des zuvor vorgelegten Kostenvoranschlages durch
den Besteller. Im Fall einer Garantieleistung trägt GYS ausschließlich die Kosten für den Rückversand an den Fachhändler.
43
Page 44

Manual de uso
INSTRUCCIONES DE SEGURIDAD
Este manual de uso contiene indicaciones sobre el funcionamiento
de su aparato y las precauciones que debe tomar para su seguridad.
Léalo atentamente antes del primer uso y consérvelo con cuidado
para cualquier relectura en el futuro. Este aparato se debe utilizar
solamente para realizar la recarga y/o la alimentación eléctrica
dentro de los límites indicados en el aparato y el manual. Se deben
respetar las instrucciones relativas a la seguridad. En caso de
uso inadecuado o peligroso, el fabricante no podrá considerarse
responsable.
Aparato destinado a un uso en interior. No se debe exponer a la
lluvia.
Este aparato se puede utilizar por niños de al menos 8 años y
por personas con capacidades físicas, sensoriales o mentales
reducidas o sin experiencia o conocimiento, siempre y cuando
estén correctamente vigilados y que se entreguen instrucciones
relativas al uso del aparato con toda seguridad y si se han señalado
los posibles riesgos. Los niños no deben jugar con el aparato. La
limpieza y mantenimiento por el usuario no se debe efectuar por
niños sin vigilancia.
En ningún caso se debe usar este aparato para cargar pilas o
baterías no recargables.
No utilice el aparato si el cable de corriente o la toma de corriente
están dañados.
No utilizar el aparto si el cordón de carga está dañado o presenta
un defecto de ensamblaje, para evitar cualquier riesgo de cortocircuito de la batería.
Traducción de las instrucciones
originales
GYSFLASH 107.24 CNT FV
44
No cargue nunca una batería helada o dañada.
No cubra el aparato.
No colocar el aparato cerca de una fuente de calor y a temperaturas
muy elevadas (superiores a 60ºC).
No obstruya las aperturas de ventilación.
El modo de funcionamiento automático y las restricciones de uso
están explicadas en este manual.
Riesgo de explosión y de incendio.
• Una batería en carga puede emitir gases explosivos.
• Durante la carga, la batería debe ponerse en un lugar aireado.
• Evite las llamas y las chispas.
• Proteja las supercies de contactos eléctricos de la batería contra
cortocircuitos.
• No deje la batería en carga y sin vigilancia durante mucho tiempo.
Riesgo de proyección de ácido.
Page 45

Manual de uso
• Lleve gafas y guantes de protección.
• En caso de contacto con los ojos o la piel, aclare inmediatamente
con agua abundantemente y consulte con un médico sin demora.
Conexión / desconexión:
• Desconecte la alimentación eléctrica antes de conectar o
desconectar las conexiones sobre la batería.
• El borne de la batería no conectado al chasis debe conectarse
primero. La otra conexión se debe efectuar en el chasis, lejos de
la batería y de la canalización de combustible. El cargador de
batería debe conectarse después a la red eléctrica.
• Tras la operación de carga, desconecte el cargador de la red
eléctrica, retire la conexión del chasis y la conexión de la batería,
en este orden.
Conexiones:
• Este aparato debe conectarse a una toma de corriente conectado
a tierra.
• La conexión a la red eléctrica se debe efectuar conforme a las
reglas de instalación nacionales.
Mantenimiento:
• Si se daña el cable de alimentación, deberá ser reemplazado por
un cable o conjunto especial disponibles en el fabricante o su
servicio pos-venta.
Traducción de las instrucciones
originales
GYSFLASH 107.24 CNT FV
ES
• El mantenimiento solo debe realizarlo una persona cualicada.
• ¡Advertencia! Desconecte siempre la toma de corriente de la red
eléctrica antes de realizar trabajos sobre el aparato.
• El aparato no requiere ningún mantenimiento particular.
• Si el fusible interno se funde, deberá ser reemplazado por el
fabricante, su servicio post-venta o una persona cualicada, para
evitar todo peligro.
• No utilice en ningún caso disolventes u otros productos de limpieza
agresivos.
Normativa:
• Aparato conforme a las directivas europeas.
• La declaración de conformidad está disponible en nuestra
página web.
• Marca de conformidad EAC (Comunidad económica Euroasiática)
• Equipo conforme a los requisitos británicos. La Declaración de
Conformidad Británica está disponible en nuestra página web
(véase la portada).
• Equipamiento conforme a las normas marroquíes.
• La declaración de conformidad Cم (CMIM) está disponible en
nuestra página web (ver página de portada).
45
Page 46

Manual de uso
100 Ah
Traducción de las instrucciones
originales
GYSFLASH 107.24 CNT FV
Desecho :
• Este material es objeto de una recogida selectiva. Ne lo tire a la
basura doméstica.
DESCRIPCIÓN GENERAL
Su GYSFLASH es un cargador profesional multiuso de tecnología inverter. Diseñado para respaldar las baterías de vehículos de
demostración o sus fases de diagnostico, garantiza igualmente una disposición de carga ideal para el mantenimiento de los modelos un poco más modernos. Este cargador puede utilizar cables de salida de hasta 8m. El cambio de los cables de carga necesitan
una re calibración (cf. página 52). Está considerado como un aparato jo y no como un aparato móvil.
De origen su GYSFLASH es entregado con una conguración que incluye 4 modos :
• Modo de carga : dedicado a la recarga de baterías de arranque de tipo plomo (selladas, liquidas, AGM...) o litio (LiFePO4).
• Modo de alimentación | Diag+: Proporciona las necesidades de energía durante las fases de diagnostico al vehículo.
• Modo de alimentación | Showroom: Asegura la conservación del estado de carga de la batería y proporciona la energía reque-
rida durante la utilización de los accesorios electrónicos de un vehículo de demostración.
• Modo probador: permite vericar el estado de la batería, tanto evaluar el arranque de un vehículo como el funcionamiento del
alternador.
Su GYSFLASH es Inteligente!
La funciones originales de su GYSFLASH se pueden duplicar tan solo agregando modos y perles de carga especicas gracias a su
comunicación USB y a la conguración personalizada (ver página 54).
Su GYSFLASH ofrece igualmente la posibilidad de recuperar los datos de varias centenas de cargas de su llave USB para analizarlas sobre la planilla electrónica.
Módulos adicionales (impresora, comunicación Ethernet...) pueden igualmente conectarse al cargador gracias a su puerto modulado.
Función «Auto-Detect» :
El GYSFLASH está equipado con la función «Auto-Detect» que permite iniciar automáticamente
una carga mientras que la batería está conectada al cargador. (Para activar/desactivar esta función ver página 53)
Auto - Detect
12.
5
Carga
v
Función «Auto-Restart» :
La función «Auto-Restart» ofrece la posibilidad de iniciar automáticamente el cargador en caso de corte de energía.
(Para activar/desactivar esta función ver página 53)
INICIO
1. Conecte el cargador en la toma de corriente.
2. Colocar el interruptor, situado a la parte trasera de su cargador, sobre «ON»
3. Seleccionar el modo deseado (Carga -> Supply -> Test).
Para acceder al Menú Conguración, presionar sobre el botón .
NAVIGATION DANS LES MENUS ET RÉGLAGE DES MODES
1 Utilice las echas para desplazarse por el menú o para modicar el valor o el estado de un parámetro.
Pulse el botón SELECT para entrar en un submenú, seleccionar un parámetro o conrmar el valor de un
2
parámetro.
3 Pulse el botón ATRÁS para volver al menú (o submenú) anterior.
MODO CARGA
46
1
3
5
Carga
Pb-CARGA
plomo
12 V
1 - Modo
2
2 - Grupo de carga
3 - Curva de carga
4 - Tensión nominal de la batería
4
5 - Capacidad nominal de la batería
(disponible según las curvas)
Page 47

Manual de uso
Tipo de carga Perl Tensión de carga
Normal
AGM
Pb-CARGA
Li-CARGA LFP/LiFePO4
• Arranque de la carga :
Líquido
Easy
Traducción de las instrucciones
originales
2.40 V/célula Baterías de plomo de tipo Gel, MF, EFB, SLA...
2.45 V/célula
2.45 V/célula Baterías de plomo abiertas de tipo líquido con tapón.
2.40 V/célula
3.60 V/célula Baterías de litio de tipo LFP (Litio Ferro Fosfato).
GYSFLASH 107.24 CNT FV
La mayoría de baterías de plomo de tipo AGM incluyendo START and STOP.
En cualquier caso, algunas baterías AGM necesitan una carga de tensión baja
(perl normal). Vericar el manual de la batería en caso de duda.
Perl dedicado a las baterías de plomo que se adaptan automáticamente a la cor-
riente de carga en función de la talla de la batería.
En cualquier caso, para la optimización máxima de la carga, se recomienda en
cuando sea posible, utilizar las curvas de carga normal, AGM o líquida.
Pb - CARGA
13.5
V
113
01:27:35 105.8
1- Courbe de charge appliquée
2- Tension de la batterie
3- Courant délivré par le chargeur
4- Temps écoulé
5- Ampère-heures injectés
6- Avancement du cycle de charge
A
Ah
3
5
6
8
5
1
2
4
v
Démarrage manuel
Pour lancer la charge, appuyer sur le bouton START/STOP.
1
Démarrage automatique
Si la fonction AUTO-DETECT est active, la charge
démarrera automatiquement au bout de 3 secondes
en présence d’une batterie.
Durant la charge, votre GYSFLASH indique le pourcentage d’avancement du
2
cycle de charge, la tension, le courant, les ampères-heures injectés ainsi que
le temps écoulé.
3 Appuyer sur le bouton START/STOP pour arrêter la charge.
Precauciones:
Cuando cargue un vehículo, le recomendamos que reduzca el consumo de energía del vehículo al mínimo (apague las luces, desconecte el encendido, cierre las puertas, etc.) para evitar interrumpir el proceso de carga.
Compruebe el nivel de electrolito de las baterías abiertas. Rellene si es necesario antes de la carga.
• Curva de carga Plomo :
Auto - Detect
12.
Carga
1 2 3 4 5 6 7
U
ES
I
Análisis Recuperación Test Desulfatado Carga Absorción
0%
Etapa 1 : Análisis
Análisis del estado de la batería (nivel de carga, inversión de
polaridad, batería conectada incorrecta…)
Etapa 2 : Recuperación
Algoritmo de recuperación de los elementos dañados tras una
descarga profunda y prolongada.
Etapa 3 : Test
Test de batería sulfatada.
Etapa 4 : Desulfatado
Algoritmo de desulfatación de la batería.
Etapa 5 : Carga
Carga rápida con corriente máxima que permite llegar al 80%
del nivel de carga.
10% 20%
80%
Etapa 6 : Absorción
Carga con voltaje constante para llevar el nivel de carga a 100%.
Etapa 7 : Refresh (perl liquido únicamente)
El cargador inyecta una corriente suplementaria para crear el
gas que permite la mezcla del electrolito y recondiciona las
células de la batería. Durante esta fase, la batería puede perder
un poco de agua.
Etapa 8 : Mantenimiento de carga
Mantenimiento del nivel de carga de la batería a su máximo nivel.
Refresh
(si la opción está activa)
95% 100%
Mantenimien-
to de carga
47
Page 48

Manual de uso
120 Ah
Curva de carga litio LFP :
Traducción de las instrucciones
originales
GYSFLASH 107.24 CNT FV
1 2 3 4 5 6 7
U
I
Análisis UVP Wake up Recuperación Carga Prueba Complemento
0%
Etapa 1 : Análisis
Análisis del estado de la batería (nivel de carga, inversión de polaridad, batería conectada incorrecta…)
Etapa 2 : UVP Wake up
Reactiva las baterías en protección UVP (Under Voltage Protection)
Etapa3 : Recuperación
Algoritmo de recuperación tras una descarga profunda.
Etapa 4 : Carga
Carga rápida con corriente máxima que permite llegar al 90% del
nivel de carga.
Etapa 5 : Absorción
Carga con voltaje constante para llevar el nivel de carga a 95%.
2% 85% 95% 99% 100%
Absorción
Etapa 6 : Prueba
Prueba de conservación de carga.
Etapa 7 : Complemento
Carga con corriente reducida que permite llegar al 100% del
nivel de carga.
Etapa 8 : Igualización / equilibrado
Equilibrado de las células de la batería.
Etapa 9 : Mantenimiento de carga
Mantenimiento del nivel de carga de la batería a su máximo
nivel.
8
Equalizing Battery System
Igualización /
equilibrado
9
Mantenimiento de carga
MODO DE ALIMENTACIÓN : SHOWROOM / DIAG+
1
3
5
• Puesta en marcha de la fuente de alimentación:
Inicio manual
Para iniciar el modo de suministro, pulse el botón
START/STOP.
Arranque automático
1
Si la función AUTO-DETECT está activa, la alimentación
se iniciará automáticamente al cabo de 3 segundos si hay
una batería o un contacto a la salida del Gysash (ejemplo: vehículo sin batería).
Durante el modo de alimentación, el Gysash indica la tensión, la corriente,
2
el tiempo transcurrido y los amperios-hora inyectados.
3 Pulse el botón START/STOP para detener la carga.
Precaución: Al iniciar un modo, si se indica una corriente superior a 10A, esto signicará que su batería está descargada. Su Gysash suministrará una corriente de recarga. Compruebe que no haya dispositivos encendidos en el vehículo. Esperar a que la inten-
sidad pase bajo los 10A antes de iniciar toda acción en el vehículo (uso de los accesorios eléctricos, operación de diagnostico, etc).
Supply
SHOWROOM
12 V
14.2
V
1- Modo
2
2- Ciclo de suministro
3- Tensión nominal (disponible según el modo)
4- Tensión de suministro
4
5- Corriente de suministro
SHOWROOM
14.2
01:27:35 105.8
1- Ciclo de alimentación aplicado
2- Tensión de la batería
3- Corriente suministrada por el Gysash
4- Tiempo transcurrido
5- Amperios-hora inyectados
6- Progreso del ciclo de carga
de carga integrada está activa)
Auto - Detect
2.
5
Supply
1
2
4
v
V
113
Ah
A
(si la función
3
5
6
48
Page 49

Manual de uso
Funcionalidades de los modos de alimentación:
Modo
Función
«sin batería»
Traducción de las instrucciones
originales
Función
«Carga integrada»
Protección de
subtensión anormal
GYSFLASH 107.24 CNT FV
Ajuste de la tensión a regular
Modelos de 12 V
SHOWROOM
DIAG+
• Función «sin batería» (no recomendada) :
Esta función permite utilizar el modo de alimentación SHOWROOM y la ausencia de batería.
Para esto, presione durante 3 segundo sobre el botón START/STOP. La indicación «Modo
sin batería» se mostrará durante 3 segundos antes de forzar la alimentación.
Se desaconseja utilizar la función «sin batería» si una batería está presente.
Esta función desactiva la función «Carga integrada» al igual que algunas protecciones tales como la protección de subtensión anormal o la detección de desconexión.
En este caso, una inversión de polaridad puede tener repercusiones negativas en los dispositivos electrónicos
del vehículo.
Modelos de 24 V
Modelos de 48 V
Modelos de 12 V
Modelos de 24 V
Modelos de 48 V
6.3 V - 7.2 V
12.7 V - 14.4 V
25.4 V - 28.8 V
38.1 V - 43.2 V
50.8 V - 57.6 V
12.7 V - 14.8 V
14.4 V - 17.2 V
25.4 V - 29.6 V
38.1 V - 44.4 V
50.8 V - 59.2 V
SHOWROOM
modo sin bateria
ES
• Función «Carga integrada» :
El modo SHOWROOM (fuera del modo «sin batería») integra un algoritmo de carga automática adaptada a todos los tipos de baterías (plomo y litio) para garantizar un nivel de carga optimo para los vehículos de demostración. Esta función es perfectamente
compatible con la presencia de consumidores activos en la batería.
1 2 3 4
6
5
U
I
Análisis Carga Complemento
Etapa 1 : Análisis
Análisis del estado de la batería (nivel de carga, inversión
de polaridad, batería conectada incorrecta, etc).
Etapa 2 : Carga
Carga rápida con corriente máxima que permite llegar hasta U1
(ex: 13.8 V en )
Etapa 3 : Absorción
Carga bajo tensión constante U1 (ex : 13.8 V en ).
Duración máx 1h.
Etapa 4 : Complemento
Aumento progresivo de la tensión hasta U2
(ex : 14.4 V en ).
Etapa 5 : Igualización / equilibrado
Soporte de la tensión U2 (ex : 14.4V en ).
Duración máx 2h.
Etapa 6 : Modo suministro
Aplicación de la tensión a regularizar.
Igualización /
equilibrado
Duración máx 2h.
Modo suministroAbsorción
49
Page 50

Manual de uso
• Protección de subtensión anormal :
Esta protección informa sobre los riesgos de corto circuito o de batería demasiado dañada. El cargador se detendrá automáticamente si la tensión es extrañamente baja durante mas de 10 minutos.
MODO DE PRUEBA
Navegación general :
Traducción de las instrucciones
originales
GYSFLASH 107.24 CNT FV
1 Utilizar las echas para seleccionar el test que se va a realizar.
2 Presionar sobre el botón STAR/STOP para iniciar el teste.
• Comprobación de la tensión :
Este modo permite visualizar la tensión de las terminales de las pinzas de carga y también
utilizar de su GYSFLASH como un voltímetro para medir la tensión de la batería.
• Prueba de arranque :
Este modo tiene como objetivo la evaluación del sistema de arranque del vehículo (arranque + batería) durante el arranque del
motor. Esta prueba debe realizarse con la batería conectada al vehículo.
Utilizar las echas para seleccionar la tensión nominal de la batería del
1
vehículo
2 Presionar sobre el botón SELECT para validar
3 Conectar las pinzas sobre la batería del vehículo
Prueba
Prueba de voltaje
Prueba de arranque
Prueba alternador
Prueba de voltaje
12.5
Prueba
Prueba de voltaje
Prueba de arranque
Prueba alternador
v
4 Arrancar el motor girando la llave de contacto
El cargador detecta automáticamente la tentativa de arranque del motor e inicia un algorit-
5
mo de calculo para determinar el estado del sistema de arranque.
Prueba de arranque
Resultado de la prueba : El cargador indica el valor mínimo de la tensión de la batería percibida durante la fase de arranque del motor, al igual que el estado del sistema de arranque como
calibrador.
• Prueba de alternador :
Este modo sirve a determinar el estado del alternador del vehículo. Esta prueba se realizar con el motor del vehículo encendido.
Utilizar las echas para seleccionar la tensión nominal de la batería del
1
vehículo
2 Presionar sobre el botón SELECT para validar
Resultado de la prueba : El cargador indica el valor de la tensión suministrada por el alternador, así como el estado del alternador bajo forma de un calibrador.
Umin
Prueba de voltaje
Prueba de arranque
Prueba alternador
Prueba alternador
12.5
Prueba
13.5
v
v
50
Page 51

Manual de uso
Nederlands
Traducción de las instrucciones
originales
GYSFLASH 107.24 CNT FV
PROTECCIONES
Este aparato está protegido contra los corto-circuitos y las inversiones de polaridad. Dispone de un sistema anti chispas que evita
las chispas cuando se conecta el cargador a la batería. Si no hay tensión en las pinzas, estas no liberan corriente por seguridad.
Este cargador está protegido contra los errores de manipulación por un fusible interno.
MENÚ DE CONFIGURACIÓN
Puede acceder al menú de conguración pulsando el botón .
Selección del idioma
ES
Idioma
English
Francais
Deutsch
Fecha / Hora
Fecha/Hora
19/10/2022
13:30
Sonido
Selección del idioma de la pantalla, 19 idiomas disponibles.
Opción para ajustar la fecha y la hora del aparato.
Opción para activar o desactivar el sonido del Gysash y del módulo luminoso externo.
Trazabilidad
Explorar datos
Exportar datos (.csv)
Opción para visualizar o recuperar el historial de las últimas 1000 cargas.
Opción para visualizar en pantalla los datos recogidos durante las últimas 1000
cargas.
Opción para exportar los datos recogidos durante las últimas 1000 cargas a una
memoria USB en formato .CSV.
51
Page 52

Manual de uso
Calibrar los cables
Traducción de las instrucciones
originales
1 Conecte la memoria USB al Gysash
2 Entre en el submenú "Exportar DONNÉES".
3 Conrme que desea guardar los datos de carga.
A continuación, el Gysash copiará los datos de carga en la memoria USB en
4
forma de archivos ".CSV".
GYSFLASH 107.24 CNT FV
Calibracion de cable
Automatico
Manual
Calibración automática (recomendada)
Calibracion de cable
Asegúrese de que las partes metálicas de las mordazas a las que están sujetos los cables
están en contacto entre sí.
Los cables pueden calibrarse automáticamente (recomendado) o manualmente.
Este procedimiento sirve para calibrar los cables de carga del aparato, de forma que el
Gysash pueda compensar de forma óptima la caída de tensión debida a los cables. Le
recomendamos encarecidamente que lleve a cabo este procedimiento cada vez que sustituya los cables o si están desgastados.
Para calibrarlos, simplemente cortocircuite las pinzas de carga y conrme.
El aparato calculará automáticamente la resistencia de los cables.
OK NOK NOK
Calibración manual (no recomendada)
Calibracion de cable
11.5 m
52
La resistencia de los cables puede ajustarse manualmente.
Atención: este valor debe incluir la resistencia interna del Gysash.
Page 53

Manual de uso
Traducción de las instrucciones
originales
Parámetros avanzados
Este menú da acceso a las funciones avanzadas de su Gysash.
+ Opción
GYSFLASH 107.24 CNT FV
+ Opciones
- Detect
Auto
- Restart
Auto
Activé Désactivé
Portabilidad
Este menú permite denir si las opciones Auto-detección y Auto-reinicio deben
activarse o no.
Opción Auto-detección: Esta función permite iniciar automáticamente una
carga cuando se detecta un contacto en la salida del Gysash. Si la opción
«Auto-detect» está desactivada, sólo se detectará un contacto en la salida en
modo «Auto-select» y los demás modos sólo podrán iniciarse mediante un
START manual.
Opción «Auto-restart»: Esta función permite reiniciar automáticamente el Gys-
ash en caso de corte de corriente.
Este menú le permite importar, exportar o inicializar la conguración del Gysash.
Su GYSFLASH está equipado con conectividad USB, lo que le permite ampliar
su funcionalidad creando conguraciones personalizadas en su ordenador, que
luego podrá descargar en el aparato mediante una simple llave USB. La conguración personalizada le permite añadir, suprimir o modicar modos y perles
de carga, para que su cargador se adapte lo mejor posible a sus necesidades.
Restaurar CONFIG
ES
Esta acción restablece la conguración original (de fábrica) del Gysash tras una modicación manual de
los modos o parámetros.
1 Acceda al submenú "Restaurar CONFIG".
2 Conrme que desea restaurar la conguración.
3 El Gysash restaurará entonces su conguración original (de fábrica)
Importar CONFIG (.gfc)
Esta acción descarga una nueva conguración de fábrica en el Gysash.
La conguración actual se sobrescribe.
Asegúrese primero de que el archivo ".gfc" correspondiente a la nueva conguración está presente
1
en la memoria USB. Este archivo no debe encontrarse en una carpeta o subcarpeta de la llave
USB.
2 Conecte la llave USB al Gysash.
3 Acceda al submenú "Importar CONFIG".
4 Seleccione el archivo a descargar.
5 Conrme que el archivo ha sido descargado.
6 El Gysash descargará entonces la nueva conguración.
53
Page 54

Manual de uso
Traducción de las instrucciones
originales
Exportar CONFIG (.gfc)
Esta acción permite descargar la conguración actual de la Gysash en una memoria USB.
1 Conecte la llave USB al Gysash.
2 Entre en el submenú "Exportar CONFIG".
3 Conrme que la conguración ha sido guardada.
4 A continuación, el Gysash guardará su conguración actual en la llave USB.
Conguración personalizada
Lista de modos y perles disponibles a la personalización :
MODO CARGA
Tipo de
carga
Pb-CHARGE
Li-CHARGE
TRACCIÓN
Perles de
carga
Normal
AGM
Líquido
Easy
boost
recovery+
Ca/Ca recov
LFP/LiFePO4
Li-ion std
LFP cell+
Li-ion cell+
Líquido
Gel
Tensión de
carga
2.40 V/célula Perl de carga para baterías de plomo de tipo Gel, MF, EFB, SLA...
2.45 V/célula
2.45 V/célula Perl de carga para baterías de plomo abiertas de tipo líquido con tapón.
2.40 V/célula
2.42 V/célula
2.40 - 2.50
V/célula
2.45 - 2.66
V/célula
3.60 V/célula Perl de carga para baterías de litio tipo LFP (Litio Hierro Fosfato)
4.20 V/célula
3.60 V/célula
4.20 V/célula
2.42 V/célula Perl de carga dedicado a las baterías de tracción tipo plomo abierta para carro elevador.
2.35 V/célula Perl de carga dedicado a las baterías de tracción tipo plomo abierta para carro elevador.
Perl de carga para la mayoría de baterías de plomo tipo AGM incluyendo START and STOP.
En cualquier caso, algunas baterías AGM necesitan una carga de tensión baja (perl normal).
Vericar el manual de la batería en caso de duda.
Perl de carga dedicado a las baterías de plomo que se adaptan automáticamente a la corriente de carga en función de la talla de la batería.
En cualquier caso, para la optimización máxima de la carga, se recomienda en cuando sea
posible, utilizar las curvas de carga normal, AGM o líquida.
Perl de carga a corriente máxima para batería de plomo. Este perl permite una carga ultra
rápida.
Atención : Este tipo de carga debe permanecer ocasional para no reducir la duración de vida de la batería.
Perl de carga destinada a la recuperación de baterías de plomo dañadas. La recuperación
debe imperativamente realizarse con la batería fuera del vehículo para no dañar la electrónica
del vehículo y al aire libre.
Atención : La tensión de recuperación puede alcanzar hasta 4.0V/célula.
Perl de carga para la recuperación de la batería de calcio. La batería debe recuperarse fuera del
vehículo para no dañar los componentes electrónicos del mismo y en una zona bien ventilada.
Precaución: La tensión de recuperación puede alcanzar hasta 2,75 V/celda.
Perl de cargar para baterías Litio-ion estandard a base de Magnesio Colbato (NMC, LCO,
LMO, MCO...)
Perl de carga dedicado a las células Litio-ion tipo LFP (Litio Hierro Fosfato) con selección del
número de células en serie a cargar.
Perl de carga dedicado a las células Litio-ion estandard a base de Magnesio o Colbato (NMC,
LCO, LMO, MCO...) con selección del número de células en serie a cargar.
GYSFLASH 107.24 CNT FV
MODOS DE ALIMENTACIÓN
SHOWROOM
DIAG+
CAMBIO DE BAT.
MODO ARRANCADOR
Suministro eléctrico
Li-SUPPLY/LFP
Li-SUPPLY/Li-on
54
Asegura la conservación del estado de carga de la batería y proporciona la energía requerida durante la utilización de los accesorios electrónicos de un vehículo de demostración.
Proporciona la energía requerida durante las fases de diagnostico del vehículo.
Permite conservar el suministro eléctrico del vehículo cuando se remplaza la batería para preservar la memoria
del vehículo.
Atención : La inversión de polaridad durante el uso puede ser perjudicial para el cargador y la electrónica del vehículo.
Ayuda de arranque para vehículos de combustión. Permite que la batería se precargue y que el cargador envíe la
máxima corriente durante la fase de arranque del motor (el cargador se detiene automáticamente después de 30
minutos).
Permito servirse del cargador como si fuera una fuente de suministro eléctrico estable y de gran potencia. La
tensión de regulación y la limitación de la corriente son totalmente ajustables.
Atención : La inversión de polaridad durante el uso puede ser perjudicial para el cargador y la electrónica del vehículo.
Modo dedicado a la carga de las células de litio-ion tipo LFP (Litio Hierro Fosfato) con una selección del numero
de células en serie, ajuste de la tensión y de la corriente a aplicar.
Modo dedicado a la carga de las células litio-ion estándar a base de Magnesio o Cobalto (NMC, LCO, LMO,
MCO...) con selección del numero de células en serie, ajuste de la tensión y de la corriente a aplicar.
Page 55

Manual de uso
Traducción de las instrucciones
originales
GYS le propone conguraciones predenidas adaptadas a cada aplicación.
Estas conguraciones están disponibles en la página de productos del sitio web de la GYS:
MODO CARGA MODOS DE ALIMENTACIÓN OTROS
Pb-CHARGE Li-CHARGE TRACCIÓN
Archivo de conguración
(gys.fr) Aplicaciones
Normal
AGM
Líquido
Easy
Boost
recovery+
Ca / Ca recov
LFP/LiFePO4
Li-ion std
1_gys_original.gfc Conguración inicial del cargador
2_car_extended.gfc Amplias funcionalidades para el mecánico
3_showroom_only.gfc
4_pro_lithium.gfc Profesional de la batería de litio
5_traction.gfc
6_full_version.gfc Versión completa
Sólo en los modelos de 24 V y 48 V.
*
DIAG+ (Pro) - Posibilidad de selección de 16 V.
Versión simplicada para la concesión y vehículo de demostración
Carro elevador, carretilla elevadora eléctrica,
apilador...
GYSFLASH 107.24 CNT FV
SHOWROOM
DIAG+
CAMBIO DE BAT.
MODO ARRANCADOR
Suministro eléctrico
Li-SUPPLY/LFP
Li-SUPPLY/Li-on
LFP cell+
Li-ion cell+
Líquido
gel
*
Modo de ensayo
ES
Multi-cargador
Multi-cargador
OFF
Master
Master
Master
Información
+ 1 Slave
+ 2 Slaves
+ 3 Slaves
Informacion
GYSFLASH 107.24
HW08.00
- SW01.00
22.11.069909.000000
Este menú permite denir la conguración en modo Multicargadores (para más
detalles, consulte el manual SHM -
025981
Seleccione «OFF» para una utilización estándar con un solo Gysash.
Este menú muestra información sobre su Gysash:
- Nombre del dispositivo
- Versiones de hardware/software
- Número de serie
).
55
Page 56

Manual de uso
Traducción de las instrucciones
originales
ÁRBOL DEL MENÚ DE CONFIGURACIÓN
Selección de idioma
Selección de fecha y hora
Son On / O
GYSFLASH 107.24 CNT FV
Trazabilidad
Calibración de cables
Calibracion de cable
Automatico
Manual
Conguración avanzada
Información
Automático o manual
Explorar datos
Exportar datos
+ Opciones
Portabilidad
Multi-cargador
Restaurar CONFIG
Importar CONFIG
Exportar CONFIG
CONECTIVIDAD MÓDULOS
Su GYSFLASH está equipado con un adaptador tipo DB9 que permite conectar diferentes módulos adicionales propuestos por
GYS tales como un impresor, Ethernet u otros con el objetivo de ampliar las posibilidades de su cargador.
LISTAS DE CÓDIGOS ERROR
Código de error Signicado Soluciones
Err01: Int_1 - Err02: Int_2
Err23: Int_3 - Err24: Int_4
Err03: Fuse_NOK El fusible de salida no funciona. Remplazar el fusible por una persona competente
Err04: T>Tmax Sobrecalentamiento anormal Contacte su distribuidor.
Err05: (+) (-)
Err06: U>__V
Err07: No_bat Batería no conectada
Err08: U<__V Baja e inusual tensión de la batería.
Err09: U>__V Elevada e inusual tensión de la batería
Err10: U<2.0V Corto circuito detectado durante la carga Vericar el montaje
Problema electrónico
Cargador defectuoso
Inversión de polaridad en las pinzas
Sobretensión detectada en los bornes de
las pinzas
Contacte su distribuidor.
Conecte la pinza roja en el polo positivo y la pinza negra en el
negativo de la batería.
Desconectar las pinzas
Verique que la batería esté correctamente conectada al cargador
Verique que el modo seleccionado es compatible con la tensión
de la batería (ex. : batería 6 V en modo 24 V)
Proceder a la carga de la batería vía el modo CARGA
Se debe reemplazar la batería.
Verique que el modo seleccionado es compatible con la tensión
de la batería (ex. : batería 24 V en modo 12 V)
56
Page 57

Manual de uso
Traducción de las instrucciones
originales
GYSFLASH 107.24 CNT FV
Err11: Time_Out
Err12: Q>___Ah Activación de la protección de sobrecarga
Err13: U<__V
Err14: Bat_UVP
Err15: U<__V Batería demasiada baja
Err16: Bat_NOK Batería inservible Se debe reemplazar la batería.
Err17: Recov_NOK Fallo en la recuperación de la batería Se debe reemplazar la batería.
Err18: U>0V
Err19: Cable_NOK Falla de la calibración de los cables
Err20: U<__V
Err21: U<__V ou Err22: U<__V
?
?
Activación del limite de tiempo
inusual y lenta carga Se debe reemplazar la batería.
Tensión de la batería anormalmente baja
durante la vericación de la carga
Tensión de la batería anormalmente baja
durante el UVP Wake up
Presencia de tensión en los bornes de las
pinzas durante la calibración de los cables.
Activación de la protección de subtensión
anormal
Tensión de la batería anormalmente baja
durante la vericación de la carga
Tecla no detectada
No hay ningún archivo de conguración
(.gfc) en la llave
Presencia de un consumidor sobre la batería que perturba la
carga
Presencia de un consumidor sobre la batería que perturba la
carga
Se debe reemplazar la batería.
Se debe reemplazar la batería.
Presencia de un corto circuito, vericar el montaje
Se debe reemplazar la batería.
Verique que el modo seleccionado es compatible con la tensión
de la batería (ex. : batería 24 V en modo 12 V)
Se debe reemplazar la batería.
Vericar el montaje
Remplazar los cables de carga
Mala conexión, vericar el montaje
Presencia de un corto circuito, vericar el montaje
Se debe reemplazar la batería.
Presencia de un consumidor de batería
Compruebe que la llave USB está correctamente conectada al
cargador
Compruebe que sus archivos están presentes en la raíz de la
llave USB. No los coloque en una carpeta o subcarpeta.
ES
Archivo dañado Cables de carga a sustituir.
Mala conexión, compruebe el montaje (PHM).
Err27: Cable_NOK
Err28: COM_NOK
Modo multicarga :
Los cables de carga en paralelo fallan
Modo multicarga :
Fallo de comunicación entre cargadores
Para volver al funcionamiento de un solo cargador, seleccione
OFF para la función de cargador múltiple.
No hay comunicación, compruebe el conjunto SHM y la conguración del cargador SLAVE X.
Para volver a funcionar con un solo cargador, seleccione OFF
para la función de cargador múltiple.
Pour rebasculer en fonctionnement avec un seul chargeur,
sélectionner OFF pour la fonction Multi-chargeurs.
GARANTÍA
La garantía cubre todos los defectos o vicios de fabricación durante 2 años, a partir de la fecha de compra (piezas y mano de obra)
La garantía no cubre:
• Todas las otras averías resultando del transporte
• El desgaste normal de las piezas (cables, pinzas…)
• Los incidentes resultando de un mal uso (error de alimentación, caída, desmontaje)
• Los fallos relacionados con el entorno (polución, oxidación, polvo…)
En caso de fallo, regresen la maquina a su distribuidor, adjuntando:
• Un justicativo de compra con fecha (recibo, factura…)
• Una nota explicativa del fallo.
57
Page 58
Инструкция по
применению
ПРАВИЛА БЕЗОПАСНОСТИ
Данная инструкция описывает функционирование вашего
устройства и меры предосторожности в целях обеспечения
вашей безопасности. Пожалуйста, прочтите ее перед первым
использованием и сохраните, чтобы при надобности перечитать.
Это устройство можно использовать только для подзарядки или
питания в пределах, указанных на устройстве и в руководстве.
Соблюдайте правила безопасности. В случае ненадлежащего или
опасного использования производитель не несет ответственности.
Аппарат предназначен для использования в помещении. Не
оставляйте под дождём.
Этот аппарат не может быть использован детьми младше 8 лет,
а также лицами с ограниченными физическими, умственными
возможностями или ограниченным сенсорным восприятием, а
также не обладающими опытом и знаниями, при условии, что
за ними надлежащим образом следят или если с ними провели
инструктаж по безопасному использованию аппарата и если все
возможные риски были предусмотрены. Дети не должны играть с
устройством. Чистка и уход не должны производиться детьми без
надлежащего присмотра.
Ни в коем случае не используйте это устройство для зарядки
батареек или не перезаряжающихся батарей.
Не используйте аппарат если сетевой шнур или вилка повреждены.
Не используйте аппарат если кабель заряда поврежден или
неправильно собран, во избежание риска короткого замыкания
аккумулятора.
Никогда не заряжайте поврежденный или замерзший аккумулятор.
Не накрывайте аппарат.
Не размещайте зарядное устройство рядом с источником тепла и
при постоянно высоких температурах (выше 60°C).
Не перекрывайте вентиляционные отверстия.
Автоматический режим и ограничения его использования описаны
далее в этой инструкции.
Перевод оригинальных
инструкций
GYSFLASH 107.24 CNT FV
58
Риск пожара и взрыва!
• При зарядке аккумулятор может выпускать взрывоопасный газ.
• Во время зарядки аккумулятор должен быть помещен в хорошо
проветриваемом месте.
• Избегайте пламени и искр.
• Защитите поверхности батареи от электрического контакта во
избежание короткого замыкания.
Не оставляйте заряжающийся аккумулятор без присмотра на
длительное время.
Риск кислотных брызг!
Page 59

Инструкция по
применению
• Обязательное ношение защитных очков и перчаток.
• В случае контакта с глазами или кожей обильно промойте
водой и без промедления обратитесь к врачу.
Подключение / отключение :
• Отключите подачу питания перед тем как подключать или
отключать соединения к батарее.
• Сначала подключите клемму аккумулятора, не соединенную с
шасси. Второе подсоединение должно быть осуществлено на
шасси как можно дальше от аккумулятора и от трубопроводов
топливной системы. Затем, подключите зарядное устройство к
сети.
• После зарядки отключите зарядное устройство от сети,
затем отсоедините зажим от шасси и, наконец, зажим от
аккумулятора. Действуйте в указанном порядке.
Подключение:
• Данный прибор должен быть подключен к заземленной
розетке.
• Подключение к электросети должно быть произведено в
соответствии с нормами страны.
Обслуживание:
• Если шнур питания поврежден, он должен быть заменен
на шнур или набор включающий шнур поставляемый
производителем или его сервисной службой.
• Техническое обслуживание должно производиться только
квалифицированным специалистом.
Перевод оригинальных
инструкций
GYSFLASH 107.24 CNT FV
RU
• Внимание! Отключите аппарат от розетки до начала ремонтных
работ.
• Аппарат не требует специфического обслуживания.
• Если предохранитель расплавился, он должен быть
заменен производителем, его сервисной службой или
квалифицированным специалистом во избежание опасности.
• Ни в коем случае не использовать растворители или другие
коррозийные моющие средства.
Нормы и правила:
• Аппарат соответствует директивам Евросоюза.
• Декларация о соответствии доступна для просмотра на нашем
сайте.
• Знак соответствия EAC (Евразийское экономическое
сообщество)
• Материал соответствует требованиям Великобритании.
Заявление о соответствии для Великобритании доступно на
нашем веб-сайте (см. главную страницу).
• Аппарат соответствует марокканским стандартам.
• Декларация соответствия Cم (CMIM) доступна на нашем сайте.
59
Page 60
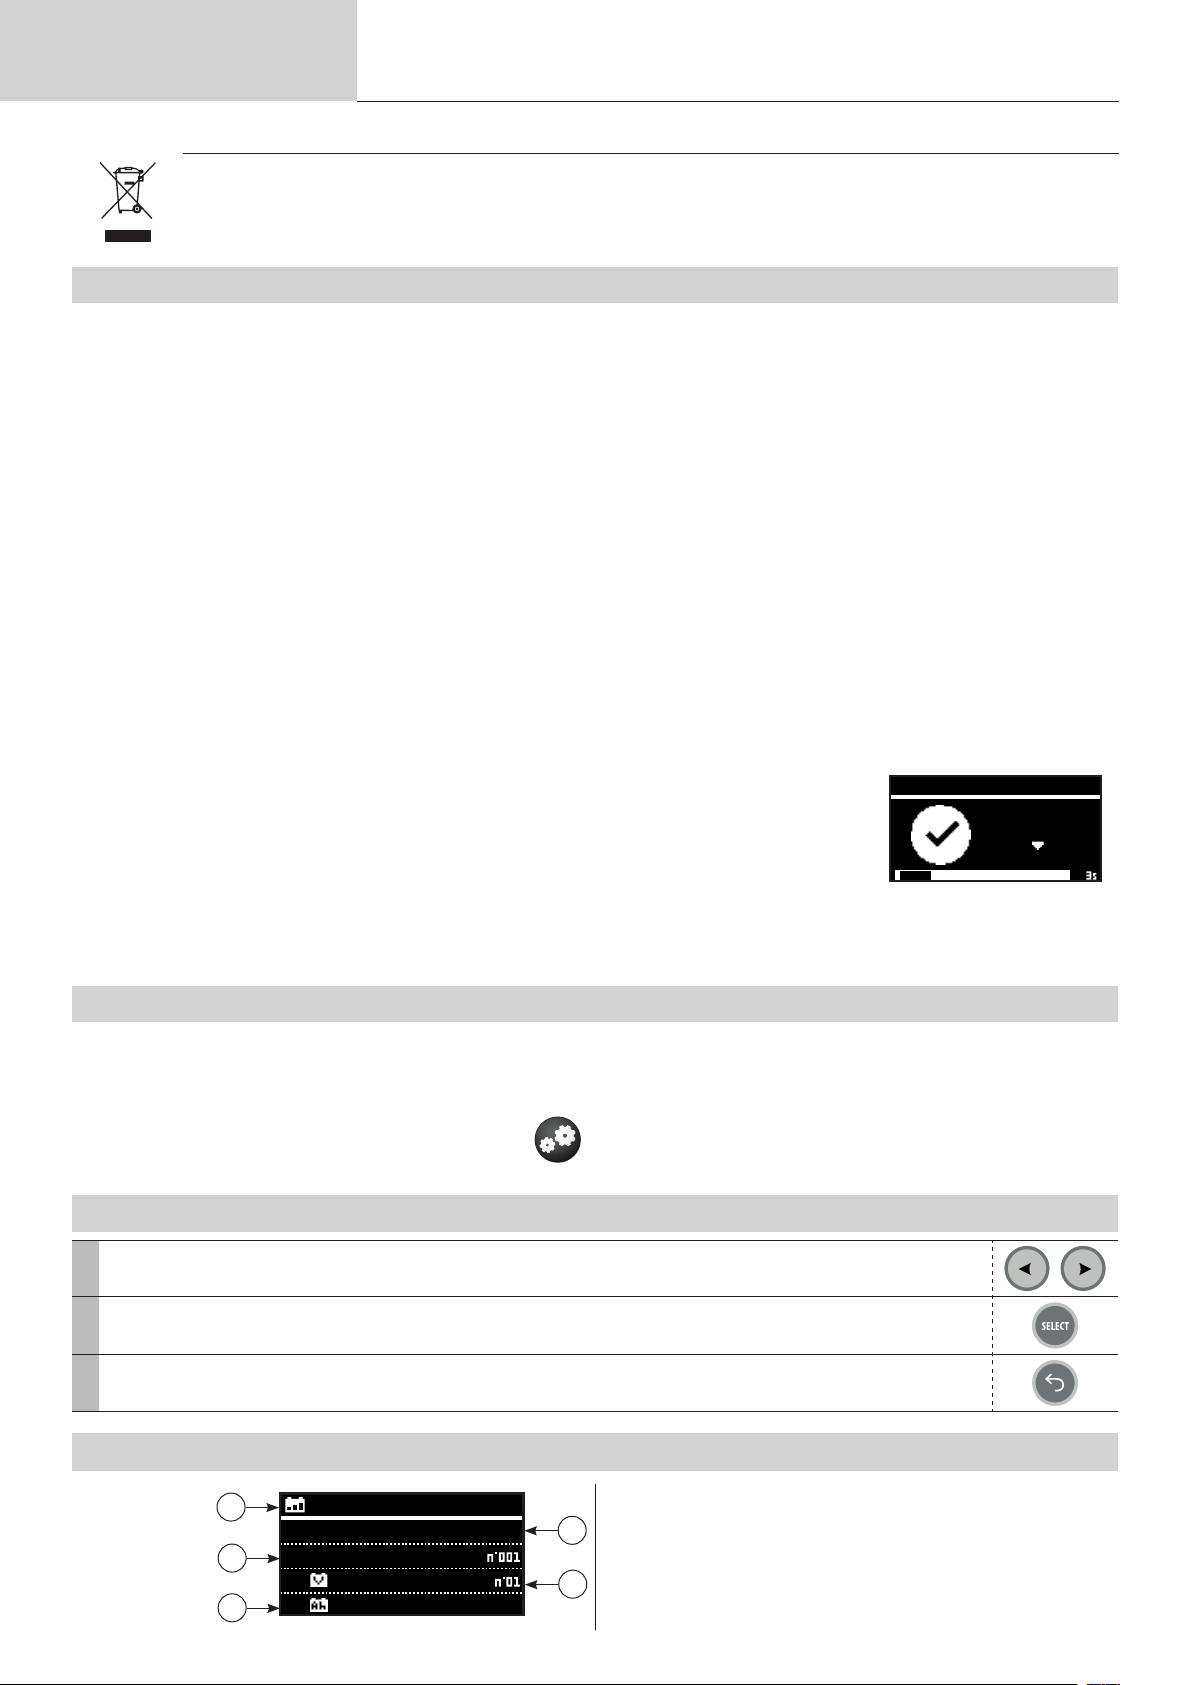
Инструкция по
100 Ah
применению
Перевод оригинальных
инструкций
GYSFLASH 107.24 CNT FV
Утилизация:
• Этот аппарат подлежит переработке. Не выбрасывайте его в
домашний мусоропровод.
ОПИСАНИЕ
Аппарат GYSFLASH - это многоцелевое профессиональное зарядное устройство инверторной технологии. Этот аппарат
разработан для подпитки аккумуляторов автомобилей в шоу-румах или при проведении диагностики. Он также гарантирует
идеальное качество зарядки для технического обслуживания новейших моделей аккумуляторов. К этому зарядному устройству можно подсоединить кабели длиной до 8 м. Замена кабелей зарядки требует повторной калибровки (см. стр. 66). Этот
аппарат является стационарным, а не переносным.
В стандартной комплектации ваш GYSFLASH поставляется с конфигурацией, состоящей из 4 режимов:
• Режим Зарядки : предназначен для подзарядки свинцово-кислотных (герметичных, жидкостных, AGM...) или литиевых
(LiFePO4) пусковых аккумуляторов.
- Режим питания | Diag+ : Для поддержания потребности в электроэнергии во время диагностики автомобиля.
- Режим питания | Выставочный зал (Шоурум) : Обеспечивает поддержание заряда аккумулятора и снабжает его энерги-
ей, необходимой при использовании электрических приборов и аксессуаров демонстрационного автомобиля.
• Режим тестера : позволяет проверить состояние аккумулятора, оценить пусковую способность автомобиля и работу генера-
тора переменного тока.
УМНЫЙ GYSFLASH
Первоначальная функциональность GYSFLASH может быть расширена за счет добавления специальных режимов и профилей зарядки благодаря USB-соединению и пользовательской конфигурации (см. стр. 68).
Ваш GYSFLASH также может получить и сохранить данные с нескольких сотен зарядок на USB-накопитель для анализа в
таблице.
К зарядному устройству можно также подключить вспомогательные устройства и модули (такие как принтер, локальная
сеть Ethernet и т.д.) с помощью специального разъема.
Функция « Auto-Detect » (автоматического обнаружения):
Gysash оснащен функцией «Auto-Detect», которая автоматически запускает заряд при
обнаружении контакта на выходе Gysash. (Чтобы активировать/деактивировать эту
функцию, см. стр. 67)
Функция « Auto-Restart » (автоматического перезапуска):
Функция Auto-Restart автоматически возобновляет подачу электроэнергии в случае отключения питания.
(Чтобы активировать/деактивировать эту функцию, см. стр. 67).
Auto - Detect
12.
5
Zaryadka
v
ВКЛЮЧЕНИЕ
1. Подключите зарядное устройство к сети.
2. Поверните переключатель на задней панели зарядного устройства в положение «ON»
3. Выберите нужный режим (зарядка -> питание -> тест).
Чтобы перейти в меню конфигурации, нажмите кнопку .
НАВИГАЦИЯ ПО МЕНЮ И НАСТРОЙКИ РЕЖИМОВ
1
Используйте стрелки для перемещения по меню или для изменения значения или состояния параметра.
2 Нажмите кнопку SELECT, чтобы войти в подменю, выбрать параметр или подтвердить значение параметра.
3 Нажмите кнопку назад, чтобы вернуться в предыдущее меню (или подменю).
РЕЖИМ ЗАРЯДА
1
3
5
Zaryadka
Pb-ZARYAD
svinets
12 V
1 - Режим
2 - Группа заряда
2
3 - Кривая нагрузки
4 - Номинальное напряжение батареи
4
5 - Номинальная емкость аккумулятора (доступна в соответствии с
кривыми)
60
Page 61

Инструкция по
применению
Перевод оригинальных
инструкций
GYSFLASH 107.24 CNT FV
Тип зарядки Профиль
normal /
стандартный
AGM 2.45 V/ячейка
Pb-ЗАРЯДКА
Li-ЗАРЯДКА LFP/LiFePO4 3.60 V/ячейка Литиевые аккумуляторы типа LFP (литий-железо-фосфатные).
охлаждающая
жидкость
Easy 2.40 V/ячейка
Напряжение
заряда
2.40 V/ячейка
2.45 V/ячейка Свинцовые открытые аккумуляторы с пробками с жидкостным электролитом.
Свинцовые аккумуляторы типа гелиевые, необслуживаемые, улучшенные залитые
(EFB), свинцово-кислотные (SLA) аккумуляторы…
Большинство свинцовых аккумуляторов типа AGM, включая START and STOP.
Тем не менее некоторые аккумуляторы AGM требуют зарядку на пониженном напряжении (Стандартный профиль). В случае сомнения проверьте руководство по эксплуатации аккумулятора.
Профиль для свинцовых аккумуляторов, которые автоматически регулируют ток зарядки, в зависимости от размера аккумулятора.
Тем не менее для максимальной оптимизации зарядки рекомендуется использовать
кривые зарядки обычную, AGM или для жидкостного электролита (когда это возможно).
• Начало зарядки :
Ручной запуск
Для начала зарядки нажмите на кнопку START/STOP.
1
Автоматический запуск
Если функция AUTO-DETECT активна, зарядка начнётся автоматически через 3 секунды в присутствии батареи.
Во время зарядки устройство GYSFLASH будет показывать процент завершения цик-
2
ла зарядки, напряжение, силу тока, количество ампер-часов и прошедшее время.
Нажмите на кнопку START/STOP для остановки зарядки.
3
Auto - Detect
12.
Zaryadka
5
1
2
4
v
1- Кривая применяемой нагрузки
2- Напряжение аккумулятора
3- Ток, подаваемый зарядным устройством
4- Прошедшее время
5 - Выданные ампер-часы
6- Ход цикла зарядки
Pb-ZARYAD
13.5
V
01:27:35 105.8
113
Ah
A
3
5
6
RU
Меры предосторожности:
При зарядке автомобиля рекомендуется снизить потребление энергии автомобилем до минимума (выключить свет, выключить зажигание, закрыть двери и т.д.), чтобы не нарушить процесс зарядки.
В случае с открытыми АКБ, проверьте уровень электролита. При надобности долейте жидкости перед зарядкой.
• Кривая зарядки свинцовой АКБ
1 2 3 4 5 6 7
8
U
I
Analyse Récupération Test Désulfatation Charge Absorption
0%
Этап 1 : Анализ
Анализ состояния батареи (уровень заряда, перепутана полярность, неправильно подключена батарея...)
Этап 2 : Восстановление
Алгоритм восстановления поврежденных элементов
после глубокого разряда.
Этап 3 : Тест
Испытание сульфатированной батареи.
Этап 4 : Десульфатация
Алгоритм десульфатации АКБ.
Этап 5: Заряд
Быстрая зарядка при максимальном токе в течение
80 % от уровня заряда.
10% 20%
80%
Этап 6 : Поглощение
Зарядка при постоянном напряжении, чтобы довести уровень заряда
до 100%.
Этап 7 : Обновить (только для профиля жидкости)
Зарядное устройство подает дополнительный ток для создания газа,
который перемешивает электролит и таким образом восстанавливает
элементы батареи. Во время этой фазы аккумулятор может потерять
немного воды.
Этап 8 : Поддержание заряда
Поддержание уровня заряда АКБ на максимальном уровне.
Refresh
(si option active)
95% 100%
Maintien de
charge
61
Page 62

Инструкция по
0%
2% 85% 95% 99% 100%
120 Ah
применению
Перевод оригинальных
инструкций
Кривая зарядки литий-железо-фосфатной АКБ:
GYSFLASH 107.24 CNT FV
1 2 3 4 5 6 7
U
I
Analyse UVP Wake up Récupération Charge Test Complément
Этап 1 : Анализ
Анализ состояния аккумулятора (уровень заряда, инверсия полярностей, подключение неправильного аккумулятора…)
Этап 2 : UVP Wake up (реактивация аккумулятора в режиме UVP)
Активирует батареи в режиме UVP (защита от пониженного напряжения)
Этап 3 : Восстановление
Алгоритм восстановления после глубокого разряда.
Этап 4 : Заряд
Быстрая зарядка при максимальном токе, обеспечивающая скорость
заряда до 90% уровень заряда.
Этап 5 : Поглощение
Зарядка постоянным напряжением для доведения уровня заряда до 95%.
Absorption
Этап 6 : Тест
Испытание на удержание нагрузки.
Этап 7 : Дополнение
Уменьшение тока заряда для достижения 100% уровня заряда.
Этап 8 : Эквализация / балансировка
Балансировка элементов батареи
Этап 9 : Поддержание заряда
Поддержание уровня заряда АКБ на максимальном уровне.
8
Equalising Battery System
Egalisation /
équilibrage
9
Maintien de charge
РЕЖИМЫ ПИТАНИЯ : ВЫСТАВОЧНЫЙ ЗАЛ / ДИАГ+
1
3
5
• Запуск режима питания :
Ручной запуск
Чтобы запустить режим питания, нажмите кнопку
START/STOP.
Автоматический запуск
1
Если функция AUTO-DETECT активна, источник питания включится автоматически через 3 секунды при наличии батареи
или контакта на выходе устройства
Gysash (пример : автомобиль без аккумулятора).
В режиме питания Gysash показывает напряжение, ток, прошедшее время и
2
количество подаваемых ампер-часов.
Нажмите на кнопку START/STOP для остановки зарядки.
3
Меры предосторожности:
При запуске режима, если ток более 10 А, это означает, что ваш аккумулятор разряжен. В этом случае GYSFLASH начнет
генерировать ток зарядки. Проверьте, что потребители энергии автомобиля отключены. Дождитесь, когда ток будет ниже
10 A перед тем, как начинать любые действия с автомобилем (использование электроприборов автомобиля, операция по
диагностики и т.д.).
Supply
SHOWROOM
12 V
14.2
V
1 - Режим
2
2- Цикл поставки
3- Номинальное напряжение (в зависимости от режима)
4- Напряжение питания
4
5- Ток питания
SHOWROOM
14.2
V
01:27:35 105.8
1- Применяется цикл снабжения
2- Напряжение аккумулятора
3- Ток, подаваемый Gysash
4- Прошедшее время
5 - Выданные ампер-часы
6- Ход цикла зарядки (если активн
встроенная функция зарядки)
Auto - Detect
2.
5
Supply
1
2
4
v
113
Ah
A
3
5
6
а
62
Page 63

Инструкция по
применению
Технические функции режимов питания:
Режим
Функция
«без батареи»
Перевод оригинальных
инструкций
Функция
«Интегрированная
зарядка»
Защита
анормальное
пониженное
напряжение
GYSFLASH 107.24 CNT FV
Регулировка регулируемого напряжения
Модели на 12 V
SHOWROOM
(выставочный
зал)
DIAG
(диагностика)
• Функция «без аккумулятора» (не рекомендуется):
Эта функция позволяет использовать режим питания SHOWROOM в отсутствии
аккумулятора. Для этого нажмите в течение 3 секунд на кнопку START/STOP.
Индикация «Режим без батареи» отображается в течение 3 секунд перед
принудительным включением питания.
Не рекомендуется использовать функцию «без батареи» при наличии батареи.
Эта функция отключает функцию «Интегрированная зарядка», а также некоторые защиты, такие как
защита против ненормального пониженного напряжения или определение отсоединения.
В такой конфигурации обратная полярность может нанести вред электронике автомобиля.
• Встроенная функция зарядки:
Режим SHOWROOM (за исключением функции «без батареи») включает в себя алгоритм автоматической зарядки, адаптированный ко всем типам батарей (свинцовым и литиевым), чтобы обеспечить оптимальный уровень заряда для демонстрационных автомобилей. Эта функция отлично совместима с присутствием потребителей на аккумуляторе.
Модели на 24 V
Модели на 48 V
Модели на 12 V 12.7 V - 14.8 V
Модели на 24 V
Модели на 48 V
6.3 V - 7.2 V
12.7 V - 14.4 V
25.4 V - 28.8 V
38.1 V - 43.2 V
50.8 V - 57.6 V
14.4 V - 17.2 V
25.4 V - 29.6 V
38.1 V - 44.4 V
50.8 V - 59.2 V
SHOWROOM
rezhim bez AKB
RU
1 2 3 4
U
I
Analyse Charge Complément
Этап 1: Анализ
Анализ состояния батареи (уровень заряда, реверс и т.д.)
полярности, неправильно подключенного аккумулятора и т.д.).
Этап 2 Заряд
Быстрая зарядка при максимальном токе до U1
(например: 13.8 V )
Этап 3 Поглощение
Нагрузка при постоянном напряжении U1 (пример: 13.8 V ).
Максимальная продолжительность 1 час.
5
6
Égalisation /
Equilibrage
Этап 4 Дополнение
Постепенное увеличение напряжения на U2
(например: 14.4 V ).
Этап 5 Эквализация / балансировка
Поддержание напряжения U2 (например, напряжение 14.4 В ).
Продолжительность 2 час максимум.
Этап 6 Режим питания
Применение регулируемого напряжения.
Продолжительность 2 час максимум.
Mode alimentationAbsorption
63
Page 64

Инструкция по
применению
• Защита от ненормального пониженного напряжения :
Эта защита предотвращает риск короткого замыкания или чрезмерного повреждения батареи. Зарядное устройство автоматически остановится, если напряжение будет слишком низким на протяжении более 10 минут.
ТЕСТОВЫЙ РЕЖИМ
Общая навигация:
Перевод оригинальных
инструкций
GYSFLASH 107.24 CNT FV
1 Выбрать нужный тест можно с помощью стрелок
2 Нажмите на кнопку START/STOP для начала теста
• Тест напряжения:
Этот режим позволяет измерять напряжение на клеммах зажимами зарядки и, таким
образом, использовать аппарат GYSFLASH в качестве вольтметра для измерения
напряжение аккумулятора.
- Испытание при запуске :
Цель этого режима - оценить состояние системы запуска автомобиля (стартер + аккумулятор) при запуске двигателя. Этот
тест должен проводиться при подключенному к автомобилю аккумулятору.
С помощью стрелок выберите номинальное напряжение аккумулятора
1
автомобиля.
2 Нажмите на кнопку SELECT для подтверждения.
3 Подсоедините клещи к аккумулятору автомобиля.
Test
Test napryazheniya
Test Zapuska
Test generatora
Test napryazheniya
12.5
Test
Test napryazheniya
Test Zapuska
Test generatora
v
4 Запустите двигатель, повернув ключ зажигания.
Зарядное устройство автоматически определяет попытку запуска двигателя и начинает
5
расчетный алгоритм для определения состояния системы запуска.
Test Zapuska
Результат теста : Зарядное устройство показывает минимальное значение напряжения
аккумулятора, воспринимаемое на этапе запуска двигателя, а также состояние системы
запуска в виде манометра.
- Проверка альтернатора :
Этот режим используется для определения состояния генератора переменного тока автомобиля. Этот тест производится
при включенном двигателе автомобиля.
С помощью стрелок выберите номинальное напряжение аккумулятора
1
автомобиля.
2 Нажмите на кнопку SELECT для подтверждения.
Результат теста : Зарядное устройство указывает напряжение, выдаваемое
альтернатором, а также отображает состояние альтернатора в виде шкалы.
Umin
Test napryazheniya
Test Zapuska
Test generatora
Test generatora
12.5
Test
13.5
v
v
64
Page 65

Инструкция по
Nederlands
применению
Перевод оригинальных
инструкций
GYSFLASH 107.24 CNT FV
ЗАЩИТА
Этот аппарат защищен от коротких замыканий и инверсии полярности. Он оснащен противоискровой защитой, предотвращающей искрение при подсоединении зарядного устройства к аккумулятору. При отсутствии напряжения на зажимах, в
целях безопасности, ток не генерируется. Это зарядное устройство защищено от ошибочных действий внутренним плавким
предохранителем.
МЕНЮ КОНФИГУРАЦИИ
Доступ к меню конфигурации осуществляется нажатием кнопки .
Выбор языка
Yazyk
English
Francais
Deutsch
Дата / время
Data/Chas
19/10/2022
13:30
Звук
RU
Выбор языка экрана, доступно 19 языков.
Возможность установки даты и времени устройства.
Звук Gysash и внешний световой модуль можно активировать или деактивировать.
Отслеживаемость
Изучение данных На экране отображаются данные, собранные за последние 1000 зарядок.
Экспорт данных (.csv)
Вы можете просмотреть или извлечь 1000 записей о предыдущих зарядка.
Данные, собранные за последние 1000 зарядок, можно экспортировать на
USB-накопитель в формате .CSV.
65
Page 66

Инструкция по
применению
Калибровка кабеля
Перевод оригинальных
инструкций
1 Подключите USB-носитель к устройству Gysash
2 Войдите в подменю «Экспорт данных».
3 Подтвердите запись данных зарядки.
Затем Gysash скопирует данные о зарядке на USB-накопитель в виде файлов
4
формата «.CSV».
GYSFLASH 107.24 CNT FV
Kalibrovka kabelya
Rukovodstvo
Avtomaticheskiy
Автоматическая калибровка (рекомендуется)
Кабели можно калибровать как автоматически (рекомендуется), так и вручную.
Эта процедура используется для калибровки зарядных кабелей устройства, чтобы
Gysash компенсировал падение напряжения на кабелях наилучшим образом. Мы
настоятельно рекомендуем выполнять эту процедуру при каждой замене кабелей или
в случае их износа.
Kalibrovka kabelya
Для калибровки просто замкните зажимы нагрузки и подтвердите калибровку.
Прибор автоматически рассчитывает сопротивление кабеля.
Убедитесь, что металлические части губок, к которым крепятся кабели, соприкасаются
друг с другом.
OK NOK NOK
Ручная калибровка (не рекомендуется)
Kalibrovka kabelya
11.5 m
66
Сопротивление кабеля может быть установлено вручную.
ВНИМАНИЕ! это значение должно включать внутреннее сопротивление
Gysash.
Page 67

Инструкция по
применению
Расширенные настройки
Это меню дает доступ к расширенным функциям Gysash.
+ опция
Перевод оригинальных
инструкций
GYSFLASH 107.24 CNT FV
+ Options
- Detect
Auto
- Restart
Auto
Активирована Дезативирована
Соединяемость
Это меню используется для определения того, включены ли функции
Auto-Detect и Auto-Restart.
Опция автоматического обнаружения: Эта функция автоматически инициирует заряд при обнаружении контакта на выходе Gysash. Если функция
«Auto-detect» - Автоопределение» отключена, выходной контакт будет
обнаружен только в режиме «Auto-select»-»Автовыбор», а остальные
режимы могут быть запущены только ручным стартом (manual start).
Опция автоматического перезапуска: Эта функция автоматически перезапускает Gysash в случае отключения питания.
Это меню используется для импорта, экспорта или инициализации конфигурации Gysash.
Аппарат GYSFLASH оснащен USB-разъемом, позволяющим увеличить
функционал путем создания персонализированных конфигураций на компьютере. Эти конфигурации могут потом быть переданы в память аппарата с помощью ключа USB. Персонализированная конфигурация позволяет
вам добавлять, убирать или изменять режимы и профили зарядки, чтобы
зарядное устройство соответствовало вашим требованиям.
Восстановить
конфигурацию -
CONFIG
RU
Это действие восстанавливает исходную (заводскую) конфигурацию Gysash после ручного изменения режимов или параметров.
1 Войдите в подменю «CONFIG Restore».
2 Подтвердите восстановление конфигурации.
3 После этого Gysash восстановит свою первоначальную (заводскую) конфигурацию
Импорт CONFIG (.gfc)
Это действие загружает новую заводскую конфигурацию в Gysash.
После этого текущая конфигурация будет перезаписана.
Сначала убедитесь, что файл «.gfc», соответствующий новой конфигурации, находится на
1
USB-носителе. Этот файл не должен находиться в папке или подпапке ключа USB.
2 Подключите USB-носитель к Gysash.
3 Войдите в подменю «Import CONFIG».
4 Выберите файл для загрузки.
5 Убедитесь, что файл загружен.
6 После этого Gysash загрузит новую конфигурацию.
67
Page 68

Инструкция по
применению
Перевод оригинальных
инструкций
Экспорт CONFIG (.gfc)
Это действие загружает текущую конфигурацию Gysash на USB-накопитель.
1 Подключите USB-носитель к Gysash.
2 Войдите в подменю «Export CONFIG» (Экспорт конфигурации).
3 Подтвердите сохранения конфигурации.
4 После этого Gysash сохранит текущую конфигурацию на USB-носителе.
Персонализованная конфигурация
Список режимов и профилей, доступных для настройки :
РЕЖИМ ЗАРЯДА
Тип заряда
Pb-ЗАРЯДКА
Li-ЗАРЯДКА
Профиль
заряда
normal /
стандартный
AGM
охлаждающая жидкость
Easy
boost
recovery+
(восстановление)
Восстановление Ca/Ca
LFP/LiFePO4
Li-ion std
LFP cell+
Li-ion cell+
Напряжение
заряда
2.40 V/ячейка
2.45 V/ячейка
2.45 V/ячейка
2.40 V/ячейка
2.42 V/ячейка
2.40 - 2.50 V/
ячейки
2.45 - 2.66
V/ячейка
3.60 V/ячейка Профиль зарядки для литиевых аккумуляторов типа LFP (литий-железо-фосфатные).
4.20 V/ячейка
3.60 V/ячейка
4.20 V/ячейка
Профиль заряда для свинцовых аккумуляторов типа гелиевых, необслуживаемых, улучшенных залитых (EFB), свинцово-кислотных (SLA)…
Профиль зарядки для большинства свинцовых аккумуляторов типа AGM, включая START
and STOP.
Тем не менее некоторые аккумуляторы AGM требуют зарядку на пониженном напряжении (Стандартный профиль). В случае сомнения проверьте руководство по эксплуатации
аккумулятора.
Профиль зарядки для свинцовых открытых аккумуляторов с пробками с жидкостным
электролитом.
Профиль зарядки для свинцовых аккумуляторов, которые автоматически регулируют ток
зарядки, в зависимости от размера аккумулятора.
Тем не менее для максимальной оптимизации зарядки рекомендуется использовать кривые зарядки обычную, AGM или для жидкостного электролита (когда это возможно).
Режим зарядки на максимальном токе для свинцовых аккумуляторов. Этот режим позволяет сверхбыструю зарядку.
ВНИМАНИЕ! Этот тип зарядки следует выполнять время от времени, чтобы не
сократить срок службы аккумулятора.
Профиль зарядки для восстановления сильно поврежденных свинцовых аккумуляторов.
Восстановление должно обязательно производиться на аккумуляторе, отсоединенным
от автомобиля, чтобы не повредить бортовую электронику, и в хорошо проветриваемом
месте.
ВНИМАНИЕ! Напряжение восстановления до 4,0 V/ячейки.
Профиль зарядки для восстановления кальциевой батареи. Восстановление должно
обязательно производиться на аккумуляторе, отсоединенным от автомобиля, чтобы не
повредить бортовую электронику, и в хорошо проветриваемом месте.
ВНИМАНИЕ! Напряжение восстановления до 2,75 V/ячейка.
Профиль зарядки для ионно-литиевых стандартных аккумуляторов на основе марганца
или кобальта (NMC, LCO, LMO, MCO и т.д.).
Профиль зарядки для ионно-литиевых аккумуляторов типа LFP (литий-железо-фосфатные) с выбором количества элементов для серийной зарядки.
Профиль зарядки для ионно-литиевых стандартных элементов на основе марганца или
кобальта (NMC, LCO, LMO, MCO и т.д.) с выбором количества элементов для серийной
зарядки.
охлаждаюТЯГОВЫЕ
АККУМУЛЯТОРЫ
щая жид-
кость
гель
2.42 V/ячейка
2.35 V/ячейка
Профиль зарядки для свинцовых открытых тяговых аккумуляторов для автопогрузчиков.
Профиль зарядки для тяговых аккумуляторов с гелиевым электролитом для автопогрузчиков.
GYSFLASH 107.24 CNT FV
РЕЖИМЫ ПИТАНИЯ
SHOWROOM
(выставочный зал)
DIAG (диагностика)
ЗАМЕНА АККУМУЛЯТОРА
68
Обеспечивает поддержание заряда аккумулятора и снабжает его энергией, необходимой при использовании электрических приборов и аксессуаров демонстрационного автомобиля.
Для поддержания потребности в электроэнергии во время диагностики автомобиля.
Позволяет поддерживать электропитание автомобиля во время замены аккумулятора, чтобы сохранить
память блока управления двигателем автомобиля.
ВНИМАНИЕ! изменение полярности во время использования может нанести вред зарядному
устройству и электронике автомобиля
Page 69

Инструкция по
применению
Перевод оригинальных
инструкций
GYSFLASH 107.24 CNT FV
Помощь при запуске для автомобилей с двигателем внутреннего сгорания. Позволяет предварительно
РЕЖИМ СТАРТА
зарядить аккумулятор и отправить максимальный ток от зарядного устройства во время фазы запуска
двигателя (зарядное устройство автоматически отключается через 30 минут).
Позволяет пользоваться зарядным устройством, как стабилизированным источником питания большой
РЕЖИМ ИСТОЧНИКА
ПИТАНИЯ
мощности. Регулируемое напряжение и ограничение тока полностью настраиваются.
ВНИМАНИЕ! изменение полярности во время использования может нанести вред зарядному
устройству и электронике автомобиля
Li-SUPPLY/LFP
Режим для питания ионно-литиевых элементов типа LFP (литий-железо-фосфатные) с выбором количества элементов для серийной зарядки и регулировкой требуемого напряжения и тока.
Режим для питания ионно-литиевых стандартных элементов на основе марганца или кобальта (NMC,
Li-SUPPLY/Li-ion
LCO, LMO, MCO и т.д.) с выбором количества элементов для серийной зарядки и регулировкой требуемого напряжения и тока.
GYS предлагает вам предварительно установленные конфигурации, подходящие для каждого применения.
Эти конфигурации доступны на странице продукта на сайте GYS:
РЕЖИМ ЗАРЯДА РЕЖИМЫ ПИТАНИЯ
ТЯГОВЫЕ
АККУМУЛЯ-
ТОРЫ
Конфигурационный
файл
(gys.fr)
Pb-ЗАРЯДКА Li-ЗАРЯДКА
Области применения
РАЗНОЕ
1_gys_original.gfc Заводская конфигурация зарядного устройства
2_car_extended.gfc Дополнительные функции для автосервисов
3_showroom_only.gfc
4_pro_lithium.gfc Специалисты по литиевым аккумуляторам
5_traction.gfc
6_full_version.gfc Полная версия
Только для моделей 24 V и 48 V.
* DIAG+ (Pro) - возможен выбор 16 V.
Упрощенная версия для автомобильных салонов и выставочных машин
Тележки с подъёмником, вилочные погрузчики,
электрические автопогрузчики и т.д.
Мульти-заряд
Multi-zaryad
OFF
Master
Master
Master
+ 1 Slave
+ 2 Slaves
+ 3 Slaves
Это меню используется для определения конфигурации в режиме
многозарядного устройства (подробнее см. руководст
Выберите «OFF» для стандартного использования с одним аппаратом
Gysash.
normal / стандартный
AGM
охлаждающая жидкость
Easy
БУСТ / BOOST
Recovery+
Ca / Ca recov
LFP/LiFePO4
Li-ion std
LFP cell+
Li-ion cell+
охлаждающая жидкость
гель
SHOWROOM (выставочный зал)
DIAG (диагностика)
*
во SHM
РЕЖИМ СТАРТА
ЗАМЕНА АККУМУЛЯТОРА
РЕЖИМ ИСТОЧНИКА ПИТАНИЯ
Li-SUPPLY/LFP
Li-SUPPLY/Li-ion
- 025981).
RU
ТЕСТОВЫЙ РЕЖИМ
Информация
Informatsiya
GYSFLASH 107.24
HW08.00
- SW01.00
22.11.069909.000000
В этом меню отображается информация о вашем устройстве Gysash :
- Название аппарата
- Версии аппаратного/программного обеспечения
- Серийный номер
69
Page 70

Инструкция по
применению
Перевод оригинальных
инструкций
ДЕРЕВО МЕНЮ КОНФИГУРАЦИИ
Выбор языка
Выбор даты/времени
GYSFLASH 107.24 CNT FV
Включение/выключение звука
Отслеживаемость
Калибровка кабеля
Kalibrovka kabelya
Rukovodstvo
Avtomaticheskiy
Расширенные настройки
Информация
Автоматический или ручной
Изучите данные
Экспорт данных
+ опции
Соединяемость
Многозарядный режим
Восстановить конфигурацию
- CONFIG
Импорт CONFIG
(конфигурации)
Экспорт CONFIG (конфигурации)
ПРОГРАММНЫЕ МОДУЛИ
Аппарат GYSFLASH имеет разъем типа DB9, позволяющий подключать различные дополнительные модули, предлагаемые
GYS, например принтер, Ethernet и другие для того, чтобы зарядное устройство имело еще больше возможностей.
СПИСОК КОДОВ ОШИБОК
Код ошибки Значение Устранение
Err01: Int_1 - Err02: Int_2
Err23: Int_3 - Err24: Int_4
Err03: Fuse_NOK
Err04: T>Tmax Ненормальный перегрев Свяжитесь с дистрибьютором
Err05: (+)(-)
Err06: U>__V на зажимах обнаружено перенапряжение Отсоедините зажимы
Err07: No_bat Аккумулятор не подсоединен
Err08 U<__V
Err09: U>__V
Проблема с электроникой
Неисправное зарядное устройство
Выходной плавкий предохранитель
вышел из строя
Инверсия полярности на зажимах Подсоедините красный зажим к (+) АКБ, а черный к (-).
Напряжение аккумулятора слишком
слабое
Напряжение аккумулятора слишком
высокое
Свяжитесь с дистрибьютором
Плавкий предохранитель должен быть заменен
компетентным специалистом
Проверьте, что аккумулятор правильно подсоединен к
зарядному устройству
Проверьте, что выбранный режим соответствует напряжению
аккумулятора (напр. : 6 В батарея в режиме 24 В)
Приступите к зарядке аккумулятора в режиме ЗАРЯДКА
Заменить аккумулятор
Проверьте, что выбранный режим соответствует напряжению
аккумулятора (напр. : 24 В аккумулятор в режиме 12 В)
70
Page 71

Инструкция по
применению
Перевод оригинальных
инструкций
GYSFLASH 107.24 CNT FV
Err10: U<2.0V
Err11: Time_Out
Err12: Q>___Ah Включение защиты от перенапряжения
Err13: U<__V
Err14: Bat_UVP
Err15: U<__V Слишком слабый аккумулятор
Err16: Bat_NOK Аккумулятор вышел из строя Заменить аккумулятор
Err17: Recov_NOK
Err18: U>0V
Ошибка19: Cable_NOK Калибровка кабелей не удалась
Err20: U<__V
Err21: U<__V ou Err22: U<__V
?
?
Err27: Cable_NOK
Err28: COM_NOK
Во время зарядки обнаружено короткое
замыкание
Включение временного ограничения
Зарядка слишком долгая Заменить аккумулятор
Напряжение аккумулятора слишком
слабое во время проверки зарядки
Напряжение аккумулятора слишком
слабое во время UVP Wake up
Восстановление аккумулятора не
удалось
Присутствие напряжения на зажимах во
время калибровки кабелей
Срабатывание защиты против
ненормального пониженного напряжения
Напряжение аккумулятора слишком
слабое во время поддержания зарядки
Флэшка не обнаружен
На носителе отсутствует файл
конфигурации (.gfc)
Поврежденный файл
Режим мульти-зарядки :
Невозможность параллельного
подключения грузовых кабелей
Режим мульти-зарядки :
Нарушение связи между зарядными
устройствами
Проверьте установку
Присутствие потребителя на аккумуляторе, мешающего
зарядке
Присутствие потребителя на аккумуляторе, мешающего
зарядке
Заменить аккумулятор
Заменить аккумулятор
Присутствие короткого замыкания. Проверьте установку.
Заменить аккумулятор
Проверьте, что выбранный режим соответствует напряжению
аккумулятора (напр. : 24 В аккумулятор в режиме 12 В)
Заменить аккумулятор
Заменить аккумулятор
Проверьте установку
Заменить кабели зарядки
Плохой контакт. Проверьте установку.
Присутствие короткого замыкания. Проверьте установку.
Заменить аккумулятор
Присутствие потребителя на аккумуляторе
Убедитесь, что USB-накопитель правильно подключен к
зарядному устройству
Убедитесь, что ваши файлы присутствуют в корне USB-
накопителя. Не помещайте их в папку или подпапку.
Файл, который вы хотите загрузить, поврежден. Удалите и
переустановите файл на флэшке.
Зарядные кабели подлежат замене.
Плохое соединение, проверьте сборку (PHM).
Чтобы вернуться в режим работы с одним зарядным
устройством,
выберите ВЫКЛ. для функции многозарядного устройства.
Нет сигнала, проверьте крепление SHM и конфигурацию
зарядного устройства SLAVE X.
Чтобы вернуться к работе с одним зарядным устройством,
выберите OFF для функции Multi-Charger.
RU
ГАРАНТИЯ
Гарантия распространяется на любой заводской дефект или брак в течение 2 лет с даты покупки изделия (запчасти и рабочая сила).
Гарантия не распространяется на:
• Любые повреждения при транспортировке.
• Нормальный износ деталей (Например : кабели, зажимы и т.д.).
• Случаи неправильного использования (ошибка питания, падение, разборка).
• Случаи выхода из строя из-за окружающей среды (загрязнение воздуха, коррозия, пыль).
В случае поломки, верните устройство своему дистрибьютору, предоставив:
- доказательство покупки с указанной датой (квитанция, счет-фактура...)
- описание поломки.
71
Page 72

Gebruikershandleiding
BELANGRIJKE VEILIGHEIDSINSTRUCTIES
Vertaling van de originele handleiding
In deze handleiding vindt u aanwijzingen voor het functioneren van
uw apparaat, en de veiligheids- en voorzorgsmaatregelen die in
acht moeten worden genomen. Leest u dit document aandachtig
door voordat u het apparaat in gebruik neemt. Bewaar dit document
vervolgens als naslagwerk. Dit apparaat kan uitsluitend gebruikt
worden als oplader of als stroomvoorziening, en enkel volgens
de instructies vermeld op het apparaat en in de handleiding. De
veiligheidsinstructies moeten altijd nauwgezet worden opgevolgd.
Bij onjuist of gevaarlijk gebruik van dit apparaat kan de fabrikant
niet aansprakelijk gesteld worden.
Dit apparaat is bestemd voor gebruik binnen. Niet blootstellen aan
regen.
Dit apparaat kan worden gebruikt door kinderen vanaf 8 jaar of
personen met verminderde lichamelijke, zintuigelijke of mentale
vaardigheden of met gebrek aan ervaring of kennis, mits deze
personen goed begeleid worden en hen de noodzakelijke instructies
voor een absoluut veilig gebruik van het apparaat uitgelegd zijn, en
op voorwaarde dat de eventuele risico’s van het gebruik door hen
volledig begrepen worden. Kinderen mogen niet met het apparaat
spelen. Reiniging en onderhoud van het apparaat mogen niet
uitgevoerd worden door kinderen zonder toezicht.
GYSFLASH 107.24 CNT FV
Dit apparaat mag onder geen beding gebruikt worden voor het
opladen van niet-oplaadbare accu’s of batterijen.
Gebruik het apparaat niet als de voedingskabel en/of de stekker
beschadigd is/zijn.
Gebruik dit apparaat niet wanneer de laadkabel beschadigd
is, of wanneer u een fabricage-fout heeft geconstateerd, om te
voorkomen dat er kortsluiting in de accu ontstaat.
Probeer nooit een bevroren of een defecte accu op te laden.
Het apparaat niet bedekken.
De oplader niet dichtbij een warmtebron plaatsen en niet blootstellen
aan blijvend hoge temperaturen (hoger dan 60°C).
De ventilatie-openingen niet bedekken.
De module voor automatisch gebruik van dit apparaat en de
gebruiksbeperkingen van het apparaat worden in deze handleiding
beschreven.
Ontplongs- en brandgevaarlijk!
• Een accu die opgeladen wordt kan explosieve gassen uitstoten.
• Plaats de accu tijdens het opladen in een goed geventileerde
ruimte.
72
• Voorkom vlammen en vonken.
• Om kortsluiting te voorkomen moeten de delen van de accu die
elektrisch contact kunnen geven afgeschermd worden.
Page 73

Gebruikershandleiding
Laat nooit een accu die wordt opgeladen langere tijd zonder
toezicht.
Let op : zuur-projectie gevaar !
• Draag altijd een veiligheidsbril en veiligheidshandschoenen.
• In geval van oog- of huidcontact : meteen afspoelen met water
en onmiddellijk een arts raadplegen.
Aansluiten / Afsluiten :
• Sluit eerst de stroomvoorziening af, alvorens de accu aan te
sluiten of los te koppelen.
• De accuklem die niet met het chassis is verbonden moet als eerste
aangesloten worden. De andere verbinding moet plaatsvinden op
het chassis, ver van de accu en van de brandstoeidingen. De
acculader moet vervolgens op het stroomnet aangesloten worden.
• Koppel, na het beëindigen van de laadprocedure, eerst de
acculader van de netspanning af. Koppel daarna de aansluiting
die op het chassis is aangesloten af, en pas daarna de verbinding
met de accu. Respecteer altijd deze volgorde.
Aansluiten :
Vertaling van de originele handleiding
GYSFLASH 107.24 CNT FV
NL
• Dit apparaat moet aangesloten worden op de netspanning met
een geaard stopcontact.
• De aansluiting op de netspanning moet conform de nationale
regelgeving gebeuren.
Onderhoud :
• Als de voedingskabel beschadigd is, dient deze vervangen te
worden door een door de fabrikant van het apparaat geleverde
voedingskabel.
• Het onderhoud dient uitsluitend door een gekwaliceerde
onderhoudsmonteur uitgevoerd te worden.
• Waarschuwing ! Haal altijd eerst de stekker uit het stopcontact,
voordat u eventuele onderhoudswerkzaamheden op het
apparaat gaat verrichten.
• Dit apparaat behoeft geen speciaal onderhoud.
• Als de interne zekering beschadigd is, dient deze vervangen
te worden door de fabrikant, zijn reparatie-dienst of een
gelijkwaardig gekwaliceerde technicus, om zo ieder gevaar of
risico te vermijden.
• Gebruik nooit oplosmiddelen of andere agressieve
schoonmaakmiddelen.
Regelgeving :
• Het apparaat is in overeenstemming met de Europese richtlijnen.
• Het certicaat van overeenstemming is beschikbaar op onze internet
site.
73
Page 74

Gebruikershandleiding
Vertaling van de originele handleiding
GYSFLASH 107.24 CNT FV
• EAC certicering (Euraziatische Economische Gemeenschap)
• Dit materiaal beantwoordt aan de Britse eisen. Het Britse certi-
caat van overeenstemming kunt u downloaden vanaf onze internet site (zie omslag van deze handleiding).
• Apparaat conform de Marokkaanse normen.
• De Cم (CMIM) verklaring van overeenstemming kunt u
downloaden vanaf onze internetsite.
Afvalverwerking :
• Afzonderlijke inzameling vereist. Gooi het apparaat niet bij het
huishoudelijk afval.
ALGEMENE BESCHRIJVING
Uw GYSFLASH is een professionele multifunctionele lader met Inverter Technologie. Deze acculader is bestemd voor het ondersteunen van accu’s van demonstratie-voertuigen en de nodige ondersteuning tijdens het stellen van een diagnose. De lader
garandeert tevens een ideale laadkwaliteit voor het optimaal onderhouden van de meest moderne accu’s. Deze lader kan worden
aangesloten op kabels van maximaal 8 m. Na het wisselen van de kabels moet de lader opnieuw gekalibreerd worden (zie pagina
81). Dit apparaat is geen mobiele accu-lader, en moet op een vaste plek geplaatst worden.
Uw GYSFLASH wordt standaard geleverd met 4 modules :
• Module Laden : voor het opladen van lood (verzegeld, vloeibaar, AGM...) of lithium (LiFePO4) start-accu’s.
• Module voeding | Diag+ : Voorziet in de energiebehoeftes tijdens diagnose-fase van een voertuig.
• Module voeding | Showroom : Garandeert het behoud van de laadstatus van de accu, en voorziet in de energie-behoefte tijdens
het gebruik van de elektrische accessoires van een demonstratie voertuig.
• Module Testen : hiermee kunt u de staat van de accu controleren en het starten van het voertuig en de werking van de dynamo evalueren.
Uw GYSFLASH is SMART !
De standaard functies van uw GYSFLASH kunnen worden uitgebreid met specieke modules en laadproelen, via de USB-aansluiting en persoonlijke instellingen (zie pagina 83).
Uw GYSFLASH biedt u tevens de mogelijkheid om gegevens van enkele honderden laadprocedures op uw USB-stick op te slaan,
om deze vervolgens met behulp van een spreadsheet te kunnen analyseren.
Andere hulpmiddelen (zoals een printer, Ethernet communicatie....) kunnen ook op de lader aangesloten worden.
Functie « Auto-Detect » :
De Gysash is uitgerust met de functie « Auto-Detect », waarmee automatisch een lading wordt
gelanceerd wanneer er een contact wordt gedetecteerd aan de uitgang van de Gysash. (Voor het
activeren/deactiveren van deze functie zie pagina 81
Functie « Auto-Restart » :
De functie « Auto-Restart » start automatisch de lader weer op na een stroomonderbreking.
(Voor het activeren/deactiveren van deze functie zie pagina 81)
OPSTARTEN
1. Sluit de acculader aan op de netspanning.
2. Zet de schakelaar, die zich aan de achterkant van de lader bevindt, op « ON »
3. Kies de gewenste module (Laden -> Supply/voeden -> Testen).
Om toegang te krijgen tot het Menu Instellingen, druk op de knop .
NAVIGATIE MENUS EN INSTELLEN MODULES
Auto - Detect
12.
Laden
5
v
Gebruik de pijltjes om u door het menu te verplaatsen, of om de waardes of de staat van een instelling te
1
wijzigen.
Druk op de knop SELECT om toegang te krijgen tot het submenu, een instelling te kiezen of de waarde van
2
een instelling te bevestigen.
3 Druk op de return toets om terug te keren naar het vorige menu (of submenu).
74
Page 75
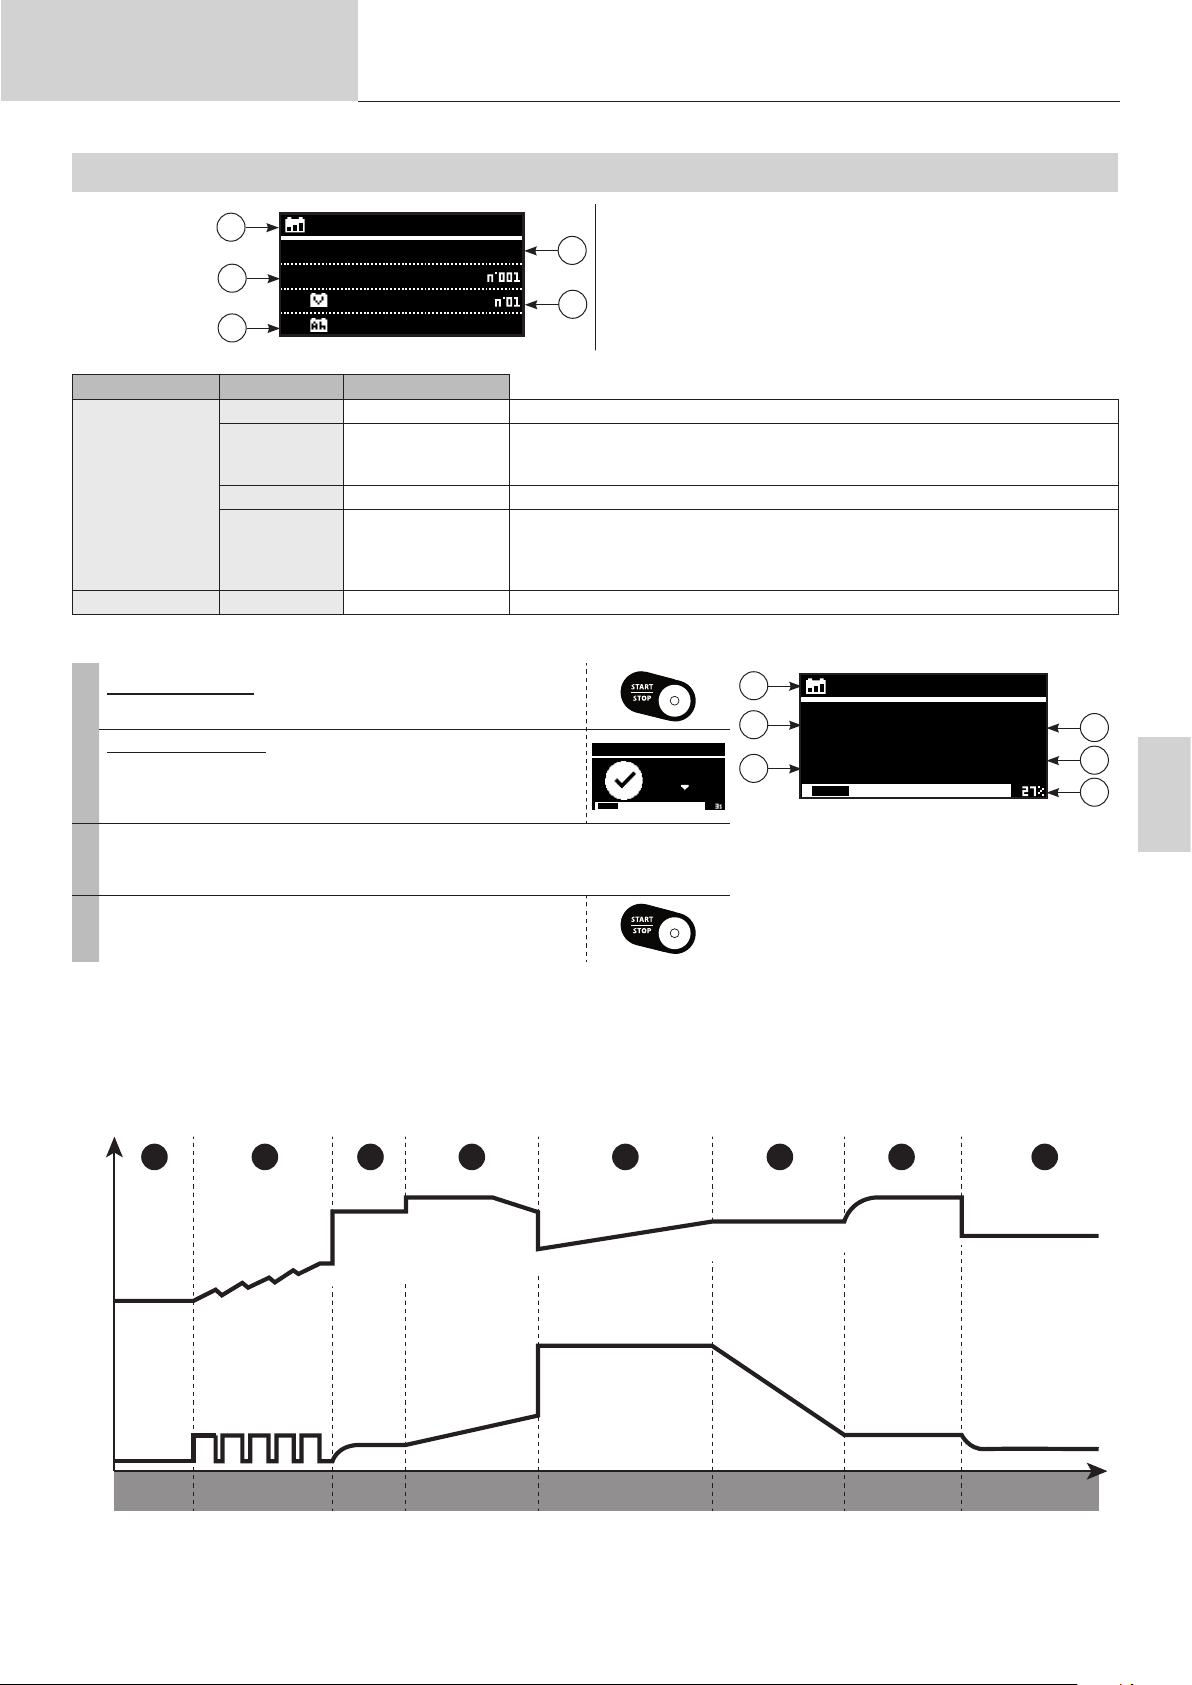
Gebruikershandleiding
100 Ah
MODULE LADEN
Vertaling van de originele handleiding
GYSFLASH 107.24 CNT FV
1
3
5
Oplaadkeuze Proel Laadspanning
normaal
AGM
Pb-LADEN
Li-LADEN LFP/LiFePO4
• Starten met opladen :
Handmatig starten
Om het laden te starten, druk op de knop START/STOP.
1
Automatisch starten
Als de AUTO-DETECT functie geactiveerd is, zal het laden
automatisch starten na 3 seconden
bij aanwezigheid van een accu.
Tijdens het laden toont uw GYSFLASH de progressie van de laadcyclus in
2
procenten, de spanning, de stroom, de geïnjecteerde ampère-uren en de
verstreken tijd.
3 Druk op de knop START/STOP om het laden te stoppen.
vloeibaar
Easy
Laden
Pb-LADEN
loodzuur
12 V
2.40 V/cel Loodaccu’s type Gel, MF, EFB, SLA...
2.45 V/cel
2.45 V/cel Open lood-accu’s, type vloeibaar met dop.
2.40 V/cel
3.60 V/cel Lithium accu’s type LFP (Lithium Fer Phosphate).
De meeste loodaccu’s type AGM, inclusief START and STOP.
Sommige AGM accu’s vragen echter een oplaadprocedure met een zwakkere span-
ning (Normaal proel). Raadpleeg in geval van twijfel de handleiding van de accu.
Proel voor lood-accu’s, past automatisch de laadstroom aan aan de omvang van
de accu.
Voor een optimale laadprocedure wordt aanbevolen om, indien mogelijk, de normale,
AGM of vloeibare laadcurves te gebruiken.
1 - Module
2 - Laadgroep
2
3 - Laadcurve
4 - Nominale spanning van de accu
4
5 - Nominale accu-capaciteit (beschikbaarheid afhankelijk van de
curve)
Auto - Detect
12.
Laden
5
1
2
4
v
Pb-LADEN
13.5
V
113
01:27:35 105.8
1 - Toegepaste laadcurve
2 - Spanning van de accu
3 - Stroom geleverd door de lader
4 - Tijdsduur laden
5 - Geïnjecteerde Ampère-uren
6 - Progressie laadcyclus
A
Ah
3
5
6
NL
Voorzorgsmaatregelen :
Tijdens het laden op een voertuig wordt aanbevolen om het energie-verbruik tot het minimum te beperken (lichten uit, contact afzetten, deuren sluiten enz) om het laadproces niet te hinderen.
Controleer het elektrolyt-niveau van de open accu’s. Vul indien nodig het niveau bij, voordat u met het opladen begint.
• Laadcurve Lood :
1 2 3 4 5 6 7
8
U
I
Analyse Récupération Test Désulfatation Charge Absorption
0%
Stap 1 : Analyse
Analyse van de staat van de accu (laadniveau,
ompoling, verkeerde accu aangesloten...)
10% 20%
80%
Stap 6 : Absorptie
Laden met constante spanning, om de accu tot 100% op te
laden.
Refresh
(si option active)
95% 100%
Maintien de
charge
75
Page 76

Gebruikershandleiding
0%
2% 85% 95% 99% 100%
120 Ah
Vertaling van de originele handleiding
GYSFLASH 107.24 CNT FV
Stap 2 : Herstel
Algoritme herstel van de beschadigde elementen
als gevolg van een diepe ontlading.
Stap 3 : Test
Test van een gesulfateerde accu
Stap 4 : Desulfatie
Algoritme ontzwaveling van de accu.
Stap 5 : Laden
Snel laden met maximale stroom, om zo
80% van het laadniveau te bereiken.
Laadcurve lithium LFP :
1 2 3 4 5 6 7
U
I
Stap 7 : Refresh (alleen bij een vloeibaar proel)
De acculader zal extra stroom injecteren en een gas creëren
dat het mogelijk maakt de elektrolyt te mengen en zo de cellen
van de accu te herstellen. Tijdens deze fase kan de accu een
beetje water verliezen.
Stap 8 : Druppelladen
Handhaaft het maximale laadniveau van de accu.
8
Equalising Battery System
9
Analyse UVP Wake up Récupération Charge Test Complément
Stap 1 : Analyse
Analyse van de staat van de accu (laadniveau, ompoling, verkeerde accu aangesloten...)
Stap 2 : UVP Wake up
Heractiveert accu’s onder UVP (Under Voltage
Beveiliging)
Stap 3 : Herstel
Algoritme herstel als gevolg van een diepe ontlading.
Stap 4 : Laden
Snel laden met maximale stroom, om zo tot 90%
Absorption
Stap 6 : Test
Test behoud laadniveau.
Stap 7 : Aanvulling
Laden met beperkte stroom, zodat 100% van het laadniveau
bereikt kan worden.
Stap 8 : Egaliseren / balanceren
Balanceren van de cellen van de accu.
Stap 9 : Druppelladen
Handhaaft het maximale laadniveau van de accu.
van het laadniveau te bereiken.
Stap 5 : Absorptie
Laden met constante spanning, om de accu tot 95% op te laden.
VOEDINGSMODULES : SHOWROOM / DIAG+
1
3
5
Supply
SHOWROOM
12 V
14.2
V
1 - Module
2
2 - Cyclus Supply
3 - Nominale spanning (beschikbaarheid afhankelijk van de module)
4 - Voedingsspanning
4
5 - Voedingsstroom
Egalisation /
équilibrage
Maintien de charge
76
Page 77

Gebruikershandleiding
• Starten met voeden :
Handmatig starten
Om de supply module te starten drukt u op de knop
START/STOP.
Automatisch starten
1
Als de AUTO-DETECT functie geactiveerd is zal het voeden automatisch starten na 3 seconden, bij aanwezigheid
van een accu of een contact aan de uitgang van de
Gysash (bijvoorbeeld : een voertuig zonder accu).
Tijdens de supply module zal de Gysash de spanning, stroom, tijdsduur en
2
de geïnjecteerde ampère-uren aangeven.
3 Druk op de knop START/STOP om het laden te stoppen.
Voorzorgsmaatregelen :
Als bij het opstarten van de module de stroom hoger is dan 10 A, betekent dit dat uw accu ontladen is. Uw GYSFLASH begint dan
op te laden. Controleer of er geen stroomverbruiker aangesloten is in het voertuig. Wacht tot de stroom onder de 10 A komt voordat
u elektrische onderdelen van uw voertuig in werking stelt (aanzetten van elektrische verbruikers van het voertuig, uitvoeren van een
diagnose enz....)
Vertaling van de originele handleiding
Auto - Detect
2.
5
Supply
GYSFLASH 107.24 CNT FV
1
2
4
v
SHOWROOM
14.2
V
113
01:27:35 105.8
1 - Cyclus Supply toegepast
2 - Spanning van de accu
3 - Stroom geleverd door de Gysash
4 - Tijdsduur laden
5 - Geïnjecteerde Ampère-uren
6 - Progressie van de laadcyclus
functie geïntegreerd laden is geactiveerd)
A
Ah
(als de
3
5
6
Functies voedingsmodules :
Module
SHOWROOM
DIAG+
• Functie « zonder accu » (niet aanbevolen) :
Deze functie maakt het mogelijk om de voedingsmodule SHOWROOM te gebruiken bij
afwezigheid van de accu. Druk hiervoor 3 seconden lang op de START / STOP knop. De
aanwijzing « Module zonder accu » verschijnt gedurende 3 seconden, voordat de voeding
geforceerd wordt.
Functie
« zonder accu »
Functie
« Geïntegreerd
Laden »
Beveiligd tegen
abnormale onder-spanning
Modellen 12 V
Modellen 24 V
Modellen 12 V
Modellen 24 V
Bijstellen van de spanning
Modellen 48 V
Modellen 48 V
6.3 V - 7.2 V
12.7 V - 14.4 V
25.4 V - 28.8 V
38.1 V - 43.2 V
50.8 V - 57.6 V
12.7 V - 14.8 V
14.4 V - 17.2 V
25.4 V - 29.6 V
38.1 V - 44.4 V
50.8 V - 59.2 V
SHOWROOM
battery module
NL
Het wordt sterk afgeraden de functie « zonder accu » te gebruiken als er een accu aanwezig is.
Deze functie deactiveert de functie « Geïntegreerd laden », evenals enkele andere functies, zoals de beveiliging
voor abnormale onderspanning of de waarschuwing dat het apparaat niet aan de netspanning is aangesloten.
Tijdens deze instelling kan een ompoling schade toebrengen aan de elektronica van het voertuig.
• Functie « Geïntegreerd laden »
De SHOWROOM module (buiten de functie « zonder accu ») heeft een algoritme voor automatisch laden, geschikt voor alle
soorten accu’s (lood en lithium). Dit garandeert een optimaal laadniveau voor demonstratie-voertuigen. Deze functie kan gebruikt
worden tijdens aanwezigheid van stroomverbruikers op de accu.
77
Page 78

Gebruikershandleiding
Vertaling van de originele handleiding
GYSFLASH 107.24 CNT FV
1 2 3 4
U
I
Analyse Charge Complément
Stap 1 : Analyse
Analyse van de staat van de accu (laadniveau, ompoling,
onjuiste accu aangesloten enz.).
Stap 2 : Laden
Snel laden met maximale stroom tot U1 wordt bereikt
(bijvoorbeeld : 13.8 V in )
Stap 3 : Absorptie
Laden onder constante spanning U1 (bijvoorbeeld : 13.8 V in
).
Max. tijdsduur 1 uur
5
6
Égalisation /
Equilibrage
Stap 4 : Aanvulling
Progressieve verhoging van de spanning tot U2
(bijvoorbeeld : 14.4 V in ).
Stap 5 : Egaliseren / balanceren
Behouden van de spanning U2 (bijvoorbeeld : 14.4 in ).
Max. tijdsduur 2u
Stap 6 : Voedingsmodule
Toepassing van de te reguleren spanning.
Mode alimentationAbsorption
Max. tijdsduur 2u
• Beveiliging bij abnormale onderspanning :
Deze beveiliging waarschuwt u voor kortsluiting of te zwaar beschadigde accu’s. De lader zal automatisch stoppen wanneer de
spanning langer dan 10 minuten abnormaal zwak is.
MODULE TESTER
Algemene navigatie :
1 Gebruik de pijltjes om de uit te voeren test te kiezen
2 Druk op de knop START / STOP om de test op te starten
• Test spanning :
Met deze module kan de spanning op de uiteinden van de laadklemmen gevisualiseerd worden
: uw GYSFLASH krijgt de functie van een voltmeter en meet de spanning van de accu.
Test
Spanningstest
Motorstarttest
Dynamo test
Spanningstest
12.5
v
78
Page 79

Gebruikershandleiding
• Test opstarten :
Deze module evalueert de staat van het startsysteem van een voertuig (starter + accu) tijdens het opstarten van de motor. Deze
test moet uitgevoerd worden met de accu aangesloten op het voertuig.
Gebruik de pijltjes om de nominale spanning van de accu van het voertuig
1
te kiezen
2 Druk op de knop SELECT om te bevestigen
3 Sluit de klemmen aan op de accu van het voertuig
4 Start de motor door de contactsleutel om te draaien
De lader detecteert automatisch de startpoging van de motor en lanceert een algoritme om
5
de staat van het startsysteem te bepalen.
Resultaat van de test : De lader geeft de minimale waarde van de spanning van de accu aan
zoals gemeten tijdens het starten van de motor en van de staat van het startsysteem.
Vertaling van de originele handleiding
GYSFLASH 107.24 CNT FV
Test
Spanningstest
Motorstarttest
Dynamo test
Motorstarttest
Umin
12.5
v
• Test Dynamo :
Deze module meet de staat van de dynamo van het voertuig. Deze test wordt uitgevoerd op een voertuig met een draaiende motor.
Gebruik de pijltjes om de nominale spanning van de accu van het voertuig
1
te kiezen
2 Druk op de knop SELECT om te bevestigen
Resultaat van de test : De lader geeft de waarde van de door de dynamo geleverde spanning
aan, evenals de staat van de dynamo.
BEVEILIGINGEN
Dit apparaat is beveiligd tegen kortsluiting en ompoling. Het apparaat beschikt over een anti-vonken systeem dat vonkvorming tijdens het aankoppelen van de lader op de accu voorkomt. In verband met de veiligheid levert het apparaat geen stroom als er geen
spanning op de klemmen staat. Deze lader is beveiligd tegen verkeerde handelingen door een interne zekering.
MENU INSTELLINGEN
Het menu instellingen is toegankelijk met een druk op de knop .
Test
Spanningstest
Motorstarttest
Dynamo test
Dynamo test
13.5
v
NL
79
Page 80

Gebruikershandleiding
Nederlands
Keuze taal
Taal
English
Francais
Deutsch
Datum / Tijd
Datum/Tijd
19/10/2022
13:30
Vertaling van de originele handleiding
Keuze taal scherm, er zijn 19 talen beschikbaar.
Mogelijkheid om datum en tijd in te stellen op het apparaat.
GYSFLASH 107.24 CNT FV
Geluid
Traceability
Verwerken van de gegevens
Gegevens exporteren (.csv)
Mogelijkheid om het geluidsniveau en de externe lichtmodule van de Gysash te activeren of te deactiveren.
Mogelijkheid om de 1000 meest recente laadgegevens te bekijken of op te roepen.
Mogelijkheid om de gegevens van de 1000 meest recente laadprocedures op een
scherm te bekijken.
Mogelijkheid om de gegevens van de 1000 meest recente laadprocedures naar
een USB-stick over te zetten, in formaat .CSV.
1 Breng de USB-stick in in de Gysash
2 Ga naar het submenu «Exporteren GEGEVENS»
3 Bevestig het opslaan van de laadgegevens.
4 De Gysash zal nu de laadgegevens op de USB-stick zetten in formaat « .CSV ».
Kalibratie kabel
Automatisch
Manueel
80
Kalibratie van de kabels
Het ijken van de kabels kan automatisch (aanbevolen) of handmatig worden gedaan.
Procedure waarmee de laadkabels van het apparaat kunnen worden gekalibreerd, zodat
de lader het spanningsverlies,dat wordt veroorzaakt door de kabels, optimaal kan compenseren. Het wordt sterk aanbevolen om deze procedure te realiseren na het vervangen van
de kabels, of wanneer de kabels versleten zijn.
Page 81

Gebruikershandleiding
Automatisch kalibreren (aanbevolen)
Kalibratie kabel
Verzekert u zich ervan dat de metalen onderdelen van de klemmen waaraan de kabels bevestigd zijn met elkaar in contact zijn.
Vertaling van de originele handleiding
Om een kalibratie uit te voeren kunt u de klemmen in kortsluiting zetten, en vervolgens bevestigen.
Het apparaat zal automatisch de weerstand van de kabels berekenen.
GYSFLASH 107.24 CNT FV
OK NOK NOK
Handmatige kalibratie (niet aanbevolen)
Kalibratie kabel
De weerstand van de kabel kan handmatig worden gedenieerd.
11.5 m
Geavanceerde instellingen
Dit menu geeft u toegang tot de geavanceerde functies van uw Gysash.
+ Option
+ Options
- Detect
Auto
- Restart
Auto
Geactiveerd Gedeactiveerd
Let op : deze waarde moet de interne weerstand van de Gysash bevatten.
Met dit menu kunt u de opties Auto-Detect en Auto-restart activeren of deactiveren.
Auto-detect optie : Met deze functie kan er automatisch een laadprocedure
worden opgestart als er een contact wordt gedetecteerd aan de uitgang van
de Gysash. Als de optie
«Auto-detect» gedeactiveerd is, zal de detectie van een contact aan de
uitgang alleen gebeuren in de module «Auto-select» en de andere modules
kunnen alleen worden gelanceerd door een handmatig opstarten.
NL
Auto-restart optie : Deze functie start de Gysash na een stroomstoring automatisch weer op.
81
Page 82

Gebruikershandleiding
Portability
Zo kunt u de fabrieksinstelling van de Gysash herstellen.
1 Ga naar het submenu «Herstel CONFIG»
2 Bevestig het herstellen van de conguratie.
3 De Gysash zal de fabrieksinstellingen herstellen
Vertaling van de originele handleiding
Met dit menu kunt u de Gysash-instellingen importeren, exporteren of initialiseren.
Uw GYSFLASH is uitgerust met de mogelijkheid om een USB aan te sluiten,
waarmee de functies uitgebreid kunnen worden en u persoonlijke instellingen
op uw pc kunt creëren, die vervolgens gedownload kunnen worden op het apparaat met behulp van een eenvoudige USB stick. Met deze persoonlijke instel-
lingen kunt u modules en laadproelen toevoegen, verwijderen of wijzigen : uw
lader past zich zo optimaal aan aan uw specieke behoeften.
Herstellen CONFIG
GYSFLASH 107.24 CNT FV
Importeren CONFIG
(.gfc)
Hiermee kunt u een opnieuw de fabrieksinstellingen downloaden.
De huidige instelling wordt gewist.
Op voorhand moet de gebruiker zich ervan verzekeren dat het « .gfc » le dat overeenkomt met de
1
nieuwe conguratie wel aanwezig is op de USB stick. Dit le mag zich niet bevinden in een dossier
of sub-dossier op de USB stick.
2 Breng de USB-stick in in de Gysash
3 Ga naar het submenu «Importeer CONFIG»
4 Kies het te downloaden le
5 Bevestig het downloaden van het le
6 De lader zal nu de nieuwe conguratie gaan downloaden.
Exporteren CONFIG
(.gfc)
Zo kunt u de huidige instelling van uw Gysash downloaden op een USB-stick.
1 Breng de USB-stick in in de Gysash
2 Ga naar het submenu «Exporteren CONFIG»
3 Bevestig het opslaan van de conguratie.
4 De Gysash zal nu de huidige conguratie op de USB-stick opslaan.
82
Page 83

Gebruikershandleiding
Vertaling van de originele handleiding
Gepersonaliseerde instelling
Lijst met modules en proelen die gepersonaliseerd kunnen worden :
MODULE LADEN
Oplaadkeuze :
Pb-LADEN
Li-LADEN
TRACTIE
Laadproel Laadspanning
normaal
AGM
vloeibaar
Easy
boost
recovery+
Ca/Ca recov
LFP/LiFePO4
Li-ion std
LFP cell+
Li-ion cell+
vloeibaar
gel
2.40 V/cel Laadproel voor loodaccu’s types Gel, MF, EFB, SLA....
2.45 V/cel
2.45 V/cel Laadproel voor open loodaccu’s type vloeibaar met dop.
2.40 V/cel
2.42 V/cel
2.40 - 2.50 V/cel
2.45 - 2.66
V/ cellule
3.60 V/cel Laadproel voor Lithium accu’s van het type LFP (Lithium Fer Phosphate)
4.20 V/cel
3.60 V/cel
4.20 V/cel
2.42 V/cel Laadproel dat geschikt is voor tractie-accu’s type open lood-accu’s voor heftrucks.
2.35 V/cel Laadproel voor tractie-accu’s type gel voor heftrucks.
Laadproel voor de meeste loodaccu’s type AGM, inclusief START and STOP.
Sommige AGM accu’s vragen echter een oplaadprocedure met een zwakkere spanning
(Normaal proel). Raadpleeg in geval van twijfel de handleiding van de accu.
Laadproel voor lood-accu’s dat automatisch de laadstroom aanpast aan de afmeting van
de accu.
Voor een maximale optimalisatie van de laadprocedure wordt aanbevolen, indien mogelijk,
de normale, de AGM of de vloeibare laadcurves te gebruiken
Laadproel maximale stroom voor lood-accu’s. Met dit proel kunt u zeer snel laden.
Let op : Dit type laadprocedure mag niet te vaak toegepast worden, omdat dit de
levensduur van de accu kan verkorten.
Laadproel dat geschikt is voor het herstel van zwaar beschadigde lood-accu’s. Het herstellen mag alleen plaatsvinden wanneer de accu zich buiten het voertuig bevindt, en op een
goed geventileerde plek, om te voorkomen dat de boord-elektronica van het voertuig wordt
beschadigd.
Let op : De herstel-spanning kan oplopen tot 4.0 V/cel.
Laadproel dat bestemd is voor het herstel van een calcium-accu. Het herstellen mag alleen plaatsvinden wanneer de accu zich buiten het voertuig bevindt, en op een goed geventileerde plek, om te voorkomen dat de boord-elektronica van het voertuig wordt beschadigd.
Let op : De herstel-spanning kan oplopen tot 2.75 V/cel.
Laadproel voor standaard Lithium-ion accu’s op basis van Mangaan of Kobalt (NMC, LCO,
LMO, MCO…)
Laadproel dat geschikt is voor Lithium-ion type LFP (Lithium Fer Phosphate) cellen, met
keuze van het aantal in serie op te laden cellen.
Laadproel dat geschikt is voor standaard Lithium-ion cellen op basis van Mangaan of
Kobalt (NMC, LCO, LMO, MCO…) met selectie van het aantal in serie op te laden cellen.
GYSFLASH 107.24 CNT FV
NL
VOEDINGS MODULES
SHOWROOM
DIAG+
CHANGE BAT.
START MODULE
POWER SUPPLY
Li-SUPPLY/LFP
Li-SUPPLY/Li-ion
Garandeert het behoud van de laadstatus van de accu, en voorziet in de energie-behoefte tijdens het gebruik van
de elektrische accessoires van een demonstratie voertuig.
Voorziet in de energiebehoeftes tijdens diagnose-fase van een voertuig.
Waarborgt het behoud van de elektrische voeding van een voertuig tijdens het vervangen van de accu, om zo het
geheugen van de board-computers te behouden.
Let op : een ompoling tijdens het gebruik kan schadelijk zijn voor de lader en voor het elektronisch systeem van het voertuig.
Hulp bij het starten van voertuigen met een verbrandingsmotor. Voor het voorverwarmen van de accu en een
maximale stroom van de lader naar de accu tijdens de opstartfase van de motor (De lader stopt automatisch na 30
minuten).
Maakt het mogelijk om de lader te gebruiken als een gestabiliseerde voedingsbron met een hoog vermogen. De
spanning en de stroom kunnen volledig aangepast worden.
Let op : een ompoling tijdens het gebruik kan schadelijk zijn voor de lader en voor het elektronisch systeem van het voertuig.
Deze module is geschikt voor het voeden van lithium-ion cellen type LFP (Lithium Fer Phosphate) met keuze van
het aantal cellen in serie en de mogelijkheid om de spanning en de stroom bij te stellen.
Deze module is geschikt voor het voeden van standaard Lithium-ion cellen op basis van Mangaan of Kobalt (NMC,
LCO, LMO, MCO…) met keuze-mogelijkheid van het aantal cellen in serie, aanpassen van de spanning en de
stroom.
83
Page 84

Gebruikershandleiding
Vertaling van de originele handleiding
GYS stelt voorgedenieerde instellingen tot uw beschikking, aangepast aan iedere toepassing.
Deze instellingen zijn beschikbaar op de pagina van het product op de GYS site :
MODULE LADEN VOEDINGS MODULES
Pb-LADEN Li-LADEN TRACTIE
Conguratie le
(gys.fr) Toepassingen
GYSFLASH 107.24 CNT FV
DIVERSEN
1_gys_original.gfc Oorspronkelijke conguratie van de lader
2_car_extended.gfc Uitgebreidere functies voor garage-houders
3_showroom_only.gfc
4_pro_lithium.gfc Professionele lithium-accu verkooppunten
5_traction.gfc Heftruck, elektrische pallet-truck, stapelaar....
6_full_version.gfc Complete versie
Uitsluitend op de modellen 24 V en 48 V.
* DIAG+ (Pro) - Keuze 16 V mogelijk.
Eenvoudige versie voor auto-showrooms en
demonstratie-voertuigen
Multi-laders
Multi-lader
OFF
Master
Master
Master
+ 1 Slave
+ 2 Slaves
+ 3 Slaves
Met dit keuzemenu kunt u de instellingen in de Multi-lader module deniëren
(voor meer details zie handleidin
Kies «OFF» voor een standaard gebruik met één enkele Gysash.
normaal
AGM
vloeibaar
Easy
Boost
Recovery+
Ca / Ca recov
LFP/LiFePO4
Li-ion std
LFP cell+
Li-ion cell+
g van
de SHM - 025981).
vloeibaar
gel
SHOWROOM
DIAG+
CHANGE BAT.
*
MODULE STARTEN
POWER SUPPLY
Li-SUPPLY/LFP
Li-SUPPLY/Li-ion
MODULE TESTER
Informatie
Informatie
GYSFLASH 107.24
HW08.00
- SW01.00
22.11.069909.000000
Dit keuzemenu toont de informatie betreende uw Gysash :
- Naam van het apparaat
- Versie materiaal/software
- Serienummer
84
Page 85

Gebruikershandleiding
Vertaling van de originele handleiding
ORGANISATIE MENU INSTELLINGEN
Keuze taal
Ingeven datum/tijd
Geluid On / O
GYSFLASH 107.24 CNT FV
Traceability
Kalibratie kabels
Kalibratie kabel
Automatisch
Manueel
Geavanceerde instellingen
Informatie
Automatisch of Handmatig
Verwerken van de gegevens
DATA EXPORTEREN
+ Opties
Portability
Multi-Lader
Herstellen CONFIG
Importeren CONFIG
Exporteren CONFIG
AANSLUITMOGELIJKHEDEN MODULES
Uw GYSFLASH is uitgerust met een aansluiting type DB9, waarmee u verschillende extra modules kunt aansluiten, zoals een printer module, Ethernet en overige modules.
NL
LIJST ERROR CODES
Error code Betekenis Oplossingen
Err01: Int_1 - Err02: Int_2
Err23: Int_3 - Err24: Int_4
Err03: Fuse_NOK Uitgangszekering defect Laat de zekering vervangen door een bevoegd persoon
Err04: T>Tmax Abnormale oververhitting Neem contact op met uw leverancier
Err05: (+)(-)
Err06: U>__V Overspanning gedetecteerd op de klemmen Ontkoppel de klemmen
Err07: No_bat Accu niet aangesloten Controleer of de accu correct is aangesloten op de lader
Err08: U<__V Spanning van de accu abnormaal zwak
Err09: U>__V Spanning van de accu abnormaal hoog
Err10: U<2.0V Kortsluiting gedetecteerd tijdens het laden Controleer de montage
Elektronisch probleem
Lader defect
Ompoling van de klemmen
Neem contact op met uw leverancier
Koppel de rode klem op (+) en de zwarte klem op (-) van de
accu.
Controleer of de gekozen module geschikt is voor de spanning
van de accu (bijvoorbeeld : accu 6 V op module 24 V)
Ga over tot het laden van de accu via de module LADEN
Accu moet vervangen worden
Controleer of de gekozen module geschikt is voor de spanning
van de accu (bijvoorbeeld : accu 24 V op module 12 V)
85
Page 86

Gebruikershandleiding
Vertaling van de originele handleiding
GYSFLASH 107.24 CNT FV
Err11: Time_Out
Err12: Q>___Ah
Err13: U<__V
Err14: Bat_UVP
Err15: U<__V Accu te zwak
Err16: Bat_NOK Accu defect Accu moet vervangen worden
Err17: Recov_NOK Herstel van de accu mislukt Accu moet vervangen worden
Err18: U>0V
Err19: Cable_NOK Kalibreren van de kabels mislukt
Err20: U<__V
Err21: U<__V of Err22: U<__V
?
?
Err27: Cable_NOK
Err28: COM_NOK
Overschrijding van de tijdslimiet
Het laden duurt abnormaal lang Accu moet vervangen worden
Inschakeling van de beveiliging tegen
overladen
De spanning van de accu is abnormaal
zwak tijdens de controle op het laden
De spanning van de accu is abnormaal
zwak tijdens de UVP Wake up
Aanwezigheid van spanning op de klemmen
tijdens het kalibreren van de kabels
In werking-stelling van de beveiliging tegen
abnormale onderspanning
Spanning van de accu abnormaal zwak
tijdens het druppelladen
Geen USB-stick gedetecteerd Controleer of de USB-stick correct in de lader is aangebracht
Er is geen conguratiebestand (.gfc) aanwezig op deze stick.
Bestand is beschadigd
Module Multi-Laders :
Parallelschakeling laadkabels mislukt
Module Multi-Laders :
Het is niet gelukt om de laders onderling te
laten communiceren
Aanwezigheid van een stroomverbruiker op de accu die het
laden stoort.
Aanwezigheid van een stroomverbruiker op de accu die het
laden stoort.
Accu moet vervangen worden
Accu moet vervangen worden
Aanwezigheid van kortsluiting, controleer de aansluitingen
Accu moet vervangen worden
Controleer of de gekozen module geschikt is voor de spanning
van de accu (bijvoorbeeld : accu 24 V op module 12 V)
Accu moet vervangen worden
Controleer de montage
Laadkabels moeten vervangen worden
Slechte verbinding, controleer de aansluitingen
Aanwezigheid van kortsluiting, controleer de aansluitingen
Accu moet vervangen worden
Aanwezigheid van een stroomverbruiker op de accu
Controleer of uw bestanden wel aanwezig zijn op root-directory
van de USB-stick. Deze bestanden mogen zich niet in een map
of in een submap bevinden.
Het bestand dat u wilt downloaden is beschadigd. Verwijder het
beschadigde bestand en installeer een correcte versie op de
stick.
De laadkabels moeten vervangen worden.
Slechte verbinding, controleer de aansluitingen (PHM).
Om weer terug te schakelen naar het functioneren met één
lader,
kiest u OFF voor de functie Multi-laders.
Geen communicatie, verieer de opstelling van de SHM en de
instelling van de laders SLAVE X.
Om terug te keren naar het functioneren met één lader kiest u
OFF voor de functie Multi-laders.
GARANTIE
De garantie dekt alle fabricage-fouten gedurende 2 jaar, vanaf de aankoopdatum (onderdelen en arbeidsloon).
De garantie dekt niet :
• Transportaverij.
• Normale slijtage van de onderdelen (bv: : kabels, klemmen, enz.).
• Ongelukken die ontstaan zijn door verkeerd gebruik (verkeerde spanning, vallen, demonteren van onderdelen).
• Defecten die zijn ontstaan door schadelijke of ongunstige omstandigheden in de werkomgeving (vervuiling, roest, stof).
In geval van uitval of storing kunt u het apparaat terugbrengen of terugsturen naar uw distributeur, samen met:
- een gedateerd aankoopbewijs (kassabon, rekening....)
- een beschrijving van de storing.
86
Page 87

Manuale d’utilizzo
ISTRUZIONI DI SICUREZZA
Questo manuale descrive il funzionamento dell’apparecchio
e le precauzioni da seguire per la vostra sicurezza. Leggerlo
attentamente prima dell’uso e conservarlo con cura per poterlo
consultare successivamente. Quest’apparecchio dev’essere utilizzato
esclusivamente per la ricarica o l’alimentazione nei limiti indicati
sull’apparecchio e sul manuale. Bisogna rispettare le istruzioni relative
alla sicurezza. In caso di uso inadeguato o pericoloso, il fabbricante
non potrà essere ritenuto responsabile.
Dispositivo da usare all’interno. Non deve essere esposto alla
pioggia.
Questo dispositivo può essere utilizzato da bambini di età superiore
a 8 anni, da persone con capacità siche, sensoriali o mentali ridotte
e da persone prive di esperienza o conoscenza, purchè esse siano
correttamente sorvegliate o se le istruzioni, relative all’utilizzo del
dispositivo in sicurezza, siano state loro trasmesse e qualora i
rischi intrapresi siano stati presi in considerazione. I bambini non
devono giocare con il dispositivo. La pulizia e la manutenzione
fatte dall’utilizzatore, non devono essere eettuate da bambini non
sorvegliati.
Traduzione delle istruzioni
originali
GYSFLASH 107.24 CNT FV
Non utilizzare in nessun caso per caricare delle pile o delle
batterie ricaricabili.
Non utilizzare l’apparecchio se il cavo di alimentazione o la spina
sono danneggiati.
Non utilizzare il dispositivo se il cavo di ricarica è danneggiato o
ha una connessione difettosa, perché questo potrebbe mandare
in corto circuito la batteria.
Non caricare mai una batteria ghiacciata o danneggiata.
Non coprire il dispositivo.
Non spostare il dispositivo nelle vicinanze di fonti di calore e
temperature spesso elevate (superiori a 60°C).
Non ostruire le aperture della ventilazione.
Il modo di funzionamento automatico così come le restrizioni
applicabili all’uso sono spiegate in seguito su questo manuale.
Rischio di esplosione e d’incendio!
Una batteria in carica può emettere dei gas esplosivi.
• Durante la carica, la batteria deve essere messa in un luogo ben
ventilato.
IT
• Evitare amme e scintille.
• Proteggere le supercie della batteria da corto-circuiti.
Non lasciareuna batteria in carica senza sorveglianza per un lungo
periodo.
Rischio di proiezioni acide!
87
Page 88

Manuale d’utilizzo
• Indossare occhiali e guanti di protezione
• In caso di contatto con gli occhi o con la pelle, sciacquare
immediatamente con acqua e consultare un medico senza
tardare.
Connessione / Sconnessione:
• Scollegare l’alimentazione prima di collegare o scollegare le
connessioni della batteria.
• Il terminale della batteria non collegato al telaio deve essere
collegato per primo. L’altro collegamento deve essere eettuato
sul telaio lontano dalla batteria, dalla canaletta del carburante
e dal serbatoio. Il caricabatterie deve essere collegato alla rete
elettrica.
• Dopo l’operazione di carica, scollegare il caricabatterie dalla
rete, in seguito ritirare la connessione dal telaio e inne la
connessione dalla batteria, nell’ordine indicato.
Traduzione delle istruzioni
originali
GYSFLASH 107.24 CNT FV
Collegamento:
• Questo dispositivo deve essere collegato ad una presa di
corrente con messa a terra.
• Il collegamento alla rete di alimentazione deve essere fatta in
conformità con le regole d’installazione nazionali.
Manutenzione:
• Se il cavo di alimentazione è danneggiato, esso deve essere
sostituito da un cavo o da un insieme speciale disponibile
presso il fabbricante o il suo servizio post-vendita.
• La manutenzione deve essere eettuata da una persona
qualicata.
• Avvertenze ! Scollegare sempre la spina dalla presa elettrica
prima di eettuare qualsiasi manipolazione sul dispositivo.
• Il dispositivo non ha bisogno di nessuna manutenzione
particolare.
• Se il fusibile interno è fuso, esso deve essere sostituito dal
fabbricante, dal suo servizio post-vendita o da persone di
qualica simile per evitare pericoli.
88
• Non usare in nessun caso solventi o altri prodotti pulenti
aggressivi.
Regolamentazione:
• Apparecchio conforme alle Direttive Europee.
• La dichiarazione di conformità è disponibile sul nostro sito internet.
• Marchio di conformità EAC (Comunità Economica Eurasiatica)
• Materiale conforme alle esigenze britanniche. La dichiarazione
di conformità britannica è disponibile sul nostro sito internet (vedere la pagina di copertina).
Page 89

Manuale d’utilizzo
100 Ah
Traduzione delle istruzioni
originali
GYSFLASH 107.24 CNT FV
• Apparecchio conforme alle norme Marocchine.
• La dichiarazione Cم (CMIM) di conformità è disponibile sul
nostro sito internet.
Smaltimento :
• Questo materiale è soggetto alla raccolta dierenziata. Non
smaltire con i riuti domestici.
DESCRIZIONE GENERALE
Il Vostro GYSFLASH è un caricabatterie professionale multifunzione con tecnologia Inverter. Concepito per sostenere le batterie
dei veicoli in dimostrazione o in fase di diagnostica, garantisce ugualmente una qualità di carica ideale per la manutenzione dei mo-
delli più evoluti. Questo caricabatterie supporta cavi di uscita no a 8 m. Il cambiamento dei cavi di carica necessità una ricalibrazione (vedi pag. 95) È considerato un dispositivo sso e non un dispositivo mobile.
Come standard, il GYSFLASH viene fornito con una congurazione che comprende 4 modalità:
• Modalità Carica : dedicata alla ricarica delle batterie d’avviamento al piombo (sigillate, liquido, AGM..) o Litio (LiFePO4).
• Modalità alimentazione | Diag+ : Supporta il fabbisogno energetico durante le fasi diagnostiche del veicolo.
• Modalità alimentazione | Showroom: Garantisce la conservazione dello stato di carica della batteria e supporta l’energia quan-
do si utilizzano gli accessori elettrici di un veicolo dimostrativo.
• Modalità Tester: consente di controllare lo stato della batteria, valutare l’avviamento del veicolo e il funzionamento dell’alternatore.
Il Vostro GYSFLASH è INTELLIGENTE!
La funzionalità originale del GYSFLASH può essere ampliata con l’aggiunta di modalità di ricarica e proli specici grazie alla comunicazione USB e alla congurazione personalizzata (vedere pagina 97).
Il tuo GYSFLASH ore anche la possibilità di recuperare i dati di diverse centinaia di cariche sulla tua chiavetta USB per analizzarli
su un foglio di calcolo.
Dei moduli aggiuntivi (es. stampante, connessione Ethernet..) possono comunque connettersi al caricabatterie grazie alla sua
presa modulo dedicata.
Funzione « Auto-Detect » :
Il Gysash è dotato della funzione «Auto-Detect», che avvia automaticamente la carica quando
viene rilevato un contatto sull’uscita del Gysash. (Per attivare/disattivare questa funzione, vedere
pagina 96)
Funzione «Auto-Restart»:
La funzione Auto-Restart riavvia automaticamente l’alimentazione in caso di interruzione di corrente.
(Per attivare/disattivare questa funzione, vedere pagina 96).
AVVIAMENTO
1. Collegare il carica batterie alla presa di corrente.
2. Posizionare l’interruttore situato dietro al caricabatterie, su «ON».
3. Selezionare la modalità desiderata (Carica -> Alimentazione -> Test).
Per accedere al menu di congurazione, premere il pulsante .
NAVIGAZIONE DEL MENU E IMPOSTAZIONI DELLA MODALITÀ
Auto - Detect
12.
5
Carica
v
IT
1 Utilizzare le frecce per spostarsi nel menu o per modicare il valore o lo stato di un parametro.
Premere il tasto SELEZIONE per accedere a un sottomenu, selezionare un parametro o confermare il valore
2
di un parametro.
3 Premere il pulsante Indietro per tornare al menu (o al sottomenu) precedente.
MODALITA’ CARICA
1
3
5
Carica
Pb-CARICA
piombo
12 V
1 - Modalità
2
2 - Gruppo di carica
3 - Curva di carica
4 - Tensione nominale della batteria
4
5 - Capacità nominale della batteria (disponibile in base alle curve)
89
Page 90

Manuale d’utilizzo
Tipo di carica PROFILO Tensione di carica
normale
AGM
Pb-CHARGE
Li-CHARGE LFP/LiFePO4
Avviamento della carica:
liquido
Easy
Traduzione delle istruzioni
originali
2.40 V/cella Batterie al piombo di tipi Gel, MF, EFB, SLA ...
2.45 V/cella
2.45 V/cella Aprire le batterie al piombo del tipo liquido con tappo.
2.40 V/cella
3.60 V/cella Batterie al litio fosfato di ferro.
GYSFLASH 107.24 CNT FV
La maggior parte delle batterie piombo-acido AGM include START e STOP.
Tuttavia, alcune batterie AGM richiedono una carica di tensione inferiore (prolo
normale). Controllare il manuale della batteria in caso di dubbio.
Prolo dedicato alle batterie al piombo che regola automaticamente la corrente in
base alle dimensioni della batteria.
Tuttavia, per ottimizzare al massimo la carica, è consigliabile, quando possibile,
utilizzare il carico normale, l’AGM o le curve di carico del liquido.
Pb-CARICA
13.5
V
113
01:27:35 105.8
1- Curva di carica applicata
2- Tensione della batteria
3- Corrente fornita dal caricabatterie
4- Tempo trascorso
5- Ampere-ora iniettati
6- Avanzamento del ciclo di carica
A
Ah
8
5
1
2
4
v
Avviamento manuale
Per lanciare la carica , premere sul pulsante START/STOP.
1
Avvio automatico
Se la funzione AUTO-DETECT è attiva, la carica
si avvia automaticamente dopo 3 secondi
in presenza di una batteria.
Durante la carica, il GYSFLASH indica la percentuale di ciclo di carica com-
2
pletato, la tensione, la corrente, gli ampere iniettati e il tempo trascorso.
3 Premere sul pulsante START/STOP per fermare la carica.
Precauzioni:
Al momento di una ricarica su veicolo, è consigliato ridurre al minimo il consumo elettrico del veicolo spegnere le luci, spegnere
l’accensione, chiudere le porte, ecc.) per non interrompere il processo di ricarica.(
Vericare il livello dell’elettrolito per le batterie aperte. Se necessario, riempire no a livello prima della carica.
• Curva di carica (Piombo):
Auto - Detect
12.
Carica
1 2 3 4 5 6 7
U
3
5
6
I
Analyse Récupération Test Désulfatation Charge Absorption
0%
Fase 1 : Analisi
Analisi dello stato della batteria (livello di carica,
inversione di polarità, batteria collegata in modo errato...)
Tappa 2 : Recupero
Algoritmo per il recupero degli elementi danneggiati
dopo una scarica profonda.
Tappa 3 : Test
Test della batteria solfatata.
Tappa 4 : Desolfatazione
Algoritmo di desolfatazione della batteria.
Tappa 5 : Carica
Carica rapida alla massima corrente per raggiungere
l’80% del livello di carica.
10% 20%
90
Refresh
(si option active)
80%
Tappa 6 : Assorbimento
Carica a tensione costante per portare il livello di carica al
100%.
Tappa 7 : Refresh (solo per il prolo liquido)
Il caricabatteria fornirà una corrente supplementare per creare
del gas che permetterà di mescolare l’elettrolito e ricondiziona-
re le cellule della batteria. Durante questa fase, la batteria può
perdere un po’ d’acqua.
Tappa 8 : Mantenimento della carica
Mantiene il livello di carica della batteria al suo massimo.
95% 100%
Maintien de
charge
Page 91

Manuale d’utilizzo
0%
2% 85% 95% 99% 100%
120 Ah
Curva di carica Litio LFP:
Traduzione delle istruzioni
originali
GYSFLASH 107.24 CNT FV
1 2 3 4 5 6 7
U
I
Analyse UVP Wake up Récupération Charge Test Complément
Fase 1 : Analisi
Analisi dello stato della batteria (livello di carica, inversione di
polarità, batteria sbagliata collegata…)
Tappa 2 : UVP Wake up
Riattiva le batterie in protezione UVP (Under Voltage
Protection)
Tappa 3 : Recupero
Algoritmo di recupero a seguito di una scarica profonda.
Tappa 4 : Carica
Carica rapida alla massima corrente per raggiungere il 90%
del livello di carica.
Tappa 5 : Assorbimento
Carica a tensione costante per portare il livello di carica al 95%.
Absorption
Tappa 6 : Test
Test di conservazione della carica.
Tappa 7 : Complemento
Carica a corrente ridotta che permette di raggiungere il
100% del livello di carica.
Tappa 8 : Equalizzazione / bilanciamento
Bilanciamento delle celle della batteria
Tappa 9 : Mantenimento della carica
Mantiene il livello di carica della batteria al suo massimo.
MODALITA’ ALIMENTAZIONE: SHOWROOM / DIAG+
8
Equalising Battery System
Egalisation /
équilibrage
9
Maintien de charge
IT
1
3
5
• Avviamento dell’alimentazione:
Avviamento manuale
Per avviare la modalità di alimentazione, premere il tasto
START/STOP.
Avvio automatico
1
Se la funzione AUTO-DETECT è attiva, l’alimentazione si
avvia automaticamente dopo 3 secondi in presenza di una
batteria o di un contatto all’uscita del
Gysash (esempio : veicolo senza batteria).
Durante la modalità di alimentazione, il Gysash indica la tensione, la corren-
2
te, il tempo trascorso e gli ampere-ora iniettati.
3 Premere sul pulsante START/STOP per fermare la carica.
Precauzioni:
All’avviamento della modalità, una corrente visualizzata superiore a 10A signica che la vostra batteria è scarica. Il GYSFLASH rilascerà una corrente di ricarica. Vericare che non ci siano consumatori di elettricità sul veicolo. Aspettare che l’intensità passi sotto i
10 A per lanciare qualsiasi azione sul veicolo (utilizzo di accessori elettrici del veicolo, diagnostica ecc).
Supply
SHOWROOM
12 V
14.2
V
1- Modalità
2
2- Cycle Supply
3- Tensione nominale (disponibile a seconda della modalità)
4- Tensione di alimentazione
4
5- Corrente di alimentazione
SHOWROOM
14.2
V
01:27:35 105.8
1- Cycle Supply applicato
2- Tensione della batteria
3- Corrente erogata dal Gysash
4- Tempo trascorso
5- Ampere-ora iniettati
6- Avanzamento del ciclo di caric
funzione di carica integrata è attiva)
Auto - Detect
2.
5
Supply
1
2
4
v
113
Ah
A
3
5
6
a (se la
91
Page 92

Manuale d’utilizzo
Funzionalità delle modalità alimentazione:
Modalità
Funzione
«senza batteria»
Traduzione delle istruzioni
originali
Funzione
«Carica integrata»
Protezione dalla
sotto-tensione anormale
GYSFLASH 107.24 CNT FV
Regolazione della tensione da regolare
Modelli a 12 V
SHOWROOM
DIAG+
• Funzione « senza batteria» (non raccomandata):
Questa funzione permette di utilizzare la modalità alimentazione SHOWROOM in assenza di
batteria. Per questo, premere per 3 secondi sul pulsante START/STOP. L’indicazione «Modalità senza batteria» si visualizza per 3 secondi prima di forzare l’alimentazione.
E’ fortemente sconsigliato utilizzare la funzione «senza batteria» se una batteri è presente.
Questa funzione disattiva la funzione «Carica integrata» nonchè certe protezioni come la protezione di sotto
tensione anormale o la rilevazione di uno scollegamento.
In questa congurazione, un inversione di polarità può essere nefasto per l’elettronica del veicolo.
Modelli a 24 V
Modelli a 48 V
Modelli a 12 V 12.7 V - 14.8 V
Modelli a 24 V
Modelli a 48 V
6.3 V - 7.2 V
12.7 V - 14.4 V
25.4 V - 28.8 V
38.1 V - 43.2 V
50.8 V - 57.6 V
14.4 V - 17.2 V
25.4 V - 29.6 V
38.1 V - 44.4 V
50.8 V - 59.2 V
SHOWROOM
modalita senza batt.
• Funzione « Carica integrata » :
La modalità SHOWROOM (disattivata «senza batteria») incorpora un algoritmo di carica automatico adatto a tutti i tipi di batterie (al
piombo e al litio), per garantire un livello di carica ottimale per i veicoli dimostrativi. ( Questa funzione è perfettamente compatibile
con la presenza di consumatori sulla batteria.
1 2 3 4
6
5
U
I
Analyse Charge Complément
Fase 1 : Analisi
Analisi dello stato della batteria (livello di carica, inversione
di polarità, batteria collegata in modo errato, ecc.)
Tappa 2 : Carica
Carica rapida a corrente massima per raggiungere U1
(es : 13.8 V in )
Tappa 3 : Assorbimento
Carico di tensione costante U1 (ad es. 13.8 V in ).
Durata max 1h.
Tappa 4 : Complemento
Aumento graduale della tensione no a U2
(es : 14.4 V in ).
Tappa 5 : Equalizzazione / bilanciamento
Mantenimento della tensione U2 (ad es. 14.4V in ).
Durata massima 2h.
Tappa 6 : Modalità di alimentazione
Applicazione della tensione da regolare.
Égalisation /
Equilibrage
Durata massima 2h.
Mode alimentationAbsorption
92
Page 93
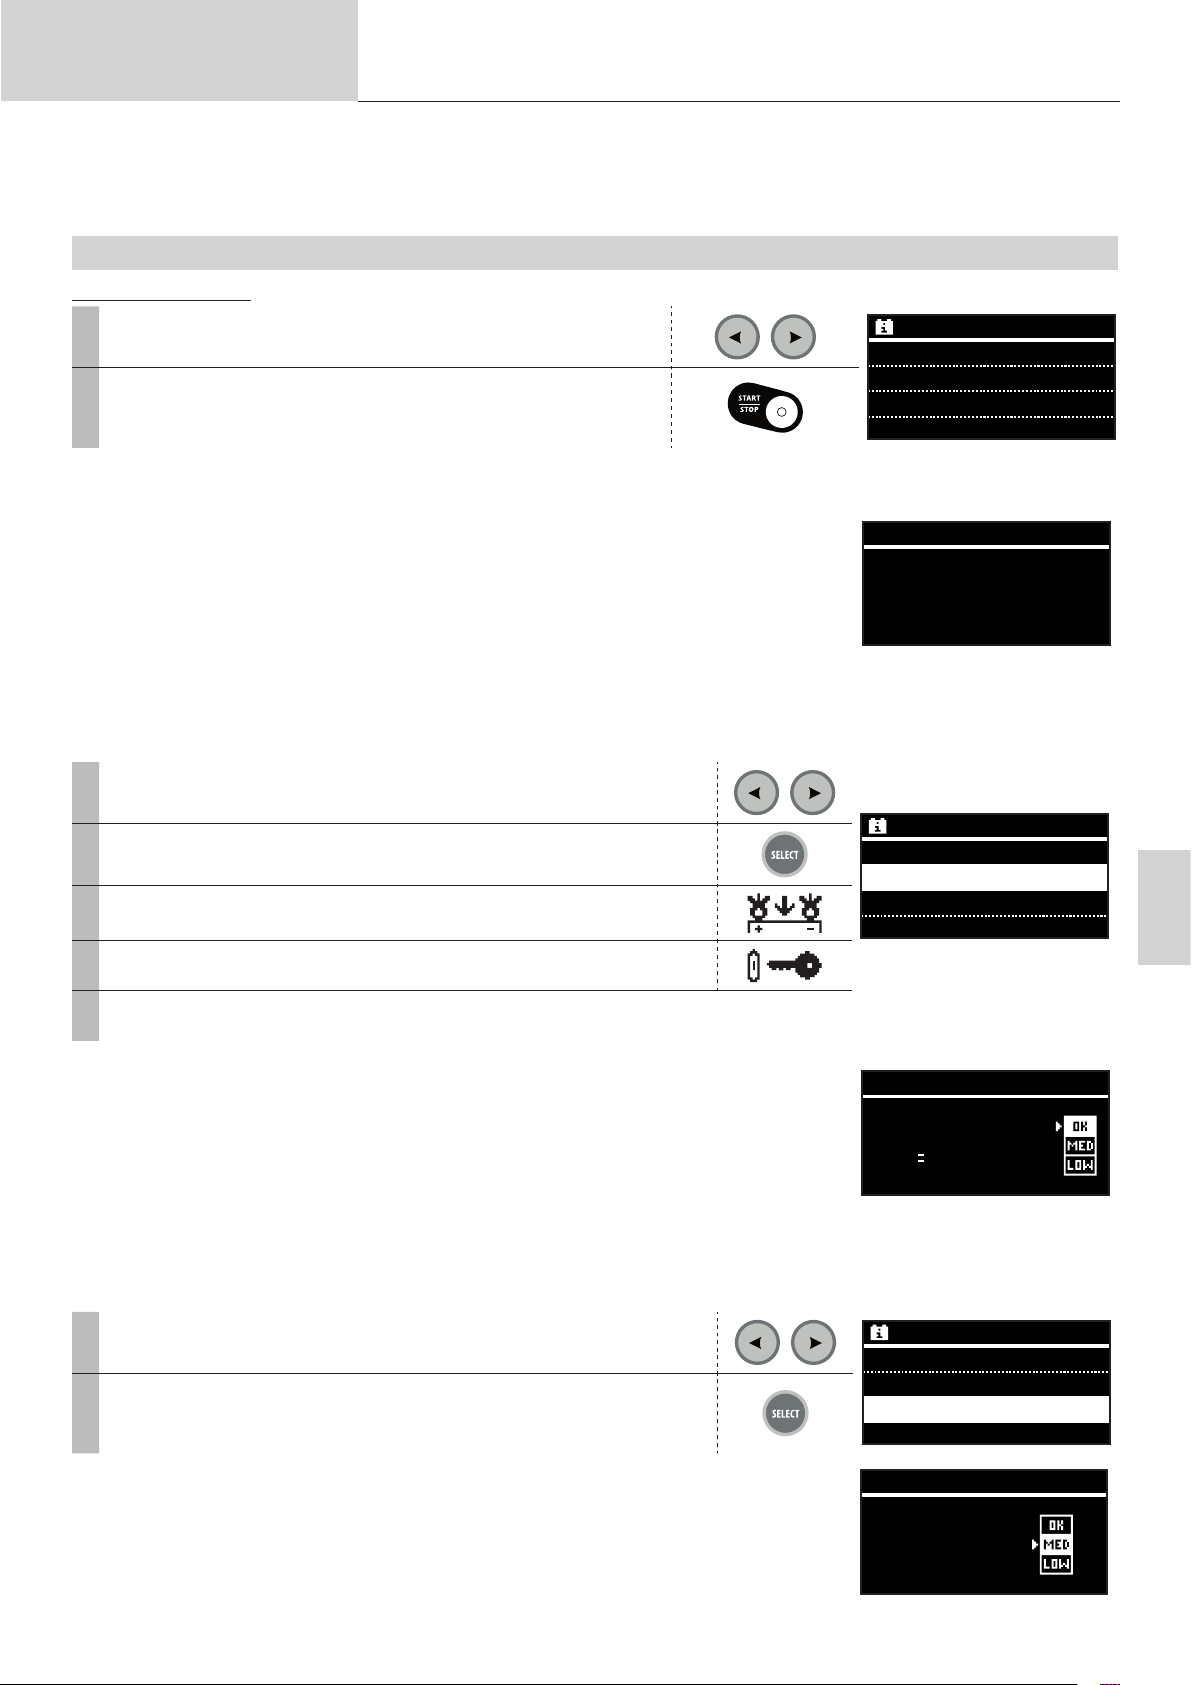
Manuale d’utilizzo
• Protezione sotto-tensone anormale:
Questa protezione impedisce il rischio di cortocircuito o batteria troppo danneggiati. Il caricatore si fermerà automaticamente se la
tensione è anormalmente bassa per più di 10 minuti
MODALITÀ TESTER
Navigazione generale:
Traduzione delle istruzioni
originali
GYSFLASH 107.24 CNT FV
1 Utilizzare le frecce per selezionare il test da eseguire
2 Premere il pulsante START / STOP per avviare il test
• Tensione del test:
Questa modalità consente di visualizzare la tensione attraverso i morsetti di ricarica e quindi
utilizzare il GYSFLASH come voltmetro per misurare la tensione della batteria.
• Test avviamento:
Questa modalità ha lo scopo di valutare lo stato del sistema di avviamento di un veicolo (starter + batteria) all’avvio del motore.
Questo test deve essere fatto batteria collegata al veicolo.
Utilizzare le frecce per selezionare la tensione nominale della batteria del
1
veicolo
2 Premere il tasto SELECT per confermare
3 Collegare i morsetti alla batteria del veicolo
Test
Test di tensione
Test di avvio
Test alternatore
Test di tensione
12.5
Test
Test di tensione
Test di avvio
Test alternatore
v
IT
4 Avviare il motore ruotando la chiave di accensione
Il caricatore rileva automaticamente il tentativo di avviamento del motore e esegue un algo-
5
ritmo di calcolo per determinare lo stato del sistema di avvio
Test di avvio
Risultato del test : Il caricabatterie indica il valore minimo della tensione della batteria percepita durante la fase di avviamento del motore, nonché lo stato del sistema di avviamento sotto
forma di un misuratore.
• Test alternatore:
Questa modalità è utilizzata per determinare le condizioni dell’alternatore del veicolo. Questo test viene eseguito su un veicolo con
un motore in esecuzione.
Utilizzare le frecce per selezionare la tensione nominale della batteria del
1
veicolo
2 Premere il tasto SELECT per confermare
Risultato del test : Il caricabatterie indica il valore della tensione fornita dall’alternatore, nonché
lo stato dell’alternatore sotto forma di indicatore.
Umin
Test di tensione
Test di avvio
Test alternatore
Test alternatore
12.5
Test
13.5
v
v
93
Page 94

Manuale d’utilizzo
Nederlands
Traduzione delle istruzioni
originali
GYSFLASH 107.24 CNT FV
PROTEZIONI
Questo dispositivo è protetto dai corto-circuiti e dalle inversioni di polarità. Dispone di un sistema che evita ogni scintilla durante il
collegamento del caricabatterie alla batteria. Senza tensione sui morsetti, non rilascia nessuna corrente per ragioni di sicurezza.
Questo carica batterie è protetto da errori di manipolazione grazie ad un fusibile interno
MENÙ CONFIGURAZIONE
Il menu di congurazione è accessibile premendo il tasto .
Selezione della lingua
Lingua
English
Francais
Deutsch
Data / Ora
Data/Ora
19/10/2022
13:30
Suono
Selezione della lingua dello schermo, sono disponibili 19 lingue.
Possibilità di impostare la data e l’ora del dispositivo.
Possibilità di attivare o di disattivare il suono del Gysash e del modulo esterno luminoso.
94
Tracciabilità
Esplorare i dati Visualizzazione su schermo dei dati raccolti nelle ultime 1.000 cariche.
Esportazione dei dati (.csv)
È possibile visualizzare o recuperare gli ultimi 1.000 record di carica.
I dati raccolti nelle ultime 1.000 cariche possono essere esportati su una chiavetta
USB in formato .CSV.
Page 95

Manuale d’utilizzo
Calibrazione del cavo
Calibrazione cavi
Automatico
Manuel
Calibrazione automatica (consigliata)
Calibrazione cavi
Traduzione delle istruzioni
originali
1 Collegare la chiave USB a Gysash
2 Accedere al sottomenu «Esportazione dati».
3 Conferma la registrazione dei dati di caricamento.
4 Gysash copierà quindi i dati di carica sulla chiavetta USB sotto forma di le «.CSV».
I cavi possono essere calibrati automaticamente (si consiglia) o manualmente.
Questa procedura serve a calibrare i cavi di ricarica del dispositivo, in modo che Gysash
compensi al meglio la caduta di tensione dovuta ai cavi. Si consiglia vivamente di eseguire
questa procedura ogni volta che si sostituiscono i cavi o se questi sono usurati.
GYSFLASH 107.24 CNT FV
Assicurarsi che le parti metalliche delle ganasce a cui sono ssati i cavi siano in contatto tra loro.
OK NON OK NON OK
Calibrazione manuale (non consigliata)
Calibrazione cavi
Per calibrare, è suciente cortocircuitare i morsetti di carica e confermare.
Il dispositivo calcola automaticamente la resistenza del cavo.
IT
11.5 m
La resistenza del cavo può essere impostata manualmente.
Attenzione: questo valore deve includere la resistenza interna del Gysash.
95
Page 96

Manuale d’utilizzo
Traduzione delle istruzioni
originali
Parametri avanzati
Questo menu consente di accedere alle funzioni avanzate del Gysash.
+ Opzione
GYSFLASH 107.24 CNT FV
+ Opzioni
- Detect
Auto
- Restart
Auto
Attivato Disattivato
Trasportabilità
Questo menu consente di denire se le opzioni Auto-detect e Auto-Restart
sono abilitate o meno.
Auto-detect opzione: Questa funzione avvia automaticamente una carica
quando viene rilevato un contatto sull’uscita del Gysash. Se l’opzione
«Auto-detect» è disattivata, il rilevamento di un contatto in uscita si farà solo
nella modalità «Auto-select» e le altre modalitò non possono essere lanciatte
se non con uno START manuale.
Auto-restart opzione: Questa funzione riavvia automaticamente il Gysash in
caso di interruzione dell’alimentazione.
Questo menu consente di importare, esportare o inizializzare la congurazione
di Gysash.
Il tuo GYSFLASH è dotato di connettività USB che estende le sue funzionalità
creando congurazioni di computer personalizzate che possono quindi essere
scaricate sul dispositivo tramite una semplice chiave USB. La congurazione
personalizzata consente di aggiungere, eliminare o modicare le modalità e
caricare i proli, in modo che il caricabatterie soddis al meglio le tue esigenze.
Ripristinare CONFIG
Questa azione ripristina la congurazione originale (di fabbrica) del Gysash in seguito a modiche manuali
di modalità o parametri.
1 Accedere al sottomenu «Ripristino CONFIG».
2 Conferma il ripristino della congurazione.
3 Il Gysash ripristina quindi la sua congurazione originale (di fabbrica)
Importazione di
CONFIG (.gfc)
Questa azione scarica una nuova congurazione di fabbrica su Gysash.
La congurazione attuale viene quindi sovrascritta.
Innanzitutto, accertarsi che il le «.gfc» corrispondente alla nuova congurazione sia presente sulla
1
chiave USB. Questo le non deve essere posizionato in una cartella o sottocartella della chiave
USB.
2 Collegare la chiave USB a Gysash.
3 Accedere al sottomenu «Importa CONFIG».
4 Selezionare il le da scaricare.
5 Confermare che il le è stato caricato.
6 Gysash scaricherà quindi la nuova congurazione.
96
Page 97

Manuale d’utilizzo
Traduzione delle istruzioni
originali
Esportazione di
CONFIG (.gfc)
Questa azione scarica la congurazione corrente di Gysash su una chiavetta USB.
1 Collegare la chiave USB a Gysash.
2 Accedere al sottomenu «Esportazione CONFIG».
3 Conferma il backup della congurazione.
4 Il Gysash salverà quindi la congurazione corrente sulla chiave USB.
Congurazione personalizzata
Elenco delle modalità e dei proli disponibili per la personalizzazione:
MODALITA’ CARICA
Tipologie di
carica
Pb-CHARGE
Li-CHARGE
TRAZIONE
Proli di
carica
normale
AGM
liquido
Easy
boost
recovery+
Ca/Ca recov
LFP/LiFePO4
Li-ion std
LFP cell+
Li-ion cell+
liquido
gel
Tensione di
carica
2.40 V/cella prolo di carica per Gel, MF, EFB, SLA ...
2.45 V/cella
2.45 V/cella Prolo di carica per batterie al piombo aperte di tipo liquido con tappo.
2.40 V/cella
2.42 V/cella
2.40 - 2.50 V/
cellule
2.45 - 2.66
V/ cellula
3.60 V/cella Prolo di ricarica per batterie al Litio Ferro Fosfato (LFP)
4.20 V/cella
3.60 V/cella
4.20 V/cella
2.42 V/cella Prolo di carica dedicato alle batterie di trazione del tipo a piombo aperto per carrelli elevatori.
2.35 V/cella prolo di carica dedicato alle batterie di trazione del gel del carrello elevatore.
Prolo di carica per la maggior parte delle batterie piombo-acido AGM incluso START e STOP.
Tuttavia, alcune batterie AGM richiedono una carica di tensione inferiore (prolo normale).
Controllare il manuale della batteria in caso di dubbio.
Prolo di ricarica dedicato alle batterie al piombo che regola automaticamente la corrente in
base alle dimensioni della batteria.
Tuttavia, per ottimizzare al massimo il carico, si consiglia, ove possibile, di utilizzare le normali
curve di carico AGM o liquido
Prolo di carica della corrente massima per le batterie al piombo-acido. Questo prolo consente una ricarica ultra rapida.
Attenzione: Questo tipo di ricarica deve essere eettuato occasionalmente per non
ridurre la durata della batteria.
Prolo di carica per il recupero di batterie al piombo fortemente danneggiate. Il recupero deve
essere fatto imperativamente al di fuori della batteria del veicolo per non danneggiare l’elettronica del veicolo e in un luogo ben ventilato.
Attenzione: Tensione di recupero no a 4,0 V / cella.
Prolo di carica per il recupero delle batterie al calcio. Il recupero deve essere fatto imperativamente al di fuori della batteria del veicolo per non danneggiare l’elettronica del veicolo e in
un luogo ben ventilato.
Attenzione: Tensione di recupero no a 2.75 V / cella.
Prolo di ricarica per batterie standard agli ioni di litio a base di manganese o cobalto (NMC,
LCO, LMO, MCO ...)
Prolo di carica a celle al litio tipo LFP (Lithium Iron Phosphate) con selezione del numero di
celle in serie da caricare.
Prolo di carico dedicato alle celle standard agli ioni di litio a base di manganese o cobalto
(NMC, LCO, LMO, MCO ...) con selezione del numero di celle in serie da caricare.
GYSFLASH 107.24 CNT FV
IT
MODALITA’ ALIMENTAZIONE
SHOWROOM
DIAG+
Cambio batteria
MODALITA’ AVVIAMENTO
ALIMENTAZIONE ELETTRICA
Li-SUPPLY/LFP
Li-SUPPLY/Li-ion
Garantisce la conservazione dello stato di carica della batteria e supporta l’energia quando si utilizzano gli
accessori elettrici di un veicolo dimostrativo.
Supporta il fabbisogno energetico durante le fasi diagnostiche del veicolo.
Mantiene l’alimentazione del veicolo durante la sostituzione della batteria, al ne di preservare la memoria
dei computer del veicolo.
Attenzione: un’inversione di polarità potrebbe avere eetti nefasti per il caricabatterie e l’elettronica
del veicolo.
Aiuto all’avviamento per veicoli termici. Consente di precaricare la batteria e di inviare la massima corrente
dal caricabatterie durante la fase di avvio del motore (il caricabatterie si spegne automaticamente dopo 30
minuti).
Consente di utilizzare il caricabatterie come un alimentatore stabilizzato regolabile ad alta potenza. La tensione da regolare e la limitazione di corrente sono completamente regolabili.
Attenzione: un’inversione di polarità potrebbe avere eetti nefasti per il caricabatterie e l’elettronica
del veicolo.
Modalità per la fornitura di celle agli ioni di litio del tipo LFP (Lithium Iron Phosphate) con selezione del
numero di celle in serie, regolazione della tensione e corrente da applicare.
Modalità destinata all’alimentazione di celle standard agli ioni di litio a base di manganese o cobalto (NMC,
LCO, LMO, MCO ...) con selezione del numero di celle in serie, regolazione della tensione e corrente da
applicare.
97
Page 98

Manuale d’utilizzo
Traduzione delle istruzioni
originali
GYS ore congurazioni predenite adattate a ciascuna applicazione.
Queste congurazioni sono disponibili sulla pagina del prodotto del sito web di GYS:
MODALITA’ CARICA MODALITA’ ALIMENTAZIONE Varie
Pb-CHARGE Li-CHARGE
File di congurazione
(gys.fr) Applicazioni
normale
AGM
liquido
Easy
Boost
Recovery+
Ca / Ca recov
1_gys_original.gfc Congurazione iniziale del caricabatterie
2_car_extended.gfc Funzionalità estese per il meccanico del garage
3_showroom_only.gfc
4_pro_lithium.gfc Batteria al litio professionale
5_traction.gfc
6_full_version.gfc Versione completa
Solo sui modelli a 24 V e 48 V.
* DIAG+ (Pro) - Possibilità di selezione a 16 V.
Versione semplicata per veicoli in concessione e
dimostrativi
Carrello elevatore, transpallet elettrico, impilatore
...
LFP/LiFePO4
Li-ion std
LFP cell+
TRA-
ZIONE
Li-ion cell+
liquido
GYSFLASH 107.24 CNT FV
gel
SHOWROOM
DIAG+
Cambio batteria
Modalita’ avviamento
Alimentazione elettrica
Li-SUPPLY/LFP
Li-SUPPLY/Li-ion
*
Modalità tester
Multi-Charger
Multi-carica
OFF
Master
Master
Master
Informazione
+ 1 Slave
+ 2 Slaves
+ 3 Slaves
Informazione
GYSFLASH 107.24
HW08.00
- SW01.00
22.11.069909.000000
Questo menu serve a denire la congurazione in modalità Multi-charger (per
maggiori dettagli, vedere il man
uale S
HM - 025981).
Selezionare «OFF» per l’uso standard con un solo Gysash.
Questo menu visualizza le informazioni relative a Gysash :
- Nome dell’apparecchio
- Versioni del dispositivo/software
- Numero di serie
98
Page 99

Manuale d’utilizzo
Calibrazione cavi
Traduzione delle istruzioni
originali
STRUTTURA DEL MENBU DI CONFIGURAZIONE
Selezione della lingua
Selezione data/ora
Suono On / O
GYSFLASH 107.24 CNT FV
Tracciabilità
Calibrazione del cavo
Automatico
Manuel
Parametri avanzati
Informazioni
Automatico o manuale
Esplora i dati
Esportazione dati
+ Opzioni
Trasportabilità
Multi-charger
Ripristinare CONFIG
Importare CONFIG
Esportare CONFIG
MODULI DI CONNETTIVITÀ
Il tuo GYSFLASH è dotato di una presa di tipo DB9 che consente di collegare diversi moduli aggiuntivi proposti da GYS come un
modulo stampante, Ethernet o altri per estendere ulteriormente le possibilità del tuo caricabatterie.
IT
ELENCO DEI CODICI DI ERRORE
Err01: Int_1 - Err02: Int_2
Err23: Int_3 - Err24: Int_4
Err03: Fusibile_NOK Fusibile d’uscita HS Far sostituire il fusibile da una persona qualicata
Err04: T>Tmax Surriscaldamento anomalo Contattare il distributore.
Err05: (+) (-)
Err06: U>__V
Err07: No_bat Batteria non collegata
Err08: U<__V
Codice errore Signicato Rimedi
Problema elettronico
Caricabatterie difettoso
Inversione di polarità sui morsetti
Rilevamento di sovratensione ai morsetti
della pinza
Tensione della batteria eccessivamente
bassa
Contattare il distributore.
Collegare il morsetto rosso sul (+) e il morsetto nero sul (-) della
batteria.
Scollegare le pinze
Controllare che la batteria sia correttamente collegata al caricabatterie
Vericare che la modalità selezionata sia compatibile con la
tensione della batteria (es. : batteria da 6 V in modalità 24 V)
Caricare la batteria tramite la modalità CHARGE
Batteria da sostituire.
99
Page 100

Manuale d’utilizzo
Traduzione delle istruzioni
originali
GYSFLASH 107.24 CNT FV
Err09: U>__V Tensione della batteria eccessivamente alta
Err10: U<2.0V Cortocircuito rilevato durante la ricarica Controllare il montaggio
Err11: Time_Out
Err12: Q>___Ah Attivazione della protezione da sovraccarico
Err13: U<__V
Err14: Bat_UVP
Err15: U<__V Batteria troppo debole
Err16: Bat_NOK Batteria HS Batteria da sostituire.
Err17: Recov_NOK Impossibile recuperare la batteria Batteria da sostituire.
Err18: U>0V
Err19: Cavo_NOK Calibrazione dei cavi non riuscita
Err20: U<__V
Err21: U<__V o Err22: U<__V
?
?
Err27: Cavo_NOK
Err28: COM_NOK
Attivazione del limite di tempo Presenza di un consumatore sulla batteria che disturba la carica
Carica eccessivamente lunga Batteria da sostituire.
Tensione della batteria eccessivamente
bassa durante la verica della carica
Voltaggio della batteria eccessivamente
basso durante l’accensione UVP
Presenza di una tensione tra i morsetti
durante la calibrazione del cavo
Attivazione della protezione da sottotensione anormale
Tensione della batteria eccessivamente
bassa durante la manutenzione
Chiave non rilevata
Nessun le di congurazione (.gfc) è presente sulla chiave
File danneggiato
Modalità Multi-Charger:
Mancato parallelismo dei cavi di carica
Modalità Multi-Charger:
Guasto di comunicazione tra i caricabatterie
Vericare che la modalità selezionata sia compatibile con la
tensione della batteria (es. : batteria da 24 V in modalità 12 V)
Presenza di un consumatore sulla batteria che disturba la carica
Batteria da sostituire.
Batteria da sostituire.
Presenza di un cortocircuito, controllare il gruppo
Batteria da sostituire.
Vericare che la modalità selezionata sia compatibile con la
tensione della batteria (es. : batteria da 24 V in modalità 12 V)
Batteria da sostituire.
Controllare il montaggio
Cavi di ricarica da sostituire
Cattiva connessione, controllare l’assemblea
Presenza di un cortocircuito, controllare il gruppo
Batteria da sostituire.
Presenza di un consumatore sulla batteria
Vericare che la chiave USB sia correttamente collegata al
caricabatterie
Verica che i tuoi le siano presenti nella radice della chiave
USB. Non metterli in una cartella o sottocartella.
Il le che vuoi scaricare è corrotto. Elimina e reinstalla il le sulla
chiave.
Cavi di carica da sostituire.
Collegamento insuciente, controllare il gruppo (PHM).
Per tornare al funzionamento del caricabatterie singolo,
selezionare OFF per la funzione Multi-charger.
Nessuna comunicazione, vericare il montaggio dell’SHM e la
congurazione del caricatore SLAVE X.
Per tornare al funzionamento con caricatore singolo, selezionare
OFF per la funzione Multi-Charger.
GARANZIA
La garanzia copre ogni difetto di fabbricazione per 2 anni, a partire dalla data d’acquisto (pezzi e mano d’opera).
La garanzia non copre:
• Ogni danno dovuto al trasporto.
• La normale usura dei pezzi (Es. : cavi, morsetti, ecc.).
• Gli incidenti causati da uso improprio (errore di alimentazione, cadute, smontaggio).
• I guasti legati all’ambiente (inquinamento, ruggine, polvere).
In caso di guasto, rispedire il dispositivo al vostro distributore, allegando:
- una prova d’acquisto con data (scontrino, fattura ...)
- una nota spiegando il guasto.
100
 Loading...