

Page 1
FR
2 / 3-11 / 66-72
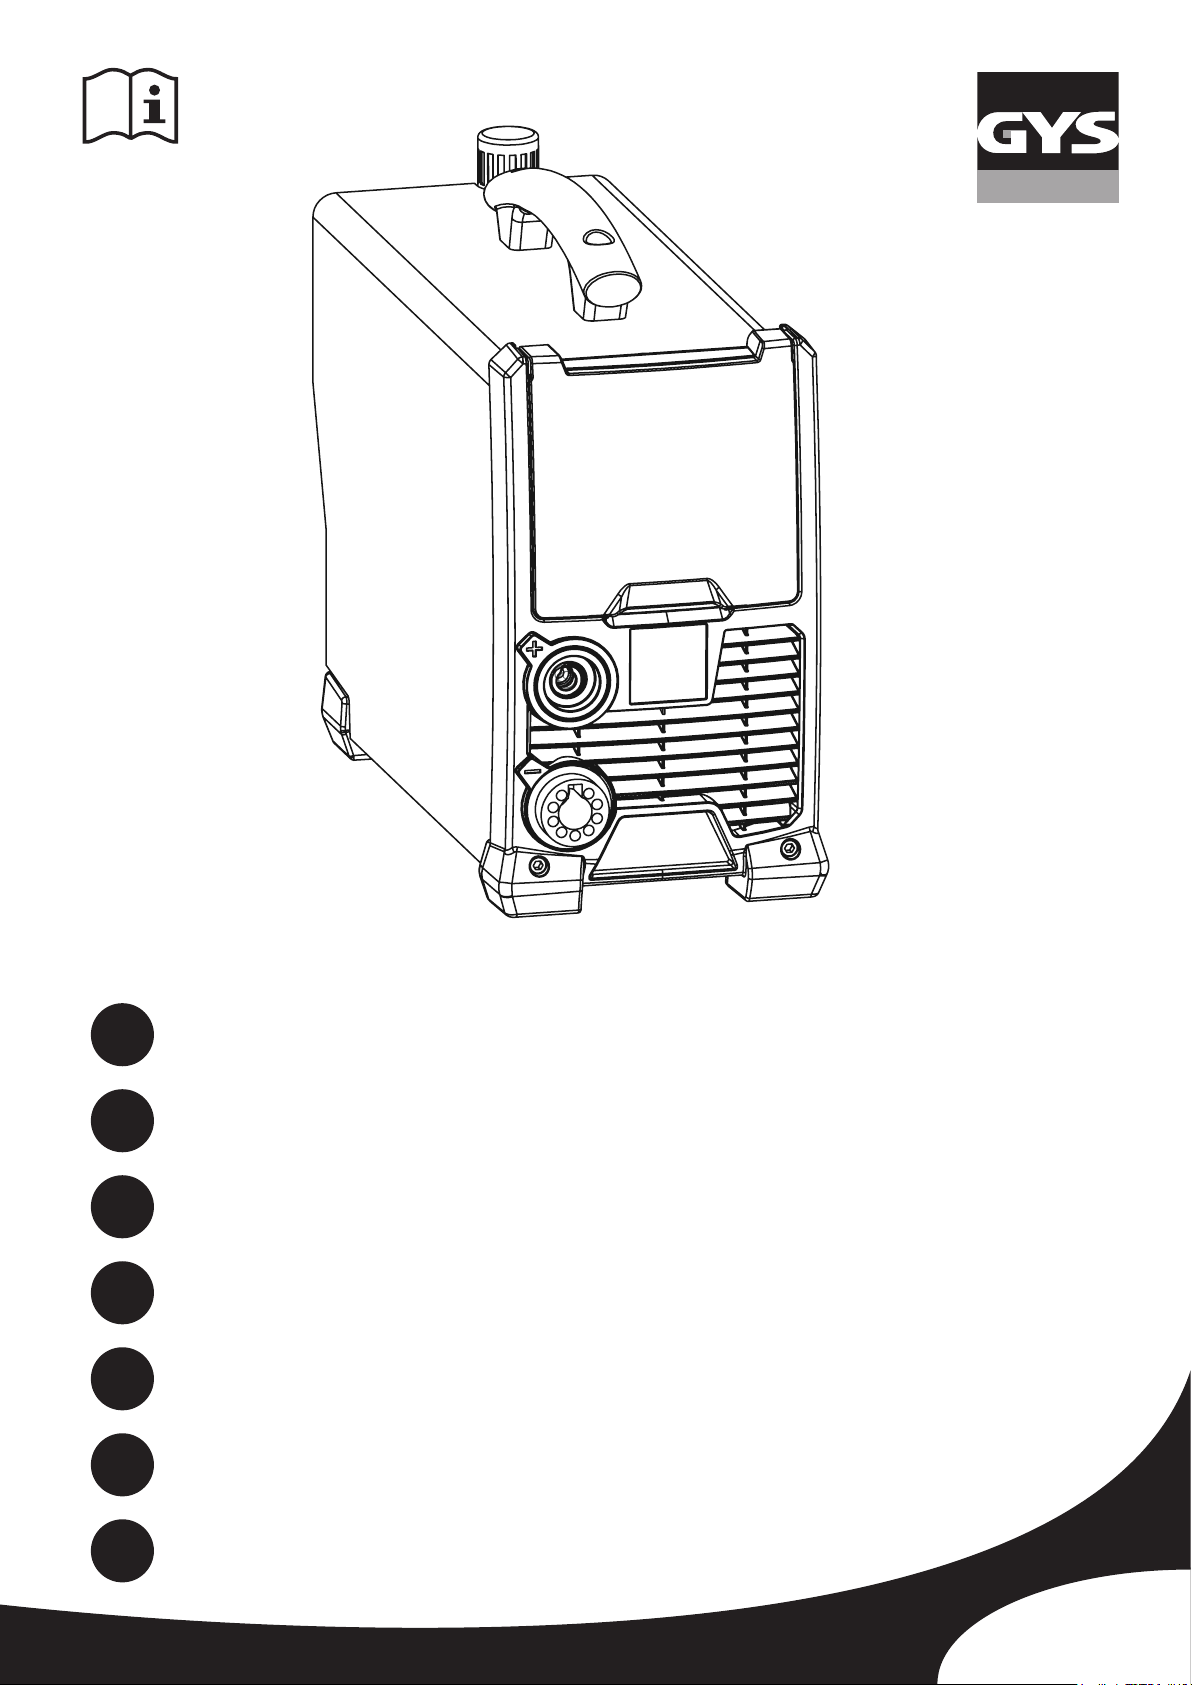
EASYCUT 40
EN
DE
ES
RU
NL
IT
C51366_V4_22/08/2019
2 / 12-20 / 66-72
2 / 21-29 / 66-72
2 / 30-38 / 66-72
2 / 39-47 / 66-72
2 / 48-56 / 66-72
2 / 57-65 / 66-72
Découpeur plasma monophasé
Single-phase plasma cutter
Einphasiger Plasmaschneider
Cortador al plasma monofásico
Однофазный аппарат плазменной резки
Enkelfase plasma-snijder
Macchina per taglio al plasma monofase
www.gys.fr
Page 2
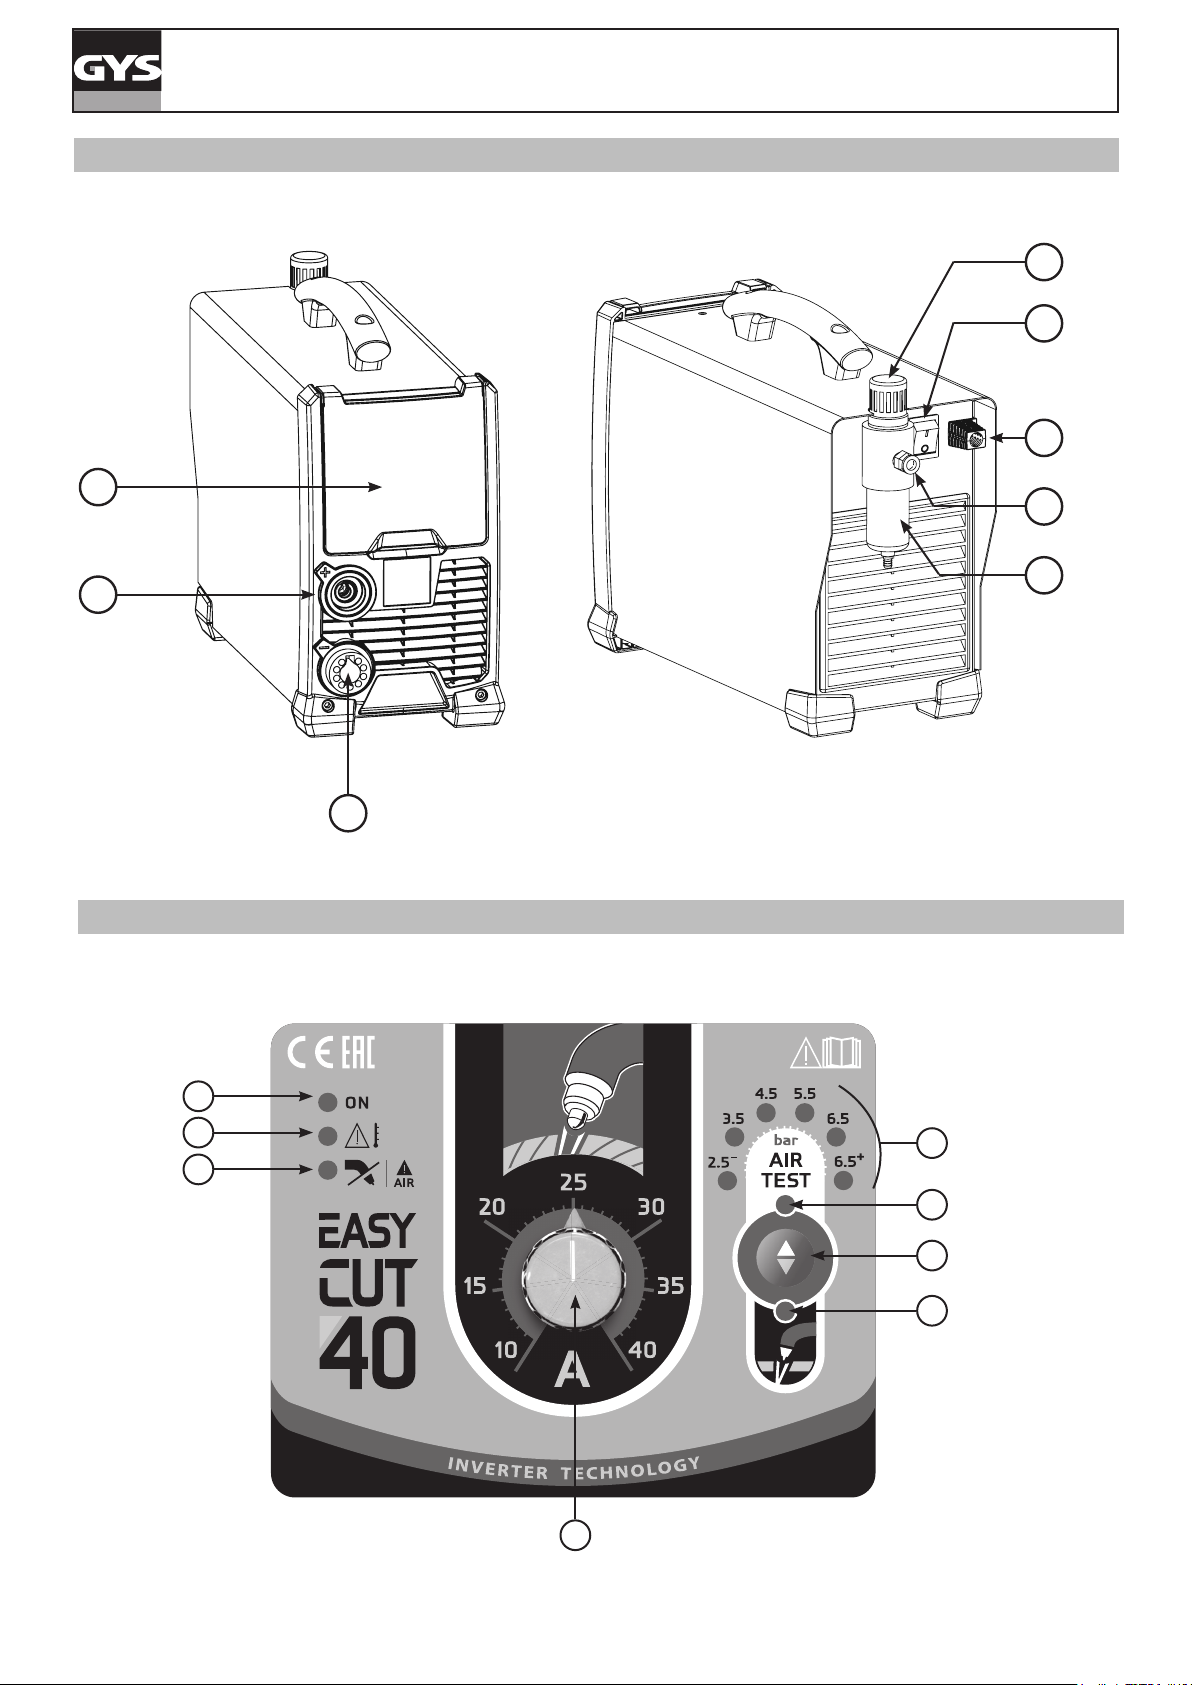
FIG-1
EASYCUT 40
8
6
7
1
3
FIG-2
4
5
2
1
2
3
4
4
8
6
5
7
2
Page 3
EASYCUT 40
EN
WARNING - SAFETY RULES
GENERAL INSTRUCTIONS
Read and understand the following safety recommendations before using or servicing the unit.
Any change or servicing that is not specied in the instruction manual must not be undertaken.
The manufacturer is not liable for any injury or damage caused due to non-compliance with the instructions featured in this manual.
In the event of problems or uncertainties, please consult a qualied person to handle the installation properly.
ENVIRONMENT
This equipment must only be used for cutting operations in accordance with the limits indicated on the descriptive panel and/or in the user manual.
The operator must respect the safety precautions that apply to this type of cutting. In case of inedaquate or unsafe use, the manufacturer cannot be
held liable for damage or injury.
This equipment must be used and stored in a place protected from dust, acid or any other corrosive agent. Operate the machine in an open, or
well-ventilated area.
Operating temperature:
Use between -10 and +40°C (+14 and +104°F).
Store between -20 and +55°C (-4 and 131°F).
Air humidity:
Lower or equal to 50% at 40°C (104°F).
Lower or equal to 90% at 20°C (68°F).
Altitude:
Up to 1000 meters above sea level (3280 feet).
PROTECTION OF THE INDIVIDUALS
Plasma cutting can be dangerous and can cause serious and even fatal injuries.
Cutting exposes the user to dangerous heat, arc rays, electromagnetic elds, noise, gas fumes, and electrical shocks. People wearing pacemakers are
advised to consult with their doctor before using this device.
To protect oneself as well as the other, ensure the following safety precautions are taken:
In order to protect you from burns and radiations, wear clothing without cuffs. These clothes must be insulated, dry, reproof and
in good condition, and cover the whole body.
Wear protective gloves which guarantee electrical and thermal insulation.
Use sufcient welding protective gear for the whole body: hood, gloves, jacket, trousers... (varies depending on the application/
operation). Protect the eyes during cleaning operations. Do not operate whilst wearing contact lenses.
It may be necessary to install reproof welding curtains to protect the area against arc rays, weld spatters and sparks.
Inform the people around the working area to never look at the arc nor the molten metal, and to wear protective clothes.
Ensure ear protection is worn by the operator if the work exceeds the authorised noise limit (the same applies to any person in
the welding area).
Stay away from moving parts (e.g. engine, fan...) with hands, hair, clothes etc...
Never remove the safety covers from the cooling unit when the machine is plugged in - The manufacturer is not responsible for
any accident or injury that happens as a result of not following these safety precautions.
The pieces that have just been welded are hot and may cause burns when manipulated. During maintenance work on the torch or
the electrode holder, you should make sure it’s cold enough and wait at least 10 minutes before any intervention. The cooling unit
must be on when using a water cooled torch in order to ensure that the liquid does not cause any burns.
ALWAYS ensure the working area is left as safe and secure as possible to prevent damage or accidents.
WELDING FUMES AND GAS
The fumes, gases and dust produced during cutting are hazardous. It is mandatory to ensure adequate ventilation and/or
extraction to keep fumes and gases away from the work area. An air fed helmet is recommended in cases of insufcient air supply
in the workplace.
Check that the air intake is in compliance with safety standards.
Care must be taken when welding in small areas, and the operator will need supervision from a safe distance. Welding certain pieces of metal
containing lead, cadmium, zinc, mercury or beryllium can be extremely toxic. The user will also need to degrease the workpiece before welding.
Gas cylinders must be stored in an open or ventilated area. The cylinders must be in a vertical position secured to a support or trolley.
Do not weld in areas where grease or paint are stored.
12
Page 4
EASYCUT 40
EN
FIRE AND EXPLOSION RISKS
Protect the entire cutting area. Compressed gas containers and other inammable material must be moved to a minimum safe
distance of 11 meters.
A re extinguisher must be readily available.
Be careful of spatter and sparks, even through cracks. It can be the source of a re or an explosion.
Keep people, ammable objects and containers under pressure at a safe distance.
Cutting of sealed containers or closed pipes should not be undertaken, and if opened, the operator must remove any inammable or explosive
materials (oil, petrol, gas...).
Grinding operations should not be directed towards the device itself, the power supply or any ammable materials.
ELECTRIC SAFETY
The machine must be connected to an earthed electrical supply. Use the recommended fuse size.
An electrical discharge can directly or indirectly cause serious or deadly accidents .
Do not touch any live part of the machine (inside or outside) when it is plugged in (Torches, earth cable, cables, electrodes) because they are
connected to the welding circuit.
Before opening the device, it is imperative to disconnect it from the mains and wait 2 minutes, so that all the capacitors are discharged.
Do not touch the torch or electrode holder and earth clamp at the same time.
Damaged cables and torches must be changed by a qualied and skilled professional. Make sure that the cable cross section is adequate with the
usage (extensions and welding cables). Always wear dry clothes in good condition, in order to be insulated from the electrical circuit. Wear insulating
shoes, regardless of the environment in which you work in.
EMC CLASSIFICATION
These Class A devices are not intended to be used on a residential site where the electric current is supplied by the public
network, with a low voltage power supply. There may be potential difculties in ensuring electromagnetic compatibility on these
sites, because of the interferences, as well as radio frequencies.
This equipment does not comply with IEC 61000-3-12 and is intended to be connected to private low-voltage systems
interfacing with the public supply only at the medium- or high-voltage level. On a public low-voltage power grid, it is the
responsibility of the installer or user of the device to ensure, by checking with the operator of the distribution network, which
device can be connected.
This equipment complies with the IEC 61000-3-11 standard.
ELECTROMAGNETIC INTERFERENCES
The electric currents owing through a conductor cause electrical and magnetic elds (EMF). The cutting current generates an
EMF eld around the welding circuit and the welding equipment.
The EMF elds may disrupt some medical implants, such as pacemakers. Protection measures should be taken for people wearing medical implants.
For example, access restrictions for passers-by or an individual risk evaluation for the welders.
All operators should take the following precautions in order to minimise exposure to the electromagnetic elds (EMF) generated by the cutting circuit::
• position the welding cables together – if possible, attach them;
• keep your head and torso as far as possible from the welding circuit;
• never enroll the cables around your body;
• never position your body between the welding cables. Hold both welding cables on the same side of your body;
• connect the earth clamp as close as possible to the area being welded;
• do not work too close to, do not lean and do not sit on the welding machine.
People wearing pacemakers are advised to consult their doctor before using this device.
Exposure to electromagnetic elds while welding may have other health effects which are not yet known.
RECOMMANDATIONS TO ASSES THE AREA AND WELDING INSTALLATION
Overview
The user is responsible for installing and using the cutting equipment in accordance with the manufacturer’s instructions. If electromagnetic
disturbances are detected, it is the responsibility of the user of the cutting equipment to resolve the situation with the manufacturer’s technical
assistance. In some cases, this remedial action may be as simple as earthing the welding circuit. In other cases, it may be necessary to construct an
electromagnetic shield around the welding power source and around the entire piece by tting input lters. In all cases, electromagnetic interferences
must be reduced until they are no longer bothersome.
13
Page 5
EASYCUT 40
Cutting area assessment
Before installing the machine, the user must evaluate the possible electromagnetic problems that may arise in the area where the installation is
planned.
In particular, it should consider the following:
a) the presence of other power cables (power supply cables, telephone cables, command cable, etc...) above, below and on the sides of the arc
welding machine.
b) television transmitters and receivers ;
c) computers and other hardware;
d) critical safety equipment such as industrial machine protections;
e) the health and safety of the people in the area such as people with pacemakers or hearing aids;
f) calibration and measuring equipment
g)The isolation of the equipment from other machinery.
The user will have to make sure that the devices and equipments that are in the same room are compatible with each other. This may require extra
precautions;
h) make sure of the exact hour when the welding and/or other operations will take place.
The surface of the area to be considered around the device depends on the the building’s structure and other activities that take place there. The area
taken in consideration can be larger than the limits determined by the companies.
Cutting area assessment
Besides the welding area, the assessment of the cutting systems intallation itself can be used to identify and resolve cases of disturbances. The
assessment of emissions must include in situ measurements as specied in Article 10 of CISPR 11: 2009. In situ measurements can also be used to
conrm the effectiveness of mitigation measures.
EN
RECOMMENDATION ON METHODS OF ELECTROMAGNETIC EMISSIONS REDUCTION
a. National power grid: The arc cutting machine must be connected to the national power grid in accordance with the manufacturer’s recommendation.
If interferences occur, it may be necessary to take additional preventive measures such as the ltering of the power suplly network. Consideration
should be given to shielding the power supply cable in a metal conduit. It is necessary to ensure the shielding’s electrical continuity along the cable’s
entire length. The shielding should be connected to the cutting current’s source to ensure good electrical contact between the conduct and the casing
of the welding current source..
b. Maintenance of the cutting equipment: The cutting machine should be be submitted to a routine maintenance check according to the
manufacturer’s recommendations. All accesses, service doors and covers should be closed and properly locked when the cutting equipment is on. The
cutting equipment must not be modied in any way, except for the changes and settings outlined in the manufacturer’s instructions. The spark gap of
the arc start and arc stabilization devices must be adjusted and maintained according to the manufacturer’s recommendations.
c. Cutting cables: Cables must be as short as possible, close to each other and close to the ground, if not on the ground.
d. Electrical bonding : consideration shoud be given to bonding all metal objects in the surrounding area. However, metal objects connected to
the workpiece increase the riskof electric shock if the operator touches both these metal elements and the electrode. It is necessary to insulate the
operator from such metal objects.
e. Earthing of the cutted part : When the part is not earthed - due to electrical safety reasons or because of its size and its location (which is the
case with ship hulls or metallic building structures), the earthing of the part can, in some cases but not systematically, reduce emissions It is preferable
to avoid the earthing of parts that could increase the risk of injury to the users or damage other electrical equipment. If necessary, it is appropriate
that the earthing of the part is done directly, but in some countries that do not allow such a direct connection, it is appropriate that the connection is
made with a capacitor selected according to national regulations.
f. Protection and plating : The selective protection and plating of other cables and devices in the area can reduce perturbation issues. The
protection of the entire welding area can be considered for specic situations.
TRANSPORT AND TRANSIT OF THE CUTTING MACHINE
The machine is tted with handle(s) to facilitate transportation. Be careful not to underestimate the machine’s weight. The
handle(s) cannot be used for slinging.
Do not use the cables or torch to move the machine. The welding equipment must be moved in an upright position.
Do not place/carry the unit over people or objects.
A clear path is available when moving the item.
EQUIPMENT INSTALLATION
• Put the machine on the oor (maximum incline of 10°.)
• Ensure the work area has sufcient ventillation for cutting, and that there is easy access to the control panel.
• The machine must not be used in an area with conductive metal dusts.
• The machine must be placed in a sheltered area away from rain or direct sunlight.
• The machine protection level is IP21, which means :
- Protection against acess to dangerous parts from solid bodies of a ≥12.5mm diameter and,
- Protection against vertically falling drops.
The power cables, extensions and welding cables must be fully uncoiled to prevent overheating.
The manufacturer does not incur any responsability regarding damages to both objects and persons that result from an incorrect
and/or dangerous use of the machine .
14
Page 6

EASYCUT 40
EN
MAINTENANCE / RECOMMENDATIONS
Ensure the machine is unplugged from the mains, and wait for two minutes before carrying out maintenance work. DANGER High
Voltage and Currents inside the machine.
Maintenance should only be carried out by a qualied person. Annual maintenance is recommended.
1 - Air lter maintenance:
• It is necessary to periodically empty the air lter. To do so, press and hold the orange button below the lter.
• Disassembly:
- Unplug the air supply.
- Grab the tank, press the latch and rotate the bowl 45 degrees to the left.
- Pull the cube downwards and then put it down .
- The ltering part is white, clean or replace it if necessary (ref. 039735).
2 - Periodical maintenance:
• Periodically remove the cover and dust with an air gun. You are advised to have the electrical connections checked by a qualied person, with an
insulated tool.
• Regularly check the condition of the power supply cable. If the power cable is damaged, it must be replaced by the manufacturer, an after sales
service or a qualied person to prevent danger.
• Do not obstruct the machine’s air intake, to allow air circulation.
• Check that the torch does not have any cracks or exposed wires.
• Check that the consumables are installed properly and not worn.
• Do not use this equipment to thaw pipes, to charge batteries, or to start any engine.
INSTALLATION – PRODUCT OPERATION
Only qualied personnel authorized by the manufacturer should perform the installation of the cutting equipment. During set up, the operator must
ensure that the machine is unplugged. Connecting generators in a series or a parallel circuit is forbidden. It is recommended to use the welding cables
supplied with the unit in order to obtain the optimum product settings.
MACHINE SUPPLIED WITH
EASYCUT 40
Ref. 029743
4 m
2 m - 10 mm²
Starting kit
Pneumatic ttings
The accessories supplies with the machine are to be used only with the same models.
HARDWARE DESCRIPTION (FIG-1)
1- Keyboard + buttons 5- Air lter
2- Torch connector 6- On/off switch
3- Earth clamp connector 7- Power supply cable
4- Compressed air connector 8- Air regulator
TPT 40
-
8 mm
(air pressure adjustment)
CONTROL BOARD (IHM) (FIG-2)
1- Power indicator (green) 5- Selection button (air pressure or cutting mode)
2- Thermal protection and over current protection indicator (yellow) 6- Air pressure selection indicator
3- Torch and air pressure fault light 7- Starting the cutting mode indicator
4- Cutting current adjustment 8- Indication to measured pressure value (LED).
POWER SUPPLY – STARTING UP
This machine is tted with a 16A socket type CEE7/7 which must be connected to a single-phase 230V (50 - 60 Hz) power supply tted with three
wires and one earthed neutral. The absorbed effective current (I1eff) is indicated on the machine, for optimal use. Check that the power supply and
its protection (fuse and/or circuit breaker) are compatible with the current required to run the machine (l1max). Use preferably a 32A plug with a 32A
circuit-breaker for intensive use. Position the device so that the socket is always accessible.
They are power supplied by a 230V +/- 15% (50 - 60 Hz) EARTHED installation and are protected to work with generators. This hardware must only
be used with a one phase electricity supply protected by a earthing wire.
The absorbed effective current (I1eff) is displayed on the machine, for optimal use. Check that the power supply and its protection (fuse and/or circuit
breaker) are compatible with the current needed by the machine.
15
Page 7

EASYCUT 40
EN
CONNECTION ON A GENERATOR
This product is not protected against overvoltages regularly emitted by generators and it is not recommended to connect it to this type of power
supply.
USE WITH EXTENSION CABLES
All extension cables must have an adequate size and section, relative to the machine’s voltage.
Use an extension that complies with national safety regulations.
Voltage input Section of extension cable (<45m)
230 V 6 mm²
AIR SUPPLY
The air supply can come from a compressor or high pressure bottles. A high pressure manometer must be used on any type of air supply and must be
able to transport the gas to the plasma cutter. These machines come with an integrated air lter (5 μm), but an extra ltering system can be necessary
depending on the quality of the air supply (impurities lter in option, ref. 039728).
If the supplied air is of low quality, the cutting speed is reduced, the cutting quality deteriorates, the maximum cutting capacity
diminishes and the life cycle of the consumables is reduced.
For optimal performance, the compressed air must comply with the standard ISO8573-1, class 1.2.2. The maximum vapor pressure point must be - 40
°C. The maximum oil quantity (aerosol, liquid et vapor) must be 0.1 mg/m3.
Connecting the gas supply to the current source by means of an inert gas
pipe of an internal diameter of 9.5 mm and a quick connect coupler.
The pressure must not exceed 9 bars,
The lter’s cuve could explose.
The recommended entry pressure during air circulation is 5 to 9 bars with a minimum of 305 L/min.
TORCH SETUP
The torches are cooled with ambient air and do not require any special cooling.
1 - CONSUMABLES LIFE CYCLE
The replacement frequency of the Plasma’s consumables depends on several factors:
• The metal thickness.
• The average cutting time
• The air quality (presence of oil, humidity or other contaminants).
• The metal piercing or the cut from the edge.
• The adequate distance between the torch and the part when cutting.
In normal conditions :
- During manual cutting, the electrode wears out rst.
Torch consumables :
16
040236
Nozzle
040212
Tip ElectrodeDiuser
040168040175
4 m
Page 8

EASYCUT 40
2 - INSTALLATION OF THE TORCH CONSUMABLES :
Before changing the consumables, cut the power supply using the interrupor behind the machine.
To use the torch, a complete set of consumables must be installed in the correct order: electrode, diffuser, tip and nozzle.
Nozzle Tip Diffuser Electrode Torch
MACHINE OPERATION
1 - PLACE THE EARTH CLAMP ON THE PART TO CUT
Ensure proper electrical contact and do not to put the cable on the cutting trajectory.
Warning: painting prevents contact between the metal part and the earth clamp, do not forget to sand.
EN
2 - CHECK THE PRESENCE OF ALL THE CONSUMABLES ON THE TORCH AND CONNECT AS FOLLOWS :
Insert the torch’s connector (A) in the female compartment (E) and
screw the B part. Be careful to tighten the torch.
To remove the torch, unscrew in the same manner as above.
3 - START THE MACHINE and check that the power light (1) is on.
4 - SETTINGS PANEL (FIG-2)
Green light (1) «ON»
When the machine is switched on the light turns on. In case of power failure, the green light goes off but the device remains powered while the power
cable is unplugged.
Orange light (2)
Over-temperature: in such a case, the orange light will ash once per second. You shall wait a few minutes, the light will turn off and the machine
will start to work again.
Over-current on primary circuit: in such a case, the orange light will turn on all the time. You shall switch off the machine (with the main switch) and
switch on.
Orange light (3)
No connection of torch: in such a case, the orange light will turn on all the time. You shall check the connection of torch and the protection shroud.
No gas or Not enough pressure: in such case, the orange light will ash once per second. You shall check the gas and adjust the pressure of gas
more than 2.5 bar and you also need to check the tailpipe was not twisted.
5 - SETTING FOR THE AIR PRESSURE (FIG-2)
Push the button et select . Choose the air pressure between 2.5 and 6.5 bar.
6 - CURRENT SETTING (FIG-2)
Use the adjuster to set the current relative to the thickness and type of the metal sheet. Refer to the «guideline printed on the serigraphy of
cutting the machine
7 - STARTING THE CUTTING MODE (FIG-2)
Push the button and select to begin cutting.
17
Page 9

EASYCUT 40
EN
SAFETY TRIGGER
The torch is equipped with a safety latch to prevent accidental use: Unlock it and pull the trigger as below:
1 2 3
Wear appropriate protective equipment. Stay away from the tip of the torch. Keep your hands away from the cutting trajectory. Never
point the torch towards you or another person.
TIPS FOR CUTTING
• Lightly drag the tip on the part for an even cut. This will guarantee a constant, adapted distance.
• When cutting, ensure that the sparks come from the bottom of the part . The sparks should lag slightly behind the torch when cutting (angle of
15 ° to 30 ° from the vertical).
• If the sparks y from the top of the part, slow the movement, or set the output current to a higher level.
• For straight cuts, use a ruler as a guide.
MANUAL CUT FROM THE EDGE OF THE PART
With the earth clamp is fastened to the part, maintain the torch’s tip perpendicu-
1
larly (90°) to the edge of the part.
Press the torch’s trigger to start the arc until this one has completely cut into the
2
part.
Once the part is cut, slightly drag the tip on the part to continue the cut. Try to
3
maintain a regular rythmn.
18
Page 10

EASYCUT 40
PART PIERCING / CUT IN THE MIDDLE OF THE PART
With the earth clamp is fastened to the part, maintain the torche at an angle of
1
roughly 30° to the part.
Press the torch’s trigger to start the arc while maintaining an angle of 30° to the
2
part. Slowly rotate the torch
towards a perpendicular position (90°).
EN
Immobilise the torch while keeping the trigger pressed. If the sparks come from
3
below the part, the arc has cut the material.
4
Once the part is cut, slightly drag the tip on the part to continue the cut. Try to maintain a regular rythmn.
CONSUMABLES INSPECTION (ASSEMBLY AND DISASSEMBLY, SEE P.16)
Parts Actions Solutions
Replace the nozzle when it looks damaged (traces of
burns).
Replace the tip if the inner diameter is enlarged or
distorted.
Replace the diffuser if the surface is damaged or
worn, or if fume exhausts are obstructed.
Nozzle
Tip
Diffuser
Check the for damage and surface wear.
Visually check the tip’s internal hole.
OK NOK
Check for damage and wear on the surface and inside the diffuser.
Check that the fumes’ exhausts are not obstructed.
Electrode
.
Visually check the electrode’s internal hole.
OK
Replace electrode when the insert is used (removal of
1.5 mm).
NOK
19
Page 11

EASYCUT 40
ANOMALIES, SOLUTIONS
PROBLEMS SOLUTIONS
- Check that the power cord is plugged to the mains properly.
- Check that the device is powered on the main circuit breaker panel or
The machine does not switch on.
The pilot arc switches off
The cutting arc stops.
Insufcient penetration.
The arc sprays and whistles.
WARRANTY
The warranty covers faulty workmanship for 2 years from the date of purchase (parts and labour).
power supply box .
- Check that the voltage is not too low (More than 15% below nominal
voltage).
- Check that the circuit breaker didn't activate.
- Worn consumables
- No electrical contact between the tailpipe and the electrode.
- Cutting speed is too low.
- Bad earth clamp connection.
- Cutting height too high.
- Cutting speed too fast.
- Not enough current.
- Part is too thick.
- Purge the air lter.
- The ltering cartridge must be cleaned or replaced.
EN
The warranty does not cover:
• Transit damage.
• Normal wear of parts (eg. : cables, clamps, etc..).
• Damages due to misuse (power supply error, dropping of equipment, disassembling).
• Environment related failures (pollution, rust, dust).
In case of failure, return the unit to your distributor together with:
- The proof of purchase (receipt etc ...)
- A description of the fault reported
20
Page 12

EASYCUT 40
PERFORMANCES / PERFORMANCES / FÄHIGKEITEN / RENDIMIENTO / РАБОЧИЕ ХАРАКТЕРИСТИКИ /
PRESTAZIONI / PRESTATIES
Fe < 2 3 6 8 12 13 15 20
Al / CrNi < 1 2 3 5 8 9 12 15
10 A 15 A 20 A 25 A 30 A 35 A 40 A 40 A
Fe
Al
CrNi
(25°C)
80 % 70 % 60 % 45 % 40 % 35 % 30 % 30 %
FR EN DE ES RU IT NL
Acier doux Soft steel Stahl Acero dulce Мягкая сталь Acciaio dolce Zacht staal
Aluminium Aluminum Alu Aluminio Алюминий Alluminio Aluminium
Acier
inoxydable
Stainless steel Edelstahl
Acero
inoxidable
Нержавеющая
сталь
Acciaio
inossidabile
Roestvrijstaal
66
Page 13

EASYCUT 40
PIÈCES DE RECHANGE / SPARE PARTS / ERSATZTEILE / PIEZAS DE RECAMBIO / ЗАПЧАСТИ / PEZZI
DI RICAMBIO / RESERVE ONDERDELEN
3
4
5
2
6
1
9
10
8
7
11
13
12
1 Carte Principale / Main board / Hauptplatine / Tarjeta principal / Основная Плата / Hoofd printplaat / Carta principale 53580
Face avant plastique / Front face plastic / Vorderseite Kunststoff / Parte frontal de plástico / Пластиковый молдинг на передней
2
панели / Voorzijde kunststof / Frontale in plastica
3 Carte PCBA / Panel PCBA / Platine PCBA / Tarjeta PCBA / Плата PCBA / PCBA kaart / Scheda PCBA 53581
Poignée en plastique / Plastic handle / Kunststoffgriff / Mango de plástico / Пластиковая ручка / Kunststoffen handvat / Impugna-
4
tora in plastica
Filtre & manodétendeur / Filter & regulator / Filter & Druckluftmesser / Filtro y manorreductor / Фильтр и редуктор / Filter en
5
drukregelaar / Filtro & riduttore di pressione
Grille en plastique / Plastic grill / Kunststoffgitter / Rejilla de plástico / Пластмассовая решетка / Kunststoffen rooster / Griglia in
6
plastica
7 Ventilateur / Fan / Ventilator / Ventilador / Вентилятор / Ventilator / Ventilatore 53586
Câble d’alimentation / Main cable / Versorgungskabel / Cable de alimentación eléctrica / Шнур питания / Voedingskabel / Cavo di
8
alimentazione
9 Interrupteur / switch / Schalter / Interruptor / Выключатель / Schakelaar / Interruttore 53546
Boîtier de protection / Protective casing / Schutzgehäuse / Carcasa de protección / Защитное стекло / Behuizing / Involucro di
10
protezione
Connecteur de pince de masse 1/4 / 1/4 earth clamp connector / Stecker der Masseklemme 1/4 / Conector de pinza de masa 1/4 /
11
Коннектор для зажима массы 1/4 / Aansluiting massaklem 1/4 / Connettore del morsetto di massa 1/4
Inducteur de sortie / Output inductor / Ausgangsindikator / Inductor de salida / Выходной индуктор / Uitgangsinductor / Induttore
12
di uscita
Raccord de torche / Torch connector / Brenneranschluss / Conector de antorcha / Коннектор для горелки / Aansluiting toorts /
13
Raccordo torcia
56164
56048
53582
51010
21464
56166
53583
53584
53585
67
Page 14

EASYCUT 40
SCHÉMA ÉLECTRIQUE / ELECTRICAL DIAGRAM / SCHALTPLAN / ESQUEMA ELÉCTRICO / ELEKTRISCH
SCHEMA
68
Page 15

EASYCUT 40
SPÉCIFICATIONS TECHNIQUES / TECHNICAL SPECIFICATIONS / TECHNISCHE DATEN / TECHNISCHE
GEGEVENS
PLASMA CUTTER
Primaire / Primary / Primär / Primario / Первичка / Primario / Primaire
Tension d’alimentation / Power supply voltage / Stromversorgung / Tensione di alimentazione / Напряжение питания / Tensión
de red eléctrica / Voedingsspanning
Fréquence secteur / Mains frequency / Netzfrequenz / Frequenza settore / Частота сети / Frecuencia / Frequentie sector 50 / 60 Hz
Fusible disjoncteur / Fuse / Sicherung / Fusibile / Плавкий предохранитель / Fusible / Zekering
Secondaire / Secondary / Sekundär / Secondario / Вторичка / Secundario / Secondair
Tension à vide / No load voltage / Leerlaufspannung / Tensione a vuoto / Напряжение холостого хода / Tensión al vacío /
Nullastspanning
Courant de sortie nominal (I2) / Normal current output (I2) / nominaler Ausgangsstrom (I2) / Corrente di uscita nominale (I2) /
Номинальный выходной ток (I2) / Corriente de salida nominal (I2) / Nominale uitgangsstroom (I2)
Tension de sortie conventionnelle (U2) / Conventional voltage output (U2) / entsprechende Arbeitsspannung (U2) / Tensione
di uscita convenzionale (U2) / Условное выходные напряжения (U2) / Tensión de salida convencional (U2) / Conventionele
uitgangsspanning (U2)
Facteur de marche à 40°C (10 min)*
Norme EN60974-1.
Duty cycle at 40°C (10 min)*
Standard EN60974-1.
Einschaltdauer @ 40°C (10 min)*
EN60974-1 -Norm.
Pression de service / Service pressure / Schweißdruck / Pressione di servizio / Рабочее давление / Presión de trabajo / Werkdruk 2.5 > 6.5 bar
Débit d’air / Air debit / Luftdurchuss / Flusso d’aria / Расход воздуха / Caudal de aire / Luchtstroom 100 l/min
Température de fonctionnement / Functionning temperature / Betriebstemperatur / Temperatura di funzionamento / Рабочая температура
/ Temperatura de funcionamiento / Gebruikstemperatuur
Température de stockage / Storage temperature / Lagerungstemperatur / Temperatura di stoccaggio / Температура хранения / Tempera-
tura de almacenaje / Bewaartemperatuur
Degré de protection / Protection level / Schutzgrad / Grado di protezione / Степень защиты / Grado de protección / Beschermingsklasse IP21
Dimensions (Lxlxh) / Dimensions (Lxlxh) / Abmessung (LxBxH) / Dimensioni (Lxlxh) / Размеры (ДхШхВ) / Dimensiones (Lxlxh) / Dimen-
sies (Lxlxh)
Poids / Weight / Gewicht / Peso / Вес / Peso / Gewicht 8 kg
*Les facteurs de marche sont réalisés selon la norme EN60974-1 à 40°C et sur un cycle de 10 min.
Lors d’utilisation intensive (> au facteur de marche) la protection thermique peut s’enclencher, dans ce cas, l’arc s’éteint et l’icône apparaît sur l’écran.
Laissez l’appareil alimenté pour permettre son refroidissement jusqu’à annulation de la protection.
La source de courant décrit une caractéristique de sortie de type tombante.
*The duty cycles are measured according to standard EN60974-1 à 40°C and on a 10 min cycle.
While under intense use (> to duty cycle) the thermal protection can turn on, which switches the arc off and the icon appears on the screen.
Keep the machine’s supply on, to enable cooling until protection cancellation.
The machine has a specication with a “dropping current output”
* Einschaltdauer gemäß EN 60974-1 (10 Minuten – 40°C).
Bei sehr intensivem Gebrauch (> Einschaltdauer) kann der Thermoschutz ausgelöst werden. In diesem Fall wird der Lichtbogen abgeschaltet und die entsprechende Warnung erscheint auf der Anzeige.
Das Gerät zum Abkühlen nicht ausschalten und laufen lassen bis das Gerät wieder bereit ist.
Die Stromquelle beschreibt eine fallende Ausgangseigenschaft
*Los ciclos de trabajo están realizados en acuerdo con la norma EN60974-1 a 40ºC y sobre un ciclo de diez minutos.
Durante un uso intensivo (> que el ciclo de trabajo), se puede activar la protección térmica. En este caso, el arco se apaga y el icono aparece sobre la pantalla.
Deje el aparato conectado para permitir que se enfríe hasta que se anule la protección.
La fuente de energía posee una salida de característica descendente.
*ПВ% указаны по норме EN60974-1 при 40°C и для 10-минутного цикла.
При интенсивном использовании (> ПВ%) может включиться тепловая защита. В этом случае дуга погаснет и на экране появится иконка.
Оставьте аппарат подключенным к питанию, чтобы он остыл до полной отмены защиты.
Источник сварочного тока имеет выходную характеристику «падающего типа».
*I cicli di lavoro sono realizzati secondo la norma EN60974-1 a 40°C e su un ciclo di 10 min.
Durante l’uso intensivo (> al ciclo di lavoro) la protezione termica può avviarsi; in tale caso, l’arco si spegne e l’icona appare sullo schermo.
Lasciare il dispositivo collegato alla presa per permettere il suo raffreddamento no all’annullamento della protezione.
La fonte di corrente descrive una caratteristica di uscita di tipo discendente.
* De inschakelduur is gemeten volgens de norm EN60974-1 bij een temperatuur van 40°C en bij een cyclus van 10 minuten.
Tijdens intensief gebruik (> inschakelduur) kan de thermische beveiliging zich in werking stellen. In dat geval gaat de boog uit en verschijnt het beveiligingsicoon op het scherm.
Laat het apparaat aan de netspanning staan om het te laten afkoelen, totdat de beveiliging afslaat.
De stroombron beschrijft een dalende uitgangskarakteristiek
Ciclo de trabajo a 40°C (10 min)*
Norma EN60974-1
ПВ% при 40°C (10 мин)*
Норма EN60974-1
Ciclo di lavoro a 40°C (10 min)*
Norma EN60974-1
Imax 20 %
100% -
60% 10 A
EASYCUT 40
230 V +/- 15%
16 A
440 V
10 40 A
84 96 V
-10° +40°C
-25° +55°C
42 x 15 x 30 cm
69
Page 16

EASYCUT 40
ICÔNES / SYMBOLS / SYMBOLE / ICONOS / ZEICHENERKLÄRUNG / PICTOGRAMMEN / ИКОНКИ /
ICONE
1
f
1
f
2
EN60974-1
EN60974-10
Class A
IP21
U0
X(40°C)
I2
- Attention ! Lire le manuel d’instruction avant utilisation.
- Caution ! Read the user manual.
- Achtung! Betriebsanleitung vor Gebrauch lesen
- ¡Cuidado! Lea el manual de instrucciones antes de su uso.
- Convertisseur monophasé transformateur-redresseur
- Single phase inverter, converter-rectier
- Einphasiger Spannungswandler Transformator-Gleichrichter
- Convertidor monofásico transformador-recticador
- L’appareil respecte la norme EN60974-1 et EN60971-10 appareil de classe A.
- The device is compliant with standard EN60974-1 and EN60971-10 class A
device.
- Das Gerät erfüllt die Norm EN 60974-1 und EN 60971-10 der Geräteklasse A
- El aparato se ajusta a la norma EN60974-1 y EN 60971-10, aparato de clase A.
- Coupage plasma
- Plasma cutting
- Corte plasma
- Plasmaschneiden
- Convient au découpage dans un environnement avec risque accru de choc électrique. La source de courant elle-même ne doit toutefois pas être placée dans de
tels locaux.
- Suitable for welding in environment with an increased risk of electric shock. Such a current source must not however be placed in the welding room or in the
surroundings.
- Adaptado al corte en lugar con riesgo de choque eléctrico. Sin embargo, la fuente eléctrica no debe estar presente en dichos lugares.
- Geeignet zum Schneiden in Umgebungen mit erhöhtem Stromschlagrisiko. Die Stromquelle darf auf keinen Fall in solchen Räumlichkeiten aufgestellt werden.
- Подходит для резки в среде с повышенным риском удара электрическим током. В этом случае сам источник тока не должен находиться в таком
помещении.
- Geschikt voor snijwerkzaamheden in een ruimte met een verhoogd risico op elektrische schokken. De voedingsbron zelf moet echter niet in een dergelijke ruimte
worden geplaatst.
- Adatto al taglio in un ambiente a grande rischio di scosse elettriche. La fonte di corrente non deve essere localizzata in tale posto.
- Protégé contre l’accès aux parties dangereuses avec un doigt, et contre les chutes verticales de gouttes d’eau
- Protected against rain and against ngers access to dangerous parts.
- Protegido contra el acceso a las partes peligrosas con un dedo y contra la lluvia vertical.
- Geschützt vor dem Eindringen von gefährlichen, ngergroßen Teilen und gegen das vertikale Fallen von Wassertropfen
- Защищен от доступа пальцев в опасные зоны, а также от вертикального падения капель воды.
- Beveiligd tegen toegang tot gevaarlijke delen met een vinger, en tegen verticaal vallende regendruppels.
- Protetto contro l’accesso alle parti pericolose con un dito, e contro cadute verticali di gocce d’acqua
- Courant de découpage continu.
- Direct welding current.
- Corriente de corte continuo.
- Gleichstrom für das Schneiden
- Tension assignée à vide - Off load voltage - Tensión asignada en vacío - Leerlauf-Bemessungsspannung - Номинальное напряжение холостого хода - Nullastspanning - Tensione assegnata a vuoto
- Facteur de marche selon la norme EN60974-1 (10 minutes – 40°C).
- Duty cycle according to standard EN 0974-1 (10 minutes – 40°C).
- Ciclo de trabajo según la norma EN60974-1 (10 minutos – 40°C).
- Einschaltdauer gemäß der Norm EN 60974-1 (10 Minuten -40 °C).
I2: courant de découpage conventionnnel correspondant / I2: corresponding conventional welding current / I2: Entsprechender konventioneller Schneidstrom / I2:
corriente de corte convencional correspondiente. / I2: соответствующий номинальный ток резки / I2: overeenkomstige conventionele stroom / I2: corrente di
taglio convenzionale corrispondente
- Внимание! Прочтите инструкцию перед использованием.
- Let op! Lees voor gebruik aandachtig de gebruiksaanwijzing door.
- Attenzione! Leggere il manuale d’istruzioni prima dell’uso.
- Однофазный преобразователь трансформатор-выпрямитель
- Enkelfase omvormer transformator-gelijkrichter
- Convertitore monofase trasformatore-raddrizzatore
- Аппарат соответствует нормам EN60974-1 и EN60971-10 аппарат класса A.
- Dit klasse A apparaat voldoet aan de EN60974-1 en EN60971-10 normen.
- Il dispositivo rispetta la norma EN60974-1 e EN 60971-10 dispositivo classe A.
- Плазменная резка
- Plasma snijden
- Taglio plasma
- Постоянный ток резки.
- Continue snijstroom.
- Corrente di taglio continua.
- ПВ% согласно норме EN 60974-1 (10 минут – 40°C).
- Inschakelduur volgens de norm EN60974-1 (10 minuten – 40°C).
- Ciclo di lavoro conforme alla norma EN60974-1 (10 minuti – 40°C).
70
A
U2
V
Hz
U1
I1max
I1eff
Ampères - Amperes - Ampere - Amperios - Амперы - Ampère
- U2: Tensions conventionnelles en charges correspondantes / U2: Conventional voltage in corresponding loads / U2: konventionelle Spannungen bei entsprechender Belastung / - U2: Tensiones convencionales en cargas correspondientes. / - U2: Номинальные напряжения при соответствующих нагрузках / U2: Conventionele spanning bij overeenkomstige belasting / U2: Tensioni convenzionali in cariche corrispondenti
Volt - Volt - Volt - Voltio - Вольт
Hertz - Hertz - Hertz - Hercios - Герц
- Alimentation électrique monophasée 50 ou 60Hz
- Single phase power supply 50 or 60Hz
- Einphasige Stromversorgung mit 50 oder 60 Hz
- Alimentación eléctrica monofásica 50 o 60Hz
- Tension assignée d’alimentation.
- Rated power supply voltage.
- Bemessungsspannung
- Tensión asignada de alimentación eléctrica.
- Courant d’alimentation assigné maximal (valeur efcace).
- Maximum rated power supply current (effective value).
- Maximaler Bemessungsstrom (Effektivwert)
- Corriente de alimentación eléctrica asignada máxima (valor ecaz).
- Courant d’alimentation effectif maximal.
- Maximum effective rated power supply current.
- Maximaler, effektiver Versorgungsstrom
- Corriente de alimentación eléctrica máxima.
- Matériel conforme aux directives européennes. La déclaration UE de conformité est disponible sur notre site (voir à la page de couverture).
- Device(s) compliant with European directives. The certicate of compliance is available on our website.
- Das Gerät erfüllt die europäischen Richtlinien. Die EU-Konformitätserklärung ist vorhanden auf unserer Webseite (siehe Titelseite)
- Aparato conforme a las directivas europeas. La declaración de conformidad UE está disponible en nuestra página web (dirección en la portada).
- Устройство соответствует директивам Евросоюза. Декларация UE о соответствии доступна для просмотра на нашем сайте (ссылка на обложке).
- Apparaat in overeenstemming met de Europese richtlijnen. De E.U. verklaring van overeenstemming is te downloaden op onze website (adres vermeld op de
omslag).
- Dispositivo conforme alle direttive europee La dichiarazione UE di conformità è disponibile sul nostro sito internet (vedere alla pagina di copertina).
- Marque de conformité EAC (Communauté économique Eurasienne).
- EAC Conformity marking (Eurasian Economic Community).
- Eurasisches Konformitätskennzeichen EAC (Eurasische Wirtschaftsunion)
- Marca de conformidad EAC (Comunidad económica euroasiática).
- Однофазное электропитание 50 или 60Гц
- Enkel fase elektrische voeding 50Hz of 60Hz.
- Alimentazione elettrica monofase 50 o 60Hz
- Номинальное напряжение питания.
- Nominale voedingsspanning.
- Tensione nominale di alimentazione.
- Максимальный сетевой ток (эффективное значение).
- Nominale maximale voedingsstroom (effectieve waarde).
- Corrente di alimentazione nominale massima (valore efcace).
- Максимальная эффективная подача тока.
- Maximale effectieve voedingsstroom
- Corrente di alimentazione effettiva massima.
- Знак соответствия EAC (Евразийское экономическое сообщество).
- EAC (Euraziatische Economische Gemeenschap) merkteken van overeenstem-
ming
- Marchio di conformità EAC (Comunità Economica Eurasiatica).
Page 17

EASYCUT 40
- Ce matériel fait l’objet d’une collecte sélective selon la directive européenne 2012/19/UE. Ne pas jeter dans une poubelle domestique !
- This hardware is subject to waste collection according to the European directives 2002/96/UE. Do not throw out in a domestic bin !
- Das Gerät ist geeignet für die Mülltrennung gemäß den europäischen Richtlinien 2012/19/EU. Nicht in den Haushaltsmüll werfen!
- Este material requiere una recogida de basuras selectiva según la directiva europea 2012/19/UE. ¡No tirar este producto a la basura doméstica!
- Это оборудование подлежит переработке согласно директиве Евросоюза 2012/19/UE. Не выбрасывать в общий мусоросборник!
- Afzonderlijke inzameling vereist volgens de Europese richtlijn 2012/19/UE. Gooi het apparaat niet bij het huishoudelijk afval !
- Questo dispositivo è oggetto di raccolta differenziata secondo la direttiva europea 2012/19/UE. Non smaltire con i riuti domestici.
- Produit dont le fabricant participe à la valorisation des emballages en cotisant à un système global de tri, collecte sélective et recyclage des déchets d’emballages
ménagers.
- Producto sobre el cual el fabricante participa mediante una valorización de los embalajes cotizando a un sistema global de separación, recogida selectiva y reciclado
de los deshechos de embalajes domésticos.
- Produkt, dessen Hersteller sich an der Verwertung von Verpackungen beteiligt, indem er seinen Beitrag leistet zu einem globalen Müllsortierungssystems und
Wiederverwertung von Haushaltsverpackungen.
- Producto sobre el cual el fabricante participa mediante una valorización de los embalajes cotizando a un sistema global de separación, recogida selectiva y reciclado
de los deshechos de embalajes domésticos.
- Продукт, производитель которого участвует в глобальной программе переработки упаковки, выборочной утилизации и переработке бытовых отходов.
- De fabrikant van dit product neemt deel aan het hergebruik en recyclen van de verpakking, door middel van een contributie aan een globaal sorteer en recyclesysteem van huishoudelijk verpakkingsafval.
- Prodotto con cui il fabbricante partecipa alla valorizzazione degli imballaggi in collaborazione con un sistema globale di smistamento, raccolta differenziata e
riciclaggio degli scarti d’imballaggio.
- Produit recyclable qui relève d’une consigne de tri.
- This product should be recycled appropriately
- Recycelbares Produkt, das sich zur Müllsortierung eignet
- Producto reciclable que requiere una separación determinada
- Этот продукт подлежит утилизации.
- Dit product is recyclebaar, niet met het huishoudelijk afval weggooien maar deponeren in het daarvoor bestemde gescheiden afval-circuit.
- Prodotto riciclabile soggetto a raccolta differenziata.
- Information sur la température (protection thermique).
- Temperature information (thermal protection).
- Informationen über die Temperatur (Thermoschutz)
- Información sobre la temperatura (protección térmica)
- Информация по температуре (термозащита).
- Informatie over de temperatuur (thermische beveiliging).
- Informazioni sulla temperatura (protezione termica).
71
Page 18

SAS GYS
1, rue de la Croix des Landes
CS 54159
53941 SAINT-BERTHEVIN Cedex
France
 Loading...