

Page 1

FR
2-9 / 57-60
EN
DE
ES
RU
NL
IT
10-17 / 57-60
18-25 / 57-60
26-33 / 57-60
34-40 / 57-60
41-48 / 57-60
49-56 / 57-60
GYSPACK AIR
C51314_V11_21/01/2022
www.gys.fr
Page 2

Notice originale
INSTRUCTIONS DE SÉCURITÉ
Ce manuel d’utilisation comprend des indications
sur le fonctionnement de votre appareil et les
précautions à suivre pour votre sécurité. Merci de
le lire attentivement avant la première utilisation
et de le conserver soigneusement pour toute
relecture future. Ces instructions doivent être lues
et bien comprises avant toute opération. Toute
modication ou maintenance non indiquée
dans le manuel ne doit pas être entreprise.
Tout dommage corporel ou matériel dû à une
utilisation non conforme aux instructions de ce
GYSPACK AIR
FR
manuel ne pourra être retenu à la charge du
fabricant. En cas de problème ou d’incertitude,
veuillez consulter une personne qualiée pour
manier correctement l’appareil. Cet appareil
doit être utilisé uniquement pour faire de la
recharge, du démarrage et de l’alimentation
dans les limites indiquées sur l’appareil et le
manuel. Il faut respecter les instructions relatives
à la sécurité. En cas d’utilisation inadéquate ou
dangereuse, le fabricant ne pourra être tenu
responsable.
Appareil destiné à un usage à l’intérieur. Il ne
doit pas être exposé à la pluie (chargeur).
Cet appareil peut être utilisé par des enfants
âgés d’au moins 8 ans et par des personnes
ayant des capacités physiques, sensorielles ou
mentales réduites ou dénuées d’expérience ou
de connaissance, s’ils (si elles) sont correctement
surveillé(e)s ou si des instructions relatives à
l’utilisation de l’appareil en toute sécurité leur
ont été données et si les risques encourus ont été
appréhendés. Les enfants ne doivent pas jouer
avec l’appareil. Le nettoyage et l’entretien par
l’usager ne doivent pas être effectués par des
2
enfants sans surveillance.
Page 3

Notice originale
GYSPACK AIR
FR
À n’utiliser en aucun cas pour charger des
piles ou des batteries non rechargeables.
Utiliser exclusivement le chargeur fourni avec
l’appareil pour la recharge de la batterie intégrée.
Ne pas utiliser l’appareil, si le cordon
d’alimentation ou la che de secteur sont
endommagés.
Ne jamais charger une batterie gelée ou
endommagée.
Ne pas couvrir l’appareil.
Ne pas placer l’appareil à proximité d’une
source de chaleur et à des températures
durablement élevées (supérieures à 50°C).
Ne pas obstruer les ouvertures de ventilation.
Se référer à la partie installation avant
d’utiliser l’appareil.
Le mode de fonctionnement de recharge
automatique ainsi que les restrictions
applicables à l’utilisation sont expliqués ci-
après dans ce mode d’emploi.
Risque d’explosion ou de projection d’acide
en cas de mise en court-circuit des pinces ou
en cas d’une connexion du booster 12V sur un
véhicule 24V ou inversement.
Risque d’explosion et d’incendie!
Une batterie en charge peut émettre des gaz
explosifs.
• Pendant la charge, la batterie doit être
placée dans un emplacement bien aéré.
• Éviter les ammes et les étincelles. Ne pas
fumer.
• Protéger les surfaces de contacts
électriques de la batterie à l’encontre des
courts-circuits.
Risque de projection d’acide !
3
Page 4

Notice originale
GYSPACK AIR
FR
• Porter des lunettes et des gants de protection.
• En cas de contact avec les yeux ou la
peau, rincer immédiatement à l’eau et
consulter un médecin sans tarder.
Connexion / déconnexion :
• Déconnecter l’alimentation avant de
brancher ou de débrancher les connexions
sur la batterie.
• La borne de la batterie non reliée au châssis
doit être connectée la première. L’autre
connexion doit être effectuée sur le châssis
loin de la batterie et de la canalisation de
combustible. Le chargeur de batterie doit
alors être raccordé au réseau.
• Après l’opération de charge, débrancher le
chargeur de batterie du réseau puis retirer la
connexion du châssis et enn la connexion
de la batterie, dans l’ordre indiqué.
Raccordement :
• Appareil de classe II (chargeur du booster).
• Appareil de classe III (booster).
• Le raccordement au réseau d’alimentation
doit être effectué conformément aux règles
d’installation nationales.
Entretien :
• Le câble d’alimentation ne peut pas être
remplacé. Si le câble est endommagé, il
convient de mettre l’appareil au rebut.
• L’entretien ne doit être effectué que par
une personne qualiée.
• Avertissement! Débrancher toujours la che
de la prise secteur avant d’effectuer des
travaux sur l’appareil (chargeur & booster).
4
Page 5

Notice originale
GYSPACK AIR
FR
• Régulièrement, enlever le capot du booster
et dépoussiérer à la soufette. En proter
pour faire vérier la tenue des connexions
électriques avec un outil isolé par un
personnel qualié.
• N’utiliser en aucun cas des solvants ou
autres produits nettoyants agressifs
• Nettoyer les surfaces de l’appareil à l’aide
d’un chiffon sec.
Réglementation :
• Appareil conforme aux directives européennes.
• La déclaration de conformité est
disponible sur notre site internet.
• Marque de conformité EAC (Communauté
économique eurasienne).
• Matériel conforme aux exigences
britanniques. La déclaration de conformité
britannique est disponible sur notre site (voir
à la page de couverture).
• Appareil conforme aux normes Marocaines.
• La déclaration Cم (CMIM) de conformité
est disponible sur notre site internet.
Mise au rebut :
• Ce matériel fait l’objet d’une collecte sélective.
Ne pas jeter dans une poubelle domestique.
• L’accumulateur présent dans cet appareil est
recyclable. Prière de procéder conformément
aux prescriptions de recyclage en vigueur.
• La batterie doit être retirée de l’appareil
avant que celui-ci ne soit mis au rebut.
• L’appareil doit impérativement être décon-
necté du réseau d’alimentation avant de retirer la batterie.
5
Page 6

Notice originale
GYSPACK AIR
DESCRIPTION GÉNÉRALE
Grâce à sa batterie haute performance intégrée, le GYSPACK AIR assure 5 fonctions :
- Test batterie
- Démarrage instantané (1250 A en crête/480 A) des véhicules équipés d’une batterie 12V au plomb à électrolyte
liquide ou GEL (6 élements 2 V).
- Compresseur 4 Bars (13 l/min) pour le gonage des roues, ballons …
- Source d’alimentation 12 V DC pour alimenter Spot, TV, outillage, etc.
- Lumière d’appoint
Pour le bon fonctionnement de l’appareil et pour préserver la durée de vie de sa batterie
interne, il est impératif de le recharger après chaque utilisation et de le laisser branché
jusqu’à la prochaine utilisation.
FONCTION TEST DE LA BATTERIE
Test de la batterie interne avant démarrage
Pour tester la batterie interne, appuyer sur le bouton test, le résultat s’ache :
- Voyant vert : La batterie est chargée. Démarrage possible.
- Voyant orange :
- Voyant rouge :
{
Attention : Ne jamais utiliser l’appareil lorsque le voyant orange ou
rouge s’allume. À recharger obligatoirement.
FR
FONCTION DÉMARRAGE D’UN VÉHICULE
Ne pas déconnecter la batterie du véhicule. Le débranchement de la batterie peut entraîner la perte
d’information et une éventuelle impossibilité de redémarrage.
Le booster doit être stocké en position verticale. Toute autre position ne doit être maintenue que de manière
temporaire.
Pour utiliser le GYSPACK AIR en fonction démarrage, respecter le cycle suivant :
• Déconnecter le GYSPACK AIR du secteur. Mettre la clé de contact du véhicule sur «OFF».
• Positionner le commutateur sur «OFF».
• Connecter la pince rouge au + de la batterie, et la pince noire au – de la batterie. Un signal sonore averti en cas d’inversion de polarité.
Les câbles ne doivent pas être pincés ou en contact avec des surfaces chauantes ou
coupantes.
• Mettre le commutateur sur «ON»
• Se rendre au poste de contrôle du véhicule et tourner la clef de contact (6 sec max). Si le moteur
ne démarre pas, attendre 3 minutes entre chaque tentative de démarrage.
- En cas de non-respect du temps préconisé entre chaque essai (3 min) ou si la durée d’essai
est trop longue (>6 secondes) les wchances de démarrage sont réduites (risque de perte
de puissance).
- Risque de fuite d’acide et de destruction de la batterie interne en cas de non-respect des
durées préconisées.
- Si le véhicule ne démarre pas, il peut y avoir un autre problème qu’une batterie en mauvais
état : alternateur, bougie de préchauage...
- Risque d’explosion ou de projection d’acide en cas d’une connexion du booster
12 V sur un véhicule 24 V.
- Danger en cas de mise en court-circuit des pinces.
• Positionner de nouveau le commutateur sur «OFF».
• Débrancher la pince noire puis rouge du véhicule.
6
• Recharger le GYSPACK AIR après utilisation. (cf partie charge)
Page 7

Notice originale
GYSPACK AIR
FONCTION CHARGE DE LA BATTERIE INTERNE A L’AIDE DU CHARGEUR
Le GYSPACK AIR intègre un chargeur automatique qui charge et qui garde la batterie interne chargée à 100% et sans
surveillance. En eet grâce à son Floating System, l’arrêt en n de charge et la reprise de charge pour maintenir le
niveau de charge sont automatiques.
Pour recharger le GYSPACK AIR :
• Poser le GYSPACK AIR verticalement pendant la charge.
• Brancher l’alimentation au secteur 230 V et l’autre extrémité sur l’avant du GYSPACK AIR (n°2 g p. 65).
• Le voyant vert indique que le GYSPACK AIR est chargé.
Nb : Si l’appareil reste plus de 24h en charge (voyant rouge, orange allumé), arrêter la charge. La batterie interne de
votre GYSPACK AIR est endommagée (Cf. remplacement de batterie).
FONCTION UTILISATION DU GYSPACK AIR COMME SOURCE D’ALIMENTATION DE 12 V DC
La prise allume-cigare est protégée par un disjoncteur thermique 20 A intégré. En cas de surchaue
due à une surcharge, celui-ci pourra interrompre l’alimentation.
Positionner le commutateur sur «OFF».
Relever le capuchon du réceptacle de l’allume-cigare 12 V CC (n°1 g p. 65).
Insérer le câble prise allume-cigare de l’appareil électrique (câble non fourni) dans le réceptacle du GYSPACK AIR.
Temps estimé d’utilisation de GYSPACK AIR comme source de courant continu de 12 V CC
Appareil Consommation en watts (estimation) Temps estimé en heures
Tube uorescent Cellulaire 4 50
Radio, Ventilateur, Echosondeur 9 22
Caméscope, magnétoscope, 15 13
Outil électrique, pompe 24 8
Compresseur à air, Aspirateur 80 2
FR
FONCTION LUMIERE D’APPOINT
Le GYSPACK AIR est muni d’une lampe constituée de 7 LED haute luminosité. Elle s’allume grâce au bouton «LIGHT»
situé à proximité (n°11 g p. 65).
Seul un service SAV compétent peut réparer ou changer cet élément en cas de panne.
FONCTION COMPRESSEUR À AIR
Le GYSPACK AIR, intègre un compresseur de 4 bars lui permettant de goner :
• des pneus grâce à son embout d’origine (abaisser le levier pour verrouiller le tuyau sur la valve).
• des ballons grâce à son aiguille de gonage fournie d’origine.
• et tous autres articles de plastiques (des ballons de plage, des jouets, des lits de camps, etc.)
grâce aux 2 buses de gonage.
Fonctionnement
• Avant d’utiliser le compresseur à air, vérier que le commutateur du GYSPACK AIR
est sur « OFF ».
• Appuyer sur le bouton pour démarrer le compresseur.
Nb : Le compresseur doit fonctionner pendant un maximum de 10 min.
Attendre 10 min pour le laisser refroidir avant de le réutiliser
• Le manomètre vous indique la pression d’air.
• Arrêter le compresseur lorsque la pression désirée est atteinte.
7
Page 8

Notice originale
GYSPACK AIR
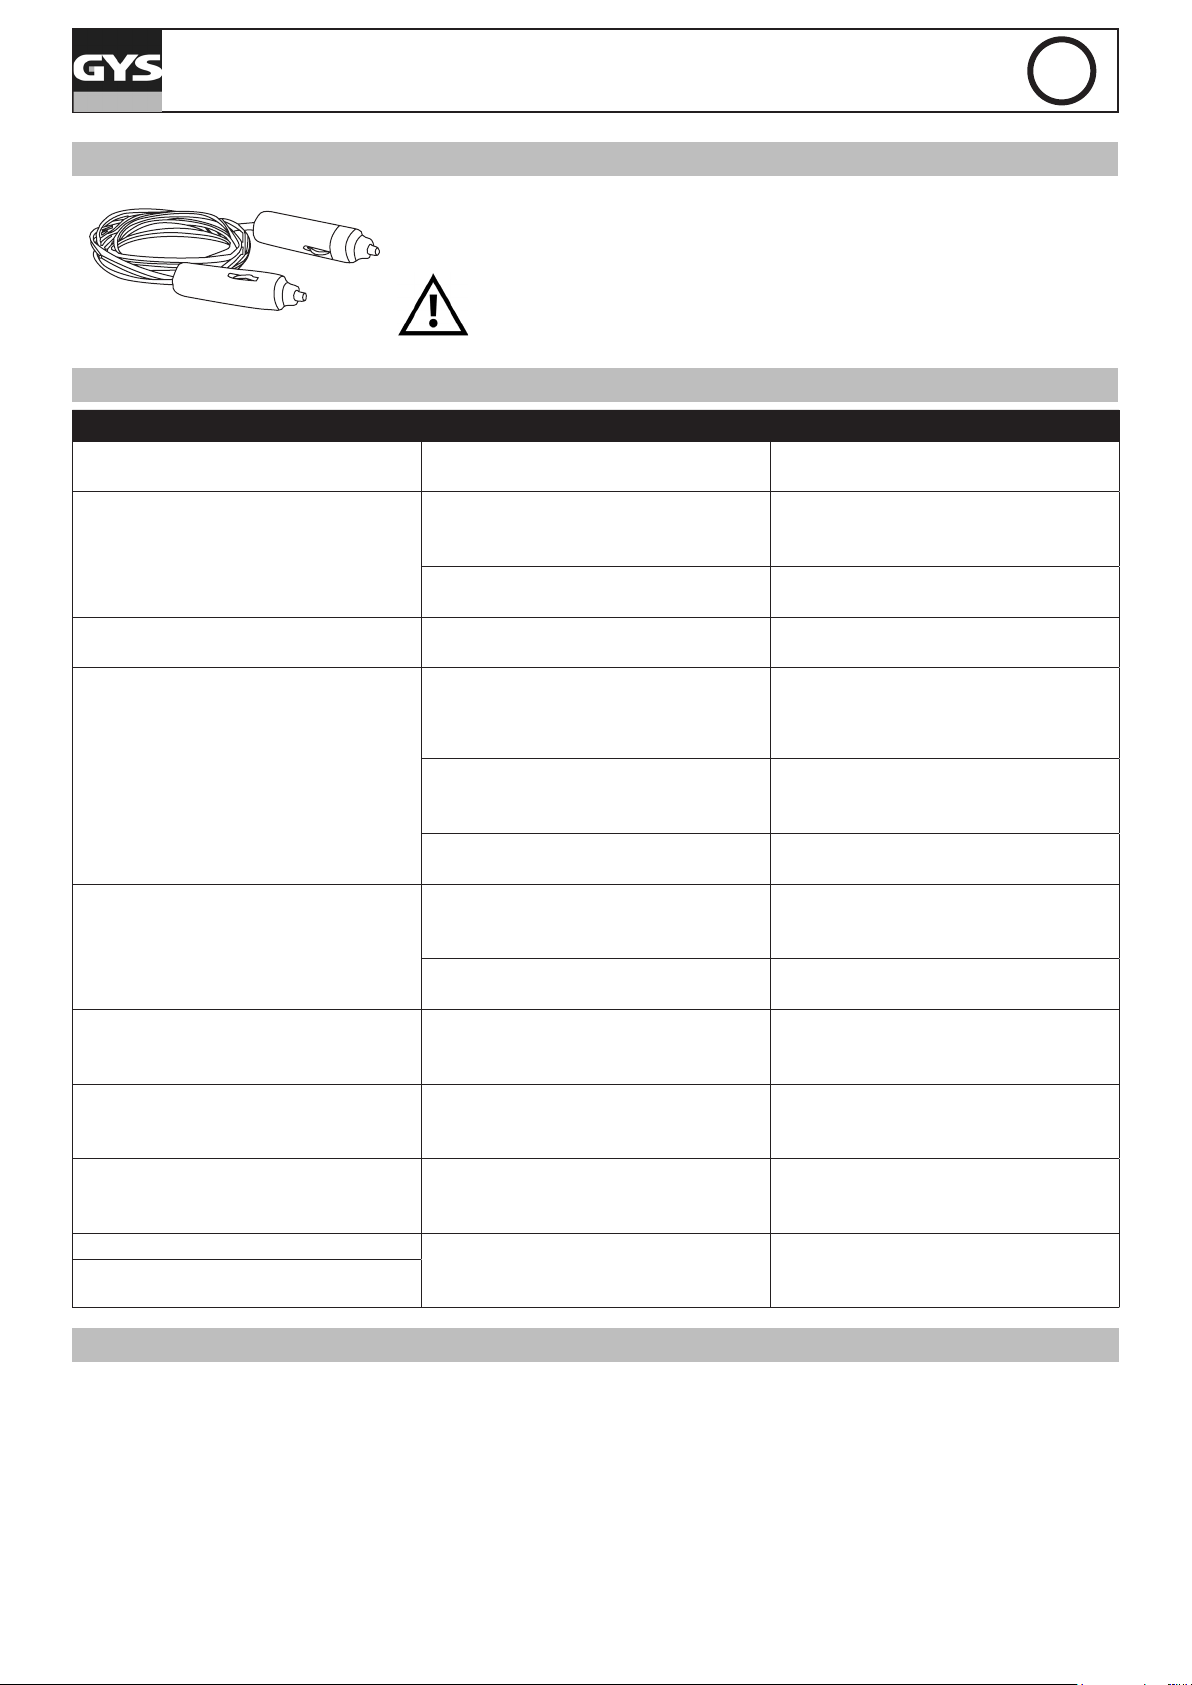
UTILISATION DE CORDONS PRISE ALLUME-CIGARE
Ce type de cordons prise allume-cigare est limité à 10 A. Fournis avec certains
GYSPACK, ils sont conçus pour réaliser UNIQUEMENT de la sauvegarde de mé-
moire. Toute utilisation à d’autre ns peut être dangereuse.
Risque de feu ! Le cordon allume-cigare ne doit pas être utilisé
pour réaliser un démarrage ou comme alimentation électrique
12 V par exemple.
ANOMALIES, CAUSES, REMÈDES
Anomalies Causes Remèdes
L’appareil émet un signal sonore. L’appareil détecte une inversion de
polarité.
Des étincelles apparaissent au
moment du contact des pinces sur la
batterie.
L’appareil n’arrive pas à démarrer le
véhicule.
L’appareil n’arrive pas à démarrer le
véhicule. L’une des LED rouge ou
orange de l’appareil s’allume en mode
“Test”.
L’appareil n’arrive plus à démarrer le
véhicule et aucune LED de l'appareil
ne s'allume en mode "Test".
La recharge de la batterie interne ne
démarre pas (aucune des LED de
l'état de charge de l'appareil ne
s'allume).
Après une journée de charge, le
voyant de n de charge ne s'allume
pas.
En mode source d’alimentation
externe 12V, le booster ne délivre
plus de courant.
La lampe ne s’allume pas. La batterie de l’appareil est décharLe compresseur d’air ne démarre pas
Le commutateur est sur la position «
ON ».
Inversion de polarité des pinces de
l’appareil sur la batterie véhicule.
Le commutateur est sur la position
OFF.
La batterie de l’appareil est
déchargée.
Plusieurs essais de démarrage sans
pause.
La tension de la batterie est inappropriée.
La tension des batteries internes est
très basse. Il se peut qu’elles soient
endommagées.
La batterie interne est endommagée
et ne peut être rechargée.
La prise du chargeur externe n’est
pas correctement enchée dans la
prise de l’appareil.
Les batteries internes sont endommagées et ne peuvent être rechargées.
Le disjoncteur thermique interne a
coupé le circuit.
gée.
FR
Vérier la polarité de la batterie.
Avant de brancher les pinces sur la
batterie, mettre le commutateur sur
la position OFF.
Vérier la polarité de la batterie.
Positionner le commutateur sur la
position ON.
Mettre en charge l’appareil, attendre
la n de charge et réessayer.
Attendre 3 minutes entre 2 tentatives.
Un démarrage ne doit pas durer plus
de 6 secondes.
Vérier que la tension de la batterie
du véhicule est bien de 12V.
Remettre l’appareil en charge pour
tenter une restauration de la batterie.
Contacter le service après-vente GYS
pour procéder à un remplacement de
la batterie.
Vérier la connexion de la prise du
chargeur sur l'appareil.
Contacter le service après-vente GYS
pour procéder à un remplacement
des batteries.
Débrancher l’appareil extérieur
connecté au booster et attendre que
le disjoncteur se réarme automatiquement.
Mettre en charge l’appareil, attendre
la n de charge et réessayer.
NON GARANTIE DE LA BATTERIE
Les batteries sont des éléments actifs, leur durée de vie dépend de leur entretien. Après chaque utilisation de ce
démarreur, il est impératif de recharger les batteries internes. Le stockage dans des lieux aux températures élevées
réduit considérablement la charge des batteries. Dans le cas d’une non-utilisation prolongée, il est fortement conseillé
de recharger les batteries avant utilisation. De manière générale, nous conseillons de laisser le produit branché en
permanence pour maintenir les batteries à leur meilleur niveau de performance.
Ce produit est équipé d’une batterie haute performance qui dans le cas du non respect des règles d’entretien peuvent
se détériorer dans le temps et de manière irréversible.
Sa conservation dépendant de son utilisation, la batterie du GYSPACK AIR est exclue de la garantie.
8
Page 9

Notice originale
GYSPACK AIR
FR
CONDITIONS DE GARANTIE
La garantie couvre tous défauts ou vices de fabrication pendant 2 ans, à compter de la date d’achat (pièces et main
d’oeuvre).
La garantie ne couvre pas :
• Toutes autres avaries dues au transport.
• L’usure normale des pièces (Ex. : câbles, pinces, etc.).
• Les incidents dus à un mauvais usage (erreur d’alimentation, chute, démontage).
• Les pannes liées à l’environnement (pollution, rouille, poussière).
En cas de panne, retourner l’appareil à votre diributeur, en y joignant :
- un juicatif d’achat daté (ticket de sortie de caisse, facture….)
- une note explicative de la panne.
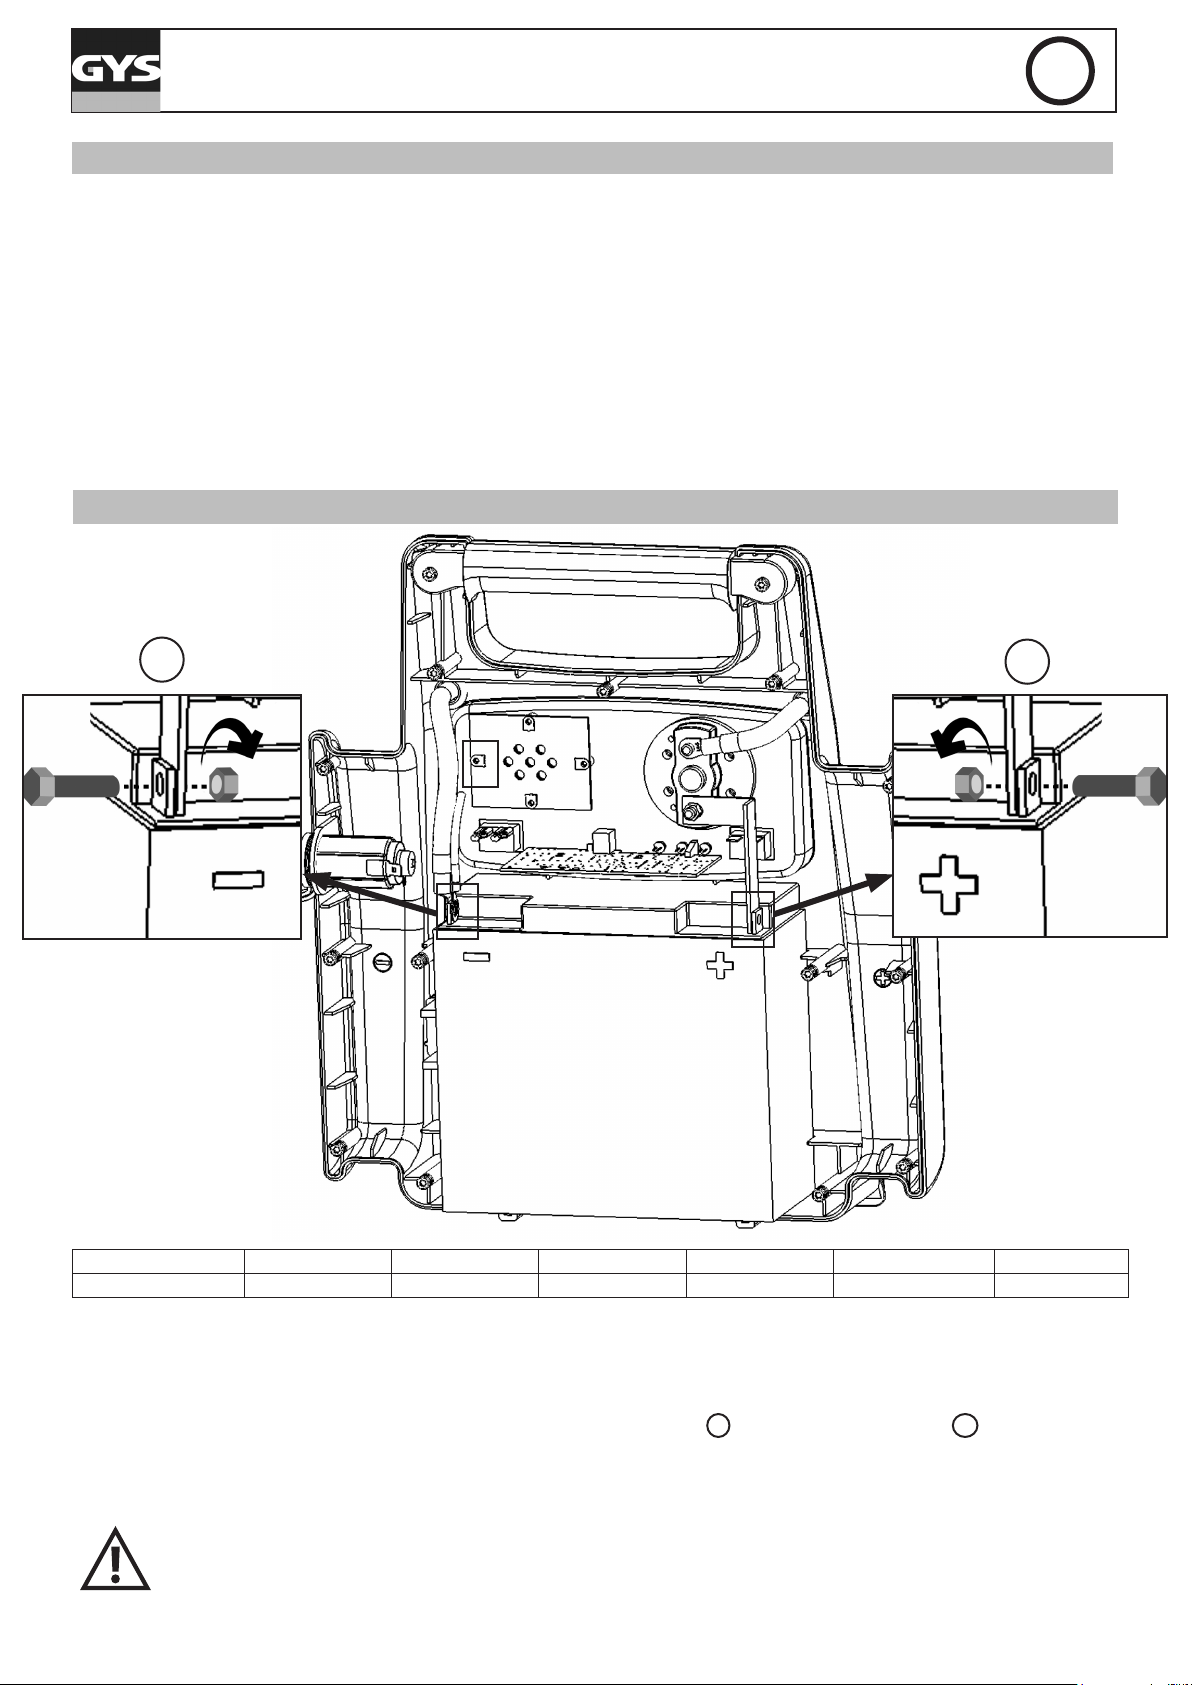
REMPLACEMENT DE LA BATTERIE
1
Produit Batterie Type Tension (V) Capacité (Ah)
Dimensions
(cm)
2
Réf. batterie
GYSPACK AIR 6FM - 18 Batterie au plomb 12 18 33 x 14 x 35 53139
Pour remplacer la batterie :
• Positionner le commutateur sur la position « OFF ».
• Il faut ensuite dévisser la coque arrière (15 vis) et la retirer.
• Une fois la coque arrière enlevée, la batterie se trouve de face (cf illustration). La batterie est reliée à la connectique
du GYSPACK AIR en deux points : au niveau de la borne - (illustration 1) et de la borne +(illustration 2). Pour la
retirer, enlever les 2 vis qui permettent la liaison entre la batterie et le reste de la connectique du GYSPACK AIR au
niveau des bornes + et -.
À la remise d’une nouvelle batterie, veiller à bien associer les polarités de la batterie et
du GYSPACK AIR. Borne - à gauche, borne + à droite (cf illustration). Repositionner les
2 vis et rondelles, serrer les écrous (couple de serrage recommandé de 4 N.m).
• Revisser la coque arrière
9
Page 10

Translation of the original instructions
SAFETY INSTRUCTIONS
This manual includes guidelines on the operation of your device and the precautions to
follow for your own safety. Ensure it is read
carefully before rst use and keep it handy
for future reference. These instructions should
be read and understood before anyone ope-
rates the product. Any modications or maintenance that are not specied in the manual
should not be undertaken. The manufacturer
is not liable for any injury or damage due to
non-compliance with the instruction manual.
GYSPACK AIR
EN
In case of problems or uncertainties, please
consult a qualied person that is able to han-
dle the device correctly. This device should
only be used for charging and / or start-up
and / or power supply within the limits indicated on the device and in the manual. The
safety instructions must be followed. In case
of improper or unsafe use, the manufacturer
cannot be held responsible.
Device suitable for indoor use only. Do not expose to rain or excessive moisture (charger).
This device may be used by children from
age 8 and by persons with reduced physi-
cal, sensory or mental capabilities or lack
of experience and knowledge, provided that
10
they are under supervision or have been told
how to use the device safely and are aware
of the potential risks. Children must not use
the device as a plaything. Cleaning and servicing tasks may not be carried out by child-
ren unless they are supervised.
Do not use for charging non-rechargeable
batteries.
Page 11

Translation of the original instructions
GYSPACK AIR
EN
Do not use any charger other than the one
supplied with the machine to charge the
batteries.
Do not operate the device with a damaged
power supply cord or a damaged mains plug.
Never charge a frozen or damaged
battery.
Do not cover the device.
Do not place the device near a re or sub-
ject it to heat or to longterm temperatures
exceeding 50°C.
Do not obstruct the cooling vents. Refer to
the installation section before operating the
machine.
The automatic mode of operation and
usage restrictions are explained below in
these operating instructions.
Risk of explosion or acid projection in case
of short-circuit of the clamps or if the 12V
booster is connected to a 24V vehicle or
vice versa.
Risk of explosion and fire!
A battery being charged can emit explosive
gas.
• During the charge, the battery must be
placed in a well ventilated area.
• Avoid ames and sparks. Do not smoke.
• Protect the electrical contacts of the batte-
ry against short-circuiting.
Connection / disconnection:
• Disconnect the power supply before
connecting/disconnecting the device to/
from the battery.
11
Page 12

Translation of the original instructions
GYSPACK AIR
EN
• The terminal of the battery that is not connected to the car frame must be connected
rst. The other connection must be made
on the car frame, far from the battery and
the fuel line. The battery charger must be
connected to the power supply network.
• After the charging process, disconnect the
battery charger from the power supply
network and remove the connector from
the car frame and then the connector from
the battery, in this order.
Acid projection hazard!
• Wear safety goggles and protective gloves
• If your eyes or skin come into contact
with battery acid, rinse the affected part
of the body with plenty of water and seek
immediate medical assistance.
Connection:
• Class II device (charger booster)
• Class III device (booster)
• Connection to the mains must be made
according to the national installation regulations.
Maintenance:
12
• If the charging / power supply cable is
damaged, the product must be disposed.
• Service should be performed by a quali-
ed person
• Warning! Always disconnect from the
mains before performing maintenance on
the device (charger & booster).
Page 13

Translation of the original instructions
GYSPACK AIR
EN
• If the internal fuse is blown, it must be
replaced by the manufacturer, its after-sales
service or an equally qualied person.
• Under no circumstances should solvents or
other aggressive cleaning agents be used.
• Clean the device’s surfaces with a soft,
dry cloth.
Regulations:
• The device complies with European
Directive.
• The certicate of compliance is available
on our website.
• EAC conformity mark (Eurasian Economic
Commission)
• Equipment in compliance with British
requirements. The British Declaration of
Conformity is available on our website
(see home page).
• Equipment in conformity with Moroccan
standards. The declaration Cم (CMIM)
of conformity is available on our website
(see cover page).
Disposal:
• This product should be disposed of at an
appropriate recycling facility. Do not dispose of in domestic waste.
• The battery tted in this device is recy-
clable. Please proceed according to the
applicable recycling regulations.
• The battery must be removed from the device before the latter is discarded.
• The device must absolutely be disconnec-
ted from the power supply network be-
fore removing the battery.
13
Page 14

Translation of the original instructions
GYSPACK AIR
GENERAL DESCRIPTION
The high performance internal battery allows the GYSPACK AIR to serve 5 functions:
- Test battery
- Instant Start (1250 A peak /480 A) from vehicle equipped with 12V Lead battery (Gel or Liquid electrolyte).
- 4 Bars Compressor (13 L/min) for inate wheels, balloons …
- 12 V DC power supply, to supply light Spot, TV, tools, etc…
- Light
To ensure good working conditions and optimize the durability of its internal battery, it is
important to recharge it after each use, and leave it plugged in until next usage.
BATTERY TEST FEATURE
Test of internal battery before the start
In order to test the internal battery, press and the result will be displayed:
- Green light: Internal battery is charged. Starting is possible
EN
- Orange light :
- Red light :
STARTING A VEHICLE
Do not disconnect the battery from the vehicle. Disconnecting the battery may result in loss of information
and a possible inability to restart.
The booster must be stored in a vertical position. Any other storage position should only be temporary.
In order to use the GYSPACK AIR as a starter, follow these steps:
• Disconnect the GYSPACK AIR from the mains. Turn the vehicle ignition key to OFF.
• Position the switch «OFF».
• Connect the red clamp to the + terminal of the battery, and the black one to the – terminal. A
buzzer will indicate any polarity inversion.
The cables must not be pinched or in contact with hot or sharp surfaces.
• Switch the commutator on ON (« Turn on the GYSPACK AIR»)
Attention !!! Please do not use the machine when the orange or red light is
lit ! You need to recharge it rst.
{
• Go to the driver’s seat and turn the ignition key ( 6 sec max). If your engine does not start, wait 3
minutes until next attempt.
- If the cooling period between each attempt (3 minutes) is not observed or if the duration
of the attempt is too long (> 6 seconds), the chances of a successful jumpstart are signi-
cantly reduced (risk of power loss).
- Risk of battery acid leaks or damage if the recommended periods are not observed.
- If the vehicle does not start, it may be a problem other than a faulty battery: alternator,
glowplug…
Risk of explosion or acid splashes when connecting a 12 V booster on a 24 V
vehicle. Beware of possible short-circuit of the clamps.
• Position the switch «OFF».
14
• Unplug the black clamp, then the red one from the vehicle.
Page 15

Translation of the original instructions
GYSPACK AIR
• Recharge your GYSPACK AIR after use. (see ‘Charging internal battery’)
CHARGING INTERNAL BATTERY USING INTEGRATED CHARGER
The GYSPACK AIR is tted with an automatic charger which maintains the internal battery fully charged without the
need for monitoring. When the battery is fully charged, the charger will automatically go into oating mode and stop
the charge. It will automatically restart when needed.
To recharge the GYSPACK AIR :
• Place the GYSPACK AIR in a vertical position during the charge.
• Plug in the power supply to an outlet 230 V and the other end on the front of GYSPACK AIR (n°2 g p. 41).
• The green indicator indicates the charge that the GYSPACK AIR is over.
Nb : If the device stays more than 24 hours in charging mode (red LED, orange indicator on), then manually stop the
charge. The internal battery of your GYSPACK AIR is damaged.
USING THE GYSPACK AIR AS 12V DC POWER SUPPLY
The cigarette lighter plug is protected by an integrated 20 A circuit breaker. In the event of an
overheating due to an overcharge, the circuit breaker will stop the power supply.
EN
Position the switch «OFF».
Open the lead of the cigarette lighter plug Remove cigarette lighter and plug lead into the hole (n°1 g p. 65).
Plug your electrical device into the plug of GYSPACK AIR, using the proper cable (not included).
Estimated autonomy of GYSPACK AIR as a 12 V DC power supply
Device Estimated consumption (in watts) Estimated automomy (in hours)
Fluorescent cellular light 4 50
Radio, Fan, Echoprobe 9 22
Videocamera, light spot 15 13
Power tool, drying pump 24 8
Air Compressor, Car vaccum cleaner 80 2
SPOT-LIGHT
The GYSPACK AIR has an in-built spotlight comprised of 7 high intensity LEDs controlled by the «light» button (n°11
g p. 65).
Repair should always be carried out by qualied personnel.
AIR COMPRESSOR
GYSPACK AIR integrates an 4 bars compressor, allowing to inate :
• Tyres with their original valve. (press the lever to lock the hose on the valve).
• Balloons with thin end (included).
• Any other plastic objects (beach balloons, toys, air beds, etc.) with 2 special ends “connectors”
Usage
• Turn the GYSPACK AIR main switch to « o »
• Press the “ON” button to start compressor.
Nb : the compressor can work for 10mn maximum. Please wait 10mn between the next use.
• Flowmeter indicates the current air pressure
• Stop the compressor when the required pressure is reached
15
Page 16

Translation of the original instructions
GYSPACK AIR
USE OF CIGARETTE LIGHTER PLUGS
This type of cigarette lighter connection lead is limited to 10A. Supplied with some
of our GYSPACK, they are SOLELY designed for memory backup. Any other use
can be dangerous.
Risk of re! We strongly advise against using the cigarette
lighter lead to jump start or power a 12V appliance for instance.
TROUBLESHOOTING
Troubleshooting Causes Solutions
The device beeps. The device detects a polarity reversal. Check the battery polarity.
Sparks appear when the clampsmake
contact with the battery terminals.
The unit can not start the vehicle. The switch is in the OFF position. Set the switch to the ON position.
The unit can not start the vehicle. One
of the red or orange LED on the unit
switches on in "test" mode.
The switch is on position «ON». Switcht machine o before connecting
the clamps to the battery.
The position of the negative and positive clamps on the battery terminals is
incorrect (polarity reversal).
The internal battery is discharged. Charge the unit, and try again after
Check the battery polarity.
the charge is complete.
EN
Several jump start attempts without
pause between each.
The battery voltage is incorrect.. Check that the battery voltage of the
The device can not start the vehicle
anymore and no one LED of the device
switches on in "Test" mode.
The charge of the internal battery
does not start (none of the charging
LEDs activate).
After a day of charge, the end of
charge indicator does not activate.
In external 12V power source mode,
the booster no longer delivers power.
The lamp does not switch on. The internal battery is discharged. Charge the unit, and try again after
The air compressor does not start.
The voltage of the internal batteries is
very low. It may be that the internal
batteries are damaged.
The internal batterie is damaged and it
cannot be recharged.
The external charger plug is not
connected correctly to the socket of
the machine.
The internal batteries are damaged
and cannot be recharged.
The internal thermal protection circuit-breaker has cut the circuit.
Wait 3 minutes between 2 starts. A
start must not last more than 6 seconds.
vehicle is 12V.
Put the device on charge in order to
attempt to recover the battery.
Contact the GYS after sale service to
replace the batterie.
Check that the plug is connected correctly to the machine.
Contact the GYS after sale service to
organise a replacement of the batteries.
Disconnect the external device connected to the machine and wait for the
circuit-breaker to reset itself automatically.
the charge is complete.
BATTERY NOT COVERED BY WARRANTY
Batteries are live parts, their life depends on maintenance. After each use of this starter, it is essential to recharge the
internal batteries. Storage in places with high temperatures greatly reduces the battery charge. In the case of prolonged
non-use, it is strongly recommended to recharge the batteries before use. In general, we recommend leaving the
product plugged in continuously to maintain the batteries at their best performance.
This product is equipped with 2 high performance batteries if the maintenance instructions are not followed the batteries
can deteriorate irreversibly over time.
For this reason the GYSPACK batteries are excluded from the warranty.
16
Page 17

Translation of the original instructions
GYSPACK AIR
WARRANTY
The warranty covers faulty workmanship for 2 years from the date of purchase (parts and labour).
The warranty does not cover:
• Transit damage.
• Normal wear of parts (eg. : cables, clamps, etc..).
• Damages due to misuse (power supply error, dropping of equipment, disassembling).
• Environment related failures (pollution, ru, du).
In case of failure, return the unit to your diributor together with:
- The proof of purchase (receipt etc ...)
- A description of the fault reported
BATTERY REPLACEMENT :
1
EN
2
Product Battery Type Voltage (V) Capacity (Ah) Dimensions (cm) Battery ref
GYSPACK AIR 6FM - 18 Lead- acid battery 12 18 33 x 14 x 35 53139
To replace the battery :
• The booster must be disconnected form the power supply.
• First the back panel must be unscrewed (15 screws) and removed.
• Once the back panel is removed, the battery front appears (cf illustration). The battery is connected to the GYSPACK
AIR at two points : at the - terminal (illustration 1) and at the + terminal (illustration 2). To remove the battery,
remove the 2 screws that enable the connection between the battery and the GYSPACK AIR at the terminals + and -.
When putting a new battery, make sure to observe the polarities of both the battery and
the GYSPACK AIR. Terminal - on the left, terminal + on the right (cf illustration). Put
the 2 screws and washers back, tighten the nuts (recommended torque wrench 4 N.m).
• Place the booster’s backpanel screws back on.
17
Page 18

Übersetzung der Originalbetriebsanleitung
SICHERHEITSANWEISUNGEN
Diese Betriebsanleitung enthält Sicherheits- und
Betriebshinweise. Bitte lesen Sie diese Anleitung aufmerksam durch, bevor Sie das Gerät
zum ersten Mal benutzen und bewahren Sie
diese sorgfältig auf. Die Nichteinhaltung dieser Anweisungen und Hinweise kann mitunter
zu schweren Personen- und Sachschäden führen. Nehmen Sie keine Wartungarbeiten oder
Veränderungen am Gerät vor, wenn diese nicht
explizit in der Anleitung genannt werden. Der
Hersteller haftet nicht für Verletzungen oder
GYSPACK AIR
DE
Schäden, die durch unsachgemäße Handhabung dieses Gerätes enstanden sind. Bei Problemen oder Fragen zum korrekten Gebrauch
dieses Gerätes, wenden Sie sich bitte an entsprechend qualiziertes und geschultes Fachpersonal. Dieses Gerät darf ausschließlich
zum Laden/Starten und/oder zur Spannungsversorgung für die in der Anleitung oder auf
dem Gerät genannten Anforderungen genutzt
werden. Die Sicherheitshinweise müssen in jedem Fall beachtet werden. Im Fall einer unangemessenen oder gefährlichen Verwendung
kann der Hersteller nicht haftbar gemacht
werden.
Schützen Sie das Gerät vor Feuchtigkeit und
18
Nässe (Ladegerät).
Schützen Sie das Gerät vor unbefugtem Ge-
brauch. Kinder unter 8 Jahren düfen nicht mit
diesem Gerät spielen. Benden sich Kinder
oder Personen mit eingeschränkten körperlichen oder geistigen Fähigkeiten sowie Per-
sonen ohne ex plizite Erfahrung im Umgang
mit dem Produkt in der Nähe des Gerätes,
sorgen Sie bitte für ausreichend Schutz und
Kontrolle bei Benutzung des Gerätes.
Page 19
Übersetzung der Originalbetriebsanleitung
GYSPACK AIR
DE
Laden Sie nie defekte oder nicht auadbare
Batterien.
Benutzen Sie ausschließlich das beiliegende
Ladegerät zum Auaden der Batterien.
Benutzen Sie das Gerät nicht, wenn der Stecker, die Klemmen oder das Zubehör defekt ist.
Laden Sie niemals eine beschädigte oder gefrorene Batterie.
Decken Sie das Gerät während der Nutzung
nicht ab.
Lagern Sie das Gerät nicht in der Nähe einer Wärmequelle oder bei dauerhaft hohen
Temperaturen (über 50°C).
Blockieren Sie nicht die Belüftungsöffnungen
des Gerätes. Bitte beachten Sie den Punkt
«Installation» der Betriebsanleitung vor Gebrauch des Gerätes.
Der Automatik-Modus sowie die Einschränkungen bei der Benutzung werden nachfolgend
in der Betriebsanleitung erklärt.
Explosionsgefahr oder Säureaustritt bei
Kurzschluss der Klemmen oder beim Anschluss
des 12V-Boosters an ein 24V-Fahrzeug oder
umgekehrt.
Explosions- und Brandgefahr!
Während des Ladevorgangs können explosive Gase entstehen.
• Während des Ladevorgangs muss die Batterie in einem gut belüfteten Bereich pla-
ziert werden.
• Vermeiden Sie Funken und Flammen.
Rauchen Sie nicht!
• Schützen Sie die Pole der Batterie vor
Kurzschlüssen.
Es besteht die Gefahr von Säurespritzern!
19
Page 20

Übersetzung der Originalbetriebsanleitung
GYSPACK AIR
DE
• Tragen Sie eine Schutzbrille und
Handschuhe.
• Bei Kontakt der Batteriesäure mit den
Augen oder der Haut gründlich mit Wasser
nachspülen und sofort einen Arzt aufsuchen.
Verbinden/Trennen
• Trennen Sie das Gerät vom Spannungsnetz
bevor Sie Kabel und Zangen anschließen
oder trennen.
• Versichern Sie sich immer, dass die rote
Klemme zuerst mit dem «+» Pol der Batterie
verbunden wird. Falls es nötig ist die schwarze
Klemme mit der Fahrzeugkarosserie zu
verbinden, versichern Sie sich, dass es
einen Sicherheitsabstand von der Batterie
zum Benzintank/Aufspuff gibt. Achten
Sie während der Ladung auf einen frei
zugänglichen Netzanschluss.
• Beachten Sie am Ende des Ladevorgangs
folgendes: Trennen Sie erst das Gerät vom
Stromnetz und entfernen Sie dann erst die
Klemmen von der Batterie.
Anschluss
• Klasse II-Gerät (charger booster).
• Klasse III-Gerät (booster).
• Der Anschluss an die Stromversorgung muss
20
den nationalen Vorschriften entsprechen.
Wartung:
• Die Wartung und Reparatur darf nur von
entsprechend geschultem und qualiziertem Fachpersonal durchgeführt werden.
• Achtung! Alle Kontrollarbeiten oder
Wartungen dürfen nur duchgeführt werden,
wenn das Gerät ausgeschaltet und die
Stromversorgung unterbrochen ist.
Page 21

Übersetzung der Originalbetriebsanleitung
GYSPACK AIR
DE
• Öffnen Sie regelmäßig das Gehäuse
und entfernen Sie Staub und andere
Ablagerungen. Beachten Sie hierbei die
geltenden Sicherheitsvorschriften.
• Benutzen Sie niemals Lösungsmittel oder
anderen aggressiven Reinigungsprodukte.
• Reinigen Sie die Oberäche des Gerätes
mithilfe eines trockenen Lappen.
Richtlinien:
• Das Gerät entspricht den europäischen
Richtlinien und Normen.
• Die Konformitätserklärung nden Sie auf
unsere Webseite.
• EAC-Konformitätszeichen (Eurasische
Wirtschaftsgemeinschaft)
• Das Gerät entspricht den britischen
Richtlinien und Normen. Die
Konformitätserklärung für Grossbritannien
ist auf unserer Internetseite verfügbar
(siehe Titelseite).
• Das Gerät entspricht die marokkanischen
Standards. Die Konformitätserklärung
Cم (CMIM) ist auf unserer Webseite
verfügbar (siehe Titelseite).
Entsorgung:
• Die interne Batterie des Gerätes ist recyclingsfähig. Bitte beachten Sie die geltenden Recycling-Vorschriften.
• Die Batterie muss erst von dem Gerät getrennt
werden, bevor Sie dieses entsorgen.
• Das Gerät muss von dem Stromnetz
getrennt werden, bevor Sie es von der
Batterie trennen.
21
Page 22

Übersetzung der Originalbetriebsanleitung
GYSPACK AIR
BESCHREIBUNG
Das GYSPACK AIR ist ein tragbarer, vom Stromnetz unabhängiger Starter, welcher durch intergrierte Hochleistungsbatterie 5 Verwendungsmöglichkeiten hat:
- Batterietest
- Starthilfe für Benzin- und Dieselfahrzeuge ( 480A Startstrom/ 1250A Peakstrom)
- Kompressor 4 bar (13 L/min) zum Aufpumpen von Rädern, Baloons,…
- Stromquelle 12 V DC für TV, elektrisches Werkzeug,...
- Extra leicht
Um die Haltbarkeit der internen Batterie zu verlängern, achten Sie darauf, dass das GYSPACK
AIR nach jedem Gebrauch ans das Stromnetz angeschlossen wird und bis zur nächsten Benutzung angeschlossen bleibt.
BATTERIETEST
Vor jedem Start muss die interne Batterie getestet werden. Drücken Sie hierzu auf die Testtaste :
- Grüne Anzeige : Die Batterie ist aufgeladen. Start ist möglich.
- Orange Anzeige :
- Rote Anzeige :
Die Batterie muss unbedingt aufgeladen werden !
Achtung! Benutzen Sie das Gerät nie, wenn die rote Anzeige leuchtet.
{
DE
STARTFUNKTION
Klemmen Sie unter keinen Umständen die Batterie vom Fahrzeug ab! Das Abklemmen kann Informationsverlust
verursachen und allenfalls einen weiteren Startversuch verhindern.
Booster immer senkrecht stellen. Alle andere Positionen dürfen nur temporär sein.
Um das GYSPACK AIR als Starthilfe zu nutzen, beachten Sie bitte folgende Schritte :
• Trennen Sie das GYSPACK AIR vom Stromnetz. Schalten Sie Zündung am Fahrzeug aus.
• Stellen Sie den Batterieschalter auf Position „OFF“.
• Schließen Sie die rote Anschlussklemme (+) am Pluspol (+) der Batterie und die schwarze
Anschlussklemme (-) an ein festes Metallbauteil des Motors an.
Die Kabel unter keinen Umständen abknicken oder direktem Kontakt mit heißen oder
scharfkantigen Oberächen aussetzen.
• Stellen Sie nun den Batterieschalter auf Position „ON“
• Versuchen Sie das Fahrzeug zu starten ( begrenzen Sie die Startzeit auf 5 bis 6 Sekunden). Startet
das Fahrzeug nicht, warten Sie bitte mindestens 3 Minuten bevor Sie einen neuen Startversuch
durchführen.
- Die Nichteinhaltung der empfohlenen Wartezeit zwischen jedem Test (3 Min.) oder bei zu
langer Testdauer (> 6 Sek.) mindern die Chancen eines erfolgreichen Startes (Leistungsverlustsrisiko).
- Bei Missachtung dieser Hinweise, besteht die Gefahr auslaufender Batteriesäure und
Beschädigung der internen Batterie. Für eine optimale Lebensdauer des Gerätes ist die
Einhaltung dieser Vorgaben unbedingt notwendig.
- Ein Fahrzeug das nicht startet, kann ein anderes Problem als eine Batterie im schlechten
Zustand haben: Lichtmaschine, Anlasser, Zündkerze….
Explosionsgefahr oder Gefahr von Säurerspritzern bei Einsatz eines 12V-Boosters an einer 24V-Batterie.
• Stellen Sie den Batterieschalter auf Position „OFF“.
22
• Schalten Sie nach erfolgreichem Start des Motors den GYSPACK AIR aus. Entfernen Sie danach
zuerst die schwarze Anschlussklemme (-) und dann die rote Anschlussklemme (+) und verstauen
Sie die Kabel am GYSPACK AIR.
Page 23
Übersetzung der Originalbetriebsanleitung
GYSPACK AIR
• Laden Sie den GYSPACK AIR sobald wie möglich wieder vollständig mithilfe des 230 V Ladegerätes
auf !
LADEFUNKTION ( FÜR INTERNE BATTERIE)
Das GYSPACK AIR besitzt ein automatisches Batterieladegerät für die Ladung der internen Batterie. Der Floating-Modus ermöglicht es den Booster am Ladegerät angeschlossen zu halten.
Auaden des GYSPACK AIR:
• Stellen Sie das GYSPACK AIR aufrecht
• Die grüne LED zeigt wenn das GYSPACK AIR aufgeladen ist.
• Dauert der Ladevorgang länger als 24 Stunden (Rote oder orange LED), sollten Sie den Ladevorgang stoppen.
• Die interne Batterie des GYSPACK AIR ist defekt.
VERWENDUNG ALS STROMQUELLE
Die Ausgangsleistung ist mit einem 20A Thermoschalter abgesichert. Bei einem Überhitzen wegen
einer Überladung, kann die Versorgung unterbrochen werden.
Stellen Sie den Batterieschalter auf Position „OFF“.
DE
Entfernen Sie die Abdeckung der 12V DC Anschlussbuchse (n°1 g p. 65).
Schließen Sie das 12V DC Anschlusskabel an der Anschlussbuchse (1) an
Übersicht der Betriebszeiten des GYSPACKS bei verwendung als 12 V DC Stromquelle
Verwendung Energieverbrauch in Watt Betriebszeit in Stunden
Leuchtstoröhren 4 50
Radio, Lüfter, Tiefenmesser 9 22
Camcorder, VCR 15 13
Elektrische Werkzeuge, Pumpen 24 8
Kompressoren, Autostaubsauger 80 2
LICHTQUELLE (ZEITWEISE NUTZUNG)
Das GYSPACK AIR ist mit einem LED Spot mit 7 SMD Bausteinen ausgestattet. An- und Ausschalten des Spots mittels
LIGHT Druckschalter (n°11 g p. 65).
Allein entsprechend qualiziertem Fachperson ist es vorbehalten den Spot bei Beschädigung oder Defekt auszutauschen.
VERWENDUNG ALS KOMPRESSOR
GYSPACK AIR enthält ein intergriertes 4 bar Kompressor für folgende Einsatzbereiche :
• Um Reifen aufzupumpen, benutzen Sie den Universaladapter am Druckluftschlauch. Sorgen Sie
für einen festen und sicheren Adaptersitz.
• Um Bälle (Fußball, Basketball,...) aufzupumpen, benutzen Sie bitte den Balladapter.
• Um Plastikgegenstände wie Strandbälle, Spielzeug, Luftmatratzen usw. Aufzupumpen, benutzen
Sie bitte einen der passenden Adapterstücke.
Inbetriebnahme
Vor dem anschluss des kompressors muss der hauptschalter des GYSPACK AIR ausgeschaltet sein !
• Schalten Sie den Kompressor ein.
Achtung! Der Luftkompressor darf maximal 10 Minuten laufen. Warten Sie bitte mindestens 10
Minuten bis das Gerät sich abgekühlt hat, bevor Sie den GYSPACK AIR wieder verwenden.
• Kontrolieren Sie den Luftdruck.
• Ist der gewünschte Luftdruck erreicht, schalten Sie den Kompressor aus.
23
Page 24
Übersetzung der Originalbetriebsanleitung
GYSPACK AIR
EINSATZ VON ZIGARETTENANZÜNDERANSCHLUSSKABELN
Diese Zigarettenanzünderanschlusskabel sind mit maximal 10A belastbar. Sie sind
im Lieferumfang einiger GYSPACK vorhanden und dienen ausschließlich der Speichererhaltung. Ein nicht sachgemäßer Einsatz kann gefährlich sein.
Brandgefahr! Die Zigarettenanzünderanschlusskabel dürfen
nicht zum Starten eines Fahrzeugs oder als 12V-Versorgung
benutzt werden.
BETRIEBSSTÖRUNG, URSACHEN, ABHILFEN
Fehler Ursachen Lösung
Ein Warnton ertönt. Das Gerät erkennt eine Verpolung. Den Anschluss an der Batterie über-
prüfen.
Bei Anschluss der Polklemmen an die
Polklemmen entstehen Funken.
Das Gerät kann das Fahrzeug nicht
starten.
Das Gerät kann das Fahrzeug nicht
starten. Die rote oder orange LED
leuchtet im "TEST" Modus.
Der Schalter steht auf «ON». Stellen Sie den Schalter auf OFF bevor
Sie Polklemmen an die Batterie
anschließen.
Verpolung der Polklemmen bei Anschluss an die Fahrzeugbatterie.
Der Schalter steht auf OFF. Den Schalter auf ON stellen.
Die Batterie des Gerätes hat sich entladen.
Den Anschluss an der Batterie überprüfen.
Das Gerät auaden, warten bis es aufgeladen ist und den Startversuch wiederholen.
DE
Mehrere Startversuche ohne Pause. Zwischen 2 Versuchen müssen Sie 3
Minuten warten. Ein Startversuch darf
nicht länger als 6 Sekunden dauern.
Es wurde die falsche Spannung ausgewählt.
Das Gerät kann das Fahrzeug nicht
starten und keine LED leuchtet im
"TEST" Modus.
Die interne Batterien wird nicht aufgeladen (keine LED des Gerätes leuchtet).
Nach einem Tag Ladung ist die interne
Batterie nicht aufgeladen.
Das Gerät liefert keinen Strom, wenn
es als 12VEnergiequelle genutzt wird.
Die Lampe leuchtet nicht. Die Batterie des Gerätes hat sich entDer Kompressor startet nicht.
GARANTIEHINWEISE FÜR INTERNE BLEIBATTERIE
Das GYSPACK AIR enthält eine interne Hochleistungsbatterie, die nach Benutzung des Gerätes unbedingt aufgeladen
werden muss. Anderenfalls kann sich die Batterie stark entladen und sulfatieren, was zu irreparablen Schäden führen
kann. Zudem kann sich die Batterielebensdauer verkürzen, falls die Batterie über einen längeren Zeitraum entladen
gelagert wird.
Achtung! Die interne Bleibatterie ist von der Garantie ausgeschlossen! Um die Haltbarkeit des Gerätes zu verlängern,
achten Sie darauf, immer die Vorgaben einzuhalten.
Die Spannung der internen Batterie ist
sehr niedrig. Die Batterie könnte defekt sein.
Die interne Batterie ist beschädigt und
kann nicht wiederaufgeladen werden.
Das Ladegerät ist nicht korrekt
angeschlossen.
Die internen Batterien sind beschädigt
und können nicht wiederaufgeladen
werden.
Der interne Thermoschutzschalter hat
den Stromkreis unterbrochen.
laden.
Überprüfen Sie, ob die Batteriespannung 12V beträgt.
Das Gerät auaden, um eine Wiederbelebung der Batterie zu erreichen.
Bitte unseren Kundendienst kontaktieren, um die Batterie zu ersetzen.
Den Anschluss des Ladegerätes am
Gerät überprüfen.
Bitte unseren Kundendienst kontaktieren, um die Batterie zu ersetzen.
Trennen SIe den Verbraucher und warten Sie bis der Thermoschalter automatisch zurücksetzt.
Das Gerät auaden, warten bis es aufgeladen ist und den Startversuch wiederholen.
24
Page 25

Übersetzung der Originalbetriebsanleitung
GYSPACK AIR
GARANTIE
Die Garantieleistung des Herstellers erfolgt ausschließlich bei Fabrikations- oder Materialfehlern, die binnen 24 Monaten
nach Kauf angezeigt werden (Nachweis Kaufbeleg).
Die Garantieleistung erfolgt nicht bei:
• Durch Transport verursachten Beschädigungen.
• Normalem Verschleiß der Teile (z.B. : Kabel, Klemmen, usw.) sowie Gebrauchsspuren.
• Von unsachgemäßem Gebrauch verursachten Defekten (Sturz, harte Stöße, Demontage).
• Durch Umwelteinüsse entstandene Defekte (Verschmutzung, Rost, Staub).
Die Reparatur erfolgt erst nach Erhalt einer schriftlichen Akzeptanz (Unterschrift) des zuvor vorgelegten Kostenvoranschlages durch den Besteller. Im Fall einer Garantieleistung trägt GYS ausschließlich die Kosten für den Rückversand
an den Fachhändler.
BATTERIEWECHSEL
DE
1
Gerät Batterie Batterietyp Spannung (V) Kapazität (Ah)
GYSPACK AIR 6FM - 18 Bleibatterie 12 18 33 x 14 x 35 53139
Abmessungen (cm)
2
Art.-Nr. Batterie
Zum Wechseln der Batterie:
• Trennen Sie das GYSPACK AIR vom Stromnetz. Schalten Sie Zündung am Fahrzeug aus.
• Entfernen Sie die 15 Schrauben und heben Sie die Rückseite ab.
• Die Batterie liegt frontal im Gehäuse (s. Abbildung). Entfernen Sie die beiden Schrauben, mit denen die Batteriepole
(+ und -) mit der Elektronik verbunden sind (Abbildung). Nehmen Sie die Batterie aus dem Gehäuse.
Achten Sie beim Einbau einer neuen Batterie auf die richtige Polarität (Minuspol links,
Pluspol rechts, s. Abbildung). Befestigen Sie die beiden Schrauben und -Unterlegscheiben und drehen Sie die Muttern fest (empfohlener Anzugsdrehmoment von 4 Nm).
• Schrauben Sie die Rückseite wieder fest.
25
Page 26

Traducción de las instrucciones originales
INSTRUCCIONES DE SEGURIDAD
Este manual de uso incluye indicaciones sobre
el funcionamiento de su aparato y las precauciones a seguir para su seguridad. Lea atentamente este documento antes del primer uso y
consérvelo para una futura lectura. Estas instrucciones deben leerse y ser comprendidas
antes de toda operación.Toda modicación o
mantenimiento no indicado en el manual no se
debe llevar a cabo. Todo daño físico o material
debido a un uso no conforme con las instrucciones de este manual no podrá atribuírsele al
GYSPACK AIR
ES
fabricante. En caso de problema o de incertidumbre, consulte con una persona cualicada
para manejar correctamente el aparato. Este
aparato se debe utilizar solamente para reali-
zar el arranque dentro de los límites indicados
en el aparato y el manual. Se deben respetar
las instrucciones relativas a la seguridad: En
caso de uso inadecuado o peligroso, el fabricante no podrá considerarse responsable.
Aparato destinado a un uso en interior. No
se debe exponer a la lluvia (cargador ).
Este aparato se puede utilizar por niños de
al menos 8 años y por personas con capacidades físicas, sensoriales o mentales reducidas o sin experiencia o conocimiento,
26
siempre y cuando estén correctamente vigilados o si han recibido instrucciones respecto al uso del aparato con toda seguridad
y si los riesgos que conllevan se hayan com-
prendido. Los niños no deben ju gar con el
aparato. Los niños sin vigilancia no deben
limpiar ni efectuar mantenimiento alguno del
aparato.
En ningún caso se debe usar este aparato
para cargar pilas o baterías no recargables.
Page 27

Traducción de las instrucciones originales
GYSPACK AIR
ES
Solo se puede usar el cargador que incluye
el producto para la recarga de las baterías.
No utilice el aparato si el cable de suminis-
tro de corriente o la clavija están dañados.
No cargue nunca una batería helada.
No cubra el aparato.
No colocar el aparato cerca de una fuente
de calor y a temperaturas muy elevadas (superiores a 50ºC).
No obstruya las aperturas de ventilación.
Lea la parte de instalación antes de utilizar
el aparato.
El modo de funcionamiento automático y
las restricciones de uso están explicadas en
este manual.
Peligro de explosión o proyección de ácido
en caso de cortocircuito de las pinzas o en
caso de conexión del amplicador de 12V
en un vehículo de 24V o viceversa.
Riesgo de explosión y de incendio.
Una batería en carga puede emitir gases explosivos.
• Durante la carga, la batería debe ponerse
en un lugar aireado.
• Evite las llamas y las chispas. No fume.
• Proteja las supercies de contactos eléctri-
cos de la batería contra cortocircuitos.
Riesgo de proyección de ácido.
• Lleve gafas y guantes de protección.
• En caso de contacto con los ojos o la
piel, aclare con agua abundantemente y
consulte con un médico sin demora.
27
Page 28

Traducción de las instrucciones originales
GYSPACK AIR
ES
Conexión / desconexión:
• Desconecte la alimentación eléctrica
antes de conectar o desconectar las
conexiones sobre la batería.
• El borne de la batería no conectado al
chasis debe conectarse primero. La otra
conexión se debe efectuar en el chasis, lejos de la batería y de la canalización de
combustible. El cargador de baterías debe
conectarse después a la red eléctrica.
• Tras la operación de carga, desconecte
el cargador de la red eléctrica, retire la
conexión del chasis y la conexión de la
batería, en este orden.
Conexiones:
• Aparato de clase II (cargador booster).
• Aparato de clase III (booster).
• La conexión a la red eléctrica se debe
efectuar conforme a las reglas de instalación nacionales.
Mantenimiento:
• El mantenimiento solo debe realizarlo una
persona cualicada.
• ¡Advertencia! Desconecte siempre la
clavija de la corriente antes de trabajar
28
sobre el aparato (cargador y booster).
• Con regularidad, quite la cubierta protec-
tora y quite el polvo con una pistola de
aire comprimido. Aproveche para que
una persona cualicada compruebe la
jación de las conexiones eléctricas con
una herramienta aislada.
• No utilice en ningún caso disolventes u
otros productos de limpieza agresivos.
Page 29

Traducción de las instrucciones originales
GYSPACK AIR
ES
• Limpie las supercies del aparato con un
trapo seco.
Normativa:
• Aparato conforme a las directivas europeas.
• La declaración de conformidad está
disponible en nuestra página Web.
• Marca de conformidad EAC (Comunidad
económica Euroasiática)
• Equipo conforme a los requisitos
británicos.
La Declaración de Conformidad Británica
está disponible en nuestra página web
(véase la portada).
• Equipamiento conforme a las normas
marroquíes. La declaración de conformidad
Cم (CMIM) está disponible en nuestra
página web (ver página de portada).
Desecho:
• Este material es objeto de una recogida se-
lectiva. No lo deposite en un contenedor
doméstico.
• El acumulador presente en este aparato
es reciclable. Proceda conforme a las indicaciones de reciclado en vigor.
• La batería se debe retirar del aparato
antes de que este se deseche.
• El aparato debe desconectarse imperativamente de la red eléctrica antes de retirar la batería.
DESCRIPCION GENERAL
Gracias a su batería de alto rendimiento integrada, el GYSPACK AIR garantiza 5 funciones :
Prueba de la batería
Arranque instantáneo (1250 A en cresta/480 A) de vehículos equipados con una batería de 12V al plomo con
electrolito líquido o GEL.
Compresor de 4 Bares (13 L/min) para el inado de ruedas, balones ….
Fuente de alimentación de 12 V DC para alimentar Spot, TV, herramienta, etc…
Luz extra
29
Page 30

Traducción de las instrucciones originales
GYSPACK AIR
Para el buen funcionamiento del aparato y para preservar la duración de vida de su batería
interna, es imprescindible recargarlo después de cada uso y dejarlo conectado a la corriente
hasta el próximo uso.
FUNCIÓN TEST DE LA BATERÍA.
Tést de la batería interna antes del arranque
Para probar la batería interna, empujar el bóton test el resultado aparece :
- Indicador verde : La batería está cargada. Arranque posible
- Indicador naranja :
- Indicador rojo :
ARRANQUE DE UN VEHÍCULO
No desconecte la batería del vehículo. La conexión de la batería puede conllevar una pérdida de información
y una eventual imposibilidad de volver a arrancar.
{
Cuidado !!! Nunca utilizar el aparato cuando el indicador naranja o rojo
se enciende.
Recargar imperativamente.
ES
El booster se debe almacenar en posición vertical. Toda otra posición se debe mantener solo de forma
temporal.
Para utilizar el GYSPACK AIR en función arranque, respectar el ciclo siguiente :
• Desconectar el GYSPACK AIR de la red eléctrica. Girar la llave de contacto del vehículo a OFF.
• Coloque el conmutador sobre OFF.
• Conectar la pinza roja al + de la batería, y la pinza negra al – de la batería. Un señal sonoro le
advierte en caso de inversión de polaridad.
Los cables no deben estar torcidos o en contacto con supercies calientes o cortantes.
• Colocar el conmutador en posición ON
• Ponerse al puesto de control de su vehículo y girar la llave de contacto (6 sec max). Si el motor no
arranca, esperar 3 minutos entre 2 intentos de arranque.
- En caso de no seguir el tiempo recomendado entre cada intento (3 min) o si la duración
del intento es demasiado larga (< 6 segundos) las posibilidades de arranque se reducen
(riesgo de pérdida de potencia).
- Riesgo de fuga de ácido y de destrucción de la batería interna en caso de no respeto de
las duraciones recomendadas.
- Un vehículo que no arranca puede tener un problema que no tenga que ver con una batería en mal estado: alternador, bujía, etc.
Riesgo de explosión o de proyección de ácido en caso de una conexión del booster
12V sobre un vehículo de 24V.
Peligro en caso de cortocircuito de las pinzas.
• Coloque el conmutador sobre OFF.
• Desconectar la pinza negra, luego la pinza roja del vehículo.
• Recargar su GYSPACK AIR después del uso. (cf parrafo carga)
30
Page 31

Traducción de las instrucciones originales
GYSPACK AIR
CARGA DE LA BATERIA INTERNA CON AYUDA DEL CARGADOR
El GYSPACK AIR incluye un cargador automático que carga y que mantiene la batería interna cargada a 100% y sin
vigilancia. Gracias al Floating System del cargador, la interrupción a nal de carga y el reinicio de carga para mantener
el nivel de carga son automáticos.
Para recargar el GYSPACK AIR :
• Coloque el GYSPACK AIR en posición vertical durante la carga.
• Conecte la clavija a la red de 230V y la otra extremidad sobre la parte frontal del GYSPACK AIR (nº2 g p.41).
• El testigo verde indica que el GYSPACK AIR está cargado.
NB: Si el aparato queda más de 24h en carga (testigo rojo y naranja encendidos), detenga la carga. La batería interna
de su GYSPACK AIR está dañado.
UTILIZACION DEL GYSPACK AIR COMO FUENTE DE ALIMENTACIÓN DE 12 V DC
La toma de encendedor está protegida por un disyuntor térmico de 20A interno. En caso de sobrecalentamiento debido a una sobrecarga, este podrá interrumpir la alimentación.
Coloque el conmutador sobre OFF.
ES
Levantar el capuchón del receptáculo del encendedor 12 V CC (n°1 g p. 65).
Insertar la toma-cable encendedor de su aparato eléctrico (cable no proporcionado) en el receptáculo del GYSPACK AIR.
Tiempo estimativo de uso del GYSPACK AIR como fuente de corriente continua de 12 V CC
Aparato Consumo en watts (estimación) Tiempo estimativo en horas
Tubo uorescente Celular 4 50
Radio, Ventilador, … 9 22
Videocámara, videocasete, projecteur 15 13
Herramienta electrica, bomba 24 8
Compresor de aires, Aspirador d’auto 80 2
LUZ COMPLEMENTARIA
El GYSPACK AIR está dotado de una lámpara de 7 LED de alta luminosidad. Se enciende gracias al botón « LIGHT »
situada a proximidad (n°11 g p. 65).
Un servicio postventa competente sólo puede reparar o cambiar este elemento en caso de avería.
COMPRESOR DE AIRE
GYSPACK AIR, integra un compresor de 4 bares, el cual permite inar :
• Neumáticos gracias a su contera de origen. (Bajar la palanca para cerrar el tubo en la válvula).
• Balones gracias a su aguja suministrada de origen.
• y cualquier otro artículo de plástico (balones de playa, juegos, camas inables, etc.) gracias a
sus 2 toberas de inado.
Funcionamiento
Antes de utilizar el compresor de aire, comprobar que el conmutador de GYSPACK AIR está colo-
cado en la posicion « o »
• Apretar el botón para arrancar el compresor.
Nb : El compresor debe funcionar durante 10 minutos como máximo.
Esperar 10 minutos para dejarlo enfriar antes de volver a utilizarlo
• El manometro indica la presión de aire.
• Parar el compresor cuando se alcanza la presión deseada
31
Page 32

Traducción de las instrucciones originales
GYSPACK AIR
UTILIZACIÓN DE CABLE DE TOMA PARA ENCENDEDOR
Este tipo de cable toma para encendedor está limitado a 10 A. Vendidos con ciertos
GYSPACK, están diseñados para realizar únicamente para proteger la memoria.
Todo uso a otros nes puede ser peligroso.
¡Riesgo de incendio! Se desaconseja la utilización de este cable
toma para encendedor para realizar una puesta en marchar o
como alimentación eléctrica 12V por ejemplo.
ANOMALÍAS, CAUSAS Y SOLUCIONES
Anomalías Causas Soluciones
El aparato emite una señal sonora. El aparato detecta una inversión de
polaridad.
Se producen chispas al conectar las
pinzas a la batería.
El aparato no llega a arrancar el vehículo.
El aparato no llega a arrancar el vehículo. Uno de los LED rojo o naranja del
aparato se enciende en modo "Test".
El conmutador está en «ON». Antes de conectar las pinzas a la ba-
Inversión de polaridad de las pinzas
del aparato sobre la batería del vehículo.
El conmutador está en la posición OFF. Coloque el conmutador sobre la
La batería del aparato está descargada.
ES
Compruebe la polaridad de la batería.
tería, ponga el conmutador en posición OFF.
Compruebe la polaridad de la batería.
posición ON.
Cargue el aparato, espere a que la car-
ga termine y vuelva a intentarlo.
Se han realizado varios intentos sin
pausa.
La tensión de la batería no es correcta. Compruebe que la tensión de la bat-
El aparato no llega a arrancar el vehículo y ningún LED del aparato se enciende en modo "Test".
La recarga de la batería interna no inicia (ningún LED del estado de carga
del aparato se enciende).
Tras une día de carga, el indicador de
n de carga no se enciende.
En modo alimentación externa de 12V,
el booster no emite corriente.
La lámpara no se enciende. La batería del aparato está descargaEl compresor de aire no se activa.
BATERÍA NO GARANTIZADA
Las baterías son elementos activos, su duración de vida depende de su cuidado. Tras usar el arrancador, es necesario
recargar las baterías internas. Guardar el producto bajo temperaturas elevadas reduce considerablemente la carga de
las baterías. En caso de no utilizar el producto durante un periodo prolongado, se recomienda encarecidamente que
se recarguen las baterías antes de su uso. En general, el fabricante recomienda mantener el producto enchufado para
mantener las baterías a su nivel de rendimiento óptimo. Este producto está equipado con 2 baterías de alto rendimiento,
las cuales pueden deteriorarse con el tiempo y de forma irreversible si no se respetan las recomendaciones mencionadas.
Debido a ello y a su coste considerable, las baterías de los GYSPACK no están incluidas en la garantía.
La tensión de las baterías internas es
muy baja. Puede que las baterías estén dañadas.
La batería interna está dañada y no se
puede recargar.
La clavija del cargador externo no está
correctamente insertada en la toma
del aparato.
Las baterías internas están dañadas y
no se pueden recargar.
El disyuntor térmico interno a interrumpido el circuito.
da.
Espere 3 minutos entre un intento y
otro. El arranque no debe durar más
de 6 segundos.
ería del vehículo es de 12V.
Ponga el aparato a cargar para inten-
tar recuperar la batería.
Contacte a su distribuidor para proceder a un reemplazo de las baterías.
Compruebe la conexión de la clavija
del cargador sobre el aparato.
Contacte a su distribuidor para proceder a un reemplazo de las baterías.
Desconecte el aparato exterior conectado al booster y espere a que el
disyuntor se vuelva a rearmar automáticamente.
Cargue el aparato, espere a que la carga termine y vuelva a intentarlo.
32
Page 33
Traducción de las instrucciones originales
GYSPACK AIR
GARANTÍA
La garantía cubre todos los defectos o vicios de fabricación durante 2 años, a partir de la fecha de compra (piezas y
mano de obra)
La garantía no cubre:
• Todas las otras averías resultando del transporte
• El desgae normal de las piezas (cables, pinzas…)
• Los incidentes resultando de un mal uso (error de alimentación, caída, desmontaje)
• Los fallos relacionados con el entorno (polución, oxidación, polvo…)
En caso de fallo, regresen la maquina a su diribuidor, adjuntando:
• Un juicativo de compra con fecha (recibo, factura…)
• Una nota explicativa del fallo
REEMPLAZO DE LA BATERÍA
ES
1
2
Producto Batería Tipo Tensión (V) Capacidad (Ah) Dimensiones (cm) Ref. batería
GYSPACK AIR 6FM - 18 Batería al plomo 12 18 33 x 14 x 35 53139
Para reemplazar la batería:
• El producto se debe desconectar previamente de la red eléctrica.
• En un primer lugar, se debe desatornillar la carcasa trasera (15 tornillos) y retirarla.
• Una vez que se quite la carcasa, la batería se encuentra delante (ver ilustración). La batería está unida a los conectores del GYSPACK AIR en dos puntos: a nivel del borne - (imagen 1) y del borne + (imagen 2). Para retirarla,
retire los dos tornillos que permiten la unión entre la batería y el resto de los conectores del GYSPACK AIR a nivel
de los bornes + y -.
Cuando se coloque una nueva batería, recuerde asociar correctamente las polaridades de
la batería y del GYSPACK AIR. Borne - a la izquierda, borne + a la derecha (ver imagen).
Recolocar los dos tornillos y apretar las tuercas (par de apriete recomendado de 4 N.m).
• Vuelva a atornillas la carcasa trasera
33
Page 34

Перевод оригинальных инструкций
ПРАВИЛА БЕЗОПАСНОСТИ
Данная инструкция описывает функционирование вашего устройства и меры предосторожности в целях
обеспечения вашей безопасности. Пожалуйста, прочтите ее перед первым использованием и сохраните, чтобы при надобности перечитать. Эти указания должны
быть прочтены и поняты до начала сварочных работ.
Изменения и ремонт, не указанные в этой инструкции,
не должны быть предприняты.Производитель не несет
ответственности за травмы и материальные повреждения связанные с несоответствующим данной инструкции использованием аппарата. В случае проблемы или
сомнений, обратитесь к квалифицированному профессионалу для правильного подключения. Этот аппарат
GYSPACK AIR
RU
должен быть использован только для перезаряда и/или
запуска и/или питания в пределах указанных на заводской табличке и/или в инструкции. Соблюдайте правила
безопасности. В случае неадекватного или опасного использования производитель не несет ответственности.
Аппарат предназначен для использования в помещении. Не выставлять под дождь (Зарядное устройство).
Этот аппарат может быть использован детьми старше
8 лет, а также персонами с ограниченными физическими, сенсорными или умственными возможностями,
а также не обладающими опытом и знаниями, при условии если за ними надлежащим образом наблюдают
или если с ними провели инструктаж по безопасному
использованию аппарата и если все возможные риски
были предусмотрены. Дети не должны играть с устройством. Чистка и уход не должны производится детьми
без надлежащего присмотра.
34
Ни в коем случае не используйте это устройство для зарядки батареек или незаряжаемых батарей.
Не использовать ни в коем случае для заряда батареек
или неперезаряжаемых АКБ.
Не используйте аппарат если сетевой шнур или вилка повреждены.
Никогда не заряжайте поврежденный или замерзший аккумулятор.
Не покрывайте аппарат.
Page 35

Перевод оригинальных инструкций
GYSPACK AIR
RU
Не устанавливать аппарат рядом с источником тепла
и не подвергать высоким температурам (выше 50°C)
в течении длительного периода.
Не перекрывайте вентиляционные отверстия. Перед
использованием ознакомьтесь с разделом «установка» инструкции.
Автоматический режим, а также ограничения при его
использовании, описаны далее в этой инструкции.
Опасность взрыва или выброс кислоты в случае короткого замыкания зажимов или подключения усилителя 12 В на транспортном средстве 24 В или наоборот.
Риск пожара и взрыва!
• При заряде батарея может выпустить взрывоопасный газ.
• Во время зарядки АКБ должна быть помещена в
хорошо проветриваемом месте.
• Избегайте пламени и искр. Не курить.
• Защитите поверхности батареи от электрического
контакта во избежание короткого замыкания.
Риск кислотных брызг!
• Носите защитные очки и перчатки.
• В случае контакта с глазами или кожей, промойте
обильно водой и проконсультируйте врача без
промедления.
Подключение / отключение :
• Отключите подачу питания перед тем как
подключать или отключать соединения к батарее.
• Сначала подключите клемму АКБ, не соединенную
с шасси. Второе подсоединение должно быть
осуществлено на шасси как можно дальше от АКБ
и от трубопроводов топливной системы. Затем,
подключите зарядное устройство к сети.
• После зарядки отключите зарядное устройство от
сети, затем отсоедините зажим от шасси и,
наконец, зажим от аккумулятора. Действуйте в
указанном порядке.
Подключение:
• Аппарат класса II (зарядное устройство Ракета-носитель)
35
Page 36
Перевод оригинальных инструкций
GYSPACK AIR
RU
• Аппарат класса III (ракета-носитель)
• Подключение к электросети должно быть произ-
ведено в соответствии с законами страны.
Уход:
• Техническое обслуживание должно производиться только квалифицированным специалистом.
• Внимание! Всегда отключайте вилку от питания
перед тем, как проводить техобслуживание
аппарата (зарядка и бустер).
• Регулярно открывайте аппарат и продувайте
его, чтобы очистить от пыли. Необходимо также
проверять все электрические соединения с помощью
изолированного инструмента. Проверка должна
осуществляться квалифицированным специалистом.
• Ни в коем случае не использовать растворители
или другие коррозийные моющие средства.
• Очистить поверхность аппарат с помощью сухой
тряпки.
Нормы и правила:
• Аппарат соответствует директивам Евросоюза
• Декларация соответствия есть на нашем сайте.
• Знак соответствия EAC (Евразийское соответствие
качества)
• Материал соответствует требованиям
Великобритании. Заявление о соответствии для
Великобритании доступно на нашем веб-сайте
(см. главную страницу).
• Товар соответствует нормам Марокко.
Декларация Cم (CMIM) доступна для скачивания
на нашем сайте (см на титульной странице).
36
Утилизация:
• Аккумулятор данного аппарат подлежит переработке. Пожалуйста, следуйте действующим правилам переработки.
• Необходимо извлечь аккумулятор из аппарата
прежде чем его отправить в утилизацию.
• Отсоедините аппарат от электропитания перед
тем как вынуть аккумулятор.
Page 37
Перевод оригинальных инструкций
GYSPACK AIR
ОПИСАНИЕ
Благодаря внедренному высокотехнологичному аккумулятору, GYSPACK AIR обладает 5-мя функциями:
тест батареи
Мгновенный запуск (1250А-пиковый ток/480A) автомобилей со свинцовым аккумулятором 12В с жидким или
гелевым электролитом.
Компрессор на 4 Бар (13 л/мин) для подкачки шин, мячей и т.п. …
Источник питания 12В DC для питания электрической лампочки, телевизора, электроинструмента и т.п.
дополнительный свет
Для хорошего функционирования аппарата и для продления срока действия
аккумулятора, необходимо его заряжать после каждого использования и оставлять
подключенным к сети до нового использования.
ФУНКЦИЯ ТЕСТИРОВАНИЯ АКБ
Тестирование внутреннего аккумулятора перед запуском
Для проверки внутреннего аккумулятора, нажмите на кнопку «test» ; результат:
- Зеленый индикатор : Аккумулятор заряжен. Запуск возможен.
RU
- Оранжевый индикатор :
- Красный индикатор :
ЗАПУСК АВТОМОБИЛЯ
Не отсоединяйте АКБ от автомобиля. Подключение АКБ может вызвать потерю данных и в некоторых
случаях невозможность завести двигатель.
Бустер нужно хранить в вертикальном положении. Он может находиться в любом другом положении
только временно.
Для использования функции запуска GYSPACK AIR, следуйте по этапам:
• Отключите GYSPACK AIR от сети. Поверните ключ зажигания автомобиля в положение OFF.
• Снова поставьте переключатель в положение «OFF».
• Посоедините красный зажим к + аккумулятора, а черный к – . Звуковой сигнал предупредит
вас в случае инверсии полярности.
кабели не должны быть защемлены или контактировать с нагревающимися или
режущими поверхностями.
• Поставьте переключатель на ON
• Подойдите к автомобилю и поверните ключ зажигания ( максимум 6 секунд). Если мотор не
заводится, подождите 3 минуты перед тем, как приступить к следующей попытке запуска.
- При несоблюдении советуемого перерыва между попытками (3 мин) или если
продолжительность попытки превышена (< 6 секунд), вероятность запуска снижается
(риск потери мощности).
- В случае несоблюдения рекомендованных сроков существует риск утечки кислоты и
разрушения встроенного аккумулятора.
- Автомобиль, который не заводится может иметь иную проблему, чем АКБ в плохом
состоянии : альтернатор, свечи накаливания…
Опасность взрыва или выброса кислоты в случае подключения бустера 12 В
к автомобилю 24 В.
Опасность в случае закорачивания зажимов.
Внимание !!! Не использовать аппарат если загорелся красный
или оранжевый индикатор.
Зарядка обязательна.
{
• Снова поставьте переключатель в положение «OFF».
• Отсоедините черный зажим, а затем красный от автомобиля.
37
Page 38
Перевод оригинальных инструкций
GYSPACK AIR
• Зарядите GYSPACK AIR после использования (см раздел зарядка).
ЗАРЯДКА ВНУТРЕННЕГО АККУМУЛЯТОРА С ПОМОЩЬЮ ЗАРЯДНОГО УСТРОЙСТВА
GYSPACK AIR оснащен автоматическим зарядным устройством, которое заряжает и поддерживает встроенный
аккумулятор заряженным на 100% без надзора. Благодаря функции Floating System остановка в конце зарядки
и начало нового цикла для поддержания уровня зарядки осуществляются автоматически.
Для перезарядки аппарата GYSPACK AIR :
• Положите GYSPACK AIR вертикально во время зарядки.
• Подключите шнур питание к сети 230 В, а другой конец к гнезду на передней панели аппарата GYSPACK (n°2
g стр. 41).
• Зеленая лампочка показывает, что GYSPACK AIR заряжен.
NB: Если аппарат остается на подзарядке более 24 часов (горит красная, оранжевая лампочка), остановите
зарядку. Поврежден встроенный аккумулятор GYSPACK AIR.
ИСПОЛЬЗОВАНИЕ GYSPACK AIR КАК ИСТОЧНИКА ПИТАНИЯ 12 В DC
Разъем для прикуривателя защищен встроенным термовыключателем на 20A. В случае перегрева
из-за перенапряжения он сможет прервать питание.
RU
Снова поставьте переключатель в положение «OFF».
Поднимите крышку гнезда для прикуривателя 12В DC (n°1 g p. 65).
Вставьте шнур со штекером для прикуривателя вашего электроаппарата (шнур не поставляется с GYSPACK AIR)
в гнездо GYSPACK AIR.
Расчетное время использования GYSPACK AIR как источника постоянного тока 12В DC
Аппарат Потребление в Ватт (расчетное) Расчетное время в часах
Флуоресцентная трубка 4 50
Радио, Вентилятор, Эхолот 9 22
Видеокамера, магнитофон, проектор 15 13
Электроиструмент, сушильная помпа 24 8
Воздушный компрессор, Авто пылесос 80 2
ИСТОЧНИК ПОДСВЕТКИ
GYSPACK AIR оборудован лампочкой из 7 светодиодов высокой яркости. Она включается с помощью находящейся
рядом кнопки «LIGHT» (n°11 g p. 65).
Только компетентная ремонтная служба может починить или заменить лампочку в случае поломки.
ВОЗДУШНЫЙ КОМПРЕССОР
GYSPACK AIR внедряет в себе компрессор на 4 Бар, позволяющий накачать:
• шины, благодаря специальному наконечнику (идет в комплекте). Опустите рычаг, чтобы
закрепить трубку на клапане.
• мячи, благодаря стержню для накачки (идет в комплекте).
• другие пластиковые предметы (пляжные мячи, надувные игрушки, надувные матрацы)
благодаря 2-м специальным насадкам.
Использование
Прежде чем использовать воздушный компрессор, проверьте, что переключатель GYSPACK
AIR находится в положении « o »
• Нажмите на кнопку запуска компрессора.
Примечание: Компрессор должен работать максимум 10 минут. Сделайте 10минутный перерыв перед тем, как использовать его снова. Аппарат должен
остыть.
• Манометр показывает давление воздуха
• Остановите компрессор, когда достигнуто требуемое давление.
38
Page 39

Перевод оригинальных инструкций
GYSPACK AIR
ИСПОЛЬЗОВАНИЕ ШНУРА СО ШТЕПСЕЛЕМ ДЛЯ ПРИКУРИВАТЕЛЯ
Данный вид шнура со штепселем для прикуривателя ограничен 10 А и продается
с некоторыми моделями GYSPACK. Он разработан ИСКЛЮЧИТЕЛЬНО для
сохранения настроек. Его использование в иных целях может быть опасным.
Риск пожара! Крайне не рекомендуется использовать
шнур для прикуривателя в таких целях, как например, для
запуска автомобиля или в качестве электропитания 12 В.
НЕИСПРАВНОСТИ, ПРИЧИНЫ, УСТРАНЕНИЕ
Неисправности Причины Устранение
Аппарат издает звуковой сигнал. Аппарат распознал инверсию
полярности.
В момент контакта зажимов с АКБ
появляются искры.
Аппарат не может завести
автомобиль.
Аппарат не может завести
автомобиль. Оранжевый или
красный светодиод аппарата
загорается в режиме "Test".
Аппарат не может завести
автомобиль и ни один светодиод
аппарата не загорается в режиме
"Test".
Зарядка встроенного аккумулятора
не запускается (ни один светодиод
показателей состояния зарядки
аппарата не загорается).
Индикатор окончания заряда не
загорается даже после целого дня
заряда.
В режиме «внешний источник
питания 12В» аппарат на подает ток.
Лампочка не загорается. Встроенный аккумулятор аппарата
Воздушный компрессор не
запускается.
Переключатель в положении
«ON».
Инверсия полярности зажимов
аппарата на АКБ автомобиля.
Переключатель в положении OFF.
Встроенный аккумулятор аппарата
разряжен.
Несколько попыток запуска без
перерывов.
Неподходящее напряжение
аккумулятора.
Напряжение встроенных батарей
очень низкое. Вероятно, что они
повреждены.
Внутренний аккумулятор
поврежден и не может быть
перезаряжен.
Штепсель внешнего зарядного
устройства плохо вставлен в
гнездо аппарата.
Внутренние АКБ повреждены и не
могут быть перезаряжены.
Внутренний термопредохранитель
разомкнул цепь.
разряжен.
Проверьте полярность АКБ.
Перед тем, как подсоединить зажимы к АКБ,
поставьте переключатель в положение OFF.
Проверьте полярность АКБ.
Поставьте переключатель на положение ON.
Поставьте аппарат заряжаться, дождитесь
конца зарядки и попробуйте снова.
Подождите 3 минуты перед тем, как совершить
следующую попытку. Каждая попытка запуска
не должна длиться более 6 секунд.
Проверьте, что напряжение АКБ автомобиля
12В.
Поставьте аппарат заряжаться, чтобы
попытаться восстановить аккумулятор.
Свяжитесь с сервисной службой для замены
аккумулятора.
Проверьте подключение штепселя зарядного
устройства к аппарату.
Свяжитесь с сервисной службой для замены
аккумуляторов.
Отключите внешний аппарат, подключенный к
пусковому устройству и подождите пока
предохранитель автоматически перезарядится.
Поставьте аппарат заряжаться, дождитесь
конца зарядки и попробуйте снова.
RU
НЕГАРАНТИЙНОСТЬ БАТАРЕИ
Батареи это активные элементы, их срок службы зависит от ухода за ними. После каждого использования
совершенно необходимо заряжать внутренние батареи этого пускового устройства. Хранение в помещении
с высокой температурой значительно снижает уровень заряда аккумуляторов. В случае длительного
неиспользования, настоятельно советуется зарядить аккумуляторы перед использованием. Как правило, мы
советуем оставлять аппарат постоянно подключенным к сети, чтобы сохранить батареи на их лучшем уровне
эффективности.
Этот аппарат оснащен 2 высокоэффективными батареями, которые, в случае не соблюдения правил ухода,
могут окончательно прийти в негодность.
По этой причине на дорогостоящие батареи аппарата GYSPACK гарантия не распространяется.
39
Page 40

Перевод оригинальных инструкций
GYSPACK AIR
RU
ГАРАНТИЯ
Гарантия распространяется на любой заводской дефект или брак в течение 2х лет с даты покупки изделия
(запчасти и рабочая сила).
Гарантия не распространяется на:
• Любые поломки, вызванные транспортировкой.
• Нормальный износ деталей (Например : кабели, зажимы и т.д.).
• Случаи неправильного использования (ошибка питания, падение, разборка).
• Случаи выхода из строя из-за окружающей среды (загрязнение воздуха, коррозия, пыль).
При выходе из строя, обратитесь в пункт покупки аппарата с предъявлением следующих документов:
- документ, подтверждающий покупку (с датой): кассовый чек, инвойс....
- описание поломки.
ЗАМЕНА АКБ
1
2
Пa Аккумулятор Тип
GYSPACK AIR 6FM - 18
Свинцовый
аккумулятор
Напряжение
(В)
12 18 33 x 14 x 35 53139
Емкость (Aч) Размеры (см) Арт. АКБ
Чтобы заменить АКБ:
• Аппарат должен быть предварительно отключен от сети питания.
• Отвинтите сначала заднюю панель (15 винтов) и снимите ее.
• После снятия корпуса АКБ находится напротив (см. иллюстрацию). Батарея соединена с аппаратом GYSPACK
AIR в двух точках : в зоне клеммы - (иллюстрация) и на клемме + (иллюстрация). Чтобы извлечь ее, отвинтите
2 винта, на которых крепится батарея и внутренние соединения аппарата GYSPACK AIR в зоне клемм + и -.
При установке новой АКБ, убедитесь в соблюдении полярности АКБ и аппарата
GYSPACK AIR. Клемма - слева, клемма + справа (см. иллюстрацию). Снова вставьте
2 винта и 2 кружочка и завинтите гайки (рекомендованный момент затяжки 4 N.m).
• Привинтите заднюю часть корпуса.
40
Page 41

Vertaling van de oorspronkelijke gebruiksaanwijzing
BELANGRIJKE VEILIGHEIDSINSTRUCTIES
In deze gebruiksaanwijzing vindt u de aanwi-
jzingen over het functioneren van uw toestel
en de veiligheidsvoorzorgsmaatregelen. Leest
u dit document aandachtig door voor u het ap-
paraat in gebruik neemt. Bewaar dit document
als naslagwerk. Deze instructies moeten eerst
goed gelezen en begrepen worden alvorens
het apparaat te gebruiken. Voer geen enkele ve-
randering en/of onderhoud uit die niet beschreven staat in deze handleiding. Leder lichameli-
jk letsel of materiële schade veroorzaakt door
GYSPACK AIR
NL
het onjuist opvolgen van de instructies in deze
handleiding kan niet op de fabrikant verhaald
worden. Raadpleeg in geval van problemen
of vragen een gekwaliceerde onderhoudsmonteur. Dit apparaat kan uitsluitend gebruikt
worden als oplader of als stroomvoorziening,
volgens de instructies vermeld op het apparaat
en in de handleiding. Volg altijd nauwkeurig
de veiligheidsinstructies op. Bij oneigenlijk of
gevaarlijk gebruik kan de fabrikant van dit product niet aansprakelijk gesteld worden.
Dit apparaat is bestemd voor gebruik binnen.
Niet blootstellen aan regen (lader).
Dit apparaat kan allen gebruikt worden door
kinderen vanaf 8 jaar en door personen met lagere lichamelijke, zintuiglijke of mentale vaardigheden of gebrek aan ervaring of kennis als
deze goed begeleid worden of als in de handleiding aangeven staat dat het toestel veilig en
zonder risico gebruikt kan worden. Kinderen
mogen niet met het apparaat spelen. Schoonmaak en onderhoud mogen niet gedaan worden door kinderen zonder toezicht.
Niet geschikt voor het opladen van
niet-oplaadbare batterijen of accu’s.
41
Page 42

Vertaling van de oorspronkelijke gebruiksaanwijzing
GYSPACK AIR
NL
Gebruik uitsluitend de lader die is meegeleverd
met het apparaat voor het opladen van de accu’s.
Gebruik het apparaat niet als de stroomkabel of de stekker defect zijn.
Probeer nooit een bevroren of een defecte
accu op te laden.
Het apparaat niet bedekken.
Het apparaat niet dichtbij een warmtebron
plaatsen en niet blootstellen aan blijvend
hoge temperatuur (hoger dan 50°C).
De ventilatie openingen niet toedekken. Volg
de installatie-instructies in deze handleiding
voor het opstarten van het apparaat.
De automatische modus en de gebruiksbeperkingen van het apparaat worden in deze
handleiding beschreven.
Gevaar voor explosie of zuurverspreiding bij
kortsluiting van de klemmen of bij aansluiting
van de 12V-booster op een 24V-voertuig of
omgekeerd.
Ontploffings- en brandgevaarlijk!
Een opladende accu kan explosief gas uits-
toten.
• Plaats de accu tijdens het opladen in een
goed geventileerde ruimte.
42
• Vermijd vuur en vonken. Niet roken.
• Scherm de elektrische delen van de accu af
om kortsluiting te voorkomen.
Let op : zuur-projectie gevaar.
• Draag altijd een veiligheidsbril en
veiligheidshandschoenen.
• In geval van oog- of huidcontact, meteen
met veel water afspoelen en onmiddellijk
een arts raadplegen
Page 43

Vertaling van de oorspronkelijke gebruiksaanwijzing
GYSPACK AIR
NL
Aansluiten / Afsluiten :
• Sluit de stroomvoorziening af, alvorens de
accu aan te sluiten of los te koppelen.
• De aansluitklem van de accu die niet is
aangesloten op een chassis moet als eerst
aangekoppeld worden. De andere verbin-
ding moet plaats vinden op de chassis, ver
van de accu en van de brandstofkanalise-
ring. De accu oplader moet vervolgens op
het net aangesloten worden.
• Koppel na het laden eerst de acculader
van de netspanning los. Koppel daarna de
connectie van de chassis los, en pas daarna de connectie met de accu.
Aansluiten :
• Klasse 2 toestel (lader booster).
• Klasse 3 toestel (booster).
• De aansluiting op de netspanning moet
conform de nationale regelgeving gebeuren.
Onderhoud :
• Het onderhoud dient uitsluitend door een
gekwaliceerde onderhoudsmonteur te ge-
daan te worden.
• Waarschuwing ! Haal altijd de stekker uit
het stopcontact alvorens eventuele
onderhouds werkzaamheden te verrichten
(lader & booster).
• Haal regelmatig de kap van het apparaat
en blaas het stof weg met een elektrisch
stofblazertje. Laat tegelijkertijd de elek-
trische aansluitingen controleren door een
gekwaliceerd technicus (met behulp van
geïsoleerd gereedschap).
• Nooit oplosmiddelen of andere agressieve
schoonmaakmiddelen gebruiken.
43
Page 44

Vertaling van de oorspronkelijke gebruiksaanwijzing
GYSPACK AIR
NL
• De oppervlaktes van het apparaat reinigen
met een droge doek.
Regelgeving :
• Het apparaat is in overeenstemming met
met de Europese richtlijnen
• De conformiteitsverklaring is te vinden op
onze internetsite.
• EAC (Euraziatische Economische
Gemeenschap) merk
• Materiaal conform aan de Britse eisen.
De Britse verklaring van overeenkomt
is beschikbaar op onze website (zie
omslagpagina).
• Dit materiaal voldoet aan de Marokkaanse
normen. De verklaring Cم (CMIM) van
overeenstemming is beschikbaar op onze
internet site (vermeld op de omslag)
Afvalverwerking :
• Afzonderlijke inzameling vereist. Niet met
het huishoudelijke afval wegwerpen.
• De accumulator in dit apparaat is recyclebaar. Volg a.u.b. de geldige afvalverwer-
kingsrichtlijnen op.
• De accu moet uit het apparaat verwijderd
worden voordat het apparaat naar de
afvalverwerking wordt gebracht.
44
• Het apparaat moet uitgeschakeld worden
voordat de accu verwijderd wordt.
Page 45

Vertaling van de oorspronkelijke gebruiksaanwijzing
GYSPACK AIR
ALGEMENE OMSCHRIJVING
Dankzij een high performance interne accu, heeftde GYSPACK AIR 5 functies :
- Batterijtest
- Onmiddelijk start (1250 A piek/48 / 0 A) voor voertuigen met een 12V lood-zuur accu met vloeibare elektrolyt of
GEL.
- Compressor 4 Bars (13L/mn) voor het oppompen van banden, ballen...
- 12 V DC voedingsbron voor voeden van Spot, TV, gereedschappen…
- Fill Light
Voor correct gebruik van het apparaat en om de levensduur van de interne accu te behouden, is het noodzakelijk om de accu op te laden na elk gebruik, en hem aangesloten aan
de netspanning te laten staan tot het volgende gebruik.
TEST-FUNCTIE VAN DE ACCU
Controle van de interne accu voor opstarten
Om de interne accu te controleren, druk op de test knop het resultaat wordt weergegeven:
- Groen lampje: De accu is opgeladen. Opstarten mogelijk
NL
- Oranje lampje:
-Rood lampje:
OPSTARTEN VAN EEN VOERTUIG
Koppel niet de accu los van het voertuig. De aansluiting van de accu kan verlies van gegevens veroorzaken
en eventueel het opstarten verhinderen.
De booster moet in verticale positie bewaard worden. Iedere andere positie mag slecht tijdelijk zijn.
Voor gebruik van de GYSPACK AIR als start booster, Volg de volgende instructies:
• Koppel de de GYSPACK AIR los van de netspanning. Draai de contactsleutel van het voertuig op
de OFF positie.
• Zet de schakelaar op «OFF».
• Sluit de rode klem aan op de + pool van de accu en de zwarte klem op de - pool van de accu. Een
geluidssignaal geeft de ompoling van de voedingsspanning aan.
De kabels mogen niet worden afgekneld of in contact met hete of scherpe oppervlakken
komen.
• Zet de schakelaar op ON
• Ga naar het controle board van uw voertuig en draai de contactsleutel om ( 6 sec max). Als de
motor niet start, wacht 3 minuten tussen 2 opstartpogingen.
Let op!!! Let op: gebruik het apparaat nooit als het rode of oranje lampje
brandt.
{
Verplicht opladen
- Wanneer de aanbevolen rusttijd tussen elke nieuwe startpoging (3 minuten) niet gerespecteerd wordt, of als de startpoging te lang duurt (< 6 seconden), worden de kansen op
succesvol starten kleiner (risico vermogensverlies) .
- Risico op lekkage van zuur en vernietiging van de interne accu indien de voorgeschreven
tijden niet gerespecteerd worden.
- Wanneer het voertuig niet start, betekent dat niet altijd dat de accu in slechte staat verkeert : De oorzaak van het probleem kan ook in de dynamo, de gloeibougie, of ergens
anders liggen...
Waarschuwing : Kans op explosie of zuurprojectie wanneer een 12V booster
aangesloten wordt op een 24V voertuig.
Waarschuwing : Gevaarlijke situaties kunnen ontstaan in geval van kortsluiting
van de klemmen.
• Zet opnieuw de schakelaar op «OFF».
45
Page 46

Vertaling van de oorspronkelijke gebruiksaanwijzing
GYSPACK AIR
• Koppel eerst de zwarte klem en daarna de rode klem van het voertuig los.
• Laadt uw GYSPACK AIR na gebruik op. (zie paragraaf opladen)
OPLADEN VAN DE INTERNE ACCU MET BEHULP VAN EEN OPLADER.
De GYSPACK AIR heeft een automatische lader die oplaadt en tevens de interne accu 100% opgeladen houdt zonder
toezicht. Dankzij het Floating system verlopen het einde van de laadcyclus, en vervolgens het laden om het niveau van
de accu op peil te houden, geheel automatisch.
Voor het opladen van de GYSPACK AIR :
• Plaats de GYSPACK AIR verticaal tijdens het laden.
• Sluit de voedingskabel aan op een 230V netspanning en aan de voorzijde van de GYSPACKn AIR (n°2 g p.41).
• Het groene lampje geeft aan dat de GYSPACK AIR opgeladen is.
Nb: Wanneer het apparaat langer dan 24 uur oplaadt (rode of oranje lampje brandt), stoppen met laden. De interne
accu van uw GYSPACK AIR is beschadigd.
GEBRUIK VAN GYSPACK AIRALS VOEDINGSBRON 12V D<T4/> C
De sigarettenaansteker-plug is beveiligd door een geïntegreerde 20 A thermische beveiliging. In geval
van oververhitting ten gevolge van overbelasting kan deze de voeding onderbreken.
NL
Zet de schakelaar op «OFF».
Verwijder de dop van de 12 V DC sigarettenaansteker (n°1 g p. 65).
Plaats de kabelvan uw elektrisch apparaat (kabel niet meegeleverd) in de sigarettenaansteker van de GYSPACK AIR.
Geschatte gebruikstijd van GYSPACK AIR <t2/> als 12V CC-bron
Apparaat Verbruik in wat (schatting) Geschatte tijd in uren
Cell TL-buis 4 50
Radio, Ventilator, Dieptemeter 9 22
Camcorder, videorecorder, projector 15 13
Elektrisch gereedschap, lenspomp 24 8
Compressor, auto stofzuiger 80 2
HULPLICHT
De GYSPACK AIR is uitgerust met een 7 hoge helderheid LED-lamp. Met de nabije knop «LIGHT» kunt u die aanzetten
(n°11 g p. 65). In het geval van storing kan alleen een bevoegde dienst dit onderdeel repareren of vervangen.
COMPRESSOR
GYSPACK AIR, bevat een 4 bar compressor, die het mogelijk maakt om :
• banden op te pompen, dankzij het originele mondstuk. ( hendel omlaag doen om de slang op
het ventiel vast te zetten).
• ballen op te pompen.
• diverse andere plastic artikelen (strandballen, speelgoed, luchtbedden enz.) op te pompen dankzij een bijgeleverd mondstukje.
Gebruik
• Zet, voor gebruik van de compressor, de schakelaar van de GYSPACK AIR op «o».
• Druk op de startknop om de compressor op te starten
Nb : De compressor mag maximaal 10 minuten werken.
Alvorens de compressor opnieuw te gebruiken, 10 minuten wachten om af te laten koelen.
• De manometer geeft de luchtdruk aan.
• Zet de compressor uit wanneer de gewenste luchtdruk is bereikt.
46
Page 47

Vertaling van de oorspronkelijke gebruiksaanwijzing
GYSPACK AIR
GEBRUIK VAN KABELS VOOR SIGARETTENAANSTEKERS
Dit type kabels voor sigarettenaanstekers zijn enkel geschikt voor een gebruik tot
10A. Deze kabels, die samen met bepaalde GYSPACK opladers worden verkocht,
zijn UITSLUITEND bestemd voor het realiseren van een geheugen-back up. Ieder
ander gebruik kan gevaarlijk zijn.
Waarschuwing : brandgevaar ! Het wordt sterk afgeraden om
de kabels te gebruiken voor bijvoorbeeld het uitvoeren van
een startprocedure, of als 12V elektrische voedingskabel.
AFWIJKINGEN, OORZAKEN, OPLOSSINGEN
Afwijkingen Oorzaken Oplossingen
Het apparaat laat een geluidssignaal
horen.
Vonken verschijnen op het moment
dat de klemmen in contact komen met
de accu.
Het apparaat kan het voertuig niet opstarten.
Het apparaat kan het voertuig niet
opstarten. Eén van de rode of oranje
LEDlampjes van het apparaat gaat
branden in de "Test"module.
Het apparaat kan het voertuig niet
meer opstarten en geen enkel LEDlampje gaat branden in de "Test"
module.
Het opladen van de interne accu start
niet op (geen enkel LEDlampje van de
laadtoestand gaat branden).
Na een dag laden gaat het lampje
"einde laden" niet branden.
De booster levert geen stroom meer in
de 12V externe voedingsbron module.
De lamp gaat niet branden. De accu van het apparaat is ontladen. Laad het apparaat op, wacht tot het
De luchtcompressor start niet.
Het apparaat heeft een polariteitsomwisseling gedetecteerd.
De schakelaar staat op «ON». Zet, voor het aansluiten van de klem-
Polariteitsinversie van de klemmen van
het apparaat op de accu van het voertuig.
De schakelaar staat op OFF. Zet de schakelaar op ON.
De accu van het apparaat is ontladen. Laad het apparaat op, wacht tot het
Meerdere opstartpogingen zonder
pauze.
De accuspanning is niet geschikt. Controleer of de spanning van de accu
De accuspanning van de interne accu's
is zeer laag. Mogelijk zijn de accu's
beschadigd.
De interne accu is beschadigd en kan
niet worden opgeladen.
De stekker van de externe lader is niet
correct aangesloten op het stopcontact
van het apparaat;
De interne accu is beschadigd en kan
niet opgeladen worden.
De interne thermische schakelaar
heeft de stroomvoorziening onderbroken.
Controleer de polariteit van de accu.
men op de accu, de schakelaar op
OFF.
Controleer de polariteit van de accu.
einde van de laadprocedure en probeer
opnieuw.
Wacht 3 minuten tussen 2 opstartpogingen. Het opstarten mag niet langer
dan 6 seconden duren.
van het voertuig 12V is.
Laad het apparaat weer op, om te pro-
beren de accu te herstellen.
Neem contact op met de after-sales
dienst van GYS om de accu te vervangen.
Controleer of de stekker van de lader
goed is aangesloten op het apparaat.
Neem contact op met de after-sales
dienst van GYS om de accu's te vervangen.
Koppel het externe apparaat dat is
aangesloten is op de booster los, en
wacht tot de stroomonderbreker zich
weer automatisch inschakelt.
einde van de laadprocedure en probeer
opnieuw.
NL
GEEN GARANTIE OP DE ACCU
De accu’s zijn de actieve elementen, hun levensduur is afhankelijk van het onderhoud. Het is verplicht om de interne
accu’s na elk gebruik op te laden. Opslag op plaatsen met hoge temperaturen vermindert drastisch laadniveau van
de accu. In het geval van langdurig niet-gebruik, is het sterk aanbevolen om de accu’s op te laden voor gebruik.
Over het algemeen, is het aan te raden om het product voortdurend aangesloten te laten om de accu’s op hun best
prestatieniveau te behouden.
Dit product is uitgerust met 2 high performance accu’s die in het geval van het niet opvolgen van het
onderhoudsadvies, na verloop van tijd onomkeerbaar beschadigd kunnen raken.
Voor deze reden, vallen de dure accu’s van de GYSPACK niet onder garantie.
47
Page 48

Vertaling van de oorspronkelijke gebruiksaanwijzing
GYSPACK AIR
GARANTIE
De garantie dekt alle gebreken en fabricagefouten gedurende twee jaar vanaf de aankoopdatum (onderdelen en
arbeidsloon).
De garantie dekt niet :
• Alle overige schade als gevolg van vervoer.
• De gebruikelijke slijtage van onderdelen (Bijvoorbeeld : kabels, klemmen, enz.).
• Incidenten als gevolg van verkeerd gebruik (verkeerde elektrische voeding, vallen, ontmanteling).
• Gebreken ten gevolge van de gebruiksomgeving (vervuiling, roe, of).
In geval van oring moet het apparaat teruggeuurd worden naar uw diributeur, samen met:
- Een gedateerd aankoopbewijs (betaalbewijs, factuur ...).
- Een beschrijving van de oring.
VERVANGEN VAN DE ACCU
NL
1
2
Product Accu Type Spanning (V) Capaciteit (Ah) Afmetingen (cm) Referentie accu
GYSPACK AIR 6FM - 18 Loodaccu 12 18 33 x 14 x 35 53139
Om de accu te vervangen :
• Het apparaat moet van te voren van het elektriciteitsnet afgekoppeld worden.
• Schroef eerst de achterste kap los (15 schroeven) en neem deze af.
• Wanneer de achterste kap is weggehaald, bevindt de accu zich aan de voorkant (zie illustratie). De accu is verbonden
aan de aansluiting van de GYSPACK op twee punten : aan de negatieve - pool (zie illustratie 1) en aan de positieve +
pool (zie illustratie 2). Om de accu af te koppelen, verwijdert u de twee schroeven die de verbinding tussen de accu
en de overige aansluitingen van de GYSPACK mogelijk maken op het niveau van de aansluitpunten + en -.
Let, bij het plaatsen van een nieuwe accu, goed op dat u de polariteiten van de accu en de
GYSPACK AIR respecteert. - pool links, + pool rechts (zie illustratie). Plaats de twee schroeven
en sluitringen weer terug, draai de moeren vast (aanbevolen aanhaalmoment 4 Nm).
• Draai de achterste kap weer vast.
48
Page 49
Traduzione delle istruzioni originali
ISTRUZIONI DI SICUREZZA
Questo manuale descrive il funzionamento
del carica-batterie e le precauzioni da se-
guire per vostra sicurezza. Leggere attentamente prima dell’uso e conservare con
cura per poter consultarlo successivamente.
Queste istruzioni devono essere lette e com-
prese prima dell’uso. Ogni modica o manu-
tenzione non indicata nel manuale non deve
essere effettuata. Ogni danno corporale o
materiale dovuto ad un uso non conforme
alle istruzioni presenti in questo manuale non
GYSPACK AIR
IT
potrà essere considerata a carico del fabbricante. In caso di problema o d’incertezza, si
prega di consultare una persona qualicata
per manipolare correttamente il dispositivo.
Questo dispositivo deve essere usato soltanto per fare la ricarica e/o riavvio e/o alimentazione entro i limiti indicati sul disposi-
tivo e su questo manuale. Bisogna rispettare
le istruzioni relative alla sicurezza. In caso di
uso inadeguato o pericoloso, il fabbricante
non potrà essere ritenuto responsabile.
Dispositivo da usare all'interno. Non deve
essere esposto alla pioggia (caricabatterie).
Questo dispositivo può essere usato da bambini di età superiore a 8 anni, da persone con
capacità siche, sensoriali o mentali ridotte e
da persone senza esperienza o conoscenze,
se esse sono correttamente sorvegliate o se le
istruzioni relative all’uso del dispositivo in sicurezza gli sono state trasmesse e che i rischi
intrapresi sono stati presi in considerazione. I
bambini non devono giocare con il dispositivo.
Le pulizie e la manutenzione fati dall’utente
non devono essere effettuati da bambini non
sorvegliati.
49
Page 50

Traduzione delle istruzioni originali
GYSPACK AIR
IT
Usare esclusivamente il caricabatterie fornito
con il dispositivo per ricaricare la batteria
Non usare il dispositivo se il cavo di alimentazione o la presa sono danneggiati.
Non caricare mai una batteria ghiacciata o
danneggiata.
Non coprire il dispositivo.
Non spostare il dispositivo in prossimità di
fonti di calore e temperature spesso elevate
(superiori a 50°C).
Non ostruire le aperture della ventilazione.
Riferirsi alla parte installazione prima di
usare il dispositivo.
Il modo di funzionamento automatico così
come le restrizioni applicabili all’uso sono
spiegate in seguito su questo manuale.
Pericolo di esplosione o proiezione di acido
in caso di corto circuito delle pinze o in caso
di collegamento del booster a 12 V su un
veicolo a 24 V o viceversa.
Rischio di esplosione e d’incendio!
Una batteria in carica può emettere dei gas
esplosivi.
• Durante la carica, la batteria deve essere
messa in un luogo ben ventilato.
50
• Evitare amme e scintille. Non fumare.
• Proteggere le supercie della batteria da
corto-circuiti.
Rischio di proiezioni acide!
• Portare occhiali e guanti di protezione.
• In caso di contatto con gli occhi o con
la pelle, sciacquare abbondantemente e
consultare un medico immediatamente.
Page 51

Traduzione delle istruzioni originali
GYSPACK AIR
IT
Conexão / desconexão :
• Desconectar a alimentação antes de conectar ou desconectar as conexões da bateria.
• O terminal da bateria não conectado au
chassis deve ser conectato em primeiro
lugar. A outra conexão deve ser feira no
chassis longe da bateria e da canalização do combustível. O carregador de bateria deve então ser conectado à rede.
• Após a operação de carga, desconectar
o carregador de bateria da rede e em
seguida retirar a conexão do chassis; en-
m, retirar a conexão da bateria, na or-
dem indicada.
Collegamento:
• Aparelho de classe II (caricatore di richiamo).
• Dispositivo di classe III (ripetitore).
• Il collegamento alla rete di alimentazione
deve essere fatta in conformità con le regole d’installazione nazionali.
Manutenzione:
• La manutenzione deve essere effettuata
da una persona qualicata.
• Attenzione! Scollegare sempre la spina
dalla presa prima di effettuare ogni
manipolazione sul dispositivo
(caricabatterie & booster).
• Regularmente retirar a tampa e limpar o
pó usando um soprador. Aproveitar para
vericar a xação das conexões elétricas
com uma ferramenta isolada e por pessoal qualicado.
• Non usare in nessun caso solventi o altri
prodotti pulenti aggressivi.
51
Page 52

Traduzione delle istruzioni originali
GYSPACK AIR
IT
• Pulire le superci del dispositivo con uno
straccio secco.
Regolamentazione:
• Dispositivo in conformità con le direttive
europee
• La dichiarazione di conformità è disponibile
sul nostro sito internet.
• Marca di conformità EAC (Comunità
Economica Eurasiatica)
• Materiale conforme alla esigenze
britanniche. La dichiarazione di
conformità britannica è disponibile sul
nostro sito (vedere pagina di copertina).
• Materiale conforme alle normative
marocchine. La dichiarazione Cم (CMIM)
di conformità è disponibile sul nostro sito
(vedi scheda del prodotto)
• Scarto:
• Este material é sujeito a coleta seletiva.
Não jogar no lixo doméstico.
• L’accumulatore elettrico presente sul dispositivo è riciclabile. Si prega di procedere in conformità con le prescrizioni di
riciclaggio in vigore.
• La batteria deve essere ritirata dal dispo-
52
sitivo prima che quest’ultimo sia scartato.
• Il dispositivo deve essere imperativamente
scollegato dalla rete elettrica prima di ritirare la batteria.
Page 53
Traduzione delle istruzioni originali
GYSPACK AIR
DESCRIZIONE GENERALE
La batteria interna ad alte prestazioni permette allo GYSPACK AIR di orire 5 funzioni:
• Test della batteria
• Instant Start (1250 A picco /480 A) da veicolo equipaggiato con batteria al piombo 12V (Gel o Liquido elettrolita).
• Compressore a 4 Bar (13 L/min) per gonare ruote, palloni ...
• 12 V DC rete elettrica, per la fornitura di luce, TV, accessori, etc…
• Luce in più
Per assicurare condizioni di lavoro ottimali e ottimizzare la durabilità della batteria interna, è
importante ricaricarlo dopo ogni uso, e lasciarlo collegato no all’uso sucessivo.
FUNZIONE TEST DELLA BATTERIA
Testare la batteria interna prima di cominciare
Per testare la batteria interna, premere e il risultato apparirà:
- Luce verde: La batteria interna è carica. L’avvio è possibile
IT
- Luce arancione:
Attenzione !!! Per favore non usare il macchinario quando la luce arancione
o rossa sono illuminate ! Dovete ricaricarlo prima.
- Luce rossa:
AVVIARE UN VEICOLO
Non scollegare la batteria dal veicolo. Il collegamento della batteria può portare alla perdita di informazioni
e eventuale impossibilità di riavviare il motore.
Il booster deve essere scoccato in posizione verticale. Qualunque altra posizione non deve essere
mantenuta che se temporanea.
Per usare GYSPACK AIR come starter, seguire quest passi:
• Disconnettere GYSPACK AIR dalla rete elettrica. Girare la chave d’accensione su OFF.
• Posizionare il commutatore su «OFF».
• Connettere il morsetto rosso al polo positivo della batteria, e il nero al polo negativo. Un avviso
acustico indicherà uninversione di carica.
• Spostare il commutatore su ON (« Accendere GYSPACK AIR»)
{
I cavi non devono toccarsi, e non devono essere messi in contatto con superci calde o
taglienti.
• Sedetevi dal lato guidatore e girate la chiave d’accensione ( 6 sec max). Se il vostro motore non
parte, aspettate 3 minuti prima di un ulteriore tentativo.
- Nel caso del non rispetto del tempo preconizzato tra ciascuna prova (3 minuti) o se la durata
di prova è troppo lunga (< 6 secondi) le probabilità di avviamento sono ridotte (rischio di
perdita di potenza).
- Rischio di perdita d’acido e di distruzione della batteria interna in caso di non rispetto delle
durate preconizzate.
- Se il veicolo non si avvia, potrebbe esserci un altro problema non relazionato alla batteria
in cattivo stato: alternatore, candela di preriscaldamento...
- Rischio di esplosione o di proiezione d’acido in caso di connessione del booster
12V su un veicolo 24V.
- Danno in caso di messa in coro-circuito dei morsetti.
• Posizionare nuovamente il commutatore su «OFF».
53
Page 54

Traduzione delle istruzioni originali
GYSPACK AIR
• Togliere il morsetto nero, e poi il quello rosso dal veicolo.
• Ricaricare GYSPACK AIR dopo l’uso. (vedere ‘Caricare batteria interna’)
CARICARE LA BATTERIA INTERNA USANDO IL CARICABATTERIE INTEGRATO
Il GYSPACK AIR possiede un caricatore automatico che carica e mantiene la batteria interna carica al 100% e senza
bisogno di sorveglianza. Infatti, grazie al suo Floating System, l’arresto a ne carica e la ripresa di carica per mantenere
il livello di carica sono operazioni automatiche.
Per ricaricare lo GYSPACK AIR :
• Posare lo GYSPACK AIR verticalmente durante la carica.
• Collegare l’alimentazione alla rete 230 V e l’altra estremità sul frontale del GYSPACK (n°2 g p. 41).
• La spia verde indica che lo GYSPACK AIR è carico.
Nb: Se il dispositivo rimane per più di 24 ore in carica (spia rossa o gialla accesa), smettere la carica. La batteria interna
del GYSPACK è danneggiata.
USO DEL GYSPACK AIR COME ALIMNETATORE ELETTRICO 12V DC
La presa accendisigari è protetta da un disgiuntore termico 20 A integrato. In caso di surriscaldamento dovuto a sovraccarica, quest’ultimo potrebbe interrompere l’alimentazione.
IT
• Posizionare il commutatore su «OFF».
Aprire la presa accendisigari rimuovere l’accendisigari e insere la presa nel foro (n°1 g p. 65).
Collegare il vostro dispositivo elettrico al GYSPACK AIR, usando il cavo adatto (non incluso).
Autonomia stimata del GYSPACK AIR come alimentatore elettrico a 12 V DC
Dispositivo Consumi Stimati (in watt) Autonomia Stimata (in ore)
Luce uorescente cellulare 4 50
Radio, Vebtilatore, sonda eco 9 22
Videocamera, punto luce 15 13
apparecchio elettrico, pompa di essicazione 24 8
Compressore d'aria, aspirapolvere auto 80 2
LUCE AUSILIARE
Il GYSPACK AIR è munito di una lampada costituita di 7 LED ad alta luminosità. Si accende grazie al tasto «LIGHT»
situato in prossimità (n°11 g p. 65).
Solo un servizio SAV competente può riparare o cambiare questo elemento in caso di guasto.
COMPRESSORE D’ARIA
GYSPACK AIR integra un compressore da 4 bar, che permette di gonare :
• Gomme con la loro valvola originale. (premere la leva per bloccare il tubo sulla valvola).
• Palloni con estremità sottile (inclusi).
• Qualsiasi altro oggetto di plastica (palloni da spiaggia, giochi, materassini ad aria, etc.) con due
speciali teminazioni «connettori»
Uso
• Girare l’interruttore principale del GYSPACK AIR su « o »
• Premere il bottone “ON” per far partire il compressore.
Nb : il compressore può lavorare al massimo per 10 min.
Per favore attendere 10 min prima di un altro uso.
• Il misuratore di usso indica la pressiomne atmosferica.
54
• Fermare il compressore quando la pressione richiesta è stata raggiunta
Page 55

Traduzione delle istruzioni originali
GYSPACK AIR
UTILIZZO DEI CAVI PER PRESA ACCENDISIGARI
Questo tipo di cavi per presa accendisigari è limitato a 10 A. Venduti con alcuni
GYSPACK, sono progettati per realizzare UNICAMENTE il salvataggio della memoria. Qualsiasi utilizzo per scopi diversi può essere dannoso.
Rischio d’incendio ! E’ fortemente sconsigliato, per esempio,
utilizzare il cavo per presa accendisigari per realizzare un
avviamento o come alimentazione elettrica 12V.
ANOMALIE, CAUSE, RIMEDI
Anomalie Cause Rimedi
Il dispositivo emette un segnale sonoro.
Delle scintille appaiono al momento
del contatto dei morsetti sulla batteria.
Il dispositivo non riesce ad avviare il
veicolo.
Il dispositivo non riesce ad avviare il
veicolo. Uno dei LED rosso o arancione
del dispositivo si accede in modalità
"Test".
Il dispositivo non riesce più ad avviare
il veicolo e nessun LED del booster si
accende in modalità "Test".
La ricarica della batteria interna non
parte (nessun LED che indiche lo stato
di carica si accende).
Dopo una giornata di carica, la spia di
ne carica non si accende.
La lampada non si accende. La batteria del dispositivo è scarica. Mettere il dispositivo sotto carica, asIl compressore d’aria non parte.
Il dispositivo riscontra un'inversione di
polarità.
Il commutatore è su “ON”. Prima di collegare i morsetti sulla bat-
Inversione di polarità dei morsetti del
dispositivo sulla batteria del veicolo.
Il commutatore è sulla posizione OFF. Posizionare il commutatore sulla po-
La batteria del dispositivo è scarica. Mettere il dispositivo sotto carica, as-
Diversi tentativi di avviamento senza
pausa.
La tensione della batteria è inadatta. Vericare che la tensione della batteria
La tensione delle batterie interne è
molto bassa. Forse sono danneggiate.
La batteria interna è danneggiata e
non può essere ricaricata.
La presa del caricabatterie esterna non
è correttamente inserita nella presa
del dispositivo.
Le batterie interne sono danneggiate e
non possono essere ricaricate.
Vericare la polarità della batteria.
teria, mettere il commutatore su OFF.
Vericare la polarità della batteria.
sizione ON.
pettare la ne della carica e riprovare.
Aspettare 3 minuti fra due tentativi.
Un avviamento non deve durare piìù di
6 secondi.
del veicolo sia 12V.
Rimettere il dispositivo in carica per
tentare un ripristino della batteria.
Contattare il servizio dopo vendita GYS
per procedere ad una sostituzione
delle batterie.
Vericare la connessione della presa
del caricabatterie sul dispositivo.
Contattare il servizio dopo vendita GYS
per procedere ad una sostituzione
delle batterie.
pettare la ne della carica e riprovare.
IT
NON GARANZIA DELLA BATTERIA
Le batterie sono degli elementi attivi, loro durata di vita varia a seconda della manutenzione. Dopo ogni uso di questo
starter, bisogna imperativamente ricaricare le batterie interne. Lo stoccaggio in luoghi a temperature elevate riduce
considerevolmente la carica delle batterie. Nel caso di non uso prolungato, si consiglia di ricaricare le batterie prima
dell’uso. In modo generale, si consiglia di lasciare il prodotto collegato alla presa di corrente permanentemente per
mantenere le batterie al loro miglior livello di performance.
Questo dispositivo è provvisto di due batterie ad alta performance che, in caso di non rispetto delle regole di manutenzione, possono deteriorarsi in modo irreversibile.
Per questa ragione le batterie dei GYSPACK, onerose, sono escluse dalla garanzia.
55
Page 56

Traduzione delle istruzioni originali
GYSPACK AIR
GARANZIA
La garanzia copre qualsiasi difetto di fabbricazione per 2 anni, a partire dalla data d’acquio (pezzi e mano d’opera).
La garanzia non copre:
• Danni dovuti al trasporto.
• La normale usura dei pezzi (Es. : cavi, morsetti, ecc.).
• Gli incidenti causati da uso improprio (errore di alimentazione, cadute, smontaggio).
• I guai legati all’ambiente (inquinamento, ruggine, polvere).
In caso di guao, rinviare il dispositivo al diributore, allegando:
- la prova d’acquio con data (scontrino, fattura...)
- una nota esplicativa del guao.
SOSTITUZIONE DELLA BATTERIA
1
IT
2
Prodotto Batteria Tipo Tensione (V) Capacità (Ah) Dimensioni (cm) Cod. batteria
GYSPACK AIR 6FM - 18 Batteria al piombo 12 18 33 x 14 x 35 53139
Sostituzione della batteria
• Il prodotto deve essere previamente scollegato dalla rete elettrica.
• Per cominciare è necessario svitare la lamiera posteriore (15 viti) e ritirarla.
• Una volta tolta la lamiera posteriore, la batteria si trova davanti (cf illustrazione). La batteria è collegata ai connettori
del GYSPACK AIR in due punti: a livello del terminale - (illustrazione 1) e del terminale + (illustrazione 2). Per
ritirarla, togliere le 2 viti che permettono il collegamento fra la batteria e il resto delle connessioni del GYSPACK AIR
a livello dei terminali + e -.
Al mettere la nuova batteria, fare attenzione ad associare correttamente le polarità della
batteria e del GYSPACK AIR. Terminale - a sinistra. terminale + a destra (cf illustrazione).
Riposizionare le 2 viti e rondelle, stringere i dadi (stringimento consigliato di 4 N.m).
• Riavvitare la lamiera posteriore.
56
Page 57
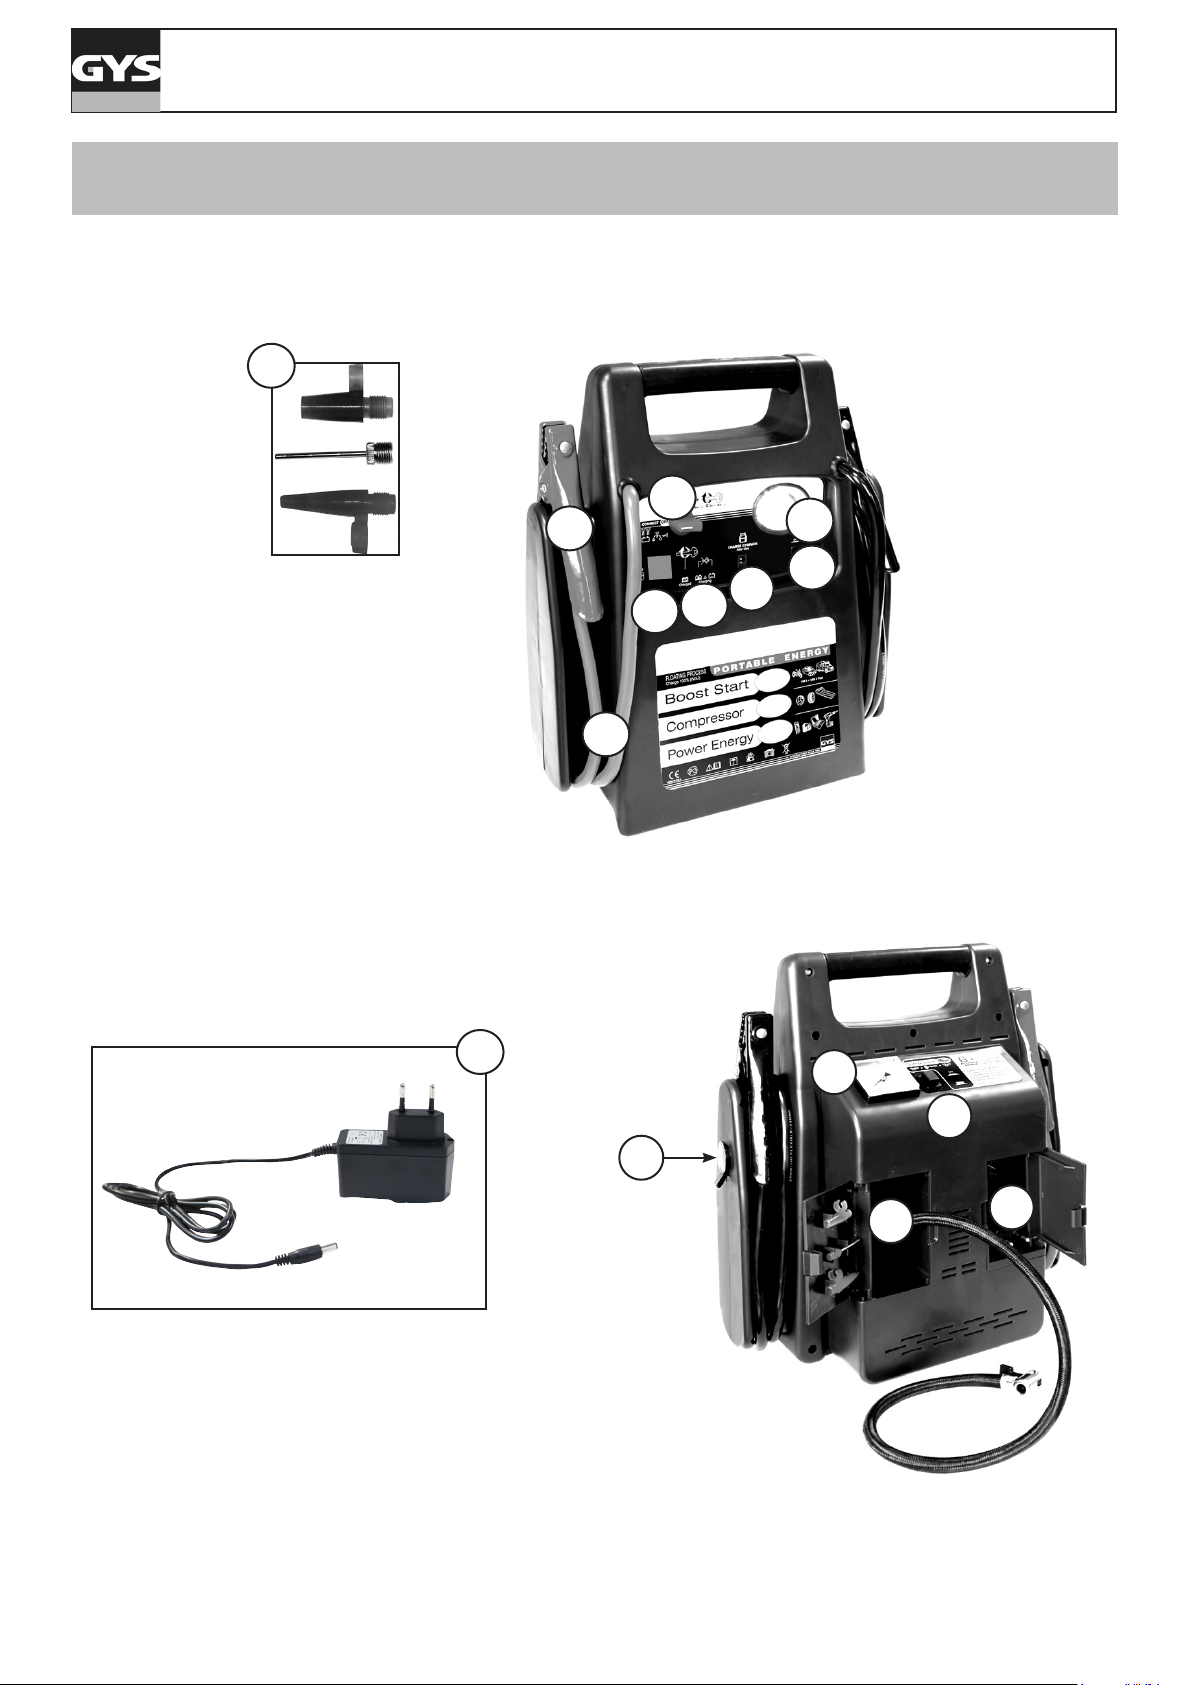
GYSPACK AIR
INTERFACE DU PRODUIT / PRODUCT INTERFACE / VORDERSEITE DES GERÄTES / INTERFAZ DEL PRODUCTO / ИНТЕРФЕЙС АППАРАТА / OMSCHRIJVING / INTERFACCIA DEL PRODOTTO/ INTERFACE DO
PRODUTO
15
7
8
9
12
10
11
2
14
13
1
3
5
4
6
57
Page 58

1
2
3
4
5
6
7
8
9
10
11
12
13
14
15
GYSPACK AIR
Sortie 12 V DC avec protection contre la surcharge / 12V DC output socket with overload protection / 12V DC Anschlussbuchse
mit Überspannungsschutz / Salida 12 V CC con protección contra la sobrecarga / Гнездо 12В DC с защитой от перегрузки /
12 V DC uitgang met beveiliging tegen overladen / Presa di uscita 12V DC con protezione sovraccarico
Réceptacle 230 V CA du câble chargeur / 230 V AC charger cord socket / Ladegerätbuchse / Receptáculo 230 V CA del cable
del encendedor / Гнездо 230В AС для кабеля зарядки / 230 V CA aansluitpunt van de laadkabel / 230 V AC presa cavo del
caricabatteria
Manomètre à air / Air pressure gauge / Druckluftanzeige / Manómetro de aire / Воздушый манометр / Luchtdrukmeter /
Manometro
Interrupteur MARCHE/ARRÊT du compresseur à air / ON/OFF air compressor switch / Ein-/ Ausschalter für Luftkompressor /
Conmutador ON/OFF del compresor de aire / Переключатель ВКЛ/ВЫКЛ воздушного компессора / AAN/UIT schakelaar van
de luchtcompressor / ON/OFF interuttore aria compressa
Rangement pour tuyau-buses / Air hose – nozzle / Druckluftschlauch mit Ventilanschluss / Alojamiento para tubo-toberas /
Отделение для трубки и насадок / Opbergruimte voor kabels / Tubo dell’aria - ugello
Rangement pour bloc chargeur/ Storage compartment for Charger/ / Ablageäche für internes Ladegerät / Alojamiento para
bloque cargador / Отделение для блока зарядки / Opbergruimte voor oplader / Scomparto per caricabatterie
Commutateur MARCHE-ARRET / ON/OFF power switch / Hauptschalter Ein/ Aus / Conmutador ON/OFF / Переключатель ВКЛ/
ВЫКЛ / AAN-UIT schakelaar / ON/OFF interuttore d’accensione
Pinces / Clamps / Anschlussklemmen / Pinces / Зажимы / Klemmen / Morsetti
Voyant charge et test batterie interne / ED Charge and battery test terminal / Ladezustandsanzeige für interne Batterie / Indi-
cador carga y test batería interna / Индикатор зарядки и тестирования внутреннего аккумулятора / Lampje laden en test
interne accu / ED Poli di carica e per il test della batteria
Lampe d’urgence-de travail / Emergency light / Notleuchte / Lámpara de urgencia-de trabajo / Аварийный фонарь / Hulplicht
- werklicht / Luce di emergenza
Interrupteur lampe d’urgence / Emergency light switch / Schalter für Notleuchte / Conmutador de lámpara de urgencia /
Переключатель авариного фонаря / Hulplicht schakelaar / Interuttore luce di emergenza
Commutateur de test / Test switch / Testschalter / Conmutador de test / Переключатель тестирования / Test schakelaar /
Interuttore di prova
Câbles haute exibilité / exible cables / Flexible Kabel / Cables de alta exibilidad / Гибкие кабели / Zeer exibele kabels /
cavo essibile
Câbles adaptateur-chargeur de 230 V / 230 V adapter - charger cord / 230V Ladegerät mit Ladekabel / Cables adaptador-car-
gador de 230 V / Адаптор-зарядка на 230В / Kabels 230V adapter-oplader / 230 V adattatore - cavo di ricarica
Adaptateurs pour tuyau d’air / Inater nozzles / Ventiladaptor / Adaptadores para tubo de aire / Насадки для воздушной
трубки / Adapters voor luchtslangen / Ugello di gonaggio
SPECIFICITÉS / SPECIFICATION / SPEZIFIKATION / CARACTERISTICAS / ОСОБЕННОСТИ / SPECIFICATIES /
SPECIFICITÀ
Batterie / Sealed battery / Interne Batterie / Batería / Аккумулятор / Accu / Batterie sigillate 12V/18Ah
Tension d’alimentation / Voltage input / Netzspannung / Tensión de alimentación/ Напряжение питания /
Netspanning / Tensione di alimentazione
Puissance nominale maximale du chargeur / Charger’s maximum nominal power / Maximum nominaler Ver-
brauch des Gerätes / Potencia nominal máxima del cargador/ Максимальная номинальная мощность заряного
устройства / Nominaal vermogen max / Potenza nominale massima del caricabatterie
Tension de charge / Charging voltage / Ladespannung / Tensión de carga / Напряжение зарядки / Laadspanning
/ Tensione di carica
Courant de charge / Charging current / Ladestrom/ Corriente de carga / Ток зарядки / Laadkracht / Corrente di
carica
Capacité nominale de charge / Nominal charging capacity / Nominale Ladekapazität/ Capacidad nominal de carga
/ Номинальная емкость заряда / Nominale laadcapaciteit / Capacià nominale della batteria
Courbe de charge / Charging curve / Ladekurve/ Curva de carga / Кривая зарядки / Laadcurve / Curva di carica WU
Température de fonctionnement / Functionning temperature / Betriebstemperaturbereich/ Temperatura de funcio-
namiento / Рабочая температура / Omgevingstemperatuur / Temperatura di funzionamento
Température de stockage / Storing temperature / Lagerungstemperature/ Temperatura de almacenamiento/
температура xpaнeния / Opslagtemperatuur / Temperatura di stoccaggio
Classe de protection / Protection rating / Schutzklasse / Clase de protección / Класс защиты / Beschermingklasse
/ Classe di protezione
Poids de l’appareil (cables compris)/ Machine weight (including all cables) / Gerätegewicht (einschließlich Kabeln)
/ Peso de la máquina (cables incluidos) / Вес аппарата (вместе с кабелями) / Gewicht van het toestel (incl.
kabels) / Peso del dispositivo (cavi compresi)
Dimension (L x l x H) / Dimensions (L x l x H) / Maße (L x B x H) / Dimensiones (L x l x H) / Размеры (Д x Ш x В)
/ Afmetingen (L x B x H) / Dimensioni (L x l x H)
100V-240V 50/60Hz
16 W
16 V
500 mA
22 Ah
-15 °C / +40 °C
-18 °C / +45 °C
IP20
10 Kg
33 cm x 17 cm x 37 cm
58
Page 59

GYSPACK AIR
SCHÉMA ÉLECTRIQUE / CIRCUIT DIAGRAM / SCHALTPLAN / DIAGRAMA ELECTRICO /
ЭЛЕКТРИЧЕСКАЯ СХЕМА / ELEKTRISCHE SCHEMA / SCEMA ELETTRICO
PIÈCES DÉTACHÉES / SPARE PARTS / ERSATZTEILE / PIEZAS DE RECAMBIO / ЗАПЧАСТИ /RESERVE
ONDERDELEN / PEZZI DI RICAMBIO
GYSPACK AIR
Batterie / Battery / Batterieladegerät / Batería / Аккумулятор / Accu / Batteria
Pressoat / Pressure switch / Druckschalter / Presoato / Прессостат / Switch / Pressoato
Syème de gonage / Air ination syem / Aufblassyem / Siema de inado / Система накачивания
/ Opblaassyteem / Siema di gonaggio
Circuit électronique de charge / Electronic circuit charge / Ladeplatine / Circuito electrónico de carga /
Электронная плата зарядки / Elektronisch laadcircuit / Circuito elettronico di carica
Chargeur GYSPACK / GYSPACK charger / GYSPACK Ladegerät / Cargador GYSPACK / Зарядное
устройство GYSPACK / Lader GYSPACK / Carica batterie GYSPACK
Syème d’éclairage / Lighting syem / Beleuchtungssyem / Siema de iluminación / Система
освещения / Verlichtingssyeem / Siema d’illuminazione
Bouton poussoir (lumière ou compresseur) / Push-button (light or compressor) / Taer (Licht oder
Kompressor) / Interruptor de batería / Нажимная кнопка (освещение или компрессор) / Drukknop
(licht of compressor) / Pulsante (luce o compressore)
Coupe batterie / Battery breaker / Batterieschalter / Carcasa de pláico delantera / Прерыватель
аккумулятора / Accu schakelaar / Interruttore
Poignée / Handle / Handgri / Mango / Ручка / Handvat / Impugnatura
53139 (18Ah)
53201
53202
53197
054677
53200
53198
53199
56153
59
Page 60

GYSPACK AIR
ICÔNES BATTERIE / BATTERY ICONS / BATTERIE-SYMBOLE / ICONOS BATERÍAS / СИМВОЛЫ АКБ /
ICONEN ACCU’S / ICONA BATTERIE
Éviter les ammes et les étincelles. Ne pas fumer. / Keep away from ames and sparks. Do not smoke. / Vermeiden Sie
das Entstehen von Funken und Flammen. Nicht Rauchen. / Evite las llamas y las chispas. No fume. / Избегайте
пламени и искр. Не курить. / Vermijd vlammen en vonken. Niet roken. / Evitare amme e scintille. Non fumare.
Risque de choc électrique. / Risk of electric shock. / Es besteht die Gefahr eines elektrischen Schlags. / Riesgo de
choque eléctrico. / Риск удара электрическим током. / Risico op elektrische schokken. / Rischio di scosse elettriche.
Ne pas laisser les enfants manipuler la batterie. / Do not let children handle the battery. / Halten Sie Kinder von den
Batterien fern. / No deje que los niños manipulen la batería. / Не давать детям трогать АКБ. / De accu buiten het
bereik van kinderen houden. / Non lasciare che i bambini manipolino la batteria.
SYMBOLES / SYMBOLS / ZEICHNENERKLÄRUNG / SÍMBOLOS / СИМБОЛЫ / SYMBOLEN / SIMBOLI
Produit recyclable qui relève d’une consigne de tri (selon le décret n°2014-1577) / Recyclable product that falls within
waste sorting recommendations (according to Decree n° 2014-1577). / Recyclingprodukt, der durch Mülltrennung
entsorgt werden muss. (gemäß Dekret n°2014-1577). / Producto reciclable que requiere una separación determi-
nada (según el Decreto n°2014-1577). / Перерабатываемый продукт, подпадаемый под определенные правила
сортировки (Декретом № 2014-1577). / Prodotto riciclabile soggetto a raccolta selettiva.
Protégé contre l’accès aux parties dangereuses des corps solides de diam>12,5mm (équivalent doigt de la main). /
Protected against ngers access to dangerous parts. / Schutz vor Eindringen von festen Fremdkörpern (Durchmesser
>12,5mm = Finger einer Hand). Schutz gegen Berühren mit einem Finger und senkrecht fallendes Tropfwasser. /
protegido contra el acceso a partes peligrosas con el dedo, y contra las caídas verticales de gotas de agua. / Защищен
против доступа твердых тел диаметром > 12,5 мм (размером с палец руки) в опасные места. Защищен против
доступа пальцев в опасные места и против вертикального попадания капель воды. / Beschermd tegen toegang
tot gevaarlijke delen met een vinger en tegen verticaal vallende waterdruppels. / Aree Pericolose protette per impedire
il contatto con l’utente, e contro cadute verticali di gocce d’acqua.
< 50dB
Niveau de bruit / Noise level / Störpegel / Nivel de ruido / Уровень шума / Geluidsniveau / Livello di rumore
Prise de raccordement du chargeur. / Charger connection plug / Ladegerät-Anschlussbuchse / Enchufe de connexion
del cargador. / Гнездо для подключения зарядного устройства / lader aansluitbus / Presa di collegamento caricabatterie
60
GYS SAS
1, rue de la Croix des Landes
CS 54159
53941 SAINT-BERTHEVIN Cedex
FRANCE
 Loading...