

Page 1
Rev.2
GZ-UM-406E(2017.12.01.)
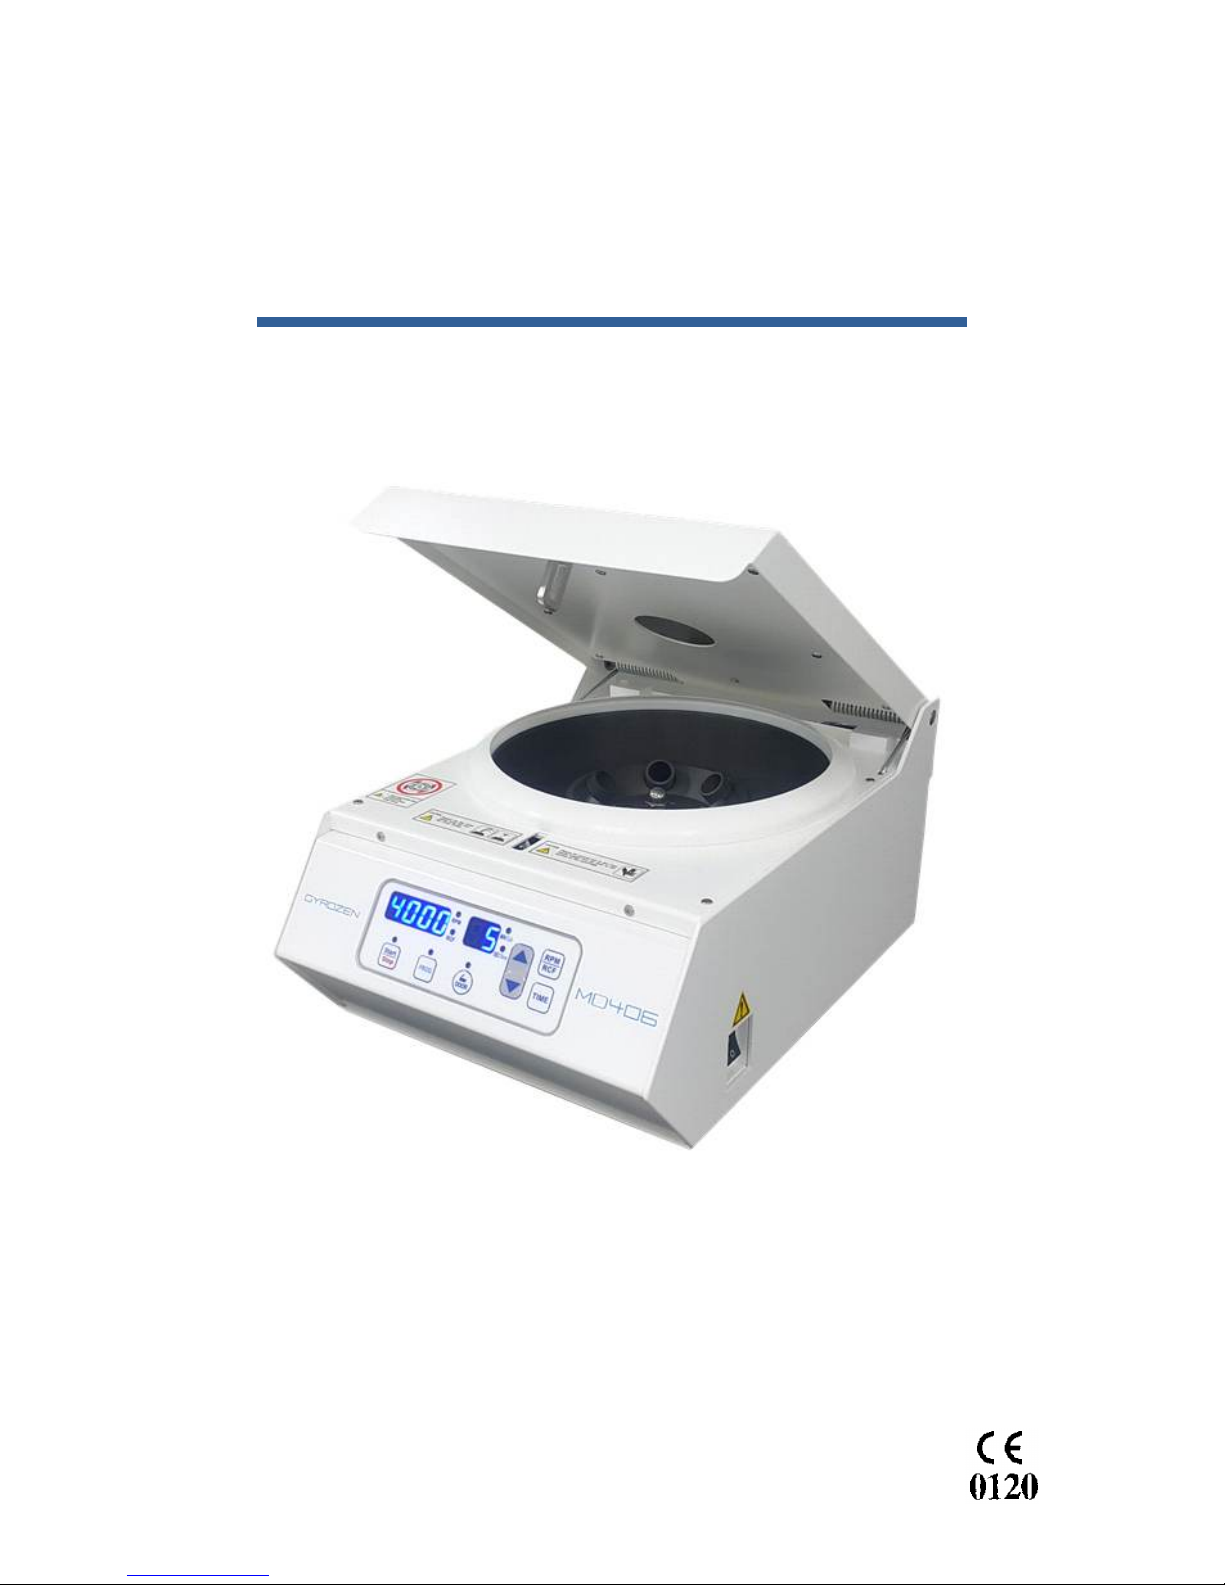
Low Speed Centrifuge
406(MD406)
User's Manual
Gyrozen Co., Ltd.
1F, 4F, B2 B-Station, 30-12, Gyeryong-ro 141beon-gil,
Yuseong-gu, Daejeon, Korea
Tel) +82(42)719-8200 Fax) +82(42)826-9848
Page 2

Rev.2
GZ-UM-406E(2017.12.01)
Page. 1 / 16
MembraPure GmbH
B-Station, 30-12, Gyeryong-ro 141beon-gil,
Yuseong-gu, 1F, 4F, B2 Daejeon, Korea
Tel) +82(42)719-8200
Fax) +82(42)826-9848
Neuendorfstr 20a 16761 Hennigsdorf, Berlin,
Germany
Tel) +49-3302-2023500
▶ Device Name_ Centrifuge
▶ Model Name_ 406(MD406)
▶ Manufacturer_ Gyrozen Co., Ltd.
▶ Contact_ 1F, 4F, B2 B-Station, 30-12, Gyeryong-ro 141beon-gil, Yuseong-gu, Daejeon,
Korea Tel) +82(42)719-8200 Fax) +82(42)826-9848
▶ Intended use_ This device is used for centrifugation of blood to prepare it for transfusion or
autotransfusion.
▶ Warnings before use_ This device is only for professional use. Anyone without proper knowledge
is not allowed to use this device.
▶ Overview
These devices are used for centrifugation of blood to prepare it for transfusion or autotransfusion.
Their bodies are composed of chambers, upper doors, motors and rotors. For this model, there is
only one compatible rotor, an angle rotor(Model name : GRA-15-6A).
Page 3
Rev.2
GZ-UM-406E(2017.12.01)
Page. 2 / 16
MembraPure GmbH
B-Station, 30-12, Gyeryong-ro 141beon-gil,
Yuseong-gu, 1F, 4F, B2 Daejeon, Korea
Tel) +82(42)719-8200
Fax) +82(42)826-9848
Neuendorfstr 20a 16761 Hennigsdorf, Berlin,
Germany
Tel) +49-3302-2023500
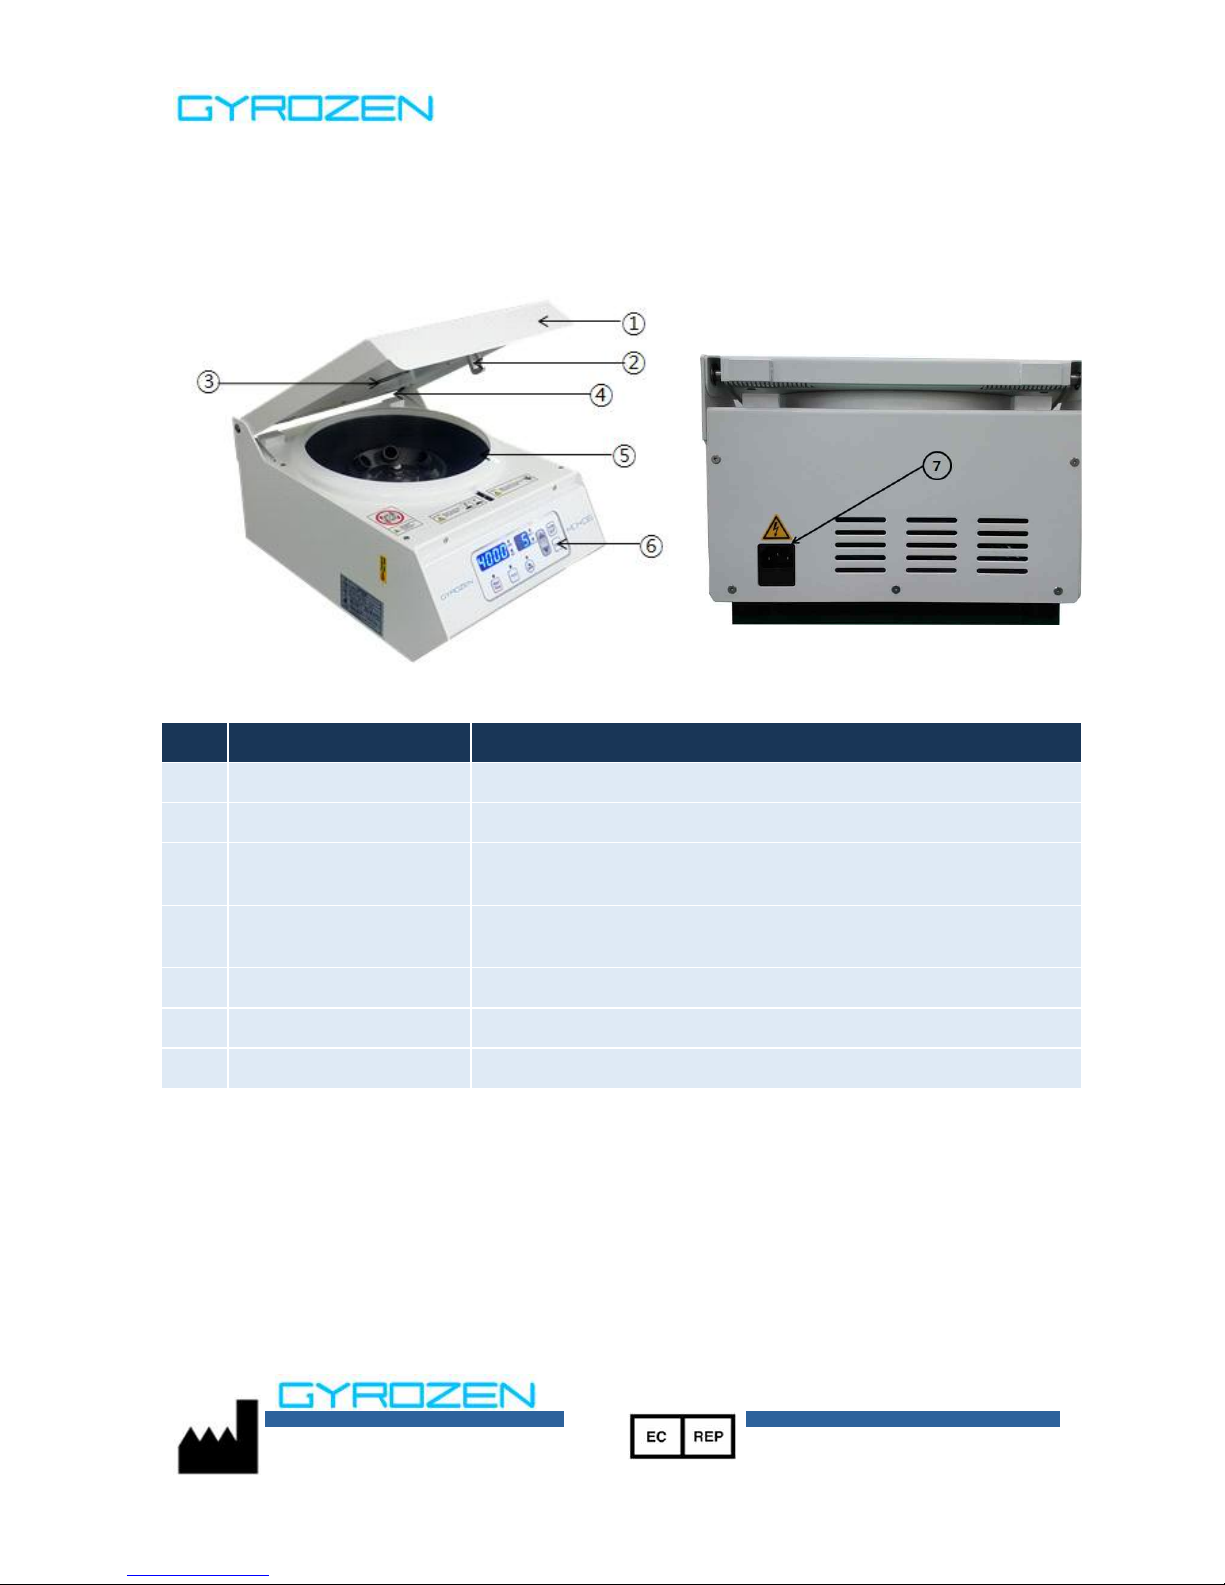
NO
NAME
DESCRIPTION
1
Door
Used to protect the inside chamber
2
Door Striker
A lock to keep the door closed
3
Air vent and Window
To keep the inside of the device cool and to check rotation
speed
4
Spring hinge
To help users to open the door conveniently and keep the door
opened
5
Chamber
Space for the rotor to rotate
6
Control panel
To set rotation time and speed
7
AC inlet
To supply power to the device
▶ Description
1) Main body
Page 4
Rev.2
GZ-UM-406E(2017.12.01)
Page. 3 / 16
MembraPure GmbH
B-Station, 30-12, Gyeryong-ro 141beon-gil,
Yuseong-gu, 1F, 4F, B2 Daejeon, Korea
Tel) +82(42)719-8200
Fax) +82(42)826-9848
Neuendorfstr 20a 16761 Hennigsdorf, Berlin,
Germany
Tel) +49-3302-2023500
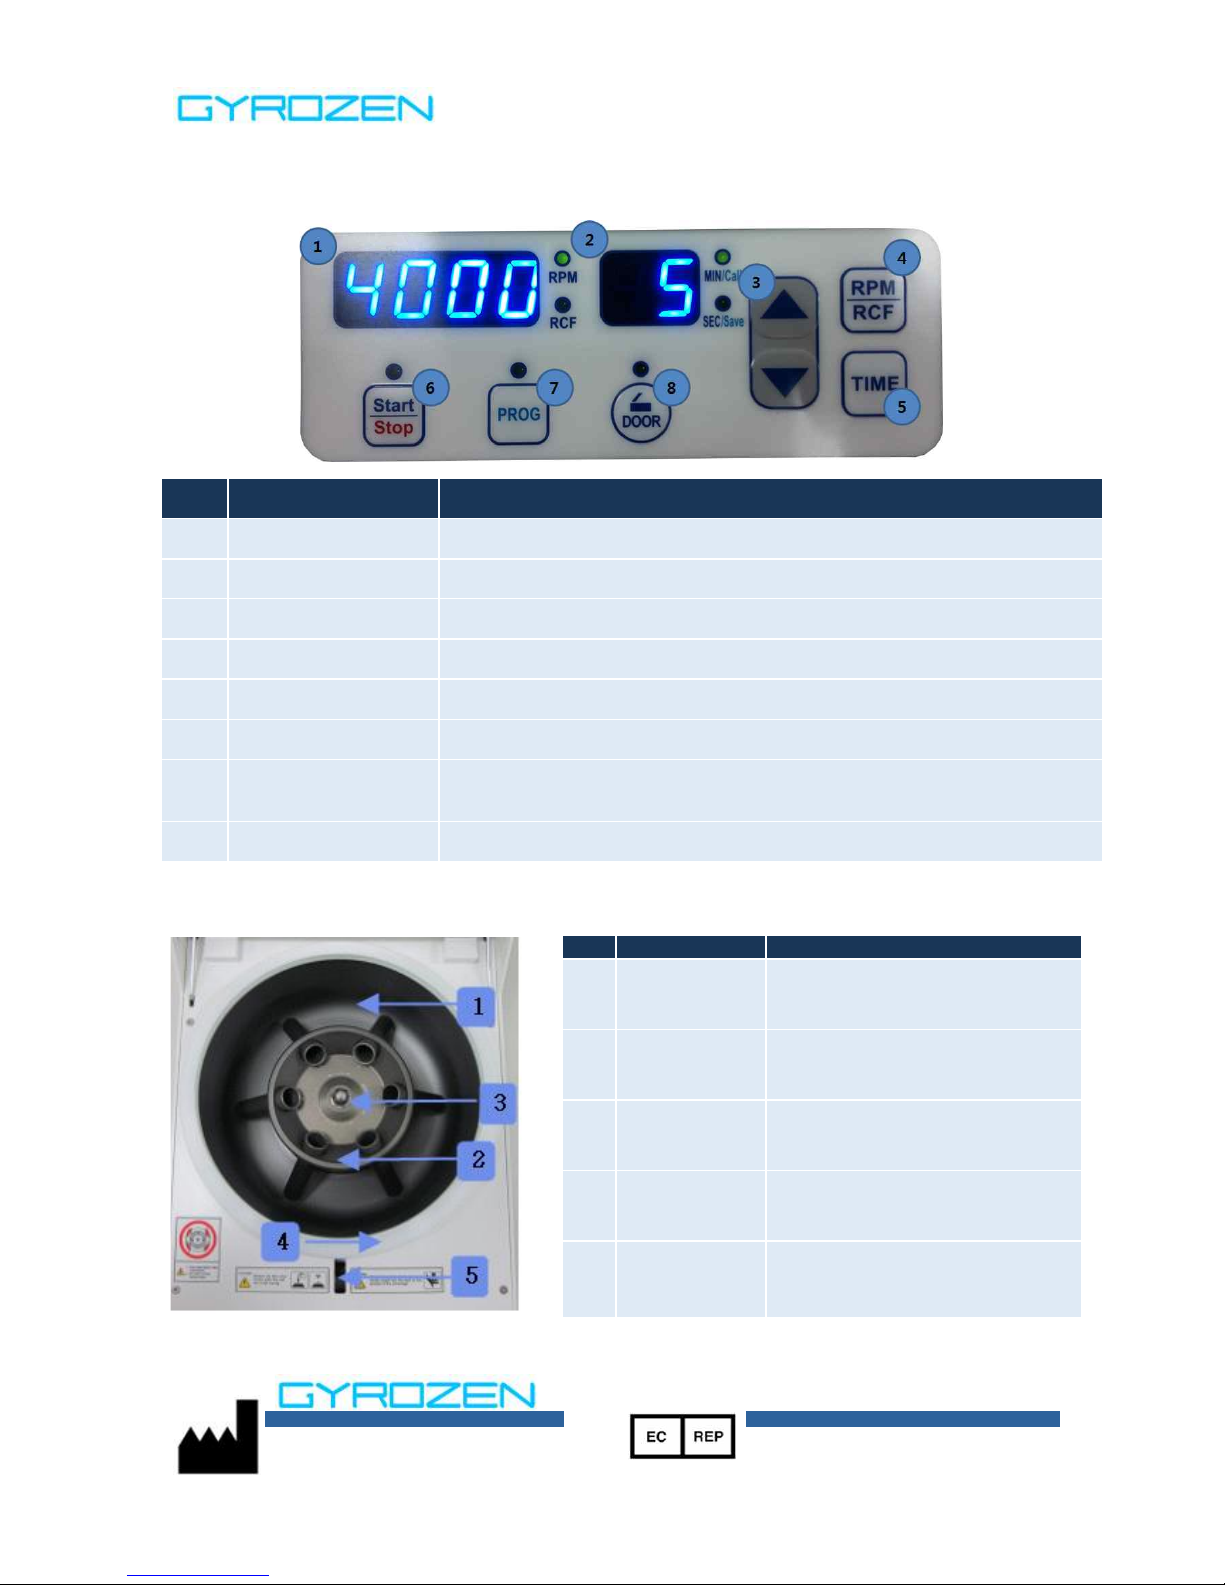
NO
NAME
DESCRIPTION
1
FND Display
Shows the data of each function
2
Time Display
Shows the time setting
3
Up & down arrow
Uses to change input data
4
RPM/RCF
Uses to switch the RPM/RCF display
5
TIME
Uses to set test time up to 99 min 59 sec (00 : continuous)
6
START/STOP
Uses to start and stop operation
7
PROG
Uses to save a set of setting values or call the saves setting values
8
DOOR
Uses to open the door
NO
NAME
DESCRIPTION
1
Chamber
A space for the rotor to rotate
2
Door striker
hole
Uses to insert the door striker
for locking the door
3
Door packing
Uses to prevent the air coming
inside of the device
4
Rotor
Rotates for centrifugation
5
Rotor lock
Uses to fix the rotor to the
motor shaft
2) Control panel
3) Inside of the chamber
Page 5
Rev.2
GZ-UM-406E(2017.12.01)
Page. 4 / 16
MembraPure GmbH
B-Station, 30-12, Gyeryong-ro 141beon-gil,
Yuseong-gu, 1F, 4F, B2 Daejeon, Korea
Tel) +82(42)719-8200
Fax) +82(42)826-9848
Neuendorfstr 20a 16761 Hennigsdorf, Berlin,
Germany
Tel) +49-3302-2023500
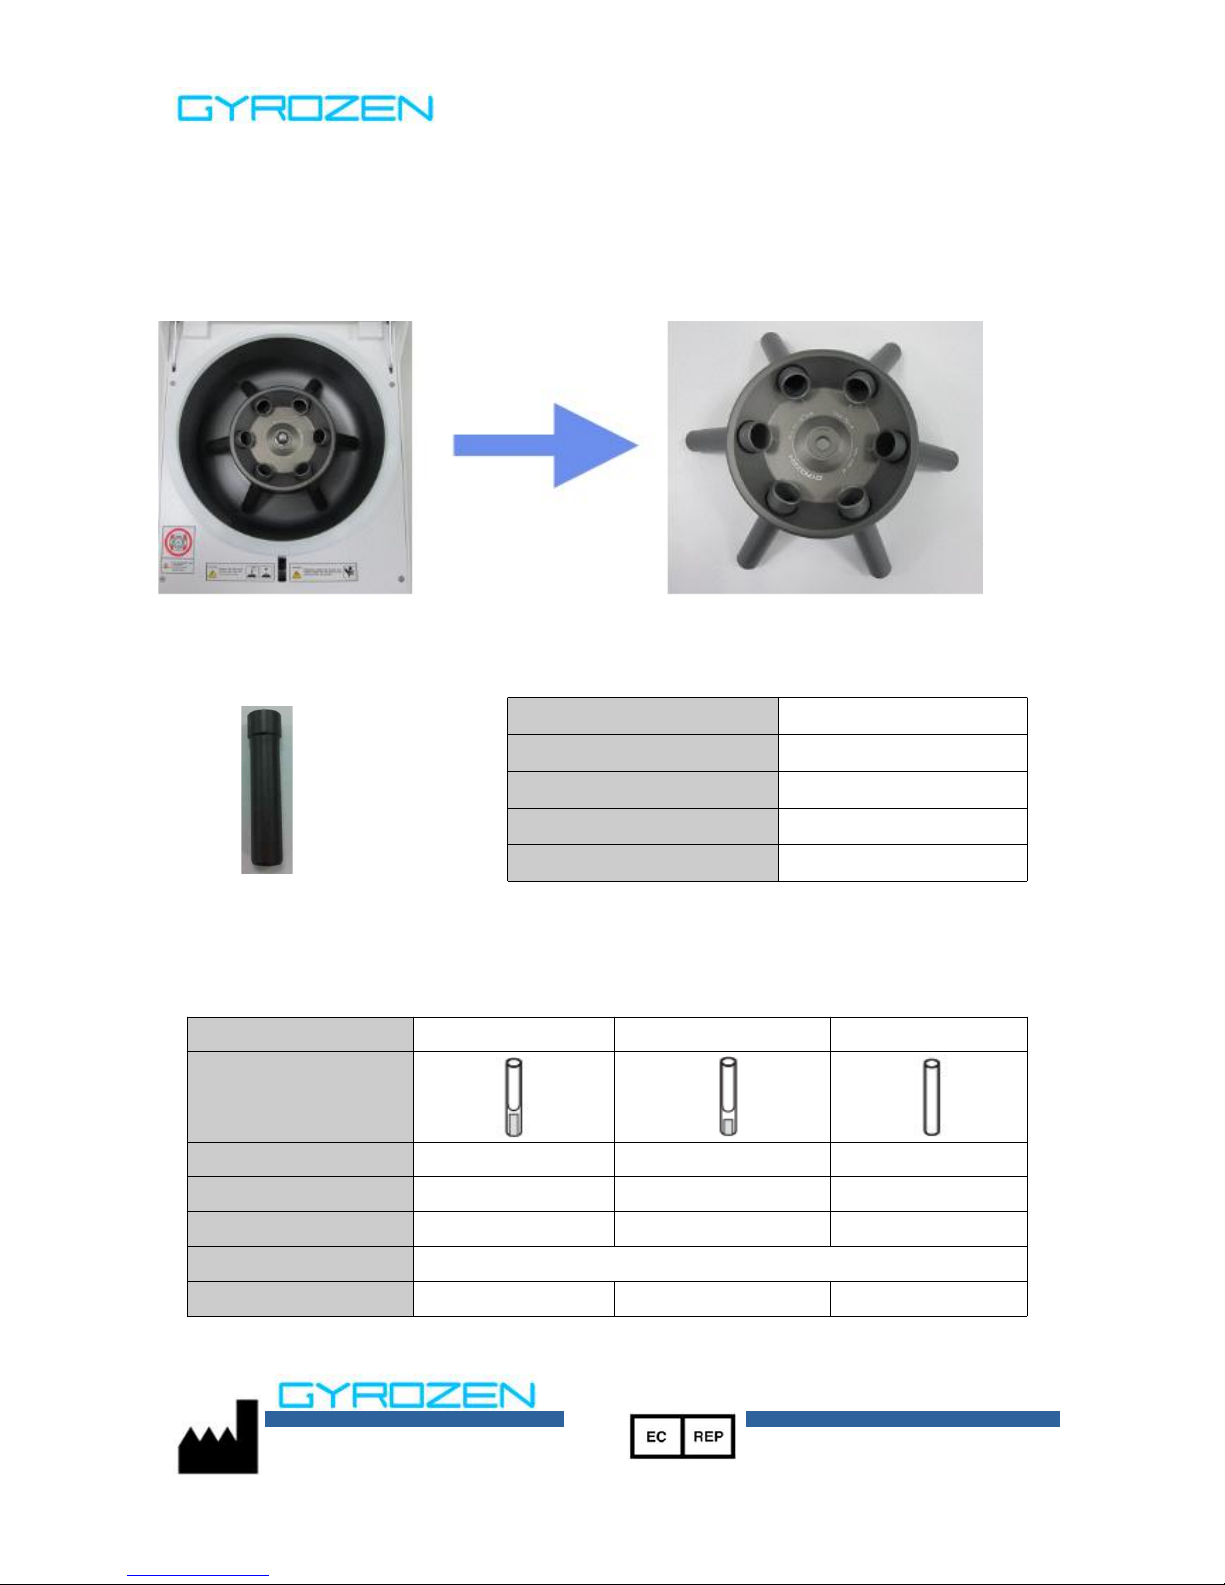
Model Name
GLB-15A-FA
Bucket bore (Ø×L, ㎜)
18 x 90
Radius (㎜)
116
Max RPM
4,000
Max RCF (g-force)
2,075
Model Name
GAS-3(15)
GAS-4(15)
GAS-5(15)
Image
Tube capacity (㎖)
345
Adaptor bore (Ø×L, ㎜)
13.5 × 61
13.5 × 65
13.5 × 85
Radius (㎜)
95.5
98.5
111
Max RPM
4,000
Max RCF (g-force)
1,703
1,762
1,986
4) Rotor
① Angle rotor (GRA-15-6A): GRA-15-6A is a basic rotor for 406 (MD406), and users can
insert 6 tubes to the rotor. The rotor can be easily inserted and removed from the main
body.
② Aluminum sleeve (GLB-15A-FA): Sleeves made of aluminum are inserted to a rotor and a
tube containing a blood sample is put into each sleeve. The maximum capacity of each
sleeve is 15㎖.
③ Adaptor: If users want to use tubes of which capacity is less than 15㎖, they will have to use
adaptors with sleeves. There are three types of adaptors for a GLB-15A-FA sleeve as
following.
Page 6

Rev.2
GZ-UM-406E(2017.12.01)
Page. 5 / 16
MembraPure GmbH
B-Station, 30-12, Gyeryong-ro 141beon-gil,
Yuseong-gu, 1F, 4F, B2 Daejeon, Korea
Tel) +82(42)719-8200
Fax) +82(42)826-9848
Neuendorfstr 20a 16761 Hennigsdorf, Berlin,
Germany
Tel) +49-3302-2023500
▶ Check delivered items
Check if there is every component. The delivery list is followed.
① Main body, 1ea
② Power cable, 1ea
③ Emergency door open tool, 1ea
④ User’s manual, 1ea
⑤ Basic Rotor (GRA-15-6A), 1ea
⑥ Aluminum sleeves (GLB-15A-FA), 6ea
⑦ Rotor locking tool, 1ea
▶ Installation
1) Installation place
① Install the machine at the solid and flat floor or table. If you place the centrifuge at the slope,
the axis of rotation is possibly changed because of the rotor weight.
② Install the machine about 30cm is departed from the wall because of the air circulation. If the
hole for the air circulation is blocked by anything, such as clothes or other devices, those
will make the air circulation impossible. Furthermore, if you install the device in a place with
lots of dusts, that will be cause the same problem. Therefore note that you should avoid
such place.
③ Install the machine at the place with appropriate temperature and humidity, because the
device is easily affected by temperature and humidity. It also has to be maintained with the
proper temperature & humidity.
④ Install the machine at the place without any kinds of corrosive gases. If the air surrounding
the device contains corrosive gases such as sulfurous acid gas or chlorine gas, that will
corrode rotors or any metal components of the device.
2) Supply the power
These centrifuges use 110V or 220V. Check proper voltage of your instrument and connect to
adequate power outlet. If the power input is more than ±10% of the recommended voltage or
fluctuating frequently, it may affect some functions of the instrument. It is advised to use AVR
(Automatic Voltage Regulator).
Page 7
Rev.2
GZ-UM-406E(2017.12.01)
Page. 6 / 16
MembraPure GmbH
B-Station, 30-12, Gyeryong-ro 141beon-gil,
Yuseong-gu, 1F, 4F, B2 Daejeon, Korea
Tel) +82(42)719-8200
Fax) +82(42)826-9848
Neuendorfstr 20a 16761 Hennigsdorf, Berlin,
Germany
Tel) +49-3302-2023500
3) Unpacking the instrument
① Open the box and lift out the instrument carefully together with the safety padding.
② Remove the safety padding and vinyl wrap.
③ Place the device on the proper place mentioned above.
4) On/off and the door open
① Turn on the instrument by pressing the switch on the right side of the machine.
② Press the ‘Door’ button to open the door.
③ Remove the protection materials inside the chamber.
▶ Function Description
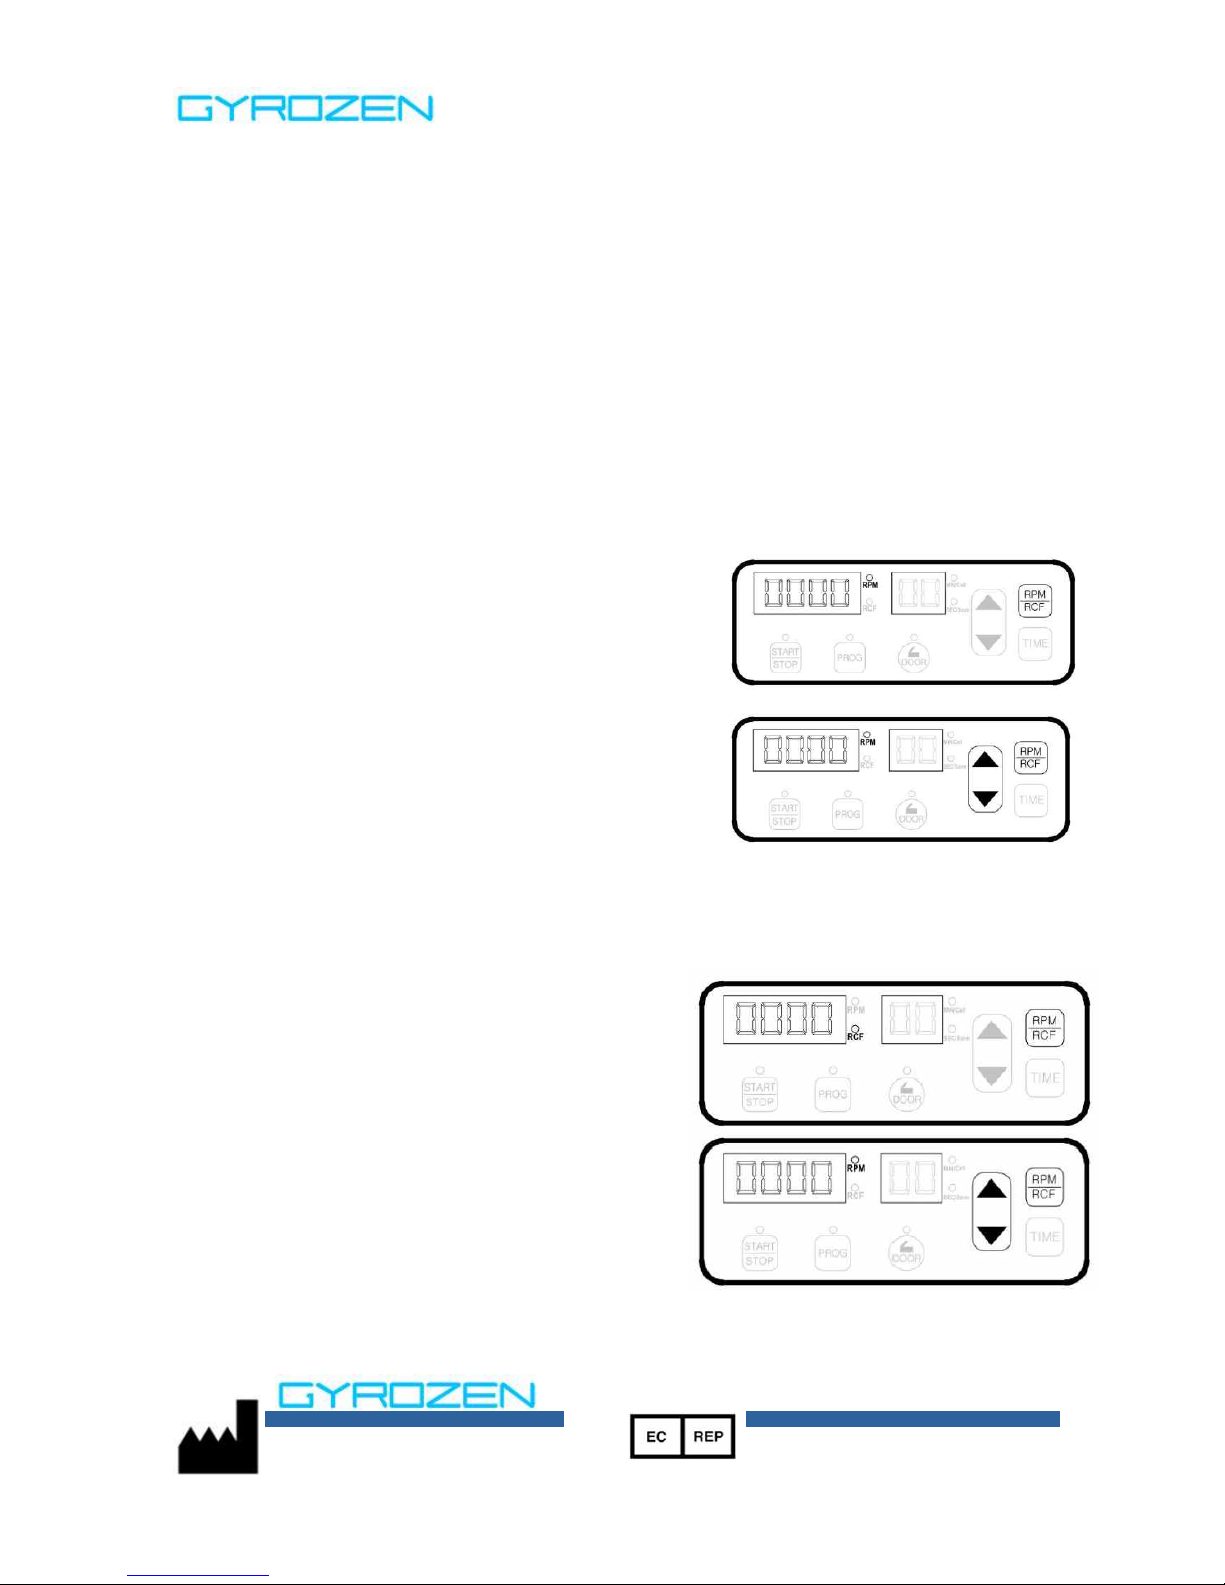
1) Setting RPM : The speed measuring and controlling
system is working precisely. The measuring unit is 1
rpm, and the user setting unit is 10 rpm.
- Speed display unit : 1 rpm
- Speed setting unit : 10 rpm
- Speed accuracy : < ±2% (at maximum speed)
① Press the ‘RPM/RCF’ button, then you will see the
‘RPM LED’ light start blinking with a beep sound.
This enables you to set the rpm value.
② Press the arrow button(▲, ▼) to change input value of
rpm.
③ The RPM value you set will be fixed after 3 seconds, and the RPM LED light will stop
blinking.
2) RCF (Relative Centrifugal Force)
① Press the ‘RPM/RCF’ button again, then you will
see the ‘RCF LED’ light start blinking. This
enables you to see the RCF value from
RPM/RCF display instead of RPM value.
② The conversion value from RPM to RCF is
calculated automatically(based on the maximum
radius and revolution). If you input the RCF
value, the RPM value will be calculated
automatically and changed.
③ Press the arrow button(▲, ▼) to change input value.
Page 8
Rev.2
GZ-UM-406E(2017.12.01)
Page. 7 / 16
MembraPure GmbH
B-Station, 30-12, Gyeryong-ro 141beon-gil,
Yuseong-gu, 1F, 4F, B2 Daejeon, Korea
Tel) +82(42)719-8200
Fax) +82(42)826-9848
Neuendorfstr 20a 16761 Hennigsdorf, Berlin,
Germany
Tel) +49-3302-2023500
④ The RCF value you set will be fixed after 3 seconds, and the RCF LED light will stop
blinking.
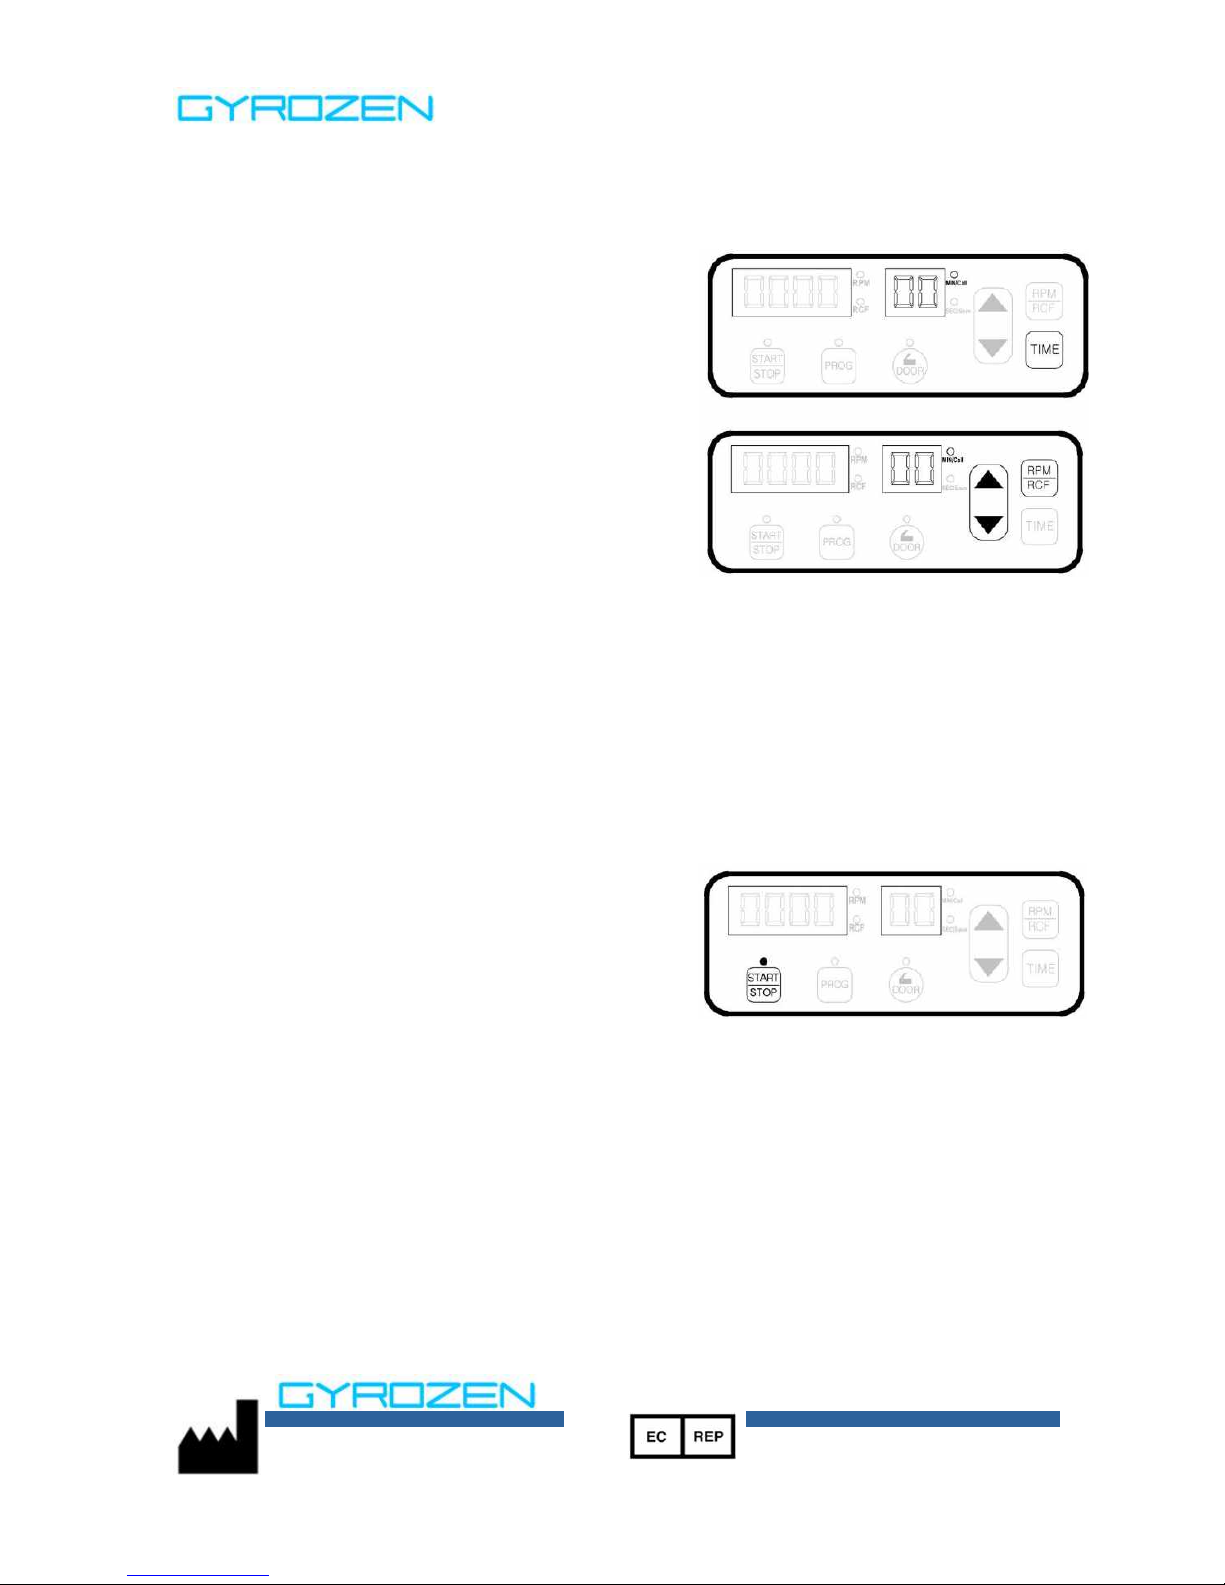
3) Time : The time can be displayed up to 99 minutes
and 59 seconds, and the “TIME DISPLAY” will show
the current time value in 2 digits. Time will be
down-counted after starting centrifugation.
① Press the ‘TIME’ button to set the minute value,
then you will see the “MIN LED” start blinking with
beep sound showing the previous time value.
② Press the arrow button(▲, ▼) to change the minute
value.
③ Press the ‘TIME’ button again to set the second
value, then the “SEC LED” start blinking with beep sound.
④ Press the arrow button(▲, ▼) to change the second value.
⑤ The time value you set will be fixed after 3 seconds. If you press “START/STOP” button, time
will be down-counted.
4) Imbalance : When the rotor is imbalanced and the vibration is severe, the operation will be
urgently stopped with the error message on the “Time display” and the alarming sound.
5) Door : Press the “Door” button to open the door. The door will not be opened while the device
is running.
6) START/STOP : If you press the “START/STOP”
button, you can start the device to run. If you press
the “START/STOP” button while its running, you can
stop the device in any circumstances.
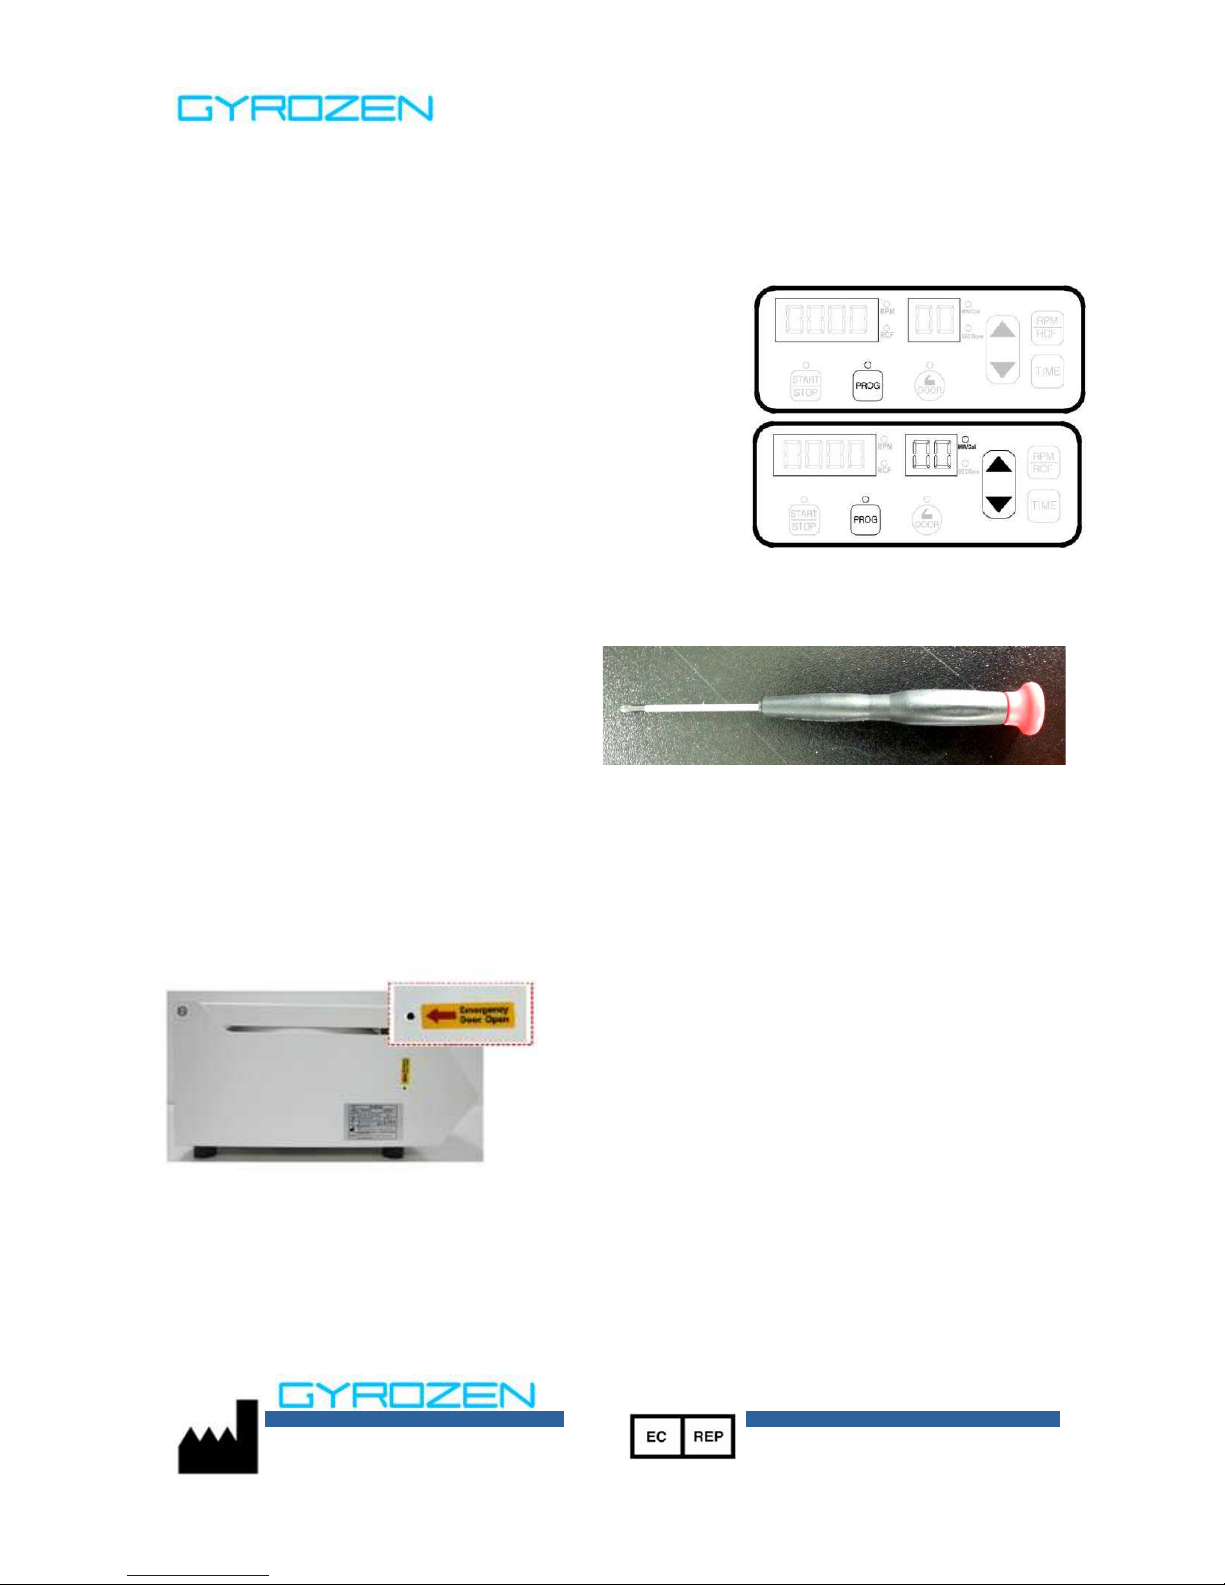
7) Program saving
① Set parameters. (Refer to 4-2 ~ 4-3)
② Press the [PROG] button longer than 3 seconds to save your preferred set values. The LED
of [PROG] button and SEC/Save is turned on.
③ Input the program number by using [▲▼] button. You can save up to 10 programs.
Page 9
Rev.2
GZ-UM-406E(2017.12.01)
Page. 8 / 16
MembraPure GmbH
B-Station, 30-12, Gyeryong-ro 141beon-gil,
Yuseong-gu, 1F, 4F, B2 Daejeon, Korea
Tel) +82(42)719-8200
Fax) +82(42)826-9848
Neuendorfstr 20a 16761 Hennigsdorf, Berlin,
Germany
Tel) +49-3302-2023500
④ Press the [PROG] button again to complete the saving. If you do not press the [PROG]
buttons for 5 second, the setting mode is cleared.
8) Program recalling
① To recall the saved program, just press the [PROG]
button shortly.
② The LED of [PROG] and MIN/Call is turned on.
③ Check the program number to call and enter the
program number you want to recall by pressing [▲▼]
button.
④ Press [PROG] button once again. Setting values are
displayed according to your saved number. If you do not
press the [PROG] buttons for 5 second, the setting mode is cleared.
▶ Emergency Door Open Tool
There is an emergency door open tool for
each product. Users can open the door
under any circumstances.
If you see the main body of each model, you will see a small hole beside a label written
"Emergency Door Open". If you put the emergency door open tool into that hole, the device will
stop operating immediately and the door will be opened.
▶ Maintenance (1) - Rotor coupling and disassembling
1) Mount the rotor fitting with the motor shaft.
2) Grasp the rotor with one hand, and rotate the rotor nut in the direction of clockwise, until it is
Page 10

Rev.2
GZ-UM-406E(2017.12.01)
Page. 9 / 16
MembraPure GmbH
B-Station, 30-12, Gyeryong-ro 141beon-gil,
Yuseong-gu, 1F, 4F, B2 Daejeon, Korea
Tel) +82(42)719-8200
Fax) +82(42)826-9848
Neuendorfstr 20a 16761 Hennigsdorf, Berlin,
Germany
Tel) +49-3302-2023500
tightly assembled.
3) Position the plastic lid properly and press slightly down to close.
4) The rotor lid is disclosed by lifting up the knob.
5) To disassemble the rotor, rotate the rotor nut in a counterclockwise direction.
▶ Maintenance (2) - Maintenance after use
1) Outer part of instrument
① Clean the outside of the machine with a dry soft cloth. If necessary, dip the cloth with neutral
detergents and clean contaminated parts. Keep completely dry after cleaning.
② Do not use any volatile chemicals such as alcohol, benzene, etc.
③ If any rust appears, clean with neutral detergents and dry it.
2) Inner part of instrument
① Keep dry inside the chamber after every use of the machine.
② Clean the shaft always for avoiding an imbalance during the rotation.
③ If any part is contaminated, clean with neutral detergents.
3) Rotor
① Clean the rotor if any parts are contaminated with samples. Be careful not to make any
scratches on the surface. Those scratches can cause rusts.
② Keep the rotor dry completely after use. You can use the hair dryer to dry up the device.
③ Rotors shall be stored in the clean places. Especially, in case of the angle rotors, they shall
be stored in the places with ventilation.
4) Moving or shipping of instrument
① If you need to move or ship the instrument, be cautious to protect the shaft from any
physical impact.
② Remove the rotor and fill inside the chamber with proper materials to keep the shaft on
place.
③ It is recommended to move or ship rotors separately if no original safety padding is available.
Page 11

Rev.2
GZ-UM-406E(2017.12.01)
Page. 10 / 16
MembraPure GmbH
B-Station, 30-12, Gyeryong-ro 141beon-gil,
Yuseong-gu, 1F, 4F, B2 Daejeon, Korea
Tel) +82(42)719-8200
Fax) +82(42)826-9848
Neuendorfstr 20a 16761 Hennigsdorf, Berlin,
Germany
Tel) +49-3302-2023500
▶ Maintenance (3) - Regular Inspection
1) Rotors and tube racks need to be cleaned regularly.
2) General checklist
- The spindle connector : This shall not be separated or bended.
- The spindle bearing : Check its rotating conditions. It shall rotate smoothly without any noises.
- The spring hinge : Check its tension.
- Rotor : Check if there is any scratch.
- Tube rack : Check if there is any scratch.
3) Speed
Measure the maximum rotation speed with a tachometer.
4) Time
Set the time 10 minutes and measure the time with a stop watch.
5) Imbalance sensor
If you run the device, in the imbalanced condition, the device shall be stopped an error
message with warning sound before achieving the maximum speed.
6) Door lock system
① The door shall not be opened and the LED light of the door shall be turned off when the
device is running. When you opened the door, the LED light of the door shall be turned on
and the device shall not be operated.
② Check if the door striker is worn out.
7) Door sealing
Prepare 4 sheets of paper and put them on the door packing at regular distance. Then close
the door and lock the door striker. When the door is closed completely, the paper shall not be
pulled out easily.
▶ General cautions
1) The device shall be placed on the flat and solid floor or table. If you use the device with the
inclined axis, there will be severe vibration, which causes failure or mal-function of the device.
2) Check the ratings of the device. There can be device failure in case of connecting wrong
ratings.
3) Only use the components provided by the manufacturer.
4) Only use the tubes made for centrifuges.
5) Do not set the RPM over than the maximum speed of the device. Samples cannot be over
1.2g/㎖.
Page 12

Rev.2
GZ-UM-406E(2017.12.01)
Page. 11 / 16
MembraPure GmbH
B-Station, 30-12, Gyeryong-ro 141beon-gil,
Yuseong-gu, 1F, 4F, B2 Daejeon, Korea
Tel) +82(42)719-8200
Fax) +82(42)826-9848
Neuendorfstr 20a 16761 Hennigsdorf, Berlin,
Germany
Tel) +49-3302-2023500
6) Do not move the device while operating.
7) Do not give any impact to the device while operating.
8) Do not stop the rotating rotors with bare hands.
9) When you try to use the emergency door open tool, check if the rotor stops completely.
10) Check the balance of the device by putting samples with the same weights into the opposite
holes of the rotor before using the device.
11) The rotor shall be fixed tightly to the spindle, and the door also shall be closed completely.
Otherwise the door can be opened suddenly while running.
12) Repairing works shall be done only by the authorized personnel from GYROZEN Co., Ltd.
13) Remove any contamination of the device completely before you send it to the manufacturer for
repairing.
14) Rotors and chambers shall be dry all the time for keeping the best running conditions.
15) Avoid any substances containing strong acid, strong alkali, detergents for lab use, or any basic
salt.
16) Please keep the device 30㎝ away from any dangerous objects.
17) If any of components is out of order, contact the manufacturer. Never try to replace them by
yourself. Only use components that the manufacturer provided.
Page 13
Rev.2
GZ-UM-406E(2017.12.01)
Page. 12 / 16
MembraPure GmbH
B-Station, 30-12, Gyeryong-ro 141beon-gil,
Yuseong-gu, 1F, 4F, B2 Daejeon, Korea
Tel) +82(42)719-8200
Fax) +82(42)826-9848
Neuendorfstr 20a 16761 Hennigsdorf, Berlin,
Germany
Tel) +49-3302-2023500
▶ Tube Arrangement
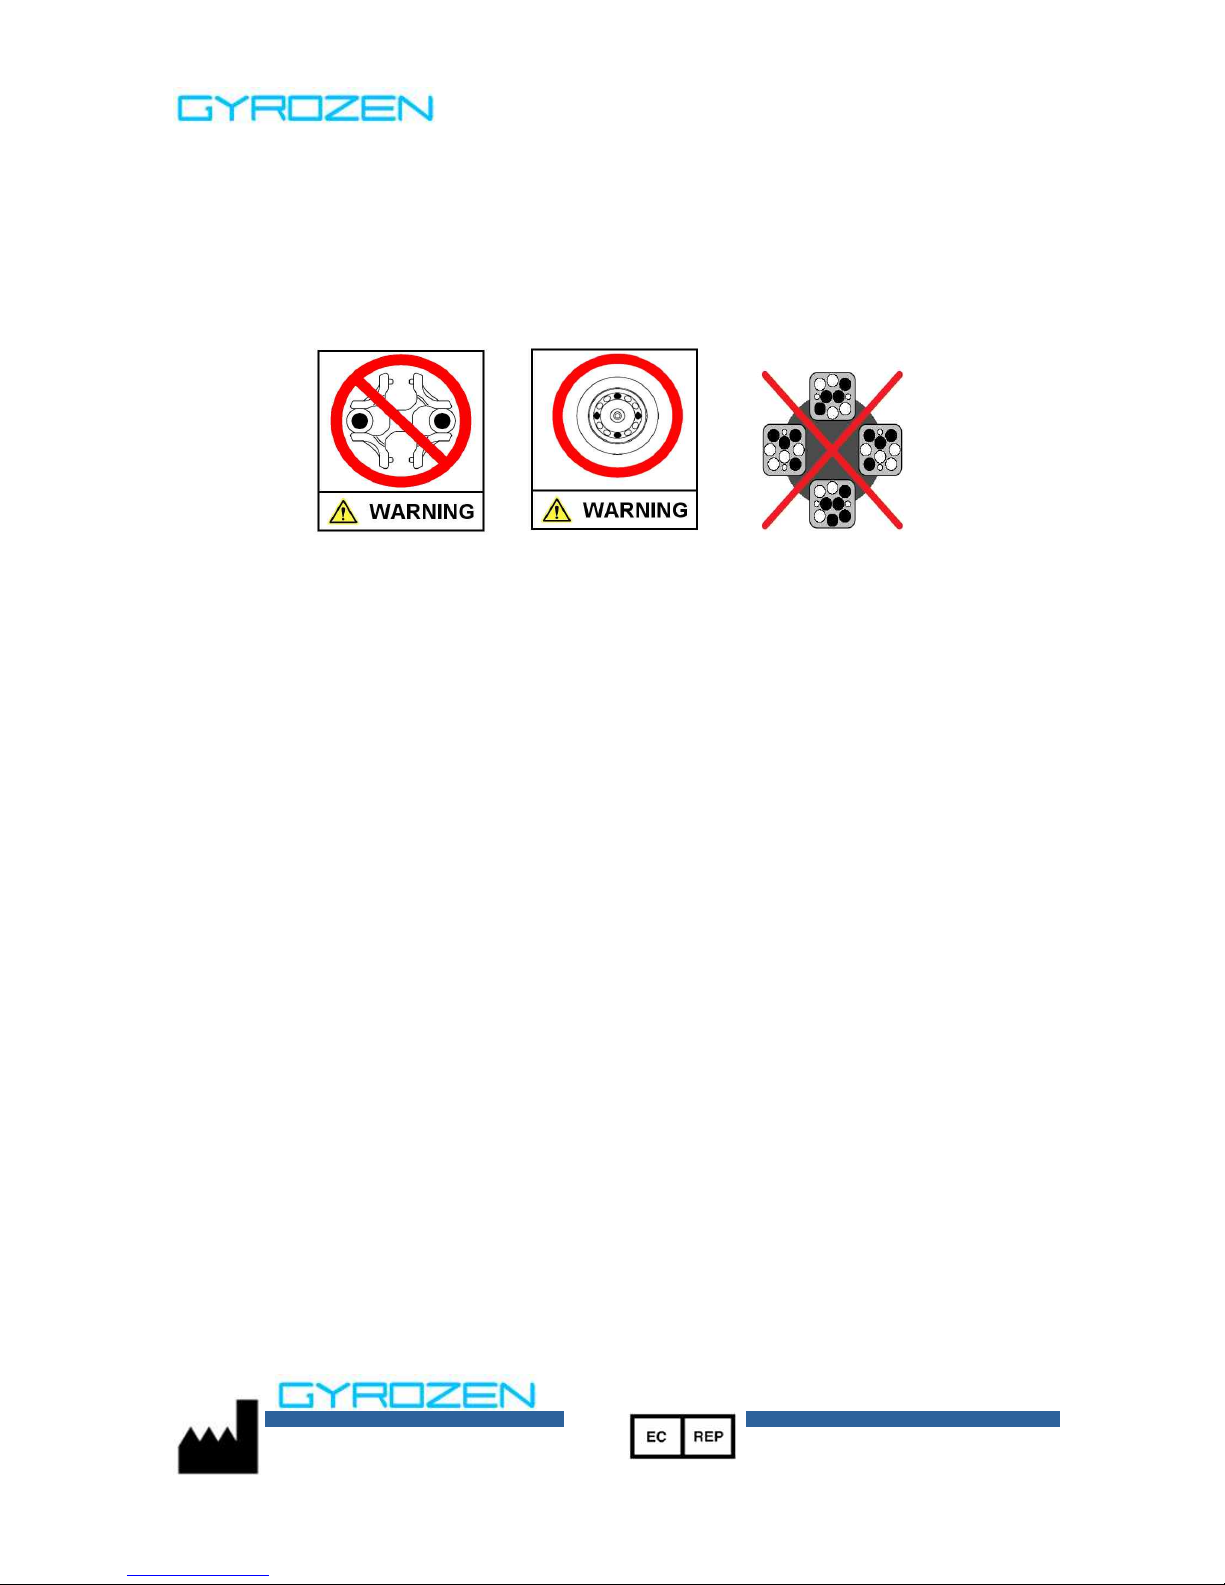
Each specimen shall be measured precisely before being put into each tube. Tube shall be
arranged symmetrically in the rotor. If the weight of each side is different, there will be severe
vibration, which can cause damages to a rotor and a shaft.
In case of a swing rotor, you should install all four buckets to the rotor before use.
▶ Blackout
If there is a blackout during operation, the door will not be opened. After blackout, if the rotor is
still running, the sensor will notice its rotation and the rotor will be decelerated rapidly with
warning sound.
Page 14
Rev.2
GZ-UM-406E(2017.12.01)
Page. 13 / 16
MembraPure GmbH
B-Station, 30-12, Gyeryong-ro 141beon-gil,
Yuseong-gu, 1F, 4F, B2 Daejeon, Korea
Tel) +82(42)719-8200
Fax) +82(42)826-9848
Neuendorfstr 20a 16761 Hennigsdorf, Berlin,
Germany
Tel) +49-3302-2023500
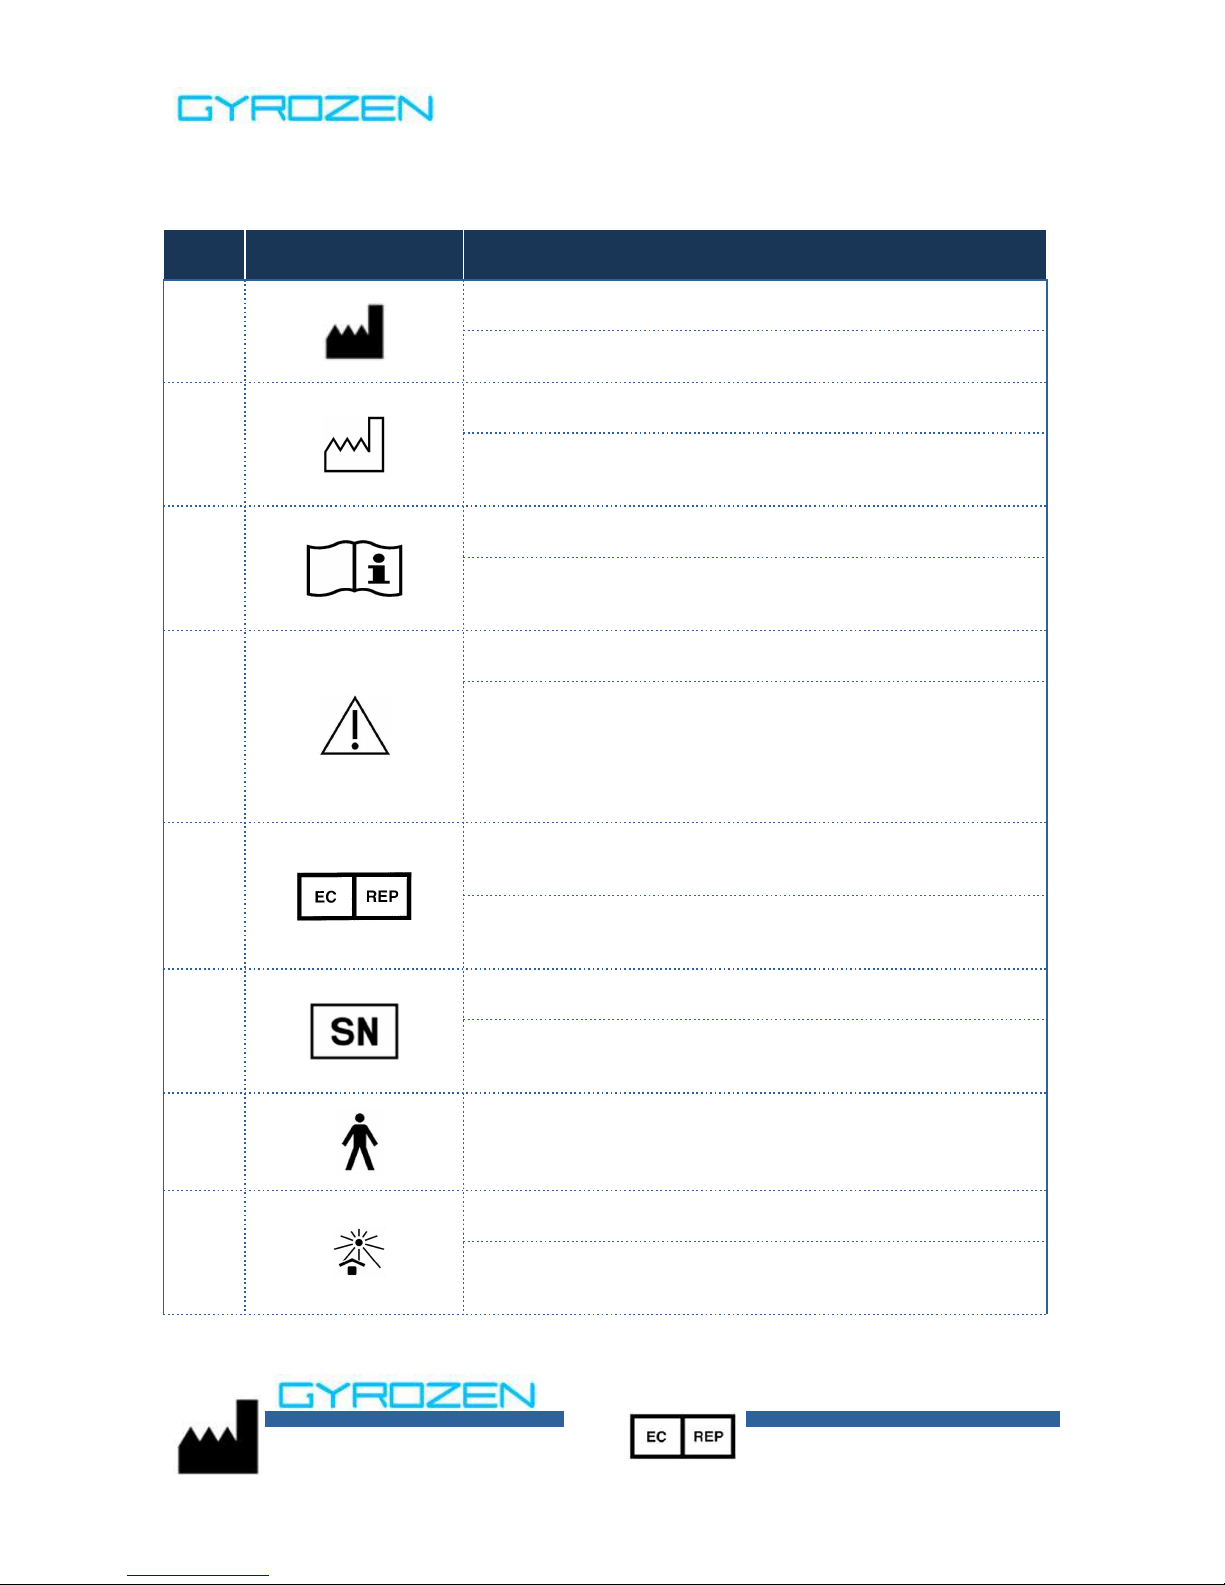
No.
Symbol
Meaning
1
Manufacturer
Indicates the medical device manufacturer
2
Date of manufacture
Indicates the date when the medical device was manufactured
3
Consult instructions for use
Indicates the need for the user to consult the instructions for
use
4
Caution
Indicates the need for the user to consult the instructions for
use for important cautionary information such as warnings and
precautions that cannot, for a variety of reasons, be presented
on the medical device itself
5
Authorized representative in the european community
Indicates the authorized representative in the European
Community
6
Serial number
Indicates the manufacturer's serial number so that a specific
medical device can be identified
7
Type B applied part
8
Keep away from sunlight
Indicates a medical device that needs protection from light
sources
▶ Explanation for CE symbols
Page 15
Rev.2
GZ-UM-406E(2017.12.01)
Page. 14 / 16
MembraPure GmbH
B-Station, 30-12, Gyeryong-ro 141beon-gil,
Yuseong-gu, 1F, 4F, B2 Daejeon, Korea
Tel) +82(42)719-8200
Fax) +82(42)826-9848
Neuendorfstr 20a 16761 Hennigsdorf, Berlin,
Germany
Tel) +49-3302-2023500
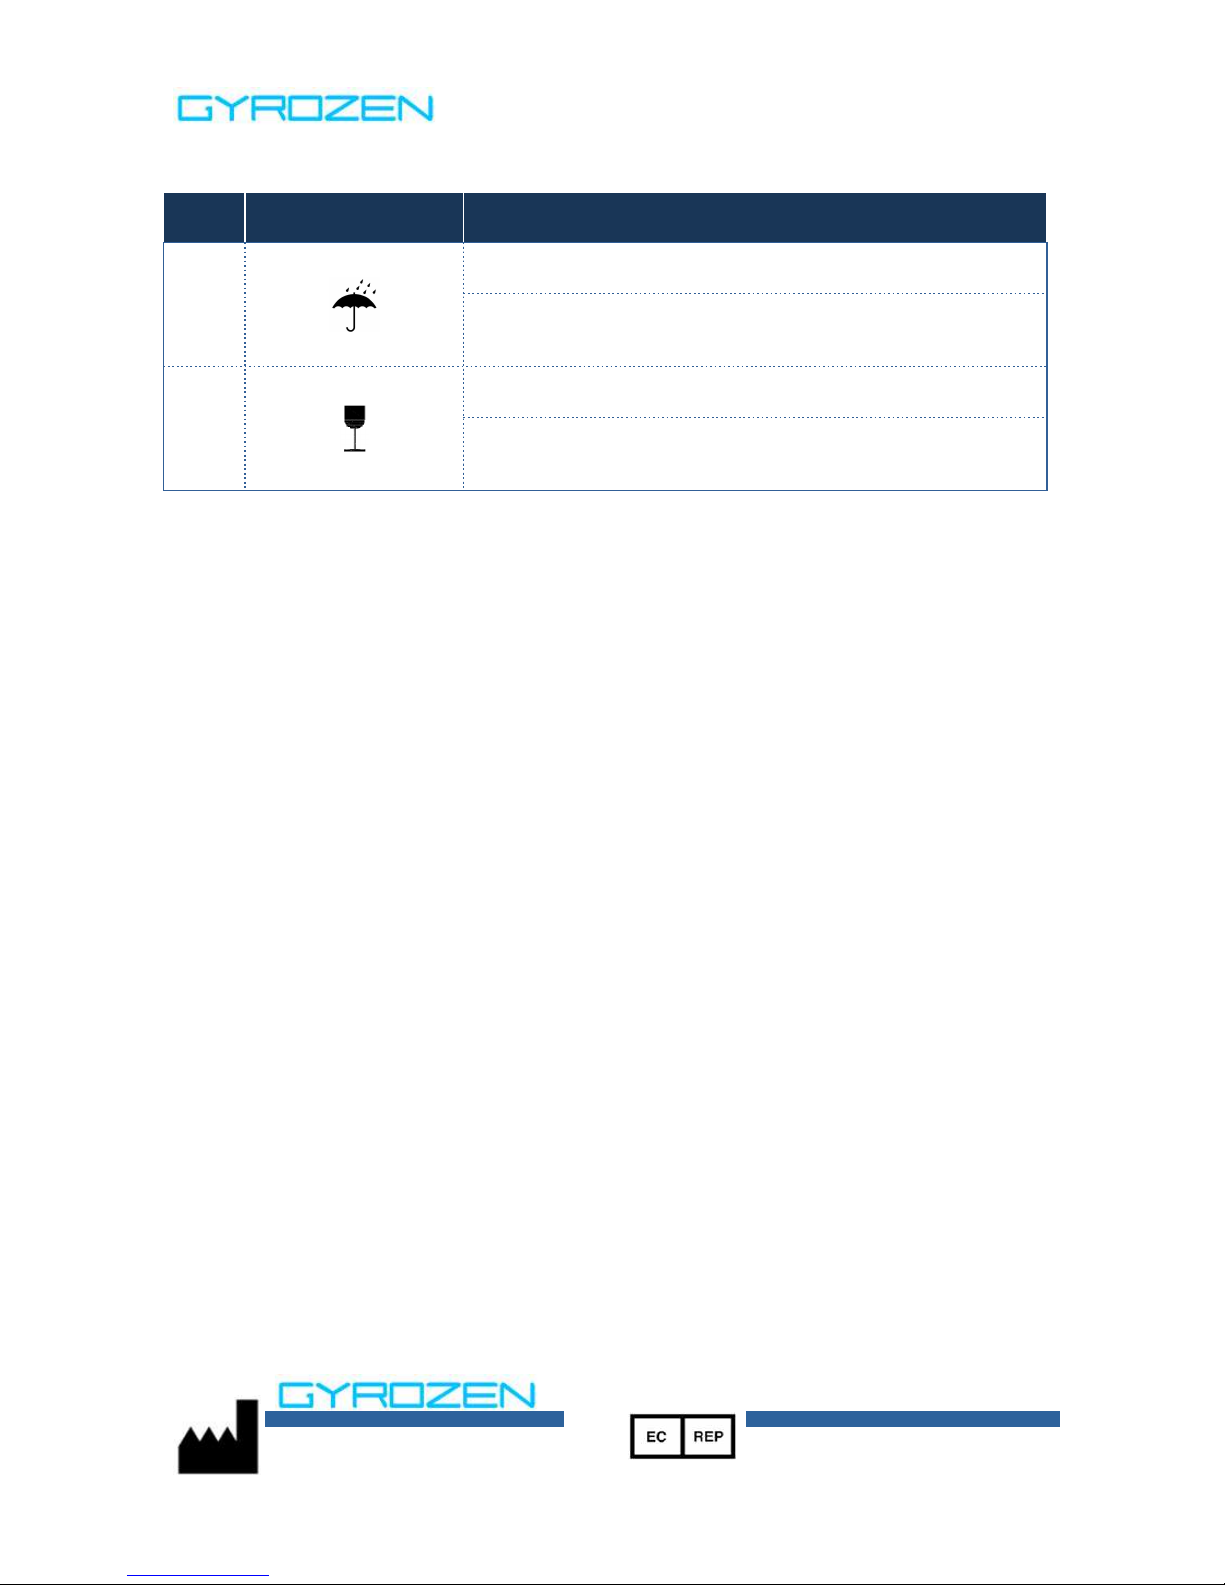
No.
Symbol
Meaning
9
Keep dry
Indicates a medical device that needs to be protected from
moisture
10
Fragile, handle with care
Indicates a medical device that can be broken or damaged if
not handled carefully
Page 16

Rev.2
GZ-UM-406E(2017.12.01)
Page. 15 / 16
MembraPure GmbH
B-Station, 30-12, Gyeryong-ro 141beon-gil,
Yuseong-gu, 1F, 4F, B2 Daejeon, Korea
Tel) +82(42)719-8200
Fax) +82(42)826-9848
Neuendorfstr 20a 16761 Hennigsdorf, Berlin,
Germany
Tel) +49-3302-2023500
Error 1
Failure to reach to 200RPM within 2 sec
- Check the RPM sensor.
- Check the connection of a RPM connector or a wire.
Error 2
When running, the door is opened.
- Check the door latch.
- Stop running, power off and on.
Error 3
Over temperature of motor.
- Check the motor temperature.
Error 4
Low voltage
- Check supply voltage.
- Use AVR to provide proper voltage.
Error 5
High voltage
- Check supply voltage.
- Use AVR to provide proper voltage.
Error 6
Over speed
- Stop running, power off and on.
- Tuning of the firmware(Download)*
Error 7
Failure of control system
- Stop running, power off and on.
- Tuning of the firmware(Download)*
Error 8
Imbalance
- Check amount of samples.
- Check weight-balances of samples.
Error 9
RPM sensor recognition error
- Check attached place of RPM sensor.
- Check connection of cable for RPM sensor.
- Change RPM sensor.
▶ Troubleshooting
※ Any wire disconnection or tuning of the instrument must be performed only by a service engineer who is
authorized by GYROZEN Co., Ltd.
Page 17
Rev.2
GZ-UM-406E(2017.12.01)
Page. 16 / 16
MembraPure GmbH
B-Station, 30-12, Gyeryong-ro 141beon-gil,
Yuseong-gu, 1F, 4F, B2 Daejeon, Korea
Tel) +82(42)719-8200
Fax) +82(42)826-9848
Neuendorfstr 20a 16761 Hennigsdorf, Berlin,
Germany
Tel) +49-3302-2023500
w Safety Standards
EN 61010-1:2010, IEC 61010-020:2006
Class I
Type B Applied parts
w EMC Standard
EN 61326-1:2006
w Classification according to
MDD 2007/47/EC
Class IIa
w Max. RPM
4,000 rpm
w Max. RCF
2,075 xg
w Max. capacity
15ml x 6
w Run time
≤ 99 min 59 sec or continuous
w Noise level
≤ 60 dB
w Acceleration time
≤ 20 sec
w Deceleration time
≤ 20 sec
w Imbalance Recognition
Automatic
w Motor
High torque AC induction motor
w Safety
Lid-lock
w Rating
230V~, 50Hz, 140VA
w without a rotor
17.5Kg
w Dimension (W x D x H)
296 x 412 x 206 mm
w Rotor
Angle rotor(GRA-15-6A), Maximum RPM : 4,000
▶ Technical Specification
 Loading...