

Page 1
Users manual on how to
Install and set up a GymPark
outdoor fitness equipment
Page 2

Preparing the ground
In order to properly prepare the foundation for the anchor a hole of 70cm length x
50cm wide x 60cm deep has to be created. The anchor is then placed in the middle of
the hole.
Anchor
70cm
50cm
60cm
Please note that the size of the hole depends on the consistency of the ground. If
the ground has debris or is extremely soft the holes need to be prepared in slightly
bigger dimensions of approximately 70cm x 70cm x 70cm
Tools needed
for the holes
Pickaxe and Hoe Drilling Tools
Page 3
Filling the hole with
concrete
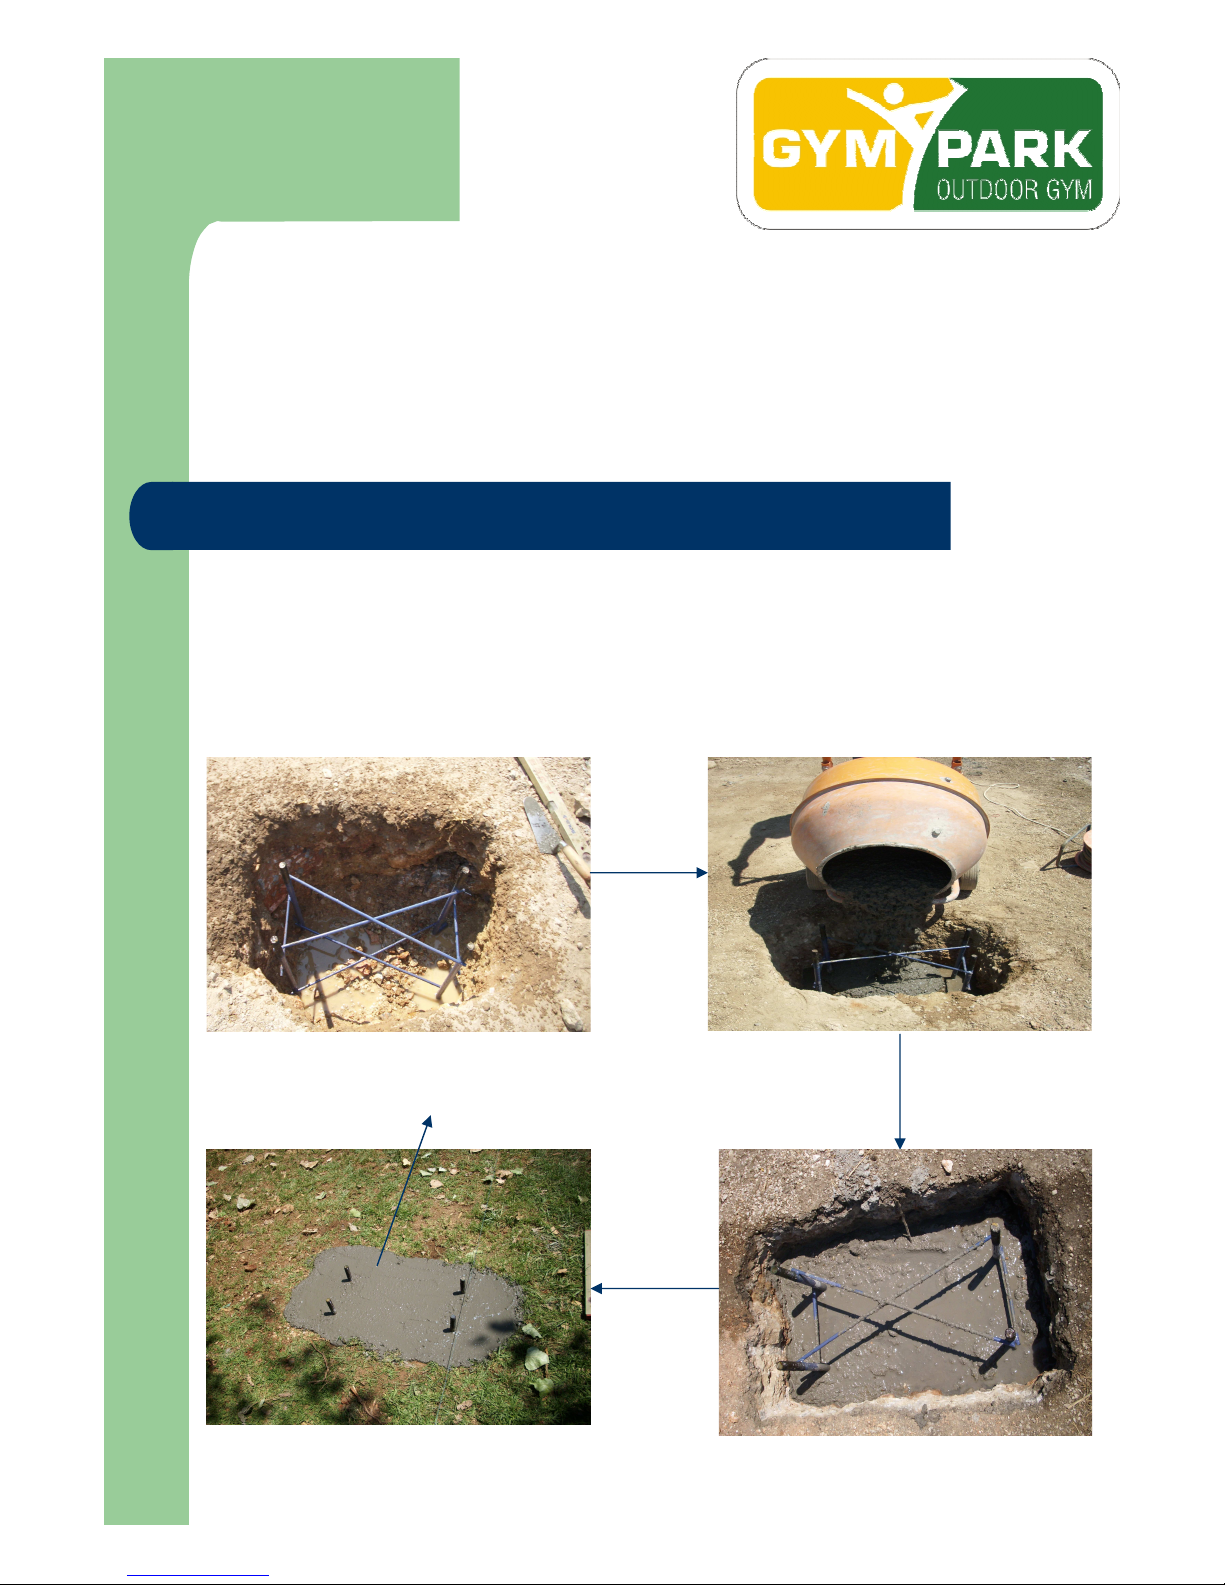
Slowly start filling the hole with concrete until it reaches ground level. Make sure
that
you use ready made C20-25 concrete. For filling up the foundation of all the holes
you would require approximately 1,5m³.
Make sure that the equipment fixing bolts are not covered by the
concrete.
(Fixing bolts)
Page 4
Properly positioning the anchor
and placing the main pole
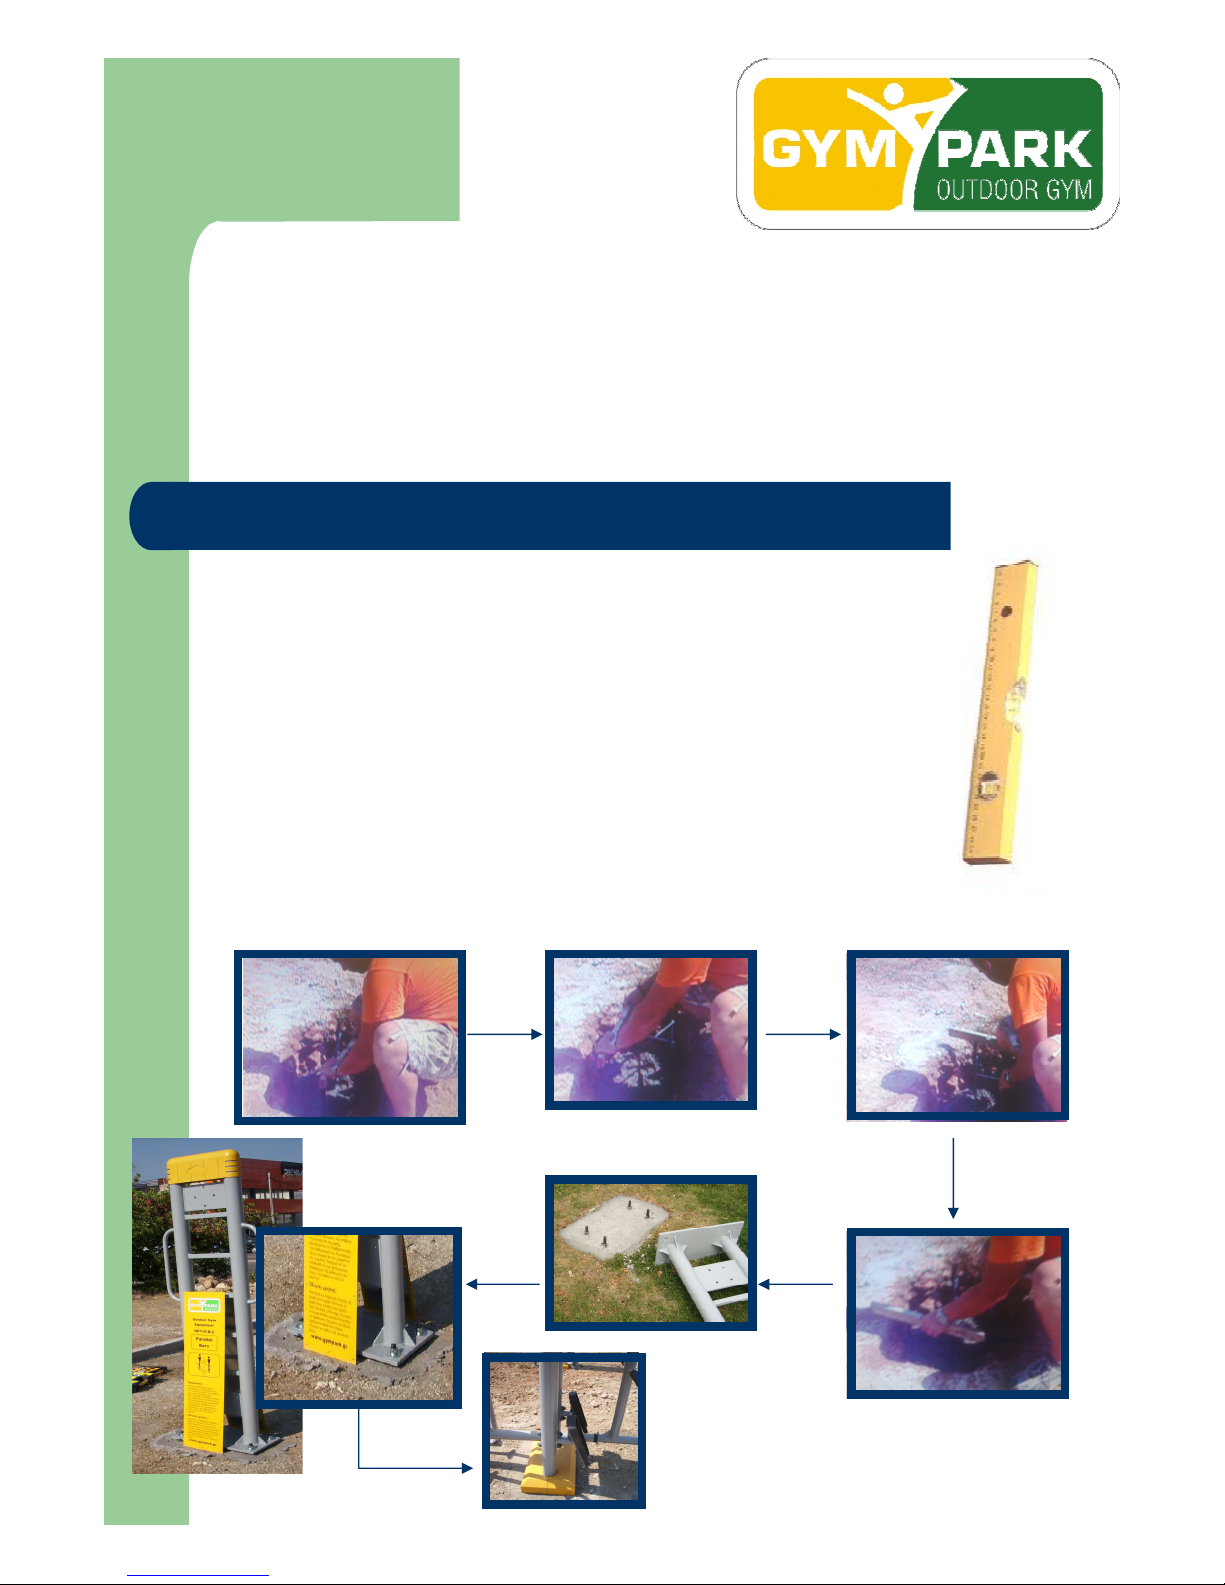
In order to ensure an exact upright position (of the main pole), make
sure that the anchor is in an absolute horizontal position using a level
while concrete casting.
Please leave approximately 16 to 40 hours (depending on the climatic
conditions) for the concrete to fully strengthen before attempting to
place the main pole.
Prior to installing the main pole completely remove any remaining
concrete or soil from the anchor’s surface.
Attach the main pole on the surface and tighten the bolts of the anchor.
Finalize the procedure by placing the yellow bottom cover over the
base of the main pole.
16 to 40 hr
Page 5
Placing and Adjusting
the equipment
After having prepared the foundation of the main pole it is time to prepare
the foundation of the instruments.
In order to better stabilize the equipment you will have to create separate
concrete bases for every instrument. The procedure takes place the
same day with the installation of the main pole.
The exact distances of the additional instrument holes can be seen from
the graphics in the following pages. Each hole needs to be approximately
30cm wide x 30 cm length x 30cm deep and should be filled with
concrete.
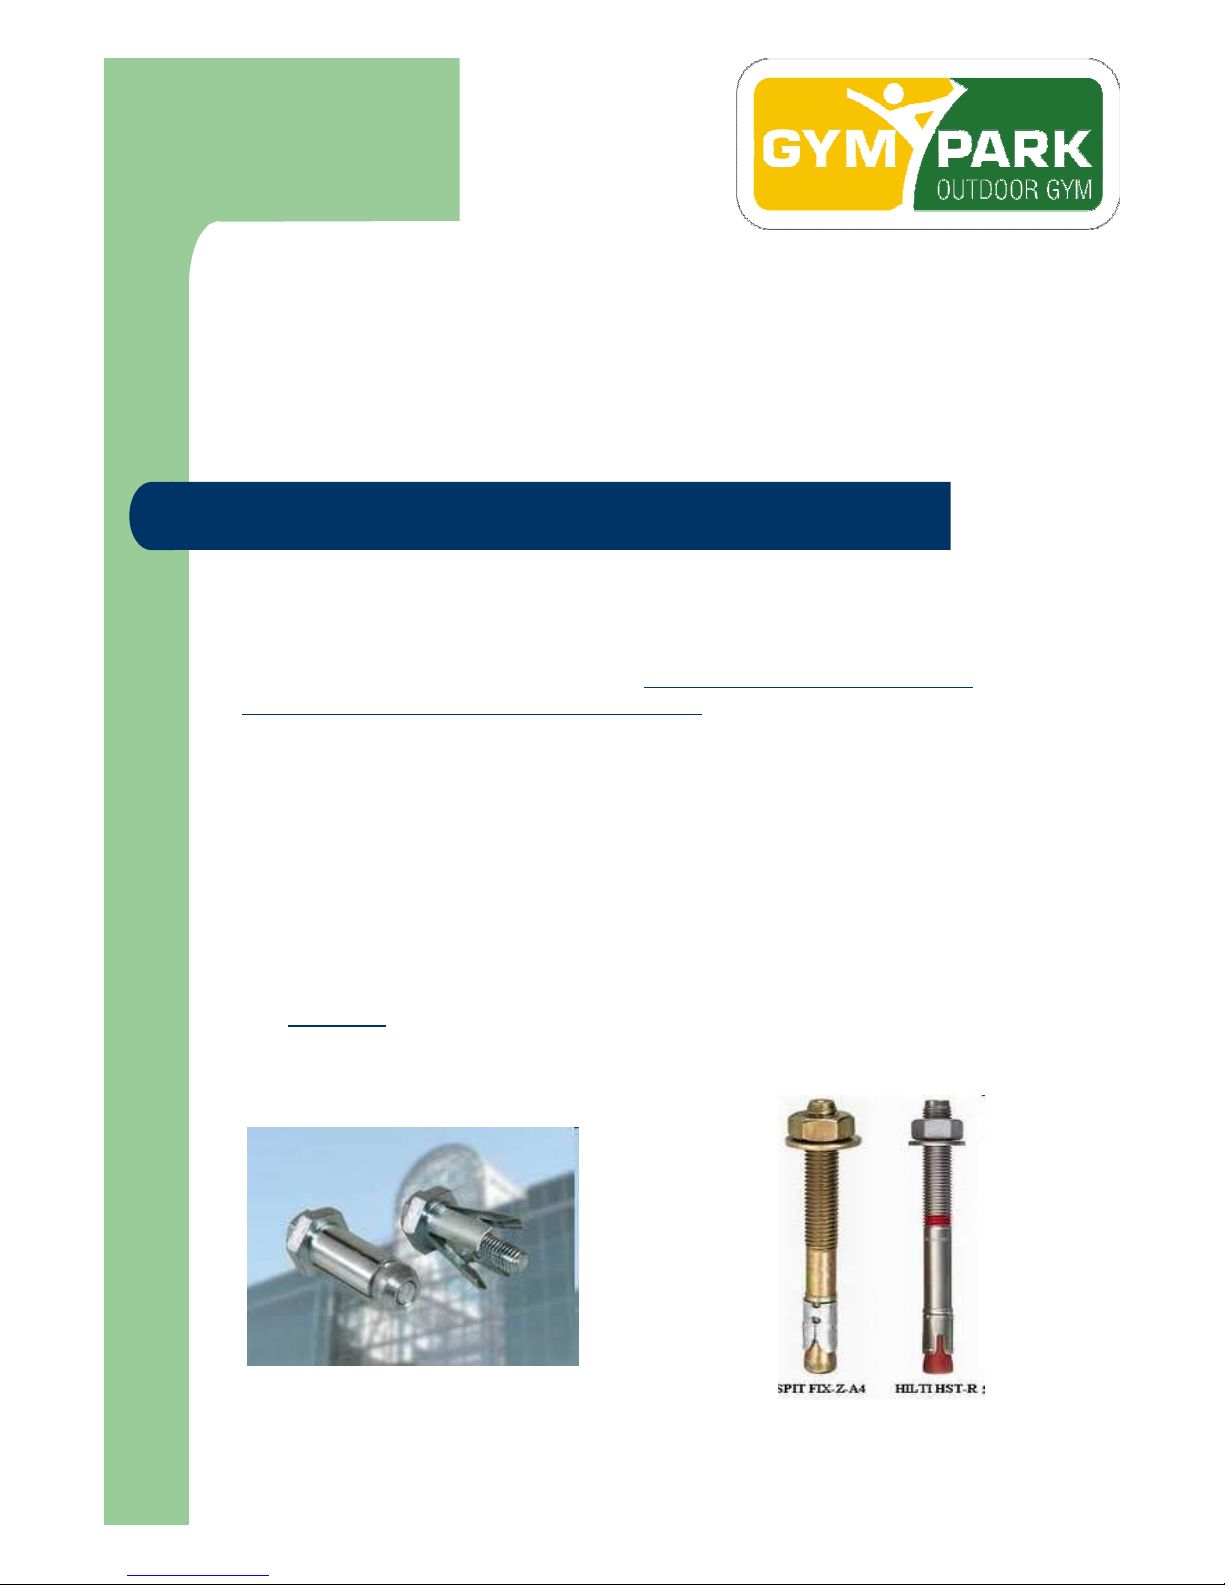
After the concrete has stabilized you need to drill and screw (if required)
the instrument on the bases you’ve created using the special expanding
screws supplied along with the equipment. Alternatively you can also use
aftermarket mechanical plugs.
Please note that drilling for stability purposes is required for some
and NOT ALL the instruments.
Concrete bases are used to ensure the stability of the instrument in
a gravel or soil surface.
Expanding screws supplied
with the equipment
Aftermarket mechanical plugs
Page 6
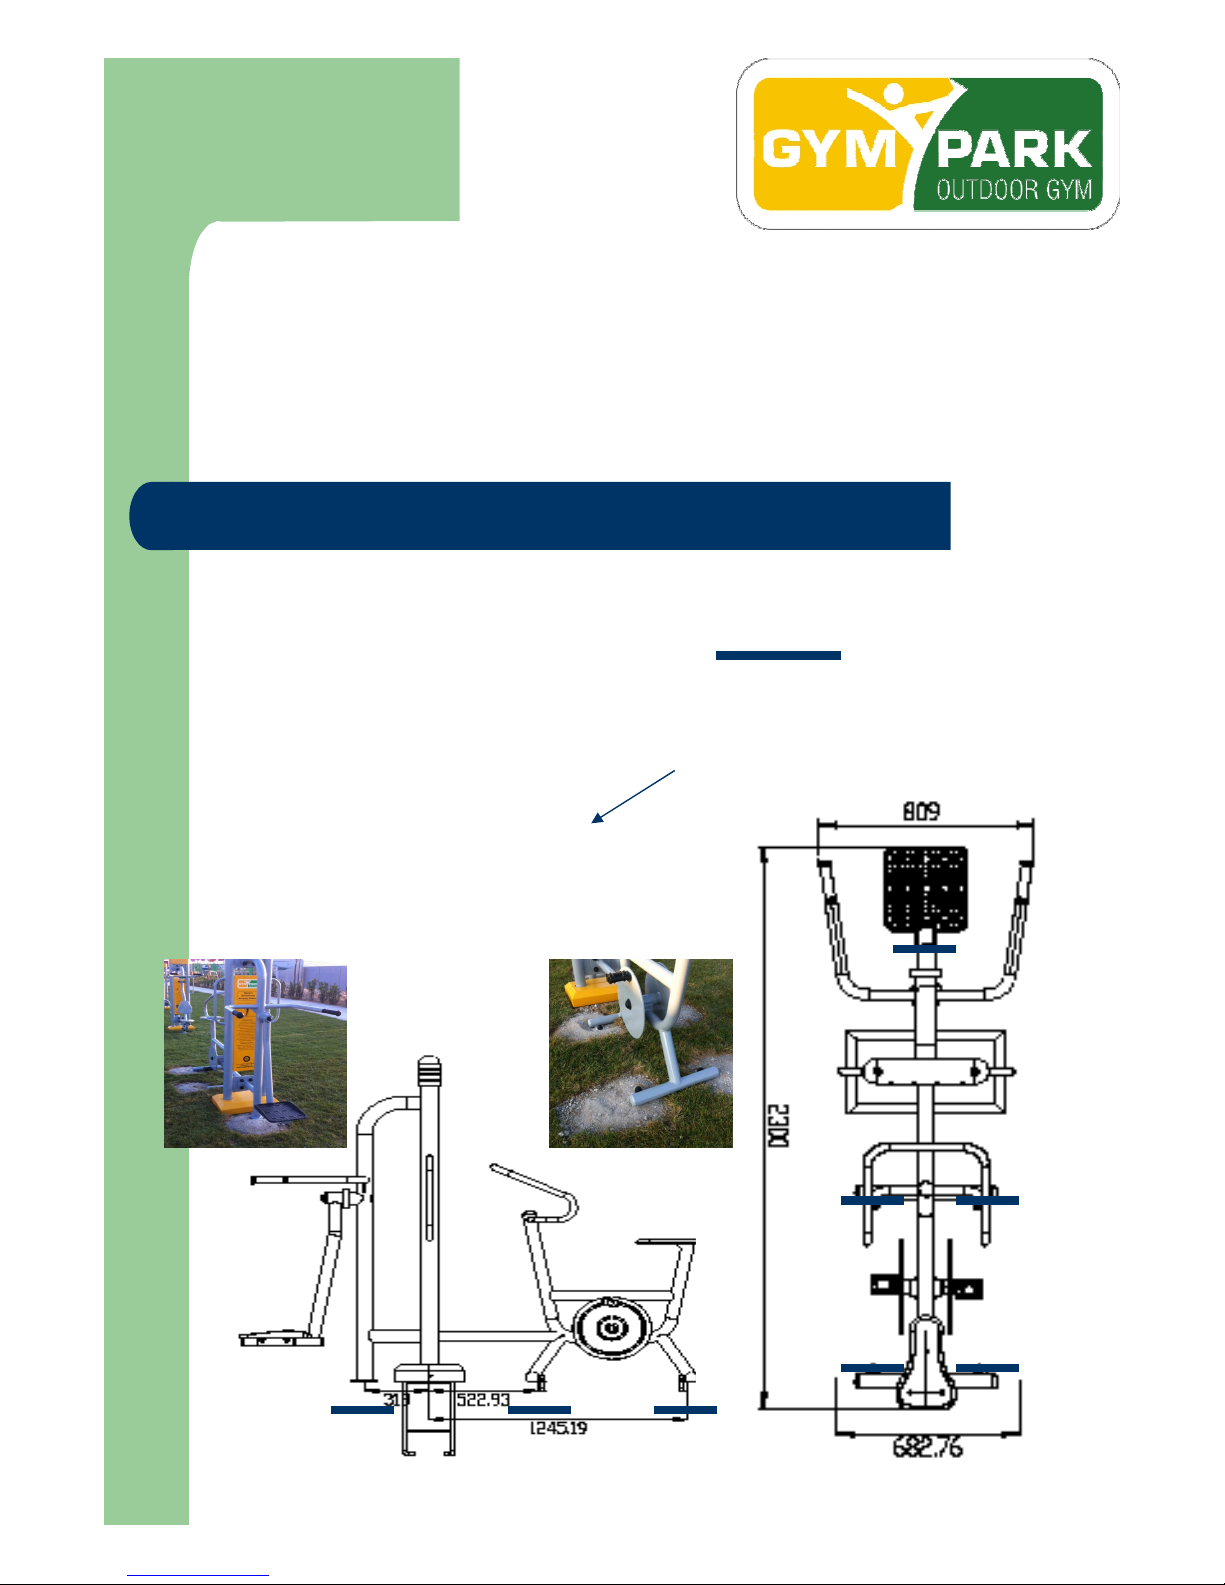
Adjusting the Bicycle
and Surf (GP117B1-GB117B2)
For installing the bicycle and surf equipment you will have to create
concrete surfaces in the areas shown with:
Number of concrete surfaces: Bicycle 4 ( 2 front - 2 rear) / Surf
1
Bicycle Only
2 holes drilled in the front (one from every side)
2 holes drilled in the back (one from every side)
Page 7
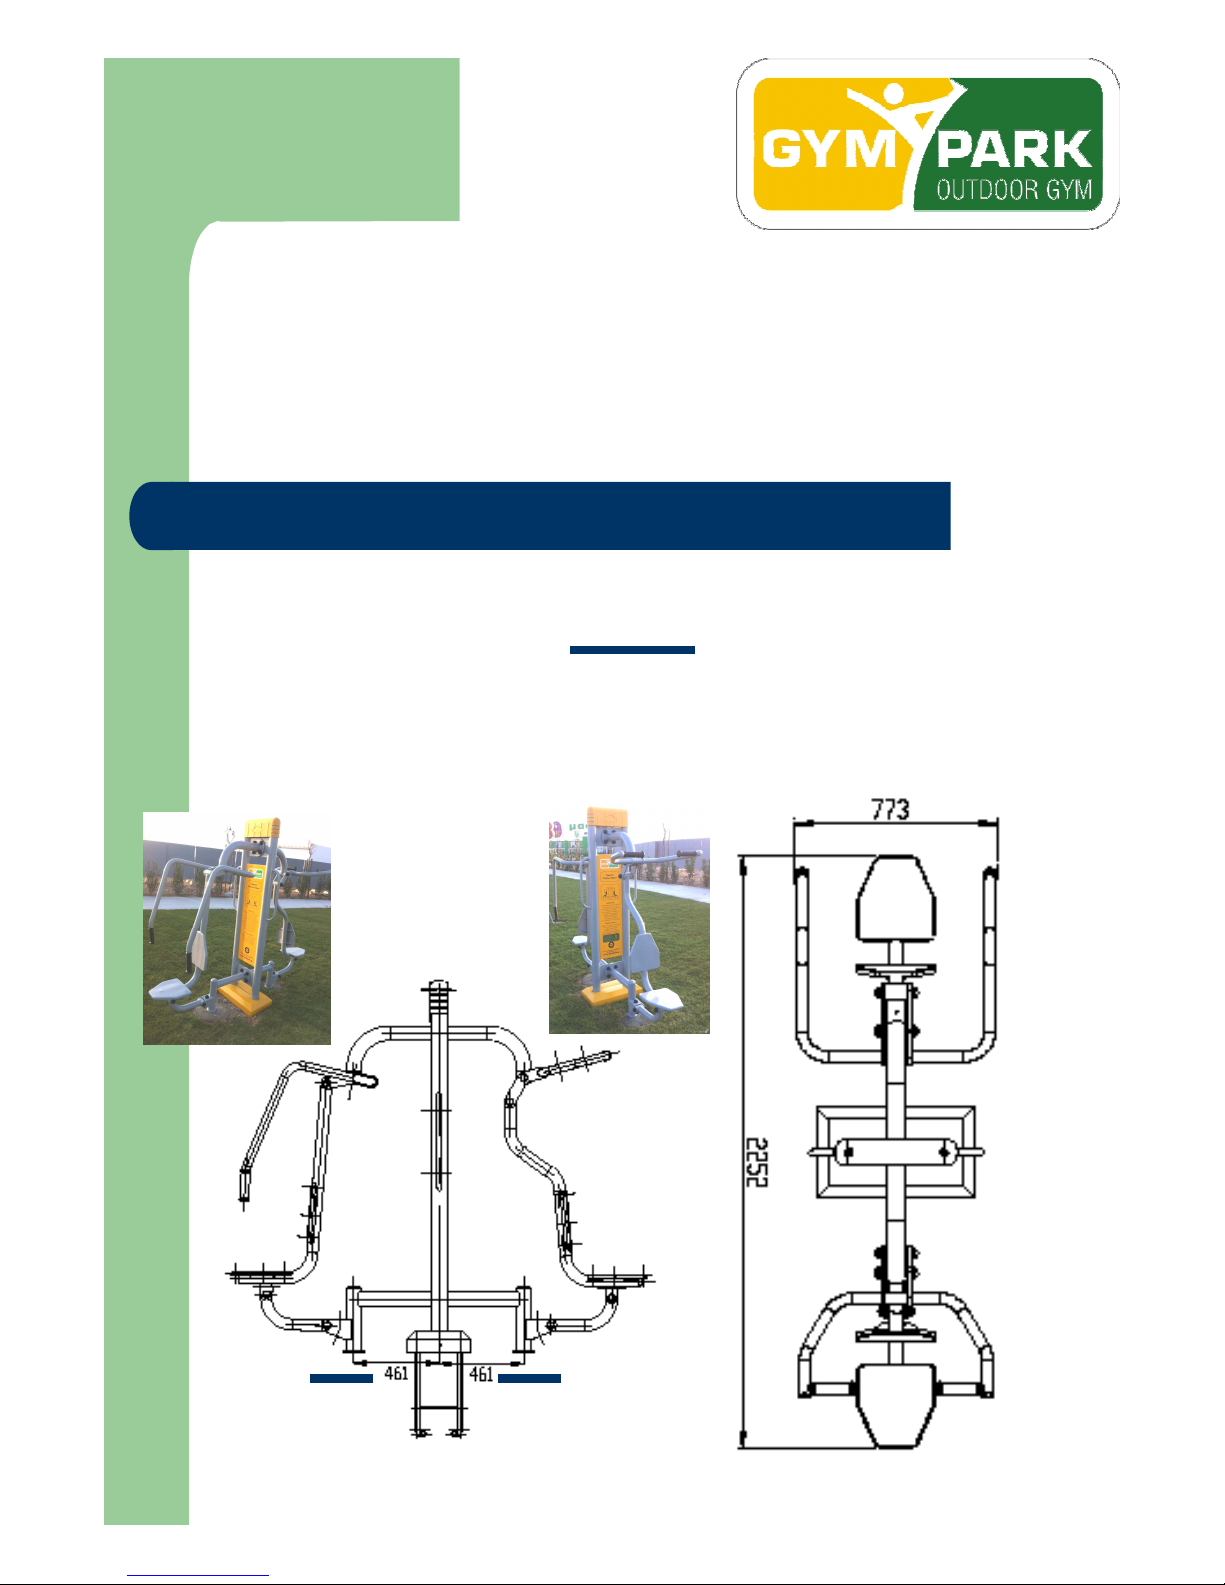
Adjusting the Pull and Push
Chair (GP111B3-GB112B3)
For installing the pull and push equipment you will have to create concrete
surfaces in the areas shown with:
Number of concrete surfaces: Push 1 / Pull 1 (No need to drill
holes)
Page 8
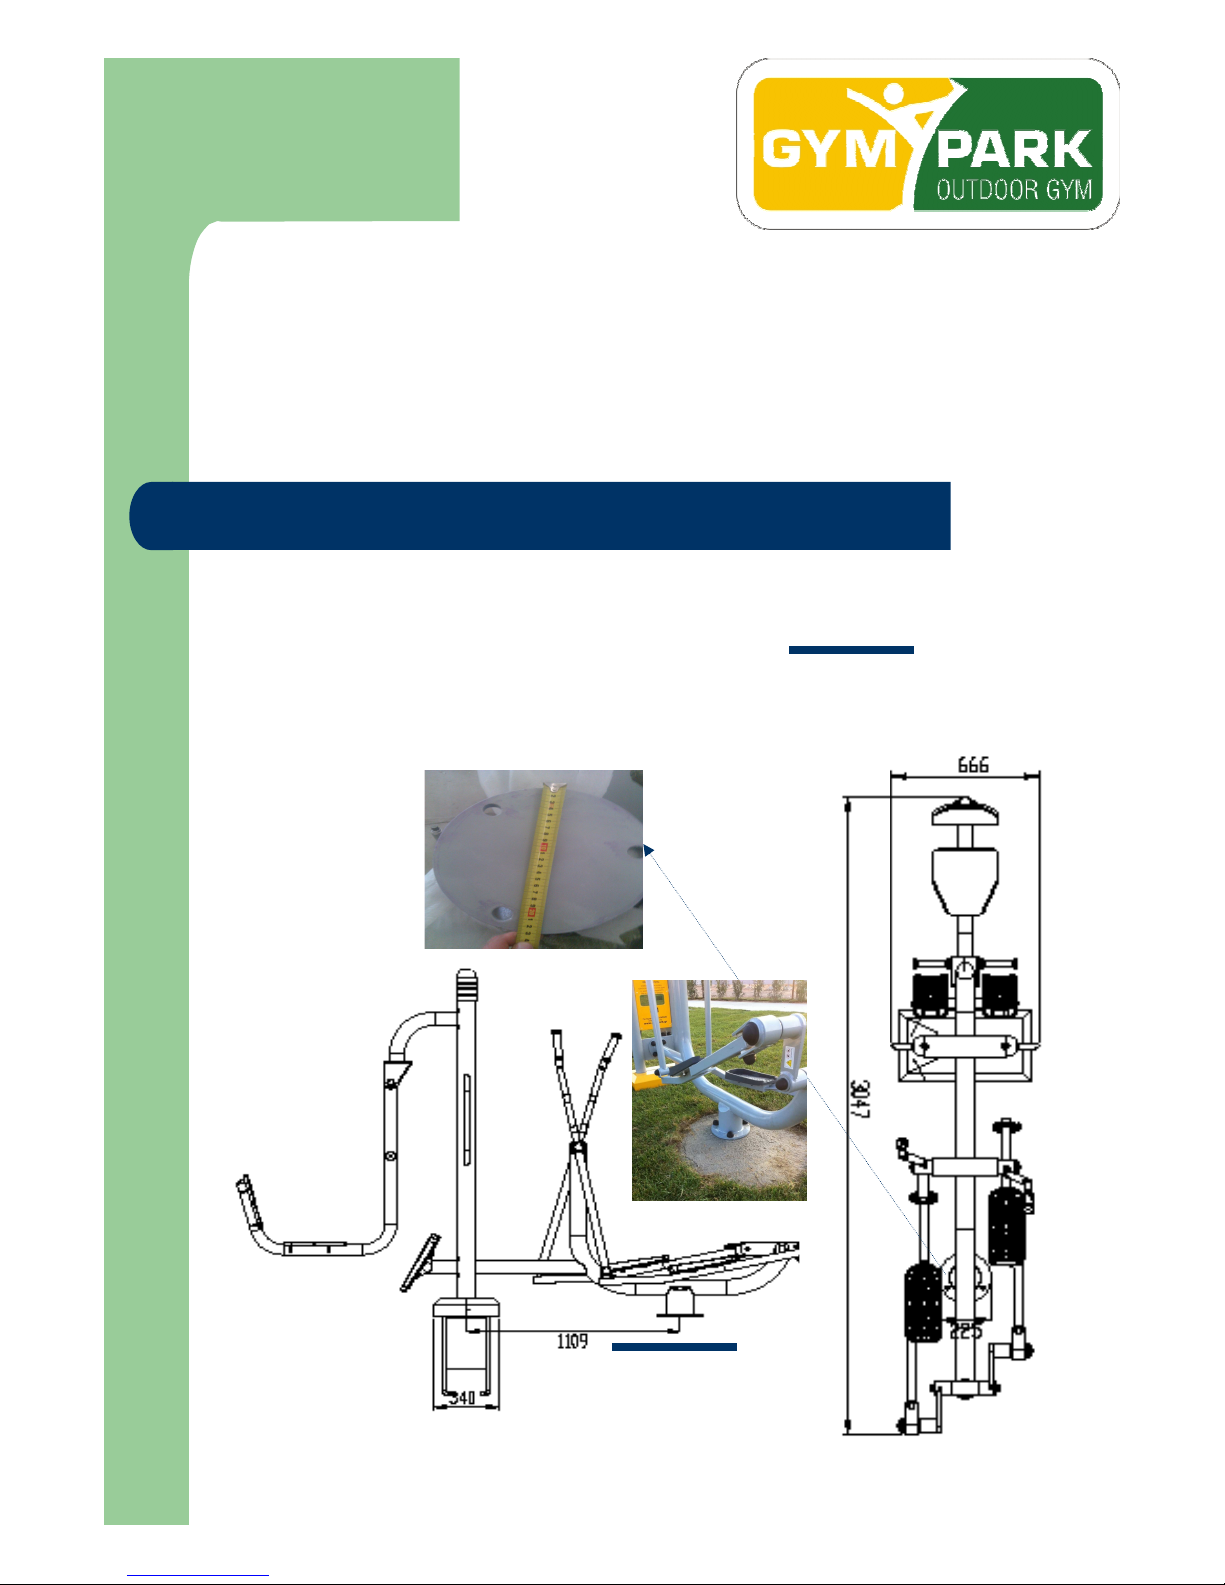
Adjusting the Stepper and
Leg Stretcher (GP110B3-
GB113B1)
For installing the stepper and leg stretcher equipment you will have
to create concrete surfaces in the areas shown with:
Number of concrete surfaces: Stepper 1 (Three holes)
Page 9
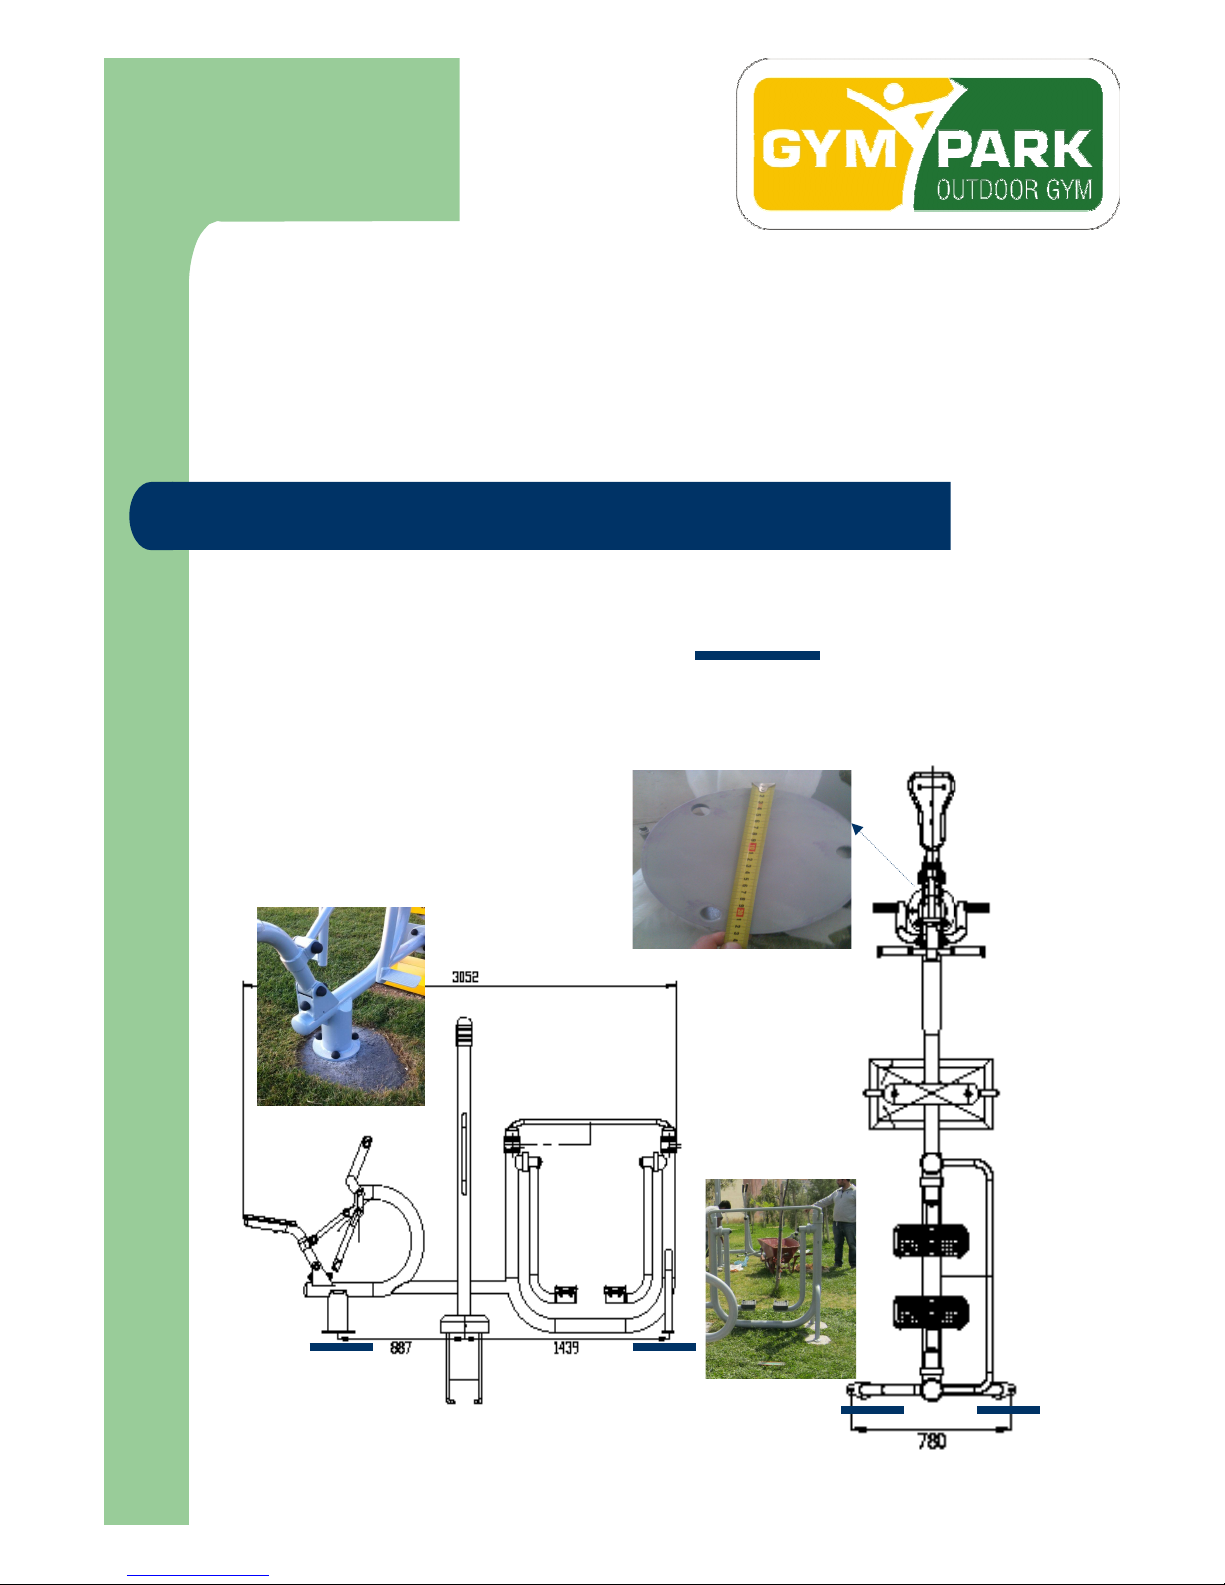
Adjusting the Rambler and
Bonny Rider (GP113B3-GB112B1)
For installing the Rambler and Bonny Rider equipment you will have to create
concrete surfaces in the areas shown with:
Number of concrete surfaces: Bonny Rider 1 (Three holes)
Rambler (Two holes – one from every side)
Page 10
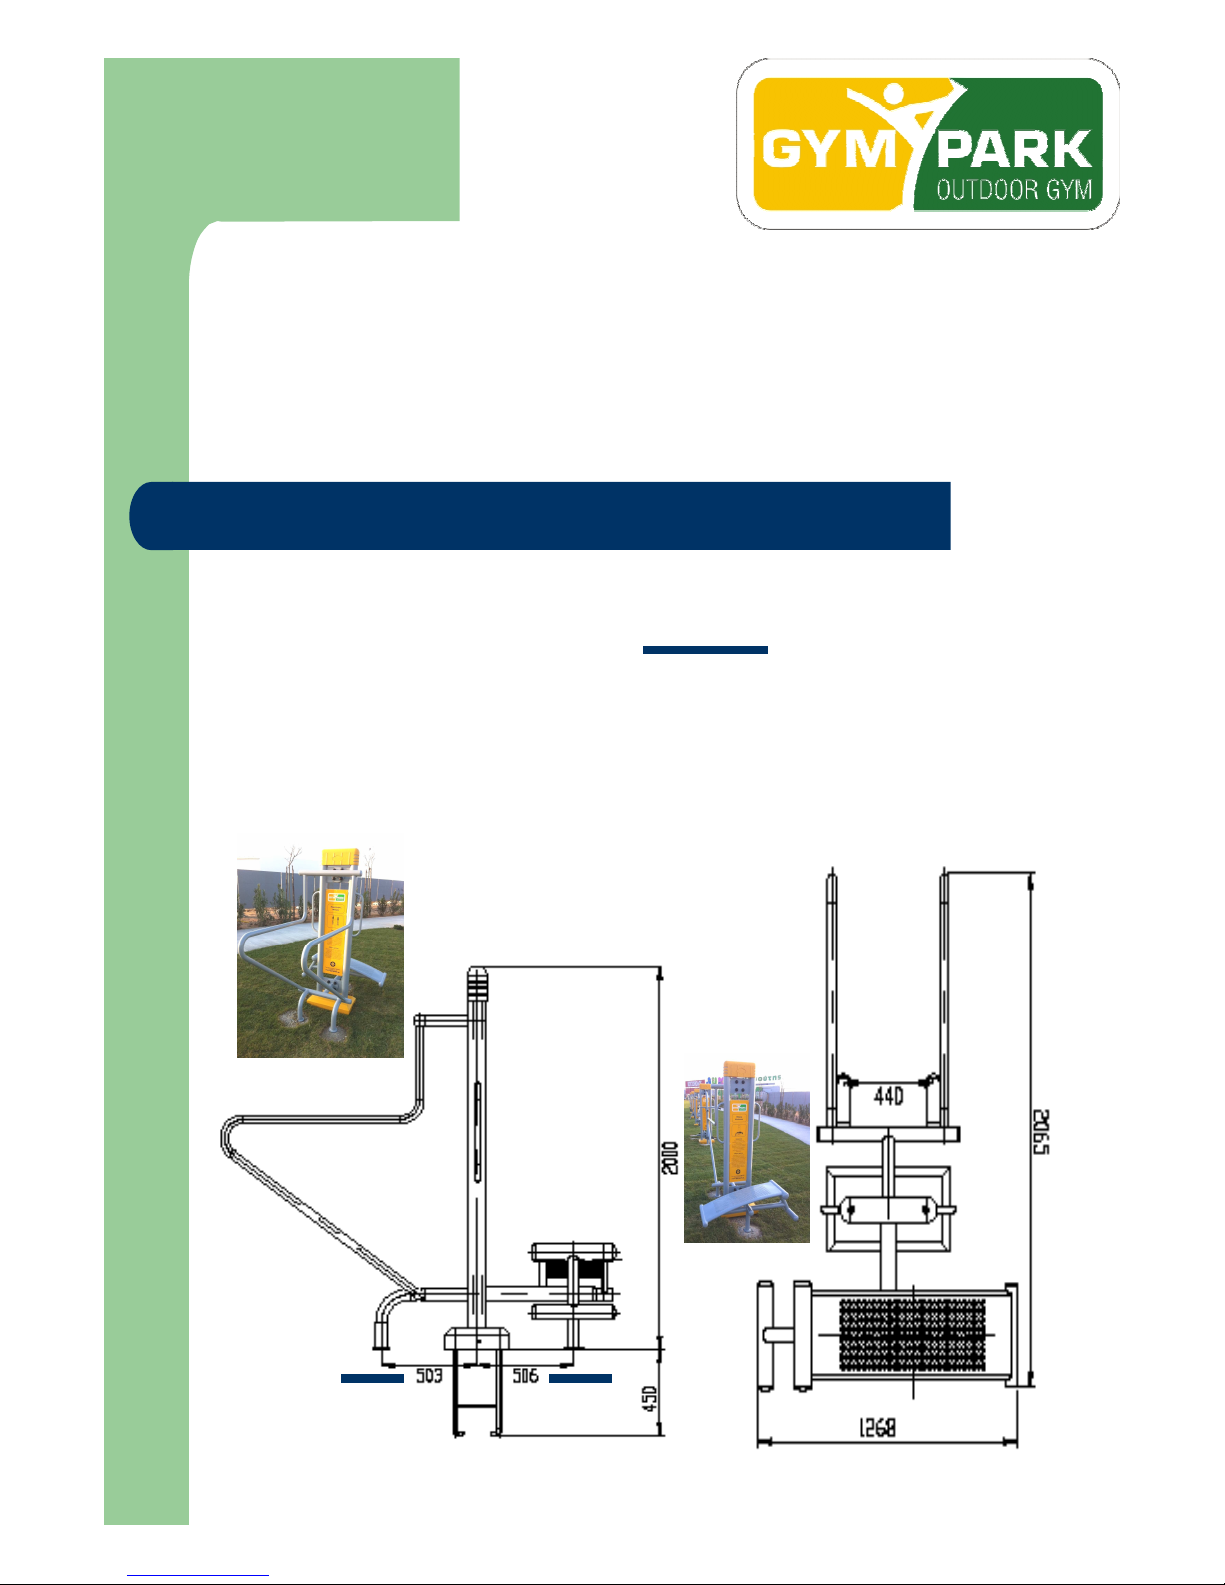
Adjusting the Parallel Bars and
Lying Curve (GP 110B2-GP113B2)
For installing the Parallel Bars and Lying Curve equipment you will have to create
concrete surfaces in the areas shown with:
Number of concrete surfaces: Parallel Bars 1 / Lying Curve 1 (No need
to drill holes)
Page 11
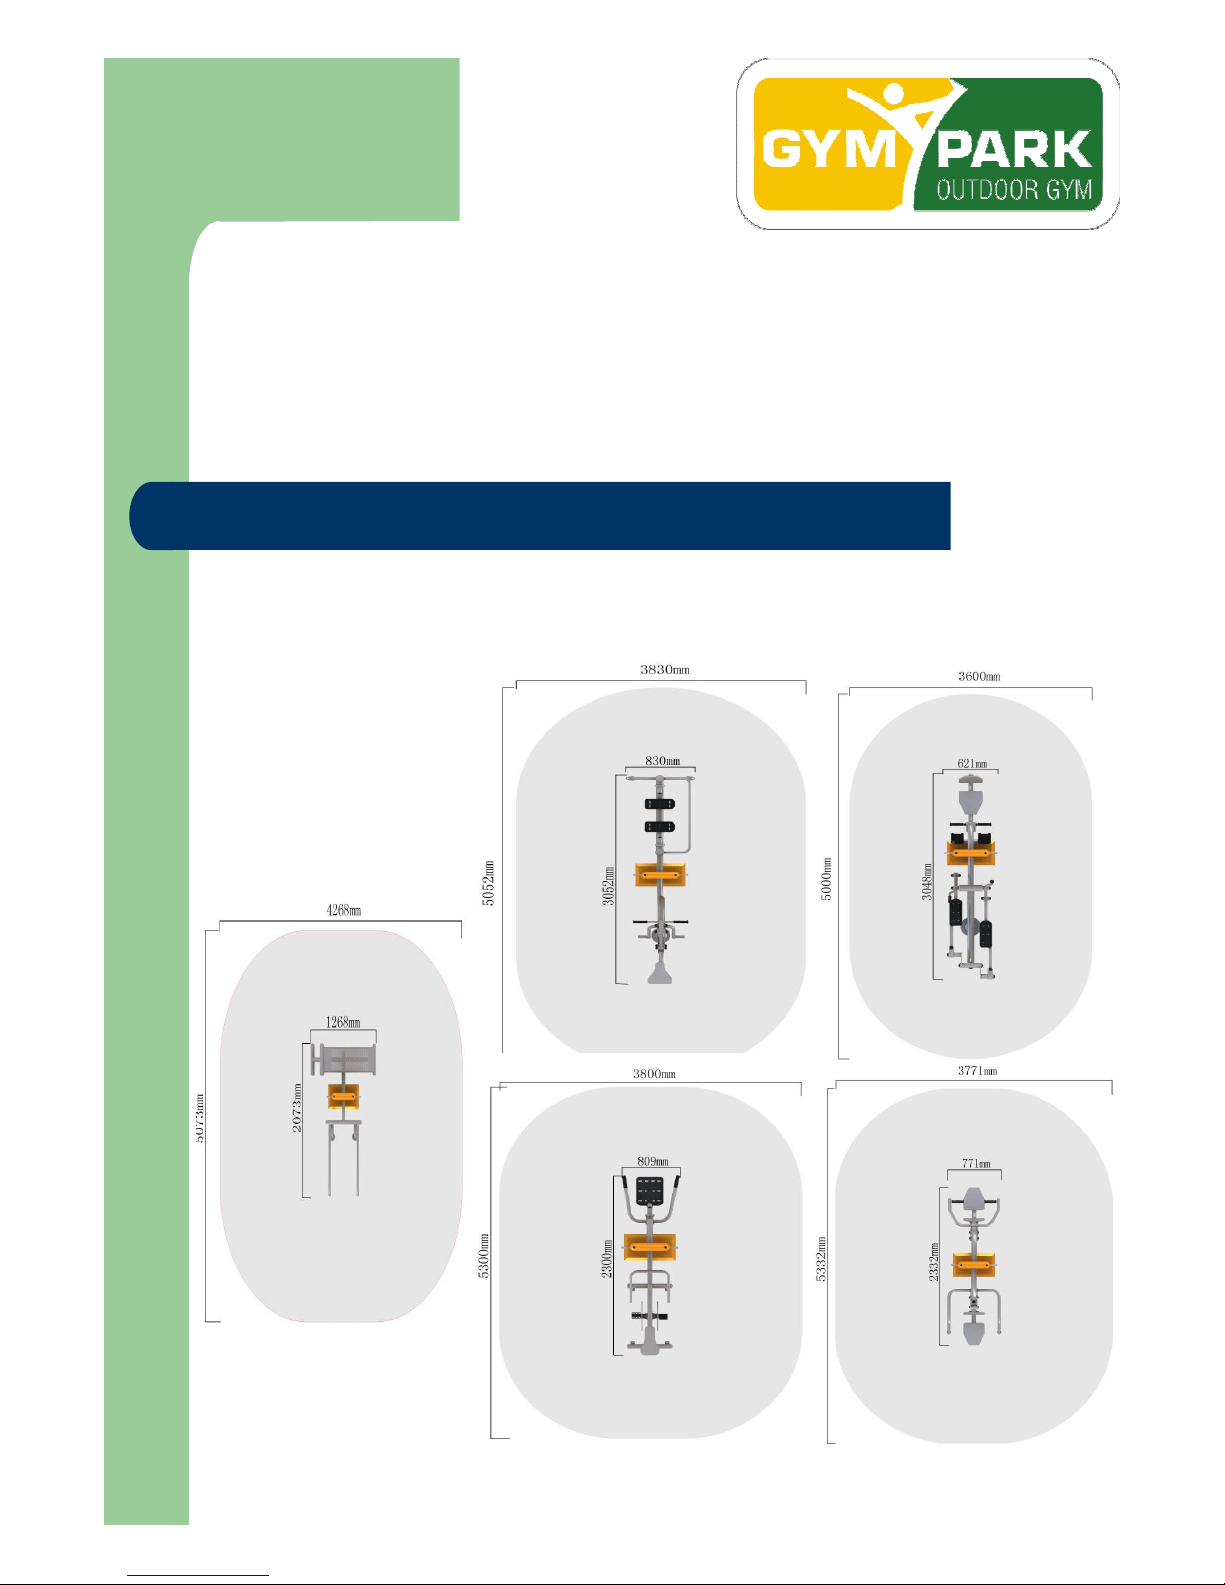
Safety Distances
In order to enable the athletes easier access as well as training to the
equipment please follow the below minimum safety distances
Page 12
Important Notes
• It is strongly recommended that the first installation is overlooked by an
authorized GymPark technician who can offer further on the spot guidance and
information to your personnel
• It is strongly recommended that the instruction plates placed on every
instrument are written on the native language of the country to be used.
• This equipment is intended for outdoor public use and it is constructed to the
highest European Standards. The instruments have been tested and certified
both for their safety and endurance by an accredited independent European
organization.
• This outdoor fitness equipment is intended to be used by healthy individuals
over the age of 14 years old. This is clearly to be stated either on each
instrument’s instruction plate or on an individual sign placed in the entrance of
the park.
• This manual describes the installation process and is to be used as a general
guidance tool. The type of ground considered in the directions illustrated is
gravel / soil. Though as there might be several occasions and several types of
ground, should you have some further enquiries or need some additional
information please do not hesitate to contact GymPark’s technical department.
( + 30 210 5151251 / [email protected])
• The installation procedure usually needs approximately 12-15 working hours
to be completed. For the preparation of the foundations (excavating the ground
and filling the holes with cement ) a two people crew can complete the project
within 7-9 hours. For the installation of the equipment a two people crew can
complete the project within 4 to 6 hours.
Please contact your country’s respective public authority for possible
restrictions or legislation prior to installing this outdoor fitness
equipment
 Loading...