

Gym Master GM98322 Owner's Manual
ELLIPTICAL MAGNETIC TRAINER
GM98322

Precautions
1) Read all the instructions in this manual and do warm up exercises before using this
equipment.
2) This bike is home stationary fitness equipment, and also aerobic training equipment that
can help you to develop your cardiovascular function.
3) Please make sure all parts are not damaged and fixed well before use. The equipment
should be placed on a flat surface when using. Using a carpet or other covering material
on the ground is recommended.
4) Please wear proper clothes and shoes when using this magnetic upright bike; do not
wear clothes that might catch any part of the equipment; remember to tighten the
pedaling straps.
5) Consult your physician and make a suitable exercise schedule before exercise. This is
particularly important to people who are over 35 years old or who have prior medical
history. In order to attain the ideal exercise result, besides executing a suitable amount
of exercise, it is also very important to insist on doing exercise every day.
6) Before exercise, in order to avoid injuring the muscle, warm-up exercise of every
position of the body is necessary. Refer to Warm Up Exercises. After exercise,
relaxation of the body is suggested for cool-down.
7) Keep children and pets away from the equipment while operating the equipment. This
machine is designed for adults only. The minimum free space required for safe
operation is not less than two meters.
8) Do not use this equipment one hour before or after dinner.
9) If you feel any chest pains, nausea, dizziness, or short of breath, you should stop
exercising immediately and consult your physician before continuing.
10)The maximum weight capacity of the user is 100kgs.
11)The braking system of the equipment is speed-independent.
Warning: It will be harmful if you disobey the above-mentioned precautions.
EXERCISE INSTRUCTIONS
Using your Elliptical trainer will provide you with several benefits, it will improve your
physical fitness, tone muscle and in conjunction with calorie controlled diet help you lose
weight.
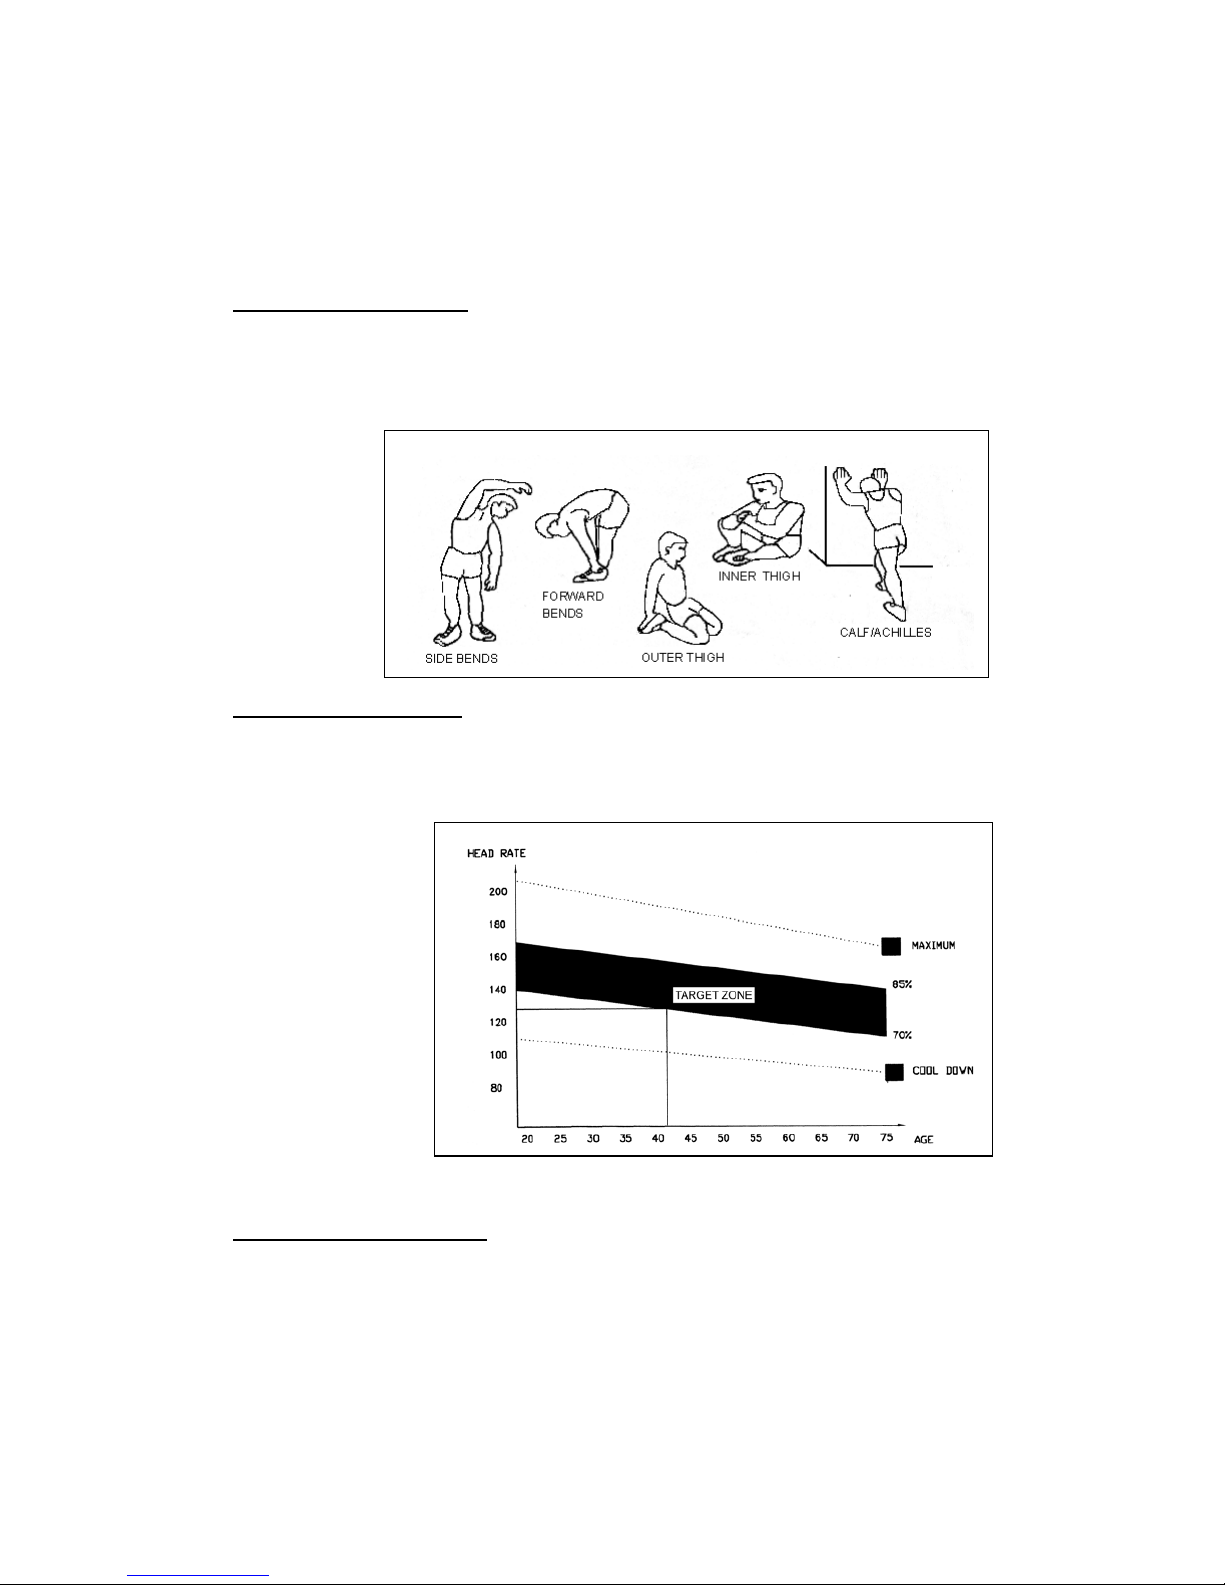
1.The Warm Up Phase
This stage helps get the blood flowing around the body and the muscles working properly. It will also reduce
the risk of cramp and muscle injur y. It is advisable to do a few stretching exercises as shown below. Each
stretch should be held for approximately 30 seconds, do not force or jerk your muscles into a stretch – if it
hurts, STO P.
2.The Exercise Phase
This is the stage where you put the effort in. After regular use, use muscles in your legs will become more
flexible. Work to your own pace but it is very important to maintain a steady tempo throughout. The rate of
work should be sufficient to raise your heart beat into the target zone shown on the graph below.
This stage should last for a minimum of 12mihutes though most people start at about 15-20 minutes.
3.The Cool Down Phase
This stage is to let your Cardio-vascular System and muscles wind down. This is a repeat of the warm up
exercise e.g. reduce your tempo, continue for approximately 5 minutes. The stretching exercises should now
be repeated, again remembering not to force or jerk your muscles into the stretch.
As you get fitter you may need to train longer and harder. It is advisable to train at least three times a week,
and if possible space your workouts evenly throughout the week.
La utilización de esta bicicleta elíptica le ofrece múltiples beneficios ya que mejorará su estado físico,
tonificará sus músculos y, junto a una dieta baja en calorías, le ayudará a perder peso.
1. Fase de calentamiento
Esta fase ayuda a que la sangre fluya alrededor del cuerpo y que los músculos funcionen correcta-
mente. También ayuda a reducir el riesgo de que se produzca un calambre o daños a los músculos.
Se recomienda efectuar algunos ejercicios de estiramiento como se muestra más abajo. Cada
ejercicio de estiramiento debe mantenerse durante aproximadamente 30 segundos. No fuerce ni
exija demasiado sus músculos durante el ejercicio de estiramiento. Si se siente dolor, DETENGA el
ejercicio
2. Fase de ejercicios
Esta es la fase en la que usted debe poner más esfuerzo. Después de un período de regularidad, los
músculos de sus piernas se volverán más flexibles. Efectúe los ejercicios a su propio ritmo, pero es
muy importante que se mantenga un ritmo constante durante todo el tiempo. El nivel de los ejercicios
debe ser suficiente como para elevar el ritmo cardiaco dentro del área objetivo como se muestra en
el gráfico más abajo.
Esta fase debe durar por lo menos 12 minutos aunque la mayoría de gente comienza con una
duración de 15 a 20 minutos.
3. Fase de enfriamiento
Esta fase permite que su sistema cardiovascular y sus músculos se relajen y se enfríen. Esta es una
repetición de los ejercicios de calentamiento, es decir, es una reducción del ritmo continuando duran-
te aproximadamente 5 minutos. Los ejercicios de estiramiento deben repetirse en esta fase siempre
recordando no forzar o exigir demasiado sus músculos al momento de efectuar el estiramiento.
Conforme su condición física mejore, será necesario llevar a cabo el entrenamiento durante más
tiempo y a un nivel de dificultad más alto. Se recomienda hacer ejercicios por lo menos tres veces a
la semana, y si es posible distribuir sus rutinas de ejercicios de manera pareja durante la semana.
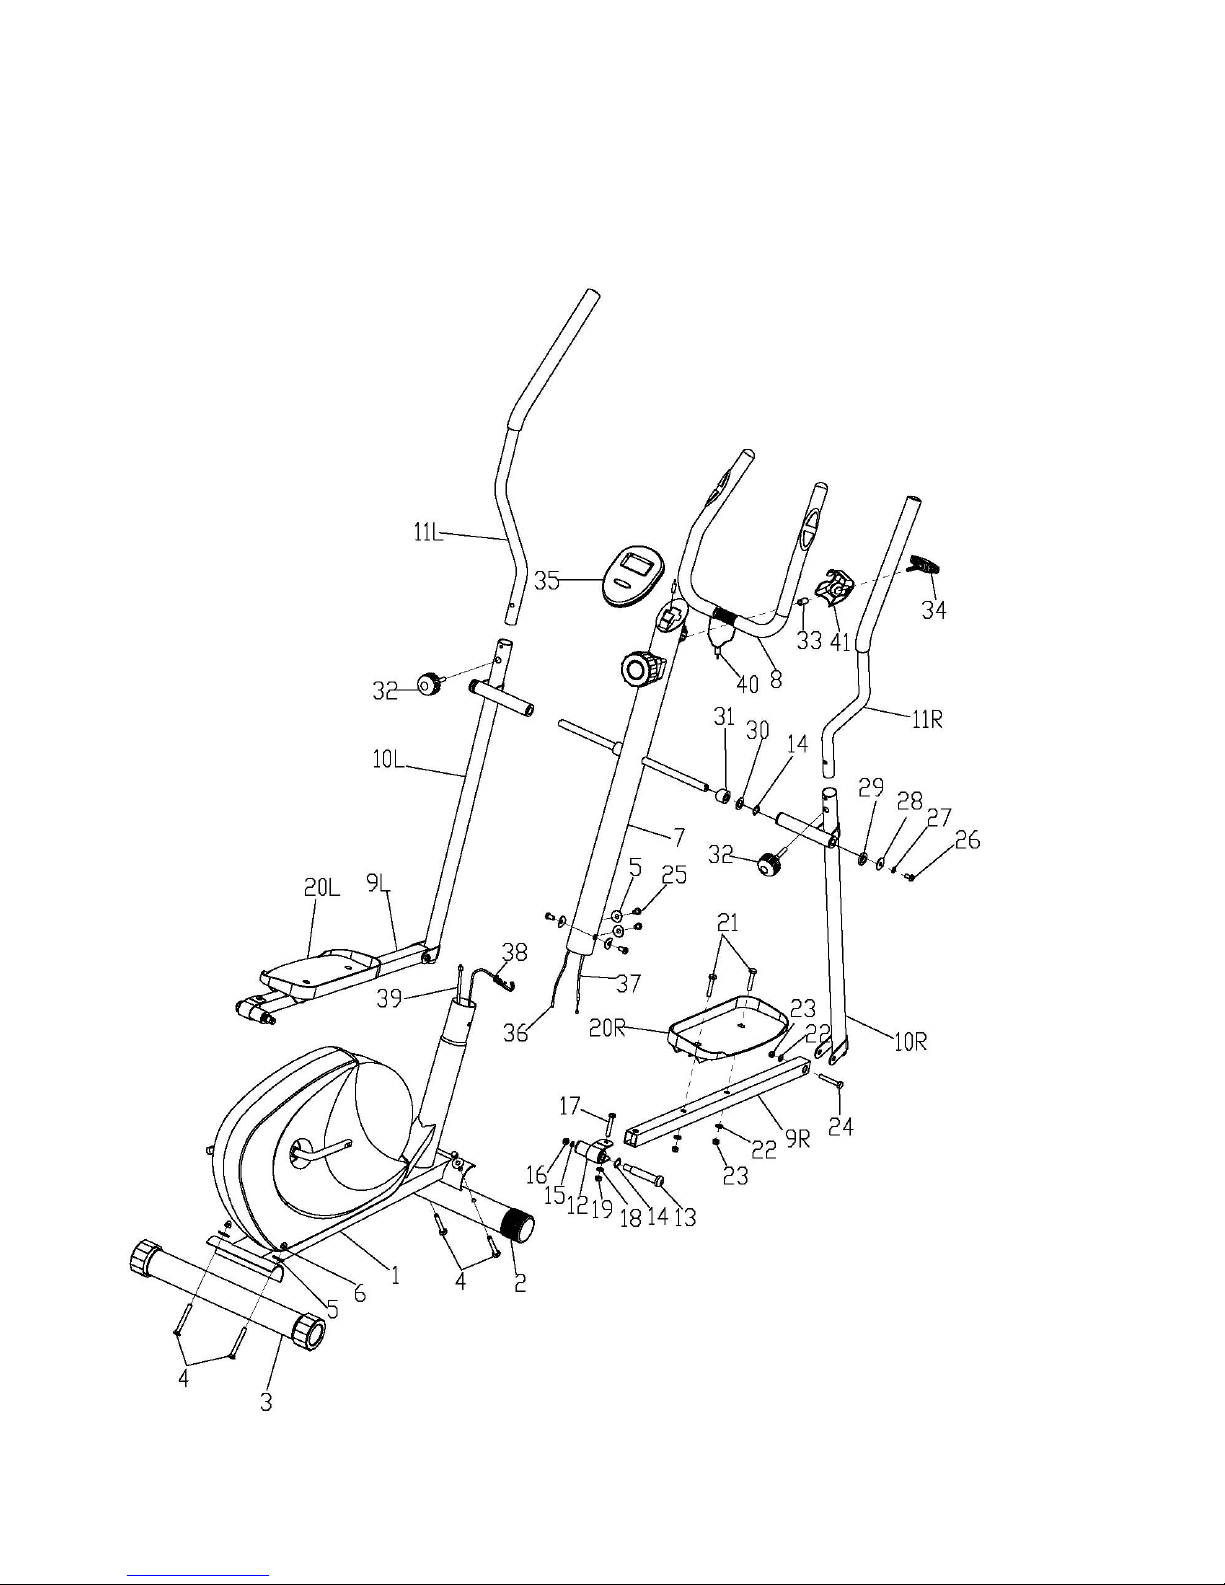
Exploded Diagram

Parts list
NO.
DESCRIPTION
QTY
NO.
DESCRIPTION
QTY
1
Main frame
122Big Flat Washer
6
2
Front bottom tube
123Nylon Nut
6
3
Rear bottom tube
124Bolt
2
4
Carriage bolt
425Bolt
4
5
Arc washer
826Bolt
2
6
Cap nut
427Spring Washer
2
7
Handlebar post
128Big Flat Washer
2
8
Handle pulse bar
129D Shape Washer
2
9L/R
Left & right Pedal tube
1L/1R
30
Big Flat Washer
2
10L/R
Left & right handle tube
1L/1R
31
Bushing
2
11L/R
Left & right handlebar
1L/1R
32
Knob
2
12
Pedal tube joint
233Spacer
1
13
Right pedal bolt
234Bolt
1
14
Ripple washer
435Computer
1
15
Spring washer
236Connection wire
1
16
Right Nylon Nut
237Tension Control wire
1
17
Bolt238
Tension cable
1
18
Flat Washer
239Sensor Wire
1
19
Nylon Nut
240Pulse wire
2
20
Left & Right Pedal
1L/1R
41
Handlebar Clamp
1
21
Bolt
2
Assembly Instruction
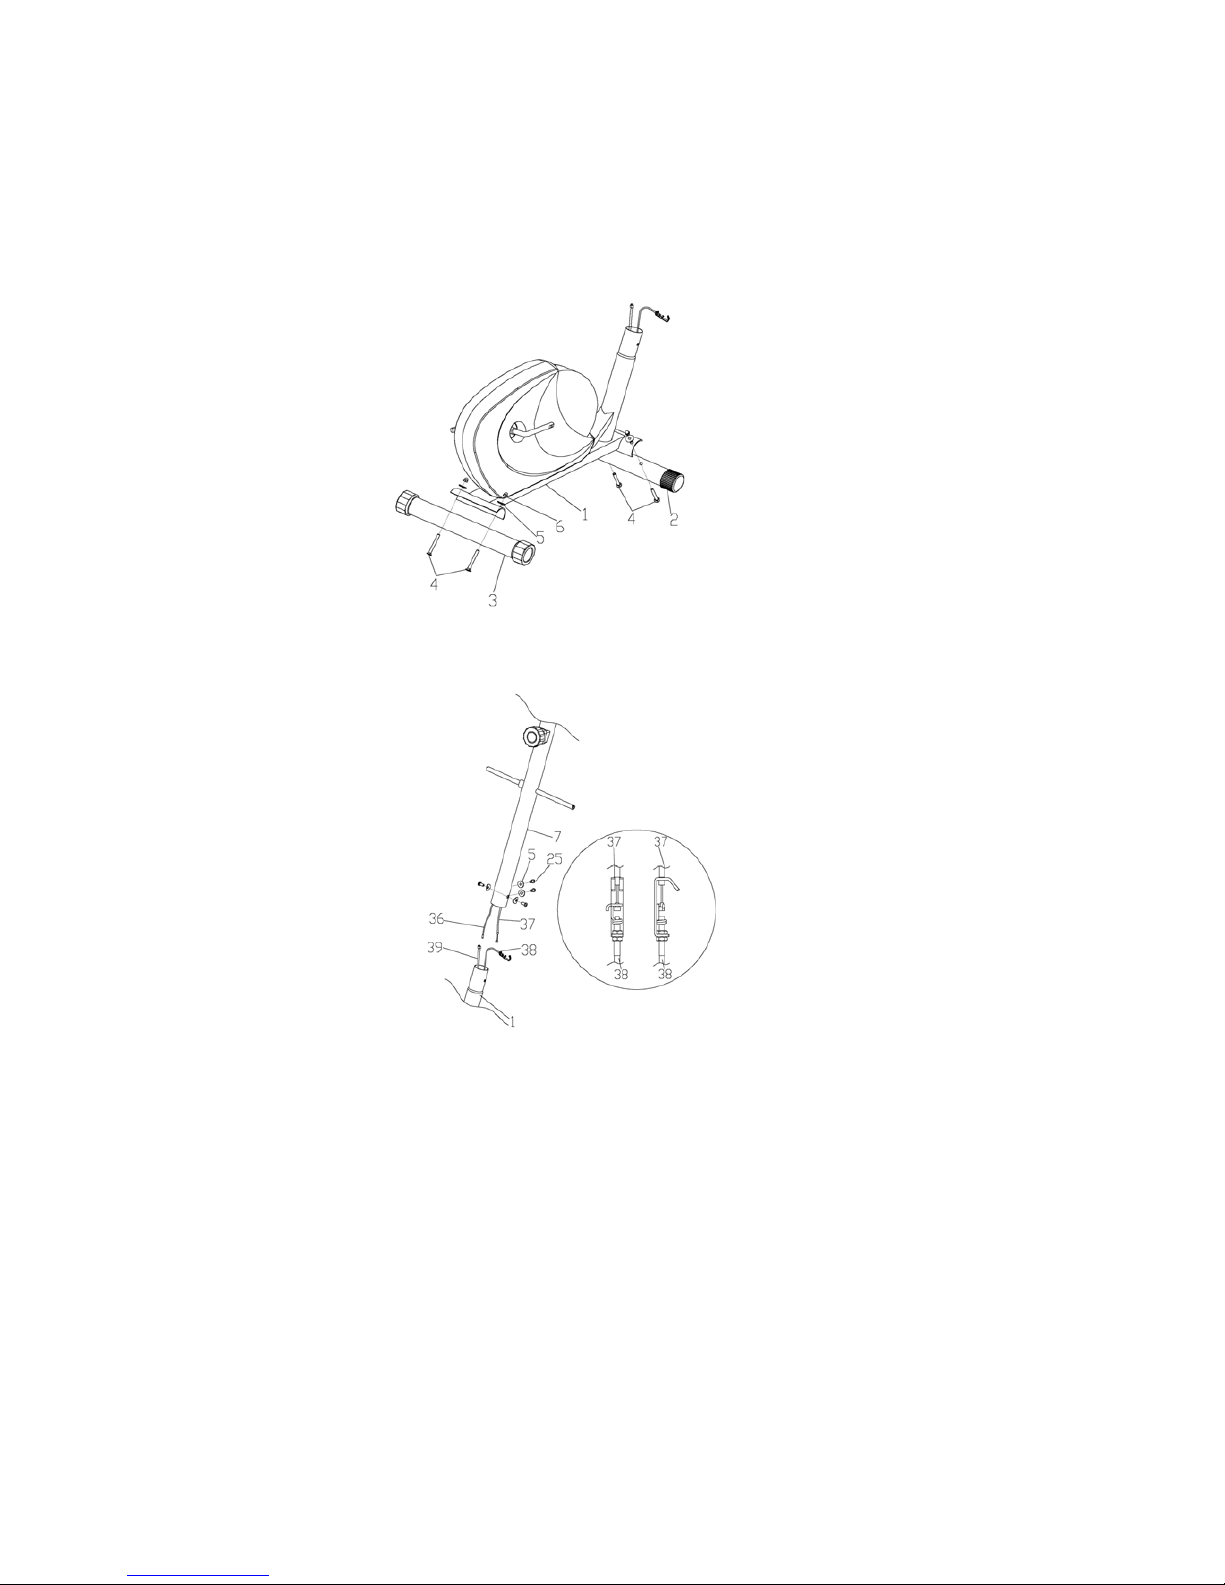
Step 1
Fix the front bottom tube (2) and rear bottom tube (3) in the main frame (1) with carriage
bolt (4), arc washer (5) and cap nut (6).
Step 2
First, connect the connection wire (36) with the sensor wire (39). Next connect tension
control wire (37) with tension cable (38). Then fix handlebar post (7) to the main frame (1)
with arc washer (5) and bolt (25).
Step 3
Fix left & right handle tube (10L/R) in the handlebar post (7) with big flat washer (30), ripple
washer (14), D shape washer (29), big flat washer (28), spring washer (27) and bolt (26).
 Loading...