

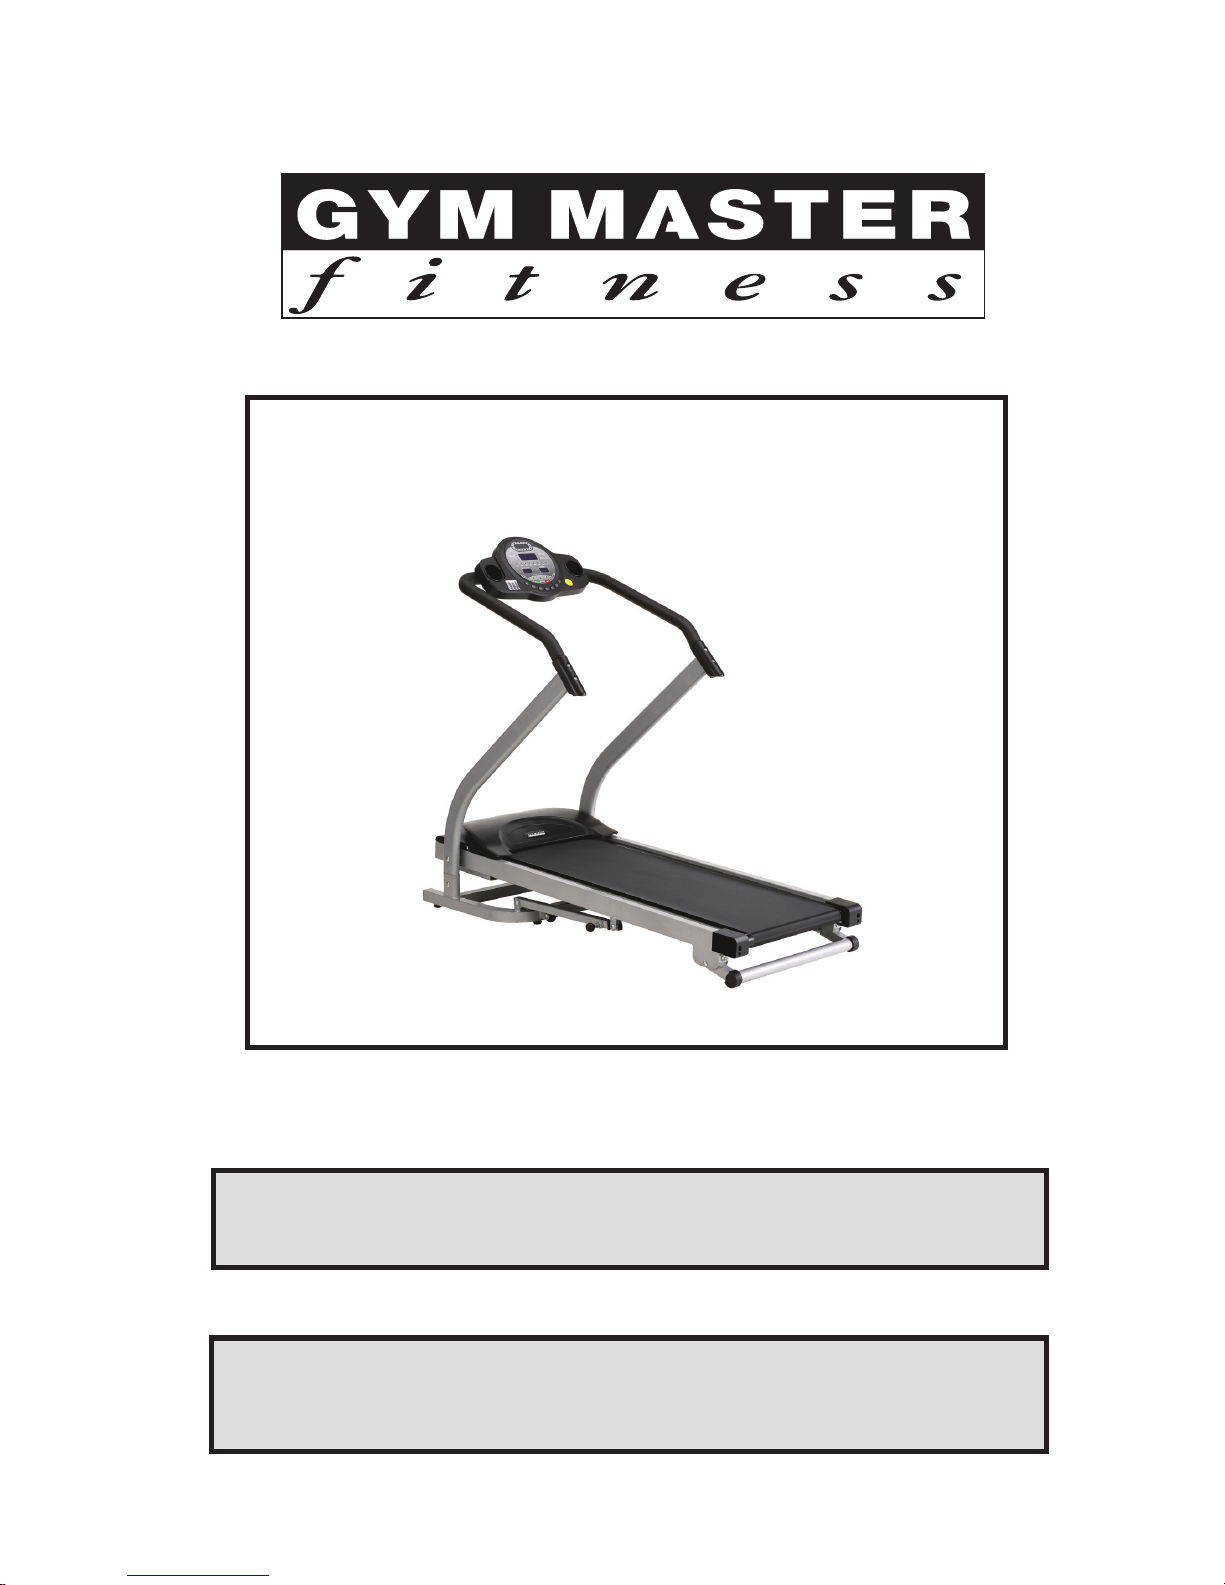
Gym Master GM97816 Instruction Manual
MODEL:
GM97816
INSTRUCTION MANUAL
MOTORIZED TREADMILL
INTRODUCTION
CAUTION!
BEFORE BEGINNING ANY EXERCISE PROGRAM, ALWAYS CONSULT YOUR
PHYSICIAN. IF YOU FEEL CHEST PAINS, NAUSEA, DIZZINESS OR SHORTNESS OF
BREATH, STOP EXERCISE AND CONSULT YOUR PHYSICIAN BEFORE CONTINUING.
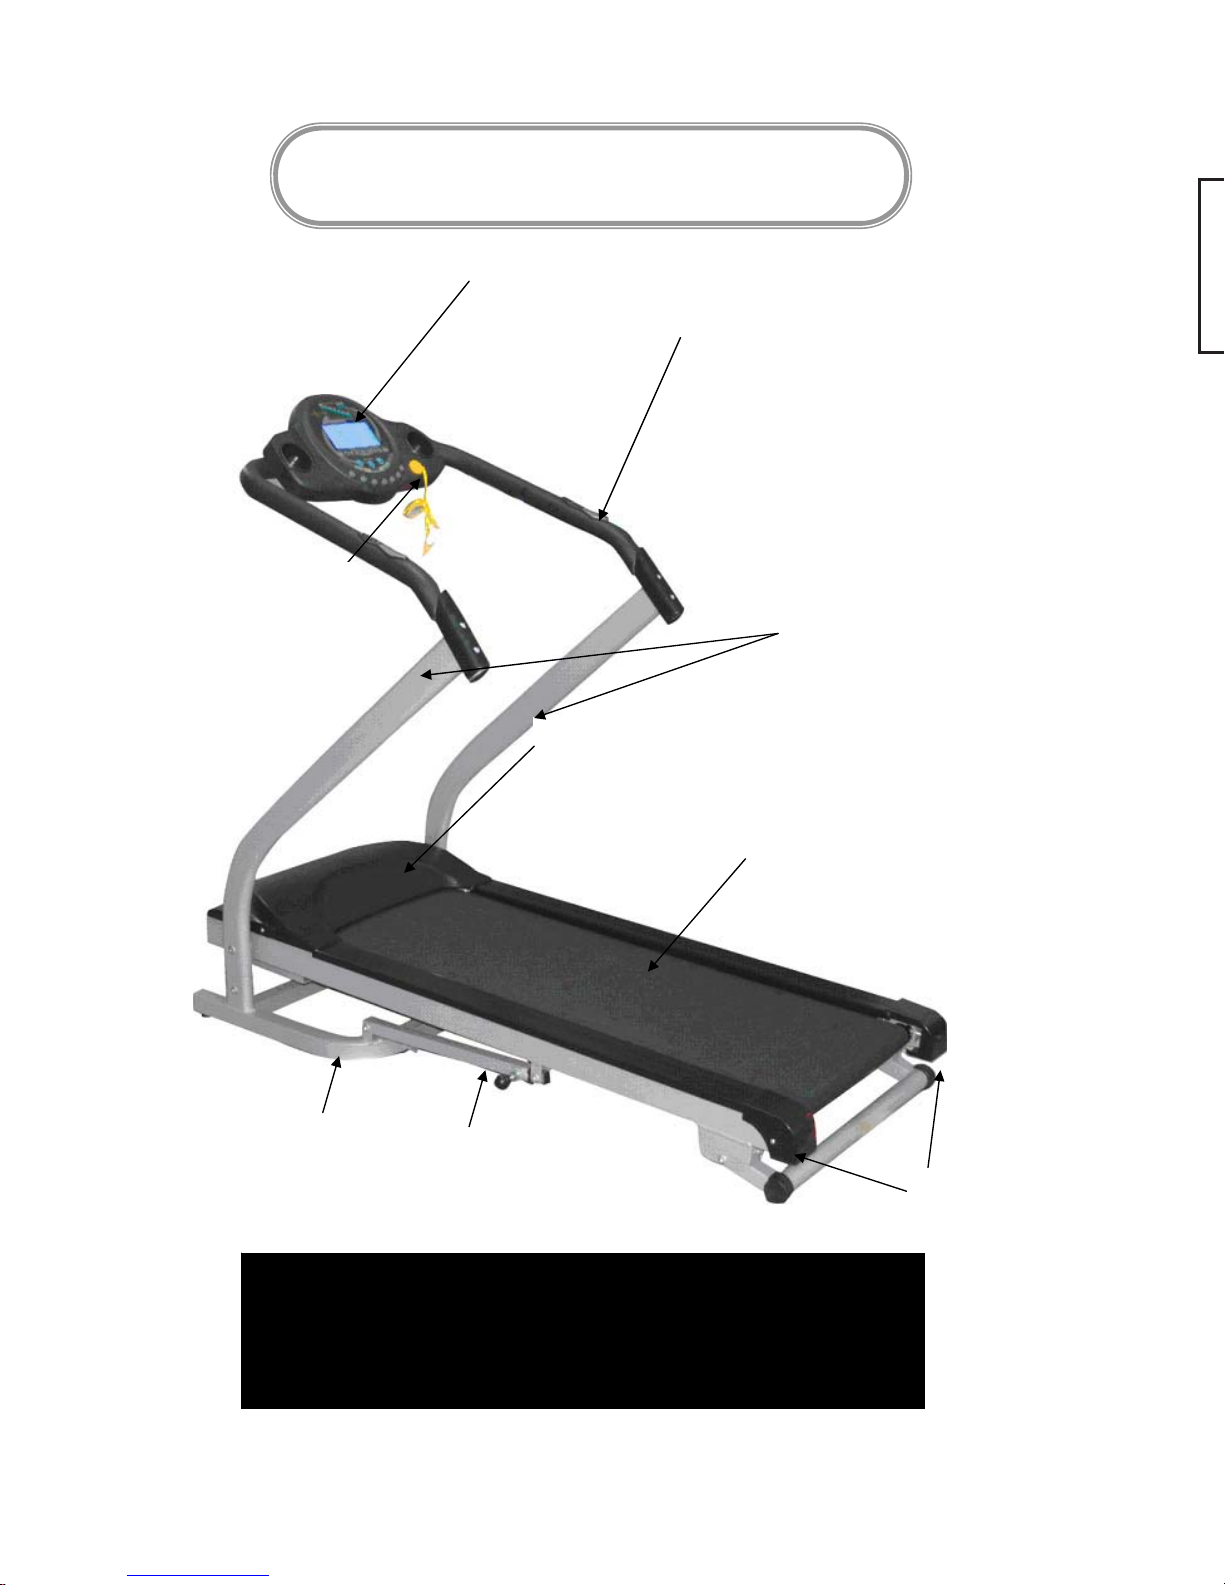
Console with LED windows
Handle pulse sensors
Extension tube
Safety key
Upright posts
Motor cover
Running belt
Bottom frame
Rear covers
CAUTION!
BEFORE BEGINNING ANY EXERCISE PROGRAM, ALWAYS CONSULT YOUR
PHYSICIAN. IF YOU FEEL CHEST PAINS, NAUSEA, DIZZINESS OR SHORTNESS OF
BREATH, STOP EXERCISE AND CONSULT YOUR PHYSICIAN BEFORE CONTINUING.
Console with LED windows
Handle pulse sensors
Owner’s Manual 1
Extension tube
Safety key
Upright posts
Motor cover
Running belt
Bottom frame
Rear covers
1

KEY FEATURES
Congratulations on choosing this treadmill.
You have taken the first step to a healthier and more rewarding lifestyle.
This treadmill is especially designed to give you reliable performance and enjoyable workout in the
comforts of your home. Please find below the features and benefits of this treadmill.
ƺ Manual incline can meet your different requirement, jogging, running, walking.
ƺ LED with big window console let you read the digital easily to know your exercise information.
ƺ LED big window with blue backlight provide 6 programs and 1 manual
ƺ Body fat function can measure your body fat.
ƺ Low impact design with cushions, and PU roller so that your joints are protected against
possible injury.
ƺ Foldable design for convenient storage.
ƺ Mobility wheels for easy moving and relocation.
ƺ Hand contact heart-rate system to monitor cardio performance.
ƺ Emergency safety key for quick motor shut-off.
TECHNOLOGY DATA
Voltage AC-220V 50Hz
Max weight 95Kg
Folding: 800X660X1450mm Dimension
Unfolding: 1450X660X1300mm
Running belt 1200X400
Horsepower 1.5HP
Speed 1.0ˉ12.0Km/h
Weight 55Kg
Function Running
ƺ Remark: Our company retain the priority of revision not to advise in advance.
CAUTION:
Before beginning any exercise program always consult your physician. If you experience chest pains,
nausea, dizziness or shortness of breath, stop exercising and consult your physician before continuing.
CARACTERÍSTICAS PRINCIPALES
Felicitaciones por haber escogido esta trotadora.
Usted ha tomado el primer paso hacia un estilo de vida más saludable y
reconfortante.
Esta trotadora está especialmente diseñada para ofrecerle un funcionamiento con-
able y programa de ejercicios que se puede disfrutar en la comodidad de su hogar.
Abajo encontrará las características y benecios de esta trotadora.
•Inclinación manual que puede satisfacer sus diferentes requisitos: trotar, correr,
caminar.
•Pantalla LED de amplia consola que le permite leer el sistema digital fácilmente para
tener acceso a información sobre su ejercicio.
•Pantalla LED y amplia consola con luz de fondo azul que le ofrece 6 programas y 1
manual.
•Función de grasa corporal que le permite medir la grasa en su cuerpo.
•Diseño de bajo impacto con cojines y con rodillos que protegen sus articulaciones
contra posibles lesiones.
•Diseño plegable para un fácil almacenamiento.
•Ruedas de transporte para un fácil traslado y reubicación.
•Sistema de ritmo cardiaco al contacto con la mano para supervisar el funcionamien-
to del corazón.
•Botón de seguridad de emergencia para un rápido apagado del motor.
Información Tecnológica
Peso Máximo 95kg.
Dimensiones Plegada: 800x660x1450mm
No Plegada: 1450x660x1300mm
Faja para Trotar 1200x400
Caballos de Poder 1.5HP
Velocidad 1.0 – 12.0Km/h
Peso 55kg.
Función Trotar / Correr
•Nota: La empresa se reserva el derecho de efectuar revisiones sin previo aviso.
PRECAUCIÓN:
Antes de comenzar cualquier programa de ejercicios, siempre consulte con su médi-
co. Si se experimenta dolores en el pecho, náusea, mareos o falta de aire, detenga
el ejercicio y consulte con su médico antes de continuar.
2
IMPORTANT SAFETY PRECAUTIONS
When using an electrical product, basic precautions should always be followed.
Read all instructions before using this treadmill.
GROUNDING INSTRUCTIONS
This product must be grounded! If treadmill should malfunction or breakdown, grounding provides
a path of least resistance for electrical current to reduce the risk of electrical shock. The product is
equipped with a cord having an equipment-grounding conductor and a grounding lug. This plug
must be plugged into an appropriate outlet that is properly installed and grounded in accordance
with local codes and ordinances.
DANGER! Improper connection of the equipment-grounding conductor can result in a risk of
electric shock. Check with a qualified electrician or serviceman if you are in doubt as to whether
the product is properly grounded. Do not modify the plug provided with the product- if it will not fit
the outlet, have a proper outlet installed by a qualified electrician.
ELECTRICAL SAFETY
To reduce the risk of burns, fire, electrical shock, or injury to persons, take the following
precautions.
ƽ When plugged in, do not leave the treadmill unattended at any time. Unplug the treadmill from
the power source when it is not in use.
ƽ Do not use the treadmill if the unit is wet or the plug or cable is damaged or the treadmill is not
working properly. Do not use a damaged or defective equipment.
ƽ Keep the power cable and plug away from heated surfaces.
ƽ Never place the power cord under carpeting or place any object on top of the power cord.
ƽ Use only the power cord provided with this treadmill
ƽ Please turn the switch to the “off” position before shut down power supply, then remove the
plug from the outlet.
This exercise equipment is designed and built for optimum safety for the home use. However,
certain precautions always apply whenever you operate any exercise equipment. Be sure to read
the entire manual before assembly and operation of this machine. Also, please note the following
safety precautions.
˘
WARNING!
Connect this unit to a properly grounded outlet only. Please using special circuit with special power
supply, plug with power supply must be connected with earth.
3
MECHANICAL SAFETY
ƽ Before you start to exercise, make sure the unit functions correctly. To maintain the safety level
of the exercise equipment does not use a faulty device.
ƽ Replace defective components immediately and/or keep the equipment out of use until repair.
ƽ Inspect the equipment prior to exercising to ensure that all nuts and bolts are fully tightened
before each use.
ƽ Do not use attachments not recommended by the manufacturer.
ƽ Never drop or insert any object into any opening.
ƽ Never activate the speed when someone is standing on the treadmill.
APPROPRIATE ATTIRE
ƽ Always wear appropriate clothing. Do not wear clothing that might catch on any part of this
treadmill
ƽ Always wear non-slippery shoes while working with the treadmill. Do not wear shoes with
heels or leather soles. Check the soles of your shoes and remove any dirt and embedded
stones.
CHILDREN AND PETS
ƽ Most exercise equipment is not recommended for small children. Children should not use the
equipment unless they are under adult supervision. To ensure safety, keep young children off
the treadmill at all time.
ƽ Exercise equipment has many moving parts. In the interest of safety, keep others (especially
children and pets) at a safe distance while you exercise.
CAUTION!
Stop your workout immediately if you feel any painor abnormal symptoms and consult
your physician. .Read this manual before operating this treadmill.
SEGURIDAD MECÁNICA
•Antes de comenzar a hacer ejercicios, asegúrese de que el equipo funcione cor-
rectamente. Para mantener su nivel de seguridad, no utilice el equipo si se encuentra
defectuoso.
•Reemplace las piezas defectuosas inmediatamente y/o mantenga el equipo fuera de
uso hasta que sea reparado.
•Inspeccione el equipo antes de hacer ejercicios para asegurarse que todas las tuer-
cas y pernos estén bien ajustados antes de cada uso.
•No utilice aditamentos no recomendados por fabricante.
•Nunca inserte o deje caer objetos dentro de ninguna abertura.
•Nunca active la velocidad cuando alguien se encuentre de pie sobre la trotadora.
VESTIMENTA APROPIADA
•Siempre lleve la vestimenta apropiada. No utilice ropa que pueda atracarse en la
tratadora.
•Siempre utilice zapatos no resbalosos para trotar en el equipo. No utilice zapatos
con tacones o suelas de cuero. Revise las suelas de sus zapatos y retire cualquier
rastro de suciedad o piedras incrustadas.
NIÑOS Y MASCOTAS
•La mayoría de equipos ejercicios no son recomendados para ser utilizados por
niños pequeños. Los niños no deben utilizar el equipo a menos que se cuente con la
supervisión de un adulto. Para garantizar su seguridad, mantenga a los niños peque-
ños lejos de la trotadora en todo momento.
•El equipo de ejercicios tiene muchas piezas en movimiento. Para garantizar la se-
guridad, mantenga a otros (especialmente niños y mascotas) a una distancia segura
mientras se lleva a cabo los ejercicios.
¡PRECAUCIÓN!
Detenga el ejercicio inmediatamente si se experimenta algún dolor o síntomas anor-
males y consulte con su médico. Lea este manual antes de utilizar la trotadora.
4
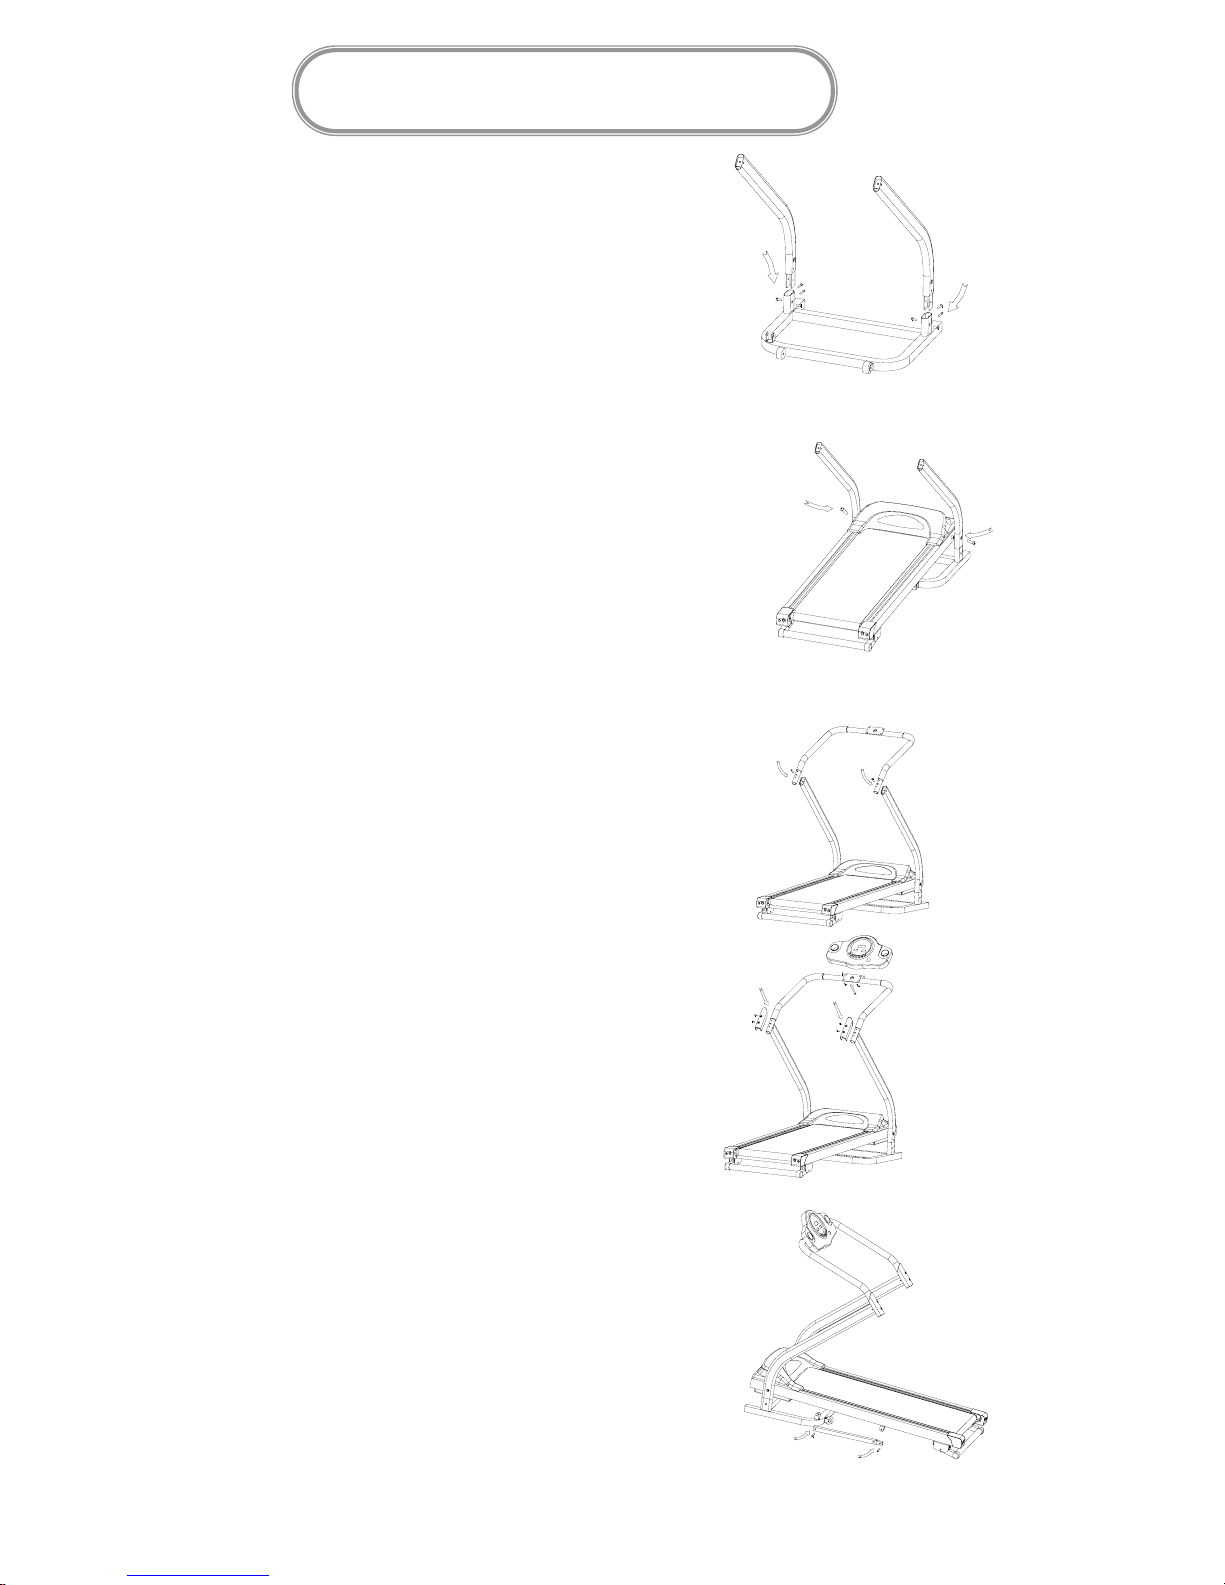
ASSEMBLY INSTRUCTIONS
ASSEMBLY TREADMILL
1/ ASSEMBLE THE UPRIGHT POSTS (as picture 1)
Connect the wires before you assembly the upright posts.
Fix each upright post and base frame with
4pcs bolts (M8X15) for each side.
Do not tighten these bolts until the console
frame have been tightened.
2/ ASSEMBLY THE MAIN FRAME(as picture 2)
Put the main frame on the bottom frame.
Fix the main frame with bolts (M10X75) ,then connect the wires well.
(2)
3/ ASSEMBLY THE HANDLE BAR (as picture 3 )
Put the handle bar on the upright posts, then connect the wires of the well.
Fix the handle bar with two
bolts (M10X50) like the picture 3.
(3)
Owner’s Manual 5
4/ ASSEMBLY THE CONSOLE AND THE HANDLE COVER (as picture 4)
Connect the wires ,fix the computer on the handle bar with
4PCS bolts(M4X15).
Fix the handle bar cover on the handle bar with 4PCS bolts(M6X20).
(4)
5/ ASSEMBLY THE EXTENSION TUBE (as picture 5)
Fix the extension tube on the bottom frame with the bolts(M8X45)
And fix the extension tube on the main frame with the bolts(M8X40)
(5)
6/ TIGHT ALL THE BOLTS ,THEN FINISH THE ASSEMBLE.
(3)
4/ ASSEMBLY THE CONSOLE AND THE HANDLE COVER (as picture 4)
Connect the wires ,fix the computer on the handle bar with
4PCS bolts(M4X15).
Fix the handle bar cover on the handle bar with 4PCS bolts(M6X20).
(4)
5/ ASSEMBLY THE EXTENSION TUBE (as picture 5)
Fix the extension tube on the bottom frame with the bolts(M8X45)
And fix the extension tube on the main frame with the bolts(M8X40)
(5)
6/ TIGHT ALL THE BOLTS ,THEN FINISH THE ASSEMBLE.
Owner’s Manual 6
5
SETTING UP YOUR TREADMILL
PLACEMENT IN YOUR HOME
To make exercise a desirable daily activity for you, the treadmill should be placed in a comfortable
and attractive setting. This treadmill is designed to use minimal floor space and to go nicely in your
home.
gDo not place the treadmill outdoors.
gDo not place the treadmill near water or in high moisture content environment.
gMade sure power cord is no tin the path of heavy traffic.
gIf your room is carpeted, check the clearance to make sure there is enough space
between the carpet fiber and the treadmill deck. If you are uncertain, it is best to place
mat beneath your treadmill.
gLocate the treadmill at least 4 feet from walls or furniture.
gAllow the safety area of 2m x1m behind the treadmill so that you can easily get on and
off the treadmill without getting trapped during an emergency.
Occasionally after extended use you will find a black dust below your treadmill. This is normal
wear and does not mean there is anything wrong with your treadmill. This dust can be easily
removed with a vacuum cleaner. If you wish to prevent this dust from getting on your floor or carpet,
place a mat beneath your treadmill.
LEVELING THE BASE
It is important that you place the treadmill on a firm level surface.
Check the treadmill to ensure the frame is level once you have moved the treadmill into the
position of your choice.
CAUTION!
Make sure the running deck is level to the ground. If the deck is positioned on uneven surfaceˈit would
cause premature damage to the electronic system.
INSTALACIÓN DE SU TROTADORA
Ubicación en el hogar
Para que los ejercicios sean una actividad diaria en usted disfrute, la trotadora debe
colocarse en un lugar cómodo y atractivo. Esta trotadora está diseñada para utilizar
un mínimo de espacio y para verse bien en su hogar.
-No coloque la trotadora al aire libre.
-No coloque la trotadora cerca al agua en un ambiente que contenga demasiada
humedad.
-Asegúrese de que el cordón no se encuentre interrumpiendo el tránsito de personas.
-Si la habitación tiene alfombra, verique que haya suciente espacio entre la alfom-
bra y la base de la trotadora. Si no se está seguro, es mejor colocar un tapete debajo
de la trotadora.
-Ubique la trotadora por lo menos a cuatro pies de las paredes o de muebles.
-Deje un área de seguridad de 2m x 1m detrás de la tratadora para facilitar el acceso
a la hora de subirse y bajarse de ella y no quedar atrapado en una emergencia.
Ocasionalmente después de un uso prolongado se puede encontrar un poco de pol-
vo color negro debajo de la trotadora. Esto es normal y no signica que exista algún
desperfecto. Este polvo puede ser fácilmente retirado utilizando una aspiradora. Si
se desea prevenir que este polvo caiga sobre el suelo o alfombra, coloque un tapete
debajo de la trotadora.
CÓMO NIVELAR LA BASE
Es importante colocar la trotadora sobre una supercie rme y nivelada.
Verique que el armazón se encuentre nivelado una vez que se haya trasladado la
trotadora al lugar de su preferencia.
¡PRECAUCIÓN!
Asegúrese de que la faja para correr se encuentre nivelada con el piso.
6
GETTING STARTED
TURN POWER ON
The On/Off switch for the treadmill is located next to the power supply cord at the back of the
motor cover. Flip this switch to the “ON” position.
SAFETY TETHER KEY AND CLIP
The safety key is designed to cut the main power to the treadmill should your fall. Therefore,
the safety key is designed to bring the treadmill to an immediate stop. At high speeds, it may be
uncomfortable and somewhat dangerous to come to a complete stop immediately. So, use the
safety key as emergency top only. To bring the treadmill to a complete stop safely and
comfortably, use the red stop button.
Your treadmill will not start unless the safety key is properly inserted into the key holder in the
middle of the console. The other end of the safety key should be securely clipped to your
clothing so that in the case that you fall, you will pull the safety key from the console, which will
stop the treadmill immediately to minimize injury. For your safety, never use the treadmill
without securing the safety key clipped to your clothing. Pull on the safety key clip to make turn
it will not come off your clothing.
GETTING ON AND OFF THE TREADMILL
Handle with care when getting on or off the treadmill. Try to use the handlebars while getting on
or off. While you are preparing to use the treadmill, do not stand on the running belt. Straddle
the running belt by placing your feet on both side rails of the treadmill deck. Place your foot on
the belt only after the belt has begun to move at a consistent slow speed.
During exercise, keep your body and head facing forward at all times. Never attempt to turn
around on the treadmill when the running belt is still moving. When you have finished
exercising, stop the treadmill by pressing the red stop button. Wait until the treadmill comes to a
complete stop before attempting to get off the treadmill.
WARNING!
Never use this treadmill without first securing the safety tether clip to our clothing.
CAUTION!
For your safety, step onto the belt when the speed
is no more than 3km/h.
7
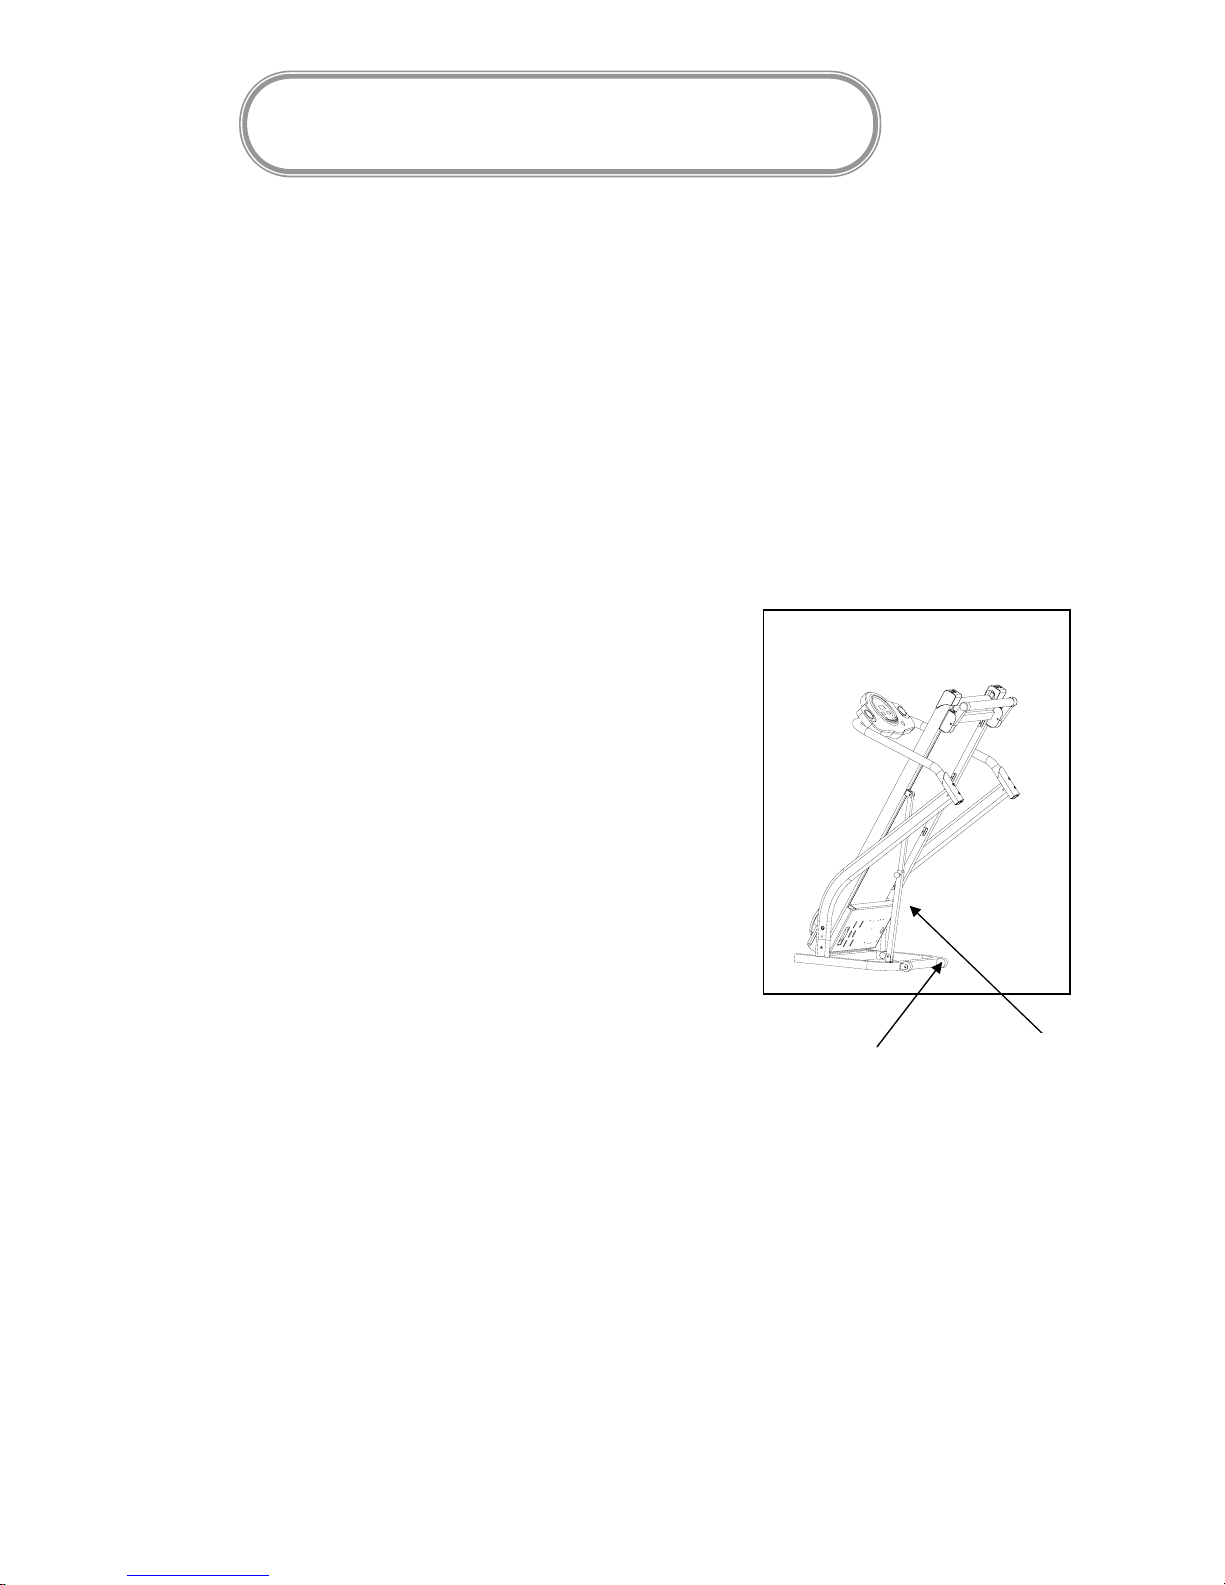
HANDLING YOUR TREADMILL
LIFT THE TREADMILL
Use the manual incline to incline the treadmill.
FOLDING THE TREADMILL
Folding and unfolding of this treadmill is made easy with the assistance of extension tube.
( the picture below) After the treadmill has come to a complete stop, unplug the treadmill
from the power source, fold up the deck slowly with both hands. Use the safety lock to lock
the item.
UNFOLDING THE TREADMILL
The release handle is located on the end of left Main Frame, To unfold the treadmill, use
your hands to push Main Frame gently, then the treadmill will be folding down with hand
free by itself slowly to the ground.
MOVING THE TREADMILL
This treadmill is easy to move around safety.
To move the treadmill
Aǃ Foldable the machine
Bǃ Unplug the power cord˗
Cǃ Moving the treadmill by using the PU transportation Wheel
extension tube
Wheel
MOVING THE TREADMILL
This treadmill is easy to move around safety.
To move the treadmill
Aǃ Foldable the machine
Bǃ Unplug the power cord˗
Cǃ Moving the treadmill by using the PU transportation Wheel
Owner’s Manual 9
principal. Para desplegar el equipo, utilice sus
manos empujando el armazón principal con
cuidado. Luego la trotadora se desplegará
hacia abajo por sí sola con la ayuda de la otra
mano hasta llegar al piso.
Cómo trasladar la trotadora
Este equipo es fácil de trasladar de manera
segura.
Para trasladar la trotadora:
A.Pliegue el equipo
B.Desenchufe
C.Traslade la trotadora utilizando la rueda de
transporte PU
8

ĉˊInstructions about the console window
1.Display windows :three Windows and a runway light:
A: The left side window display: Heart range data.
B: The right side window display: Speed range data.
C: In the center the window display: Time , distance, calories, runway. When show a certain data
correspond of LED light would be flicker. Press the mode key to choose to fixed or time-sharing way to
show the data, when display time-sharing , the light will flicker in the windows.
D: Top side is 16 LED of simulation drill ground, each circuit is:400 meter.
E: In the center the window: handle normal modeˉ> handle countdown modeˉ> handle countdown
distance modeˉ>handle countdown calorie mode> P6-> handle normal modeˉ>
The light of the window will be flicker when you choose that window.
2.Fuction key:Program, mode, power supply, start/pause, speed +, speed –
Speed Key: 3,6,9
A:Āprogram ākey˖when the machine stops, press the “program” key can enter the circle choosing
program: handle normal modeˉ> handle countdown modeˉ> handle countdown distance modeˉ
>handle countdown calorie mode>P1- ->P2->P3->P4->P5->P6-> handle normal modeˉ>- - -/DŽ
B˖Āmodeākey˖press the key can enter the circle choosing program of the middle window. fixed show
timeˉ> fixed show calorieˉ>
C˖Āstart/pause ākey˖ when press this keyˈthe motor can start the motor can pause when press this
key in the process of motor moving. in the state of pause, all the date keep unchanged, the speed
window show PAU .
D˖Āstopākey: press this key the motor will stop working ˈall the data turn 0 and then enter into handle
mode.
E˖Āpowerākey˖you can put on or off the power of the console at any state.
F˖”+” “-“ key:adjust sped in the running status and adjust parameter in the stop status.
G:Āquick speedākeyΨĀ3.6.9āDŽquick key of adjust the speed.
Owner’s Manual 10
OPERATING THE CONSOLE
1.DISPLAY AND KEY FUNCTION:
ĉˊInstructions about the console window
1.Display windows :three Windows and a runway light:
A: The left side window display: Heart range data.
B: The right side window display: Speed range data.
C: In the center the window display: Time , distance, calories, runway. When show a certain data
correspond of LED light would be flicker. Press the mode key to choose to fixed or time-sharing way to
show the data, when display time-sharing , the light will flicker in the windows.
D: Top side is 16 LED of simulation drill ground, each circuit is:400 meter.
E: In the center the window: handle normal modeˉ> handle countdown modeˉ> handle countdown
distance modeˉ>handle countdown calorie mode> P6-> handle normal modeˉ>
The light of the window will be flicker when you choose that window.
2.Fuction key:Program, mode, power supply, start/pause, speed +, speed –
Speed Key: 3,6,9
A:Āprogram ākey˖when the machine stops, press the “program” key can enter the circle choosing
program: handle normal modeˉ> handle countdown modeˉ> handle countdown distance modeˉ
>handle countdown calorie mode>P1- ->P2->P3->P4->P5->P6-> handle normal modeˉ>- - -/DŽ
B˖Āmodeākey˖press the key can enter the circle choosing program of the middle window. fixed show
timeˉ> fixed show calorieˉ>
C˖Āstart/pause ākey˖ when press this keyˈthe motor can start the motor can pause when press this
key in the process of motor moving. in the state of pause, all the date keep unchanged, the speed
window show PAU .
D˖Āstopākey: press this key the motor will stop working ˈall the data turn 0 and then enter into handle
mode.
E˖Āpowerākey˖you can put on or off the power of the console at any state.
F˖”+” “-“ key:adjust sped in the running status and adjust parameter in the stop status.
G:Āquick speedākeyΨĀ3.6.9āDŽquick key of adjust the speed.
9

II.Programas
1.Un programa manual PO que incluye: opción normal, conteo regresivo de tiempo, con-
teo regresivo de distancia, conteo regresivo de calorías.
2.6 programas predeterminados: P1, P2, P3, P4, P5, P6
3.Un programa de reducción de grasa corporal.
III.Instrucciones de inicio
1.Coloque el botón de seguridad en el tablero de la computadora. Encienda y todas
las funciones de la pantalla se mostrarán durante dos segundos y se emitirá un sonido
“beep”. Luego ingrese a las opciones manuales normales.
2.Presione el botón “start”. La pantalla de velocidad mostrará: 5 – 4 – 3 – 2 – 1. El motor
comenzará a funcionar una vez que se emita el sonido cinco veces.
IV.Opción de Manejo
1.Cómo ingresar al programa manual:
A.Encienda e ingrese a la opción normal del programa manual directamente.
B.Retire el botón de seguridad para detener el motor. La pantalla de velocidad mostrará
E07. Se emitirá un sonido “beep” (la información de las otras ventanas se mantendrá
intacta).
C.Una vez detenido, presione el botón “program” para poder ingresar a la opción normal
manual.
2. 3 funciones predeterminadas de funciones de manejo PO: programación de tiempo,
programación de distancia y programación de calorías.
A.Muestra opción normal primero y todos los parámetros originales al ingresar a las
opciones de manejo.
B. Durante la opción normal manual, presione el botón “mode” para ingresar a la opción
de conteo regresivo de tiempo. El tiempo se mostrará intermitente así: 30:00. Presione
“+” o “-“ para programar el conteo regresivo de tiempo, el cual se puede establecer dentro
de un rango de 8:00 a 99.00.
C.Bajo la opción de conteo regresivo, presione el botón “mode” para ingresar a la opción
de conteo regresivo de distancia.
La distancia original se muestra así: 1.0 kilómetros. Presione el botón “+” o “-“ para cam-
biar la distancia de movimiento, la cual se puede establecer dentro de un rango de 1.00 a
99.00 kilómetros.
D.Presione el botón “mode” para ingresar a la opción de conteo regresivo de calorías.
Las calorías originales se mostrarán así: 50. Presione el botón “+” o “-“ para establecer
las calorías dentro de un rango de 20 a 9990.
V.Funcionamiento del opción manual
A.Presione el botón “start/pause”. El tiempo de conteo regresivo será de 5 segundos y el
motor comenzará a funcionar. La velocidad original será de 1.0km/h.
B.Presione “+” o “-“ para regular la velocidad.
C.Presione el botón “stop”. La velocidad disminuirá hasta detenerse. Presione el botón
“start/stop” para hacer que el motor comience a funcionar de nuevo.
D.Presione el botón “quick speed” para programar la velocidad de manera rápida.
E.Retire el botón de seguridad para detener el motor. La ventana de velocidad mostrará
Ċ˖Program Instruction˖
1:A PO manual program including: normal mode, time countdown, distance countdown, calorie
countdown mode
2˖6 set programs˖P1,P2,P3,P4,P5,P6.
3.˖a program of body fat faction
ċΨStart instructions˖
1ΨPut the safety key on computer board, open the power supply, all the functions of the window will
show 2 seconds and the buzzer will give off a “beep” sound. Then enter into the normal manual
modes.
2ΨPressĀstartākey, speed window show˖5ˉ4ˉ3ˉ2ˉ1,start the motor once when the buzzer
sound five times.
ČΨHandle mode˖
1ΨHow to enter in manual program˖
A˖Put through the switch., enter in the normal mode of PO manual program directly.
B: Put off the safety key to stop the motor moving, speed window show E07, buzzer will give off
sound bi-bi-bi(the data of other windows keep unchanged)
C˖ When stop, press the Āprogramākey can enter into the normal mode of manual modes.
2˖ 3 set functions of the PO handle functions˖DŽTime set, distance set and calorie set.
A: It shows the normal mode at first and all the parameters are original When starts to enter into the
handle modes.
B: When at the normal manual modes, press the Āmodeā key enter into the time countdown
modes ,the time displays flashing 30:00,press Ā+āor Ā-ācan set the time count down which can be
designed in the range of the time is 8:00-99:00.
C: In the mode of time countdown, press the Āmodeākey can enter the distance countdown modeDŽ
The original distance show 1.0 kilometers. press the Ā+āor Ā-ā key could design moving distance,
the designed range is 1.00-99.00 kilometers.
D: PressĀmodeākey could enter into calorie countdown mode, the original show of calorie is 50
therm, press Ā+āor Ā-ācan design the range of calorie:20-9990 term.
č:Operation of manual mode
A: press the Āstart/pauseākey, count down the time 5 seconds, motor start moving, original speed
is 1.0km/h.
B: Press Ā+āor Ā-ācan adjust the speed.
C: press the “Stop” key, the speed will decrease till without moving. Press the “Start/stop” key, the
motor starts moving again.
D: Press the quick speed key, you can get your desired speed soon.
E: Put off the safety key to stop the motor moving, speed window show E07, buzzer will give off
sound bi-bi-bi(the data of other windows keep unchanged)
F: Under the time countdown mode, when the designed time descends to 0, the speed slows down
and stop at last, the buzzer sound 5 times every one second. PressĀstart/pauseākey, the speed
increase from 1.0km/h to the speed of the window display. The time displays not count down.
G: the distance countdown mode is the same as the above.
H: the calorie countdown mode is the same as the above.
I: The unset data adding .
J: Press the “Power supply” key, the treadmill can be opened and closed.
10

ĎΨProgram mode
1: the original time is designed to 30 minutes. You can just set time between 8:00 to 99:00.Press
“+””-“ can adjust the set parameter.
2: press Āstart/pauseākey, the motor start function according to the program.
3:Press “stop”key, the speed will slow down until the machine stops.
4.PressĀ+āor Ā-ā can adjust the running speed.
5: press the quick speed key Ā3.6.9.ācan quickly enter your desired speed.
6: the program can be divided into10 parts, every part is 1/10 of the designed time.
7: the console sound 3 times during the transition of every part.
8:When the motor function, press Āstart/pauseākey, the motor stop function, all the parameter keep
unchanged, the speed window display PAU.
9: the designed time slow down to 0,the speed slow down to stop, the buzzer sound 5 times every
one second, the middle window transfer to the fixed display time. Press Āstart/pauseākey, speed
increase from 1.0km/h to the current speed of the window display.
10:Pull off the safety key can stop the motor peremptorily, the speed window display E07, the
buzzer sound bi-bi-bi all the time.
11:Press the “Power supply” key, it can stop and open the treadmill.
ďΨSafety key functions
ˍΨPull off the safety key, the speed windows show E07,the buzzer soundĀBIBI-BIā(the data of
other windows keep unchanged).the motor stop moving.
ĐΨBody fat function:
When the treadmill stops, press the “Program” key to select the body fat function key and enter into
body fat function.
The handle pulse window displays the set parameter, the speed window displays the input
parameter.
After entering into this function, the speed window displays01, which shows you should input the
gender “Male” or “Female”. Press the speed “+””-“ you can select the gender: 01(male),02(female).If
the body fat window displays 01,which shows you select “Male”,
Press “Mode” key, the speed window displays 02, it shows you enter into set age,25 years old.
Press speed “+””-“ to adjust the age (the range is from 1-99)
Press “Mode” key, the speed window displays 03, which shows you enter into set height “170” cm,
Press speed “+””-“ to adjust the height(The set height can be from 100CM to 200 CM)
Press “Mode” key, the speed window displays 04, which shows you enter into set weight “70”kgs,
press speed “+””-“ to adjust the weight (The set weight can be from 20 kgs to 150kgs)
Press “Mode” key, the speed window displays 05, which shows you have entered into body fat
function, Please touch the handle pulse on the handle cover, the body fat window will display the fat
parameters of the tester in 8 seconds.
8. According to the standard of Asian people, the fat low 18 shows you are tend to be thin, it is
perfect when the fat is between 23 to 28. If between 23 to 28 it suggests you are a little fat. If exceeds
28, it means you should lose weight.
11
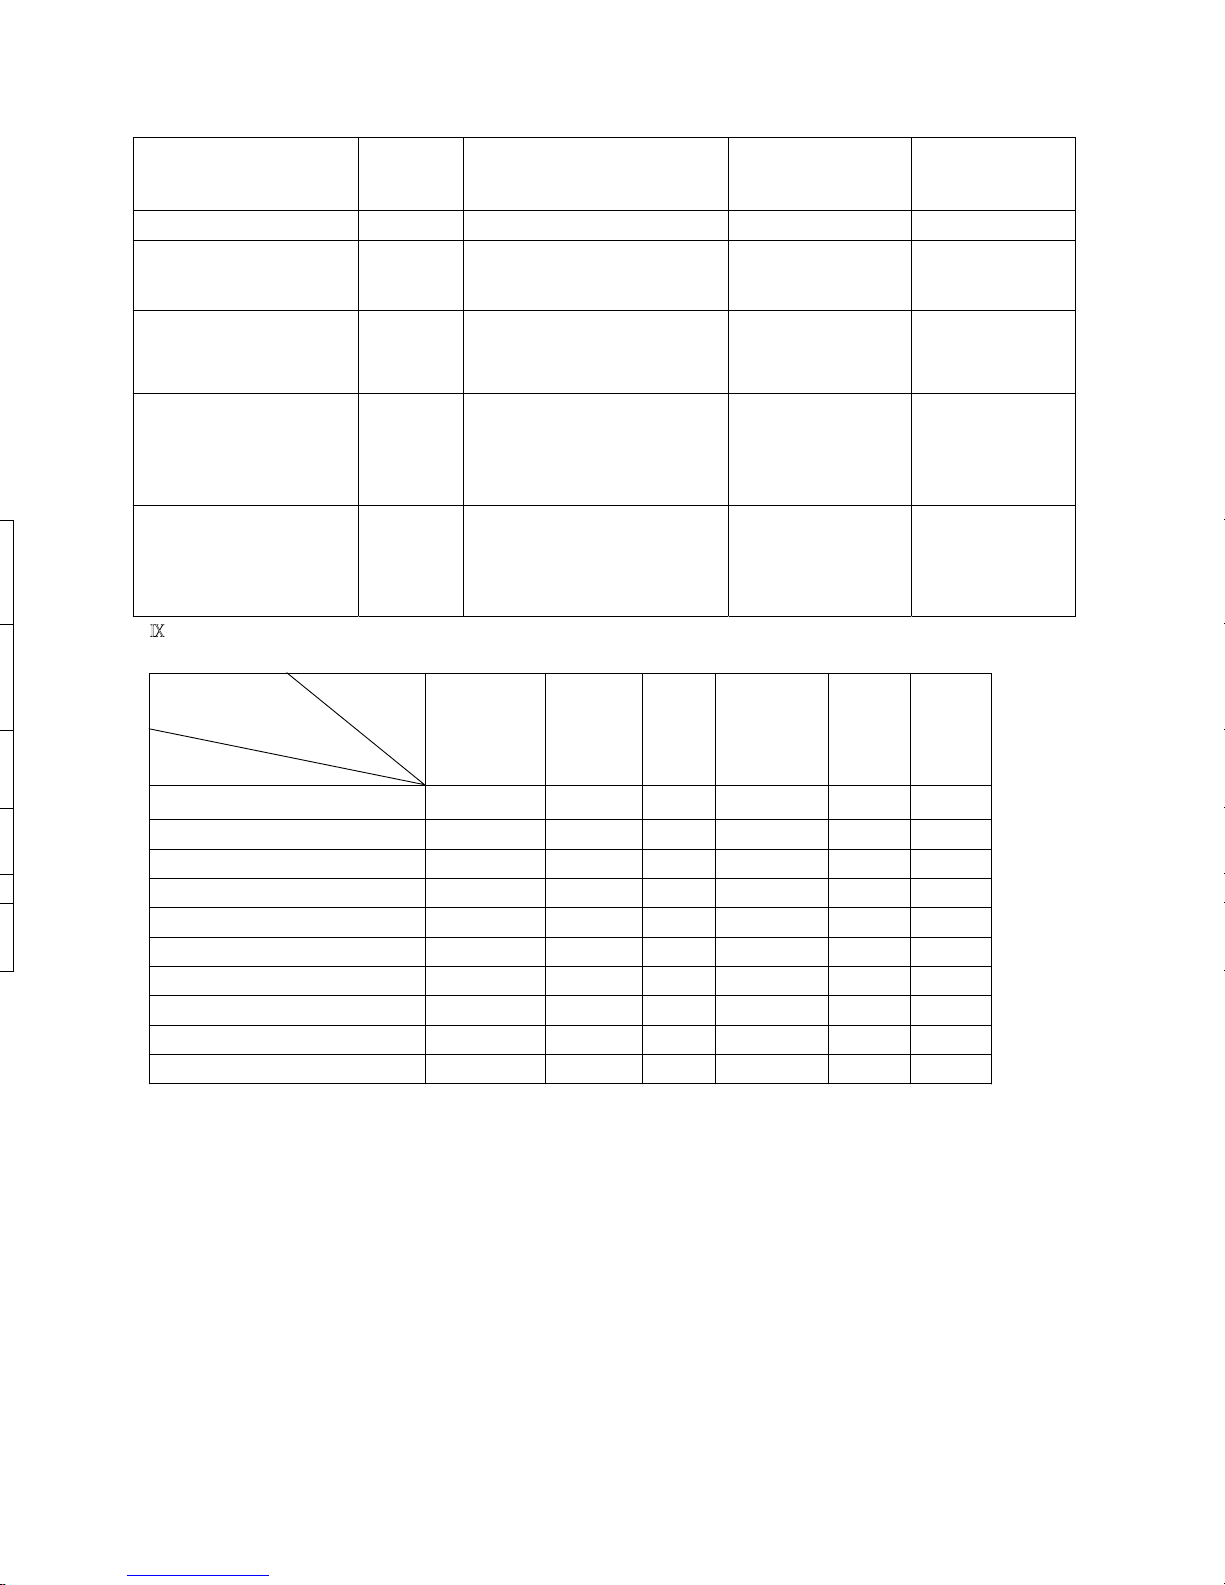
IX:the display range of numerical value
original Designed range Display range
Designed original value
Time(minute:second) 0:00
30:00
8:00-99:00 0:00~99:59
speed(km/h) 0.0
N/A
N/A 1.0ˉ12.0
Heart rate P
N/A
N/A 40-199
distance(km) 0.00
1.00
1.00ˉ99.00 0.0ˉ99.99
calorie(term)
50
10ˉ9990 0ˉ99990
đI: program speed diagram:
P1 P2 P3 P4 P5 P6
1 1.0 1.0 1.0 1.0 1.0 1.0
Program
Speed
section
2 1.5 2.0 3.0 4.0 3.0 3.0
3 2.5 2.0 6.0 6.0 6.0 6.0
4 3.5 3.0 3.0 8.0 3.0 8.0
5 4.5 3.0 6.0 6.0 2.0 8.0
6 4.5 4.0 6.0 5.0 3.0 8.0
7 3.5 4.0 3.0 4.0 6.0 8.0
8 2.5 5.0 6.0 3.0 3.0 6.0
9 1.5 5.0 3.0 2.0 2.0 3.0
10 1.0 1.0 1.0 1.0 1.0 1.0
muestra 01, esto indica que se ha seleccionado el género “masculino”.
Presione el botón “Mode”. La pantalla de velocidad mostrará 02 y mostrará la edad
predeterminada, veinticinco años de edad. Presione “+” o “-“ para seleccionar la edad (el
rango es de 1-99).
Presione el botón “Mode” y la pantalla de velocidad mostrará 03 y mostrará la altura pre-
determinada de 170cm. Presione “+” o “-“ para seleccionar la altura (el rango de altura
va de 100cm a 200cm).
Presione el botón “Mode” y la pantalla de velocidad mostrará 04 mostrará el peso prede-
terminado de 70Kgs. Presione “+” o “-“ para seleccionar el peso (el rango de peso va de
20Kgs. a 150Kgs.).
Presione el botón “Mode” y la pantalla de velocidad mostrará 05, lo cual indica que se
ha ingresado a la función de grasa corporal. Toque el mango del pulso en la cubierta del
mango y la pantalla de grasa corporal mostrará los parámetros de grasa en 8 segundos.
De acuerdo los estándares de individuos asiáticos, si la grasa es de 18, esto signica
que uno se encuentra algo delegado. Es óptimo cuando la grasa se encuentra entre 18
y 23. Si está entre 23 y 28, esto sugiere que uno se encuentra con algo de sobrepeso.
Si excede de 28, esto signica que uno debe perder peso.
Tiempo (minuto:segundo)
Velocidad (km/h)
Ritmo Cardiaco
Distancia (km)
Calorías (término)
IX.Rango de valor numérico
X.Diagrama de programa de velocidad
12
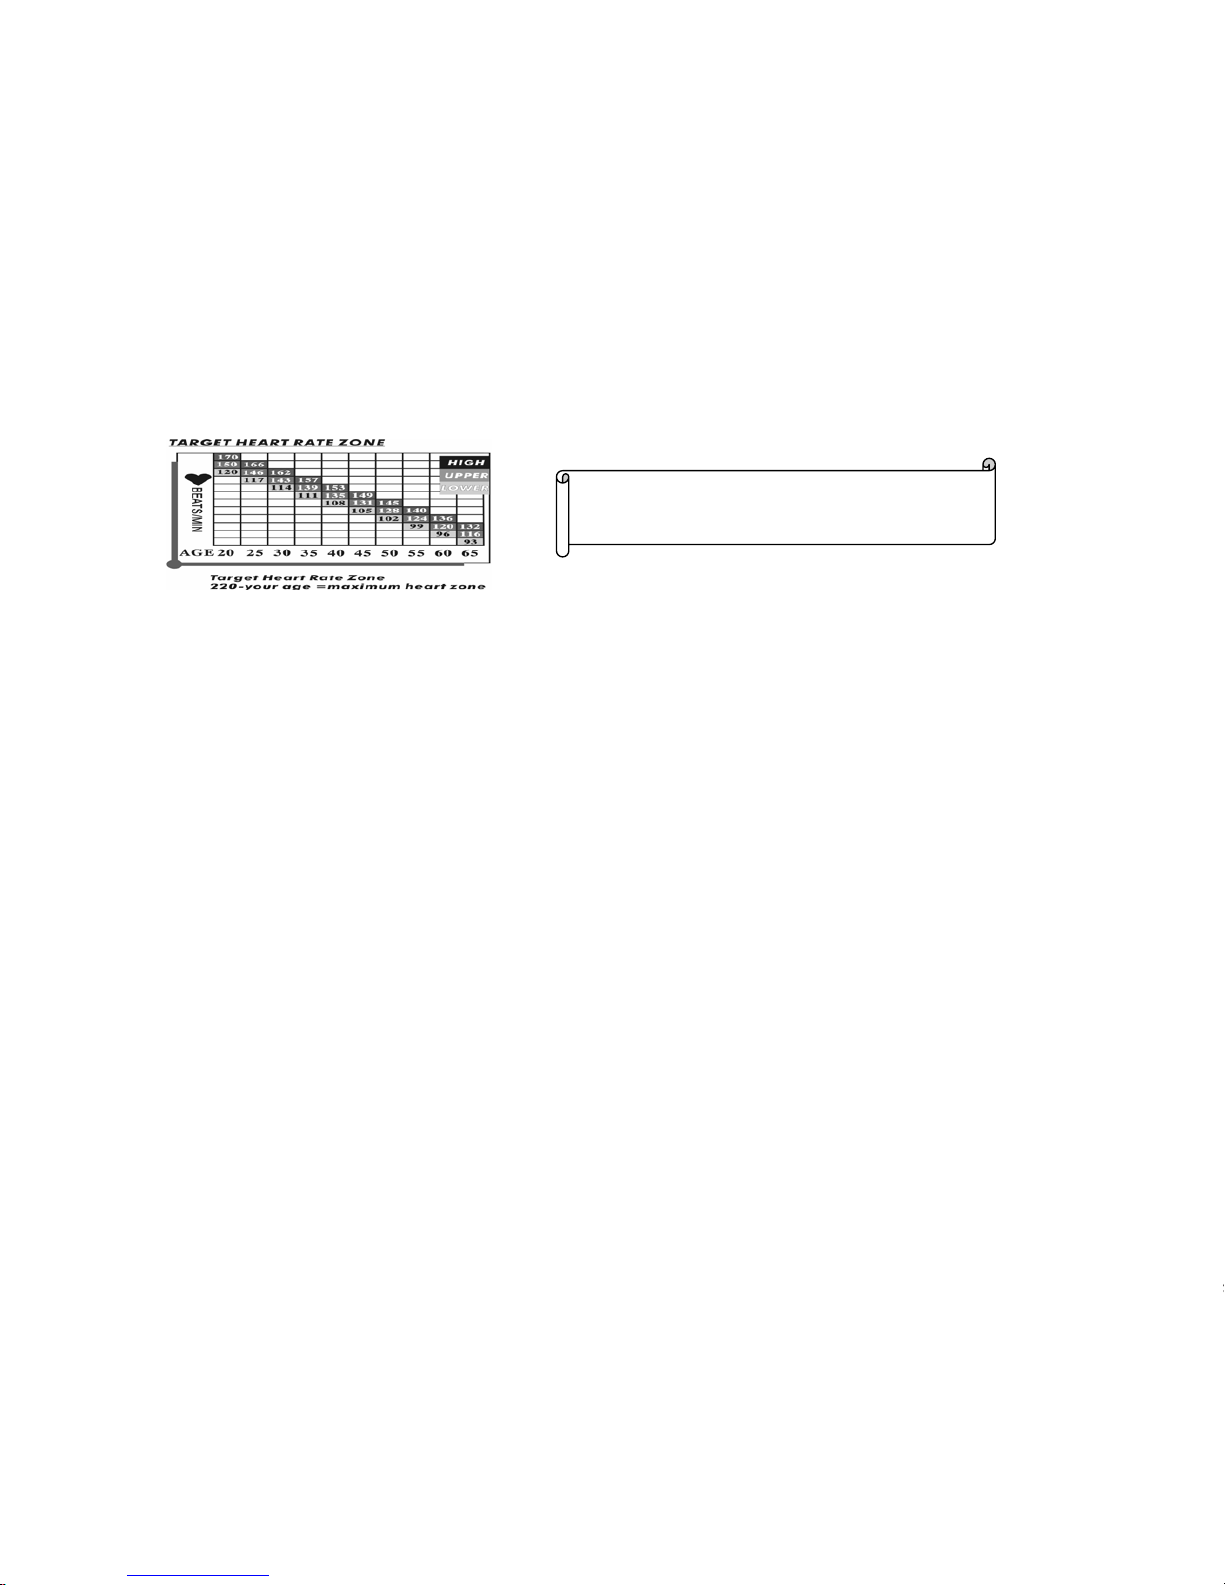
TARGET HEART RATE
The most common method for calculating your target heart rate is to find your maximum heart rate.
The standard formula for this is: 220 - your age = maximum heart rate.
You DO NOT want to workout at your maximum heart rate. You want to workout in your target
heart rate zone. Your target heart rate zone is a percentage of your maximum heart rate. The
American Heart Association recommends working out at a target heart rate zone of between 60% -
75% of your maximum heart rate. If you are just beginning an exercise program, exercise near or
below the lower limit of your target zone.
Lower limit of target zone = maximum heart rate x 0.60
Upper limit of target zone = maximum heart rate x 0.75
CAUTION!
For your health and safetyˈDo not over exert yourself.
(American Heart Association recommends this. Before starting exercise program, please consult
your physician to understand your physical situation.)
HOW OFTEN SHOULD YOU EXERCISE
You should exercise three to four times a week to improve your cardiovascular and muscle fitness.
HOW HARD SHOULD YOU EXERCISE
Intensify of exercise is reflected in your heart rate. Exercise must be sufficiently rigorous to
strengthen your heart muscle and condition your cardiovascular system. Only your doctor can
prescribe the target training heart range for you. Before starting any exercise program consult your
physician.
HOW LONG SHOULD YOU EXERCISE
Sustained exercise conditions your heart, lungs and muscles. The longer you are able to sustain
exercise within your target heart range, the greater the aerobic benefits. To begin maintain 2-3
minutes of steady, rhythmic exercise, then check your heart rate.
BEGINNER TREADMILL PROGRAM
EXERTION LEVEL DURATION
WEEK 1 Easy 6-12 minutes
WEEK 2 Easy 10-16 minutes
WEEK 3 Moderate 14-20 minutes
WEEK 4 Moderate 18-24 minutes
WEEK 5 Moderate 22-28 minutes
WEEK 6 Slightly higher or slightly lower 20minutes
WEEK 7 Add interval training 3 minutes at moderate exertion with 3 minutes
at higher exertion for 24 minutes
13

CONSEJOS Y PAUTAS PARA EL EJERCICIO
Estiramiento
El estiramiento antes de llevar a cabo el ejercicio mejora su exibilidad y reduce las
posibilidades de lesiones. Comience los ejercicios de estiramiento con un movimiento
lento y suave. Mantenga la posición durante diez segundos. No se balancee. Repita
los ejercicios de estiramiento al nal para enfriarse y ayudar a relajar los músculos y
así prevenir su inamación.
Calentamiento
Los primeros cinco minutos del ejercicio deben dedicarse al calentamiento. Este
calentamiento exibilizará sus músculos y los preparará para un ejercicio más fuerte.
Lleve acabo al calentamiento en la trotadora caminando a una velocidad lenta.
Enfriamiento
Nunca detenga el ejercicio de manera repentina. Un periodo enfriamiento de unos 5
minutos le permitirá a su corazón reajustarse al menor esfuerzo. Utilice una velocidad
más baja durante el enfriamiento para gradualmente disminuir el ritmo cardiaco.
¿Cuán a menudo?
Generalmente se recomienda que uno ejercite por lo menos tres o cuatro veces por
semana para mantener su buen estado cardiovascular. Si se tiene otros objetivos
como por ejemplo perder peso o grasa, se podrá lograr dicha meta de manera más rá-
pida con un ejercicio más frecuente. Bien sean tres o seis días, recuerde que su meta
nal debe ser la de hacer que los ejercicios sean un hábito de por vida.
¿Durante cuánto tiempo?
Para obtener benecios de los ejercicios aeróbicos, es recomendable hacer los ejer-
cicios durante unos 30 minutos por sesión. Siempre comience lentamente, especial-
mente si se ha llevado una vida sedentaria durante el pasado. Al comienzo se puede
comenzar con tan sólo cinco minutos por sesión. Su cuerpo necesitará tiempo para
ajustarse a la nueva actividad conforme su cuerpo se ajusta, gradualmente incre-
mente el tiempo de ejercicios por sesión.
Si su meta es perder peso, una sesión de ejercicios más larga a menor intensidad
puede resultar ser más efectiva. Un tiempo de ejercicios de 45 - 50 minutos o más es
recomendable para obtener mejores resultados de pérdida de peso.
¿Con cuánta intensidad?
La intensidad se determina de acuerdo a sus metas. Independientemente de sus
objetivos físicos, siempre comience con un programa de ejercicios de intensidad baja.
El ejercicio aeróbico no tiene que ser doloroso para ser benecioso.
Hay dos maneras de medir la intensidad del ejercicio. La primera es evaluando el nivel
de esfuerzo que se percibe y la segunda es supervisando su ritmo cardiaco.
¡PRECAUCIÓN!
Siempre consulte con su médico antes de comenzar cualquier programa de ejercicios.
EXERCISE TIPS AND GUIDELINE
S
STRETCH
Stretching prior to exercise will improve flexibility and reduce chances of exercise related injury. Ease
into each of these stretches with a slow gentle motion. Hold for a count of ten. Do not bounce. Repeat
the stretch exercises again after the cool down will help to loosen and relax your muscles to prevent
soreness.
WARM UP
The first five minutes of a work out should be devoted to warming up. This warm up will limber your
muscles and prepare them for more strenuous exercise. Warm up on the treadmill by walking at slow
speeds.
COOL DOWN
Never stop exercising suddenly. A cool down period of about 5 minutes will allow your heart to readjust to
the decreased demand. Use a low speed setting during the cool down to gradually lower your heart rate.
HOW OFTEN?
It is most often recommended that you exercise at least three to four times a week to maintain
cardiovascular fitness. If you have other goals such as weight or fat loss, you will achieve your goal
faster with more frequent exercise. Whether it is three days or six days, remember that your ultimate
goal should be to make exercise a lifetime habit.
HOW LONG?
For aerobic exercise benefits, it is recommended that you exercise for about thirty minutes per session.
Always start slowly, especially if you have been sedentary during the past year. In the beginning you may
began with as little as five minutes per session. Your body will need time to adjust to the new activity.
As your body adjusts, gradually increase your workout time per session.
If your goal is weight loss, a longer exercise session at lower intensities has been found to be most
effective. A workout time of 45-50 minutes or more is recommended for best weight loss results.
HOW HARD?
How hard you work out is determined by your goal. Regardless of your fitness goals,
always begin an exercise program at low intensity. Aerobic exercise does not have to be
painful to be beneficial!
There are two ways to measure your exercise intensity. The first is by evaluating your
perceived exertion level and the second is by monitoring your heart rate.
˚˚˚
CAUTION!
Always consult your physician before beginning any
exercise
prog
ram.
14
 Loading...