

GW Security GW-NVR3208E, GW-NVR3216E, GW-NVR2208E-8P, GW-NVR3216E-16P, GW-NVR3232E-8S User Manual
Page 1

Network Video Recorder User Manual
Page 2

Welcome, and thank you for purchasing your GW Security product.
This user manual is a reference tool for installing and operating your NVR. Please read this
manual before installation and operation to ensure an optimal experience with your NVR.
Contents
1. Features and Safety 3
1.1 Features 3
1.2 Safeguards and Warnings 3
1.2.1 Packing List 3
2. Product Appearance 4
3. Device Installation 4
3.1 NVR Connections Diagram 4
3.2 Installing a HDD 5
4. Basic Operation 6
4.1 Powering On and Shutting Down the NVR 6
4.2 Start-up Wizard 6
4.3 Mouse Operation 7
4.4 Virtual Keyboard 7
4.5 Navigation Bar 7
5. The Main Menu 8
5.1 Main Menu Flowchart 9
5.2 Data Inquiry 10
5.2.1 Time Inquiry 10
5.2.1.1 Intel Play 10
5.2.2 Data Manager 12
5.3 Backup 13
5.3.1 Quick Backup and Manual Backup 13
5.3.2 Schedule Backup 14
5.4 Record 14
5.4.1 Recording Parameters 14
5.4.2 Manual Recording 16
5.4.3 Scheduled Recording 16
5.5 Alarm Settings 17
5.5.1 Motion Detection 17
5.5.2 Alarm Output 18
5.5.3 Other Alarms 18
5.6 IPC Management 19
5.6.1 Adding IP Cameras 19
5.6.1.1 Adding via Manual Add 20
5.6.1.2 Adding via the “Plus” Icon 20
Official Website: www.gwsecurityusa.com
Email: support@gwsecurityusa.com
Business Hours: Mon-Fri 9am to 5:30pm PST/PDT
Tel: 626-350-0555
Page 3

5.6.1.3 Adding via Smart Access 20
5.6.2 Removing IP Cameras 20
5.6.3 Other Options 20
5.7 Settings Management 21
5.7.1 General Settings 21
5.7.2 Time Settings 22
5.7.2.1 Daylight Saving Time (DST) 22
5.7.2.2 NTP Settings (Internet Time) 23
5.7.3 Output 23
5.7.3.1 Channel Settings 23
5.7.3.2 Display Sequence 24
5.7.3.3 Output Mode 25
5.7.4 Network Sub-menu 25
5.7.4.1 Network Settings 26
5.7.4.2 DDNS Settings 26
5.7.4.3 PPPOE Settings 27
5.7.4.4 Email Settings 28
5.7.4.5 Advanced Settings 28
5.7.4.6 Cloud Service 29
5.7.4.7 Network Bridge 29
5.8 HDD Manager 30
5.8.1 Basic Information 30
5.8.2 HDD Group 31
5.8.3 Storage Settings 31
5.8.4 SMART 32
5.9 System Information 32
5.9.1 Device Information 32
5.9.2 Channel Status 33
5.9.3 Alarm Status 33
5.9.4 Online Status 33
5.9.5 Log Inquiry 33
5.10 System Maintenance 33
5.10.1 Quick Settings 33
5.10.2 Account Maintenance 33
5.10.3 Reset to Default 33
5.10.4 Upgrade 34
5.10.4.1 Upgrade via FTP 34
5.10.4.2 Upgrade via USB 34
5.10.4.3 Upgrade via Web Browser 34
5.10.5 Schedule Restart 34
5.10.6 System Shutdown 34
6. NVR Remote Access 35
6.1 Remote Access via LAN 35
6.2 Remote Access via WAN 35
7. Specifications 36
Official Website: www.gwsecurityusa.com
Email: support@gwsecurityusa.com
Business Hours: Mon-Fri 9am to 5:30pm PST/PDT
Tel: 626-350-0555
Page 4
Item
Quantity
DVR/NVR
1x
Power Adapter
1x
NVR Quick Guide
1x
NVR Manual
1x
Software CD
1x
USB Mouse
1x
IR Remote Control (Optional)
1x
1. Features and Safety
1.1 Features
The GW SMART Series NVR is a high performance network video recorder. The NVR supports local preview, multi-window
display, local recording storage, mouse shortcut menu operations, remote management and control functions.
1.2 Safeguards and Warnings
1. Electrical Safety
Installation and operation should conform to your local electrical safety codes.
The product must be grounded to reduce the risk of electric shock.
We assume no liability or responsibility for any fires or electric shock caused by improper handling or installation.
2. Handling
Avoid heavy stress, violent vibrations, and moisture during transportation, storage, or installation.
3. Warnings
Keep upright and handle with care.
Do not apply power to the NVR before completing the installation.
Do not place objects on the NVR.
Do not use near water; do not use the device with wet hands.
Do not remove any cable connectors while the device is powered on.
Do not open the NVR’s case while the power is on.
4. Qualified Technician
All examination and repair work should be done by qualified service technicians.
We are not liable for any problems caused by unauthorized modifications or attempted repairs.
5. Operating Environment
The NVR should be installed in a cool, dry place away from direct sunlight, flammable materials, explosive substances, etc.
Required temperature: 50°F ~ 122°F
Required humidity: 15% ~ 85%
6. Accessories
Before installing, check the package to ensure all the accessories are included. Contact our office immediately if something is
broken or missing from your package. Be sure to only use accessories recommended by the manufacturer.
1.2.1 Packing List
Official Website: www.gwsecurityusa.com
Email: support@gwsecurityusa.com
Business Hours: Mon-Fri 9am to 5:30pm PST/PDT
Tel: 626-350-0555
Page 5
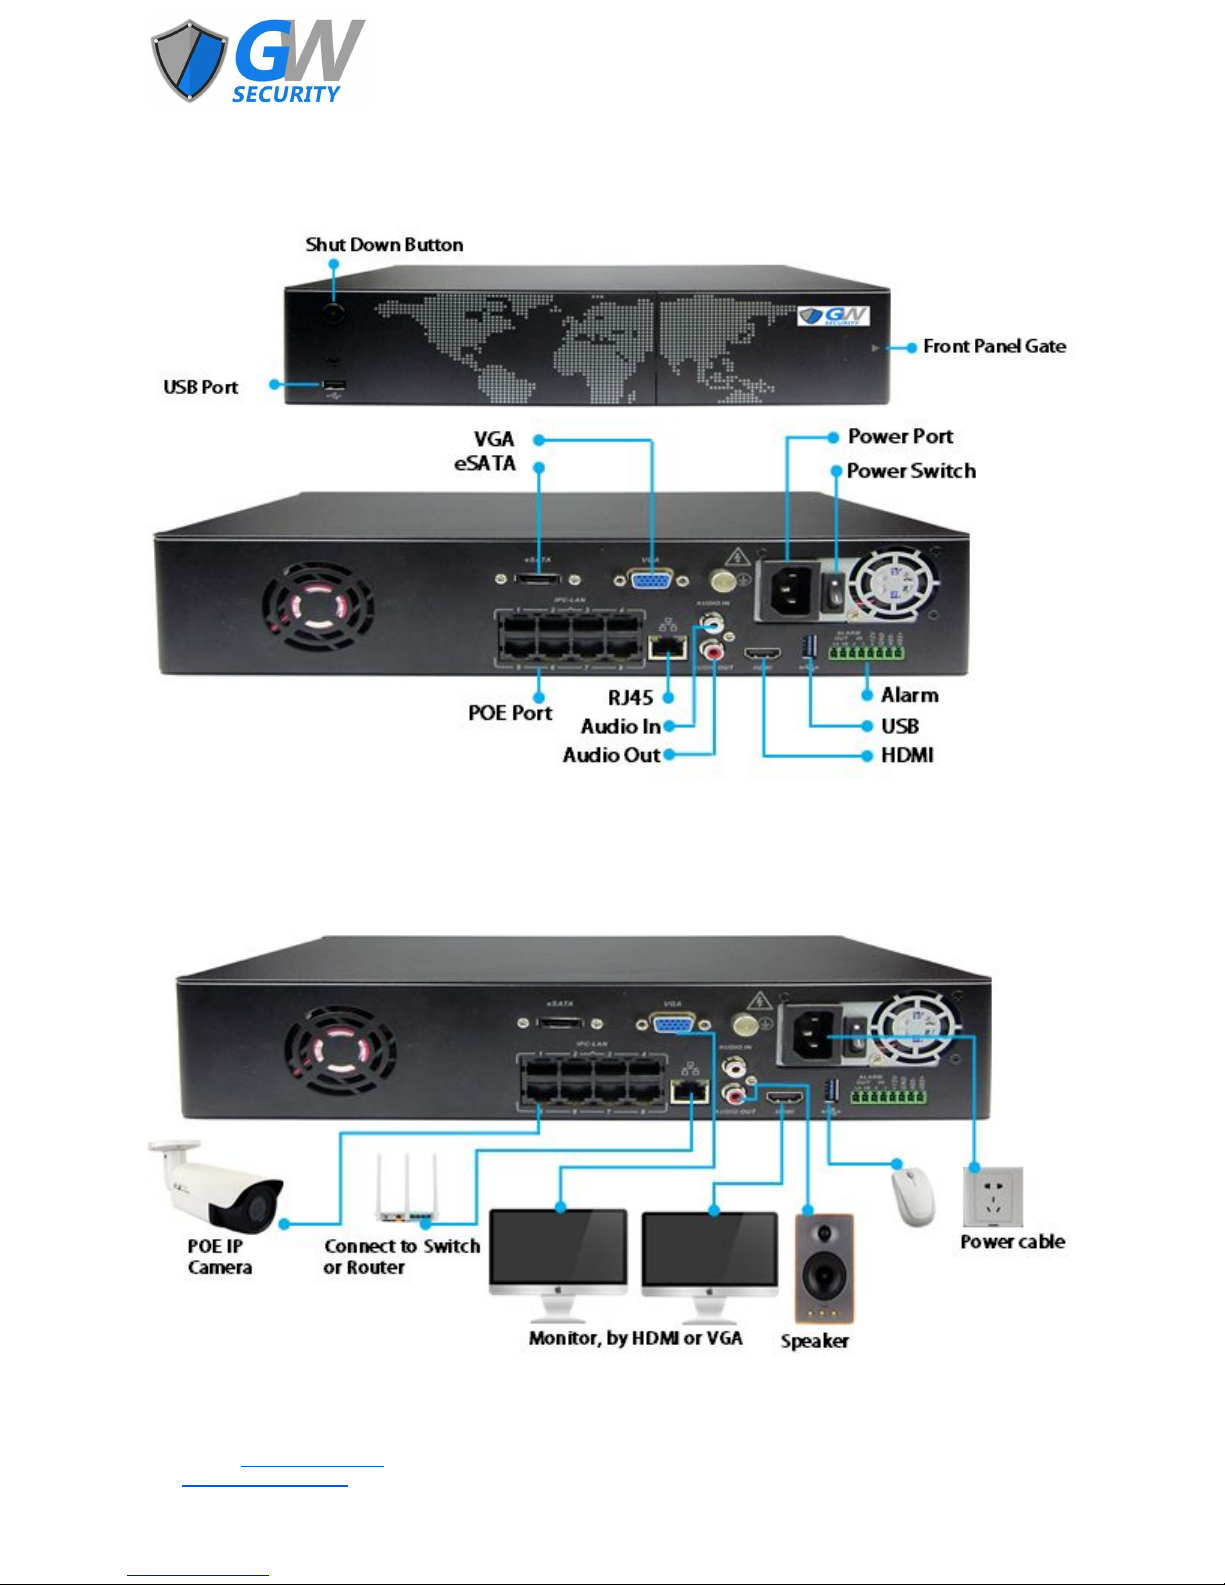
2. Product Appearance
(GW2208E-P shown)
3. Device Installation
3.1 NVR Connections Diagram
Follow the pictures below when connecting cables and components.
Official Website: www.gwsecurityusa.com
Email: support@gwsecurityusa.com
Business Hours: Mon-Fri 9am to 5:30pm PST/PDT
Tel: 626-350-0555
(GW2208E-P shown)
Page 6
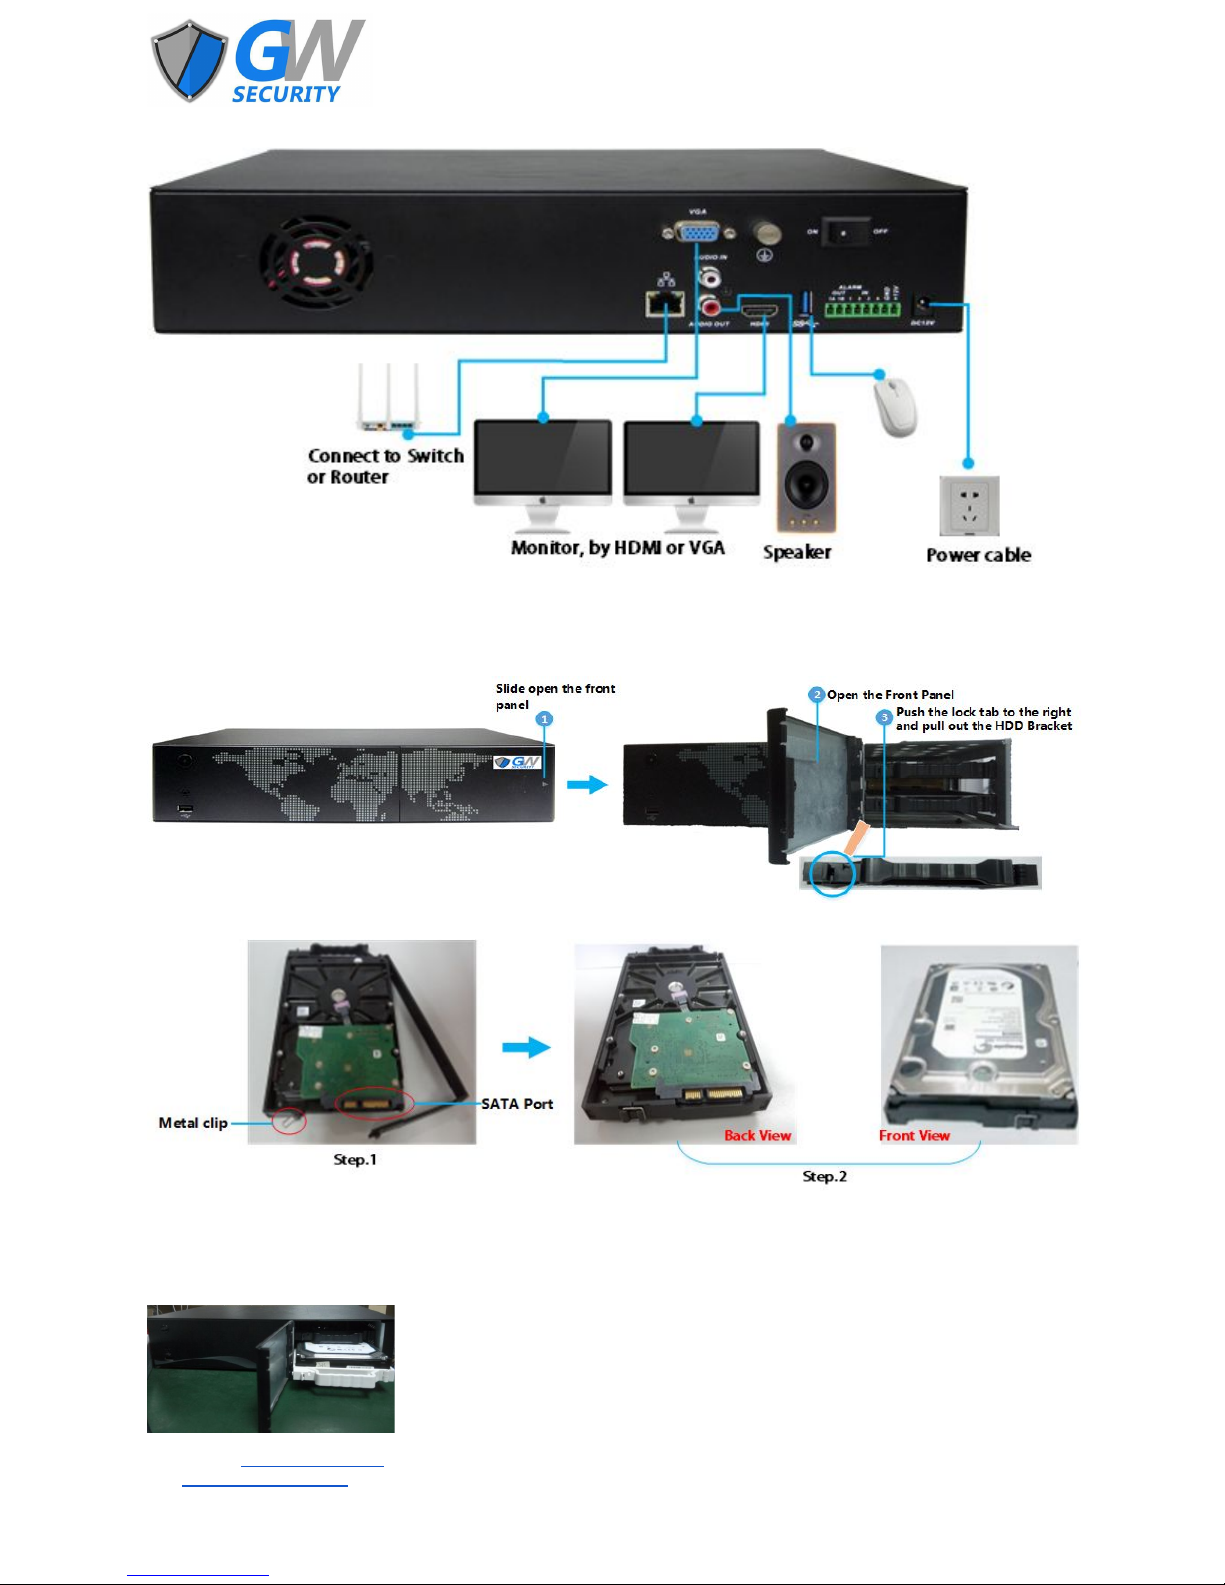
3.2 Installing a HDD
Open the front panel as pictured.
(GW3208E shown)
Install the HDD into the HDD placement bracket.
Step 1: Open the HDD bracket by unlatching the metal clip on back of the bracket. Place the bracket around the HDD and
ensure the SATA port connectors are aligned with the opening in the bracket and not covered.
Step 2: Close the metal clip to secure the HDD in the bracket.
Step3: Insert the HDD into the NVR and close the front panel as shown below.
Official Website: www.gwsecurityusa.com
Email: support@gwsecurityusa.com
Business Hours: Mon-Fri 9am to 5:30pm PST/PDT
Tel: 626-350-0555
Page 7
4. Basic Operation
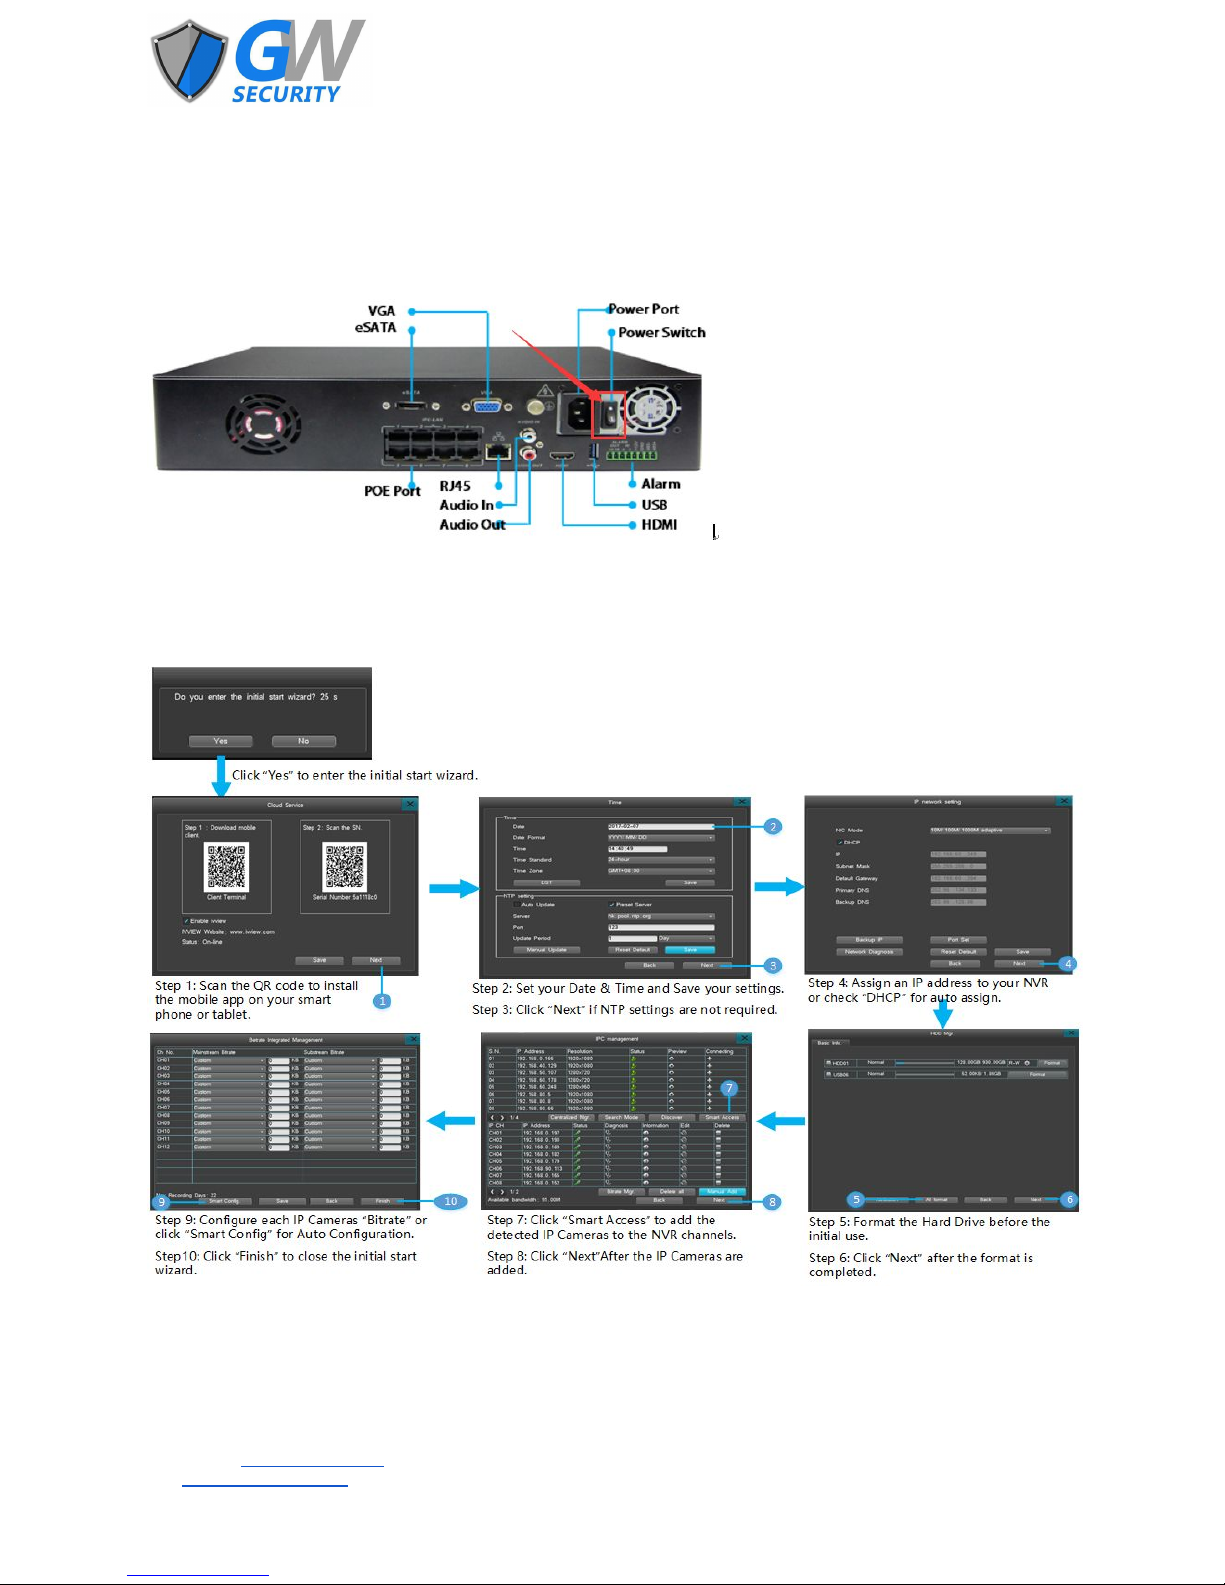
4.1 Powering On and Shutting Down the NVR
To power on the NVR, flip the power switch located on the rear of the unit after connecting the power cable, monitor, mouse,
and installing the HDD.
(GW2208E-P shown)
To shut down the NVR, press the Shutdown button on the front of the unit, or by right clicking and selecting [Shutdown] from
the menu in the NVR interface. After the NVR has shut down, the unit can be safely disconnected from the power supply.
4.2 Start-up Wizard
Official Website: www.gwsecurityusa.com
Email: support@gwsecurityusa.com
Business Hours: Mon-Fri 9am to 5:30pm PST/PDT
Tel: 626-350-0555
Page 8
Mouse Part
Action
Command
Left Mouse Button
Single Click
In Preview: Select current screen and display context menu.
In Menu: Select/Confirm
Double Click
In Preview or Playback: Switch between single and multi-screen display.
In Data Inquiry or Backup: Play a selected segment of video.
Display calendar when inputting date.
Click and Drag
Select motion sensitive areas.
Adjust brightness, contrast, and saturation.
Select the digital zoom range.
Right Mouse Button
Single Click
In Preview: Show the pop-up menu.
In Menu: Exit the current menu, go back to the previous menu layer.
Scroll Wheel
Scroll Up
In Selection Box: Scroll up through options.
In Scrollbar: Scroll up the page.
Scroll Down
In Selection Box: Scroll down through options.
In Scrollbar: Scroll down the page.
4.3 Mouse Operation
The NVR interface is operated by a mouse after connecting one to the unit’s USB port.
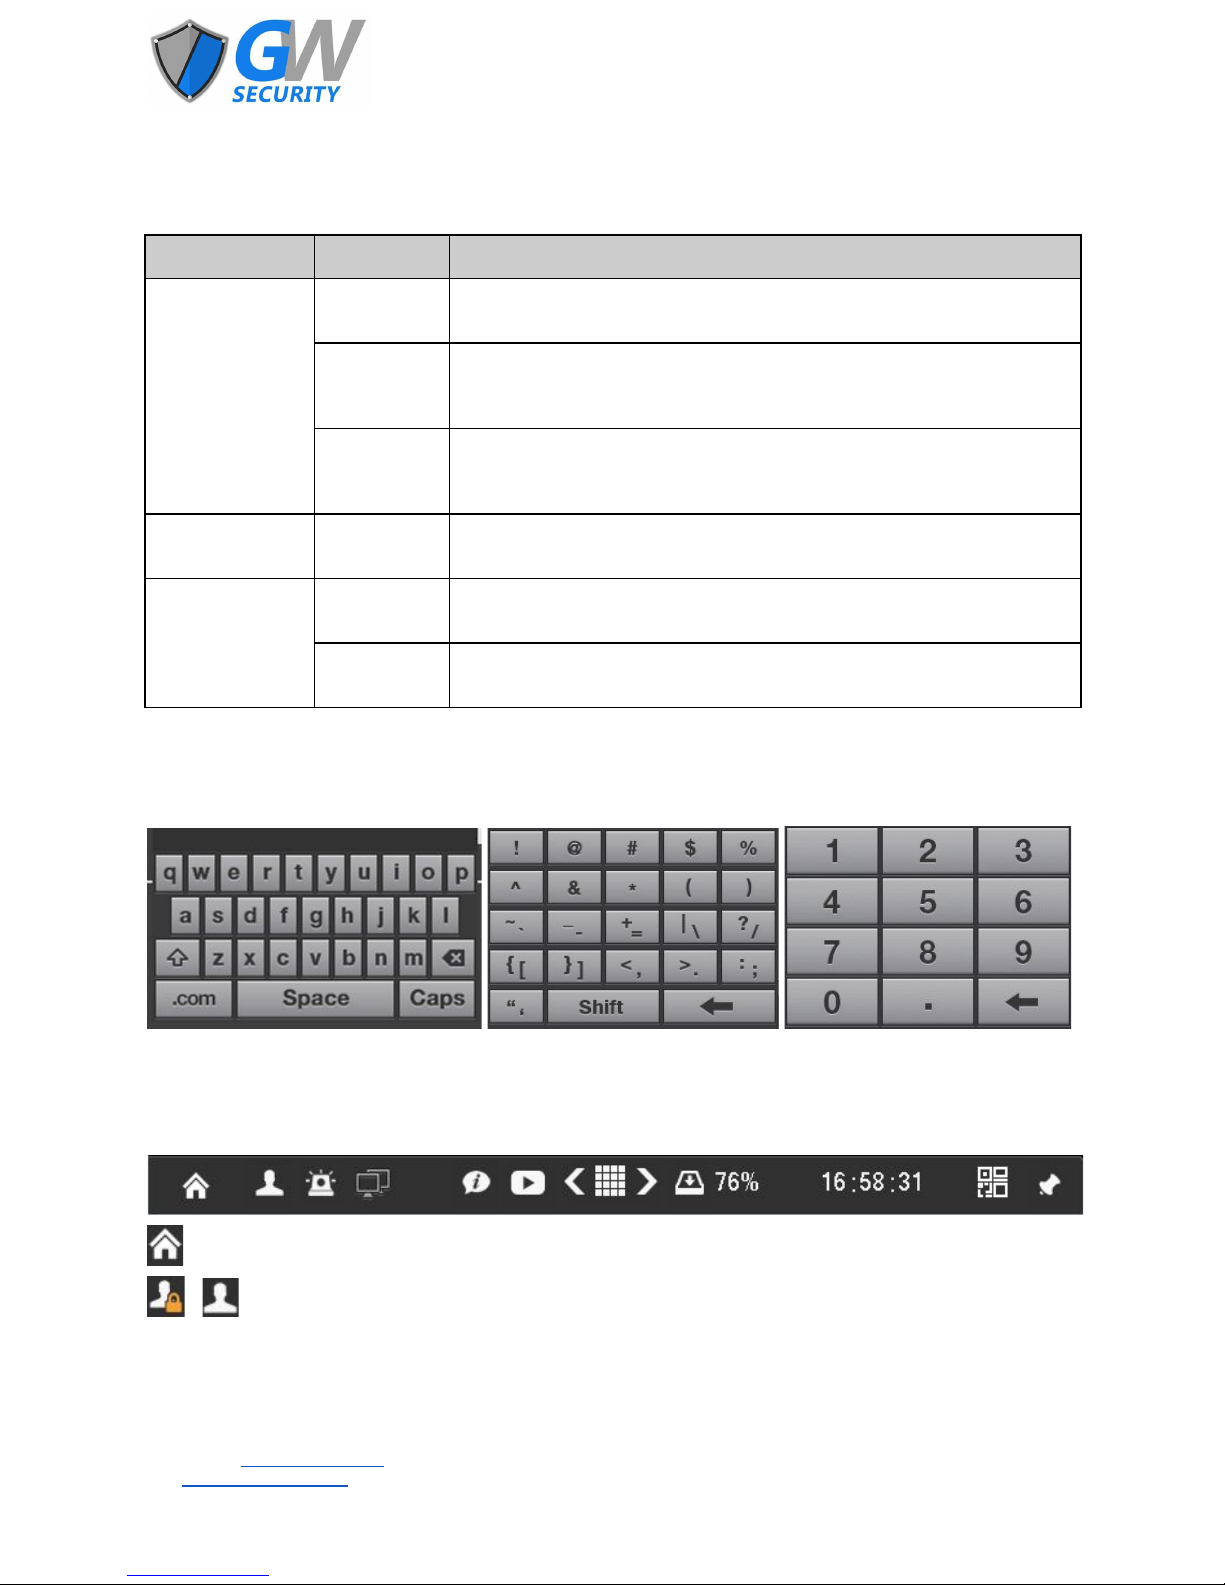
4.4 Virtual Keyboard
Whenever text needs to be input into a field in the NVR interface a virtual keyboard will be displayed. The virtual keyboard can
be utilized through the mouse.
4.5 Navigation Bar
The Navigation Bar is displayed at the bottom of the screen in the NVR interface. It allows for access to [Main Menu] and quick
access to other common functions. It also displays used HDD space and the current time.
Left click to access the [Main Menu]
& Left click to Log in and out of the administrator account.
● Default username: admin
● Default password: 888888
● After three failed login attempts the interface will automatically lockout for 20 seconds.
● It is highly recommended that you change the default password after initial login.
Official Website: www.gwsecurityusa.com
Email: support@gwsecurityusa.com
Business Hours: Mon-Fri 9am to 5:30pm PST/PDT
Tel: 626-350-0555
Page 9
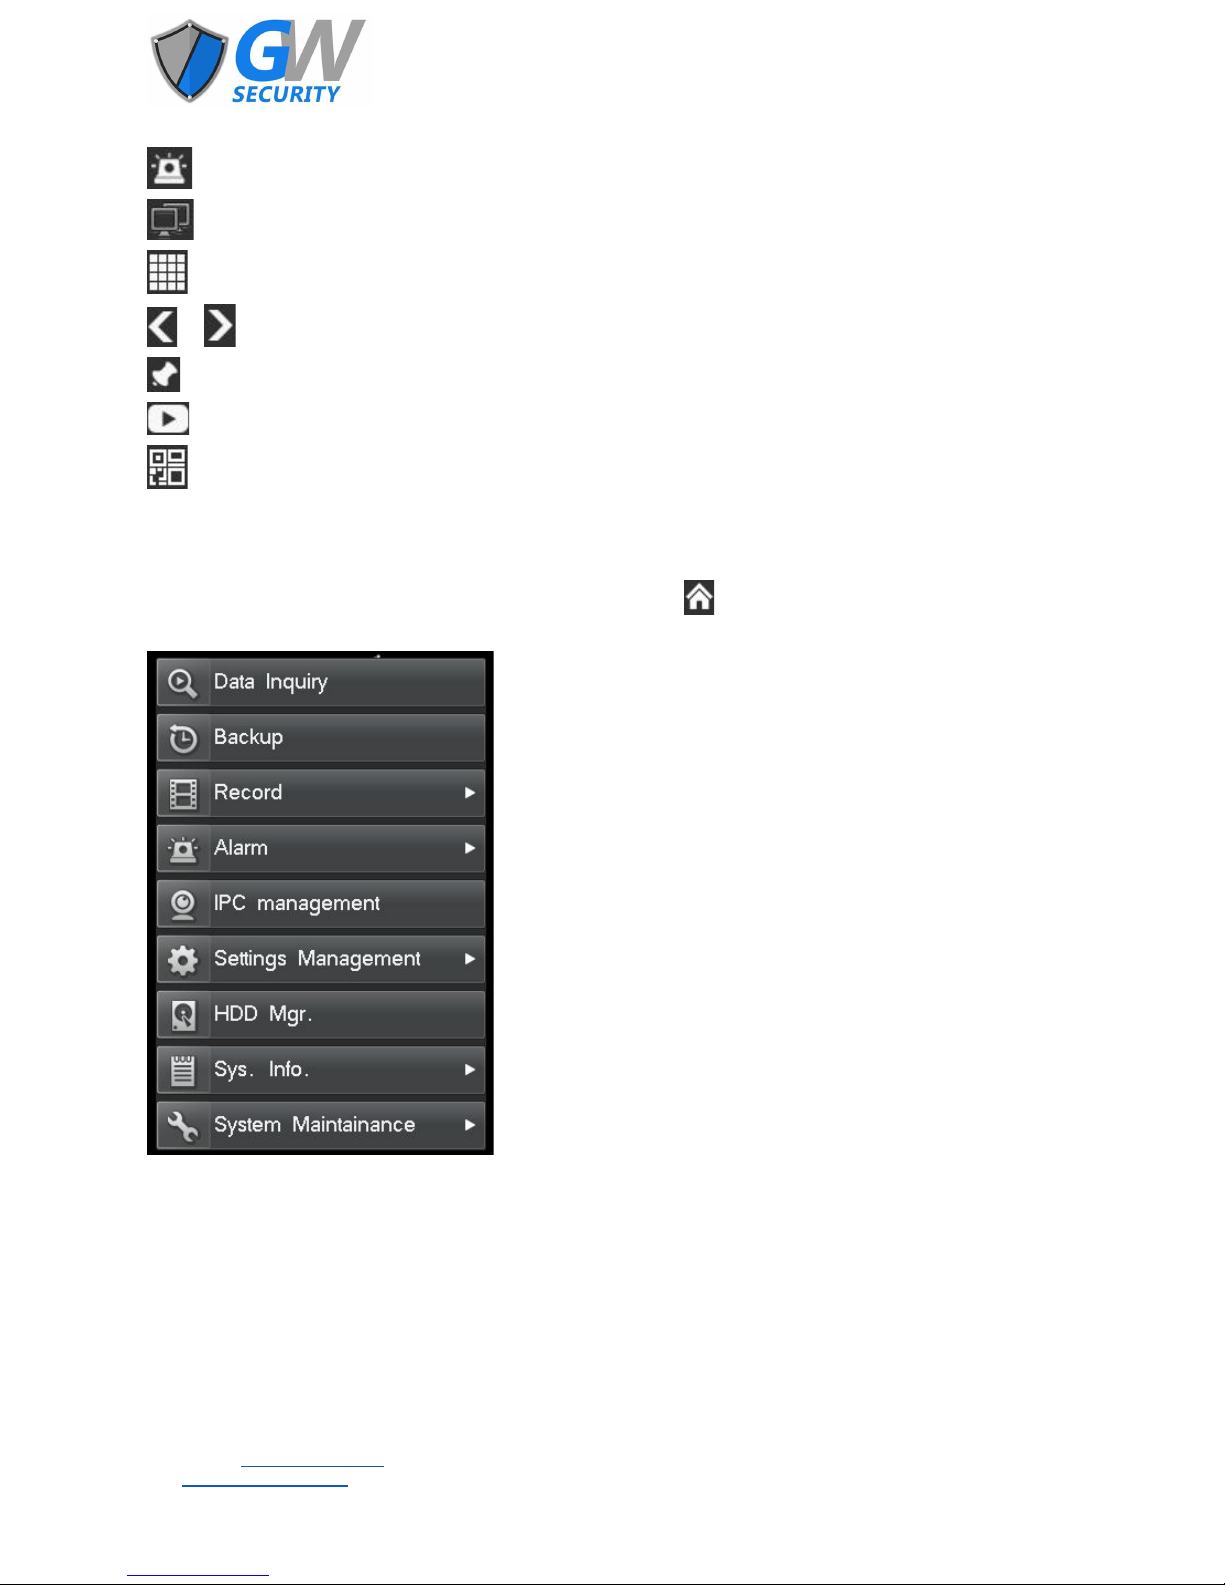
Left click for quick access to the alarm status interface.
Left click for quick access to network diagnosis and repair.
Left click to adjust the live view screen.
& Left click to adjust the channel layout.
Left click to show or hide the Navigation Bar.
Left click for playback of the last five minutes.
Left click for quick access to the cloud services interface.
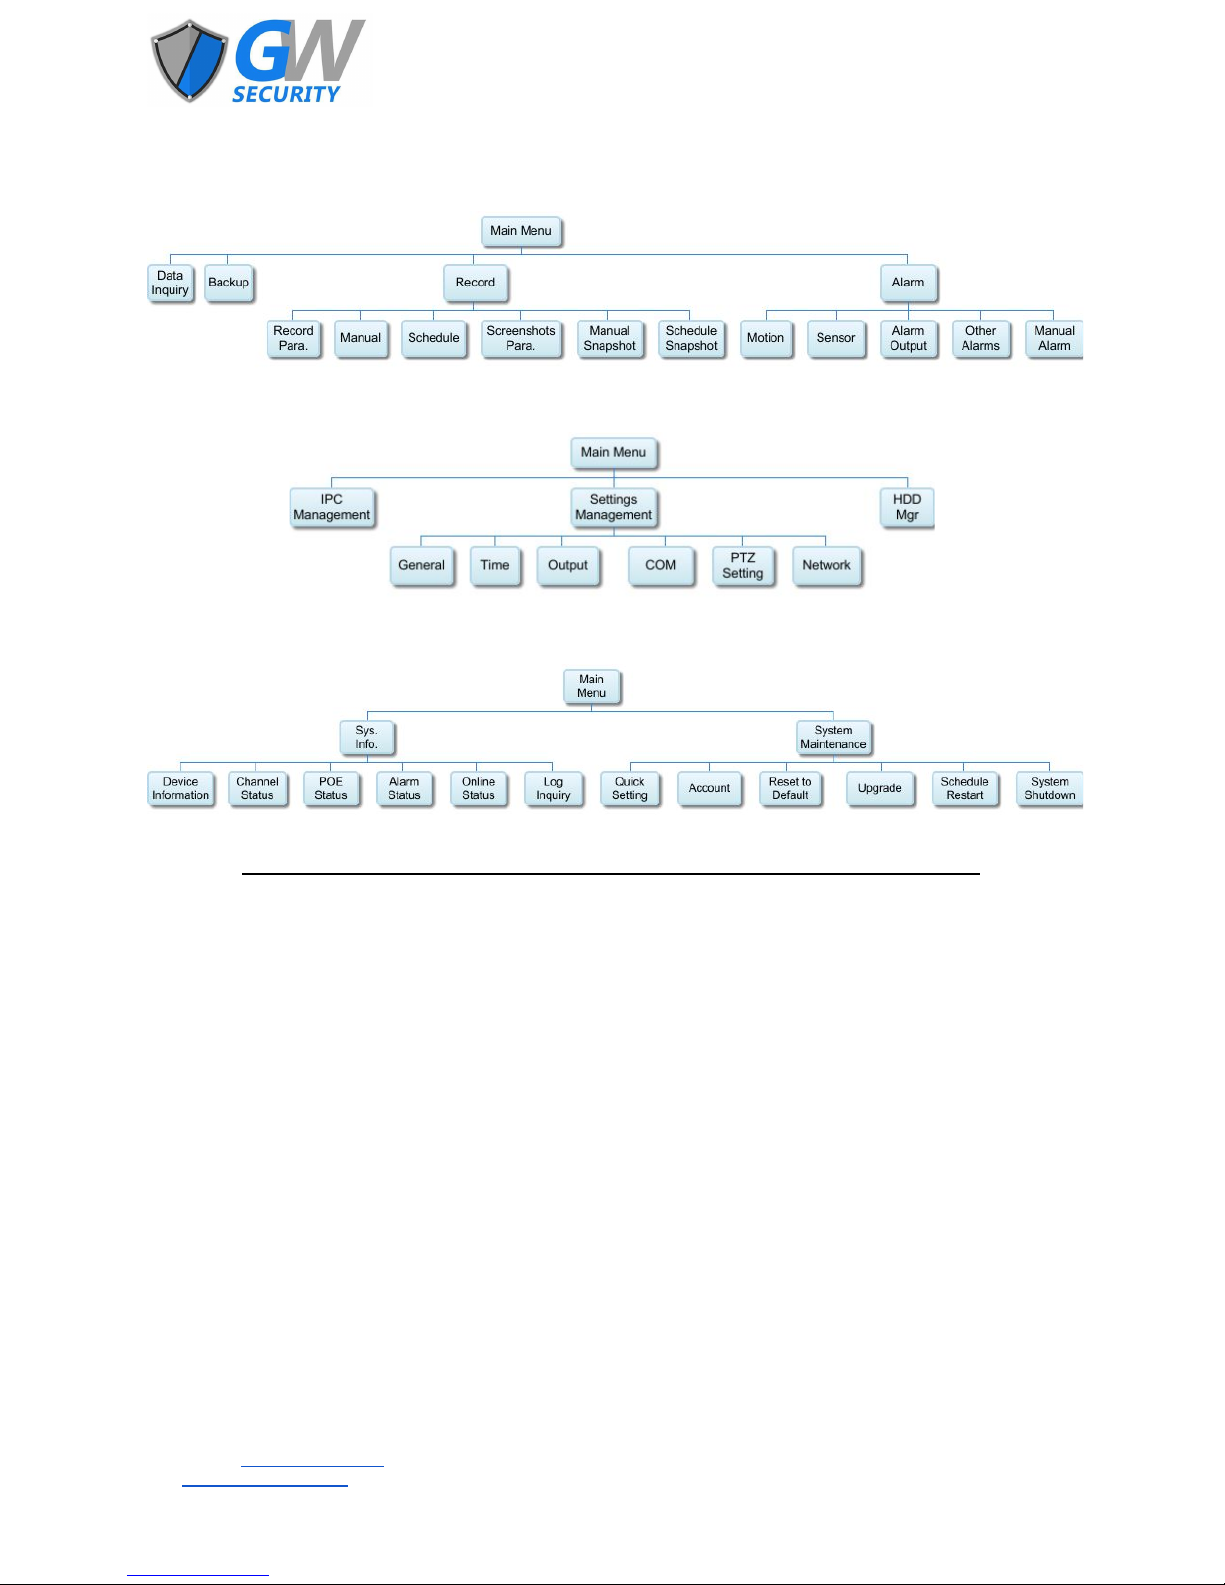
5. The Main Menu
After logging in, the [Main Menu] can be access either by left clicking the icon on the Navigation Bar, or right clicking the
live view and selecting [Main Menu] from the pop-up menu. The [Main Menu] will appear as below.
Official Website: www.gwsecurityusa.com
Email: support@gwsecurityusa.com
Business Hours: Mon-Fri 9am to 5:30pm PST/PDT
Tel: 626-350-0555
Page 10
5.1 Main Menu Flowchart
Flowchart Part 1:
Flowchart Part 2:
Flowchart Part 3:
(Note: Different models may have slightly different menu options. This chart is from the 22XX series.)
Official Website: www.gwsecurityusa.com
Email: support@gwsecurityusa.com
Business Hours: Mon-Fri 9am to 5:30pm PST/PDT
Tel: 626-350-0555
Page 11
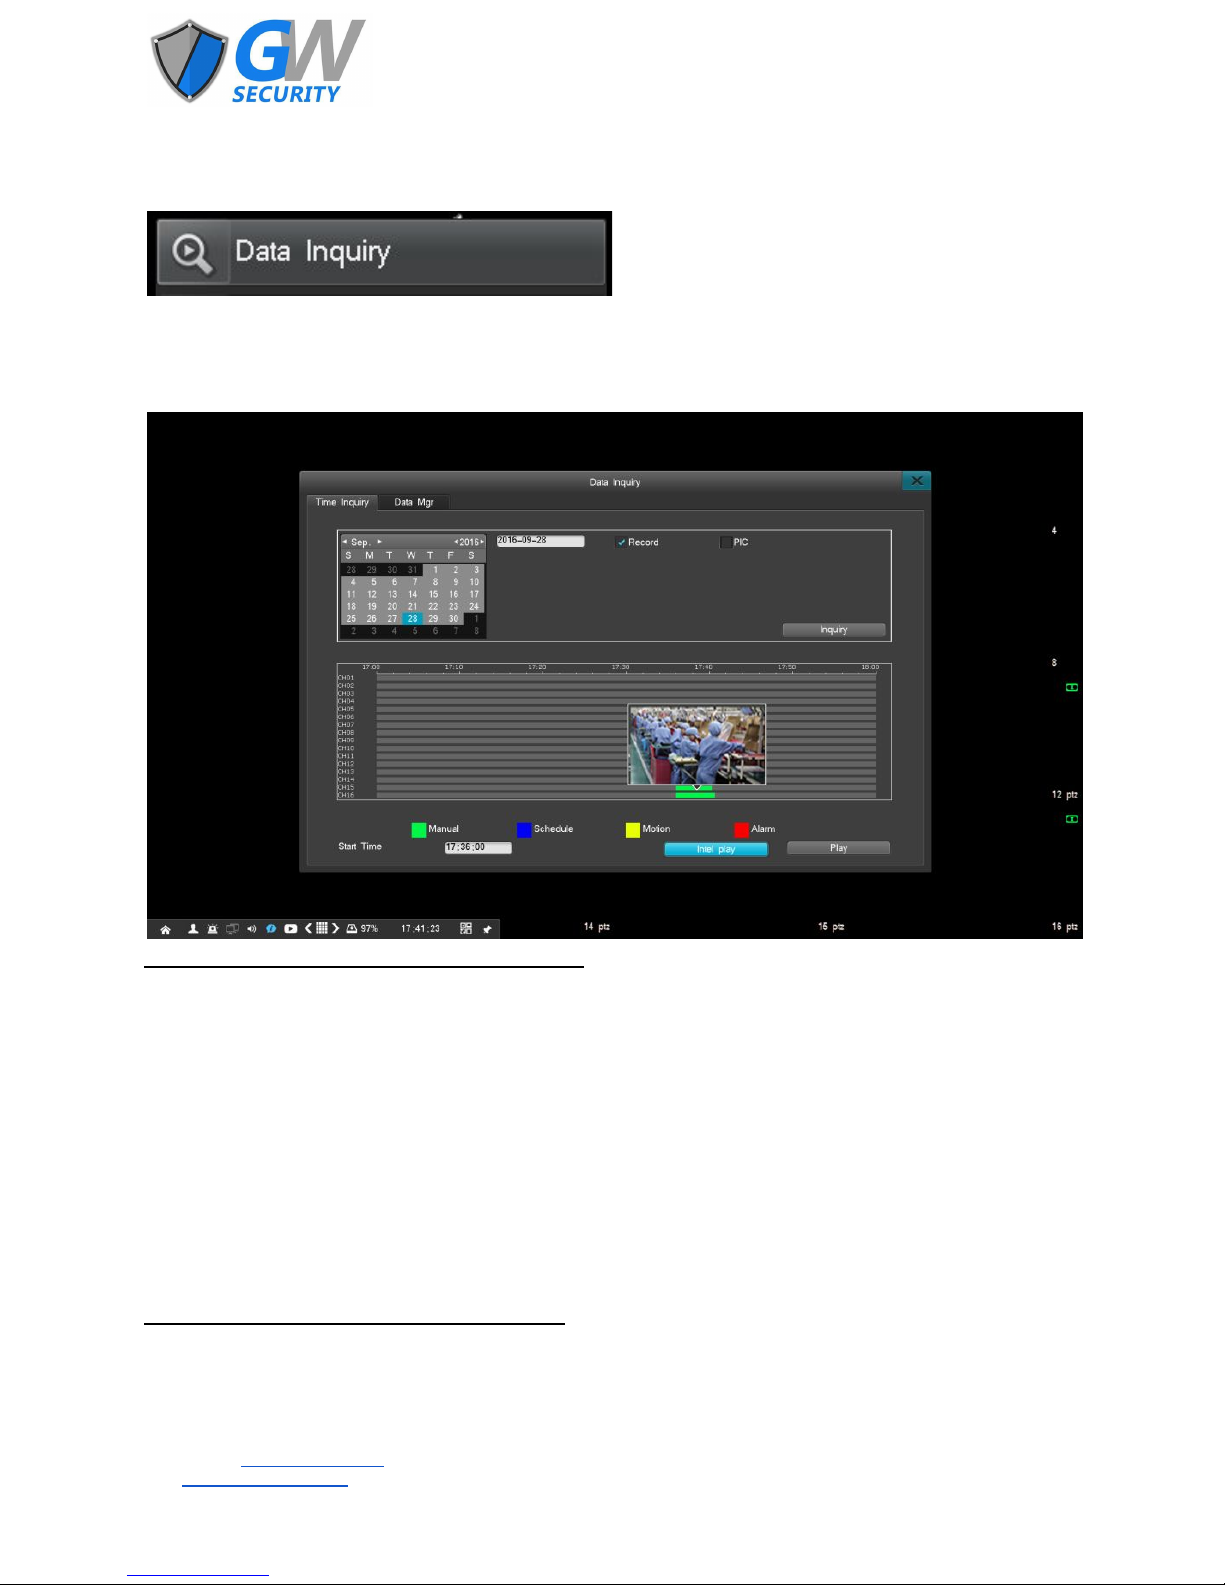
5.2 Data Inquiry
Go to [Main Menu] → [Data Inquiry]
5.2.1 Time Inquiry
In the [Data Inquiry] interface, left click on the Time Inquiry tab. By moving the mouse cursor onto any point of a channel
timeline that has data you can preview a recording of that particular time.
Note: 2224E & 2424E do not currently support this function.
Left click on the graphical interface, enter a specific starting time in the Starting Time box, then click Play to start playing the
video. Alternatively, double left click the graphical interface to start playing the video. The white vertical line marks the start
point.
To enlarge the video when playing, simply move the cursor onto the timeline, and then left click on the enlarge icon once to
enlarge the video display. To restore normal view, move the cursor to the timeline and left click the minimize icon.
A dark gray square on the calendar means that there are video files on that date. A light gray square indicates that than there
are no video files of that date. The light blue square indicates the selected date on the calendar.
A green square indicates a manual recording, a blue square indicates a scheduled recording, a yellow square indicates a
motion-detection recording, and a red square indicates an alarm recording.
The graphical interface will display video storage information for up to 16 channels. To view information for additional channels
left click on the icon for the last page or the next page to check the status of the video files of other channels.
5.2.1.1 Intel Play
Note: GW22XXE/EP Series does not support this function.
With Intelligent Playback you can select a zone of a channel’s display for playback. It will then search that zone for all motion
that was detected and quickly play it back.
Official Website: www.gwsecurityusa.com
Email: support@gwsecurityusa.com
Business Hours: Mon-Fri 9am to 5:30pm PST/PDT
Tel: 626-350-0555
Page 12

Left click Intel Play, choose a channel, and confirm.
Left click and drag to select a zone for playback and then left click the icon.
Official Website: www.gwsecurityusa.com
Email: support@gwsecurityusa.com
Business Hours: Mon-Fri 9am to 5:30pm PST/PDT
Tel: 626-350-0555
Page 13

The NVR will now playback all movement detected in the selected zone of that channel.
5.2.2 Data Manager
In the [Data Inquiry] interface, left click on the Data Mgr tab. In the Data Manager interface you can check video files based on
channel number or video type.
Official Website: www.gwsecurityusa.com
Email: support@gwsecurityusa.com
Business Hours: Mon-Fri 9am to 5:30pm PST/PDT
Tel: 626-350-0555
Page 14

To initiate playback and manage channel data follow these steps:
● Select a desired channel.
● Select the video type of the channel on the drop down menu.
● Double left click the file segment to start playback.
● Left click on the next/last page icons to view additional pages.
● Lock or unlock data of a selected channel.
● Delete the data of a selected channel.
Playback supports the following features.
● Playback control bar: Right click to display or hide the control bar.
● Multi-channel playback: Select multiple channels for playback.
● Area zooming: During playback, left click Enlarge and select the zones you wish to zoom. Right click to deselect.
● Segment backup: During playback, left click to set the start point, and again to set the end point. The
Cutting window will pop up and the storage device, file type, and backup player can be selected.
5.3 Backup
Go to [Main Menu] → [Backup]
The NVR can backup channel data to either a local HDD or to a remote HDD.
In order to backup data follow these steps:
● Backup channel: Choose the channel(s) to back up.
● Query time: Enter a start and end time of the file to backup. The maximum time period is one month.
● Backup device type: Choose the device type to query; local HDD or stored files on other listed devices.
● File status: Choose to backup locked, unlocked, or all data.
● File type: Choose the file type of the video to be backed up. Video can be stored as either DAT or AVI. NOTE: The NVR
can only playback DAT file type.
● Backup device: Choose the storage device for the backup files.
5.3.1 Quick Backup and Manual Backup
To initiate Quick Backup or Manual Backup, in the Backup interface select the channels and file status, check the box for
recording, and left click Quick Backup or Manual Backup. To complete the process, select Yes at the Confirm to Start Backup
menu pop-up.
Official Website: www.gwsecurityusa.com
Email: support@gwsecurityusa.com
Business Hours: Mon-Fri 9am to 5:30pm PST/PDT
Tel: 626-350-0555
Page 15

5.3.2 Schedule Backup
In the Backup interface, left click on Schedule Backup to enter the scheduling interface.
To schedule automatic backups, select the channel(s) to be backed up. Set the record mode, the day and time to initiate
backup, the destination device, the overwrite parameters, and the file type. Finally, left click save.
5.4 Record
Go to [Main Menu] → [Record]
5.4.1 Recording Parameters
Go to [Main Menu] → [Record] → [Record Para.] to enter the Recording Parameters interface.
When using the NVR to record it is important to set up the recording parameters beforehand. These parameters will affect
playback and HDD space consumption.
Official Website: www.gwsecurityusa.com
Email: support@gwsecurityusa.com
Business Hours: Mon-Fri 9am to 5:30pm PST/PDT
Tel: 626-350-0555
Page 16

Bitrate
8M
6M
4M
3M
2M
1M
512K
Min. Rec. Time
4s
5.3s
8s
10.7s
16s
30s
30s
The following parameters must be set:
● Channel number: Select a channel from the drop down menu.
● Stream: Select the bit stream type; mainstream or sub-stream.
● Resolution: The resolution range is determined by the connected IP camera. Not all model cameras will have the
same resolution options.
● Image Quality: Select the quality; Highest, Higher, High, Medium, Lower, Lowest
● Frame Rate: Set the frames per second from 1 to 30.
● Bitrate: The default bitrate is based on the connected IPC. A customized bitrate should be within the supported
bitrate range of the IPC.
● Pre-record: The NVR will record video before the event occurs. The value ranges from 5 to 30 seconds depending on
the bitrate stream.
● Delay-REC: The NVR will continue to record after the event has ended. The value ranges from 1 to 180 seconds.
● Copy (Optional): Left click in order to copy parameters from one channel to another.
The minimum recording time is dependent upon the selected bitrate of the video stream.
Official Website: www.gwsecurityusa.com
Email: support@gwsecurityusa.com
Business Hours: Mon-Fri 9am to 5:30pm PST/PDT
Tel: 626-350-0555
Page 17

5.4.2 Manual Recording
Go to [Main Menu] → [Record] → [Manual] to enter the manual recording interface.
To enable manual recording select the channel(s) you wish to record (recording channels are displayed in blue and channels not
recording/selected are displayed in gray), then left click Save.
Once the manual recording feature is activated, it will keep recording until turned off. If there is an unexpected loss of power to
the unit recording will stop, but will restart automatically once the power restored.
5.4.3 Scheduled Recording
Go to [Main Menu] → [Record] → [Schedule] to enter the scheduled recording interface.
To schedule recording times for a channel follow these steps:
● Channel No.: Select the channel to record.
● Day and Time: Select which day to record. Left click and drag to highlight the specific times to record. A maximum of
six segments can be recorded per day. Time intervals are in 15 minute segments.
● Save: Left click to save the scheduled recording times.
● Copy (Optional): Left click in order to copy a schedule from one channel to another.
Official Website: www.gwsecurityusa.com
Email: support@gwsecurityusa.com
Business Hours: Mon-Fri 9am to 5:30pm PST/PDT
Tel: 626-350-0555
Page 18

5.5 Alarm Settings
Go to [Main Menu] → [Alarm]
5.5.1 Motion Detection
Go to [Main Menu] → [Alarm] → [Motion] to enter the motion detection interface.
To enable motion detection for a channel follow these steps:
● Before setting up motion detection for a channel, that channel must have it’s recording parameters already input.
● Channel No.: Select the channel to detect motion.
● Sensitivity: Select the motion detection sensitivity level.
● Motion Area: Left click and drag to select the area of the channel that motion will be detected. Right click to exit the
preview and save the area. Double left click to remove the selected area. The selected area is highlighted in yellow.
● Day and Time: Select the days and times the channel will detect motion. Functions as per scheduled recording.
● Linkage Setting: Select the channel(s) that will begin recording or taking screenshots when motion is detected by the
channel. Select whether to link email to receive an alarm alert or not.
● Copy (Optional): Left click in order to copy motion detection settings from one channel to another.
● Continuous Alarm (Optional): If selected the alarm will go off continuously while motion is detected. Otherwise, the
alarm will only occur once.
Official Website: www.gwsecurityusa.com
Email: support@gwsecurityusa.com
Business Hours: Mon-Fri 9am to 5:30pm PST/PDT
Tel: 626-350-0555
Page 19

5.5.2 Alarm Output
Go to [Main Menu] → [Alarm] → [Alarm Output] to enter the alarm output interface.
The following parameters determine how the NVR alarm behaves:
● Alarm Duration: Set the duration an alarm will sound or buzz. The default is 30 seconds.
● Audio & Buzzer: Select if the alarm will use the built in buzzer and/or output an audio signal through the
HDMI and/or the audio jack.
● Full Screen: When selected, the channel triggering an alarm will display full screen.
● Alarm Push: When selected, a message will be sent to a smartphone when an alarm occurs. NOTE: The
RealViewPro app must be installed on the smartphone to utilize this option.
● Days and Times: Select the days and times an alert can sound. Functions as per scheduled recording.
5.5.3 Other Alarms
Go to [Main Menu] → [Alarm] → [Other Alarms] to enter the miscellaneous alarms interface.
Official Website: www.gwsecurityusa.com
Email: support@gwsecurityusa.com
Business Hours: Mon-Fri 9am to 5:30pm PST/PDT
Tel: 626-350-0555
Page 20

Use this feature to enable alarm types other than motion for channels.
Select the alarm type and channel and left click Enable Alarm. Multiple alarm types can be selected for the same channel. An
email can be linked to the alarm as per motion detection alarms. Copy can be used to copy alarm settings from one channel to
another. Left click Save for each alarm that is created.
5.6 IPC Management
Go to [Main Menu] → [IPC Management]
After entering the IPC Management interface, the system will automatically search all IP Camera's that are within the same
network and display them in a list. Available cameras are shown on the upper half of the interface and cameras already paired
are shown in the bottom half.
5.6.1 Adding IP Cameras
IP cameras can be added to the system in one of three ways:
● Manually adding a camera via Manual Add.
● Manually adding a camera by left clicking the icon of an available camera.
● Automatically adding all available cameras via Smart Access.
Official Website: www.gwsecurityusa.com
Email: support@gwsecurityusa.com
Business Hours: Mon-Fri 9am to 5:30pm PST/PDT
Tel: 626-350-0555
Page 21

5.6.1.1 Adding via Manual Add
Left click Manual Add to enter the manual addition interface.
To manually add a camera follow these steps:
● IP CH: Select the channel number to assign to the camera.
● Dev Type: Device type should automatically default and not be selectable under normal conditions.
● IP address: Input the IP address of the camera.
● Protocol (if multiple options): Select the desired protocol type.
● Port: Input the desired port. The default is 80.
● Username & Password (if required): enter the username and password of the camera.
● Add: Left click Add to finish and add the camera.
5.6.1.2 Adding via the “Plus” Icon
Left click the icon of an available camera to add it to the system. If the camera has a icon in the status box it requires
input of the camera’s username and password in order to complete the addition. If the camera has a icon in the status box
it does not require a username and password.
5.6.1.3 Adding via Smart Access
Left click Smart Access and the system will automatically add all IP Cameras to the system in the same order shown in the
available cameras section. The order of available cameras can be changed before adding them by left clicking any of the list
parameters (IP Address, Resolution, etc.).
5.6.2 Removing IP Cameras
Only paired cameras can be removed. All removed paired cameras will be moved to the available camera list. Cameras can be
removed one by one or all at once.
● Left click the icon of a paired camera and select Yes to remove it.
● Left click Delete All and select Yes to remove all paired cameras.
5.6.3 Other Options
IPC Management also includes the following features and options.
● Preview: Hover the mouse over the icon to pop-up a preview window of the available camera. (This function is
only available on cameras that support snapshots.)
Official Website: www.gwsecurityusa.com
Email: support@gwsecurityusa.com
Business Hours: Mon-Fri 9am to 5:30pm PST/PDT
Tel: 626-350-0555
Page 22

● Refresh: Left click Refresh to refresh the list of available cameras.
● Page Flip: If there are multiple pages of cameras, left click the & icons to navigate to other pages.
● Status: The status of a paired camera is displayed. Red indicates abnormal operation, Orange indicates abnormal
operation but video is still displaying, Green indicates normal operation.
● Diagnosis: Left click the “stethoscope” icon of a paired camera to enter the IPC diagnosis interface to diagnose video
streams.
● Information: Left click the icon of a paired camera to display information about that camera.
● Edit: Left click the icon of a paired camera to change the camera’s IP address, port, and/or username &
password.
5.7 Settings Management
Go to [Main Menu] → [Settings Management]
5.7.1 General Settings
Go to [Main Menu] → [Settings Management] → [General] to enter the general settings interface.
The following general parameters can be set or changed:
● Host Name: Input a host name for the NVR.
● Resolution: Set the display resolution (1024x768, 1280x1024, 1440x900, 1280x720, 1920x1080).
● Language: The NVR only supports the English language.
● Auto Lock: Set how long until the system locks out the interface because of inactivity. Three minutes is the default.
● Audio Device: Select the device for audio output.
Official Website: www.gwsecurityusa.com
Email: support@gwsecurityusa.com
Business Hours: Mon-Fri 9am to 5:30pm PST/PDT
Tel: 626-350-0555
Page 23

● Open adaptive optimal resolution: If selected the system will choose the best display resolution base on the monitor
connected.
● Display Power on Wizard: If selected the Start-up Wizard will run whenever the system is turned on.
● Saving and enable beep: Select to turn on or off the system beep sound.
● Save: Left click to save the settings.
5.7.2 Time Settings
Go to [Main Menu] → [Settings Management] → [Time] to enter the time settings interface.
The following time parameters can be set or changed:
● Date: Input the date manually or via the calendar by double left clicking.
● Date Format: Select the format to display the date.
● Time: Input the time and select AM/PM if a 12 hour clock is being used.
● Time Standard: Select whether to display a 12 or 24 hour clock.
● Time Zone: Select the time zone.
● Save: Left click to save the settings.
5.7.2.1 Daylight Saving Time (DST)
Left click on DST to enter the daylight saving time interface.
Official Website: www.gwsecurityusa.com
Email: support@gwsecurityusa.com
Business Hours: Mon-Fri 9am to 5:30pm PST/PDT
Tel: 626-350-0555
Page 24

DST can be enabled by either week or specific date. In either case, select the times and dates that correspond to when DST
begins and ends for your location.
5.7.2.2 NTP Settings (Internet Time)
This feature requires the NVR to have internet access to function.
The following NTP parameters can be set or changed:
● Auto Update: If selected the system will automatically synchronize its time.
● Preset Server: If selected, only the preset servers may be selected when selecting a server. Otherwise, the server to
synchronize time must be manual input. It is recommended this setting is selected.
● Server: The time synchronization server can be selected or manually input.
● Port: Input the desired port. The default is 123.
● Update Period: Input/select how often the system will update NTP if auto update is selected.
● Manual Update: Left click to have the system update its time.
● Save: Left click to save the settings.
5.7.3 Output
Go to [Main Menu] → [Settings Management] → [Output]
5.7.3.1 Channel Settings
Go to [Main Menu] → [Settings Management] → [Output] → [Channel Setting] to enter the channel settings interface.
Official Website: www.gwsecurityusa.com
Email: support@gwsecurityusa.com
Business Hours: Mon-Fri 9am to 5:30pm PST/PDT
Tel: 626-350-0555
Page 25

The following channel parameters can be set or changed:
● Channel No.: Select the channel that will be edited.
● Channel Name: Input a name for the channel.
● Video Mask: Select to enable or disable this feature. If enabled, up to four areas can be selected not to be displayed in
the channel video, recording, or both. The selection interface functions the same as setting a motion alarm area. Not
all models support this function.
● Time & Channel Name Display: Select to display the time and name in the channel video.
● Video Adjust: Left click Video Adjust to open the video adjustment interface. Either left click the arrows or left click
and drag the slider to adjust the brightness, contrast, and saturation of the channel.
● CH Name Pos. & Time Pos.: Left click to enter the position adjustment interface, and select a desired position from
the drop-down menu. Some models do not have a separate menu for adjusting the position.
● Save: Left click to save the settings.
5.7.3.2 Display Sequence
Go to [Main Menu] → [Settings Management] → [Output] → [Sequence] to enter the video sequence interface.
This interface may look slightly different on differing models but its functionality remains the same.
Video sequencing will only occur when the system is locked down.
To enable video sequencing follow these steps:
● Sequence: Select to enable or disable the feature.
● Channels: Select which channels to video sequence. Not all models have this option.
● Sequence period: Input the time in seconds between each sequence change. The time can be between 3 and 60
seconds.
● Layout: Select the desired display layout and where channels are displayed in the layout.
● Save: Left click to save the settings.
Official Website: www.gwsecurityusa.com
Email: support@gwsecurityusa.com
Business Hours: Mon-Fri 9am to 5:30pm PST/PDT
Tel: 626-350-0555
Page 26

5.7.3.3 Output Mode
Go to [Main Menu] → [Settings Management] → [Output] → [Output Mode] to enter the output mode interface.
This interface allows the output video to be set in one of five preset modes that adjust brightness, color, and sharpness.
5.7.4 Network Sub-menu
Go to [Main Menu] → [Settings Management] → [Network]
This sub-menu may have different features for differing models.
Official Website: www.gwsecurityusa.com
Email: support@gwsecurityusa.com
Business Hours: Mon-Fri 9am to 5:30pm PST/PDT
Tel: 626-350-0555
Page 27

5.7.4.1 Network Settings
Go to [Main Menu] → [Settings Management] → [Network] → [Network] to enter the network settings interface.
This interface allows for the manual modification of network addresses and ports. In most cases these parameters should be
left as is unless a complex NVR system is being set up. It is highly recommended that only a professional network technician or
other qualified technician alter these parameters.
5.7.4.2 DDNS Settings
Go to [Main Menu] → [Settings Management] → [Network] → [DDNS] to enter the network settings interface.
Setting up a DDNS allows for a remote connection to the NVR by a computer or smartphone via the internet.
To set up a DDNS follow these steps:
● Server: Select the desired server. The default selection is multi.super-ddns.com.
● Domain: The domain is the last eight digits of the NVR’s MAC address. Default should be enabled in this option.
● Login: Left click Login to input the username and password of the domain.
● DDNS Test: Left click to check if the domain is available.
● Auto Login: Select to enable automatic login to the DDNS.
● Domain display box: The domain address will be updated and displayed in this box.
● Save: Left click to save the settings.
Official Website: www.gwsecurityusa.com
Email: support@gwsecurityusa.com
Business Hours: Mon-Fri 9am to 5:30pm PST/PDT
Tel: 626-350-0555
Page 28

For ORAY, Meibu, FreeDNS, no-ip, Dyndns domain names: Sign up for a domain name on the service’s official website, enter the
correct required information in the NVR, and left click Save. Set up the username and password you registered on any of those
sites, save the setting, and then the system will be able to update the domain name.
5.7.4.3 PPPOE Settings
Only the GW22XX series supports this feature.
Go to [Main Menu] → [Settings Management] → [Network] → [PPPOE] to enter the PPPOE settings interface.
PPPOE settings are only used for direct dial-up/ADSL internet connections. If the NVR is connected to the internet via a router
which is connected to a modem then these settings are not necessary.
The following PPPOE parameters can be set or changed:
● Username & Password: Enter the username and password of the ADSL account. These can only be obtained from your
Internet Service Provider (ISP).
● Auto-redial: Select to enable the system to automatically redial if disconnected from the internet.
● 3G Dial-up: Select this option if a 3G wireless adapter is being used to connect to an ADSL service. Selecting this will
open the Network Standard, APN, and Dial Number options.
● Network Standard: Select the network standard of the 3G wireless connection from the drop-down menu.
● APN: Enter the APN as provided by you ISP.
● Dial Number: Enter the number to dial as provided by your ISP.
● Save: Left click to save the settings.
Official Website: www.gwsecurityusa.com
Email: support@gwsecurityusa.com
Business Hours: Mon-Fri 9am to 5:30pm PST/PDT
Tel: 626-350-0555
Page 29

5.7.4.4 Email Settings
Go to [Main Menu] → [Settings Management] → [Network] → [Email Setting] to enter the email settings interface.
In order to send and receive alerts and notifications via email, email parameters must be entered into the system.
The following email parameters can be set or changed:
● Server: Enter the server of the email service being used for the sender email account. (e.g. gmail.com)
● Username & Password: Enter the username and password of the sender email account.
● Sender Email: Enter the email address that will send the alerts.
● Receiver Email: Enter the email address(es) the will receive the alerts. Multiple emails must be separated by a “;” and
a maximum of 256 characters can be input.(e.g. example1@email.com; example2@email.com)
● Port: Enter the email port number. The default number is 25. Confirm with the email provider the correct port
number.
● Period: Enter the period in minutes between email notifications. If there are multiple alerts within the time period
only one email for the first alert will be sent. The time period range can be between one and ten minutes.
● SSL safety login: Enable this option if it is required by the email service provider.
● Email Test: Left click to send out a test email notification.
● Save: Left click to save the settings.
5.7.4.5 Advanced Settings
Go to [Main Menu] → [Settings Management] → [Network] → [Advanced] to enter the advanced settings interface.
The advanced settings can be used to enable UPNP (universal plug and play) and FTP features. In most cases these features do
not need to be used unless a complex NVR system is being set up. It is highly recommended that only a qualified technician
alter these parameters.
Official Website: www.gwsecurityusa.com
Email: support@gwsecurityusa.com
Business Hours: Mon-Fri 9am to 5:30pm PST/PDT
Tel: 626-350-0555
Page 30

5.7.4.6 Cloud Service
Go to [Main Menu] → [Settings Management] → [Network] → [Cloud Service] to enter the cloud service interface.
To enable cloud service follow these steps:
● Select Enable ivview and left click Save. The status displayed should will change from offline to online.
● Scan the first QR code with a smartphone to download the client app and install it.
● Scan the second QR code with the same smartphone to add the NVR device to the app.
5.7.4.7 Network Bridge
Only the GW3216E-16P & GW3232E-8S support this feature.
Go to [Main Menu] → [Settings Management] → [Network] → [Bridge] to enter the network bridge interface.
Official Website: www.gwsecurityusa.com
Email: support@gwsecurityusa.com
Business Hours: Mon-Fri 9am to 5:30pm PST/PDT
Tel: 626-350-0555
Page 31

A network bridge is a computer networking device that creates a single aggregate network from multiple communication
networks or network segments. There are two different network segments on the NVR models with built-in POE switches or
SDA ports. The network bridge will bind the network segments together, allowing users to access cameras directly from a
computer on the network. Left click Enable to turn on this feature.
Important notes about the network bridge:
● The interface will lock after enabling the bridge function and unlock after you disable it.
● While enabled, all cameras will be offline and stop recording.
● Only one NVR’s bridge mode can be activated at once.
● Do not connect the LAN port, the PoE port, or the SDA port on the same network.
● While enabled, cameras found are those connected to either the built-in PoE switch or those connected to the SDA
port.
● The computer needs to be on the same network segment as the cameras.
5.8 HDD Manager
Go to [Main Menu] → [HDD Mgr.] to enter the hard disk drive manager interface.
5.8.1 Basic Information
The Basic Info. tab displays information about each HDD and USB data storage device connected to the NVR. This tab can also
be used to format storage devices and to change HDDs from read/write status to read-only and back.
Official Website: www.gwsecurityusa.com
Email: support@gwsecurityusa.com
Business Hours: Mon-Fri 9am to 5:30pm PST/PDT
Tel: 626-350-0555
Page 32

5.8.2 HDD Group
The HDD Group tab allows channels to be recorded to specific storage devices. The channels recording to individual storage
devices can be set by left clicking the corresponding Edit button and selecting which channels to record.
5.8.3 Storage Settings
The Storage Setting tab allows data overwrite parameters to be set for the system.
The following data overwrite parameters can be set or changed:
● Overwrite: Select either Auto or Manual from the drop-down menu. The default selection is Auto. If manual is
selected, the system will need permission each time data needs to be overwritten.
● Triggering Time: Select a time from the drop-down menu. The system will check the HDD storage every day at the
specified time.
Official Website: www.gwsecurityusa.com
Email: support@gwsecurityusa.com
Business Hours: Mon-Fri 9am to 5:30pm PST/PDT
Tel: 626-350-0555
Page 33

● Channel No.: Select a channel to set its data overwrite parameters.
● Enable: Select to turn on and off the data overwrite parameters for the selected channel.
● Record/Photo Saving Days: Set the number of days recorded data will be stored. Data after the set number of days
will be overwritten.
5.8.4 SMART
The SMART tab provides in depth information about each HDD connect to the NVR. Information such as the HDD model, serial
number, firmware version, current temperature, health status and other SMART attributes are displayed.
5.9 System Information
Go to [Main Menu] → [Sys. Info.]
5.9.1 Device Information
This interface displays detailed information about the NVR such as: device model, software version, hardware version, IP
address, MAC address, language, etc.
Official Website: www.gwsecurityusa.com
Email: support@gwsecurityusa.com
Business Hours: Mon-Fri 9am to 5:30pm PST/PDT
Tel: 626-350-0555
Page 34

5.9.2 Channel Status
This interface displays the current status of all channels and the following information: IP address, protocol, bitrate, and
resolution.
5.9.3 Alarm Status
This interface displays the alarm information for each channel, including motion detection alarms (yellow), and video lost
alarms (blue).
5.9.4 Online Status
This interface displays all currently logged in user accounts with their IP address, and login time.
5.9.5 Log Inquiry
This interface allows for the inquiry of specified event logs on the selected date.
5.10 System Maintenance
Go to [Main Menu] → [System Maintenance]
5.10.1 Quick Settings
Go to [Main Menu] → [System Maintenance] → [Quick Setting] to execute the start-up wizard.
The start-up wizard will guide you through the initial basic setup of the NVR system.
5.10.2 Account Maintenance
Go to [Main Menu] → [System Maintenance] → [Account] to enter the account maintenance interface.
The default administrator username is “admin” and the default password is 888888. The administrator account has full
authority on the device and is able to establish up to 15 additional user accounts. The administrator account determines the
access permitted for each additional user account. For security, it is recommended to change the default administrator
password.
5.10.3 Reset to Default
Go to [Main Menu] → [System Maintenance] → [Reset Default] to enter the default reset interface.
This interface allows for various settings of the NVR to be quickly reset to the default settings. It also allows for a complete
factory reset to be initiated.
Official Website: www.gwsecurityusa.com
Email: support@gwsecurityusa.com
Business Hours: Mon-Fri 9am to 5:30pm PST/PDT
Tel: 626-350-0555
Page 35

5.10.4 Upgrade
Go to [Main Menu] → [System Maintenance] → [Upgrade] to enter the upgrade interface.
This interface allows the firmware of the NVR to be updated via FTP or USB device. Alternatively, the NVR firmware can be
updated via a remotely connected computer. After updating the firmware, the NVR will automatically restart, and the
administrator password will reset to the default.
5.10.4.1 Upgrade via FTP
To upgrade via FTP follow these steps:
● Ensure an FTP service is enabled on the remote computer that the NVR will connect to.
● Enter the FTP server information and the file path of the upgrade file into the interface and left click Save.
5.10.4.2 Upgrade via USB
To upgrade via USB follow these steps:
● Copy the upgrade file into the root directory of a USB flash drive.
● Insert the flash drive into a USB port on the NVR.
● Left click USB Upgrade in the upgrade interface and confirm the upgrade.
5.10.4.3 Upgrade via Web Browser
To upgrade via remote web browser follow these steps:
● Enter the NVR IP address into the web browser and login to the system.
● Select Configuration at the top of the screen and then select Maintenance from the list on the left of the screen.
Select Browse to locate the upgrade file on the computer. Select the file and then select Upgrade.
5.10.5 Schedule Restart
Go to [Main Menu] → [System Maintenance] → [Schedule Restart] to enter the scheduled restart interface.
This interface allows a specific time and day to be set for the system to automatically restart.
5.10.6 System Shutdown
Go to [Main Menu] → [System Maintenance] → [System Shutdown] to enter the system shutdown sub-menu.
This sub-menu allows the current user to logout, for the system to be shutdown, or for the system to be restarted.
Official Website: www.gwsecurityusa.com
Email: support@gwsecurityusa.com
Business Hours: Mon-Fri 9am to 5:30pm PST/PDT
Tel: 626-350-0555
Page 36

6. NVR Remote Access
The NVR is capable of remote access via a LAN (local area network) or WAN (wide area network).
DirectX 9.0 or higher, Internet Explorer version 6.0 or newer, and Adobe Flash Player is required. Disable or uninstall any
browser add-ons if the web interface is not behaving as it should. If connection errors occur then lower any firewall settings.
6.1 Remote Access via LAN
To access the NVR over LAN follow these steps:
● Ensure the computer is connected to the same network as the NVR.
● Open a web browser program and enter the NVR’s IP address into the navigation bar. The IP address of the NVR can
be located in Device Information (see 5.9.1).
6.2 Remote Access via WAN
The NVR can be accessed via a WAN by three different methods.
Method 1:If there is a static WAN IP address available, the user can assign the static IP to the NVR and access the NVR directly
using the static IP address from a browser, smartphone app, or client software. However, this is not recommended because the
NVR does not have a firewall and direct Internet access opens the NVR to attacks.
Method 2: If there is PPPOE connection available, go to [Main Menu] → [Settings Management] → [Network] → [PPPOE] to
enter the interface (see 5.7.4.3). Once all the information is entered, use the IP address provided by your PPPOE provider to
access the device using a browser, smartphone app, or client software.
Method 3: Port forward the device on a router, then connect through the WAN IP address using a browser, smartphone app, or
client software.
Official Website: www.gwsecurityusa.com
Email: support@gwsecurityusa.com
Business Hours: Mon-Fri 9am to 5:30pm PST/PDT
Tel: 626-350-0555
Page 37

Model
GW-NVR3208E/NVR2208E-8P
GW-NVR3216E/NVR3216E-16P
GW-NVR3232E-8S
Video/Audio
input
IP video input
8 Ch.
16 ch.
32 Ch.
Up to 12 MP for the first 2 Ch., up to 8MP for the rest
IP audio input
8 Ch.
16 Ch.
32 Ch.
Two-way audio
1x RCA (2.0 Vp-p, 1 kΩ)
Network
Incoming
ONVIF, RTSP
160Mbps
320Mbps
Outgoing
CGI, RTSP, RTMP(Only for H.264)
160Mbps
320Mbps
Video/Audio
output
Recording
resolution
Up to 12 MP for the first 2 Ch., up to 8MP on other channels.
HDMI output
4K (3840x2160)/60Hz, 1080p (1920x1080)/60Hz, 720p (1280x720)/60Hz, UXGA
(1600x1200)/60Hz, 1280x1024/60Hz
VGA output
1080p (1920x1080)/60Hz, 720p (1280x720)/60Hz, UXGA (1600x1200)/60Hz,
1280x1024/60Hz
Audio output
1x RCA (Linear, 1 kΩ)
Decoding
Decoding
standard
H.265 / H.264
Live
view/Playback
resolution
Up to 12 MP for the first 2 Ch., up to 8MP on other channels.
Synchronous
playback
All Ch. Synchronous playback
HDD
SATA
2x SATA interfaces for 2 HDDs
Capacity
Up to 8TB capacity for each HDD
External
interface
Network
1x 10/100Mbps self-adaptive RJ45 interface
USB
Front panel: 1x USB2.0, Rear panel: 1x USB3.0
Alarm
4 in / 1 out
RS-485
N/A
PoE
Interface
PoE Option (8×PoE RJ45
IEEE802.3af/at)
PoE Option (16×PoE RJ45
IEEE802.3af/at)
SDA Port: 8x 10/100Mbps
RJ45 interfaces. Up to 32
Ch., up to 8 Ch. for each
SDA interface
7. Specifications
Official Website: www.gwsecurityusa.com
Email: support@gwsecurityusa.com
Business Hours: Mon-Fri 9am to 5:30pm PST/PDT
Tel: 626-350-0555
Page 38

Max. Power
120W
240W
N/A
General
Power supply
12V 40W
Operating
conditions
Temperature: -10°C to 55°C (14°F to 131°F)
Humidity: 10 to 90%
Dimensions
(WxLxH)
340 x 217.6 x 77mm (13.8" x 8.5" x 3")
Official Website: www.gwsecurityusa.com
Email: support@gwsecurityusa.com
Business Hours: Mon-Fri 9am to 5:30pm PST/PDT
Tel: 626-350-0555
 Loading...