


SenseView Duo
User Guide
Distributed in the U.S. by:
GW Micro, Inc.
TEL: (260) 489-3671
FAX: (260) 489-2608
E-mail: support@gwmicro.com
http://www.gwmicro.com/cctv


TABLE OF CONTENTS
1. SenseView Duo Package ..... 1
2. General Instructions............. 1
3. Configuration ........................ 2
4. How to Use Each Function .. 7
5. Technical Specifications .... 18
6. Digital Zoom Rate Table ..... 19
7. Warranty .............................. 20
8. FCC Warning ....................... 21


1
1. SenseView Duo Package
Thank you very much for choosing the
SenseView Duo. Please check to make sure
the following items are included in the
SenseView Duo Package:
(A) SenseView Duo
(B) AC power adapter
(C) Bag
(D) Strap
(E) User guide
2. General Instructions
(A) The battery must be fully charged for
approximately 3 hours prior to initial use.
Please connect the supplied AC power
adapter to DC-in in order to charge the
battery.
(B) To avoid electrical damage, please use
the supplied AC power adapter only.
(C) To prevent fire or shock hazard, do not
expose this unit to water or moisture.
(D) Please do not disassemble. Please refer
2
all servicing questions to qualified service
personnel only.
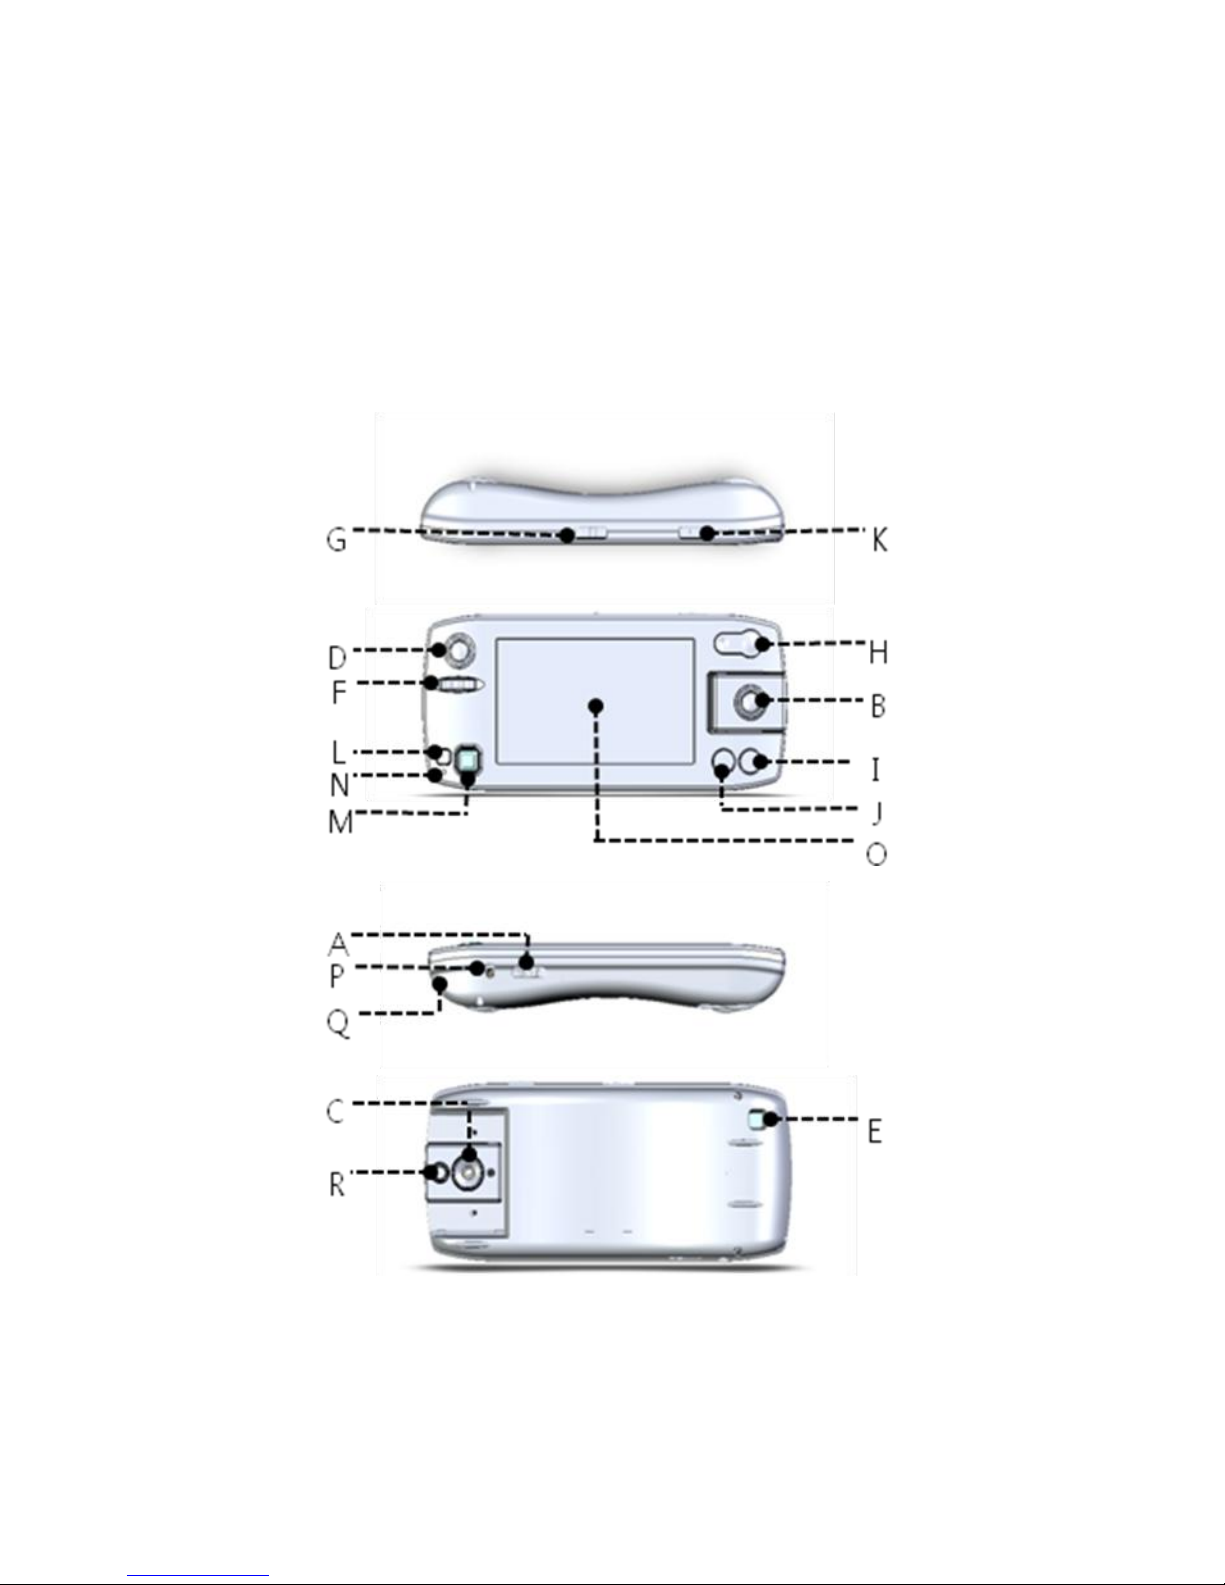
3. Configuration

3
(A) Power on/off switch
You can turn the SenseView on by
sliding the switch into the opposite
direction of DC-in and turn off by sliding
once more.
(B) Close-up & handwriting camera indicator
The lamp turns on when close-up &
handwriting camera is selected, and
flickers in the power-saving mode.
(C) Close-up & handwriting camera
(D) Distance camera indicator
The lamp turns on when distance
camera is selected, and flickers in the
power-saving mode.
(E) Distance camera
(F) Focus knob for distance camera
You can focus the distance camera by
rotating the wheel back and forth.
(G) Camera selection switch
You can select the close-up &

4
handwriting camera or distance camera
by moving the switch to the desired side.
(H) Zoom-in/out button
You can change the magnification rate
with 10 levels. Detailed magnification
rate at each level is explained in the
Digital Zoom Rate Table section.
(I) Color mode button
You can change colors on the LCD with
7 different combinations in the close-up
camera and 6 different combinations in
the distance camera, respectively. When
you switch to the distance camera from
the close-up camera, the color mode is
changed into full color mode
automatically, regardless of the color
mode of the close-up camera. When you
return to the close-up camera from the
distance camera, the color mode is also
restored to the original setting. The full
color mode is to view an object with its
original color and the enhanced color
mode is to view a text with high contrast.
In the enhanced color mode, an object

5
can be seen as brightened and changed
colors.
- 1. Full color
- 2. Enhanced color (close-up camera
only)
- 3. Black on white background
- 4. White on black background
- 5. Yellow on black background
- 6. Yellow on blue background
- 7. Blue on white background
(J) Brightness button
You can change the brightness on the
LCD with 4 different levels.
(K) Image capture button
You can capture the image which you
are looking at, and store the image, by
pressing the button and holding it for
more than 1.5 seconds.
(L) Menu button
When you press this button, five icons
will be appeared in a row at the bottom
of the LCD.

6
(M) Panning/selection key
This key has 5 buttons: right, left, up,
down and center. After you press Menu
button(L), you can navigate among
following functions:
1. Open the stored images one by one
2. Erase the stored images
3. Close-up camera light on/off
4. Check available storage capacity for
storing images
5. Sound on/off
How to use this key is explained in the
How to Use Each Function section.
(N) Battery charging indicator
When you are charging the battery, the
lamp is in red. It is changed to green
after fully charged.
(O) LCD screen
(P) DC-in
Insert the AC power adapter to charge

7
the battery here. To avoid electrical
damage, please use the supplied AC
power adapter only.
(Q) Strap hole
(R) Lamp for handwriting mode
4. How to Use Each Function
(1) Power on/off
You can turn the power on by sliding the
Power on/off switch (A) into the opposite
direction of DC-in and turn the power off
by sliding it once more.
(2) Distance camera mode
- You can select distance camera by
sliding the Camera selection switch
(G) to the distance camera.
- You can look at the objects from 1m
(3.3 feet) away or further.
- You can rotate the Focus knob (F) to
focus the distance camera. If you
rotate the knob into the leftmost
position like as Figure1, you can look

8
at the object from 1m. As you rotate
the knob into the right position, you
can look at the object further away.
<Figure 1>
(3) Close-up & handwriting camera
You can select the close-up and
handwriting camera by sliding the
Camera selection switch (G) to the right.
(4) Reading mode/handwriting mode
Select the handwriting mode by tilting the
close-up camera, like in Figure 2.
<Figure 2>

9
(5) Image storing
You can capture the image which you are
looking at by pressing the Image capture
button (K). You can store the captured
image by pressing and holding this button
once more for more than 1.5 seconds. If
you do not want to store the captured
image, press this button again for less
than 1.5 seconds. You can store up to 20
images.
You will hear an alarm sound and/or see
a flickering red 20 when you press the
Image capture button (K) for more than
1.5 seconds and 20 images are stored.
You must erase the stored images to
keep additional images when you have
20 images that are stored. Please refer to
the Erasing Pictures section. The stored
images are not deleted when turning off
the unit.
(6) Opening saved images
You can open the stored images by doing
the following in order:
1. Press the Menu button (L).

10
2. Move to the following icon – Figure 3
- for opening the stored images by
pushing the Panning/selection key
(M) to the right or left direction.
<Figure 3>
3. Press the center of Panning/selection
key (M). Then you can find an image
which is stored most recently. You will
hear an alarm sound and/or see a
flickering 00 when there are no stored
images.
4. Move to the desired picture by
pushing the Panning/selection key
(M) to the right or left.
5. You can magnify the selected image
by pressing the Zoom in/out button
(H) and pan it by pushing
Panning/selection key (M) to the right
or left direction, as well as change
colors by pressing the Color mode
button(I). Panning is NOT available in
zoom level 1.
6. Press Menu button (L) twice to return

11
to the normal viewing mode.
(7) Erasing pictures
You can erase the stored images by
doing the following in order:
1. Move to a picture to erase as
explained in the ‘Opening saved
image’.
2. Press the Menu button (L).
3. Move to the following icon - Figure 4 for erasing image by moving the
Panning/selection key (M) to the right
or left.
<Figure 4>
4. Press the center of the
Panning/selection key (M) and you
can see above the icon to confirm if it
is the exact image which you want to
delete.
5. Press the center of Panning/selection
key (M) once more to delete the
selected image. The deleted images
can NOT be restored in any case.

12
After deleting an image, you can
delete more images on the screen by
continuing to press the center of the
Panning/selection key (M).You will
hear an alarm sound and/or see a
flickering 00 when there are no stored
images to delete.
6. Press Menu button (L) twice to return
to the normal viewing mode.
(8) Panning
1. You can pan the image on the screen
in normal viewing, capture status, and
the stored image mode by moving the
Panning/selection key (M) in the four
directions (up, down, right and left).
2. Panning is NOT active in zoom level
1. You need to increase the zoom
level to 2 or more by pressing + (plus)
on the Zoom-in/out button (M).
(9) Power-saving mode
1. If you don’t move the product for 3
minutes while it is turned on, powersaving mode will be activated. In the
power-saving mode, the LCD turns off

13
and the camera indicator flickers.
2. You can cancel the power-saving
mode by pressing any button or move
the product. However, if you were
looking at a captured or saved image
before the power-saving mode began,
the power-saving mode is not
cancelled by moving the product. You
need to press any button to wake up
the unit.
3. If you don’t use the product for 7
minutes after power-saving mode, it
turns off automatically.
4. You need to slide the Power on/off
switch (A) again if you want to wake
the SenseView Duo up after auto
power-off.
(10) Battery status
1. You can check battery status by
pressing the Color mode button (I)
and Brightness button (J)
simultaneously.
2. The battery status is displayed for 3
seconds on the screen like as in
Figure 5 in blue, and in blue when the

14
AC adapter is not connected.
<Figure 5>
3. Please connect the supplied AC
power adapter to charge the unit
when the battery status flickers, like
as in Figure 6.
<Figure 6>
4. The battery status is in red, like as in
Figure 7, when this unit is being
recharged by connecting the AC
power adapter to the DC-in. When the
unit is fully charged, the color of the
battery indicator icon is changed to
green like as Figure 8.
<Figure 7>

15
<Figure 8>
(11) Close-up camera light on/off
You can turn the close-up camera light on
or off by doing the following:
1. Press the Menu button (L).
2. Move to the following icon - Figure 9 for close-up camera light-off by
pushing the Panning/selection key
(M) to the right or left direction.
<Figure 9>
3. Press the center of Panning/selection
key (M) to turn off the light.
4. If you want to restore the light, press
the Menu button (L) and move to the
following icon - Figure 10 - by pushing
the Panning/selection key (M) to the
right or left direction.

16
<Figure 10>
5. Press the center of the
Panning/selection key(M) to turn the
light on.
(12) Sound on/off
You can turn the sound on or off by doing
the following:
1. Press the Menu button (L).
2. Move to the following icon - Figure 11
- for sound-off by pushing the
Panning/selection key (M) to the right
or left direction.
<Figure 11>
3. Press the center of Panning/selection
key (M) to turn off the sound.
4. If you want to restore the sound,
press the Menu button (L) and move
to the following icon - Figure 12 - by

17
pushing the Panning/selection key
(M) to the right or left.
<Figure 12>
5. Press the center of the
Panning/selection key (M) to turn the
sound on.
(13) Storage capacity
You can check available storage capacity
for storing images by doing the following
in order:
1. Press the Menu button (L).
2. Move to the following icon - Figure 13
- for storage capacity by pushing the
Panning/selection key (M) to the right
or left direction.
<Figure 13>
3. Press the center of Panning/selection
key (M). Then you can see the
remaining number of images that can

18
be stored.
4. Press Menu button (L) twice to return
to the normal viewing mode.
5. Technical Specifications
(A) LCD: 4.3 inch WQVGA TFT LCD (16:10
wide type)
(B) Magnification rate: 3x ~ 13x (close-up
camera)
(C) Brightness: 4 levels
(D) Color mode: 7 color modes
- 1. Full color
- 2. Enhanced color (close-up camera
only)
- 3. Black on white background
- 4. White on black background
- 5. Yellow on black background
- 6. Yellow on blue background
- 7. Blue on white background
(E) Close-up reading & handwriting camera
(F) Distance camera
(G) Battery: Rechargeable lithium polymer
- Continuous use: 4.5 hours
- Recharging time: 3 hours

19
(H) Size(W*D*H) : 17.8 x 7.8 x 2.8cm
7” x 3” x 1.1”
(I) Weight : 261g, 0.57lb
6. Digital Zoom Rate Table
(A) Close-up camera
Zoom Level
Digital Zoom Rate
Level 1
3.2x
Level 2
3.8x
Level 3
4.6x
Level 4
5.4x
Level 5
6.5x
Level 6
7.3x
Level 7
8.2x
Level 8
9.6x
Level 9
11.2x
Level 10
13.4x
Digital zoom rate 3.2 in zoom level 1
means that object of 1cm long is
displayed as 3.2cm long on the screen.
(B) Distance camera
Zoom Level
Digital Zoom Rate
Level 1
1.0x

20
Level 2
1.2x
Level 3
1.4x
Level 4
1.7x
Level 5
2.0x
Level 6
2.3x
Level 7
2.5x
Level 8
2.9x
Level 9
3.4x
Level 10
4.1x
Digital zoom rate is the relative
magnification rate which is compared
with the zoom level 1 on the screen.
7. Warranty
(A) Warranty term is for 2 years except for
the battery.
(B) Warranty term of the battery is 6 months.
(C) Warranty does not cover the problems
due to the user’s fault.

21
8. FCC Warning
NOTE: This equipment has been tested and found to
comply with the limits for a Class B digital device, pursuant
to part 15 of the FCC Rules. These limits are designed to
pro-vide reasonable protection against harmful
interference in a residential installation.
This equipment generates, uses and can radiate radio
frequency energy and, if not in-stalled and used in
accordance with the instructions, may cause harmful
interference to radio communications. However, there is
no guarantee that interference will not occur in a particular
installation. If this equipment does cause harmful
interference to radio or television reception, which can be
determined by turning the equipment off and on, the user
is encouraged to try to correct the interference by one or
more of the following measures:
-Reorient or relocate the receiving antenna.
-Increase the separation between the equipment and
receiver.
-Connect the equipment into an outlet on a circuit different
from that to which the receiver is connected.
-Consult the dealer or an experienced radio/TV technician
for help.
CAUTION: Changes or modifications not expressly
approved by the manufacturer responsible for compliance
could void the user’s authority to operate the equipment.
 Loading...