

Page 1

Arbitrary Function Generator
Module
AFG-125/225/125P/225P
USER MANUAL
GW INSTEK PART NO. 82DS-23042EA1
ISO-9001 CERTIFIED MANUFACTURER
Page 2

August 2014
This manual contains proprietary information, which is protected by
copyright. All rights are reserved. No part of this manual may be
photocopied, reproduced or translated to another language without
prior written consent of Good Will company.
The information in this manual was correct at the time of printing.
However, Good Will continues to improve products and reserves the
rights to change specification, equipment, and maintenance
procedures at any time without notice.
Good Will Instrument Co., Ltd.
No. 7-1, Jhongsing Rd., Tucheng Dist., New Taipei City 236, Taiwan
Page 3

TABLE OF CONTENTS
Table of Contents
SAFETY INSTRUCTIONS ................................................... 4
GETTING STARTED ........................................................... 8
AFG-125/225/125P/225P Overview ........ 9
Panel Overview .................................... 12
DS2-FH1 Housing Installation ............. 14
Module Installation/Removal ............... 15
USB Configuration ............................... 17
AFG App Installation ........................... 18
Uninstalling the AFG App .................... 19
QUICK REFERENCE ......................................................... 20
Options Menu Tree .............................. 21
OPERATION .................................................................... 25
Basic Operation ................................... 26
Modulation .......................................... 40
Sweep .................................................. 50
Burst .................................................... 53
ARB ...................................................... 56
Power Supply Function ........................ 70
APPENDEX ...................................................................... 71
Dimensions ......................................... 71
Preset ARB Waveform .......................... 72
Declaration of Conformity .................... 80
INDEX............................................................................. 81
3
Page 4
AFG-125/225 Series Options Manual
WARNING
Warning: Identifies conditions or practices that
could result in injury or loss of life.
CAUTION
Caution: Identifies conditions or practices that
could result in damage to the function generator or
to other objects or property.
DANGER High Voltage
Attention: Refer to the Manual
Protective Conductor Terminal
Earth (Ground) Terminal
DANGER Hot Surface
SAFETY INSTRUCTIONS
This chapter contains important safety
instructions that should be followed when
operating and storing the function generator.
Read the following before any operation to
ensure your safety and to keep the function
generator in the best condition.
Safety Symbols
These safety symbols may appear in this manual or on the
instrument.
4
Page 5
SAFETY INSTRUCTIONS
Double Insulated
Do not dispose electronic equipment as unsorted
municipal waste. Please use a separate collection
facility or contact the supplier from which this
instrument was purchased.
General
Guideline
CAUTION
Do not place heavy objects on the instrument.
Do not place flammable objects on the
instrument.
Avoid severe impact or rough handling that
may damage the function generator.
Avoid discharges of static electricity on or near
the function generator.
Use only mating connectors, not bare wires, for
the terminals.
The instrument should only be disassembled by
a qualified technician.
Power Supply
WARNING
DC Input voltage: 5V/2A.
Do not exceed an input voltage of 5V±5%.
Fuse
WARNING
Fuse type: F3.15A/125V.
Only qualified technicians should replace the
fuse.
To ensure fire protection, replace the fuse only
with the specified type and rating.
Disconnect the power and all test leads before
replacing the fuse.
Make sure the cause of fuse blowout is fixed
before replacing the fuse.
Safety Guidelines
5
Page 6

AFG-125/225 Series Options Manual
Cleaning the
function
generator
Disconnect the power cord before cleaning the
function generator.
Use a soft cloth dampened in a solution of mild
detergent and water. Do not spray any liquid
into the function generator.
Do not use chemicals containing harsh products
such as benzene, toluene, xylene, and acetone.
Operation
Environment
Location: Indoor, no direct sunlight, dust free,
almost non-conductive pollution (Note below)
and avoid strong magnetic fields.
Relative Humidity: < 80%
Altitude: < 2000m
Temperature: 0°C to 40°C
(Pollution Degree) EN 61010-1:2010 specifies pollution degrees and
their requirements as follows. The function generator falls under
degree 2.
Pollution refers to “addition of foreign matter, solid, liquid, or
gaseous (ionized gases), that may produce a reduction of dielectric
strength or surface resistivity”.
Pollution degree 1: No pollution or only dry, non-conductive
pollution occurs. The pollution has no influence.
Pollution degree 2: Normally only non-conductive pollution
occurs. Occasionally, however, a temporary conductivity caused
by condensation must be expected.
Pollution degree 3: Conductive pollution occurs, or dry, non-
conductive pollution occurs which becomes conductive due to
condensation which is expected. In such conditions, equipment
is normally protected against exposure to direct sunlight,
precipitation, and full wind pressure, but neither temperature
nor humidity is controlled.
Storage
environment
Location: Indoor
Relative Humidity: < 70%
Temperature: -10°C ~ 70°C
6
Page 7

SAFETY INSTRUCTIONS
Disposal
Do not dispose this instrument as unsorted
municipal waste. Please use a separate collection
facility or contact the supplier from which this
instrument was purchased. Please make sure
discarded electrical waste is properly recycled to
reduce environmental impact.
7
Page 8
AFG-125/225 Series Options Manual
AFG-125/225/125P/225P Overview .................................... 9
Model Lineup ......................................................................... 9
Main Features ....................................................................... 10
Accessories ............................................................................ 11
Optional Accessories ........................................................... 11
Panel Overview ............................................................... 12
Front Panel ........................................................................... 12
Rear Panel ............................................................................. 13
DS2-FH1 Housing Installation ......................................... 14
Module Installation/Removal .......................................... 15
USB Configuration .......................................................... 17
AFG App Installation ....................................................... 18
Uninstalling the AFG App ................................................ 19
GETTING STARTED
This chapter gives a brief overview of how to
install the AFG-125/225/125P/225P module onto
the GDS-2000A.
8
Page 9

GETTING STARTED
Model
AFG-125
AFG-125P
AFG-225
AFG-225P
Frequency Range
1uHz-25MHz
Output Channels
1 1 2
2
Power Output
None
Yes
None
Yes
AFG-125/225/125P/225P Overview
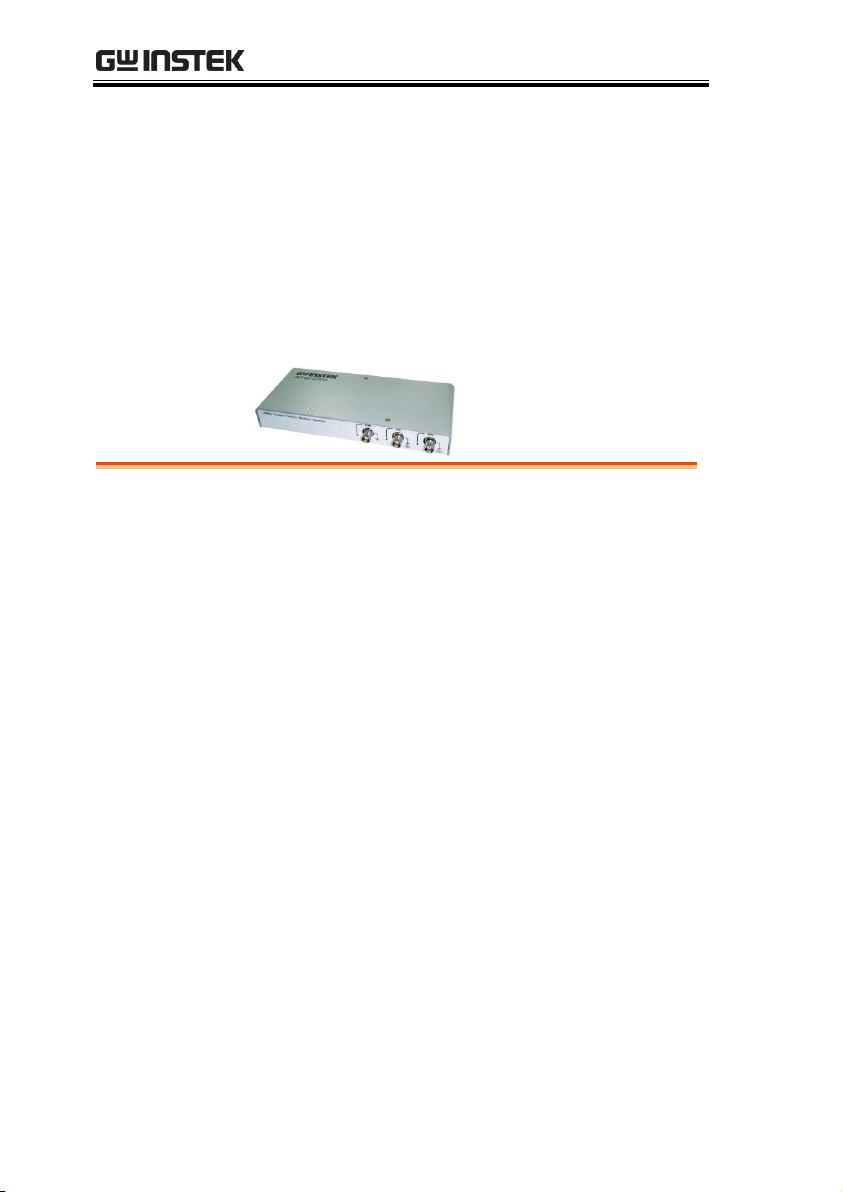
The AFG-125, AFG-225, AFG-125P and AFG-225P are arbitrary
function generator modules for use with the GDS-2000A series
DSOs. The options require the DS2-FH1 module extension bay to
secure the module to the DSO. This user manual will explain how
to become familiar with the arbitrary function generator modules.
The Getting Started chapter will introduce the modules with an
overview of the features and installation of the APP and
accompanying PC software. The Operation chapter will go over the
operation details.
Note1: The AFG-125/225/125P/225P are only supported with
GDS-2000A series DSOs with firmware version V1.19 or above
installed.
Note2: Throughout this manual AFG-125 will refer to both the
AFG-125 and the AFG-125P, unless stated otherwise. Similarly,
AFG-225 will refer to both the AFG-225 and AFG-225P, unless
stated otherwise.
Model Lineup
9
Page 10

Main Features
Performance
DDS signal generator
1μHz resolution over the full range
20ppm frequency stability
Arbitrary Waveform Capability
120 MSa/s sample rate
60 MSa/s repetition rate
4 k-point waveform length
4k waveform memory, 10 groups
User-defined output
DWR (Direct waveform reconstruction) capability
PC waveform editing
Features
Sine, Square, Ramp, Pulse & Noise as standard
waveforms
Internal LIN/LOG sweeps with marker output
AM, FM, FSK, SUM modulation
Triggered burst function
Save/recall 10 setup memories
Output overload protection
Interface
USB interface as standard
AWES (arbitrary waveform editing software) PC
software
Power Supply
(AFG-125P/
225P only
2.5V/3.3V/5V supply output
0.6A current output
AFG-125/225 Series Options Manual
10
Page 11

GETTING STARTED
Part Number
Description
DS2-FH1
Module extension bay
GTL-254
USB A – USB A/B converter
Quick start guide
CD User manual
Part Number
Description
GPA-501
Power adapter
GTL-246
USB Type A – Type B cable
GTL-201A
Ground lead
Accessories
Optional Accessories
11
Page 12
AFG-125/225 Series Options Manual
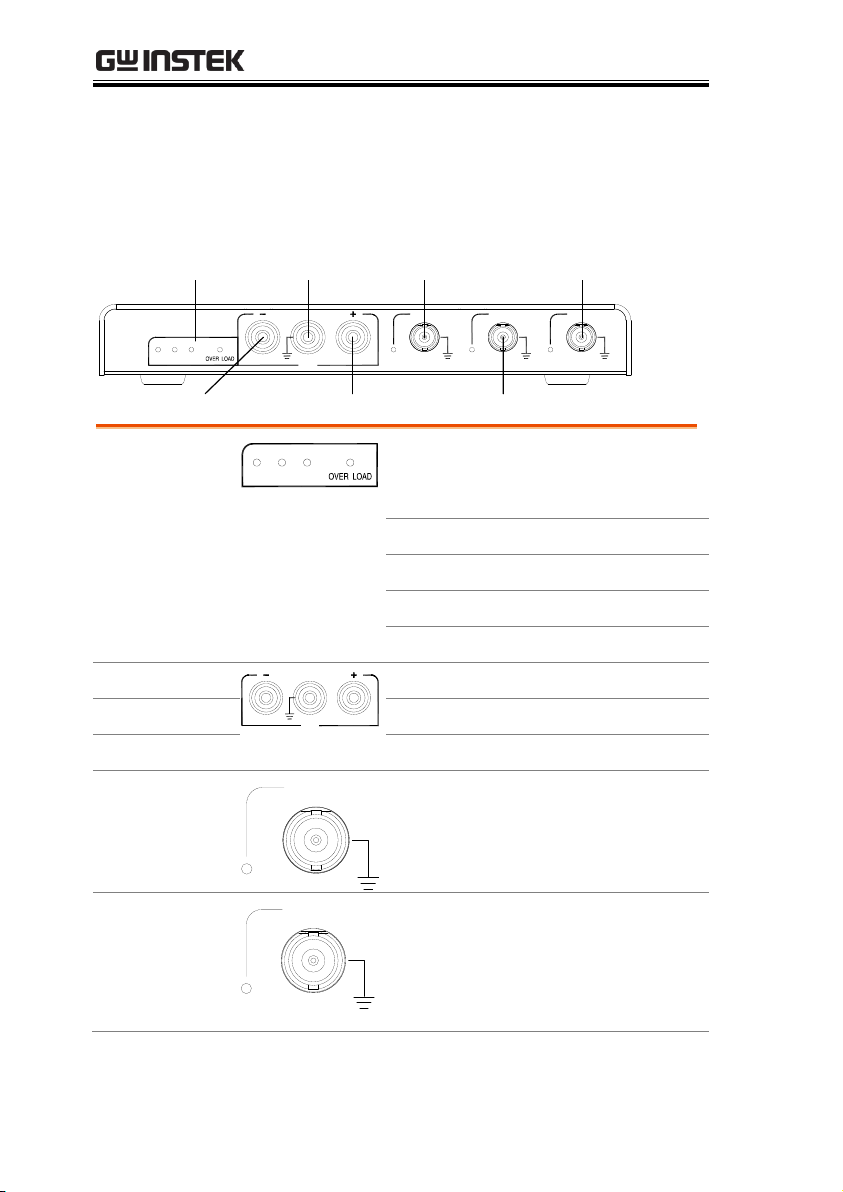
GND CH1 Output
Power Supply
Status LEDs
CH2 Output
SYNC Output
Positive OutputNegative Output
C
CH CH
GD
VV V
FIED
WP
Power Supply
Status LEDs
VV V
FIED
These LEDs indicate the immediate
status of the power supply function
on the AFG-125/225:
2.5V
2.5V output is on
3.5V
3.5V output is on
5V
5V output is on
OVER LOAD
Overload condition
Negative Output
8
GD
Negative output port
GND
Ground port
Positive Output
Positive output port
SYNC
C
Sync output. A TTL signal is output
as the sweep marker or sync output
signal. See page 50 for sweep
details or page 34 for sync details.
CH1
CH
CH1 (Signal 1) output.
Panel Overview
Front Panel
12
Page 13
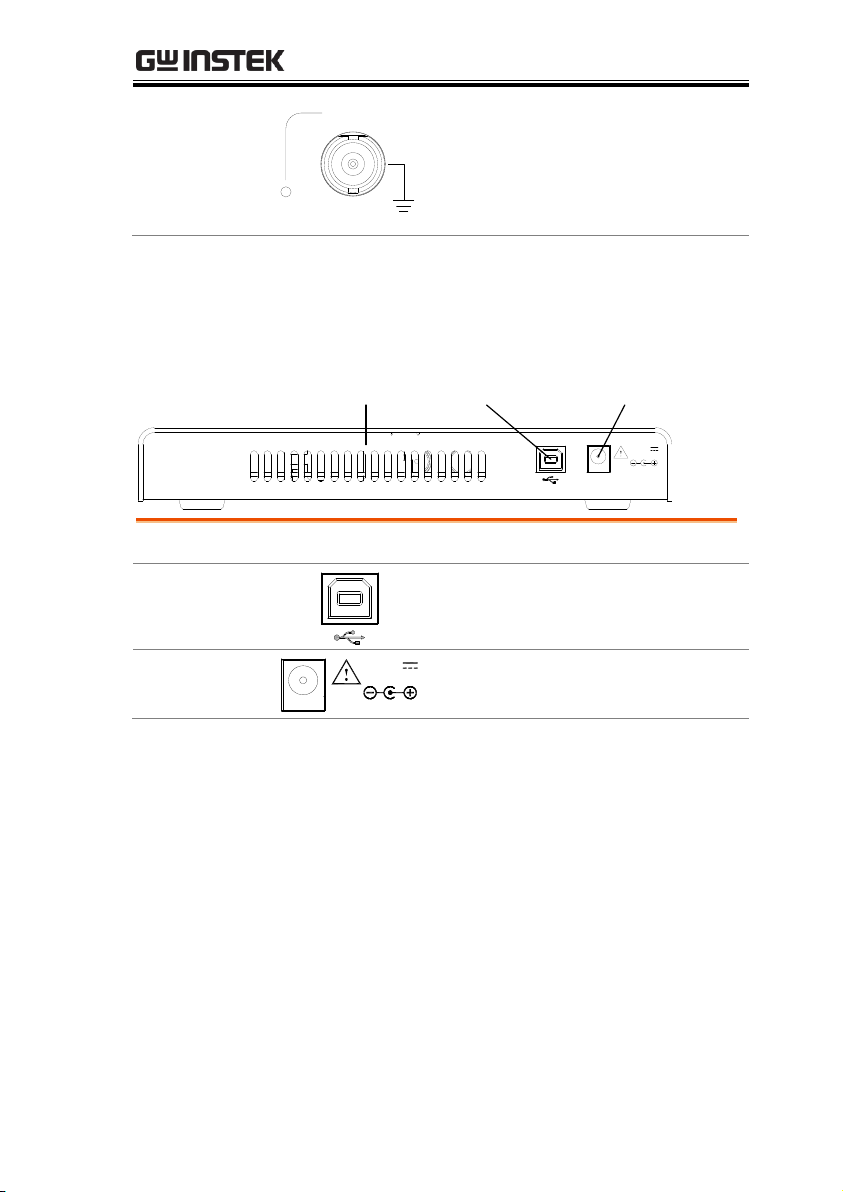
CH2
CH
CH2 (Signal 2) output (AFG-225
only).
MX
V
INPUT
Vent USB Device Port Input Power
Vent
Cooling vent.
USB Device Port
Interfaces with the GDS-2000A and
can also provide power.
Input Power
MX
V
INPUT
Input power source:
DC 5V; 2A max.
Rear Panel
GETTING STARTED
13
Page 14

AFG-125/225 Series Options Manual
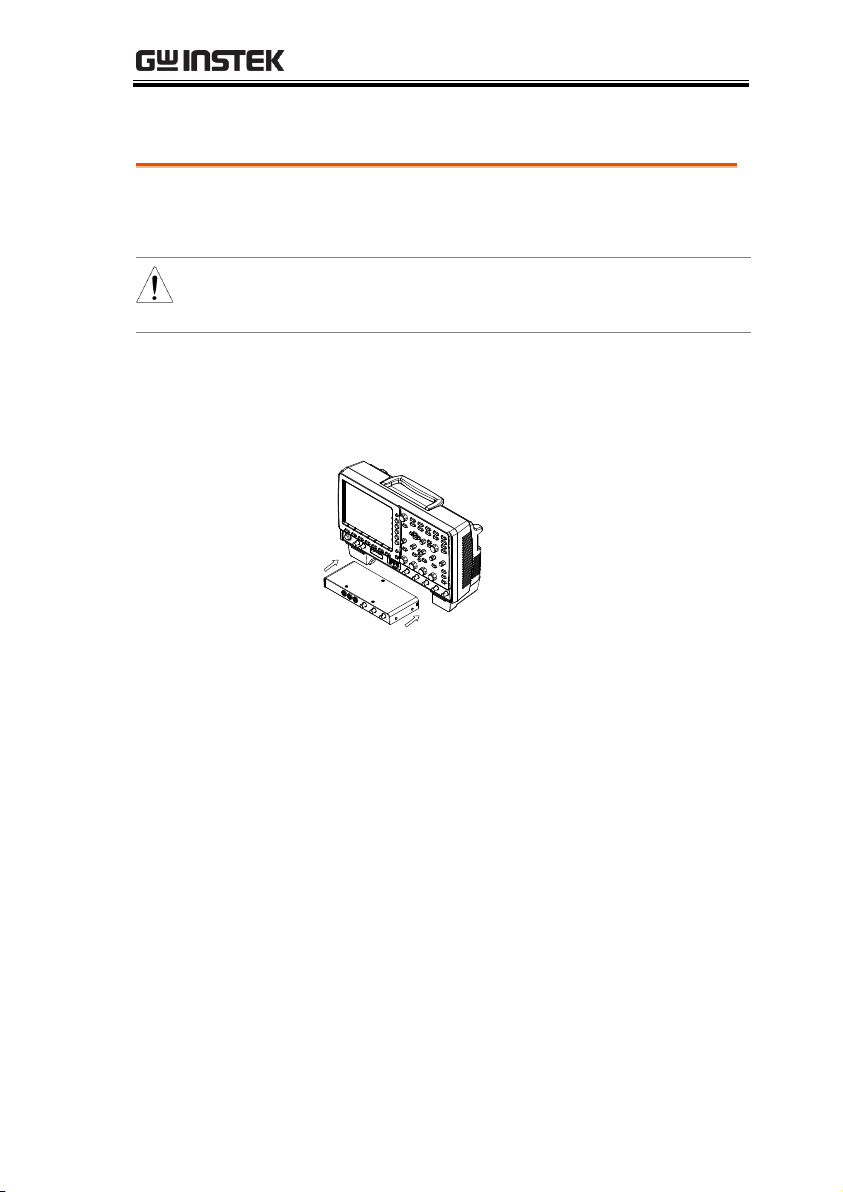
Background
The DS2-FH1 consists of 2 housings that are
attached to the feet on the underside of the case.
Note
Make sure the power is turned off before installing the
AFG-125/225 module.
Steps
1. Slip the housing over the front of the feet on the
GDS-2000A.
2. Make sure that the rear tab clips securely over
the fan vent grid on the rear panel, as shown
below.
1
2
3. The AFG-125/225 module is now ready to be
installed.
DS2-FH1 Housing Installation
14
Page 15
GETTING STARTED
Background
The AFG-125/225 modules are installed into the
area that is left between both of the DS2-FH1
housings.
Note
Make sure the power is turned off before installing the
AFG-125/225 module.
Installation Steps
1. Slide the module into the slot that was created
between the DS2-FH1 housings. The front of
the module should be facing forwards.
2. Make sure the module is secure. The module
will click into place when it is inserted
properly.
3. Make sure the GDS-2000A is turned off before
proceeding.
4. Connect one end of the GTL-254 USB cable to
the rear panel USB Device port and to the USB
Host port. Connect the other end to the Device
port on the AFG-125/225, as shown below.
5. Turn the power back on. The AFG-125/225 will
now be accessible in the Option menu.
Module Installation/Removal
15
Page 16
AFG-125/225 Series Options Manual
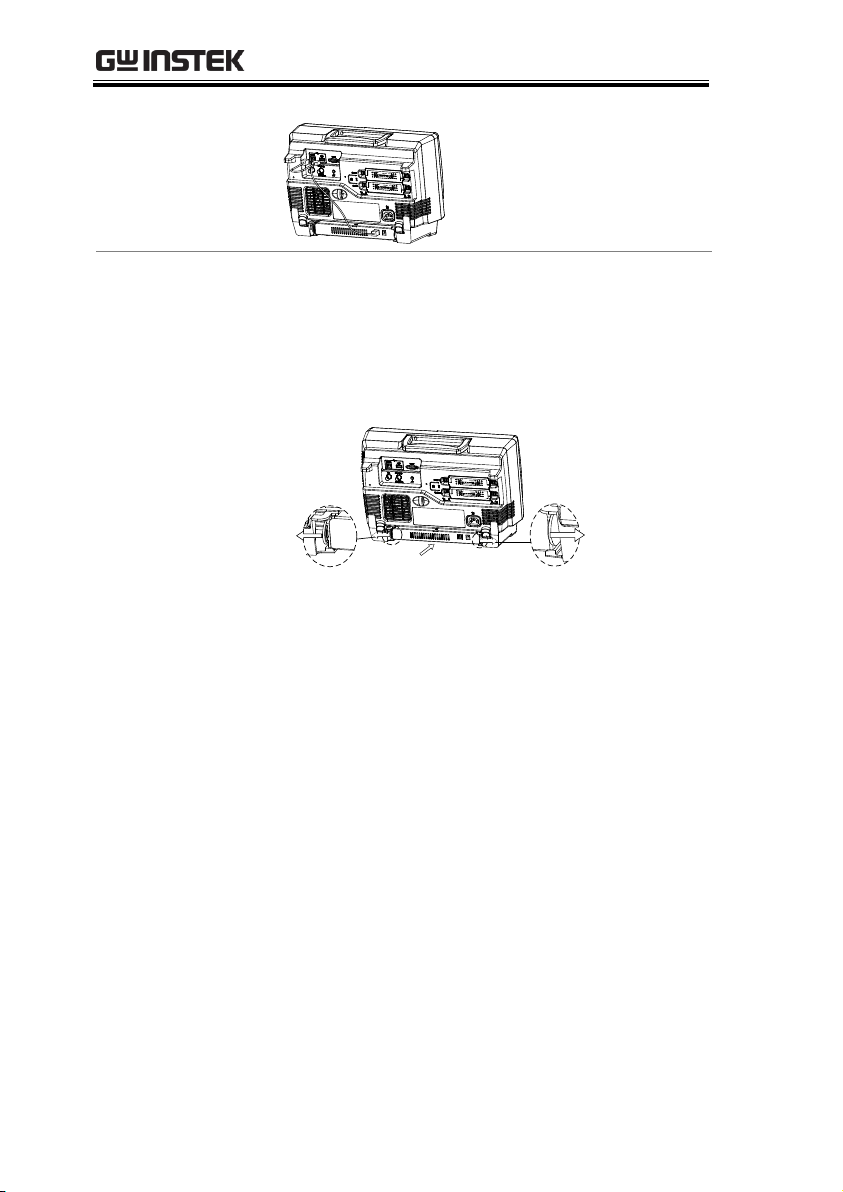
Removal
1. At the rear of the housings are two tabs. Pull
both tabs outwards.
2. The module can now be slid out from the
housing (back to front).
16
Page 17
GETTING STARTED
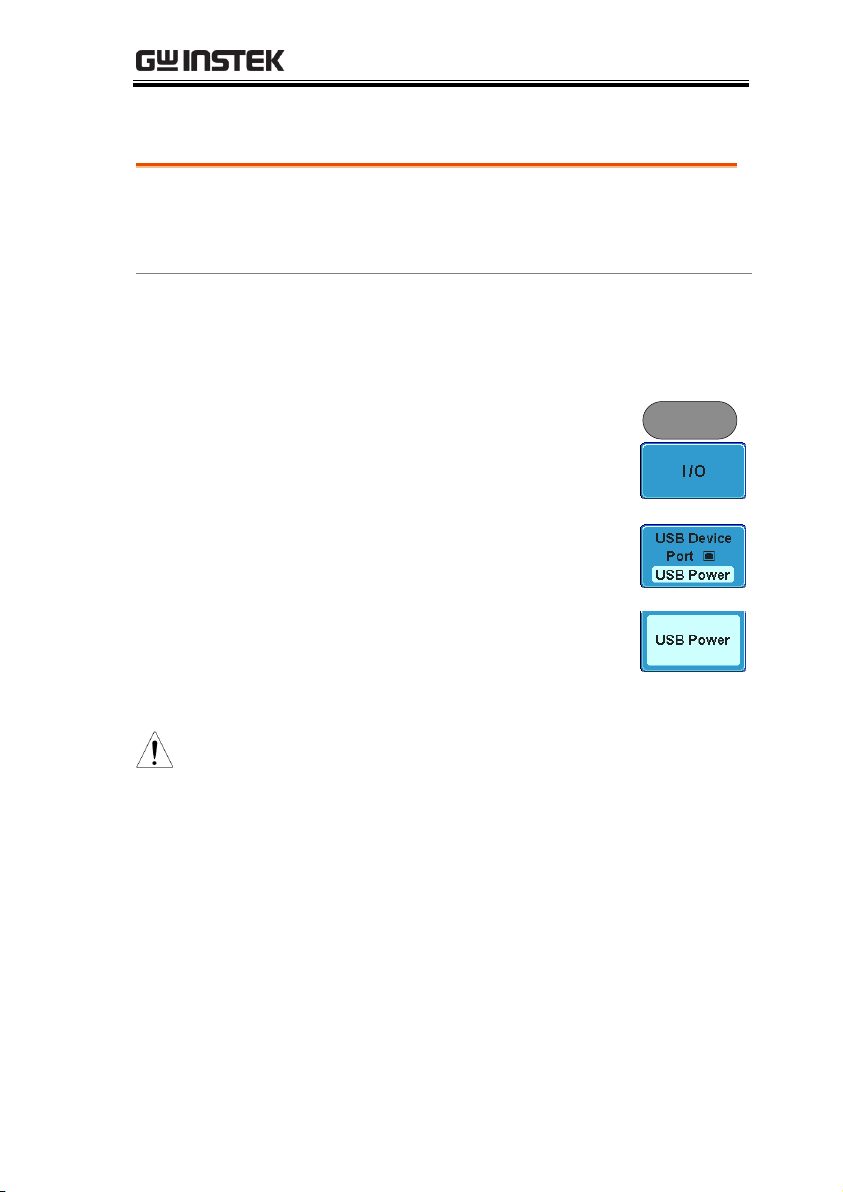
Background
The USB Device port needs to be configured to
provide power for the AFG-125/225 if an external
power supply is not used.
Steps
1. As shown previously in the “AFG-125/225
Module Installation/Removal” section, connect
the GTL-254 USB cable.
2. Press the Utility key then I/O from
the bottom menu.
Utility
3. From the side menu press USB
Device Port and select USB Power.
The port will now supply power to the AFG-125/225.
Caution
The USB Device Port should be reconfigured to
“Computer” or “Printer” when the AFG-125/225 is not
used. Failure to do so may damage the PC or printer
when connected in the “USB Power” mode.
USB Configuration
17
Page 18
AFG-125/225 Series Options Manual
Background
Install the AFG app as you would any application
for the GDS-2000A series.
The AFG app file (AFG.gz) can be found on the
User Manual CD under the APP directory.
For the latest files and information for
applications, see the GW Instek website:
www.gwinstek.com or contact your nearest
distributor.
Steps
1. Make sure the DS2-FH1 and AFG-125/225 are
installed and turned on.
Panel Operation
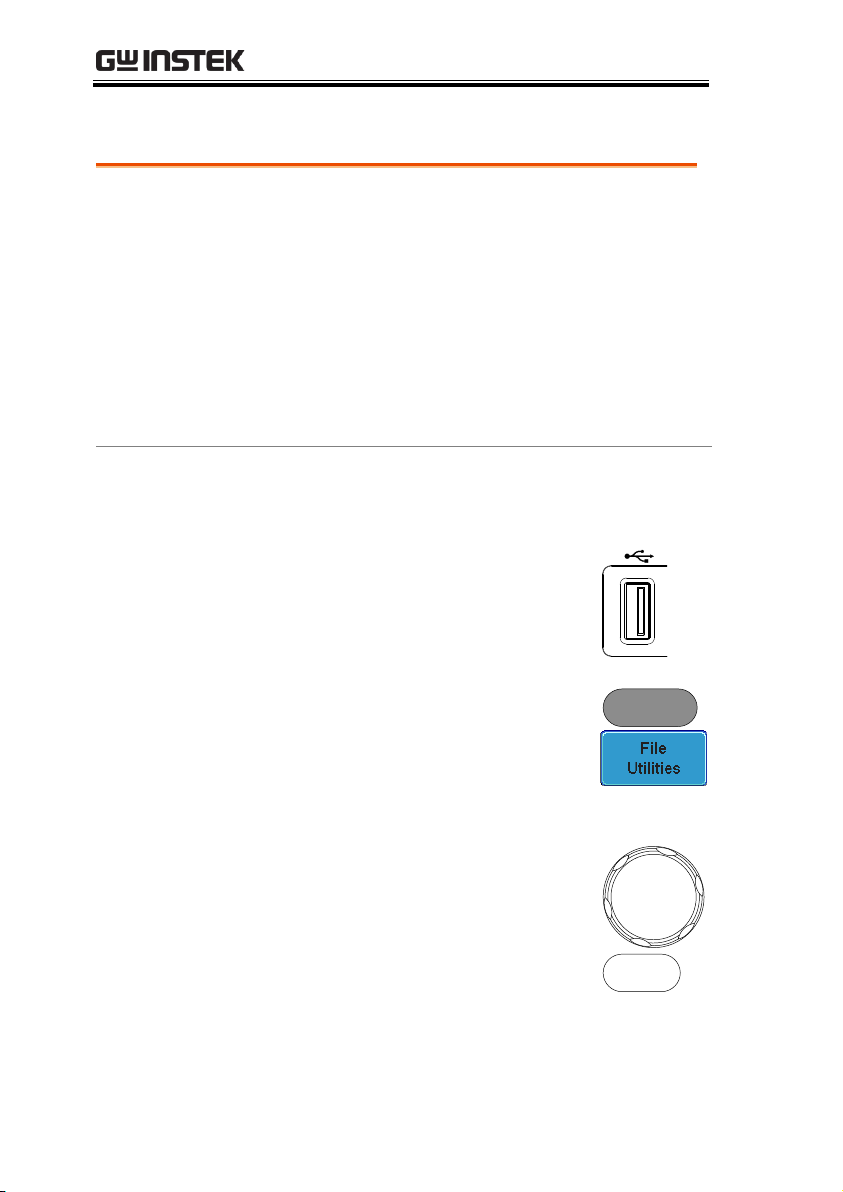
2. Insert a USB flash drive that has
the AFG app file (AFG.gz) copied
onto it into the front panel USB
port.
Demo
3. Press the Utility key then the File
Utilities soft-key.
Utility
4. Navigate to the desired file in the
USB file path.
When the AFG.gz file has been
found, press the Select key twice to
start the installation.
VARIABLE
AFG App Installation
18
Page 19
GETTING STARTED
5. The installation will complete in a few seconds.
When finished a pop-up message will appear
asking you to restart the GDS-2000A.
6. Restart the GDS-2000A.
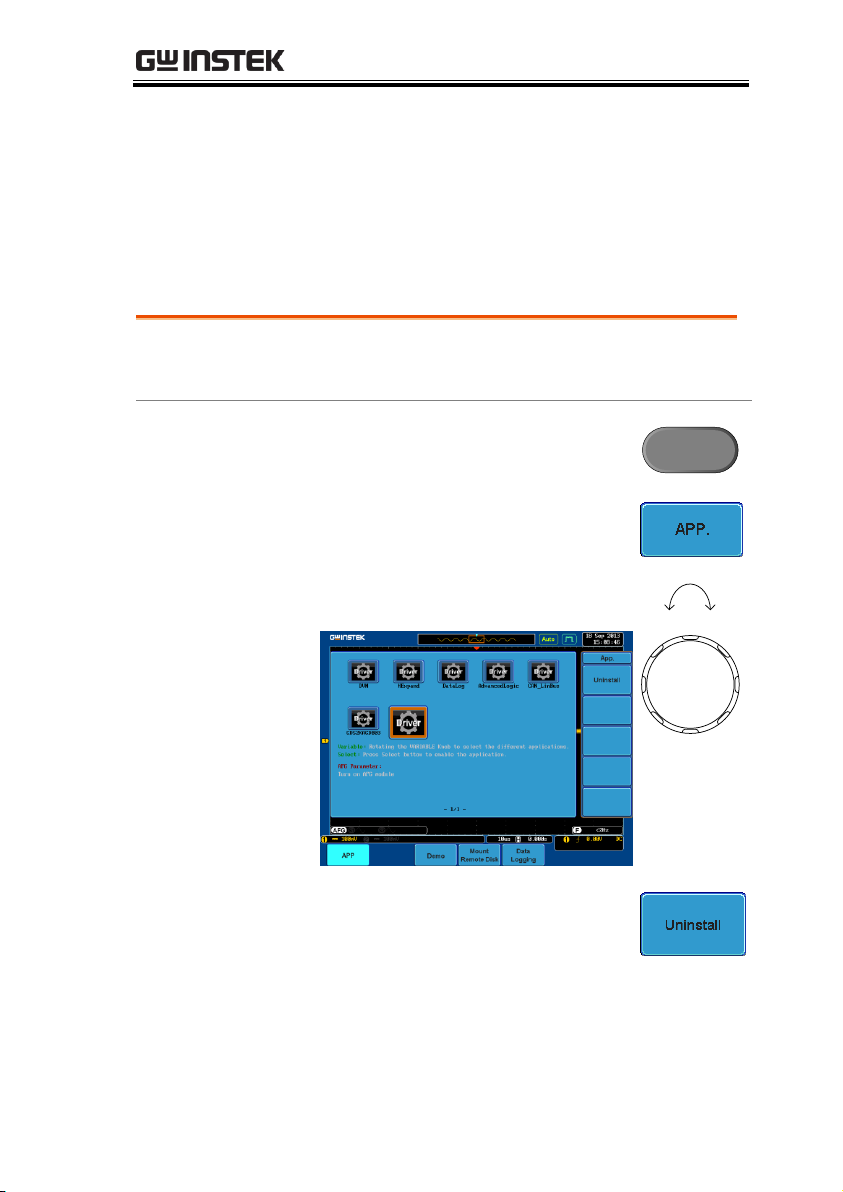
Background
The AFG app can be uninstalled from the TEST
menu, like the other optional apps.
Panel Operation
1. Press the Test key.
T
1. Press the APP button from the
bottom menu.
2. Use the Variable knob to select the
AFG app.
VRIBL
Up Down
2. Press Uninstall on the side menu
twice. Once to select and once to
confirm uninstallation.
3. The uninstallation process is complete when a
message showing “Please turn off the
oscilloscope and turn on again” appears.
Uninstalling the AFG App
19
Page 20

AFG-125/225 Series Options Manual
Options Menu Tree ......................................................... 21
Option Key ........................................................................... 21
Arbitrary Function Generator ............................................ 22
Arbitrary Function Generator – Signal 1/2 Setup ........... 23
Arbitrary Function Generator – MOD part II ................ 24
Power Supply ........................................................................ 24
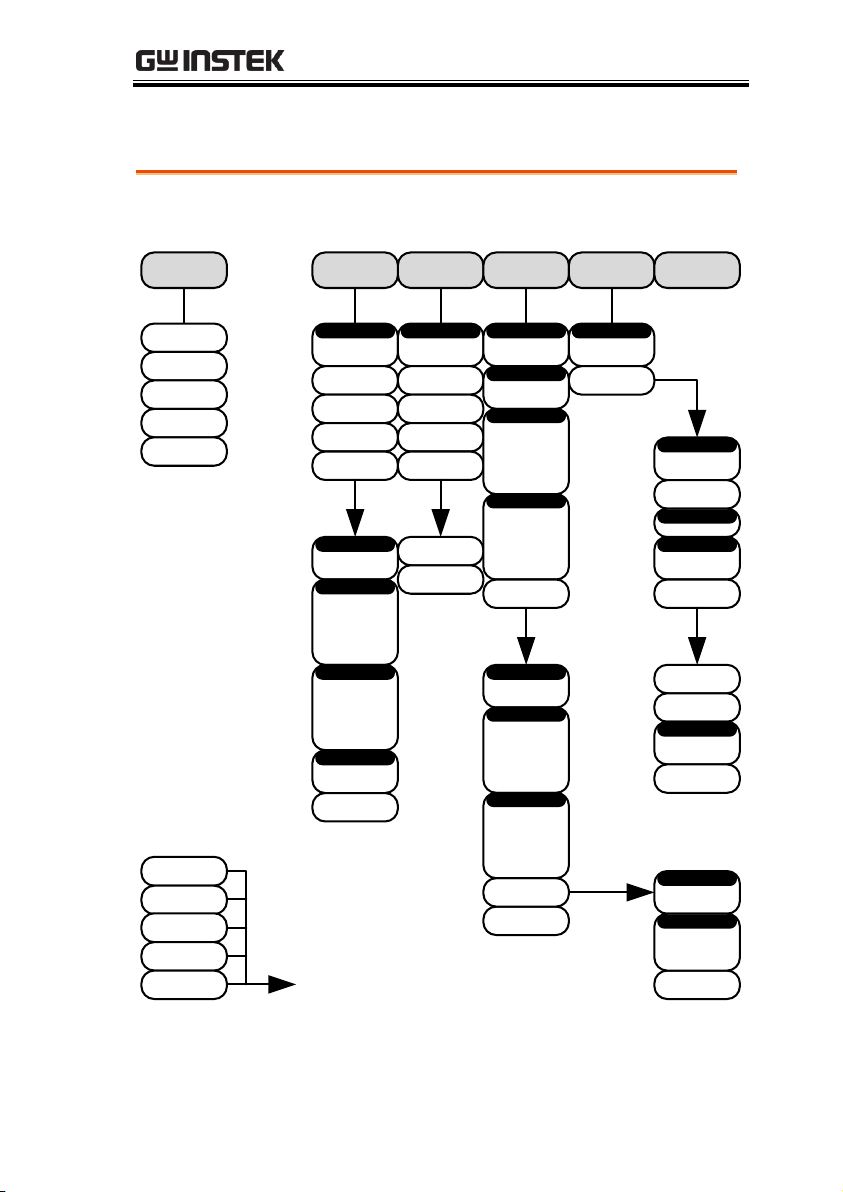
QUICK REFERENCE
This chapter describes the menu tree for the AFG125/225.
20
Page 21
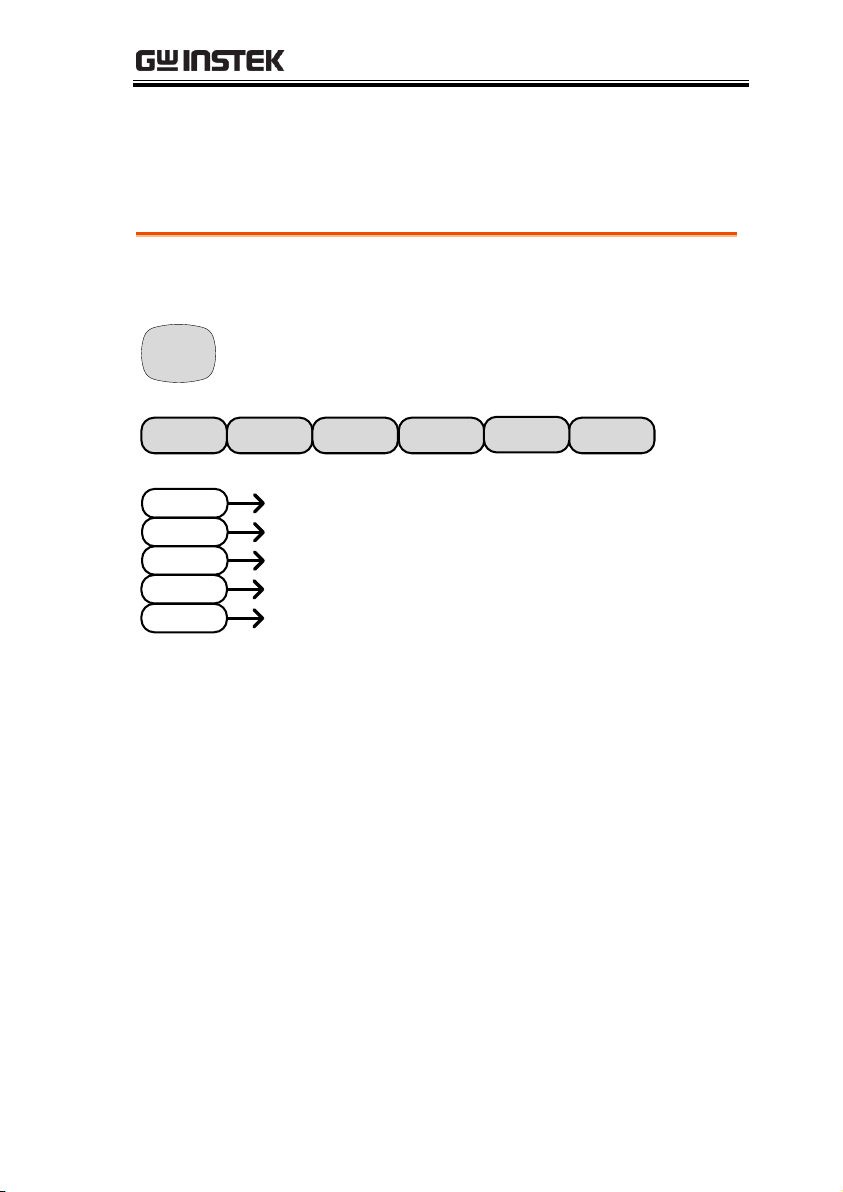
QUICK REFERENCE
Accesses the functions in the Option menu.
Function
Gen 1
Function
Gen 2
I/O
L
z
O
Logic
Analyzer
Function
Gen 1
Goes to the Logic Analyzer menu
Goes to the Function Generator menu
for the GEN 1 output
Function
Gen 2
Goes to the Function Generator
menu for the GEN 2 output
I/O
Goes to the options I/O menu
DVM
AFG
AFG
Goes to the options AFG menu
*Note: Any option that is not installed/turned on will be grayed-out.
Options Menu Tree
Option Key
21
Page 22
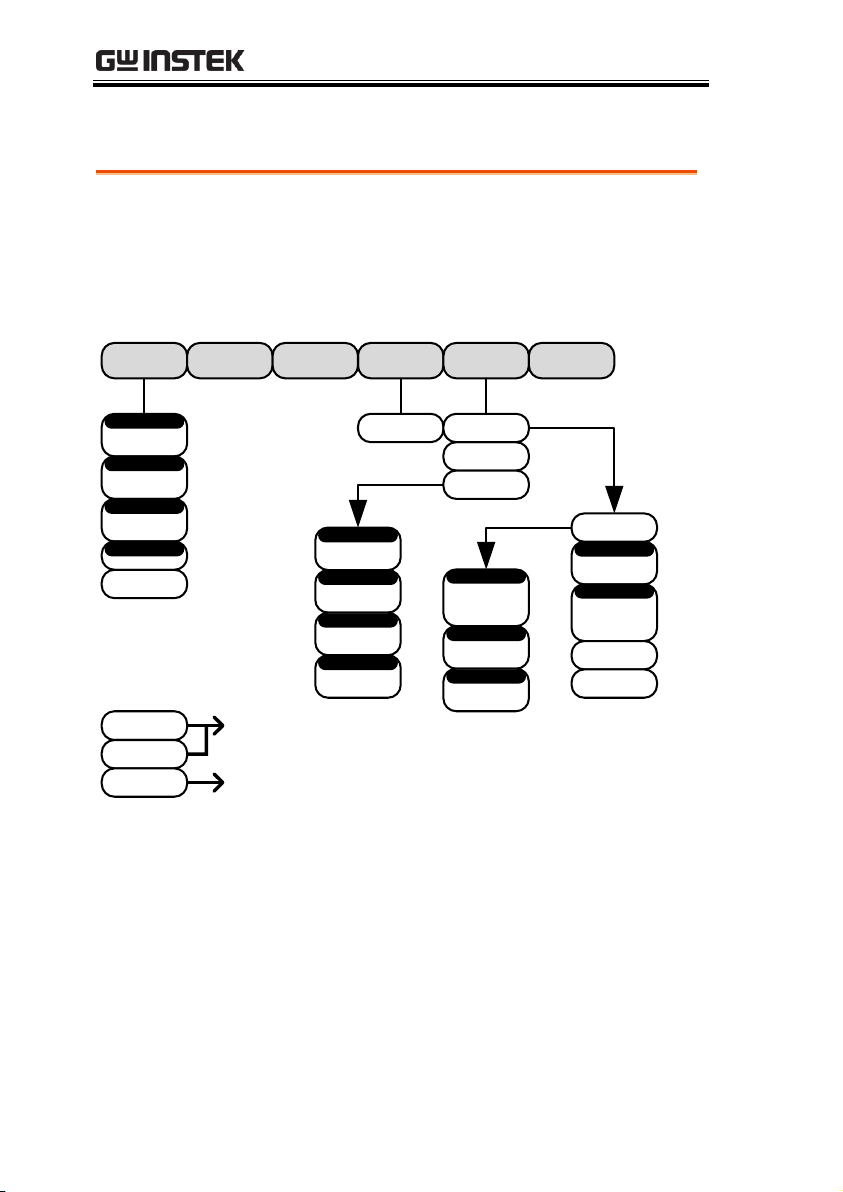
AFG-125/225 Series Options Manual
Set up the AFG-225/125 arbitrary function generator.
Note: The Power Supply function is only available for the AFG-125P
and AFG-225P
The Dual Chan and Sync Setup functions are only available for the
AFG-225 and AFG-225P.
O
Signal 1 Setup
UTIL
Signal 1
Signal 2
Select
ON
O
On
Off
Output
50Ω
High Z
Load
-180.0º~180.0º
Phase
_P
Signal 1 Setup
Signal 2 Setup
Goes to the Signal 1/2 Setup menu
Signal 1 Setup
P
On
Off
Ampl Cpl
OFF
ON
Inverted
Tracking
_P
Bk
OFF
Offset
Ratio
Freq Cpl Type
-999.99Hz ~
24.999MHz
Offset
0.001 ~
1000.000
Ratio
On
Off
Sync
Signal 1
Signal 2
Source
Carrier
Marker
Mode
Normal
Inverted
Polarity
P
Power Supply
Goes to the Power Supply menu
Arbitrary Function Generator
22
Page 23
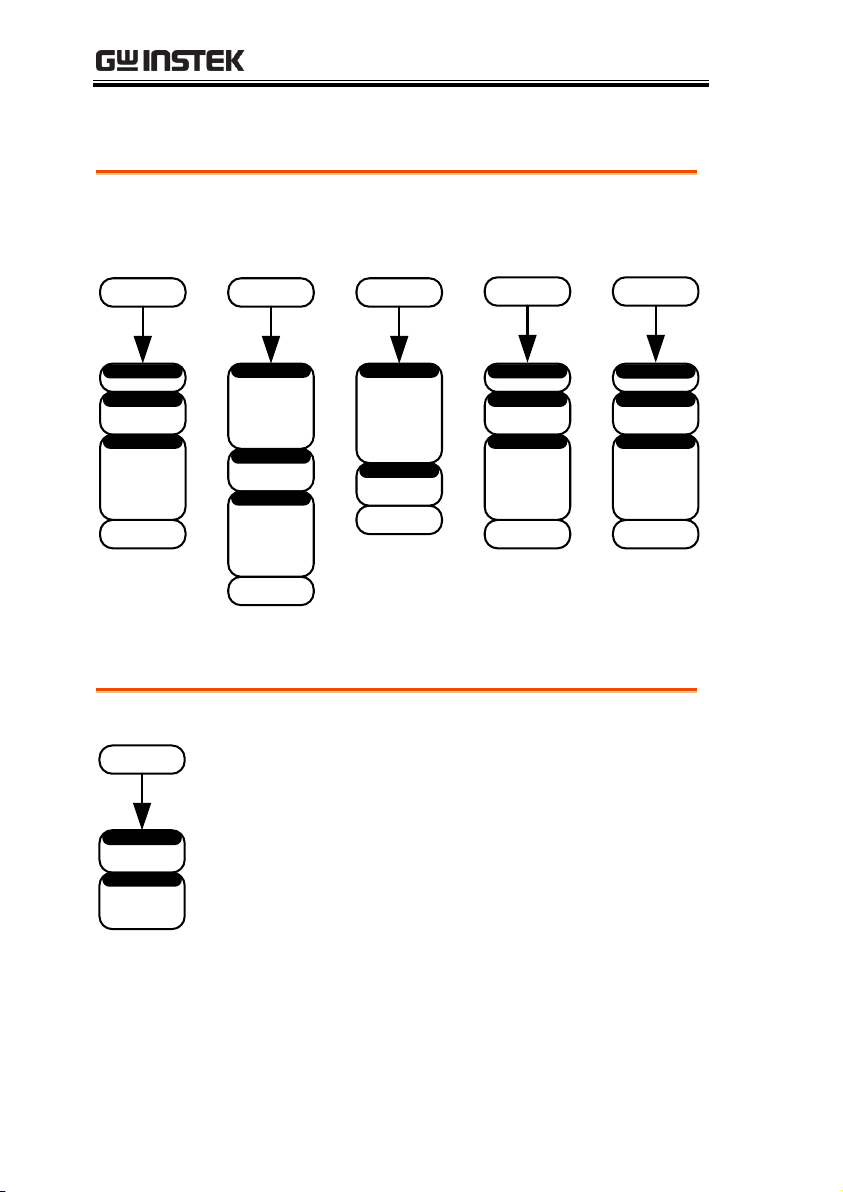
QUICK REFERENCE
Setup the signal type for each channel. From the AFG Arbitrary
Function Generator menu on page 22.
Waveform Mode
MO
ARB
Sine
Square
Pulse
Rm
N
On
Off
ARB
L
Om
M1
On
Off
MOD
M
M
K
M1
On
Off
Sweep
B
On
Off
Burst
N
User
1μHz ~ 60MHz
Frequency
1mVpp to
2.5Vpp
(into 50Ω)
2mVpp to 5Vpp
(open-circuit)
Amplitude
User
2μHz ~ 120MHz
Rate
Linear
Log
Type
M
M
Mk
Go Back
1~65535 cycles
Cycles
Infinite
-360º ~ 360º
Phase
1ms ~ 500
seconds
Period
TRI
INT
Manual Trigger
0~655350 nS
Delay
Bk
PM
SUM
1μHz~ 25MHz
1μHz~ 15MHz
(Square)
1μHz~ 1MHz
(Ramp)
Start
1μHz~ 25MHz
1μHz~ 15MHz
(Square)
1μHz~ 1MHz
(Ramp)
Stop
M1
0.001 ~ 500.000
Sec
SWP Time
1μHz ~ 25MHz
1μHz ~ 15MHz
(Square)
1μHz ~ 1MHz
(Ramp)
Span
450Hz ~ 25MHz
450Hz ~ 15MHz
(Square)
450Hz ~ 1MHz
(Ramp)
Center
±1.25Vpk ac+dc
(into 50Ω)
±2.5Vpk ac+dc
(Open circuit)
Offset
On
Off
Marker
Bk
1μHz ~ 25 MHz
1μHz ~ 1 MHz
(Ramp)
Frequency
AM
FM
Goes to the Signal 1 Setup menu -MOD part II
FSK
PM
SUM
Arbitrary Function Generator – Signal 1/2 Setup
23
Page 24
AFG-125/225 Series Options Manual
Configures AM, FM, FSK, PM or SUM modulation. From the
Arbitrary Function Generator – Signal 1/2 Setup – MOD menu on
page 23.
UM
Bk
0.0% ~ 100.0%
SUM Ampl
0.002Hz ~
20kHz
SUM Freq
Sine
Square
Triangle
UpRamp
DnRamp
Shape
M
Bk
0.0% ~ 120.0%
Depth
0.002Hz ~
20kHz
AM Freq
Sine
Square
Triangle
UpRamp
DnRamp
Shape
M
Bk
0.002Hz ~
20kHz
FM Freq
Sine
Square
Triangle
UpRamp
DnRamp
Shape
K
Bk
0.002Hz ~
100kHz
FSK Rate
Bk
0.0º ~ 360º
Phase Dev
0.002Hz ~
20kHz
PM Freq
Sine
Square
Triangle
UpRamp
DnRamp
Shape
PM
DC~25MHz
DC~15MHz
(square)
DC~1MHz
(Ramp)
Freq Dev
1 μHz~25MHz
(sine)
1 μHz~15MHz
(Square, Pulse)
1 μHz~1MHz
(Ramp)
Hop Freq
Power supply menu for the AFG-125P and AFG-225P.
P
On
Off
Power
2.5V
3.3V
5V
Voltage
Arbitrary Function Generator – MOD part II
Power Supply
24
Page 25

OPERATION
Basic Operation .............................................................. 26
Entering the AFG Menu ..................................................... 26
State Display ......................................................................... 27
Selecting a Basic Waveform ................................................ 28
Turning the Output On ...................................................... 29
Dual Channel Tracking ....................................................... 31
Recalling the Preset Settings ............................................... 33
Sync Setup ............................................................................. 34
Modulation ..................................................................... 40
AM Modulation .................................................................... 40
FM Modulation .................................................................... 42
FSK Modulation ................................................................... 44
PM Modulation .................................................................... 46
SUM Modulation .................................................................. 48
Sweep ............................................................................. 50
Sweep ..................................................................................... 50
Burst ............................................................................... 53
Burst Waveform ................................................................... 53
ARB ................................................................................. 56
Loading a Preset ARB Waveform ...................................... 56
Creating/Editing a Preset ARB Waveform ...................... 59
Setting ARB Output Length ............................................... 67
Setting ARB Frequency, Rate, Amplitude & Offset ........ 68
OPERATION
25
Page 26

AFG-125/225 Series Options Manual
Background
Like the other options for the GDS-2000A, the AFG
option can be accessed via the front panel option
key.
Panel Operation
1. Press the Option key.
O
2. Press AFG from the bottom menu
to enter the first level of the AFG
menu. (The model type will be
shown below the icon)
AFG Menu
Basic Operation
Entering the AFG Menu
26
Page 27

State Display
Background
The state display function provides a visual
display of the status of each channel and the
function that is used.
The state display is on by default.
The state display is also used as a visual guide
when editing/creating an ARB waveform.
State Display
Signal1
Status
Signal2
Status
Signal1
Function
Settings
Signal2
Function
Settings
Signal1 Function
Visual Display
Signal2 Function
Visual Display
Panel Operation
1. From the first level AFG menu,
press State Disp to toggle the
display pop-up on or off.
OPERATION
27
Page 28

AFG-125/225 Series Options Manual
Background
The AFG-125/225 can output 5 different types of
basic waveforms: Sine, Square, Pulse, Ramp,
Noise.
The basic waveforms can be output as is or they
can be used as the baseband waveforms for the
modulation functions or as the primary waveforms
for the sweep and burst functions.
Connection
1. The AFG-125/225 arbitrary function has 2
output channels, CH1 and CH2. Each output
can be selected individually.
2. Connect a BNC cable
to the appropriate
output (CH1 or CH2).
Panel Operation
1. From the first level AFG menu,
select Signal 1 Setup or Signal 2
Setup from the bottom menu to
select the output channel.
2. Press Waveform Mode from the
bottom menu and then select a
waveform from the side menu.
Waveforms
Sine, Square, Pulse Ramp, Noise
3. See page 29 to set the output
settings and turn the output on.
Page 29
Selecting a Basic Waveform
28
Page 29

OPERATION
Background
The AFG-125/225 can output 5 different types of
basic waveforms: Sine, Square, Pulse, Ramp,
Noise.
The basic waveforms can be output as is or they
can be used as the baseband waveforms for the
modulation functions or as the primary waveforms
for the sweep and burst functions.
Connection
1. The AFG-125/225 arbitrary function has 2
output channels, CH1 and CH2. Each output
can be selected individually.
2. Connect a BNC cable
to the appropriate
output (CH1 or CH2).
Steps
1. Press the Output Setup key to set
the amplitude.
2. From the side menu choose the
output parameters
Choose the signal that will be
output:
Signal 1:
Signal 2:
CH1
CH2
Turns the output of the selected
signal on/off.
Sets the output impedance to 50Ω or
High Z.
Turning the Output On
29
Page 30

AFG-125/225 Series Options Manual
Sets the output phase relative to 0º.
Synchronizes the phase of both
channels on dual channel models.
The signal will be output as soon as the output is
turned on.
30
Page 31

Background
As only the AFG-225 has dual channels, it has a
number of tracking functions not available on the
AFG-125. The tracking functions are listed below.
Dual Channel
Functions
Function
Description
Frequency Coupling
Frequency coupling will
couple the channel outputs by
frequency. Frequency
coupling can be achieved by
frequency offset or by a
frequency ratio.
Amplitude Coupling
Amplitude coupling will
couple the both channel
outputs by amplitude. Any
changes in amplitude in one
channel is reflected in the
other channel.
Tracking
There are two tracking modes,
ON and Inverted. When
turned on, tracking performs
frequency and amplitude
tracking so the channels
behave as a single channel.
When set to inverted, the one
channel will output the
inverse of the other.
S_Phase
S_Phase will synchronize the
phase of both channels.
Steps
1. From the first level AFG menu,
press UTIL and then press Dual
Chan on the side menu.
OPERATION
Dual Channel Tracking
31
Page 32

AFG-125/225 Series Options Manual
2. From the side menu choose the
relevant tracking function(s):
Turns frequency coupling on and
sets the type of frequency coupling:
Offset: Sets frequency
coupling as an offset.
Ratio: Sets frequency
coupling as a ratio.
Turns amplitude coupling on or off.
Ampl Cpl:
OFF, ON
Turns tracking on or off, or turns
tracking on and inverts the output
of the second output.
Tracking:
OFF, ON, INVERTED
Press S_Phase to synchronize the
phase of the both channels.
32
Page 33

OPERATION
Background
Recalling the preset settings will effectively reset
the settings to the factory defaults.
Preset Settings
Waveform Mode
Sine
Frequency
1kHz
Amplitude
1.000Vpp
Offset
0.0Vdc
Phase
0.0º
Load
50Ω
Output
Off
ARB
Off
MOD
Off
Sweep
Off
Burst
Off
Frequency Coupling*
Off
Amplitude Coupling*
Off
Tracking*
Off
*Only applicable to the AFG-225.
Steps
1. From the first level of the AFG
menu, press UTIL.
2. Press Preset. The preset settings
will be recalled straight away.
Recalling the Preset Settings
33
Page 34

Sync Setup
Background
The sync output signal is output from the SYNC
port on the front panel. The sync output signal is
based on either the channel 1 or channel 2 output
signals. Each periodic type of waveform output
function has an associated sync output signal.
The characteristics of the sync output depend on
the selected signal source.
Sync Signal
Output
Sine, Square, Pulse,
Ramp Source
For these types of waveforms,
the sync output is a square
wave pulse. The pulse is high
for the positive transition of
the waveform and low for the
negative transition. The signal
is a TTL level signal.
Sine output
SYNC output
0V
0V
AFG-125/225 Series Options Manual
34
Page 35

OPERATION
MOD waveform
Source
The sync output is a positive
pulse for the positive
transition of the modulating
waveform and low for the
negative transition. The signal
is a TTL level signal.
FM output
SYNC output
0V
0V
Arbitrary Waveform
Source
The ARB function can output
either carrier or marker
signals.
Carrier: The sync output is a
single TTL positive pulse for
the positive transition of the
ARB waveform and low for
the negative transition.
Marker: A single TTL level
positive pulse is output at the
start of each period of the ARB
waveform.
35
Page 36

AFG-125/225 Series Options Manual
Carrier
ARB output
SYNC output
0V
0V
Marker
ARB output
SYNC output
0V
0V
Sweep Source
The sweep function can
output either carrier or marker
signals.
Carrier: The sync signal
output is a positive TTL level
pulse for the positive
transition of the sweep
waveform and low for the
negative transition.
Marker: The marker signal
output is a TTL level positive
pulse from the “marker”
frequency to the stop
frequency and a low level
signal from the start frequency
to the “marker” frequency. See
page 50 to set the marker
settings.
36
Page 37

OPERATION
Carrier
Sweep output
SYNC output
0V
0V
Marker
Sweep output
SYNC output
0V
0V
Marker
frequency
Burst Source
Like the sweep function, the
burst function can output
Carrier or Marker signals from
the SYNC output.
Carrier: The sync signal
output is a positive TTL level
pulse for the positive
transition (0V and above) of
the burst waveform and low
for the negative transition.
Marker: The marker signal
output is a TTL level positive
pulse for the duration of the
burst period and low for the
remainder of waveform
period
37
Page 38

AFG-125/225 Series Options Manual
Carrier
FSK output
SYNC output
0V
0V
Marker
FSK output
SYNC output
0V
0V
Steps
1. From the first level of the AFG
menu, press UTIL and then press
Sync Setup on the side menu.
2. From the side menu choose the
sync setting:
The Sync function will turn the sync
output on for all waveforms except
for noise.
(Note: If Marker is turned on in the
Sweep function, the Sync On setting
will be overridden.
Selects the source signal on which
to base the sync signal.
Source:
Signal 1, Signal 2
When Sync is on, You can force the
sync signal to follow the carrier or
the marker* mode.
Mode:
Carrier, Marker
38
Page 39

OPERATION
The polarity can be set to Normal or
Inverted.
Polarity:
Normal, Inverted
Note
The marker mode can only be used for the ARB and
mod waveforms.
For the Sweep function, the marker output must be
turned on in the Sweep function menu. It cannot be
activated in the Sync Setup menu. See page 51 to turn
the marker option on.
39
Page 40

Modulation
Background
The AM Modulation function can set the carrier
frequency (AM Freq), amplitude modulation depth
(Depth) and carrier waveform (Shape).
Steps
1. Set the carrier waveform and
frequency. You can set the carrier
waveform and frequency in the
Selecting a Basic Waveform section.
Page 26
2. From the first level of the AFG
menu, press the Signal 1 Setup or
Signal 2 Setup key to select the
signal source.
3. From the bottom menu press
MOD.
4. From the side menu turn MOD On
and then select the AM
modulation.
Note
Only one modulation mode can be active at any one
time. The function generator also will not allow sweep,
burst or ARB mode to be used with a modulation
function. Activating a modulation mode will turn the
previous modulation mode off.
5. Select the AM parameters from the side menu:
AM Modulation
AFG-125/225 Series Options Manual
40
Page 41

OPERATION
Sets the amplitude modulation
depth: 0~ 120%
Sets the AM frequency:
2 mHz~20kHz.
Sets the carrier waveform shape:
Sine, Square, Triangle, Upramp,
Dnramp.
6. See page 29 to set the output
settings and turn the output on.
Page 29
Example
Amplitude Modulation
41
Page 42

FM Modulation
Background
The FM Modulation function can set the carrier
frequency (FM Freq), frequency deviation (FM
DEV) and carrier waveform (Shape).
Steps
1. Set the carrier waveform and
frequency. You can set the carrier
waveform and frequency in the
Selecting a Basic Waveform section.
Page 26
2. From the first level of the AFG
menu, press the Signal 1 Setup or
Signal 2 Setup key to select the
signal source.
3. From the bottom menu press
MOD.
4. From the side menu turn MOD On
and then select the FM
modulation.
Note
Only one modulation mode can be active at any one
time. The function generator also will not allow sweep,
burst or ARB mode to be used with a modulation
function. Activating a modulation mode will turn the
previous modulation mode off.
5. Select the FM parameters from the side menu:
AFG-125/225 Series Options Manual
42
Page 43

OPERATION
Sets the frequency deviation:
DC~25MHz
DC~15MHz(square)
DC~1MHz (Ramp)
Sets the FM frequency:
2mHz~20kHz.
Sets the carrier waveform shape:
Sine, Square, Triangle, Upramp,
Dnramp.
6. See page 29 to set the output
settings and turn the output on.
Page 29
Example
Frequency Modulation
43
Page 44

AFG-125/225 Series Options Manual
Background
The FSK Modulation function can set the hop
frequency (FSK Hop) and the frequency-shift
keying rate (FSK Rate). FSK Modulation essentially
jumps between the carrier frequency and the hop
frequency at a rate determined by the FSK rate
frequency.
Steps
1. Set the carrier waveform and
frequency. You can set the carrier
waveform and frequency in the
Selecting a Basic Waveform section.
Page 26
2. From the first level of the AFG
menu, press the Signal 1 Setup or
Signal 2 Setup key to select the
signal source.
3. From the bottom menu press
MOD.
4. From the side menu turn MOD On
and then select the FSK
modulation.
Note
Only one modulation mode can be active at any one
time. The function generator also will not allow sweep,
burst or ARB mode to be used with a modulation
function. Activating a modulation mode will turn the
previous modulation mode off.
5. Select the FSK parameters from the side menu:
FSK Modulation
44
Page 45

OPERATION
Sets the hop frequency:
1μHz~25MHz (Sine)
1μHz~15MHz (Square, Pulse)
1μHz~1MHz (Ramp)
Sets the FSK rate:
2mHz~100kHz.
6. See page 29 to set the output
settings and turn the output on.
Page 29
Example
Frequency-Shift Keying Modulation
45
Page 46

PM Modulation
Background
The PM Modulation function can set the phase
modulation frequency (PM Freq), phase deviation
(Phase Dev) and the PM shape (Shape).
The phase deviation of the carrier waveform
deviates from a reference phase value in
proportion to changes in the modulating
waveform.
Steps
1. Set the carrier waveform and
frequency. You can set the carrier
waveform and frequency in the
Selecting a Basic Waveform section.
Page 26
2. From the first level of the AFG
menu, press the Signal 1 Setup or
Signal 2 Setup key to select the
signal source.
3. From the bottom menu press
MOD.
4. From the side menu turn MOD On,
press more 1 of 2 and then select the
PM modulation.
Note
Only one modulation mode can be active at any one
time. The function generator also will not allow sweep,
burst or ARB mode to be used with a modulation
function. Activating a modulation mode will turn the
previous modulation mode off.
AFG-125/225 Series Options Manual
46
Page 47

OPERATION
5. Select the PM parameters from the side menu:
Sets the phase deviation: 0º ~ 360º
Sets the phase modulation
frequency: 2mHz ~ 20kHz
Sets the PM wave shape:
Sine, Square, Triangle, UpRamp,
DnRamp.
6. See page 29 to set the output
settings and turn the output on.
Page 29
Example
Pulse Modulation
47
Page 48

AFG-125/225 Series Options Manual
Background
The SUM Modulation function can set the SUM
amplitude (SUM Ampl) the carrier frequency
(SUM Freq) and carrier waveform (Shape).
In general SUM modulation adds a modulating
signal to a carrier wave. Typically, sum
modulation is used to add noise to a carrier wave.
The modulating signal is added as a percentage of
the carrier amplitude.
Steps
1. Set the carrier waveform and
frequency. You can set the carrier
waveform and frequency in the
Selecting a Basic Waveform section.
Page 26
2. From the first level of the AFG
menu, press the Signal 1 Setup or
Signal 2 Setup key to select the
signal source.
3. From the bottom menu press
MOD.
4. From the side menu turn MOD On,
press more 1 of 2 and then select the
SUM modulation.
Note
Only one modulation mode can be active at any one
time. The function generator also will not allow sweep,
burst or ARB mode to be used with a modulation
function. Activating a modulation mode will turn the
previous modulation mode off.
SUM Modulation
48
Page 49

OPERATION
5. Select the SUM parameters from the side menu:
Sets the SUM amplitude (relative to
the carrier): 0.0% ~ 100.0%
Sets SUM modulation frequency:
2mHz ~ 20kHz
Sets the SUM wave shape.
6. See page 29 to set the output
settings and turn the output on.
Page 29
Example
SUM Modulation
49
Page 50

Sweep
Background
The AFG-125/225 can perform a sweep for sine,
square or ramp waveforms. In Sweep mode, the
function generator will sweep from a start
frequency to a stop frequency. The sweep can be
performed in a linear or logarithmic fashion. The
AFG-125/225 can also output a TTL signal from
the SYNC output when the marker function is
turned on.
Steps
1. Set the carrier waveform and
frequency. You can set the carrier
waveform and frequency in the
Selecting a Basic Waveform section.
Page 26
2. From the first level of the AFG
menu, press the Signal 1 Setup or
Signal 2 Setup key to select the
signal source.
3. From the bottom menu press
Sweep.
4. From the side menu turn Sweep
On.
Note
Only one modulation mode can be active at any one
time. The function generator also will not allow sweep,
burst or ARB mode to be used with a modulation
function. Activating a modulation mode will turn the
previous modulation mode off.
Sweep
AFG-125/225 Series Options Manual
50
Page 51

OPERATION
5. Select the sweep parameters from the side
menu:
Selects the type of sweep:
logarithmic or linear.
Sets the start frequency*:
1μHz ~ 25MHz
1μHz ~ 15MHz (Square)
1μHz ~ 1MHz (Ramp)
Sets the Stop frequency*:
1μHz ~ 25MHz
1μHz ~ 15MHz (Square)
1μHz ~ 1MHz (Ramp)
Press to access the remaining sweep
settings, shown below:
Sets the sweep time: 1ms ~ 500s.
Sets the Span*:
1μHz ~ 25MHz
1μHz ~ 15MHz (Square)
1μHz ~ 1MHz (Ramp)
Sets the center frequency*.
Note
*Setting the Start and Stop frequencies will override
the Span and Center settings, and conversely setting
the Span and Center settings will override the Start
and Stop settings.
Marker
6. To set a marker signal, press
Marker and turn Marker On. The
marker will output a TTL-level
square wave signal at the
designated frequency from the
SYNC output port.
51
Page 52

AFG-125/225 Series Options Manual
7. Press Frequency and set a marker
frequency. The marker frequency
cannot be lower than the center
frequency.
1μHz ~ 25MHz
1μHz ~ 1MHz (Ramp)
8. See page 29 to set the output
settings and turn the output on.
Page 29
Example
Sweep Waveform (CH1) with marker output
(CH2).
52
Page 53

OPERATION
Background
The function generator can create a waveform
burst with a designated number of cycles. Burst
mode supports sine, square and ramp waveforms.
Steps
1. Set the carrier waveform and burst
frequency. You can set the carrier
waveform and burst frequency in
the Selecting a Basic Waveform
section.
Page 26
2. From the first level of the AFG
menu, press the Signal 1 Setup or
Signal 2 Setup key to select the
signal source.
3. From the bottom menu press Burst.
4. From the side menu turn Burst On.
Note
Only one modulation mode can be active at any one
time. The function generator also will not allow sweep,
burst or ARB mode to be used with a modulation
function. Activating a modulation mode will turn the
previous modulation mode off.
5. Press N Cycle from the side menu.
Burst
Burst Waveform
53
Page 54

AFG-125/225 Series Options Manual
6. Select the N Cycle parameters from the side
menu:
Sets the number of burst cycles* :
1~ 65,535, infinite.
Sets the starting phase of the burst
waveform.
Sets the period* length in seconds
for the burst waveform.
Note
*The Period setting will affect the number of cycles
that can be chosen for any given frequency. The
relationship is shown in the following equation:
Burst Cycle < (Burst Period x Wave Frequency)
Trigger Settings
7. Press Trigger set from the side
menu.
8. Select the Trigger parameters from the side
menu:
Sets the trigger as internal. An
internal trigger is generated at the
end of each period.
Sets the trigger to Manual mode.
This Manual Trigger key must be
pressed each time to output a burst
waveform.
Sets a delay time between the
trigger and the burst waveform
output: 0 ~ 655350nS.
9. See page 29 to set the output
settings and to turn the output on.
Page 29
54
Page 55

OPERATION
Example
Burst Waveform
55
Page 56

AFG-125/225 Series Options Manual
Background
The AFG-225 can load a number of different
waveforms as an arbitrary waveform file:
CH1~CH4, Ref1~Ref4, Wave1~Wave20, a
previously saved waveform (LSF and fast CSV
format*), a previously created ARB waveform or
one of the 66 preset ARB waveforms**. The preset
waveforms are categorized into Common, Math,
Window and Engineer waveforms, as shown in the
table below.
* See the DSO user manual for save file formats.
** See the appendix on page 72 for a full list and
description of the preset ARB waveforms.
Preset
waveforms
Common:
Absatan, Abssin, Abssinehalf, Ampalt, Attalt,
Direven, Diriodd, Gauspuls, Havercos, Haversin,
Negramp, N_pulse, Rectpuls, Roundhaf, Sawtooth,
Sinetra, Sinever, Stair_dw, Stair_ud, Stair_up,
stepresp, trapezia, tripuls
Math:
Arccos, Arccot, Arccsc, Arcsec, Arcsin, Arcsinh,
Arctan, Arctanh, Cosh, Cot, Csc, Dlorentz,
Expofall, Exporise, Gauss, Ln, Lorentz, Sec, Sech,
Sinec, Sinh, Sqrt, Tan, Tanh, Xsquare
Window:
Barthwin, Bartlett, Blackman, Bohmwin, Chebyshe,
Flattwin, Hamming, Hann, Hanning, Kaiser,
Triang, Tukeywin
Engineer:
ARB
Loading a Preset ARB Waveform
56
Page 57

OPERATION
Airy, Bessel, Betainc, Gamm, Legendre, Neumann
Steps
1. From the first level of the AFG
menu, press the Signal 1 Setup or
Signal 2 Setup key to select the
signal source.
2. From the bottom menu press ARB.
3. From the side menu turn ARB On.
Note
The function generator also will not allow ARB to be
turned on when sweep, burst or a modulation function
is active. Turn off any other active modes before using
ARB mode.
4. Press Load from the side menu.
5. You can load an ARB waveform from one of the
source channels, from internal memory or from
a number of predefined waveforms:
Press From to select an input
channel or internally saved
waveform.
From:
CH1 ~ CH4
Ref1 ~ Ref4
Math
Wave1 ~ Wave20
Press From File to load a previously
saved waveform or a predefined
waveform.
57
Page 58

AFG-125/225 Series Options Manual
From File:
LSF, Fast CSV, User
Preset, Common, Math,
Window, Engineer
If a previously saved waveform or
predefined waveform type was
chosen above, use the File Utilities to
select the desired ARB waveform.
Press Recall Now to load the ARB
waveform.
A message will appear on the
screen when the ARB waveform is
successfully recalled.
Example
Triangle Pulse waveform
58
Page 59

OPERATION
Background
The AFG-125/225 has a number of methods to
create and edit arbitrary waveforms. The ARB
waveforms can have a maximum of 4096 (0~4095)
points in length and 1023 (0±511) points in
amplitude.
Editing Methods
Point/Line:
Creates a vertical line of a user-defined length and
amplitude.
Diagonal:
Creates a diagonal line of a user-defined length
and amplitude.
Scale:
Scales the full-scale of the ARB waveform.
Copy/Paste:
This method will copy and paste a user-defined
section of the ARB waveform.
Clear:
This will clear a user-defined section of the ARB
waveform.
Note: By default, any section of the ARB waveform
that is not edited will be set to 0Vpp. By default the
editing will automatically match the amplitude of
each point.
Steps
1. From the first level of the AFG
menu, press the Signal 1 Setup or
Signal 2 Setup key to select the
signal source.
Creating/Editing a Preset ARB Waveform
59
Page 60

AFG-125/225 Series Options Manual
2. From the bottom menu press ARB.
3. From the side menu turn ARB On.
Note
The function generator also will not allow ARB to be
turned on when sweep, burst or a modulation function
is active. Turn off any other active modes before using
ARB mode.
4. Press Edit from the side menu.
Point/Line
Editing
5. Press Edit Method and choose Point
Line.
6. Press Action to begin editing the
waveform using the Point/Line
method.
7. Use the side menu to create a point or vertical
line:
Press Address to set the starting
address of the line or point.
The maximum address depends on
the Length setting below:
Max address = 4096 – Length
Range:
0 ~ 4095
Press Length to set the length of the
line. The maximum length depends
on the address set above:
Max length = 4096 – Address
Length
1 ~ 4096
60
Page 61

OPERATION
Press Data to set the amplitude of
the point/line.
Data
-511 ~ 0 ~ +511
When the point/line has been
edited, press Preview to view the
edited line.
Press Undo to cancel the
point/line edit.
Press Done to confirm
and save the point/line
edit.
Example
Figure showing a horizontal line (black highlight)
Diagonal Editing
1. Press Edit Method and choose
Diagonal.
2. Press Action to begin editing the
waveform using the Diagonal
method.
3. Use the side menu to create a diagonal line:
61
Page 62

AFG-125/225 Series Options Manual
Press Addr1/Data1 to set the first
data point for the diagonal line.
Press once to set the Addr1, press
again to set Data1 (amplitude).
Addr1 range:
0 ~ 4095
Data1 range:
±511
Press Addr2/Data2 to set the second
data point for the diagonal line.
Press once to set the Addr2, press
again to set Data2 (amplitude).
Addr2 range:
0 ~ 4095
Data2 range:
±511
When the line has been edited,
press Preview to view the edited
line.
Press Undo to cancel the
line edit.
Press Done to confirm
and save the line edit.
Example
Figure showing a diagonal line (black highlight).
62
Page 63

OPERATION
Scale Editing
1. Press Edit Method and choose Scale.
2. Press Action to begin editing the
waveform using the Scale method.
3. Use the side menu to set the scale:
The scale function sets the vertical
scaling factor* for the whole ARB
waveform.
Scale
0.1 ~ 10X
Example
Figure of 2.0X scaling. Notice that the waveform is
clipped at the bottom.
Note
* If any data points that exceed a magnitude of ±511
will be clipped.
Copy / Paste
1. Press Edit Method and choose
Copy /Paste.
63
Page 64

AFG-125/225 Series Options Manual
2. Press Action to enter the
Copy/Paste menu.
3. Use the side menu to copy a section of the ARB
waveform:
Press Start* to set the start address
of the section you want to copy.
Start range:
0 ~ 4095
Press Length* to set the length of the
section you wish to copy.
Length range
1~ 4096
Press Paste To to choose the position
to paste the copied section of
waveform**.
Paste range
0~ 4095
When the copy and paste areas
have been selected, press Preview to
view the result.
Press Undo to cancel the
copy/paste operation.
Press Done to confirm
and save the copy/paste
operation.
64
Page 65

OPERATION
Example
Figure showing the copied section (black) and the
pasted section (red bars).
Note
* The maximum start address depends on the Length
setting: Max Start = 4096 – Length
The maximum length depends on the start address set
above: Max Length = 4096 – Start
** You cannot paste over an area that was originally
copied. For example, if you copy from points 100 ~
200, you cannot paste that to points 150 ~ 250. A
setting conflict error will appear on the screen when
the “Copy” and “Paste To” area overlap.
Clear
1. Press Edit Method and choose
Clear.
2. Press Action to enter the Clear
menu.
3. Use the side menu to select a section of the ARB
waveform to clear or to clear the whole ARB
waveform:
65
Page 66

AFG-125/225 Series Options Manual
Sets the start address of the section
of the ARB waveform to be cleared.
Start range
0 ~ 4095
Sets the length of the section of the
ARB waveform to be cleared.
Length range
1 ~ 4096
Press Done to confirm and then
clear the selected section of the ARB
waveform.
Press Done to clear the whole ARB
waveform instantly.
Example
Figure showing the cleared section of the
waveform.
Saving the ARB
Waveform
After you have created/edited your waveform,
you can save it for use at a later time. See page 56
to load a User Preset ARB waveform.
1. Press Save Now to save the ARB
waveform to the current directory.
66
Page 67

OPERATION
Background
The Output Confirm menu allows the user to
specify a section of the ARB waveform to be
output.
The length of the outputted section will directly
affect the possible frequency or rate of the ARB
waveform. See page 68 for details.
Steps
1. From the ARB menu press Output
Confirm.
2. Select the section of the ARB waveform that
you wish to have output from the side menu:
Press Start* to set the start address
for the output section.
Press Length* to set the total length
of the output section.
Example
Output section is shown in black.
Setting ARB Output Length
67
Page 68

AFG-125/225 Series Options Manual
Note
* The maximum length depends on the start address
setting.
The maximum length = 4096 – Start address.
3. Press Confirm to set the chosen
output section.
4. See page 29 to set the output
settings and turn the output on.
Page 29
Background
The rate, frequency, amplitude and
(amplitude)offset output parameters can also be
set.
Steps
1. From the ARB menu press more 1
of 2.
2. Select the parameters from the side menu:
Sets the frequency* of the ARB
waveform.
Sets the amplitude** of the
waveform:
1mVpp to 2.5Vpp (into 50Ω)
2mVpp to 5Vpp (open-circuit)
Sets the Offset** of the ARB
waveform:
±1.25Vpk ac +dc (into 50Ω)
±2.5Vpk ac +dc (Open circuit)
Setting ARB Frequency, Rate, Amplitude & Offset
68
Page 69

OPERATION
Sets the rate of the ARB waveform*.
This will set the number of times
the ARB waveform will be output
each second.
Note
*The frequency setting is inversely proportional to the
Rate setting. The frequency and rate settings are also
directly affected by the length of the output ARB
waveform. See page 67 for setting the output length of
the ARB waveform.
**The amplitude and offset are linked. Together the
amplitude and offset cannot exceed 2.5Vpp (into
50Ω).
3. See page 29 to set the output
settings and turn the output on.
Page 29
69
Page 70

AFG-125/225 Series Options Manual
Background
The AFG-125P and AFG-225P have an additional
power supply function. The power supply has
three fixed output levels: 2.5V, 3.3V, 5V.
Steps
1. Press Power Supply from the first
level of the AFG menu.
2. Press Power to turn the power
supply output on.
3. Press Voltage to select one of the
fixed output levels. Status LEDs on
the front panel will light up
appropriately.
Voltage
2.5V, 3.3V, 5V
Note
The current power supply has a current output of 6A
and a voltage output of (2.5V, 3.3V or 5V)±5%.
If the power supply is overload, the OVER LOAD LED
on the front panel will light up.
Power Supply Function
Using the Power Supply Function (AFG-125P & AFG-225P
only)
70
Page 71

APPENDEX
106.9
30.7
223.6
3.5
APPENDEX
Dimensions
71
Page 72

AFG-125/225 Series Options Manual
Function
Description
Function
Description
ABSATAN
y=|atan(x)|
The absolute of atan(x)
RECTPULS
Sampled aperiodic
rectangle
ABSSIN
y=|sin(x)|
The absolute of sin(x)
ROUNDHAF
y=sqrt(1-x^2)
Half round function
ABSSINEH
y=sin(x),0<x<pi
y=0,pi<x<2pi
Half- wave function
SAWTOOT
Sawtooth or triangle wave
AMPALT
y=e(x).sin(x)
Oscillation rise
SINETRA
Piecewise function
Preset ARB Waveform
Common
72
Page 73

APPENDEX
ATTALT
y=e(-x).sin(x)
Oscillation fall
SINEVER
Piecewise function
DIRIEVEN
Even
f(x)=-1^(x*(n-1)/2*pi)
x=0,±2*pi,±4*pi,……
STAIR_DW
Step down
DIRIODD
Odd
f(x)=sin(nx/2)/n*sin(x/2)
x=±pi,±3pi,……
STAIR_UD
Step up and step down
GAUSPULS
f(x)=a*e^(-(x-b)^2)/c^2)
Gaussian-modulated
sinusoidal pulse
STAIR_UP
Step up
HAVERCOS
y=(1-sin(x))/2
Havercosine function
STEPRESP
Heaviside step function
73
Page 74

AFG-125/225 Series Options Manual
HAVERSIN
=(1-cos(x))/2
Haversine function
TRAPEZIA
Piecewise function
NEGRAMP
y=-x
Line segment
TRIPULS
Sampled aperiodic
triangle
N_PULSE
Negative pulse
Function
Description
Function
Description
ARCCOS
Basic trigonometric
function
EXPORISE
Exponential rise
Math
74
Page 75

APPENDEX
ARCCOT
Basic trigonometric
function
GAUSS
A waveform representing
a gaussian bell curve
ARCCSC
Basic trigonometric
function
LN
Logarithm function
ARCSEC
Basic trigonometric
function
LORENTZ
The derivative of the
lorentz function
y=1/(k*x^2+1)
ARCSIN
Basic trigonometric
function
SEC
Basic trigonometric
function
ARCSINH
Basic trigonometric
function
SECH
Basic trigonometric
function
75
Page 76

AFG-125/225 Series Options Manual
ARCTAN
Basic trigonometric
function
SINEC
y=sin(x)/x
ARCTANH
Basic trigonometric
function
SINH
Basic trigonometric
function
COSH
Basic trigonometric
function
SQRT
y=sqrt(x)
COT
Basic trigonometric
function
TAN
Basic trigonometric
function
CSC
Basic trigonometric
function
TANH
Basic trigonometric
function
76
Page 77

DLORENTZ
The derivative of the
lorentz function.
y=-2x/(k*x^2+1)
XSQUARE
Parabola
EXPOFALL
Exponential decay
Window
Function
Description
Function
Description
BARTHWIN
Modified Bartlett-Hann
window
HAMMING
The Hamming window
function
BARTLETT
The Bartlett window is
very similar to a triangular
window as returned by
the TRIANG function.
HANN
The Hann window
function
APPENDEX
77
Page 78

AFG-125/225 Series Options Manual
BLACKMAN
The Blackman window
function
HANNING
The Hanning window
function
BOHMWIN
The Bohman window
function
KAISER
The Kaiser window
function
CHEBYSHE
The Chebyshev window
function
TRIANG
The Triang window
function
FLATTWIN
The Flattopwin window
function
TUKEYWIN
The Tukey window
function
Function
Description
Function
Description
AIRY
The Airy function
GAMM
The Gamma function
Engineer
78
Page 79

APPENDEX
BESSEL
The Bessel function
LEGENDRE
Associated Legendre
functions
BETA
The Beta function
NEUMANN
The Neumann function
79
Page 80

AFG-125/225 Series Options Manual
Type of Product: Arbitrary Function Generator (With DC Power Supply)
Model Number: AFG-125, AFG-225, AFG-125P & AFG-225P
◎ EMC
EN 61326-1:
Electrical equipment for measurement, control and
laboratory use –– EMC requirements (2013)
Conducted and Radiated Emissions
EN 55011: 2009+A1: 2010
Electrostatic Discharge
EN 61000-4-2: 2009
Current Harmonic
EN 61000-3-2: 2006+A1: 2009+A2:
2009
Radiated Immunity
EN 61000-4-3: 2006+A1:
2008+A2 :2010
Voltage Fluctuation
EN 61000-3-3: 2008
Electrical Fast Transients
EN 61000-4-4: 2012
-------------------------
Surge Immunity
EN 61000-4-5: 2006
-------------------------
Conducted Susceptibility
EN 61000-4-6: 2009
-------------------------
Power Frequency Magnetic Field
EN 61000-4-8: 2010
-------------------------
Voltage Dips/Interrupts
EN 61000-4-11: 2004
Declaration of Conformity
We
GOOD WILL INSTRUMENT CO., LTD.
No. 7-1, Jhongsing Rd, Tucheng Dist., New Taipei City 236, Taiwan
GOOD WILL INSTRUMENT (SUZHOU) CO., LTD.
No. 69 Lushan Road, Suzhou New District Jiangsu, China.
declare that the below mentioned products
are herewith confirmed to comply with the requirements set out in the
Council Directive on the Approximation of the Law of Member States
relating to Electromagnetic Compatibility (2004/108/EC).
For the evaluation regarding the Electromagnetic Compatibility, the
following standards were applied:
80
Page 81

INDEX
INDEX
Accessories ................................. 11
AFG menu .................................. 26
App installation ......................... 18
App uninstallation ..................... 19
Appendix .................................... 71
ARB
Amplitude ..................................... 68
Clear................................................ 65
copy/paste ..................................... 63
diagonal line .................................. 61
Editing ............................................ 59
Frequency ...................................... 68
line .................................................. 60
Load waveforms ........................... 56
Offset .............................................. 68
Output ............................................ 67
point ................................................ 60
Preset waveform list .................... 72
Preset waveforms ......................... 56
Rate ................................................. 68
Save ................................................. 66
scale ................................................ 63
Baseband waveforms ................ 28
Basic waveforms ........................ 28
Burst ............................................ 53
Caution symbol ............................ 4
Cleaning the instrument ............. 6
Coupling ..................................... 31
Declaration of conformity ......... 80
Default settings .......................... 33
Disposal
symbol .............................................. 5
Disposal instructions ................... 7
DS2-FH1 installation ................. 14
Dual tracking .............................. 31
EN61010
pollution degree.............................. 6
Entering the ARB function
menu ........................................ 26
Environment
safety instructions .......................... 6
Front panel diagram .................. 12
Function generator
operation ........................................ 26
Fuse
type ................................................... 5
Ground
symbol .............................................. 4
List of features ............................ 10
Main features .............................. 10
Menu tree .................................... 21
Modulation
AM .................................................. 40
FM ................................................... 42
FSK .................................................. 44
PM ................................................... 46
SUM ................................................ 48
Module installation .................... 15
Module removal ......................... 15
Operation .................................... 25
Output ................................... 29, 34
Overview ....................................... 9
Power on/off
safety instruction ............................ 5
Power supply operation ............ 70
Preset settings ............................. 33
Rear panel diagram ................... 13
Service operation
about disassembly .......................... 5
State display ................................ 27
Sweep .......................................... 50
Sync Output ................................ 34
Tracking ...................................... 31
Turn the output on or off .......... 29
81
Page 82

AFG-125/225 Series Options Manual
USB configuration ..................... 17 Warning symbol .......................... 4
82
 Loading...