

Page 1

Table of Contents
1. Cautions and Warnings …………………………………………………….. 2
2. VESA mounting installation …………………………………………………. 5
2-1. 15” LCD Monitor VESA Mounting ……………………...………………. 5
2-2. 17”/19” LCD Monitor VESA Mounting …………………………………. 6
3. FCC Statement ………..………….………………………………………... 7
4. WEEE Statement …………………………………………………………….. 8
5. Japan RoHS Declaration …………………………………………………… 10
6. Introduction ………………………………………………………………….. 11
7. Monitor Controls ………….…………………………………………………. 12
7-1. Key Function ……………………...……………………………………. 12
7-2. Quick Adjustment Function …………………………….……………... 12
7-3. Display Angle ……………………...……………………………….……13
7-4. Stand setting up ……………………...……………….…………………13
7-5. I/O Port ……………………...………………………...…….…….……. 14
7-6. OSD Control options ………………………………….……….………. 14
8. Screen Adjustment ………………........…………………………………... 15
9. Touch installation …………………………………………………………… 17
10. Power Management ………………………………………………………. 18
11. Trouble shooting …………………………………………………………… 19
12. Display Modes …………………………………………………………… 20
13. Specification …………………………………...………………………... 21
1 of 41
Page 2
1. Cautions and Warnings
Model: M15AE / M17AE / M19AI
Symbol Description
Caution ! – This symbol alerts you to important operating
considerations or a potential operating condition that
could damage equipment. Refer to user’s manual or
operation’s manual for precautionary instructions.
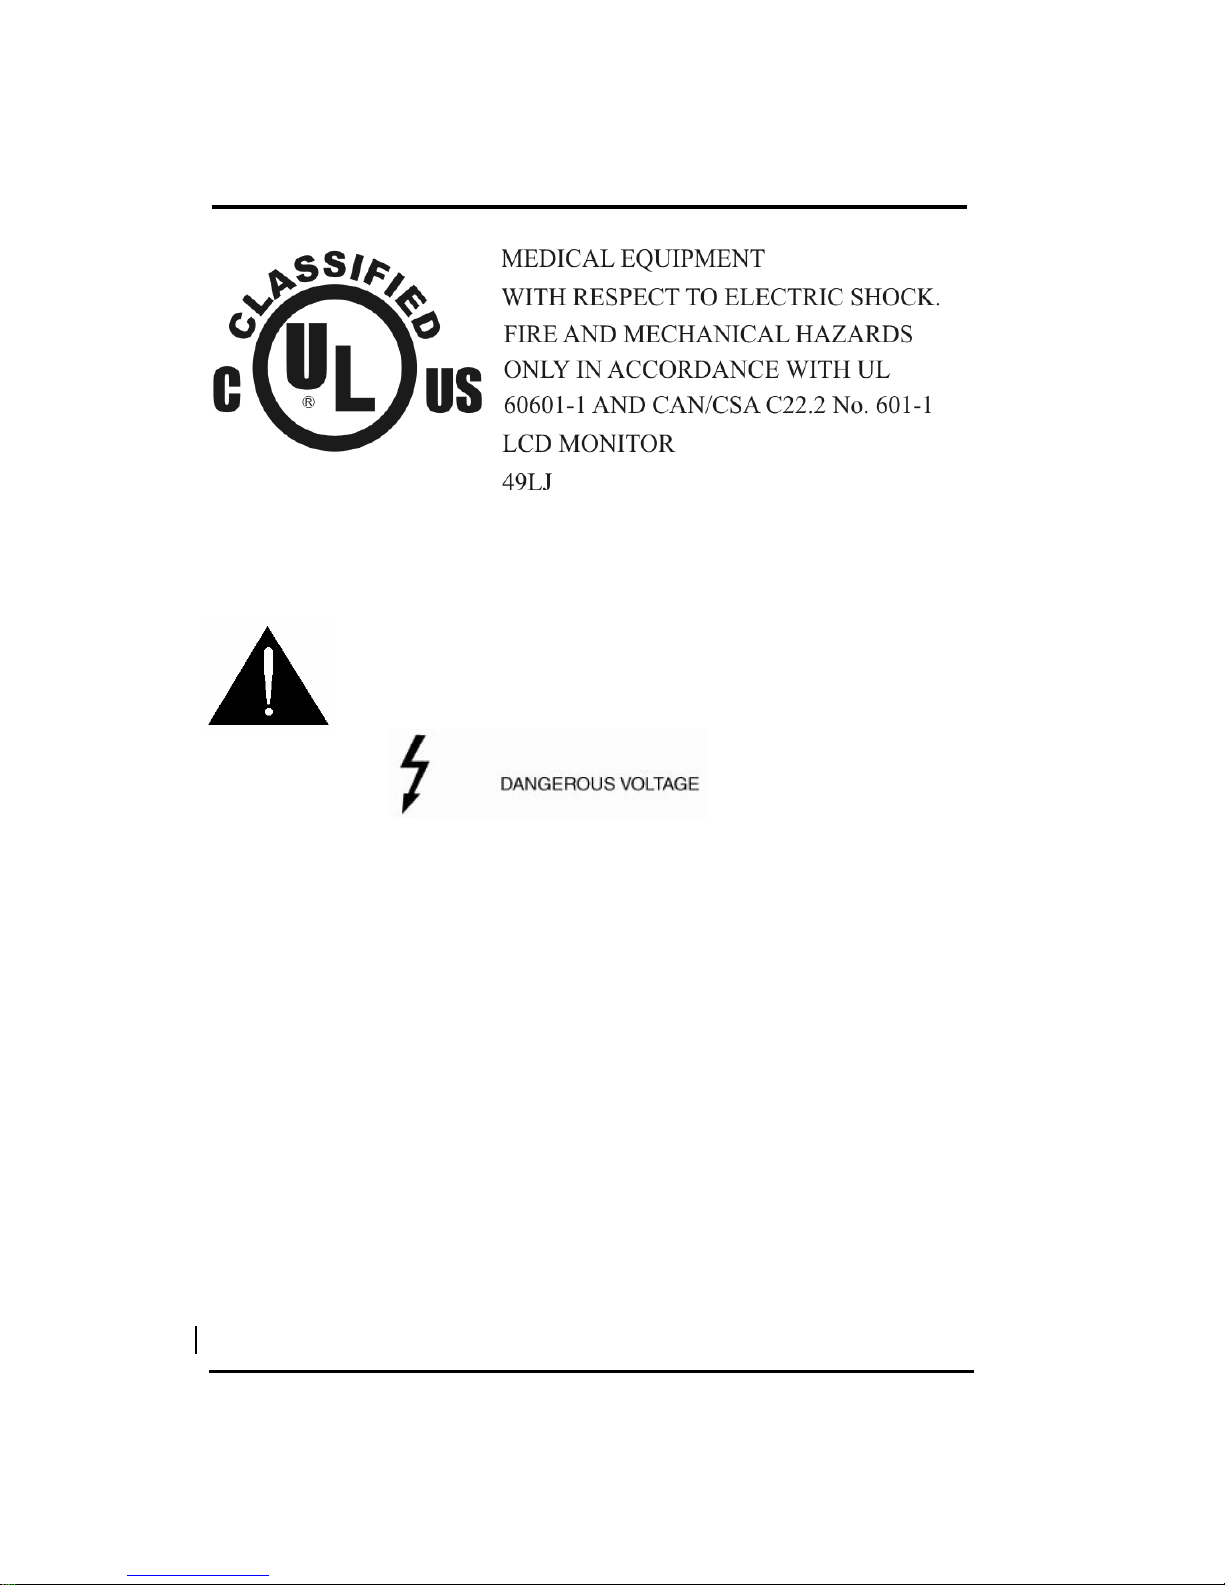
CLASSIFICATION
Class I.
No applied parts.
Protection against harmful ingress of water : Ordinary Equipment (IPX0) – No protection.
Not suitable for use in the presence of a flammable anesthetic’s or oxygen.
Mode of operation : Continuous.
Precautions
Read all of these instructions and save them for later use.
Follow all warnings and instructions on the product.
Product
- Do not cover or block the vent holes in the case.
- Do not insert sharp objects or spill liquid into the LCD monitor through cabinet slots. They
may cause accident fire, electric shock or failure.
- Disconnect the power plug from the AC outlet if you will not use it for an indefinite period
of time.
- Do not attempt to service this product yourself, as opening or removing covers may
expose you to dangerous voltage points or other risks.
- Do not apply pressure to the screen. The LCD is very delicate.
- Do not touch the LCD panel or Touch Screen surface with sharp or hard objects.
Removed power cord if fault happened..
2 of 41
Page 3

Patients are not accessible to touch the panel when the monitor is turning on (or turn
off) .
Power
- Use the type of power indicated on the marking label.
Power Adapter : Only use an adapter designed for the LCD monitor, model M15AE,
M17AE.
Adaptor type : BridgePower , BPM050S12F05.
- Rating : Input 100-240Vac , 50-60Hz , 1.5A max. at 100 VAC input ; Output 12Vdc, 4.2A,
50W
Power Rating : Input 100-240Vac , 50-60Hz , 1.5A max. for M19AI
Manufacturer : GVision Incorporated. 11F,No.166,Chien-I Rd., Chung-Ho City ,Taipei Hsien ,
Taiwan ; Tel : +886-2-8226-5511 ; Fax : +886-2-8226-5533
IMPORTANT – Use of another type of adapter will result in malfunction and/or danger.
The device could be sent back to manufacturer for recycling or proper disposal after
their useful lives. Alternatively the device shall be disposed in accordance with national
laws after their useful lives
If you will not use it for an indefinite period time.
When the power cord or plug is damaged or frayed.
If the product does not operate normally when the operating instructions are
followed. Adjust only those controls that are covered by the operating
instructions. Improper adjustment of other controls may result in damage and
will often require extensive work by a qualified technician to restore the product
to normal operation.
If the product has been dropped or the cabinet has been damaged.
If the product exhibits a distinct change in performance, indicating a need for
service.
Power and extension cords
- Do not allow anything to rest on the power cord.
- Do not locate this product where persons will walk on the cord.
- Use the proper power cord with correct attachment plug type. If the power source is 120
V AC, use a power cord that has UL and C-UL approvals. If the power source is a 240 V
AC supply, use the tandem (T blade) type attachment plug with ground conductor power
cord that meets the respective European country's safety regulations, such as VDE for
Germany.
- Do not overload wall outlets or power cords. Ensure that the total of all units plugged into
the wall outlet does not exceed 10 amperes.
- Ensure that the total ampere ratings on all units plugged into the extension cord is not
above the cord's rating.
- If the power supply cord, which came with your monitor, is to be connected to the PC
instead of the wall outlet, this equipment is to be used with UL/TÜV approved computers
with receptacle rated 240V AC, 2.0A (minimum).
Environment
- Place the monitor on a flat and leveled surface.
- Place the monitor in a well-ventilated place.
- Keep the monitor away from: overly hot, cold or humid places, places directly under
sunlight, dusty surroundings, equipment that generate strong magnetic fields.
- Not suitable for use in the presence of a flammable substance.
- To prevent fire or shock hazard, never expose the monitor to rain or moisture.
3 of 41
Page 4

• Option Mounting Methods: Either Base mounting or VESA mounting can be used.
"Accessory equipment connected to the analog and digital interfaces must be certified
according to the respective IEC standards (e.g. IEC 60950 for data processing equipment
and IEC 60601-1 for medical equipment). Furthermore all configurations shall comply with
the valid version of the system standard IEC 60601-1-1. Everybody who connects additional
equipment to the signal input part or signal output part configures a medical system, and is
therefore responsible that the system complies with the requirements of the valid version of
the system standard IEC 60601-1-1. If in doubt, consult the technical service department or
your local representative. " (MDD: 13.6.c, IEC 60601-1: 6.8.2.c, 19.2.b, 19.2.c)
External Equipment
External equipment intended for connection to signal input/output or other connectors, shall
comply with relevant UL/IEC standard (e.g. UL 1950 for IT equipment and UL 60601-1 / IEC
60601 series for systems – shall comply with the standard IEC 60601-1-1, Safety
requirements for medical electrical systems. Equipment not complying with IEC60601-1-1
shall be kept outside the patient environment, as defined in the standard.
4 of 41
Page 5
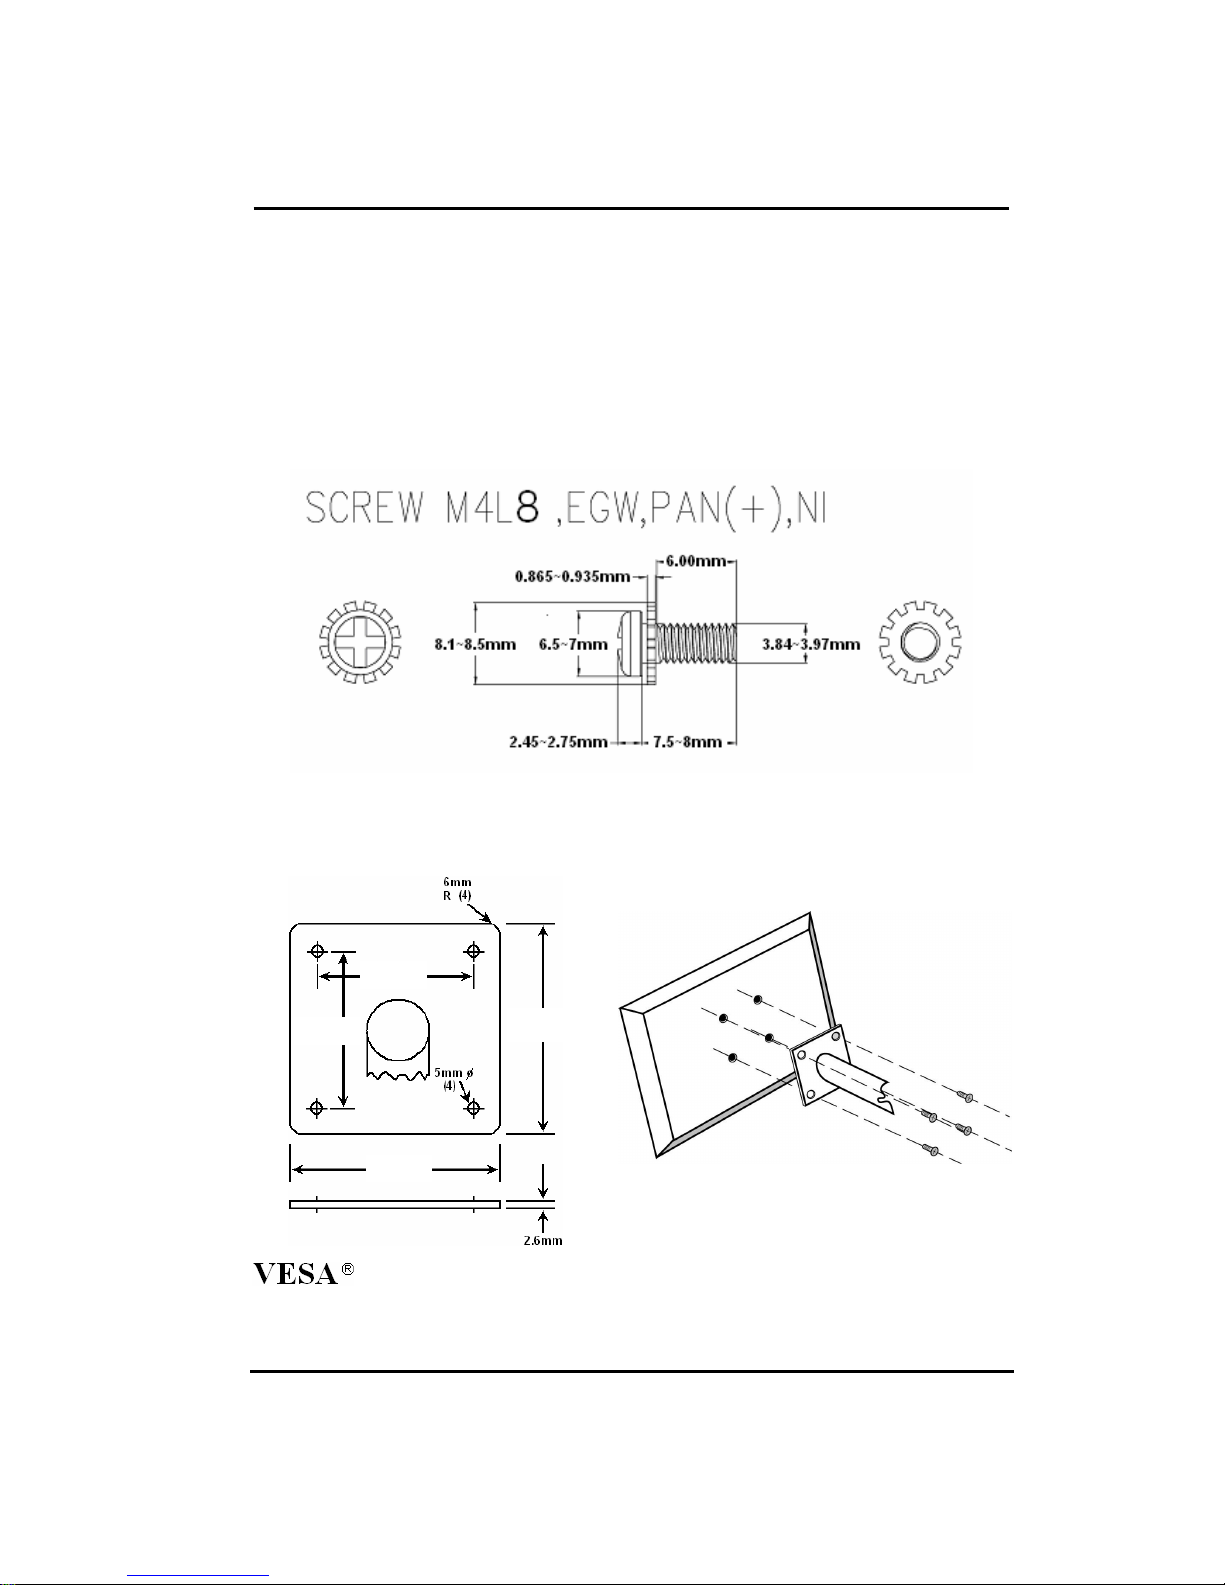
2. VESA mounting installation
2-1. 15” LCD Monitor VESA Mounting
Fix UL listed wall mount bracket on the back of the monitor with screws, the specification of
screw (ref. image 1) , to prevent electric damage to ensure user’s safety. The dimension of
interface pad of wall mount bracket has to follow VESA standard (ref. Image 2)
Installation: Please aim UL listed wall mount bracket at the 4 screw holes on the back of
monitor and screw tightly (ref. Image 3) .
Please refer to user’s manual of UL listed wall mount bracket for wall mount installation.
Image 1
75mm
75mm
90mm
90mm
Standard Interface Pad Configurations
Image 2 Image 3
5 of 41
Page 6
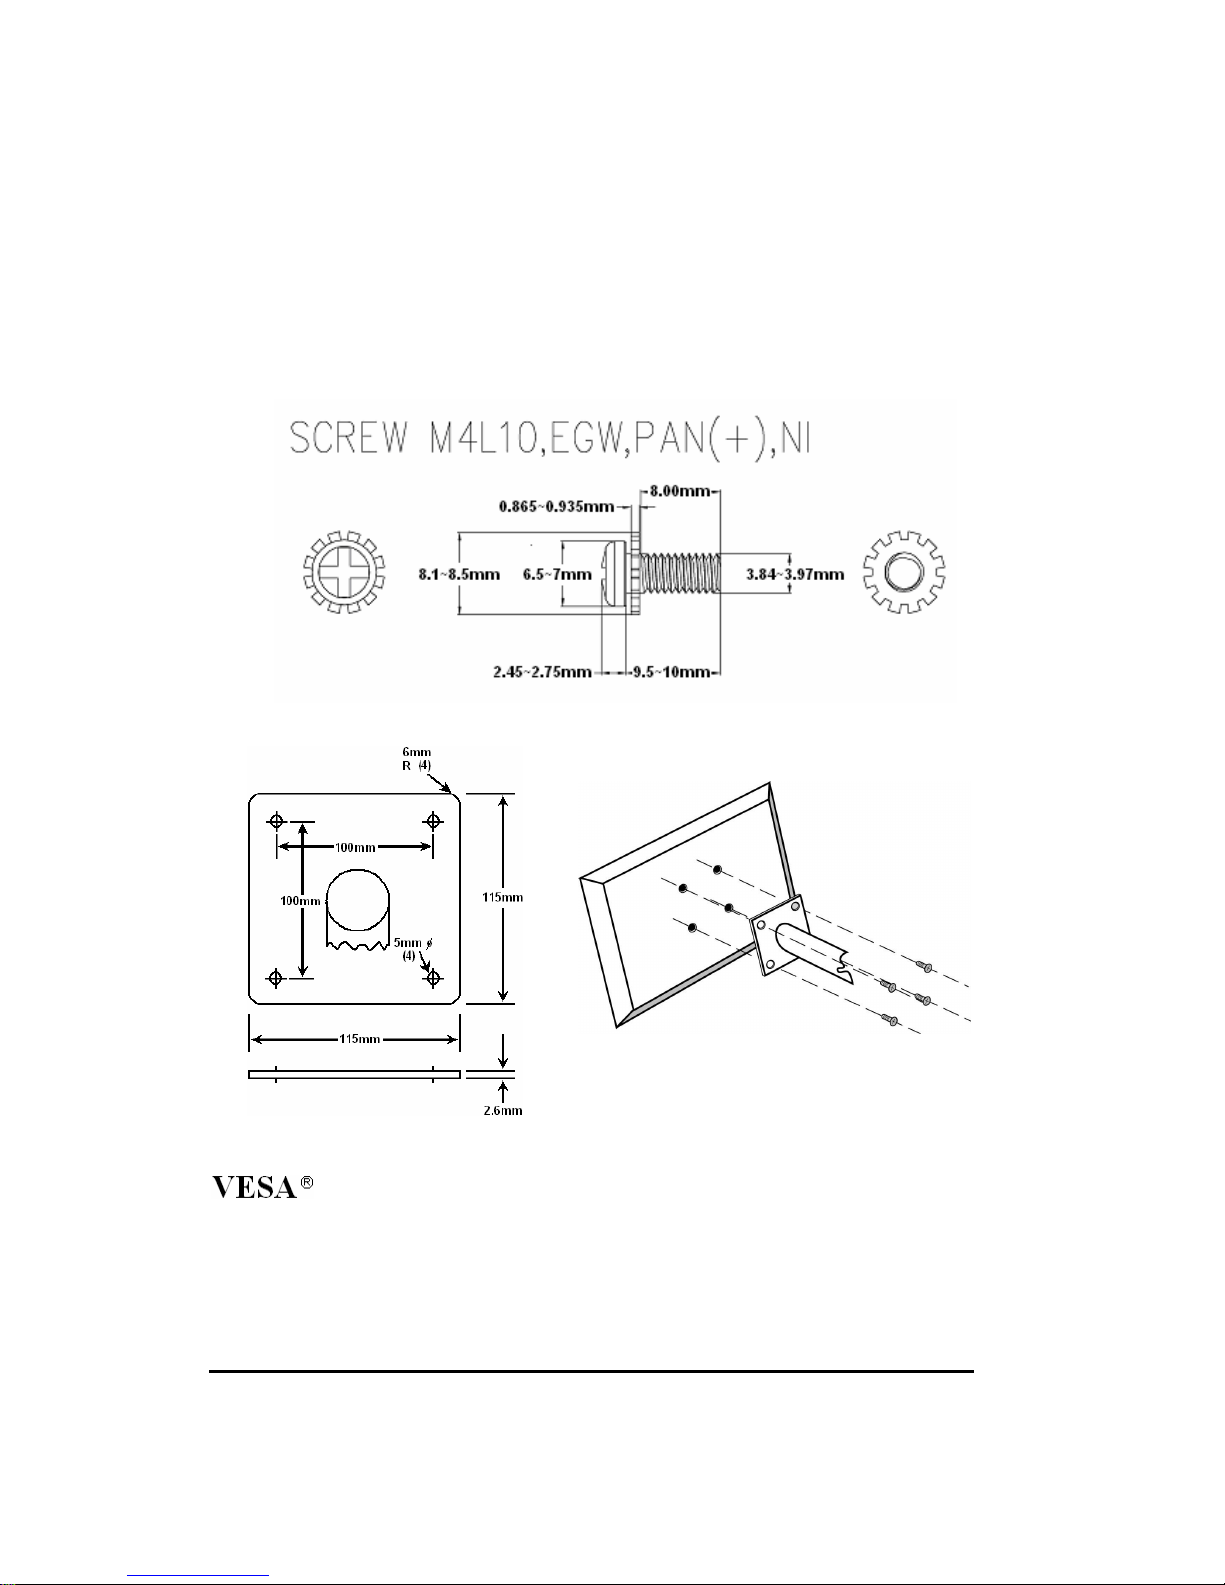
2-2. 17” / 19” LCD Monitor VESA Mounting
Fix UL listed wall mount bracket on the back of the monitor with screws, the specification of
screw (ref. image 1) , to prevent electric damage to ensure user’s safety. The dimension of
interface pad of wall mount bracket has to follow VESA standard (ref. Image 2)
Installation: Please aim UL listed wall mount bracket at the 4 screw holes on the back of
monitor and screw tightly (ref. Image 3) .
Please refer to user’s manual of UL listed wall mount bracket for wall mount installation.
Image 1
Standard Interface Pad Configurations
Image 2 Image 3
6 of 41
Page 7

3. Federal Communication Commission Radio Frequency
International Statement
This equipment has been tested and found to comply with the limits for a Class B digital
device, pursuant to Part 15 of the FCC Rules. These limits are designed to provide
reasonable protection against harmful interference in a residential installation. This
equipment generates, uses and can radiate radio frequency energy and, if not installed and
used in accordance with the instructions, may cause harmful interference to radio
communications. However, there is no guarantee that interference will not occur in a
particular installation. If this equipment does cause harmful interference to radio or television
reception, which can be determined by turning the equipment off and on, the user is
encouraged to try to correct the interference by one or more the following measures:
Reorient / Relocate the receiving antenna.
•
Increase the separation between the equipment and receiver.
•
Connect the equipment into an outlet on a circuit different from that to which the receiver is
•
connected.
Consult the dealer or an experienced radio/TV technician for help.
•
This device complies with Part 15 of the FCC Rules. Operation is subject to the following two
conditions: (1) This device may cause harmful interference, and (2) this device must accept
any interference received, including interference that may cause undesired operation.
Notice:
The use of non-shielded interface with this equipment is prohibited.
If necessary, the user should consult the dealer or an experienced radio / television
technician for additional suggestions. The user may find the following booklet prepared by the
Federal Communications Commission helpful. This booklet is available from the U.S.
Government Printing Office Washington DC, 20402, Stock No. 004-000-00345-4.
The manufacture is not responsible for any radio or TV interference caused by unauthorized
modification of this equipment. It is the responsibility of the user to correct such interference.
Caution: To meet FCC limits for a Class B computing device, a shielded signal cable
should be used.
Canadian Department Of Communications
Compliance Statement
This equipment does not exceed Class B limits per radio noise emissions for a digital
apparatus, set out in the Radio Interference Regulation of the Canadian Department of
Communications. Operation in a residential area may cause unacceptable interference to
radio and TV reception requiring the owner or operator to take whatever steps necessary to
correct the interference.
Département Canadien des Communications
Cet équipement ne dépasse pas les limites de classe B pour des émissions de bruit radio
pour des appareils numériques comme présenté au règlement d'interférence radio du
département canadien des communications. L'utilisation dans une zone résidentielle risque
de générer des interférences inacceptables à la réception radio et TV, auquel cas l'utilisateur
se verrait dans l'obligation de prendre toutes mesures nécessaires pour corriger les
interférences.
Rapport De Conformité
7 of 41
Page 8
4. WEEE Statement
Important Information for Recycling
This warning sign of trash bin indicates that the objects are not allowed to be
disposed as general refuse. Please follow the local Act and carry out further
disposal with refuse recycling and collecting system in your Country or District.
For more information on recycling, please contact locally authorized recycling
centre or place of purchase.
Your recycling behaviour will bring better future for the Earth and create living
environment with excellent quality for the descendant.
Informations importantes relatives au recyclage
Cet avertissement sur un récipient à ordures indique qu'il est interdit d'y déverser des ordures
ménagères. Veuillez à l'avenir respecter les réglementations locales et rester en conformité
avec le système de collecte et de recyclage des ordures de votre circonscription ou district.
Pour plus d'informations sur le recyclage, veuillez contacter votre centre de recyclage agréé
local ou le lieu d'achat.
Votre attitude quant au recyclage améliorera l'avenir de la planète et créera un
environnement de vie de qualité pour les générations futures.
Wichtige Hinweise zum Recycling
Dieses Mülleimer-Warnsymbol gibt an, dass die Objekte nicht mit dem regulären Hausmüll
entsorgt werden dürfen. Bitte halten Sie sich an die örtlichen Bestimmungen und entsorgen Sie
die Objekte über Recycling- und Sammelstellen in Ihrer Nähe. Detaillierte Informationen zum
Recycling erhalten Sie von Ihrer örtlichen, offiziellen Recycling-Sammelstelle oder beim
Händler, bei dem Sie die Objekte erworben haben.
Ihre Mitarbeit trägt dazu bei, unsere Umwelt zu schützen und sorgt dafür, dass unsere Erde auch
für nachfolgende Generationen ein Ort bleibt, an dem es sich zu leben lohnt.
Información importante de reciclado
Este letrero de aviso de cubo de basura indica que los objetos no pueden desecharse como
residuos generales. Cumpla la normativa local y realice la eliminación según el sistema de
reciclado y recogida de su país o región. Para obtener más información sobre el reciclado,
póngase en contacto con su centro de reciclado autorizado local o su lugar de compra.
Su conducta de reciclado supondrá un mejor futuro para la Tierra y crea un entorno de vida
de calidad para las futuras generaciones.
Informazioni importanti sul riciclaggio
Questo simbolo del bidone dell’immondizia sta ad indicare che è vietato smaltire il prodotto
insieme ai rifiuti domestici generici. Attenersi alle normative ed alle procedure di raccolta e
riciclaggio dei rifiuti speciali in vigore nella propria città o regione. Per altre informazioni sul
riciclaggio, mettersi in contatto con i centri autorizzati di raccolta e riciclaggio, oppure con
negozio dove è stato fatto l’acquisto.
Le vostre azioni garantiranno il miglioramento futuro della Terra e creeranno un ambiente ed
una qualità di vita che tutti preferiscono sia per sé sia per le generazioni future.
Důležité informace pro recyklaci
Tato značka na kontejneru znamená, že do něj není dovoleno vhazovat určité předměty.
Dodržujte prosím místní předpisy a likvidujte odpad podle systému recyklace a sběru odpadu
ve vaší zemi nebo okresu. Pro další informace o recyklaci kontaktujte místní recyklační
středisko nebo místo nákupu výrobku.
Svým postojem k recyklaci přispějete k lepší budoucnosti na Zemi a ke kvalitnějším životním
podmínkám pro budoucí generace.
8 of 41
Page 9
WaŜna informacja dotycząca recyklingu
Symbol przedstawiający pojemnik na odpadki informuje, Ŝe oznaczone nim obiekty nie mogą być
usuwane razem z ogólnymi odpadami. NaleŜy stosować się do lokalnego prawa i wykonywać
zalecenia dotyczące dalszego przetwarzania takich odpadów poprzez umieszczanie ich punktach
gromadzenia odpadów w danym kraju lub okręgu. Dalsze informacje dotyczące recyklingu moŜna
uzyskać, po skontaktowaniu się z punktem przetwarzania odpadów autoryzowanym przez władze
lokalne lub w miejscu zakupu.
Stosowanie się do zaleceń w sprawie przetwarzania odpadów, przyczyni się do zmniejszenia
zanieczyszczenia Ziemi i zachowania czystości środowiska dla przyszłych pokoleń.
Важная информация о переработке отходов
Такое изображение мусорного ящика обозначает, что данный предмет не разрешается
выбрасывать вместе с общими отходами. Пожалуйста, придерживайтесь местных
законов и выбрасывайте данный предмет в соответствии с системой переработки
отходов вашей страны или области. Для более детальной информацией о переработке
отходов обращайтесь к местным авторизированным центрам переработки отходов или
к продавцу данного изделия.
Ваши действия по утилизации мусора повлияют на лучшее будущее Земли и повысят
чистоту окружающей среды для будущих поколений.
回收重要資訊
回收重要資訊
回收重要資訊回收重要資訊
這個垃圾桶警告標識,表示不能依一般廢棄物處理,請依照當地法律,利用貴國或貴地區的廢品
回收及收集系統加以處理,欲取得更多的回收資訊,請聯絡當地授權的回收中心或產品購買地點
你的回收行為,將為地球帶來更美好的將來,為後代子孫創造更優質的生活環境 ◦
回收重要信息
回收重要信息
回收重要信息回收重要信息
这个垃圾桶警告标识,表示不能依一般废弃物处理,请依照当地法律,利用贵国或贵地区的废
品回收及收集系统加以处理,欲取得更多的回收信息,请联络当地授权的回收中心或产品购买
地点 ◦
你的回收行为,将为地球带来更美好的将来,为后代子孙创造更优质的生活环境 ◦
リサイクル
リサイクルにににに関関関関する
リサイクルリサイクル
このごみ入れの警告標示は、物体を一般廃棄物として廃棄できないことを示しています。地
方自治体の規制に従い、居住する国または地域の廃棄物リサイクルおよび収集システムに従
って廃棄を実行してください。リサイクルの詳細については、地域の認可されたリサイクル
センターまたは購入店にお問い合わせください。
お客様のリサイクルに対する態度は地球の未来、また後の世代の生活環境の向上をもたら
すものとなるはずです。
する重要
重要なななな情報
するする
重要重要
情報
情報情報
For User in USA
9 of 41
Page 10
5. Japan RoHS Declaration
JIS C 0950: 2005 in Japan:
Green MarkはJ-Mossに合致したと表す(JIS C 0950電気,電
子の機械の特定的な化学の物質は含有して方法を表す)。
J-Mossの特定的な化学の物質の(鉛 水銀,カドミウム,六
つの値段クロム PBB,PBDE),その含有量きわめてになる低い
設備名前 : LCDウォッチドッグ 類型は指定しました : 全部の模型
毒がある有害物質あるいは要素でした
部 品 名 称
電線のケ-ブル
のモジュ-ル
プラスチック
の部品
メタルの部品
電気回路のモ
ジュ-ル
液状結晶のデ
スク
ぶつかってモ
ジュ-ルを訴え
た
1.「Ο」は計算されたこういう物質のパ-セントの内容が參考のパ-セントの内容を越え
たなかったと表明したと気を配りました。
2. が「免除し」たことを注意して計算されたことを表すこういう物質のパ-セントは合
致して項目を免除します。
鉛
水銀
( Pb )
( Hg )
ΟΟΟΟ ΟΟΟΟ ΟΟΟΟ ΟΟΟΟ ΟΟΟΟ ΟΟΟΟ
ΟΟΟΟ ΟΟΟΟ ΟΟΟΟ ΟΟΟΟ ΟΟΟΟ ΟΟΟΟ
ΟΟΟΟ ΟΟΟΟ ΟΟΟΟ ΟΟΟΟ ΟΟΟΟ ΟΟΟΟ
X
X X
X
カドミ
ウム
( Cd )
ΟΟΟΟ ΟΟΟΟ ΟΟΟΟ ΟΟΟΟ ΟΟΟΟ
ΟΟΟΟ ΟΟΟΟ ΟΟΟΟ ΟΟΟΟ
ΟΟΟΟ ΟΟΟΟ ΟΟΟΟ ΟΟΟΟ ΟΟΟΟ
六値段
クロム
(Cr6+)
たくさんの臭素
のジフェニルで
した
( PBB )
たくさんの臭素
のジフェニルオ
キサイド
( PBDE )
X : 免除した
JIS C 0950
10 of 41
Page 11

6. Introduction
◆ Product Features
High contrast color TFT LCD display support resolution up to XGA ( 15” model ) and
SXGA 1280 x 1024 ( 17” & 19” model ).
Compatible with IBM VGA,DVI, VESA standards.
Imbedded audio system provides sound performance.
Power management system conforms to VESA DPMS standard.
Universal power adapter.
Support DDC1/2B for Plug & Play compatibility.
Advanced OSD control for picture quality adjustment.
Support VESA standard mounting holes for wall mount or ARM mounting application.
Touch screen system (Optional)
Digital interface (Optional)
The aluminum stand base tilt down -5°~ tilt up +90°
◆ Package Contents
15” / 17” / 19” TFT liquid crystal monitor
D-sub 15 pin signal cable for analog input
DVI 24 pin signal cable for digital input (Optional)
RS232 / USB cable for touch screen function (option).
RCA / S-Video signal cable for video-in function (option).
Audio cable (Optional)
Power adapter / AC power cord (Optional)
Touch screen CD driver (Optional)
4 pieces M4x10mm washer screws (Optional)
User’s manual
11 of 41
Page 12
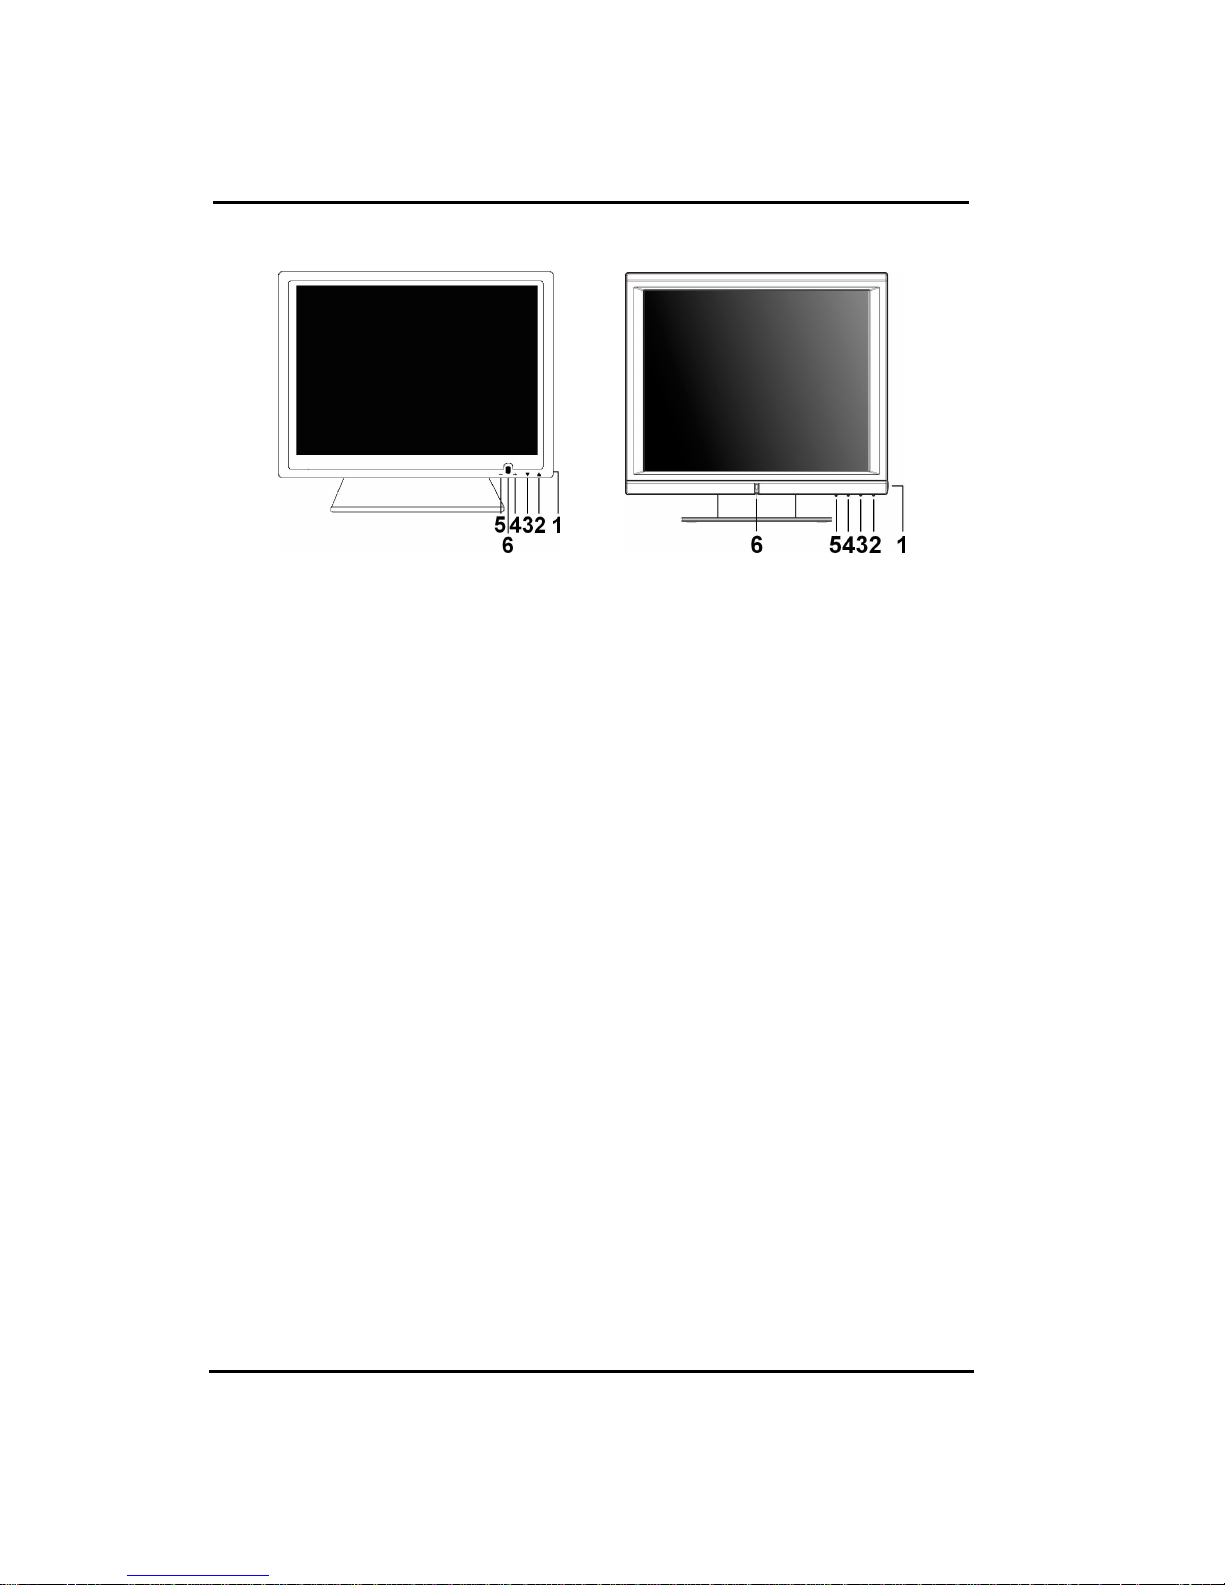
7. Monitor Controls
7-1. Key Function
△BX / BH Serial △VX / VH Serial
1. Power Switch Pressing this button turns the display system power on or off.
2. Menu/Select “▲” Pressing this button opens the OSD menu on the screen, and is used
to select (“Up” direction) the OSD control options on the screen.
3. Select “▼” This button is used to select (“Down” direction) the OSD control options on
the screen.
4. “++++” This button is used to increase the value of the selected OSD control option.
5. “0000” This button is used to decrease the valve of the selected OSD control option.
6. Power LED on or off.
7-2. Quick Adjustment Function
When the OSD Menu is not active, the following functions are available for the quick
adjustment.
Pressing “▲” button once pops up the OSD Function Main Menu .
Pressing “▼” button once pops up the small Brightness icon. Use “++++” or “0000” button to
adjust the Brightness level.
Pressing “++++” button once pops up the small Volume icon. Use “++++” or “0000” button to
adjust the Volume level.
Pressing “0000” button once pops up the small Input Select icon. Press “0000” button again
to switch to the digital interface. (Only for the model with digital input)
Pressing “++++” button once and then press both “++++” and “0000” buttons at one time, the
audio will be mute .Pressing “++++” button again, the audio come back .
Note:
Key lock function : Press “▼” button and then press Power switch together to freeze all
function keys. Press “▼” button and then press Power switch together
again to unlock the keys.
12 of 41
Page 13

7-3. Display Angle
Place the monitor in an
Tilting
For viewing clarity, you can tilt the LCD backward . (up to 90 degrees).
CAUTION : In order to protect the LCD, be sure to hold the base whenever you adjust it.
7-4. Stand setting up
Step 1 Step 2 Step 3
Hold the stand tight and
pull monitor out upward.
Step 4 Step 5 Step 6
Continuing step , then out down
the entire monitor downward.
upright position.
WARNING : DO NOT USE falls short of the specifications of screw for VESA mounting.
Strongly recommend use the 4 screws we provided.
13 of 41
Page 14

7-5 I/O Port
◆◆◆◆ Standard Model:
15”
17” / 19”
◆◆◆◆ Touch / Video-in Model:
15”
17” / 19”
AC-in
WARNING Be sure to hold the connector instead of the wire when you disconnect the cord/cable.
7777----6.
6. OSD Control options
6.6.
Pressing “0000” button once opens the small Input Select icon.
PC ANALOG
PC DIGITAL ( Optional )
VIDEO ( Optional )
S-VIDEO ( Optional )
EXIT
14 of 41
Page 15

8. Screen Adjustment
PC Analog Mode
PC Digital
Mode
S-Video/Video
Mode
CONTRAST
Adjust the contrast using “++++” and “0000” buttons.
BRIGHTNESS
Adjust the brightness using “++++” and “0000” buttons.
VOLUME
Adjust the speaker volume using “++++” and “0000” buttons.
AUTO TUNE
Press “ ++++” or “0000” buttons to make LCD monitor adjust the related parameters
automatically for optimal display status.
H - POSITION
Pressing “++++” moves the display image to the right; Pressing “0000” moves the display
image to the left.
V - POSITION
Pressing “++++” moves the display image upward; Pressing “0000” moves the display image
downward.
LANGUAGE
This item is used to select OSD languages.
FREQUENCY
This item is used to decrease the vertical interference.
1.Select one display pattern from your computer.
2.Use“+
+” and “0
++
0” buttons on the LCD monitor to decrease the vertical interference to
00
get the optimal display.
PHASE
This item is used to decrease the horizontal interference.
1.Select one display pattern from your computer.
2.Use “++++” and “0000” buttons on the LCD monitor to decrease the horizontal interference
to get the optimal display.
15 of 41
Page 16

RED / GREEN / BLUE
Adjust the value of color gain (Red, Green, Blue) using “++++” and “0000”buttons.
COLOR TEMP.
This section is for “Color Temperature” adjustment. You can select the Warm, Cool, or
Normal in this section, and then press “++++” and “0000” buttons to set up. The color
temperature will be recalled as factory preset value.
RECALL
Press “+
+” or “0
0” buttons to recall factory preset values.
++
00
HUE (For the model with Video input only)
Adjust the video image hue using ++++ or
−
− buttons to set up.
−−
SHARPNESS (For the model with Video input only)
Adjust the sharpness using ++++ or
−
− buttons to set up.
−−
SATURATION (For the model with Video input only)
Adjust the video image color saturation using ++++ or
−
− buttons to set up.
−−
16 of 41
Page 17

9. Touch installation
◆ Installing Touch Screen Controller Driver
To install the driver of the touch screen controller to your computer, please follow the
steps below:
1. Insert the CD-ROM in your computer’s CD-ROM drive.
2. If autorun is enabled, the setup program appears automatically. If autorun is disabled, run
setup.exe from the root directory of CD.
3. Follow the directions on the screen to complete the installation.
4. After finishing the installing, restart the computer as instructed.
◆◆◆◆ Uninstalling Touch Screen Controller Driver
To uninstall the driver of the touch screen controller from your computer, please follow
the steps below:
1. Click the Start button, click Control Panel, and then click Add/Remove Programs.
2. Select Touch Screen Controller Driver from the list of uninstallable programs on the
Install/Uninstall tab.
3. Click the Add/Remove button then follow the directions on your screen.
4. After finishing the uninstalling, restart the computer as instructed.
17 of 41
Page 18

10. Power Management
General Power Saving Mode
Mode Power LED Color Power Consumption
On Green Monitor
Stand by Orange 2W
Suspend Orange 2W
Off Orange 2W
* We recommend to switch off the monitor when it is not use for quite a long time.
Monitor+
Touch
2W 4W
2W 4W
2W 4W
Monitor+Video
+Touch
48W
(max.)
18 of 41
Page 19

11. Trouble shooting
The monitor does not respond after you turn on the system.
• Check if the Power Switch of monitor is turned on .
• Turn off the power and check the monitor’s power cord and signal cable for proper
connection.
The characters on the screen are dim.
• Refer to the Controls and Adjustments section to adjust the brightness.
The screen is blank.
• During operation, the monitor screen may automatically turn off as a result of Power
Saving feature. Press any key to see if the screen comes back.
• Refer to the Controls and Adjustments section to adjust the brightness.
The screen flashes when it’s initialized.
• Turn off the monitor and turn it on again.
◆ Cleaning
Gently wipe the screen with a clean camel hair lens brush, or a soft, clean, lint-free cloth.
This removes dust and other particles that can scratch the screen.
Do not apply pressure to the screen surface when wiping it clean.
Do not pour or spray any liquid directly onto the screen or case of the LCD monitor.
Chemical cleaners have been reported to damage the screen or case of the LCD
monitor.
WARNING : Do not disassemble the monitor. Contact your dealer if needed.
19 of 41
Page 20

12. Display Modes
Display
Resolution Type H. Scan V. Scan Pol. Pixel
Size
(KHz) (Hz) (MHz)
640X350 VGA 31.469 70.087 + / - 25.175
640X400 VGA 31.469 70.087 - /+ 25.175
720X400 VGA 31.469 70.087 - / + 28.322
640X480 VGA 31.469 59.940 - / - 25.175
640X480 VESA72 37.861 72.809 - / - 31.500
640X480 VESA75 37.500 75.000 - / - 31.500
15” 17” 19”
800X600 SVGA 37.879 60.317 + / + 40.000
800X600 VESA72 48.077 72.188 + / + 50.000
800X600 VESA75 46.875 75.000 + / + 49.500
1022 X 512
1024X768 VESA60 48.363 60.004 - / - 65.000
1024X768 VESA70 56.476 70.069 - / - 75.000
1024X768 VESA75 60.023 75.029 + / + 78.750
1152X864 VESA 67.5 75.5 + / + 108.0
34.39 60.000 + / + 46.77
17” 19”
20 of 41
1280X1024
1280X1024
VESA 64.3 60.0 + / + 108.0
VESA 80.0 75.0 + / + 135.0
Page 21

13. Specification
LCD Display
Panel Display Size
Panel Pixel Pitch
Panel Max. Resolution
Panel Contrast Ratio
Panel Brightness
15” / 17” / 19” TFT Active Matrix Panel
15”
17”
19”
15”
17”
19”
15”
17”
19”
15” 700 : 1(typical)
17”
19”
15”
17”
19”
15”
304.1(H) x 228.1 (V) mm
337.9 (H)×270.3 (V) mm
376.3(H)×301.05(V) mm
0.297(H) x 0.297 (V) mm
0.264(H) x 0.264 (V) mm
0.294(H) x 0.294(V) mm
XGA 1024 x 768
SXGA 1280 x 1024
SXGA 1280 x 1024
1000 : 1(typical)
1000 : 1(typical)
225 Cd/m2 [M15] or 350 Cd/m2 [G15] (typical)
350 Cd/m2 (typical)
350 Cd/m2 (typical)
8 ms (typical)
Panel Response Time
Panel Display Color
Panel Viewing Angle
Input Signal
Signal Connector
Plug & Play
Audio System
17”
19”
15”
17”
19”
15”
17”
19”
Video
Sync
Analog
Digital (Option)
5 ms (typical)
5 ms (typical)
16.2M (typical)
16.7M (typical)
16.7M (typical)
140o (L/R), 125o (U/D) (typical)
170o (L/R), 160o (U/D) (typical)
170o (L/R), 160o (U/D) (typical)
R.G.B. Analog 0.7V
TTL Positive or Negative
15 Pin D-Sub
24 -pin DVI-D
DDC1 / 2B Compatible
1W / Per Channel
peak-peak
21 of 41
Page 22

Touch Screen (Option)
Output
Output
AC
Video system (Option) RCA, S-Video
15” Power Adapter
Power
17” Power Adapter
USB A Type or RS232 or Combo
Input AC 100~240Vac, 50~60Hz, 1.5A .
DC 12V / 4.2A .
Input AC 100~240Vac, 50~60Hz, 1.5A .
DC 12V / 4.2A .
19” Internal Power
Temperature
Operating
Conditions
Storage Conditions
Stand
Monitor Dimensions (W x H x D)
Carton Dimensions (W x H x D)
Monitor and Stand Weight (Net)
Total Weight
Certifications
Humidity
Altitude
Pressure
Temperature
Humidity
Pressure
Universal 100 ~ 240Vac, 50~60Hz, 1.5A .
input
0 oC ~ 40oC (32oF ~ 104oF) [Note]
20% ~ 80% (no condensation) [Note]
To 10,000 Feet
697~1060 hpa
-20oC ~ 60oC (-4oF ~ 140oF) [Note]
10% ~ 90% (no condensation) [Note]
187~1060 hpa
Tilt down : -5o ~ Tilt up : +90o
351 x 314.5 x 140 mm
15”
392 x 381.5 x 180 mm
17”
438 x 417.5 x180 mm
19”
438 x 460 x 214 mm
15”
452 x 461 x 228 mm
17”
530 x 500 x 230 mm
19”
4.5 Kg
15”
5 Kg
17”
7 Kg
19”
5.2 Kg
15”
7 Kg
17”
9.1 Kg
19”
UL ,C-UL ,FCC ,CE ,TUV
Waterproof & dustproof level
Compliance with IEC60601-1-2 EMC requirement and UL 60601-1
Specifications are subject to change without notice.
22 of 41
IP54 ( Front panel optional )
Page 23

[ Note ]
For quality performance. Please refer the graph below for the corresponding of temperature
and humidity.
23 of 41
Page 24

目录
1. 注意事项 …………………………………………………...……………….. 25
2. VESA架置 ………………………………………………………………… 26
2-1. 15寸液晶显示器VESA架置 ……………………………………………... 26
2-2. 17/19寸液晶显示器VESA架置 …………….…………………………… 27
3. 联邦通讯委员会(FCC)无线电频率国际陈述 ………………………...... 28
4. 中国 RoHS …………………………………………………………………….. 29
5. 包装内容物 ………………………………………………………………… 30
6. 显示器控制 …………………………………………………………………… 31
6-1. OSD 控制按键 ……………………………………………………………. 31
6-2. 快速调整功能 ……………………………………………………………. 31
6-3. I/O Port ………………………………………………………………………………… 32
7. OSD 控制选项 ………………........…………………………………............. 33
8. 触控屏幕安装 ……………………………………………………………… 35
9. 电源管理 ………………………………………………………………………. 36
10. 疑难排解 …………………………………………………………………….. 37
11. 显示模式 ……………………………………………………………………... 38
12. 规格 …………………………………...………………………........................ 39
24 of 41
Page 25

1. 注意事项
注意事项
注意事项注意事项
请阅读以下指示,并保存好以备未来使用之需。
请遵守本产品的所有警告与指示事项。
产品
- 请勿盖住或封阻机壳上的通风口。
- 请勿将尖锐的物体透过机壳开口插入机内,或将液体泼洒进LCD屏幕中。这可能会导致
意外的火灾、电击或故障。
- 如果您不确定将有多长时间不使用本设备,请将电源插头从AC插座上拔下。
- 请勿尝试自行维修本机,因为开启或卸除机盖都可能会使您暴露于危险的电压或其它危
险情况之下。
- 请勿对屏幕施予重压。LCD非常脆弱。
- 请勿使用尖锐或坚硬的物体点击液晶屏幕或触控屏幕。
电源变压器
- AC 输入 100~240Vac, 50~60Hz, DC 输出 12V / 3A (最小).
- 请使用此种类型的电源变压器,它是由生产商针对安全电源的目的所提供的。贴有LPS
标示的电源变压器.
插头
- 请勿拔下显示器三针电源插头的任何一个针。
- 在以下情况下,请将电源插头从AC插座上拔下来:
如果您不确定将有多久时间不使用时。
当电源线或插头损坏或磨损时。
如果在遵守操作指示的情况下,而产品无法正常操作时。请只调整操作指示中
所提到的控件目。错误调整其它控件将会导致损坏,并且可能需要合格技师花
费更多的心力来使产品恢复正常操作状态。
如果产品摔落地面或机壳损坏时。
如果产品在效能上出现明显改变,而表示需要维修时。
电源与延长线
- 请勿将任何物品放置于电源在线。
- 请勿将本产品放置于可能会有人踩踏电线的位置。
- 请使用含有正确连接插头类型的电源线。如果电源为120 V AC,请使用通过UL与C-UL
许可的电源线。如果电源为240 V AC,请使用具有接地导电电源线串接片(T接片)且
符合相关欧洲国家安全法规(例如德国的VDE)的电源插头。
- 请勿使墙上插座或电源线电力过载。请确保所有插到墙壁插座上的设备总电流不超过10
安培。
- 请确保所有插到墙壁插座上的设备总额定电流不超过电线的额定电流。
- 如果您要将显示器随附的电源线插到PC上,而不插到墙壁插座上,本设备必须使用
UL/TÜV许可的240V AC、2.0A(最低)的计算机。
环境
- 请将显示器放置在水平的平面上。
- 请将显示器放置于通风良好地点。
- 请使显示器远离以下地点:过热、过冷或过湿的地点、受到阳光直射的地点、灰尘过多
的地点、会产生强烈电磁场的设备附近。
- 请勿在有易燃物质环境使用。
- 为避免起火或触电,请勿将显示器暴露在下雨或潮湿的环境中。
25 of 41
Page 26

2. VESA架置
安装VESA 架置, 请只使用UL列出的墙壁托架。VESA安装孔螺丝如下:
2-1. 15寸液晶显示器
寸液晶显示器VESA架置
寸液晶显示器寸液晶显示器
75mm
75mm
架置
架置架置
90mm
26 of 41
90mm
Page 27

2-2. 17/19寸液晶显示器
寸液晶显示器VESA架置
寸液晶显示器寸液晶显示器
架置
架置架置
27 of 41
Page 28

联邦通讯委员会
联邦通讯委员会
联邦通讯委员会联邦通讯委员会
3.
本设备经测试证明符合
为居家环境的有害干扰提供合理之保护。本设备会产生、使用及放射无线电频率能源,如果未
依指示安装,将会导致对于无线电通讯之有害干扰。但是,即使在特定的安装方式之下,我们
也不保证干扰情形不会发生。如果本设备确实造成对于广播或电视接收的有害干扰(您可以藉
由开关本设备而测知),我们鼓励使用者尝试以下一或多种方法来改善干扰的情形:
更改接收天线的方向或位置。
•
增加设备与接收天线之间的距离。
•
将本设备连接到与接收天线所连接的电路不同的插座上。
•
向有经验的广播/电视技术人员寻求协助。
•
本装置符合
本装置不可导致有害之干扰
(1)
本装置必须接受所收到的干扰,包括可能导致意外操作之干扰。
(2)
注意
注意::::
注意注意
本设备禁止使用未裹皮接口。
如有必要,使用者应向经销商或有经验的广播/电视技术人员寻求更进一步的建议。联邦通讯
委员会提供以下小册子,也许对您有所帮助。这本小册子由美国政府公共宣传部提供,地址为
U.S. Government Printing Office Washington DC, 20402
制造商不对因未授权修改本设备所导致的任何广播或电视干扰情形负责。使用者必须负责更正
这种干扰情形。
小心
小心 ::::为了符合
小心小心
本数字设备未超过「加拿大通讯部」所订定之「无线电干扰规定」中有关B级数位设备放射无
线电噪声之限制。在居家地区操作可能会对广播及电视讯号接收产生无法接受的干扰情形,而
需要拥有者或操作者采取必要措施来更正干扰情形。
为了符合
为了符合为了符合
规章第15条之规定。操作必须符合以下两项条件:
FCC
FCC
规章第15条有关B级数位装置之限制。这些限制的设计目的是为了
FCC
对于
对于B级计算机装置的限制
级计算机装置的限制,,,,必须使用裹皮缆线
对于对于
级计算机装置的限制级计算机装置的限制
加拿大通讯部一致性陈述
加拿大通讯部一致性陈述
加拿大通讯部一致性陈述加拿大通讯部一致性陈述
(FCC)
无线电频率国际陈述
无线电频率国际陈述
无线电频率国际陈述无线电频率国际陈述
。品号为
必须使用裹皮缆线。。。。
必须使用裹皮缆线必须使用裹皮缆线
004-000-00345-4。
.
28 of 41
Page 29

4. 中国 RoHS
根据中国《电子信息产品污染控制管理办法》, 也称为中国RoHS.
本产品环保使用期限为10年,在正常使用的条件下,不会发生外泄或突
变, 使用该电子信息产品不会对环境造成严重污染或对其人身财产造成严
重损害. 以下列出产品中可能包含的有毒或有害物质的名称.
有 毒 有 害 物 质 或 元 素
多溴联苯
部 件 名 称
电线电缆组件
塑 胶 部 件
金 属 部 件
电 路 模 组
液 晶 面 板
触 控 模 组
镉
六价铬(Cr6+)
(Cd) 汞(Hg) 铅(Pb)
Ο Ο Ο Ο Ο Ο
Ο Ο Ο Ο Ο Ο
Ο Ο Ο Ο Ο Ο
Ο Ο Χ Ο Ο Ο
Ο Χ Χ Ο Ο Ο
Ο Ο Χ Ο Ο Ο
(PBB)
多溴二苯醚
(PBDE)
“ Ο “: 表示该有毒有害物质在该部件所有均质材料中的含量均在SJ/T 11363-2006
规定的限量要求以下.
“ Χ “: 表示该有毒有害物质至少在该部件的某一均质材料中的含量超出SJ/T 11363
-2006规定的限量要求. 对于有显示Χ的情况, 我们按照欧洲RoHS采用了
容许的豁免指标.
本公司鼓励并建议客户将本产品依据所在地的相关法令, 进行回收及再利用, 切勿随意与
一般垃圾丢弃.
29 of 41
Page 30

5. 包装内容物
包装内容物
包装内容物包装内容物
15”/ 17” / 19” TFT液晶显示器 。
D-sub 15针模拟输入讯号缆线 。
DVI 24 针数字输入讯号缆线(选件)。
声音缆线 。
RS232 / USB 触控缆线(选件)。
RCA / S 视频线 。
电源变压器 /电源线 。
触控式屏幕光盘驱动程序 。
使用者手册 。
M4 x 10 毫米VESA 架置螺丝 x 4(选件)。
30 of 41
Page 31

6. 显示器
显示器控制
显示器显示器
控制
控制控制
6-1. OSD 控制按键
1. 电源开关
电源开关 按这个按钮可以打开
电源开关电源开关
2. “▲” 按这个按钮可以打开屏幕上的 OSD 菜单,并且可以用来在屏幕上选择(向上方向)
OSD 控制选项。
3. “▼” 这个按钮可以用来屏幕上选择(向下方向)OSD 控制选项。
4. “++++” 这个按钮可以用来增加所选 OSD 控制选项的值。
5. “0000” 这个按钮可以用来减小所选 OSD 控制选项的值。
6. 电源指示灯开关
控制按键
控制按键控制按键
开关。
开关开关
打开和关闭
关闭系统电源。按着电源开关3 秒关闭显示器.
打开打开
关闭关闭
△BX / BH Serial △VX / VH Serial
6-2. 快速调整功能
快速调整功能
快速调整功能快速调整功能
在 OSD 菜单没有显示时,可以使用以下功能来做快速调整。
按一下 “▲” 按钮会弹出 OSD 功能主菜单。
按一下 ”▼” 按钮会弹出亮度小图标。 使用 ++++或 0000按钮可以调整亮度。
按一下 “++++” 按钮会弹出音量小图标。使用 ++++或 0000按钮可以调整音量。
按一下 “0000” 按钮会弹出输入选择小图标。
按一下 “0000” 按钮执行自动调整. (仅限模拟输入型号) 。
按一下 “0000” 按钮可以切换回数字接口(仅限数字输入型号)。
按一下 “0000” 按钮可以切换输入来源选择(仅限视频输入型号)。
按一下“++++” 按钮,再同时按 “++++” 和 “0000” 按钮会静音。再按一下“++++” 按钮可以恢复声音。
注注注注意意意意:::: 按键锁功能
关,再一次一并按”▼” 按钮可以解锁功能键。
按键锁功能::::按一下 ”▼” 按钮然后再一并按电源开关可以锁定所有功能键.按电源开
按键锁功能按键锁功能
31 of 41
Page 32

6-3. I/O Port
◆◆◆◆标准型号
标准型号:
标准型号标准型号
15”
17” / 19”
◆◆◆◆触控
触控 / 视频输入型号
视频输入型号:
触控触控
视频输入型号视频输入型号
15”
17” / 19”
AC-in
警告
警告 在断开电源线/缆线时,一定要抓住插头部分,而不是电线部分。
警告警告
32 of 41
Page 33

7. OSD 控制选项
控制选项
控制选项控制选项
OSD 菜单
CONTRAST(
使用 “+” 和 “0000”按钮调整对比度。
BRIGHTNESS(
使用 “+” 和 “0000”按钮调整亮度。
VOLUME(
使用 “+” 和 “0000”按钮调整扬声器音量。
AUTO TUNE(
按 “++++”或 “0000” 按钮让液晶显示器自动调整相关参数以取得最佳显示状态。
H – POSITION(
按“++++”右移显示图像,按“0000”左移显示图像。
V – POSITION(
按“++++”上移显示图像,按“0000”下移显示图像。
LANGUAGE(
此项用来选择 OSD 语言。
FREQUENCY(
此项用来减小垂直干扰。
1. 从计算机中选择一个显示图案。
2. 使用液晶显示器上的“+
3.
PHASE(
此项用来减小水平干扰。
1. 从计算机中选择一个显示图案。
2. 使用液晶显示器上的“+
(相位
((
菜单 – 模拟
模拟 OSD菜单
菜单菜单
模拟模拟
(对比度
对比度))))
((
对比度对比度
(亮度
亮度))))
((
亮度亮度
(音量
音量))))(可选模块
((
音量音量
相位))))
相位相位
可选模块)
可选模块可选模块
(自动调谐
自动调谐))))
((
自动调谐自动调谐
(水平位置
水平位置))))
((
水平位置水平位置
(垂直位置
垂直位置))))
((
垂直位置垂直位置
(语言
语言))))
((
语言语言
(频率
频率))))
((
频率频率
+” 和“0
0” 按钮减小垂直干扰最取得最佳显示效果。
++
00
+” 和“0
0” 按钮减小水平干扰最取得最佳显示效果。
++
00
菜单 - 数字
菜单菜单
数字 OSD菜单
数字数字
RED / GREEN / BLUE(
使用“+
+” 和 “0
0”按钮调整颜色增益值(红绿蓝)。
++
00
(红绿蓝
红绿蓝))))
((
红绿蓝红绿蓝
菜单–
菜单菜单
S-视频
视频 / 视频
视频视频
视频
视频视频
33 of 41
Page 34

COLOR TEMP(
此部分用于色温调整。 您可以选择暖、冷或正常,然后按 “+
色温会被恢复出厂默认值。
RECALL(
按 “+
+”或 “0
++
HUE (色度
SHARPNESS (清晰度
SATURATION (饱和度
色度)(仅限于带视频输入功能的型号)
色度色度
使用“+
+” 或 -
++
使用“+
+” 或 -
++
使用“+
+” 或 -
++
(色温
色温))))
((
色温色温
(恢复出厂值
恢复出厂值))))
((
恢复出厂值恢复出厂值
0” 按钮可以恢复所有出厂默认值。
00
- 按钮调整视频图像色度。
--
清晰度)(仅限于带视频输入功能的型号)
清晰度清晰度
- 按钮调整清晰度。
--
饱和度)(仅限于带视频输入功能的型号)
饱和度饱和度
- 按钮调整视频图像饱和度。
--
+”和“0
0” 按钮进行设置。
++
00
34 of 41
Page 35

8. 触控屏幕安装
触控屏幕安装
触控屏幕安装触控屏幕安装
◆ 安装
安装触控屏幕驱动程序
触控屏幕驱动程序
安装安装
触控屏幕驱动程序触控屏幕驱动程序
请依照以下安装步骤完成所有的驱动程序安装:
1. 将驱动程序安装光盘片放入 CD ROM 中。
2. 光盘片中的驱动程序安装程序会自动出现。如果安装程序没有出现,请直接执行光盘片中
的 setup.exe 程序。
3. 请依照安装程序的指示完成所有的驱动程序安装步骤。
4. 当驱动程序安装完毕后,请重新开启计算机。
◆ 移除
移除触控屏幕驱动程序
触控屏幕驱动程序
移除移除
触控屏幕驱动程序触控屏幕驱动程序
请依照以下安装步骤移除所有的驱动程序安装:
1. 请依序按一下[开始],[控制台]及[新增或移除程序]。
2. 选择要变更或移除的触控屏幕驱动程序。
3. 按一下[变更/移除] 或 [移除]按钮,依照移除安装步骤移除所有的驱动程序。
4. 当驱动程序移除完毕后,请重新开启计算机。
35 of 41
Page 36

9. 电源管理
电源管理
电源管理电源管理
一般省电模式
一般省电模式
一般省电模式一般省电模式
模式
模式 电源指示灯颜色
电源指示灯颜色
模式模式
电源指示灯颜色电源指示灯颜色
开启
开启
开启开启
待机
待机
待机待机
暂停
暂停
暂停暂停
关闭
关闭
关闭关闭
我们建议您,当将会长时间不使用显示器时,请关闭显示器电源。
绿色 显示器
橙色 2W (最大)
橙色 2W (最大)
橙色 2W (最大)
显示器+
触控功能
2W (最大) 4W (最大) 4W (最大)
2W (最大) 4W (最大) 4W (最大)
2W (最大) 4W (最大) 4W (最大)
电源消耗
电源消耗
电源消耗电源消耗
显示器+USB+触
控功能
显示器+视频+
触控功能
48W
(最大)
警告 不要
不要拆解显示器。如有需要,请联系经销商。
不要不要
36 of 41
Page 37

10. 疑难排解
疑难排解
疑难排解疑难排解
开启系统电源之后
开启系统电源之后,,,,显示器没有反应
开启系统电源之后开启系统电源之后
• 请检查显示器的电源开关
• 关闭电源后,检查显示器的电源线及讯号缆线是否正确连接。
屏幕上的字符显示偏暗
屏幕上的字符显示偏暗。。。。
屏幕上的字符显示偏暗屏幕上的字符显示偏暗
• 请参考
屏幕无法显示
屏幕无法显示。。。。
屏幕无法显示屏幕无法显示
• 在操作过程中,显示器屏幕会因为使用「省电功能」而自动关闭。请按下任何按键来看
• 请参考
启始屏幕时
启始屏幕时,,,,屏幕会闪烁
启始屏幕时启始屏幕时
• 请关闭屏幕电源,然后再开启一次。
◆ 清洁
请使用骆驼毛镜头清洁刷或干净、无线头的软布来轻擦屏幕。这将可以去除可能刮伤屏
擦式屏幕时,请勿对屏幕表面施予重力。
请勿在屏幕上或LCD屏幕机壳上直接倒洒或喷洒任何液体。已有报导指出,化学清洁剂
控制与调整
看屏幕是否可以恢复显示。
控制与调整
清洁
清洁清洁
幕表面的灰尘及其它粒子。
会损坏屏幕或LCD屏幕机壳。
显示器没有反应。。。。
显示器没有反应显示器没有反应
电源开关是否已经开启
电源开关电源开关
的说明来调整亮度。
的说明来调整亮度。
屏幕会闪烁。。。。
屏幕会闪烁屏幕会闪烁
开启。
开启开启
警告
警告 为避免图像黏附或任何其它不良现象发生, 强烈建议每8小时关闭液晶显示器电源几
警告警告
分钟再开启。
37 of 41
Page 38

显示器
显示器尺寸
显示器显示器
尺寸 分辨率
尺寸尺寸
分辨率 类型
分辨率分辨率
640X350 VGA 31.469 70.087 + / - 25.175
640X400 VGA 31.469 70.087 - /+ 25.175
720X400 VGA 31.469 70.087 - / + 28.322
640X480 VGA 31.469 59.940 - / - 25.175
640X480 VESA72 37.861 72.809 - / - 31.500
640X480 VESA75 37.500 75.000 - / - 31.500
11. 显示模式
显示模式
显示模式显示模式
水平扫描
水平扫描
类型
类型类型
水平扫描水平扫描
(KHz)
垂直扫描
垂直扫描
垂直扫描垂直扫描
(Hz)
Pol.
图素
图素(MHz)
图素图素
15” 17” 19”
17” 19”
800X600 SVGA 37.879 60.317 + / + 40.000
800X600 VESA72 48.077 72.188 + / + 50.000
800X600 VESA75 46.875 75.000 + / + 49.500
1022 X 512
1024X768 VESA60 48.363 60.004 - / - 65.000
1024X768 VESA70 56.476 70.069 - / - 75.000
1024X768 VESA75 60.023 75.029 + / + 78.750
1152X864 VESA 67.5 75.5 + / + 108.0
1280X1024
1280X1024
34.39 60.000 + / + 46.77
VESA 64.3 60.0 + / + 108.0
VESA 80.0 75.0 + / + 135.0
38 of 41
Page 39

12. 规格
规格
规格规格
液晶显示器
液晶显示器 15” / 17” / 19” TFT主动矩阵面板
液晶显示器液晶显示器
面板显示大小
面板显示大小
面板显示大小面板显示大小
面板图素点距
面板图素点距
面板图素点距面板图素点距
面板最大分辨率
面板最大分辨率
面板最大分辨率面板最大分辨率
面板对比率
面板对比率
面板对比率面板对比率
面板亮度
面板亮度
面板亮度面板亮度
面板反应时间
面板反应时间
面板反应时间面板反应时间
15”
17”
19”
15”
17”
19”
15”
17”
19”
15”
17”
19”
15”
17”
19”
15”
17”
304.1(水平) x 228.1 (垂直) 公厘
337.9 (水平)×270.3 (垂直) 公厘
376.3(水平)×301.05(垂直) 公厘
0.297(水平) x 0.297 (垂直) 公厘
0.264(水平) x 0.264 (垂直) 公厘
0.294(水平) x 0.294(垂直) 公厘
XGA 1024 x 768
SXGA 1280 x 1024
SXGA 1280 x 1024
700 : 1(典型)
1000 : 1(典型)
1000 : 1(典型)
225 Cd/m2 [M15] 或 350 Cd/m2 [G15] (典型)
350 Cd/m2 (典型)
350 Cd/m2 (典型)
8 ms (典型)
5 ms (典型)
19”
15”
面板显示色数
面板显示色数
面板显示色数面板显示色数
面板检视角度
面板检视角度
面板检视角度面板检视角度
输入讯号
输入讯号
输入讯号输入讯号
讯号接头
讯号接头
讯号接头讯号接头
随插即用
随插即用 DDC1 / 2B 相容
随插即用随插即用
17”
19”
15”
17”
19”
影像
影像 R.G.B. 模拟0.7V
影像影像
同步
同步 TTL 正或负
同步同步
模拟
模拟 15 针 D-Sub
模拟模拟
数字
数字 (选件
选件)
数字数字
选件选件
5 ms (典型)
16.2M (典型)
16.7M (典型)
16.7M (典型)
140o (L/R), 125o (U/D) (典型)
170o (L/R), 160o (U/D) (典型)
170o (L/R), 160o (U/D) (典型)
24 针 DVI-D
peak-peak
39 of 41
Page 40

声声声声音系统
2, EMC requirement and
音系统 1W / 每声道
音系统音系统
触控屏幕
触控屏幕 (选件
触控屏幕触控屏幕
视频输入
视频输入(选件
视频输入视频输入
电源
电源
电源电源
操作条件
操作条件
操作条件操作条件
储存条件
储存条件
储存条件储存条件
基座
基座 俯角 : -5o ~ 仰角 : +90o
基座基座
显示器尺寸
显示器尺寸((((宽宽宽宽 x 高高高高 x 厚厚厚厚)
显示器尺寸显示器尺寸
显示器包装尺寸
显示器包装尺寸((((宽宽宽宽 x 高高高高 x 厚厚厚厚)
显示器包装尺寸显示器包装尺寸
显示器与基座重量
显示器与基座重量((((净重
显示器与基座重量显示器与基座重量
总重
总重
总重总重
选件)
选件选件
选件)
选件选件
15” 电源变压器
电源变压器
电源变压器电源变压器
17” 电源变压器
电源变压器
电源变压器电源变压器
19” 内嵌
内嵌电源
电源
内嵌内嵌
电源电源
温度
温度
温度温度
湿度
湿度
湿度湿度
高度
高度 至 10,000英尺
高度高度
大气压力
大气压力
大气压力大气压力
温度
温度
温度温度
湿度
湿度
湿度湿度
大气压力
大气压力
大气压力大气压力
净重))))
净重净重
USB A 类型 or RS232
RCA , S 视频
AC 输入 100~240Vac, 50~60Hz, 1.5A . DC 输
出 12V / 4.2A .
AC 输入 100~240Vac, 50~60Hz, 1.5A . DC 输
出 12V / 4.2A .
通用 100 ~ 240Vac, 50~60Hz, 1.5A . AC 输入
0 oC ~ 40oC (32oF ~ 104oF) [注释]
20% ~ 80% (非凝结状态) [注释]
697~1060 hpa
-20oC ~ 60oC (-4oF ~ 140oF) [注释]
10% ~ 90% (非凝结状态) [注释]
187~1060 hpa
351 x 314.5 x 140 公厘
15”
392 x 381.5 x 180 公厘
17”
438 x 417.5 x180 公厘
19”
438 x 460 x 214 公厘
15”
452 x 461 x 228 公厘
17”
530 x 500 x 230 公厘
19”
4.5 公斤
15”
5 公斤
17”
7 公斤
19”
5.2 公斤
15”
7 公斤
17”
9.1 公斤
19”
UL, C-UL, FCC, CE ,TUV
认证
认证
认证认证
IP54 ( 选件 )
Compliance with IEC60601-1-
UL 60601-1
˙ 规格变更不另行通知
40 of 41
Page 41

[ 注释
注释 ]
注释注释
为得到高性能质量,请参考下列温度和湿度的相应图。
41 of 41
 Loading...