


Instruction Manual
Sandwich Press
/GVASP4

1
Important Safety and General Instructions
Please keep this user manual in a safe place along with your purchase receipt and
carton for future reference. The safety precautions enclosed herein reduce the
risk of fire, electric shock and injury when correctly adhered to.
1. Read all instructions before using the Sandwich Press.
2. DO NOT touch hot surfaces. The temperature of the outer surface can get
very hot while the Sandwich Press is in operation. DO NOT touch any
other surface except for the products handles only.
3. DO NOT use the Sandwich Press for other than its intended use.
4. Ensure that you position the Sandwich Press in a location which is
inaccessible by children, to ensure your child’s safety.
5. Before turning on, ensure the electrical voltage and frequency of the
circuit corresponds to those indicated on the rating label of the appliance.
6. To protect against the risk of electric shock, do not immerse this Sandwich
Press, cord set or plug in water or any other liquid.
7. The Sandwich Press is not intended to be operated by means of an
external timer or any type of separate remote control system.
8. This appliance is designed for indoor use only. DO NOT use outdoors.
9. DO NOT use an extension cord unless completely necessary with this
product. If an extension cord is used please ensure that it has a rating
equal or exceeding the rating of this appliance.
10. DO NOT pull or carry by cord, use cord as a handle, close a door on the
cord, or pull cord around sharp edges or corners. Keep cord away from
heated surfaces.
11. DO NOT bend or damage the power cord.

2
12. Always unplug the Sandwich Press when not in use. To disconnect from
the power supply, grip the plug and pull from the power socket. Never
pull by the cord. The power plug must be removed from the power socket
before cleaning, servicing, maintenance or moving the Sandwich Press
13. Never force the plug into an outlet.
14. DO NOT place the appliance near a hot gas or electric burner.
15. DO NOT cover the appliance whilst in use. If it is covered there is a risk of
fire.
16. Improper installation may result in the risk of fire, electric shock and/or
injury to persons.
17. If the supply cord or plug is damaged, DO NOT use the appliance. Please
return to your place of purchase along with your receipt for a refund or
exchange.
18. The manufacturer or retailer is not responsible for any eventual damages
caused by improper or faulty use.
19. The unit has no user-serviceable parts contained within. Do not attempt
to repair, disassemble or modify the appliance.
20. Always operate on a dry level surface. Operating on sinks or uneven
surfaces must be avoided.
21. DO NOT clean with metal scouring pads.
22. This product is designed for domestic use only and not for commercial
purposes.
23. The Sandwich Press is best located on a heat proof surface or mat.
24. Do not locate this unit directly under a cupboard or in an area with a low
ceiling as this may cause heat build-up.
25. Never use any utensil which may scratch the non-stick coating.
3
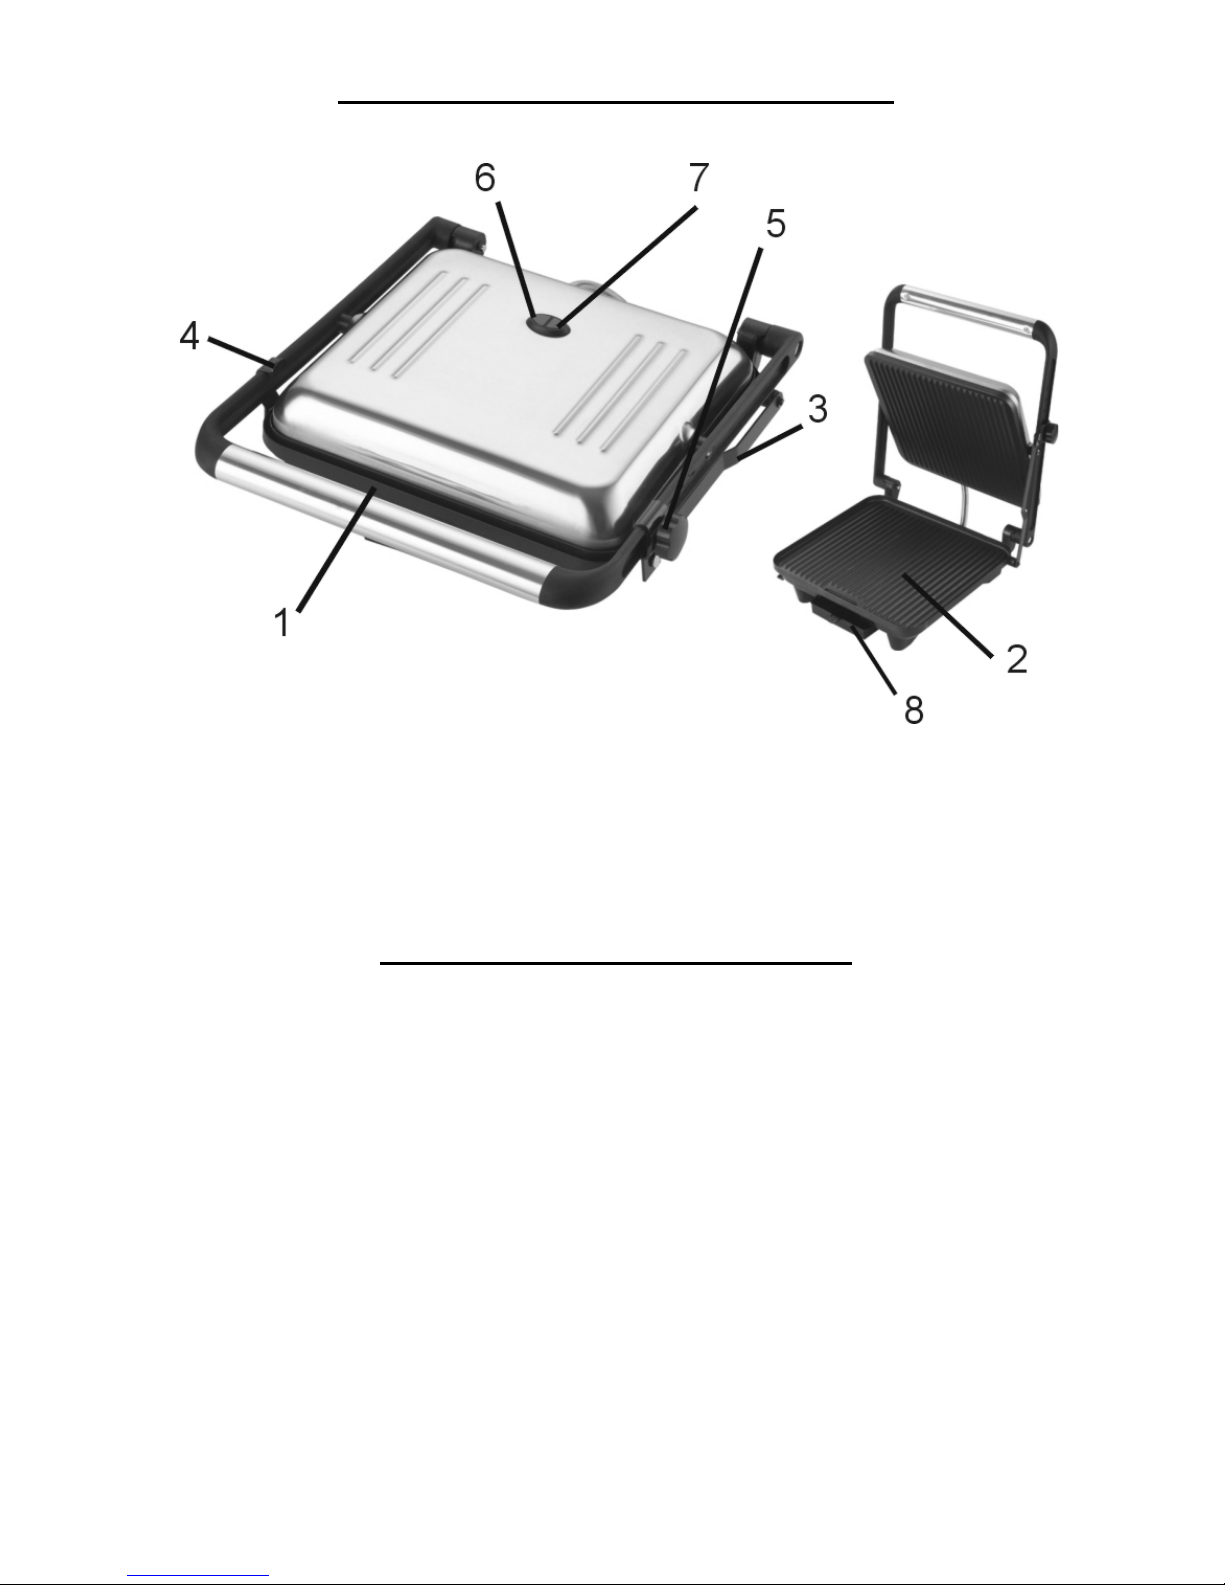
Understanding your Sandwich Press
1. Top Grilling Plate
2. Bottom Grilling Plate
3. Floating Hinge
4. Locking Clip
5. Top Plate Adjustment Knob
6. Power Indicator Light
7. Ready Indicator Light
8. Drip Tray
Before Using for the First Time
1) Ensure all packaging, labels and accessories have been removed from the unit
2) Position the Sandwich Press in a well-ventilated area, on a stable and level
surface. Ensure that the surface is heat resistant and/or place the Press on a
heatproof mat. Ensure that flammable materials and curtains are not in the
vicinity of the Sandwich Press.
3) Thoroughly clean both cooking plates using a soft damp cloth and wipe dry
with a towel.
4) It is recommended that you lightly wipe the cooking plates with cooking oil
when the unit is heated for the first time. This will help cure and protect the
nonstick cooking plates.

4
5) When connecting the Sandwich Press to the power outlet, ensure that the
Sandwich Press is closed. The Power indicator light will illuminate red to let
you know that the unit is switched on. The ready indicator light will illuminate
green when the Press is ready to use. The ready indicator light will turn on and
off as the thermostat regulates the temperature.
6) Allow the ready light to turn on and off several times, and then switch the
power off and disconnect the power cable. Allow the plates to cool then wipe
off with a damp soft cloth. Your Sandwich Press is now ready for general use.
Using your Sandwich Press
1) Connect your Sandwich Press to the power outlet. Ensure that the plates are
closed. The Power indicator light will illuminate red.
2) The ‘Ready’ light will illuminate green when the Sandwich Press has reached
the correct cooking temperature.
3) ‘Open’ the plates by gripping the top handle and lifting (ensuring that the
plates are not locked with the locking clip (4) on diagram on previous page).
4) Place the Sandwich on the bottom plate and lower the top plate (for best
results butter the outside of the bread, not the inside). The floating hinge
design of the plate will automatically adjust to the thickness of the sandwich
and will gradually and evenly press the sandwich. You can also position the
top plate at a pre-determined height of your choice. Adjust the height of the
top plate and tighten the Adjustment Knob (No. 5 on the diagram found on
page 4) to select the desired height.
5) Do not lock the locking clip during this process as the clip is for storage ONLY.
6) Cooking time will depend on the thickness, content of the sandwich and the
type of bread used. Cook sandwich until it has been browned to your liking.
Check by lifting the top plate – do this by lifting the top plate handle.
NOTE: Most parts of the press will be HOT during the cooking process. DO
NOT TOUCH ANY OTHER PART OF THE PRESS OTHER THAN THE HANDLE.

5
7) When the sandwich has finished cooking, raise the top plate by raising the
handle and remove the sandwich with a plastic, wooden or silicone spatula.
Warning: Never use any utensil which may scratch the non-stick coating
Cleaning your Sandwich Press
1. Before cleaning, unplug the unit and allow it to cool.
2. Never place the unit in water or under running water. DO NOT ALLOW ANY
WATER TO ENTER THE UNIT.
3. To clean the outside of the Sandwich Press, use a damp cloth and dry carefully
with a soft dry cloth.
4. To clean the plates, use a sponge that has been dampened in a weak solution
of dishwashing detergent and water. Wipe clean with a sponge or a cloth
dampened in water only, and dry carefully.
5. If you experience stubborn build up on the plates use a nonmetallic scrubber
pad and gently wipe clean. You may also apply a little cooking oil to the
cooking plate and reheat for approximately 2 minutes and then allow the
plate to cool. This will soften any hard build up so you can clean off easier.
6. Never use a scouring pad, steel wool, cleaning powder, solvents or abrasives
as this may scratch or ruin the non-stick surface.
7. If you are cleaning the unit whilst open, ensure you steady the top plate by
holding the handle.
Storing the Appliance
1. Before storing, ensure the unit has been unplugged, cooled and cleaned.
2. Close the top plate and secure the locking clip to hold the plates closed
3. Store the product in a clean and dry place in a vertical position.

6
Warning: This appliance gets extremely hot during operation and should be
handled with care. Never put flammable objects on or near the Sandwich Press
as they could set alight.
NOTE: There are no serviceable parts in this appliance. If you appliance is not
functioning correctly, ensure that you have followed all instructions correctly
and that power is correctly being supplied to the unit. If the appliance still fails
to work, please return it to your place of purchase along with the receipt and
packaging.
The manufacturer or retailer is not responsible for any eventual damages caused
by improper or faulty use.
 Loading...