


/ Beverage Refrigerator
/
GVA60

Contents
Guide to the Appliance
Caring for the Environment
3
Safety Information and Warnings
Getting Started
7
Basic Set Up
9
Reversing the Door Swing
10
Troubleshooting
11
Care and Maintenance
13
4
2
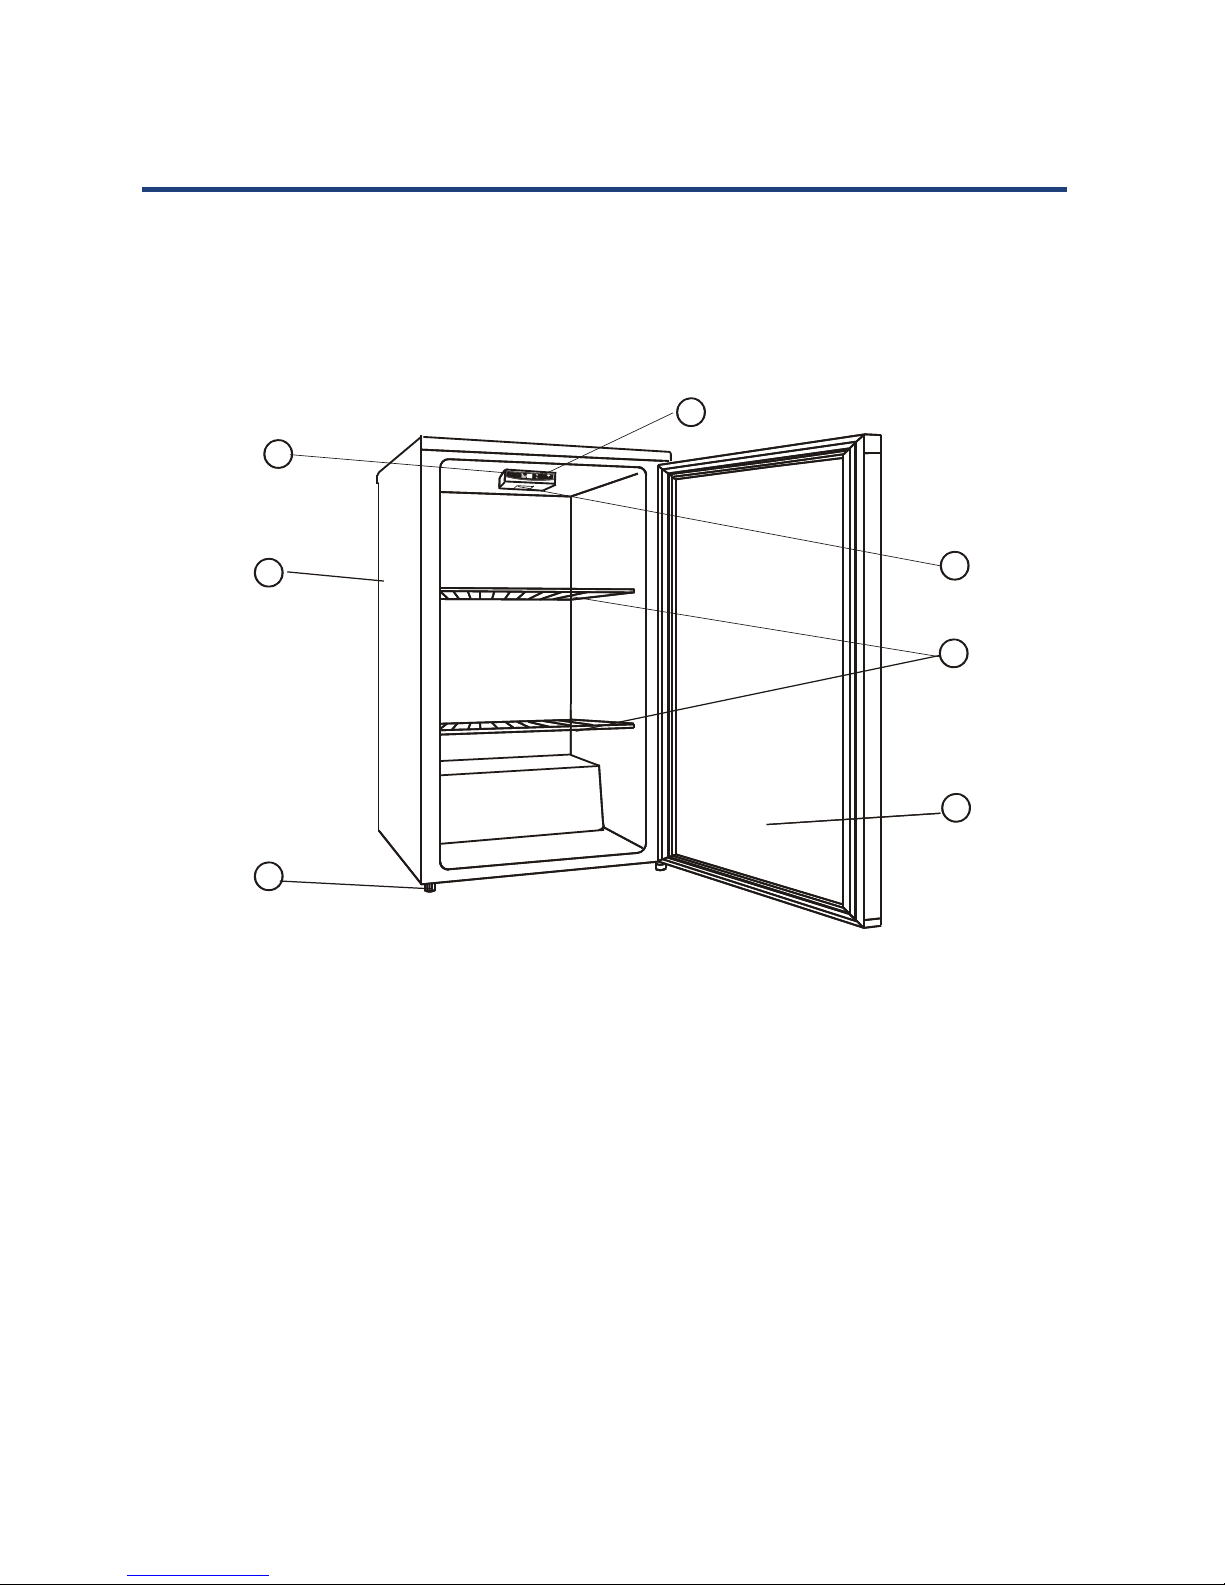
Guide to the Appliance
NOTE: Due to production improvements, the unit you purchased may vary slightly
from the below sketch.
1
2
3
4
5
6
7
7. THERMOSTAT KNOB
6. INTERIOR LAMP
5.
SHELVES
4. GLASS DOOR
3. LEVELLING LEGS
2. CABINET
1. LAMP SWITCH

3
Responsible disposal of the packaging
At the end of its working life, do not throw this appliance out with your household rubbish.
Electrical and electronic appliances contain materials and substances which, if handled or
disposed of incorrectly, could be potentially hazardous on the environment and human
health.
Observe any local regulations regarding the disposal of electrical consumer goods and
dispose of it appropriately for recycling and recovery of the refrigerant. This appliance
contains the flammable refrigerant isobutane (R600a) and cyclopentane (R141b) in the
cabinet insulation, and must be disposed of in a separate waste collection. Contact your
local authorities for advice on recycling facilities in your area.
Take care not to damage the pipework at the back of the appliance before or during
transportation so that the refrigerant gas cannot escape.
The plug must be rendered useless and the cable cut off directly behind the appliance or
the machine to prevent misuse.
DANGER. Risk of child entrapment: When discarding a fridge or freezer, make sure to take
off the door and the spring action or bolt catch. Leave the shelves in place so that children
cannot easily climb in, get trapped inside and suffocate.
Caring for the Environment
The packaging of your appliance has been selected from environmentally friendly materials
and can usually be recycled. Please ensure these are disposed of correctly.
Plastic wrapping can be a suffocation hazard for babies and young children, please ensure
all packaging materials are out of reach and are safely disposed of. Please ensure they are
offered for recycling rather than throwing these materials away.
Responsible disposal of the appliance

DANGER means that failure to read this safety statement may result in severe personal
injury.
WARNING means that failure to read this safety statement may result in extensive product
damage or serious personal injury.
CAUTION means that failure to read this safety statement may result in minor or moderate
personal injury, property or equipment damage.
Safety Information and Warnings
This symbol alerts you to take care as the appliance contains a
flammable refrigerant. Do not expose it to high heat, sparks or open
ames.
Pay particular attention to safety messages that follow this safety alert
symbol or the words DANGER, WARNING or CAUTION. These words are
used to alert you to a potential hazard that can seriously injure you and
others.
The instructions will tell you how to reduce the chance of injury and let
you know what can happen if the instructions are not followed.
Read this manual thoroughly before rst use, even if you are familiar with this type of
pr
oduct. We have provided many important safety statements in this manual concerning the
use of this appliance. Always read and observe all safety statements. They reduce the risk of
fire, electric shock and injury when correctly adhered to.
Keep the manual in a safe place for future reference, along with the purchase receipt.
If applicable, pass these instructions on to the next owner of the appliance.
We assume no liability for any eventual damages caused by misuse of the appliance
or non-compliance with the instructions in this manual.
CAUTION:
Flammable Gas
4

Safety Information and Warnings
Installation
Heavy: This appliance is heavy, take care when moving it. To avoid back or other injury,
consider a two person lift or mechanical aid when installing it.
Location: The room for installing appliance must be at least 1M³per 8g of refrigerant. The
amount and type of refrigerant in the appliance can be found on the rating plate on the
back of the appliance.
Moisture: Install the refrigerator in an indoor area protected from wind, rain, water spray or
drips.
Heat: Do not install it next to an oven, grill or other source of high heat.
Ventilation: To ensure proper ventilation, the front of the unit must be completely
unobstructed. Keep any ventilation openings clear of obstructions. Choose a well
ventilated area with temperatures above 16˚C and below 32˚C.
Refrigerant circuit: Do not damage the refrigerant circuit.
Level: Install the appliance on a level surface or adjust the feet to level the unit and ensure
proper operation.
Pipes: Make certain that the pipes are not pinched, kinked or damaged during installations.
Check for leaks after connection.
Electrical safety
Voltage: Make sure your outlet voltage and circuit frequency correspond to the voltage
stated on the appliance rating label. Plug the refrigerator into a 220-240V, 50Hz, 3-prong,
power outlet with a 15A fuse at the mains. The outlet must be properly earthed to the
ground.
Separate circuit: Do not use an adaptor; do not use an extension cord. We recommend you
connect the refrigerator to a separate circuit serving only this appliance. This provides the
best performance and prevents overloading the house wiring circuits that could cause a fire
hazard from overheating. Use a power point that cannot easily be turned off accidentally.
Power cord: Do not kink or damage the power cord. Do not leave it exposed or dangling.
Secure it behind the unit so no one steps on or places anything on the cord or against it.
Never unplug the unit by pulling the cord. Always grip the plug firmly and pull straight out
from the power point.
Damaged cord: Do not use a cord that shows cracks or abrasion damage along its length
or at either end. If the power cord is damaged, it must be replaced by the manufacturer or
its service agent. Contact the after sales support line to have it replaced.
Electrical work: If the installation of this appliance requires any electrical work, make sure it
is carried out by a qualified electrician.
5

Safety Information and Warnings
Usage conditions and restrictions
Indoor domestic use only: This appliance is intended for indoor household use only. It is
not suitable for commercial, industrial or outdoor use.
Intended purpose: Do not use this appliance for anything other than its intended purpose
and only use it as described in this manual. Do not attempt to alter or modify this appliance
in any way.
Electrical type appliances: Do not use any such appliances inside the food storage compartments of the appliance, unless they are specifically recommended in this manual.
Usage restrictions: The appliance is not intended for use by persons (including children) with
reduced physical,
sensory or mental capabilities, or lack of experience and knowledge, unless
they have been given supervision or instruction concerning use of the appliance by a person
responsible for their safety.
Children: Supervise children to ensure they do not play with the refrigerator. Never allow
children to operate, play with or crawl inside the refrigerator.
Cleaning and maintenance
Disconnect: Unplug the refrigerator or disconnect power before cleaning or servicing
Failure to do so can result in electrical shock, injury or death. Do not connect or disconnect
the electric plug when your hands are wet.
Flames: Do not let open ames or ignition sources enter the appliance.
Flammable/explosive substances: Never clean this appliance with flammable fluids. Do
not store or use volatile, flammable or explosive propellants or liquids close to this or any
other appliance. The fumes can create a fire hazard or explosion caused by electric sparks.
Solvents: Do not use solvent based cleaning agents or abrasives on the interior. These
cleaners may damage or discolour the interior.
Defrosting aids: Do not use mechanical devices, steam cleaners or other means to
accelerate the defrosting process. Never use a sharp or metal instrument to remove frost as
it may damage the cooling system and will void the warranty. We recommend using a
plastic scraper.
Service: Do not attempt to repair or replace any part of the refrigerator unless it is
specifically recommended in this manual. Refer all other servicing to a qualified technician,
or contact the after sales support line for advice on repair or replacement. It is hazardous
for anyone other than an Authorised Service Person to service this appliance. In
Queensland - the authorized Service Person MUST hold a Gas Work Authorisation for
hydrocarbon refrigerants, to carry out Servicing or repairs which involve the removal of
covers.
6

7
Getting Started
Before rst use
• Unpack the appliance but keep all packaging materials until you have made sure your new
refrigerator is undamaged and in good working order.
• Plastic wrapping can be a suocation hazard for babies and young children, so ensure all
packaging materials are out of their reach.
•
Check to ensure you have all the parts listed on the 'Guide to the Appliance' page, plus
aninstruction manual and a warranty certificate.
•
Read this manual to familiarise yourself with all the parts. Pay particular attention to the
safety instructions on the previous pages.
•
Unwind the cord to its full length and inspect it for damage. Do not use the appliance if
the appliance or its cord have been damaged. In case of damage, contact our after sales
support line for advice on examination, repair or return of the damaged product.
•
Make sure the refrigerator is disconnected from the power supply before cleaning the
interior surfaces with lukewarm water using a soft cloth to remove any dust from transit
and storage. Dry the appliance thoroughly.
•
Your
refrigerator has the capability of the door opening from the right or left side. If your
setup requires reversal of the door swing, follow
the
instructions
on page 10.
•
Your new beverage fridge is now ready for use – see page 9 for set up instructions.
Installing the refrigerator
•
Before installing your new upright beverage fridge, read all safety instructions in this manual,
especially the sections on electrical safety and installation. Then follow the instructions below.
• This appliance is designed to be freestanding only and should not be recessed or built in.
•
Place the beverage fridge on a sturdy, level floor that is strong enough to support the unit
when it is fully loaded.
•
DO NOT install the appliance directly on carpeting or soft material. Carpeting must be
removed or protected by a metal or wood panel beneath the appliance, which extends at
least the full width and depth of the appliance.
NOTE: Ensure that the appliance does not stand on the electrical supply cable. Parts which
heat up should not be exposed. Whenever possible, the back of the appliance should be
close to a wall but leaving the required distance for ventilation.
Overloading the beverage center will affect cold air circulation and cooling
performance. We therefore recommend you only load the beverage center up to
about 70% of its storage volume, always leave some space around food stored and
do not use containers that are too large and block ventilation openings.

8
•
Locate the beverage fridge
• Away from direct sunlight, which may aect the acrylic coating.
•
Away from sources of heat (stove, heater, radiator, dishwasher, etc.), which may increase
power consumption.
•
In an area without extreme cold ambient temperatures, which may affect cooling
performance.
• In a cool, well ventilated area, without excessive moisture and high humidity.
•
Installing the unit in the coolest area of the room will save energy consumption and
running costs.
•
To ensure correct operation, this appliance must not be located where the temperature
will be below 16°C or above 32°C.
• Ensure there are no obstructions that could prevent the refrigerator door from closing.
• To level the unit, adjust the levelling legs at the bottom of the unit.
•
The beverage fridge must have at least 50mm clearance between the rear of the
appliance and the wall, 100mm between the sides and wall, and the space above the top
should be at least 100mm. Ensure that there is enough spacing to open the door to 160°.
•
Before plugging in your new beverage fridge, let it stand upright for approximately
2 hours. This will allow the refrigerant gases to settle into the compressor and reduce the
possibility of a malfunction in the cooling system from handling during transportation.
• The beverage fridge is suitable for connection to 220-240VAC 50Hz supply. The refrigerator
must be plugged into a dedicated individual 220-240VAC main socket outlet.
• Plug the unit into an exclusive, properly installed and earthed wall outlet. Do not under
any circumstances cut or remove the third (ground) prong from the power cord. If in doubt
about your setup, direct any questions concerning power and/or grounding to a certied
electrician.
• Do not use an extension cord or an adapter plug.
•
Secure the unit's supply cord behind the unit. Do not leave it exposed or dangling to
prevent injury and accidental disconnection from the power supply.
NOTE: After plugging the appliance into a wall outlet, allow the unit to cool down for 2 to 3
hours before placing food in the refrigerator compartment.
Getting Started

9
Basic Set Up
It is recommended you install the beverage center in a place where the ambient
temperature is between 22 -25 degree Celsius. If the ambient temperature
is above of below the recommended temperature, conditions may cause interior
temperature to fluctuate.
Operating your beverage centre
How to use the Thermostat
The above temperatures may fluctuate depending on whether the bottles are located on
the lower/middle or lower section of the appliance and if the interior light is turned on
or off.
If the interior light is left on, the temperature inside the beverage fridge will be higher.
Recommended Temperatures for chilling beverages.
WARM
NORMAL
COLD
OFF
7-9 CWarmer beverage
Colder beverage
3-6 C
To adjust the temperature of the wine cooler, turn
the thermostat knob. Turn the thermostat knob
clockwise for a cooler temperature, for a warmer
setting turn the thermostat knob anti-clockwise.

10
Reversing the Door Swing
This beverage fridge can be opened from either the left side (as supplied) or right side to suit
your i
ndividual installation requirements. If you want to open the door from the right side,
follow the instructions below and opposite to reverse the door swing (the numbers in
brackets refer to the parts in the illustrations).
WARNING! Ensure the beverage fridge is disconnected from the power supply when reversing
door swing.
NOTE: Keep all parts you remove for re-installation of the door on the other side.
1. Remove the upper hinge cover (6)
2. Remove the two screws (1) that hold the upper hinge (5) (right side) from the frame.
Take o the upper hinge (5).
3. Lift the door and place it on a padded surface to prevent scratching.
4. Remove the two screws (8) that hold the lower hinge (2). Remove the lower hinge (2).
If there is originally a washer on the hinge pin, it must remain there while reversing the
door.
5. If necessary, remove the front levelling legs (4) when reversing the lower hinge and
remember to install them after reversing.
6. Remove the plug buttons (7) from the holes and place to the right side.
7. Set the door in place, make sure it sits on the door seat at the lower hinge (2).
8. While holding the door in the closed position secure the upper hinge (5) on the top
left hand side with the two screws (1). Do not tighten the two screws (1) until the door
is well aligned with the cabinet. Adjust the lower hinge (2) as well if necessary when
aligning the door.
9. Install the upper hinge cover (7) back onto the upper hinge.

11
Troubleshooting
Problem Possible cause
The beverage fridge does not
operate.
• It is not plugged in. Ensure it is properly plugged in and
there is power at the socket (plug another appliance into
the outlet to check).
• The circuit breaker tripped or has blown a fuse.
• The beverage fridge temperature control is set to OFF.
• A general power outage has cut power to your home
(check the household lights).
The beverage fridge
temperature is not cool
enough.
• The room temperature is hotter than normal.
• A large number of beverages have been added at once.
• The door is opened too often.
• The door is not closed completely.
• The temperature control is not set correctly.
• The door gasket does not seal properly.
There are vibrations. • The beverage fridge is not level.
The beverage fridge
seems to make too
much noise.
• A rattling noise may come from the ow of the
refrigerant, which is normal. A popping and crackling
noise may be caused by the contraction and expansion
of the inside walls.
• The beverage fridge is not level, or is touching other
furniture.
• Bottles or packages inside the fridge are touching each
other.
The door will not close
properly.
• The beverage fridge is not level.
• The door was reversed and is not properly installed.
• The gasket is dirty or bent.
• The shelves, racks or crisper are out of position.
The beverage fridge door
will not open.
• If the door has just been opened, leave it for a few
minutes to allow the air pressure to equalise before
trying again.
Moisture forms on the inside
or outside walls of the
beverage fridge.
• Hot and humid weather increases the internal rate of
frost build-up. This is normal.
• Open the door less often and make sure it is always
properly closed.
If you experience a problem with your beverage fridge, check in the following table for
solutions to help you solve the problem. If after these checks you still have a problem with
your beverage fridge, call the after sales support line for advice.

12
Troubleshooting
Th
e external beverage fridge
surface is warm.
• The exterior walls can be warmer than room
temperature. This is normal while the compressor works
to transfer heat from inside the beverage center cabinet.
Excessive frost and ice has
built up.
•
The beverage fridge door has been left open.
• Something is preventing the door from closing.
• The door gasket is dirty or damaged.
•
Make sure to defrost the fridge
center regularly.
The compressor runs
continuously.
• The temperature is set too cold: select a lower (warmer)
setting.
• The door is open, or something is obstructing proper
door closure.
• The door gaskets are worn, dirty or damaged.
•
Large quantity of beverages ha
s been added to
the beverage fridge.
• The room temperature is hotter than usual.

13
Care and Maintenance
NOTE: All parts removed must be saved to do the replacement of the light bulb.
Before removing the light bulb, either unplug the refrigerator or disconnect the electricity
leading into the refrigerator, failure to do so could result in electrical shock or personal injury.
Cleaning the CFWFSBHFDFOUFS
•
Unplug the beverage fridge, and remove the bottles.
• Wash the inside with a warm water and baking soda solution. The solution should be
about 2 tablespoons of baking soda to a litre of water.
•
Wash the shelves and trays with a mild detergent solution.
• The outside of the beverage fridge should be cleaned with mild detergent and
warm water.
•
It may also be necessary to periodically wipe the bottom part of the storage area, as
the beverage fridge is designed to retain humidity and condensation may collect in
this area.
Power failure
Most power failures are corrected within a few hours and should not affect the temperature of
your beverage fridge if you minimize the number of times the door is opened. If the power is
going to be off for a longer period of time, you need to take the proper steps to protect your
contents.
Defrosting the beverage centre
When? For the most efficient operation and minimum energy consumption, defrost the
appliance when the frost accumulated on the evaporator is about 5mm thick.
How? Turn the thermostat dial to the [0] position and unplug the appliance. Remove
beverages from the appliance and keep them in another fridge or cooler bag.
Defrosting usually takes a few hours. After defrosting, dry the inside of the appliance
and return the thermostat dial to the desired position.
To defrost quickly, remove all beverages from the appliance and leave the door open.
CAUTION: D
o not use boiling water because it may damage the plastic parts. Never use a
sharp or metallic instrument to remove frost as it may damage the cooling system. Use a
plastic scraper, if required.
Changing the light bulb

14
Care and Ma
intenance
Energy saving tips
• Place the beverage fridge in the coolest area of the room, away from heat-producing
appliances and out of direct sunlight.
•
Do not line any beverage fridge storage bin with aluminum foil, wax paper or paper
towels. Liners interfere with cold air circulation, reducing cooling efficiency.
• Do not leave the beverage fridge door open for longer than required.
Moving the CFWFSBHFf ridge
• Remove all the bottles.
•
Securely tape down all loose items inside your beverage fridge.
• Turn the levelling screws up to the base to avoid damage.
• Tape the doors shut.
• Be sure the beverage fridge stays in the upright position during transportation.
7BDBUJPO5JNF
During long absences, remove all the bottles; unplug your beverage fridge, clean your
beverage center, and leave the door open slightly to avoid possible formation of condensation,
mold or o
dours

M.E.W (Australia) Pty Ltd
15 Vaughan St
Essendon Fields VIC 3041
ACN 152 719 036
www.gvaproducts.com.au
 Loading...