


Instruction Manual
39” (99cm) FHD LED LCD TV
/ GVA39FDLED

Contents
Preface 3
Safety Precautions 3
In the carton 5
Front Back Connections of LED 6
TV Installation Drawings 7
Power Cord Connection 7
Antennas Connection 7
HDMI Connection 8
VGA Connection 8
USB Connection 9
AV Connection 10
YPbPr Connection 10
Remote Control 11
Remote Control Instructions in TV/Media mode 11
Remote Control Setup 13
Menu Operation 14
Installation Guide 14
CHANNEL Menu 14
PICTURE Menu 17
SOUND Menu 19
TIME Menu 20
OPTION Menu 21
LOCK Menu 22
Hotel Setting 23
Input Source 24
EPG and Channel List Menu 25
Multimedia (Media) Menu 26
PVR Menu 32
Troubleshooting and Advise 38
Specications 39

3
Preface
Safety Precautions
Thank you for buying this TV ! Please read this manual thoroughly before operating the TV.
Make sure the TV was not damaged in transit. Should the TV is damaged, do no install it and
contact your dealer. Check that you have all the accessories according to the model.
1.PREFACE
Thank you for buyi ng this TV ! Please rea d this manual thoroughly before operating the TV. Make
sure the TV was not damaged in transit. S hould the TV is damag ed, do no ins tall it and contact
your dealer. Check that you ha ve all the accessories according to the model.
2.SAFETY PRECAUTIONS
Power cord and cables must be p roperly routed and protected to prevent
people from step ping on them and causing the TV to fall.
Put the TV on a stable surface.
Do not place any mat erial on the TV.
Do not block or cove r the ventilation openings on the
If you have a wall mou nt, check that it is steady.
TV.
Min imum dis tance s
10c m
20c m
10c m 5cm
Do not use the TV with fixtures other than those provided or
suggested by the m anufacturer.
Keep the TV dry and away from humidity.
Put the TV on stable surface.
Do not place any material on the TV.
Do not use the TV with xtures other than those provided or
suggested by the manufacturer.
Do not block or cover the ventilation openings on the
If you have a wall mount, check that it is steady.
TV.
Power cord and cables must be properly routed and protected to
prevent people from stepping on them and causing the TV to fall.
Keep the TV dry and away from humidity.

4
Keep the TV away from heat s ou rc es .
Unplug t he before c le an in g it . Do n ot u se solvent or liquid
clean th e TV.
TV to
Only cle an t he TV with a sof t an d dr y cl ot h.
Unplug t he TV during l ig ht en in g st or ms or when unused for lon g
period s of t im e.
In case of t ro ub le sh oo ti ng, do not use spare part s ot he r th an
those su gg es te d by t he m an ufacturer. Using ina de qu at e sp ar e
parts ca n le ad t o el ec tr ic s hocks, short-circ ui ts f ir e or o th er
incide nt s.
Keep the TV away from heat sources.
Unplug the before cleaning it. Do not use solvent or liquid to
clean the TV. Only clean the TV with a soft and dry cloth.
In case of troubleshooting, do not use spare parts other than
those suggested by the manufacturer. Using inadequate spare
parts can lead to electric shocks, short-circuits re or other
incidents.
Unplug the TV during lightening storms or when unused for long
periods of time.
1. Where the MAINS plug or an appliance coupler is used as the disconnect device, the
disconnect device shall remain readily operable;
2. A warning that batteries (battery pack or batteries installed) shall not be exposed to
excessive heat such as sunshine, re or the like.
3. A warning that an apparatus with CLASS I construction shall be connected to a MAINS
socket outlet with a protective earthing connection.
IMPORTANT INFORMATION
• If a television is not positioned in a suciently stable location, it can be potentially
hazardous due to falling. Many injuries, particularly to children, can be avoided by
taking simple precautions such as:
• Using cabinets or stands recommended by the manufacturer of the television.
• Only using furniture that can safely support the television.
• Ensuring the television is not overhanging the edge of the supporting furniture.
• Not placing the television on tall furniture (for example, cupboards or bookcases)
without anchoring both the furniture and the television to a suitable support.
• Not standing the televisions on cloth or other materials placed between the television
and supporting furniture.
• Educating children about the dangers of climbing on furniture to reach the television or
its controls.
Safety Precautions

5
In the carton
3. IN THE CARTON
TV SET Remote Control
3. IN THE CARTON
Remote Control
1.5V
1.5V
TV SET
Adaptor & Power Cord AAA Batteries
Remote Control
1.5V
1.5V
AAA Batteries
TV SET
USER'S MANUAL
Adapter & Power Cord
User’s Manual

6
Front & Back Connections of LED
Front View
(Picture are for reference only.)
(The sample is subject to the real product.)
4. FRONT & BACK CONNECTIONS OF LED
F
ront View
1. Press“VOL+” to increase the sound level.
2. Press “VOL - ”to decrease the sound level.
3. Press“CH+” to change channels .
4. Press“CH - ”to change channels.
5. Press“MENU” to bring up the main menu on the screen.
6. Press “SOURCE” to select the input source.
7. Press “POWER” button to turn standby mode on or o.
Back View and Control Connections
4. FRONT & BACK CONNECTIONS OF LED
Back View and Contr ol Connections
1.
Press“SOURCE”to sel ect the input source .
2.
Press “MENU”to bring u p the m ain menu on the screen.
3. Press“CH+” .
4.
Press“VOL+” to increase or decre ase the sound level.
Press “VOL-”to increase o r decrease the sound level.
5.
Press“POWER” butto n to turn standby mode on or of f.
6.
7.
to change channel s
Press “CH-” .to change channel s
F
ront View
1 2
3
4
5
6 7 8 10
9
HEADPHONE HDMI 1 HDMI 2 HDMI 3 USBTV antenna VGA YPbPR AV & AUDIOPC AUDIO
1. HEADPHONE output terminal.
2. HDMI 1 input terminal.
3. HDMI 2 input terminal.
4. TV antenna
5. PC AUDIO input terminal.
6. VGA input terminal.
7. YPBPR input terminal.
8. AV& AUDIO input terminal.
9. HDMI 3 input terminal.
10. USB input terminal.
1. HEADPHONE output terminal
2. HDMI 1 input terminal
3. HDMI 2 input terminal
4. TV antenna
5. PC AUDIO input terminal
6. VGA input terminal
7. YPBPR input terminal
8. AV & AUDIO input terminal
9. HDMI 3 input terminal
10. USB input terminal

7
TV Installation Drawings
Power Cord Connection
5. TV INSTALLTION DRAWINGS
Power Cord Connection
AC
5. TV INSTALLTION DRAWINGS
75 OHM
ANTENNA
PLUG
POWER PLUG OF
ANTENNA
AMPLIFIER
OUTDOOR
ANTENNA
AMPLIFIER
VHF
ANTENNA UHF ANTENNA
INDOOR
ANTENNA
AMPLIFIER
Power Cord Connection
Antennas Connection
- Conne ct the power cord correctly as shown.
- Press the POWER switch of yo ur LED TV to swit ch on the LED TV.
The pow er indicator on the f ront panel lights up in Green or Blue .
RF IN
AC
- Connect the power cord correctly as shown.
- Press the POWER switch of your LED TV to switch on the LED TV.
The power indicator on the front panel lights up in Green or Blue.
Antennas Connection
To ensure good picture and sound, TV antenna system needs to be installed. The antenna
system as shown can be soured from TV equipment shops, which will provide service for
correct installation and connection. After installation, insert the 75-ohm antenna plug into
the antenna jack as shown.
8
HDMI Connection
TV Back
HDMI Connection
TV Back
HDMI Cable
DVD o r VCR
DVD or VCR Back
HDMI Cable
DVD o r VCR
DVD or VCR Back
HEADPHONE HDMI 1 HDMI 2 HDMI 3
USB
TV antenna VGA YPbPR AV & AUDIOPC AUDIO
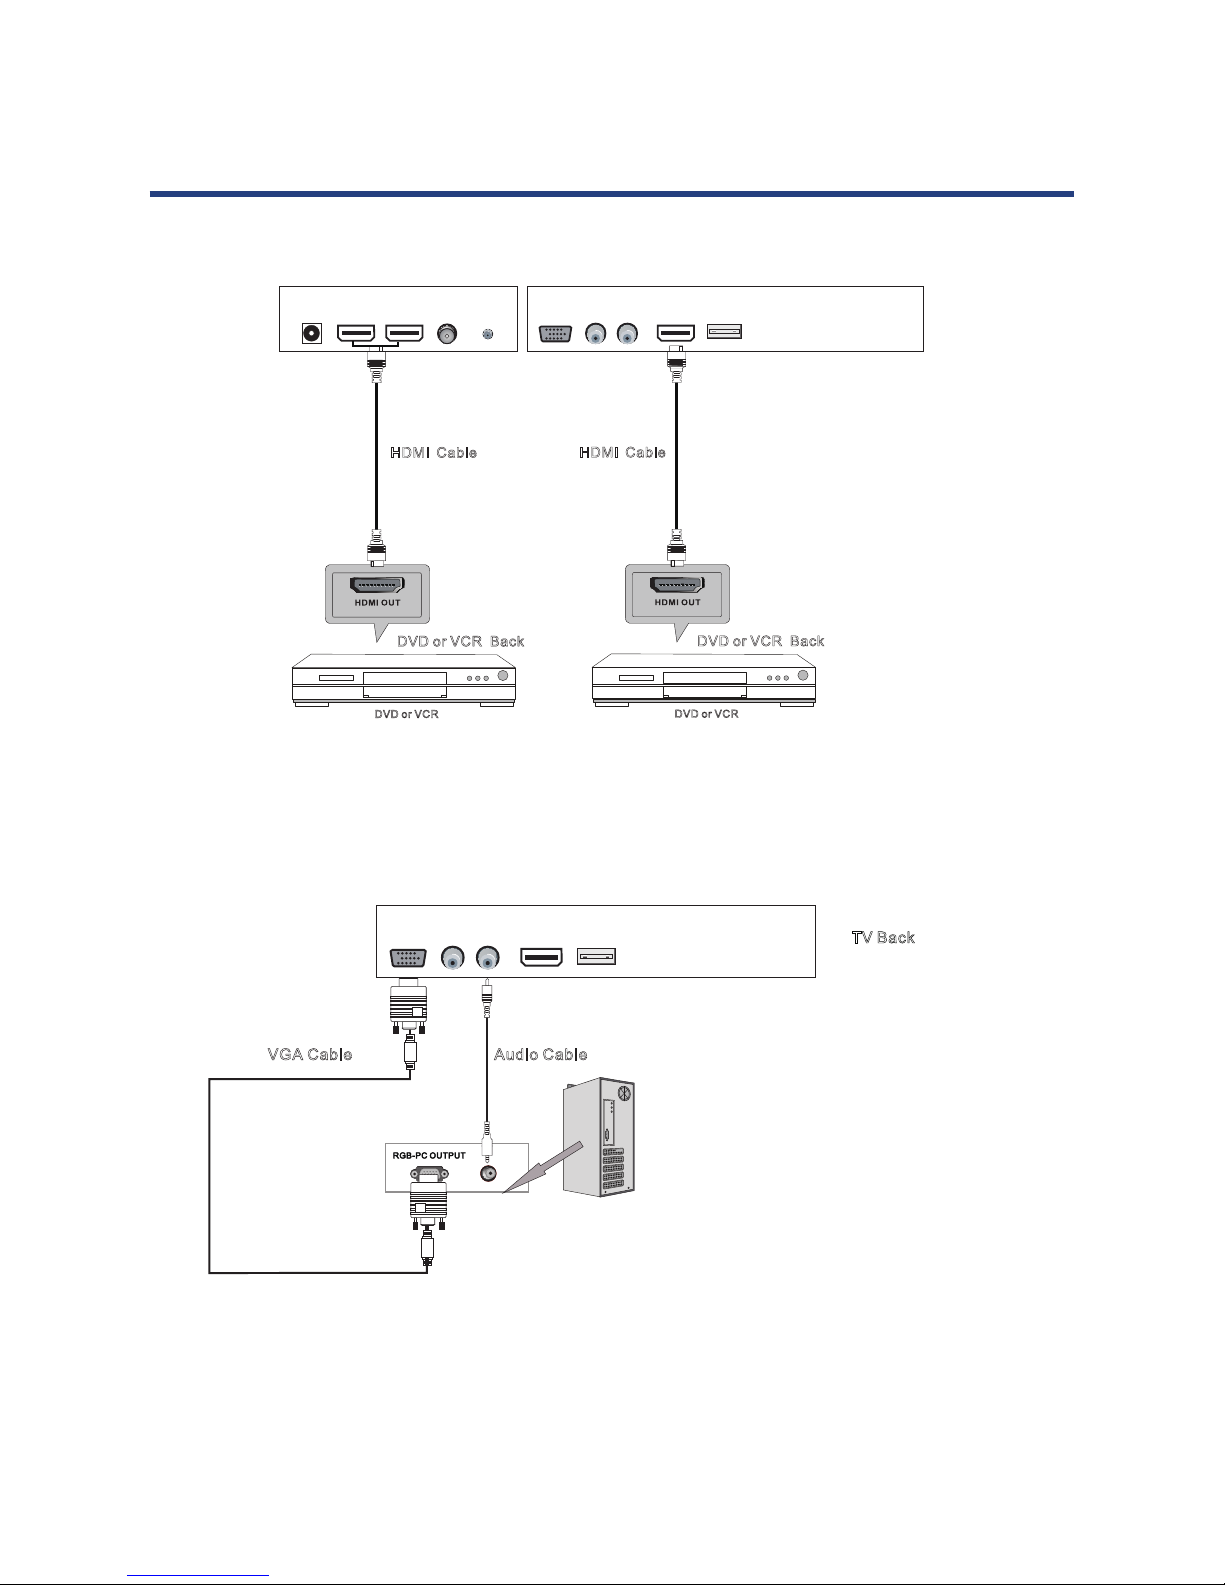
The HDMI input connection enables the digital transfer of audio/video/control signals
through one cable only.
VGA Connection
Connect the RGB output of the PC to the VGA jack on the set. Connect the AUDIO output
of the PC to the PC AUDIO jack on the set . Select the VGA input source with using SOURCE
button on the remote control.
TV Back
TV Back
HDMI Connection
VGA Connection
TV Back
Audi o Ca bl eVGA Cabl e
HDMI C ab le
DVD o r VCR
DVD or V CR B ac k
HDMI C ab le
DVD o r VCR
DVD or V CR B ac k
HEADPHONE HDMI 1 HDMI 2 HDMI 3
USB
TV antenna VGA YPbPR AV & AUDIOPC AUDIO
HDMI 3 USBVGA YPbPR AV & AUDIO
TV Installation Drawings

9
USB Connection
USB Po rt
TV Bac k
USB Connection
HDMI 3 USBVGA YPbPR AV & AUDIO
Insert the USB ash drive to the USB port. Select USB channel source via the SOURCE button
on the remote control.
TV Installation Drawings

10
AV Connection
TV Back
Video cable
DVD or VCR b ac k
DVD o r VCR
AV Connection
HDMI 3 USBVGA YPbPR AV & AUDIO
Connect the VIDEO and AUDIO output jack of the DVD or VCR to the VIDEO jacks on the TV
set using the RCA cable. Match the jack colors: Video is yellow, Audio left is white, and Audio
right is red. Select the AV input source via the SOURCE button on the remote control.
YPbPr Connection
Connect the YPbPr output of the DVD or VCR to the YPbPr input on the TV set. Connect the
Audio output of the DVD or VCR to the Audio input jacks on the TV set using the RCA cable.
Match the jacks colors : Y is green, Pb is blue,Pr is red, Audio left is white and Audio right is
red. Select Component input source via the SOURCE button on the remote control.
TV set
TV Back
Video cable
DVD or VCR b ac k
DVD o r VCR
AV Connection
YPbPr Connection
PrPbY L R
DVD o r VCR
DVD or VCR B ac k
YPbPr Ca bl e
Audio Ca bl e
TV Back
HDMI 3 USBVGA YPbPR AV & AUDIO
HDMI 3 USBVGA YPbPR AV & AUDIO
TV Installation Drawings

11
Remote Control
7. REMOTE CONTROL
Remote Control Instructions in TV/Media mode
STANDBY
Turn the LED TV ON or OFF.
SOURCE
,
Press ▲▼ to select an input source, and then press
OK to confirm.
P MODE
Press to select the picture modes
S.MODE
Press this button to change the audio mode.
SLEEP
Lets you select amount of time before your TV turn
itself off automatically.
MUTE
Press to mute the sound. Press again or press VOL+ to
u
n-mute the TV.
NUMBER BUTTONS
Press 0-9 to select a TV channel directly when you are
w
atching TV. The channel change after 2 seconds.
-/--
Press this button to enter Channel List.
Return to the previous channel viewed.
MENU
Brings up the main TV menu to the screen.
EXIT
Exit the main TV menu to the screen.
DISPLAY
Press to display the source and channel's information.
THUMBSTICK( ▲/ ▼/◄ / ►/ ENTER)
Allows you to navigate the on-screen menus and adjust
the system settings to your preference.
VOL+/VOL-
Press to increase / decrease the sound level.
CH+/CH-
Press to scan through channels.
TV/RADIO
Select the TV/RADIO mode.
P
ress SOURCE to display the OSD input source
.
.
Remote Control Instruction in TV/Media mode
STANDBY: Turn the LED TV ON or OFF.
TV/RADIO: Select the TV/RADIO mode.
SOURCE: Press SOURCE to display the OSD input source.
Press / to select an input source, and then
press OK to conrm.
P MODE: Press to select the picture modes.
S.MODE: Press this button to change the audio mode.
SLEEP: Lets you select amount of time before your TV turn
itself o automatically.
MUTE: Press to mute the sound. Press again or press VOL+ to
un-mute the TV.
NUMBER BUTTONS: Press 0-9 to select a TV channel directly
when you are watching TV. The
channel change after 2 seconds.
-/--: Press this button to enter Channel List.
: Return to the previous channel viewed.
MENU: Brings up the main TV menu to the screen.
EXIT: Exit the main TV menu to the screen.
TEXT: Press to enter the Teletext mode.
DISPLAY: Press to display the source and channel’s
information.
THUMBSTICK( / / / ENTER):
Allows you to navigate the on-screen menus and adjust the
system settings to your preference.
VOL+/VOL: Press to increase / decrease the sound level.
CH+/CH: Press to scan through channels.
STANDBY
Turn the LED TV ON or OFF.
SOURCE
,
Press ▲▼ to select an input source, and then press
OK to confirm.
P MODE
Press to select the picture modes
S.MODE
Press this button to change the audio mode.
SLEEP
Lets you select amount of time before your TV turn
itself off automatically.
MUTE
Press to mute the sound. Press again or press VOL+ to
u
n-mute the TV.
NUMBER BUTTONS
Press 0-9 to select a TV channel directly when you are
w
atching TV. The channel change after 2 seconds.
-/--
Press this button to enter Channel List.
TV/RADIO
Select the TV/RADIO mode.
P
ress SOURCE to display the OSD input source
.
.

12
Remote Control Instructions in TV/Media mode
HOLD
Hold on or off for current page display.
INDEX
Request the index page(In Teletext mode).
Enter to the recorded list(In DTV mode).
SIZE
Change display size i teletext mode.
AUDIO
Audio select button.
.
ZOOM
In DTV mode, press to select alternate subtitle
languages during view/playback of a DTV program.
In teletext mode, press to display P.100.
Record button
MEDIA
Press to display the Media menu.
Press while playing and the picture will zoom in once.
SUBTITLE
FAV
Press to display the FAV list.
Stop playing(In Media mode).
Previous/next chapter in Media mode.
Play or pause(In Media mode).
E
PG
Press to ent er th e EPG menu.
Remote Control Instruction in TV/Media mode
HOLD: Hold on or o for current page display.
INDEX: Request the index page(In Teletext mode).
Enter to the recorded list(In DTV mode).
SIZE: Change display size i teletext mode.
AUDIO: Audio select button.
ZOOM: Press while playing and the picture will zoom in once.
SUBTITLE : In DTV mode, press to select alternate subtitle
languages during view/playback of a DTV program.
In teletext mode, press to display P.100.
AUDIO: Audio select button.
Record button:
MEDIA: Press to display the Media menu.
FAV: Press to display the FAV list.
/ : Previous/next chapter in Media mode.
: Stop playing(In Media mode).
: Play or pause(In Media mode).
EPG: Press to enter the EPG menu.
Remote Control

13
Remote Control Setup
1. Open the cover.
2. Uses three A size batteries. When inserting the batteries, make sure correct polarities “+”
and “-” marks on the batteries line up correctly with compartment markings .
3. Replace the battery cover.
Place the remote control on a even surface and insert the supplied batteries into the remote
control as follows.
1. Softly push the back cover to open the battery compartment.
Remote Control Setup
on the batteries line up correctly with compartment markings .
.
2. Insert two batteries(1.5V size AAA ),please make sure the polarity matches the marks inside
the compartment.
Remote Control Setup
on the batteries line up correctly with compartment markings .
.
3. Softly press the back cover to close it.
Remote Control Setup
on the batteries line up correctly with compartment markings .
.
Remote Control
14
Menu Operation
In ATV/DTV mode press the MENU button to enter the main menu. A window will appear, use
/ to scroll through the following menu headings: CHANNEL, PICTURE, SOUND, TIME,
OPTION and LOCK. Press or OK to enter the sub menus under the headings listed above.
While in MENU mode, press the MENU button to return to the previous menu window, or
press EXIT to exit menu mode completely.
Installation Guide
Press / / / to set the OSD language/Country/Tune Type and press OK to begin auto
tuning.
CHANNEL Menu
▼ or OK to enter t he sub menus under the headings lis ted above.
INSTALLATION GUIDE
Installa tio n Guide
Move
Selec t
OK
Quit
EXIT
Pleas e se t th e fo llowi ng o pt io ns, the n
Press O K bu tt on t o begin a ut o tu ni ng.
OSD La uguage
Coun try
Tun e Type
Engl ish
Aust ralia
ATV+DTV
Mov e Back
MENU
OK
Sel ect
Qui t
EXIT
CHANNEL Menu
CHA NNEL
Aut o Scan
DTV M anual Tu ning
ATV Ma nual Tun ing
Pro gram Ed it
Sig nal inf ormat ion
Rec ord
Sta rt
Mov e Back
MENU
OK
Sel ect
Qui t
EXIT
CHA NNEL
ATV Ma nual Tun ing
Pro gram Ed it
Sig nal inf ormat ion
Rec ord Sta rt
Rec ord
ed Li st
Rec ord
ed Mo de
Sch edule
Lis t
PVR F ile Sys tem
Press to set th e OSD language/Co untry/Tune Type and press OK to begin au to tuning.▲▼ ◄►
▼ or OK to enter t he sub menus under the headings lis ted above.
INSTALLATION GUIDE
Installa tio n Guide
Move
Selec t
OK
Quit
EXIT
Pleas e se t th e fo llowi ng o pt io ns, the n
Press O K bu tt on t o begin a ut o tu ni ng.
OSD La uguage
Coun try
Tun e Type
Engl ish
Aust ralia
ATV+DTV
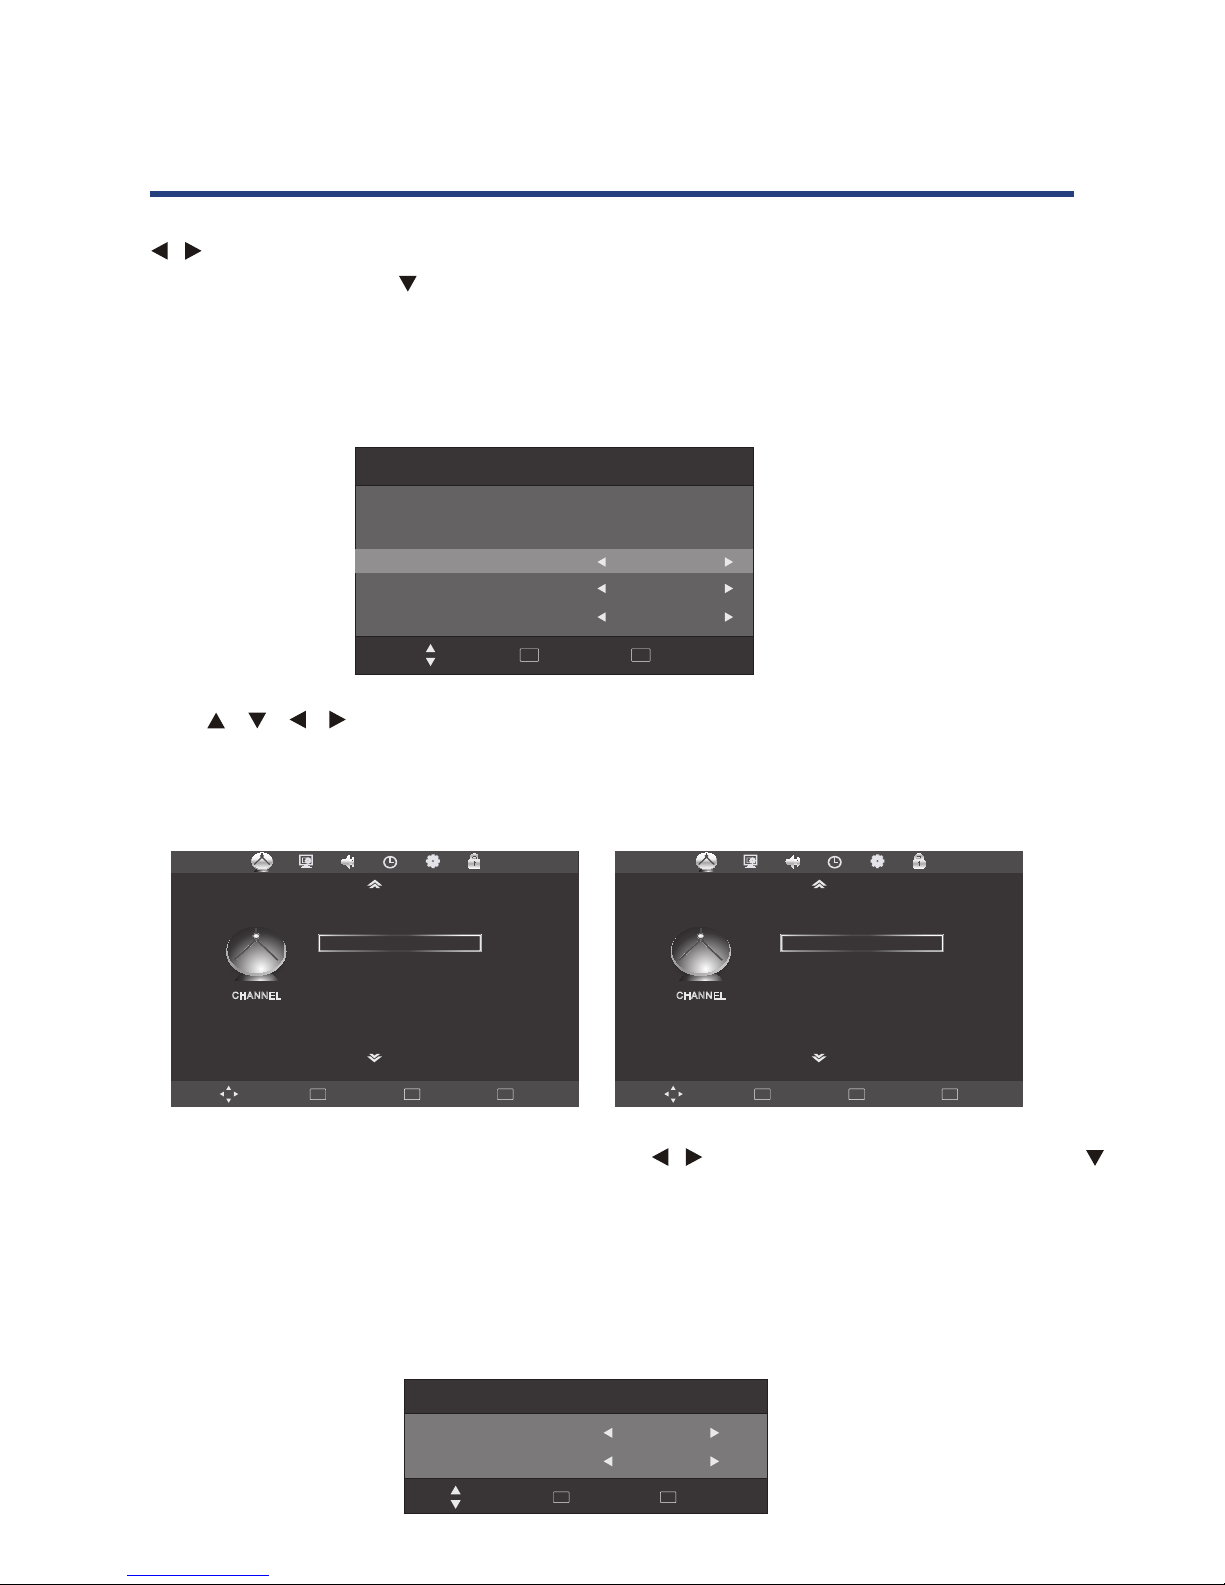
Press MENU button to display the main menu, use / to select CHANNEL menu, press OK or
to enter, and press menu to return to the main menu.
NOTE: CHANNEL can be only selected under ATV/DTV mode. The CHANNEL menu is disabled
while in all other input modes.
Auto Scan
OK
Sel ect
Qui t
EXIT
Auto Scan
Mov e
OK
OK E xit
EXIT
Coun try
Tun e Typ e
Aust ralia
ATV+DTV
CHANNEL Menu
Mov e Back
MENU
OK
Sel ect
Qui t
EXIT
CHA NNEL
ATV Ma nual Tun ing
Pro gram Ed it
Sig nal inf ormat ion
Rec ord Sta rt
Rec ord
ed Li st
Rec ord
ed Mo de
Sch edule
Lis t
PVR F ile Sys tem
▼
INSTALLATION GUIDE
Installa tio n Guide
Move
Selec t
OK
Quit
EXIT
Pleas e se t th e fo llowi ng o pt io ns, the n
Press O K bu tt on t o begin a ut o tu ni ng.
OSD La uguage
Coun try
Tun e Type
Engl ish
Aust ralia
ATV+DTV

15
Auto Scan
In the Auto Scan menu there are 2 options for you select from, Country and Tune Type.
Press / to select Country and Tune Type, press OK to start scanning. If you select
ATV+DTV, the first 50% of the processing is for ATV tuning, while the second 50% represents
DTV tuning. When ATV tuning, you can press MENU to skip ATV tuning and start DTV tuning,
or press EXIT to exit tuning.
Channel Tuning
Quit
EXIT
MENU
9%
474
.00
MHz
(TV)
TV
DTV
Radi o
:
:
:
0
0
0
Prog ra mme(s)
Prog ra mme(s)
Prog ra mme(s)
Back
DTV Manual Tuning
You can manually tune DTV channels in the CHANNEL menu.
Press / the buttons to select the channel you wish to tune, then press ENTER button to
scan for the channel.
Channel Tuning
Quit
EXIT
MENU
9%
474
.00
MHz
(TV)
TV
DTV
Radi o
:
:
:
0
0
0
Prog ra mme(s)
Prog ra mme(s)
Prog ra mme(s)
DTV Manual Tuning
UHF CH 27
Press OK to s ea rc h
Quit
EXIT
Back
MENU
Bad Norm al
Good
Back
ATV Manual Tuning
You can manually tune ATV channels in the CHANNEL menu.
Channel Tuning
Quit
EXIT
MENU
9%
474
.00
MHz
(TV)
TV
DTV
Radi o
:
:
:
0
0
0
Prog ra mme(s)
Prog ra mme(s)
Prog ra mme(s)
DTV Manual Tuning
UHF CH 27
Press OK to s ea rc h
Quit
EXIT
Back
MENU
Bad Norm al
Good
ATV Manual Tuning
Storage To 1
►◄
System DK
►◄
►◄
►◄
►◄
Current CH 1
Search
Fine
-
Tune
Freque nc y 51 1. 31 M hz
Quit
EXIT
Move
Save
Back
Menu Operation

16
Storage to: Press / the buttons to change the numbered location of the found channel.
System: Select the system using the / buttons.
Current CH: Displays the current channel number, press the / buttons to choose the
channel you wish to modify.
Search: Press the / buttons to scan through the frequencies to find new channels.
Fine tune: In case of bad reception, you can press the / buttons to make fine
adjustments to the tuning. After manual tuning is complete, please press the RED
key to save any found channels.
Program Edit
CH.NAME SKIP LOC K FAV Typ e
Program Edit
Radi o
ATV
ATV
ATV
702 BBC R ad io 2
703 BBC R ad io 3
704 BBC R ad io 4
714 hea t
1 C-26
2 C-44
3 C-56
Radi o
Radi o
Radi o
2 ABC TV Me ih our
20 ABC HD TV
DTV
DTV
Mov e Bac k
MENU
OK
Sel ect
Del ete
Ski p FAV
FAV
Use / to navigate through the Program Edit window.
DELETE: Press the RED button to delete the highlighted channel, a red circle will appear next to
the channel name.
Press the RED key again to confirm delete.
Press MENU to return to the main menu.
SKIP: Press / to select the channel you wish to skip.
Press the BLUE button, a logo will appear next to the channel name and the channel will be
skipped when you scroll through the channels.
Press the BLUE button again on the highlighted channel to disable the skip function.
Press MENU to return to the main menu.
Menu Operation

17
FAV: Set your favorite channel by pressing the / buttons to highlight the channel, then
press the FAV button.
A logo will appear next to the channel name. When you are viewing you can press the
FAV button to see a list of your favorite channels.
Signal Information: Only available in DTV mode, Signal Information includes: channel /
network /modulation/quality/strength.
PVR MENU: Enter PVR menu. (See page 32 for more details)
PICTURE Menu
Press MENU button display the main menu, use / to select PICTURE , press OK or to
enter, and press menu to return to the main menu.
Picture Mode
channel by pres sin g the ▲ ▼ buttons to hi ghlight the channe l, then press the
(See page 32 for m ore details)
Mov e Ba ck
MENU
OK
Sel ect
Qui t
EXIT
Mov e Ba ck
MENU
OK
Sel ect
Qui t
EXIT
PICTURE Menu
PIC TURE
Pic ture Mo de
Con trast
Bri ghtne ss
Col or
Sha rpnes s
Tint
Col or Temper ature
Red
Sta ndard
50
50
50
50
50
Red
Gre en
Blu e
Asp ect
Rat io
Noi se
Red uctio n
Scr een
50
50
50
16
:9
Mid dle
PIC TURE
(See page 32 for m ore details)
Mov e Ba ck
MENU
OK
Sel ect
Qui t
EXIT
MENU
OK
Sel ect
Qui t
EXIT
PICTURE Menu
Pict ure Mode
Stan dard
Adj ust
Qui t
EXIT
Bac k
MENU
Pic ture Mo de
Con trast
Bri ghtne ss
Col or
Sha rpnes s
Tint
Col or Temper ature
Red
Sta ndard
50
50
50
50
50
Red
Gre en
Blu e
Asp ect
Rat io
Noi se
Red uctio n
Scr een
50
50
50
16
:9
Mid dle
to ◄► to select menu press OK or
▼
PIC TURE
Press / to select the picture mode,press MENU to return to the main menu.
You can select from the following preset modes - Dynamic, Standard, Mild or User.
Only User mode allows the adjustment of Contrast, Brightness, Colour and Sharpness, Tint is
only available to adjust for NTSC.
Contrast / Brightness / Color / Sharpness / Tint
(See page 32 for more details )
Mov e Back
MENU
OK
Sel ect
Qui t
EXIT
MENU
OK
Sel ect
Qui t
EXIT
PICTURE Menu
Pict ure Mode
Stan dard
Adj ust
Qui t
EXIT
Bac k
MENU
Pic ture Mo de
Con trast
Bri ghtne ss
Col or
Sha rpnes s
Tint
Col or Temper ature
Red
Sta ndard
50
50
50
50
50
Red
Gre en
Blu e
Asp ect
Rat io
Noi se
Red uctio n
Scr een
50
50
50
16
:9
Mid dle
to ◄► to selec t menu press OK or
▼
PIC TURE
Cont rast
Adj ust
Qui t
EXIT
Bac k
MENU
50
In User mode, select from Contrast/Brightness/Color/Sharpness using / and press /
to make adjustments.
Menu Operation

18
Color Temperature
Color Tempera ture
Adjus t
Quit
EXIT
Back
MENU
Normal
You can select from the following preset modes Cool, Medium or Warm. Only User mode allows
adjustment of Red, Green and Blue values.
Red / Green / Blue:
In user mode, press / to select Red/Green/ Blue, then press / to adjust.
Press MENU to return to the main menu.
Aspect Ratio:
Press / to highlight Aspect Ratio and OK to enter. A window will appear at the bottom of
the screen, press / to scroll through the following options to get the best fit picture on your
screen - 16:9, ZOOM 1, ZOOM 2, Auto,4:3.
Noise Reduction:
Press / to highlight Aspect Ratio and OK to enter.
Use / to select from noise reduction modes as follows: Off, Low, Middle, High.
NOTE: Noise Reduction is not available in PC mode.
Screen( Only available in PC mode)
Medium
Quit
EXIT
Back
MENU
Screen
Auto A dj ust
Hori zo ntal Po s.
Vert ic al Pos.
Size
Phas e
50
50
50
30
Quit
EXIT
Back
MENU
Move
,
Normal
Normal
Auto Adjust: Select “Auto Adjust”and press , the unit will automatically adjust all items.
Horizontal Pos: Allows you to use / buttons to adjust the Horizontal Position.
Vertical Pos: Allows you to use / buttons to adjust the Vertical Position.
Size: Allows you to adjust the width of image.
Phase: Allows you to adjust the definition.
Menu Operation

19
SOUND Menu
Press MENU button display the main menu, use / to select SOUND menu press OK or
to enter and press menu to return to the main menu.
Sound Mode
Move Ba ck
MENU
OK
Select
Quit
EXIT
SOUND Menu
Tre bl e
Bass
Balance
Auto Volume
Surround Sound
Sound Mode
Standard
50
50
0
Off
Off
SOUND
Press / to select from the following sound modes: User, Standard, Music, Movie and
Sports. Press MENU or OK to confirm.
Treble/ Bass /Balance: Use / to select the Treble /Bass /Balance, and press / to
adjust. Treble and Bass are only adjustable in User mode.
Auto Volume: Auto sound adjust, press / to set ON OFF
Surround Sound: Surround sound settings, press / to set ON/OFF.
Move B ac k
MENU
OK
Select
Quit
EXIT
SOUND Menu
to ◄► to select SOUND menu press OK or
▼
Tre bl e
Bass
Balanc e
Auto Volu me
Surrou nd S ou nd
Sound Mo de
Standa rd
50
50
0
Off
Off
SOUND
Sound Mode
Music
Adjus t
Quit
EXIT
Back
MENU
Menu Operation

20
TIME Menu
Move Back
MENU
OK
Select
Quit
EXIT
31/May 1 4: 25
Off
Off
Off
On
Wes te rn Au st ra li a. .
TIME
I
I
I
I
I
I
I
I
Clock
Off Ti me
On Time
Sleep Timer
Auto Sleep
Tim e Zo ne
TIME Menu
I
I
I
I
Auto clock update: please select DTV to obtains the time.
Press MENU button to display the main menu, use / to select TIME menu, press OK or to
enter, and press menu to return to the main menu.
Clock
Press / / / to set the Date/Month/Year/Hour/Minute, press MENU to confirm and return to
Time menu.
Off Time
You can set a time for the TV to turn off automatically. The Repeat mode allows the unit to be
set to turned off Once, Every day, Mon-Fri, Mon-Sat, Sat-Sun or only Sun, use / to select
your preference. Once the Repeat setting has been made, press / to select Hour and Minute
settings, use / to adjust.
MENU
OK
Select
Quit
EXIT
31/May 1 4: 25
Off
Off
Off
On
Wes te rn Au st ra li a. .
I
I
I
I
I
Clock
Off Ti me
On Time
Sleep Timer
Auto Sleep
Tim e Zo ne
TIME Menu
▼
Clock
Date
Month
Year
Hour
Minute
Move Bac k
MENU
Quit
EXIT
◄ ►
20
◄ ►
May
◄ ►
2010
◄ ►
13
◄ ►
25
MENU
OK
Select
Quit
EXIT
31/May 1 4: 25
Off
Off
Off
On
Wes te rn Au st ra li a. .
I
I
I
I
I
Clock
Off Ti me
On Time
Sleep Timer
Auto Sleep
Tim e Zo ne
TIME Menu
▼
Clock
Date
Month
Year
Hour
Minute
Move Bac k
MENU
Quit
EXIT
◄ ►
20
◄ ►
May
◄ ►
2010
◄ ►
13
◄ ►
25
Off Time
Repeat
Hour
Minute
Once
13
28
Move
Back
MENU
Quit
EXIT
Press MENU to confirm and return to TIME menu.
Menu Operation

21
On Time
You can specify a time, input source, channel and volume for the TV to turn on.
Press / to select Repeat mode and use / to select your preference as above.
Use / to select the other parameters and / to adjust.
Press MENU to confirm and return to TIME menu.
Sleep time: Press OK to enter Sleep Time sub menu, use / to set the sleep time. You
can select from the following Sleep times: 10, 20, 30, 60, 90, 120, 180, 240 minutes or Off to
disable the Sleep time function. Then press OK or MENU to confirm.
Auto Sleep: Press / to select ON/OFF.
This function allows you to set your TV to automatically turn off after 10 minutes
if the TV detects no signal from the inputs.
Time zone: Press OK to enter Time Zone sub menu, use / to set time zone for your local
area. Press OK or MENU to confirm.
OPTION Menu
On Time
Repeat
Hour
Minute
Source
Channel
Volume
◄ ►
Once
◄ ►
12
◄ ►
00
◄ ►
DTV
◄ ►
1
◄ ►
30
Move
Back
MENU
Quit
EXIT
On Time
Repeat
Hour
Minute
Source
Channel
Volume
◄ ►
Once
◄ ►
12
◄ ►
00
◄ ►
DTV
◄ ►
1
◄ ►
30
Move
Back
MENU
Quit
EXIT
▲▼ to select the other parameters and ◄► to adjust.
▲▼
.
Mov e Ba ck
MENU
OK
Sel ect
Qui t
EXIT
Mov e Ba ck
MENU
OK
Sel ect
Qui t
EXIT
Eng lish
Eng lish
Eng lish
Eng lish
Eng lish
40S
OSD Language
Audio Languages 1st
Audio Languages
2nd
Subtitle Languages
1st
Subtitle Languages
2nd
OSD Duration
OPTIO N
OPTION Menu
Eng lish
Eng lish
Eng lish
40s
Audio La guage
n s 2nd
S n s 1stubtitle La guage
Subtitle La guage
n s 2nd
OSD Duration
Aus trali a
Country
OPTIO N
Restore Factory Default
Software Update(USB)
On
Blue Screen
Press MENU to display main menu, use / to select OPTION menu, then press OK or to
enter, press MENU to return to main menu.
OSD Language: Press OK to enter OSD Language sub menu, use / to set OSD language.
Audio Language 1St/2nd: Press OK to enter Audio Language sub menu, use / to set
Audio language.
Menu Operation

22
Subtitle Language 1st/2nd: Press OK to enter Subtitle Language sub menu, use / to
set subtitle language.
OSD Duration: Press OK to enter OSD Duration sub menu, use / to select the amount of
time the OSD will remain on screen.
Blue Screen : Press / to select “Blue Screen” menu and press the OK button to select “On”
or “Off”.
Country: Displays your country as set in the Installation Guide, not adjustable.
Restore Factory Default: Press OK to enter second menu, use / to select “yes” or “no”,
and press OK again to confirm.
NOTE: Use Restore Factory Reset function with caution, as it will erase all channels and return
your settings to factory default settings.
Software Update (USB): Press / button to select “Software Update (USB)”, the press OK
to update software using USB.
LOCK Menu
Move Back
MENU
OK
Select
Quit
EXIT
▲▼ to select the
LOCK
No Block
Lock Channel
Set Passwor d
Block Progr am
Program Gui de
LOCK Menu
Off
Hotel Setti ng
Press MENU to display main menu, use / to select LOCK menu , then press OK or to enter.
A password is required to enter the Lock settings. Enter the default password ‘0000’ to unlock the
menu.
Press to quite password and return to main menu.
Press to clear any incorrectly entered numbers. The correct numbers will need to be entered to
enter the LOCK sub menu. The message ‘Wrong Password’ will be displayed if the numbers are
entered incorrectly.
Press Menu to return to Lock menu.
OK
Select
Quit
EXIT
▲▼ to select the
No Block
Lock Channel
Set Passwor d
Block Progr am
Program Gui de
LOCK Menu
◄► to se lect menu then pres s OK or ▼ to
Off
Plea se e nter pass wo rd
Canc el Clear
Hotel Setti ng
Lock Channel
This setting enables a password lock for the Program Edit function under the Channel menu.
Press / or OK to turn the lock On or Off.
Menu Operation

23
Set Password
Press OK to enter sub menu.
Using the numeric keys enter the old password followed by your new password.
Enter the new password again to confirm.
Block Program
Use / to select the channel, and press Green button to lock/unlock the channel.
If the channel is locked you will be prompted to enter a password before you can access the
channel.
Parental Guidance
Press / to select the “Parental Guidance” menu and press OK to enter sub-menu. You can
then choose level.
NOTE: If you forgot your password input, you can reset your password by using the master
password: 4711. It will clear your old password set and reset password back to factory default
password.
Hotel Setting
Please enter old password
Cancel Clear
Please enter new password
Confirm new password
Hotel Lock
Use / to select the Hotel Lock, use /
to select On/Off.
On: Select Hotel Lock the following sub-menu.
Off: Unable to select Hotel Lock submenu.
Loch Channel
Use / to select the Lock Channel, use
/ to select On/Off.
On: Unable to select Channel setup in menu.
Off: Able to select Channel setup in menu.
Ple ase enter o ld p ass wo rd
Can cel C le ar
Ple ase enter n ew p ass wo rd
Con firm ne w passwor d
Hotel Setting
Hotel Setting
Lock Chan ne l
Set Sourc e
Channel N um be r
Picture L oc k
Key Lock
Max Volume
Source Lo ck
Clear Loc k
Hotel Loc k On
On
Off
0
Off
Off
100
Mov e
Adjus t
Quit
EXIT
and you can
Menu Operation

24
Set Source
Use / to select the default source which appears on the screen after power on.
Channel Number (available in DTV/ATV source only).
Use / to select the default Channel Number which appears on the screen after power on.
Picture Lock
Use / to select the Picture Lock, use / to select On/Off.
On: Unable to select Picture setup in the menu.
Off: Able to select Picture setup in the menu.
Key Lock
Use / to select the Key Lock, use / to select On/Off.
On: To lock and invalidate the unction key.
Off: To unlock and enable the unction key.
Max Volume
Use / to select the Max Volume, use / to select a volume as maximum.
Source Lock
Use / to select the Source Lock, use OK key to enter, select DTV/ATV/YPBPR/PC/HDMI1/
HDMI2/AV/MEDIA source on or off.
On: Make the source can not be selected.
Off: Make the source available.
Clear Lock
Use / to select the Clear Lock, use OK key to clear.
Input Source
Change Input
Press source button to display the source menu. Use / to select the input source, press OK to
confirm.
Input Source
DTV
ATV
YPBPR
PC
HDMI1
HDMI2
AV
MEDIA
Move
Selec t
OK
Quit
EXIT
INPUT SOURCE
HDMI
3
Menu Operation

25
EPG and Channel List Menu
Move: Use
/ to select programme
EXIT: exit EPG.
OK: View the highlighted programme.
Index: switch to type option.
Record: Press REC button to enter a window to book a recording, see page 34 for details.
Schedule: Press YELLOW key to show a list of scheduled recordings.
Remind: Press GREEN button to enter a sub window to book a reminder.
You can select the channel, repeat mode, minute and hour, date and month using
the / / / buttons.
When a reminder has been set and the time arrives, a window will appear on the
display and the channel will change after 10 seconds.
You can also intercept and confirm the change by pressing
.
TIME
Program E PG
Move
Quit
EXIT
OK
Selec t
Sch edule
Remin d
31 May 13 36 :
700 B BC Radi o 1 Edith B owman
31 May 2010 13:00-18:00
EPG and Channel List Menu
Deta il ed inform ation
for th e hi ghlight ed
prog ra m.
702 B BC Radi o 2 Steve W right i n the Aft ernoo n
703 B BC Radi o 3 After noon on 3
704 B BC Radi o 4 After noon Pl ay: JAC K's Lov e
721 h eat U ptemp p arty Po p
The b est roc k thran ks incl uding t he 3
for m 1S.
1/1
Index
Index
Recor d
RECORD
Use
to select
between TIME and
CHANNEL modes.
This is a list of
programs that
are scheduled to
be shown by the
broadcaster.
Detailed information
for the highlighted
program.
TIME
Program EPG
Quit
EXIT
OK
Selec t
Sch edule
Remin d
31 May 2010 13 :0 0- 18 :0 0
Deta iled in formati on
for th e highl ighted
prog ram.
The b est roc k thran ks incl uding t he 3
for m 1S.
1/1
Index
Index
Recor d
RECORD
Reminder Setting
◄ - + ►
2 ABC TV M elbou rne
◄ ►
12
◄ ►
00
◄ ►
DTV
◄ ►
1
◄ ►
30
Move
Select
OK
Back
MENU
Mode
Minute
Hour
Date
Month
Favourite List
Press FAV button to display the Favourite Channel List.
Menu Operation

26
Channel List
Press OK button to display a list of tuned channels.
The status of the channels (Skip/Lock/Favourite) will also be displayed, see below.
Multimedia (USB) Menu
Multimedia main menu style:
Channel List
DTV
ATV
ATV
ATV
ATV
DTV
DTV
DTV
DTV
Selec t
Quit
EXIT
OK
5 Five
6 abc1
7 abc2
8 abc3
9 abc5
1 C-01
2 2C-0 1
3 3S-0 2
4 4S-0 3
Move
Channel List
DTV
ATV
ATV
ATV
ATV
DTV
DTV
DTV
DTV
Selec t
Quit
EXIT
OK
5 Five
6 abc1
7 abc2
8 abc3
9 abc5
1 C-01
2 2C-0 1
3 3S-0 2
4 4S-0 3
Move
PHO TO
Disc:C
Multimedia(USB) Menu
Disc s
Mult im edia
Oper at ion
USB St at us
Inse rt ed USB
devi ce i nfo
Move
Menu
MENU
OK
Selec t
USB 2.0
USB Status
If a compatible USB is attached the logo will appear blue. If not USB is attached the logo will be
grey.
Multimedia style
Choose from the menu across the top of the screen which file type you would like to play: Photo,
Music, Movie or Text.
DISC (HDD)
Shows the inserted HDD Discs. Each disc is assigned a letter from C onwards.
Menu Operation

27
Inserted USB device info
Displays USB version of the device that is attached, for example if a USB 2.0 device is
attached, 2.0 will be displayed. When no device is attached it will display ‘No Device’.
Disc: Show the current disc.
Operation guide: Operational buttons o n the remote / / / , Menu and OK.
Multimedia main board keypress instruction:
The follows only list MM page and other relevant function, Menu, sleep and other system
function is not included.
/ : Move Focus to left/right, it can circle move.
/ : Turn up/down.
OK/Enter: Enter submenu.
PHOTO
Multimedia PHOTO’s submenu layout:
Inserted USB device info
2.0 will be displayed. When no device is attached it will display 'No Device'.
Displays USB version of the devic e that is attached, fo r example if a USB 2.0 device is attached,
Operation guide
Operational buttons on the remote ◄► , Menu and OK.▲▼
◄ ►/
▲ ▼/
OK/Enter
Multimedia main board keypress instruction:
The follows only list MM page and other relavant function, Menu, sleep and other systerm
function is not included.
Enter submenu.
Turn up/down.
Move Focus to left/right, it can circle move.
Retu rn 200*2 00 1
UP.p ng
2. bmp
2
C:\
Resol ut ion 102 4x 768
Size 20 0K Bytes
Date 20 10
/08/0 8
Tim e
08/23 /22
1/2
Del ete Cur rent Fi lt
1.bm p
Disc
File f olders in d isc,
pres s ok to enter
Pict ure overv iew
Page
Preview
Picture
information
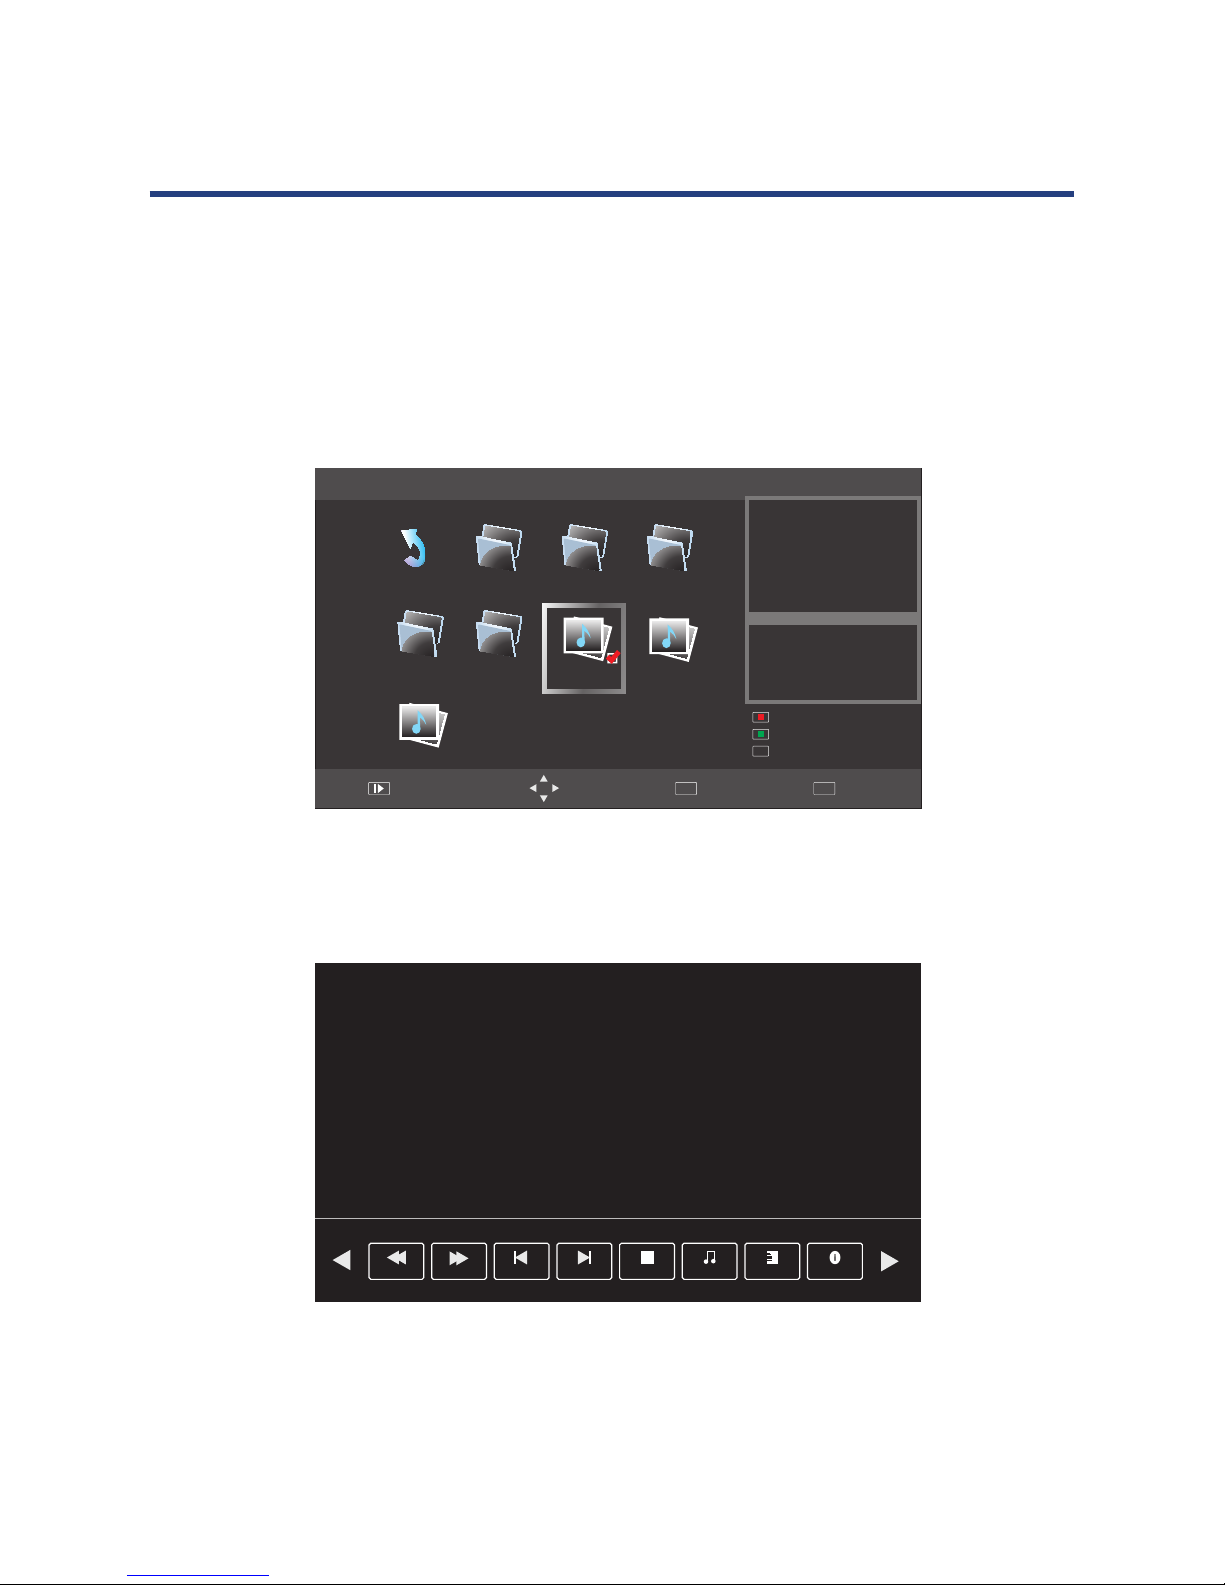
PHOTO
Multimedia PHOTO’s submenu layout:
Disc
Show the current disc.
Quit
EXIT
Move Me nu
MENU
Full Sc re en
Add /Remo ve all
Add /Remo ve to pla ylist
OK
Page: Indicates the total number of pages containing files. example as per picture - ‘1/2’
represents page 1 of 2.
Picture list: Use / / / to scroll through the picture list. Press OK to select the picture,
a tick will appear on the file.
Press PLAY to view picture in full screen.
Preview window: Displays a preview of the highlighted picture in the Picture list.
Menu Operation

28
Slide Show
When in Picture List mode you can select multiple pictures to be viewed as part of a Slide
Show. Use / / / to scroll through the list, press OK when the desired pictures are
highlighted.
If you wish to highlight all pictures, press the GREEN button. Press the RED button to deselect all pictures. Press the PLAY button to enter Slide Show mode, the pictures will scroll
after approximately 5 seconds.
Exit
Repeat
Rotate
Repe at ALL
Play L ist
Info .
Zoom O ut
Musi c
90
Rota teRo tate
90
Zoom I n
A
Exit playing,enter previous menu.
Full screen playing of photos.
Clockwise/ counter clockwise turn pictures.
Press once to repeat once, press again to repeat all photos, press three times to disable the repeat function.
Play next file.
Play previous file.
Stop playing,enter list menu.
Slide Show
When in Picture List mode you can select multiple pictures to be viewed as part of a Slide Show.
Use ◄► to scroll through the list, press OK when the desired pictur es are highlighted.
If you wish to highlight all pictures, press the GREEN button. Press the R ED button to de-select all
pictures. Press the PLAY button t o enter Slide Show mode, the pictures w ill scroll after
approximately 5 seco nds.
▲▼
Retu rn 2... 200- 20 0
EQ
2564
Put.m p3
Asdkj .m p3
Dkj.m p3
2asd -2 00
C:\
Album :
Tit le:
Bit rat e:
Artis t:
Sampl in g:
Year :
Size:
Bounc e
Asdkj
48K
Sarah
20K
2008
600KB yt es
Multimed a MUSIC submenu layout.
When selected songs in the list, press OK to show the so ngs preview, as follows:
i
Disc
File w indow
Page
Preview
Files
information
1/2
MUSIC
Quit
EXIT
Move M en u
MENU
Full Sc re en
Add /Remo ve to pla ylist
OK
Del ete Cur rent Fi lt
Add /Remo ve all
EXIT: Exit playing, enter previous menu.
: Full screen playing of photos.
: Stop playing, enter list menu.
: Play previous file.
: Play next file.
Repeat: Press once to repeat once, press again to repeat all photos, press three
times to disable the repeat function.
Rotate: Clockwise / counter clockwise turn picture.
MUSIC
Multimedia MUSIC submenu layout.
When select songs in the list, press OK to show the songs preview, as follows:
Repe at ALL
Play L ist
Info .
Zoom O ut
Musi c
90
Rota teRo tate
90
Zoom I n
A
Menu Operation

29
MUSIC submenu equip description:
Page: Show pages.
Preview window: Music picture.
Files information: Show songs name and size etc.
MUSIC playing condition and keys function:
MUSIC playing is the menu just like playing software in PC, mainly have playlist, basic
information, processing sign, operation guide part,as follows:
AUD.MP3
Alb um: Gov ergir l
Tit le: Far A may Fro m Home
Art ist: Gr oove Go verag e
Bit R ate: 96 k Sampl ing: 48 k
Yea r: 2002 S ize: 52 9KByt es
AUD.MP3
Sanple. MP 3
AUD_2.M P3
Rep eat ALL G oto Tim e
00:01:0 0/ 01 :00:45
1/1
Songs nam e
Songs infor
MUSIC image
Operation guid e
Songs lis t
Scr een Mut e
Rem ove all f orm pla ylist
Rem ove
Play Time
Songs name: Current songs name.
MUSIC image: One image used to sign MUSIC.
Songs list: Songs marked in Browser,from the top files on, orders by letters.
Playing time: Show playing time and in total,such as 00:01:23/00:04:56 format.
Operation guide: Show current operation guide.
Processing sign: Show current procession time and rate.
OK/ENTER: Play selected files.
EXIT: Exit MUSIC playing menu.
/ / / : Scroll through songs on file list.
: Stop playing.
/ : Play previous / next file.
Menu Operation

30
/ : Fast forward and fast reverse.
Repeat: Repeat playing,can choose repeat 1, repeat all, and disable repeat mode.
MOVIE
Video format: AVI etc.
Enter the MOVIE menu and scroll through the files using / / / the keys.
Press OK to select the file and to view a preview as above.
Press PLAY to view the file in full screen.
Retu rn 200* 2 00 2 3
C:\
Resolut io n: 8 00x336
Audio Track: 1 / 1
Subti tl e:
Artis t:
Prpgram :
Size: 122 311 K Bytes
1/2
keys. ▲▼
MOVIE
Preview window
File i nformati on
File l ist
Quit
EXIT
Move Menu
MENU
Full Sc re en
Add /Remo ve to pla ylist
OK
Del ete Cur rent Fi lt
Add /Remo ve all
Rep eat ALL Got o Time
00:00:0 0/ 00 :50:00
Set A
A/B
Pla y List
Inf o.
Slo w
Ste p
Zoo m In
Retu rn 200* 2 00 2 3
C:\
Resolut io n: 8 00x336
Audio Track: 1 / 1
Subti tl e:
Artis t:
Prpgram :
Size: 122 311 K Bytes
1/2
keys. ▲▼
Preview window
File i nformati on
Quit
EXIT
Move Menu
MENU
Full Sc re en
Add /Remo ve to pla ylist
OK
Del ete Cur rent Fi lt
Add /Remo ve all
Repeat: You can choose repeat 1, repeat all, repeat none.
Set A/B: Set A/B circle playing.
File list: You can scroll through the file list using / / / . Press OK to select a
file and view a preview, you can also select multiple files to be played in
sequence. Press PLAY to view selected file in full screen.
NOTE: Larger files may take longer to load, please wait for the file to load.
Some files may not play even though they are the correct format.
Menu Operation
31
Info: Displays the highlighted file’s information including resolution, audio track, subtitle,
artist and size.
Goto: This function allows you to jump to a preset time during playback. Press GOTO, a
window will appear displaying time in hour minutes and seconds as follows 00:00:00.
Enter the time you would like to jump to using the numeric keys.
Press OK to confirm.
TEXT
Chose TEXT files, press OK and it shows the above frame.
Press play to start full screen playing as follows:
Retu rn 2... 2 00-200
EQ
2564
put. te xt
jack.tex t
2asd -2 00
C:
Size:
60K Bytes
1/2
jack1. te xt
Pet
Puppy
Linux
Make
jac k.txt
Rem ove all f orm pla ylist
Quit
EXIT
Move M en u
MENU
Full Scree n
Add a ll to pla ylist
Add /Remo ve to pla ylist
OK
#Cze c h 0
#Dan i s h 1
#Ger m a n 2
#Eng e l s h 3
#Spa n i s h 4
#Gre e k 5
en_s t r _ P i c t u re_Te x t . 0 = O B RAZ
en_s t r _ P i c t u re_Te x t . 1 = B I LLEDE
en_s t r _ P i c t u re_Te x t . 2 = B I LD
en_s t r _ P i c t u re_Te x t . 3 = P I CTURE
Pre v Page Ne xt Page
Nex tPre v. St op Mu sic P lay Lis t Inf o.
Retu rn 2... 2 00-200
EQ
2564
put. te xt
jack.tex t
2asd -2 00
C:
Size:
60K Bytes
1/2
jack1. te xt
Pet
Puppy
Linux
Make
jac k.txt
Rem ove all f orm pla ylist
Quit
EXIT
Move M en u
MENU
Full Scree n
Add a ll to pla ylist
Add /Remo ve to pla ylist
OK
Prev Page: Play previous page.
Next Page: Play next page.
Prev. : Play previous files.
Next: Play next files.
Menu Operation
32
STOP: Stop playing and Exit to browser menu.
Playlist: Show play list.
Info: Displays the current file’s information including file name and size.
PVR Menu
This television supports Personal Video Recorder (PVR) and time shift functions when a
compatible USB storage device is connected. PVR allows you to record digital TV programs
for playback at a later date. Time shift, allows you to pause live TV and then fast forward to
rewind until you catch up the live TV stream again. PVR and time shift functions are only
available on Digital TV input source and can not be used to record analog TV or other input
sources.
Setting up and Connecting a Storage Device
The first step to using PVR functionality is to setup and connect a compatible USB storage
device such as a flash drive or external hard disk. External hard disks will require their own
power supply as the USB port in the TV may not be used to power large devices.
To prevent accidental data loss, it is not recommended that you connect a disk drive to
the television for PVR that already contains data. It is best to use a newly formatted and
dedicated disk for recording.
PVR File System
When connecting a new device for the first time, you need to check the file system and
format the disk. To do this, access the PVR File System option from the SETUP menu.
Menu Operation
PVR menu
to record analog TV or other input sources.
rt in the TV may not be used to power large devices.

33
PVR function is only available for DTV,includes Record,Time shift and Playback function.
NOTE:
• WhenPVRfunctionisinprogress,pleasedon’tunplugthepowerandtheexternal
USBdeviceatwill.
• WhenPVRfunctionisstandby,thepowerindicatorwillblinkwithredandgreen
consecutively.
• WhenPVRfunctionisactive,thepowerindicatorwillblinkwithgreen.
• Beforestartrecordingaprogram,pleasemakesuretheexternalUSBdeviceis
connected.
• Whilerecording,iftheavailablestoragespacebecomeslow,therecordingwillbe
automaticallystopped.
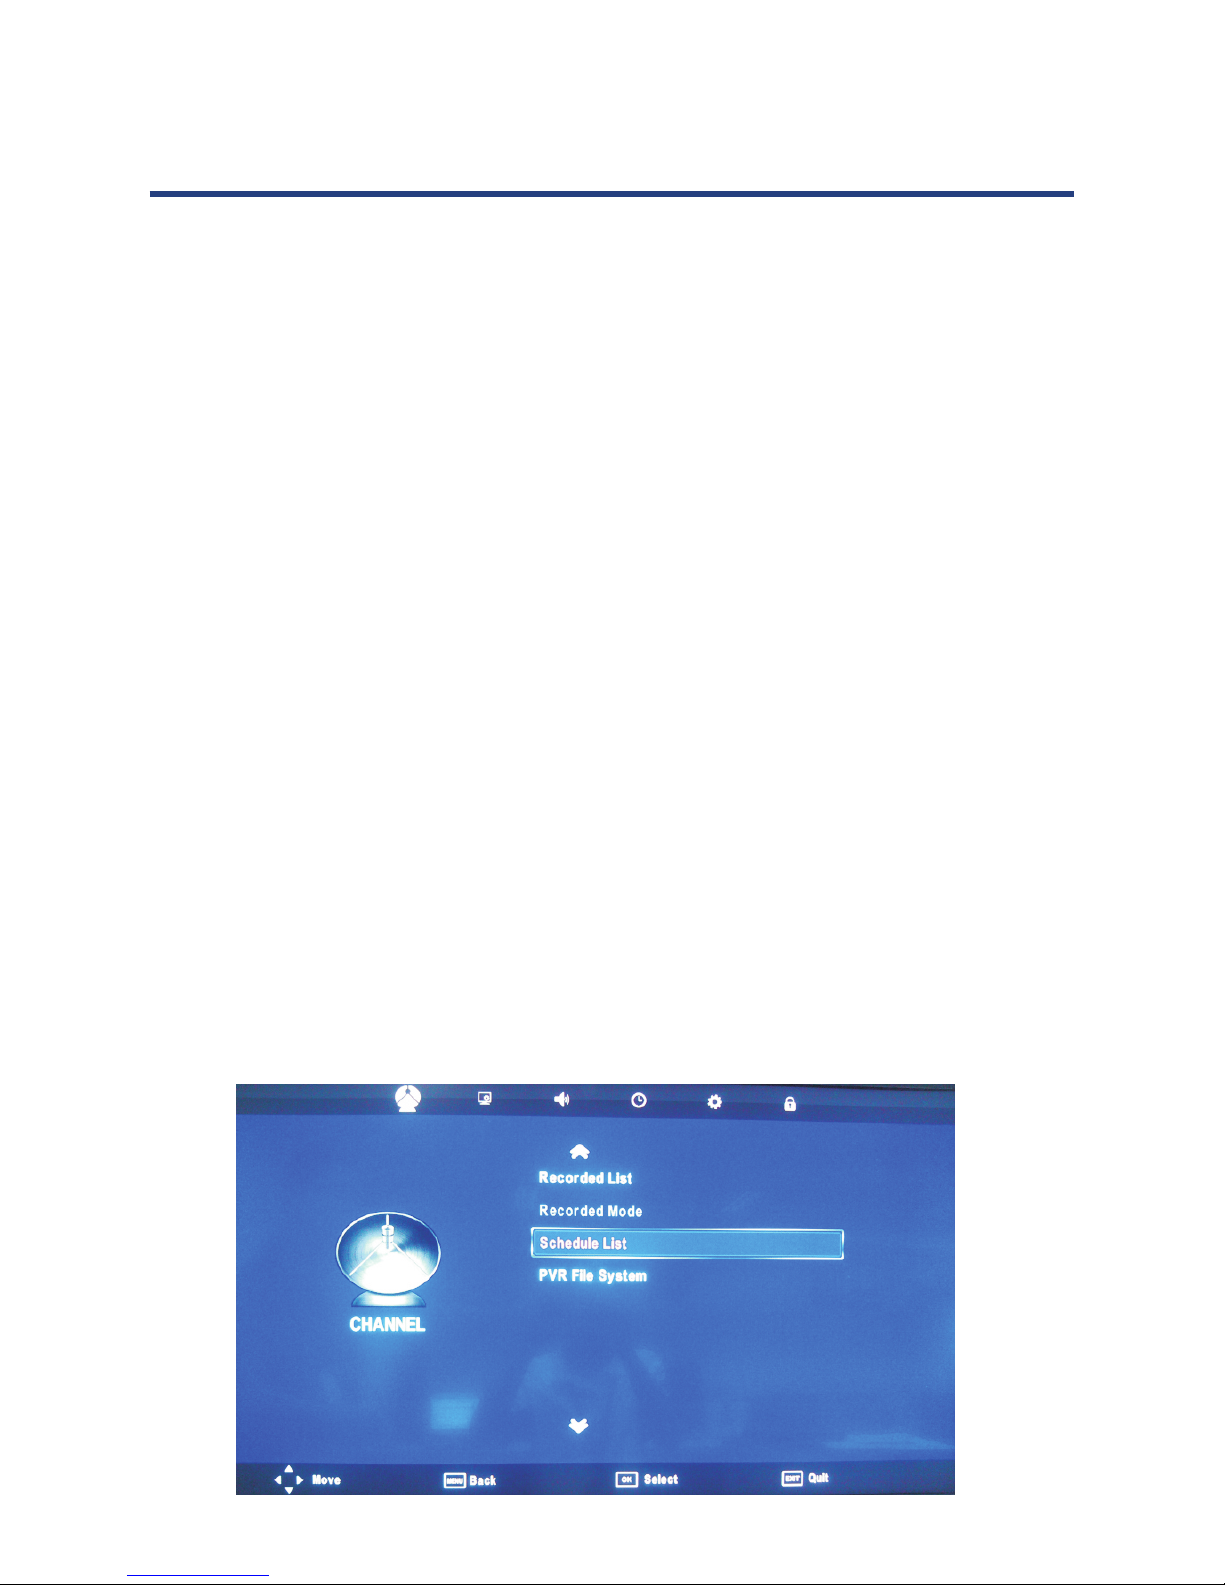
PVR File System
Enter PVR from CHANNEL menu, as follows:
USB Disk: If a compatible USB device is attached, this will indicate “PASS”. If no device is
attached, it will appear grey.
Format: You USB device will need to be formatted before it can be used for PVR functions.
NOTE: FormattingaUSBdevicewilleraseanyexistingdataonthedevice,backupall
existingdata.Largerdeviceswilltakelongertoformat.
Time Shift Size: Can’t be chosen. After check PVR File System, it means the USB passed
Master Format and can be used at Time Shift Space, the size is chosen by
clients when doing format.
Speed: Displays the speed of the attached USB device.
PVR File Syetem
Select Disk C:
Move
Selec t
OK
Back
MENU
Check PVR File S yet em Start
USB Disk
Format
Time Shift Siz e
Speed
Menu Operation

34
Select Disk
Choose the drive for PVR, C: is the default drive.
Channel - Recorded List
To view a list of recorded programs.
Title: Recorded List.
Ordering: Show in title right, means the current ordering way, Index key can switch option:
Programme -> Channel ->Time, which make orders by programme name, channel
order and record time.
Mark: Show current condition, recorded programme shows no mark, if shows
means
recording, and if it shows , it means on the playing, if Focused, it shows color image,
otherwise it is gray.
Select Disk
USB
Disk
0
C:
Mov e
Sel ect
OK
Check PVR File System
Press ‘OK’ button to check if you USB device is ready for PVR functions, If the disc is formatted
and compatible it will displays ‘SUCCESS’, if the disc is not ready, it will display ‘FAIL’.
File System Size
PVR File System Type
PVR File System Size
SD104 Min s
HD 29 Mins
Hi Sp eed FS
ALL
Mov e
Sel ect
OK
Select Disk
USB
Disk
0
C:
Mov e
Sel ect
OK
Bac k
MENU
Recorded List
Programme
8 Simples Rules
Before Winter Comes
Before Winter Comes
Love Comes Softly
INF O
Ind ex
Del ete
OK
Sel ect
INFO
Inde x
File System Size
PVR File System Type
PVR File System Size
SD104 Min s
HD 29 Mins
Hi Sp eed FS
ALL
Mov e
Sel ect
OK
Select Disk
USB
Disk
0
C:
Mov e
Sel ect
OK
Bac k
MENU
Menu Operation

35
Programme name: The programme name is construct by channel number and record
channel number.
Operation guide: Show the current available operation.
/ : Up and down to move Focus to select programme.
/ OK/Enter : Close/pop out the programme instruction.
Info/Display: Pop out or close the programme instruction.
DELETE: Delete Focused programme.
Menu Operation

36
Record Start (Instant Recording)
You can press the REC button to start (and the button to stop) recording directly.
If you want to stop recording, you should select Stop in the operation menu and press OK
button to operate.
The system can record and play back DTV at the same time. Select the appropriate action
from the panel above and press OK to operate.
The icon will be appear when you start to record.
Time Recorder
1. Press the “EPG” button on the remote control, the EPG menu will appear on the screen,
select a programme required and press the REC button to display the RECORDER
menu.
Menu Operation
When you success to set the timer record, it will
start recording.
Press Play to play what you have recorded, but the
recording is still on.
Press FB to play fast backward.
Press FF to play fast forward.
Press Pre. to play the previous video.
Press Next to play the next video.
Press Pause to pause the scene of video you are
watching, but the recording is still on.
Press Stop to stop recording.
Record Start (Instant Recording)
You can press the REC button to start (and the button to stop) recording directly.
If you want to stop recording, you should select Stop in the operation menu and press OK
button to operate.
The system can record and play back DTV at the same time. Select the appropriate action from the
panel above and press OK to operate.
The icon will be appear when you start to record.
PVR and Time shift Operation
When you success to set the timer
record, it will start recording.
Press Play to play what you have
recorded, but the recording is still on.
Press FB to play fast backward.
Press FF to play fast forward.
Press Pre. to play the previous video.
Press Next to play the next video.
Press Pause to pause the scene of
video you are watching, but the
recording is still on.
Press Stop to stop recording.
When you success to set the timer record, it will
start recording.
Press Play to play what you have recorded, but the
recording is still on.
Press FB to play fast backward.
Press FF to play fast forward.
Press Pre. to play the previous video.
Press Next to play the next video.
Press Pause to pause the scene of video you are
watching, but the recording is still on.
Press Stop to stop recording.
Record Start (Instant Recording)
You can press the REC button to start (and the button to stop) recording directly.
If you want to stop recording, you should select Stop in the operation menu and press OK
button to operate.
The system can record and play back DTV at the same time. Select the appropriate action from the
panel above and press OK to operate.
The icon will be appear when you start to record.
Time Recorder
1. Press the “EPG” button on the remote control, the EPG menu will appear on the screen,select
a programme required and press the REC button to display the RECORDER menu.
Recorded Mode
09 Ju n 18:14
Onc e
Sta rt Time
Mod e
Mon th
Dat e
Jan
201 0
/05/
04
End T ime
Min ute
Hou r
00
00
Mon th
Dat e
Jan
201 0
/05/
04
Min ute
Hou r
00
00
20 AB C HDTV
Mov e
Sel ect
OK
Bac k
MENU
PVR and Time shift Operation
2. Press the / buttons to select “Start Time” item, press the / buttons to set the
beginning recording time.
3. Use the / buttons to select “End Time” item, press the / buttons to select the
end time recorded.

37
4. A confirmation massage will be displayed and the recording time will be added into the
schedule list.
5. Press the “EPG” button then press the “YELLOW” to display the Schedule List.
NOTE:
1. List timer recording will start according to date and time priority.
2. New items will be added to the end of the list.
3. It enters the menu when recording, Focus on current recording plans.
Schedule List
Mode Ti me Da te
Program me T it le
Result
Channel Nam e
Delete
Quit
EXIT
Move B ac k
MENU
18:14 09t h Ju n
A TOU
19: 28-20 :20
Sat os
Jun
New
Tan ks
2 ABC T V
Menu Operation
Result
Quit
EXIT
Viewing Recorded Programs
A list of recorded programs can be displayed by
pressing the INDEX button on the remote control
when in DTV mode. You can navigate through the list
by using the arrow buttons on the remote. Press
RED button to delete the current highlighted recorded
program or INFO to display detailed information. Press
OK to commence playback of the selected recorded
program.
When playing back recorded programs, you can control
the playback using the PLAY/PAUSE, STOP, FFWD, and
FREV buttons on the remote as you would for media
mode.
Play
Press OK to play the selected program, or press
to play the recorded program directly. The icon will
appear when you start playback.

38
Delete: Press the RED button to delete the selected program.
Info: Press the Display or green button to bring up or close program information.
Time Shift Mode: Time shift may be used to pause and control live TV (digital only). When
watching digital TV program, press the PLAY/PAUSE button to start time shift mode. The
playback will pause and recording will commence in the background. To resume playback,
press PLAY / PAUSE again. You can also use FFWD and PREV to skip through the buffered
content.
NOTE: Whilst you can fast forward through the recording buffer, once you ‘catch up’ to live TV,
you will only be able to playback at normal speed.
Press the STOP button to cancel time shift mode.
Menu Operation

39
Troubleshooting and Advise
Troubleshooting
Control
No Signal
Please check that all cables are correctly plugged
in.
No Colour Shades Adjust the contrast, the colour and the brightness.
Stain show on the screen
Maybe result from a lighting signal from car,
motor, neon light and other electrical devices or
appliances.
Double or multiple display image
Maybe the result of an electrical wave disturb from
other TV, Computer and Game machine or Radio.
Snow on the screen The cables of the antenna are not correctly
plugged in.
The remote control does not work
Please check the batteries order and alignment,
check that the IR of the remote control is not hidden by something.
“Zip” made noise on TV cover
Even if the display image is correct, the noise may
come from an unsteady xation of the panel.
No Sound
Make sure that you have not press the MUTE button of the panel or of the remote control.
Please check if you can solve the troubleshooting by yourself.

40
Model GVA39FDLED
Display Type TFT LED
Resolution (Pixel) 1920 x 1080
Aspect Ratio 16: 9
Power Supply AC 100-240 V
Power Consumption 90 W
TV System PAL
Video Input Format PAL/NTSC
Audio Output Power L/R 2 x 8W
SUPPORT
ANTENNA YES
AV-IN YES
YPbPr-IN YES
HDMI-IN YES
VGA (PC)-IN YES
VGA (PC) AUDIO-IN YES
SCART - -
EARPHONE - OUT YES
S-VIDEO - IN - -
COAXIAL - OUT - -
COMMON INTERFACE - -
USB YES
DVD
Disc Physical Format - -
DVD Video Output Format - -
Specications
This manual is only for you reference, any change to the design and specication will not
be advised.

41
Notes

42
Notes

43
Notes
 Loading...