

1. ▲WARNING. Check the Bolts, Rivets, brakes and accessories very carefully before
using this stroller.
2. ▲WARNING. Stop using this product if there is any damage or broken parts or pieces.
3. Lubricate all moving parts and joints with a penetrating spray lubricant, from time to time.
4. Remove front wheel cylinder housings and clean thoroughly from time to time.
5. Clean the stroller frame by wiping with moist cloth and dry thoroughly to prevent any
rusting.
6. Always wipe dry your stroller after using it in the rain or in winter climates, making sure
road salt is removed from frame and joints. Allow the stroller to stand in an open, warm
and ventilated place to dry.
7. Do not leave your stroller outside in wet weather as the fabric could mildew.
8. Only hand-wash the fabric by using mild detergent in warm water. DO NOT wash in
machine. Hang in a ventilated place to dry. DO NOT tumble dry.
9. If you have any questions regarding the product please contact guzzie and Guss at
1-888-597-0992, or online at www.guzzieandguss.com. We will provide you the best
customer service.
10. It may be unsafe to use accessories other than those approved by the manufacturer
or distributor.
11. It may be unsafe to use replacement parts other than those supplied or approved by
the manufacturer or distributor.
The G+G 101 Goose stroller has a Limited Warranty for the period of 1
year from the receipt of purchase against manufacturers’ defects and
workmanship.
For Registration: submit online @ www.guzzieandguss.com
Or mail to the address provided.
Contact Info:
Peter John M. Distribution Inc.
88 SW Marine Drive, Vancouver, BC
Canada V5X 2R1
www.pjmdistribution.com
CANADA: 1-888-597-0992
Fax 1-604-324-2876
PRODUCT REGISTRATION AND WARRANTY
Goose
Goose Stroller
Please read this instruction manual carefully before using this product.
Be sure to save these instructions for future reference.
guzzie+Guss are committed to making the lives of children and parents safe,
uncomplicated and convenient. We would like to thank you for purchasing
this exciting product. It is important that you read and follow the instructions
in this manual carefully. Please make sure all the parts are properly attached
and the removable pieces fit on correctly. Please pay close attention to the
opening and closing mechanism. Read all warnings and safety steps before
use.
After completely reading and following all instructions in this manual, please
file the instruction manual in a safe place for future reference. If the product
you have received operates differently from instructions included with the
product please contact guzzie+Guss on the internet at
info@guzzieandguss.com. There you can obtain the most current information
regarding your new G+G 101 Goose stroller. You may have to provide the
registration number and manufacturing date; this information will be found
on frame of your stroller.
1
2
10
11
13
12
3
4
5
6
7
8
9
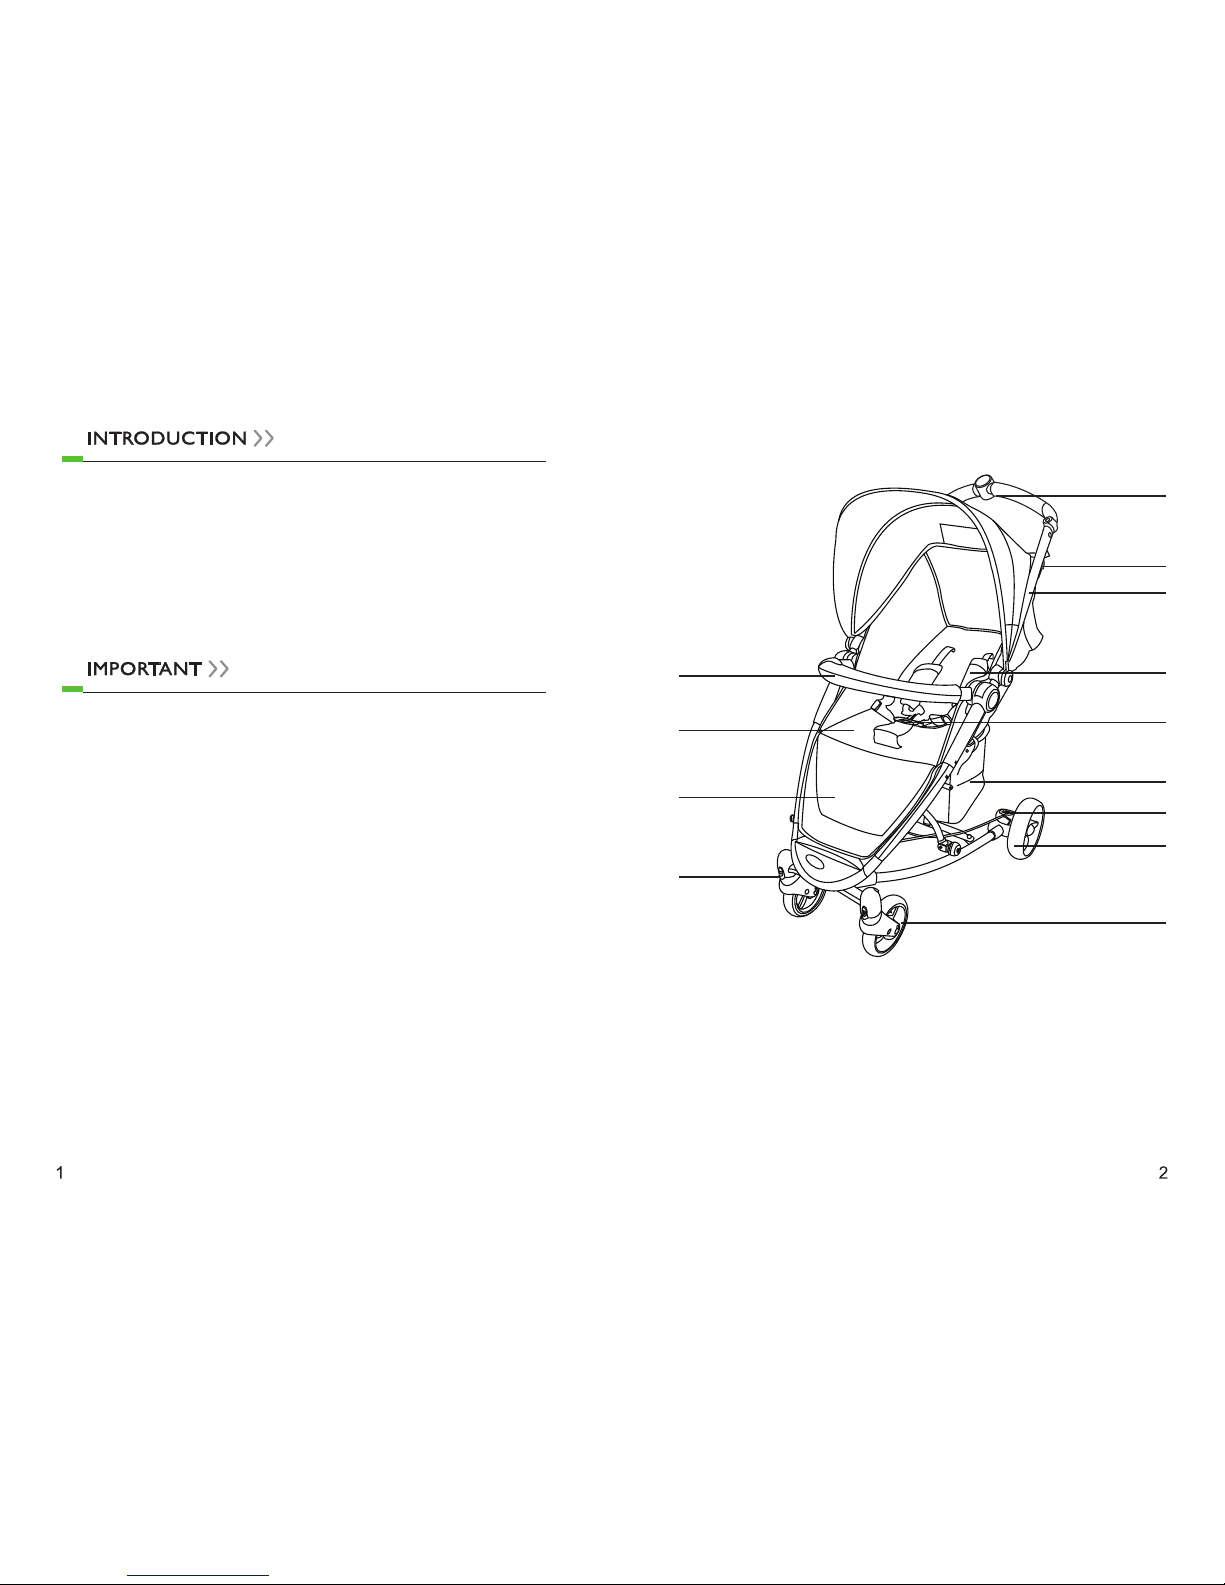
1 Button
2 Folding latch
3 Handle
4 Shoulder protecter
5 Harness buckle
6 Mesh basket
7 Parking brake
8 Rear wheel
9 Front wheel
10 Front bar
11 Seat
12 Foot Rest
13 Swivel lock
STROLLER CONTENTS
a. The Stroller chassis, including the
seat upholstery fabric attached, and
a storage basket attached.
b. The Canopy/Hood and back drape
c. The Wheels, 2 fronts & 2 rears
d. Car seat hooks (2) and Manual
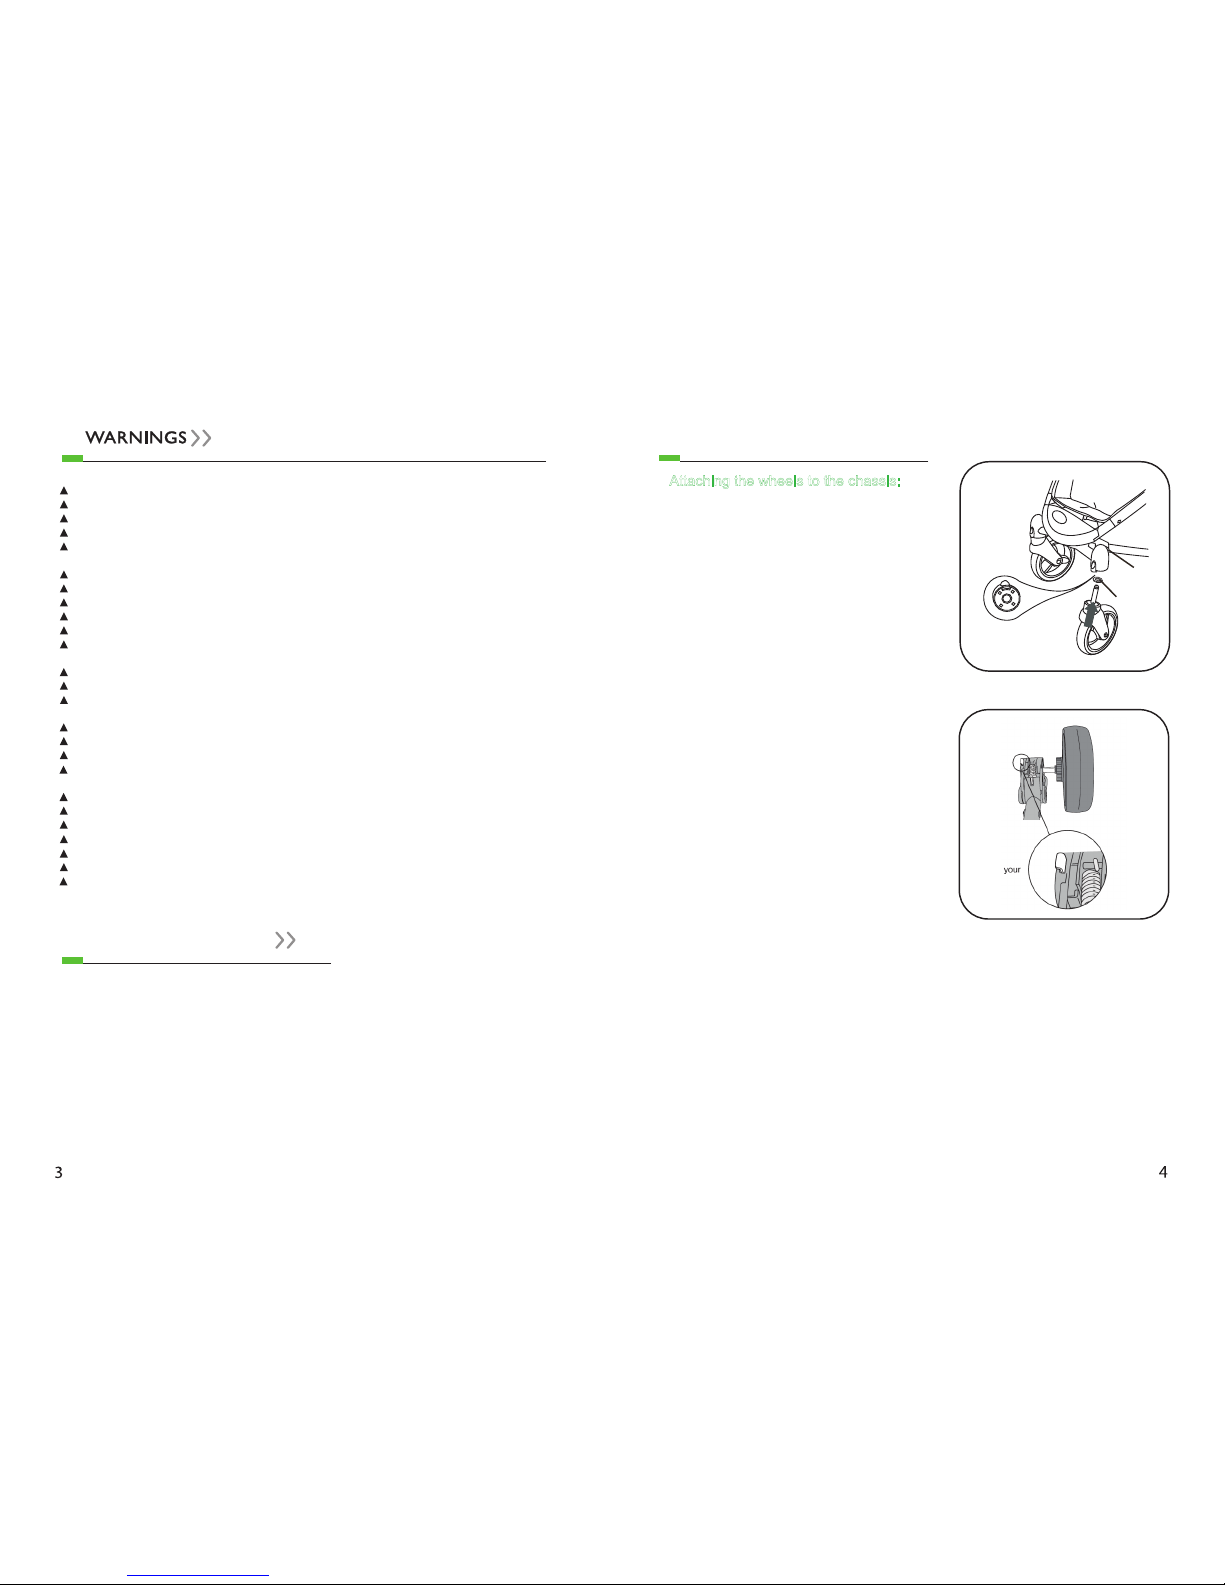
Attaching the wheels to the chassis:
NOTE: You should lubricate the wheels
prior to installing them. Use oil based
lubricant, and make sure to lubricate the
shaft as well as the wheels on the axle.
Make sure to remove any excess
lubricant with a cloth or paper towel.
a. To install the front wheels, lay the
stroller on it’s back with the rear wheels
on the bottom against the floor.
There is no right or left, either set will fit
properly on both sides.
b. Slide a washer, onto the wheel post.
Then slide the front wheel post into the
front wheel housing of the stroller
chassis. Push the wheel up until it clicks
into place. Repeat the same procedure
on the other side.
c. To remove the front wheel, look for a
release button at the top of the wheel
housing cylinder. While pushing the
button, slide the wheel housing cylinder
off the post.
To assemble rear wheels: Insert rear wheel
pegs into plastic houses until a click is
heard. To remove the rear wheel; press
down on the latch located on the plastic
housing. Pull the rear wheel out.
button
washer
Read and understand these instructions before using this product.
Never leave child in the stroller unattended.
To ensure proper use, store this user guide in a convenient place so it can be consulted often. Failure
to follow all warnings and instructions could result in serious injury or death.
WARNING! Care must be taken when folding and unfolding the product to prevent nger
entrapment.
This stroller is designed for one child.
Make sure child’s arms are clear when adjusting the seat – backrest up or down.
Avoid serious injury from falling or sliding out. Always use the 5-point harness to secure child.
Do not use stroller with a child who weighs more than 50 lbs (22kgs).
Do not use stroller with a child taller than 40 inches (101.6 cm).
Do not overload basket – Maximum weight in basket is 10 lbs (4.5kg). Overloading the basket may
cause the stroller to become unstable.
Always make certain that the stroller is fully opened and in the locked position before use.
Assembly of this stroller must be performed only by an adult.
Do not hang or place items on the stroller handle or frame except for those approved by
guzzie+Guss. They may cause the stroller to become unstable.
Do not allow children to climb on or play with the stroller.
Never use stroller on stairs or escalators
WARNING. Never allow the child to stand while in the stroller.
To avoid entrapment or pinching, do not fold or unfold stroller when child is in or within reach of the
stroller.
Only use this stroller on even surfaces such as sidewalks and roads, and at walking speed.
Stroller is intended for walking speed only. Do not use while jogging, skating, etc.
Always set the parking brake when stroller is not moving.
Only use accessories and replacement parts approved by guzzie+Guss
Do not use this stroller if there are any broken or missing parts.
When the stroller is not being used, please store the stroller in the dry and shady place.
The stroller is not a toy; do not let children play with the stroller.

Getting Started (Assembling the Stroller)
IMPORTANT: Before beginning to
assembly the stroller, be sure that you
have all proper parts and pieces for your
stroller and that these parts and pieces
are in proper working condition.
1. Opening the chassis: Figure 1
To unfold frame: First undo the frame
lock, located on the right side of the
frame. Then grasp the handle and lift up
quickly to open frame. Once upright,
press down handle until a click is heard.
See Figure 1.
5
Attaching the Canopy/Hood:
1. To assemble the canopy: Align the
holes on the canopy fixture with the
fixing rivets on the handles. Press the
fixture onto the handles. Snap on the
buttons as shown in Figures 4B and 4C.
2. On the back of the canopy flap, you
will find a strip of vecro, this will attach
to the back of the seat top.
To Remove Canopy
Twists the “C” clamps until they pop off
the stroller frame, and undo the Velcro
from the back of the seat fabric.
A
B
C
Rivet head
6

To assemble the front bar
Insert the front bar pegs into holes in
the base until they click. To remove,
press down side buttons and remove
completely. See Figure 5.
The guzzie+Guss G+G101 Goose
stroller has been equipped with a foldout
visor on the front of the canopy; you can
either pull this out, or tuck it back into the
canopy to store it.
Using the Canopy
To adjust the canopy: Pull forward or
press back on the canopy to open or
close the canopy. The fold out visor
can be pulled out for extra shading
from the sun.
Using Your Stroller:
1. To use the safety harness:
• A five point harness is provided to
secure your child in the stroller.
• All straps of the harness are adjustable
by moving the slider on each strap.
• The buckle is released by squeezing the
buckle tongues together.
• The harness must be used at all times
and adjusted for a comfortable fit.
To adjust waist length: To shorten, pull
bottom loop (2) down then pull on strap
end (1). To lengthen, pull out top loop (3)
then pull out on buckle. See figure 6.
Reclining the Stroller Seat-backrest:
a. To recline (lower) the seat, press
down on the grey button and pull back
the seat.
b. To erect (raise) the seat-backrest;
hold the adjusting buckle (A), and pull
up on theplastic ring which is attached
to the end of the adjusting webbing.
A
top loop
strap end
male buckle
8
7

Pushing the stroller
The front swiveling wheels can be
locked into a stationary position (so
they will not swivel). You will find on the
top of both front wheel housings a black
button. Push to engage the locking
mechanism.
To use braking system:
Step down on rear wheel parking brake
lever 1 (red) to brake. Step down on
rear wheel parking brake lever 2 (grey)
to release brake. Always apply the wheel
brakes whenever you are stopped.
To release the swivel lock, slide the
tab up, repeat on both sides.
9 10
Brake System Adjustment Instruction
Caution: Always check and adjust the
brake cable to make both brakes work
correctly. Do not overstep brake pedal.
Follow the instructions below to adjust
brake system:
1. Twist the adjustment nut to right side
to tighten brake pedals.
2. Twist the adjustment nut to left side to
loosen the brake pedals.
3. After twisting the adjustment nut into
the correct position, tighten the fixing
nut into place to secure the adjustment
nut.
11
A
C
B
Folding latch
3
4
5
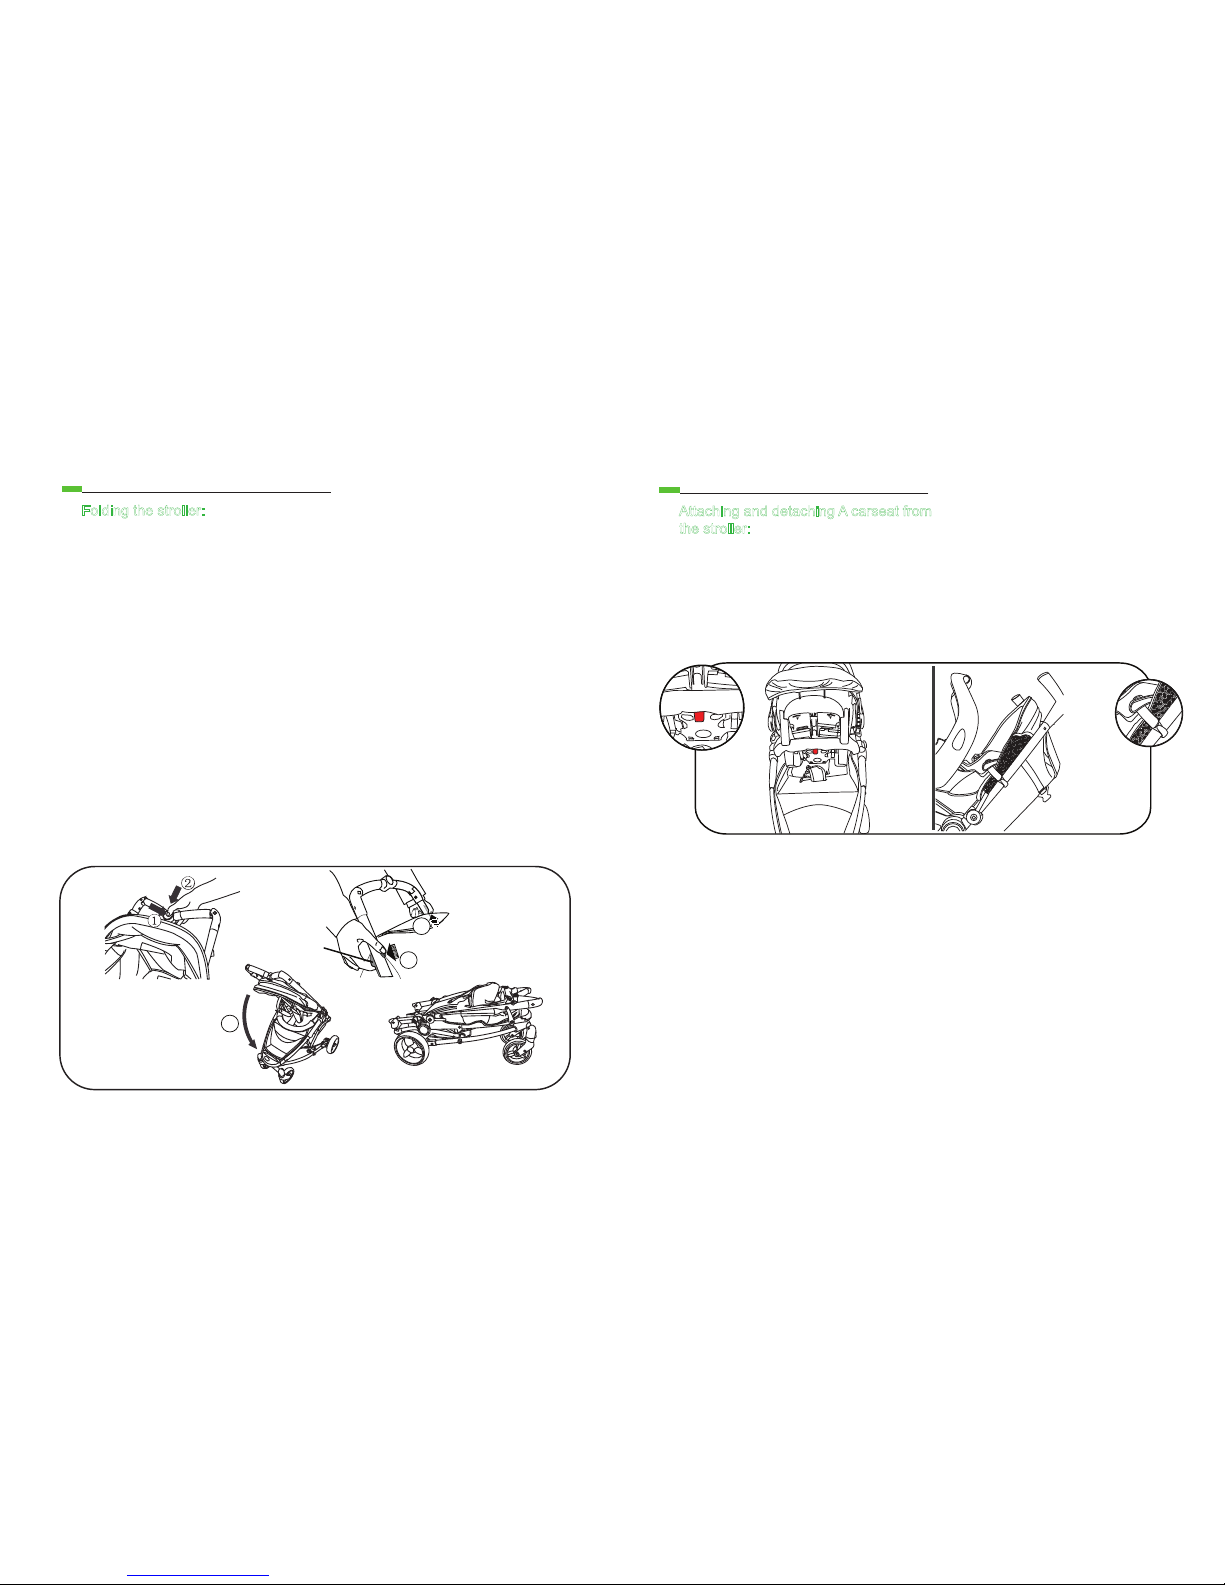
Folding the stroller:
(A) Press down button on Handle and
push downward on the Handle (1).
(B) Release the folding latches (4) on
the handles and push forward the
handles at the same time
(C) Continue to push down towards the
front wheels to completely fold the
frame. Be sure to secure the frame
lock once the stroller has been folded.
Warning: make sure children are not close
to the stroller while you fold the stroller.
Attaching and detaching A carseat from
the stroller:
Please note: at time of production, this
stroller is only capable of working with
Graco SnugRide brand car seats, other
car seats may not work or fit with this
stroller.
12
To attach a car seat to the stroller:
1. Remove the fabric cover from the
front bar.
2. Insert the car seat into the stroller seat
with the car seat facing back towards
the handlebar and seatback.
3. Align the red hook on the back of the
car seat with the corresponding holes
on the front bar of the stroller and
press down until you hear a click.
Please make sure that the red hook
has fully locked onto the front bar of
the stroller before use with your baby.
4. Hook the round plastic hooks of the
car seat straps onto the stroller handles.
Clip the other plastic ends into the
seatbelt slots on the car seat. See
Figure 6.

Available guzzie+Guss accessories
(sold separately)
Universal Cup Holder
Universal Rain Cover
Universal Hitch
ACCESSORIES
13
 Loading...