

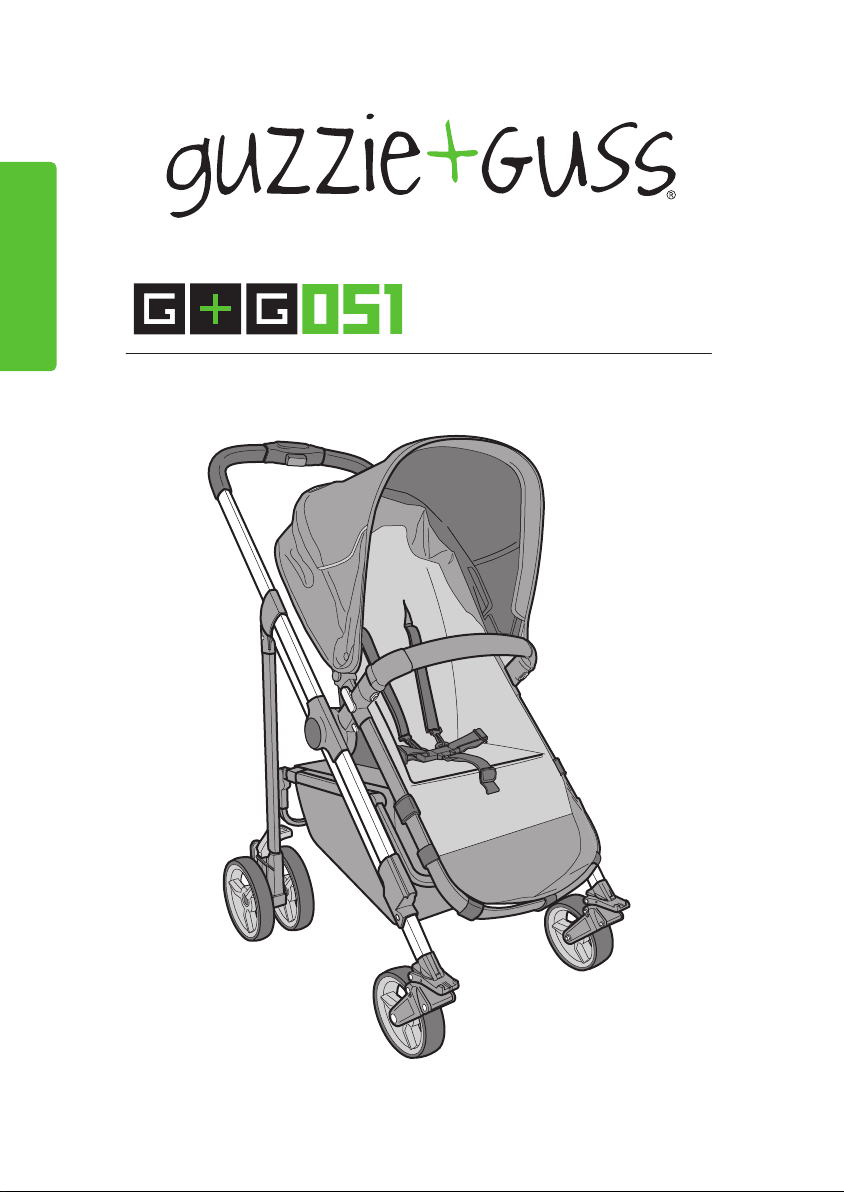
Instruction Manual
G+G051 DENMAN
Sport Stroller
Please read this instrucon manual carefully before using this product.
Be sure to save these instrucons for future reference.

INTRODUCTION
guzzie+Guss are committed to making the lives of children and parents safe,
uncomplicated and convenient. We would like to thank you for purchasing this
exciting product. It is important that you read and follow the instructions in this
manual carefully. Please make sure all the parts are properly attached and the
removable pieces fit on correctly. Please pay close attention to the opening and
closing mechanism. Read all warnings and safety steps before use.
IMPORTANT
After completely reading and following all instructions in this manual, please file the
instruction manual in a safe place for future reference. If the product you have
received operates differently from instructions included with the product please
contact guzzie+Guss on the internet at info@guzzieandguss.com. There you can
obtain the most current information regarding your new G+G 051 stroller. You may
have to provide the registration number and manufacturing date; this information will
be found on frame of your stroller.
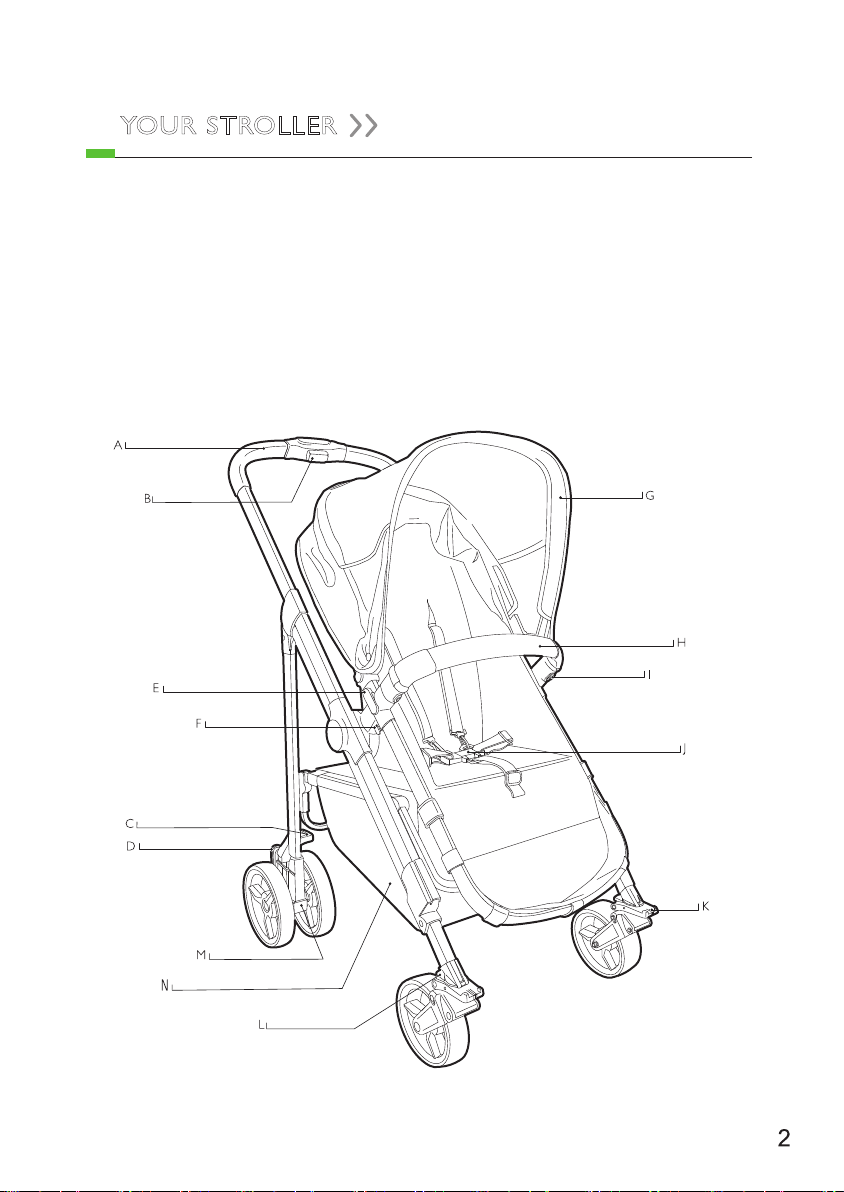
YOUR STROLLER
A) Handle
B) Folding/Unfolding trigger
C) Brake
D) Brake release
E) Seat frame release
F) Seat recline
G) Canopy
H) Bumper bar
I) Bumper bar release
J) Harness
K) Front Swivel lock
L) Swivel Lock release
M) Rear wheel release
N) Basket
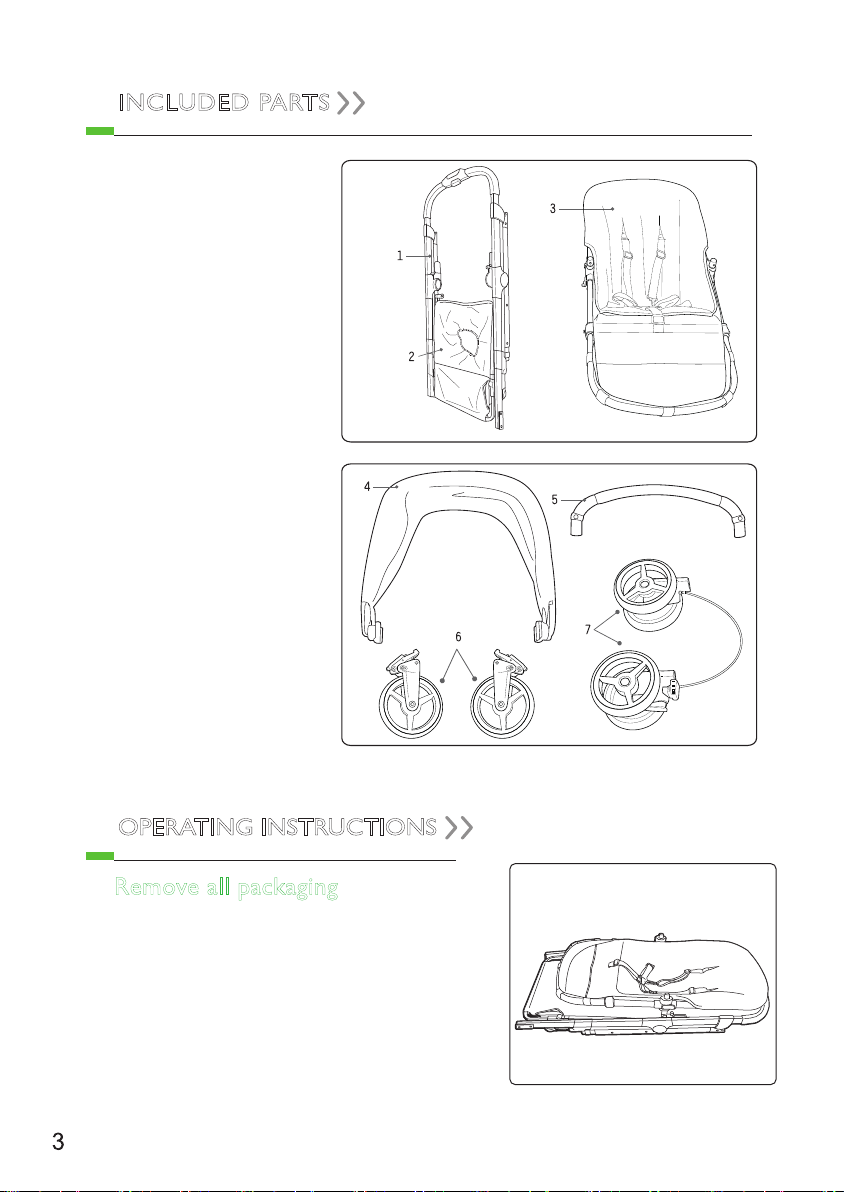
INCLUDED PARTS
1. Stroller frame
2. Basket
3. Seat
4. Canopy
5. Bumper bar
6. Front wheels
7. Rear wheels
8. Rain cover (not shown)
OPERATING INSTRUCTIONS
Remove all packaging
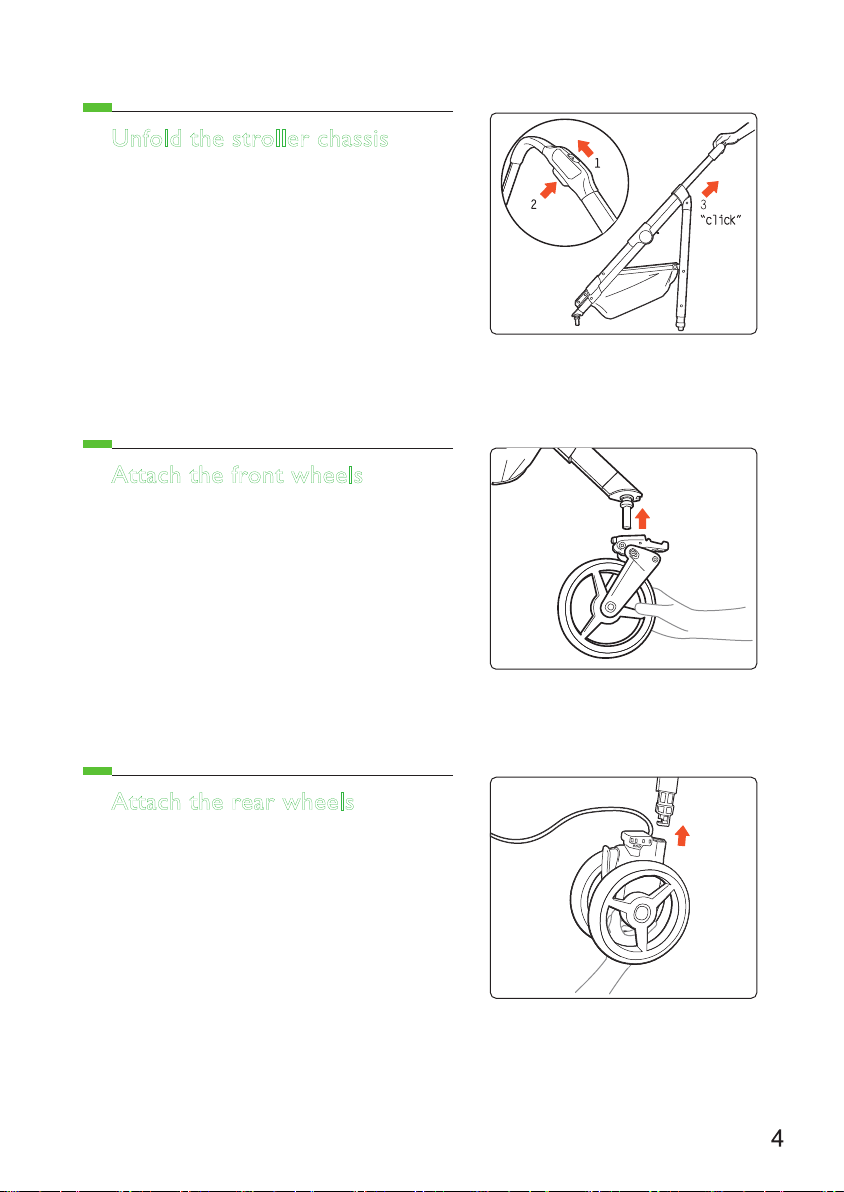
Unfold the stroller chassis
1. Slide the 2nd lock on the handle to
the right, until it locks.
2. Squeeze the Folding Trigger.
3. Pull upwards on the handle; allowing
the rear of the chassis to swing out,
which will lock the stroller in the open
position.
Attach the front wheels
1. Line up the front wheel with the wheel
shaft. Push wheel upward until you hear
a “Click”.
2. Repeat for the other side.
ATTENTION: make sure the wheels are
properly attached by lightly tugging on
the wheel.
Attach the rear wheels
1. Line the rear wheel up with the rear
chassis, push upward until you hear a
“Click”
2. Please repeat for the other wheel
ATTENTION: make sure the wheels are
properly attached by lightly tugging on
the wheel.

USING YOUR STROLLER
Front wheels
1. To lock wheels, lift the tab on the top of
the wheel. Be sure that wheels are straight.
You will hear a “click” when lock is engaged.
2. Repeat on the second wheel.
3. To unlock wheels, just push down on the
tab on the top of the wheel, you will again
hear a “click”.
4. Repeat on the second wheel.
5. To remove the front wheel to lubricate,
you will find a button on the inside of the
wheel base. Push this button, and pull down
on the wheel.
Please Note: it is necessary to lubricate
your stroller from time to time, including the
wheels, as well as other moving parts.
Please use oil based lubricant.
Rear wheels and brakes
1. To engage the brake, step down on
the red pedal on the right side. Please
make sure the brake is engaged before
letting go of your stroller
2. To disengage the stroller brake, press
in at the top of the grey brake release
button.
3. To remove the rear wheels, press the
button and pull down on the wheels. (see
pic)
Reclining the seat
1. Lift the seat recline mechanisms
(lever) upward, you need to do both
sides simultaneously.
2. There are 3 positions for the seat,
fully reclined, fully upright, and a middle
position.

Removing the seat
1. Press the buttons on both sides of the
seat.
2. Pull the seat upward, while holding
the buttons down.
Reversing the seat
1. Remove the seat.
2. Move the seat recline mechanism to
the desired position (this can also be
adjusted later).
3. Align the seat above the recline
mechanisms in the rear-facing position.
4. Push the seat connectors onto the
seat recline mechanisms, until you hear
a “click”.
5. Adjust the recline mechanism to your
desired position.
▲WARNING: Please make sure that
both sides have been attached properly.
Try lifting the seat off the chassis; if
either side moves, you need to push
down until you hear a “click”.
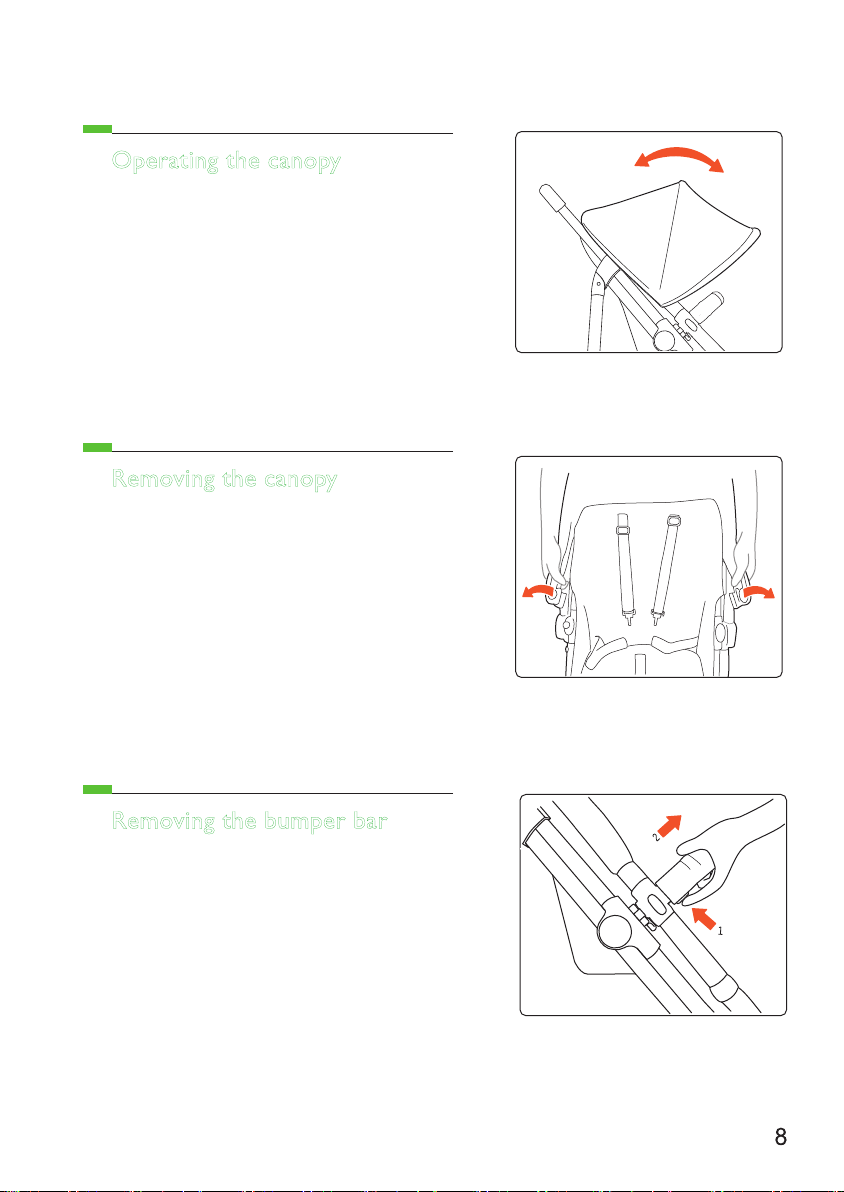
Operating the canopy
1. Gently pull the canopy forward to
open to the desired angle.
2. To close, evenly pull back on the
canopy to desired position.
Removing the canopy
1. To remove the canopy, unhook the
C-clips on both sides of the seat frame
and lift away from tubing.
Removing the bumper bar
1. Push both the grey buttons on the
outside ends of the bumper bar. While
depressing both buttons, pull the bar
forward to remove.
▲WARNING: The bumper bar is NOT
designed to be used as a carry handle
for the stroller seat.

Using the safety harness
The G+G 051 Stroller is equipped with a
5-point adjustable harness system. The
shoulder harness is adjustable in height
and can be changed by unthreading the
metal from its current position and
rethreading it through the shoulder belt
positioning loop at the desired height.
The length of the shoulder straps can
also be changed by sliding the buckle on
each shoulder strap. The waist belts are
adjustable on either the right or left by
using the adjustment buckles on the
waist strap.
To use the 5-point harness, insert the 2
waist strap tongues into the center
crotch strap buckle from the right and
left. The shoulder straps do not need to
be detached each time the child is
removed or seated in the stroller.
▲WARNING: Always fasten the 5-point
harness securely and properly around
the child’s body whenever the child is
seated in the stroller.
▲WARNING: Never leave the child
unattended when seated in the stroller
Removing the insert pad
1. Undo Velcro enclosures on insert pad
located beneath the shoulder belts.
2. Slip pad out from beneath the belts.

Removing the seat fabric
1. Remove the seat from the stroller
chassis.
2. Undo all the Velcro straps around the
footrest.
3. Under the seat you will find a strap
that needs to be unbuckled.
4. Pull seat fabric upward off the seat
frame.
Using the optional carseat adaptor
1. Set the seat recline mechanisms to
the vertical position on both sides.
2. Align the carseat adaptor over the
recline mechanisms. Ensure that the
safety strap is on the side closer to the
handle.
3. Simultaneously push the connectors
onto the recline mechanisms until you
hear a “click” from both sides (see
image).
4. To remove adaptor, simultaneously
press buttons on the connectors and lift.
▲WARNING: Please make sure that
both sides have been attached properly.
Try lifting the adaptor off of the chassis; if
either side moves, you need to push
down until you hear a “click”.
▲WARNING: Carseat adaptor is only to
be used in the horizontal position.

Using the rain cover
1. Fully extend the canopy.
2. Place the rain cover over the canopy.
3. Attach the left and right buckles to the
corresponding rivets on each side of the
stroller seat.
4. Place the elastic strap around the
footrest to secure the rain cover.
▲WARNING: Never use the rain without
having your child properly restrained in
stroller.
▲WARNING: The rain cover is designed
to be used with this guzzie+Guss stroller.
Not for use with other accessories.
Folding the stroller
1. Lock the front wheels.
2. Slide the 2nd lock on the handle to
the right, until it locks.
3. Squeeze the folding trigger.
4. Lift the stroller slightly; allowing the
rear leg of the chassis to swing in, and
then push the handle down towards the
ground, this will lock the stroller in the
folded position. You should hear a “click”
when it is locked.
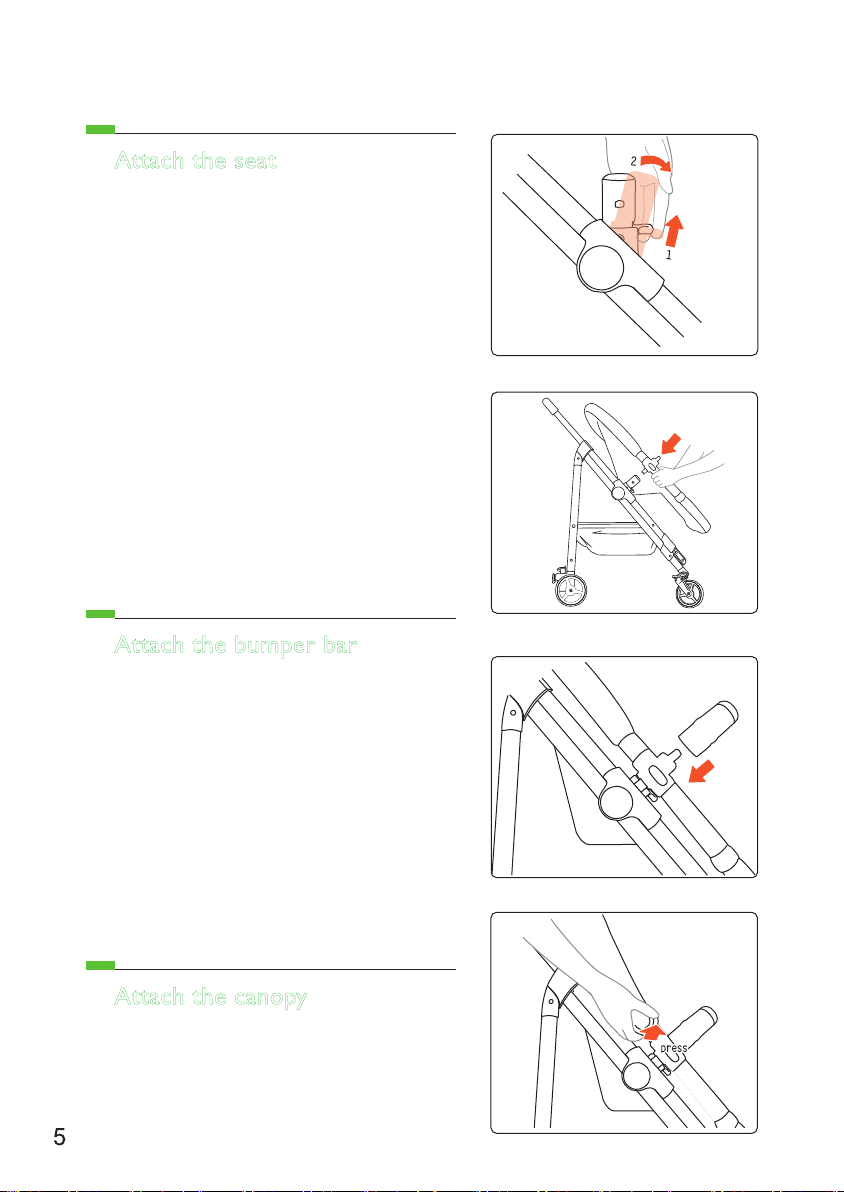
Attach the seat
1. Pull the seat recline post upwards on
both sides.
2. Now adjust the posts to a 45 degree
angle towards the front of the stroller.
3. When attaching the seat, align the
connectors on each side of the stroller
seat above the recline posts. Once
aligned, simultaneously push the
connectors onto the recline posts until
you hear a “click” from both sides.
▲WARNING: Please make sure that
both sides have been attached properly.
Try lifting the seat off the chassis; if
either side moves, you need to push
down until you hear a “click”.
Attach the bumper bar
1. On both sides of the stroller seat, you
will find a black post with a grey button
on the outside. The front bumper bar is
to be pushed directly onto these two
posts. You should hear the bar “click”
into the proper position. Test the lock by
gently pulling up on the center of the bar.
The bumper bar should not pull off the
posts if it is properly locked into position.
There is no specific orientation for the
bumper bar. It can be installed in either
direction and will work properly.
Attach the canopy
1. Attach the canopy clamp onto the
seat frame on both sides by pressing
clamp firmly onto tubing.

OPTIONAL EQUIPMENT
Universal carseat adaptor
guzzie+Guss has developed a “truly”
universal carseat adaptor that will work
with every infant carseat that we have
seen yet. Just adjust it to fit your seat
and the included safety belt will keep
baby in a secure position.
Universal cup holder
guzzie+Guss has developed a “truly”
universal cup holder will work with both
your new G+G051 or any other stroller
you own. Auto adjusts to fit bottles or
large cups. Flexible hinge keeps your
cup from tipping over.

WARNING
Please note the following to ensure safe use of your stroller
▲WARNING: Using this stroller for purposes other than intended use may:
• Void the warranty
• Damage the stroller
• Cause harm or injury to the child
• Cause harm or injury to others
▲WARNING: The G+G 051 is NOT designed as a jogging or running stroller and
should never be pushed while wearing inline skates or roller blades.
▲WARNING: Always fasten the 5-point harness securely and properly around
the child’s body whenever the child is seated in the stroller.
▲WARNING: Never use the rain cover without having the Canopy/Hood in place
and properly attached to the seat frame.
▲WARNING: Never leave the child unattended.
▲WARNING: This stroller is designed for use with one child at a time, from infant
up to 25 kgs (56 lbs). .
▲WARNING: Never allow the child to stand while in the stroller.
▲WARNING: Make sure child’s arms are clear when adjusting the seat recline
position.
▲WARNING: Only use this stroller on even surfaces such as sidewalks and
roads, and at walking speed.
▲WARNING: Avoid using the stroller on uneven surfaces.
▲WARNING: Keep away from high temperatures and other dangerous places.
▲WARNING: When the stroller is not in use, please fold and store in a dry,
shady place, away from children. This stroller is not a toy.
▲WARNING: To prevent the stroller from becoming unstable, do not place
parcels or accessory items anywhere except in the storage basket and pockets
provided.
▲WARNING: Any load attached to the handle may affect the stability of the
stroller. Do not overload stroller.

CARE & MAINTENANCE
1. ▲WARNING: Check the rivets, brakes and accessories very carefully before
using this stroller.
2. ▲WARNING: Stop using this product if there is any damaged or broken parts or
pieces.
3. Lubricate all moving parts and joints with a penetrating spray lubricant, from time
to time.
4. Remove front wheel cylinder housings and clean thoroughly from time to time.
5. Clean the stroller frame by wiping with moist cloth and dry thoroughly to prevent
any rusting.
6. Always wipe dry your stroller after using it in the rain or in winter climates, making
sure road salt is removed from frame and joints. Allow the stroller to stand in an open,
warm and ventilated place to dry.
7. Do not leave your stroller outside in wet weather as the fabric could mildew.
8. Only hand-wash the fabric by using mild detergent in warm water. DO NOT wash
in machine. Hang in a ventilated place to dry. DO NOT tumble dry.
10. It may be unsafe to use accessories other than those approved by the manufacturer or distributor.
11. It may be unsafe to use replacement parts other than those supplied or approved
by the manufacturer or distributor.
12. If you have any questions regarding the product please contact guzzie + Guss at
1-888-597-0992, or online at www.guzzieandguss.com.

WARRANTY
The G+G 051 has a Limited Warranty for the period of 1 year from the receipt of
purchase against manufacturers’ defects and workmanship.
For Warranty Registration:
submit online @ www.guzzieandguss.com
Or mail to the address provided below:
Imported by:
Peter John M. Distribution Inc.
88 SW Marine Drive, Vancouver, BC
Canada V5X 2R1
info@guzzieandguss.com
Tel 1-888-597-0992
Fax 1-604-324-2876
 Loading...