

GUSTARD DAC-X20PRO User Manual
Gustard
DAC-X20PRO
HD D/A converter with DSD
User Manual

- 1 -
Table of contents
Front Panel...................................................................... 2
Rear panel....................................................................... 2
The Screen and the Setting menu............................................. 3
Remote controller............................................................... 5
Product Specification........................................................... 6
Warranty and service........................................................... 7
Drivers installation.............................................................. 8
OS Settings..................................................................... 11
Archive DSD function with foobar2000....................................... 12
Q/A.............................................................................. 16
- 2 -
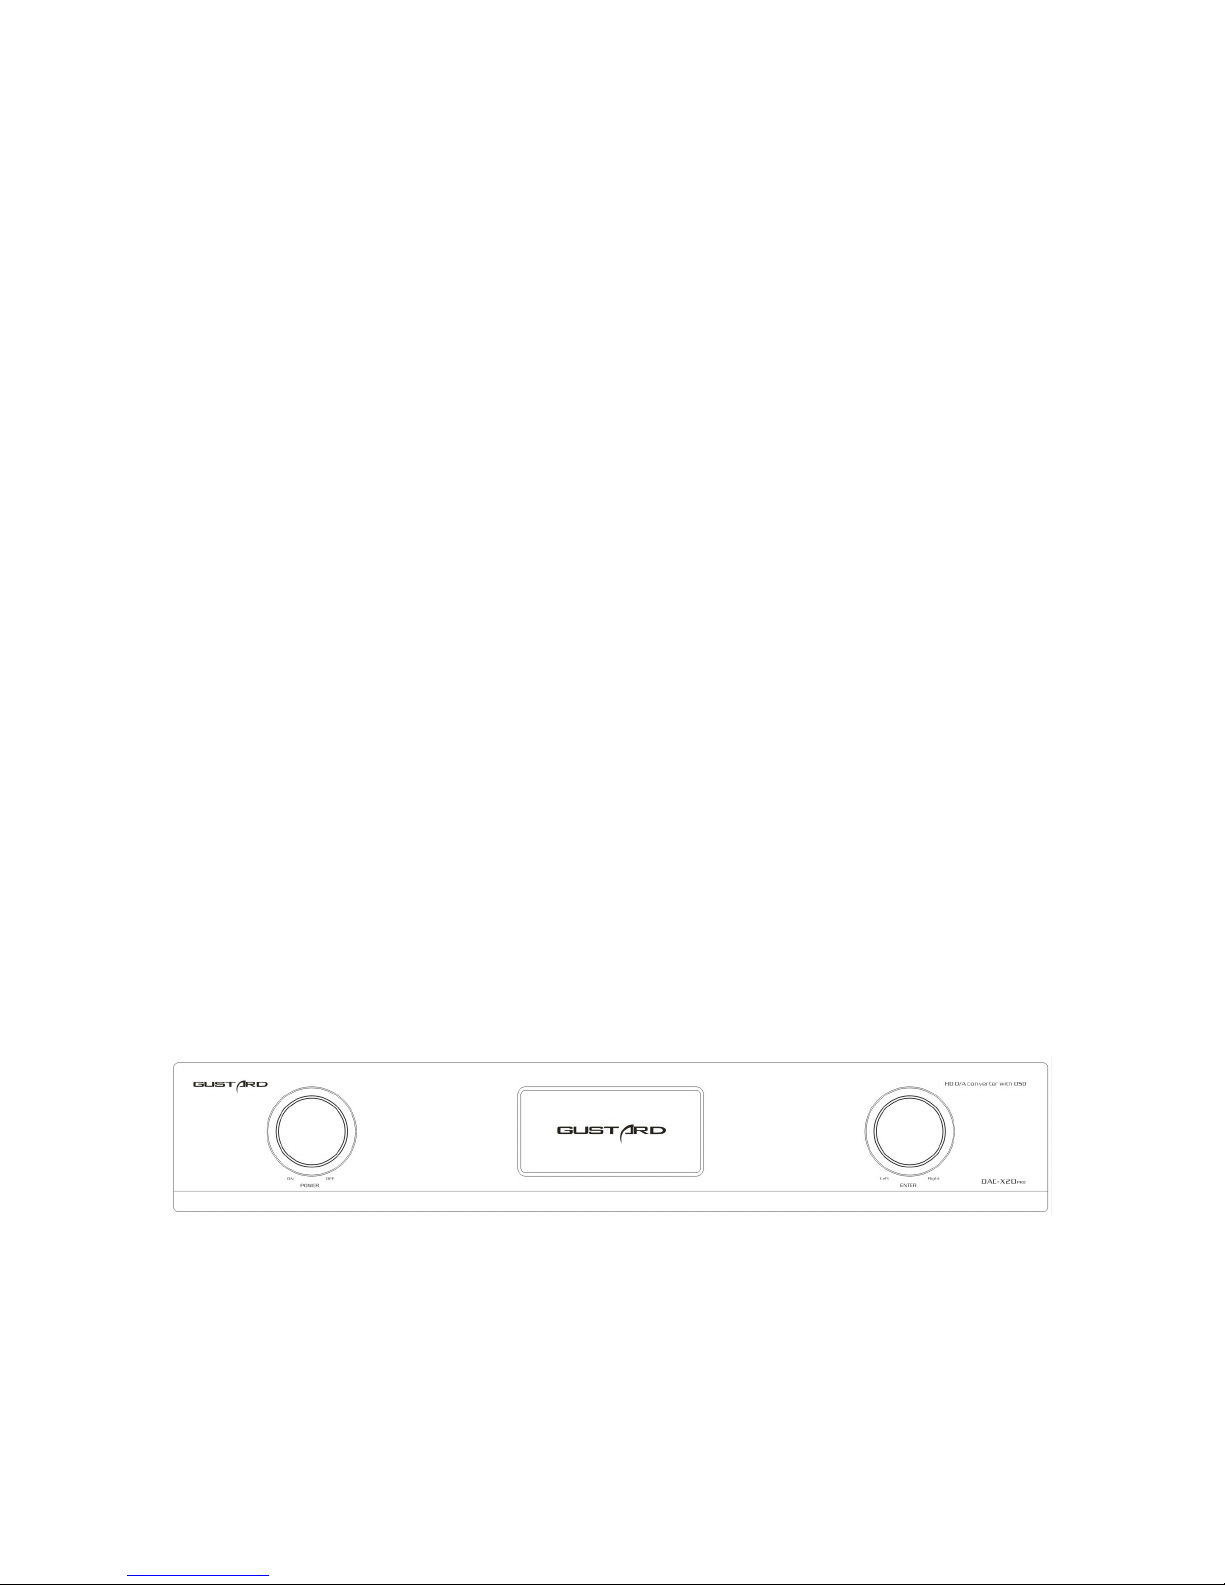
Front panel
1. Power switch——rotary switch.Clockwise to turn on.Counter clockwise to turn off.
2. The monitor display the input channel encoding format sampling rate volume and others.
3. Multi-function knob can archive all the functions by rotating(CW/CCW) or pressing.
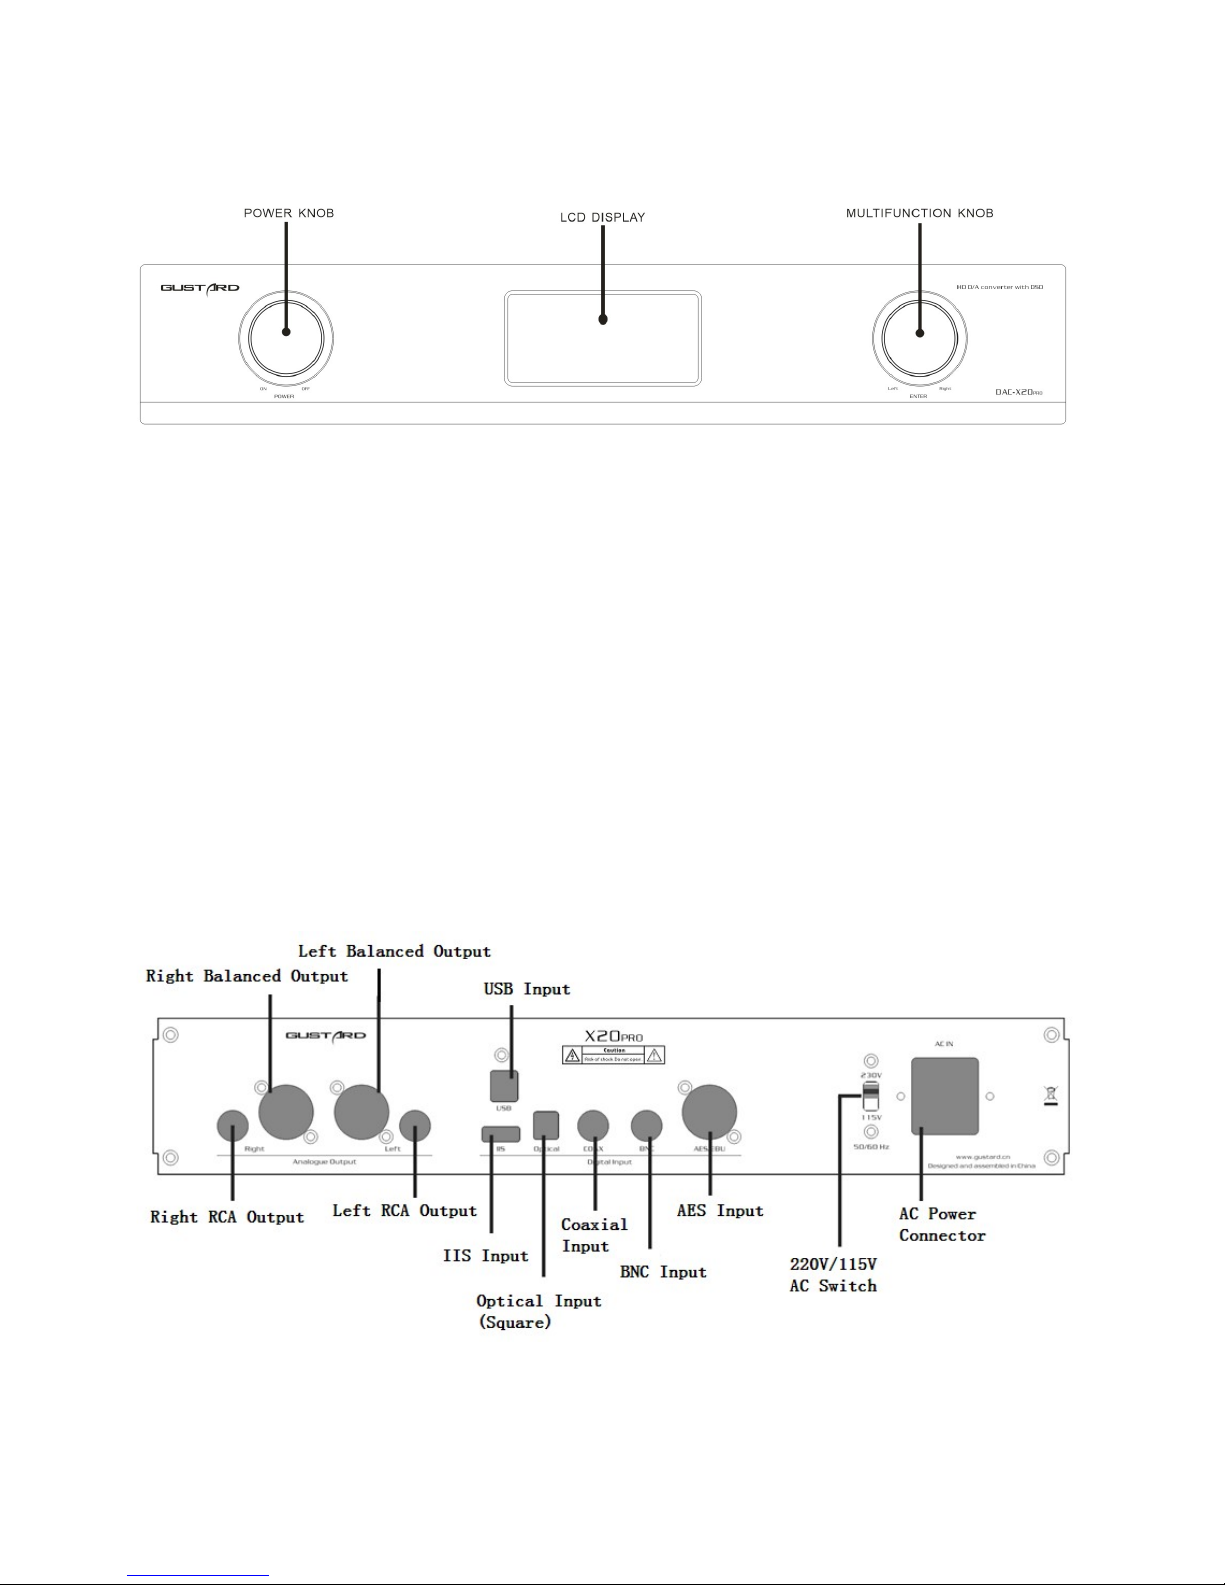
Rear panel
- 3 -
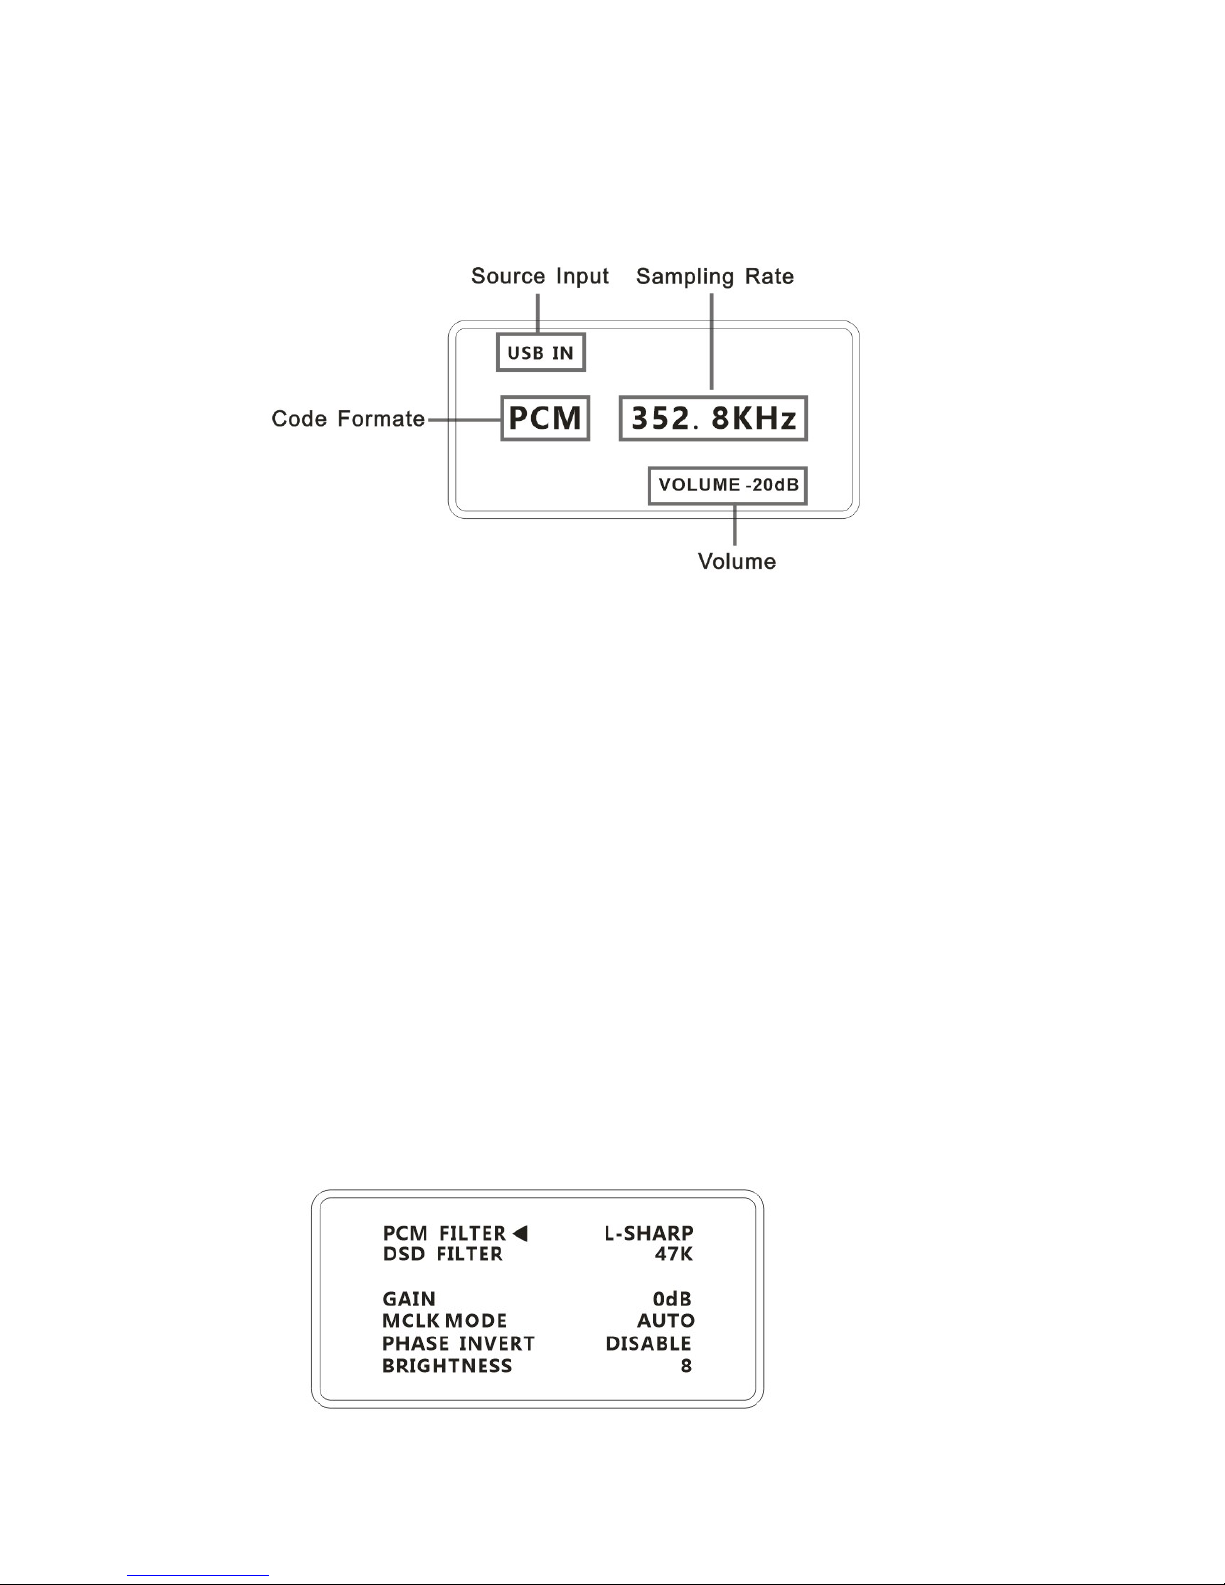
Display and the menu
1. Used large OLED monitor.Display the real-time status and functions
The following figure shows an example
2. Input channel selection:
X20Pro has 6 channels to input.In main menu press the knob to select in
COAX——BNC——AES——USB——IIS——OPT circularly.(With out USB daughter-card will also
display the USB channel.But no signal input)
3. Volume:
In main menu turn the knob to adjust the volume.Clockwise to increase counter clockwise
to decrease from -90dB to 0dB a total of 90 levels adjustment.
4. Enter the menu:
When in the main interface.Hold down the knob for 2s to enter the menu.And press it to enter the
next function.Adjust the functions by rotation.The menu switched by the arrow circularly.
—PCM Digital Filter adjust
—DSD Digital Filter adjust
—Gain adjust
—Master clock mode
—Phase control
—Brightness adjust

- 4 -
5. Menu introduction:
When in the main interface.Hold down the knob for 2s to enter the menu(For two more second to
cancel or after 30s back to the main interface).The following were introduced on each line of the
menu:
a.PCM FILTER:
X20PRO's filter can work in seven modes:M-SHARP —— M-SLOW —— L-SHARP —— L-SLOW ——
HYBRID —— APODIZING —— BRICKWALL switched by the knob
SHARP/SLOW filter divided in two group.One is MINIMUM PHASE start with M-.The other one is
LINEAR PHASE start with M-.SHARP for rapid roll-off digital filtering it is the most common type
sounds most accurate and neutral.LOW slow roll-off.which has a smooth signal attenuation
characteristics of the band.but also because of the band Attenuation characteristics.MINIMUM
PHASE and LINEAR PHASE have the different Impulse response.MINIMUM PHASE without
pre-ringing but long post-ringing.Can be more harmonic overtones.HYBRID Combined with the
characteristics of the two.Sometimes could have the advantages of two.APODIZING is a unique
filter could conceal the Pre-ringing(a type of digital distortion will resulting in some unnatural sharp
or harsh sound).BRICKWALL the filter is sharp roll-off and clean sound.
b.DSD Filter:
X20PRODSD filter with 4 different bandwidth can be selected.Rotate the knob to select in
47K——50K——60K——70K circularly.According to the sampling rate to adjust.47K is recommended
when listen DSD64(2.82M).The larger bandwidth means more treble detail
c.GAIN:
The high-performance fully balanced analog circuit in DAC-X20 has a 3-level gain adjustment to suit
for different input sensitivity back-end equipment for achieving the optimum signal matching
performance. After entering the corresponding menu item and the gain can be changed in values 0dB,
+6dB, and +12dB.
* If the volume of the back-end equipment can be adjusted, the volume and gain are recommended to be set at 0dB, namely straight
connection.
d.MCLK MODE:
After many years of research and development.X20PRO archive this unique function.In order to set
the ES9028PRO in the best clock environment.True HI-END performance.When select
AUTO.X20PRO will enter the adaptive master clock mode.A more accurate clock will be obtained by a
set of high performance PLLs (phase-locked loop), and it will then be fed to the ES9028PRO DAC.
Because the signal clock and the master clock are not the conventional asynchronous mode, the digital
interpolation filter inside ES9028 will no longer produce a weak timing error (jitter), and the digital
signal will be more accurately recovered. When selecting “Normal” option, the clock mode becomes to
the normal mode, which is the official ES9028PRO asynchronous mode.
*Under the “Auto” mode, the quality of the master clock of DAC-X20Pro will be more or less depended by the quality of the superior
clock. This mode is recommended to be used only for the clock of the front-end audio equipment in good condition.
- 5 -
e.PHASE INVERT:
The amplifier in the RCA output default is positive phase.XLR balanced output for the American
standard polarity output.that is 1,2 hot 3 cold. There are two options for this function: DISABLE
and ENABLE (optional).
f.BRIGHTNESS :
There are 8 levels of brightness to adjust(OLED Display)
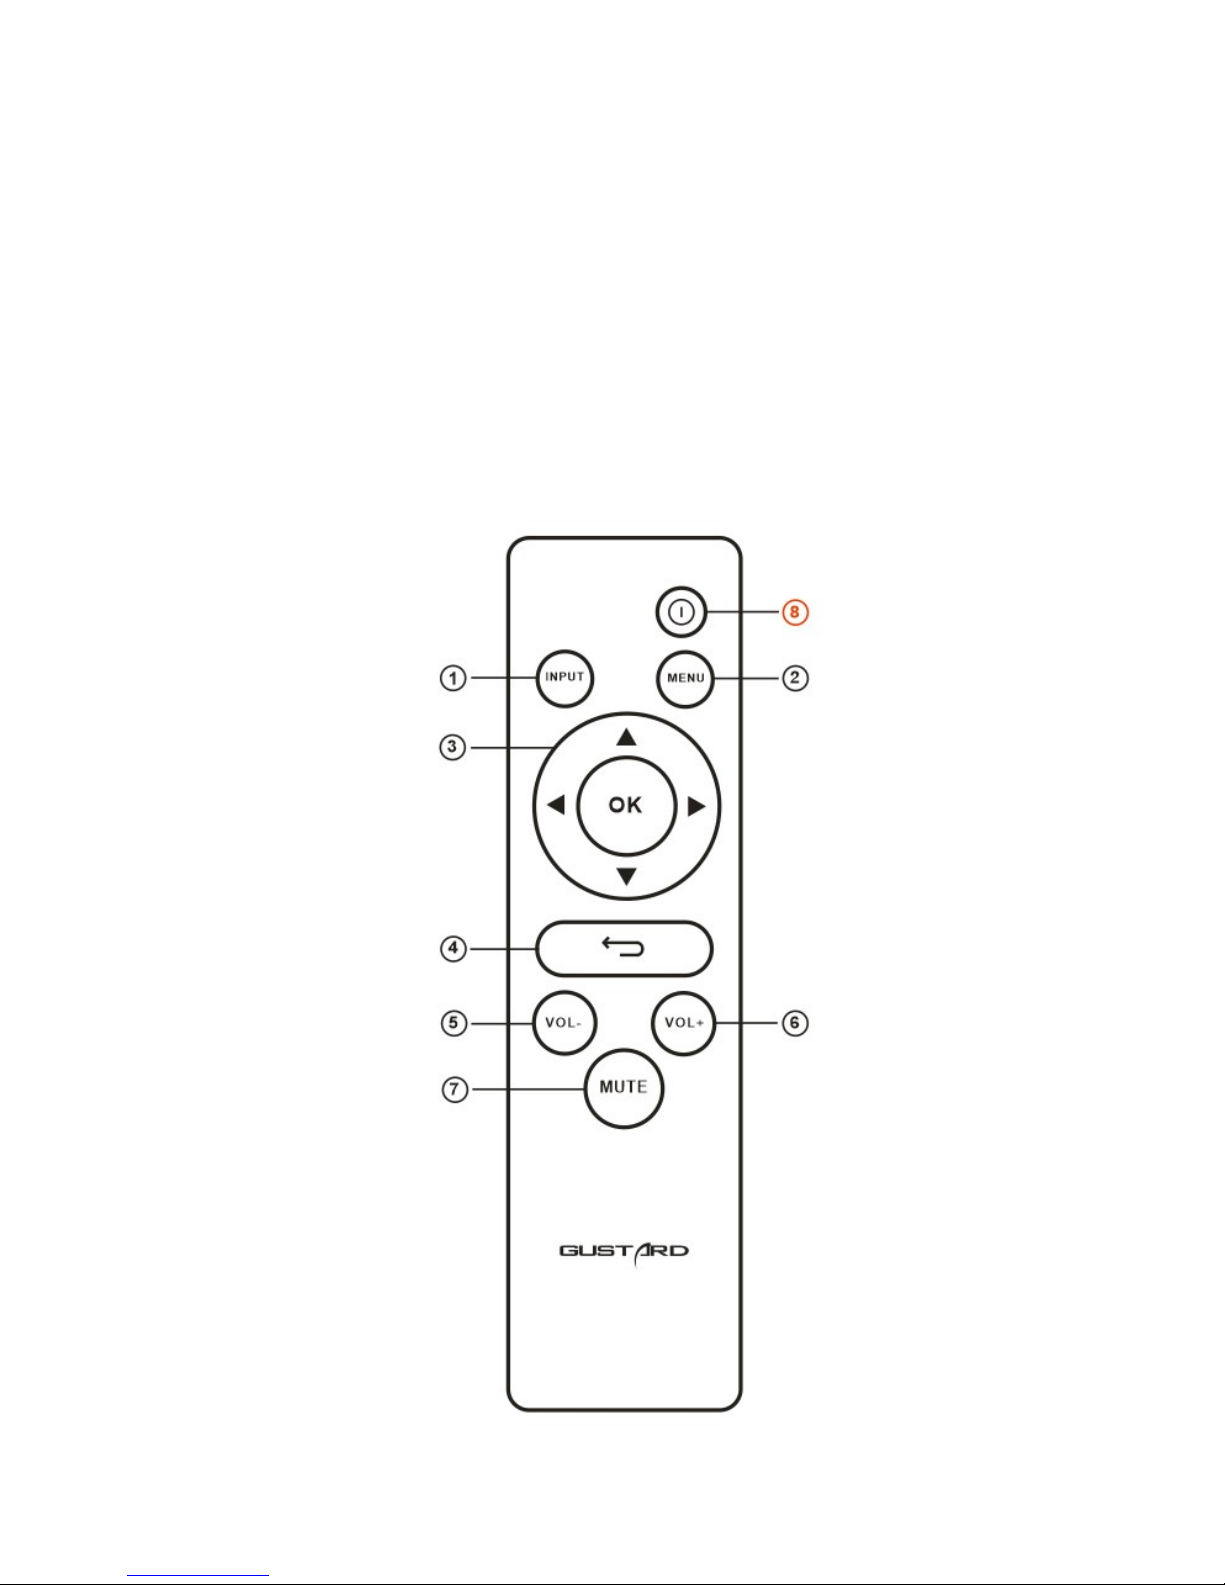
Remote Controller

- 6 -
Input Button.
Source will be switch to the next after pressing this button by the following cycle sequence: COAX -
BNC - AES - USB – IIS.
Menu Button.
DAC-X20 main menu is shown by pressing this button.
Four Directions Button.
In DAC-X20 main menu,different item can be explored by UP and DOWN buttons, and different
options in an item can be selected by LEFT and RIGHT buttons.
Return Button.
Return back to the main menu display.
Volume Decrease Button.
It can reduce volume only when DAC-X20 shows the main menu on the screen.
Volume Increase Button.
It can increase volume only when DAC-X20 shows the main menu on the screen.
Mute Button.
DAC-X20 will be muted when this button is pressed, and mute will be released after another
pressing.
Power Button.
This button is invalid, X20pro does not have the corresponding function.
Note
1) Operating distance of the remoter varies depending on the angle.
2) If there something blocks the remoter and the sensor, operation might be failed.
3) If the remoter will not be used for a long time (one month or longer), the battery is recommended to be removed.
4) If battery liquid leakage happens, battery compartment should be clean immediately and installed a new battery
5) This remoter might cause the wrong operation of other infrared-red controlled devices.
 Loading...