

GUSTARD A20H User Manual
Gustard
A20H
DAC/Headphones Amplifier
User Manual

- 1 -
Table of Contents
Front Panel...................................................................... 2
Rear panel....................................................................... 2
The Screen and the Setting menu............................................. 3
Remote controller............................................................... 5
Product Specification........................................................... 6
Warranty and service........................................................... 7
Drivers installation.............................................................. 8
OS Settings..................................................................... 11
Archive DSD function with foobar2000....................................... 12
Q/A.............................................................................. 16
- 2 -
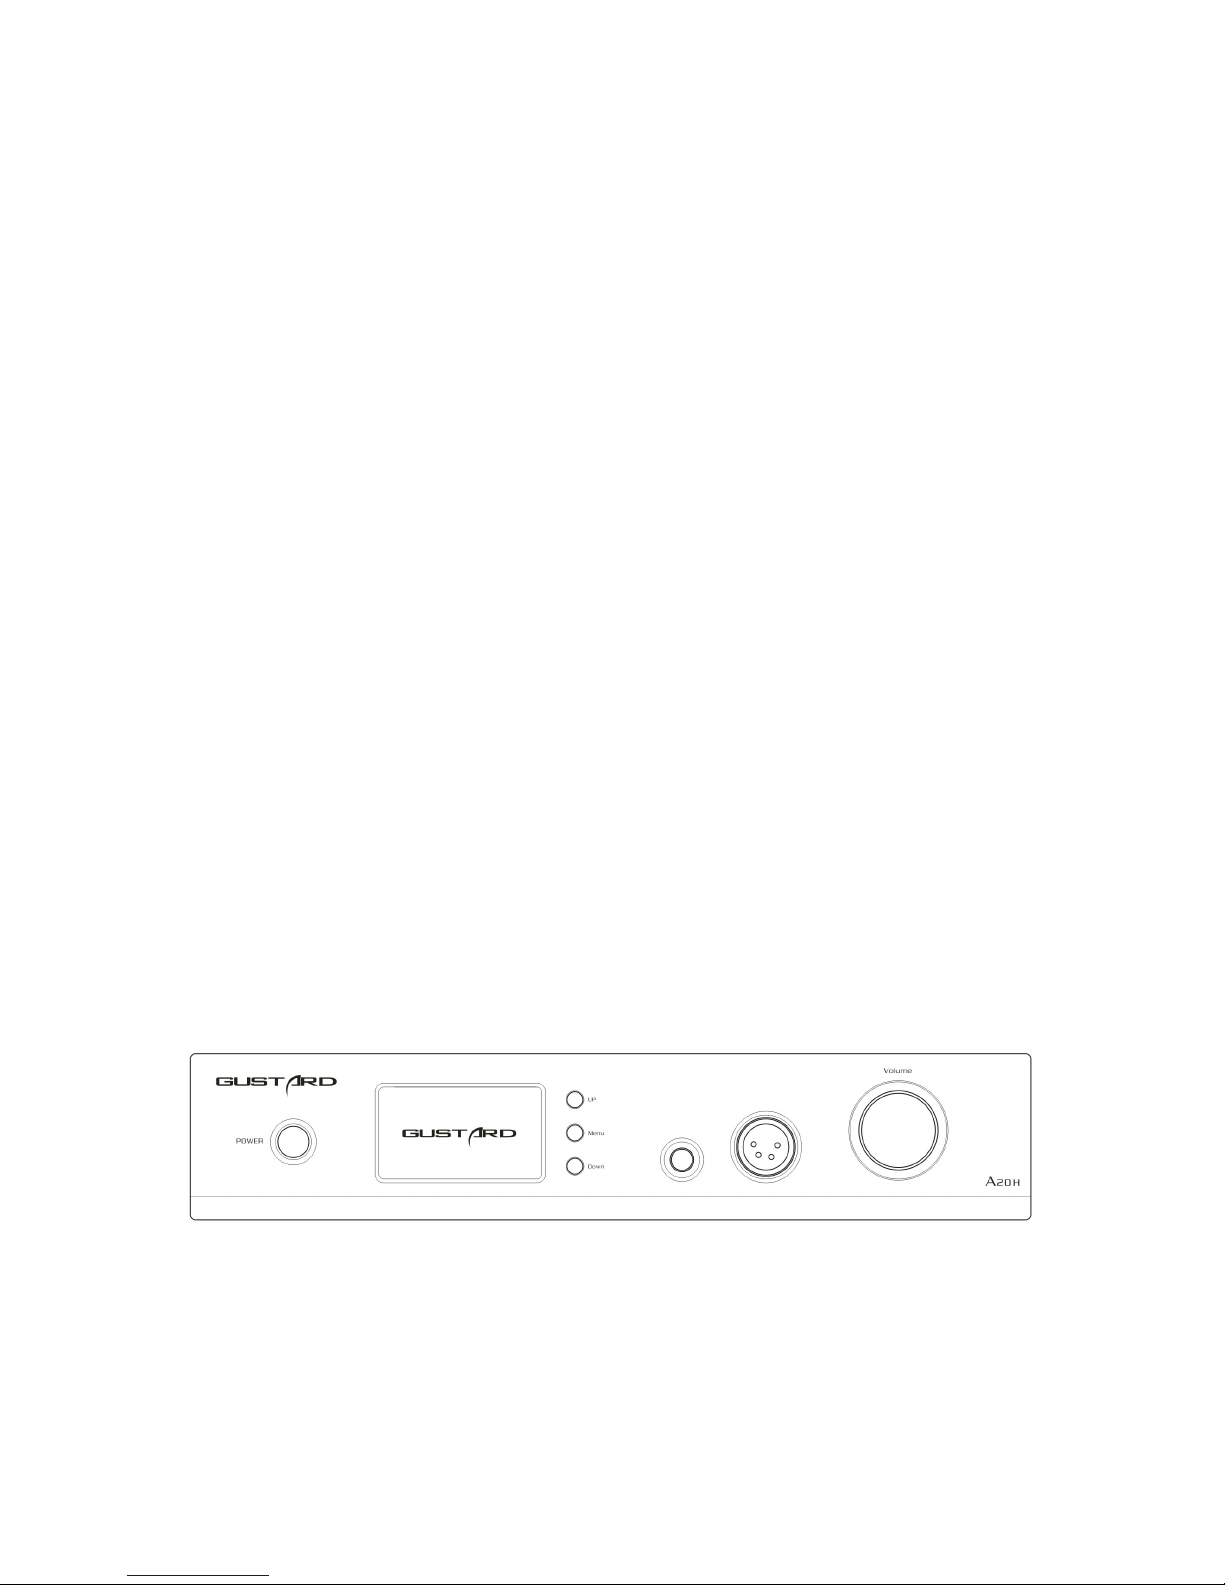
Front panel
1. The Power button is a key switch, press once to power on, press again to shutdown.
2. The screen shows the current input channel, encoding format, and sample rate, volume
and other status.
3. The Function buttons can be used to select the input channel and enter the settings menu.
4. Balanced headphone jack can be connected to balance headphones.
5. Single-ended headphone jack can be connected to single-ended headphones.
6. Rotate the volume knob clockwise or counterclockwise to increase or decrease the volume
of the output; or to adjust the options when entering the menu.
Rear panel
- 3 -
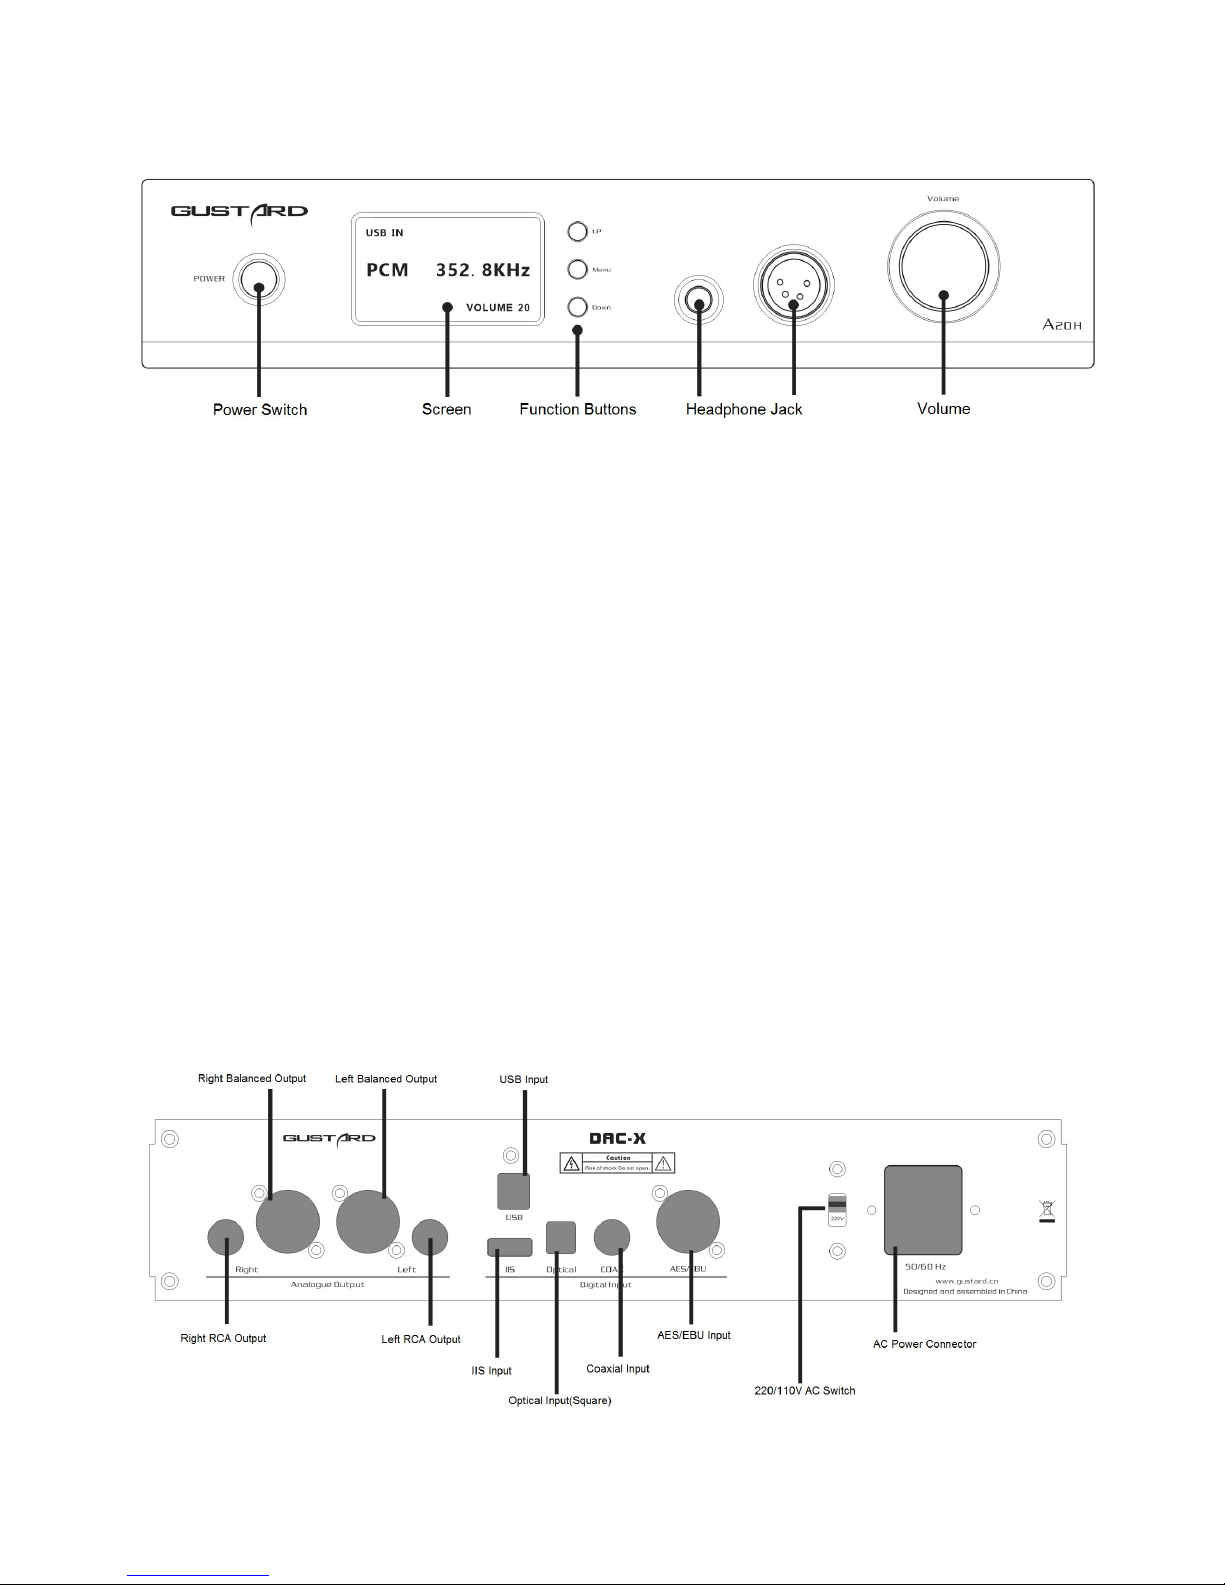
The screen and the setting menu
1.The A20H DAC & Headphones amplifier use a large-size OLED screen to display the
real-time status and functions operation.The following figure shows an example
2.Input channel selection
The A20H has 5 input channels. In main menu status, press button "Down" could select in
COAX——AES——USB——IIS——OPT. You can also press "Up" to select in the Reverse order.
(Note: the USB option can be selected at any time. But if the USB option is selected without
USB daughter-card installed, there will not be any signal input to the A20H)
3.Volume
In main menu status, rotate the volume knob to adjust the volume. Clockwise to
increase, counterclockwise to decrease. Volume from -60dB to 0dB, a total of 60 levels adjustment.
4.Settings
In main menu status, press the Menu button to enter the settings menu. Press the button Up and Down
buttons to toggle the items .Rotate the Volume knob to adjust or select the options. Press the Menu
button again to return to the main menu status.
The Setting menus are toggled by arrow movement, as follows:
- PCM digital filters selections
- DSD digital filters selections
- Amp gain adjust
- Pre-Amp control
- Analog output phase control
- Screen brightness

- 4 -
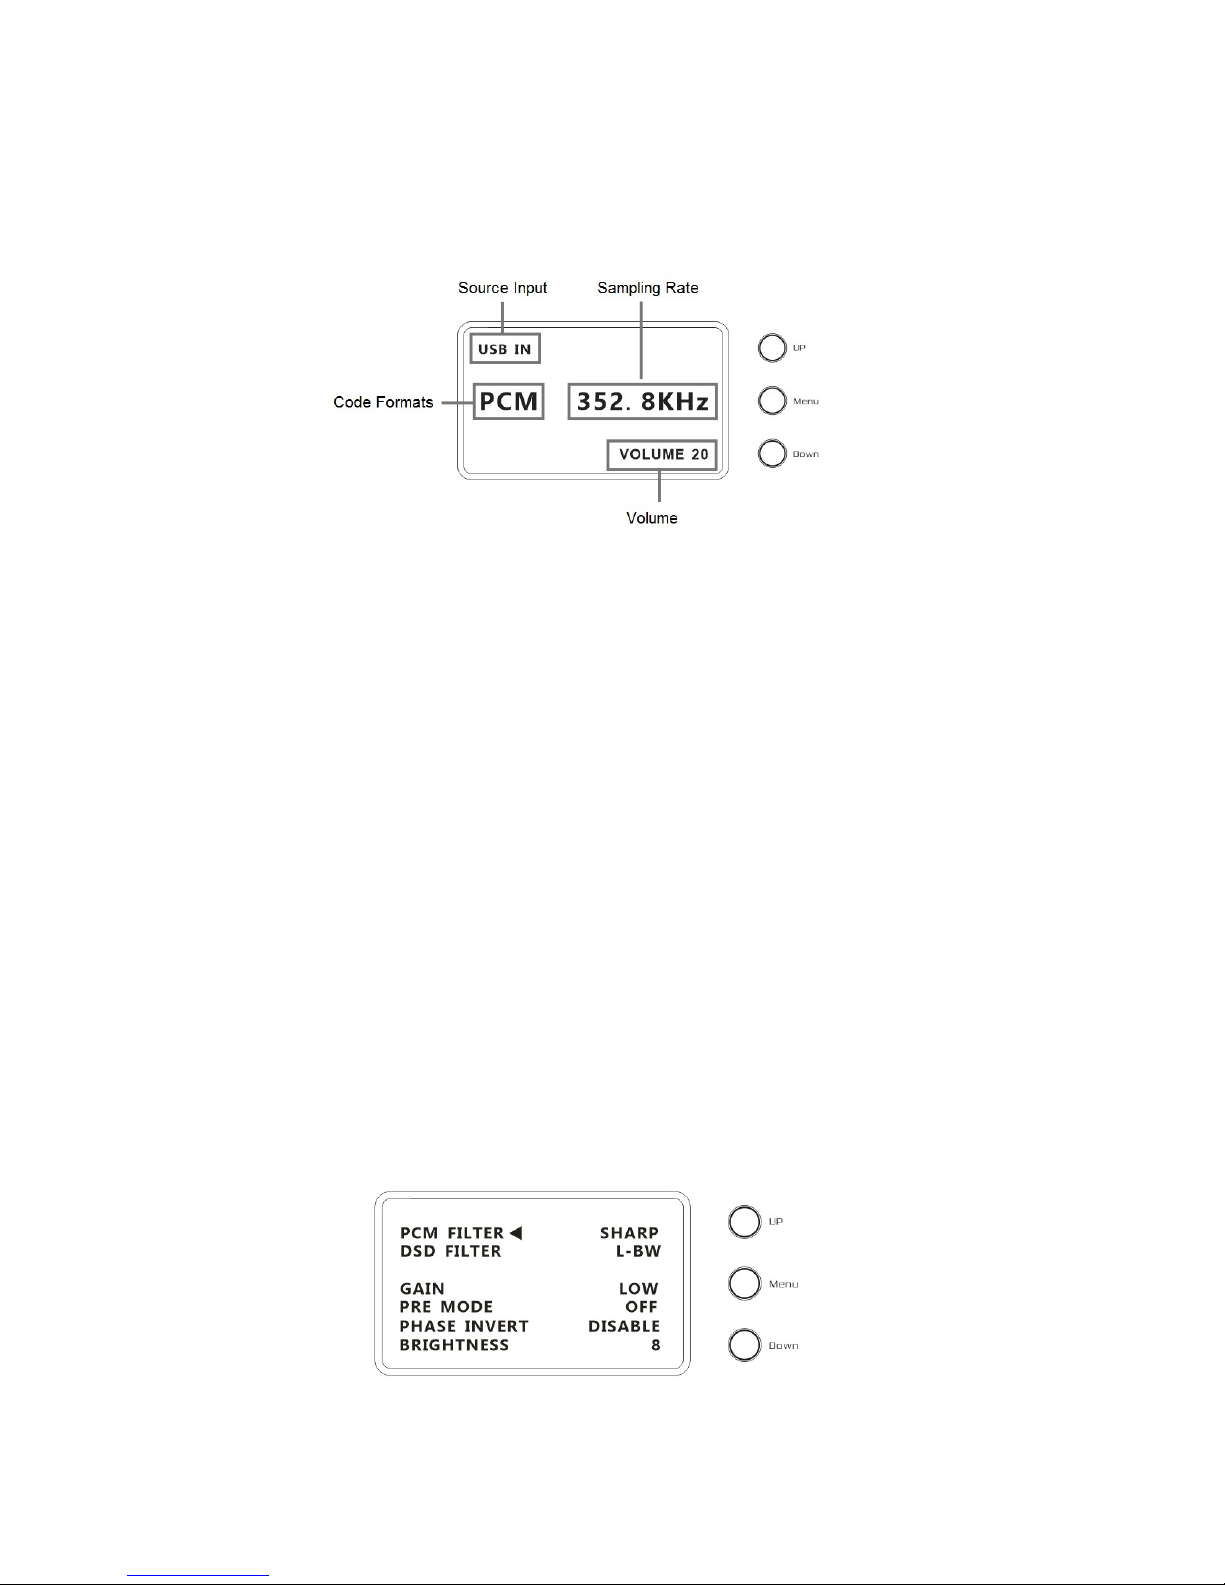
5.Menu Function Introduction
In main menu status, press the Menu button to enter the setting menu. The following
is a line-by-line introduction.
a. PCM FILTER:
The filter can work in six modes: SHARP——SLOW——SUPER SLOW——SHORT SHARP——LOW-d
SHORT——SHORT SLOW. Switched by the Volume knob. SHARP for rapid roll-off digital filtering,
the most common type of digital filters, listening to the sense of the most accurate, neutral; SLOW
for slow roll-off, which has a smooth signal attenuation characteristics of the out-band, but also
because of the audio-band Attenuation characteristics, will make the sound becomes a softening
effect; SHORT SHARP / SHORT SLOW for the short delay version of SHARP / SLOW, listening to
feel close substantially. SUPER SLOW is similar to the effect of NOS, both ends of the extension
to reduce the frequency of natural suitable for human voice. LOW-d SHORT is a new filter in AKM
AK4497 chip, the effect of combining some of the characteristics of other types of filtering.
b. DSD Filter
DSD filter can work in 2 different bandwidth. L-BW for low bandwidth; H-BW for high bandwidth.
AK4497 does not have a fixed frequency point as the filter cutoff frequency. but switch
automatically according to the DSD sampling rate.
The cutoff frequency is shown in the table below.
c. GAIN:
The Amp has two levels of Gain to select. The HIGH gain is 12dB higher than the LOW gain. Can be
adjusted according to different sensitivity of the headphone to achieve the best match. We
recommend to use low-sensitivity headphones HIGH, high sensitivity headphones with LOW.
d. PRE MODE:
The rear panel has RCA and XLR output, you can switch between different modes of output. When
PRE MODE is OFF. The RCA and XLR outputs are output directly as DAC decoded signals. and the
volume cannot be adjusted(Not through the volume adjustment circuit). When PRE MODE is ON, the
RCA and XLR outputs signal in high-quality segmented volume or pre signal.60-level volume
adjustment and GAIN adjustment. Used to match the active monitor speakers or as a lossless
volume adjustment.
e. PHASE INVERT:
The RCA output default is positive phase. XLR balanced output default is the American standard
polarity output. That is 1 Ground 2 Hot 3 Cold. There are two options for this function: DISABLE
and ENABLE.
f. BRIGHTNESS
There are 8 levels of OLED screen brightness to adjust.
- 5 -
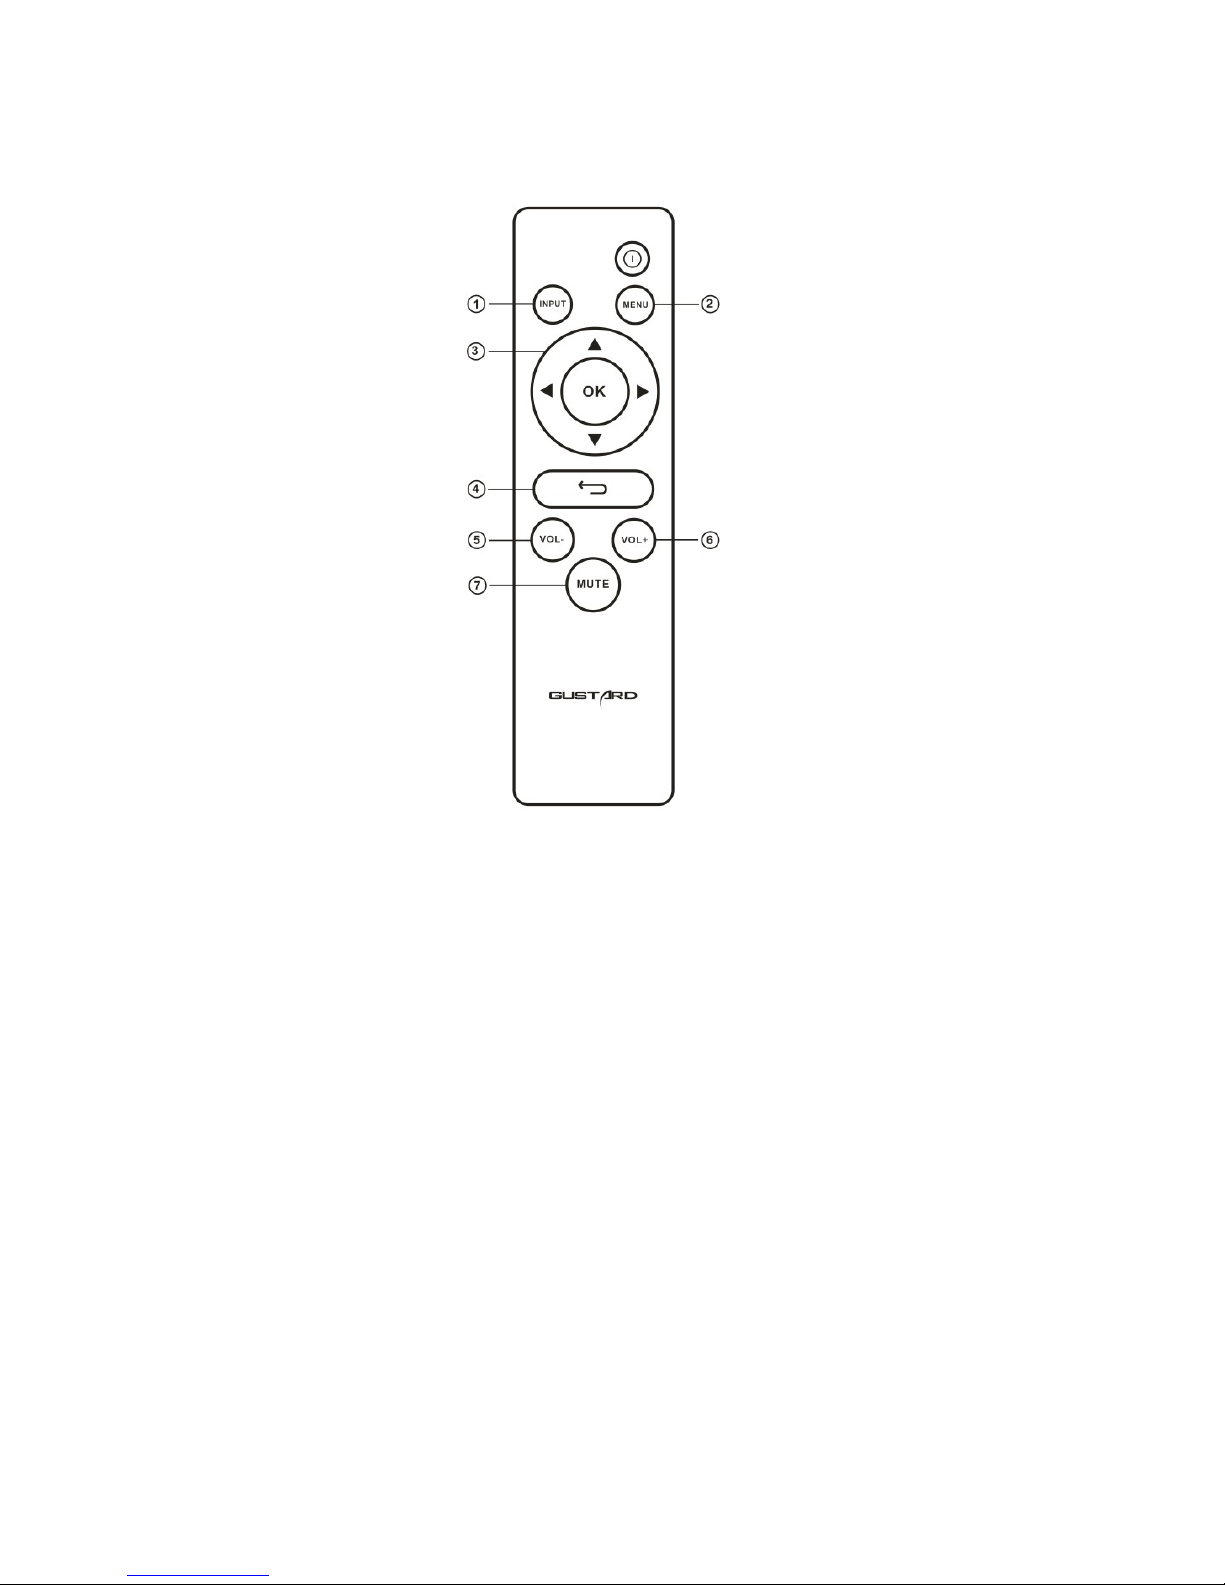
Remote Controller
① Input Button: Input source will be switch to the next after pressing this button by the following
cycle sequence: COAX - BNC - AES - USB – IIS - OPT
② Menu Button: Main menu will be shown after pressing this button.
③ Four Directions Button :In A20H main menu status,the items can be toggled by UP and DOWN
buttons, and different options in current item can be selected by LEFT and RIGHT buttons.
④ Return Button: Turn back to the Main Menu status.
⑤ Volume Decrease Button: It can reduce volume only if A20H shows the main menu on the screen.
⑥ Volume Increase Button: It can increase volume only if A20H shows the main menu on the screen.
⑦ Mute Button: A20H will be muted when this button is pressed once. And mute will be released after
another pressing.
Note
1) Operating distance of the remote controller varies depending on the angle.
2) If there something blocks the remote controller and the sensor, operation might be failed.
3) If the remote controller will not be used for a long time (one month or longer), the battery is recommended to be removed.
4) If battery liquid leakage happens, battery compartment should be clean immediately and installed a new battery
5) This remote controller might cause the wrong operation of other infrared-red controlled devices.
 Loading...