

Page 1

User’s manual for Shout
January 15, 2003
$Id: manual.tex,v 1.2 2002/03/24 11:42:15 root Exp root $
1 Overview
Shout provides a way to configure test and even record sample data from connected Guralp equipment
using a variety of PalmOS platforms. Many Palm Pilots can run for many days on a single set of AAA
batteries thus they can be used where getting a power source for a laptop would be impractical. Shout
supports downloading predefined configurations to attached equipment so that many instruments may
be configured to exactly the same parameters. Shout can record blocks from the attached instruments
and store them in the Palm Pilot for later analysis on a PC or workstation.
2 Getting started
2.1 Prerequisites
2.1.1 Compatibility
Shout has been tested on PalmOS 3.0 3.0.1 3.1 3.1.1 3.5 3.5.1 and 4.0. To communicate with Guralp
equipment you require a Palm Pilot with a serial port. Some PalmOS devices have only USB slave
ports, devices which have serial ports include the following Palm models: III, IIIe, IIIe SE, IIIx, IIIxe,
IIIc, V, Vx, Vx LE, VII, VIIx, m100, m105, m125, m130, m500 m505, m515, and i705. The Visor Treo
has a serial port, and serial port adapters are available for other Visor models but they may require
external power.
2.1.2 Cables
To use Shout you will need the correct sort of cable.
Most people have a Hotsync cable or cradle. To use
this with the standard data cable that connects Guralp
equipment to a PC you will need a null modem adapter.
The adapter should have two 9 pin male D connectors
and be wired as follows. (As the adapter is symmetrical
the two ends are interchangeable, so it doesn’t matter
which end is connected to the palm pilot)
Palm side
1
2
3
4
5
6
7
8
9
a
a
!
a
!
!
!
a
Guralp side
1
2
3
4
5
6
7
8
9
2.2 Memory
Shout uses approximately 45kB of space on your Palm Pilot, when running it uses another 15kB on
the local heap and 20kB of database space. When recording Shout has a 32 byte overhead per block
stored.
1
Page 2
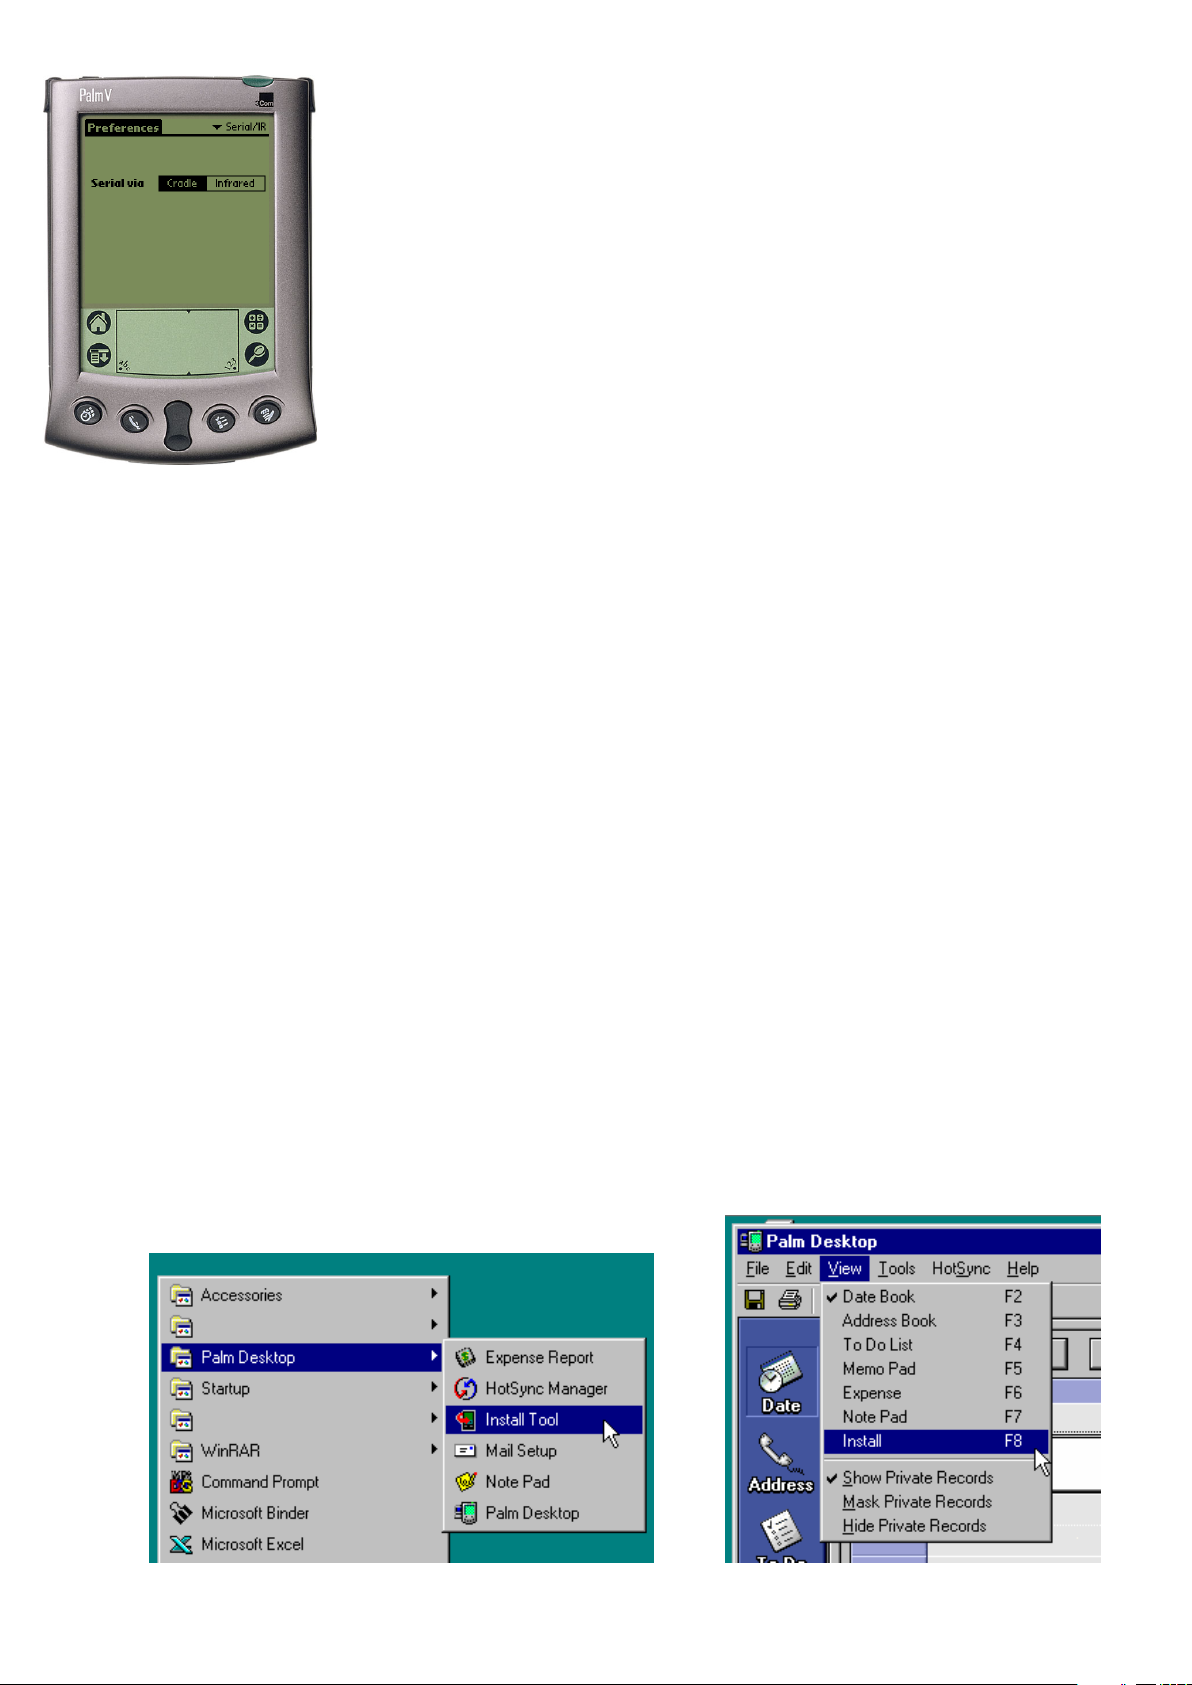
2.2.1 Old Infrared Enhancements
If you are using an older Palm Pilot (one running PalmOS 3.1.1 or
earlier) you will need to ensure that the serial port is not redirected to
use infrared. To check this start the preferences application and select
‘Serial/IR’ from the drop down menu at the top right, and change the
setting to ‘Cradle’. If your Palm doesn’t have a ‘Serial/IR’ option then
you either have the modern IR packages or you haven’t installed any IR
packages.
2.2.2 Slow Palm Pilots
If you are using a slow Palm Pilot (such as an m100), or are using one of the utilities which slows the
processor of the Palm in order to extend battery life you may find that Shout is unable to keep up with
packets as they arrive. This problem may be especially noticeable when plotting or recording. The
simplest solution to this problem is to use a utility like ‘Tornado V’ to speed up the Palm Pilot clock.
2.3 Installing
Unix:
Use your Pilot desktop to install the shout.prc file or use the command line. For example:
[root@unix cgcf]# pilot-xfer -p /dev/ttyS0 -i shout.prc
Port: /dev/ttyS0
Please press the HotSync button now...
Connected...
Installing shout.prc... OK
Install done
[root@unix cgcf]#
Windows:
Either launch the Palm ‘Install tool’ from the Start Menu, or select the install option from the
Palm Desktop software:
2
Page 3
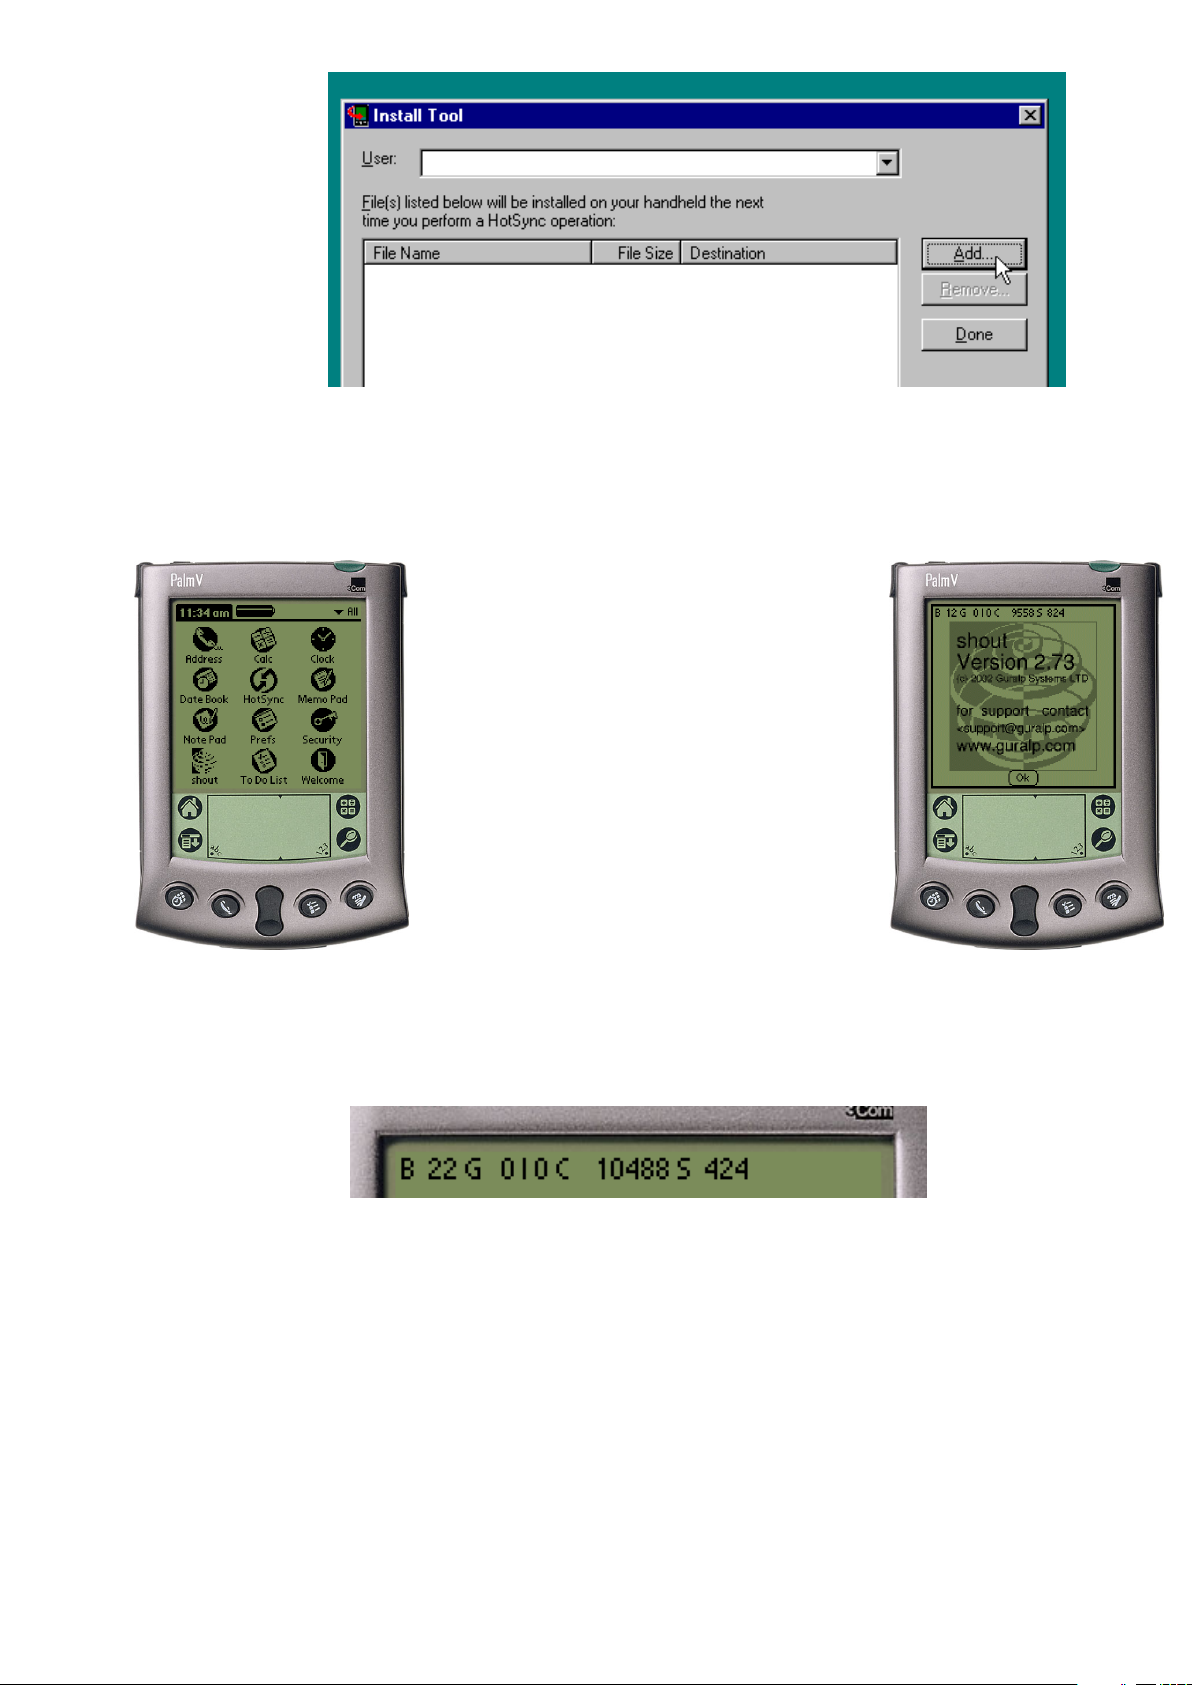
Once you have launched the installer click on the Add button and select the shout.prc file:
Next click the done button; Shout will be installed the next time your Palm Pilot Hotsyncs with
your PC.
2.4 Launching Shout
Launch Shout by clicking on the Shout
icon in the launcher. Shout will use the
first hardware serial port on your Palm
Pilot. You can check the version of Shout
by selecting ‘About’ from the menu (click
on the menu button to display the menu).
3 Usage
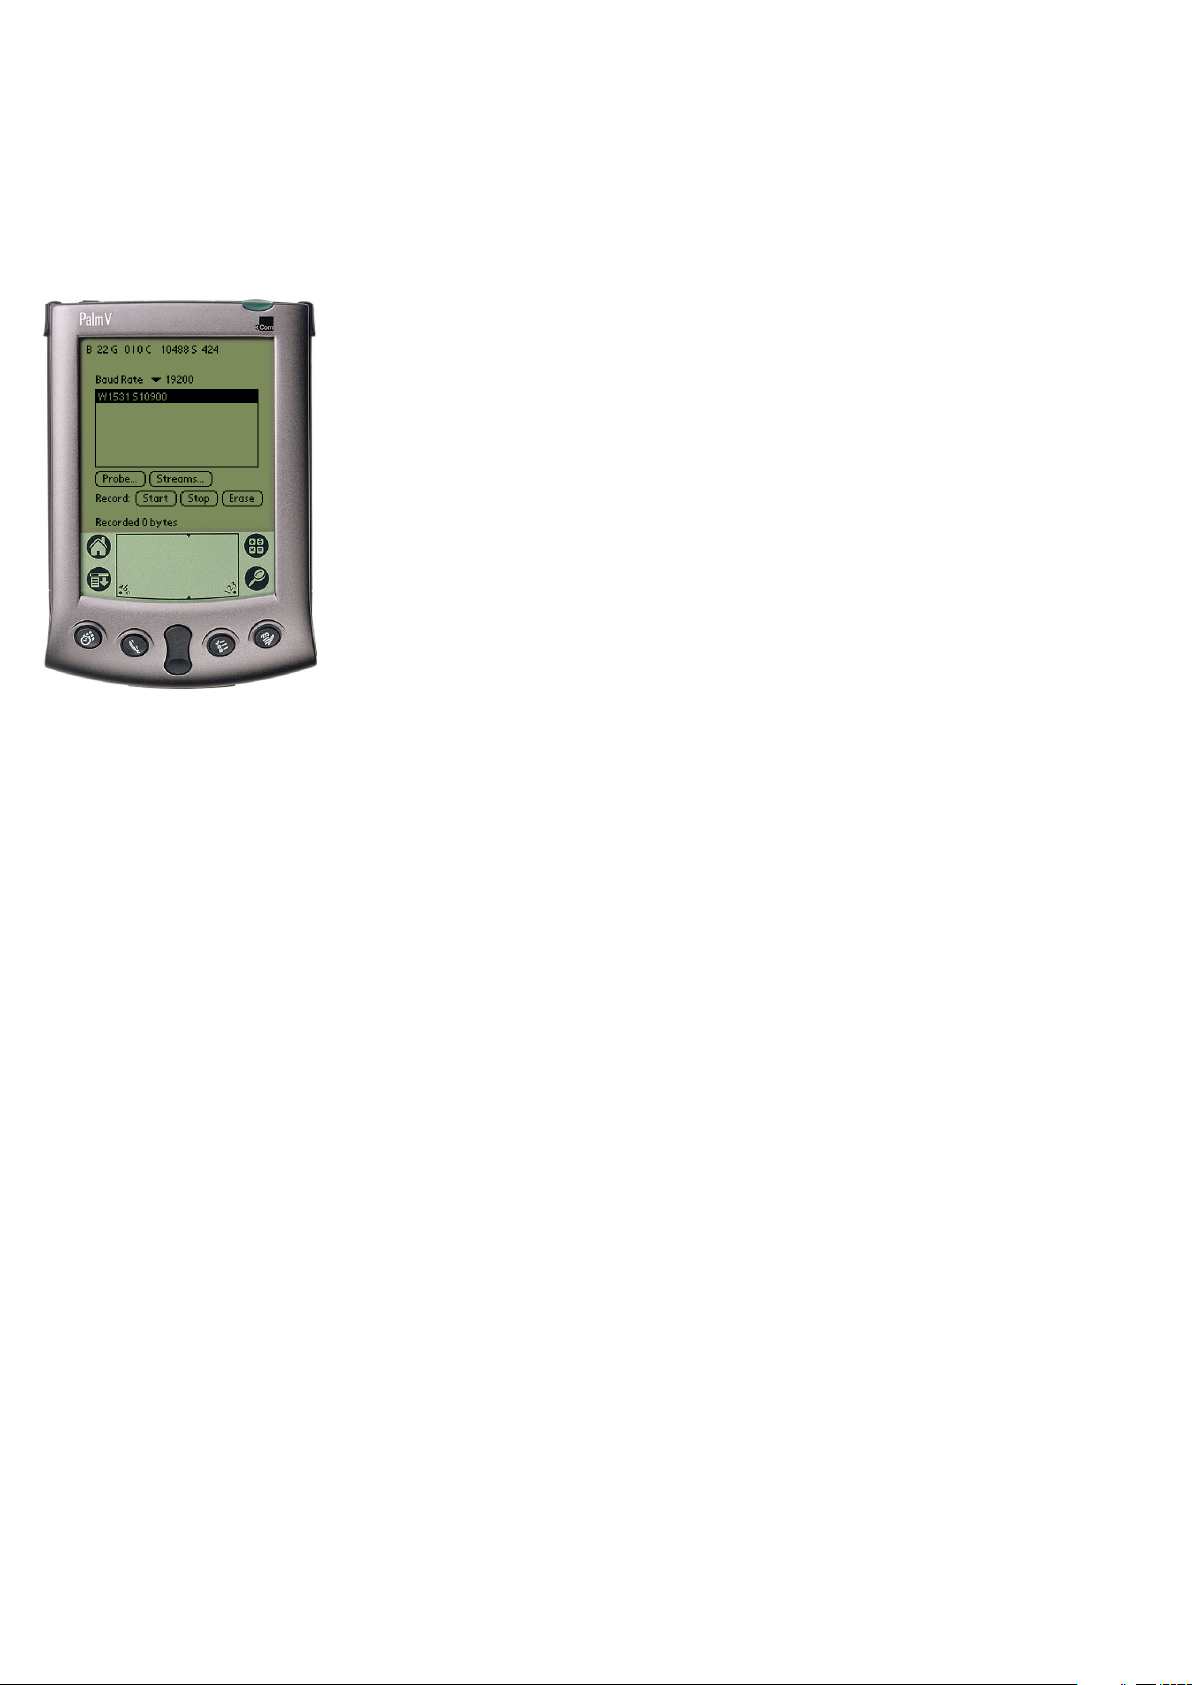
3.1 The status line
At the top of the display Shout shows a status indicator. The numbers from left to right mean:
B The number of valid blocks so far received.
G The number of errors the block parser has encountered.
I The number of interrupt requests that Shouthas sent.
C The number of bytes received on the serial port.
S The size of the last received block.
It is normal for the parser to encounter a few errors when Shout is first started or parts of the system
are being rebooted. Note that most actions will reset the number of blocks counter.
3
Page 4
3.2 Quitting Shout
Occasionally you may ask Shout to do something impossible (for example contacting a now disconnected
device). You can interrupt at any time by clicking on the applications button (which is the button on
the silkscreen which looks like a house or an arrow). Clicking on the applications button will cause
Shout to quit and will return you to the application launcher.
3.3 The devices form
Here Shout displays the system ids and serial numbers found in all
the blocks so far received. When it is known, the type of device is displayed next to the serial number.
Baud rate: Here you can adjust the baud rate Shout uses to
communicate with the attached devices (see the notes for slow Palm
Pilots in section 2.2.2 if you intend to use particularly high baud
rates).
Probe: Clicking on ‘Probe’ causes Shout to connect to and identify
the first attached device. ‘Probe’ is useful if you wish to contact
an attached device which isn’t sending out packets often.
Streams: Clicking on ‘Streams’ will take you to the streams form
(see section 3.6).
Start: Clicking on ‘Start’ will start recording received blocks to
a database in the Palm Pilot, appending them to any currently
stored blocks (see section 3.8).
Stop: Clicking on ‘Stop’ will stop the recording of received blocks.
Erase: Clicking on ‘Erase’ will erase any currently stored blocks.
Clicking on a system id causes Shout to query that device to determine what type of device it is
and then to launch the relevant configuration form for that type of device.
3.4 The DM configuration forms
Before any changes to the configuration can be made you must ‘Fetch’ the current configuration from
the DM. Do this by clicking on the ‘Fetch’ button. You can now modify configuration items in any of
the DM forms. After changing any of settings in the forms click on the ‘Apply’ button for that form,
which will cause the new settings to be downloaded to the DM and the DM to be rebooted. Once you
have finished with the form (or if you wish to exit the form without saving the changes to the DM)
click ‘Done’. It is not necessary to fetch the configuration if you only wish to use the ‘Mass’, ‘Lock’,
‘Unlock’, ‘Center’, ‘Gps’, ‘Macros’, or ‘Send Buffer’ functions.
4
Page 5
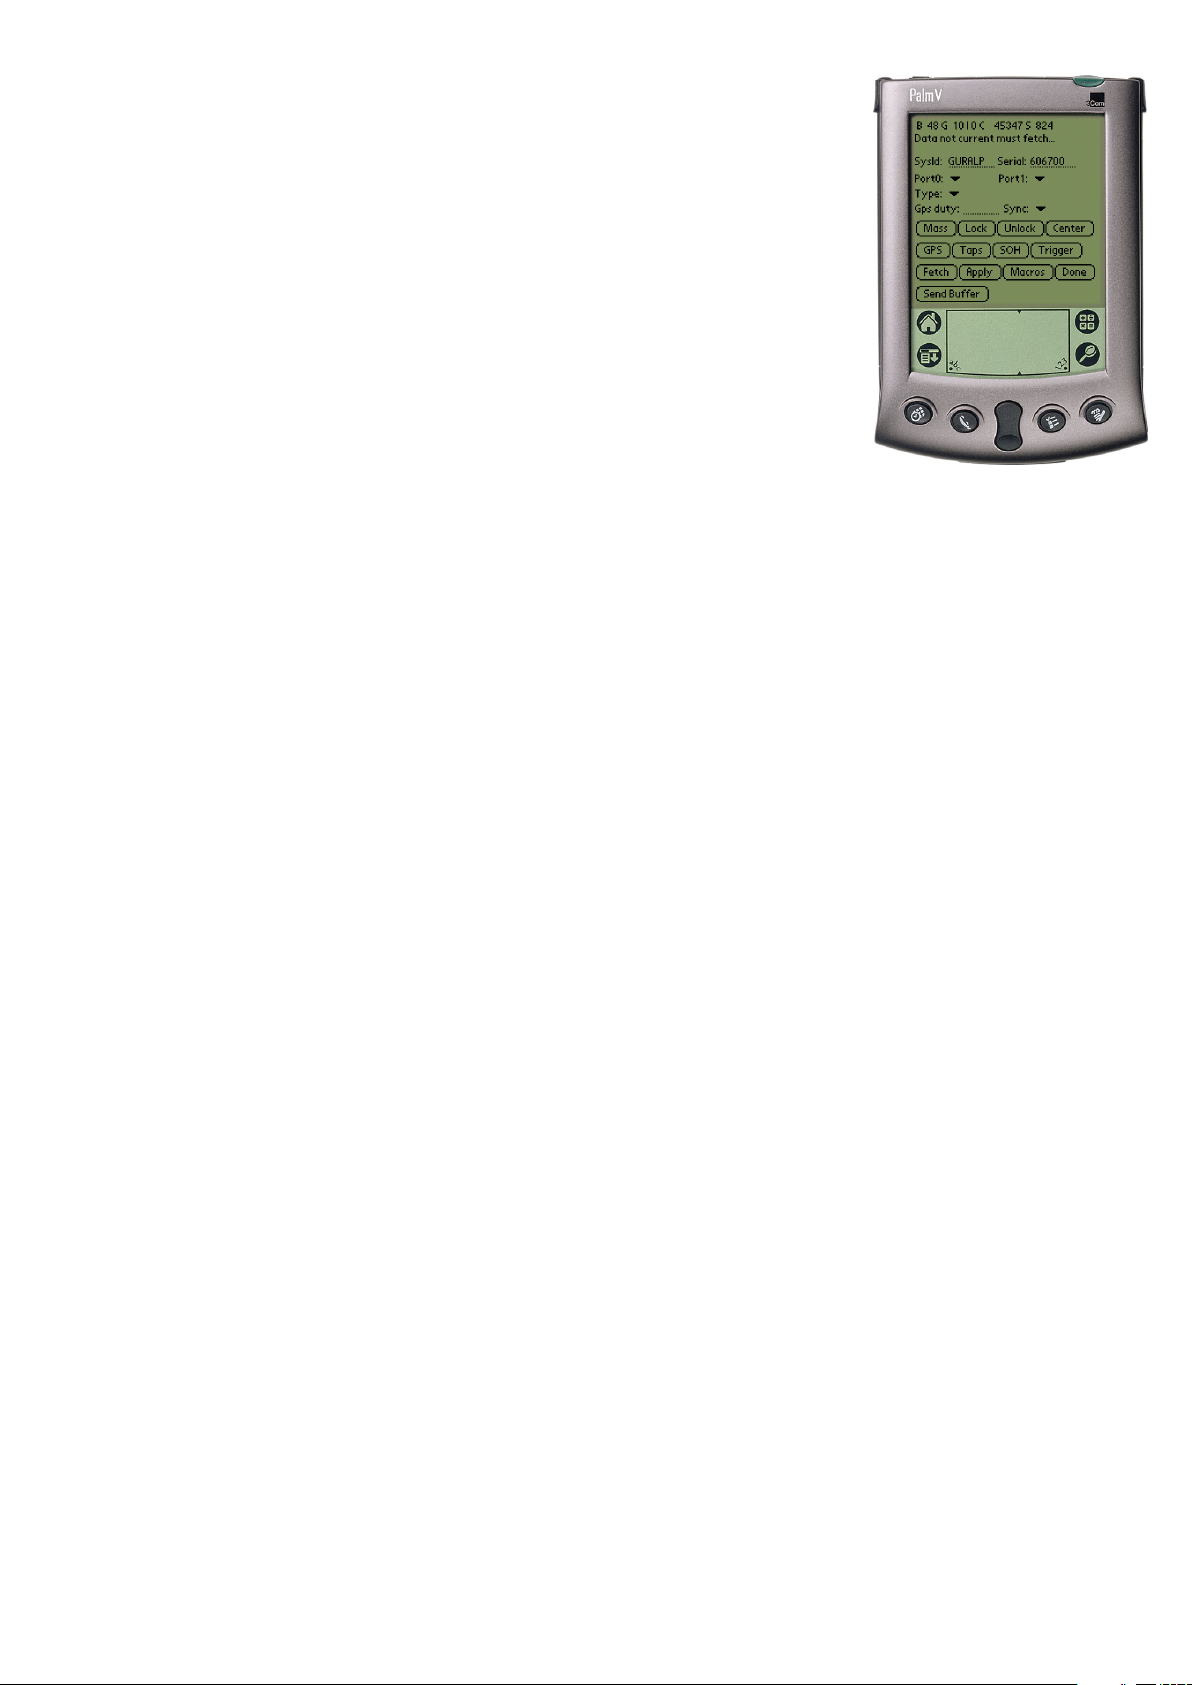
3.4.1 Main DM form
SysId: and Serial: Here you can edit the system id, and serial
number for the DM. The strings are composed of the characters
‘A’-‘Z’ and ‘0’-‘9’. Leading ‘0’s are stripped.
Port0: Here you can set the baud rate for Port 0. (On the DM24/3
this is the baud rate of the Data Out port).
Port1: Here you can set the baud rate for Port 1. (On the DM24/3
this is the baud rate for the GPS port which should be set to 4800).
Type: Here you can set the type of seismometer connected to the
DM.
Gps duty: Here you can set the duty cycle of the GPS in minutes.
Sync: This controls the protocol used on port 1. Choose from
trimble, garmin or stream.
Mass: Click here to query the positions of the masses in the attached seismometer (see section 3.4.2).
Lock: Click here to lock the masses (see section 3.4.3).
Unlock: Click here to unlock the masses (see section 3.4.4).
Center: Click here to center the masses (see section 3.4.5).
GPS: Click here to query the status of the GPS receiver (see section
3.4.6).
Taps: Click here to go to the taps form where you can change
sample rates and streams (see section 3.4.7).
SOH: Click here to change the streams in the MUX and the automatic centering threshold (see section 3.4.8).
Trigger: Click here to set the trigger parameters (see section 3.4.9).
Fetch: Click here to fetch the current parameters from the DM.
Apply: Click here to apply the changes on this form to the DM
and reboot it.
Macros: Click here to enter the macros form (see section 3.9).
Done: Click here to exit this form and return to the main form.
5
Page 6

Send Buffer: Click here to cause the DM to dump the contents of
its silicon file buffer.
3.4.2 Mass form
The positions of the masses in the attached seismometer are displayed. Click ‘Done’ when done and you will be returned to the main
DM configuration form. Note that the mass position channels must be
enabled in the mux for this to work.
3.4.3 Lock form
3.4.4 Unlock form
The lock command is issued to the DM and the results are displayed
in the window below, when the sensor has finished locking you can click
‘Done’ to return to the main DM configuration form.
The unlock command is issued to the DM and the results are displayed in the window below, when the sensor has finished unlocking you
can click ‘Done’ to return to the main DM configuration form.
6
Page 7

3.4.5 Center form
The center command is issued to the DM and the results are displayed in the window below, when the sensor has finished centering you
can click ‘Done’ to return to the main DM configuration form.
3.4.6 GPS form
Shout contacts the DM and asks for the state of the GPS sub-system.
The information given includes whether a fix has been established (‘Auto2D’ or ‘Auto-3D’ indicates a fix has been made, ‘No FIX’ indicates that
one hasn’t), the current location and the number of satellites that are in
view. Click on ‘Done’ to return to the main DM configuration form.
3.4.7 Taps form
Here you can adjust the sample rates for each stage of the DSP, and
choose which channels are transmitted. If the ‘Cts’ checkbox is ticked
then the channel is continuously transmitted. If the ‘Trig’ checkbox is
ticked then the channel is transmitted when the DM is triggered (see
section 3.4.9). Changing a sample rate will alter the sample rates below
it. When you have finished making changes click on ‘Apply’ to copy the
changes to the DM, and then ‘Done’ to return to the main DM configuration form. If you wish to return without saving the changes just click
on ‘Done’.
7
Page 8

3.4.8 SOH form
3.4.9 Trigger form
Here you can choose which of the auxiliary channels are transmitted. Note that if you disable the Mass position channels then the ‘Lock’,
‘Unlock’, ‘Center’ and ‘Masses’ commands will return misleading values.
You can enable automatic centering by checking the box and entering a
value. If enabled the masses are automatically centered when they move
to the specified percentage of their full travel. When you have finished
making changes click on ‘Apply’ to copy the changes to the DM, and
then ‘Done’ to return to the main DM configuration form. If you wish
to return without saving the changes just click on ‘Done’.
Trig: SR: Click to choose the sample rate from which the triggering algorithm will be fed (you can choose any of the sample rates
defined in the Taps form, see section 3.4.7).
filter: Click to choose the filter that is applied before the averaging
algorithm, the values displayed are the corner frequencies in Hz.
Not all values are available on all systems, if the value you choose
is not available, it will revert to one which is when you click on
‘Apply’.
Z, N and E: For each channel you can choose if this channel will
cause the DM to trigger, the short and long term averages and the
ratio for the triggering algorithm.
PreTrig: This sets the number of seconds of data of the channels
marked with ‘Trig’ in the taps form (see section 3.4.7) that are
transmitted before the event that caused the DM to trigger.
PostTrig: This sets the number of seconds of data that are
recorded after the device is triggered.
Apply Click here to apply the changes on this form to the DM
and reboot it.
Done Click here to dismiss this form and return to the main DM
form.
3.5 The CRSM configuration forms
As with the DM forms before any changes to the configuration can be made you must ‘Fetch’ the
current configuration from the CRSM. Do this by clicking on the ‘Fetch’ button. You can now modify
configuration items in any of the CRSM forms. After changing any of settings in the forms click on the
‘Apply’ button for that form, which will cause the new settings to be downloaded to the CRSM and the
CRSM to be rebooted. Once you have finished with the form (or if you wish to exit the form without
saving the changes) click ‘Done’. Again if you only wish to use the ‘Battery’, ‘Spin Disk’. ‘Disk Space’
or ‘Macros’ functions you need not perform a fetch.
8
Page 9

3.5.1 Main CRSM form
SysId: and Serial: Here you can edit the system id, and serial
number for the DM. The strings are composed of the characters
‘A’-‘Z’ and ‘0’-‘9’. Leading ‘0’s are stripped.
Port0: Here you can set the baud rate for Port 0. (On the CRSM
this is the baud rate of the data out port).
Port1: Here you can set the baud rate for Port 1. (On the CRSM
this is the baud rate of Port ‘A’).
Port2: Here you can set the baud rate for Port 2. (On the CRSM
this is the baud rate of Port ‘B’).
Gps duty: Here you can set the duty cycle of the GPS in minutes
Sync: This controls where the CRSM gets its time information
from. Specify ‘trimble’ or ‘garmin’ to read from the CRSM’s GPS
port, or ‘stream’ to extract timing information from the chain of
devices connected to any of the data in ports.
Battery: Click here to see the status of the CRSM’s internal battery
(see section 3.5.2).
Spin disk: Click here to force the CRSM to spin-up its internal
disk and re-calculate the amount of disk space remaining (see section
3.5.3).
Spin disk: Click here to get the CRSM to give the disk status from
the last time the CRSM accessed its internal disk (see section 3.5.4).
Fetch: Click here to fetch the current parameters from the CRSM.
Apply: Click here to apply the changes on this form to the CRSM
and reboot it.
Macros: Click here to enter the multiset form (see section 3.9).
Done: Click here to exit this form and return to the main form.
9
Page 10

3.5.2 CRSM Battery form
played. When done click on ‘Done’ to return to the main CRSM form.
3.5.3 CRSM disk status form
up. The CRSM re-calculates the available disk space. If there are any
disk access problems (As in this example) they are displayed. When
done click on ‘Done’ to return to the main CRSM form.
A link is opened to the CRSM and the current battery status is dis-
A link is opened to the CRSM and the internal CRSM disk is spun
3.5.4 CRSM disk space form
from the last CRSM disk access is displayed. When done click on ‘Done’
to return to the main CRSM form.
A link is opened to the CRSM, and the cached CRSM disk status
10
Page 11

3.6 Streams form
The names of all received streams are displayed in the list box in the
center. Shout recognizes a maximum of 20 different streams and caches
the last block received from each stream. Clicking on a stream name
takes you to the plot form (see section 3.7).
Done: Clicking on ‘Done’ returns you to the main f orm.
Start: Clicking on ‘Start’ will start recording received blocks to a
database in the Palm Pilot, appending them to any currently stored
blocks (see section 3.8).
Stop: Clicking on ‘Stop’ will stop the recording of received blocks.
Erase: Clicking on ‘Erase’ will erase any currently stored blocks.
3.7 Plot form
The last cached block for the stream you selected is displayed, further blocks from the same stream will be displayed as they arrive. Text
streams are displayed as text. The time for the start of the block which
is the left hand edge of the plot is displayed above the plot. The offset
(value of the dotted line) and the full scale deflection (distance in counts
from the top to the bottom of the plot) are displayed at the bottom of
the plot. Click on ‘Done’ to return the the streams form.
3.8 Recording
Shout can record the blocks it receives for later analysis. You can record as many blocks as you have
space for on your Palm Pilot. You can append to the currently stored blocks by clicking the ‘Start’
button, recording is stopped by clicking on the ‘Stop’ button, and the stored blocks can be erased
(returning the used memory to the system) by clicking on the ‘Erase’ button. Recorded blocks are
stored in the Pilot’s memory even when you quit Shout or soft-reset the Pilot. The tally of recorded
bytes is displayed at the bottom of the main form and the streams form. Shout does not use the BRP
(Block recovery protocol) to ensure that the blocks it receives are contiguous.
To extract the recorded blocks first get the PDB (Palm database file) onto your PC. If you
use Windows perform a Hotsync, and after the Hotsync the PDB file will be in the directory
C:\PALM\username\Backup\ShoutRecordDB.PDB where username is your Palm Pilot user name. If
you use Unix, use your Palm utilities to extract the file eg:
[root@unix cgcf]# pilot-xfer -p /dev/ttyS0 -f ShoutRecordDB
Port: /dev/ttyS0
Please press the HotSync button now...
Connected...
11
Page 12

Fetching ShoutRecordDB.pdb... OK
[root@unix cgcf]#
Once you have the file use the palm2gcf utility to convert the PDB file to the standard GCF block
format. ANSI C Source code for palm2gcf is available and binaries for the following platforms are
available: Alpha OSF/1, ix86 Linux, Alpha Linux, Win32/Windows 95/98/NT/Me/2000/XP, SunOS
4, Solaris, and various versions of IRIX.
C:\tmp> palm2gcf C:\Palm\User\Backup\ShoutRecordDB.pdb out.gcf
File c:/Palm/User/Backup/ShoutRecordDB.PDB contains 303 blocks total 128552 bytes
Block 1: WO1524 S109N2 100 sps 200 samples time 01:48:35 21/Oct/2001
....
Block 302: WO1524 S109M7 4 sps 200 samples time 02:11:32 21/Oct/2001
All blocks processed
GCF stream is in out.gcf
C:\tmp>
The GCF file produced can now be viewed or replayed in other programs such as ‘Scream’.
3.9 Macros
It is convenient to group a set of commands together that put an instrument into a known state. Shout
supports such macros. Shout looks for such macros in two places: in a pre-installed database of macros
called ‘ShoutMSDB’ and in the memos of the standard Palm Memo Pad application. The format of
the macros is compatible with the Windows Multiset program. The first line of the macro should be
‘ok-1’, the next line should start with a ‘\’ followed by text describing the macro. The subsequent lines
then contain commands that are sent to the device to be configured. Place exactly one macro in each
memo and remove any blank lines before the ok-1. An example macro is shown below:
ok-1
\ DM24/3 default configuration
1 sensor-type
2 sync-src ! sync-src backup!
2 hr-cycle
200 100 20 4 samples/sec
set-config
0007,0000
4700
0 0 triggered
1 0 triggered
2 0 triggered
3 0 triggered
3 1 bandpass
255 triggers
1 1 1 STA
10 10 10 LTA
2 2 2 RATIOS
10 pre-trig 20 post-trig
0 9600 baud
7 stopbits
Multiset files can either be entered by hand into the Palm Pilot, or pasted into the Memo pad application
of your Palm Desktop software and thence downloaded to the Palm Pilot. If you use the windows Palm
Desktop you can establish a permanent link between files on your disk and entries in the Memo Pad
application.
12
Page 13

If you use the memo pad application, don’t forget to insert a space after
the ‘\’ character, and a newline at the end of the memo.
When you click on the ‘Macros’ button, a list of all the available macros
is displayed. The displayed names are taken from the comment in the
second line of the macros. Click on ‘Cancel’ to return to the main form,
or click on a macro name to execute it on the device that you were looking at when you pressed the ‘Macros’ button. As the macro executes
you will see the results of the commands in the window below. If all
the commands execute successfully and you have ticked the ‘Reboot device afterwards?’ checkbox, Shout will reboot the device to which the
macro was sent. When the macro has finished executing your can click
on ‘Done’ to return to the main form.
If any errors are encountered during the execution of the macro, execution will abort and and error message will be displayed. Click on ‘Ok’
followed by ‘Done’ to return to the main form.
13
Page 14

4 Notes
4.1 Battery life
Shout uses a considerable amount of battery power, as unlike most Palm applications it is not often
idle as it has to process and store the incoming blocks. The auto-off timer is reset every time a valid
block is received. If you leave your Palm connected to a system your batteries will flatten until the low
battery safety-off feature of the Palm Pilot is activated.
4.2 Cannot open link
Occasionally Shout can’t connect to a device because the link is congested or the device has not finished rebooting. Click on retry to retry
the connection. This error can also be caused when a device has had its
ID changed but has not yet been rebooted (this can happen, for example,
due to an error in a multiset macro). While in this state the device emits
streams with names that don’t match the device ID. If this is the case
the simplest way to fix the situation is to manually reboot the device
either using a terminal emulator or by power cycling it.
4.3 Acknowledgments
Alpha is a trademark of Compaq Information Technologies Group.
ANSI is a trademark of the American National Standards Institute.
IRIX is a trademark of Silicon Graphics, Inc.
Linux is a trademark of Linus Torvalds.
OSF/1 is a trademark of the Open Software Foundation, Inc.
Palm, Palm Pilot, Palm Desktop, PalmOS and Hotsync are trademarks of Palm, Inc.
Solaris and SunOS are trademarks of Sun Microsystems, Inc.
Tornado V is a trademark of IS/Complete, Inc.
UNIX is a trademark of AT&T Corp.
Windows is a trademark of Microsoft, Corp.
14
 Loading...