

Guntermann & Drunck GmbH Installation- and configuration Guide
p
CATPro2 VT100
CATPro2 VT100
Installation- and Configuration
Guide
Copyright G&D 12/09/2006
M 1.00
Errors exce
Page 1
ted and subject to technical

Guntermann & Drunck GmbH Installation- and configuration Guide
CATPro2 VT100
IMPORTANT INFORMATION
Attention
EAD THESE INSTRUCTIONS CAREFULLY BEFORE SETTING UP THE DEVICE.
R
OLLOW ALL WARNINGS AND OPERATING INSTRUCTIONS FOUND ON THE DEVICE OR IN THE
F
OPERATING MANUAL
KEEP THE OPERATING MANUAL AT HAND FOR FUTURE USE.
POWER SUPPLY: ONLY OPERATE THIS DEVICE WITH THE SUPPLIED AC ADAPTER OR WITH
THE
NLY OPERATE THIS DEVICE ON AN EARTHED VOLTAGE SOURCE.
O
DEENERGISING OF DEVICE: BEFORE INSTALLING THE DEVICE, ENSURE THAT IT IS
DEENERGISED
CABLES: ONLY USE CABLES SUPPLIED BY G&D. DAMAGE RESULTING FROM THE USE OF
CABLES NOT SUPPLIED BY
TRIPPING HAZARDS WHEN LAYING CABLES
VENTS: VENTS PREVENT THE DEVICE FROM OVERHEATING. DO NOT COVER THE VENTS.
XCLUSION OF WARRANTY: G&D SHALL NOT BE LIABLE FOR DEVICES THAT
E
-
-
-
G&D
FROM THE USE OF THIS PRODUCT
AREA OF APPLICATION: THE DEVICES ARE DESIGNED FOR INDOOR USE. AVOID EXTREME
COLD
CONFORMITY: THIS DEVICE CONFORMS WITH THE RELEVANT PROTECTION REQUIREMENTS
OF THE STATUTORY DIRECTIVES ON ELECTROMAGNETIC COMPATIBILITY
AND THE
TO REDUCE THE RISK OF ELECTRIC SHOCK, NEVER OPEN THE DEVICE OR
REMOVE ITS COVER
F SERVICE IS REQUIRED, PLEASE CONTACT OUR TECHNICIANS.
I
.
AC ADAPTER DESCRIBED IN THE OPERATING MANUAL.
. DISCONNECT THE POWER PLUG OR POWER SUPPLY FROM THE DEVICE.
G&D IS NOT COVERED BY THE WARRANTY. AVOID CREATING
HAVE BEEN USED FOR ANY PURPOSE OTHER THAN THE INTENDED USE.
HAVE BEEN REPAIRED OR MODIFIED WITHOUT AUTHORISATION.
EXHIBIT MAJOR EXTERNAL DAMAGE THAT WAS NOT REPORTED UPON RECEIPT OF THE
DELIVERY
WERE DAMAGED BY ACCESSORIES NOT SUPPLIED BY G&D.
SHALL NOT BE LIABLE FOR ANY TYPE OF CONSEQUENTIAL DAMAGE THAT MAY ARISE
.
, HEAT AND HUMIDITY.
EN55022 CLASS B (1998), EN50082-1 (1992) AND EN60950 STANDARDS.
.
.
.
(89/336/EWG)
Page 2

Guntermann & Drunck GmbH Installation- and configuration Guide
CATPro2 VT100
CATPro2 VT100 table of contents
1 Description............................................................................................................. 4
1.1 General information ....................................................................................... 4
1.2 Mode of operation.......................................................................................... 4
1.3 Scope of delivery ........................................................................................... 4
2 Installation instructions ........................................................................................ 5
3 Power supply .........................................................................................................5
4 Terminal window presettings ............................................................................... 5
5 Configuration ......................................................................................................... 6
5.1 Serial interface settings .................................................................................7
5.2 'Terminal window settings.............................................................................. 9
5.3 General settings .......................................................................................... 12
6 Additional control elements in the "Edit" menu............................................... 13
7 "Info" menu .......................................................................................................... 14
8 Default-Values...................................................................................................... 15
9 Update of the CATPro2 VT100............................................................................ 17
10 Technical data...................................................................................................... 18
Page 3

Guntermann & Drunck GmbH Installation- and configuration Guide
CATPro2 VT100
1 Description
1.1 General information
The CATPro2 VT100 is used to connect serial VT-100 devices to the CATCenter
system. The CATPro2 VT100 converts the serial data stream to VGA and PS/2
signals, which can be processed by the CATCenter.
Configuration and operation is carried out over a user interface.
The CATPro2 VT100 has a memory of 2000 lines.
1.2 Mode of operation
The CATPro2 VT100 offers the following features:
• Emulate a VT100-Terminal
• Resolution 800 x 600 or 1024 x 768
• Supports diverse functions of the VT100 follow-up models
• automatic video alignment
• configuration via GUI with mouse support
• Mouse operation possible, when remote station supports xterm
• History with 2000 lines (equals 83 VT100-screen pages)
• Interface is switchable between DCE- and DTE-assignement (no
requirement for a nullmodem cabel )
• Supports Copy and Paste with the in a terminal window
• Various keyboard layouts adjustable
• Interface is „break-free“
• Visible Bell
1.3 Scope of delivery
• 1x CATPro2 VT100
• Serial connection cable, 9-pin Sub D (plug/socket)
• 1x manual
• 1x power supply (12 volt)
Page 4

Guntermann & Drunck GmbH Installation- and configuration Guide
CATPro2 VT100
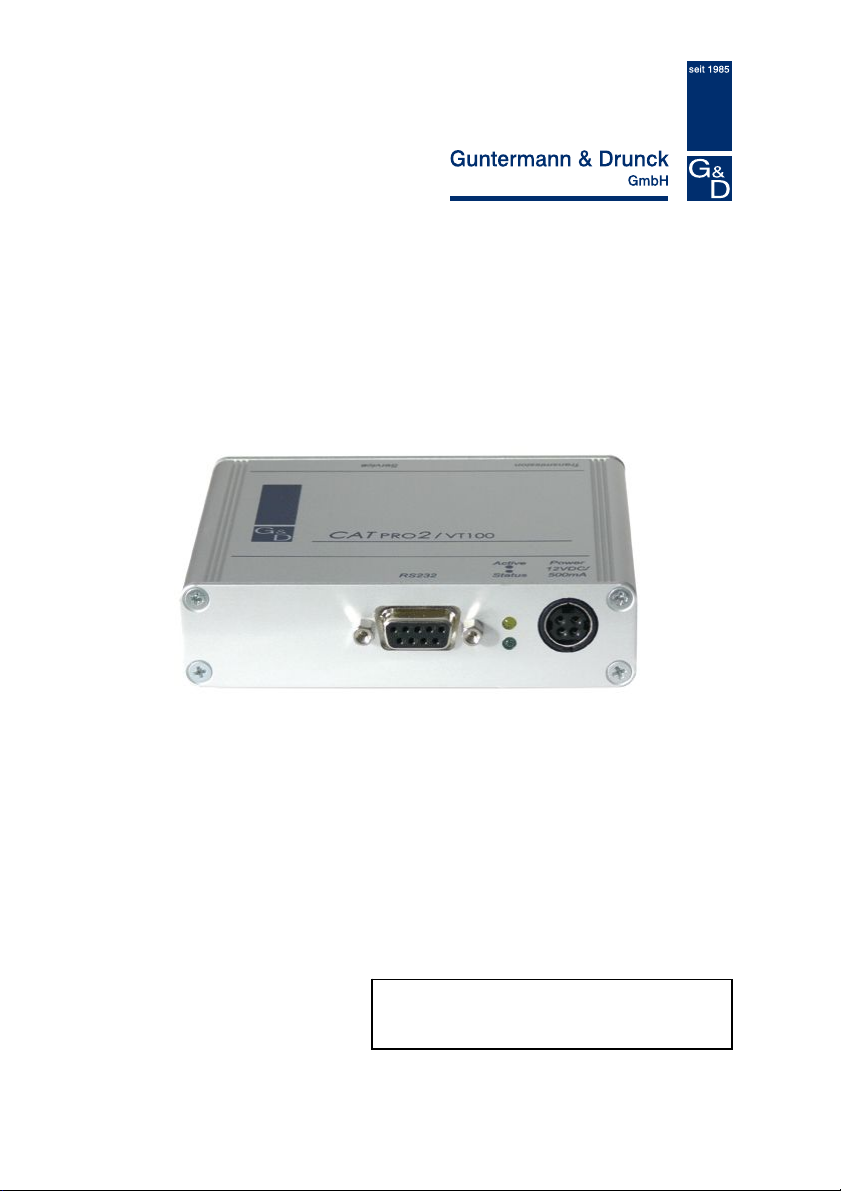
2 Installation instructions
To connect serial VT-100 devices, use the CATPro2 VT100.
• Disconnect the serial cable of the VT-100 device from the computer.
• Connect the serial cable of the VT-100 device to the CATPro2 VT100.
• Now plug one end of the Cat5 patch cable into the RJ45 socket
(transmission) of the CATPro2 VT100.
• Then connect the other end of the Cat5 patch cable to the desired
CPU interface (RJ45 socket) of the CATCenter.
3 Power supply
Connect the power supply via the Power socket. Use the plug-in power supply
provided in the scope of delivery.
The voltage is 12V DC and a lockable thick-pin MiniDIN4 is used as a connector.
4 Terminal window presettings
At the top of the terminal window is the menu bar with the "Edit" and "Info"
items.
The "Edit" menu item can be used to configure the CATPro2 VT100 (see also
Chap. 5). The "Info" menu item provides you with license information on the
CATPro2 VT100 (see also Chap. 7) and other information.
Entries can be made in the central area of the terminal window.
The line at the bottom provides status information on the CATPro2 VT100. The
left field contains the size of the terminal window in columns and lines. The
middle field shows the current parameter settings for the RS232 interface of the
CATPro2 VT100; these parameters can be edited (see also Chap. 5.1).
Page 5

Guntermann & Drunck GmbH Installation- and configuration Guide
CATPro2 VT100
Send Break
In the terminal window you can send a break to the serial VT100 device. To do so,
click on the "Send Break" button.
The field on the far right contains a percentage value that indicates to what
percentage the internal buffer of the CATPro2 VT100 is utilised.
5 Configuration
After you have connected the serial VT100 device with the CATCenter via the
CATPro2 VT100, you can select the serial VT100 device in the OSD (Select menu)
of the CATCenter. In this case, the terminal window of the CATPro2 VT100 will
appear on your screen.
Page 6

Guntermann & Drunck GmbH Installation- and configuration Guide
CATPro2 VT100
To perform the necessary configuration, open the "Edit -> Preferences" menu. To
do so, move the mouse to the menu bar, click on the "Edit" item and select the
"Preferences" item in the menu that opens.
The configuration settings that can be made in this menu are described in the
following chapters.
5.1 Serial interface settings
On the "Serial Port" tab you can make settings that relate to the CATPro2
VT100 serial interface. These settings should correspond to the specifications
of the serial VT-100 device.
In the "UART" panel you can configure the RS232 interface on the CATPro2
VT100. Before making configuration settings in this panel, inform yourself of the
Page 7

Guntermann & Drunck GmbH Installation- and configuration Guide
CATPro2 VT100
specifications of the serial VT-100 device to ensure fault-free communication
between it and the CATPro2 VT100.
The following settings are available:
• Baud rate
• Character size (bits) (if you enter a value less than 8 you can no
longer enter any special characters)
• Parity
• Stop bits
In these four scroll-down menus, select the values that suit your application.
Note:
If you set up the Baud rate higher than 38400, we recommend the
activation of one the two options in the panel „Flow control“.
In the "Flow control" panel you can configure the data stream of the RS232
interface.
The following settings are available:
• Hardware (RTS/CTS)
• Software (XON/XOFF)
As soon as you have selected an option, the "Maximum buffer fill" field is
activated. In this field, set the level to which the internal buffer of the CATPro2
VT100 may be filled before the counterpart receives a signal that the data
stream should be interrupted until the buffer is again ready to receive data. This
prevents a Buffer Overflow.
If you do not activate any of these options, it will be possible for a Buffer
Overflow to occur. 'Information on whether or not there is a Buffer Overflow is
provided in the bottom right field of the terminal window. This message
disappears when there is sufficient free memory in the buffer for the incoming
data stream.
In the "Interface" panel you can define the operating mode of the CATPro2
VT100. This operating mode depends on which serial connection cable is in
use.
Page 8

Guntermann & Drunck GmbH Installation- and configuration Guide
CATPro2 VT100
The following settings are available:
• DCE when using a 1:1 serial cable
• DTE when using a null modem cable
If you select the "DCE" option, two additional selection options are activated.
These options are:
• DCE on indicates whether a data stream is present
• RI on indicates an incoming call
If necessary, select a value suitable for your serial connection.
All settings made here are accepted by clicking on the OK button. Cancel
closes the menu without saving the changes and you return to the terminal
window.
5.2 'Terminal window settings
On the "Terminal" tab, you can make settings that relate to the appearance of
the terminal window. In addition, you can specify to the CATPro2 VT100 the
keyboard layout with which you are working locally and how it should be
implemented on the serial device (emulated).
Page 9

Guntermann & Drunck GmbH Installation- and configuration Guide
CATPro2 VT100
In the "Size" panel, you can define the size of the terminal window. The size of
the terminal window is defined in columns x lines.
The following settings are available:
• vt100 (80 x 24)
• vt100_wide (132 x 24)
• pc (80 x 25)
• xterm (80 x 40)
• maximum (sets the terminal window to the maximum value, which
depends on the resolution)
• Custom...
If you select the Custom item, the "Columns" and "Lines“ fields are activated
one row down. Enter the required values in these fields (maximum of 132 x 50).
If you set the terminal window to be larger than the resolution of panel
“Display”, the terminal window will automatically be adjusted to the largest
possible size. The bottom left field of the terminal window shows the size of the
displayed terminal window in red.
In the "Keyboard" panel you can define:
• the keyboard layout of your local keyboard (German, US American,
French, Lat. American, Portuguese, Spanish, UK English).
• the emulation procedure with which the signals sent from the local
keyboard are interpreted on the serial device. The following emulation
procedures are available:
o vt100,
o vt420 pc,
o linux,
o solaris,
o x11r5 (XFree 3.xx)
o default (XFree 4.xx).
The setting made here depends on the emulation procedure of the
serial device. Ascertain the emulation procedure with which the serial
device works.
Page 10

Guntermann & Drunck GmbH Installation- and configuration Guide
CATPro2 VT100
If a sent data stream is not automatically echoed by the serial device (after
prompting, in the terminal window are no characters visible), activate the "Local
echo" box.
In the Drop-Down menu „Encoding“ you can define, how the charactes, send
from the PC to the terminal, should be interpreted. In default the setting is „ISO
8859-1“. This setting is appropriate for most of the applications. However, if you
work with a Windows 2003 Server-console we recommend to change the value
to UTF-8 (Unicode).
In the "Appearance" panel you can define the appearance of the terminal
window.
Select the colour scheme in which the terminal window is to be displayed in the
"Color scheme" field.
By marking the "Blinking cursor" box, you instruct the terminal program to
display a blinking cursor. The cursor only blinks when the terminal window is
active. If you select a menu item from the menu bar, the cursor stops blinking.
By marking the "Visible bell" box, you instruct the terminal program to indicate
that the serial device has output a warning or informational signal by flashing
the screen.
By marking the "Inverse" box, the terminal window is displayed in the inverse
of the selected colour scheme.
In the "Display" panel you can define the size of the terminal window. The
following resolutions are available:
• 800 x 600
• 1024 x 768
All settings made here are accepted by clicking on the OK button. Cancel
closes the menu without saving the changes and you return to the terminal
window.
Page 11

Guntermann & Drunck GmbH Installation- and configuration Guide
CATPro2 VT100
5.3 General settings
In the "General" tab, you can make settings that relate to the CATPro2 VT100.
In the "Device name" panel, you can activate the "Device name" field by
clicking on the corresponding box. In the activated field you can assign a name
to the CATPro2 VT100.
The name you define here will be displayed in the terminal window above the
text entry mask.
Page 12

Guntermann & Drunck GmbH Installation- and configuration Guide
CATPro2 VT100
Instead of a device name, you can have the active directory of your VT100
device displayed in this field. To do so, mark the "Allow external window title
overwrite" box.
All settings made here are accepted by clicking on the OK button. Cancel
closes the menu without saving the changes and you return to the terminal
window.
6 Additional control elements in the "Edit" menu
The "Edit" menu contains additional control elements.
These elements are described in this chapter:
Clear screen: Selecting this menu item clears the contents of the terminal
window.
Clear selection: Using the mouse, you can mark letters, words, lines or even
whole sections within a text mask of the terminal window. This
marking makes it possible to insert the marked area at the
current position of the cursor (copying function).
You can use the "Clear selection" menu item to unmark the
selection marked with the mouse. The content of the clipboard is
not deleted and the copying procedure can still be performed.
Paste selection: With this menu item you can insert the selection marked with the
mouse at the current position of the cursor.
Page 13

Guntermann & Drunck GmbH Installation- and configuration Guide
CATPro2 VT100
7 "Info" menu
The "Info" menu contains information on the CATPro2 VT100 in use.
Click on the "About" item. The following window opens:
The "License" button provides license information on the CATPro2 VT100 in use.
Clicking on the "OK" button closes the window and you return to the terminal
window.
Page 14

Guntermann & Drunck GmbH Installation- and configuration Guide
CATPro2 VT100
8 Default-Values
In this chapter you find the default values of the CAT
Preferences menu.
Menü Abschnitt Zeile Default-Wert
Serial Port UART Baud rate
Character size
Parity
Stop bits
Flow control Hardware
Software
Maximum buffer fill
Interface DCE
DTE
DCD on
RI on
Terminal Size Profile
Columns
Lines
Keyboard/Char. Layout
Emulation
Local echo
Encoding
Appearance Color scheme
Inverse
Blinking cursor
Visible bell
Display 800 x 600
1024 x 768
General Device name Show device name
Device name
Allow external window..
Page 15
PRO2-VT100 from the
38400
8
None
1
Off
Off
90
On
Off
Off
Off
vt100
80
24
de
vt100
Off
ISO 8859-1 (def..)
default (ANSI)
Off
Off
Off
On
Off
Off
My serial device
Off

Guntermann & Drunck GmbH Installation- and configuration Guide
CATPro2 VT100
To reconstitute the default settings, open the menu „Preferences“ and than the
tab „General“.
Klick the button „Reset to defaults“. In the following window klick on the button
„OK“.
All default settings have been reconstituted as described in this chapter.
Page 16

Guntermann & Drunck GmbH Installation- and configuration Guide
CATPro2 VT100
9 Update of the CATPro2 VT100
Via the service interface of theCAT
Therefore you need:
• a serial cabel (SUB-D 9-jack -> stereo jack) for the update process of the
CAT
PRO2-VT100 firmware
• an Update-Wizard for the CATPRO2-VT100 firmware
For updating the CAT
PRO2-VT100 firmware proceed as follows:
Copy the file „CATpro2VT100Wizard_x_x_xxx_xxxxx.exe“ in a folder on your
computer. This folder has to be chosen by you and is needed for the upcoming
update procedure.
Copy the file „msvcp71.dll" & "msvcr71.dll" in the same folder, in which you
have copied the CATpro2VT100Wizard.
Start the self-extracting file „CATpro2VT100Wizard_x_x_xxx_xxxxx.exe“ with a
double-click.
Follow the instructions.
PRO2-VT100 the firmware can be updated.
Page 17

Guntermann & Drunck GmbH Installation- and configuration Guide
CATPro2 VT100
10 Technical data
Power supply:
Connectors: SUB-D 9-pin to RS232C
Baud rates:
Parity: none, even, uneven
Data bits: 5 to 8
Stop bits: 1, 2
Handshake: none, hardware, Xon/Xoff
Display size: 24 x 80 (default)
Buffer size:
Housing: 105 x 84 x 26, aluminium
+12 VDC, miniDIN4
RJ45 socket (transmission)
2.5 mm jack connector (service socket)
miniDIN4 (power supply)
50 – 115200
Free adjustable up to 139 x 48 characters
2000 lines
Page 18

Guntermann & Drunck GmbH Installation- and configuration Guide
CATPro2 VT100
Page 19

Guntermann & Drunck GmbH
System Development Germany
Dortmunder Str. 4a ▪ Tel: +49-2739/8901-100
57234 Wilnsdorf ▪ Fax: +49-2739/8901- 120
http://www.GDsys.de ▪ eMail: sales@GDsys.de
©Sun, MAC, RS 6000, HP 9000, SGI, DEC Alpha Station, USB are registered trademarks of the
respective manufacturer.
 Loading...