


UCON-IP-NEO
Operation Web Interface
copyright G&D 25/01/2012
Web Interface version 2.30
Subject to possible errors and technical modifications

Guntermann & Drunck GmbH UCON-IP-NEO Web interface
License notes
G&D license
Copyright G&D GmbH 2003-2012:
All rights reserved. By using this software, you declare your acceptance of the
terms of use.
GNU GPL / GNU LGPL license note
Parts of the IP user module are free software, licensed in accordance with the
GNU GPL. In accordance with the terms of the GNU GPL, as published by the
Free Software Foundation, you may forward and/or modify these parts either in
accordance with version 2 of the GPL or (optionally) any future version. We
accept no liability of any kind for these parts.
Other parts are free software licensed in accordance with the GNU LGPL. In
accordance with the terms of the GNU LGPL, as published by the Free
Software Foundation, you may forward and/or modify these parts either in
accordance with version 2.1 of the LGPL or (optionally) any future version. We
accept no liability of any kind for these parts.
Page 2

Guntermann & Drunck GmbH UCON-IP-NEO Web interface
Table of Contents
IP user module – Web Interface
troduction to the web interface ......................................................................... 4 In
1
1.1
General .......................................................................................................... 4
1.2 Unacceptable special characters................................................................... 5
1.3 Notes on system operation ............................................................................ 5
2 Starting the web interface..................................................................................... 6
3 Menus .....................................................................................................................8
3.1 Configuration menu ....................................................................................... 9
3.1.1 Defining and editing network settings ................................................ 10
3.1.2 Defining system wide settings ........................................................... 15
3.1.2.1 Adjust user settings ................................................................. 16
3.1.2.2 Adapting server settings ..........................................................17
3.1.2.3 Adjust time and date settings................................................... 18
3.1.3 Syslog................................................................................................ 20
3.1.3.1 Locally activate syslog ............................................................. 21
3.1.3.2 Send syslog messages to a syslog server............................... 21
3.1.4 Import your own certificate................................................................. 23
3.2 Tools menu .................................................................................................. 27
3.2.1 Backup of configuration data ............................................................. 28
3.2.2 Restoring of configuration data.......................................................... 30
3.2.3 Execute a firmware update ................................................................ 34
3.2.4 Create delivery status ........................................................................ 37
3.2.4.1 Create delivery status via web interface .................................. 37
3.2.4.2 Create the delivery status via the IP user module ...................39
3.2.4.3 Default values of the IP user module....................................... 39
3.2.5 Restarting the IP user module ...........................................................40
3.3 System information inquiry .......................................................................... 42
3.4
Ending a web interface session................................................................... 43
4 Starting the Java client .......................................................................................44
Page 3

Guntermann & Drunck GmbH UCON-IP-NEO Web interface
1 Introduction to the web interface
1.1 General
The IP user module is configured via the web interface. The configuration
options are extensive. In detail, these are:
Integration in the productive network (e.g. assignment of IP
addresses)
Definition of the web interface timeout
Designation of the standard language of the web interface
Definition of the Syslog server
Administration of the user settings of the respective registered user
Update of the firmware (update function)
In addition, the web interface provides extensive operating options. You can
thus:
Restart the IP user module
Call up the Java Client
In addition, the web interface provides information on:
Currently used network settings
Event protocol
System configuration of the IP user module
Current user sessions (client and server)
The following browser requirements have to be fulfilled to call up the web
interface:
Cookies enabled
Java script activated
Popup windows not principally blocked
Internet Explorer:
- Activate Initial ActiveX control initialization and execute those
that are not safe
or
- Activate Execute ActiveX Control Elements Safe for Scripting
and Execute ActiveX Control Elements and Plug-ins (default
of the IE)
Page 4

Guntermann & Drunck GmbH UCON-IP-NEO Web interface
1.2 Unacceptable special characters
Some special characters may not be used in the web interface. In detail, these
are:
For the user name, user password, host name, domain name,
NTPserver1 and 2, syslog server 1 and 2:
" ' `
For the file name (restore, update):
" ' ` # & ;
1.3 Notes on system operation
The web interface was tested on different operation systems using the
following browsers:
Operating system Browser
Windows XP Internet Explorer 7
Windows Vista Internet Explorer 8
Windows 7 Mozilla Firefox 3.6
Ubuntu 10.04
Ubuntu 10.10
Page 5
Guntermann & Drunck GmbH UCON-IP-NEO Web interface
2 Starting the web interface
Perform the following steps in order to work with the web interface:
1. Open the web browser of your computer and enter the IP address or
the hostname (for DNS servers) in the address bar of the IP user
module.
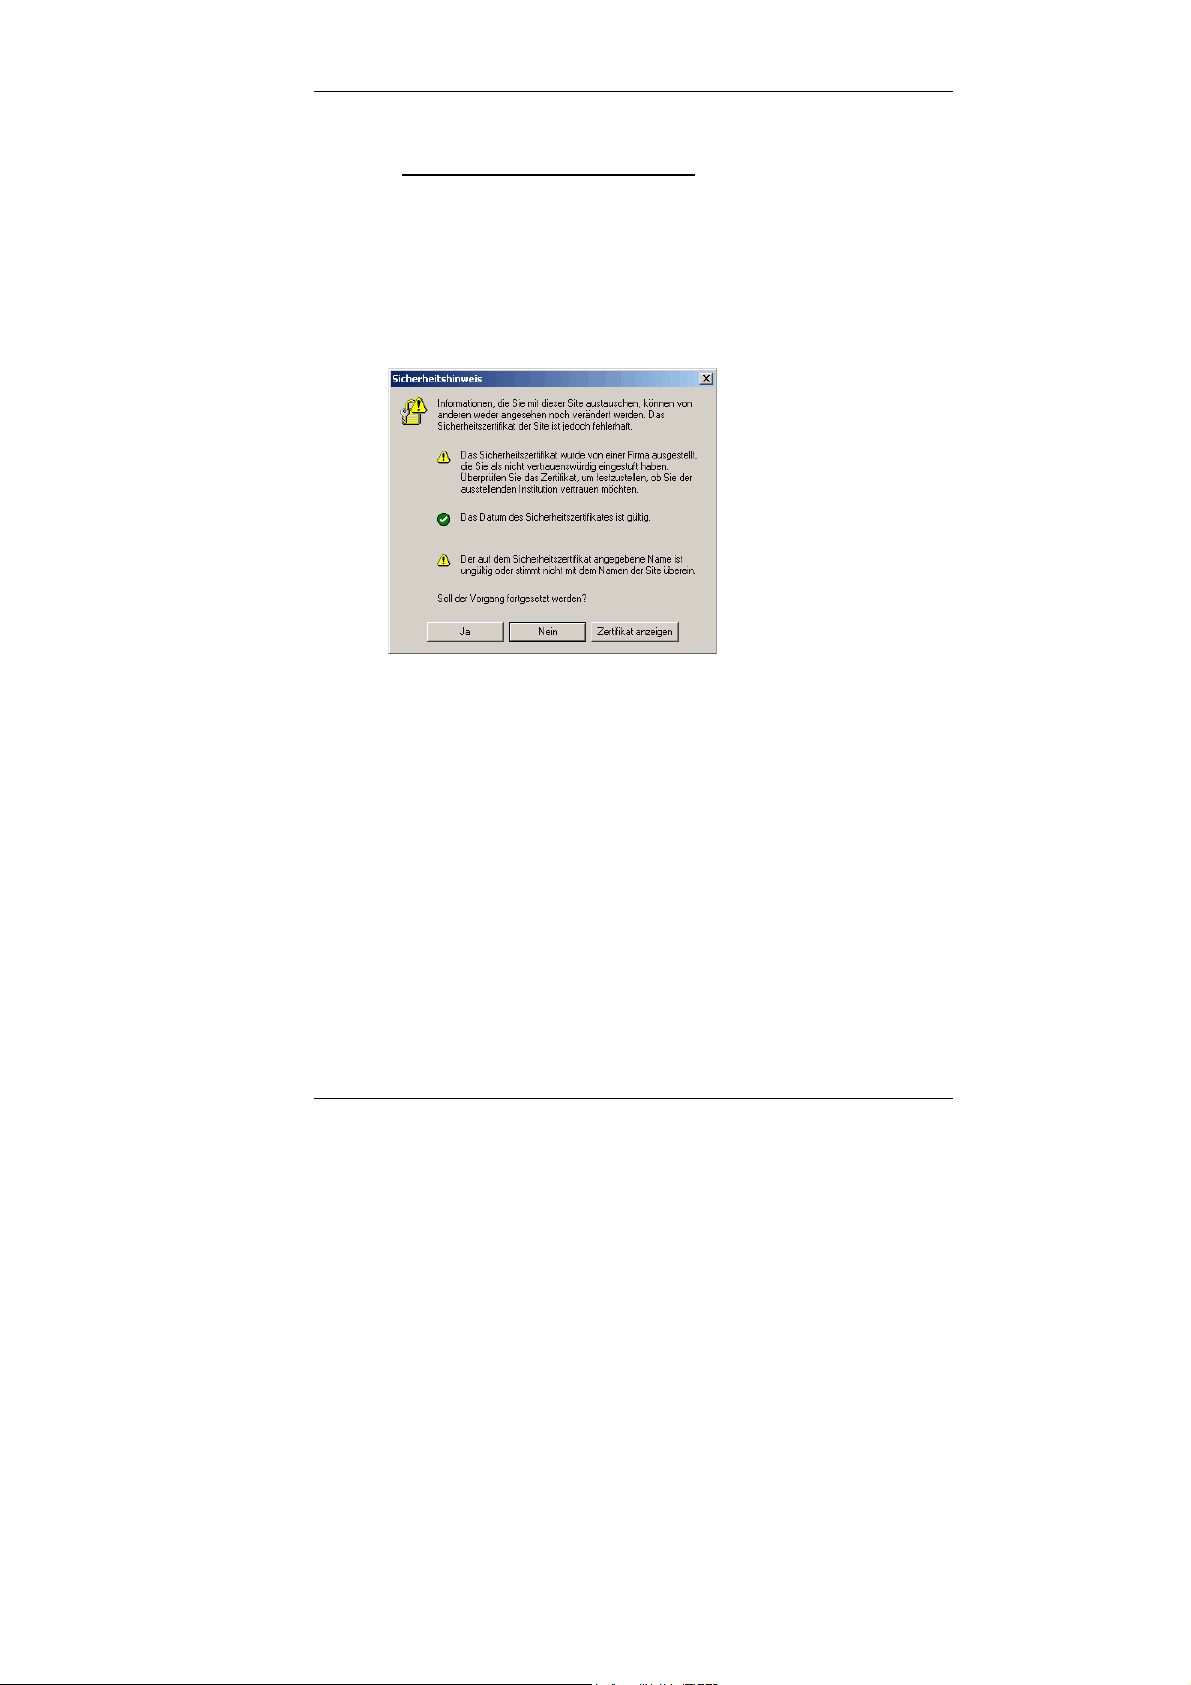
2. Click on Yes to confirm the security notice that is opening.
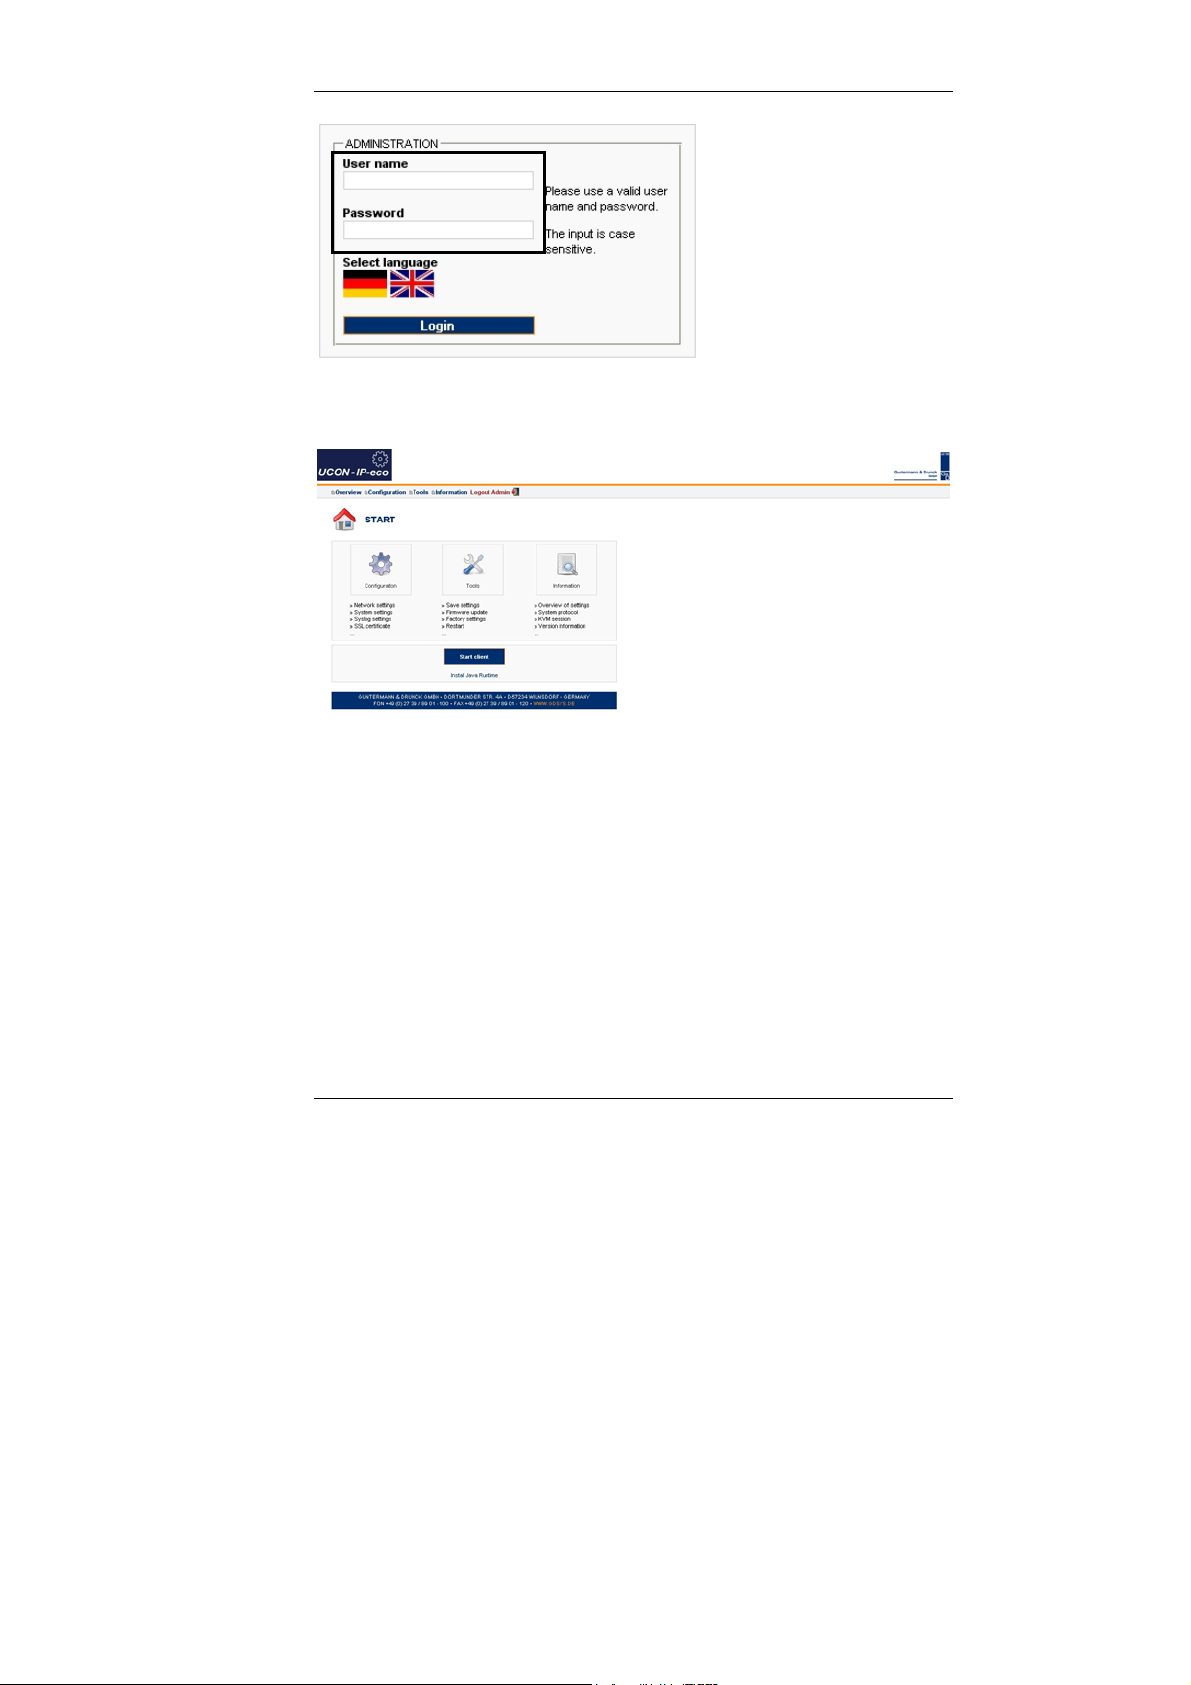
3. A web interface now opens. Select the language for running this
session in the field Language selection. You can select between
German and English. The language selection applies for the duration
of the session. The language that is displayed when the web interface
is first accessed is based on the defined standard language. This is
set within the web interface in the menu Configuration->System-
>User settings (see Chapter 3.1.2.1)
4. Please login with the user name and password for the web interface.
Ask your administrator for the respective information.
The default user name is Admin and the password is 4658. Please
contact your administrator about the new user identification if this user
identification has been changed.
To login, first move to the field User name. Use the TAB key to move
to the field Password.
Page 6
Guntermann & Drunck GmbH UCON-IP-NEO Web interface
5. After entering the User name and Password, click on Login.
Once you have logged in, you will see the start page of the web interface.
Now, from this window you can
configure,
operate,
and obtain system information.
Information regarding these topics is given in the following chapters.
Page 7
Guntermann & Drunck GmbH UCON-IP-NEO Web interface
3 Menus
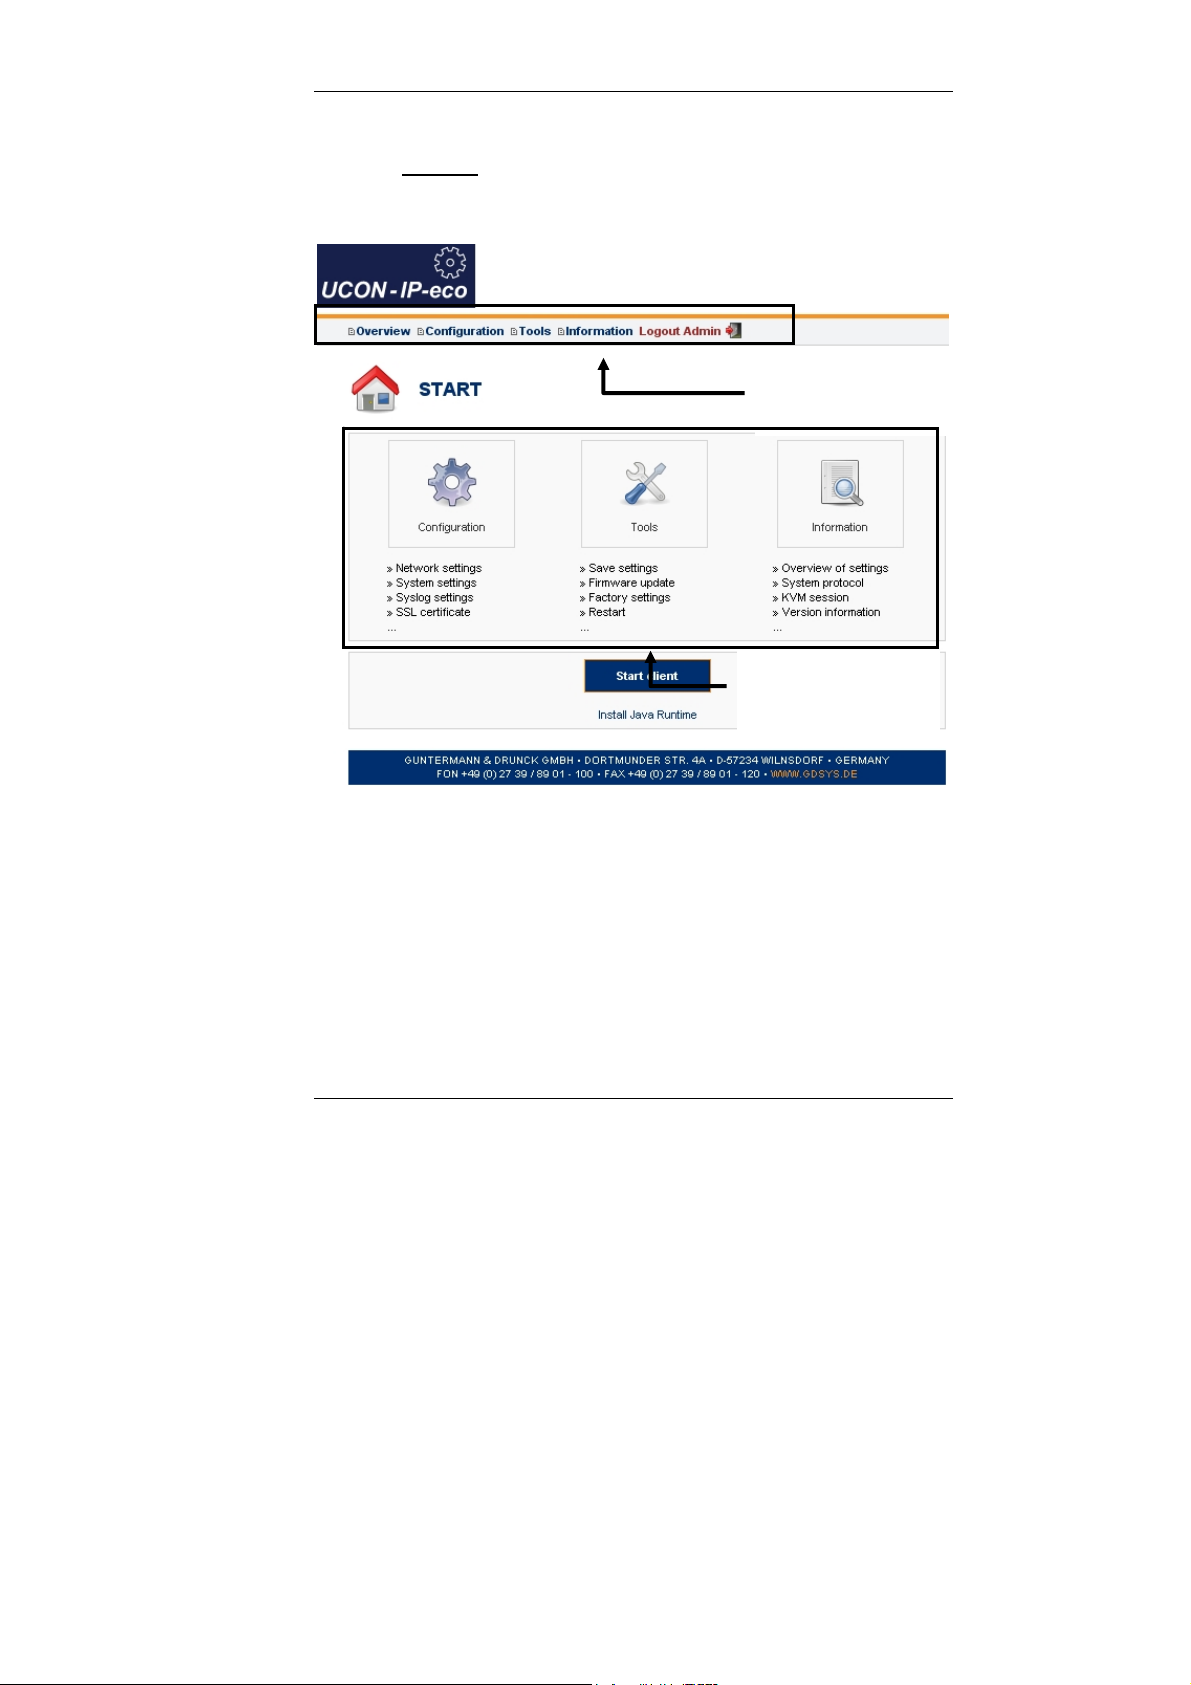
You have two options to navigate within the web interface:
Menu navigation of
the IP user module
web interface
Symbol navigation of
the IP user module
web interface
Either move th
symbol within the navigation symbol. Click one of these menu entries to open
the selected menu and view the sub-entries associated with this menu (a new
window appears).
e mouse over an entr
Page 8
y in the menu navigation or click on a
Guntermann & Drunck GmbH UCON-IP-NEO Web interface
3.1 Configuration menu
Click on the menu item Configuration in the menu navigation or symbol
navigation.
Note:
See the notes regarding the unacceptable special characters in Chapter 1.2!
Page 9
Guntermann & Drunck GmbH UCON-IP-NEO Web interface
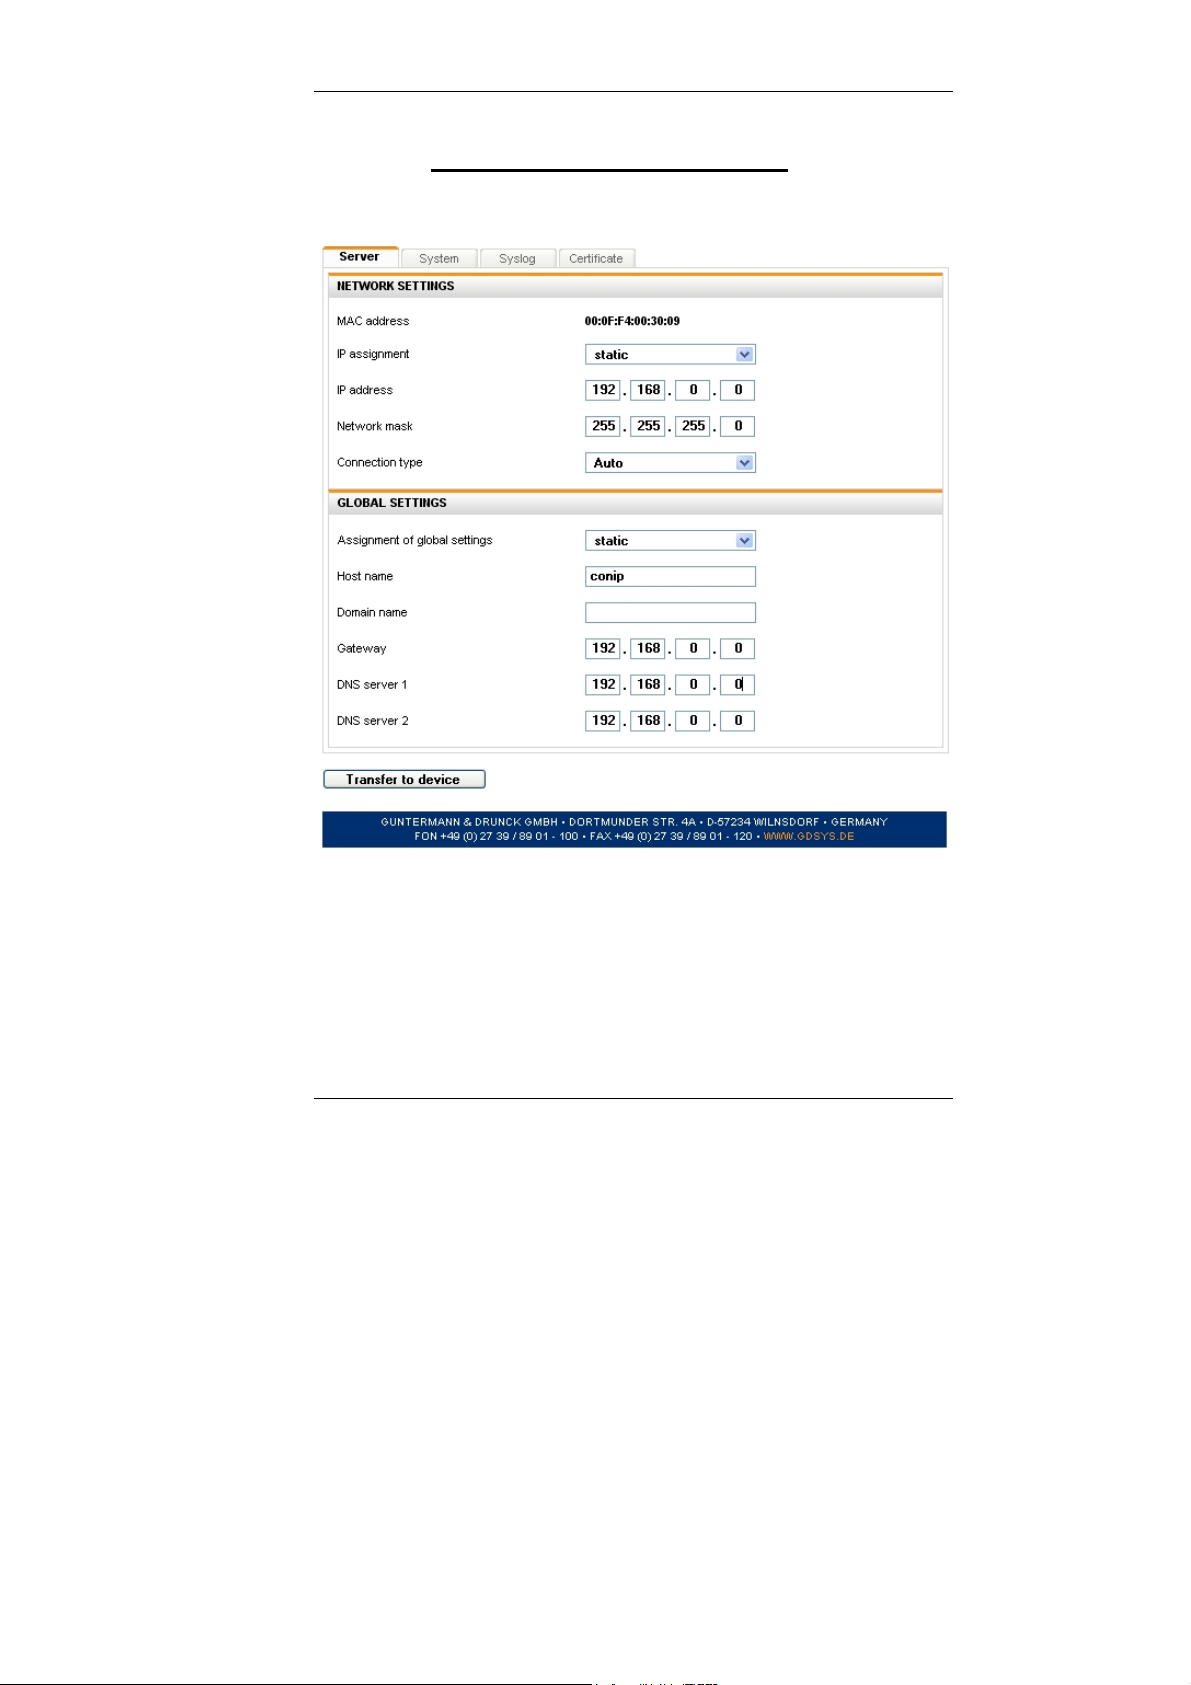
3.1.1 Defining and editing network settings
Click the Server tab. The following window opens:
The entries in this window to be configured refer to the Ethernet interface of
the IP user module.
Use this interface to perform extensive network functions such as output of
syslog messages, time adjustment via a time server, and the KVM access via
the operation clients (Java or native client).
Page 10
Guntermann & Drunck GmbH UCON-IP-NEO Web interface
Use the Network settings section to define via which IP address the IP user
module is to be accessed in the network.
In the area IP assignment, you can choose between the settings Static and
DHCP (default: static).
If you set the entry in the field IP configuration to DHCP, no additional
settings are required.
The new IP address is now displayed.
If you set the entry in the area IP configuration to Static, you have additional
configuration options in the following fields:
IP Address: The IP address to be assigned to the IP user module in your
network
Net mask: The standard setting is 255.255.255.0
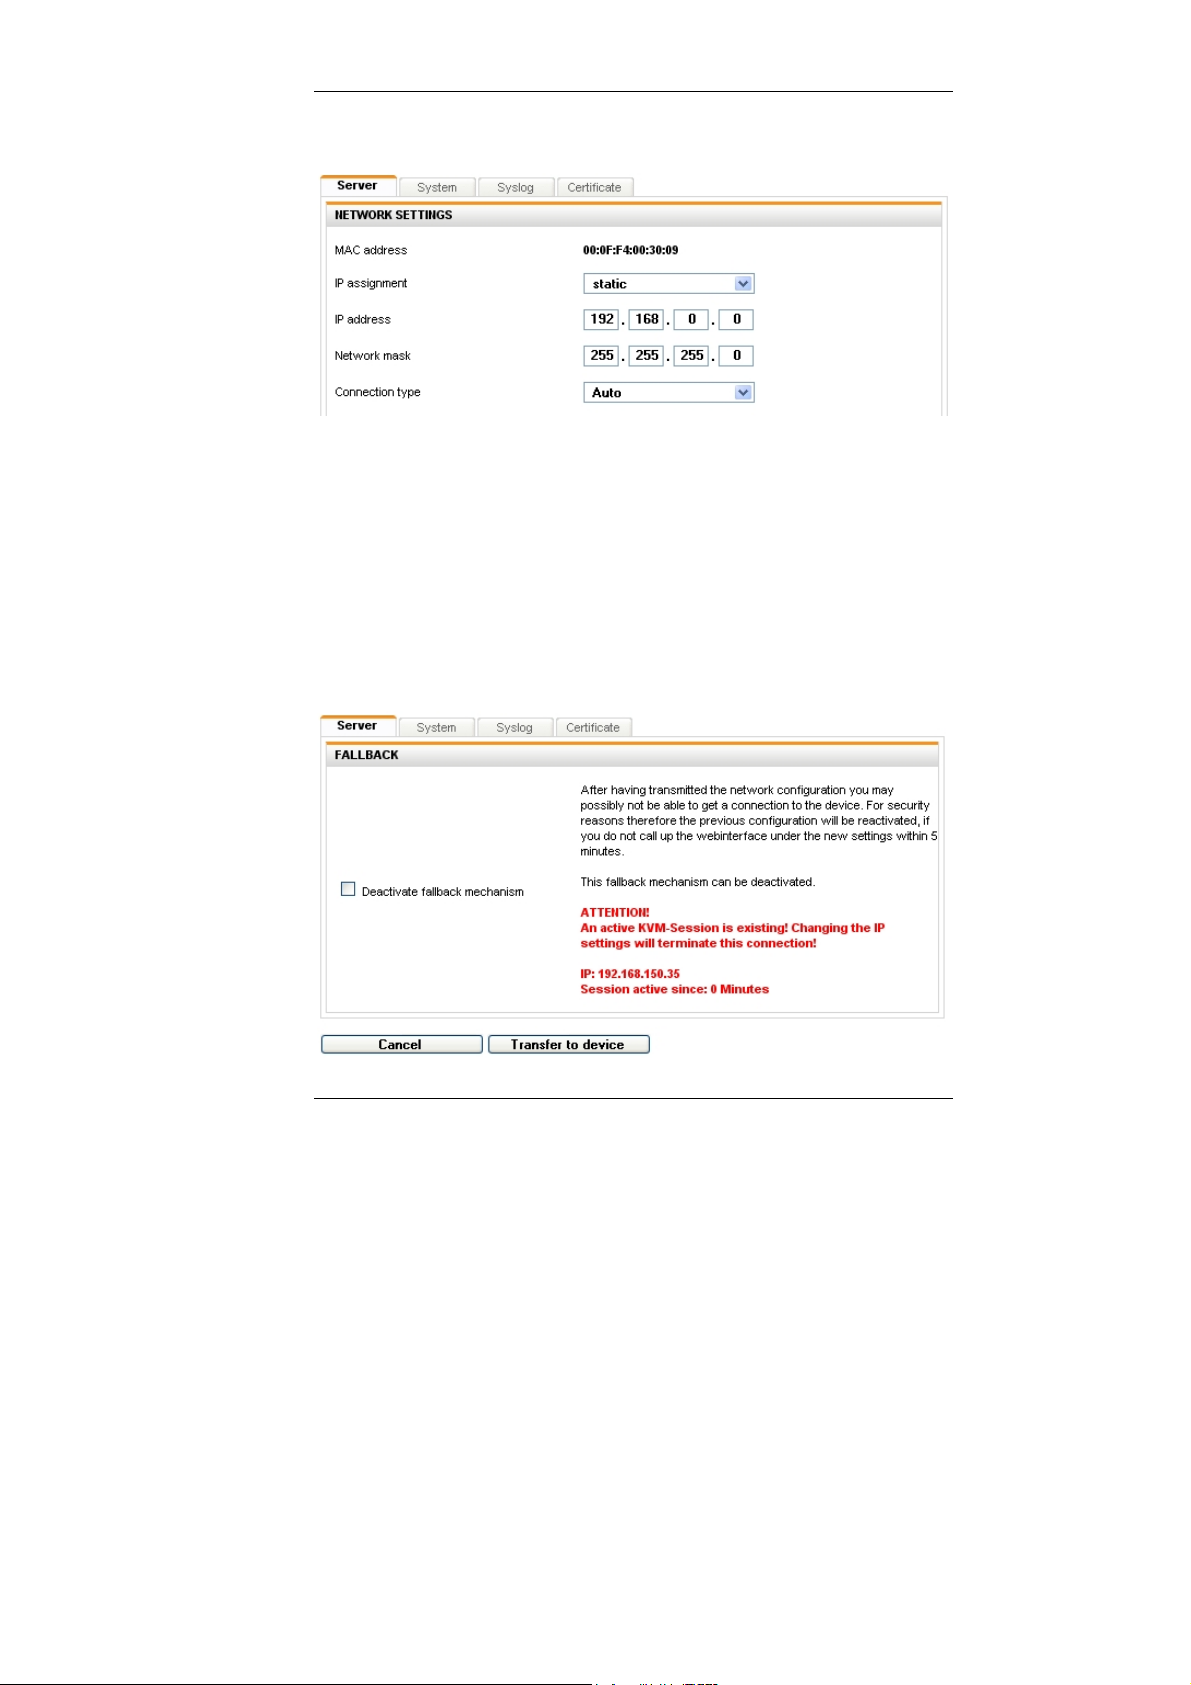
Note: If you change the IP address during an active IP session, the following
message window will alert you to this fact:
Page 11
Guntermann & Drunck GmbH UCON-IP-NEO Web interface
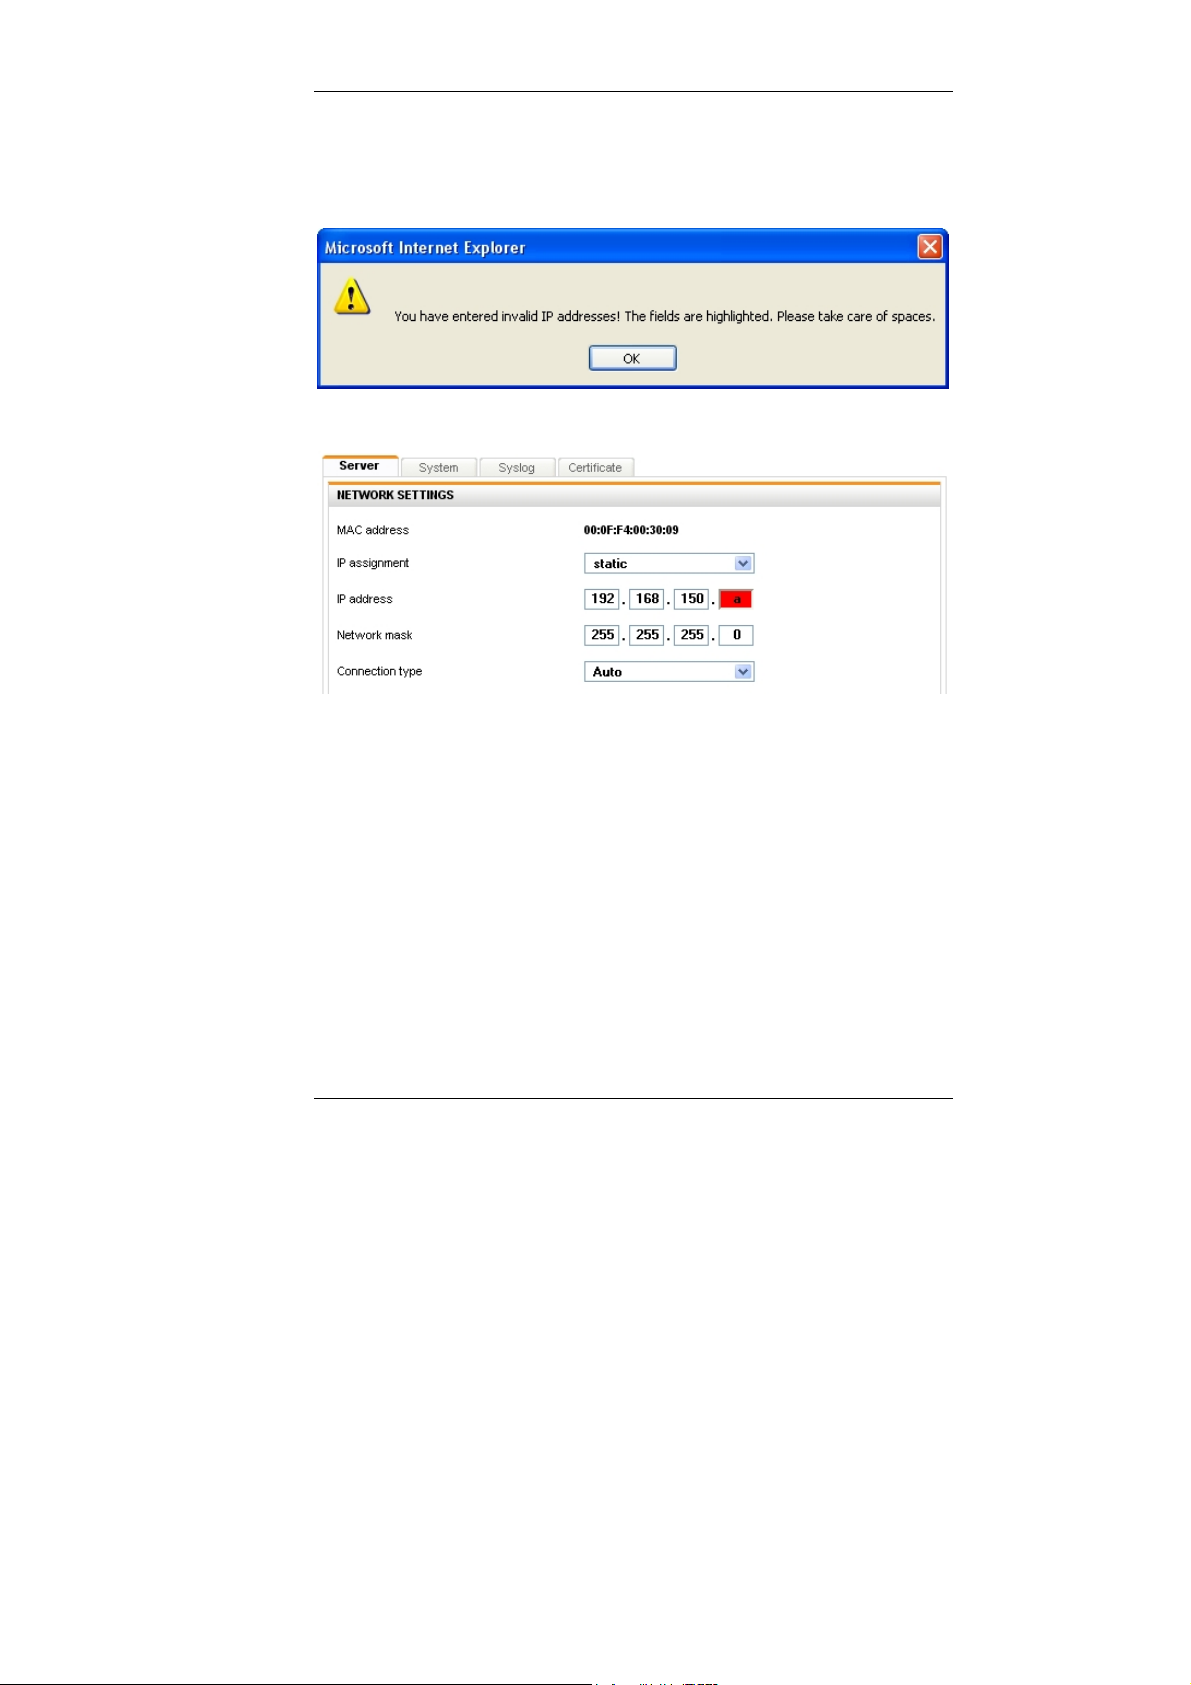
If you enter an invalid value in the field IP address (e.g. an alpha value, blank
value or a value that is too high that does not correspond with the IPv4
specifications) and you want to transfer this value to the device (Transfer to
device button) you will be advised of an invalid entry:
At the same time, the field IP address will mark the invalid entry box in red.
In the field Connection type, you choose the Ethernet connection speed and
the mode. This selection is available for the static assignment as well as for the
IP assignment via DHCP.
The options are:
Fixed Manual setting of the Ethernet connection speed and the mode.
Select between the listed options.
Auto The network interface and the counter device (second computer,
hub, switch) coordinate the speed between each other.
Page 12
Guntermann & Drunck GmbH UCON-IP-NEO Web interface
In the section Global settings, you have the following entry options:
Assignment of global settings
Indicate here whether the IP address is to be a static or a
dynamic assignment (DHCP)
Host name The host name to be assigned to the IP user module
Domain Indicate here which domain the IP user module is to belong
to
Gateway Indicate here via which standard gateway
the IP user module is to be accessed
DNS-Server 1 Enter the P address of the DNS-Server
DNS-Server 2 See above
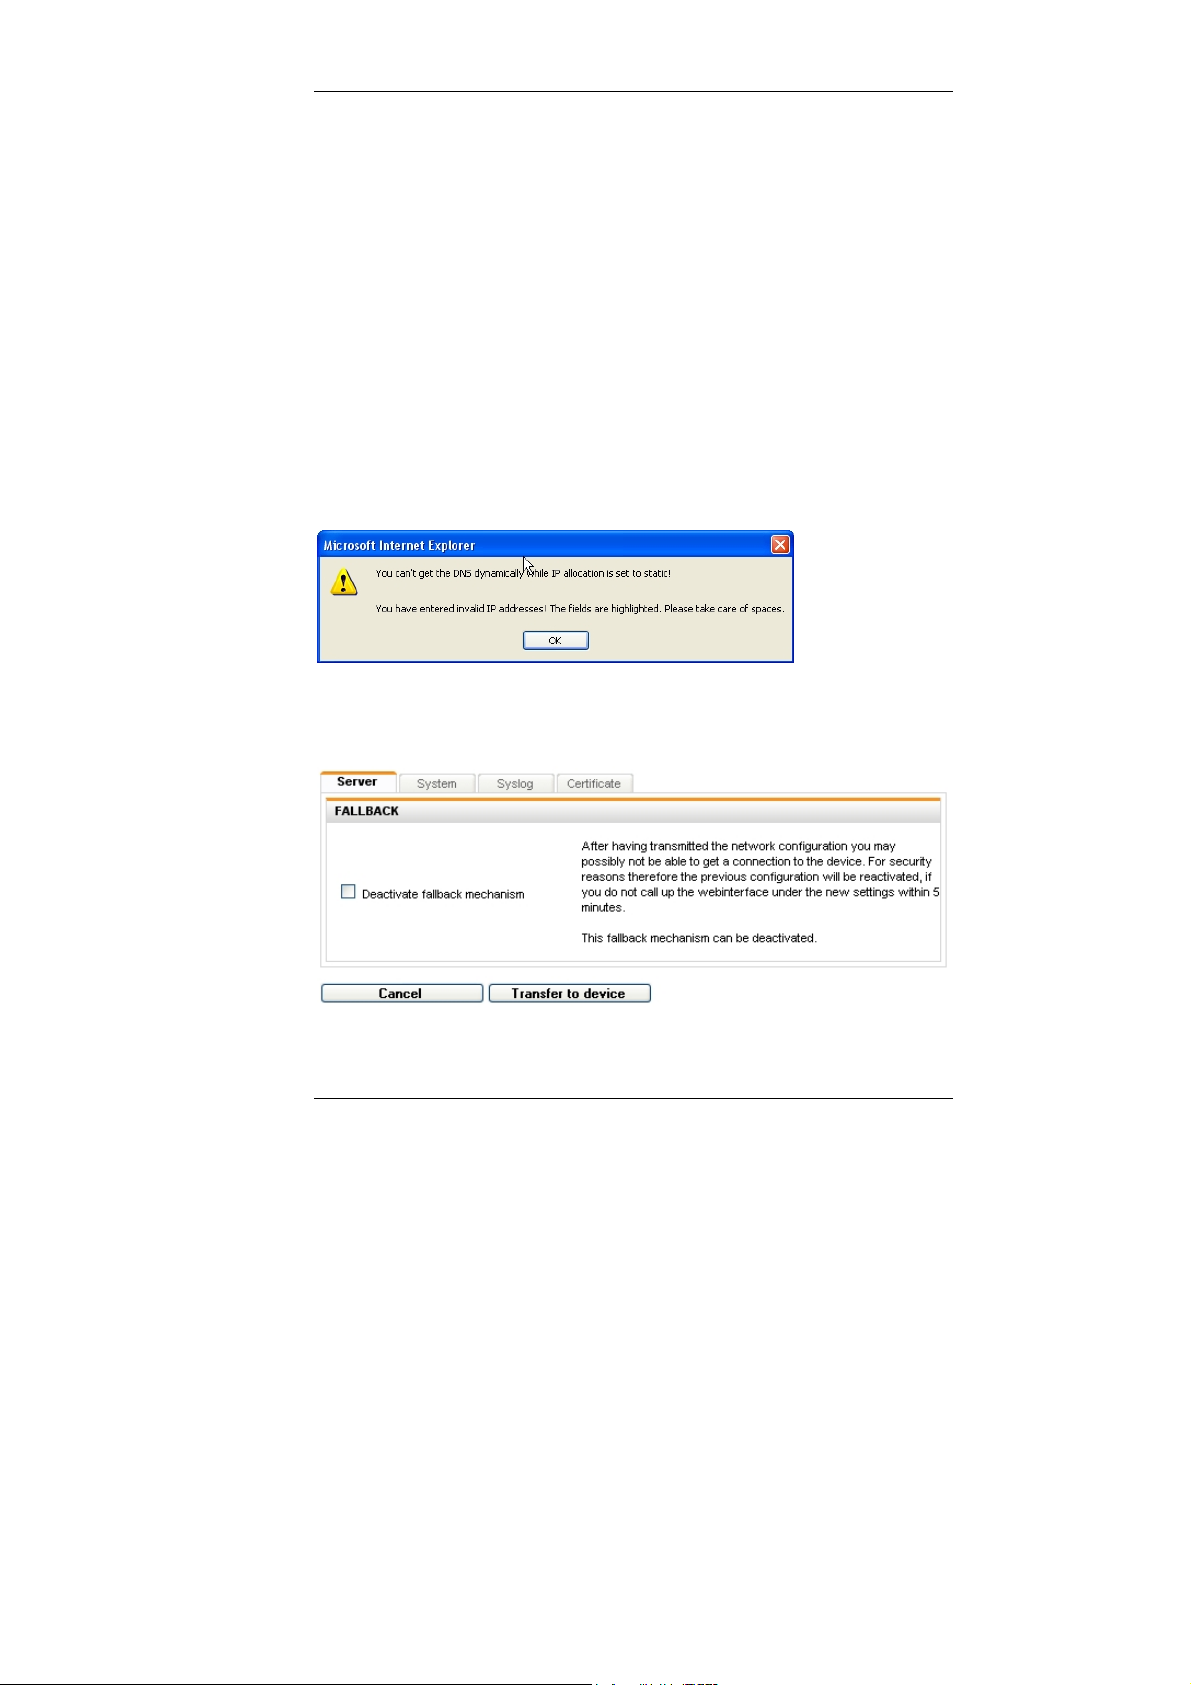
Note:
If you indicated in the field IP assignment (in the area for network settings) the
value as static, but in the field Assignment of global settings (in the area of
Global settings) you entered the value DHCP, you get the following warning:
Pay close attention that the values for the fields IP assignment and
assignment of global settings correspond.
After you made your changes, you transmit them to the IP user module by
clicking on Transfer to device. The following notification window opens:
If you decided to use this IP address for the IP user module in the future, you
have to reconnect to the IP user module within 5 minutes. From the time of the
next login, the IP user module can be accessed in the network with the new IP
address.
Page 13
Guntermann & Drunck GmbH UCON-IP-NEO Web interface
With the fallback mechanism, you achieve that the IP user module picks up the
old IP address setting again if there is no login after 5 minutes. This ensures
that the IP user module is accessible again with the old network settings.
This function is deactivated by setting the Deactivate fallback mechanism
checkmark! In this case, the IP user module keeps the new network settings.
By clicking Cancel, you end the process without transmitting the new settings
to the IP user module and you return to the Server tab.
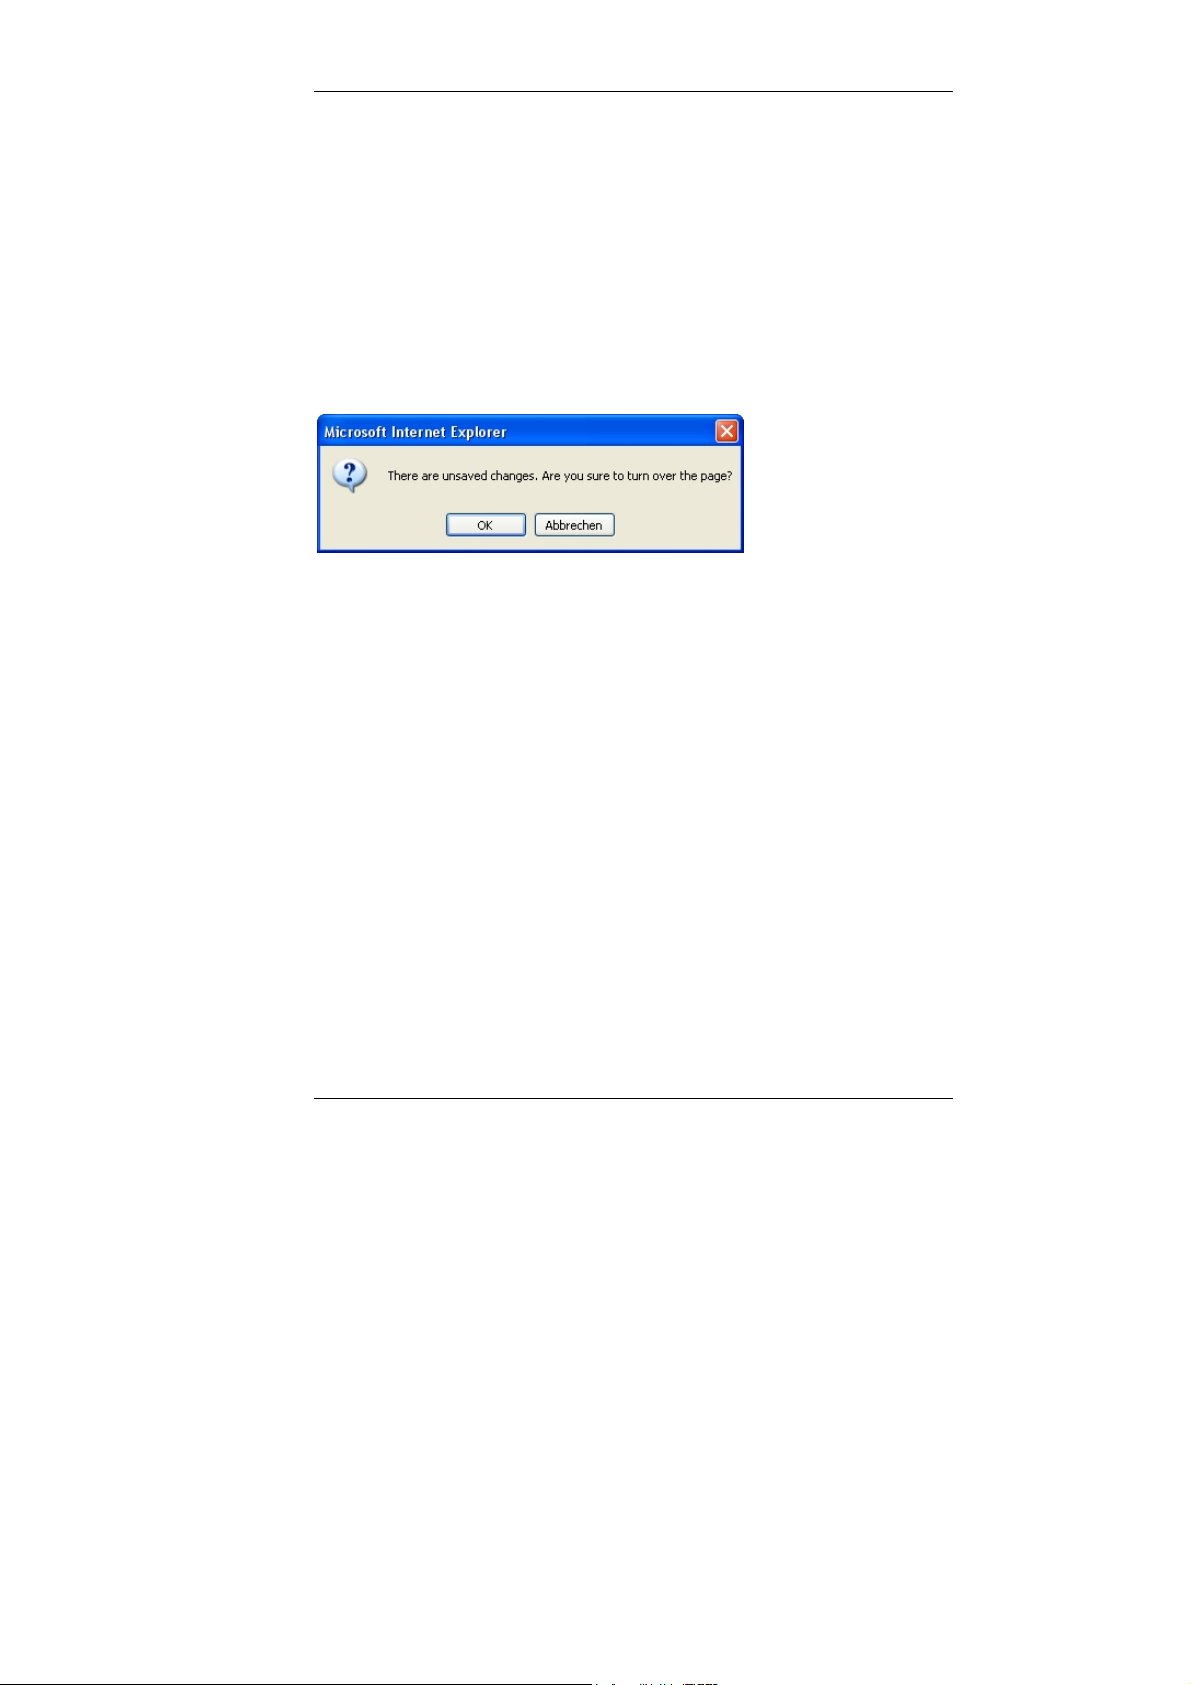
If you want to change the tab or the menu without saving, you will be notified of
this condition in the following window:
Note:
Be sure to consider the notes regarding the impermissible special characters in
Chapter 1.2!
Page 14
Guntermann & Drunck GmbH UCON-IP-NEO Web interface
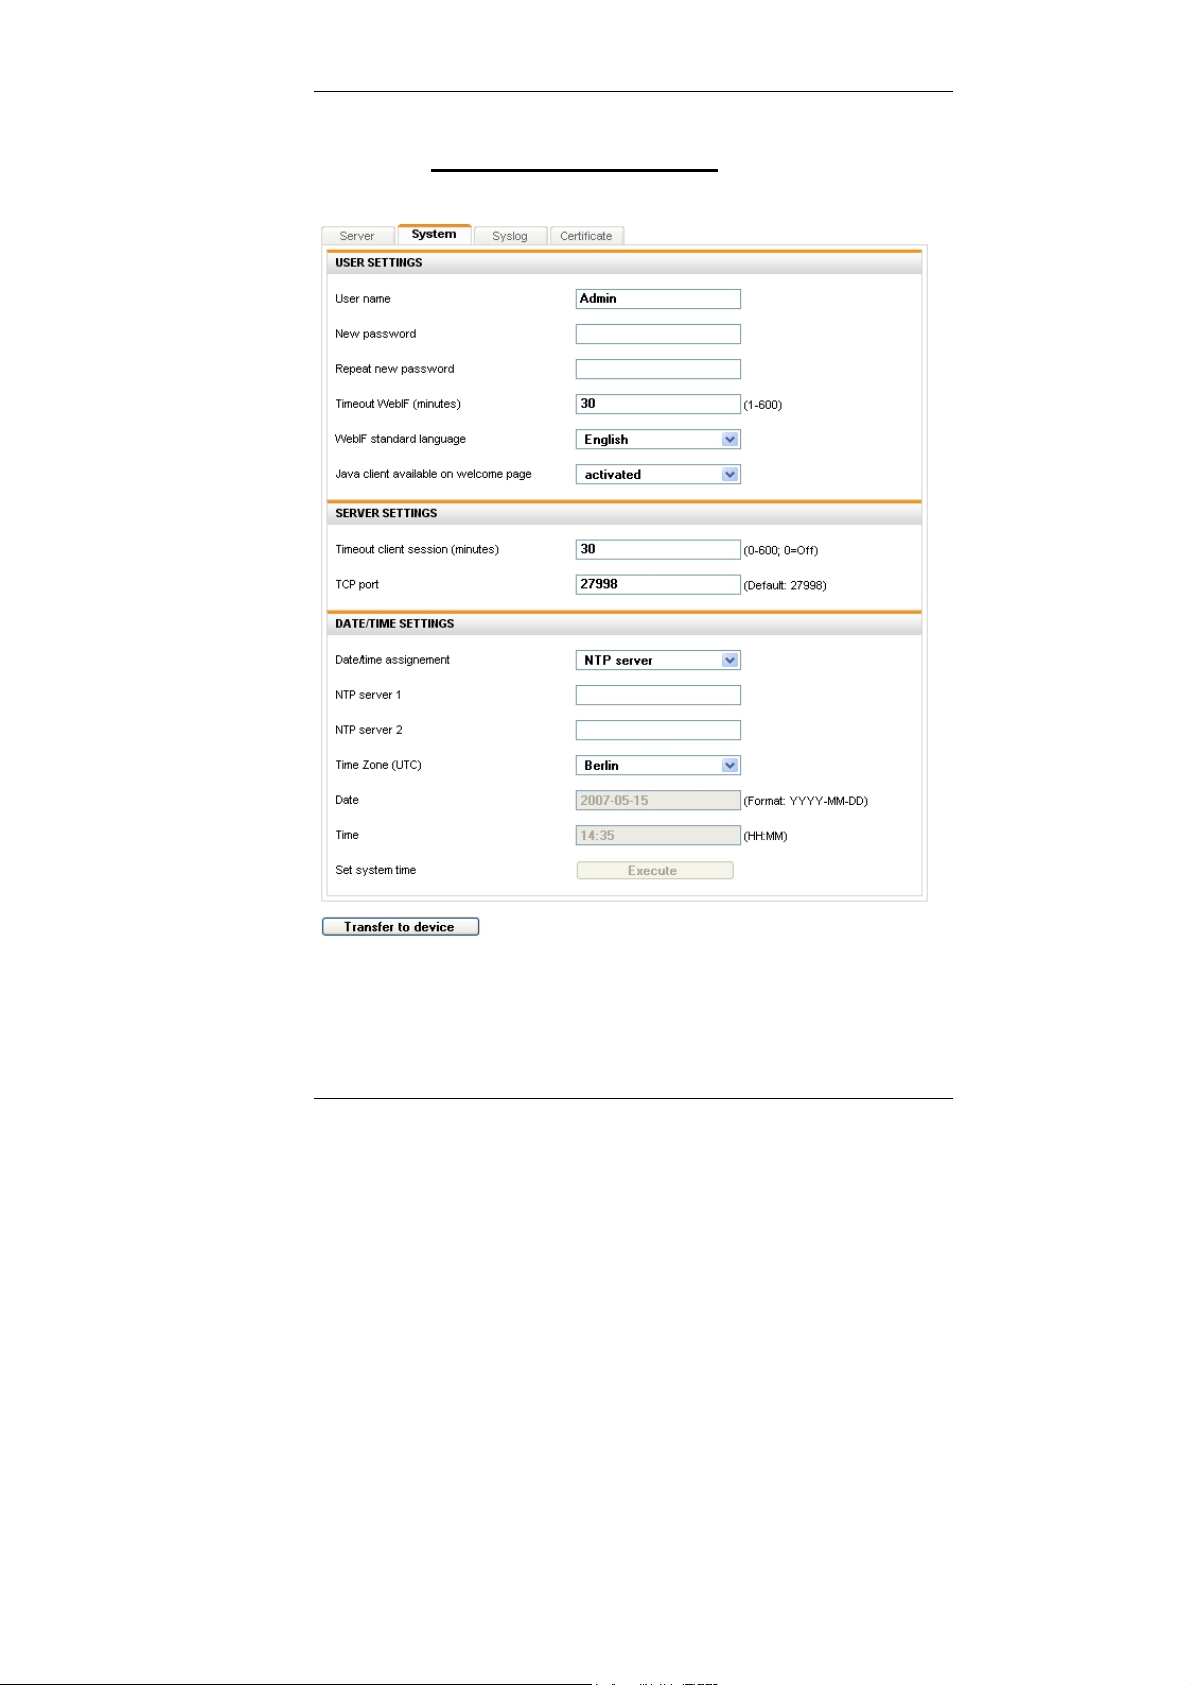
3.1.2 Defining system wide settings
Click on the Server tab. The following window opens:
Here, you can change the user data of the web interface user, define the
server setting of the IP user module and process date and time settings.
Note:
Be sure to consider the notes regarding the impermissible special characters in
Chapter 1.2!
Page 15

Guntermann & Drunck GmbH UCON-IP-NEO Web interface
3.1.2.1 Adjust user settings
The IP user module only has one user. Additional user accounts cannot be
created. This user has the rights of a web interface administrator. All tabs are
accessible for this user.
The default user name is Admin, the login password is 4658.
You can change these login dates in the area User settings.
Here, you have the following setting options:
User name: Enter your preferred user name here.
New Password: Assign a password to the new user.
It must have at least 3 digits.
Repeat new password: In this field, repeat the new password.
.
Note:
Be sure to consider the notes regarding the impermissible special characters in
Chapter 1.2!
Page 16

Guntermann & Drunck GmbH UCON-IP-NEO Web interface
In addition, you have these setting options:
Definition of the period of inactivity after which an automatic logout
should take place (timeout, can be set from 1-600 minutes)
Determination of the standard language of the web interface. You may
choose between German or English. The web interface is started with
the standard language that is set here. This standard language
however can be set for one language for the duration of a web
interface session, which can differ from the standard language that is
set here. This setting takes place on the welcome page on the web
interface (see Chapter 2, bullet point 3).
Use the Java client standard layout field to choose the keyboard
layout of the connected keyboard.
After you made your changes, you transmit them to the IP user module by
clicking on Transfer to device.
3.1.2.2 Adapting server settings
In this area, you can define the Timeout of a client session and determine the
TCP port via which the IP user module should be accessible.
Timeout client session (minutes):
Use this entry to determine whether a client session should be protected
against unauthorized access via timeout after a specified period without
keyboard/mouse activities. Here, you can enter values ranging from 0 (no logoff) to a maximum of 600 minutes.
After the period entered and without mouse or keyboard activities, the IP user
module terminates the client session (0 = no termination).
TCP port:
Here, you enter the port number to be used for accessing the IP user module in
your network. You can enter values here ranging from 1 to a maximum of
65535. The port that is set here must be permitted in the firewall. Port 80 and
port 443 are blocked.
Default: 27998
Note:
If you use a native client, please ensure that the server port in the native client
is identical with the setting entered here.
Click Cancel to cancel all your changes.
If all settings are correct, click Save to save your changes.
After you made your changes, you transmit them to the IP user module by
clicking on Transfer to device.
Page 17

Guntermann & Drunck GmbH UCON-IP-NEO Web interface
3.1.2.3 Adjust time and date settings
In order to track log messages, the internal clock of the IP user module must
be set to the correct time and date.
This can be automated via a network time protocol server or you do this
manually.
Note:
Be sure to consider the notes regarding the impermissible special characters in
Chapter 1.2!
Select the automatic time setting via an NTP server, set the entry in the area
Date/time assignment to NTP server.
Before you activate the time server, ensure that the time you
NOTE:
specified via the manual settings differs by no more than +/- 5 min from
your time server.
In the field NTP server 1, enter the IP address or the host name of the time
server. Alternatively, you can set another time server in the field NTP server 1.
In the field Time zone, you enter the applicable value.
For manual time setting, please proceed as follows:
Set the entry in the field Date/time assignment to manually.
Enter the values that apply for you in the fields Time Zone, Date, and Time.
Page 18

Guntermann & Drunck GmbH UCON-IP-NEO Web interface
The time of the IP user module server must be identical with the time of the
local computer from which the web interface is accessed. You can execute this
by clicking on Execute in the line Set system time.
Click on Transfer to device to transmit your changes to the IP user module.
Page 19

Guntermann & Drunck GmbH UCON-IP-NEO Web interface
3.1.3 Syslog
In addition to the internal protocol, the IP user module can forward events to
syslog servers in the network in the syslog format.
You can enter up to two systems in the network as recipients of events – the
events are forwarded to any registered system via TCP or UDP to port 514
(default).
Here you can decide:
whether the IP user module shall send syslog messages
which log level shall send messages
whether messages should be sent locally and/or to a syslog server
Page 20

Guntermann & Drunck GmbH UCON-IP-NEO Web interface
3.1.3.1 Locally activate syslog
If you set the value to Activated in the filed Syslog local in the drop down
menu, the syslog messages are saved locally in the IP user module.
In the line Log level, you can determine the level from which messages are to
be saved locally.
The storage space, however, is limited. If the storage is full, old messages are
being overwritten by new messages. When the IP user module is restarted, all
messages that were stored locally will be deleted.
For this reason, it is recommended to also list a syslog server. This will be
explained in the next chapter.
3.1.3.2 Send syslog messages to a syslog server
As an alternative to sending syslog messages to the IP user module, you can
activate a syslog server as the recipient for the syslog messages. Overall, a
maximum of two syslog servers can be addressed via the IP user module.
In the area Syslog server 1 set the value to Activated in the drop down menu.
All additional fields in the area Syslog server 1 are activated and can be
edited.
Under Log level, you determine the level from which messages are to be sent
to the syslog server.
Page 21

Guntermann & Drunck GmbH UCON-IP-NEO Web interface
Under IP address and Port, you enter the IP address and the port of the
syslog server that is to receive the syslog messages.
In addition, you can also determine the protocol type (TCP or UPD).
If you want to transmit your entries to the IP user module by pressing the
button Transfer to device, but you have not entered an IP address for a
syslog server, the following message appears on your screen:
In this case, enter the required information for the certificate and the key.
If you have entered all required information, press the button Transfer to
device. In the lower area, you receive a notification about the saving process
with a "Please wait..." message.
Note:
If you intend to also communicate with a second syslog server, please repeat the
previously described steps in the area Syslog server 1.
Be sure to consider the notes regarding the impermissible special characters in
Chapter 1.2!
Page 22

Guntermann & Drunck GmbH UCON-IP-NEO Web interface
3.1.4 Import your own certificate
An SSL certificate is stored for the web server on the IP user module for the
safe connection via SSL. If the name of the device in the certificate does not
match with the name in the UPR, a warning message appears in the browser.
The only option to remove this message is for the user or the administrator of
the IP user module to import a certificate with the correct name. This can be
done via the web interface. Here, it should be ensured that
the certificate is a RSA certificate, and not a DSA certificate.
it is neither a Certificate Authority (CA) and nor a root certificate.
To create a certificate you can use the openssl program from the OpenSSL
package, which can be downloaded from http://www.openssl.org/.
As an example the commands are:
1. Create private key: openssl genrsa -out server.key 2048
2. Create certificate request: openssl req -new -key server.key -out
server.csr
3. Sign: openssl x509 -req -days 60 -in server.csr -signkey server.key out server.crt
During the creation, some entries such as company, name, email address etc.
are requested that the creator may enter at will. The DNS name or the IP
address of the IP user module should be entered as Common name.
At the end of the process, 3 files were created: server.crt, server.csr and
server.key. The content of server.crt is entered in the WebIF into the
certificate field and the content of the server key is entered into the Key field.
Note:
The contents of the server.crt and server.key have to be entered in the
respective fields because the certificate can otherwise not be copied
successfully.
Page 23

Guntermann & Drunck GmbH UCON-IP-NEO Web interface
Example:
ds@ds:/tmp/ssl$ openssl genrsa -out server.key 2048
Generating RSA private key, 2048 bit long modulus
......................................................+++
...................................................................+++
e is 65537 (0x10001)
ds@ds:/tmp/ssl$ openssl req -new -key server.key -out server.csr
You are about to be asked to enter information that will be
incorporated
into your certificate request.
What you are about to enter is what is called a Distinguished Name or
a DN.
There are quite a few fields but you can leave some blank
For some fields there will be a default value,
If you enter '.', the field will be left blank.
----Country Name (2 letter code) [AU]:DE
State or Province Name (full name) [Some-State]:NRW
Page 24

Guntermann & Drunck GmbH UCON-IP-NEO Web interface
Locality Name (eg, city) []:Wilnsdorf
Organization Name (eg, company) [Internet Widgits Pty Ltd]:G&D
Organizational Unit Name (eg, section) []:F&E
Common Name (eg, YOUR name) []:10.1.50.21
Email Address []:sales@gdsys.de
Please enter the following 'extra' attributes
to be sent with your certificate request
A challenge password []:
An optional company name []:G&D
ds@ds:/tmp/ssl$ openssl x509 -req -days 60 -in server.csr -signkey
server.key -out server.crt
Signature ok
subject=/C=DE/ST=NRW/L=Wilnsdorf/O=GuD/OU=F&E/CN=10.1.50.21/emailAddre
ss=sales@gdsys.de
Getting Private key
ds@ds:/tmp/ssl$
To copy the created certificate and keys, proceed as follows:
Import the certificate:
1. Save the certification on your computer.
2. Open the certificate with an editor.
3. Now, mark the certificate text.
4. In the following, copy the text of the certificate into the Certificate text
field.
Import the key:
1. Save the key on your computer.
2. Open the certificate with an editor.
3. Mark the key text
4. In the following, copy the text of the certificate into the Certificate text
field.
If you want to transmit your entries to the IP user module by pressing Transfer
to device, but you have not entered a certificate or a key yet, the following
message appears on your screen:
In this case, enter the required information for the certificate and the key.
Page 25

Guntermann & Drunck GmbH UCON-IP-NEO Web interface
The certificate or the key can also contain errors. In this case, the following
message appears on your screen:
Additional possible error messages are:
Cannot load certificate file! The
file does not exist or does not
contain certificate information
(see error message above).
Cannot load private key file!
The file does not exist or does
not contain a key!
Certificate and key do not
match!
Private key is not RSA!
Public key is not RSA!
Check the information again and repeat
the transmission process to the IP user
module afterwards.
If on the other hand you have entered
all required information, the following
message appears upon successful
transmission of the information:
Upon completion, click on Close
window.
Page 26

Guntermann & Drunck GmbH UCON-IP-NEO Web interface
3.2 Tools menu
With the mouse click on the menu item Tools in the menu navigation or symbol
navigation.
Here, the firmware of the IP user module can be
updated (Update)
and the configuration settings can be
backed up (Backup)
restored (Restore)
reset to factory settings
In addition, the KVM service and the IP user module can be restarted using this
tab.
Page 27

Guntermann & Drunck GmbH UCON-IP-NEO Web interface
3.2.1 Backup of configuration data
Click Execute to execute the backup.
The system saves the current
configuration data automatically.
This activity is confirmed by the
following window.
In addition to the backup, you can
enter a comment to this configuration
file under the Comment field.
You can now download this data to
your local computer. Click on Start.
qu
In the subse
blue shaded hyperlink to download the
backup file.
ent window click on the
Page 28

Guntermann & Drunck GmbH UCON-IP-NEO Web interface
Select a folder in your computer where you want to save the backup file.
In this window, you determine the action that shall be executed. Click on Save.
Next, determine the location where you want to save the backup file.
As soon as you have selected the location, click Save and the download of the
backup file is completed.
Page 29

Guntermann & Drunck GmbH UCON-IP-NEO Web interface
3.2.2 Restoring of configuration data
Click on Select file to execute the backup. The following message opens on
your monitor:
Click on Browse to search for the file to be used for the restore process.
Page 30

Guntermann & Drunck GmbH UCON-IP-NEO Web interface
When you selected the file, click on
Open. This action is confirmed by
the following window:
w click
No
on Start. The following window advises you at this time about a
potentially existing IP session:
You end the restore process by clicking on Cancel.
If you click on OK, the restore process continues.
During the process, the following window opens on your screen with any
existing comments.
Page 31

Guntermann & Drunck GmbH UCON-IP-NEO Web interface
Start the restore process in this window
by clicking on Start. This restarts the
system functions and the WebIF cannot
be accessed for about 20 seconds.
During the rest
ore process, the
following message will appear on
your screen.
Page 32

Guntermann & Drunck GmbH UCON-IP-NEO Web interface
In the web interface, however, a message opens that indicates how long the
restore process will still last.
Upon completion of this action, you have to log back in to the IP user module
web interface.
Page 33

Guntermann & Drunck GmbH UCON-IP-NEO Web interface
3.2.3 Execute a firmware update
Click on Select file to execute the firmware update. The following message
appears on your monitor:
Click on Browse to search for the file to be used for the restore process.
Page 34

Guntermann & Drunck GmbH UCON-IP-NEO Web interface
When you have selected the file, click on Open. This activity is confirmed by
the following window:
Note:
he saved conf
T
iguration will not be
overwritten. You can continue to work
with the current settings. The import of a
new firmware can take up to 3 minutes.
No window content is visible during this
time period.
During the firmware update, do not
close the window that appears on the
screen!
Now click on Start. The following
notification window will inform you about
the firmware update process:
Page 35

Guntermann & Drunck GmbH UCON-IP-NEO Web interface
Once the new firmware is successfully imported into the system, the following
message appears:
The system will restart automatically. You can close this window by clicking on
Close window!
In the web interface, however, a message appears that indicates how long the
restart will still take.
Upon completion of this action, log back in to the IP user module web interface.
Page 36

Guntermann & Drunck GmbH UCON-IP-NEO Web interface
3.2.4 Create delivery status
The execution of this function sets all values that are determined in the system
(e.g. other user, IP configuration, etc.) to the values that were defined by the
delivery status.
A list of all default values can be found in Chapter 3.2.4.3.
There are two ways to initiate the execution of this function:
via the web interface
on the device at the IP user module
These two procedures are explained in the following chapters.
3.2.4.1 Create delivery status via web interface
To execute this function via the web interface, click on Execute. The following
message appears on your monitor:
Page 37

Guntermann & Drunck GmbH UCON-IP-NEO Web interface
In this window, click on Start. The following message appears on your monitor:
You can now close this window. A message appears in the web interface that
indicates that you have to login again.
After the default settings have been reset, the web interface of the IP user
module can only be accessed over the address described in the chapter
"Configuration before initial startup" of the installation manual.
The chapter "Configuration before initial startup" of the installation manual also
provides information on how to adjust the network settings of the IP user
module to the local network.
Page 38

Guntermann & Drunck GmbH UCON-IP-NEO Web interface
3.2.4.2 Create the delivery status via the IP user module
The creation of the delivery status can also be executed through the device.
There is a small button on the front, which can be pushed with a pointed object.
This button activates the Set system defaults. For this, proceed as follows:
Turn off the IP user module
Press and hold the button
Turn on IP user module
Wait until the status LED flashes rapidly.
Release the button.
The IP user module is set to the delivery status. The rapid flashing stops after
several seconds. The device will now start.
3.2.4.3 Default values of the IP user module
This chapter shows the factory settings of IP user module in form of a table:
Login name: Admin
Password: 4658
Menu Section Line Default value
Configuration Server IP assignment
IP address
Net mask
Connection type
Assignment of global
settings
Host name
system User name
Timeout WebIF
Standard language
Access Java-Client
Timeout client
TCP port
Issue date/ time
time zone
Syslog Local syslog
Log Level
Static
192.168.0.1
255.255.255.0
Auto
Static
EcoV3
Admin
30
German
Activated
10
27998
manually
Berlin
Deactivated
Info
Page 39

Guntermann & Drunck GmbH UCON-IP-NEO Web interface
Menu Section Line Default value
Syslog server 1
LogLevel
Port
Protocol
Syslog server 2
LogLevel
Port
Protocol
3.2.5 Restarting the IP user module
If you want to restart the IP user module and the operating system, click
Execute in the field Restart device.
Deactivated
Info
514
UPD
Deactivated
Info
514
UPD
Page 40

Guntermann & Drunck GmbH UCON-IP-NEO Web interface
The following message opens after
clicking on Restart device.
End the process by clicking on Cancel.
If you click on OK, the restore process is
continued and the following message
pops up:
You can now close this window.
Page 41

Guntermann & Drunck GmbH UCON-IP-NEO Web interface
The web interface displays a message indicating how long the restart process
will still take.
After restarting, you have to log in to the web interface again with your login
and password.
3.3 System information inquiry
With the mouse click on the menu item Information in the menu navigation or
symbol navigation. The following menu is displayed:
Page 42

Guntermann & Drunck GmbH UCON-IP-NEO Web interface
This menu item shows information on the IP user module.
Among other things, the information refers to:
your current network settings
logging of the events in the IP user module
system configuration of the IP user module
current IP user module sessions (whose session it is, that person's IP
address and the duration of the session).
3.4 Ending a web interface session
Clicking on Logout will immediately end the session at the web interface and
the welcome screen of the web interface will is displayed.
Page 43

Guntermann & Drunck GmbH UCON-IP-NEO Web interface
4 Starting the Java client
You can access the Java client two different ways:
Via the welcome screen
This access is only possible when these have been activated like in
Chapter 3.1.2 (access Java client on welcome page). No access option will
appear on the welcome page if it has been deactivated.
Via the start page of the web interface
Page 44

Guntermann & Drunck GmbH UCON-IP-NEO Web interface
Note:
For the Java applet to work, you must have a Java virtual machine of the
version 1.5.0 or higher installed on your computer.
If you do not have the required version of the Java Virtual Machine available,
you need to download it in the active window by clicking the hyperlink Install
Java runtime.
The system automatically takes you to the corresponding Website, where you
can download the file suitable for your operating system. For this purpose,
please follow the instructions of the installation program.
To start the Java client, please proceed as follows:
Click on Start client in one of the two web interface windows.
Confirm the warning messages by clicking on Yes!
Subsequent to the last warning message, the following window opens:
Enter your user name and password. Obtain this information from your
administrator.
See the separate manual for information on how to operate the Java client.
Page 45

Guntermann & Drunck GmbH UCON-IP-NEO Web interface
Page 46

Guntermann & Drunck GmbH UCON-IP-NEO Web interface
Page 47

Guntermann & Drunck GmbH UCON-IP-NEO Web interface
Guntermann & Drunck GmbH
Systementwicklung Germany
Dortmunder Str. 4a ▪ Tel: +49-2739/8901-100
57234 Wilnsdorf ▪ Fax: +49-2739/8901- 120
http://www.GDsys.de ▪ E-mail: sales@GDsys.de
©Sun, MAC, RS 6000, HP 9000, SGI, DEC Alpha Station, are registered trademarks of the
respective manufacturers.
Page 48
 Loading...