

G&D DevCon-Center
Installation Guide

About this guide
This guide is authored with special diligence and verified by the state of the art for
correctness.
G&D neither explicitly nor implicitly takes guarantee or responsibility for the quality, efficiency and marketability of the product when used for a certain purpose that
differs from the scope of service covered by this guide.
For losses, which directly or indirectly result from the use of the documentation as
well as for incidental damages or subsequent damages, G&D is liable only in the
cases of intent or gross negligence.
Warranty exclusion
In the following cases, G&D will not accept warranty claims:
The devices were not used as intended.
The devices were repaired or modified by unauthorized personnel.
The devices offer extensive external damage that was not reported at time of
delivery.
The devices were damaged by third-party accessories.
G&D will assume no liability for any consequential damages that may arise from
the use of the products.
Trademark credits
All product and company names mentioned in this guide and other documents you
have received with your G&D product may be trademarks or trade names of their
respective owners.
Impressum
© Guntermann & Drunck GmbH 2010. All rights reserved.
Version 1.10 – 15/04/2010
Firmware: 1.2.000 (00182)
Guntermann & Drunck GmbH
Dortmunder Str. 4a
57234 Wilnsdorf
Germany
Phone +49 2739 8901-100
Fax +49 2739 8901-120
http://www.GDsys.de
sales@GDsys.de
i · G&D DevCon-Center

Contents
Contents
Safety guidelines ............................................................................................... 1
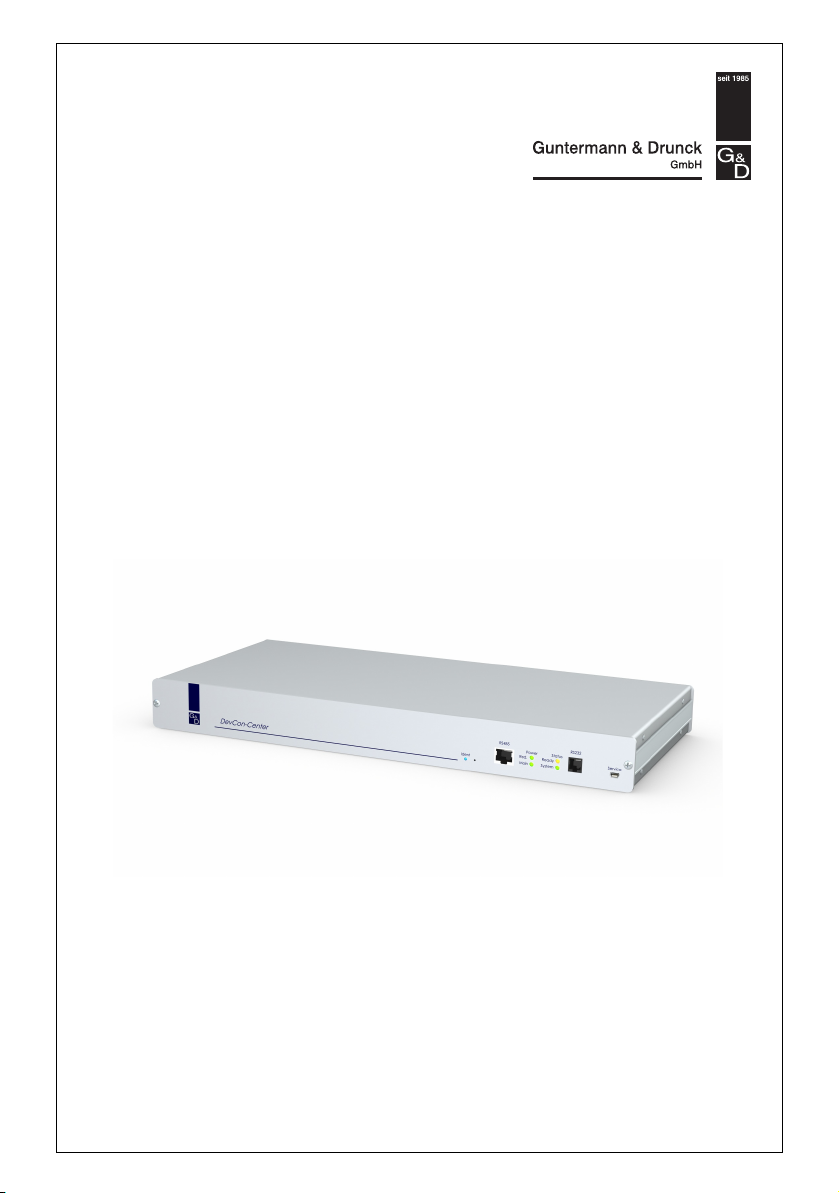
The »DevCon-Center« appliance ...................................................................... 2
Scope of delivery ............................................................................................... 2
Installation ....................................................................................................... 3
Initiation .......................................................................................................... 3
Initial configuration of the network settings ..................................................... 4
Adjusting a common database for all devices .................................................... 6
Using the Reset button ...................................................................................... 7
Resetting the default settings .............................................................................. 7
Temporarily deactivating the netfilter rules ......................................................... 8
Status displays .................................................................................................. 9
Technical data ................................................................................................ 10
G&D DevCon-Center · ii

Safety guidelines
Safety guidelines
Please read the following safety guidelines attentively before you start running the
G&D product. The guidelines help to avoid damage to the product and prevent pos
sible injuries.
Inform all persons that use this equipment in detail about these safety guidelines.
Observe all warnings or operating instructions put on the device or stated in this
operating guide.
, Avoid the risk of electric shock
To avoid the risk of electric shock, do not open the device or remove the covers.
If service is required, please contact our technicians.
, Disconnect the main power plug or the power supply before installation
Before installation, ensure that the device has been disconnected from the power
source. Disconnect the main power plug or the power supply of the device.
, Ensure constant access to the power plugs
Ensure that the power plugs remain accessible during the installation of the devices.
! Avoid the risk of tripping over cables
Ensure that there is no risk of tripping over cables.
! Only use a grounded electrical outlet
Operate this device by using a grounded electrical outlet.
, Use only the provided G&D power pack
Operate this device with the provided G&D power pack or with the power packs
listed in the operating manual.
, Operate the device only in the intended area of application
This device has been designed for indoor use. Do not expose it to extreme cold,
heat or humidity.
-
1 · G&D DevCon-Center
The »DevCon-Center« appliance
The »DevCon-Center« appliance
The Config Panel web application is integrated into various G&D devices. It provides
the graphical user interface to configure and monitor the devices.
Adding an DevCon-Center appliance to the existing G&D devices (with integrated
web application) adds up to a KVM system which enables you to centrally configure
and monitor the single devices.
ADVICE:
the devices connected to the KVM system.
The web application can be applied independently from the locations of
Scope of delivery
1 × DevCon-Center
2 × power cable (PowerCable-2 Standard)
1 × service cable (USB-Service-2)
1 × manual »Installation Guide«
1 × manual »Config Panel« web application
NOTE:
The scope of delivery includes rackmount sets (19" RM-Set-435-1HE) to
mount the devices into a 19” rack.
G&D DevCon-Center · 2

Installation
Installation
When choosing a location for the device, please ensure to comply with the
ambient temperature limit (see
The ambient temperature limit must not be influenced by other devices.
When installing the devices, make sure to only place a maximum of three devices
directly on top of each other. This way, a good circulation of air is provided and
mutual thermal interference can be avoided. After having installed three devices,
provide for a distance (at least 2 cm).
Do not cover the ventilation openings. For reasons of electric safety, mount the
device variants with ventilation openings only horizontally.
Technical data on page 10 ff.) close to the device.
Establishing a connection to up to two local networks
Network A: Insert a category 5 twisted pair cable (or better).
NOTE:
Connect the other end of the cable to the network interfaces of any compu-
ter for the initial configuration of the network interface(s).
After the initial configuration (see page 4), the cable is connected to the local network.
Network B: If you want to integrate the DevCon-Center appliance into another network,
insert the category 5 (or better) cable into this interface.
Connect the other end of the cable to the local network.
Establishing the power supply
Main Power: Insert the supplied PowerCable-2 Standard power cable.
Red. Power: Insert the supplied PowerCable-2 Standard power cable. This provides the
device with a second, redundant power supply
.
NOTE:
The interfaces USB 2.0, RS485 and RS232 are provided for future expansions.
Initiation
After the appliance has been properly installed, it is ready for operation. Switch on
the Main
3 · G&D DevCon-Center
Power and optionally the Red. Power power pack.

Initial configuration of the network settings
Initial configuration of the
network
In order to access the web application, the network settings of the DevCon-Center
appliance on which the web application is operated are to be configured.
The following table lists the default settings of the Network A network interface:
IP allocation: static
IP address: 192.168.0.1
Subnet mask: 255.255.255.0
Connetion type: Auto
NOTE:
In the default, the Network B interface is deactivated.
How to configure the network settings before integrating the device into the local
network:
1. Connect the network interface of any computer to the appliance’s Network A
interface. Use a category 5 (or better) twisted pair cable for this purpose.
2. Ensure that the IP address of the computer’s network interface is part of the subnet to which the appliance’s IP address belongs to.
NOTE:
settings
Use the IP address 192.168.0.100, for example.
3. Switch the device on.
4. Start the computer’s web browser and enter the URL 192.168.0.1 in the address bar.
5. Authenticate your user account against the web application.
NOTE:
These are the preset access data for the administrator account:
Username: Admin
Password: 4658
Change the preset password of the administrator account. The manual of the
web application provides a detailed description of how to change the preset
access data.
6. Click the tools sysmbal in the toolbar.
7. Click the tabs Configuration > Interfaces.
G&D DevCon-Center · 4

Initial configuration of the network settings
In the DHCP operational mode, the following settings are obtained
automatically. Inputs are therefore not possible.
8. Use the paragraphs Interface A and/or Interface B to enter the following data:
Operational
mode:
IP address:
Select the operational mode of interface A or interface B in the
pull-down menu:
Off: switches off network interface.
Static: uses static settings.
DHCP: obtains the settings from a DHCP server.
Only if the Static operating mode has been selected: Enter the
interface IP address.
Netmask:
Only if the Static operating mode has been selected: Enter the
network netmask.
Connection
type:
Select if the network interface and its communication partner are to negotiate the connection type automatically (Auto)
or use one of the available types.
9. Enter the following data in the section Global network settings:
Global preferences:
Hostname:
Domain:
Gateway:
DNS Server 1:
DNS Server 2:
Select the operational mode in the pull-down menu:
Static: uses static settings.
DHCP: obtains the settings from a DHCP server.
Enter the device hostname.
Enter the domain the device is to belong to.
Enter the gateway IP address.
Enter the DNS server IP address.
Optionally, enter the IP address of another DNS server.
10.Click OK to save your data.
11.Click the Logout symbol (see figure on the right) to end the active session of
the web application.
12.Remove the twisted pair cable connection between computer and the appliance.
13.Integrate the appliance into the local network.
5 · G&D DevCon-Center

Adjusting a common database for all devices
Adjusting a common database for
devices
all
In order to being able to use the web application of the DevCon-Center appliance to
administer, configure and monitor all devices of the KVM system, the databse set
tings of the different devices need to be configured.
IMPORTANT:
applications of the different devices and not in the appliance!
How to define a device’s database settings:
1. Open the Config Panel web application of the respective device and log in with
your user account.
2. Click the tool symbol in the toolbar.
3. Click the tabs Configuration > Device.
4. Use the Type field to select the Slave option.
5. Use the gdcd IP row to enter the IP address of the appliance.
6. Use the gdcd Port field to enter the communication port (usually 27996) adjusted
in the appliance.
7. Click OK to save your settings.
IMPORTANT:
to be accessing the common database.
The steps described in the following are to be carried out in the web
Carry out these steps in the web application of all devices that are
-
G&D DevCon-Center · 6

Using the Reset button
Using the Reset button
The Reset button is located between the Identification LED and the RS 485 interface on
the front panel of the computer module and the user module.
This button enables you to reset the default settings as well as to temporarily deactivate the netfilter rules.
NOTE:
As protection against pressing the button accidentally, it is located behind a
drilling in the front panel.
Use a thin, pointed item to press the button.
Resetting the default settings
Pressing and holding the button during booting resets the default setting of the
DevCon-Center appliance.
How to reset the default settings:
1. Switch off the device if in operation.
2. Press and hold the Reset button on the front panel of the device.
3. Keep the button pressed and switch on the device.
4. Release the button as soon as the green System LED is blinking.
NOTE:
It is also possible to use the Config Panel web application to reset the default
settings (see separate manual).
7 · G&D DevCon-Center

Using the Reset button
Temporarily deactivating the netfilter rules
In the default status of the DevCon-Center appliance, all network computers have
access to the extender’s IP address (open system access).
The web application enables you to create netfilter rules to control the access to the
appliance. As soon as a netfilter rule has been created, the open access to the system is
deactivated and all incoming data packets are compared to the netfilter rules.
If the currently adjusted netfilter rules prevent the access to the Config Panel web
application, they can be can temporarily deactivated in order to be edited.
How to temporarily deactivate the netfilter rules:
1. Press and hold the Reset button on the front panel of the appliance for 5 seconds.
IMPORTANT:
2. Use the Config Panel web application to edit the netfilter rules that are stored in
the appliance and, afterwards, save these rules.
IMPORTANT:
created within 15 minutes.
Now, the open system access is activated.
The former settings are reactivated if no new netfilter rules are
G&D DevCon-Center · 8

Status displays
Status displays
Various status LEDs enable you to control the DevCon-Center’s current operating status.
The following table lists all possible operating states and the respective LED displays:
Range LED Status Meaning
Ident. Ident. on Lights up as soon as the LED has been activated
Power Red. on The power pack is switched on and supplies the
off The power pack is switched off or the device is not
Main on The power pack is switched on and supplies the
off The power pack is switched off or the device is not
Status Ready blinking Device is ready for operation.
off Device is booting or defective internal communi-
System blinking Device is ready for operation
off Defective internal communication
flickering Device is booting
Network A left green Activity at the network interface.
right green Active 1 GBit/s connection.
yellow Active 10 or 100 Mbit/s connection.
Network B left green Activity at the network interface.
right green Active 1 GBit/s connection.
yellow Active 10 or 100 Mbit/s connection.
via the web application.
necessary voltage.
connected to the power network.
necessary voltage.
connected to the power network.
cation.
9 · G&D DevCon-Center

Technical data
Interfaces Network: 2 × RJ45 socket
RS232: 1 × RJ11 socket
RS485: 1 × RJ45 socket
Service: 1 × Mini-USB socket (Typ B)
USB 2.0: 2 × USB-A socket
Main power supply Type: internal power pack
Connection: IEC plug(IEC-320 C14)
Voltage: AC100-240V/60-50Hz
Redundant
power supply
Current consumption
Operation
Power consumption
Operation
Casing Material: anodised aluminium
Operating environment Temperature: +5 to +45 °C
Type: internal power pack
Connection: IEC plug (IEC-320 C14)
Voltage: AC100-240V/60-50Hz
Main power supply: 110mA @240VAC; 220mA@100VAC
Red. power supply: 110mA @240VAC; 220mA@100VAC
Main power supply: 14,8W@240VAC; 14,2W@100VAC
Red. power supply: 14,8W@240VAC; 14,2W@100VAC
Dimensions (W × H × D): 435 mm × 44 mm × 286 mm
Weight: approx. 2,8 kg
Air humidity: < 80%, non-condensing
Technical data
G&D DevCon-Center · 10

Notes
11 · G&D DevCon-Center

Notes
G&D DevCon-Center · 12

Guntermann & Drunck GmbH
Dortmunder Str. 4a
57234 Wilnsdorf
Germany
Phone +49 2739 8901-100
Fax +49 2739 8901-120
http://www.GDsys.de
sales@GDsys.de
A9200076
 Loading...