

Guntermann & Drunck GmbH
www.gdsys.de
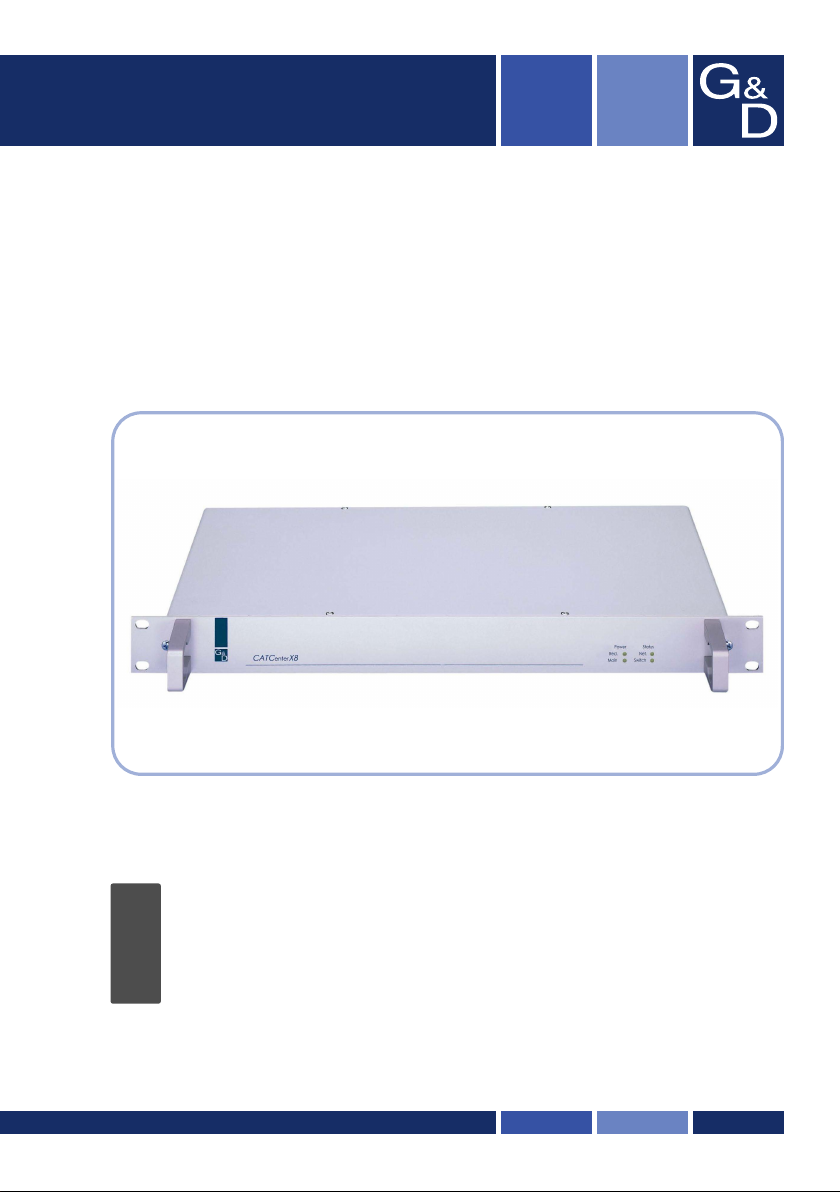
G&D CATCenter
EN
Operation Guide
Operating the matrix switch
A9200021-4.48a

Guntermann & Drunck GmbH CATCenter Operating Manual
Table of Contents
1
Description .............................................................................................................6
1.1 Component Introduction ....................................................................................6
1.2 Principle of Operation ........................................................................................7
1.3 Delivery Condition / Default Settings.................................................................7
1.4 Administrator Login............................................................................................8
1.5 Function Key Overview......................................................................................8
1.6 Definition of Terms ............................................................................................9
2
Principle of Operation .........................................................................................11
2.1 CATCenter Login.............................................................................................11
2.2 System Operation using AdonIS .....................................................................12
2.2.1 Accessing AdonIS .......................................................................................12
2.2.2 Using AdonIS...............................................................................................12
2.2.2.1 Keyboard Operation .............................................................................12
2.2.2.2 Mouse Operation ..................................................................................13
2.3 Target Selection Using Hotkey ........................................................................13
2.4 The Target Selection SELECT Menu ..............................................................14
2.4.1 Accessing Other Menus ..............................................................................16
2.4.2 SELECT Menu Symbols..............................................................................17
2.4.3 User-Related Target Display .......................................................................17
2.4.4 Target Info "Ctrl + F12"................................................................................18
2.5 F-Key Functions within ADONIS .....................................................................20
2.6 System Notifications ........................................................................................22
2.6.1 Message "NOT CONNECTED" ...................................................................22
2.6.2 Message „No free route to target“ ...............................................................22
2.6.3 Message „No route to target known“ ...........................................................23
2.6.4 „Target not available“...................................................................................23
2.7 Keyboard emulation for operation of SUN-computer.......................................24
3
Operation Menu (F9) ............................................................................................25
3.1 Automatically pass through all targets............................................................. 26
3.1.1 Calling the AutoScan Function ....................................................................26
3.1.2 Identifying the AutoScan Function............................................................... 27
3.1.3 Canceling the AutoScan Function ...............................................................27
3.1.4 Setting the AutoScan Time.......................................................................... 27
3.2 Automatically pass through all active targets ..................................................27
3.2.1 Calling the AutoSkip Function .....................................................................27
3.2.2 Identifying the AutoSkip Function................................................................28
3.2.3 Canceling the AutoSkip Function ................................................................28
3.3 Manually connecting through all targets ..........................................................28
3.3.1 Calling the StepScan Function ....................................................................28
3.3.2 Identifying the StepScan Function............................................................... 29
3.3.3 Canceling the StepScan Function ...............................................................29
3.4 Canceling the Connection to a target ..............................................................29
3.5 User Logout / End Session..............................................................................30
3.6 Re-Initializing the Mouse .................................................................................30
3.7 Return to Last Target.......................................................................................32
3.8 Displaying Additional Target Information.........................................................33
3.9 Turn Target On/Off using AdonIS....................................................................33
3.10 Login to an OpenAccess Console ...................................................................34
Page 2

Guntermann & Drunck GmbH CATCenter Operating Manual
4 Personal Profile Menu (F10) ...............................................................................35
4.1 Permanent Screen Display of Target Information ........................................... 36
4.2 Setting the Scan Interval ................................................................................. 37
4.3 Establishing Keys for StepScan ...................................................................... 37
4.4 Defining SelectKeys & Default Computer / Scan Participation ....................... 38
4.5 Positioning the Target Display on the Monitor ................................................ 39
4.6 Positioning AdonIS on the Monitor..................................................................40
4.7 Changing own password................................................................................. 41
5 Configuration Menu (F11) ................................................................................... 42
5.1 Creating, Editing, and Deleting Users ............................................................. 43
5.1.1 F3 ADD User...............................................................................................45
5.1.1.1 Changing the "User Password"............................................................47
5.1.1.2 Group Membership...............................................................................48
5.1.1.2.1 Adding a User to a Group ................................................... 50
5.1.1.2.2 Removing a User from a Group.......................................... 52
5.1.1.3 Edit Config Rights.................................................................................53
5.1.1.4 Edit Operation Rights ...........................................................................54
5.1.1.5 Edit Target Access Rights....................................................................56
5.1.1.6 Edit Personal Profile .............................................................................58
5.1.1.7 New Target Right.................................................................................. 58
5.1.2 F4 Delete User ............................................................................................ 58
5.1.3 F5 Edit User ................................................................................................59
5.1.4 F6 Enable/Disable....................................................................................... 59
5.2 Creating, Editing, and Deleting User Groups .................................................. 60
5.2.1 F3 ADD Group ............................................................................................ 62
5.2.2 F4 Delete Group.......................................................................................... 63
5.2.3 F5 Edit Group..............................................................................................63
5.2.3.1 Member Management ..........................................................................64
5.2.3.1.1 Adding a User to a Group ................................................... 66
5.2.3.1.2 Removing a User from a Group.......................................... 66
5.2.3.2 Edit Config Rights.................................................................................67
5.2.3.3 Edit Operation Rights ...........................................................................68
5.2.3.4 Edit Target Access Rights....................................................................70
5.2.3.5 New Target Right.................................................................................. 71
5.2.4
F6 Enable/Disable..................................................................................... 72
5.3 Creating, Editing, and Deleting Targets ..........................................................72
5.3.1 Editing the Selected Target......................................................................... 73
5.3.1.1 Changing the Target Name..................................................................73
5.3.1.2 Reset Target Video Data......................................................................73
5.3.1.3 OSD Sync .............................................................................................74
5.3.1.4 USB Multimedia Keyboard ...................................................................75
5.3.1.5 IBM RS/6000 support ...........................................................................75
5.3.1.6 USB power management .....................................................................75
5.3.1.7 Apple mode........................................................................................... 76
5.3.2 Inheriting Existing Target Information ......................................................... 76
5.3.3 Deleting a Target......................................................................................... 77
5.4 Creating, Editing, and Deleting Target Groups ...............................................79
5.4.1 F3 Add Group.............................................................................................. 80
5.4.2 F4 Delete Group.......................................................................................... 82
5.4.3 F5 Edit Group..............................................................................................83
5.5 Optimizing the Screen Display ........................................................................ 83
Page 3

Guntermann & Drunck GmbH CATCenter Operating Manual
5.5.1 Rights ..........................................................................................................83
5.5.2 Accessing IVT Mode....................................................................................83
5.5.3 Video Tuning Setting ...................................................................................84
5.5.3.1 Automatic Settings................................................................................85
5.5.3.2 Manual Settings ....................................................................................85
5.5.3.2.1 Establishing the Video Boost...............................................85
5.5.3.2.2 Setting Noise Suppression..................................................86
5.5.3.2.3 Fine Tuning .........................................................................86
5.5.3.2.4 Setting the Delay.................................................................87
5.5.4 Notes on IVT Settings..................................................................................88
5.5.5 Tested Resolution........................................................................................89
5.6 Administering a Console / Establishing an OpenAccess Console...................89
5.6.1 Edit Console - Standard Console (F5).........................................................91
5.6.1.1
Enhanced Keyboard .............................................................................92
5.6.1.2 AutoLogout............................................................................................92
5.6.1.3 Screensaver Time.................................................................................93
5.6.1.4 Scancode Set........................................................................................93
5.6.1.5 OSD Keyboard Layout .........................................................................93
5.6.1.6 OSD by Mouse .....................................................................................94
5.6.1.7 Remember Last User Name ................................................................94
5.6.1.8 Keyboard Required...............................................................................95
5.6.1.9 OSD Blocked ........................................................................................95
5.6.1.10 Reset Console Video Data ...................................................................96
5.6.1.11 Video .....................................................................................................97
5.6.2 Console Type "OpenAccess" ......................................................................97
5.6.2.1 Activating an OpenAccess Console.....................................................98
5.6.2.2 Configuring an OpenAccess Console ..................................................99
5.6.2.3 Activating Temporary Administrator Access ......................................100
5.6.3 Console Type – Video Console.................................................................101
5.6.3.1 Activating a Video Console ................................................................101
5.6.3.2 Configuring a Video Console .............................................................103
5.6.4 Enable / Disable Console (F6)...................................................................104
5.6.5 Deleting a console.....................................................................................104
5.7 Slave Name Assignment for Cascaded Systems ..........................................105
5.8 Defining System-wide Settings......................................................................107
5.8.1 Defining the Initial Hotkey.......................................................................... 108
5.8.2 Establishing the Double Hotkey.................................................................108
5.8.3 Establishing the SelectKey........................................................................109
5.8.4 Turning the Screen Display On / Off for Multi-User Operation ..................109
5.8.5 Establishing the Communication Mode of the RS232 Interface ................110
5.8.6 Establishing the RS232 Baud Rate ...........................................................110
5.8.7 Operation modes of the CATCenter within a cascade ..............................111
5.8.8 Establishing the System Name..................................................................111
5.8.9 Expanding the System with New Functions ..............................................113
5.8.10 Resetting the System to Default Values....................................................114
5.8.11 Reset Netfilter Configuration .....................................................................114
5.9 Turn Targets On/Off using AdonIS – Required Configuration .......................115
5.10 Establishing and Editing Network Settings....................................................118
5.10.1 Gateway Definition ....................................................................................118
5.10.2 Defining the Network Parameters for Network A or Network B ................120
Page 4

Guntermann & Drunck GmbH CATCenter Operating Manual
6 Information Menu (F12)..................................................................................... 123
6.1 Requesting System Information .................................................................... 124
6.2 Requesting the Console Status..................................................................... 124
6.3 AdonIS F-Keys – Function Overview ............................................................126
7 Index ...................................................................................................................127
Page 5

Guntermann & Drunck GmbH CATCenter Operating Manual
1 Description
1.1 Component Introduction
The CATCenter line includes the following devices:
CATCenter X2: Allows you to control up to 16 targets via 2 consoles
(console = monitor-keyboard-mouse). The number of
targets can be increased to 1024 by cascading.
CATCenter X4: Allows you to control up to 32 targets via 4 consoles.
The number of targets can be increased to 2048 by
CATCenter X8: Allows you to control up to 32 targets via 8 consoles.
In principle, all three products are identical. Functional
differences are highlighted separately in this manual. Otherwise,
this manual pertains only to the CATCenter.
Both targets and consoles are connected to the CATCenter using CAT-x
cables (x = 5, 6, 7). Cabling is reduced to a minimum.
The consoles are connected to the CATCenter via the UCON devices. The
UCON are used to connect the monitor, keyboard, and mouse.
The UCON-IP offers the additional option of remotely administering the targets
connected to the CATCenter via TCP/IP or ISDN (or DSL). The UCON-IP is
described in a separate manual!
The targets are connected to the CATCenter via the CPU module CATpro2.
The CATpro2 optimizes the signals for transmission via the CAT cable. The
distance between a target connected via a CATpro2 and a UCON can be up to
300 meters.
Power is supplied to the connected targets using HardBoot CCX. Up to 128
users per CATCenter can be connected to the OSD with HardBoot CCX.
Therefore, the CATCenter makes an active contribution towards saving costs,
energy, and space for additional input devices and towards using the
connected targets more efficiently.
cascading.
The number of targets can be increased to 512 by
cascading.
Page 6

Guntermann & Drunck GmbH CATCenter Operating Manual
The users have comfortable access to the capabilities of several targets via
several consoles. The multitude of possible consoles combined with the
remote access option allows the user to develop individual operating concepts.
1.2 Principle of Operation
The CATCenter is an electronic switch, which includes the following
functionality:
Password protection and LOGOUT
Extensive network functionality, e.g. syslog message output,
authentication, time leveling using a time server (only with CATCenter
X8)
Intelligent user management
Configuration of the entire system using the configuration software
CATCenter view (only with CATCenter X8)
Configurable target access for each user
Full keyboard / mouse emulation for error-free operation
SUN-USB keyboard support, also on the console side (with
conversion, connecting a SUN keyboard with miniDIN8 connector is
also possible)
Full support of the Microsoft Explorer mouse
Video bandwidth up to 250 MHz
Switching via keyboard hotkey or ADONIS
ADONIS configurable
USB support (keyboard and mouse, remote via converter with UCON-a)
Intelligent "CPU Search" function
Multi-access mode
Flash upgrade capability
1.3 Delivery Condition / Default Settings
In the delivery condition, the CATCenter is configured as follows:
LOGIN via admin access
No user password assigned
Configuration only possible via administrator login
Hotkey „CTRL“
Page 7

Guntermann & Drunck GmbH CATCenter Operating Manual
1.4 Administrator Login
If you want to change the default settings, enter your administrator username in
the "Name" field and your administrator password in the "Password" field of the
LOGIN window. Please obtain this information from your administrator.
Using the administrator login, you always have access to all configuration
levels regardless of the current settings.
Of course, user logins can also be granted configuration rights (see Chapter
5.1.1.3).
For your own security, please remove the administrator password from
the operating manual.
1.5 Function Key Overview
After the SELECT menu has been opened using the key combination (CTRL +
NUM), you can display the ADONIS function keys. To do so, press the F12
key and select the submenu "VIEW SYSTEM-FUNCTION KEYS" in the
INFORMATION menu that opens (see Chapter 6.3)
System function keys
Key Function
F1 Help
F2 Save
F3 Add
F4 Delete
F5 Edit
F6 Enable/Disable
F7 Copy/Move
F8 Paste
F9 Operation
F10 Personal Profile
F11 Configuration
F12 Information
ESC
↑
↓
Page 8

Guntermann & Drunck GmbH CATCenter Operating Manual
1.6 Definition of Terms
This chapter explains terms that are found frequently throughout this manual.
AdonIS The AdonIS is the graphical user interface of the CATCenter
system. You can use AdonIS for operation and configuration.
In addition, AdonIS offers controlled access to the entire
CATCenter system via the login functionality.
Cascading A cascade consists of a master-slave architecture. The
master serves as the central control unit for all connected
slave devices. A CATCenter cascade can be used to
increase the number of targets that can be connected to 512,
1024 or 2048 (depending on the CATCenter used).
CATCenter The CATCenter is the central unit of the overall system. The
CATCenter is the connection point for (2, 4, or 8) consoles on
the one hand and (16) 32 targets on the other hand. If more
than (16) 32 targets are connected then this takes place by
cascading; in this case, the CATCenter is used both as
master and as slave.
CATpro2 Dongle used to connect the targets to the CATCenter. The
keyboard, video, and mouse signals are modulated by the
CATpro2 and transmitted to the CPU interface of the
CATCenter via a CAT-x cable (x=5,6,7).
CAT-x-Cable Fully shielded CAT cable that transports the modulated KVM
signals.
Console A console consists of keyboard, video, and mouse. These
peripheral devices are connected to the UCON.
Console Port RJ45 interface on the CATCenter used to connect the UCON
devices.
CPU Port RJ45 interface on the CATCenter used to connect the
targets.
Page 9

Guntermann & Drunck GmbH CATCenter Operating Manual
Footer The header is the lower blue area of an AdonIS window.
Header The header is the upper blue area of an AdonIS window.
Footer
HEADER
List field The list field is the middle area of an AdonIS window.
Network Ethernet with IP protocol.
Service Port You can install a firmware update on the CATCenter via the
Target A target is any device that can be operated via a CATCenter.
Transmission RJ45 interface of the UCON products used to connect to the
UCON The UCON devices are used for console connections and
LIST FIELD
service port (2.5 mm plug). You will find the CATCenter
service port on the front of the device.
CATCenter. The transmission interface is connected to a
console port of the CATCenter with a CAT-x cable.
thus provide the user with access to the CATCenter system.
The user can operate and configure via the UCON devices.
The UCON devices are offered in five variations (UCON,
UCON-a, UCON-s, UCON-IP-eco, UCON-IP).
Page 10
Guntermann & Drunck GmbH CATCenter Operating Manual
2 Principle of Operation
2.1 CATCenter Login
Login CON 00002005
User name
Password
G&D CATCenter
ESC TAB Enter
After turning on the CATCenter, the LOGIN window appears. Enter your
USER name and personal USER password here. The number of attempts is
not limited.
The user name and password are case-sensitive.
Confirm your entry in each field using the ENTER key. You can use the TAB
key to switch between the input fields. ESC cancels data entry.
If the device is still in the delivery condition (no user passwords have been
assigned), then the system can only be accessed using the administrator login.
You will find this as an attachment in printed version of this manual.
To change the delivery condition of the device, you also have to enter the
administrator password. This provides you with additional configuration rights
(see Chapter 1.4).
After this information has been entered, the SELECT menu appears (see
Chapter 2.4).
Targets can be selected using AdonIS (see Chapter 2.2) or a keyboard hotkey
(see Chapter 2.3).
Page 11
Guntermann & Drunck GmbH CATCenter Operating Manual
2.2 System Operation using AdonIS
2.2.1 Accessing AdonIS
Access AdonIS by pressing and holding the CTRL key (default) and then
pressing the NUM key.
2.2.2 Using AdonIS
AdonIS can be operated using the keyboard or the mouse.
2.2.2.1 Keyboard Operation
The following keys are available to operate AdonIS, and they carry out the
same actions in all windows:
Move up / down 1 entry
PgDn PgUp
Bild
End
Bild
Home
Pos 1Ende
Esc
Move up / down 10 entries
Move to the end / beginning of the
entire list
Carry out or discard function /
selection
Access the Operation menu
Access the Personal Profile menu
Access the Configuration menu
Access the Information menu
Page 12

Guntermann & Drunck GmbH CATCenter Operating Manual
2.2.2.2 Mouse Operation
AdonIS can also be operated using the mouse.
- Scrolling → Selecting an entry
- Left button → Enter
- Right button → Escape
This assignment applies to all AdonIS windows.
2.3 Target Selection Using Hotkey
In the delivery condition, no select keys for direct selection of a target have
been defined. You first have to define these select keys in the ASSIGN
SELECT KEY submenu (see Chapter 4.4) for a maximum of 10 targets.
To switch, you then press and hold the CTRL key and press the NUMBER key
of the desired channel according to your settings in the ASSIGN SELECT KEY
submenu (see Chapter 4.4).
Allowable number keys are those above the letters, from 1 – 0 (default setting).
Selection of target 1: CTRL (or any other definable Hotkey) + 1
The default setting starts with 1 and ends with 0. The hotkey combination can
be modified (see Chapter 5.8.1).
Once a selection has been made using the keyboard or mouse, the name of
the TARGET and the switch is displayed on your screen for approx. 5 seconds
(screen display).
Example:
Win 2000
Console 1
(Target name, editable)
(Console name, editable)
Page 13

Guntermann & Drunck GmbH CATCenter Operating Manual
2.4 The Target Selection SELECT Menu
After the LOGIN, the SELECT menu is automatically opened.
This menu shows all targets connected to the CATCenter. The targets that are
turned on and were detected during installation are displayed in green (the
CATCenter detects a target when the CATpro2 is supplied with power by the
target). Targets that are turned off are displayed in red.
Select Menu
Sort Alph+on Show ALL
CPU search: . . . . . . . . . . . . . .
WIN2000
1 WIN NT
Linux
SUN SPARC 5
Linux Server
3 CPU-ID 12345678
2 BSD
WIN2000
WIN NT
F9: Operation F10: Pers. Profile
F11: Config F12: Info
CPU Search Function
CPU Search: . . . . . . . . . . . . . . .
To find the desired target quickly, the SELECT menu has a search function.
Enter the name of the desired target. The search is carried out as soon as you
start entering characters.
Target Name
By default, the target name corresponds to the ID number of the CATpro2
used. Each CATpro2 is assigned a unique ID. This ID is marked on a label on
the CATpro2. This target name can be edited in the SELECT menu.
CPU-ID 12345678
↑
↓
Page 14

Guntermann & Drunck GmbH CATCenter Operating Manual
To do so, place the cursor onto the desired target and then press the F5 key.
The field changes to edit mode (font color changes to YELLOW). After you
have made all required changes to the target name, confirm your changes by
pressing ENTER. This exits edit mode for this target.
Alternatively, the target name can be edited in the TARGET MANAGEMENT
menu (see Chapter 5.3).
Hotkey Assignment
To access a target using a hotkey combination (e.g. CTRL + 1), you have to
assign a hotkey to the target. This is done in the SYSTEM CONFIG submenu.
First, you define the initial hotkey (see Chapter 5.8.1, Defining the Initial
Hotkey), and then you assign the desired select keys to a maximum of 9
targets (see Chapter 5.8.3, Establishing the Select Key).
TAB / Change Sort Criteria (Sort Mode ► Alph+ ◄ )
Press TAB in the SELECT menu to move to the sort field. Change the sort
criteria by pressing SPACEBAR (toggle).
The following sort options are available:
Alph+: Ascending alphabetic sort of the targets
Alph+on: 1. Ascending alphabetic sort of the connected
(Default) targets and subsequently
2. Ascending alphabetic sort of the unconnected targets
Alph-: Descending alphabetic sort of the targets
Alph-on: 1. Descending alphabetic sort of the connected
targets and subsequently
2. Descending alphabetic sort of the unconnected targets
ID: Displays the physical name of the CATpro2
"Show" Area - Changing the Display Mode:
By default, the "Show Field" includes the items "All" and "GRP".
"ALL" means: All targets are displayed in the list field.
"GRP" means: Only groups are displayed in the list field.
Page 15

Guntermann & Drunck GmbH CATCenter Operating Manual
If you already selected a group earlier and you access the SELECT menu
again, then the Show Field displays the selections "All", "GRP", and the group
name of the last group you selected ("Last Group").
"ALL" means: All targets are displayed in the list field.
"GRP" means: Only groups are displayed in the list field.
"Last Group" means: Targets that belong to the last group you accessed
are displayed.
"Last Group" is a variable that stands for the group
name.
You can exit all three versions of the SELECT menu using the ESC key. This
takes you back to the target.
2.4.1 Accessing Other Menus
You can access other menus from the SELECT menu. These menus have
predefined F-Keys.
In particular, these F-Keys are:
F 9 Access the "OPERATION menu" (see Chapter 3)
In this menu, you carry out operations you require for the dayto-day use of the system.
F 10 Access the "PERS. PROFILE menu (see Chapter 4)
User-related settings are established in this menu.
F 11 Access the "CONFIGURATION menu" (see Chapter 5)
Central configuration settings for the CATCenter are
established in this menu. Administrators and users with
configuration rights are authorized to access this menu. These
users can either access all entries under this menu, or they are
assigned the right to access certain configuration submenus by
the administrator.
F 12 Access the "INFORMATION menu" (see Chapter 6)
This menu contains information regarding the CATCenter being
used.
Page 16

Guntermann & Drunck GmbH CATCenter Operating Manual
2.4.2 SELECT Menu Symbols
The following symbols are displayed as supplemental information in front of the
target name:
2
Target being accessed by your own console.
Target being accessed by 2 consoles, for
example. Numbering is from 1 – 9 (and A – F
accessed by 2 CATCenter + CATpro2-UC). Your
own console is not accessing this target currently.
If your own console is accessing the target, the
symbol changes ( ).
2.4.3 User-Related Target Display
Due to the option to assign user-specific access rights (see Chapter 5.1.1.5),
the SELECT menu can display different targets for different users.
If a user does not have access to one or more targets, then they are not
displayed in the SELECT menu.
If a user has VIEW ONLY access to a target (see Chapter 5.1.1.5), then this
target is included in the selection list. However, a corresponding message
appears in the screen display if this target is selected.
Page 17

Guntermann & Drunck GmbH CATCenter Operating Manual
2.4.4 Target Info "Ctrl + F12"
The SELECT menu shows all targets connected to the CATCenter. The targets
that are turned on are displayed in green; those that are turned off are
displayed in red.
However, this display method does not give you any
connection location of the targets on the CATCenter.
To receive this connection information, proceed as follows:
a) Select a target with the mouse or the keyboard (arrow keys). This
selection is not
the mouse. The selected target is identified with a black bar. In the
following example, a Linux computer was selected.
confirmed with the ENTER key or double-clicking with
information regarding the
Select menu
Sort Alph+ Show All
CPU search: . . . . . . . . . . . . . .
WIN2000
1 WIN NT
Linux
SUN SPARC 5
Linux Server
3 CPU-ID 123456
2 BSD
↑
↓
WIN2000
WIN NT
F9: Operation F10: Pers. Profile
F11: Config F12: Info
b) Now press the hotkey combination CTRL + F12 (not changable).
In the window that opens (see next page), you will find the following
information:
a) The target you are currently accessing
b) The console port to which your own console is connected
c) The CPU port where this target is connected
d) Display of the connection dynamics in case of cascading
Page 18
Guntermann & Drunck GmbH CATCenter Operating Manual
This sample window shows you the following information:
a) You are accessing a Linux computer. This information is displayed
by the entry Linux [A]. The target name (including CATpro2 ID) is
always shown in the first line of this window.
b) Underneath the target name, you will find the connection location
of the Linux computer. In this case, it is CPU port 8 [B] of the
CATCenter slave 2 [C]. The relationship between the target name
and the CPU port is displayed using a downward-pointing arrow.
Target Info
Linux (00020f58)
-------------------------------------------------------------------------
CPU 8
CCX_Slave 2 (0000210a)
CON 8 3 5 2 1 4
-----------------------------------------------------------------------
CPU 11 12 13 14 15 16
CCX _Slave 1 (00000011)
CON 4 8 6 3 1 2
-----------------------------------------------------------------------
CPU 11 12 13 14 15 16
CCX_Master (00000010)
CON 6
Enter: OK
c) You are working on console port 6 [K] of the CATCenter master
[J]. This information is displayed by the entry CON 6. The
console port is always displayed in the last line of this window.
d) The system structure of this sample CATCenter system includes 1
master device (CATCenter_Master [J]) and 2 slave devices
(CATCenter_Slave 1 [F] & CATCenter_Slave 2 [C]). These names
can be edited (see Chapter 5.8.8). The device ID (e.g. /00000010)
of the respective CATCenter is displayed behind each device
name. This number is permanently assigned to the device and is
not editable.
e) The CATCenter_Master [J] is connected to the console ports [G] of
the CATCenter_Slave 1 [F] via its CPU ports [H]. The
CATCenter_Slave 1 [F] is connected to the console ports [D] of the
CATCenter_Slave 2 [C] via its CPU ports [E].
Extract from the Connection Overview Within the Target Info Window:
Page 19
[A]
[B]
[C]
[D]
[E]
[F]
[G]
[H]
[J]
[K]

Guntermann & Drunck GmbH CATCenter Operating Manual
The connection between a master device and a slave device is established by
connecting the console ports of a slave device to the CPU ports of the master
device (see the CATCenter Installation Guide, Chapter 2.5). The ports used for this
connection can also be seen from the Target Info.
In this example, the connection between the CATCenter_Master and the
CATCenter_Slave 1 appears as follows:
CATCenter_Master CATCenter_Slave 1
CPU port of the master device connected to the console port of Slave 1
11 4
12 8
13 6
14 3
15 1
16 2
Connection Overview CATCenter Master -> CATCenter Slave 1
CATCenter_Master
21 22 23 24 CPU 25 26 27 28 29 30 31 32
Main Power
5678CPU910 11 12 13 14 15 16
AC 100-240 V, 47-63 Hz
CATCenter_Slave 1
Read instruction
carefully before
installing!
Avoid misuse!
KVM Switch.
Red.
Power
5V DC/5A Network A
Network B
56 78Console
12
17 18 19 20 21 22 23 24
4Console
3
12
3
5678
4
Note: The information described here always relates to the target selected
in the SELECT menu. Connection information of targets that are not
selected is not displayed in the Target Info.
To exit the Target Info, press the ENTER or ESC key.
2.5 F-Key Functions within ADONIS
Page 20

Guntermann & Drunck GmbH CATCenter Operating Manual
The F-Keys on your keyboard have fixed functions within the AdonIS structure.
This means you always have the same F-Keys available to you in any menu
that you access.
You can see an overview of the system function keys by opening the SELECT
menu by pressing CTRL + NUM, and then pressing the F12 key. In the menu
that opens, select the VIEW SYSTEM FUNCTION KEYS submenu using the
mouse or keyboard. The following window is opened:
System Function Keys
Key Function
F1 Help
F2 Save
F3 Add
F4 Delete
F5 Edit
F6 Enable/Disable
F7 Copy/Move
F8 Paste
↑
↓
F9 Operation
F10 Personal Profile
F11 Configuration
F12 Information
ESC
The F-Keys F1 - F8 are global function keys and have the same function or
meaning in all AdonIS menus you access, insofar as the function is supported
by the respective AdonIS window.
The F-Keys F9 - F12 are master function keys and are available in every
AdonIS main menu. The following are the AdonIS main menus:
OPERATION menu F9
PERS. PROFILE menu F10
CONFIG menu F11
INFORMATION menu F12
The assignment of the F-Keys is a factory default and cannot be modified.
Page 21

Guntermann & Drunck GmbH CATCenter Operating Manual
2.6 System Notifications
2.6.1 Message "NOT CONNECTED"
If the ESC key is pressed in the SELECT menu before a target is selected, the
message NOT CONNECTED is displayed.
Example:
CON 02234100
Not connected
To return to the SELECT menu, access it again using the key combination
CTRL + NUM.
2.6.2 Message „No free route to target“
In a casdaded system (e. g. 1 x CATCenter-Master and 1 x CATCenter-Slave)
and depending on your personal target access rights, you can access targets
wich are connected at a CATCenter-Slave from a CATCenterX8-Master (See
Cascading Chapter 2.5 of the Installation Manual CATCenter).
The CATCenter-Slave doesn´t has to be necessarily a CATCenter X8. A
CATCenter X2 and CATCenter X4 can also act as a slave device.
Information about the cascading:
The master device (e.g. a CATCenter X8) has a total of 32 CPU ports available
for cascading. Assuming that 8 consoles are connected to the master device
and all of them are to access all targets, then one CPU port has to be used for
cascading every console connection. Therefore, 8 CPU ports have to be used
on the master device so that all 8 consoles can continue to access all
connected targets.
If, on the other hand, you only have one console then you only have to use one
CPU port on the master; this is identical to the method described above.
In general, the following applies: For every console access
implemented on the slave, the same number of CPU ports must be
available on the master!
However, if fewer console access (e. g. only for console access connections) is
realized at the CATCenter-Slave as consoles are connected to the CATCenterMaster (in this example 8 consoles), only four consoles of the master device
can access the targets connected to the slave.
When four consoles are accessing the targets connected at the slave, and
during this process an fifth console is tryind to access one of the targets
connected at the slave following message appears on the screen of this
console:
(Console name, editable)
Page 22

Guntermann & Drunck GmbH CATCenter Operating Manual
Attention
Connecting to target failed
Error message:
No free route to target
Enter/ESC: OK
The information of this message is, that no connection to the target can be
established, since the maximum number of console access is reached.
By pressing the keys Enter or ESC this window is closed and you return to the
SELECT menu.
2.6.3 Message „No route to target known“
If you intend to access a target, which is connected at a powerd down slave
following message appears on the screen of this console:
Attention
Connecting to target failed
Error message:
No route to target known
Enter/ESC: OK
By pressing the keys Enter or ESC this window is closed and you return to the
SELECT menu.
2.6.4 „Target not available“
If you intend to access a target, following conditions can exist:
A target is switch off (is displayed in the SELECT menu in in red
color),
The last known connection port (CPU-Port) of a target is occupied by
a new target or
Page 23

Guntermann & Drunck GmbH CATCenter Operating Manual
The same target has been connected to CATCenter by a new
In this case, following message appears on your screen.
CATpro2-Dongle.
Attention
Connecting to target failed
Error message:
Target not available
Enter/ESC: OK
By pressing the keys Enter or ESC this window is closed and you return to the
SELECT menu.
2.7 Keyboard emulation for operation of SUNcomputer
The dongle CATpro2–SUN USB must be used to ensure the emulation of
specific SUN-Keyboard shortcuts at none SUN-keyboards. Two versions of this
dongle exist (German and American layout). (see. chapter 2.1.3 of the
manual „CATCenter Installation Guide“).
Following keyboard combinations must be pressed to emulate the
corresponding SUN-shortcut:
Sun-shortcut Keyboard
combination
Sun-shortcut Keyboard
combination
Stop PAUSE + A Find Ctrl Alt + F9
Again Ctrl Alt + F2 Cut Ctrl Alt + F10
Props Ctrl Alt + F3 Help Ctrl Alt + F11
Undo Ctrl Alt + F4 Mute Ctrl Alt + F12
Front Ctrl Alt + F5 Speaker Up Ctrl Alt + NUM +
Copy Ctrl Alt + F6 Speaker Down Ctrl Alt + NUM Open Ctrl Alt + F7 Compose Ctrl Alt + NUM x
Paste Ctrl Alt + F8 Shutdown Ctrl Alt + Pause
Page 24

Guntermann & Drunck GmbH CATCenter Operating Manual
3 Operation Menu (F9)
The OPERATION menu provides the basic operating functions of the
CATCenter. This menu is accessed using the following hotkey combination:
CTRL + NUM (default) followed by pressing the F9 key.
From here, the following functions can be accessed:
G&D Operation
A - Autoscan
B - Autoskip
C - Stepscan
D - Disconnect
E - User Logout
F - Mouse utility
G - Return to last target
H - Target Info off
I - Target power off
Temporary OAC login
ESC: Select F10: Pers. Profile
F11: Config F12: Information
You can select from the entries displayed here using the mouse or the UP
ARROW and DOWN ARROW keys on your keyboard. Confirm your selection
using the ENTER key or by clicking the left mouse button.
All functions can be carried out from the SELECT menu using the following
hotkey combinations:
CTRL + A AutoScanFehler! Textmarke nicht definiert.
CTRL + B AutoSkip
CTRL + C StepScan
CTRL + D Disconnect
CTRL + E User Logout
CTRL + F Mouse utility
CTRL + G Return to last target
CTRL + H Target Info
CTRL + I Target power on/off
Within the OPERATION menu, you only have to enter the desired letter.
Page 25

Guntermann & Drunck GmbH CATCenter Operating Manual
The hotkey combinations within this menu are predefined and cannot be
edited. Modifying the initial hotkey (CTRL) (see Chapter 5.8.1) to access
AdonIS has no effect on the valid hotkey combinations in this menu.
The entries in the OPERATION menu are accessible to all users. Exception:
Mouse utility; only for users with corresponding rights.
The entry Temporary OAC login (see Chapter 5.6.2.3) is only visible when
OpenAccess has been activated on the CATCenter system. This entry is only
available to the administrator or user with configuration rights when
OpenAccess has been activated. For notes regarding OpenAccess, see
Chapter 5.6.2.
Depending on your rights, you access additional main menus from the
OPERATION menu. In particular, these are:
ESC Switches back to the SELECT menu
F10 Switches to the PERS. PROFILE menu
F11 Switches to the CONFIG menu
F12 Switches to the INFORMATION menu
3.1 Automatically pass through all targets
Activating the AutoScan function pass through all channels (targets) to which
the user has access.
Targets that are not turned on can also be included in the AutoScan function
(e.g. to check the boot phase of a target that has just been turned on).
3.1.1 Calling the AutoScan Function
Carry out the following steps:
1. Access AdonIS by pressing the key combination (default): CTRL +
NUM
2. Access the OPERATION menu by pressing the F9 key.
3. Move the cursor to the entry AutoScan and press the ENTER key or
the A key.
Alternatively, the function can be called from the SELECT menu using the
hotkey combination CTRL + A.
The channels you have access to are connected to your console, one after the
other, for approx. 5 seconds. The time period can be modified (see chapter
4.2).
In the delivery condition, all computers are enabled for the AutoScan function.
Page 26

Guntermann & Drunck GmbH CATCenter Operating Manual
3.1.2 Identifying the AutoScan Function
Activation of the AutoScan function is shown by "Scan" on the display.
Example:
Win 2000
CATCenter
AUTOSCAN
(Computer name, editable)
(Switch name, editable)
(Active scan function)
3.1.3 Canceling the AutoScan Function
Keyboard or mouse input pauses the AutoScan function and it resumes only
after input ceases. To cancel the function, access AdonIS (CTRL + NUM) or
select a computer using a hotkey. The scan display disappears.
3.1.4 Setting the AutoScan Time
See Chapter 4.2, Setting the Scan intervall
3.2 Automatically pass through all active targets
The AutoSkip functionality is similar to AutoScan. However, only the
computers that are connected and active are displayed. Unused channels or
computers that are turned off are skipped.
3.2.1 Calling the AutoSkip Function
Carry out the following steps:
1. Access AdonIS by pressing the key combination (default): CTRL
+ NUM
2. Access the OPERATION menu by pressing the F9 key.
3. Move the cursor to the entry AutoSkip and press the ENTER key
Alternatively, the function can be called from the SELECT menu using the
hotkey combination CTRL + B.
Now the active channels you have access to are connected to your console,
one after the other, for approx. 5 seconds. The time period is identical to the
setting for the AutoScan time.
or the B key.
Page 27

Guntermann & Drunck GmbH CATCenter Operating Manual
3.2.2 Identifying the AutoSkip Function
Activation of the AutoSkip function is shown by "SKIP" on the display.
Example:
Win 2000
CATCenter
AUTOSKIP
( Computer name, editable)
( Switch name, editable)
( Active skip function)
3.2.3 Canceling the AutoSkip Function
Keyboard or mouse input pauses the AutoSkip function and it resumes only
after input ceases. To cancel the function, access AdonIS (CTRL + NUM) or
select a computer using a hotkey. The SKIP display disappears.
3.3 Manually connecting through all targets
This function makes it possible to manually connect through all channels on the
CATCenter in an ascending or descending sequence, in increments of 1. The
StepScan function starts with the currently selected computer.
3.3.1 Calling the StepScan Function
Carry out the following steps:
Ascending order is set using the UP ARROW key, descending order with the
DOWN ARROW key. The keys used to activate the StepScan function can be
modified (see Chapter 4.3).
If no computer is selected, the following message is displayed:
Example:
1. Access AdonIS by pressing the key combination (default): CTRL +
NUM
2. Access the OPERATION menu by pressing the F9 key.
3. Move the cursor to the entry StepScan and press the ENTER key
or the C key.
Alternatively, the function can be called from the SELECT menu using the
hotkey combination CTRL + C.
DISCONNECT
CATCenter
STEPSCAN
(No active selection)
(Switch name, editable)
(Note regarding the active StepScan)
Page 28

Guntermann & Drunck GmbH CATCenter Operating Manual
In this case, press one of the keys that activates the StepScan. The
StepScan then starts with either the last or the first channel.
3.3.2 Identifying the StepScan Function
Activation of the StepScan function is shown by " STEPSCAN " on the display.
Example:
Win 2000
CATCenter
STEPSCAN
(Computer name, editable)
(Switch name, editable)
(Active step function)
3.3.3 Canceling the StepScan Function
To cancel the function, access AdonIS (CTRL + NUM) or select a target using
a hotkey.
The STEP display disappears.
3.4 Canceling the Connection to a target
Carrying out the DISCONNECT function cancels the connection from your
console to a selected target. This ensures that a console that is not in use is
not accessing any targets and that the targets are therefore available to all
consoles.
To activate the DISCONNECT function, carry out the following steps:
After carrying out this function, the connection to the last active target is
cancelled and you return to the SELECT menu.
Caution! DISCONNECT does not protect your console against unauthorized
access!
1. Access AdonIS by pressing the key combination (default): CTRL
+ NUM
2. Access the OPERATION menu by pressing the F9 key.
3. Move the cursor to the entry "DISCONNECT" and press the
ENTER key or the D key.
Alternatively, the function can be called from the SELECT menu using the
hotkey combination CTRL + D.
Page 29

Guntermann & Drunck GmbH CATCenter Operating Manual
3.5 User Logout / End Session
The User Logout cancels your login to the CATCenter. It also cancels an
existing connection to a target.
After the function is carried out, the CATCenter LOGIN window is displayed.
To access the system again, you have to re-enter your user password or the
administrator password.
To activate this function, carry out the following steps:
Note: You should always use this function when you want to protect the
CATCenter against unauthorized access, e.g. when you leave your
workstation. When this function is activated, an existing connection to a target
is cancelled.
1. Access AdonIS by pressing the key combination (default): CTRL +
NUM
2. Access the OPERATION menu by pressing the F9 key.
3. Move the cursor to the entry "User Logout" and press the ENTER
key or the E key.
Alternatively, the function can be called from the SELECT menu using the
hotkey combination CTRL + E.
3.6 Re-Initializing the Mouse
If the mouse of one
(mouse pointer does not move), it is possible to re-initialize it.
First, check all cable connections to ensure they are seated properly. Please
note that the Mouse-Enable function is always carried out for the respective
active channel only.
To activate this function, carry out the following steps:
1. Access AdonIS by pressing the key combination (default): CTRL +
NUM
2. Access the OPERATION menu by pressing the F9 key.
3. Move the cursor to the MOUSE UTILITY submenu and press the
ENTER key or the F key.
Alternatively, the function can be called from the SELECT menu using the
hotkey combination CTRL + F.
target stops working during operation or after maintenance
Page 30

Guntermann & Drunck GmbH CATCenter Operating Manual
This opens the MOUSE UTILITY submenu, which offers the following options:
Mouse utility
Reset mouse
Enable mouse (for Unix)
Enable Intelli
Enable Intelli - Explorer
Esc Enter
Caution! Only carry out the enable / reset that matches the particular target!
The decisive factor is the mouse drive installed on the target - not the
physical mouse used!
Reset Mouse
Use this selection for Windows operating systems, regardless of the mouse
driver used.
This applies to:
WIN 98, WIN NT, WIN ME, WIN 2000, WIN XP, OS/2, Silicon Graphics.
Confirm your selection with the ENTER key. The mouse is initialized and the
menu is closed. The mouse will then work normally once again.
Enable Mouse (for Unix)
Use this selection for Unix or Linux operating systems when the target uses a
standard mouse driver.
Any driver that is not an Intelli-mouse driver is a standard driver.
Enable Intelli
Use this selection when the target uses an Intelli-mouse driver and a nonWindows operating system.
(E.g. Linux OS with Intelli-mouse driver)
Confirm your selection with the ENTER key. The mouse is initialized and the
menu is closed. The mouse will then work normally once again.
Page 31

Guntermann & Drunck GmbH CATCenter Operating Manual
Enable Intelli - Explorer
Use this selection when the target uses an Intelli-Explorer-mouse driver and a
non-Windows operating system (e.g. Linux OS with Intelli-Explorer-mouse
driver).
Confirm your selection with the ENTER key. The mouse is initialized and the
menu is closed. The mouse will then work normally once again.
3.7 Return to Last Target
With this function, you can automatically select the last target that was used.
To activate this function, carry out the following steps:
1. Access AdonIS by pressing the key combination (default): CTRL +
NUM
2. Access the OPERATION menu by pressing the F9 key.
3. Move the cursor to the entry "RETURN TO LAST TARGET" and
After carrying out this function, you will be connected to the last target used.
press the ENTER key or the G key.
Alternatively, the function can be called from the SELECT menu using the
hotkey combination CTRL + G.
Page 32

Guntermann & Drunck GmbH CATCenter Operating Manual
3.8 Displaying Additional Target Information
In the TARGET INFO line, you can determine what additional target
information is displayed in the right-hand column of the Select menu.
The following entries are available:
Off No additional information is displayed.
SelectKey The SelectKey established to access the respective
target is displayed (this is editable, see Chapter
4.4).
ID The physical target name (ID of the CATpro2; see
To change the entries, carry out the following steps:
1. Access AdonIS by pressing the key combination (default): CTRL +
NUM
2. Access the OPERATION menu by pressing the F9 key.
3. Move the cursor to the entry TARGET INFO and press the Spacebar
key or the H key.
Alternatively, the function can be called from the SELECT menu using the
hotkey combination CTRL + H.
Now you can switch between the individual entries, which are shown with a
yellow background, using the toggle key (Spacebar). Use the ESC key to exit
this menu and return to the SELECT menu. All settings that were modified are
saved.
Chapter 2.4) can be displayed.
3.9 Turn Target On/Off using AdonIS
This function is only available if a HardBoot CCX is connected.
In the row "TARGET POWER", you can turn the currently active target on or
off.
The base requirements for this function are:
At least one HardBoot must be connected to the CATCenter to supply
power.
The corresponding settings have to be established in the "CONFIG
menu -> Power" for this target (see Chapter 5.9)
Page 33

Guntermann & Drunck GmbH CATCenter Operating Manual
To turn off a target, carry out the following steps:
1. Access AdonIS by pressing the key combination (default): CTRL +
NUM
2. Access the OPERATION menu by pressing the F9 key.
3. Move the cursor to the entry "TARGET POWER" and press the
By pressing the ENTER key a security advice appears on your screen. By
confirming the selected (and running) target is automatically turned off.
After the target has been turned off, the entry in the "TARGET POWER" line
changes from On to Off.
Follow the same process to turn on a target that is not running.
Alternatively, the function can be called from the SELECT menu using the
hotkey combination CTRL + I.
ENTER key or the I key.
3.10 Administrator LoginFehler! Textmarke nicht
definiert. to an OpenAccess Console
This function is only available if OpenAccess has been activated on the
console you are currently working on (see Chapter 5.6.2). This function
provides you with temporary administrator access to an OpenAccess console.
For more information on this function, see Chapter 5.6.2.3.
Page 34

Guntermann & Drunck GmbH CATCenter Operating Manual
4 Personal Profile Menu (F10)
You can establish user-specific settings in the PERS. PROFILE menu. This
menu is accessed using the following hotkey combination: CTRL + NUM
(default). Press the F10 key in the window that opens.
From here, the following settings can be established:
G&D Personal Profile
Display temp
Scantime 05 sec
Stepkeys Up Dn
Selectkey, Scan&Default Target
Set Display Position
Set Menu Position
Change own password
Esc: Select F9: Operation
F11: Config F12: Information
Note:
The entries within this window depend on the rights given you by the
administrator. If, for example, you only have the right to change your own
password, only this entry is editble. All other entries are not accessible.
You can select from the entries displayed here using the mouse or the UP
ARROW and DOWN ARROW keys on your keyboard. Confirm your selection
using the ENTER key or by clicking the left mouse button.
You can access other main menus from the PERS. PROFILE menu. In
particular, these are:
ESC Switches back to the SELECT menu
F9 Switches to the OPERATION menu
F11 Switches to the CONFIG menu
F12 Switches to the INFORMATION menu
To save the changes you have made, press the F2 key. You are then returned
to the SELECT menu.
Page 35

Guntermann & Drunck GmbH CATCenter Operating Manual
If you press the ESC key after making changes, the following warning message
is displayed:
Warning
You did not save your changes!
Press
F2 to save and exit
ENTER to exit without saving
ESC to cancel
F2 : Save and exit
Enter : Exit without saving
You then have the following options:
Pressing the F2 key: Saves the changes you made and returns you to
the SELECT menu
Pressing the ENTER key: All changes you have made are discarded and you
return to the SELECT menu
Pressing the ESC key: Returns you to the PERS. PROFILE menu
ESC: Cancel
4.1 Permanent Screen Display of Target Information
The following settings are available to display the information for the selected
target:
- Permanent => perm or
- Temporary => temp (approx. 5 seconds after switching)
- Off => off (display is not shown)
After you move the cursor to the DISPLAY field, you can use the SPACEBAR
(toggle) to select the desired option (off/temp/perm).
If you select the temporary channel display, you can display the selected
channel at any time using the key combination CTRL + CAPS LOCK (default
setting).
Default setting: temp
Page 36

Guntermann & Drunck GmbH CATCenter Operating Manual
4.2 Setting the Scan Interval
Set the cursor to the line SCANTIME. The existing entry can be edited by
pressing the ENTER key.
A scan time of 1 – 99 seconds is valid. ENTER completes the entry.
To save the changes you have made, press the F2 key. You are then returned
to the SELECT menu.
4.3 Establishing Keys for StepScan
Here you can define the keys used for manually cycling through computers
(STEPSCAN, see Chapter 3.3).
The following keys or mouse buttons are available:
Up Dn UP arrow and DOWN arrow
PgUp PgDn Page Up and Page Down
NUM Up Dn UP arrow and DOWN arrow on the number pad
NUM PgUp PgDn Page Up and Page Down on the number pad
NUM + - PLUS and MINUS on the number pad
Explorer mouse Buttons 4 and 5 of the Intelli-Explorer-mouse
After you move the cursor to the STEPKEYS field, you can use the
SPACEBAR (toggle) to select the desired option.
To save the changes you have made, press the F2 key. You are then returned
to the SELECT menu.
Page 37

Guntermann & Drunck GmbH CATCenter Operating Manual
4.4 Defining SelectKeys & Default Computer / Scan Participation
After you select this menu item (with either the mouse or the keyboard), the
following window opens.
Assign Selectkey, Scan&Default
Sort ► Alph+ ◄ Show: All
WIN2000 1 S
WINXP 2 S
► LINUX 3 S
SUN Sparc 4 S
0 – 9 , - : Set Selectkey
SPACE: Scanmode
In this menu, each user can define an individual target-SelectKey assignment
for the targets he or she can access.
Column 1: Identifies the default computer
Column 2: Target name
Column 2: SelectKey for direct selection
Column 3: Scan mode setting
Rights: Can be changed by each user with the configuration right
“Personal Profile”.
Scope:
Each user can modify his or her own profile.
After login, the system can connect directly to a computer without having to
select it first in the Select menu. You can define this default computer in this
menu. To do so, use the arrow keys to move to a desired computer within the
list field and press the Enter key. A yellow triangle appears in front of the
selected computer. Pressing the Enter key again cancels this assignment.
To modify the SelectKey, use the mouse or the UP ARROW or DOWN
ARROW keys on your keyboard to select the desired target. Assign a new
SelectKey to the target by pressing one of the following keys on your keyboard:
Any number key (0 - 9) or
Any number pad key (NUM 0 – NUM 9) or
Any letter (A – K) or
Any number F-key (F1 - F9)
You can only pick a SelectKey that matches your specifications in the menu
Configuration -> System -> SelectKey (see Chapter 5.7.3). Entering a dash
(-) erases the entry that was made.
Page 38
F2 : Save
Enter: Default

Guntermann & Drunck GmbH CATCenter Operating Manual
To include a target in the scan process, press the SPACEBAR (toggle) on the
selected target. The "S" character signifies that the selected target is included
in the scan process. Entering a dash (-) excludes the target from the scan
process.
To save the changes you have made, press the F2 key. You are then returned
to the PERS. PROFILE menu.
4.5 Positioning the Target Display on the Monitor
Use this menu item „Set Display Position“ to adjust the position + size of the
channel display on the screen.
Press the ENTER key to enter edit mode; now you can move the display to the
desired location using the arrow keys or the mouse.
+
Set Display
F2: Save
In order to ensure optimal legibility of AdonIS for all resolutions, the size of the
display can be changed for monitor resolutions greater than 640 x 480 using
the PgUp + PgDn keys.
F2 saves the setting and takes you back to the PERS. PROFILE menu.
To cancel the settings, press the ESC key. This action also takes you back to
the PERS. PROFILE menu.
Page 39

Guntermann & Drunck GmbH CATCenter Operating Manual
4.6 Positioning AdonIS on the Monitor
After selecting the corresponding menu item „Set Menu Position“, you can
change the position and size of all AdonIS windows.
Press the ENTER key to enter edit mode; now you can move the display to the
desired location using the arrow keys or the mouse.
Set Menu Position
Up, Down, Left, Right: Set Pos
PgUp, PgDn: Set Size F2: Save
In order to ensure optimal legibility of AdonIS for all resolutions, the size of the
display can be changed for monitor resolutions greater than 640 x 480 using
the PgUp + PgDn keys.
F2 saves the setting and takes you back to the PERS. PROFILE menu.
To cancel the settings, press the ESC key. This action also takes you back to
the PERS. PROFILE menu.
Page 40

Guntermann & Drunck GmbH CATCenter Operating Manual
4.7 Changing own password
Rights:
Can be changed by each user with the configuration right
“Change own password”.
You can change your own password in this menu. Possible is the alphanumeric
entry. To do so, the adminstrator must have given you the right to change your
own password (see chapter 5.1.1.4).
Press the ENTER key or click the left mouse button on the entry Change
password to open the following window which prompts you to enter the
password.
Change password
Password
Repeat
ESC
Alphanumeric entries are possible; the minimum length is 3 characters and the
maximum length is 12 characters.
ENTER completes the first entry and automatically moves to the second field
where the password has to be re-entered. F2 confirms the new password and
takes you back to the EDIT USER submenu.
Canceling the password change
Pressing ESC in the CHANGE PASSWORD submenu cancels the action and
also takes you back to the EDIT USER submenu.
Please take care to remember the passwords. The system cannot be
accessed without them.
TAB F2: Save
Page 41

Guntermann & Drunck GmbH CATCenter Operating Manual
5 Configuration Menu (F11)
In the CONFIGURATION menu, you can establish configuration settings that
affect the entire CATCenter system. The following users have rights to do so:
The administrator
Users with configuration rights (these rights can be assigned
individually, e.g. video only or overall)
This menu is accessed using the following hotkey combination: CTRL + NUM
(Default). Press the F11 key in the window that opens.
From here, the following settings can be established:
G&D Configuration
User
User Group
Target
Target Group
Video
Console
Cascade
System
Power
Network
Esc: Select F9: Operation
F10: Pers. Profile F12: Info
You can select from the entries displayed here using the mouse or the UP
ARROW and DOWN ARROW keys on your keyboard. Confirm your selection
using the ENTER key or by clicking the left mouse button.
You can access other main menus from the CONFIGURATION menu. In
particular, these are:
ESC Switches back to the SELECT menu
F9 Switches to the OPERATION menu
F10 Switches to the PERS. PROFILE menu
F12 Switches to the INFORMATION menu
Entries that are not accessible for a user are identified in light blue.
Page 42

Guntermann & Drunck GmbH CATCenter Operating Manual
5.1 Creating, Editing, and Deleting Users
After you access this menu item, the USER CONFIG submenu opens.
User Config Mode: Alph+
Search …………………….
Name Groups Enabled
Admin 0 en
User 1 1 en
User 2 3 dis
F3 ADD User F4 Delete User
F5 Edit User F6 Enable/Disable
Using the menu item USER SEARCH, you can select an existing user via
keyboard input. To do so, place the cursor in the SEARCH field using the TAB
key. By entering the username in this field, you narrow down the number of
entries displayed in the list field. Only users matching the character sequence
entered in the SEARCH field are displayed in the list field. Keyboard input is
possible at all times.
You can change the sort order of the list field by modifying the entry in the
MODE field. Press the TAB key to reach the MODE field. Use the Spacebar
(toggle) to switch between the 2 entries:
Alph+: Sort in ascending alphabetic sequence
Alph- Sort in descending alphabetic sequence
Use the UP ARROW or DOWN ARROW keys on your keyboard to select
existing users.
↑
↓
Page 43

Guntermann & Drunck GmbH CATCenter Operating Manual
The meaning of the columns within this window is as follows:
Column 1 Username: This column contains all users that exist in the
CATCenter system.
Column 2 Groups This column displays the number of group
memberships (the number of groups this user is a
member of)
Column 3 Enable: This column shows whether a user account is
currently activated or deactivated. This column is
edited using the F6 key on the keyboard.
Four different F-keys are available to you for editing tasks in the footer of the
USER CONFIG submenu.
In particular, these are:
F3: ADD User Use this key to create a new user
(see Chapter 5.1.1)
F4: Delete User Use this key to delete an existing user
(see Chapter 5.1.2)
F5: Edit User Use this key to edit an existing user account
(see Chapter 5.1.3)
F6: Enable Disable Use this key to activate or deactivate a user
(see Chapter 5.1.4)
These editing functions are explained in more detail in the following chapters.
All editing tasks carried out up to this point can be saved by pressing the F2
key.
Use the ESC key to exit the USER CONFIG submenu. If you have made any
changes up to this point but wish to exit the USER CONFIG submenu without
saving your changes, a notification message to that effect will be displayed.
Page 44

Guntermann & Drunck GmbH CATCenter Operating Manual
5.1.1 F3 ADD User
If you want to create a new user account, press the F3 key in the USER
CONFIG submenu. The following window is opened:
Add User
Name
Password
Repeat
ESC F2: Save
Assign a unique NAME for this user account in the NAME field. A minimum of
1 and a maximum of 14 alphanumeric characters is available to you for this
purpose. To move to the PASSWORD field, press the ENTER key.
In the PASSWORD field, assign a password to this user account (this
password can be a maximum of 12 alphanumeric characters in length). To
move to the REPEAT field, press the ENTER key.
Re-enter the password you assigned to this user account in the REPEAT field.
To save the changes you have made, press the F2 key. This returns you to
the USER CONFIG submenu.
Press ESC to exit the menu without saving the changes you have made.
Page 45

Guntermann & Drunck GmbH CATCenter Operating Manual
To edit the new user you have created, select the user in the USER CONFIG
submenu and press the F5 key (Edit User). The following submenu opens:
Edit User
Username User 1
User Password
Group membership
Edit Config rights…
Edit Operation rights…
Edit target access rights…
Edit Personal Profile…
Edit Personal Profile…
New target rights full no
ESC
The user name can be edited. When the window is opened, the cursor is in the
list field. Press the TAB key to move to the USERNAME field in the header.
The displayed name can be overwritten. ENTER completes the entry and the
window „Change Password“ is opened.
TAB F2: Save
Change Password
Password
Repeat
ESC TAB
Set a new password for the changed user name.
Once you have established all required settings for the user being edited, save
your changes by pressing the F2 key.
Press the ESC key to return to the USER CONFIG submenu.
The entries in this window are explained in more detail in the following
chapters.
F2: Save
Page 46

Guntermann & Drunck GmbH CATCenter Operating Manual
5.1.1.1 Changing the "User Password"
Here you can establish the user password. Ensure that both the password and
the USER name are unique. Alphanumeric entries are possible.
Press the ENTER key or click the left mouse button on the entry USER
PASSWORD to open the following window which prompts you to enter the
password.
Change password
Password
Repeat
ESC
Alphanumeric entries are possible; the minimum length is 3 characters and the
maximum length is 12 characters.
ENTER completes the first entry and automatically moves to the second field
where the password has to be re-entered. F2 confirms the new password and
takes you back to the EDIT USER submenu.
Canceling the password change
Pressing ESC in the CHANGE PASSWORD submenu cancels the action and
also takes you back to the EDIT USER submenu.
Please take care to remember the passwords. The system cannot be
accessed without them.
F2: Save
Page 47

Guntermann & Drunck GmbH CATCenter Operating Manual
5.1.1.2 Group Membership
Here you can assign the user account to one or more user groups, up to a
maximum of 20. By assigning a user to certain user groups, rights the group
has at that point in time are also inherited. Assignment to user groups makes
the configuration process easier for system administrators, since they only
have to establish rights for the group.
In addition, individual rights for the user – which deviate from the group rights –
can also be assigned. The effective rights for a user are established by
comparing the individual user rights and the group rights. In general, the user
always has the highest assigned right when the two sets of rights are
compared.
Example:
Configuration rights are assigned for User 2 in the Config Right (see Chapter
5.1.1.3) submenu.
Config Right User 2
Set all rights to no
Name Eff Ind
User yes no
Target yes no
Console yes no
Video yes no
System no no
Network yes yes
Power no no
Esc
In this menu, you will see two values in the right column:
The individual rights of the selected user are displayed in a yellow font.
These can be edited within this menu. This column is identified by the label
"Ind" above the entries in yellow.
The effective rights of the selected user are displayed in a green font.
These cannot be edited within this menu. These entries represent the
maximum rights (effective rights) composed of the individual rights and the
group rights.
TAB F2 Save
Page 48

Guntermann & Drunck GmbH CATCenter Operating Manual
In this example, these effective rights are determined as follows:
Due to his or her individual rights, this user does not have rights to
create users in the system.
However, the "Eff" column has the entry "Yes". This must mean that
this user is a member of a group that has the right to create users.
Therefore, the selected user is assigned the group right as the
effective right.
To view the source from which this right comes, press the key
combination CTRL + F12.
Right Source User 2
Right: User
USER RIGHT no
Administration Group yes
Marketing Group no
Esc
In this example, the user received the right to created users from the
administration group.
TAB F2 Save
Page 49

Guntermann & Drunck GmbH CATCenter Operating Manual
5.1.1.2.1 Adding a User to a Group
To assign a user to a user group, proceed as follows:
By pressing the ENTER key or left-clicking on the entry Group Membership,
the following submenu opens:
Membership User 2
Sort Alph+on Show All
Search: . . . . . . . . . . . . . .
Administration
Marketing DISABLED
Sales
F3: Add F4: Remove
SPACE: Toggle TAB F2: Save
The list field displays all group memberships of the respective selected user. If
a user has been assigned to a group, this group is displayed in green in the list
field. All other groups are displayed in yellow. Groups that are currently not
available have the note "DISABLED" in the second column.
The user may already be a member of user groups. This indicated by a green
arrow that points to the right. A user can belong to a maximum of 20 groups.
Users can only be assigned to groups displayed in this list field. User groups
are created by administrators and by users with configuration rights.
To assign a user to a group to which he or she has not been assigned yet,
move the cursor to the desired group entry. Press the SPACEBAR (toggle) or
the F3 key to assign the user to the selected group. A green arrow appears in
front of the group name. However, the group name is still displayed in yellow.
The process is completed by pressing the F2 key, and the user is now a
member of the selected group. If the Group Membership submenu is opened
again, the previously selected group is now displayed in green and has a green
arrow.
Page 50

Guntermann & Drunck GmbH CATCenter Operating Manual
TAB / Change Sort Criteria (Sort Mode ► Alph+ ◄ )
Press TAB in the membership submenu to move to the sort field. Change the
sort criteria by pressing SPACEBAR (toggle).
The following sort options are available:
Alph+: Ascending alphabetic sort of the groups
Alph-: Descending alphabetic sort of the targets
"Show" Area Changing the Display Mode:
Press TAB in the membership submenu to move to the Show field.
"ALL GROUPS" stands for: All groups are displayed in the list field.
"MEMBER" means: Only groups to which the user has been
assigned are displayed in the list field.
"NONMEMBER" means: Only groups to which the user has not been
assigned are displayed.
You can exit all three versions of the Membership submenu using the ESC key.
This takes you back to the Edit User menu.
Page 51

Guntermann & Drunck GmbH CATCenter Operating Manual
5.1.1.2.2 Removing a User from a Group
To remove a user from a user group, proceed as follows:
By pressing the ENTER key or left-clicking on the entry Group Membership,
the following submenu opens:
Membership User 2
Sort Alph+on Show All
Search: . . . . . . . . . . . . . .
Administration
Marketing DISABLED
Sales
F3: Add F4: Remove
Enter: Toggle TAB F2: Save
Now move the mouse to the desired group entry. Press the SPACEBAR
(toggle) or the F4 key to cancel the assignment of the user to the selected
group. The right arrow in front of this group disappears. Press the F2 key to
complete the process.
Page 52

Guntermann & Drunck GmbH CATCenter Operating Manual
5.1.1.3 Edit Config Rights
Here you can assign configuration rights to the user account. These rights are
the individual rights of the selected user. These are displayed in the "Ind"
column. The effective rights of the user are displayed in the "Eff" column (see
Chapter 5.1.1.2).
By pressing the ENTER key or left-clicking on the entry CONFIG RIGHTS, the
following submenu opens:
Config Right User 2
Set all rights to no
Name Eff Ind
User yes no
Target yes no
Console yes no
Video yes no
System no no
Network no no
Power no no
Esc
In this window, you can use "Set all rights to" to set all entries to one of the
following values:
yes or
no
Use the TAB key to access this pre-select field. This key alternates between
the entry "Set all rights to" and the other seven configuration areas. Use the
Spacebar (toggle) to change the values within the „Set all rights to" field.
Here you can assign configuration rights to the user account. Only those
configuration items activated for the user can be selected by the user in the
Configuration menu F11 (displayed in white)! To do so, select the desired
entry and then change the current value in the column "Ind" to either "yes" or
"no".
Use the ESC key to exit the CONFIG RIGHT submenu. If you have made any
changes up to this point but wish to exit the CONFIG RIGHT submenu without
saving your changes, a notification message to that effect will be displayed.
To save the changes you have made, press the F2 key and return to the EDIT
USER submenu.
Default setting: no
TAB F2 Save
Page 53

Guntermann & Drunck GmbH CATCenter Operating Manual
5.1.1.4 Edit Operation Rights
Here you can define which operation rights should be available to the user
account in the OPERATION menu (F9). These rights are the individual rights
of the selected user. These are displayed in the "Ind" column. The effective
rights of the user are displayed in the "Eff" column (see Chapter 5.1.1.2).
By pressing the ENTER key or left-clicking on the entry EDIT OPERATION
RIGHTS in the EDIT USER submenu, the following submenu opens:
Operation Right User 2
Set all rights to no
Name Eff Ind
Mouse Reset yes no
Personal Profile yes no
Multi Access no no
Target Power no no
Change own password yes yes
Esc TAB
In this window, you can use "Set all rights to" to set all entries to one of the
following values:
yes or
no
Use the TAB key to access this pre-select field. This key alternates between
the entry "Set all rights to" and the other four operation areas. Use the
Spacebar (toggle) to change the values within the „Set all rights to" field.
Here you can assign operation rights to the user account. Only those
operation items made available to the user are displayed in the OPERATION
menu in white and are therefore available to the user! To do so, select the
desired entry and then change the current value in the column "Ind" to either
"yes" or "no".
Use the ESC key to exit the OPERATION RIGHT submenu. If you have made
any changes up to this point but wish to exit the OPERATION RIGHT submenu
without saving your changes, a notification message to that effect will be
displayed.
To save the changes you have made, press the F2 key and return to the EDIT
USER submenu.
Default setting: See window display
F2 Save
Page 54

Guntermann & Drunck GmbH CATCenter Operating Manual
The entries within the list field have the following meanings:
Execute Mouse Reset: (see Chapter 3.6)
Change Personal Profile: (see Chapter 4)
Execute Target Power: (see Chapter 3.9)
Multi Access:
Here you can grant or deny the user account the right to MultiAccess target
access via the CATCenter. The MultiAccess function is the option that a user
can access a target that is already in use by another user.
Both users simultaneous have the display of the target on their monitor, and full
keyboard / mouse access.
As soon as one of the users provides input via the keyboard or mouse, the
keyboard / mouse of the other user are automatically locked.
Once input has ceased, the system re-enables the keyboard / mouse after a
timeout of approx. 1 second, and access is once again possible for both users.
The active MultiAccess mode is permanently shown on the display of both the
initial and the second user (see Chapter 5.8.4):
Example:
Win 2000
Console 1
The following parameters can be established here:
MULTIUSER
(Target name, editable)
(Console name, editable)
(Note regarding shared access)
no No multi-user right
full Multi-user right for this user
vie w Multi-user right for this user, but view-only
Default:
MultiAccess = No
Page 55

Guntermann & Drunck GmbH CATCenter Operating Manual
The setting option "MultiAccess" is expanded with the operating right View.
Note:
To be able to exercise this operating right, a user must first be assigned the
access right "Full Access" in the submenu Target Access Rights (see Chapter
5.1.1.4).
In practice, the View operating right means the following:
If User A, who has the operating right View, connects to a computer to which
User B, who has operating rights, is already connected, then A is only granted
View access. Keyboard and mouse are disabled for A.
If User B disconnects from the computer, User A remains in View mode. User
A obtains operating access only upon disconnecting from this computer and
then reconnecting to it.
Change own password:
By editing this entry you can grant the owner of this account the right, to
change his or her own password (see chapter 4.7). Default: yes
5.1.1.5 Edit Target Access Rights
Here you can define the targets the user account can access. These rights are
the individual rights of the selected user. They are displayed in yellow in the list
field. The effective rights of the user are displayed in the green (see Chapter
5.1.1.2).
By pressing the ENTER key or left-clicking on the entry EDIT TARGET
ACCESS RIGHTS in the EDIT USER submenu, the following window opens:
Access rights User 2
Set display ALL
Set all targets no
Target search …………………….
Linux No No
SUN Sparc View No
WIN 2000 Full No
WIN XP Full No
WIN NT Full Full
SPACE: Toggle
ESC TAB F2 Save
Using the menu item Target search, you can select an existing target via
keyboard input. To do so, place the cursor in the Target search field using the
Page 56

Guntermann & Drunck GmbH CATCenter Operating Manual
TAB key. By entering the target name in this field, the cursor jumps directly to
the corresponding target in the list field. Keyboard input is also possible when
the cursor is in the list field.
With the menu item "Set target display", you can toggle the display mode of
the list field between "ALL" and a specific group. If you set the entry to "ALL"
using the SPACEBAR, then all targets connected to the CATCenter are
displayed. If you select a group, then the list field only shows targets that also
belong to this group.
Furthermore, you can set all entries to one of the following values in this
window using the entry "Set all targets":
no or
full or
view
You can reach all fields in the header using the TAB key. This key switches back
and forth between the entries mentioned above and the targets in the list field. Use
the Spacebar (toggle) to change the values within these fields.
You can grant the user access rights to the targets displayed in the list using
F5 or Spacebar. Only the right-hand entries can be edited in the list field
(yellow font, individual rights). The entries in green are the effective rights of
the selected user. Only those targets to which the user is granted access here
are displayed in the SELECT menu! To do so, select the desired entry and
then change it to either "No", "Full", or "View".
Press ESC to exit the menu without saving the changes you have made. If you
choose to do this, a warning message is displayed.
Warning
You did not save your changes!
Press
F2 to save and exit
ENTER to exit without saving
ESC to cancel
F2 : Save and exit
Enter : Exit without saving
Subsequently, you are returned to the EDIT USER submenu.
To save the changes you have made, press the F2 key and return to the EDIT
USER submenu.
Default setting: no access
ESC: Cancel
Page 57

Guntermann & Drunck GmbH CATCenter Operating Manual
5.1.1.6 Edit Personal Profile
You can establish user-specific settings in the PERS. PROFILE menu. This
menu corresponds to the description in Chapter 4.
5.1.1.7 New Target Right
In this line, you can define the access rights the respective user has for new
targets as they are connected. These rights are the individual rights of the
selected user. They are displayed in yellow in the list field. The effective rights of
the user are displayed in the green (see Chapter 5.1.1.2).
The following entries are available (affects the individual rights):
No (No access to all new targets that are connected) or
Full (Full access to all new targets that are connected) or
View (The user has view-only access to the new targets that are
connected)
To save the changes you have made, press the F2 key.
Use the ESC key to exit the EDIT USER submenu. If you have made any
changes up to this point but wish to exit the EDIT USER submenu without
saving your changes, a notification message to that effect will be displayed.
5.1.2 F4 Delete User
You can remove an account from the CATCenter system within the USER
CONFIG submenu by pressing the F4 key. This action is saved automatically.
Page 58

Guntermann & Drunck GmbH CATCenter Operating Manual
5.1.3 F5 Edit User
You can use the F5 key to edit an existing user account. This edit function
corresponds to Chapters 5.1.1.1 – 5.1.1.7).
Edit User
Username User 1
User Password
Group membership
Edit Config rights…
Edit Operation rights…
Edit target access rights…
Edit Personal Profile…
New target rights no no
ESC
The user name is in an editable field, which you can reach using TAB key.
The username can be overwritten by pressing the F5 key. ENTER completes
the entry.
Pressing the F2 key saves all changes you have made.
Use the ESC key to exit the EDIT USER submenu. If you have made any
changes up to this point but wish to exit the EDIT USER submenu without
saving your changes, a notification message to that effect will be displayed.
TAB F2: Save
5.1.4 F6 Enable/Disable
To activate or deactivate a user account, select the corresponding account in
the list field of the USER CONFIG submenu and then press the F6 key.
The following selections are available:
en Activates the selected user account
dis Deactivates the selected user account
The entry in column 3 (enable) changes according to the selection you make
with the F6 key.
Your selection is automatically saved when you exit the USER CONFIG
submenu.
Note: The user "Admin" displayed in the USER CONFIG submenu cannot
be deactivated!
Page 59

Guntermann & Drunck GmbH CATCenter Operating Manual
5.2 Creating, Editing, and Deleting User Groups
After you access this menu item, the USER GROUP CONFIG submenu opens.
User Group Config Mode: Alph+
Search …………………….
Name Users Enabled
Sales 7 en
Marketing 4 en
Accounting 3 dis
F3: Add Group F4: Delete Group
F5: Edit Group F6: En-/Disable
Using the menu item SEARCH, you can select an existing group via keyboard
input. To do so, place the cursor in the SEARCH field using the TAB key. By
entering the group name in this field, you narrow down the number of entries
displayed in the list field. Only groups matching the character sequence
entered in the SEARCH field are displayed in the list field. Keyboard input is
possible at all times.
You can change the sort order of the list field by modifying the entry in the
MODE field. Press the TAB key to reach the MODE field. Use the Spacebar
(toggle) to switch between the 2 entries:
Alph+: Sort in ascending alphabetic sequence
Alph- Sort in descending alphabetic sequence
Use the UP ARROW or DOWN ARROW keys on your keyboard to select
existing groups.
The meaning of the columns within this window is as follows:
Column 1 Name: This column contains all groups that exist in the
CATCenter system.
Column 2 Users: This column displays the number of users assigned to
the group.
Page 60

Guntermann & Drunck GmbH CATCenter Operating Manual
Column 3 Enable: This column shows whether a group is currently
activated or deactivated. This column is edited using
the F6 key on the keyboard.
Four different F-keys are available to you for editing tasks in the footer of the
USER GROUP CONFIG submenu.
In particular, these are:
F3: ADD Group Use this key to create a new group
(see Chapter 5.2.1)
F4: Delete Group Use this key to delete an existing group
(see Chapter 5.2.2)
F5: Edit Group Use this key to edit an existing group
(see Chapter 5.2.3)
F6: Enable Disable Use this key to activate or deactivate a group
(see Chapter 5.2.4)
These editing functions are explained in more detail in the following chapters.
All editing tasks carried out up to this point can be saved by pressing the F2
key.
Use the ESC key to exit the USER GROUP CONFIG submenu. If you have
made any changes up to this point but wish to exit the USER GROUP CONFIG
submenu without saving your changes, a notification message to that effect will
be displayed.
Page 61

Guntermann & Drunck GmbH CATCenter Operating Manual
5.2.1 F3 ADD Group
If you would like to create a new group, press the F3 key in the USER GROUP
CONFIG submenu. The following window is opened:
Add Group
Group name
ESC F2 Save
Assign a unique name for this group in the line GROUP NAME. A maximum of
14 alphanumeric characters is available to you for this purpose.
To save the changes you have made, press the F2 key. This returns you to
the USER GROUP CONFIG submenu.
Press ESC to exit the menu without saving the changes you have made.
To edit the new group you have created, select the group in the USER GROUP
CONFIG submenu and press the F5 key (Edit User). This is explained in
Chapter 5.2.3.
Note:
A maximum of 128 groups can be created.
Page 62

Guntermann & Drunck GmbH CATCenter Operating Manual
5.2.2 F4 Delete Group
By pressing the F4 key, you can remove a group from the CATCenter system
within the USER GROUP CONFIG submenu. After pressing the F4 key, the
following window opens:
Confirm
Do you really want to delete
User Group
Marketing
ESC : Cancel
Enter : OK
Pressing the ENTER key confirms the deletion process and returns you to the
USER GROUP CONFIG submenu. Pressing the ESC key cancels the deletion
process and also returns you to the USER GROUP CONFIG submenu.
5.2.3 F5 Edit Group
You can use the F5 key to edit an existing group.
Edit User Group
Group name
Marketing
Member Management
Edit Config rights…
Edit Operation rights…
Edit target access rights…
New target right no
ESC
The group name can be edited. When the window is opened, the cursor is in
the list field. Press the TAB key to move to the GROUPNAME field in the
header. The displayed name can be overwritten. ENTER completes the
entry.
Once you have established all required settings for the user being edited, save
your changes by pressing the F2 key.
TAB F2: Save
Page 63

Guntermann & Drunck GmbH CATCenter Operating Manual
Press the ESC key to return to the USER CONFIG submenu.
The entries in this window are explained in more detail in the following
chapters.
5.2.3.1 Member Management
Here you can add the user to a currently selected group. Note that a user can
be a member of no more than 20 groups. On the other hand, there can be any
desired number of members in a group.
By pressing the ENTER key or left-clicking on the entry Member Management,
the following window opens:
Manage Members Marketing
Sort Alph+ Show: ALL USERS
Search …………………….
Miller
Perry
Rider
Hoover
Jones
Gardner
F3 Add F4 Remove
SPACE: Toggle F2 Save
Users that currently belong to a selected group are identified by an arrow that
points to the right.
Using the menu item SEARCH, you can select an existing user via keyboard
input. To do so, place the cursor in the SEARCH field using the TAB key. By
entering the username in this field, you narrow down the number of entries
displayed in the list field. Only users matching the character sequence entered
in the SEARCH field are displayed in the list field. Keyboard input is possible
at all times.
You can change the sort order of the list field by modifying the entry in the
MODE field. Press the TAB key to reach the Sort field. Use the Spacebar
(toggle) to switch between the 3 entries:
Alph+ Sort in ascending alphabetic sequence
Alph- Sort in descending alphabetic sequence
Members The members of the currently selected group are
shown at the top of the list field
Page 64

Guntermann & Drunck GmbH CATCenter Operating Manual
Press the TAB key to reach the Show field. Use the Spacebar (toggle) to
switch between the 3 entries:
ALL USERS All systems for the available user are displayed
NONMEMBERS All users that are not members of the currently
selected group are displayed
MEMBERS All users that are members of the currently selected
group are displayed
Use the UP ARROW or DOWN ARROW keys on your keyboard to select
existing users.
Four different F-keys are available to you for editing tasks in the footer of the
Manage Members submenu.
In particular, these are:
F3: ADD Use this key to add a user to the currently selected
group
F4: Remove Use this key to remove a user from the currently
selected group
Space: Toggle Use this key to add a user to or remove a user from
the currently selected group
F2: Save Press this key to save all changes you have made
and return to the Edit User Group submenu
Press the ESC key to exit the Manage Members submenu. If you have made
any changes up to this point but wish to exit the Manage Members submenu
without saving your changes, a notification message to that effect will be
displayed.
Page 65

Guntermann & Drunck GmbH CATCenter Operating Manual
5.2.3.1.1 Adding a User to a Group
To add a user to the currently selected group, use the cursor or the arrow keys
to move to the desired user.
Manage Members Marketing
Sort Alph+ Show: ALL USERS
Search …………………….
Miller
Perry
Rider
Hoover
Jones
Gardner
F3 Add F4 Remove
SPACE: Toggle F2 Save
Press the SPACEBAR (toggle) or the F3 key to assign the user to the selected
group. A green arrow appears in front of the username. However, the
username is still displayed in yellow. The process is completed by pressing the
F2 key, and the user is now a member of the selected group.
5.2.3.1.2 Removing a User from a Group
To remove a user from the currently selected group, use the cursor or the
arrow keys to move to the desired user.
Press the SPACEBAR (toggle) or the F4 key to cancel the assignment of the
user to the selected group. The right arrow in front of this user disappears.
Press the F2 key to complete the process.
Page 66

Guntermann & Drunck GmbH CATCenter Operating Manual
5.2.3.2 Edit Config Rights
Here you can assign configuration rights to the group account.
By pressing the ENTER key or left-clicking on the entry CONFIG RIGHTS, the
following submenu opens:
Config Right Marketing
Set all rights to no
Name Grp
User no
Target no
Console no
Video no
System no
Network no
Power no
ESC
In this window, you can use "Set all rights to" to set all entries to one of the
following values:
yes or
no
Use the TAB key to access this pre-select field. This key alternates between
the "Set all rights to" entry and the other seven configuration areas. Use the
Spacebar (toggle) to change the values within the "Set all rights to" field.
Here you can also assign configuration rights to the user group. Only those
configuration items activated for the user group can be selected by the
members of this user group in the Configuration menu F11 (displayed in
white)! To do so, select the desired entry and then change it to either "yes" or
"no".
Use the ESC key to exit the CONFIG RIGHT submenu. If you have made any
changes up to this point but wish to exit the CONFIG RIGHT submenu without
saving your changes, a notification message to that effect will be displayed.
To save the changes you have made, press the F2 key and return to the EDIT
USER GROUP submenu.
Default setting: no
TAB F2 Save
Page 67

Guntermann & Drunck GmbH CATCenter Operating Manual
5.2.3.3 Edit Operation Rights
Here you can define which OPERATION rights should be available to the user
account in the OPERATION menu (F9).
By pressing the ENTER key or left-clicking on the entry "EDIT OPERATION
RIGHTS, the following submenu opens:
Operation Right
Set all rights to no
Name Grp
Mouse Reset no
Personal Profile no
Multi Access no
Target Power no
Change own password no
ESC
In this window, you can use "Set all rights to" to set all entries to one of the
following values:
yes or
no
Use the TAB key to access this pre-select field. This key alternates between
the "Set all rights to" entry and the other four operation areas. Use the
Spacebar (toggle) to change the values within the "Set all rights to" field.
Here you can also assign configuration rights to the user group. Only those
operation items made available to the user are displayed in the OPERATION
menu in white and are therefore available to the members of this user group!
To do so, select the desired entry and then change it to either "yes" or "no".
Use the ESC key to exit the OPERATION RIGHT submenu. If you have made
any changes up to this point but wish to exit the OPERATION RIGHT submenu
without saving your changes, a notification message to that effect will be
displayed.
To save the changes you have made, press the F2 key and return to the EDIT
USER GROUP submenu.
Default setting: See window display
TAB F2 Save
Page 68

Guntermann & Drunck GmbH CATCenter Operating Manual
The entries within the list field have the following meanings:
Mouse Reset: (see Chapter 3.6)
Personal Profile: (see Chapter 4)
Target Power: (see Chapter 3.9)
Multi Access:
Here you can grant or deny the user group the right to MultiAccess target
access via the CATCenter. The MultiAccess function is the option that a user
can access a target that is already in use by another user.
Both users simultaneous have the display of the target on their monitor, and full
keyboard / mouse access.
As soon as one of the users provides input via the keyboard or mouse, the
keyboard / mouse of the other user are automatically locked.
Once input has ceased, the system re-enables the keyboard / mouse after a
timeout of approx. 1 second, and access is once again possible for both users.
The active MultiAccess - mode is permanently shown on the display of both
the initial and the second user (see Chapter 5.8.4).
Example:
Win 2000
Console 1
MULTIUSER
(Target name, editable)
(Console name, editable)
(Note regarding shared access)
Default:
MultiAccess = No
Change own password:
By editing this entry you can grant the owner of this account the right, to
change his or her own password (see chapter 4.7). Default: no
Page 69

Guntermann & Drunck GmbH CATCenter Operating Manual
5.2.3.4 Edit Target Access Rights
Here you can define the targets the user group can access.
By pressing the ENTER key or left-clicking on the entry EDIT TARGET
ACCESS RIGHTS, the following window opens:
Access rights Marketing
Set display ALL
Set all targets no
Target search …………………….
Linux no
SUN Sparc no
WIN 2000 no
WIN XP no
WIN NT no
SPACE: Toggle
ESC
Using the menu item Target search, you can select an existing target via
keyboard input. To do so, place the cursor in the Target search field using the
TAB key. By entering the target name in this field, the cursor jumps directly to
the corresponding target in the list field. Keyboard input is also possible when
the cursor is in the list field.
With the menu item "Set target display", you can toggle the display mode of
the list field between "ALL" and a specific group. If you set the entry to "ALL"
using the SPACEBAR, then all targets connected to the CATCenter are
displayed. If you select a group, then the list field only shows targets that also
belong to this group.
Furthermore, you can set all entries to one of the following values in this
window using the entry "Set all targets":
No or
Full or
View
You can reach all fields in the header using the TAB key. This key switches back
and forth between the entries mentioned above and the targets in the list field. Use
the Spacebar (toggle) to change the values within these fields.
You can grant the user group access rights to the targets displayed in the list
using F5 or Spacebar. Only those targets to which the user group is granted
TAB F2 Save
Page 70

Guntermann & Drunck GmbH CATCenter Operating Manual
access here are displayed in the SELECT menu! To do so, select the desired
entry and then change it to either "No access", "Full access", or "View only".
Press ESC to exit the menu without saving the changes you have made. If you
choose to do this, a warning message is displayed.
Warning
You did not save your changes!
Press
F2 to save and exit
ENTER to exit without saving
ESC to cancel
F2 : Save and exit
Enter : Exit without saving
Subsequently, you are returned to the EDIT USER GROUP submenu.
To save the changes you have made, press the F2 key and return to the EDIT
USER GROUP submenu.
Default setting: no access
ESC: Cancel
5.2.3.5 New Target Right
In this line, you can define the access rights the respective user has for new
targets as they are connected.
The following selections are available:
No (No access to all new targets that are connected) or
Full (Full access to all new targets that are connected) or
View (The members of the user group have view-only access to the
targets)
To save the changes you have made, press the F2 key.
Use the ESC key to exit the EDIT USER GROUP submenu. If you have made
any changes up to this point but wish to exit the EDIT USER GROUP submenu
without saving your changes, a notification message to that effect will be
displayed.
Page 71

Guntermann & Drunck GmbH CATCenter Operating Manual
5.2.4 F6 Enable/Disable
To activate or deactivate a user group, select the corresponding account in the
list field of the USER GROUP CONFIG submenu and then press the F6 key.
The following selections are available:
en Activates the selected user group
dis Deactivates the selected user group
The entry in column 3 (enable) changes according to the selection you make
with the F6 key.
Your selection is automatically saved when you exit the USER GROUP
CONFIG submenu.
5.3 Creating, Editing, and Deleting Targets
After you access the TARGET submenu in the list field of the
CONFIGURATION menu, the TARGET MANAGEMENT submenu opens.
Target Management
Sort Alph+ Show: All
CPU Search: . . . . . . . . . . . . . .
WIN 2000 000001DC
WIN XP 0000125W
WIN NT 000025DQ
Linux 0000010Q
SUN Sparc 5 0000252A
CPU-ID 000012dc 000012DC
F4: Delete F5: Edit
F7: Move ESC
The first column contains the editable target name (see Chapter 5.3.1). The
second column contains the CATpro2 ID. This ID cannot be edited.
Page 72

Guntermann & Drunck GmbH CATCenter Operating Manual
5.3.1 Editing the Selected Target
Open the Edit TARGET submenu of the target selected using the UP ARROW
or DOWN ARROW keys on your keyboard by pressing the F5 key. In this
submenu, you can perform the following tasks:
Change the target name
Reset the IVT data of the selected target
AdonIS synchronization
5.3.1.1 Changing the Target Name
You can modify the default physical target name (ID of the CATpro2; see
Chapter 2.4) to a logical target name.
Press the TAB key to enter edit mode for the selected target. The target name
is displayed in white in the header of the Edit TARGET submenu.
Up to 15 alphanumeric characters can be entered.
F2 saves the data and takes you back to the TARGET MANAGEMENT
submenu.
To exit the menu, press ESC.
5.3.1.2 Reset Target Video Data
A profile that contains information regarding the cable parameters (e.g. cable
length) for every target is saved per console. These values ensure the optimal
display of the video at your workstation. These values are determined and
saved automatically the first time your console connects to a target.
If the cable length between a CATpro2 and the CATCenter changes, this may
influence the display quality. The target displayed on your monitor may
become fuzzy or distorted.
In order to automatically create new profiles for all connected consoles the next
time they connect to this target, the stored profiles can be deleted using the
entry Reset target video data.
To do so, use the UP ARROW and/or DOWN ARROW keys on your keyboard
or the mouse to select the entry Reset target video data and then press
ENTER.
Page 73

Guntermann & Drunck GmbH CATCenter Operating Manual
The following window opens:
Confirm
Do you really want to delete
all video data for target
Server 1.6?
ESC: Cancel
Enter: OK
Pressing the ENTER key again deletes the video profiles. Subsequently, you
are returned to the Edit Target submenu.
To exit the menu without making any changes, press ESC.
5.3.1.3 OSD Sync
Depending on the computer settings, it is possible that a synchronization signal
(H, V) is also transmitted over a common cable in addition to the color
information (R, G, B). In such cases, the color display in AdonIS is incorrect. It
appears brighter and with less contrast.
In the menu item OSD sync, you can adjust this behavior for the affected
target.
Three alternatives are available:
Off
green
all
Adjust AdonIS by selecting the correct setting, depending on the appearance,
using the Spacebar.
With the entry off, AdonIS is not adjusted.
F2 saves the data and takes you back to the TARGET MANAGEMENT
submenu.
Use the ESC key to exit the EDIT TARGET submenu. If you have made any
changes to the OSD sync entry up to this point but wish to exit the EDIT USER
Page 74

Guntermann & Drunck GmbH CATCenter Operating Manual
submenu without saving your changes, a notification message to that effect will
be displayed.
5.3.1.4 USB Multimedia Keyboard
Select this menu item to activate multimedia USB support in the CATpro2 USB
dongle. By default, this setting is deactivated (value is set to "no")!
This item is only active and therefore selectable if the following conditions have
been met:
The selected target must be connected to the CATCenter using a
CATpro2 USB dongle.
This CATpro2 USB dongle must be active.
The firmware version of the CATpro2 USB dongle must be greater
than or equal to rev. 1.42. You can obtain this information under
system info (first press the F12 key, then access the menu item
"System Info"). You will find the revision number of the currently
connected CATpro2 USB dongle in the right hand column of the target
line.
5.3.1.5 IBM RS/6000 support
Activate the support for UNIX servers of IBM’s RS/6000 series (option: yes) if
the target computer is such a server.
Note: This setting can only be edited with PS/2 versions of the target modules.
5.3.1.6 USB power management
The target modules of the CATpro2-USB series are usually switched on as
soon as the USB controller provides the target module with the required
voltage.
Deactivate the »USB power management« setting (option: no) if no screen
content is being displayed on the monitor of the accessing user module while
the target computer is booting.
Note: This setting can only be edited with USB versions of the target modules.
Page 75

Guntermann & Drunck GmbH CATCenter Operating Manual
5.3.1.7 Apple mode
If the Apple computer that is connected to the target module does not react
(properly) when the multimedia keys are pressed, a special keymode for Apple
computers can be activated (option: yes).
Note: This setting can only be edited with USB versions of the target modules.
5.3.2 Inheriting Existing Target Information
If you have connected a target that is already connected to the CATCenter with
a new CATpro2 (e.g. after the failure of an old CATpro2, the TARGET
MANAGEMENT submenu shows the physical ID of the new CATpro2 instead
of the old target name (this can either be a physical ID of the old CATpro2 or a
logical name for a target assigned to this dongle).
The new CATpro2 can inherit the old target information.
To do so, use the UP ARROW or DOWN ARROW keys on the keyboard or the
mouse to move to the physical ID of the new CATpro2 in the TARGET
MANAGEMENT submenu. The press the F7 key (Move). A window opens
listing all targets from the TARGET MANAGEMENT submenu which have the
status RED and that can be assigned to the new CATpro2.
The targets displayed in this window are shown in white.
Move CPU-ID 12Xf34 to
LINUX Server
Accounting Server
WIN NT
Open BSD
SUN Sparc 5
Enter
The status can be RED when:
ESC
Page 76

Guntermann & Drunck GmbH CATCenter Operating Manual
A target is turned off.
A target no longer exists on a CPU interface.
A CATpro2 no longer works.
Now use the UP ARROW and/or DOWN ARROW keys on your keyboard or
the mouse to select the entry MOVE TARGET INFO submenu and then press
ENTER. The target information is then transferred to the new CATpro2.
5.3.3 Deleting a Target
If you remove a CATpro2 from a CPU interface because the connected target
no longer exists, the corresponding entry remains in the SELECT menu and
the TARGET MANAGEMENT submenu. It is displayed in RED.
You can delete this entry from the TARGET MANAGEMENT submenu
therefore from the CATCenter system.
To do so, use the UP ARROW and/or DOWN ARROW keys on your keyboard
or the mouse to select the corresponding entry in the TARGET
MANAGEMENT submenu and then press the F4 key.
Page 77

Guntermann & Drunck GmbH CATCenter Operating Manual
A confirmation dialogue opens with the following text:
Confirm
Do you really want to delete
Target LINUX – Server?
ESC: Cancel
Enter: OK
Press the ENTER key to confirm the deletion. Use the ESC key to cancel it.
Note:
This function can be used to delete inactive targets only. If you would like to
delete an active target (a target that is running), you receive the following
warning message:
Attention
Powered on target cannot
be deleted
Enter: OK
Page 78

Guntermann & Drunck GmbH CATCenter Operating Manual
5.4 Creating, Editing, and Deleting Target Groups
The targets edited in Chapter 5.3 can be combined into target groups. A target
can only be a member of one
After you access the TARGET GROUP submenu in the list field of the
CONFIGURATION menu, the TARGET GROUP submenu opens.
Target Group Config
Sortmode Alph+
Search
WIN TG GRP
SUN TG GRP
LINUX TG GRP
F3 Add Group F4 Delete Group
F5 Edit Group
Use the UP ARROW and/or DOWN ARROW keys on your keyboard to select
existing groups.
This column contains all target groups that exist in the CATCenter system.
Three different F-Keys are available to you in the footer of this window to carry
out editing tasks.
In particular, these are:
F3: Add Group Use this key to create a new group
These editing functions are explained in more detail in the following chapters.
(see Chapter 5.4.1)
F4: Delete Group Use this key to delete an existing group
F5: Edit Group Use this key (or Enter) to edit an existing
group (see Chapter 5.4.3)
target group.
(see Chapter 5.4.2)
Page 79

Guntermann & Drunck GmbH CATCenter Operating Manual
All editing tasks carried out up to this point can be saved by pressing the F2
key.
Use the ESC key to exit the TARGET GROUP CONFIG submenu.
5.4.1 F3 Add Group
If you want to create a new target group, press the F3 key in the TARGET
GROUP CONFIG submenu. The following window is opened:
Add Group
Group name
ESC F2: Save
Assign a unique name for this group in the line Group name. A maximum of
12 alphanumeric characters is available to you for this purpose.
Press ESC to exit the menu without saving the changes you have made. To
save the changes you have made, press the F2 key. Subsequently, you are
returned to the TARGET GROUP CONFIG submenu.
To add new targets to this group, press the F5 key. The GROUP MEMBERS
submenu opens; here you can add targets to the new group you have created.
In case of existing target groups, this list shows all targets already assigned to
this group.
Group Members WIN GRP
Search
F3 Add Member
F5 Edit group name
F4: Delete member
F2: Save
Page 80

Guntermann & Drunck GmbH CATCenter Operating Manual
The previously established group name can be subsequently edited in the
GROUP MEMBERSHIP submenu by pressing the F5 key. By pressing this
key, the cursor jumps to the field that contains the target group name so that it
can be edited. ENTER completes the entry.
Targets being added to a group can be removed from this group by pressing
the F2 key. A confirmation dialogue opens with the following text:
Confirm
Do you really want to delete
Target Group member
CPU-ID 00001711?
ESC: Cancel
Enter: OK
Press the ENTER key to confirm the deletion. Use the ESC key to cancel it.
To add new targets to this group, press the F3 key.
Add Members WIN GRP
Sort Alph+ Show: Available
Search
Linux
SUN Sparc
WIN 2000
x
WIN XP
WIN NT
x
F3: Add member
ESC
This list shows all targets available on the CATCenter, i.e., those that have not
yet been assigned to a group.
Press the TAB key to reach the SORT field. Use the Spacebar (toggle) to
switch between the 2 entries:
Alph+: Sort in ascending alphabetic sequence
Alph- Sort in descending alphabetic sequence
F2: Save
TAB
Page 81

Guntermann & Drunck GmbH CATCenter Operating Manual
The field "Show" can be used to limit the list that is displayed.
All Shows all targets available on the CATCenter.
Available Shows only those targets that can be added to a group.
By default, this is set to "Available".
If the display setting is changed to "ALL", the targets that can be added to a
group are displayed in white. Targets that already belong to a group are
displayed in light blue.
For the targets already assigned to a group, the group name is displayed in the
right-hand column.
Use the F3 key to add a target to the current group. To do so, use the cursor
or the UP ARROW and/or DOWN ARROW keys on your keyboard to move to
the desired target and then press the F3 key. This is indicated by a cross in
front of the respective target. Pressing the F3 key again cancels the selection.
The changes are saved by pressing the F2 key. The selected targets are
added to the current group. You are returned to the GROUP MEMBERS
submenu.
5.4.2 F4 Delete Group
By pressing the F4 key, you can remove a group from the CATCenter system
within the TARGET GROUP CONFIG submenu. All changes that have been
made are saved automatically.
To do so, use the UP ARROW and/or DOWN ARROW keys on your keyboard
or the mouse to select the corresponding entry in the TARGET GROUP
CONFIG submenu and then press the F4 key (delete). A confirmation dialogue
opens with the following text:
Confirm
Do you really want to delete
Target Group
Accounting?
ESC: Cancel
Enter: OK
Press the ENTER key to confirm the deletion. Use the ESC key to cancel it.
Page 82

Guntermann & Drunck GmbH CATCenter Operating Manual
5.4.3 F5 Edit Group
You can use the F5 key to edit an existing group. This edit function
corresponds to the explanation in Chapter 5.4.1.
5.5 Optimizing the Screen Display
The first time a console connects to a target, a video profile is automatically
created for the target. The CATCenter system offers the option to
subsequently adjust the video manually for all connected consoles using the
IVT mode.
After you access the VIDEO submenu in the list fieldFehler! Textmarke nicht
definiert. of the CONFIGURATION menu, the "IVT" window opens.
The user can adjust for various cable lengths using this function. The
individual design of this function makes it possible to use the subjective
perception of every person as the guideline for a "good picture".
The adjustment is carried out via the UCON (or UCON-s, UCON-a, UCON-IP)
using the connected keyboard.
The system covers the range from 0 - 190 and the adjustment can be made in
increments of 1.
Delay differences of the CAT-x cables (skew) are automatically compensated
electronically with the delay setting (only for UCON and UCON-s). However, a
manual setting is possible.
5.5.1 Rights
The following persons have the right to carry out the IVT function:
The administrator
All users granted the right to do so by the administrator. These users
must have video configuration rights (see User Accounts, Chapter
5.1.1.3).
5.5.2 Accessing IVT Mode
You can access IVT mode via the CONFIGURATION menu. To do so, use the
UP ARROW and/or DOWN ARROW keys on your keyboard or the mouse to
select the entry Video in the CONFIGURATION menu and then press ENTER.
Page 83

Guntermann & Drunck GmbH CATCenter Operating Manual
The following window opens:
IVT
Boost 4
Noise filter 0
Fine tuning 36
delay R delay G delay B
0 ns 0 ns 0 ns
F1: Help F2: Save F3: Auto
Settings within the IVT submenu can be established via the UCON and UCON-s.
The delay setting is not
available for the UCON-a and UCON-IP.
5.5.3 Video Tuning Setting
After you access IVT, the following settings are available to you in the open IVT
submenu:
Establishing the video boost.
Setting the noise filter.
Fine tuning.
Delay setting on the colors R, G, and B of the CAT-x cable (this
The IVT submenu appears as follows:
You can switch between the individual entries using the UP ARROW and/or
DOWN ARROW keys.
function is only available for the UCON and UCON-s!).
IVT
Boost 4
Noise filter 0
Fine tuning 36
delay R delay G delay B
0 ns 0 ns 0 ns
F1: Help F2: Save F3: Auto
ESC: Exits the IVT submenu without saving changes
F1: Opens the IVT help window
F2: Saves all changes and closes the IVT submenu
F3: Carries out automatic video optimization
Page 84

Guntermann & Drunck GmbH CATCenter Operating Manual
5.5.3.1 Automatic Settings
You can establish all video settings automatically. To do so, you must be
connected to a target.
To activate this function, press the F3 key. While the settings are being
established automatically, the monitor turns black for approx. 3 seconds. After
the automatic settings have been established, the display reappears.
After the automatic video setting process, save the settings by pressing the F2
key. In this case, the IVT submenu is closed and you return to the
CONFIGURATION menu.
5.5.3.2 Manual Settings
In case, that the automatic setting doesn´t meet your expectations, you can
adjust the video display manually. This manually adjusting of the video display
is described in the following chapters.
5.5.3.2.1 Establishing the Video Boost
Boost: 4
The following keys are available to you to modify the video boost:
Key
Key
Keys CTRL +
Keys CTRL +
Home
End
If you want to make other changes within the IVT submenu, use the UP
ARROW and/or DOWN ARROW keys to move to another entry.
After establishing the video boost, confirm and save your selection by pressing
F2 or discard your changes by pressing ESC. In both cases, the IVT submenu
is closed and you return to the CONFIGURATION menu.
Subtracts 1 from the video boost value
Adds 1 to the video boost value
Subtracts 5 from the video boost value
Adds 5 to the video boost value
Maximum video boost (Caution: Overdrive possible
no picture visible on monitor)
Minimum video boost
Page 85

Guntermann & Drunck GmbH CATCenter Operating Manual
5.5.3.2.2 Setting Noise Suppression
Noise filter: 0
If the video quality of your monitor is influenced by noise, this effect can be
removed using the noise filter setting.
The following keys are available to you to modify the noise filter setting:
Key
Key
Keys CTRL +
Keys CTRL +
Home
End
If you want to make other changes within the IVT submenu, use the UP
ARROW and/or DOWN ARROW keys to move to another entry.
After establishing the noise filter setting, confirm and save your selection by
pressing F2 or discard your changes by pressing ESC. In both cases, the IVT
submenu is closed and you return to the CONFIGURATION menu.
Subtracts 1 from the noise suppression value
Adds 1 to the noise suppression value
Subtracts 5 from the noise suppression value
Adds 5 to the noise suppression value
Maximum noise suppression (value: 255)
Noise suppression has the value 0
5.5.3.2.3 Fine Tuning
Fine tuning: 36
The following keys are available to you for fine tuning:
Key
Key
Keys CTRL +
Keys CTRL +
Home
End
If you want to make other changes within the IVT submenu, use the UP
ARROW and/or DOWN ARROW keys to move to another entry.
After establishing the fine tuning setting, confirm and save your selection by
pressing F2 or discard your changes by pressing ESC. In both cases, the IVT
submenu is closed and you return to the Configuration menu.
Subtracts 1 from the fine tuning value
Adds 1 to the fine tuning value
Subtracts 5 from the fine tuning value
Adds 5 to the fine tuning value
Maximum fine tuning (value: 575)
Minimum fine tuning (value: 0)
Page 86

Guntermann & Drunck GmbH CATCenter Operating Manual
5.5.3.2.4 Setting the Delay
An important aspect for the use of the CATCenter system is that the delay of
signals on the various wire pairs of a CAT-x cable must be the same. Different
delay times lead to color errors that appear similar to a convergence error on
the monitor. The severity of the color error depends on the cable length, cable
type, screen resolution, and screen refresh rate.
The cause for this type of delay difference is the uneven transposition of the
various wire pairs.
A visible effect of the delay differences is that the three colors red, green, and
blue do not converge on top of each other. The text on the monitor then
appears as follows (exaggerated for clarity):
Before
Vor der Kompensierung
compensating for
der Laufzeitunterschiede
delay differences
After compensating for
Nach der Kompensierung
delay differences
der Laufzeitunterschiede
The three colors appear next to each other. The display on the monitor does
not have well-defined edges. It appears blurry and may have a colored aura.
The CATCenter system automatically compensates for delay differences. A
manual setting is also possible. This manual setting is established using either
the UCON or the UCON-s.
However, this will only be required in exceptional cases.
This setting is not necessary and thus not available for UCON-a and UCON-IP.
Setting the delay compensation
delay R delay G delay B
0 ns 0 ns 0 ns
The delay compensation can be set in the CATCenter system for all three color
signals up to 46 ns.
At 0 ns, no delay compensation (delay) has been set.
The following keys are available to you to modify the delay compensation:
Page 87

Guntermann & Drunck GmbH CATCenter Operating Manual
Key
Key
Keys CTRL +
Keys CTRL +
Decreases the delay compensation by 2 ns
Increases the delay compensation by 2 ns
Decreases the delay compensation by 10 ns
Increases the delay compensation by 10 ns
Example:
If the color signal for red appears too early, select the entry delay R and delay
the signal until all colors converge again and a correct picture is displayed. If
another color signal appears on the monitor too late, repeat this process as
described above.
After establishing the delay compensation settings, confirm and save your
selection by pressing F2 or discard your changes by pressing ESC. In both
cases, the IVT submenu is closed.
If you want to make other changes within the IVT submenu, use the UP
ARROW and/or DOWN ARROW keys to move to another entry.
5.5.4 Notes on IVT Settings
The steps described above are guidelines.
Since the quality of a video display depends on the monitor, the graphics card,
and the transmission cable, it is possible that you may achieve the subjective
"best picture" with a boost setting of 140 in spite of a cable length of 120
meters, for example.
Test the settings to find what is best for your application.
Since the UP ARROW and/or DOWN ARROW keys work in 1-meter
increments, you may have to press these keys repeatedly to achieve a perfect
picture.
If your monitor remains black, please check whether the resolution setting of
the graphics card is supported by the monitor. If this is the case, activate the
IVT submenu (Chapter 5.5.2).
It is also possible that the range supported by your monitor has been
exceeded. Select the lowest setting and then move up using the PgUp key.
The picture will reappear and you can establish the optimal settings.
Page 88

Guntermann & Drunck GmbH CATCenter Operating Manual
5.5.5 Tested Resolution
During internal testing, we achieved good picture quality at the following
resolutions (the values are independent of the cable and IVT settings used):
Meters Resolution Screen Refresh Rate
100 1600 x 1200 Max. 85 Hz
150 1600 x 1200 60 Hz
200 1280 x 1024 Max. 85 Hz
300 1280 x 1024 60 Hz
This overview is not intended to represent maximum values.
5.6 Administering a Console / Establishing an OpenAccess Console
After you select the CONSOLE submenu in the list field of the
CONFIGURATION menu, the CONSOLE CONFIG submenu opens.
Console Config
CON 00000028 Standard
CON 00000029
CON 00000030
CON 00000031
CON 000000121
CON 000000122
CON 000000134
CON 000000138
F4: Delete F5 Edit SPACE: Toggle type
F6 Enable / Disable F2: Save
The meaning of the columns within this window is as follows:
Column 1 Name: This column displays the logical name assigned to this
physical console. In the default state, this name is the device
ID of the UCON (or UCON-s or UCON-a) connected to this
console port. This name can be edited by pressing the F5
key on the keyboard.
Standard
OpenAccess
Standard
Standard
Video
Standard
Standard
Page 89

Guntermann & Drunck GmbH CATCenter Operating Manual
Column 2 Type: This column displays the console type. The choices are
"OpenAccess", "Standard", and "Video". If the console is a
standard console, then this console has the right to access
the system and possibly carry out configuration tasks.
Access takes place using an assigned password and login
name. If the console is an "OpenAccess" console (see
Chapter 5.6.2, OpenAccess console type, then the rights of
the console must first be defined. In case of a video console,
target operation using the keyboard / mouse is deactivated
(see Chapter 5.6.3, video console type). It is only possible to
view the video display of the device connected to the
console.
The console types can be configured further by pressing the
F5 key (see Chapter 5.6.1).
Use the UP ARROW and/or DOWN ARROW keys on the keyboard or the
mouse to select the individual consoles.
All editing tasks carried out up to this point are saved by pressing F2.
Press ESC to exit the menu without saving the changes you have made. If you
choose to do this, a warning message is displayed.
Warning
You did not save your changes!
Press
F2 to save and exit
ENTER to exit without saving
ESC to cancel
F2 : Save and exit
Enter : Exit without saving
Press the F2 key to permanently save your changes. This returns you to the
CONFIGURATION menu
ESC: Cancel
Page 90

Guntermann & Drunck GmbH CATCenter Operating Manual
5.6.1 Edit Console - Standard Console (F5)
You can edit a standard console by pressing the F5 key or the ENTER key.
This opens the following window:
Edit Console
Console name CON00001245
Edit Config rights…
Edit Operation rights…
Edit target access rights…
Edit Personal Profile…
New target rights full
Enhanced keyboard
Auto Logout 00 off
Screensaver time 00 off
Scancode set 2
OSD keyboard layout German
OSD by mouse no
Remember last user name yes
Keyboard required no
OSD blocked no
Reset console video data
Video
ESC TAB: Edit Name F2: Save
Within this window, the first four entries and the menu items OSD blocked and
Video cannot be edited. The other entries are explained in the following
chapters.
The console name can be edited. When the window is opened, the cursor is in
the list field. Press the TAB key to move to the CONSOLE NAME field in the
header. The displayed name can be overwritten. ENTER completes the entry.
Once you have established all required settings for the user being edited, save
your changes by pressing the F2 key.
Press the ESC key to return to the CONSOLE CONFIG submenu.
The entries (including the inactive ones) in this window are explained in more
detail in the following chapters.
Page 91

Guntermann & Drunck GmbH CATCenter Operating Manual
5.6.1.1 Enhanced Keyboard
If you use PixelPower keyboards, you can use this menu item to activate the
special functions for these keyboards in the CATCenter system.
To do so, use the UP ARROW and/or DOWN ARROW keys on your keyboard
or the mouse to select the entry ENHANCED KEYBOARD. Now press the
ENTER key. The SELECT ENHANCED KEYBOARD submenu opens.
You can select from the entries displayed here using the mouse or the UP
ARROW and DOWN ARROW keys on your keyboard. The following
selections are available:
PixelPower Rapid Action
PixelPower Clarity (blue)
Press the SPACEBAR to activate one of these entries. A yellow triangle
appears in front of the selected entry. Pressing the ENTER key again cancels
this assignment.
Once you are finished editing, press the F2 key. All changes are saved and
you return to the CONSOLE CONFIG submenu.
Press ESC to exit the menu without saving the changes you have made. If you
choose to do this, a warning message is displayed.
5.6.1.2 AutoLogout
Use this entry to determine if this console is to be automatically logged out via
AUTO LOGOUT to protect it against unauthorized access after a user-defined
period of time when there is no keyboard / mouse activity.
To do so, use the UP ARROW and/or DOWN ARROW keys on your keyboard
or the mouse to select the entry AUTO LOGOUT. By default, AUTO LOGOUT
is turned off and the entry is set to "00 Off".
If you want to define AUTO LOGOUT for this console, press the ENTER key.
The cursor jumps to an editable field to the left of the entry "Off". In this field,
you can enter a value from 01 – 99 (in minutes).
After you have entered the desired AUTO LOGOUT time, press the ENTER
key and the entry "Off" changes to "min" (for minutes). Entering "00" changes
the value back to "Off".
Once you are finished editing, press the F2 key. All changes are saved and
you return to the CONSOLE CONFIG submenu.
Page 92

Guntermann & Drunck GmbH CATCenter Operating Manual
5.6.1.3 Screensaver Time
The screen saver set here is generated by the CATCenter and is not
connected in any way to the screen saver of the target.
Since there is normally an indirect connection (via the CATCenter) between the
target and the monitor, you should turn the screen saver on the target off to
make your work easier.
The screen saver of the CATCenter assumes this task; it puts the monitor in
power-down mode.
Use the UP ARROW and/or DOWN ARROW keys on your keyboard to select
the entry SCREENSAVER TIME. The existing entry can be overwritten, or
edited by pressing the ENTER key.
A time of 1 – 99 minutes is valid. The entry "0" sets the screen saver to "OFF".
Once you are finished editing, press the F2 key. All changes are saved and
you return to the CONSOLE CONFIG submenu.
5.6.1.4 Scancode Set
The scancode is the "language" the keyboard uses to communicate with the
target. The CATCenter works with scancode set 2.
Do not modify this setting unless asked to do so by our service
department.
Place the cursor onto the corresponding entry.
By pressing the SPACEBAR, you can select between the following
alternatives: 2 or 3
Once you are finished editing, press the F2 key. All changes are saved and
you return to the CONSOLE CONFIG submenu.
5.6.1.5 OSD Keyboard Layout
Use this to adjust the keyboard layout used by the CATCenter to the actual
layout of the connected keyboard. For example, you should modify this setting
if you notice that Y/Z are switched (U.S. / German keyboard layout).
Page 93

Guntermann & Drunck GmbH CATCenter Operating Manual
Note:
The country-specific keyboard setting is only required for the communication
between your keyboard and AdonIS. When AdonIS is closed, all characters
are passed to the target transparently.
The following alternatives are available:
German
English US
English UK
French
Spanish
Latin America
Portuguese
Use the UP ARROW and/or DOWN ARROW keys on your keyboard to select
the entry ADONIS KEYBOARD LAYOUT. Use the SPACEBAR (toggle) to
select the desired option.
Once you are finished editing, press the F2 key. All changes are saved and
you return to the CONSOLE CONFIG submenu.
5.6.1.6 OSD by Mouse
Here, you can activate the special buttons of the Intelli-Explorer mouse for your
work with the CATCenter. If you change this setting to "Yes", then AdonIS
cannot only be activated using the keyboard but also by pressing button 4 or 5
on the Explorer mouse (left side buttons).
Use the UP ARROW and/or DOWN ARROW keys on your keyboard to select
the entry OSD by Mouse. Use the SPACEBAR (toggle) to select the desired
option.
Once you are finished editing, press the F2 key. All changes are saved and
you return to the CONSOLE CONFIG submenu.
5.6.1.7 Remember Last User Name
Every time you want to access a target connected to the CATCenter, you first
have to log on to the system using your login name and password (see
Chapter 2.1).
Exception: OPEN ACCESS (see Chapter 5.6.2) and target access option VIEW
(see Chapter 5.2.3.4)
However, if you are normally the only one working on a console, you can
reduce the login process to password entry only with the function Remember
Page 94

Guntermann & Drunck GmbH CATCenter Operating Manual
last user name. In this case, your Login name is always displayed in the user
name field of the login window.
Login CON 00002005
User name
Password
G&D CATCenter
ESC TAB Enter
To do so, use the UP ARROW and/or DOWN ARROW keys on your keyboard
or the mouse to select the entry Remember last user name in the Edit
Console submenu and then press ENTER.
Use the Spacebar (toggle) to set the entry Remember last user name to Yes.
Save this setting by pressing F2.
5.6.1.8 Keyboard Required
Use this function to determine if a keyboard is required on a console or not. A
keyboard is not necessarily required, especially when using a video console.
Therefore, you can determine that proper operation of this console can also
take place without a keyboard for the UCON connected to the console.
Use the UP ARROW and/or DOWN ARROW keys on your keyboard to select
the entry Keyboard required. Use the SPACEBAR (toggle) to select the
desired option.
Once you are finished editing, press the F2 key. All changes are saved and
you return to the CONSOLE CONFIG submenu.
5.6.1.9 OSD Blocked
Use the entry OSD blocked to define whether AdonIS can be accessed from
the selected console or not. Thus, you can establish that, on this console, the
user can only switch between the targets he or she has access to via hotkey.
Use the UP ARROW and/or DOWN ARROW keys on your keyboard to select
the entry OSD blocked. Use the SPACEBAR (toggle) to select the desired
option.
Page 95

Guntermann & Drunck GmbH CATCenter Operating Manual
Once you are finished editing, press the F2 key. All changes are saved and
you return to the CONSOLE CONFIG submenu.
In case of a console defined as Standard (see Chapter 5.6) this entry is
inactive and therefore cannot be selected.
5.6.1.10 Reset Console Video Data
A profile that contains information regarding the cable parameters (e.g. cable
length) for every target is saved per console. These values ensure the optimal
display of the video at your workstation. These values are determined and
saved automatically the first time your console connects to a target.
If the cable length between a UCON and the CATCenter changes, this may
influence the display quality. A fuzzy or distorted representation of the target
on your monitor may result.
In order to automatically create new profiles for all connected targets the next
time they connect to this console, the stored profiles can be deleted using the
entry Reset console video data.
To do so, use the UP ARROW and/or DOWN ARROW keys on your keyboard
or the mouse to select the entry Reset console video data in the Edit
Console submenu and then press ENTER.
The following window opens:
Confirm
Do you really want to delete
all video data for console
CON 00000033?
ESC: Cancel
Enter: OK
Pressing the ENTER key again deletes all video profiles and takes you back to
the Edit Console submenu.
To exit the menu without making any changes, press ESC.
Page 96

Guntermann & Drunck GmbH CATCenter Operating Manual
5.6.1.11 Video
The video entry in the Edit Console submenu for a remove IVT cannot be
accessed for:
Consoles that are not video consoles
Consoles that are turned off
UCON-S
This function can only be carried out for remote consoles. This function
corresponds to IVT (see Chapter 5.5).
5.6.2 Console Type "OpenAccess"
With OpenAccess it is possible to enable system access to the CATCenter
individually for every console without entering a login name and password.
After turning on the console, the Select menu is automatically displayed.
When you first define a console as an OpenAccess console, it has no
operation, configuration, and access rights. You have to assign these rights to
the console (see Chapter 5.6.2.2).
Page 97

Guntermann & Drunck GmbH CATCenter Operating Manual
5.6.2.1 Activating an OpenAccess Console
To enable open system access for a console, you have to complete the
following steps:
1. Access the SELECT menu using the hotkey combination CTRL
(default) + NUM
2. Press the F11 key (the CONFIGURATION menu opens)
3. Select the CONSOLE submenu using either the keyboard or mouse
(the CONSOLE CONFIG submenu opens)
Console Config
CON 00000028 Standard
CON 00000029
CON 00000030
CON 00000031
CON 000000121
CON 000000122
CON 000000134
CON 000000138
Standard
OpenAccess
Standard
Standard
Video
Standard
Standard
F4: Delete F5 Edit SPACE: Toggle type
F6 Enable / Disable F2: Save
Use the UP ARROW and/or DOWN ARROW keys on the keyboard or the
mouse to select a console you want to define as an OPEN ACCESS
CONSOLE. Use the Spacebar (toggle) to set the entry to OPEN ACCESS.
Save this setting by pressing F2.
Page 98

Guntermann & Drunck GmbH CATCenter Operating Manual
5.6.2.2 Configuring an OpenAccess Console
To configure OPEN ACCESS and assign specific rights, return to the
CONSOLE CONFIG submenu, select the console marked as an OPEN
ACCESS console, and press the F5 key.
This takes you to the OPEN ACCESS configuration window.
Edit Console
Console name CON00001245
Edit Config rights…
Edit Operation rights…
Edit target access rights…
Edit Personal Profile…
New target rights full
Enhanced keyboard…
Auto Logout 00 off
Screensaver time 00 off
Scancode set 2
OSD keyboard layout German
OSD by mouse no
Remember last user name yes
Keyboard required no
OSD blocked no
Reset console video data
Video
ESC TAB: Edit Name F2: Save
In this window, you can perform the following tasks:
Define the configuration rights to grant to OPEN ACCESS (see
Chapter 5.1.1.3)
Define the operating rights to grant to OPEN ACCESS (see Chapter
5.1.1.4)
Determine the targets OPEN ACCESS is to have access to (see
Chapter 5.1.1.5)
Define the personal settings of the OPEN ACCESS (see Chapter 4)
Determine what access OPEN ACCESS has to newly connected
targets (see Chapter 5.1.1.7).
Define whether the CATCenter system should support additional
functions of special keyboards (see Chapter 5.6.1.1)
Page 99

Guntermann & Drunck GmbH CATCenter Operating Manual
Define after what time period AutoLogout is carried out (see Chapter
5.6.1.2)
Activate the screen saver mode (see Chapter 5.6.1.3)
Define the keyboard language the target uses to communicate (see
Chapter 5.6.1.4)
Define the keyboard layout to be used (see Chapter 5.6.1.5)
Define whether the additional buttons of the Intelli-Explorer mouse are
activated to operate AdonIS (see Chapter 5.6.1.6)
Define whether a keyboard is required on the OpenAccess console
(see Chapter 5.6.1.8)
Define if the user of the OpenAccess console has an OSD available
(see Chapter 5.6.1.9)
Whether the IVT settings for this console are to be reset to zero (see
Chapter 5.6.1.10)
Please note that activating an OpenAccess console creates an
alternative system access to the CATCenter.
open
Use the ESC key to exit the OPEN ACCESS menu without saving your
changes.
To save the settings, exit the menu with the F2 key.
If OpenAccess is deactivated, the settings for OPEN ACCESS are retained.
These settings only become active again if the OPEN ACCESS for this console
is reactivated.
5.6.2.3 Activating Temporary Administrator Access
While OpenAccess is active, the administrator has the option to grant or revoke
additional operating, configuration, and access rights on this OpenAccess
console via a temporary access.
To do so, proceed as follows:
1) Activate AdonIS on the OpenAccess console by pressing the key
combination (default): CTRL + NUM
2) Access the OPERATION menu by pressing the F9 key.
3) Move the cursor to the entry Temporary OAC login and press ENTER.
The login window of the CATCenter appears on your screen. Log on here
either as administrator or as user with configuration rights. You can now carry
out all necessary configuration tasks for this OpenAccess console.
Page 100
 Loading...