

Gunnebo Lifting CH, CHE, CHS, CHP, CHD Owner's Manual
...
1
Användarhandbok - Lyfthandskar
Gebrauchsanleitung - Sicherheits-greifklemmen
Lifting Systems
Owners Manual - Safety plate lifting clamp
www.gunnebolifting.com
Manual do Utilizador - Pinça de segurança de elevação
CH, CHE, CHS, CHD, CHP, CHNM

2
Please carefully read the safety instructions of this owner’s manual before using
the safety lifting clamp. In case of any doubts, please refer to your dealer!
Our manuals are intended to be a reference source throughout the lifetime
of your product.We appreciate any suggestions, and/or comments regarding this manual.
Due to continuing research and development activities, product specifi cations are subject
to change without notice.
English
Läs anvisningarna i denna användarhandbok noggrant innan du använder lyfthandsken.
Vid frågor, rådgör med återförsäljaren. Våra handböcker är avsedda att vara en referenskälla
under produktens livslängd. Vi uppskattar förslag och/eller kommentarer angående
denna handbok. På grund av kontinuerligt undersöknings- och utvecklingsarbete, kan
produktspecifi kationer ändras utan föregående meddelande.
Lesen Sie die Gebrauchsanleitung vor Benutzung des Produkts sorgfältig durch.
Bei Fragen wenden Sie sich bitte an Ihren Zulieferer. Die Gebrauchsanleitung dient
während der gesamten Lebensdauer des Produkts als ständige Informationsquelle.
Für Hinweise oder Anmerkungen zur Verbesserung des Inhalts dieser Gebrauchsanleitung
sind wir dankbar. Aufgrund kontinuierlicher Forschungs- und Entwicklungsprozesse
behalten wir uns technische Änderungen und/oder Änderungen äußerlicher
Leia atentamente as instruções de segurança deste manual do utilizador antes de utilizar
a pinça de segurança de elevação. Em caso de dúvida, consulte o seu revendedor! Os
nossos manuais devem ser um ponto de referência ao longo da vida útil do seu produto.
Agradecemos quaisquer sugestões e/ou comentários relativos a este manual. Devido às
contínuas actividades de investigação e desenvolvimento, as especifi cações do produto
estão sujeitas a alterações sem aviso prévio.
Svenska
DeutschPortuguês
3
Contents
1 General 3
2 Operating principle 3
3 Permitted applications 3
4 Safety instructions 4
5 Lifting 5
- CH, CHE, CHD, CHNM
- CHP
6 Maintenance 6
7 Disassembling/Assembling 6
- CH, CHE, CHS, CHD
- CHP
- CHNM
8 Overhauling 7
9 Disposal 7
10 Troubleshooter’s checklist 8
11 Warranty 8
1 General
Congratulations with the acquisition of a Gunnebo Lifting safety plate lifting clamp.The quality
systems of management and services of Gunnebo Lifting fully comply with ISO 9001
standards. The many years of vast experience are a guarantee of optimum quality and safety.
Gunnebo Lifting Clamps are made of top quality steel and fully comply with European standards
as laid down in Machine Directive 2006/42/EG.
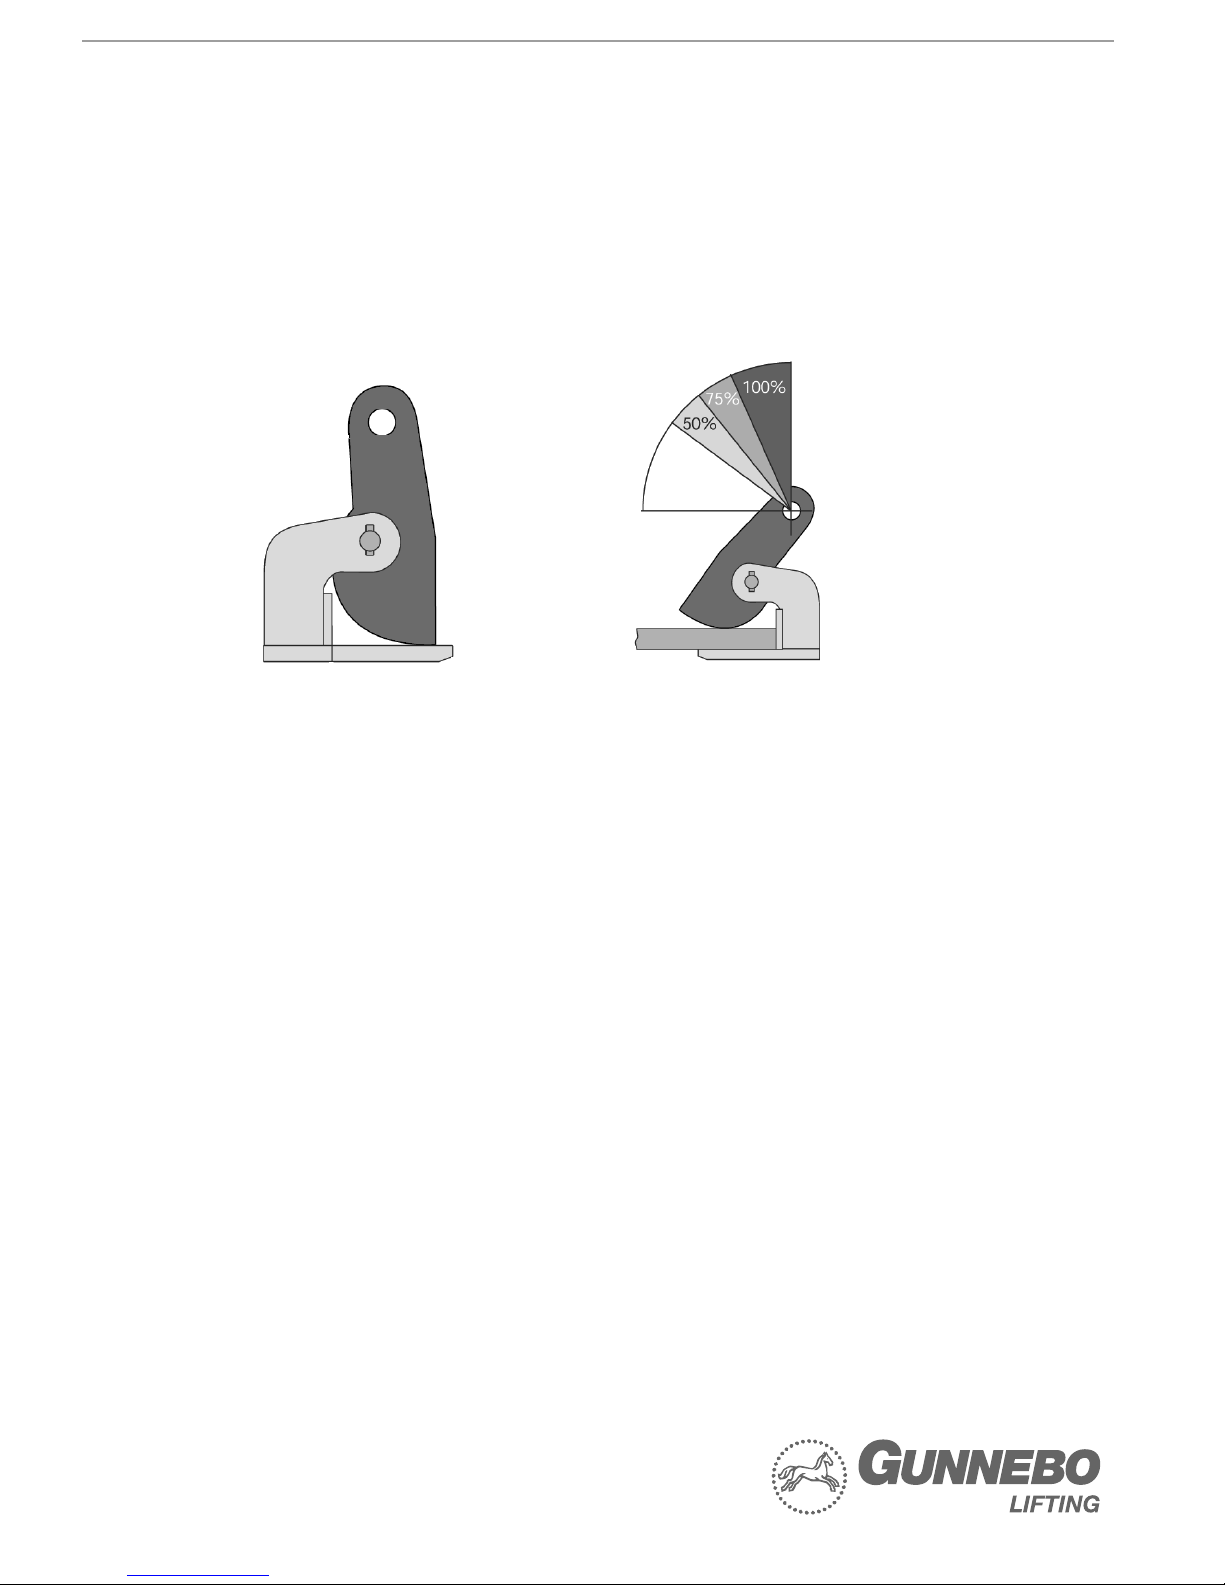
2 Operating Principle
The CH, CHE, CHS, CHNM and CHP horizontal safety lifting clamps have specifi cally
been designed for the horizontal lifting and transporting of non-bending steel plates. The
clamps consist of a body, cam, and cam pin. The cam also functions as a lifting shackle and
ensures that the load is held fi rm-ly while it is being lifted.
3 Permitted Applications
CH, CHE, CHS and CHNM
Gunnebo Lifting CH, CHE and CHNM lifting clamps are only suitable for lifting and horizontal
movement of non-bending steel plates and structures where it is possible to position the clamp
on a fl at point of contact. The clamps should always be used in pairs, or multiples thereof.
In the latter case, however, preferably with a load spreader beam.
CHD
Gunnebo Lifting CHD lifting clamps are only suitable for lifting and horizontal movement of both
bending steel plates and formed steel plates, where it is possible to position the clamp on
a fl at point of contact. CHD clamps should always be used in pairs, or multiples thereof.
CHP
Gunnebo Lifting CHP clamps are only suitable for horizontal movement of steel plates and packages
of steel plates, where it is possible to position the clamp on a fl at point of contact. The clamps should
always be used in pairs, or multiples thereof. In the latter case, however, preferably with a load
equalising beam. Provided that the steel plate of plates do net bend (defl ect), one or more plates can
be hoisted at once per Iift. When pairs or multiple clamps are used, each damp should carry en
equal part of the load.
English

4
4 Safety Instructions
Safety fi rst! Guarantee your personal safety by carefully reading the following safety
instructions fi rst.
Ensure your own safety and continue to benefi t from our product safety by having the
clamp inspected, tested and, if necessary, overhauled at least once a year by Gunnebo Lifting
or a recognized mechanical repair and service centre. See also Chapter 8 - Overhauling.
Contact Gunnebo Lifting for further information.
Avoid situations dangerous to life
Prevent dangerous situations by seriously taking care of the following precautions:
- Never work with an untested clamp.
- Keep your distance when lifting and never stand under the load.
- Do not use the clamp if (it has been) damaged; have the clamp immediately repaired by Gunnebo
Lifting or a recognized mechanical repair centre. If in doubt consult your supplier.
- Never lift more than one plate or a package of plates at a time.
- Never lift plates heavier than the working load limit (W.L.L.), as indicated on the clamp and in the
test certifi cate.
- Do not lift plates which are thicker or thinner than the jaw opening, as indicated on the clamp and
in the test certifi cate.
- When using a number of lifting damps at the same time, please provide lifting slings or chains of
a suffi cient length to ensure that the angle between the slings or chains never exceeds 60°.
- When simultaneously operating a number of lifting clamps time side by side, please use a lifting
beam (equalizer) and lifting slings or chains of a suffi cient length to ensure that the lifting shackles
on the clamps are never subjected to lateral load.
- Do not place the clamp on tapered or conical sections of the plate or structure to be lifted.
- Remove all grease, oil, dirt, corrosion and mill scale from the plate at the point where the clamp is
to be attached.
- Ensure that the damp(s) is (are) positioned so as to balance the load when it is being lifted.
- The surface hardness of the plate must not exceed 37 HrC (345 Hb, 1166 N/mm2).
- The clamp is only suitable for use in normal atmospheric conditions.
Safety precautions
Ensure that the cam can never be subjected to lateral load.
- A free fall or uncontrolled swaying at the crane hook resulting in objects being struck, may cause
impact damage to the clamp. If this happens check whether the clamp is still in good working
order before using it.
- Lifting clamps are not suitable for creating permanent joints.
- Maintenance of the clamp should take place on a regular monthly basis, see Chapter 6 - Maintenance.
- Do not modify the clamp (by welding, grinding, etc.), as this can adversely affect its operation and
safety, thereby nullifying any forms of guarantee and product liability.
- For the very same reason, use only original Gunnebo Lifting components.
- Any improper use of the clamp and/or failure to observe any directions and warnings in these
operating instructions concerning the use of this product may endanger the health of the user
and/or bystanders.
The following additional safety precautions are applicable to the CH, CHE CHS, CHNM
CHD and CHP model
The clamps can be loaded laterally at a maximum angle of 15°, only when they are not loaded
more than the maximum W.L.L. and the permitted top angle. The capacity of the clamps has been
calculated on basis of a maximum top angle of 60°. In case of situations with larger top angles, then
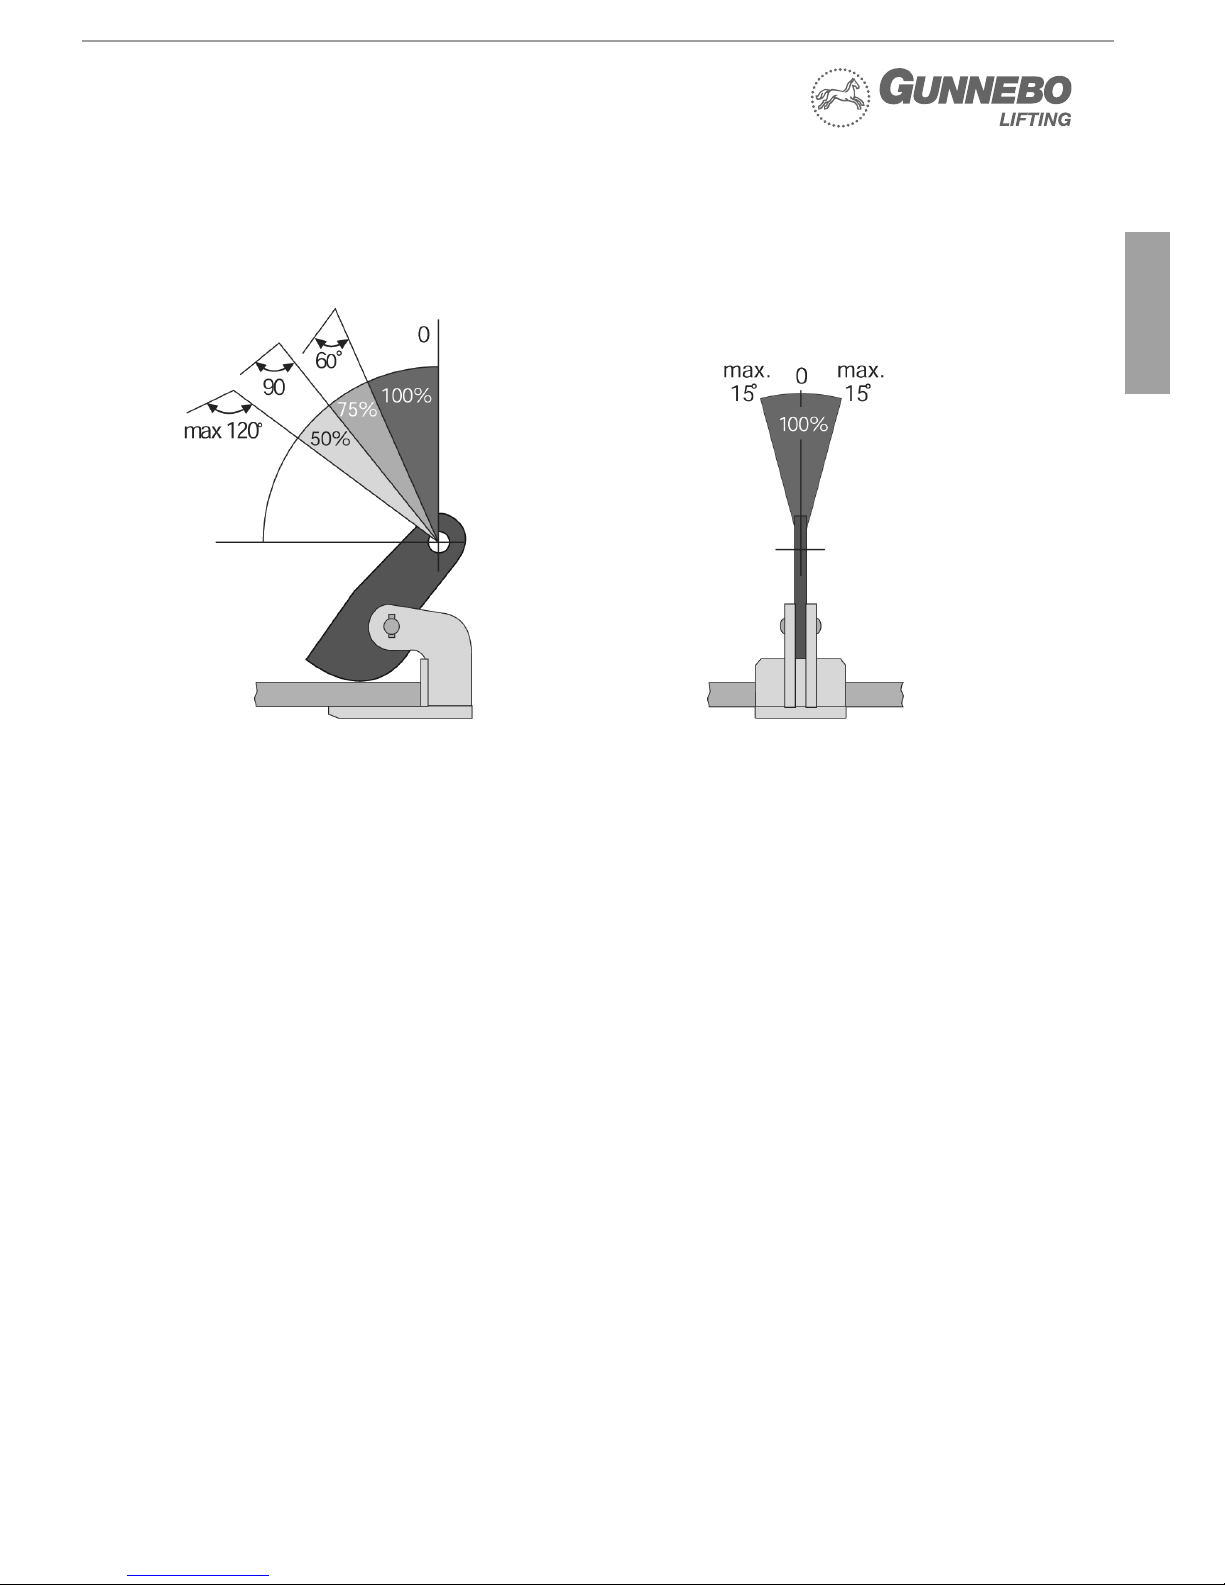
5
the WL.L. should be reduced proportionally, according the following loading drawing.
With shored up usage, a maximum top angle of 60° is applicable and the W.L.L. is 50% of
the maxi-mum permissible working Ioad. The environmental temperature for use of the
standard lifting clamps is between minus 40 and 100 °C.
The clamps can be loaded laterally at a maximum angle of 15’.
5a Lifting with CH, CHE, CHS, CHD and CHNM Clamps
- Check whether the working load limit (W.L.L.) of the clamp is suffi cient for the load created in the
lifting situation. Note: The working load limit (W.L.L.) is shown on the lifting clamp.
- Attach the lifting clamp to the hoisting mechanism either by means of a:
- Safety shackle directly to a crane hook,
- Coupling link or D-shackle,
- Sling or chain, if necessary in conjunction with a coupling link or D-shackle.
- Ensure that all attachments have been tested and are of the correct tonnage. Make sure that coupling
links and shackles are large enough to allow the clamp to move freely in the hook.
- Check whether the clamp has any visible damage. Check whether the cam opens and closes
smoothly.
- Check whether the teeth of the cam are free from dirt, and if necessary clean with a wire brush.
- Remove any grease, dirt and mill scale from the plate at the site of the lifting clamp.
- Open the clamp.
- Place the jaws as far as they will go over the plate, making sure that the clamp is positioned so as to
balance the load when it is being lifted.
- Lift gently so that the lifting force can be applied; check whether the clamp is rotating or tilting.
- If the clamp is rotating or tilting read the fore mentioned remarks on lifting again.
- Ensure that the load is in a stable position.
5b Lifting with CHP Clamps
- Place the clamp onto the plate (cable or chain already attached to the tooth segment; and take care
that the chain of cable is not twisted);
- Tighten the clamps fi rmly by hand;
English
6
- Tension the cables or chains with the crane hook, while the inside of the jaws presses fi rmy against
the edge of the plate (note: due to the fact that the clamp does not have a con-stant pre-tension
available on the tooth segment, it will be necessary to watch the position of the clamps until the
cables are tensioned: make sure the clamps stay in the correct posi-tion).
- The load can now be lifted carefully.
- During the transport of the load, take care that a constant tension is maintained on chains or slings.
- To unhook, the crane hook should be lowered so far that the clamp is completely free of any load
(note: make sure that when the load is lowered, there are no obstacles underneath where the load
could rest on during lowering and whereby the clamps will become unloaded to early by accident).
- The clamps can now be removed from the load.
6 Maintenance
- Check the general condition of the clamp at least once a month, see Chapter 7 - Disassembling/
Assembling.
- Do not use the clamp if:
- the body is split or deformed, in particular in way of the jaw corners,
- the cam has been visibly deformed,
- the cam teeth are no longer sharp,
- the shackle pins have visibly been deformed,
- any retaining pins are missing,
- the marking on the clamp is no longer legible.
Depending on the defects noted:
Disassemble and clean the clamp (see Chapter 7 - Disassembling/Assembling) or have the
clamp overhauled by Gunnebo Lifting or another recognized mechanical repair
center (see Chapter 8 - Overhauling).
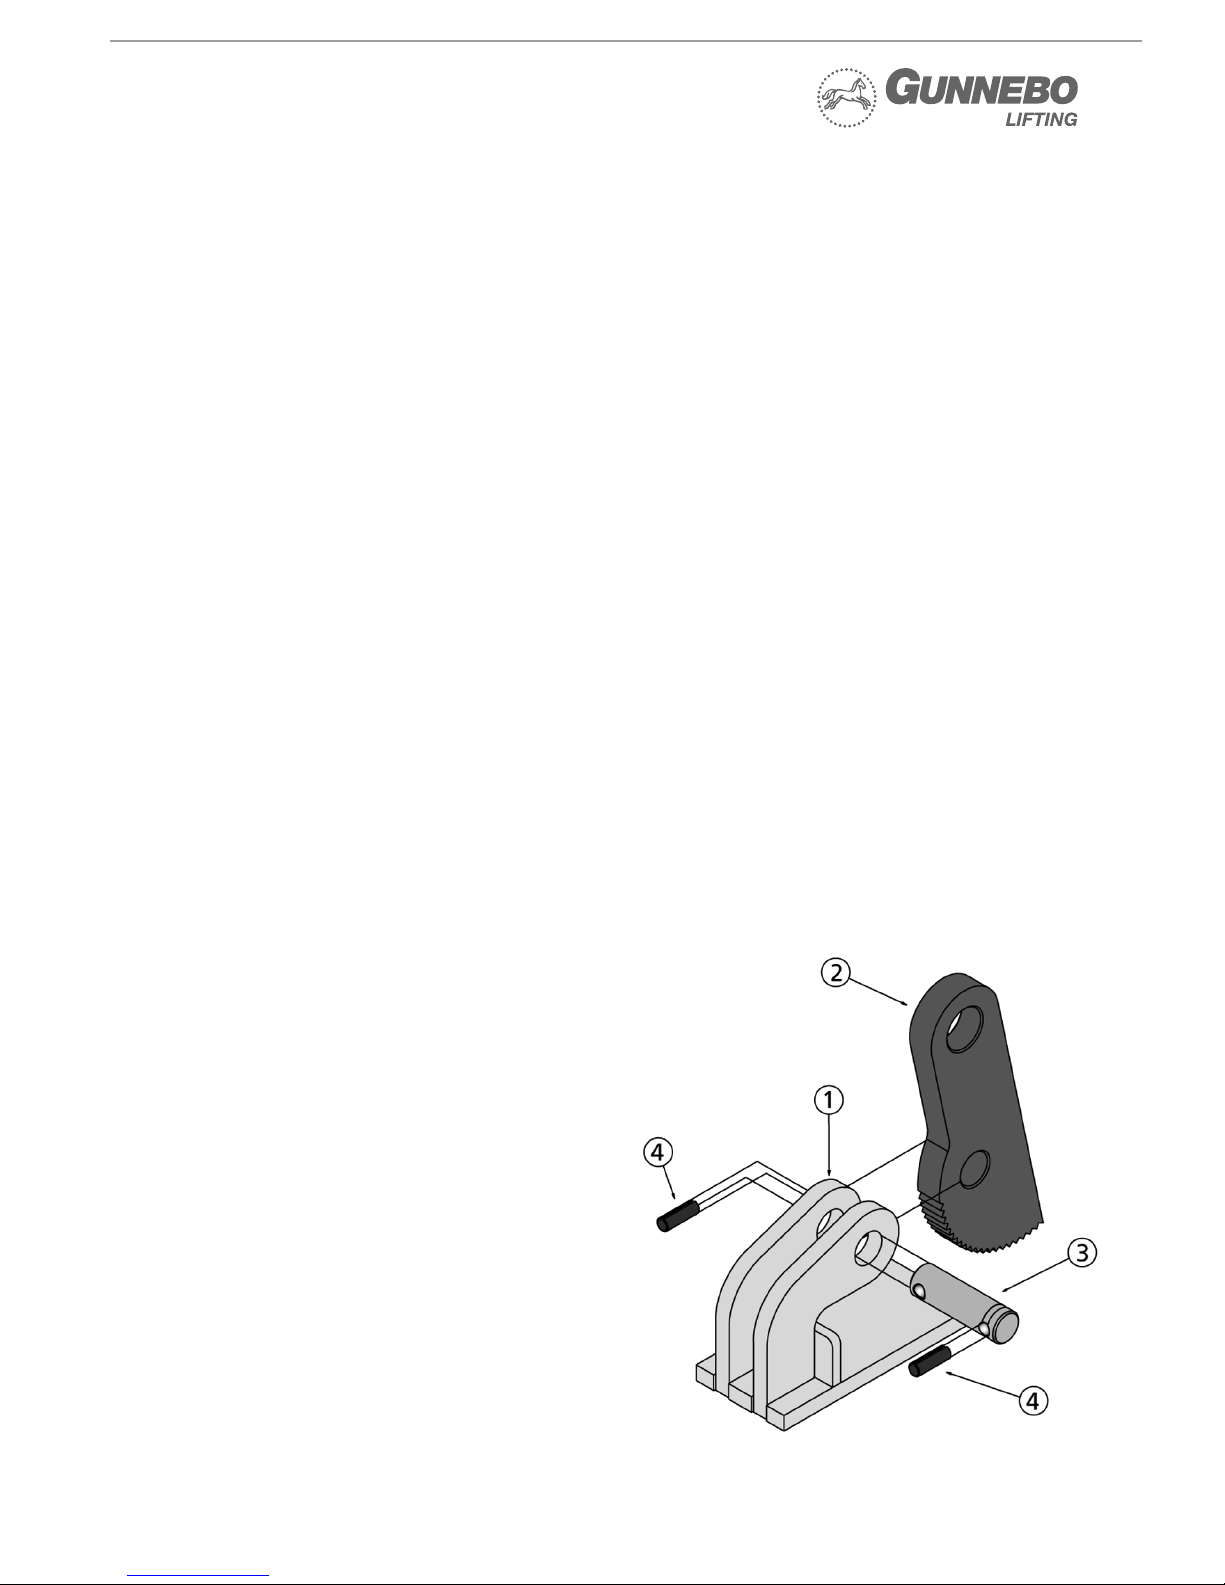
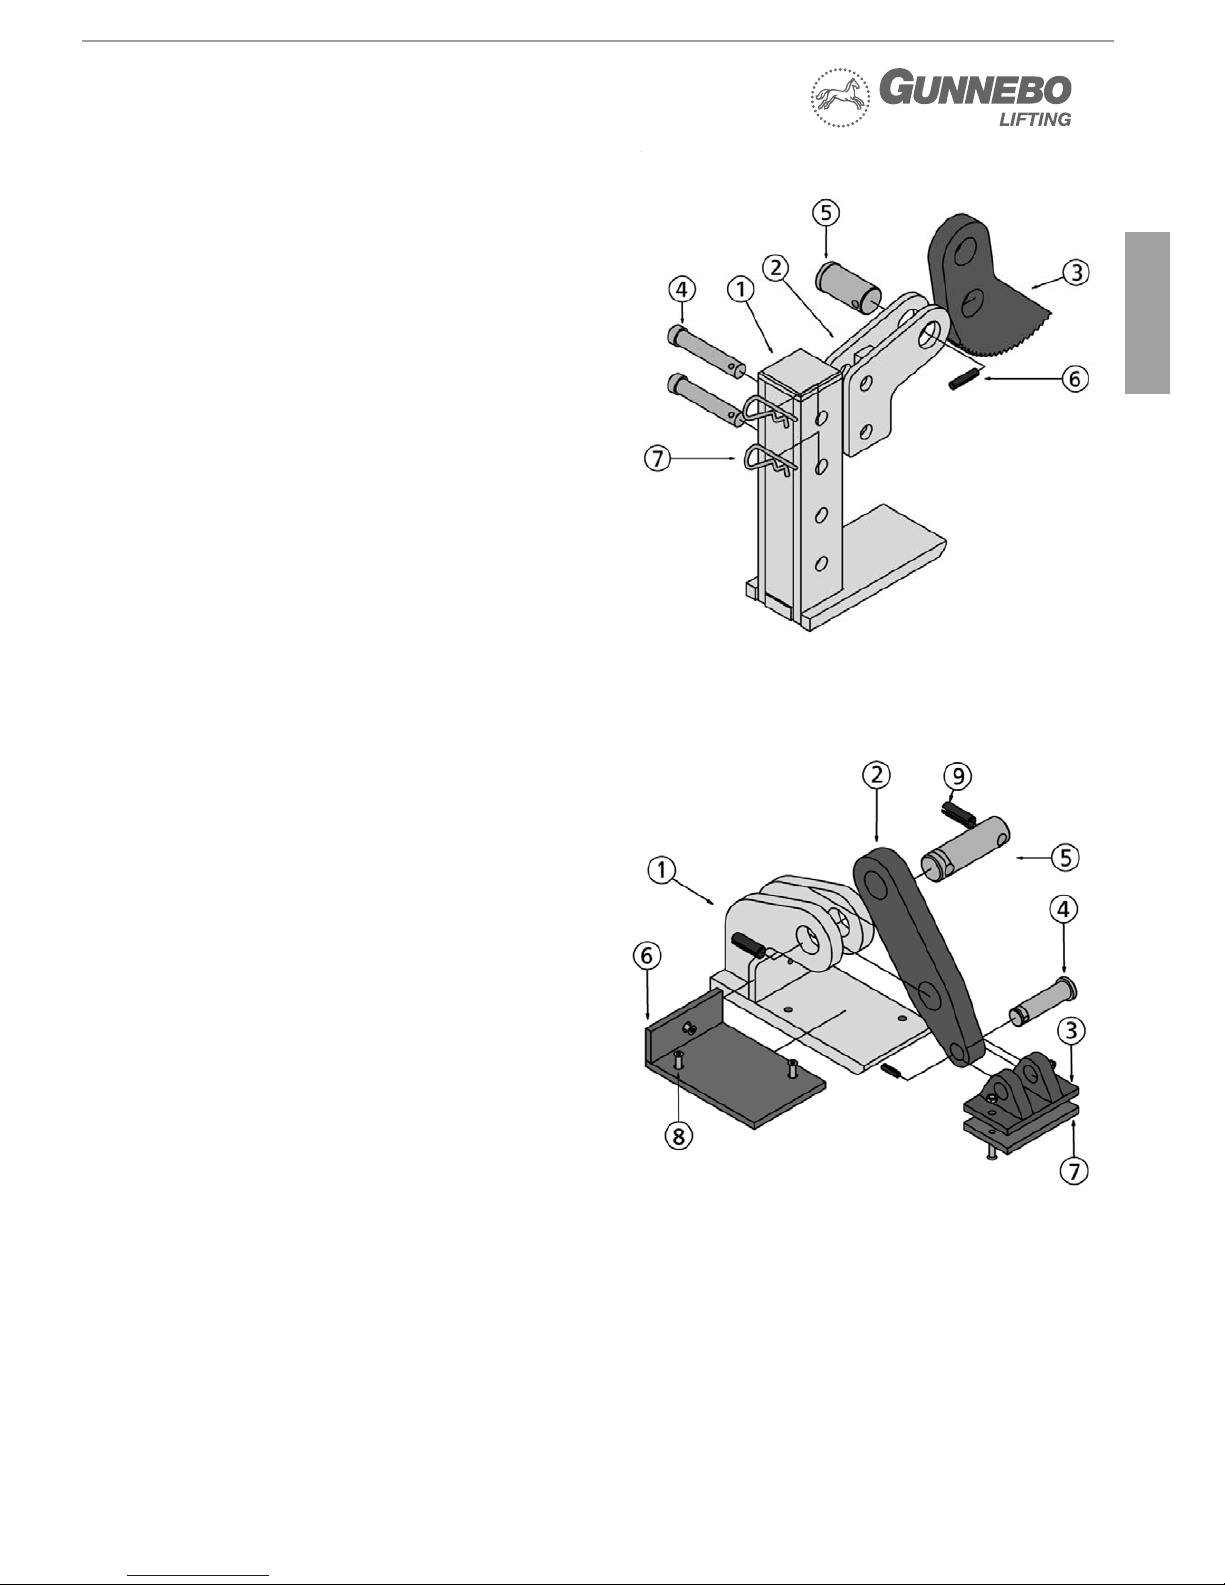
7a Disassembling/Assembling CH, CHE, CHS, CHD, Clamps
The clamps can be easily disassembled for cleaning
and inspection purposes. Please make use of the
following procedure.
- Remove the retaining pin (4) and the cam pin (3).
- Remove the cam (2).
- Clean all parts with a stan-dard degreasant.
- Grease the cam pin (3) with bearing grease.
- Assembling the clamp is in reverse order.
- Always insert new original retaining pins (4) with
the aid of a hammer, combination pliers and pin
punch.
- Always use original Gunnebo Lifting components
when replacing parts.
- Remove any burr with a fi le.
7
7b Disassembling/Assembling CHP Clamps
The CHP clamp can be easily disassembled
for cleaning and inspection. Please make use of
the following procedure.
- Remove the tension pin (6) with the use of a pin
driver from the tooth segment shaft (5).
- The tooth segment shaft can now be pushed
out of the frame and the tooth segment (3) can
be removed.
- Remove the hairpin pegs (7) and the pins (4),
and the two side plates (2) can be taken from the
clamp.
- Clean all the parts with a standard degreasant.
- Assembling of the clamp is in reverse order.
- Always use original Gunnebo Lifting components
when replacing parts.
- Remove any burr with a fi le.
7c Disassembling/Assembling CHNM Clamps
The CHNM clamp can be easily disassembled
for cleaning and inspection. Please make use
of the following procedure.
- Remove the retaining pin (9) and the cam pin (5).
- Remove the cam (2).
- Remove the small retaining pin (9) and the cam
pin (4).
- Clean all parts with a stan-dard degreasant.
- If necessary you can remove the fabric pads
(6 & 7) by removing the bolts (8)
- Grease the cam pin (4 & 5) with bearing grease.
- Assembling the clamp is in reverse order.
- Always insert new original retaining pins (9) with
the aid of a hammer, combination pliers and pin
punch.
- Always use original Gunnebo Lifting components
when replacing parts.
- Remove any burr with a fi le.
8 Overhauling
At least once a year or in case of any damage to the clamp, the clamp should be inspected,
tested and if necessary overhauled by Gunnebo Lifting or a recognized mechanical repair centre.
9 Disposal
Once it has reached the end of its useful life the clamp can be treated as scrap iron, provided
that the clamp is rendered unfi t for further use.
lamps
English

8
10 Troubleshooters Checklist
Failure/malfunction Possible Cause Action
Load slipping Load dirty
Pivot and/or cam dirty
Pivot and/or cam blunt
Jaws bent open
Clean load
Clean clamp
Overhaul clamp
Reject clamp
Cam pivoting badly Cam overloaded Reject clamp
Body bent Clamp overloaded Reject clamp
Cam shackle oval Clamp overloaded Reject clamp
Cam pin bent Clamp overloaded Renew cam pin
Adjustable pins bent Clamp overloaded Reject clamp
Retaining pins missing Incorrectly assembled Fit new retaining pins
Clamp diffi cult to open/close Clamp worn out
Clamp contaminated
Reject clamp
Clean clamp
11 Warranty
Gunnebo Lifting provides a 5 year warranty on its lifting clamps. This warranty is applicable
to the original end user of the lifting clamps. Only if the clamp has been inspected,
checked and maintained by this instructions and by an offi cial dealer. This warranty period
of 5 years is valid from the day of purchase, and is liable to all conditions and measurements
stated in this document.
11a Conditions
This warranty only covers failures in the lifting tools which is the consequence of production
errors which occur during normal use. The warranty covers no wear to components such as
pivots, cam assemblies, lock springs etc. Should there be any kind of failure within this guarantee
period, the lifting tool will be replaced or repaired to insight of the producer
No warranty is given to clamps due to the following failures:
- Regular wear
- Overload.
- Wrong and/or carelessly use
- Damages
- Not following procedures and measures
- Hoisting differing material other then indicated on clamp or stated in the user-manual
- Adapting and/or modifying of the Gunnebo Lifting clamp.
- The injudicious use of the clamp, and not succeeding all indications which are stated in the users
manual.
- When maintenance and/or revision has not been carried out by an authorised Gunnebo Lifting
distributor.
The producer is not responsible for incidental damage or damage due to use of the lifting
tools as well as from violation of this manual.
9
11b Procedure Safety Inspection
All inspections and repairings must be written down in the maintenance diagram. This counts
not only for your own inspections but also for inspections which are carried out by your
authorised Gunnebo Lifting distributor. When the clamp is handed in for maintenance and
inspection you always must provide the maintenance diagram.
Defective Lifting Clamps
When a form of wear or damage is indicated, you must take the following measures.
1 Take the lifting clamp out of use. (Note the date of failure of the lifting clamp)
2 Try to recover the cause of the failure, for example (complete list is available in
chapter 1):
- Overload
- Wrong and/or carelessly use
- etc
These claims stated in no.2 do not fall under the guarantee! To guarantee the security of
you and your colleagues you are obliged to follow up this procedure.
3 Return your lifting clamp (with the maintenance history) to your authorised
Gunnebo Lifting distributor.
4 If the lifting clamp has been revised / repaired by your distributor, you can safely
use your clamp again.
Please note this date in your maintenance chart (see page 35).
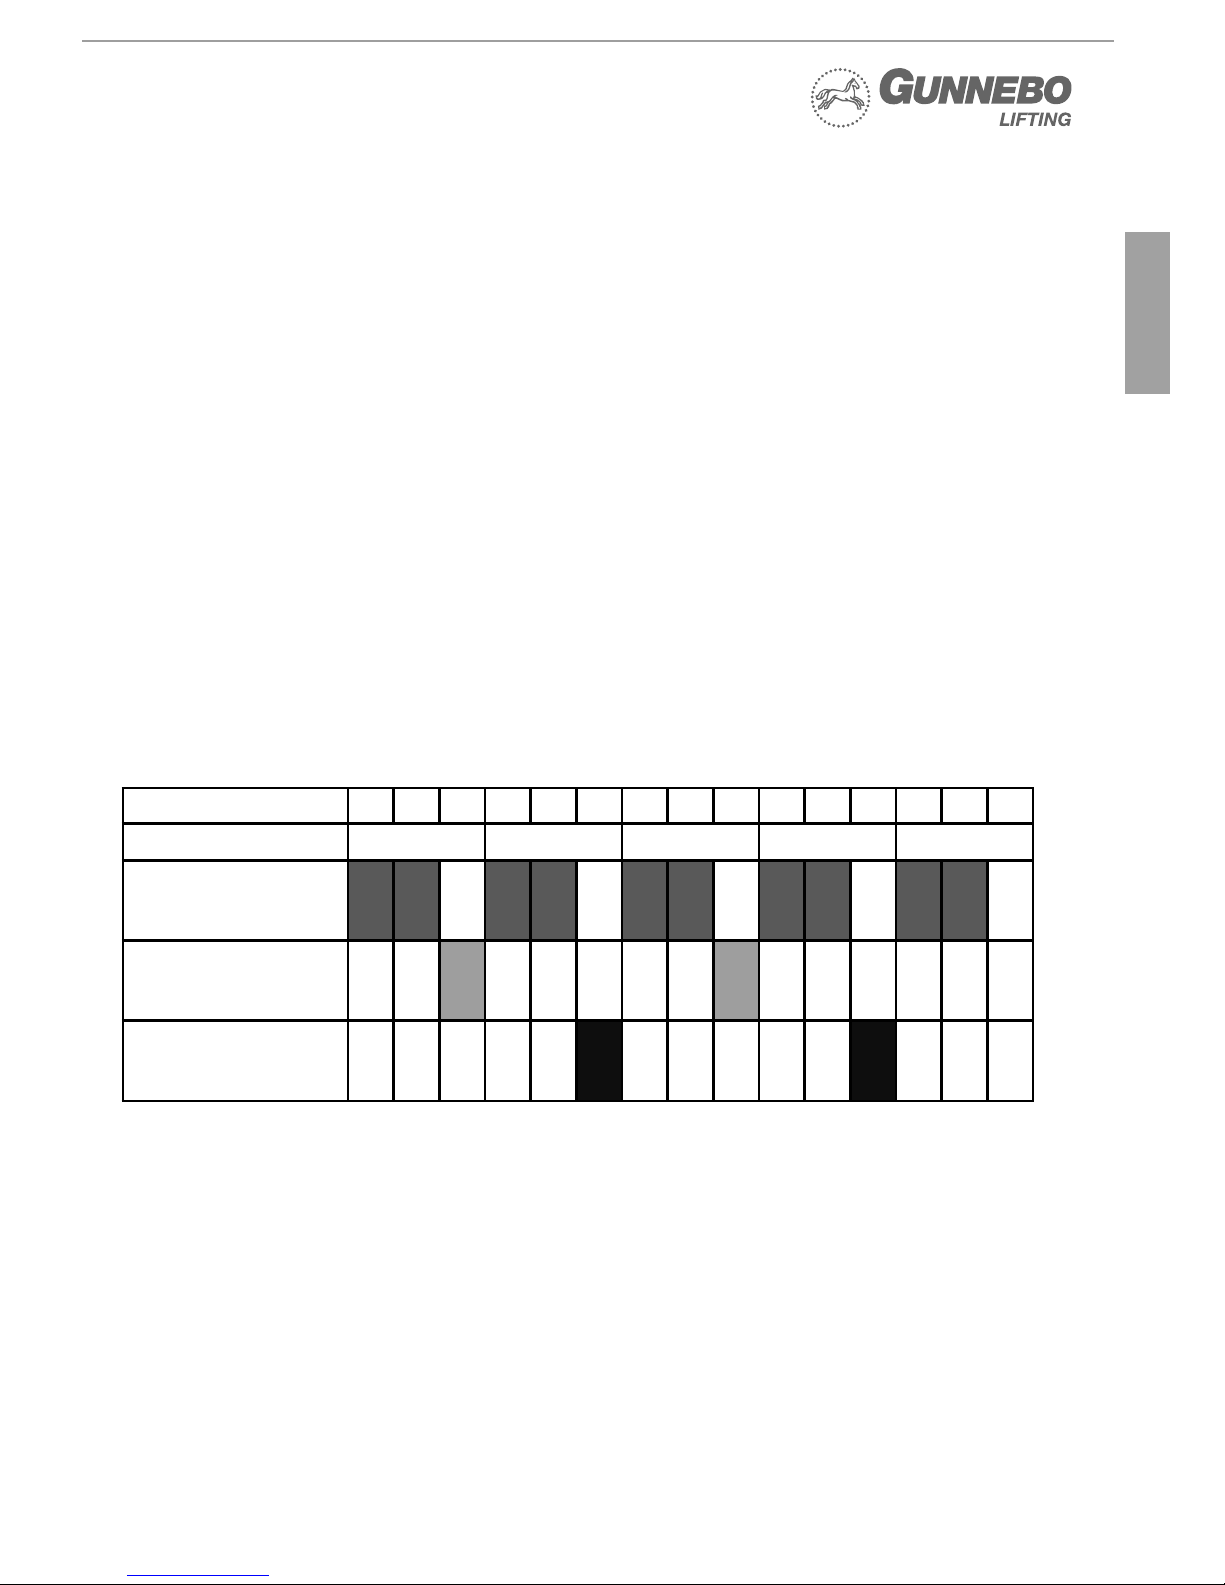
11c Inspection Schedule
Months 4 8 12 16 20 24 28 32 36 40 44 48 52 56 60
Years
12345
Safety inspections by
your own inspector
Maintenance by a
offi cial Gunnebo Lifting
distributor
Revision by a offi cial
Gunnebo Lifting
distributor
English

10
Innehåll
1 Allmänt 10
2 Arbetsprincip 10
3 Tillåtna applikationer 10
4 Säkerhetsanvisningar 11
5 Lyfta 12
- CH,CHE, CHD, CHNM
- CHP
6 Underhåll 13
7 Demontering/Montering 13
- CH,CHE, CHS, CHD
- CHP
- CHNM
8 Service 14
9 Kassation 14
10 Checklista för felsökning 15
11 Garanti 15
1 Allmänt
Grattis till köpet av ny Gunnebo Lifting lyfthandske för balkar. Kvalitetssystemen för
hantering och tjänster från Gunnebo Lifting är helt i enlighet med ISO 9001-krav.
Många års omfattande erfarenhet är en garanti för optimal kvalitet och säkerhet.
Gunnebo Liftings lyfthandskar är tillverkade av legerat stål av bästa kvalitet och uppfyller
europeiska normer och krav som fastställs i Maskindirektivet 2006/42/EG.
2 Arbetsprincip
Horisontella lyfthandskarna CH, CHE, CHS, CHNM och CHP har särskilt utformats för
horisontella lyft och transport av oböjliga stålplåtar. Lyfthandskarna består av en stomme,
en kam och en kambult. Kammen fungerar även som en lyftbygel och garanterar att lasten
hålls fast ordentligt när den lyfts.
3 Tillåtna Applikationer
CH, CHE, CHS and CHNM
Gunnebo Liftings lyfthandskar CH, CHE och CHNM är endast lämpliga för lyft och horisontell förfl yttning av oböjliga stålplåtar och strukturer där det är möjligt att placera handsken på en
plan kontaktpunkt. Lyfthandskarna skall alltid användas i par, eller fl era par. I det senare fallet
rekommenderas dock användning med en lastfördelare.
CHD
Gunnebo Liftings lyfthandskar CHD är endast lämpliga för lyft och horisontell transport av böjliga och
formade stålplåtar, där det är möjligt att placera handsken på en plan kontaktpunkt.
CHD-lyfthandskarna skall alltid användas i par, eller fl era par.
CHP
Gunnebo Liftings lyfthandskar CHP är endast lämpliga för horisontell transport av stålplåtar och paket
av stålplåtar, där det är möjligt att placera handsken på en plan kontaktpunkt.
Lyfthandskarna skall alltid användas i par, eller fl era par. I det senare fallet rekommenderas dock användning med en lastutjämnare. En eller fl era plåtar kan lyftas på en gång per lyft under förutsättning
att stålplåten eller -plåtarna inte böjs (defl ekterar). När par eller fl era lyfthandskar används, skall lasten
fördelas lika över lyfthandskarna.
11
Svenska
4 Säkerhetsanvisningar
Säkerheten främst! Garantera din personliga säkerhet genom att först läsa igenom
säkerhetsanvisningarna noggrant.
Garantera din egen säkerhet och fortsätt att dra nytta av vår produktsäkerhet genom att
låta lyfthandsken inspekteras, testas och, om nödvändigt, servas minst en gång om året av
Gunnebo Lifting eller ett auktoriserat mekaniskt reparations- eller servicecenter.
Se även kapitel 8 - Service. Kontakta Gunnebo Lifting för mer information.
Undvik livshotande situationer
Förebygg farliga situationer genom att iakttaga följande försiktighetsåtgärder:
- Arbeta aldrig med en otestad lyfthandske.
- Håll avståndet när du lyfter och stå aldrig under lasten.
- Använd inte lyfthandsken om den är skadad; låt lyfthandsken repareras omgående av Gunnebo
Lifting eller ett auktoriserat mekaniskt reparationscenter. Rådgör med leverantören om du är osäker.
- Lyft aldrig mer än en plåt eller ett paket med plåtar åt gången.
- Lyft aldrig plåtar tyngre än den tillåtna arbetsbelastningen (W.L.L.), som anges på lyfthandsken och
i testcertifi katet.
- Lyft aldrig plåtar som är tjockare eller tunnare än gripklons öppning, som anges på lyfthandsken
och i testcertifi katet.
- När du använder fl era lyfthandskar samtidigt, nyttja lyftslingor eller -kättingar av tillräcklig längd
för att garantera att vinkeln mellan lyftslingorna eller
- kättingarna aldrig överskrider 60°.
- När du använder ett antal lyfthandskar samtidigt sida vid sida, använd en lyftbom (utjämnare)
och lyftslingor eller
- kättingar som har en tillräcklig längd för att garantera att lyftbyglarna på lyfthandskarna aldrig
utsätts för sidobelastning.
- Placera inte lyfthandsken på avsmalnande eller koniska delar på plåten eller strukturen som skall
lyftas.
- Avlägsna fett, olja, smuts, korrosion och glödspån från plåten där lyfthandsken skall fästas.
- Se till att lyfthandsken/lyfthandskarna är placerade så att lasten är balanserad när den lyfts.
- Plåtytans hårdhet får inte överskrida 37 HrC (345 Hb, 1166 N/mm²).
- Lyfthandsken är endast lämplig för användig under normala atmosfäriska förhållanden.
Säkerhetsanvisningar
- Kontrollera att kammen aldrig kan utsättas för sidobelastning.
- Fritt fall eller okontrollerad svajning från lyftkroken som leder till att föremål fastnar, kan leda till
stötskador på lyfthandsken. Om detta händer, kontrollera om lyfthandsken fortfarande är i användbart
skick innan du använder den igen.
- Lyfthandskar är inte lämpliga för att skapa permanenta fogar.
- Underhåll av lyfthandsken skall ske regelbundet varje månad, se kapitel 6 - Underhåll.
- Ändra inte lyfthandsken (genom svetsning, slipning, etc.), då detta kan påverka dess funktion och
säkerhet negativt, och därmed upphäva garanti och produktansvar.13
- Av samma skäl får endast Gunnebo Lifting originalkomponenter användas.
- Felaktig användning av lyfthandsken och/eller underlåtenhet att iakttaga anvisningar och varningar
i denna handbok som gäller användningen av denna produkt kan utsätta användarens och/eller
kringståendes hälsa för fara.
 Loading...