

Gulfstream Aerospace PlaneBook Owner's Manual
owners manual
Electronic Document Manager
smal l e r. faster. b e t ter.

© Copyright 2008 Gulfstream Aerospace Corporation
Gulfstream Aerospace
P.O. Box 2206, M/S C-20
Savannah, GA 31402
912-965-3520 (Fax)
pubs@gulfstream.com
1-800-810-4853 (United States)
1-912-965-4178 (International)
Then:
Sales, Invoicing and Distribution: option 3, then option 1.
Flight Crew Technical Information: option 3, then option 2.
®
All rights reserved. Except as expressly provided herein,
no part of this manual may be reproduced, copied,
transmitted, disseminated, downloaded or stored in any
storage medium, for any purpose, without the expressed
prior written consent of Gulfstream.
Information in this document is subject to change without
notice. Gulfstream reserves the right to change to improve
its products and to make changes in the content without
obligation to notify any person or organization of such
changes or improvements. Visit Gulfstream’s customersonly web site (www.myGulfstream.com) for current
updates and supplemental information concerning the use
and operation of this product.
PlaneBook™ is a registered trademark of Gulfstream
Aerospace Corporation and may not be used without the
expressed permission of Gulfstream.

PREFACE
Welcome!
Congratulations on your acquisition of Gulfstream’s
PlaneBook™. To obtain the most value from your investment, it is suggested that you take the time to read this
manual and learn how to use the system.
Important Numbers
Record the configuration part number (Configuration P/N)
and unit serial number (S/N) here in case your unit ever
needs service or if you need to contact technical support.
Both of these numbers can be found on the bottom of the
unit, on two white decals. The configuration part number
(Configuration P/N) decal is usually placed above the serial
number (S/N) decal.
Configuration P/N: ______________________________
Unit S/N: ______________________________
Technical Support
It is our foremost concern to ensure that you are always
100% satisfied with PlaneBook™, including support after
the sale. Given that a computer is still a machine, however,
it is foreseeable that machines will break from time to time.
We ask that you please take the following steps toward
obtaining technical support:
1. Ensure you’ve first checked all of the documentation
that was included with the Fujitsu FG-1620G Tablet PC,
the PlaneBook™ Quick Reference Guide, and this
PlaneBook™ Owner’s Manual.
2. If you are unable to solve your problem using the docu-
mentation, contact Flight Crew Technical Information using the information on the following page.
© Gulfstream 2008 i PlaneBook™ Owner’s Manual

PREFACE
Contact Gulfstream
If you have any questions or encounter any difficulty while
using PlaneBook™, please contact Gulfstream:
By e-mail: pubs@gulfstream.com
By telephone:
1-912-965-4178 or
1-800-810-GULF (4853)
For Flight Crew Technical Information questions or
technical support issues, select option 3, then option 2.
For Sales, Invoicing and Distribution questions, such as
subscriptions and billing, select option 3, then option 1.
Second Tier Technical Support
Our staff at Gulfstream should be able to answer any questions and remedy any difficulty of the PlaneBook™ portion
of the Fujitsu FG-1620G Tablet PC. However, if we determine
the problem is with the PC itself and not the
tem, we may elect to confer with our PC provider and then
get back in touch with you, or we may escalate your issue
directly to our PC provider for assistance.
Regardless of your technical support issue, we request
that you always contact Gulfstream first to ensure the
best and quickest service.
PlaneBook™ sys-
PlaneBook™ Owner’s Manual ii © Gulfstream 2008

TABLE OF CONTENTS
Getting to Know PlaneBook™.......................................... 1
References Available ..................................................1
The Operating State of Your Tablet: PlaneBook™
Mode versus Windows® Mode.......................................... 1
Windows® Mode ..........................................................1
PlaneBook™ Mode ...................................................... 2
Hardware Modifications Made for PlaneBook™ ............. 2
Changing From Windows® Mode to PlaneBook™
Mode and Vice Versa.........................................................4
To Change From Windows® Mode to
PlaneBook™ Mode ...................................................... 4
To Change From PlaneBook™ Mode to
Windows
®
Mode ..........................................................5
The PlaneBook™ Desktop: Description .......................... 6
The “Open PlaneBook™ Taskbar” Button................7
The “Print Screen” Button..........................................7
The “PlaneBook™ Start” Button................................ 8
The PlaneBook™ Taskbar .......................................... 8
The PlaneBook™ Taskbar Buttons............................ 9
“Document / Application” Buttons .......................... 11
The “Utilities” Button Functions..............................12
The “Shut Down” Button Functions ........................ 24
Working with Your Pilot’s Manuals Suite ...................... 25
Document Navigation Button Functions.................25
The Centralized, Linked QRH Architecture .............26
© Gulfstream 2008 i PlaneBook™ Owner’s Manual

TABLE OF CONTENTS
GPS Setup Guide for JeppView FliteDeck3TM............... 29
Introduction ............................................................... 29
PlaneBook™ Bluetooth™ Recognition of the
GPS Unit and Setup .................................................. 30
GPS Setup in Jeppesen FliteDeck3™ ..................... 37
Lithium-ion Battery and Power Management ............... 41
Recharging the Batteries.......................................... 42
Low Battery State...................................................... 43
Replacing the Battery ............................................... 44
Power Management .................................................. 46
Power/Suspend/Resume Button.............................. 46
Standby Mode............................................................ 47
Hibernation (Save-to-Disk) Feature ......................... 49
Windows™ Power Management .............................. 49
PlaneBook™ Owner’s Manual ii © Gulfstream 2008

PLANEBOOK
TM
OWNER’S MANUAL
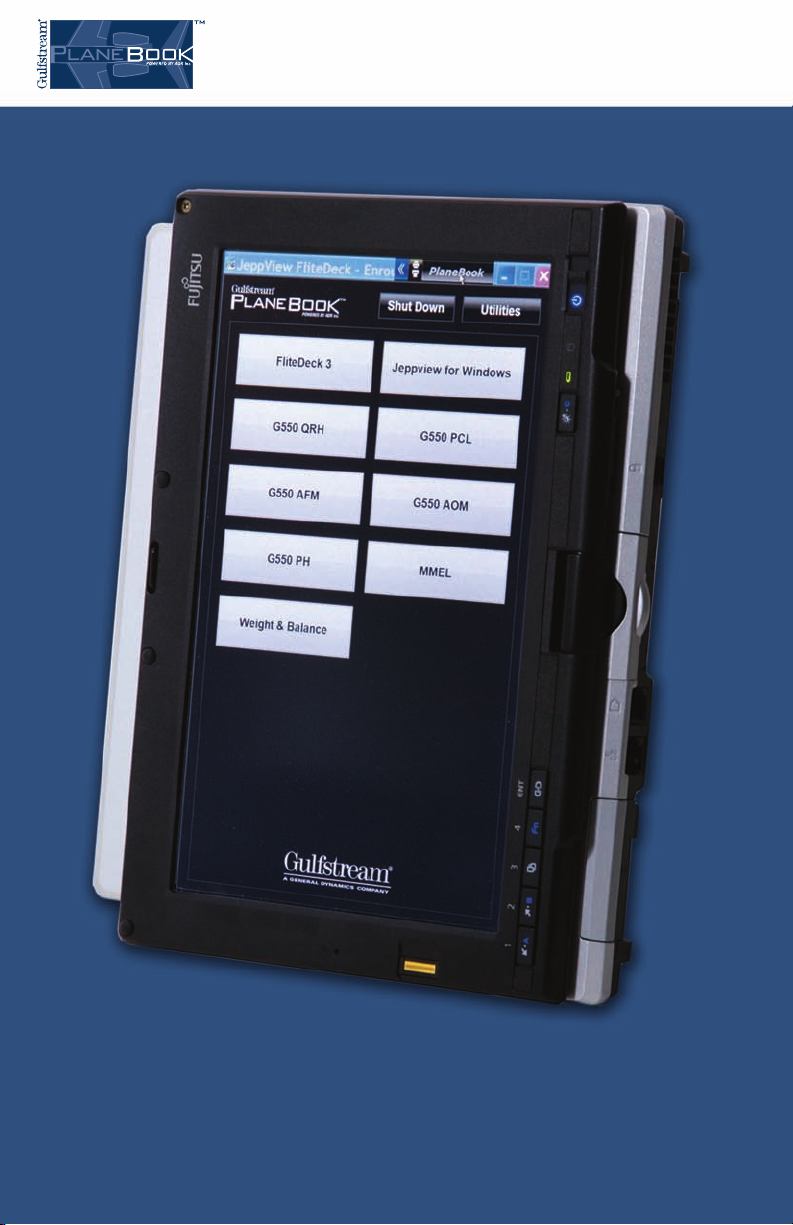
1. Getting to Know PlaneBook™
References Available
In addition to this owner’s manual, the following references are available to assist you in getting to know
PlaneBook™. References to these guides will be given
throughout this manual:
• PlaneBook™ Quick Reference Guide
®
• Fujitsu’s “User’s Guide” for the Lifebook
Notebook
It is recommended that all of the above guides be read
and understood in order to minimize any otherwise
preventable “downtime” of PlaneBook™.
P1620
2. The Operating State of Your Tablet:
PlaneBook™ Mode versus Windows
®
Mode
The Fujitsu FG-1620G PlaneBook™ system is capable
of operation in two different modes: Windows
and PlaneBook™ mode.
Changing from Windows
®
mode to PlaneBook™ mode
(and vice versa) is described on page 4 of this guide.
Windows® Mode
When in Windows® mode, the FG-1620G functions as a
®
laptop PC, using Microsoft Windows
XP Tablet PC
Edition as its base operating system. Functions and
features in this mode are compatible with what is
expected of an ordinary compact tablet PC.
®
mode
© Gulfstream 2008 1 PlaneBook™ Owner’s Manual

PLANEBOOK
TM
OWNER’S MANUAL
PlaneBook™ Mode
When in PlaneBook™ mode, the FG-1620G functions
as an electronic document management (EDM) tool for
flight crews who desire to operate in a paperless cockpit environment in accordance with FAA Advisory Circular No. 91-78, Use of Class 1 or Class 2 Electronic
Flight Bag (EFB), dated 07/20/07, or later approved
version. In addition to providing service as an EDM,
PlaneBook™ also may be loaded with additional data
and/or convenience programs, such as weight and
balance calculators, navigation charts, and aircraft
performance planning software.
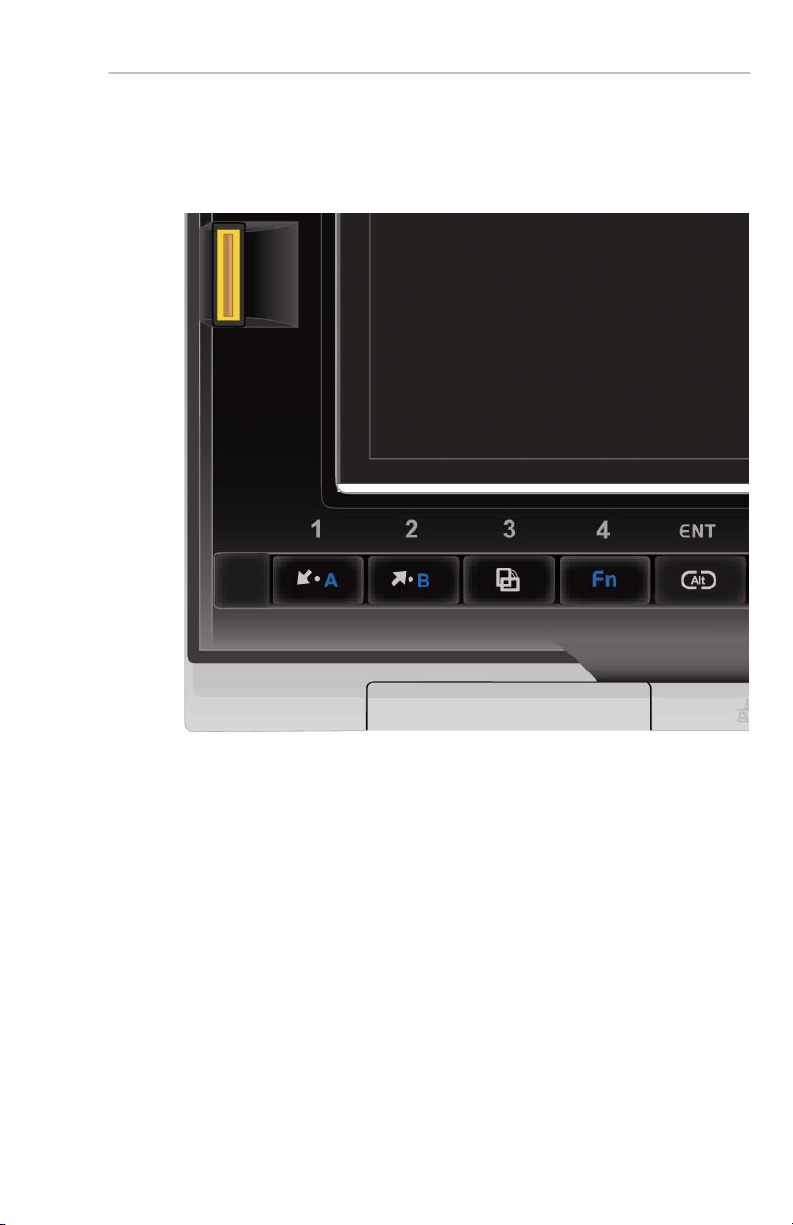
3. Hardware Modifications Made for
PlaneBook™
(Refer to Fujitsu’s “User’s Guide” for the Lifebook®
P1620 Notebook, page 21, USING THE LIFEBOOK
APPLICATION PANEL.)
(See illustration on next page.) Two of the five application buttons (bottom left corner of the display screen)
have been modified for use when in the PlaneBook™
mode. Buttons 1 and 2 have been modified to serve as
BRIGHTNESS control buttons. Pushing button 2 (↑) in-
creases the screen brightness. Pushing button 1 (↓)
decreases the screen brightness. Whenever either
button is pushed, the Brightness Min. / Max. scale is
displayed. The Min. / Max. scale automatically hides a
few seconds after the button is released.
®
In Windows
mode, buttons 1 and 2 serve primarily as
Page Up [button 2 (↑)] and Page Down [button 1 (↓)].
Secondary functions for these buttons can be assigned
at the discretion of the owner when in Windows
PlaneBook™ Owner’s Manual 2 © Gulfstream 2008
®
mode.
PLANEBOOK
TM
OWNER’S MANUAL
Buttons 3, 4 and the ENT (Ctl+Alt+Del) button remain
unchanged in both the PlaneBook™ and Windows
®
modes.
© Gulfstream 2008 3 PlaneBook™ Owner’s Manual
PLANEBOOK
TM
OWNER’S MANUAL
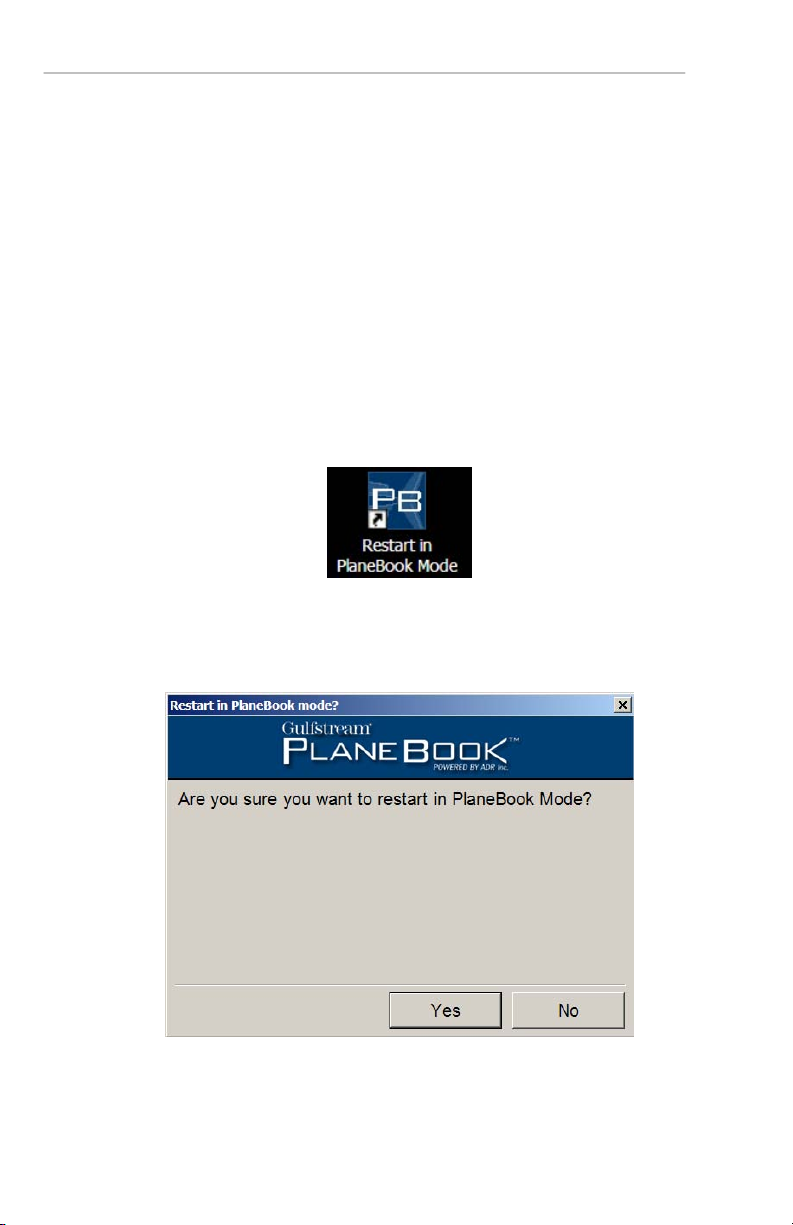
4. Changing From Windows® Mode to
PlaneBook™ Mode and Vice Versa
Note: Whenever the FG-1620G is shut down, it will re-
start in the operating mode it was in when previously
shut down (Windows
To Change From Windows® Mode to PlaneBook™
Mode
After the FG-1620G has finished its startup routine, locate the Restart in PlaneBook
double-click it.
This causes the following dialog box to be displayed.
Select Yes to restart the FG-1620G in PlaneBook™
Mode.
®
mode or PlaneBook™ mode).
™ Mode icon and
PlaneBook™ Owner’s Manual 4 © Gulfstream 2008
PLANEBOOK
TM
OWNER’S MANUAL
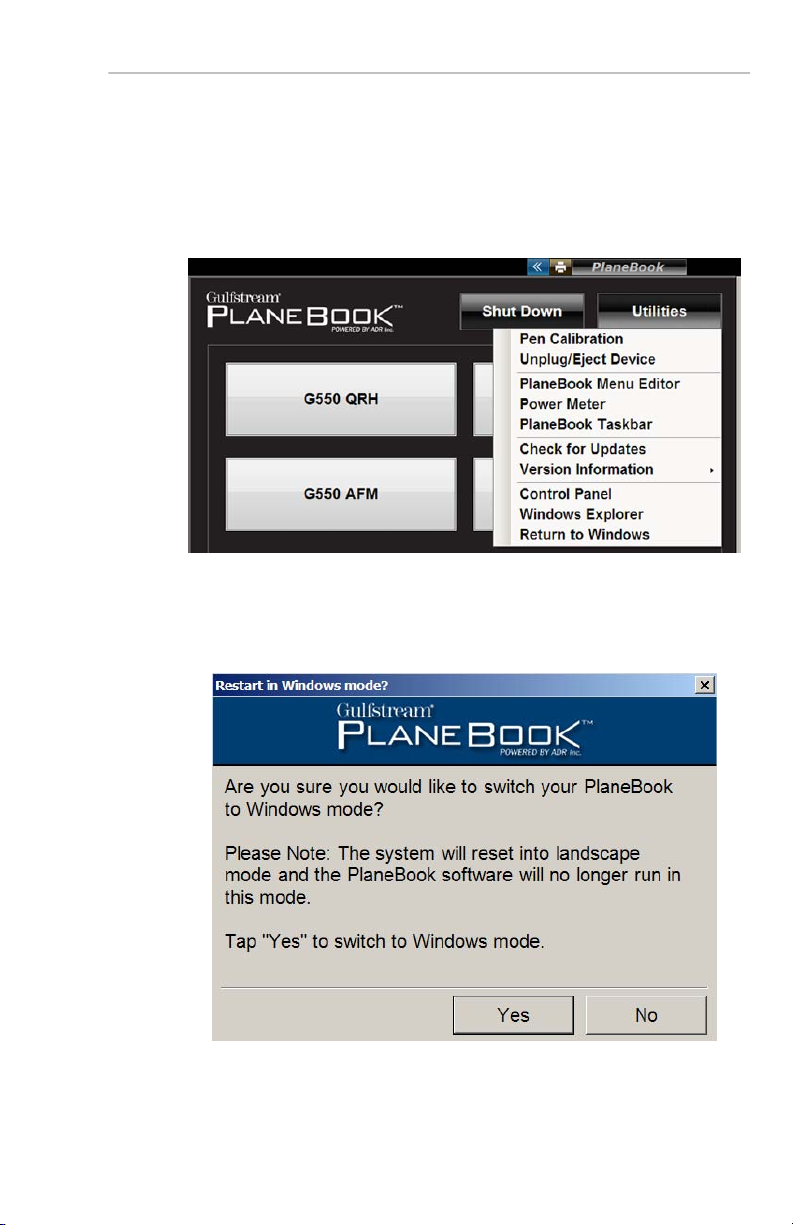
To Change From PlaneBook™ Mode to Windows®
Mode
Click the Utilities menu button and select Return to
Windows from the drop-down menu.
This causes the following dialog box to be displayed.
Select Yes to restart the FG-1620G in PlaneBook™
Mode.
© Gulfstream 2008 5 PlaneBook™ Owner’s Manual
PLANEBOOK
TM
OWNER’S MANUAL
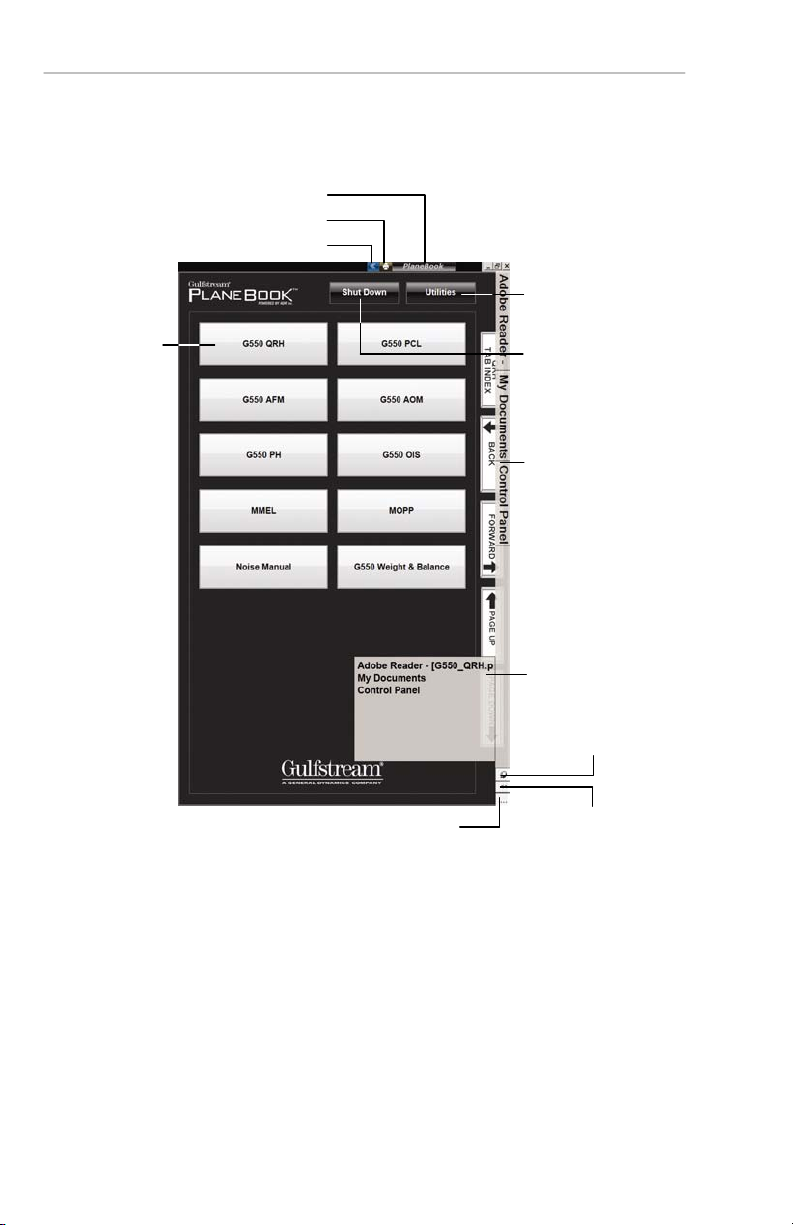
5. The PlaneBook™ Desktop: Description
PlaneBook
Open PlaneBookTM Taskbar Button
Document /
Application
Button
TM
Start Button
Print Screen Button
Utilities Button
Shut Down Button
PlaneBook
PlaneBook
Taskbar Pin Control
TM
Taskbar
TM
Taskbar
Overflow List
PlaneBook
Settings Button
TM
Taskbar
PlaneBook
Overflow List Button
TM
Taskbar
PlaneBook™ Owner’s Manual 6 © Gulfstream 2008
PLANEBOOK
TM
OWNER’S MANUAL
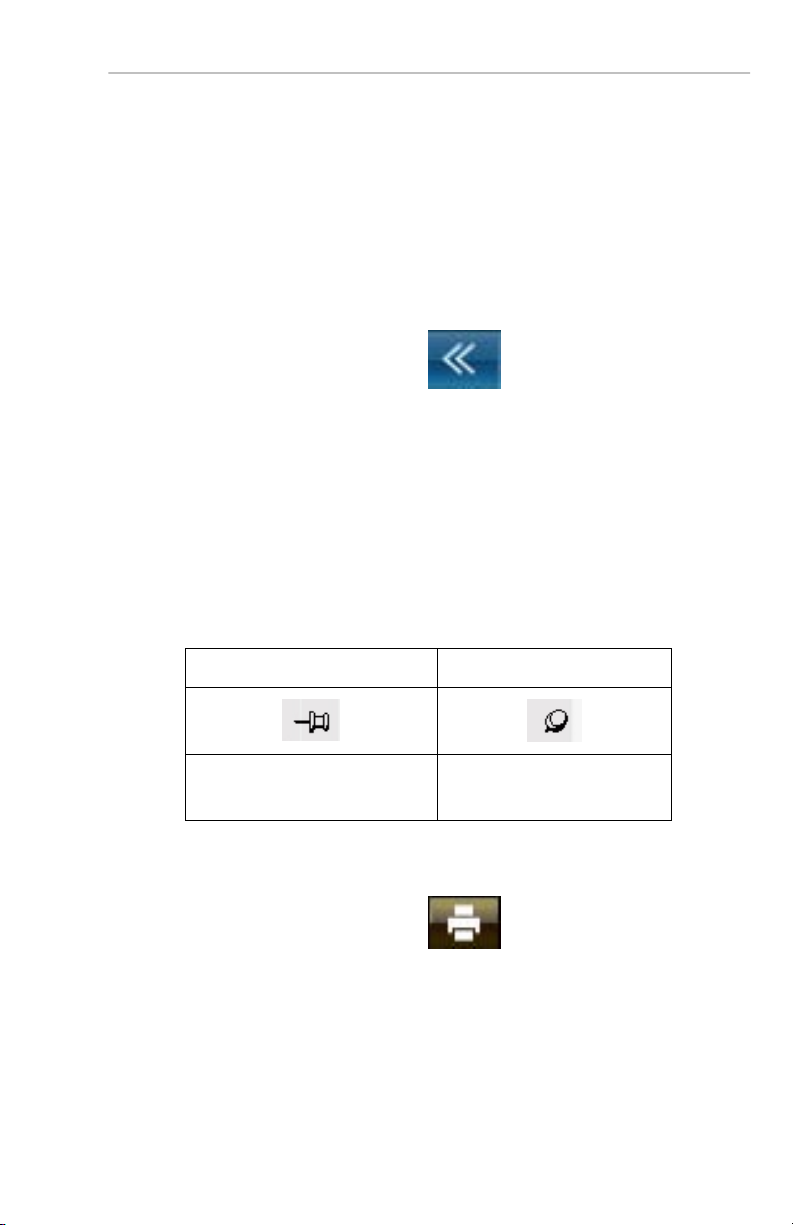
The “Open PlaneBook™ Taskbar” Button
With the PlaneBook™ taskbar hidden, tapping the button shown below results in the taskbar being displayed
vertically on the right edge of the PlaneBook™ desktop.
With the taskbar visible (but not “pinned”), tapping this
button twice results in the taskbar being hidden from
view.
Note: With the taskbar visible, tapping anywhere on the
tablet screen results in the taskbar being hidden from
view (unless “pinned”). (See next Note.)
Note: The feature described above works only when
the PlaneBook™ taskbar is not “pinned” in the “always
displayed” position. “Pinning” the taskbar is accomplished using the Taskbar Pin Control button, located
at bottom of the taskbar, which functions as follows:
“Unpinned” “Pinned”
Taskbar can be
hidden or displayed.
Taskbar remains
displayed.
The “Print Screen” Button
Clicking this button prints an image of whatever is currently displayed on the PlaneBook™ desktop.
© Gulfstream 2008 7 PlaneBook™ Owner’s Manual

PLANEBOOK
The “PlaneBook™ Start” Button
If the tablet is in PlaneBook™ mode and the PlaneBook™ desktop is not displayed, clicking this button
displays the PlaneBook™ desktop. If the tablet is in
PlaneBook™ mode and the PlaneBook™ desktop is
displayed, clicking this button hides the PlaneBook™
desktop.
The PlaneBook™ Taskbar
The PlaneBook™ taskbar provides the user with a list
of open documents and applications. Tapping the text
area of the listed document or application brings it into
the foreground for use.
At the bottom of the taskbar there are three buttons that
determine how the taskbar functions and is presented.
These three buttons are described on the following
page.
TM
OWNER’S MANUAL
PlaneBook™ Owner’s Manual 8 © Gulfstream 2008

PLANEBOOK
TM
OWNER’S MANUAL
The PlaneBook™ Taskbar Buttons
On the PlaneBook™ taskbar are three buttons that
determine how the taskbar functions and is presented:
the Taskbar Pin Control button, the PlaneBook™
Taskbar Overflow List button and the PlaneBook™
Taskbar Settings button.
The Taskbar Pin Control button controls whether or
not the taskbar can be hidden from view. The default
position is “unpinned”, allowing the taskbar to be shown
or hidden by tapping the Open PlaneBook™ Taskbar
Button. In this configuration, the button is displayed as
follows:
With the taskbar displayed, tapping the Taskbar Pin
Control button “pins” the taskbar to the “always in
view” position. In this configuration, the button is displayed as follows:
If the number of open documents and/or applications
exceeds what can be shown vertically on the taskbar,
tapping the PlaneBook™ Taskbar Overflow List button results in a list of open documents and/or applications being displayed:
←
© Gulfstream 2008 9 PlaneBook™ Owner’s Manual
PLANEBOOK
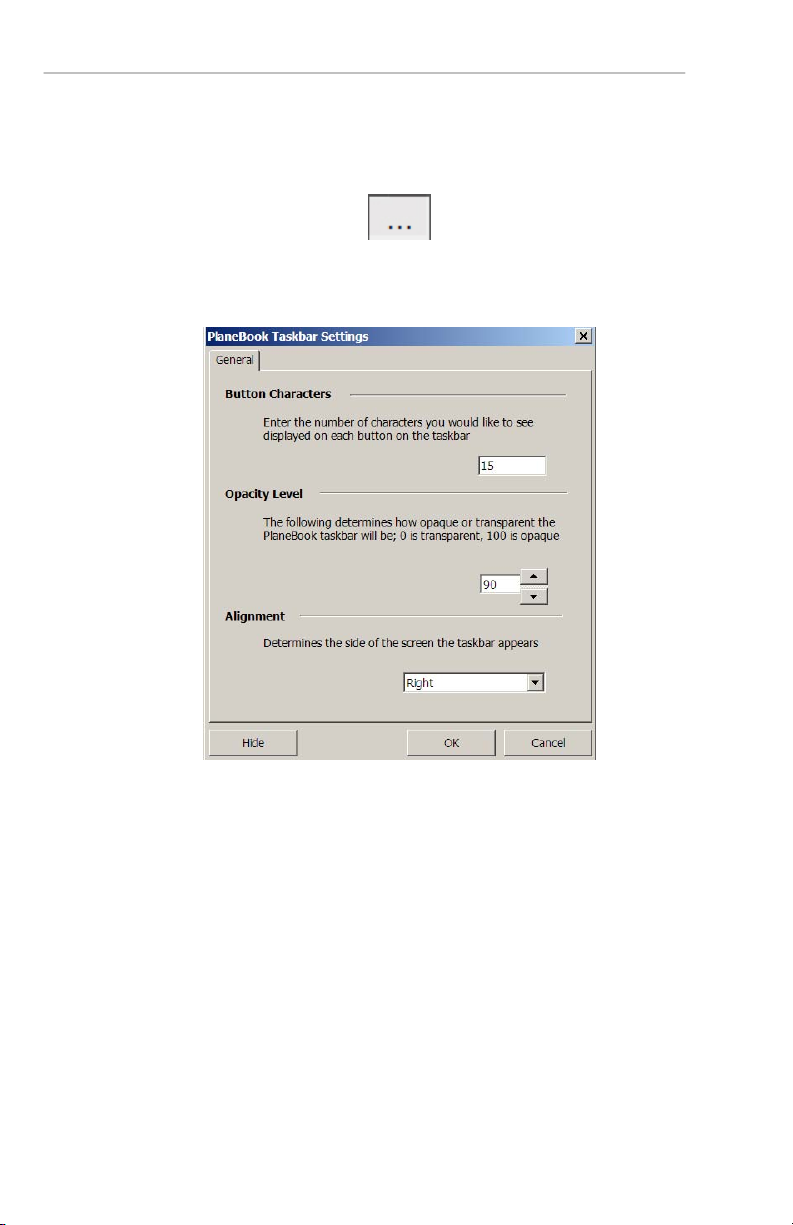
The PlaneBook™ Taskbar Settings button allows
changes in the appearance and placement of the taskbar.
Tapping the button results in the following dialog box
being displayed:
TM
OWNER’S MANUAL
In addition to the general settings available, the taskbar
can be “turned off” (hidden). Selecting the Hide button
results in the taskbar not being available or displayed
until returned to view through selection of the Plane-
Book™ Taskbar from the Utilities menu drop-down
list. For related information, see page 18.
PlaneBook™ Owner’s Manual 10 © Gulfstream 2008
PLANEBOOK
TM
OWNER’S MANUAL
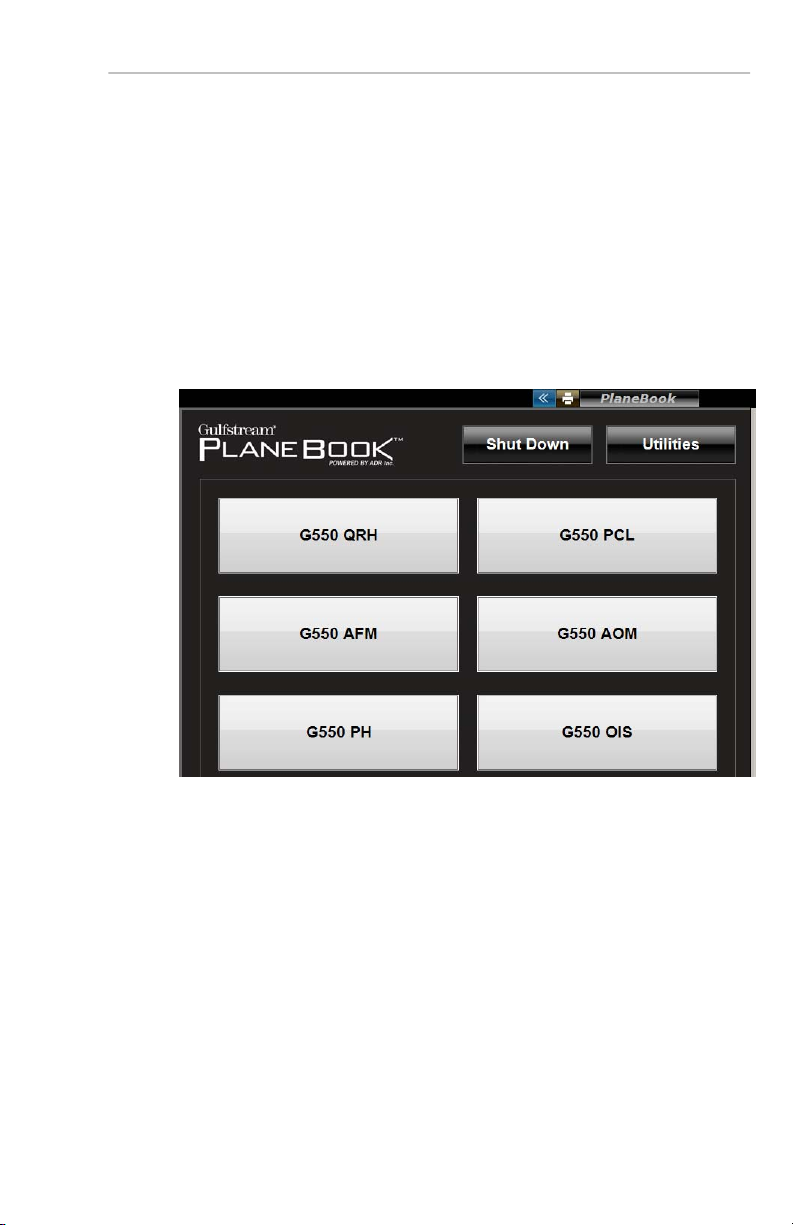
“Document / Application” Buttons
Tapping the Document / Application buttons launches
the document or application associated (linked) with the
button. Up to fifty (50) documents or applications can
have buttons placed on the PlaneBook™ desktop, with
eighteen visible at any given time. When more than
eighteen documents or applications are placed on the
desktop, a vertical scroll bar appears to allow scrolling
through the range of buttons.
To add or remove a Document / Application button,
see the description of the PlaneBook™ Menu Editor
on page 14 of this manual.
© Gulfstream 2008 11 PlaneBook™ Owner’s Manual
 Loading...