

Guldmann Sit-On Comfort, Sit-On Comfort High, 2930X1, 2840X1 User Manual
DK ......... Sit-On Comfort ................................................2
GB/US ...... Sit-On Comfort ...............................................14
DE.......... Sit-On Comfort ...............................................28
SE.......... Sit-On Comfort ............................................... 41
FR.......... Sit-On Comfort ............................................... 53
IT .......... Sit-On Comfort ...............................................66
ES.......... Sit-On Comfort ............................................... 79
Manual – vers. 3.00

DK .......Sit-On Comfort og Sit-On Comfort High
Vers. 3.00
Varenr.:
2930X1 Sit-On Comfort
2840X1 Sit-On Comfort High
1.00 .........Formål og anvendelse ..........................................3
1.01 .........Producent .....................................................3
1.02 .........Formål .......................................................3
1.03 .........Vigtigt/advarsler ................................................3
1.04 .........Anvendelse ...................................................4
2.00 .........Vedligeholdelse ...............................................5
2.01 .........Rengøring ....................................................5
2.02 .........Hvilken vedligeholdelse skal ejer selv forestå? ........................5
2.03 .........Bortskaffelse af sejl .............................................6
3.00 .........Service og levetid .............................................6
3.01 .........Sikkerheds-/serviceeftersyn .......................................6
3.02 .........Levetid .......................................................8
4.00 .........Tekniske specikationer ........................................8
5.00 .........CE-overensstemmelseserklæring ................................8
6.00 .........Erklæring om miljøpolitik – V. Guldmann A/S. . . . . . . . . . . . . . . . . . . . . . .8
7.00 .........Pålægning af Sit-On Comfort ....................................9
8.00 .........Pålægning af Sit-On Comfort High ..............................11
2
© Guldmann 11/2014 # 900696_3

1.00 Formål og anvendelse
1.01 Producent
V. Guldmann A/S
Graham Bells Vej 21-23A
DK-8200 Aarhus N
Tel. +45 8741 3100
Fax +45 8741 3131
www.guldmann.com
1.02 Formål
Sejlet anvendes til at løfte eller forytte en person med funktionsnedsættelse
på sygehuse, plejeboliger, genoptræningscentre, rideskoler og i den individuelle bolig.
Sejlet er designet til brug i både mobile personløftere og lofthejssystemer.
Sit-On sejlet er ideelt til at løfte en person til og fra seng og kørestol i
siddende stilling. Sejlet er designet til løft af en person, der skal blive siddende i sejlet pga. overvægt eller specialtilpasset kørestol. Materialet tillader
brugerens krop at “ånde”. Sejlet bør ikke bruges til en person med tryksårsproblemer.
Forudsætninger
Hvor sejlet anvendes, er det en forudsætning at:
• Sejlet anvendes af uddannet personale eller personer, der har modtaget
instruktion i det aktuelle sejls brug.
• Der anvendes den korrekte størrelse sejl.
• Max løftekapacitet på henholdsvis 255 kg aldrig overskrides.
• Sejlet anvendes ved løft af en person i siddende stilling.
• Hjælperen er opmærksom på brugerens velbendende ved løft i sejlet.
• Sejlet anvendes i forbindelse med en Guldmann løftebøjle.
1.03 Vigtigt/advarsler
• Læs instruktionerne nøje, før du benytter løftesejlet.
• Sejlets mærkelast må aldrig overskrides.
• Sejlet må kun bruges til løft af en person.
• Før ibrugtagning af et sejl skal det kontrolleres jævnfør punkt 2.02.
• Der må aldrig anvendes et sejl, der er for stort til brugeren.
• Reparationer må kun udføres af fabrikanten.
© Guldmann 11/2014 # 900696_3
3
1.04 Anvendelse
Er du i tvivl vedrørende valg eller brug af løftesejl, kontakt
venligst Guldmann.
Vigtigt!
Planlæg forytningen, og lad ikke brugeren sidde i sejlet uden tilsyn. Før du
løfter, skal du sikre, at brugeren ikke kan blive fastklemt, samt at sejlet ikke
hænger fast i seng, kørestol eller andet. Brugerens hoved, arme, hænder og
fødder må ikke være i fare for at sidde fast. Vær forsigtig med evt. slanger
eller ledninger, der er fastgjort til brugeren og/eller til udstyr. Kontroller at
håndbetjeningen og håndbetjeningskablet er fri af løftebøjlen, brugeren og
andre genstande, før løftebøjlen hejses op eller ned.
Guldmann fraskriver sig ansvar for fejl eller ulykker, der opstår, fordi løftesejlet ikke anvendes korrekt eller på grund af manglende agtpågivenhed fra
hjælper eller bruger. Såfremt sejlet bruges i forbindelse med andet udstyr end
Guldmanns, skal dette risikovurderes af kvaliceret personale.
GH løftebøjle
Advarsel!
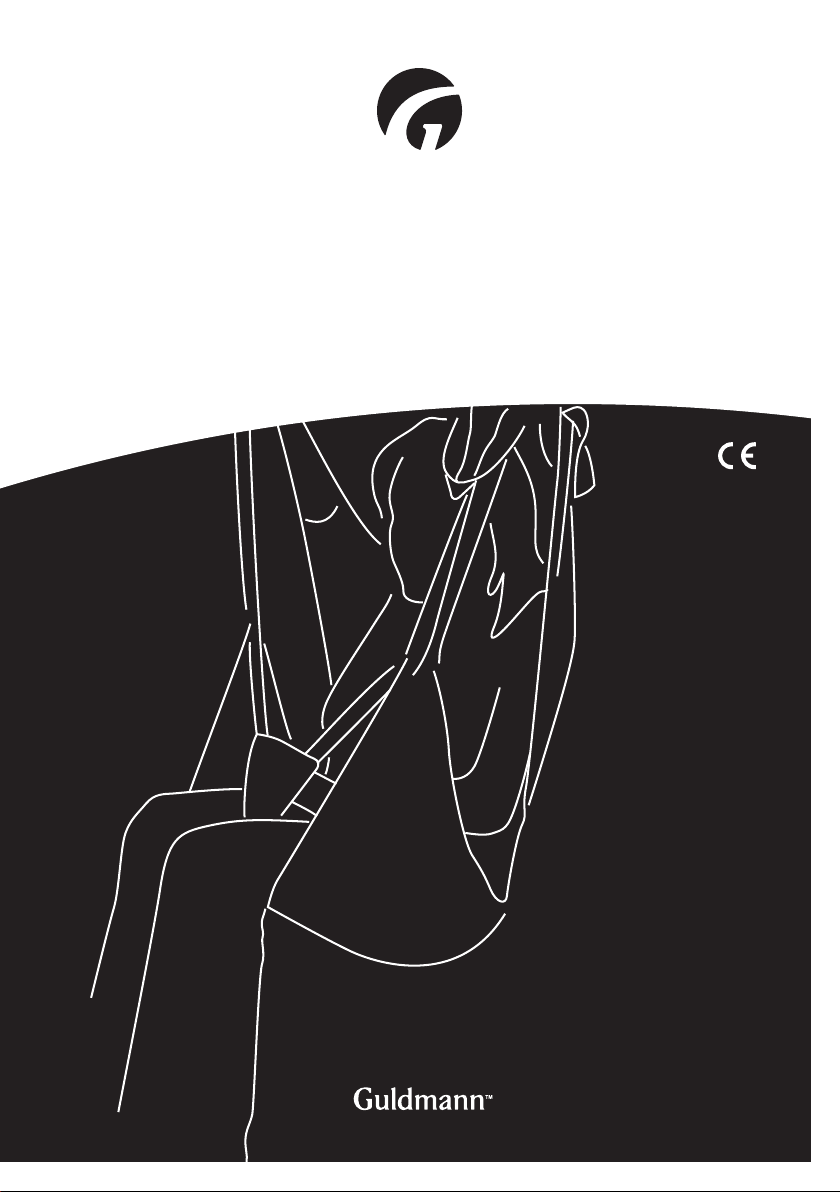
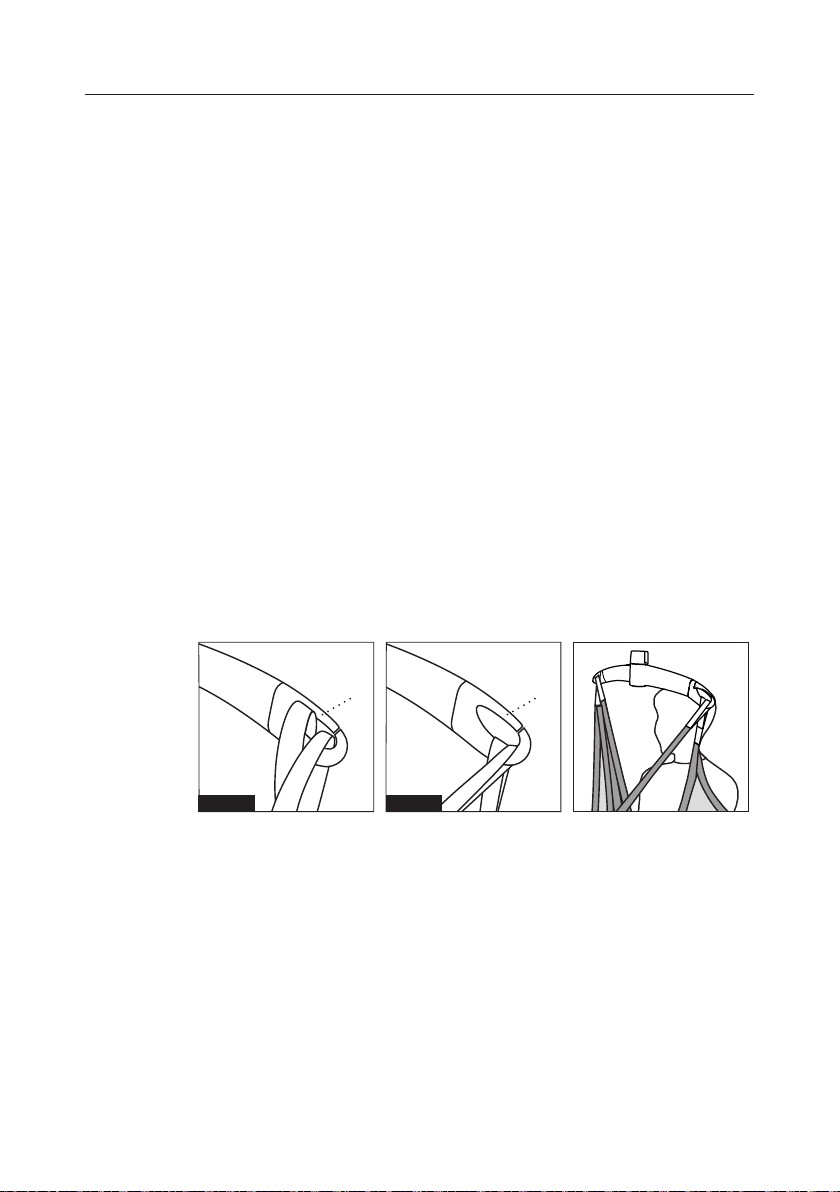
Vær opmærksom når du placerer sejlstropperne på løftebøjlen. Kontroller at sejlstropperne er trukket ned forbi gummiarmen (A) og er placeret korrekt i krogen på løftebøjlen. Når der trykkes på ‘pil op’ knappen
på håndbetjeningen tjek igen at sejlstropperne forbliver i den korrekte
position i løftebøjlens krog (g. 1a og g. 1b).
Fig. 1a Fig. 1b
4
AA
© Guldmann 11/2014 # 900696_3
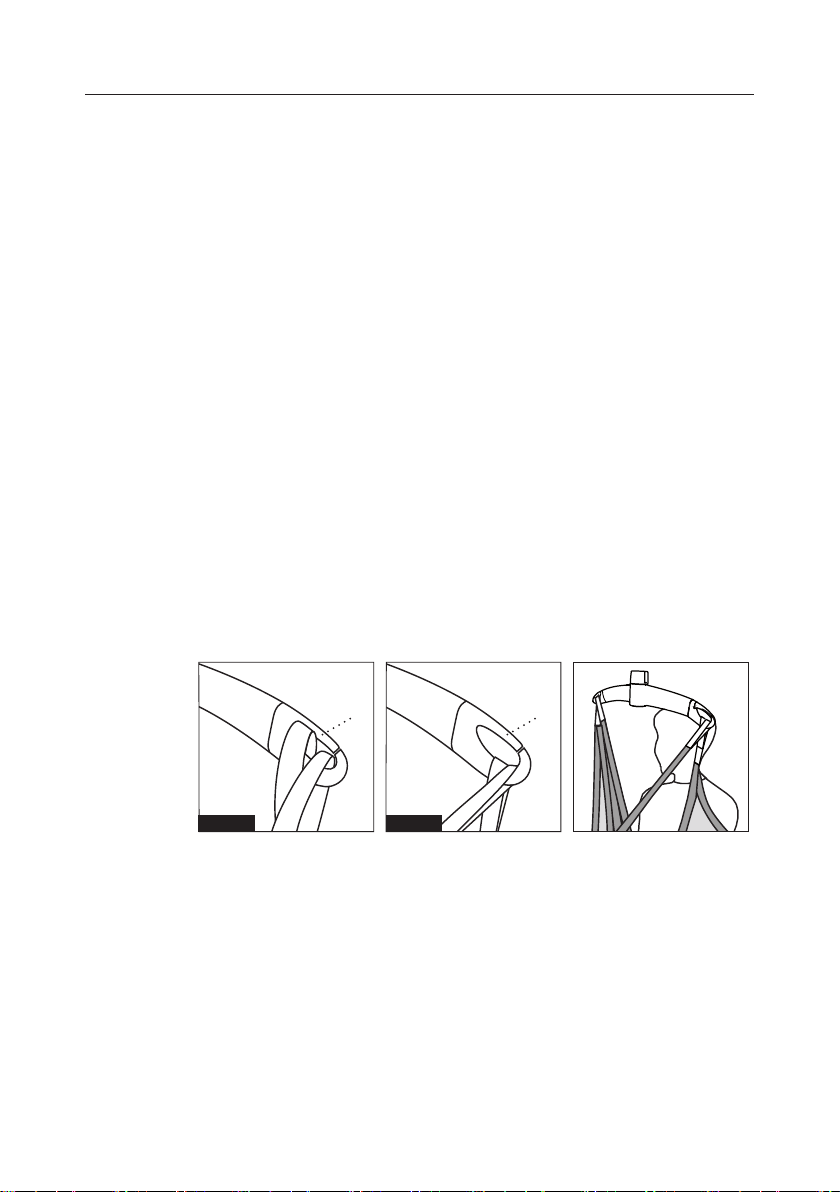
GH løftebøjle med 4 ophængspunkter
Advarsel!
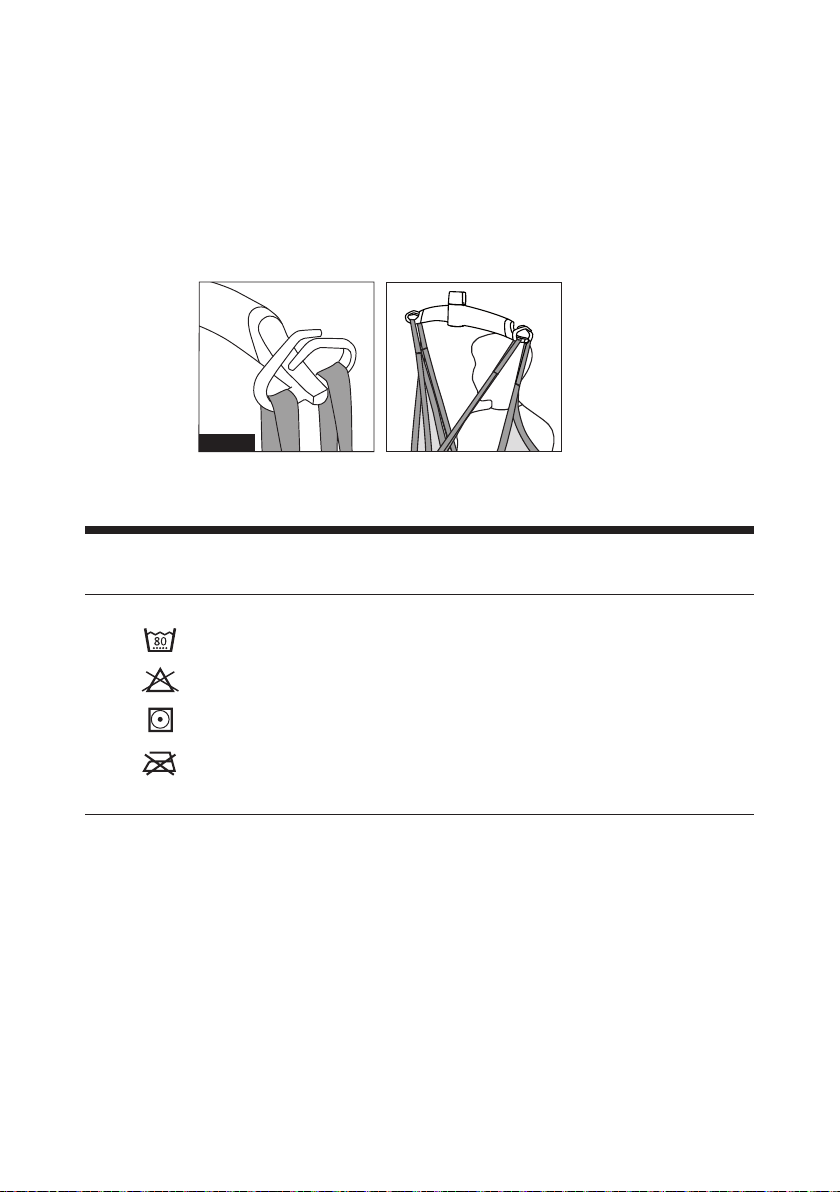
Vær opmærksom når du placerer sejlstropperne på løftebøjlen. Kontroller at sejlstropperne er placeret korrekt i krogen på løftebøjlen. Når
der trykkes på ‘pil op’ knappen på håndbetjeningen tjekkes igen at sejl-
stropperne forbliver i den korrekte position i løftebøjlens krog (g. 1).
Fig. 1
Pålægning af løftesejlet, se afsnit 7.
2.00 Vedligeholdelse
2.01 Rengøring
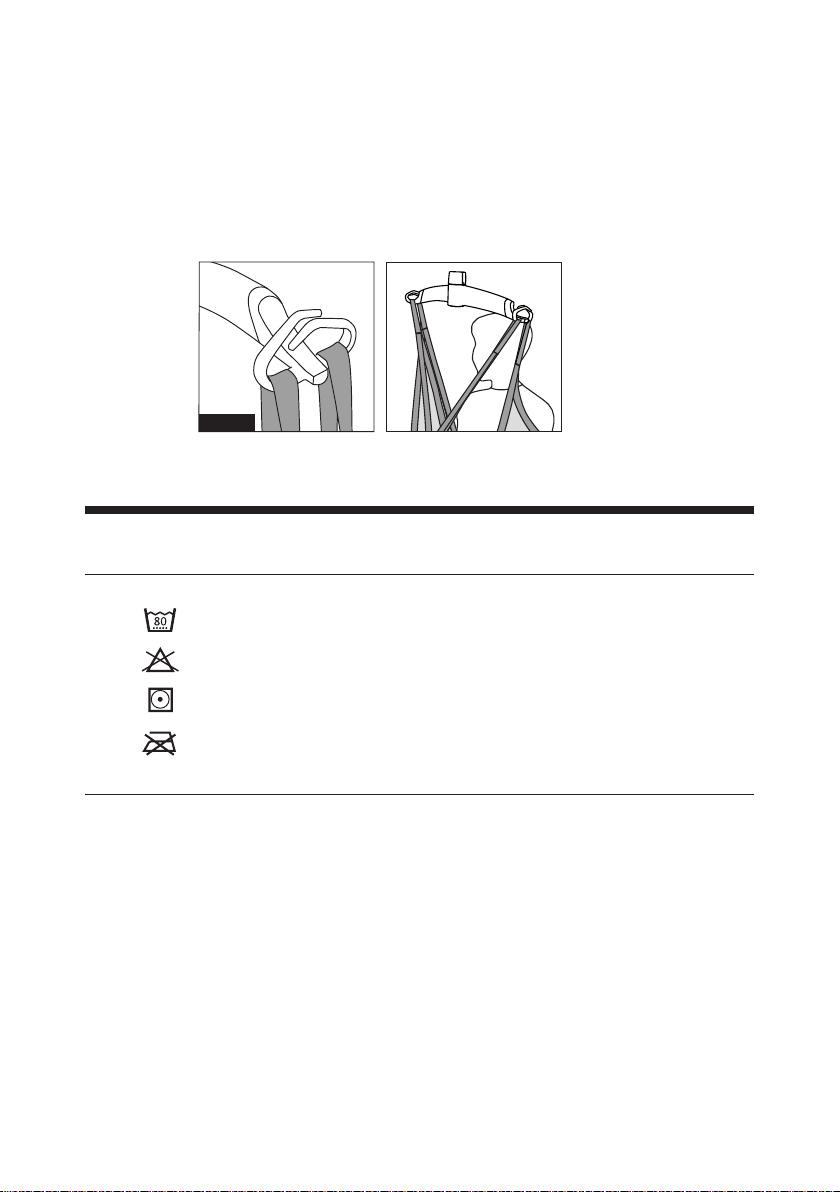
Tåler normal maskinvask ved angiven temperatur
Tåler ikke blegemidler
Tåler tørring i tørretumbler ved lav temperatur
Tåler ikke strygning
2.02 Hvilken vedligeholdelse skal ejer selv forestå?
Tjek om der er tegn på slid og skader før sejlet tages i brug i henhold til
nedenstående tjekliste, som ikke er tænkt som en udtømmende oversigt over
alle tænkelige inspektionstrin. Eventuelle skader kan variere. Den
kontrolansvarlige/arbejdsstedets dømmekraft er afgørende.
Tjekliste for inspektion af sejl
Før et Guldmann sejl/tilbehør tages i brug, skal følgende kontrolleres:
Er sejlet rent?
Følg proceduren for infektionskontrol, der gælder for det specikke
arbejdssted.
© Guldmann 11/2014 # 900696_3
5

Er sejlets mærkat læselig og komplet?
Tjek sejlet for manglende, ulæselige og ufuldstændige mærkater. Mangler
mærkaten er det ikke muligt at denere sejlets type, sejlets funktion og/eller
vægtbegrænsning.
Er løftestopperne og syningerne intakte?
• Tjek efter for ødelagte eller slidte syninger
• Tjek efter for knuder på stropperne
• Tjek efter for ænger eller osser
• Tjek efter for huller, ænger eller snit
• Tjek efter for fremmedlegemer i stoffet eller på stropperne
(fx metalsplinter e.l.)
Er stoffet intakt?
• Tjek efter for tegn på unormalt slid og overdreven brug
• Tjek efter for trævler og ænger
• Tjek efter for usædvanlige eller væsentlige misfarvninger
• Tjek efter for rifter, huller, ænger eller snit
• Tjek efter for trævlede eller usikre sømme
• Tjek efter for mærker fremkaldt af kemikalier eller ætsende stoffer
• Tjek efter for forandringer i stoffet – fx øget stivhed
• Tjek efter for indkapslede partikler
Har sejlet stadig den originale størrelse og længde uden
brug af knuder, nåle, tape eller andre metoder, der kan ændre
formen og gøre sejlet kortere eller længere?
Konklusion
Såfremt sejlet har nogle af ovennævnte mangler, skader e.l., skal det
kasseres uanset vægten af brugeren, der skal løftes.
2.03 Bortskaffelse af sejl
Sejl bortskaffes ved forbrænding.
Ved korrekt forbrænding nedbrydes polyester til kuldioxid og vand.
3.00 Service og levetid
3.01 Sikkerheds-/serviceeftersyn
I henhold til international standard EN/ISO 10535 ”Hoist for the transfer of
disabled persons – Requirements and test methods” skal der udføres et sik-
kerhedseftersyn mindst hvert halve år. Proceduren for sejleftersynene skal
være grundig, systematisk og vedvarende. Derudover er både praktisk og
visuel gennemgang anbefalet.
Visse former for skader er langt lettere at opdage gennem praktisk gennemgang end blot ved visuel gennemgang. Som eksempel kan nævnes: stivhed
i stoffet, defekte stropper og tyndslidt stof. Disse kan ndes gennem fysisk
kontakt med sejlet. Visuelle eftersyn afslører sandsynligvis ikke alle former for
sejlskader.
6
© Guldmann 11/2014 # 900696_3
Overvej udformningen og håndteringen af den skriftlige dokumentation af sej-
leftersynene. Dokumentationen bør indeholde følgende informationer: navnet
på producenten, sejlets varenummer, bredde og længde, sejlets unikke identikationsnummer (vigtigt ved uddifferentiering af ens sejl) samt sejlets tilstand.
Andre vigtige oplysninger kunne også være dato for modtagelse af sejlet,
dato for ibrugtagning af sejlet og andre brugbare specielle kendetegn.
Vis omtanke vedrørende ødelagte og defekte sejl, og tag derfor sejlet ud af
brug, hvis nogle af følgende forhold er til stede:
1. Kemiske og ætsede mærker
2. Nedsmeltede eller brændte mærker
3. Rifter, huller, ænger eller snit
4. Ødelagte eller slidte syninger
5. Manglende, ulæselige eller mangelfulde sejlmærkater
6. Knuder på sejlet
7. Slitage
8. Andre synlige skader, der medfører tvivl om sejlets styrke
Sejleftersynene udføres for at beskytte brugere og hjælpere.
En systematisk gennemgang af sejlene har ere fordele:
• at identicere påbegyndte skader
• at forebygge evt. hændelser
• at sikre kvalitet i arbejdet.
NB: Eftersynene bør udføres af en person, som er kvaliceret til det og som
er bekendt med designet, brugen og vedligeholdelsen af sejlet.
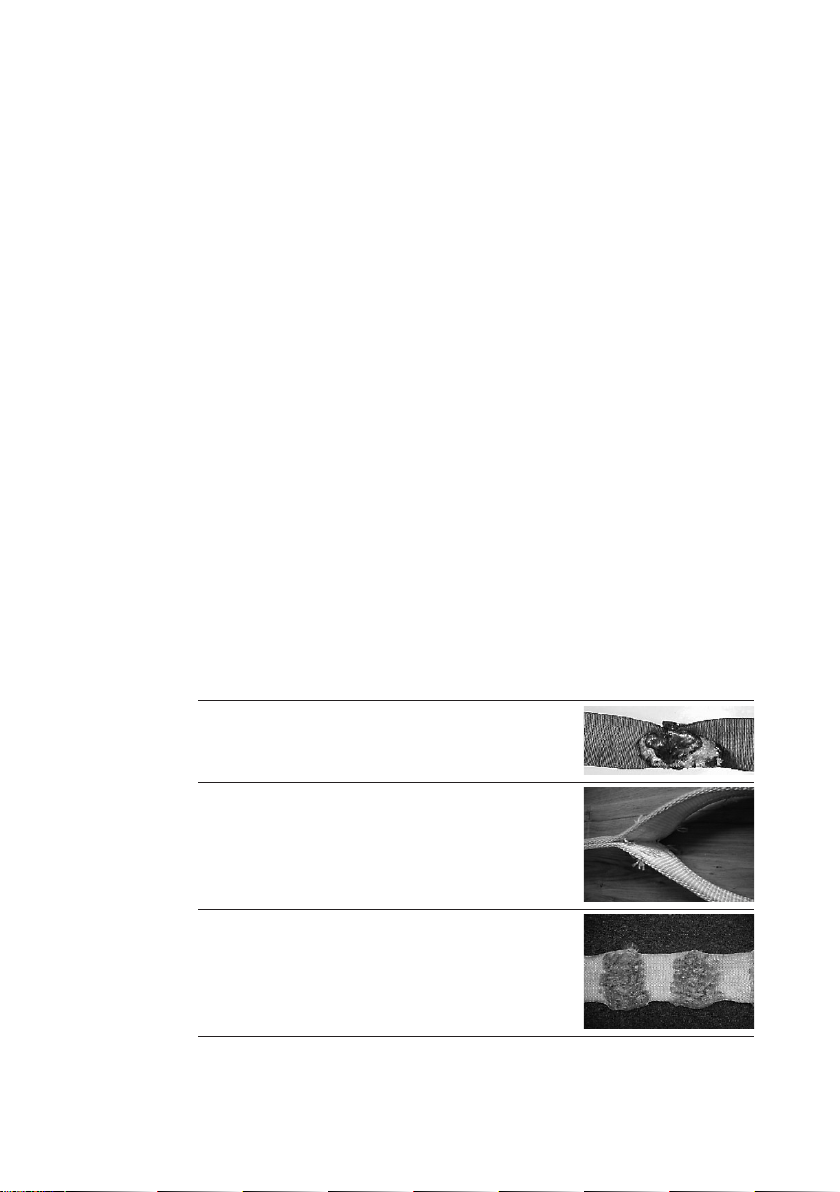
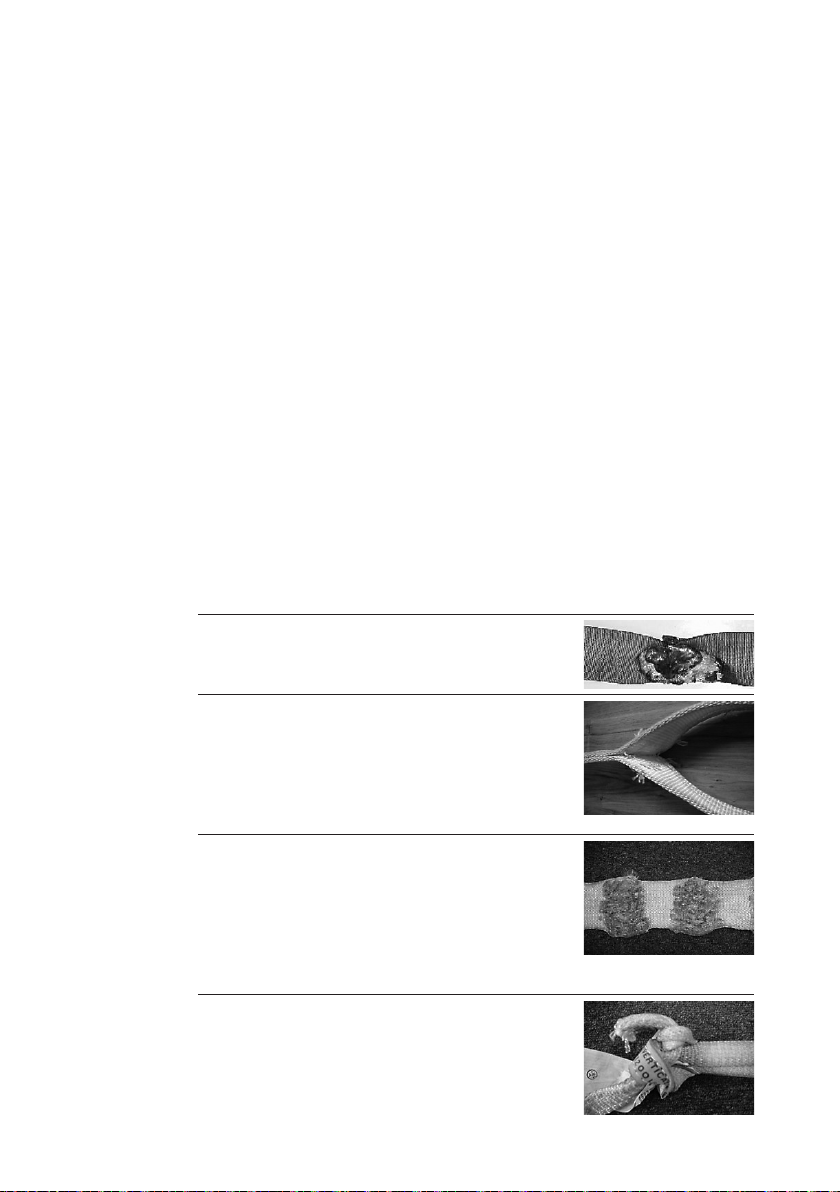
Eksempler på defekte sejl x)
© Guldmann 11/2014 # 900696_3
Mærker efter kemikalier/ætsende stoffer
Ødelagte syninger
Flossede/ødelagte stropper
7

Knuder
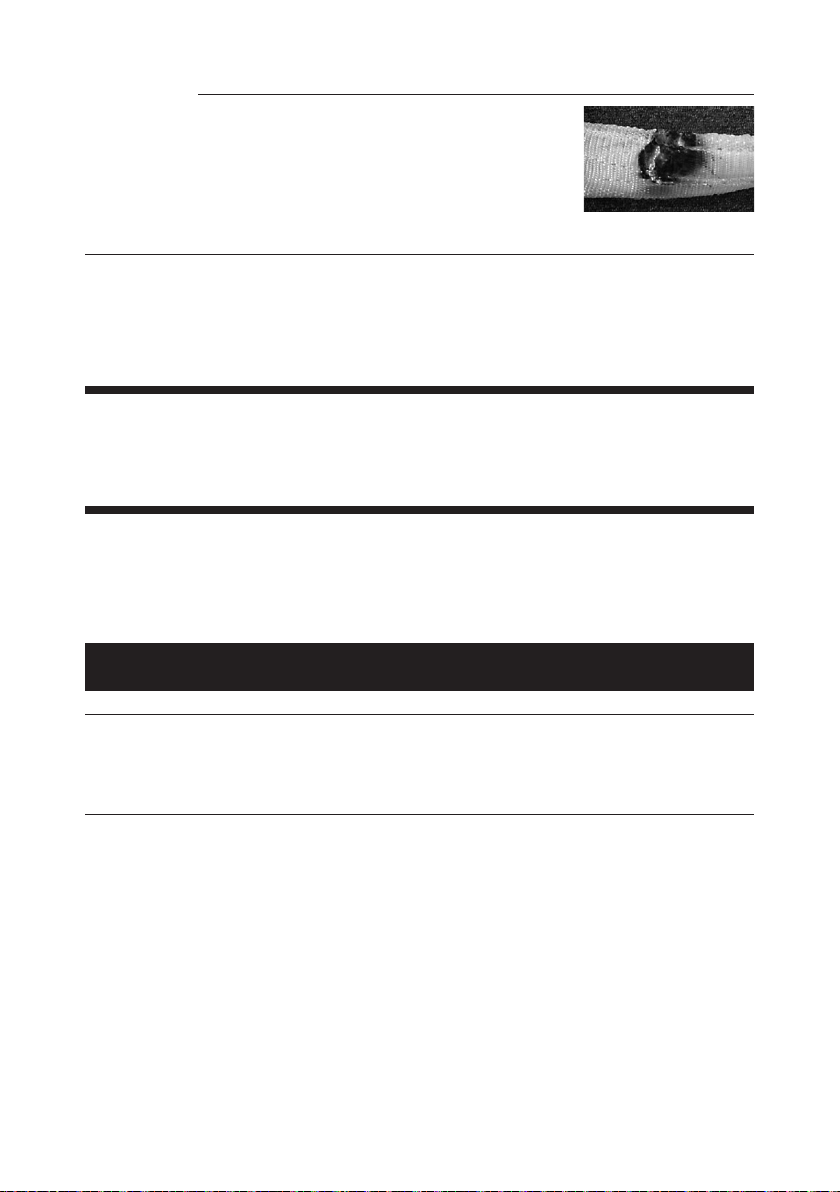
Brændt / smeltet
x
) billedeksemplerne er ikke ment som en
udtømmende oversigt over mulige skader
3.02 Levetid
Sejlets levetid er individuelt afhængig af brugsmønster, vask mv., men sejlet
skal efterses inden brug i henhold til beskrivelse i afsnit 2.02 og evt. kasseres, hvis eftersynet ikke lever op til vejledningen.
4.00 Tekniske specikationer
Løftekapacitet, SWL ........................................ 255 kg
Materiale .............................................. Polyester
5.00 CE-overensstemmelseserklæring
Produktet er fremstillet i henhold til Rådets direktiv 93/42/EØF af 14. juni
1993, med tilføjelser, som medicinsk udstyr klasse 1.
6.00 Erklæring om miljøpolitik – V. Guldmann A/S
Guldmann arbejder løbende på at sikre, at virksomhedens påvirkning af
miljøet både lokalt og globalt reduceres til et minimum.
Det er Guldmanns målsætning at:
• Efterleve den gældende lovgivning på miljøområdet (f.eks. WEEE- og
REACH-direktiverne)
• Sikre, at vi i videst mulige udstrækning benytter materialer og komponenter,
der overholder RoHS-bekendtgørelsen
• Sikre, at vores produkter ikke unødigt påvirker miljøet negativt i forbindelse
med brug, genbrug og evt. destruktion
• Sikre, at vores produkter medvirker til et positivt arbejdsmiljø de steder,
hvor de anvendes
Der gennemføres årligt tilsyn af forvaltningen Natur og Miljø under Aarhus
Kommune med udgangspunkt i miljøbeskyttelseslovens § 42.
8
© Guldmann 11/2014 # 900696_3
7.00 Pålægning af Sit-On Comfort
Sit-On Comfort-sejlene skal altid lægges på
i liggende stilling.
Bøj eller kryds det ene ben (øverst)
mod den side, som du ønsker at rulle
brugeren mod.
Før den samme sides arm frem over
Brystkasse.
Bed brugeren om at vende hovedet
i samme retning.
For at sikre centrering af sejlet skal
markeringen af midtpunktet på sejlet
følge brugerens rygrad.
Indsnittet i sejlet skal placeres ud
for brugerens hofte.
Vend brugeren om på ryggen, og træk
sejlet frem på den anden side.
Træk de to benloop’s op mellem
knæene og før de to nederste
løftestropper igennem.
© Guldmann 11/2014 # 900696_3
Sørg for, at anvende en korrekt bredde
af løftebøjlen.
Kontroller, at sejlet ikke bevæger sig
op under lårene ved løft fra liggende
stilling.
Løftestropperne monteres på løftebøjlen.
9

Indstil sengen til siddende stilling.
Løft med Sit-On Comfort-sejlet skal altid
foregå fra siddende stilling.
Det er funktionsniveauet, som afgør,
om armene skal indenfor sejlet eller
udenfor. En person, som er lam i den
ene side, skal have den lamme arm
indenfor sejlet.
Løft, indtil alle løftestropper er belastede,
kontroller nu alle befæstninger.
Du kan godt sænke sengen, før du
løfter brugeren. Du behøver ikke at løfte
højere end nødvendigt.
Udfør disse trin i omvendt rækkefølge,
når brugeren skal tilbage i sengen.
Ved placering i kørestol tippes stolen
lidt bagover. Tryk på knæene for at få
brugeren så langt tilbage i stolen som
muligt.
De midterste stropper kan
placeres i lommen.
10
© Guldmann 11/2014 # 900696_3
8.00 Pålægning af Sit-On Comfort High
Sit-On Comfort High-sejlene skal altid
lægges på i liggende stilling.
Bøj eller kryds det ene ben (øverst)
mod den side, som du ønsker at rulle
brugeren mod.
Før den samme sides arm frem over
brystkurven.
Bed brugeren om at vende hovedet
i samme retning.
For at sikre centrering af sejlet skal
markeringen af midtpunktet på sejlet
følge brugerens rygrad.
Indsnittet i sejlet skal placeres ud
for brugerens hofte.
Sejlets overkant skal støtte hovedet
Vend brugeren om på ryggen, og træk
sejlet frem på den anden side.
© Guldmann 11/2014 # 900696_3
Træk de to benloop’s op mellem knæene
og før de to nederste løftestropper igen-
nem.
Sørg for, at anvende en løftebøjle
i korrekt bredde.
Kontroller, at sejlet ikke bevæger sig
op under lårene ved løft fra liggende
stilling.
Løftestropperne monteres på løftebøjlen.
11
Indstil sengen til siddende stilling.
Løft med Sit-On Comfort High sejlet
skal altid foregå fra siddende stilling.
Hvis nødvendigt kan hovedstropperne
justeres.
Brugeren placeres i kørestolen.
Hovedstøtten kan nu foldes sammen
bag brugeren.
12
© Guldmann 11/2014 # 900696_3
De midterste stropper kan
placeres i lommen.
Løft fra kørestol.
Løftestropperne monteres på løftebøjlen.
© Guldmann 11/2014 # 900696_3
13

GB/US ....Sit-On Comfort og Sit-On Comfort High
Vers.3.00
Item nos:
2930X1 Sit-On Comfort
2840X1 Sit-On Comfort High
1.00 .........Purpose and use .............................................15
1.01 .........Manufacturer .................................................15
1.02 .........Purpose .....................................................15
1.03 .........Important/Precautions ..........................................15
1.04 .........Use .........................................................16
2.00 .........Maintenance .................................................17
2.01 .........Cleaning .....................................................17
2.02 .........The owner’s daily maintenance duty ...............................17
2.03 .........Disposal of slings ..............................................18
3.00 .........Service and lifetime ...........................................18
3.01 .........Safety/service inspections .......................................18
3.02 .........Lifetime .....................................................21
4.00 .........Technical specications .......................................21
5.00 .........EC-Declaration of conformity ...................................21
6.00 .........Environmental policy statement – V. Guldmann A/S ................22
7.00 .........Placing Sit-On Comfort ........................................23
8.00 .........Placing Sit-On Comfort High ...................................25
14
© Guldmann 11/2014 # 900696_3

1.00 Purpose and use
1.01 Manufacturer
V. Guldmann A/S
Graham Bells Vej 21-23A
DK-8200 Aarhus N
Tel. +45 8741 3100
Fax +45 8741 3131
www.guldmann.com
1.02 Purpose
The sling is suited for lifting or transferring a person with disabilities in
hospitals, at nursing homes, rehabilitation centres, riding schools and in
private homes.
The sling is designed for use with both mobile lifters and ceiling hoist
systems. It is ideal for lifting a person to and from beds and wheelchairs in
seated positions as required.
The sling is designed to lift a person who remains on the sling for long periods due to high weight or customized wheelchair. The material prevents heat
generation between body and sling. The sling is not suitable for persons with
pressure sore problems.
Conditions for use
The use of the sling is subject to the following:
• The sling is used by trained staff or persons who have been instructed in the
use of the sling in question.
• The correct size of sling is used.
• The maximum nominal load, 255 kg (560 lbs) must not be exceeded.
• The sling is used for lifting a person in a sitting position.
• The helper pays attention to the well-being of the user when using the sling.
• The sling is used with the Guldmann lifting hanger.
1.03 Important/Precautions
• Read the instructions carefully before using the sling.
• The slings maximum load must never be exceeded.
• The sling may only be used to lift a person.
• Before a sling is used, it must be examined according to point 2.02.
• Never use a sling that is too big for the user.
• Possible repairs must only be made by the manufacturer.
© Guldmann 11/2014 # 900696_3
15
1.04 Use
If there is any doubt about the selection or use of a lifting sling, please
contact your supplier.
Important!
Plan the move. Avoid leaving the user in the lifting sling unattended.
Do not start to lift until it has been checked that the user cannot get trapped
and that the sling does not catch on the bed, wheelchair etc. The user’s head,
arms, hands and feet must not be in danger of becoming trapped. Be careful
with any tubes and wires that are attached to the user and/or equipment.
Check that the hand control and hand control cable is free of hanger, patient
and other object before the hoist is activated up or down moved.
Guldmann shall not be liable for faults or accidents due to incorrect use of the
lifting sling, or for reasons of inadequate attention on the part of the carer or
user. If the sling is used in combination with products that are not manufactured by Guldmann, a risk assessment must be made by qualied staff.
GH Lifting hanger
Caution!
Be careful when attaching the lifting sling on the hooks. Check that the
straps have been pulled completely through the rubber safety catch
(A) and into place in the lifting hanger’s hooks. When pressing the up
button to lift the user, check again that all the straps remain correctly
placed in the lifting hanger’s hooks (g. 1a and g. 1b).
Fig. 1a Fig. 1b
16
AA
© Guldmann 11/2014 # 900696_3
GH lifting hanger, 4 attachment points
Caution!
Be careful when attaching the lifting sling’s straps on the hooks. Check
that the straps have been correctly placed in the lifting
hanger’s hooks. When pressing the up button on the hand control to lift
the user, check again that all straps remain correctly placed in the lifting
hanger’s hooks (Fig. 1).
Fig. 1
Placing the sling, look at section 7
2.00 Maintenance
2.01 Cleaning
Normal washing at the indicated temperature
Do not use bleaching agent
Tumble-drying at low temperature
Do not iron
2.02 The owner’s daily maintenance duty
Check the lifting sling for wear and damage before use according to the
following checklist which is not intended to represent all potential inspection
steps. Potential damage may vary. Judgment of inspector/site prevails.
Sling inspection checklist
Before using a Guldmann sling / accessory check the following:
Is the sling clean?
Follow facility specic infection control procedure.
© Guldmann 11/2014 # 900696_3
17

Is the sling’s label present, legible and complete?
Missing, illegible or incomplete sling label(s) could make identication of
appropriate size of the sling, function of sling, and or weight limit capacity of
the sling impossible.
Are the lifting straps and stitches intact?
• Look for broken or worn stitches
• Look for knots in straps
• Look for tears or fraying of straps
• Look for snags or punctures or holes
• Look for any particles in fabric or straps
•
Is the fabric intact?
• Look for abnormal wear patterns, excessive wear, abrasive evidence
• Look for cuts or frayed fabric
• Look for unusual or signicant discoloration
• Look for snags, punctures, tears, holes
• Look for frayed or insecure seams
• Look for any acid / caustic / thermal burns
• Look for changes in material consistency, e.g. increased stiffness
• Look for any imbedded particles
Are slings the original size and length without the use of knots, pins,
tape or other methods to change the shape, shorten or lengthen them?
Conclusion
If the sling suffers from one or more of the above mentioned conditions then
it must be taken out of service regardless of the weight of the person to be
lifted.
2.03 Disposal of slings
Slings are disposed of by incineration. By proper incineration polyester
will be degraded to carbon dioxide and water.
3.00 Service and lifetime
3.01 Safety/service inspections
In accordance with international standard EN/ISO 10535 “Hoist for the
transfer of disabled persons – Requirements and test methods” an inspection
must be performed every 6-month according to the following instructions,
which is not intended to represent all potential inspection steps. Potential
damage may vary. Judgment of inspector/site prevails.
Safe Operating Practices with Slings
Considerations for damaged or defective slings and taking them out of
service:
18
© Guldmann 11/2014 # 900696_3

Withdraw the sling from service if one or more of the following conditions are
present:
1. chemical or caustic burns
2. melting or charring of any part of the sling
3. snags, punctures, tears or cuts
4. broken or worn stitches
5. missing, illegible or incomplete sling tag
6. knots in any part of the sling
7. abrasion
8. other visible damage that causes doubt as to the strength of the sling
Sling inspection is done for the protection of the user, the caregiver, and the
overall hospital site safety. A sling inspection system has additional benet.
Systematic sling inspection will assist in the identication of damage trends,
potentially leading to cost effective suggestions and results. The inspection
process can also help to identify inventory duplicity in certain sling types and
sizes.
Sling inspection system
Development of a specic procedure and program for the inspection of
slings at your facility is your best safeguard. Consider employing a three
part system of inspection. Slings that are removed from service and are not
capable of repair should be disposed of so they are unt for any future use
and can not nd a way back into active inventory.
1) Initial
This level of inspection is done at the time that the sling is received into your
facility. The inspector should ensure that no damage has occurred during
transit, and also verify that the sling work load limits match those contained in
the manufacturer’s catalogue. If your facility documents the sling inspection
process through written inspection records, the paper trail should begin at this
stage
© Guldmann 11/2014 # 900696_3
2) Frequent
The frequent level of inspection should be done by the sling user before each
use. The sling should be examined and removed from service if damage is
detected. The sling user should also determine that the sling is proper for the
user conditions, care task required and the required weight capacity.
3) Periodic
Your facility might want to consider implementing a program for a periodic
level of inspection at regular intervals. The interval should be based upon
the frequency of use, severity of the service cycle and information derived
through the inspection process. Recommendations to prevent damage and
enhance service life could be made by staff that perform the periodic inspections. If written inspection records are maintained, they should always reference the unique sling identication number, and be updated to record the
condition of the sling. Not intended to represent all potential inspection steps
or all potential aspects of product management program. Judgment of inspector/site prevails.
19
Sling inspection technique
The sling inspection procedure should be thorough, systematic and consistent; both visual and “hands on” inspection techniques are recommended. Certain forms of damage are far more discernable through hands-on
inspection, than by visual inspection. For example, fabric stiffness, crushed
webbing, as well as, thinning fabric can be identied through tactile inspection. Visual inspection alone may not reveal all forms of sling damage. Once
signs of damage have been identied, do not downgrade the work load limit
of the sling, with the intent of continuing to use it, but at limited capacity or
frequency. This is sometimes done to get more service life out of a damaged
sling. The operating rule and standard should be: intact = use; damage = do
not use.
Consider the practice of documenting sling inspections through written
inspection records. The documentation should include information such as:
the name of manufacturer, the sling stock number, width and length, the
unique sling identication number (important in differentiating similar slings),
as well as the condition of the sling. Other important information might also
include the date it was received or put into use at your facility and any special
features (if applicable). A benecial outcome of an inspection program would
be the realization of repetitive forms of damage and the analysis that would
lead to specic recommendations.
Sample visual examples of synthetic sling damage x)
Chemical/caustic burns
Broken stitching
Crushed / Frayed webbing
Knots
20
© Guldmann 11/2014 # 900696_3
Melting / Charring
x
) sample visual images not intended to
represent all types of potential damage
3.02 Lifetime
The life of the sling is individual and depends on how it is used, washed etc.
Before use the sling must be examined according to description in section
2.02 and if it does not meet the inspection requirements, it must be discarded
if necessary.
4.00 Technical specications
Lifting capacity, SWL ................................255 kg (560 lbs)
Material ............................................... Polyester
5.00 EC-Declaration of conformity
The product is manufactured in compliance with the Council Directive 93/42/
EEC of June 14th 1993, including amendments, as medical device class 1.
WARRANTY – U.S.A. and countries outside the EU
A. Users guide
B. WARRANTY
© Guldmann 11/2014 # 900696_3
Before using the product, read the entire operation manual
including warranty.
Guldmann warrants its equipment is free from material defects under normal
use, and will perform substantially in accordance with the specications set
forth in documentation provided with the equipment.
This express warranty shall be in effect for one year from the date of original
purchase and installation (the “Warranty Period”). If a valid claim is made
during the Warranty Period for malfunction or equipment defect, Guldmann
will repair or replace the equipment at no additional cost to you. Guldmann
retains sole discretion as to whether the equipment will be repaired or repla-
ced.
This warranty shall be null and void if the equipment is operated and maintained in any manner inconsistent with its intended use or the instructions
provided with the product. Further, in order for the warranty to remain in effect
21

for the full Warranty Period, all service to the equipment must be provided
by a Guldmann designated technician. Any parts or components repaired or
replaced by a Guldmann designated technician will be guaranteed for the
remainder of the Warranty Period.
The warranty does not cover any part of the equipment which has been subject to damage or abuse by the user or others. The warranty does not cover
any part of the equipment which has been altered or changed in any way by
the user or others. Guldmann does not warrant that the lifting device functions
will meet your requirements, be uninterrupted or error free.
The warranty set forth is in lieu of all other express and implied warranties,
whether oral, written or implied, and the remedies set forth above are your
sole and exclusive remedies. Only an authorized ofcer of Guldmann may
make modications to this warranty, or additional warranties binding on Guldmann. Accordingly, additional statements such as advertising or presentations, whether oral or written, do not constitute warranties by Guldmann.
Service or Repair
Contact Guldmann Repair for an authorization to return any defective item
during the Warranty Period. You will be provided with a return authorization
number and address for returning the item for warranty service or replace-
ment. Do not return items to Guldmann under warranty without receiving a
Return Authorization Number.
If mailing the item, pack it carefully in a sturdy carton to prevent damage.
Include your Return Authorization Number, a brief description of the problem
and your return address and phone number. Guldmann does not assume the
risk of loss or damage while in transit, so it is recommended you insure the
package.
6.00 Environmental policy statement – V. Guldmann A/S
Guldmann is continuously working towards ensuring that the company’s
impact on the environment, locally and globally, is reduced to a minimum.
It is Guldmann’s goal to:
• Comply with the current environmental legislation (e.g. WEEE and REACH
directives)
• Ensure that we, at the widest possible range, use RoHS compliant materials
and components
• Ensure that our products do not have an unnecessary negative impact on the
environment regarding use, recirculation or disposal
• Ensure that our products contribute to a positive working environment in the
places they are utilised
Inspections are made annually by the Department for Nature and Environment from the Municipality of Aarhus using the Danish Environmental Protection Act, section 42 as a reference.
22
© Guldmann 11/2014 # 900696_3
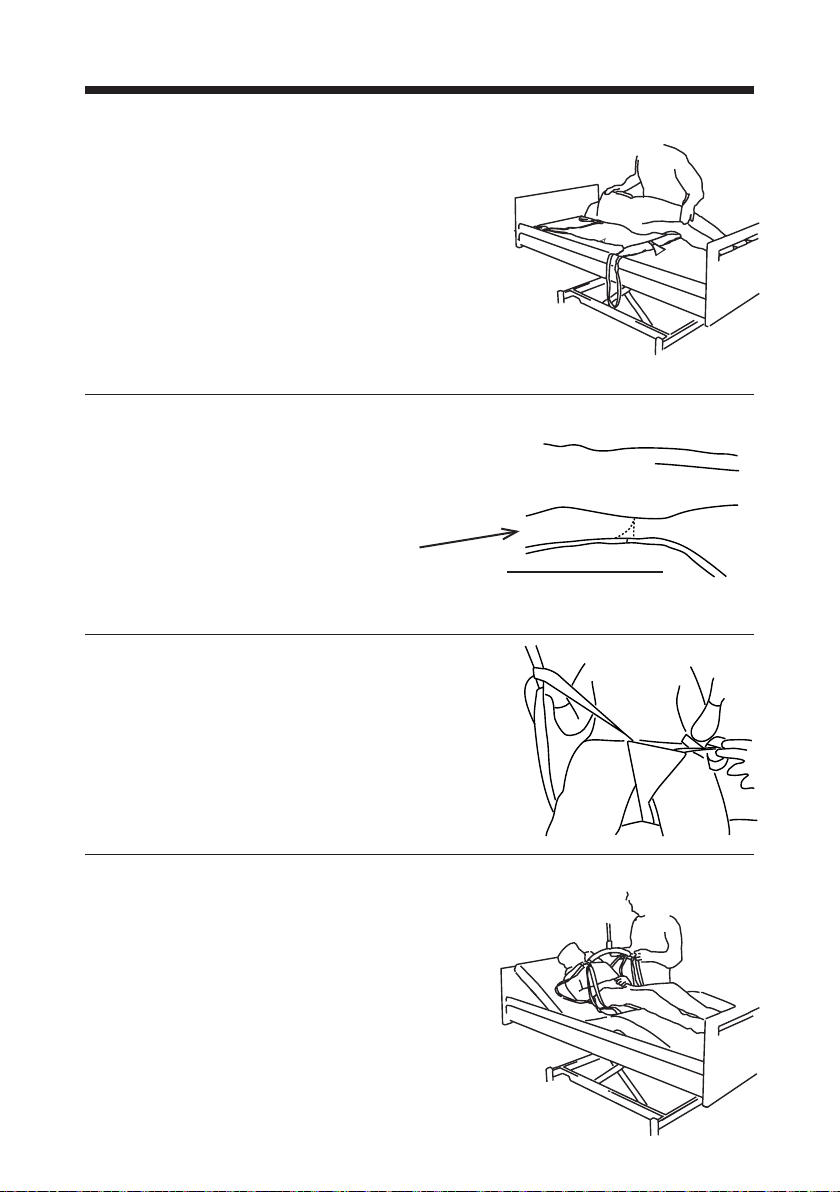
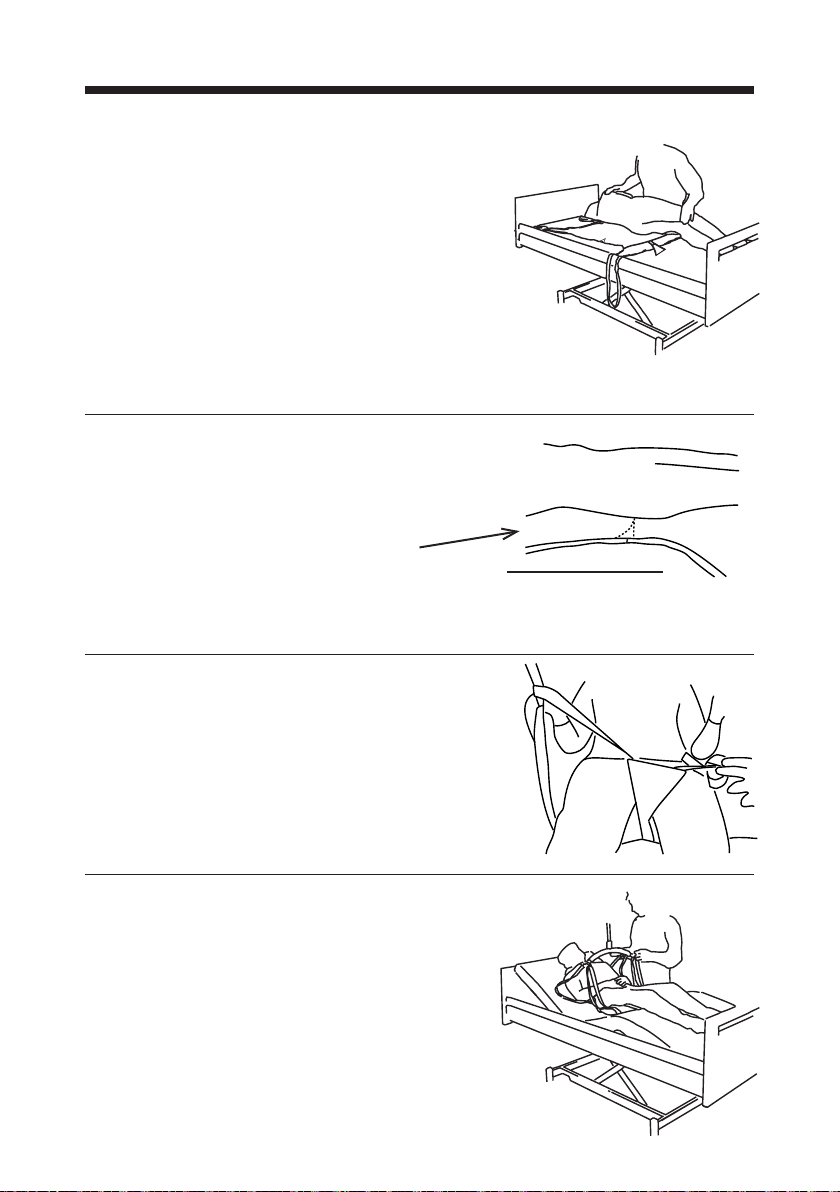
7.00 Placing Sit-On Comfort
Sit-On Comfort slings must always be put
on in a lying position.
Bend or cross one leg (upper) towards
the side you wish to roll the user.
Pass the arm on the same side forward
over the chest.
Have the user turn his/her head in the
same direction.
To ensure the sling is centered, the center
mark on the sling should follow the user’s
backbone.
Position the dart of the sling opposite the
user’s hip.
Turn the user onto his/her back and
pull the sling out on the other side.
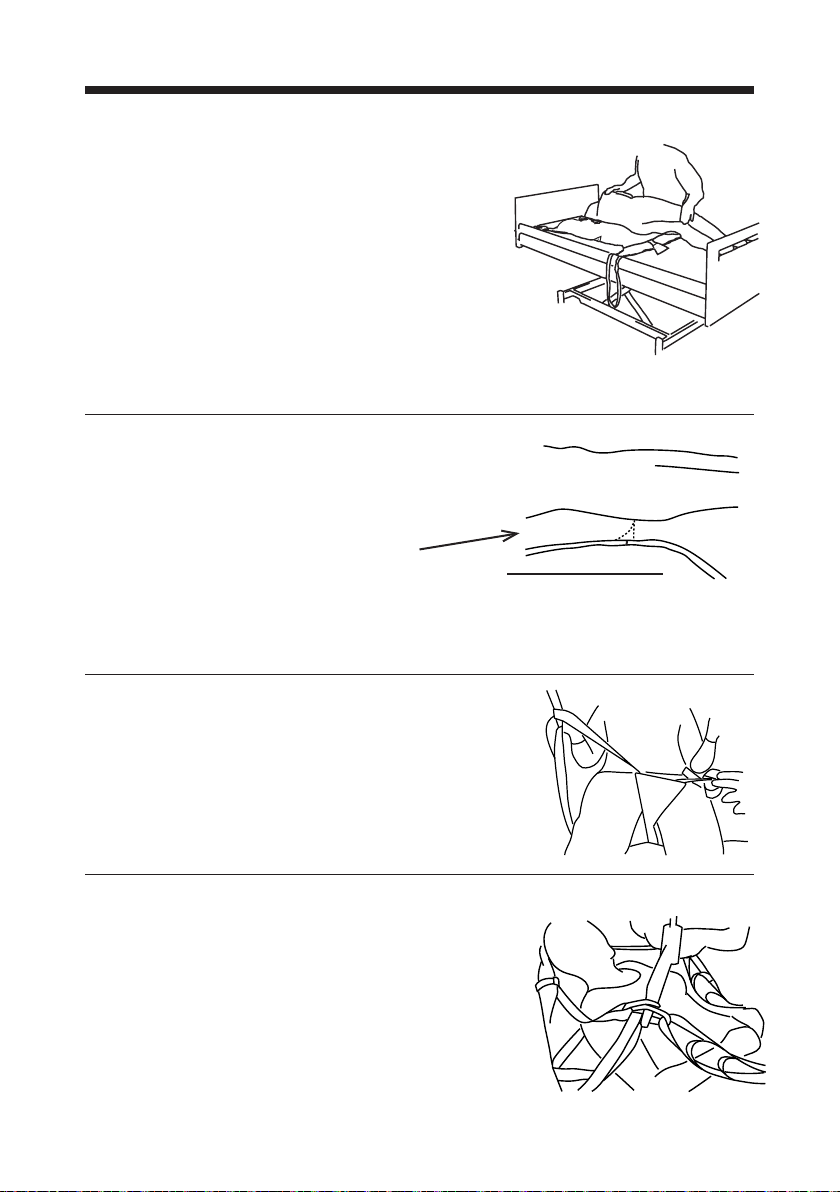
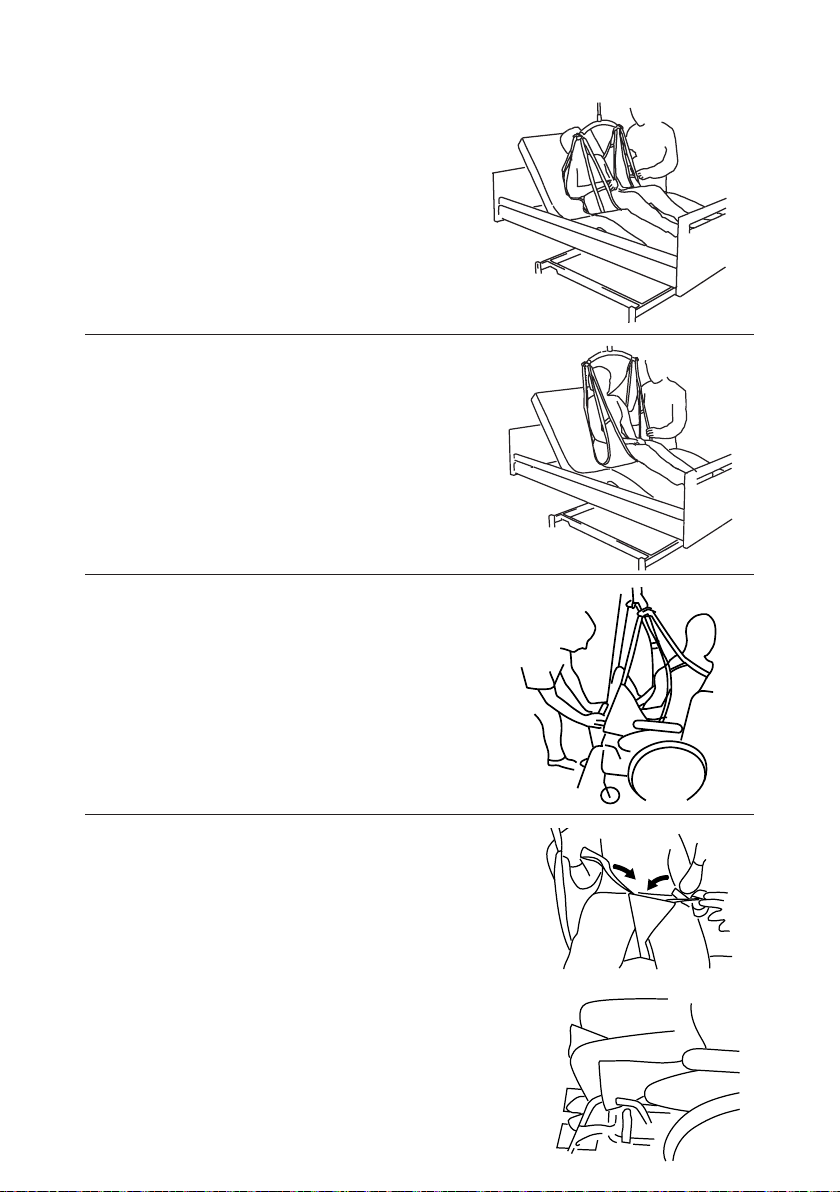
Thread the two leg loops up between
the thighs and insert the two lower
lifting straps.
© Guldmann 11/2014 # 900696_3
Make sure to use the correct width of lifting
hanger.
Check that the sling does not move up
under the thighs when lifting from a lying
position.
Attach the lifting straps on the lifting
hanger.
23
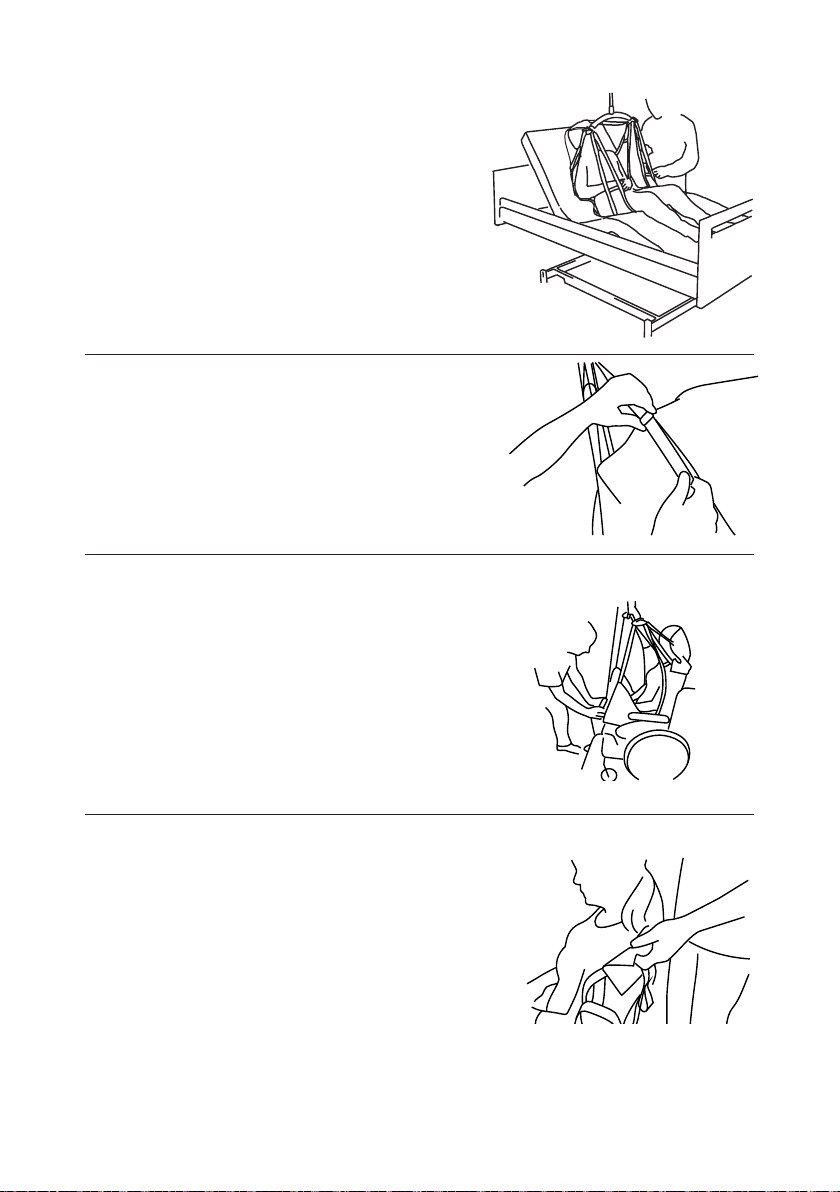
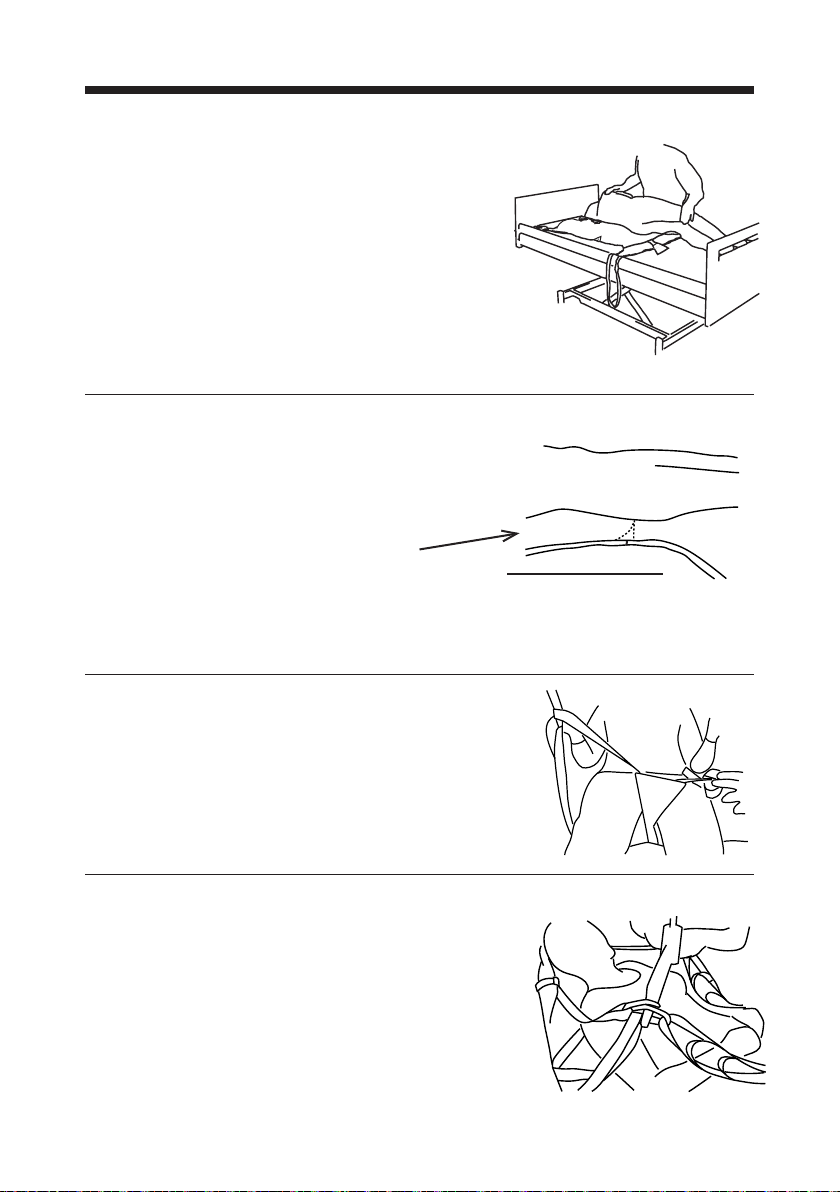
Adjust the bed’s position to sitting
Lifting with the Sit-On Comfort sling should
always take place from a sitting position.
The user’s degree of body control
determines whether the arms should be
inside or outside the sling.
If a person is paralysed on one side, the
paralysed arm should be inside the sling
Lift until all straps are taut and now check
all attachments.
It is a good idea to lower the height of the
bed before starting to lift the user.
It feels more secure and you need not
lift the user higher than necessary.
Do these stages in reverse when the user
is being put back into bed.
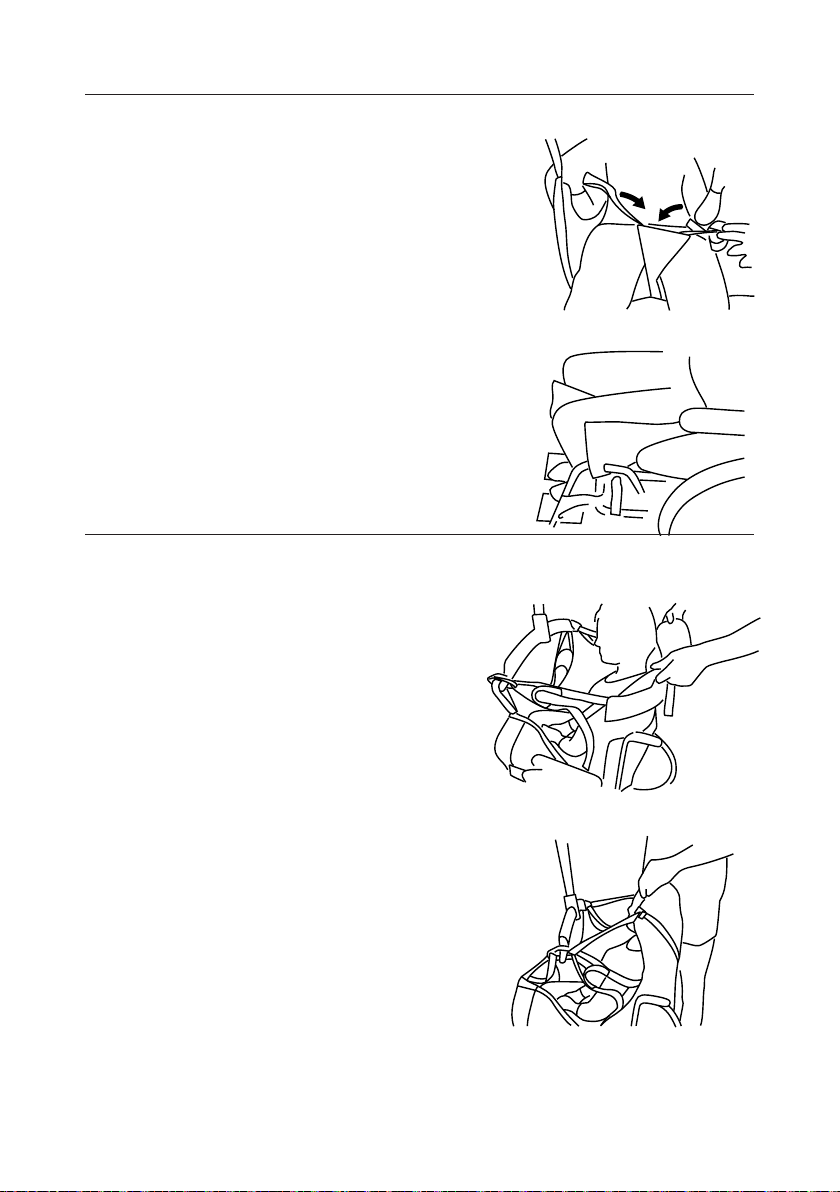
When the user is placed in a wheelchair
tip the chair slightly backwards and push
against the user’s knees to get the user as
far back in the chair as possible.
The two leg loops can be placed
in the pocket.
24
© Guldmann 11/2014 # 900696_3
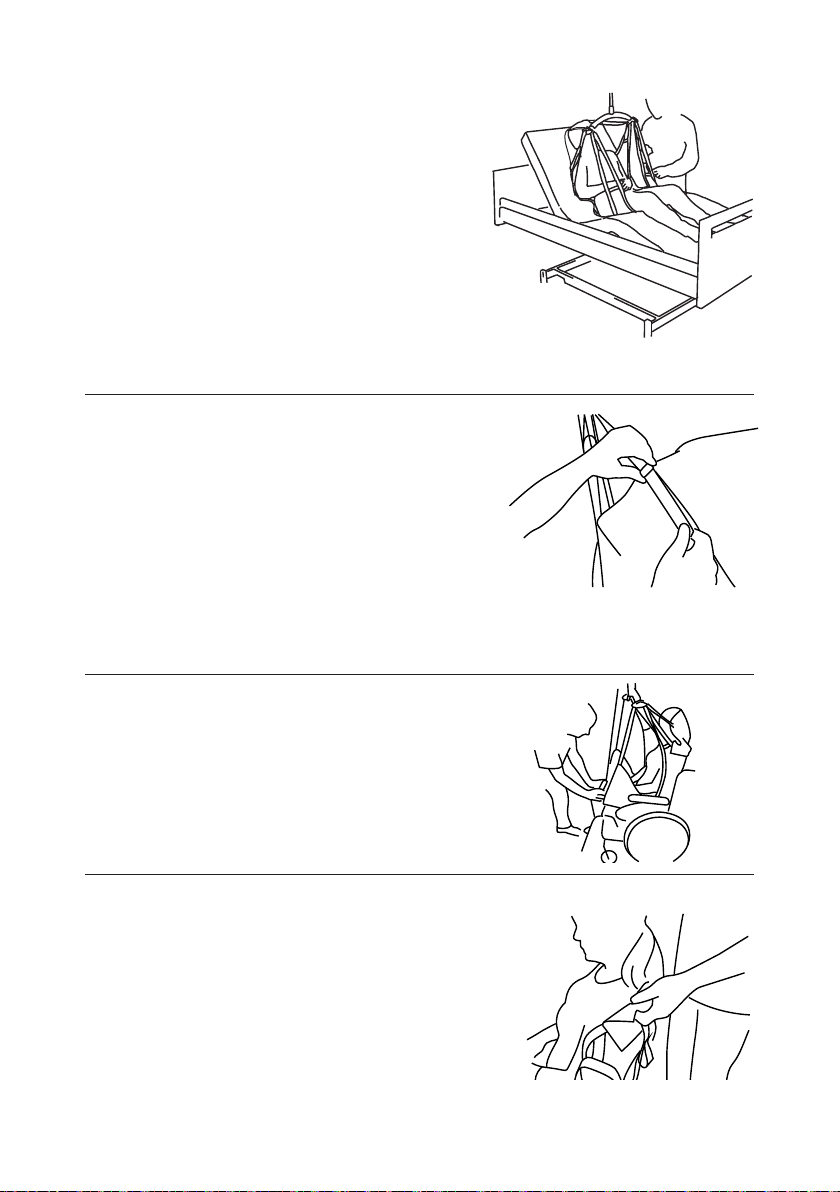
8.00 Placing Sit-On Comfort High
The Sit-On Comfort High slings should
always be put on in a lying position.
Bend or cross one leg (upper) towards
the side you wish to roll the user.
Pass the arm on the same side forward
over the chest.
Have the user turn his/her head in the
same direction.
To ensure the sling is centered, the center
mark on the sling should follow the user’s
backbone.
Position the dart of the sling opposite the
user’s hip.
The upper edge of the sling
must support the user’s head.
Turn the user onto his/her back and pull
the sling out on the other side.
© Guldmann 11/2014 # 900696_3
Thread the two leg loops up between
the thighs and insert the two lower lifting
straps.
Make sure to use the correct width of lifting
hanger.
Check that the sling does not move up
under the thighs when lifting from a lying
position.
Attach the lifting straps on the lifting hanger.
25
Adjust the bed’s position to sitting
Lifting with the Sit-On Comfort High
sling must always take place from a
sitting position.
If necessary, adjust the straps on the head
support.
The user can now be placed in the
wheelchair.
The head support can be folded away
behind the user.
26
© Guldmann 11/2014 # 900696_3

The two leg loops can be placed in the
pocket.
Lifting from the wheelchair.
Attach the lifting straps on the
lifting hanger.
© Guldmann 11/2014 # 900696_3
27

DE .......Sit-On Comfort und Sit-On Comfort High
Vers. 3.00
Artikelnummer:
2930X1 Sit-On Comfort
2840X1 Sit-On Comfort High
1.00 .........Zweck und Verwendung .......................................29
1.01 .........Hersteller ....................................................29
1.02 .........Zweck .......................................................29
1.03 .........Wichtige Sicherheitsmaßnahmen .................................29
1.04 .........Anwendung ..................................................30
2.00 .........Wartung .....................................................31
2.01 .........Reinigung ....................................................31
2.02 .........Die täglichen Wartungsaufgaben des Besitzers ......................31
2.03 .........Entsorgung der Sitze ...........................................32
3.00 .........Wartung und Lebensdauer .....................................32
3.01 .........Sicherheitsinspektionen/Wartungen ................................32
3.02 .........Lebensdauer .................................................34
4.00 .........Technische Daten ............................................35
5.00 .........EU-Konformitätserklärung .....................................35
6.00 .........Erklärung zur Umweltpolitik - V. Guldmann A/S ....................35
7.00 .........Positionieren des Sit-On Comfort ...............................36
8.00 .........Positionieren des Sit-On Comfort High ...........................38
28
© Guldmann 11/2014 # 900696_3
 Loading...