

Guldmann GH3, GH3 Twin, GH3 Twin Series, GH3 Twin 500 Series, GH3 Twin 250 Series User Manual
GB/US ....GH3 Twin Ceiling Hoist
Vers. 9.00
1
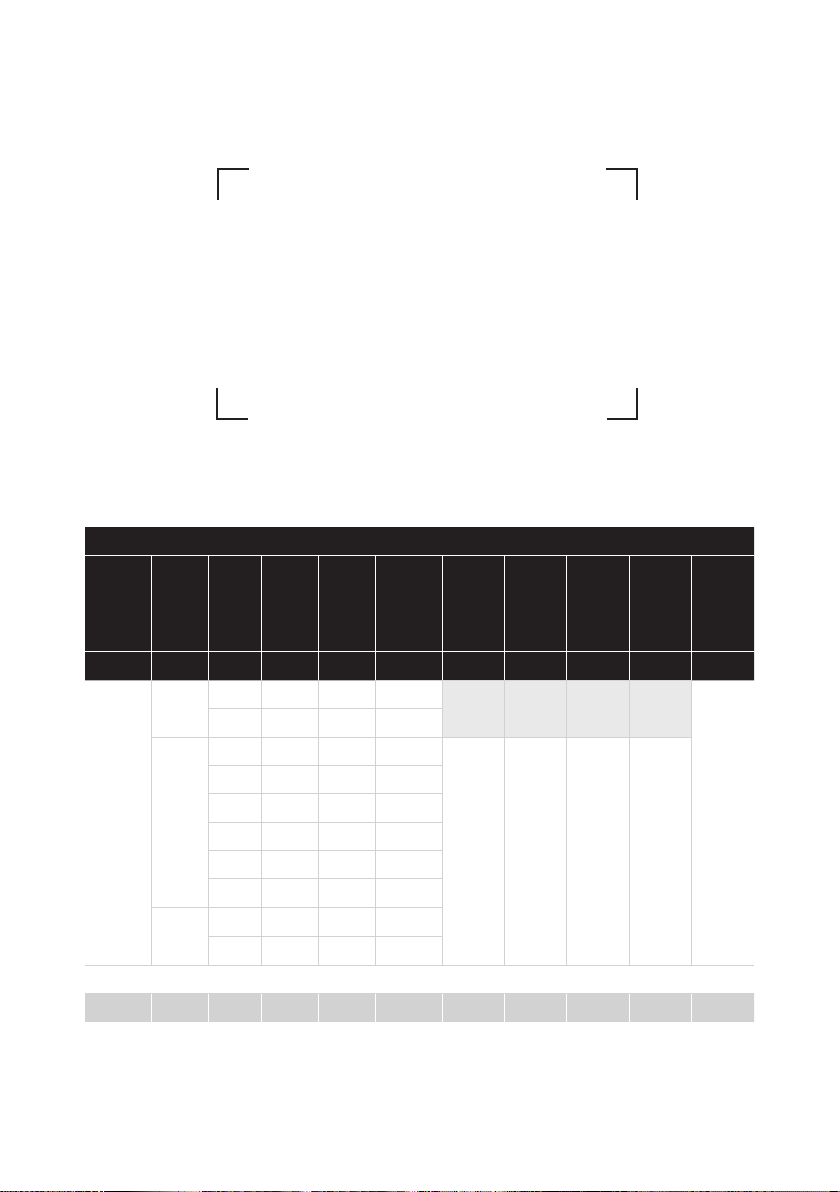
GH3 Lifting modules, congurations
Guldmann
hoist type
GH3 (x) xxx x x x (x) x x x x
GH3 200 1 1 0 - 1 - 2 Hand
GH3 X Y Z Z Z Q Q Q Q Q
Product
Load inkgNumber
line
250 1 1 0 - 1 - 2
+ 250 1 1 0 - 1 - 2 None:
275 1 1 0 - 1 - 2
300 1 2 0 - 2
350 1 2 0 - 2
375 1 2 0 - 2
400 1 2 0
Twin 250 2 2 0
500 2 2 0
of lifting
straps
Number
of lifting
motors
Number of
horizontal
drive
motors
WIFI
module
empty
WIFI: 1
Scale
module
None: 0
Scale: 1
Class III
Scale: 2
CLM
module
None: 0
CLM: 1
Service
module
None: 0
Service: 1
User
interface
control: 0
IR: 1
2
© Guldmann GB/US- 12/2018 • # 550383_9.00

GH3 Twin Ceiling Hoist
Item nos:
552xxx
1.00 .........Purpose and use ..............................................5
1.01 .........Manufacturer ..................................................5
1.02 .........Intended use ..................................................5
1.03 .........Conditions for use ..............................................5
1.04 .........Important/Precautions ...........................................6
1.05 .........Load limits on GH3 system .......................................7
1.06 .........Unpacking and Preparation .......................................7
1.07 .........Placing a new GH3 Hoist in an existing rail system ....................7
1.08 .........Power supply ..................................................8
1.09 .........Installation of GH3 Cross hanger and Horizontal lifter ..................9
1.10 .........Lifting sling ...................................................11
2.00 .........Description of functions .......................................12
2.01 .........Pictograms ...................................................12
2.02 .........Indicator lamps and audio signals .................................13
2.03 .........Operation ....................................................14
2.04 .........Supplementary modules, GH3+. . . . . . . . . . . . . . . . . . . . . . . . . . . . . . . . . . . 16
2.05 .........Conguration of supplementary modules, GH3 .......................20
2.06 .........Important before using the Scale module and Class III scale ............21
2.07 .........Scale module (GH3+ with integrated scale module) ..................22
2.08 .........Class III Scale (GH3+ with Class III Scale) ..........................25
2.09 .........Calibration/verication of Classe III Scale ...........................30
2.10 .........CLM module (GH3 with statistical function for management use) ........31
2.11 .........Service module (GH3 with service module) .........................33
2.12 .........Safety functions ...............................................35
2.13 .........Charging/connection ...........................................37
2.14 .........Accessories ..................................................37
3.00 .........Environmental conditions ......................................38
4.00 .........Maintenance and storage ......................................39
4.01 ........Cleaning and disinfection ........................................39
4.02 .........Storage .....................................................39
4.03 .........How to prevent/avoid corrosion? ..................................39
4.04 .........The owner’s daily maintenance duty ...............................40
4.05 ........Disposal of the GH3 including batteries ............................40
5.00 ........Service and lifetime ...........................................40
5.01 .........Lifetime .....................................................40
5.02 .........Safety/service inspections .......................................40
5.03 .........Troubleshooting ...............................................41
© Guldmann GB/US-12/2018 • # 550383_9.00
3

6.00 .........Classication ................................................41
7.00 .........Certicates ..................................................43
8.00 .........Technical specications .......................................43
9.00 .........EC-Declaration of conformity ...................................46
10.00 ........Type approval certicate .......................................47
11.00 ........Environmental policy statement - V. Guldmann A/S ................48
12.00 ........EMC Information .............................................48
. . . . . . . . . . . . . USA and countries outside the EU ..............................52
. . . . . . . . . . . . . A. Users guide ...............................................52
. . . . . . . . . . . . . B. WARRANTY ...............................................52
4
© Guldmann GB/US- 12/2018 • # 550383_9.00

1.00 Purpose and use
1.01 Manufacturer
V. Guldmann A/S
Graham Bells Vej 21-23A
DK-8200 Aarhus N
Tel. + 45 8741 3100
Fax + 45 8741 3131
www.guldmann.com
1.02 Intended use
The GH3 Twin (hereafter called GH3) is a ceiling-mounted hoist, which covers
the requirements for heavy and special lifting or moving of persons.
GH3 is intended for use in professional healthcare facility environments
where operators with medical training are continually available.
1.03 Conditions for use
The use of the GH3 is subject to the following:
• The GH3 should only be used by trained personnel.
• The maximum nominal load, 250 kg (550 lbs), 500 kg (1100 lbs), respectively,
must not be exceeded.
• The instruction offered by Guldmann to all customer groups in connection
with the purchase of a ceiling-mounted hoist has been received.
• The helper pays attention to the well-being of the user when using the
hoist.
• The hoist is used in rail systems which are installed, tested and approved
according to Guldmann’s stipulation.
• Only technicians who have been certied by Guldmann may install and
test the rail systems.
• The hoist is used with the Guldmann lifting hanger or with other suitable
hanger (section 1.09).
• The hoist is used with a Guldmann lifting sling or with other suitable slings
(section 1.10).
© Guldmann GB/US-12/2018 • # 550383_9.00
5

1.04 Important/Precautions
• Read the instructions carefully before using the GH3 and in connection
with cleaning and service of the hoist.
• The GH3’s maximum load must never be exceeded.
• The GH3 may only be used to lift a person.
• The red strap for the emergency stop and the emergency lowering must
be adjusted to the helpers reach, and must not be removed.
• The GH3 must not be used where there is a risk of it being splashed with
water.
• If a defect appears during use of the GH3, stop using the hoist and contact
the Guldmann Service Team for repairs.
• The GH3 is controlled by a microprocessor PCB, which can be damaged by
static electricity if touched without the necessary precautions, (see point 1.08)
• The electronics may only be serviced by Guldmann approved service
technicians.
• The lifting hanger must not be mounted or replaced when the GH3 hoist is
positioned over the patient.
• Do not modify this equipment without authorization of the manufacture
• The GH3 needs special precautions regarding EMC and needs to be installed
and put into service according to the EMC information provided in Chapter 11
EMC Information.
• Portable and mobile RF communications equipment can affect the GH3.
• The use of ACCESSORIES, transducers and cables other than those
specied, with the exception of transducers and cables sold by Guldmann A/S
of the GH3 as replacement parts for internal components, may result in
increased EMISSIONS or decreased IMMUNITY of the GH3.
• The GH3 should not be used adjacent to or stacked with other equipment
and that if adjacent or stacked use is necessary, the GH3 should be observed
to verify normal operation in the conguration in which it will be used.
• Transport of this equipment should only be undertaken after conditions
described in section 3.00 (Environmental conditions).
Re: EMC
If electromagnetic or other inuences occur between this product and other
products, these products must not be used together.
6
© Guldmann GB/US- 12/2018 • # 550383_9.00

1.05 Load limits on GH3 system
Read the label which indicate the maximum load limits for each component.
The components, e.g. lifting hanger, lifting sling, etc. labelled with the lowest
load limit determines the maximum load limit for the entire system.
This maximum load limit must not be exceeded.
Please note that the max load may change when different components are
used, such as lifting hangers, lifting slings, etc.
1.06 Unpacking and Preparation
Visual check of the GH3.
If the GH3 is thought to be damaged upon reception, the GH3 must not be
used before it has been checked and approved by a qualied person or the
Guldmann Service Team.
Contents of the box
5
1. GH3 hoist (leader)
2. GH3 hoist (follower)
3. Hand control
1
4. Transformer
5. Connector bar and cable
6. Manual (not illustrated)
3
7. Label for rail system
(not illustrated)
1.07 Placing a new GH3 Hoist in an existing rail system
Please notice, placing a new GH3 hoist in an existing rail system it must
be ensured that:
• The rated max load of the rail system, must be equal or higher than the
max load of the new hoist.
– If there is no max load mentioned on the rail system, the rail system
must then be checked according to the guideline in the Installation
guide (distance between bracket according to max load)
– If the brackets are not visible, then a load test with 1,5 x max load of
the hoist must be performed minimum 20 min. The deection of rails must
not be higher than 1/200 of the length of the rail.
– If it is not possible to do any of the above mentioned, please contact
Guldmann or their representative.
2
4
• If the rail system can not be rated to the same max load as the hoist,
then extra brackets must be installed according to the Installation
guide (distance between bracket according to max load).
© Guldmann GB/US-12/2018 • # 550383_9.00
7

Class I equipment
Fixed rail systems are class I equipment and must be installed by a qualied
technician or by Guldmann Service Team.
Equipment is disconnected from Supply Mains by breaking the mains breaker
switch.
Emergency stop device
The emergency stop device must be reset in order to connect power to the
product. To do this, push the yellow reset button (see point 2.09).
1.08 Power supply
GH3 is equipped with batteries that require regular recharging. The power
supply for charging and the battery charging point must be connected by a
qualied engineer or by Guldmann Service Team.
The transformer supplied must always be used.
Safety concerning static electricity (ESD)
Service technicians and installers must use an ESD-safety package
consisting of a mat, a ground wire, and a bracelet. The technician/installer
connects the mat to a grounding point. The technician/installer must then
put on the bracelet and connect it to the mat. If it is not possible to nd a
grounding point, the mat and the bracelet must be used as a minimum.
Only then is it allowed to work with the PCB Board or components where it is
possible to come into contact with the PCB Boar
8
© Guldmann GB/US- 12/2018 • # 550383_9.00
1.09 Installation of GH3 Cross hanger and Horizontal lifter
Lifting hangers from other manufacturers
Guldmann shall not be liable for faults or accidents that may occur as a result
of using lifting hangers made by other manufacturers.
If there is any doubt about the selection or use of a lifting hanger,
please contact your supplier.
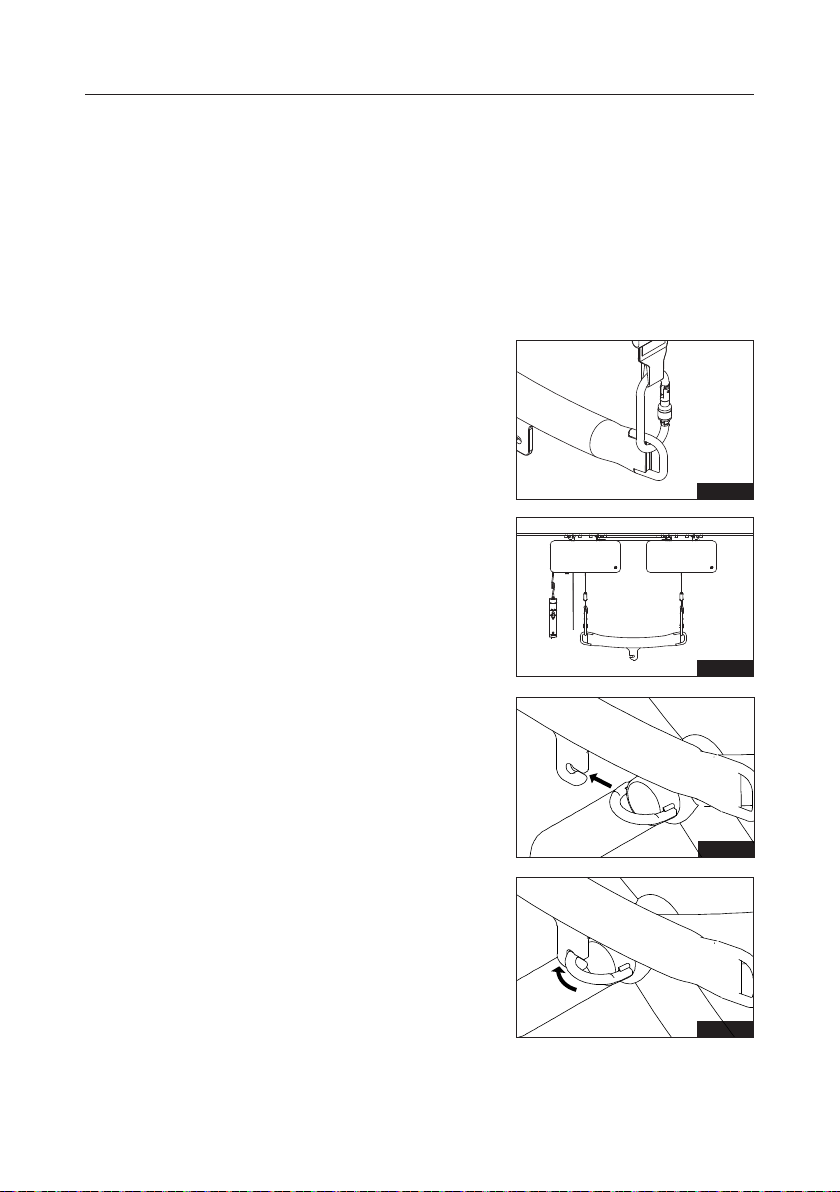
The lifting hanger can be installed to the lifting strap without the use of any
tools.
Installation of GH3 Cross
lifting hanger
1.
Start with the installation of the GH3 lifting
beam. Place each of the lifting straps oval
hook in the eye of the GH3 lifting beam,
one on each side (Fig. 1 and 2).
Important:
Check that none of the lifting straps
are twisted after the installation of the
lifting beam and ensure that the lifting
beam is horizontal during the lift!
Fig. 1
Fig. 2
2. Tilt GH3 Cross hanger to slide the round
hoop in to the hook (Fig. 3)
3. Turn the at part of the Hoop out of
the hook before lowering the GH3
Cross hanger to horizontal position
(Fig. 4 and 5)
© Guldmann GB/US-12/2018 • # 550383_9.00
Fig. 3
Fig. 4
9
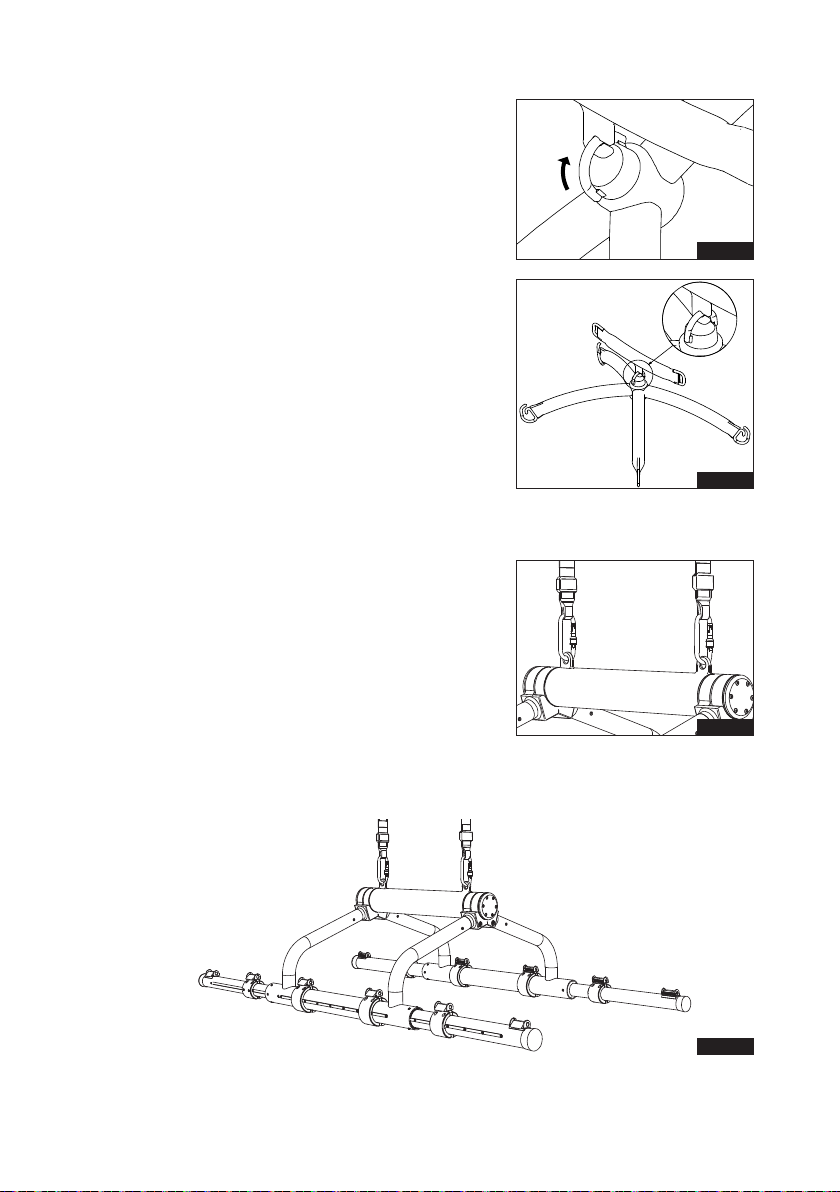
5. The GH3 Cross hanger is ready to use,
when it is able to move freely in a
horizontaI position (Fig. 6)
Installation of GH3 Horizontal lifter
Use the oval hook to install the Horizontal
lifter. (Fig. 7 and 8)
Important:
Check that none of the lifting straps are
twisted after the installation of the GH3
Horizontal lifter
Fig. 5
A
Fig. 6
Fig. 7
Fig. 8
10
© Guldmann GB/US- 12/2018 • # 550383_9.00

1.10 Lifting sling
A lifting sling with four to six lifting straps designed for mounting on hooks
should be used when using a Guldmann lifting hanger. Place the straps on
the hooks.
Slings made by other manufacturers
Guldmann shall not be liable for faults or accidents that may occur as a
result of using lifting slings made by other manufacturers.
If there is any doubt about the selection or use of a lifting sling,
please contact your supplier.
Guldmann shall not be liable for faults or accidents due to incorrect use of
the lifting sling, or for reasons of inadequate attention on the part of the carer
or user.
Working with the GH3
The GH3 runs easily in the rail system and does not have any special
requirements for space or power in connection with moving. Attention can
thus be fully focused on the user’s functional level and the helper’s technique.
If the hoist is used correctly, the user should only be lifted to the extent that
she/he is clear of the surface and should be moved at this height.
Attaching the lifting sling to GH3 Cross hanger
Place the straps from the lifting sling on the hooks on the lifting hanger. Start
with the uppermost set of straps (from the back) and then take the lowest set
of straps (from the legs). Refer to section 2.14 Cross Hanger 550800 with
Connecting Bar 550544.
Attaching the lifting sheet to Horizontal lifter, foldable
Read the instructions in the user manual for the Horizontal lifter.
Important!
Only persons who have received competent instruction regarding the use of
lifting equipment and tting of slings should use the hoist.
Plan the move. Avoid leaving the user in the lifting sling unattended.
The hoist lifts quickly and powerfully. Before lifting, check that the user is
completely free of his/her surroundings. The user’s head, arms, hands and
feet must not be in danger of becoming trapped. Be careful with any tubes
and wires that are attached to the user. The user should not hold the lifting
strap during the moving procedure as there is a risk of crushing between
the strap’s hook and the hoist. Check that the hand control and hand control
cable is free of hanger, patient and other object before the hoist is activated
up or down moved.
If the hoist is used correctly, the user should only be lifted to the extent that
she/he is clear of the surface and should be moved at this height.
© Guldmann GB/US-12/2018 • # 550383_9.00
11
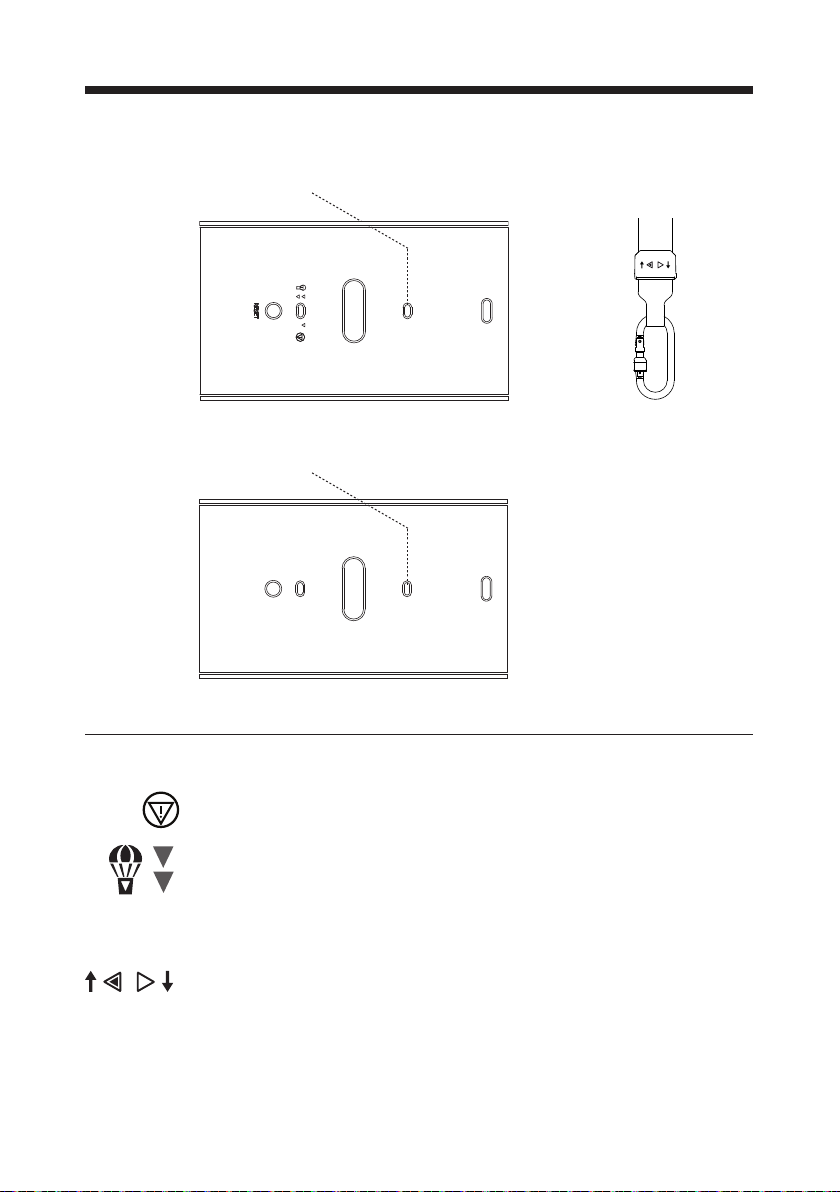
2.00 Description of functions
Information panel on the GH3 bottom surface on leader hoist.
Lamp indicator Information on strap
Information panel on the GH3 bottom surface on follower hoist.
Lamp indicator
2.01 Pictograms
Emergency stop
Emergency lowering function
Reset emergency stop
RESET
Tilt function
12
© Guldmann GB/US- 12/2018 • # 550383_9.00
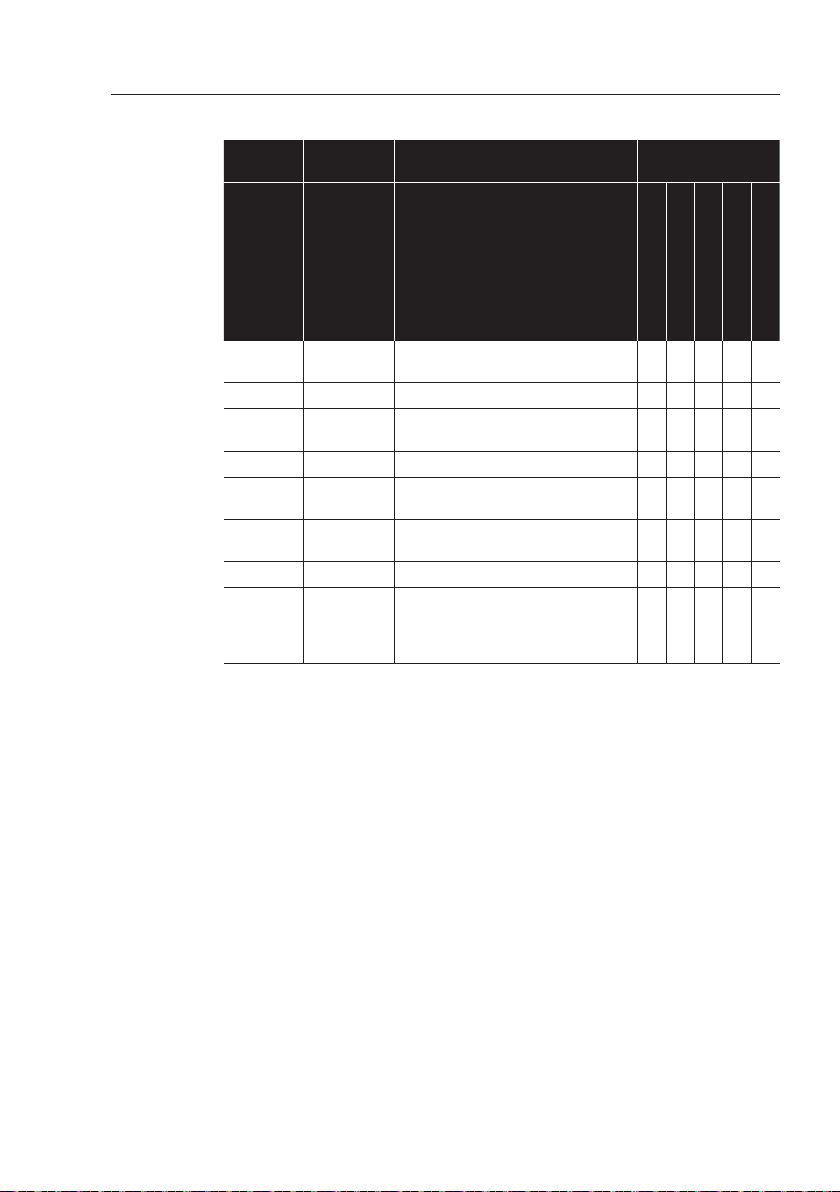
2.02 Indicator lamps and audio signals
Status Indicator
Off
Off
lamps
Audio signals Possible GH3
Functions
Up
Down
Emergency lowering
Horizontal drive motor
– stand by
All OK Green x x x x x
No charging Yellow,
3 x Beep after 60 sec x x x x x
after 15 sec
Low battery Yellow x x x x x
Fault on
Yellow Beeps at button activation x x
hoist
Battery
critically low
Yellow Beeps at button activation
that is not permitted
x x x
Over load Yellow Beeps at button activation x x
Service date
Yellow Beeps at button activation x x x x x
exceeded
more than
x
)
60 days
x
) Only if the hoist is with Service modul
Communication
© Guldmann GB/US-12/2018 • # 550383_9.00
13
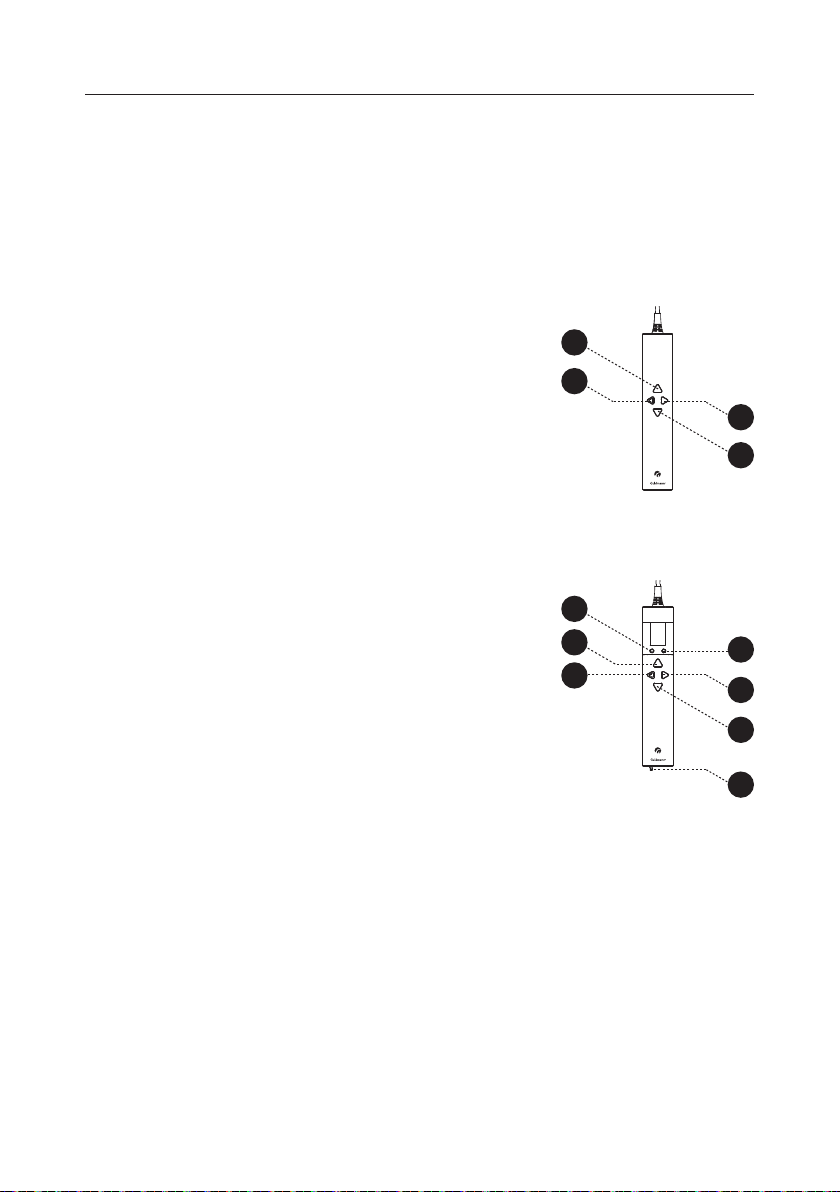
2.03 Operation
Hand control
The GH3 is switched on automatically when
a button on the hand control is pressed.
The GH3 is switched off automatically after
approx. 8 minutes without activation.
GH3
1. Lift
2. Lower
3. Lift leader hoist. (Tilt fuction)
4. Lower leader hoist. (Tilt fuction)
GH3 with sumplementary modules
1. Lift
2. Lower
3. Lift leader hoist. (Tilt fuction)
4. Lower leader hoist. (Tilt fuction)
5. Function selection button
(section 2.05, supplementary modules)
6. Function selection button
(section 2.05, supplementary modules)
7. PDA interface (mini USB) x)
PDA /Netbook
1
3
4
2
5
1
3
6
4
2
7
x) Accessories to CLM module
(see Supplementary modules, GH3 (section 2.04))
14
© Guldmann GB/US- 12/2018 • # 550383_9.00
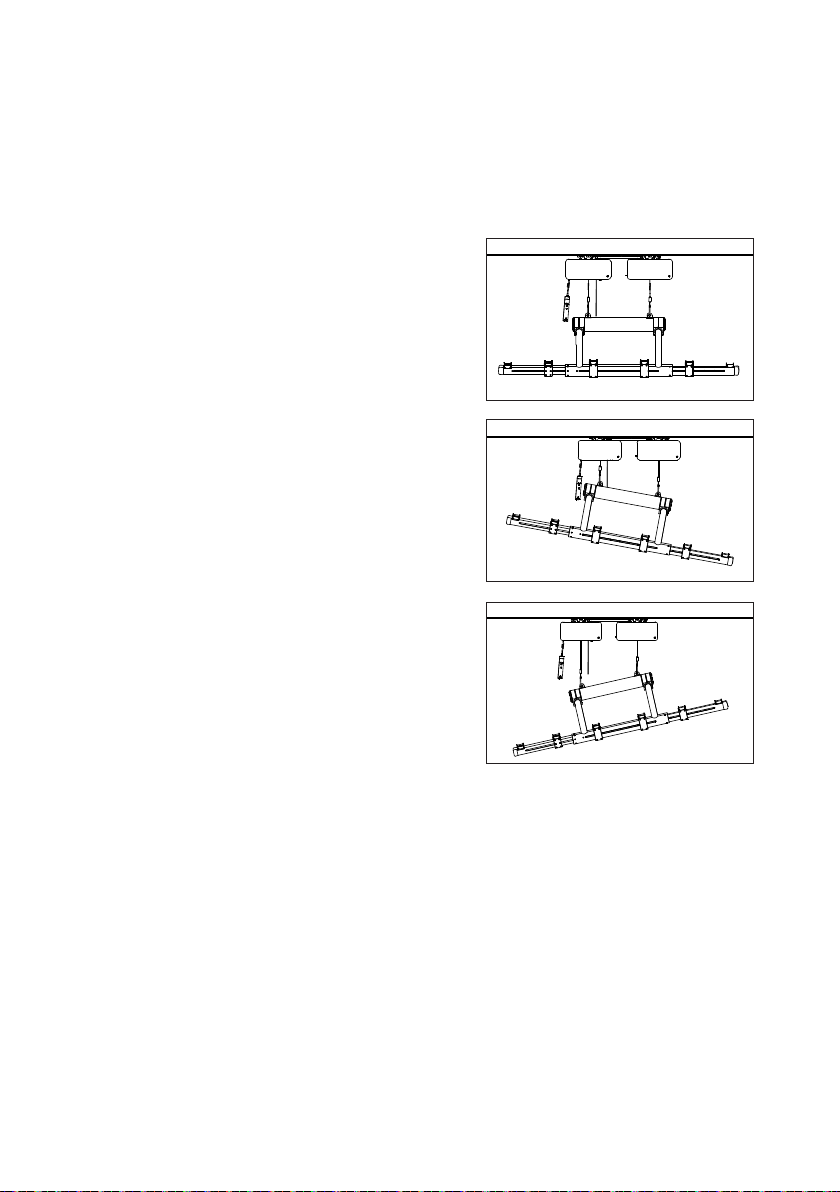
Using tilt function on GH3
The GH3 has a tilt function. This function can only be used with
a horizontal lifter. (See section 2.03 for positions of hand control buttons)
1. When the buttons 1 or 2 are pressed
both hoists will lift or lower the
horizontal lifter.
2. When the button 3 is pressed only the
leader hoist lifts the horizontal lifter.
3. When the button 4 is pressed only the
leader hoist will lower the horizontal
lifter.
© Guldmann GB/US-12/2018 • # 550383_9.00
15
Setup
Setup
Change
Language
English
OK
Change
Language 1-8
Dansk
OK
Change
Language 2-8
Deutsch
OK
Change
Language 3-8
Svenska
Change
Units
KG
Change
Units
lbs
Change
Units
KG
OK
OK
2.04 Supplementary modules, GH3+
There are various supplementary modules for the GH3+
• CLM module (GH3+ with statistical function for management use)
• Service module (GH3+ with Service module)
• Scale module (GH3+ with integrated scale)
• Class III Scale (GH3+ with integrated Class III Scale)
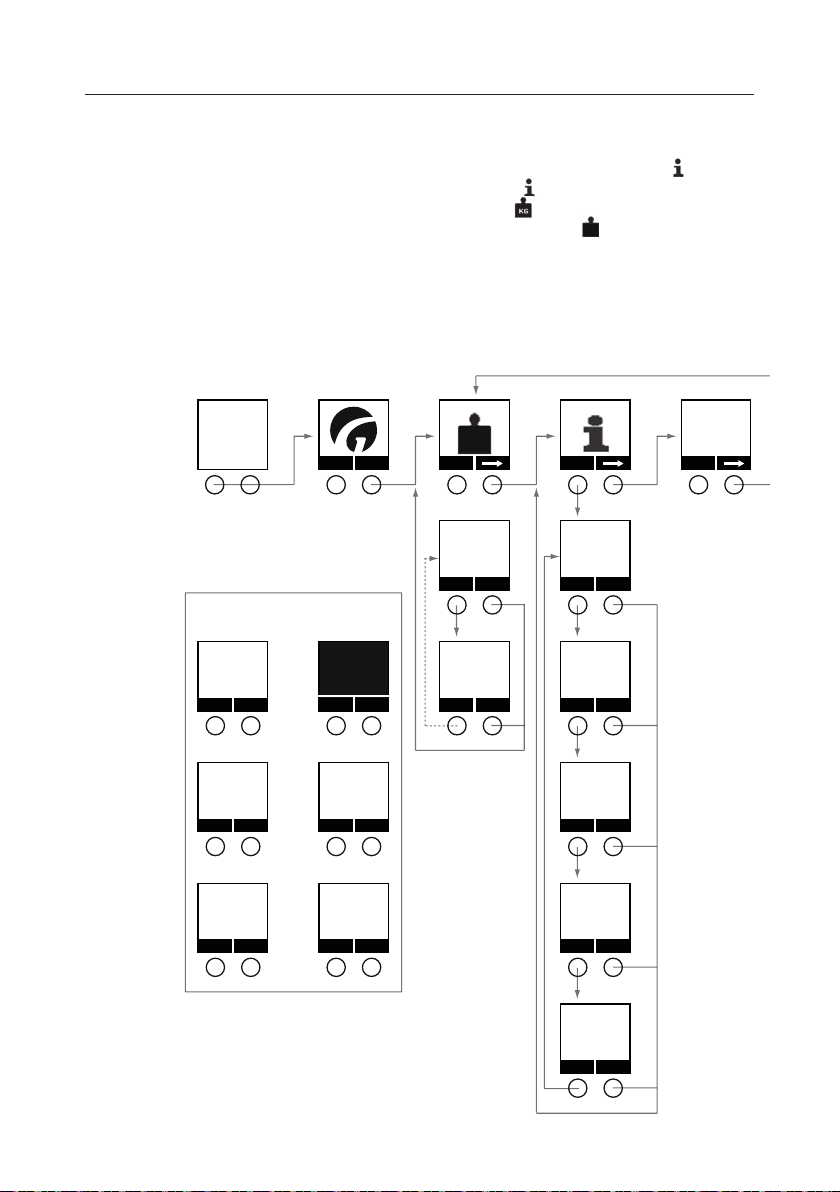
Menu structure, GH3/GH3+ with supplementary modules
• Scale module
• CLM module
• Service module
III
Next
service
2008.04.22
OK
Low battery
OK
No charging
OK
Pop-ups
Service date
exceeded
call service
Critical low
battery
Fault hoist
Scale
KG
OK
Start
Scale KG
248.0
ExitZero
Scale KG
0.0
Exit
OK
OK
ExitZero
CLM
Show
CLM 1-5
Lifetime
total lifts
987
ExitNext
CLM 2-5
Lifetime
heavy lifts
232
ExitNext
CLM 3-5
Last week
total lifts
60
ExitNext
CLM 4-5
Lifts per
week avg
72
ExitNext
CLM 5-5
Hoist ID
Hoist #1
ExitNext
Next service
2008.04.22
16
© Guldmann GB/US- 12/2018 • # 550383_9.00
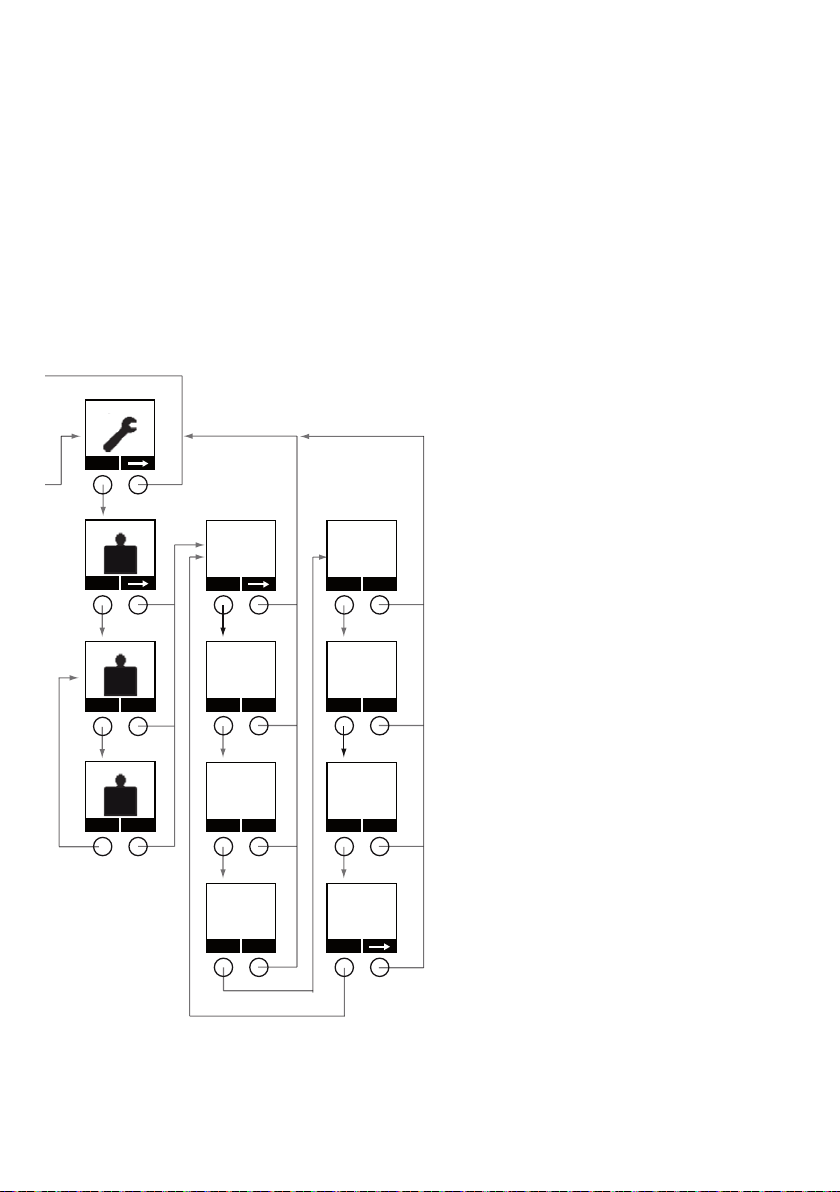
Setup
Setup
Units
Change
Units
Change
Units
Change
lbs
Language
KG
English
Change
Language 1-8
Dansk
Change
OK
OK
Language 2-8
KG
OK
Deutsch
Change
OK
Language 3-8
Svenska
Change
OK
Language 4-8
Italianio
Change
OK
Language 5-8
Espanol
Change
OK
Language 6-8
Francaise
Change
OK
Language 7-8
Portuguese BR
Change
© Guldmann GB/US-12/2018 • # 550383_9.00
17
 Loading...