

Page 1

- 1 -
Model #B125C
Quick Start Guide
For more information about how to use this cellphone, please go to
www.burnerphone.com to download the complete user manual. Additionally, from the
website you can also download a FAQ, find software information, etc. Need more help?
Call our Customer Support Line at 1-844-8BURNER (1-844-828-7637)
2017
Version 5.510 English
Disponible en Español at Burnerphone.com
Page 2

- 2 -
YOUR NEW WIRELESS PHONE ........................................................................................ - 3 -
WHAT’S IN THE BOX? ......................................................................................................... - 3 -
CHARGING THE BATTERY ................................................................................................ - 4 -
PHYSICAL FEATURES OF YOUR NEW WIRELESS PHONE ....................................... - 4 -
SIM CARD ................................................................................................................................ - 6 -
START UP & BURN-IT CONFIGURATION .................................................................... - 6 -
HOME SCREEN ...................................................................................................................... - 6 -
KEYBOARD: ENTERING INFORMATION ...................................................................... - 6 -
SETTING UP WI-FI ................................................................................................................ - 7 -
DEVICE MEMORY .................................................................................................................. - 7 -
ADDING A MICRO SD MEMORY CARD ....................................................................... - 7 -
CALL FEATURES .................................................................................................................... - 8 -
ADDING A GOOGLE ACCOUNT ................................................................................... - 8 -
TEXT AND MMS MESSAGING ........................................................................................... - 8 -
INTERNET BROWSER AND SURFING THE WEB ........................................................ - 9 -
CONTACTS ............................................................................................................................. - 9 -
TAKING PHOTOS AND VIDEOS ..................................................................................... - 10 -
VIEWING PHOTOS AND VIDEOS .................................................................................. - 10 -
CHANGING BASIC PHONE SETTINGS ....................................................................... - 11 -
ADDING A BLUETOOTH DEVICE ................................................................................. - 11 -
FACTORY DATA RESET...................................................................................................... - 12 -
SAFETY AND LEGAL INFORMATION .......................................................................... - 12 -
SOFTWARE AND CONTENT COPYRIGHT NOTICES ........................................... - 15 -
EMERGENCY CALLS (911) ............................................................................................... - 16 -
FCC NOTICE ........................................................................................................................ - 16 -
HEARING AID COMPATIBILITY (HAC) ........................................................................ - 17 -
Page 3
- 3 -
Your New Wireless Phone
Congratulations on the purchase of your new wireless telephone. This Quick Start
Guide will help you go through the basic features of your device to get you started.
For more detailed information , please refer to the User Manual available at
www.burnerphone.com.
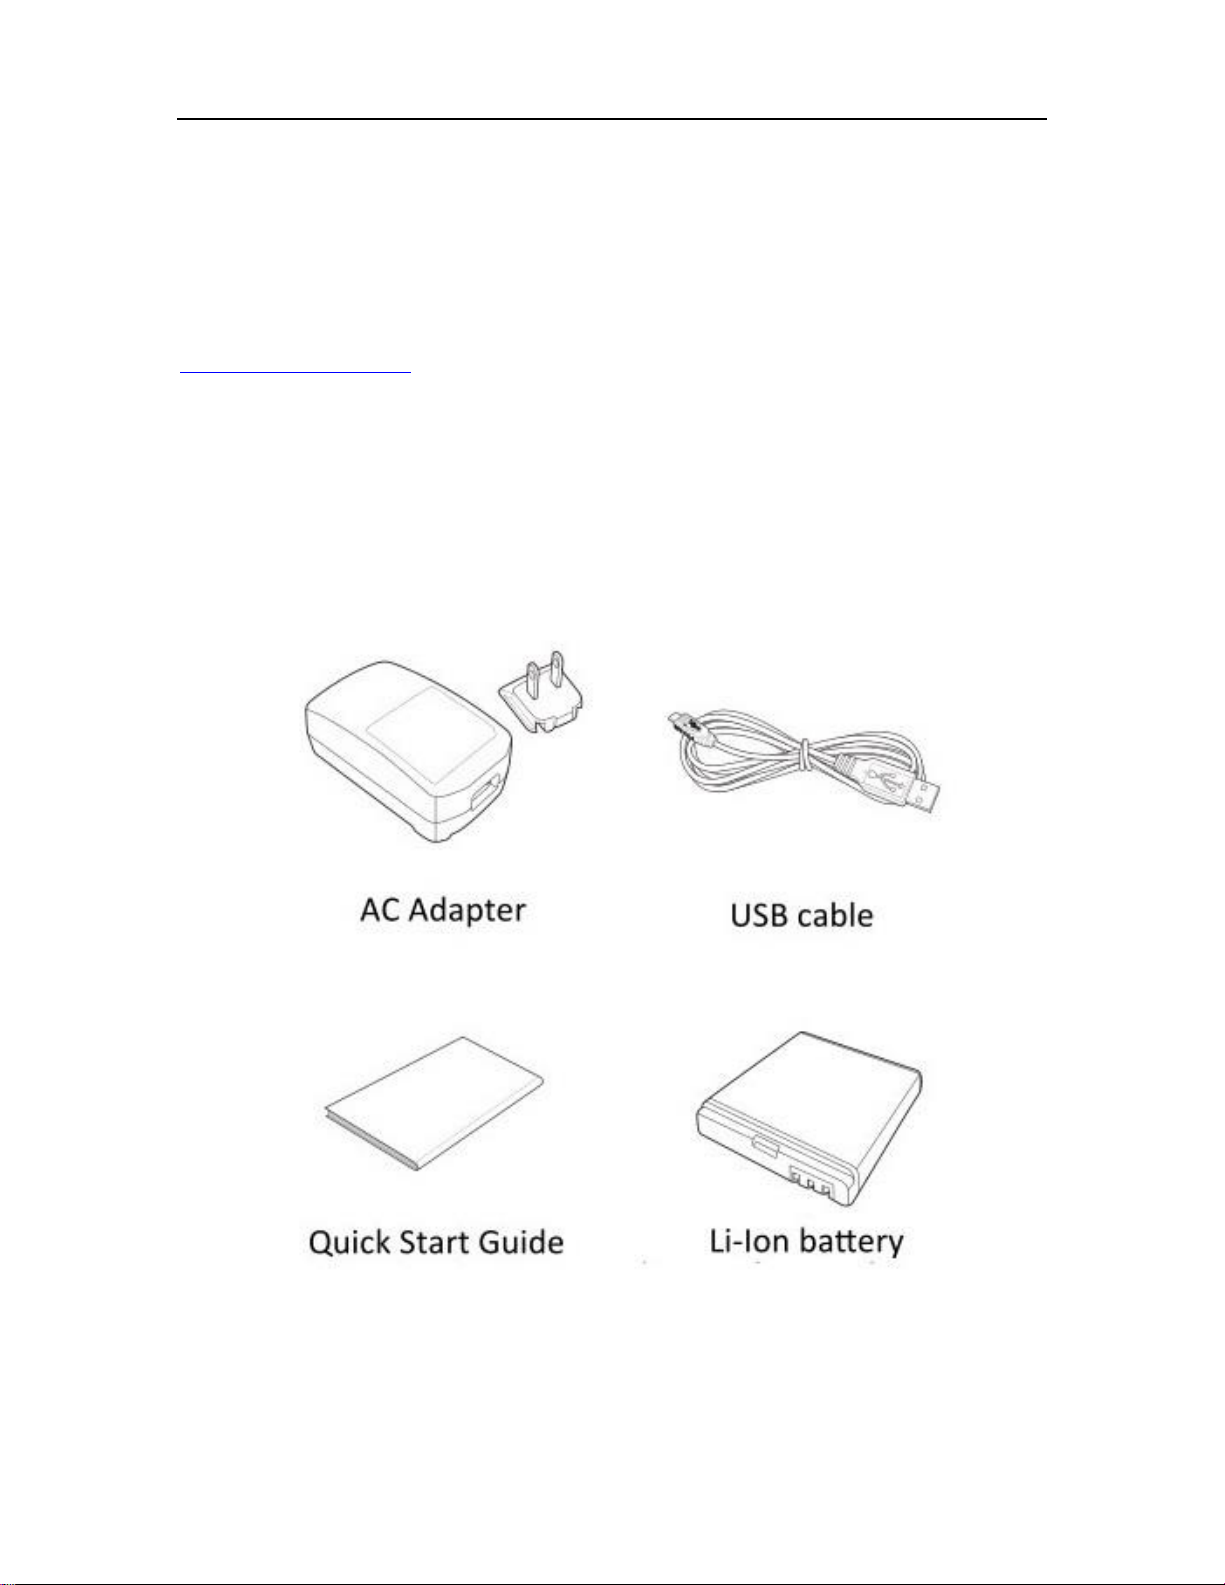
What’s in the Box?
Your new wireless phone comes with the following items. AC Adapter/Travel Charger,
USB Cable, Battery, this Quick Start Guide and your new wireless phone. If any items are
missing, please contact your nearest retailer.
Page 4

- 4 -
Charging the Battery
Plug your AC Adapter into the supplied micro USB Cable. Plug the AC Adapter into a
standard wall outlet. When you connect your phone, the micro USB cable will only fit in
one way. The charging progress of the battery will be displayed on the device. When the
device is powered on, battery charging progress is displayed in the upper right corner of
the device in the battery icon.
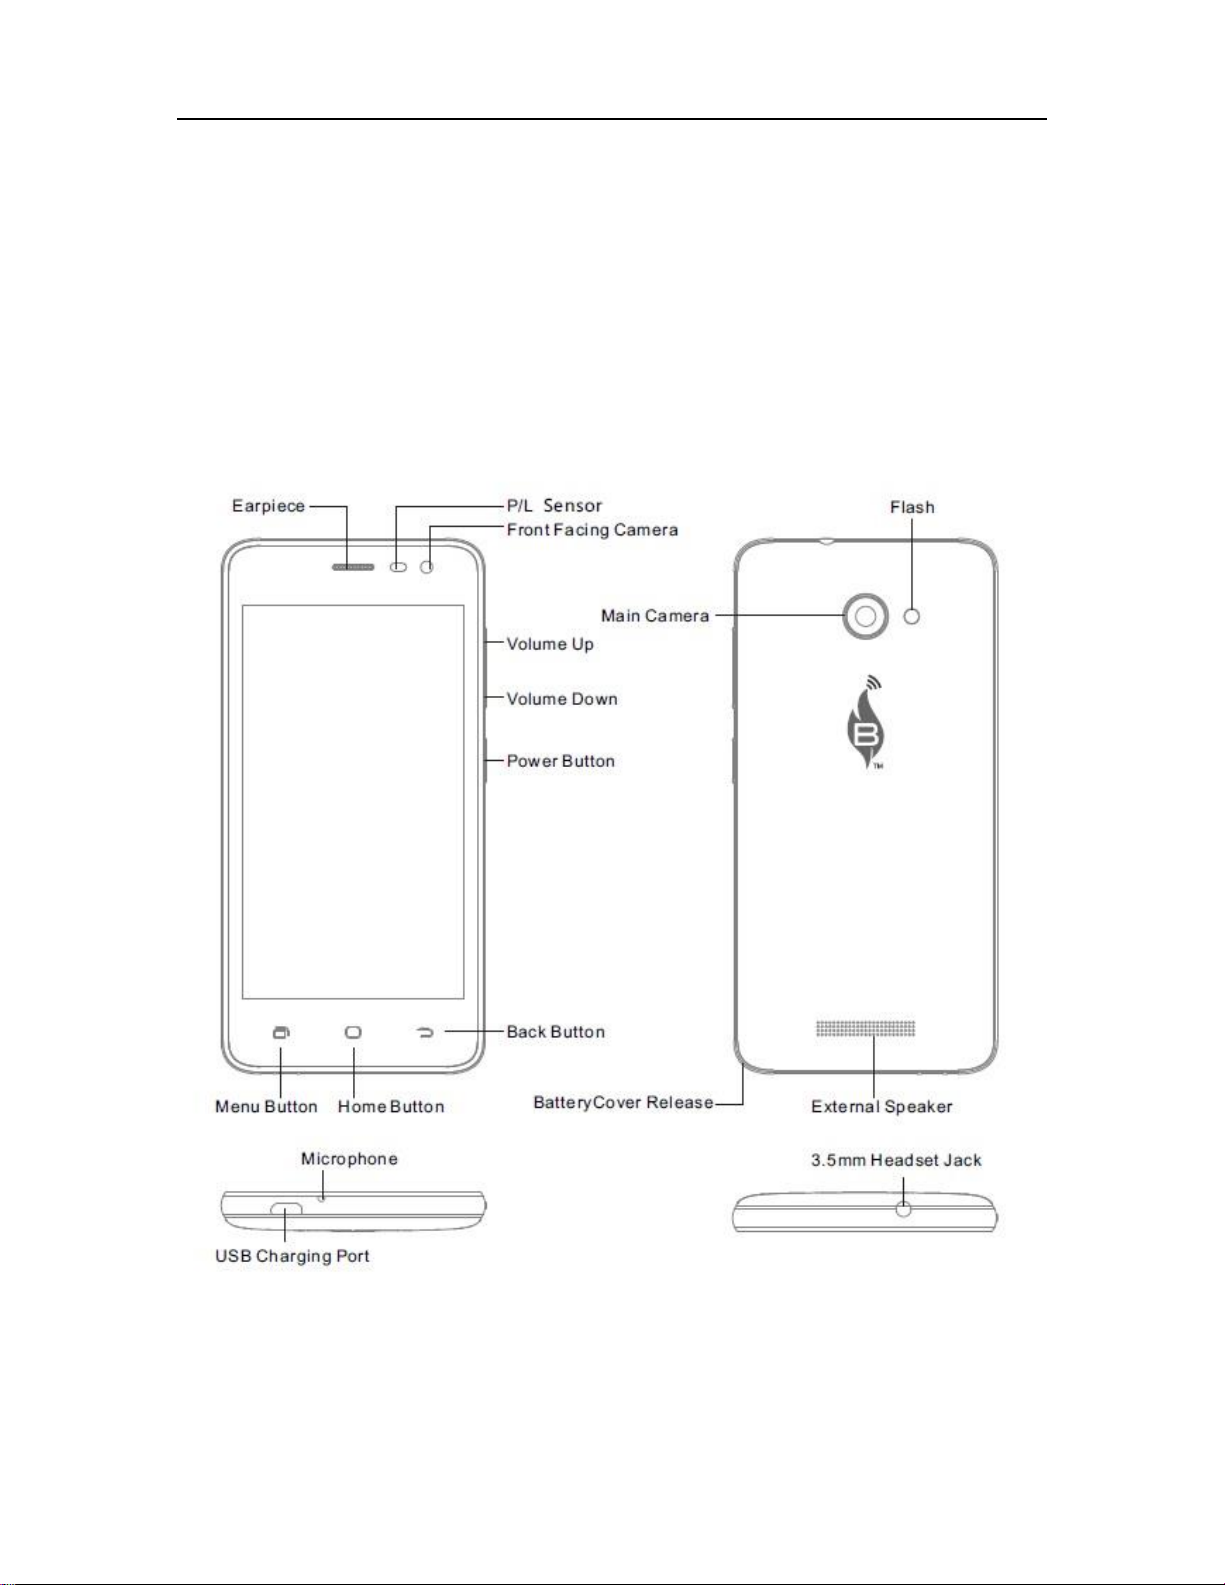
Physical Features of your new Wireless Phone
Power button: On the right side of your device, mid-display. Press and hold the power
button for 3 seconds to power on your device. Press for three seconds from any
Android screen and select Power Off to power down.
Volume Up/Down Button: On the right side of your device, above the power key.
The volume keys correspond to volume levels.
Menu button: Leftmost symbol on bottom of your wireless phone screen. Clicking this
will bring up the menu and submenu functions of Android operating system.
Home button: Center “circle” symbol on the bottom of your phone screen. Clicking
on this button will take you to your home screen. Note: although you are returned to
your home screen, applications will continue to run in the background and should be
properly closed.
Back button: Rightmost symbol on your phone. Clicking this will take you back to
previous operations in the Android operating system or within the application you are
using.
Micro USB Charging Port: On the bottom left side of your phone. This port is used
for both charging and for PC connectivity. Pay attention to insertion direction as the
charger only fits properly one way. Damage caused by improper use will not be covered
under any warranty. Small side of the charger faces up, big side faces down.
3.5mm Stereo Headphone Jack: On the top right side of your phone to the right of
the Micro USB Charging port. Connect to this port for FM radio and MP3 playback
using your device.
Main Camera and Camera Flash: Located in the top center of the back of your
device.
Secondary Camera: Front facing camera on the front top right side of your wireless
phone.
Page 5
- 5 -
Earpiece: Top center on the front of your wireless device. The earpiece is the default
audio output means for phone calls and voicemail playback.
External Speaker: On the back bottom of your device. This external speaker is for
speakerphone, and audio playback using the loudspeaker on your wireless device.
Microphone: Located on the bottom center of your device. Please keep this area clean
for optimal microphone performance.
Page 6
- 6 -
SIM Card
Your SIM card is provided by your wireless carrier and is required to provide
functionality to your new wireless phone. If your wireless retailer did not install your
SIM, it can easily be done in a few seconds. First, remove the battery cover by starting at
the battery cover release on the lower left of the device. Lift up. Remove the battery (if
installed). Remove the SIM card out of the plastic credit card size holder paying attention
to not damage the SIM or the nest. Slide your SIM in your device shiny side down with
the cut corner in the upper left. Replace your battery and battery cover door.
Start Up & Burn-iT Configuration
After installing your SIM Card and charging the device battery, you are now ready to
power on your phone. Press and hold the power button until your new device vibrates.
You should see the power on logo on the display. When powering on for the first time
or after a Factory Reset, a one-time Welcome Screen will be displayed. Please be
patient during the first start up as your device is configuring necessary files and settings
for operation. Device network registration times may take up to five minutes in certain
situations so please be patient. Click okay to complete initial setup.
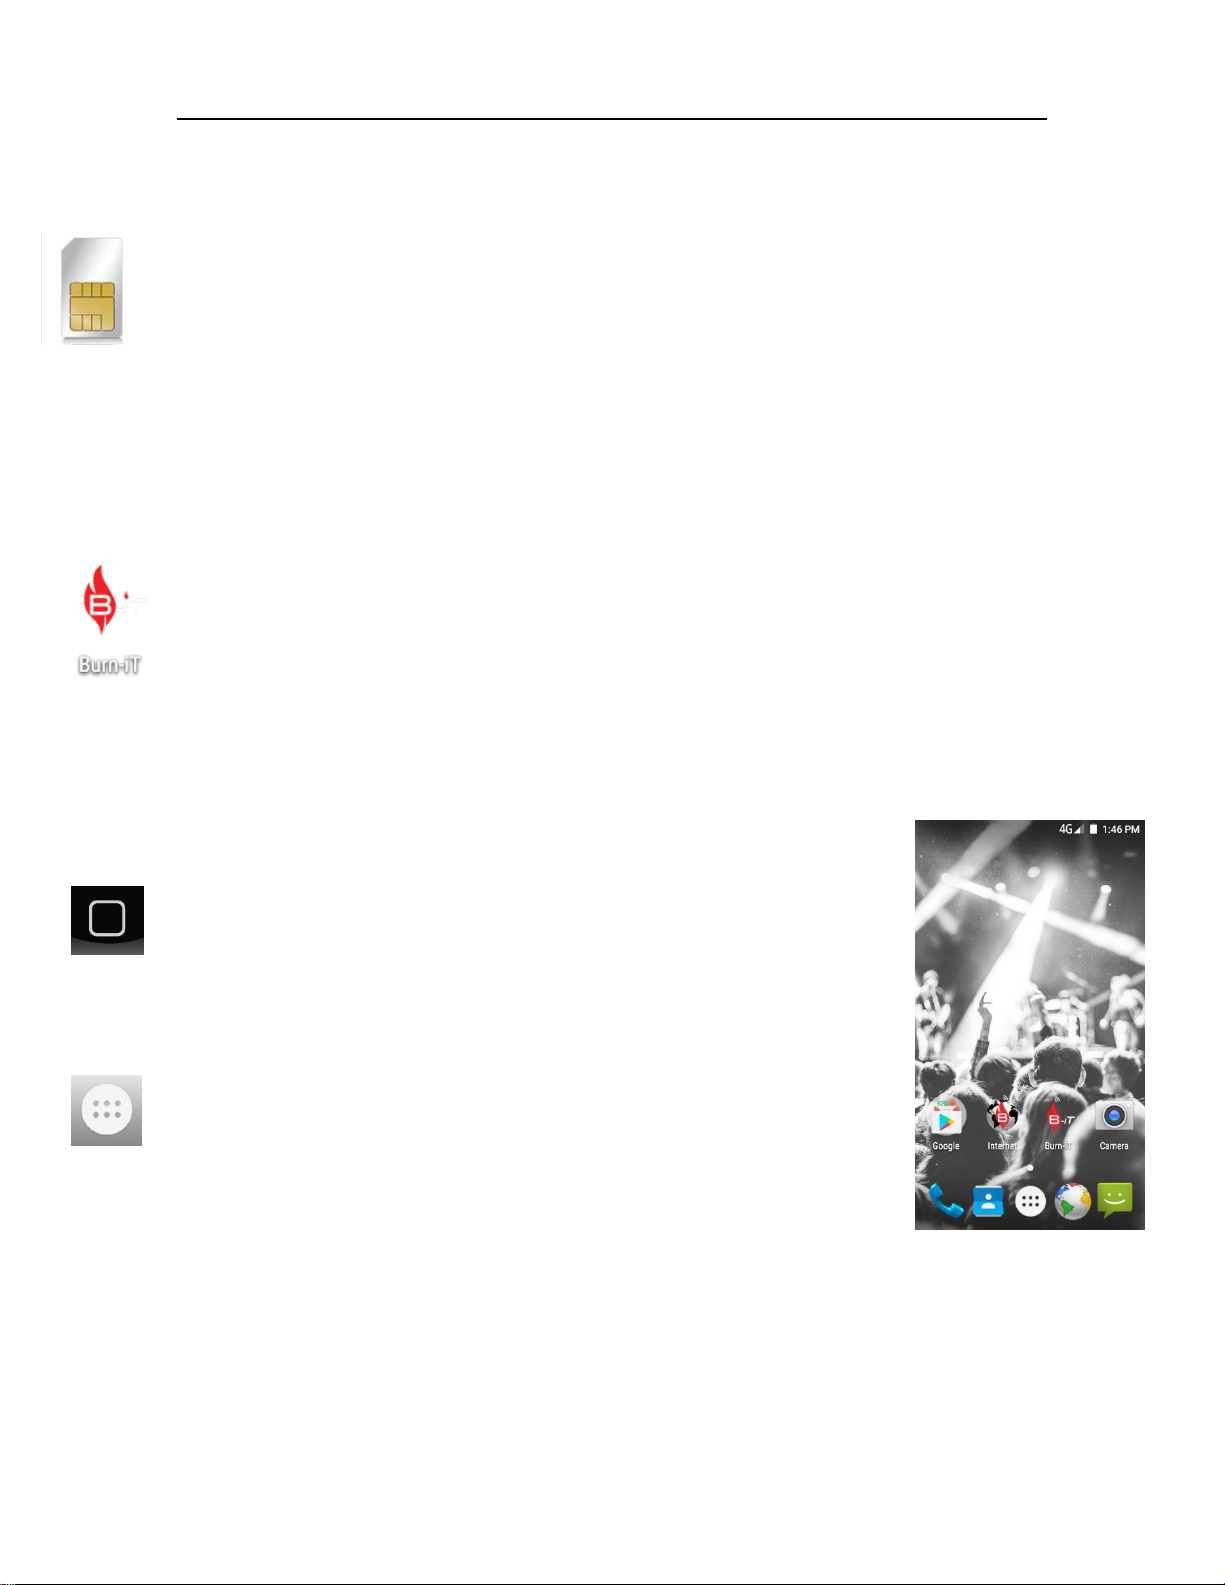
Home Screen
From the Home Screen, you can quickly access common features and
view notifications of missed calls, received messages, and connection
status.
Select an application icon to access its features and functionality. Press
the Home Screen symbol to return to your Home Screen at any time.
Application Drawer: The application drawer appears as a white circle
with 6 small dots inside. This key is used to produce all device
applications in Google Android format.
Keyboard: Entering Information
Regardless of which application you are using, you can enter information using the built
in on-screen Android keyboard.
Using the On-screen Keyboard: When an application requires text or numeric
input, select the input box to display the on-screen keyboard. Select the keys on the
keyboard to enter the proper characters. Select the return key to complete your input.
Page 7

- 7 -
Setting up Wi-Fi
Your new wireless phone is equipped with Wi-Fi so you can connect to wireless
networks. Complete these steps to properly configure Wi-Fi. From your home screen,
select the Application drawer icon (Press Home, The Application Drawer Icon shows as
6 grey dots in white circle just above the Home Screen Key). Swipe from top to bottom
and scroll to the Settings icon and select it. Select Wi-Fi in the settings menu. If turned
off, turn Wi-Fi on. You should see a list of available wireless networks. Select the network
you wish to connect to. If prompted to enter security information, enter the password
and select Connect. If the security information matches the wireless network, you will
automatically be connected. Please note password is case sensitive and must match your
security key set by your network administrator or internet service provider. If you have
issues connecting, please contact your Wi-Fi service provider or network administrator.
Device Memory
Your wireless phone has a preset amount of internal storage space. In order to keep
your device healthy and free of unnecessary files, it may be necessary that you install a
MicroSD memory card on your device and routinely remove unnecessary files. To
remove unwanted files that may be slowing your device down or preventing applications
from using available system memory, it is recommended that users download a memory
cleaner application from the Google Play Store. If you try to install an application from
the Google Play Store and receive a message that says “insufficient storage”, try deleting
old SMS & MMS messages, remove unnecessary applications, or move applications to a
Micro SD Card.
Adding a Micro SD Memory Card
Your device is capable of supporting removable storage in the form of a MicroSD card
up to 32Gb in size. It is highly recommended that you add a MicroSD card so your
device memory doesn’t get too crowded. To add a MicroSD card, simply remove the
back battery cover of your device by popping the cover off starting at the left bottom of
the device. Remove your device battery, then insert the MicroSD card in the direction
displayed on the card holder on the right side of the interior panel. The card will only fit
in one way, so pay special attention to the orientation image to avoid unnecessary
damage to your device and MicroSD card. Re-insert the battery, replace the cover and
power the device on. Your memory card will automatically setup to work with your
device. You will also receive notification in your status bar when you initially add your
memory card.
Page 8

- 8 -
Call Features
Making a Call: From your home screen, click on the phone icon in the bottom left.
Click on the dial pad icon in the bottom center to bring up the dialer. Enter your area
code and telephone number then click on the “Talk” phone icon to dial. To end the call,
press the red phone icon to disconnect.
Answering a Call: When an incoming call is registered, caller ID information will be
displayed on the phone screen. If you’ve saved the caller’s name in your Contacts, the
caller’s name will also be displayed. See Contacts on page 9 for more information.
Ending a Call: To end a call press the red phone “End” button at any time to
disconnect the current call.
Adding a Google Account
Your device is compatible with current up to date Google content and your Google
account, (if you have one). You must first have internet connectivity via Wi-Fi or mobile
network. Please ensure your plan includes mobile data and your account is properly
provisioned to avoid unexpected charges or deductions from your account. It is
recommended that Wi-Fi is used to add and configure your Google account settings on
your wireless device.
Setting Up a New or Adding an existing Google Account: From your Home
Screen, Click on the Google Play icon next to the Burner browser. When you run the
Google Account Wizard for the first time, you will be ask if you want to add an existing
account or create a new one. Click on New to create a new account for your wireless
device or add your existing Google account if applicable. Follow the onscreen prompts
to complete setup.
Text and MMS Messaging
Your Burner supports both regular text messaging service (SMS) and multimedia
messaging (MMS) also known as picture messaging.
To Send a New SMS or MMS Message: From your home screen, select the
Messaging icon in the far right lower corner next to the Internet application. Click on
the Message+ icon in the top center, then add the telephone number or contact you
wish to message. Enter the message you want the recipient to receive. If you wish to add
pictures or other multimedia, click on the paperclip in the upper right corner. Your
wireless phone will automatically format your message for the appropriate service. To
send the message click on the right facing “Send” arrow.
Page 9

- 9 -
To Reply to a SMS or MMS: Click on the message you received, then click on reply,
enter the text you wish to send to the recipient followed by the right facing “Send”
arrow.
To Delete a SMS or MMS Message: From your messaging application, press and hold
the message you wish to delete, then click on the “Trashcan” icon on the bottom of the
screen. The message thread will be permanently deleted.
Performance Notice: It may be necessary to delete old message threads to free up
device memory. If you delete messages as they are read or save them to a MicroSD card,
this will ensure optimal performance of your device.
Internet Browser and Surfing the Web
To surf the internet, click on the Browser icon (multi-color globe) from your home
screen. Type in the desired URL for any website or type in any keyword into the search
box and click return on your keyboard. If you use any other browser on your device, it
will have the standard browser functionality and user experience.
Contacts
To add a Contact: From your home screen, click on Contacts icon next to the phone
icon from your home screen OR select the application drawer icon and scroll to the
Contacts icon. From inside the Contacts application, click on the lower right blue icon
(face+) to create a new entry. If you have a Google account associated with your device,
you can choose to save your contacts to Google, or locally on the device. We
recommend setting up a Google account so your contact information can be shared
between your Google account and your device. Enter the requested information in the
text input boxes and click DONE in the upper left corner when complete.
To Delete a Contact: Select the contact you wish to remove from inside the
Contacts application. Click on the three squares icon from the upper right side of the
display. Select Delete. When prompted again, select OK.
To Import/Export Contacts: From inside your Contacts application, click on the
three squares icon on the bottom left side of your display. Select the location you wish
import from or export to. Select Next, followed by the location you wish to save your
information. When importing, choose # Selected then Select All to bulk import your
data.
To add a Caller Ringtone: From inside the Contacts application, first select a
contact. Next click on the three squares icon in the upper right. Select Set Ringtone.
Assign a ringtone for your contact from the list provided.
Page 10

- 10 -
To add a Picture of your Caller: In order to add a picture of your caller, you must
have an existing image of the person on your device or MicroSD card. From inside your
Contact application, select the proper contact you wish to add, then click on the three
squares icon in the upper right. Select Edit, followed by clicking the smile face to the
right of the caller’s name. After you’ve cropped the photo, click DONE in the upper left
to save the contact.
Taking Photos and Videos
Your wireless phone is equipped with two 5.0 megapixel cameras to take photos and
videos.
To Take a Photo: From your home screen select the camera icon next to the Internet
Browser and Gmail. Touch the capture button to take a picture. To toggle to the front
facing camera, select the camera rotate icon for “selfies”.
To Take a Video: From your home screen select the camera icon next to the Internet
Browser and Gmail. Click on the Camcorder icon next to the capture icon. Once you
tap the icon, video recording will begin. Tap the icon again to stop recording.
Viewing Photos and Videos
To view and edit photos and videos follow the following steps. Additional 3rd party photo
and video editing software can be downloaded from the Google Play store.
To View Photos: From your home screen, select your Application drawer icon. Swipe
from top to bottom until you reach the Photos Icon. To view photos taken from your
device, select Camera. Scroll through your photographs until you reach the desired
image and click on it. If a Google account is synchronized with your device, your Google
photographs and videos will also be displayed here. You may be ask to enable or allow
Back up & Sync for your Google account to enable this wireless synchronization feature.
To View Videos: From your home screen, select your Application drawer icon. Swipe
from top to bottom until you reach Video Player. Click on the Video Player application
and select the video file you wish to playback.
Page 11

- 11 -
Changing Basic Phone Settings
To Change your Ringtone: From your home screen, select the Application drawer
icon. Swipe from top to bottom and scroll to the Settings icon and select it. From your
Settings, select Sound & Notification in your list. You will be taken to your Audio Profile
Settings page. Select the profile which you wish to modify by selecting the gear next to
the profile name (General is default profile). In the dropdown select Phone Ringtone.
From there you can choose your ringtone.
To Change the Time and Date: From your home screen, select the Application
drawer icon. Swipe from top to bottom and scroll to the Settings icon and select it.
Scroll to the near bottom of the list and select Date & Time. From inside this menu you
can change the date and time along with display formats. It is recommended to use
Automatic Date and Time and Automatic Time Zone which uses information provided by
your Wireless Carrier. Note: Some wireless providers may not send this information
over the wireless network requiring manual date and time settings.
Change your Display Settings: From your home screen, select the Application
drawer icon. Swipe from top to bottom and scroll to the Settings icon and select it.
From your settings menu, scroll to the Display icon and select it. From this menu, you
can modify Lock Screen Notifications, Themes, Wallpaper, Brightness, Screen Sleep
(timeout), and Font Sizes.
Other Settings: There are many other settings that can be found in the Settings of
your device. You can enable device security and lock from here, or change the power
settings. It is highly recommended that you familiarize yourself with this area of your
device.
Adding a Bluetooth Device
Your wireless phone is equipped with Bluetooth for connectivity to different Bluetooth
devices such as Headsets, Speakers, Vehicles, etc.
To Add a Bluetooth Device: From your home screen, select the Application drawer
icon. Swipe from top to bottom and scroll to the Settings icon and select it. Select the
Bluetooth Setting. Enable Bluetooth by swiping the toggle switch to the ON position.
Enable pairing mode on the device which you wish to pair with your wireless phone.
Once enabled, the device should be listed in the Available Devices dropdown. Click on
the device you wish to pair with and enter the Bluetooth PIN for the device being
connected. Please consult your Bluetooth device instruction manual for Bluetooth PIN
information. Most device manufactures set default PIN’s to “0000”.
Page 12

- 12 -
To Remove a Bluetooth Device: From your home screen, select the Application
drawer icon. Swipe from top to bottom and scroll to the Settings icon and select it.
Select Bluetooth. Select the gear next to the device which you wish to Unpair, and select
Forget.
Factory Data Reset
To reset your wireless phone to a factory state from your home screen, select the
Application drawer icon. Swipe from top to bottom and scroll to the Settings icon and
select it. Scroll down to Backup & Reset and select it. Scroll to the very bottom of the
list and select Factory Data Reset, and when prompted check the box that says “Erase
Phone Storage” followed by Reset Phone. WARNING: Factory resetting a device
permanently erases all data. Unless data is backed up prior to reset, all information will
be permanently deleted from the device memory.
Safety and Legal Information
Please read before proceeding.
Safety Information:
Use only batteries and power adapters provided by BTG Mobile or authorized
affiliates. The use of unauthorized accessories may void any device warranty and
may present a risk of fire, explosion, leakage, or other hazard.
Do not remove the battery while phone is charging due to risk of damage.
Avoid dropping the phone or battery. Dropping these items, especially on a hard
surface can potentially cause damage
Unplug the power adapter from the wall outlet during storms to avoid potential
damage to charger and phone.
Do not expose the phone to temperatures higher than 140 degrees F. Avoid
direct exposure to sunlight or leaving in a hot vehicle.
Do not use harsh detergents or cleaning agents to clean your device.
Do not expose phone to liquids such as water, soda, coffee, etc. as liquids will
cause irreversible damage to your device which is not covered by any warranty.
Safety Precautions for Battery Use:
Use only approved batteries provided by BTG Mobile or its affiliates.
Keep the battery dry and away from any liquid as this may cause a short circuit.
Keep the battery away from metal objects to avoid an electrical short.
Page 13

- 13 -
Do not place the battery near a heat source. Excessive heat can damage the
phone and battery. High temperatures can cause the battery to swell, leak or
malfunction.
If the battery emits a foul odor, immediately discontinue use and take the battery
outside.
Do not disassemble, crush, puncture shred or otherwise attempt to change the
form of the battery.
Never attempt to open or service the battery yourself.
Do not dispose of the battery in water, other liquids or fire. Dispose battery
according to State and local laws and regulations.
Tips for Charging your Battery:
Keep the battery near room temperature when charging. Never expose your
battery to temperatures in excess of 140˚F or below 32 ˚F.
New batteries are not fully charged when they are manufactured and packaged.
New batteries may take longer to charge the first time.
Batteries stored for a long period of time my take additional time to charge
properly.
Road and Environmental Safety:
Turn off your phone when in areas with a potentially explosive atmosphere or
where flammable objects exist such as gas stations, fuel depots, chemical plants,
and while in similar scenarios.
Do not use this device while driving a vehicle or operating any machinery.
Serious injury or death may result from such action.
Aircraft Safety:
It may be necessary to place your device in Airplane Mode when traveling in an
airplane. Consult flight attendants and your flight safety guide for information
regarding operation of portable electronic devices in flight. It may be against the
law in some countries to use this device while onboard an aircraft.
Exposure to Radio Frequency:
Your mobile device contains a radio transmitter and receiver. When your device is ON, it
receives and transmits RF energy. When you communicate with your mobile device, the
system handling your call controls the power level at which your mobile device
transmits. Your mobile device is designed to comply with local regulatory requirements
in your country concerning exposure of RF to humans.
Page 14

- 14 -
For optimal mobile device performance, and to be sure that human exposure to
RG energy does not exceed the guidelines set forth in the relevant standards,
always follow these instructions and precautions.
When placing or receiving a call, hold your mobile phone just like you would a
landline phone. If you wear the device in a body worn accessory such as a case
or holster, try to keep the device at least one inch from your body while
transmitting. Using accessories not supplied or approved by BTG Mobile or
affiliates may cause your mobile device to exceed RF energy exposure guidelines.
Nearly every electronic device is subject to RF energy interference from external
sources if inadequately shielded, designed, or otherwise configured for RF energy
compatibility. In some circumstances, your mobile device may cause interference
with other devices. Follow instruction to avoid interference problems. Turn off
your mobile device in any location where posted notices instruct you to do so.
Implantable Medical Devices:
If you have an implantable medical device, such as a pacemaker or defibrillator, consult
your physician before using this mobile device. Persons with medical devices should
always observe the following precautions:
ALWAYS keep the mobile device at least 8 inches from the implanted medical
device.
DO NOT carry the mobile device in the breast pocket.
Use the opposite ear of the implanted medical device to minimize the potential
for interference.
Immediately discontinue use if you suspect your device is causing interference
with your implanted medical device.
Seizures and Blackouts:
Some people may be susceptible to epileptic seizures or blackouts when exposed to
flashing lights such as when playing a video game. These may occur even if a person has
never had a previous seizure of blackout.
If you have experienced seizures or blackouts, or if you have a family history of such
occurrences, please consult with your physician before playing video games or enabling
certain display features on your device.
Discontinue use and consult a physician if any of the following symptoms occur:
convulsion, eye or muscle twitching, loss of awareness, involuntary movements, or
disorientation. It is always a good idea to hold the screen away from your eyes, leave the
lights on in the room, and take a 15 minute break every hour. Stop use if you are tired.
Page 15

- 15 -
Caution about high Volume usage:
Exposure to loud noise from any source for extended periods of time may affect your
hearing. The louder the volume, the less time required to permanently damage your
hearing. To protect your hearing:
Limit the amount of time you use headsets or earphones.
Avoid turning the volume up to block out noisy surroundings.
Turn the volume down if you can’t hear what’s going on around you.
If you experience hearing discomfort, including the sensation of pressure of
fullness in your ears, ringing, or headaches discontinue use and consult a
physician.
Repetitive Motion:
When you repetitively perform actions such as pressing keys or entering finger written
characters, you may experience occasional discomfort in your hands, arms, shoulders,
neck, or other parts of your body. If you continue to have discomfort during or after
such use, stop use and see a physician.
Software and Content Copyright Notices
Your wireless phone includes copyrighted third-party software stored in semiconductor
memory or other media. Laws in the United States of America and other countries
preserve for third-party software provider’s certain exclusive rights for copyrighted
software such as the exclusive rights to distribute or reproduce the copyrighted
software. Accordingly, any copyrighted software contained in this device may not be
modified, reverse-engineered, distributed, or reproduced in any manner to the extent
allowed by law. Furthermore, the purchase of this device will not be deemed to grant
either directly or by implication, estoppels, or otherwise, any license under the
copyrights, patents, or patient applications of any third-party software provider, except
for the normal, non-exclusive, royalty free license to use that arises by operation of law
in the sale of this product.
Content Copyright:
The unauthorized copying of the copyrighted materials is contrary to the provisions of
the Copyrights Laws of the United States of America and other countries. This phone
model is intended solely for copying non-copyrighted materials, materials in which you
own the copyright, or materials which you are legally authorized or permitted to copy. If
you are uncertain about your right to copy any material, please contact a legal advisor.
Your Location:
Location based information includes information that can be used to determine the
approximate location of a mobile device. Mobile phones which are connected to a
wireless network transmit location based information. Devices enabled with GPS or
Page 16

- 16 -
AGPS (Assisted GPS) technology also transmit location based information. Additionally, if
you use applications that require location based information (e.g. local restaurant search)
such applications transmit location based information. This location based information
may be shared with third parties including your wireless provider, service provider,
application providers, and other third parties providing services.
Emergency Calls (911)
When you make an emergency call, the cellular network may activate your device’s
Assisted GPS (AGPS) technology to assist the emergency responders in determining
your approximate location. AGPS has limitations and may not work in your area
therefore always tell emergency responders your location to the best of your ability, and
remain on the phone for as long as the emergency operator needs to determine your
exact location if possible.
FCC Notice
The following statement applies to all products that have received FCC approval.
Applicable products bear the FCC logo, and/or and FCC ID in the format FCC-ID on
the product label.
This mobile device complies with part 15 of the FCC Rules. Operation is subject to the
following two conditions: 1) This mobile device may not cause harmful interference, and
2) this mobile device must accept any interference received, including interference that
may cause undesired operation. This mobile device has been tested and found to comply
with the limits for a Class B digital device, pursuant to Part 15 of the FCC Rules. These
limits are designed to provide reasonable protection against harmful interference in a
residential installation. This equipment generates, uses, and can radiate radio frequency
energy and, if not installed and used in accordance with these instructions, may cause
harmful interference to radio communications. However, there is no guarantee that
interference will not occur in a measurement known as Specific Absorption Rate, or
SAR. The SAR limit set by the FCC is 1.6W/kg averaged over one gram of tissue. Tests
for SAR are conducted using standard operating positions accepted by the FCC with the
mobile transmitting at its highest certified power level in all tested frequency bands.
Although the SAR is determined at the highest certified power level, the actual SAR level
of the phone while operating can be well below the maximum value. This is because the
mobile device is designed to operate at multiple power levels so as to use only the
power required to reach the mobile network. In general, the closer you are to a wireless
tower, the lower the power output.
Page 17

- 17 -
While there may be differences in the SAR levels of various mobile devices and at
various positions, they must all be tested and certified to the FCC that they meet the
government requirement before being made available for sale to the public in the U.S.A.
The FCC has granted an Equipment Authorization for this mobile phone with all
reported SAR levels evaluated as in compliance with the FCC RF exposure guidelines.
SAR in formation on this mobile phone is on file with the FCC and can be found under
the Display Grant section of https://www.fcc.gov/general/fcc-id-search-page after
searching the above FCC ID. Please note that improvements to this device could cause
slight differences in the SAR value for later products; in all cases, products are designed
to be within guidelines. Additional information on SAR can be found on the Cellular
Telecommunications & Internet Association (CTIA) website at:
http://www.phonefacts.net.
Hearing Aid Compatibility (HAC)
This Device’s HAC Rating: Not Rated
Digital wireless telephones sometimes cause interference because of electromagnetic
energy emitted by the telephone’s antenna, backlight, or other components. To address
this interference, the FCC has adopted specific hearing aid compatibility rules for digital
wireless telephones. The standard for compatibility of digital wireless phones with
hearing aids is set forth in American National Standard Institute (ANSI) standard C63.19.
Hearing aids operate in one of two modes – acoustic coupling or telecoil coupling. Thus,
the ANSI standard C63.19 contains two sets of standards: an “M” rating from one to
four for reduced radio frequency (RF) interference to enable acoustic coupling with
hearing aids that do not operate in telecoil mode, and a “T” rating from one to four to
enable inductive coupling with hearing aids operating in telecoil mode. A digital wireless
handset is considered hearing aid-compatible for acoustic coupling if it meets an “M3”
rating and for inductive coupling if it meets a “T3” rating.
Please be aware that some mobile phones allow users to make voice calls over a
wireless broadband internet connection (i.e. Wi-Fi) using what’s known as Unlicensed
Mobile Access. Please note that such phones have been tested and rated for use with
hearing aids for some of the wireless technologies they use (i.e. GSM). However, there
may be some newer wireless technologies used in these phones that have not been
tested yet for use with hearing aids (i.e. Wi-Fi or UMA). It is important to try the
different features of these phones to determine if you hear any interfering noise.
Consult with the service representative for information on hearing aid compatibility. If
you have questions about return or exchange policies, please consult with a store
representative.
Page 18

- 18 -
Burnerphone and the B Flame Stylized is trademarked ™ by BBM Holdings, Inc. and is
used under license by BTG Mobile, Limited.
Copyright © symbol 2016 BTG Mobile, LLC. All rights reserved ®
BTG Mobile, Limited. Reserves the right to alter material or technical specification
without prior notice.
Page 19

FCC RF Exposure Information and Statement
The SAR limit of USA (FCC) is 1.6 W/kg averaged over one gram of tissue. Device types 4G Smart Phone /
(FCC ID: 2ALQJB125C) has also been tested against this SAR limit. SAR information on this and other pad can
be viewed on‐line at http://www.fcc.gov/oet/ea/fccid/. Please use the device FCC ID number for search. This
device was tested for typical body-worn operations with the back of the handset kept 10mm from the body. To
maintain compliance with FCC RF exposure requirements, use accessories that maintain a 10mm separation
distance between the user's body and the back of the handset. The use of belt clips, holsters and similar
accessories should not contain metallic components in its assembly. The use of accessories that do not satisfy
these requirements may not comply with FCC RF exposure requirements, and should be avoided.
FCC Warning
This device complies with Part 15 of the FCC Rules. Operation is subject to the following two conditions:
(1) This device may not cause harmful interference, and (2) this device must accept any interference received,
including interference that may cause undesired operation.
NOTE 1: This equipment has been tested and found to comply with the limits for a Class B digital device,
pursuant to part 15 of the FCC Rules. These limits are designed to provide reasonable protection against harmful
interference in a residential installation. This equipment generates, uses and can radiate radio frequency energy
and, if not installed and used in accordance with the instructions, may cause harmful interference to radio
communications. However, there is no guarantee that interference will not occur in a particular installation. If this
equipment does cause harmful interference to radio or television reception, which can be determined by turning
the equipment off and on, the user is encouraged to try to correct the interference by one or more of the following
measures:
- Reorient or relocate the receiving antenna.
- Increase the separation between the equipment and receiver.
-Connect the equipment into an outlet on a circuit different from that to which the receiver is connected.
-Consult the dealer or an experienced radio/TV technician for help.
NOTE 2: Any changes or modifications to this unit not expressly approved by the party responsible for
compliance could void the user's authority to operate the equipment.
 Loading...