

Guillemot 5061156 User Manual

HWNAP-300 Hercules Wireless N Access Point
CONTENTS
Click a title in this table of contents to access the corresponding section
1. YOUR HERCULES WIRELESS N ACCESS POINT............................................................................ 3
1.1. Recommendations ........................................................................................................................3
1.2. Specifications ................................................................................................................................3
1.3. Minimum system requirements .....................................................................................................4
1.4. Box contents..................................................................................................................................4
1.5. Front face overview.......................................................................................................................5
1.6. Connectivity overview ...................................................................................................................5
2. INSTALLING YOUR HERCULES WIRELESS N ACCESS POINT..................................................... 6
2.1. How to position your Hercules Wireless N Access Point ............................................................. 6
2.2. Launching the Hercules Wireless N Access Point installation Assistant...................................... 7
2.3. Installing Hercules Wireless N Access Point only ........................................................................8
2.4. Installing the Hercules pack (Hercules Wireless N Access Point + Wireless N USB Key) ........17
2.5. Installing the Wireless N USB key only....................................................................................... 27
2.6. Exploring the CD-ROM ...............................................................................................................27
2.7. Connecting to a network with Wi-Fi Protected Setup
2.7.1. Connecting to a network in master mode...................................................................... 28
2.7.2. Connecting to a network in client mode ........................................................................29
3. WIFI MANAGER N, THE VERSATILE UTILITY.................................................................................30
3.1. Opening the doors of WiFi Manager N .......................................................................................30
3.2. Changing the WiFi Manager N password...................................................................................32
3.3. Navigating within the WiFi Manager N interface......................................................................... 33
3.4. Resolving any difficulties accessing WiFi Manager N or the Internet ........................................33
3.5. Mastering your WiFi network at your fingertips ..........................................................................36
3.5.1. Personalizing your WiFi network ...................................................................................36
3.5.2. Securing your WiFi network........................................................................................... 38
3.5.3. Limiting access to your WiFi network to certain WiFi computers or devices ................42
3.6. A toolbox with multiple facets...................................................................................................... 44
3.6.1. Restarting your Hercules access point..........................................................................44
3.6.2. Restoring your original settings .....................................................................................44
3.6.3. Updating firmware.......................................................................................................... 45
4. WELCOME TO THE WIRELESS ATTITUDE
TM
4.1. A few important points to bear in mind before getting started ....................................................46
4.2. Computers running Windows Vista: Sharing folders, a printer or an ADSL connection ............46
4.2.1. Enabling sharing ............................................................................................................46
4.2.2. Windows Vista: Sharing public or personal folders .......................................................49
4.2.3. Computers running Windows Vista: Accessing shared folders ....................................................51
4.2.4. Windows Vista: Sharing a printer........................................................................................... 51
4.2.5. Computers running Windows Vista : Accessing the shared printer ...............................................54
4.2.6. Windows Vista: Sharing an ADSL connection in an Infrastructure type network .........55
4.3. Computers running Windows XP: Sharing folders, a printer or an ADSL connection................ 57
4.3.1. Windows XP: Using the Network Setup Wizard in an Infrastructure network............... 57
4.3.2. Windows XP: Sharing folders........................................................................................61
4.3.3. Windows XP: Accessing shared folders..............................................................................62
4.3.4. Windows XP: Sharing a printer...................................................................................... 62
4.3.5. Windows XP: Modifying a workgroup name.................................................................. 64
4.3.6. Windows XP: Manually enabling or disabling your adapter’s WiFi connection
(advanced users) ...........................................................................................................65
TM
..............................................................27
! ................................................................................46

Hercules Wireless N Access Point HWNAP-300
4.4. Computers running Windows 2000: Sharing folders, a printer or an ADSL connection............ 65
4.4.1. Creating a workgroup in Windows 2000 ....................................................................... 65
4.4.2. Windows 2000: Sharing folders .................................................................................... 66
4.4.3. Windows 2000: Accessing shared folders............................................................................... 66
4.4.4. Windows 2000: Sharing a printer...........................................................................................67
4.4.5. Windows 2000: Modifying a workgroup name.................................................................. 68
4.4.6. Windows 2000: Sharing an ADSL connection in an Infrastructure network................. 70
4.4.7. Windows 2000: Manually enabling or disabling your adapter’s WiFi connection
(advanced users)........................................................................................................... 71
4.5. Computers running Windows Me: Sharing folders, a printer or an ADSL connection............... 71
4.5.1. Windows Me: Using the Home Networking Wizard in an Infrastructure network .........71
4.5.2 Windows Me: Sharing folders ....................................................................................... 73.
4.5.3.
Windows Me: Accessing shared folders............................................................................... 74
4.5.4. Windows Me: Sharing a printer..................................................................................... 74
4.5.5. Windows Me: Modifying a workgroup name ................................................................. 76
4.5.6. Windows Me: Manually enabling or disabling your adapter’s WiFi connection
(advanced users)........................................................................................................... 76
4.6. Computers running Windows 98 SE: Sharing folders, a printer or an ADSL connection ..........77
4.6.1. Windows 98 SE: Creating a workgroup ........................................................................ 77
4.6.2. Windows 98 SE: Sharing folders................................................................................... 77
4.6.3. Windows 98 SE: Accessing shared folders ............................................................................... 78
4.6.4. Windows 98 SE: Sharing a printer ................................................................................78
4.6.5. Windows 98 SE: Sharing an ADSL connection in an Infrastructure network ...............80
4.6.6. Windows 98 SE: Manually enabling or disabling your adapter’s WiFi connection
(advanced users)........................................................................................................... 81
5. WIFI MANAGER N FOR ADVANCED USERS.................................................................................. 82
5.1. Configuring your WiFi network’s advanced options ................................................................... 82
5.2. Configuring the DHCP server ..................................................................................................... 83
5.3. Setting priorities for types of data according to available bandwidth......................................... 85
5.4. Product information..................................................................................................................... 86
6. GLOSSARY ........................................................................................................................................ 87
7. TECHNICAL SUPPORT ..................................................................................................................... 91
8. WARRANTY........................................................................................................................................ 91
9. ENVIRONMENTAL PROTECTION RECOMMENDATION................................................................ 92

HWNAP-300 Hercules Wireless N Access Point
1. YOUR HERCULES WIRELESS N ACCESS POINT
With your Hercules Wireless N Access Point, move up to superior transfer speeds and live a new high-speed
wireless communications experience with an extended coverage zone.
Hercules Wireless N Access Point extends the signal from your WiFi equipment or very easily adds the WiFi
function to your modem-router. It takes interactivity with users even further by letting you share your Internet
access to watch high-definition videos or transfer large files without any hassles. It also allows you to share
your devices and data between multiple computers, while at the same time freeing you from the need for
kilometers worth of cables.
Great care has been taken in designing your product. Both simple to operate and user-friendly, it is well
suited to beginners and advanced users alike.
And now, it’s time to learn about your new product and join in the Wireless Attitude
1.1. Recommendations
- Never open up your Hercules Wireless N Access Point, as you risk damaging its internal components.
- In order to avoid the risk of fire or electrical discharge, keep your access point away from:
- rain or humidity, as well as all fluids (water, chemical products and any other liquids),
- sources of heat such as heaters, stoves and any other heat-producing devices (including amplifiers),
- direct sunlight.
- Do not cover your access point.
- Unplug the access point’s power cable if you do not plan on using it again for an extended period of time. To
unplug the power cable, take hold of and pull on the plug. Never pull on the cable itself.
- Disconnect the access point before cleaning. Use a soft cloth for cleaning and avoid using aerosol cleaners.
TM
!
1.2. Specifications
Wireless access point compatible with the following WiFi protocols:
- 802.11b: 1, 2, 5.5 and 11Mbits/s data rates in the 2.4GHz band
- 802.11g: 6, 9, 12, 18, 24, 36, 48 and 54Mbits/s data rates in the 2.4GHz band
- 802.11n draft 1.0 and 2.0: data rates in the 2.4GHz band, varying depending on the bandwidth of
the channel used (20 or 40MHz). Values are classified from MCS0 to MCS15 and vary from 7.2
DSSS/CCK frequency range and OFDM modulation from 2.412GHz to 2.484GHz (13 channels)
Compatible with the following security protocols:
Filtering by MAC address
WMM mode support (Wi-Fi MultiMedia™)
WPS (Wi-Fi Protected Setup
LAN mode support
802.11n wireless access point
RF specification: frequency band = 2.4GHz – 2.484GHz
to 144.44Mbits/s for 20MHz and from 15 to 300Mbits/s for 40MHz
- WEP with 64 and 128-bit key length
- WPA-PSK with TKIP or AES encryption (802.11i security protocol)
- WPA2 with TKIP and AES encryption (802.11i security protocol)
TM
)
User Manual – 3/94

Hercules Wireless N Access Point HWNAP-300
Maximum transmission power: 100mW
2 removable, adjustable 2dBi antennas
1 RJ-45 connector for a Fast Ethernet 10/100Mbps connection
Auto-MDIX support (automatic detection of crossed cabling)
Conforms to the IEEE 802.3u specification
IEEE 802.3x flow control support in Full Duplex mode
External DC power supply. Input: 200~240V, 50/60 Hz; output: 9V DC/1 A
Blue LEDs on front face
Software update via Ethernet port
1.3. Minimum system requirements
To access configuration settings:
Intel Pentium III, AMD Athlon/AMD-K6
64MB RAM
Ethernet 10/100 RJ45 network card
CD-ROM drive
Operating system: Microsoft Windows 2000/XP/Vista
To access the Internet:
Active Internet line
Internet Explorer 6.0, Netscape Navigator 4.7 or Mozilla Firefox 1.0 or higher
ADSL Ethernet modem, cable modem, Internet modem-router
1.4. Box contents
Please verify that the following elements are present in your Hercules access point box:
Hercules Wireless N Access Point
CD-ROM containing the installation Assistant and User Manual in PDF format
Quick Start Guide in English
Ethernet cable
Power adapter
Hercules Wireless N USB Key (optional)
4/94 – User Manual
HWNAP-300 Hercules Wireless N Access Point
M
N
O
P
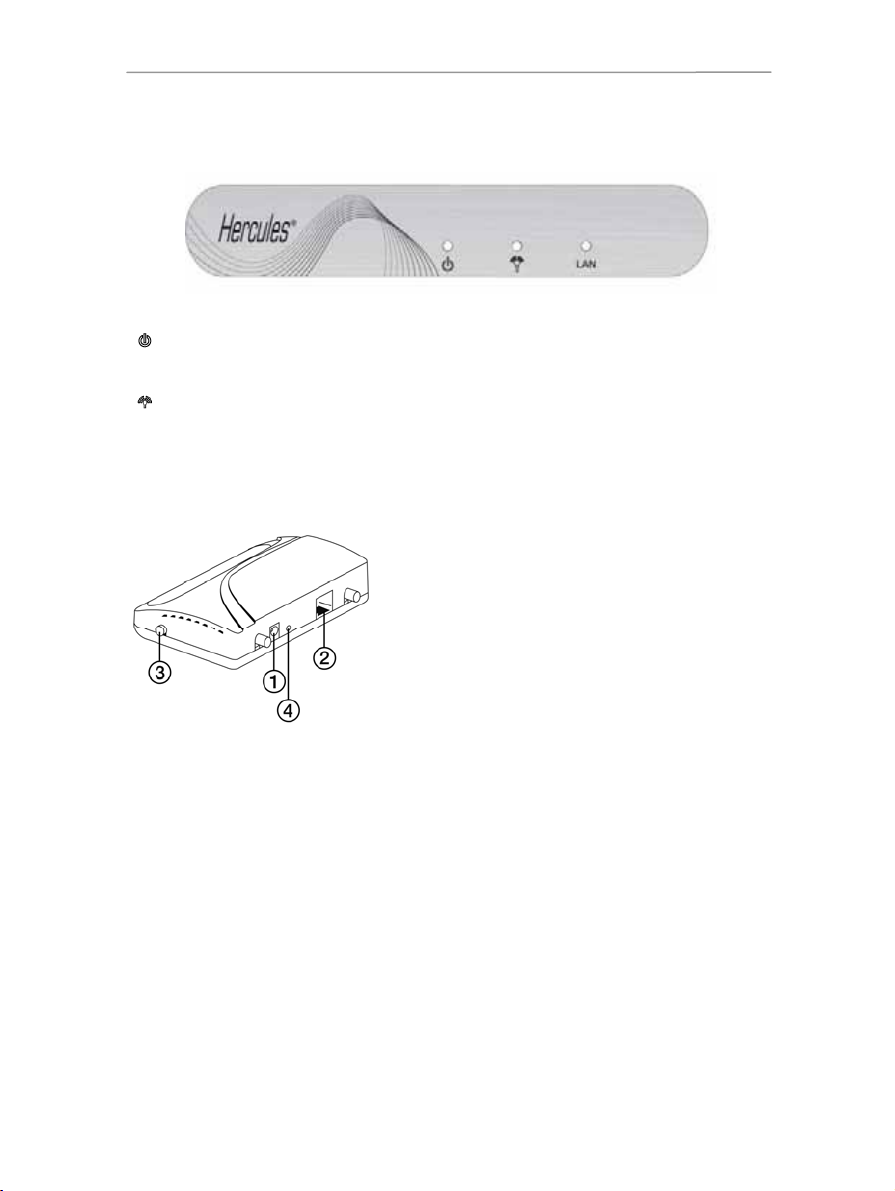
1.5. Front face overview
: Power LED
: WiFi LED: lit up when the WiFi connection is active. Flashes during data transfer.
LAN : Ethernet LED: the LED is lit up when a device is connected to the corresponding port. The LED flashes during data
transfer.
1.6. Connectivity overview
Power plug to connect the power adapter.
One Ethernet port allowing your Hercules access point to
be connected to a modem-router.
WPS button (Wi-Fi Protected Setup
Return to factory default settings button.
TM
).
User Manual – 5/94

Hercules Wireless N Access Point HWNAP-300
2. INSTALLING YOUR HERCULES WIRELESS N ACCESS
POINT
Your Hercules Wireless N Access Point has been designed to be simple to use and install. If you are new to
working with wireless products, we invite you to first follow the advice presented in chapters 2.1 to 2.3.
Otherwise, you can proceed directly to chapter 2.4. Launching the Hercules Wireless N Access Point
installation Assistant, which explains how to install your Hercules Wireless N Access Point step by step.
2.1. How to position your Hercules Wireless N Access Point
Remove the access point and the power adapter from the box.
Screw the 2 included antennas onto the access point and place them in an upright position.
To help you select the best spot to position your Hercules access point, we are pleased to offer you the
following tips, which you may adapt according to your environment (the number of rooms, computers, floors in
your home, the presence of any obstacles, the locations of power and telephone plugs…).
Position the access point near your modem (ADSL, cable or Internet “Box”) and a power outlet.
Try to place your access point in a room centrally located in relation to your other computers and WiFi
devices.
Keep a minimum distance of 2m between the access point and any computers and WiFi devices.
If you have several computers or WiFi devices on different floors in your home (on the ground floor and
the second floor, for example), you should ideally try to place your Hercules access point on the ground
floor.
Your access point’s WiFi performance may be greatly affected by certain obstacles, such as the
presence of paper (a bookcase), metal, water (an aquarium) or a wall made of reinforced concrete
between the Hercules access point and any WiFi adapters.
Moreover, do not hesitate to adjust the 2 antennas to different positions in order to achieve optimum
reception of the WiFi signal.
6/94 – User Manual
HWNAP-300 Hercules Wireless N Access Point
2.2. Launching the Hercules Wireless N Access Point
installation Assistant
The Assistant, available on the CD-ROM included with the access point, will guide you through the different
steps of the installation. To help you with the installation, each of the steps is described below.
- Insert the included CD-ROM into your CD-ROM drive.
The installation Assistant appears automatically.
If the installation menu is not launched automatically:
- Double-click My Computer (Windows 2000/XP) or Computer (Windows Vista).
- Double-click .
- Double-click Setup.exe, if necessary.
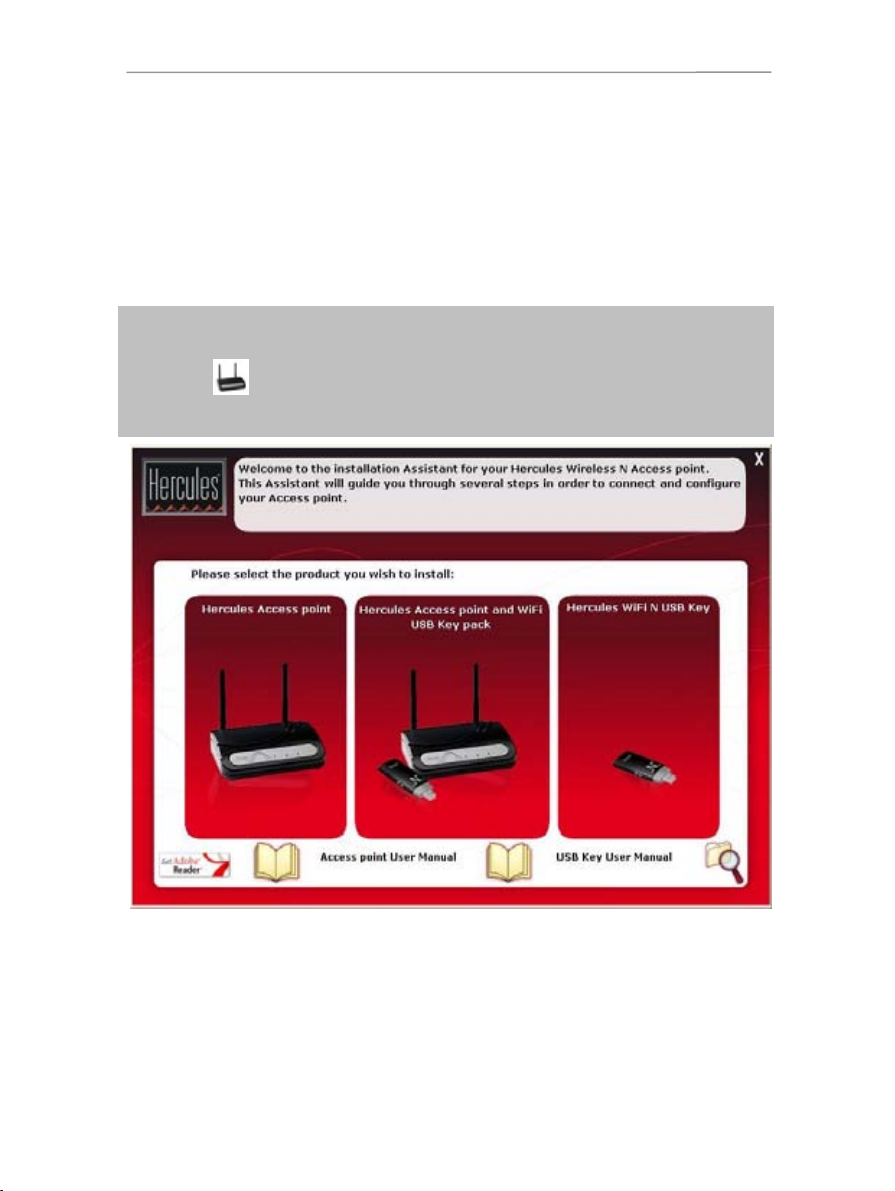
The home page prompts you to install the product of your choice.
You can choose to install the Hercules pack (composed of the Hercules Wireless N Access Point and the
Wireless N USB Key), the Hercules Wireless N Access Point only or the WiFi Station N software only,
which is required for using your Hercules Wireless N Key.
User Manual – 7/94
Hercules Wireless N Access Point HWNAP-300
2.3. Installing Hercules Wireless N Access Point only
- Click Hercules Access point.
The Assistant will launch the installation procedure for your access point, along with the associated
software, Hercules QuickAccess, which will allow you to access the WiFi Manager N configuration interface.
This interface has been specifically developed by Hercules to set, verify and configure all connection and
security settings for Hercules Wireless N series devices.
For more information on WiFi Manager N, please refer to section 3. WiFi Manager N, the versatile utility.
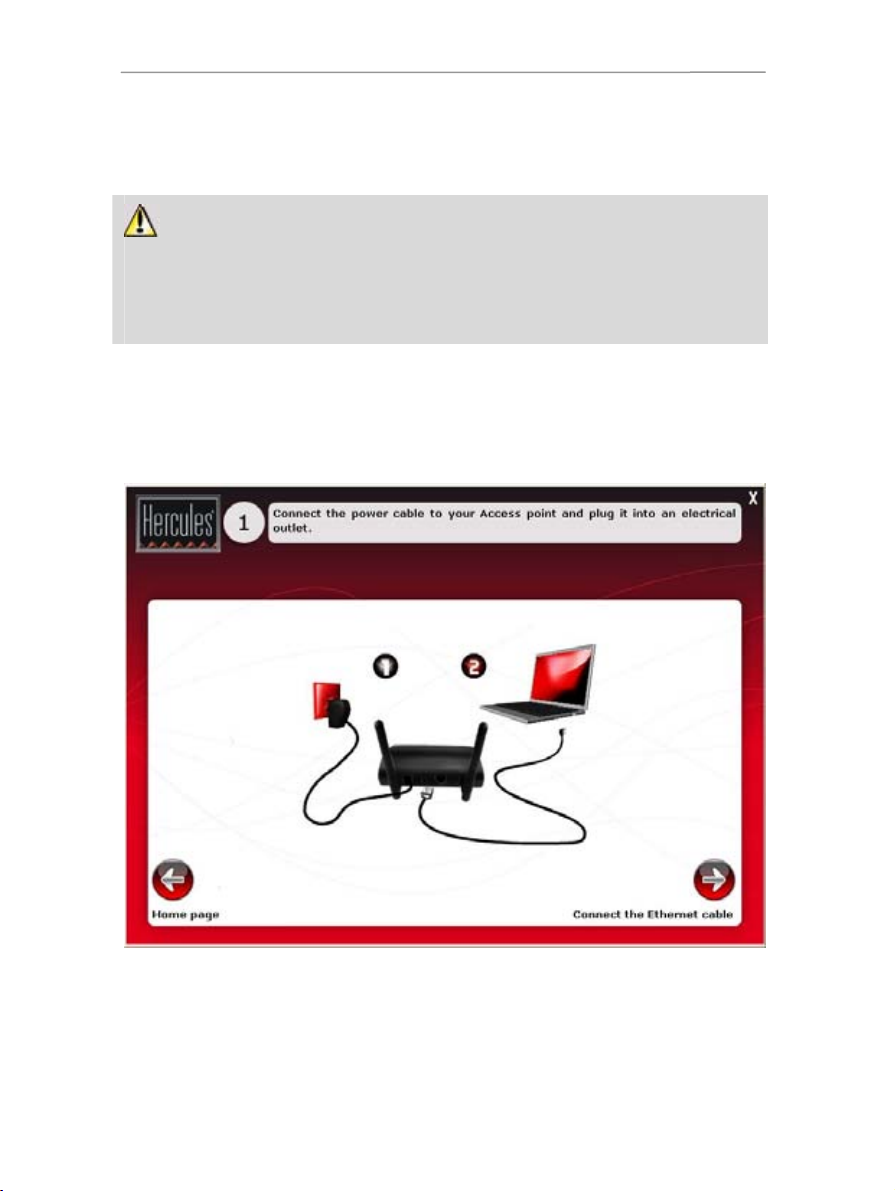
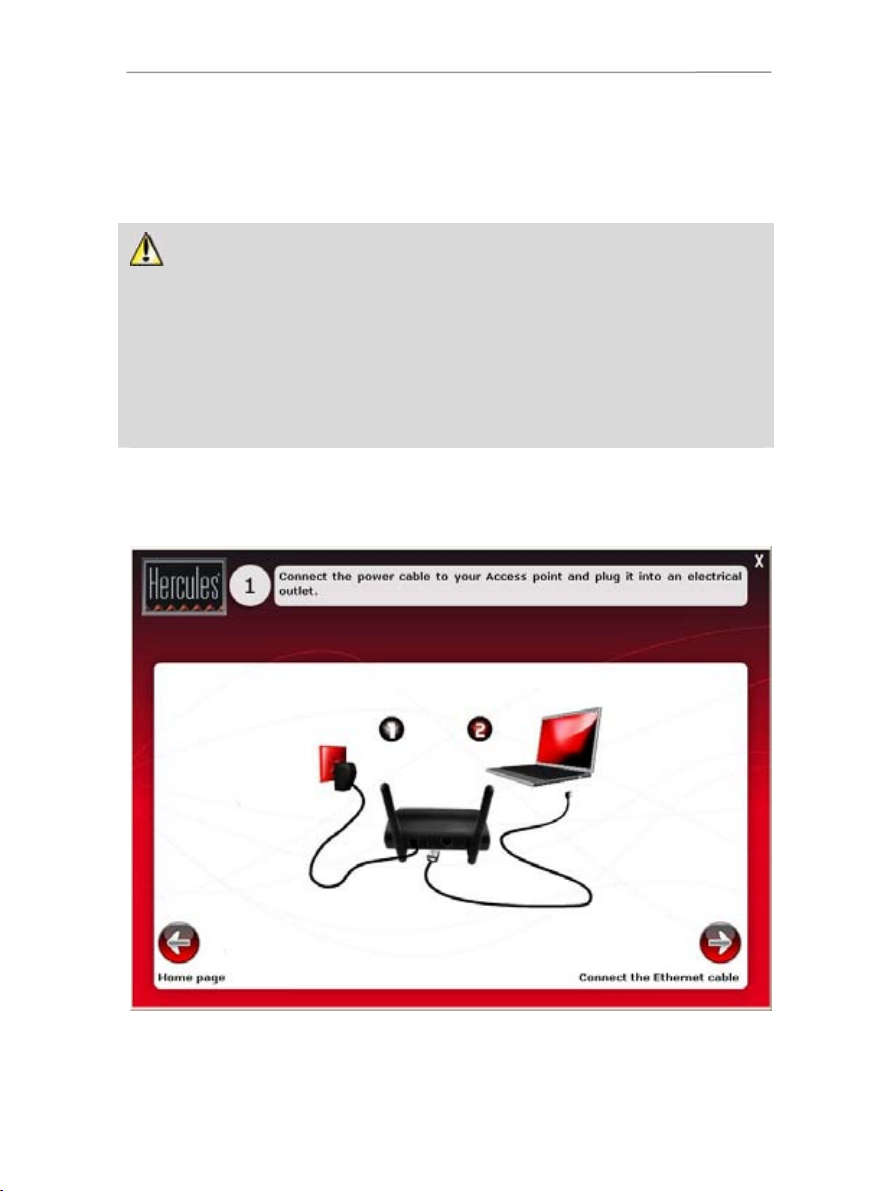
Step 1: Connecting the power supply
- Connect the Hercules access point's power adapter to the power plug and plug the power adapter into an
electrical outlet.
The power LED and the WiFi LED light up.
- Click Next.
8/94 – User Manual

HWNAP-300 Hercules Wireless N Access Point
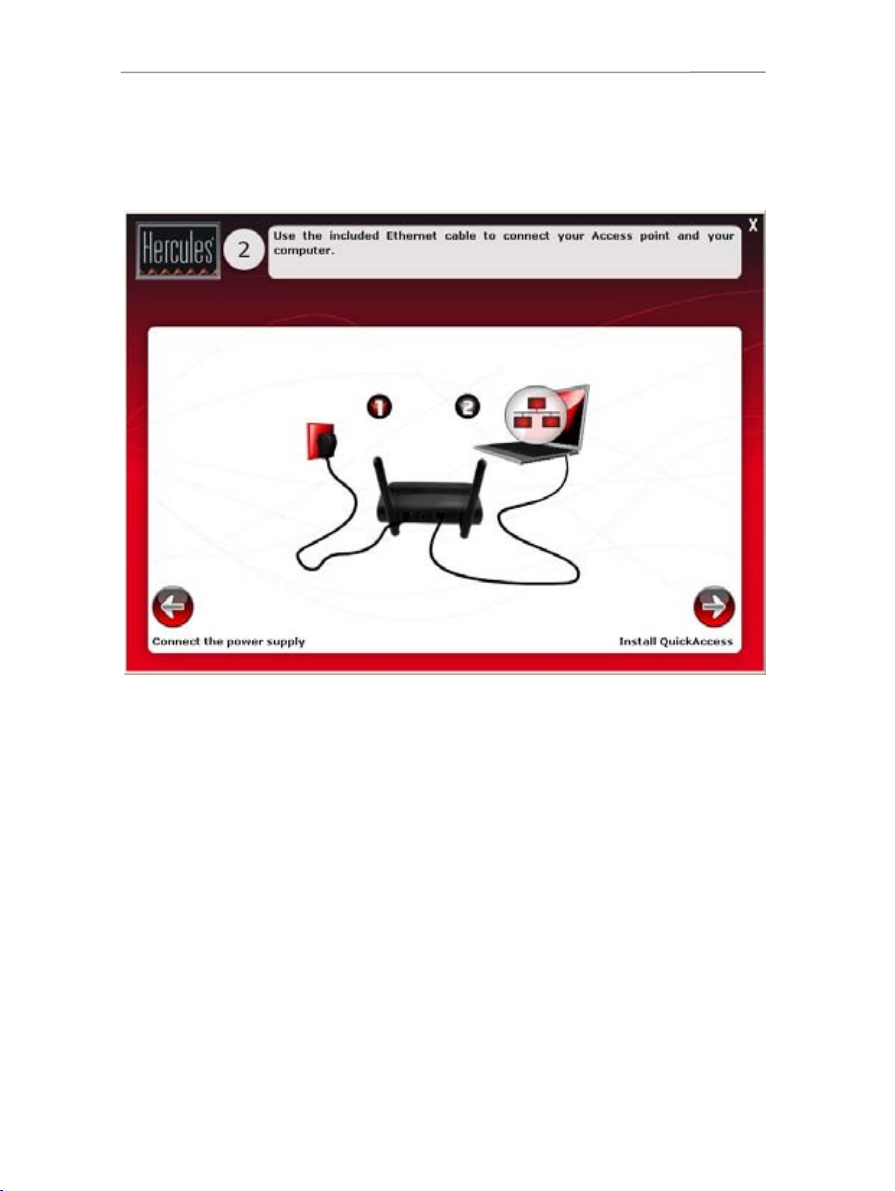
Step 2: Connecting the access point to your computer
- Make sure to disconnect all devices (modem-router, "box") connected to your computer via an Ethernet
cable. Connect one end of the included Ethernet cable to the Ethernet port on your Hercules Wireless N
Access Point, and the other end of the cable to the Ethernet port on your computer.
The Ethernet LED lights up.
- Click Next.
User Manual – 9/94

Hercules Wireless N Access Point HWNAP-300
Step 3: Installing QuickAccess
The Assistant prompts you to install Hercules QuickAccess, the quick connection utility to WiFi Manager N.
Click the Install QuickAccess button if you wish to install this utility.
You must install QuickAccess in order to be able to configure your access point.
10/94 – User Manual
HWNAP-300 Hercules Wireless N Access Point
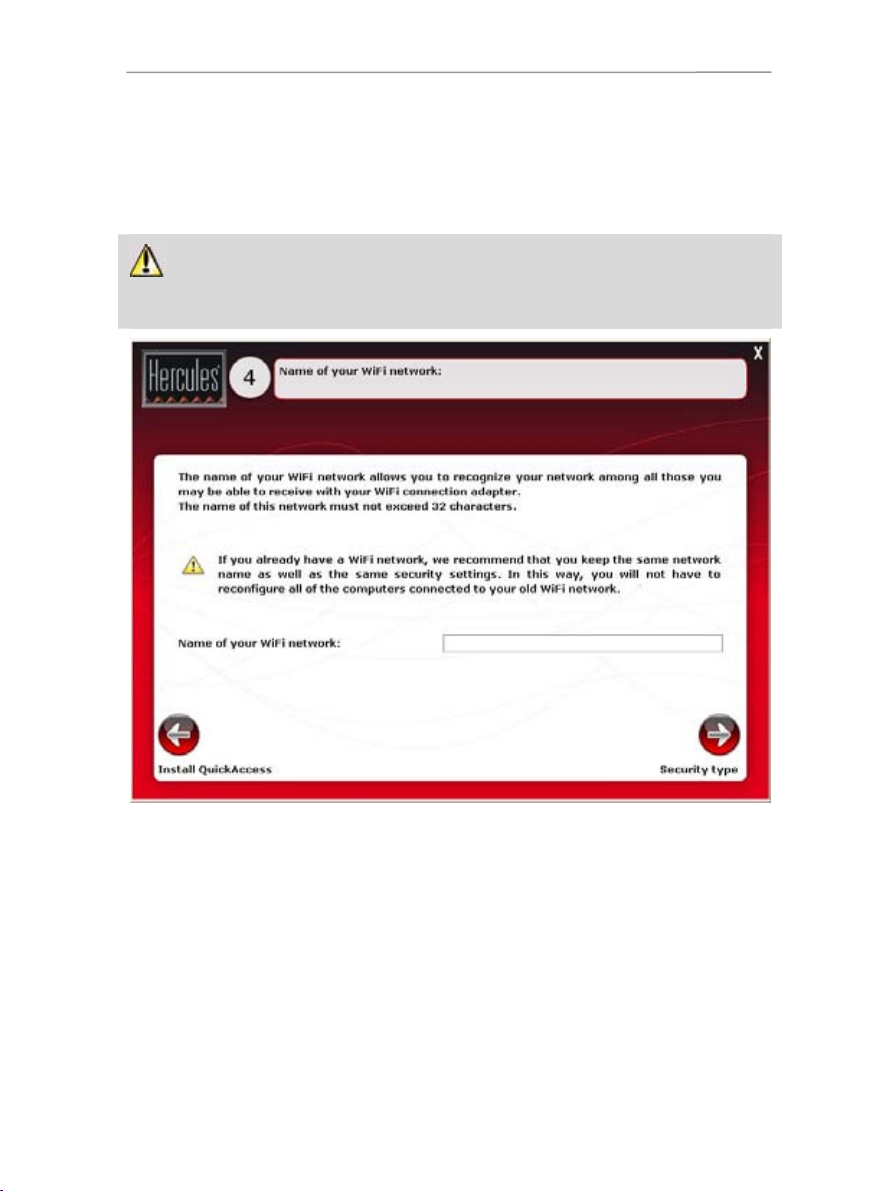
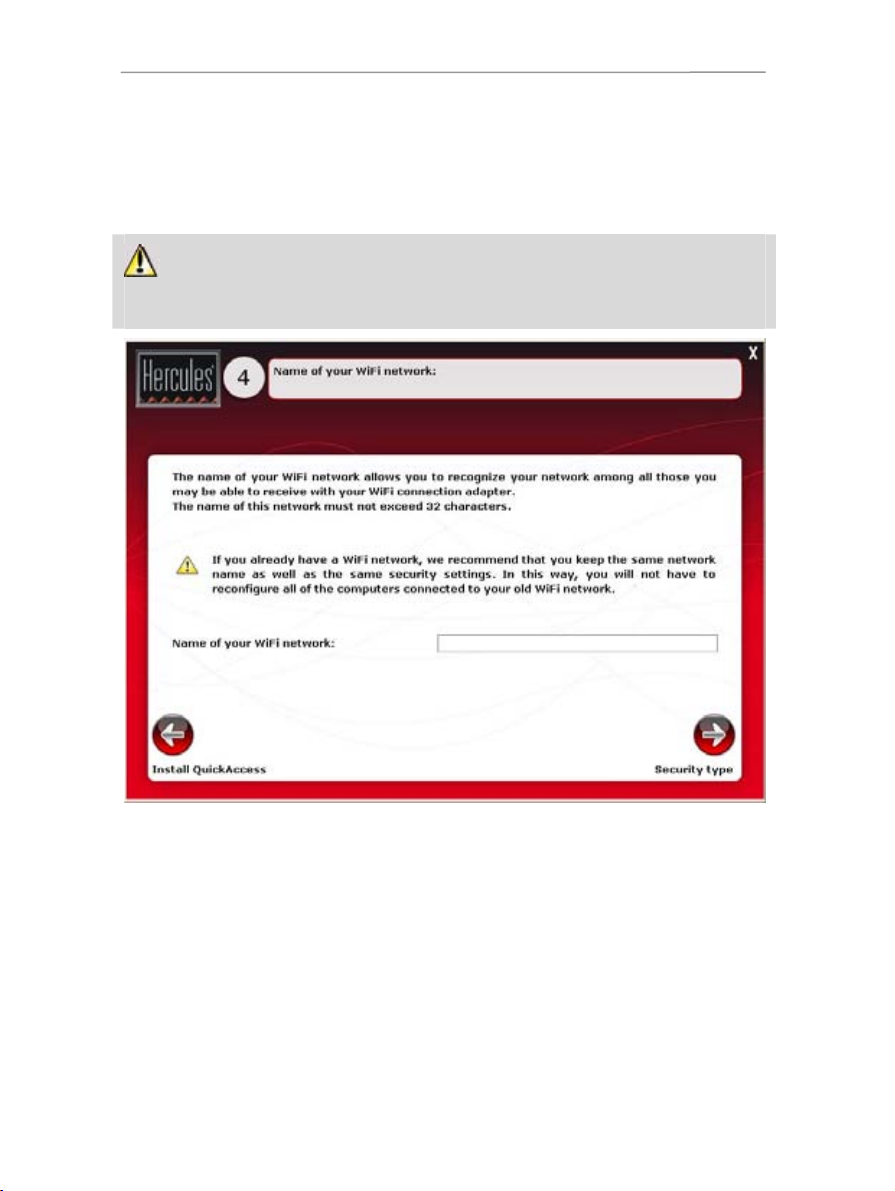
Step 4: Network name (SSID)
Steps 4 and 5 will allow you to configure your WiFi network.
- Select the name of your WiFi network. Click Next.
If you already have a WiFi network, we recommend that you keep the same network name as well as
the same security settings. In this way, you will not have to reconfigure all of the computers connected to your
old WiFi network.
User Manual – 11/94
Hercules Wireless N Access Point HWNAP-300
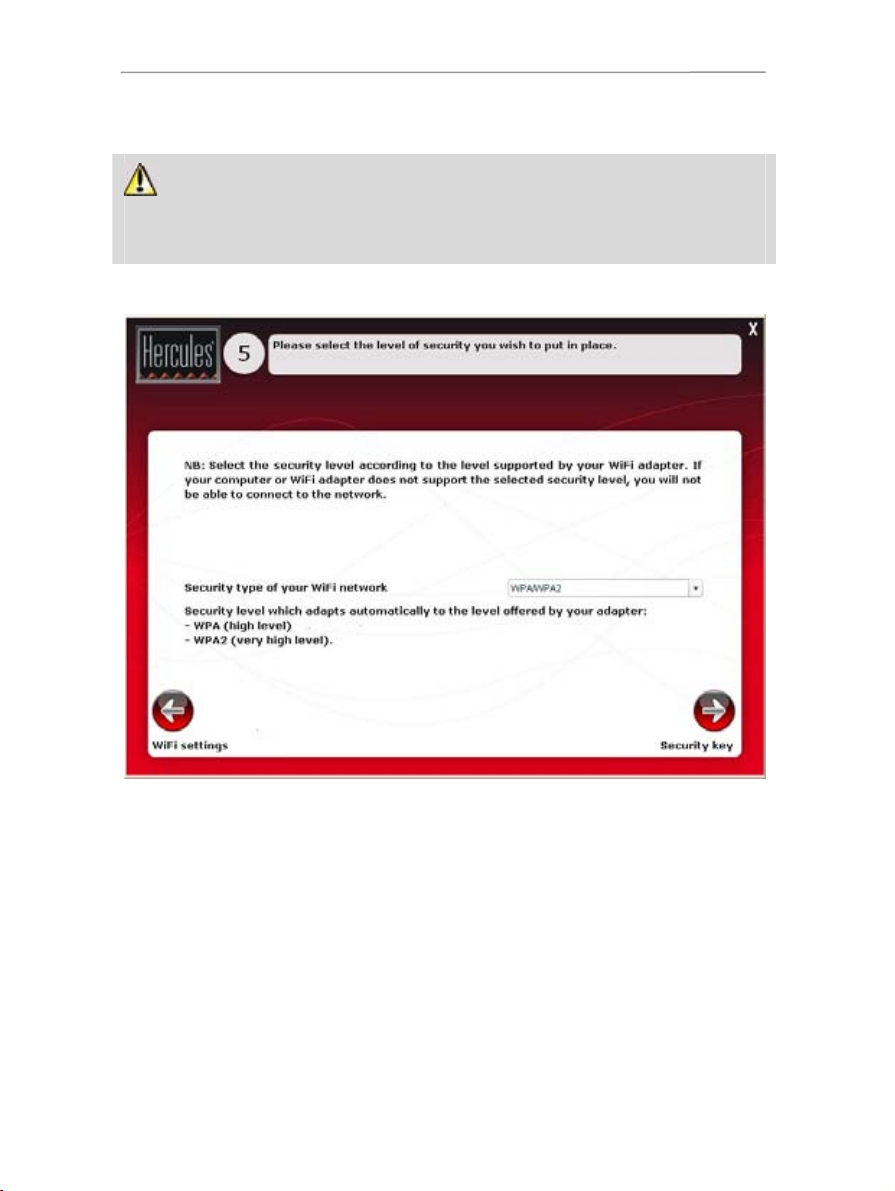
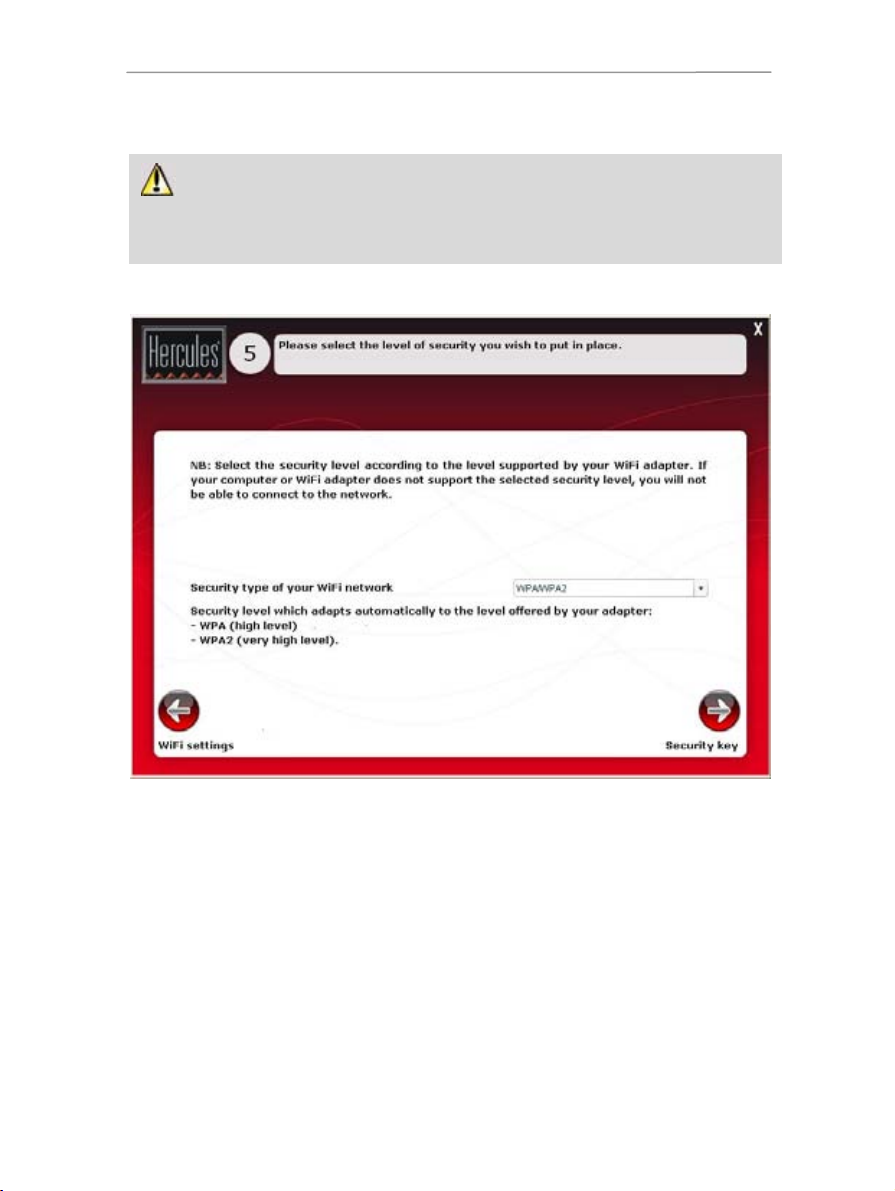
Step 5: Selecting your level of security
Don’t forget to protect your network by selecting a level of security combined with a security key.
Otherwise, any user, whether malicious or not, will be able to connect to your network.
To find out how to protect your network, please refer to section 3.5.2. Securing your WiFi network.
- Select the level of security in the drop-down list.
12/94 – User Manual
HWNAP-300 Hercules Wireless N Access Point
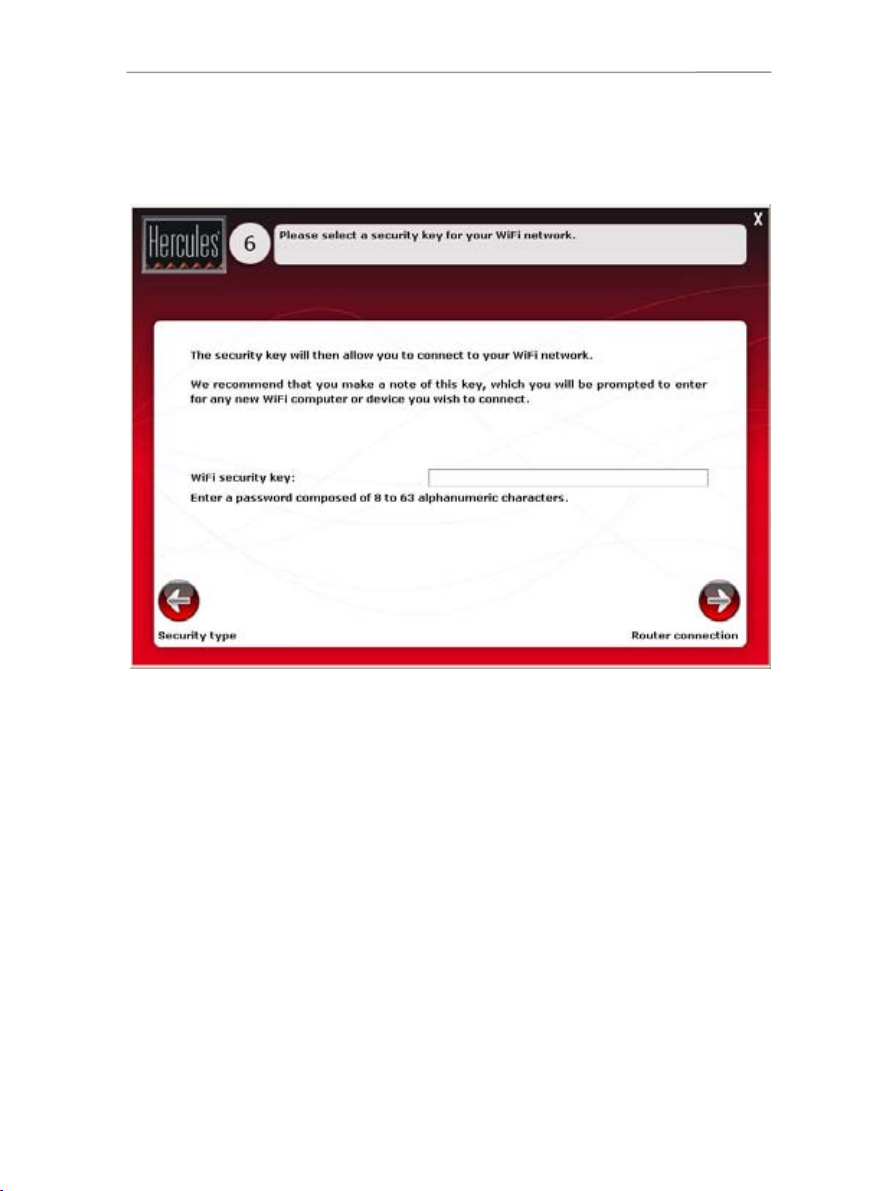
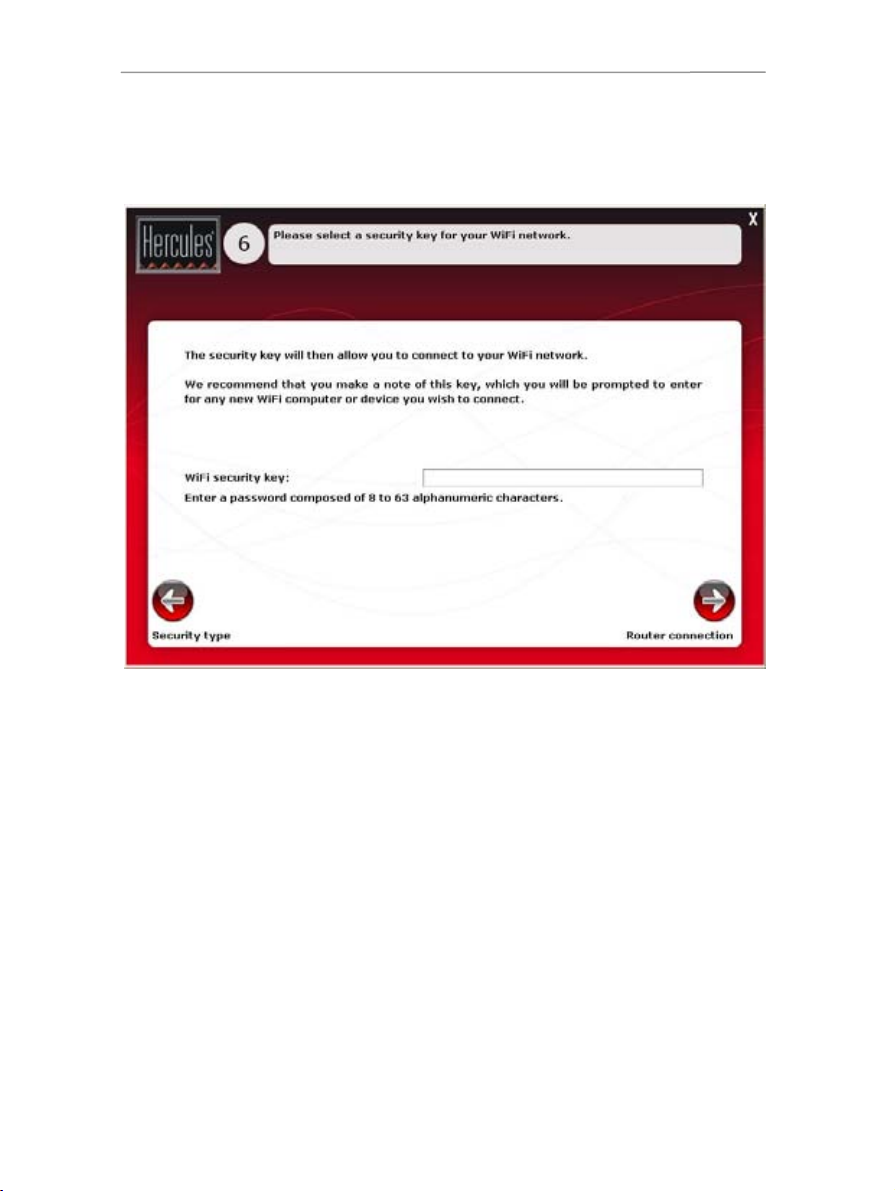
Step 6: Choosing the security key
- Choose the security key if you have selected a level of security in the previous step. Click Next.
User Manual – 13/94
Hercules Wireless N Access Point HWNAP-300
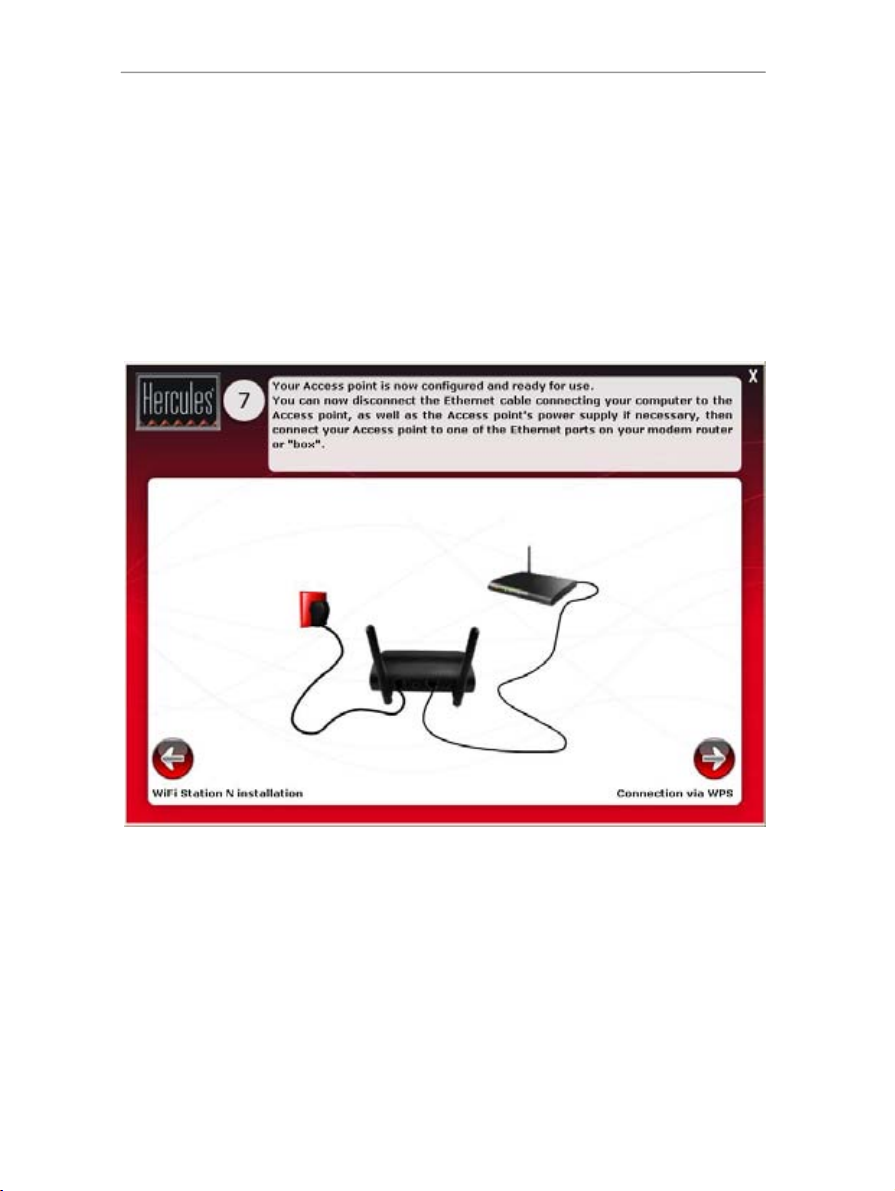
Step 7: Connecting the access point to the modem-router
- If necessary, disconnect the access point's power supply (if your modem-router is located in another room,
for example, you will have to move your access point close to it to connect it via Ethernet).
- Disconnect the Ethernet cable from the computer.
- If necessary, reconnect the access point's power supply.
- Connect one end of the included Ethernet cable to the Ethernet port on your Hercules Wireless N Access
Point, and the other end to the Ethernet port on your modem-router.
14/94 – User Manual

HWNAP-300 Hercules Wireless N Access Point
Step 8: WPS connection
Installation of your Hercules Wireless N Access Point is almost complete. Before learning about advanced
functionalities and moving on to practical applications, the screen shown above demonstrates how you can
connect very easily using WPS. Click Next to complete the installation.
User Manual – 15/94
Hercules Wireless N Access Point HWNAP-300
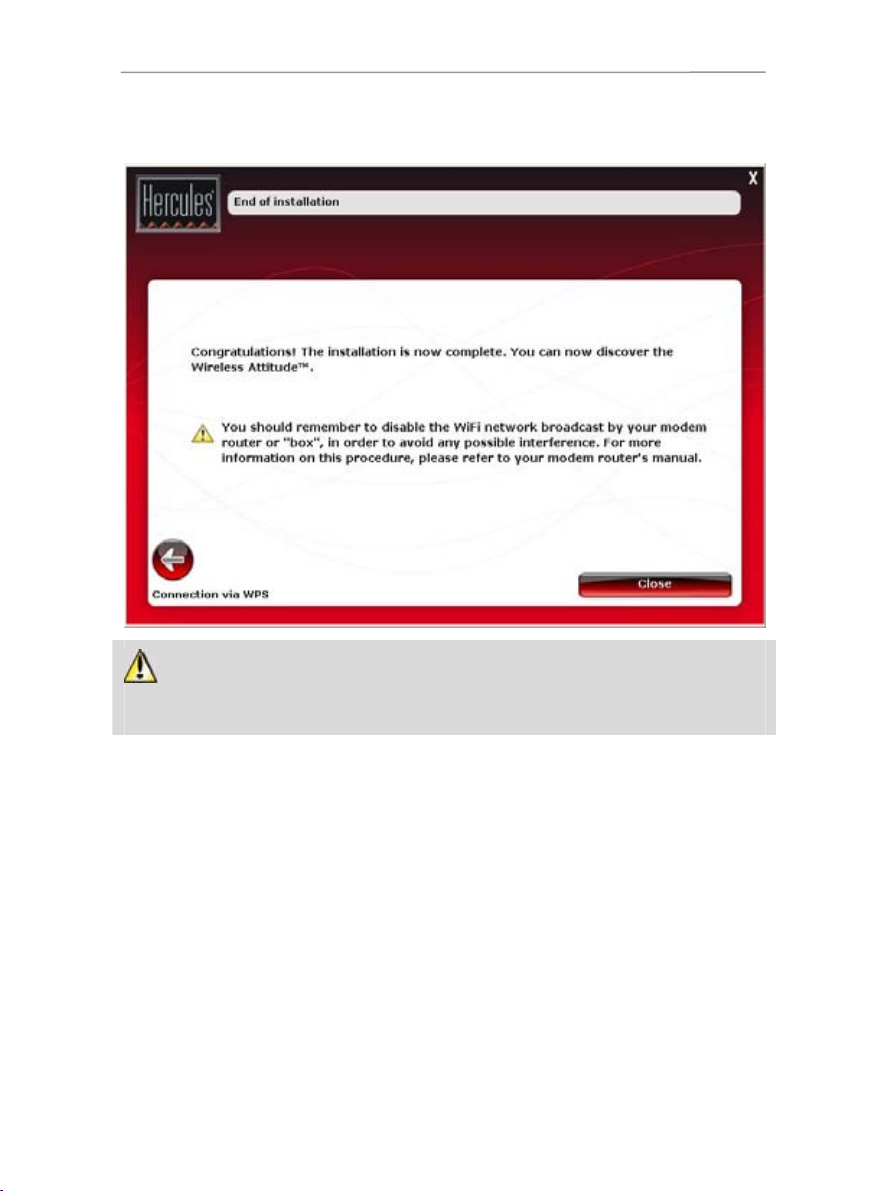
End of installation
In order to avoid any interference, you should now disable your modem-router's WiFi network, if your
access point's WiFi network settings are the same as those of your modem-router's WiFi network. For more
information on this procedure, please refer to your modem-router's manual.
For more information on connecting using WPS, please refer to section 2.7. Connecting to a network with
Wi-Fi Protected Setup
TM
.
To learn about all of your product's advanced functionalities, please refer to section 3. WiFi Manager N, the
versatile utility.
To learn about practical applications for your WiFi devices, please refer to section 4. Welcome to the
Wireless Attitude™.
16/94 – User Manual
HWNAP-300 Hercules Wireless N Access Point
2.4. Installing the Hercules pack (Hercules Wireless N Access
Point + Wireless N USB Key)
- Click Hercules Access point and WiFi USB Key pack.
The Assistant will successively launch installation of your access point and your Key, as well as of the
associated software (WiFi Manager N for the Hercules Wireless N Access Point and WiFi Station N for the
Hercules Wireless N USB Key), specifically developed by Hercules to set, verify and configure all connection
and security settings for Hercules Wireless N series devices.
For more information regarding WiFi Manager N, please refer to section 3. WiFi Manager N, the versatile
utility.
For more information regarding WiFi Station N, please refer to the PDF manual for your Hercules
Wireless N USB Key.
Step 1: Connecting the power supply
- Connect the Hercules access point's power adapter to the power plug and plug the power adapter into an
electrical outlet.
The power LED and the WiFi LED light up.
- Click Next.
User Manual – 17/94
Hercules Wireless N Access Point HWNAP-300
Step 2: Connecting the access point to your computer
- Make sure to disconnect all devices (modem-router, "box") connected to your computer via an Ethernet
cable. Connect one end of the included Ethernet cable to the Ethernet port on your Hercules Wireless N
Access Point, and the other end of the cable to the Ethernet port on your computer.
The Ethernet LED lights up.
- Click Next.
18/94 – User Manual

HWNAP-300 Hercules Wireless N Access Point
Step 3: Installing QuickAccess
The Assistant prompts you to install Hercules QuickAccess, the quick connection utility to WiFi Manager N.
Click the Install QuickAccess button if you wish to install this utility.
You must install QuickAccess in order to be able to configure your access point.
User Manual – 19/94
Hercules Wireless N Access Point HWNAP-300
Step 4: Network name (SSID)
Steps 4 and 5 will allow you to configure your WiFi network.
- Select the name of your WiFi network. Click Next.
If you already have a WiFi network, we recommend that you keep the same network name as well as
the same security settings. In this way, you will not have to reconfigure all of the computers connected to your
old WiFi network.
20/94 – User Manual
HWNAP-300 Hercules Wireless N Access Point
Step 5: Selecting your level of security
Don’t forget to protect your network by selecting a level of security combined with a security key.
Otherwise, any user, whether malicious or not, will be able to connect to your network.
To find out how to protect your network, please refer to section 3.5.2. Securing your WiFi network.
- Select the level of security in the drop-down list.
User Manual – 21/94
Hercules Wireless N Access Point HWNAP-300
Step 6: Choosing the security key
- Choose the security key if you have selected a level of security in the previous step. Click Next.
22/94 – User Manual

HWNAP-300 Hercules Wireless N Access Point
Step 7: Installing WiFi Station N
- Click Install WiFi Station N.
The WiFi Station N installation Assistant then starts up to launch installation of your Hercules Wireless N USB
Key. Follow the on-screen instructions.
For more information on installing WiFi Station N, please refer to the PDF manual for your Hercules
Wireless N USB Key.
User Manual – 23/94

Hercules Wireless N Access Point HWNAP-300
Step 8: Connecting the access point to the modem-router
- If necessary, disconnect the access point's power supply (if your modem-router is located in another room,
for example, you will have to move your access point close to it to connect it via Ethernet).
- Disconnect the Ethernet cable from the computer.
- If necessary, reconnect the access point's power supply.
- Connect one end of the included Ethernet cable to the Ethernet port on your Hercules Wireless N Access
Point, and the other end to the Ethernet port on your modem-router.
24/94 – User Manual
HWNAP-300 Hercules Wireless N Access Point
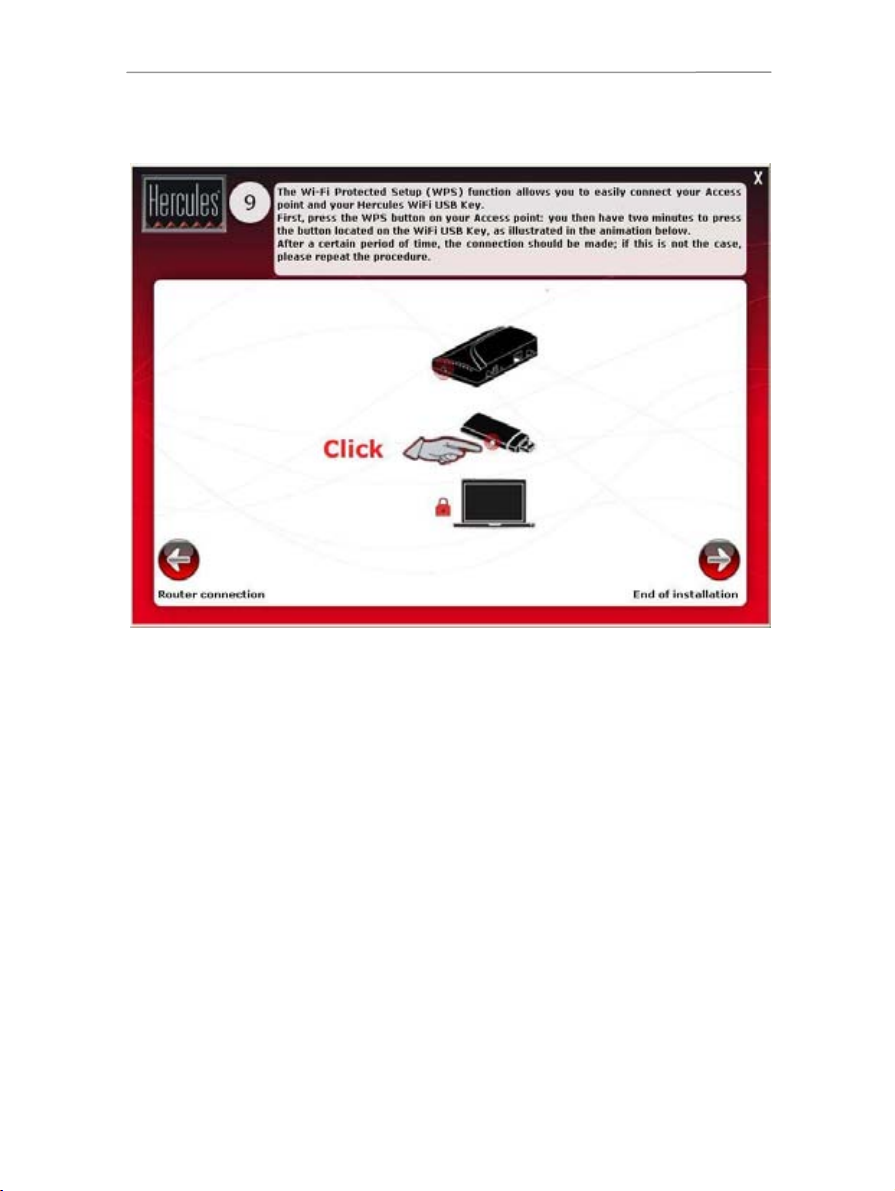
Step 9: WPS connection
Installation of your Hercules Wireless N Access Point/Hercules Wireless N USB Key is almost complete.
Before learning about advanced functionalities and moving on to practical applications, the screen shown
above demonstrates how you can connect very easily using WPS. Click Next to complete the installation.
User Manual – 25/94
Hercules Wireless N Access Point HWNAP-300
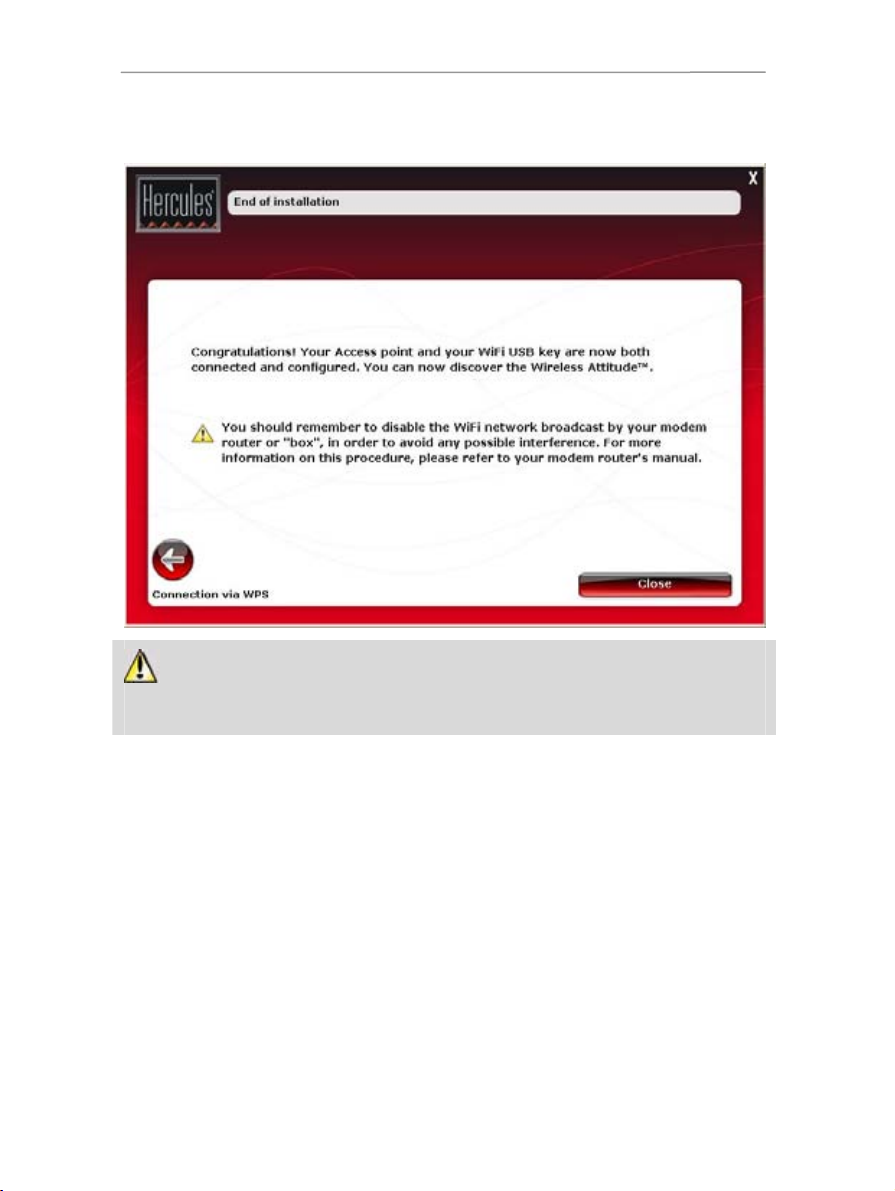
End of installation
In order to avoid any interference, you should now disable your modem-router's WiFi network, if your
access point's WiFi network settings are the same as those of your modem-router's WiFi network. For more
information on this procedure, please refer to your modem-router's manual.
For more information on connecting using WPS, please refer to section 2.7. Connecting to a network with
Wi-Fi Protected Setup
TM
.
To learn about all of your product's advanced functionalities, please refer to section 3. WiFi Manager N, the
versatile utility or section 4. The WiFi Station N utility in the PDF manual for your Hercules Wireless N Key.
To learn about practical applications for your WiFi devices, please refer to section 4. Welcome to the
Wireless Attitude™.
26/94 – User Manual
HWNAP-300 Hercules Wireless N Access Point
2.5. Installing the Wireless N USB key only
To install the Wireless N USB Key:
- Click Hercules WiFi N USB Key.
The WiFi Station N installation Assistant is launched. Follow the on-screen instructions
For more information on installing WiFi Station N, please refer to the PDF manual for your Hercules
Wireless N USB Key.
2.6. Exploring the CD-ROM
- Click the button.
The CD-ROM's tree structure is displayed in the new window. You can browse through the contents of the
different folders.
2.7. Connecting to a network with Wi-Fi Protected Setup
If connecting to a WiFi network and configuring it seems like too much trouble to you, you can use the
integrated WPS (Wi-Fi Protected Setup
following logos:
What is WPS (Wi-Fi Protected SetupTM) ?
WPS is a technology which simplifies the connection procedure to a wireless network between a WPS-
compatible device (your Hercules Wireless N Key, for example) and your Hercules Wireless N Access
Point. Different connection methods are available to you: simply click a button located on the access point or
in WiFi Manager N, or enter the PIN code of the device to be connected (your Hercules Wireless N Access
Point or your Hercules Wireless N Key, for example) in the WiFi Manager N interface.
About master and client modes
To get a better understanding of the two connection modes via WPS, it is important to grasp the concepts of
master and client. In master mode, the WPS device (your Hercules Wireless N Access Point, for
example) is the access point to which other WPS devices will connect (your Hercules Wireless N Key or
another WPS device). In client mode, it is the WPS device (your Hercules Wireless N Key or another WPS
device) which connects to the master (your Hercules Wireless N Access Point).
Note: The procedure detailed hereafter describes connecting your Hercules Wireless N Access Point with
the Hercules Wireless N USB Key; however, you can also connect other WPS devices. Should you wish to
do so, please refer to your WPS device's user manual.
In order to enjoy using a simplified connection thanks to the WPS (Wi-Fi Protected SetupTM)
functionality, devices which will be connecting to your Access Point must be WPS-compatible and
certified.
TM
) functionality, indicated on the product or packaging by one of the
or
TM
User Manual – 27/94
Hercules Wireless N Access Point HWNAP-300
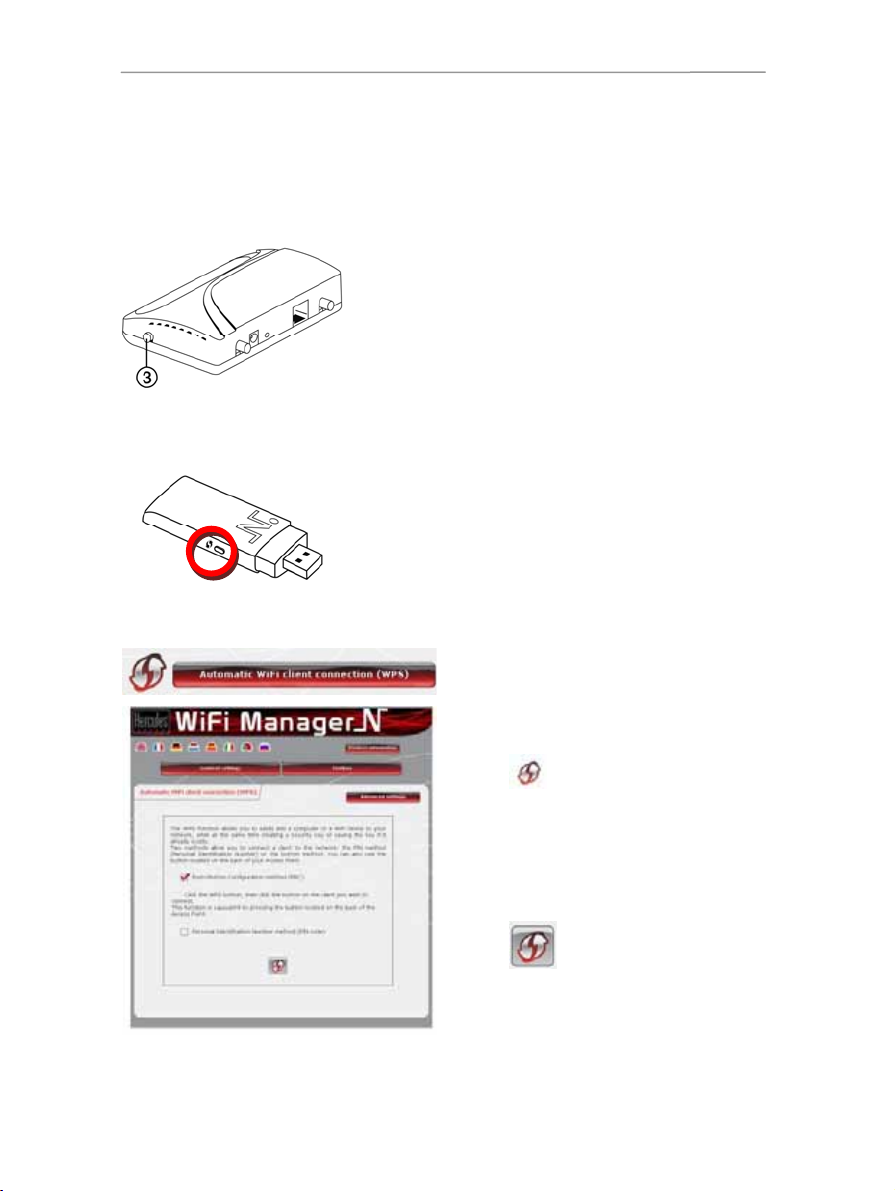
2.7.1.Connecting to a network in master mode
Note: by default, your Hercules Wireless N Access Point is configured to master mode, meaning that it will
serve as the access point to which other WPS devices will be able to connect.
st
1
option: use the WPS button located on the Access Point
- On your WiFi access point: press the WPS button Olocated on the
side of the access point.
You now have two minutes to connect your Hercules Wireless N USB
Key to the access point. You will not have to repeat this step the next
time you connect.
- Press the WPS button located on the side of the Hercules
Wireless N Key or the WPS button on a WPS-compatible device.
nd
option: use the WPS button accessible in WiFi Manager N
2
- On the WiFi Manager N home page, press the
Automatic WiFi client connection (WPS) button.
28/94 – User Manual
Push-Button Configuration method (PBC) is
selected by default.
- Click the
connection button.
Alternatively:
- Select Personal Identification Number method
(PIN code).
- Enter the PIN code of the WPS device you wish to
connect.
- Click the
connection button.
To find out the PIN code for your WPS device, please
refer to section 4.3.3. Connecting to a network with
a PIN code in the user manual of your Hercules
Wireless N USB Key, or refer to the manual supplied
by the manufacturer of your WPS device.
HWNAP-300 Hercules Wireless N Access Point
You now have two minutes to connect your Hercules Wireless N USB Key or your device via WPS.
If the connection is not secure, a WPA or WPA2 type security key (depending on the client's capabilities) is
generated automatically.
For more information on connecting your device via WPS, please refer to the PDF user manual of your
Hercules Wireless N USB Key or to the manual supplied by the manufacturer of your WPS device.
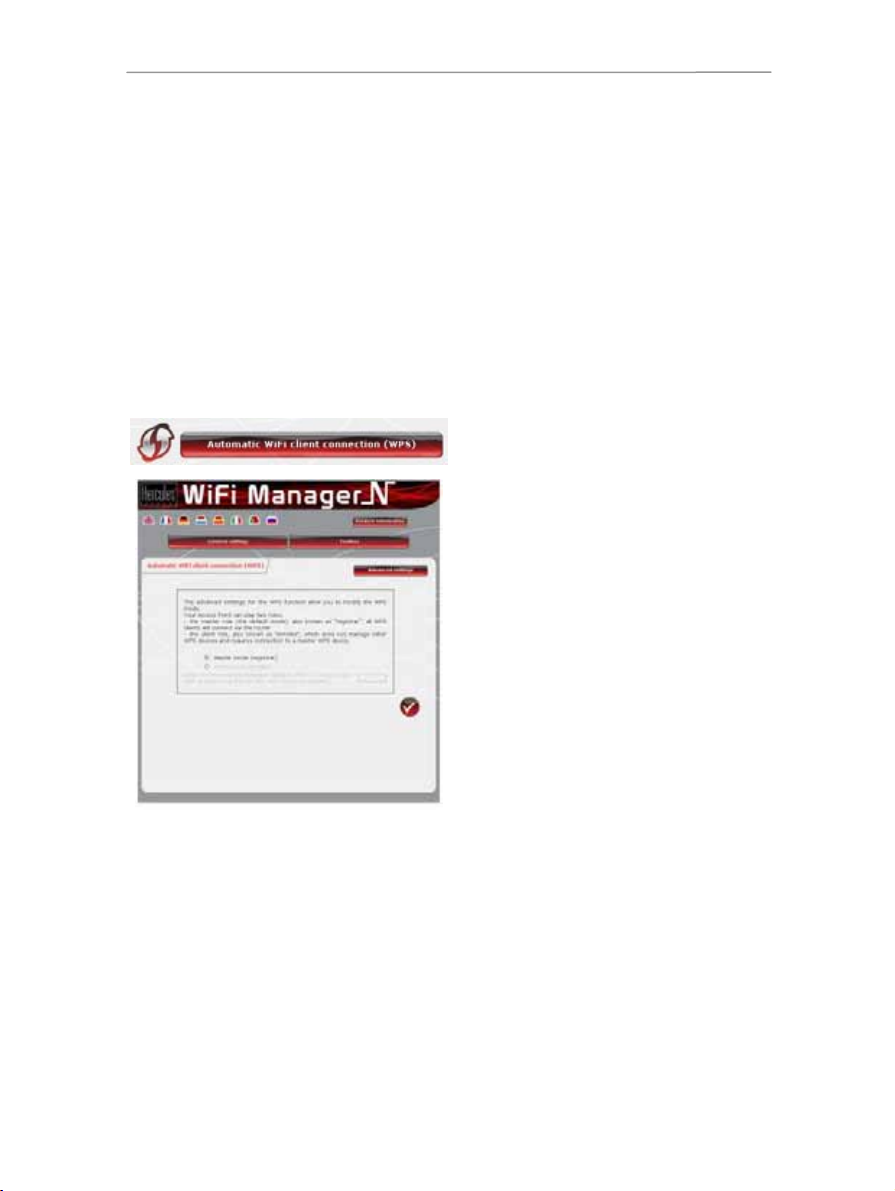
2.7.2.Connecting to a network in client mode
Note: by default, your Hercules Wireless N Access Point is configured to master mode, meaning that it will
serve as the access point to which other WPS devices will be able to connect. By switching to client mode,
your access point will connect to a master WPS device which will become the access point. You should be
aware, however, that your Hercules Wireless N Access Point, with its access point function, is not meant to
connect to other WPS devices.
- On the WiFi Manager N home page, press the
Automatic WiFi client connection (WPS)
button.
- Click the Advanced settings button.
Two options are available to you: Master mode or
Client mode.
- Select Client mode.
WiFi Manager N displays the PIN code for your
Hercules Wireless N Access Point. Make a note of
this code, as you will have to enter it in the client's
interface in order to connect your Access Point to
other devices.
User Manual – 29/94
 Loading...