

GUILIN WOODPECKER Ai-Motor, MotoPex Instruction Manual

Contents
1 Product introduction .............................................................................. 1
2 Installation ............................................................................................ 6
3 Function and operation of product .................................................... 13
4 Operation instruction ......................................................................... 16
5 Troubleshooting .................................................................................. 30
6 Cleaning, Disinfection and Sterilization ............................................. 31
7 Storage, maintenance and transportation ........................................... 34
8 Environmental protection ................................................................... 35
9 After service ....................................................................................... 35
10 European authorized representative .................................................. 35
11 Symbol instruction ........................................................................... 35
12 Statement .......................................................................................... 36
13 EMC-Declaration of conformity ....................................................... 36

Note: the description on reciprocating mode is only applicable
for the device that has reciprocating mode.
1 Product introduction
1.1 Preface
Guilin Woodpecker Medical Instrument Co., Ltd is a professional
manufacturer researching, developing, and producing dental products.
Woodpecker owns a sound quality control system. Guilin Woodpecker
Medical Instrument Co., Ltd has two brands, Woodpecker and DTE.
Its main products include Ultrasonic Scaler, Curing light, Apex locator,
Ultrasurgery, Endo Motor, etc.
1.2 Product description
Endo Motor (mode:Ai-Motor、MotoPex) is mainly used in
Endodontic treatment. It is a cordless endo motor with root canal
measurement capability. It can be used as a endo motor for preparation
and enlargement of root canals, or device for measuring canal length. It
can be used to enlarge the canals while monitoring the position of the le
tip inside the canal.
Features:
a) Ecient brushless motor, low noise, long service life.
b) Cordless portable endo motor with combined length determination.
c) 360 degrees rotation of contra angle.
d) Adopt real-time feedback technology and dynamic torque control,
eectively preventing le separation.
1.3 Model and specication
Ai-Motor、MotoPex
Please refer to packing list for device congurations.
1.4 Performance and composition
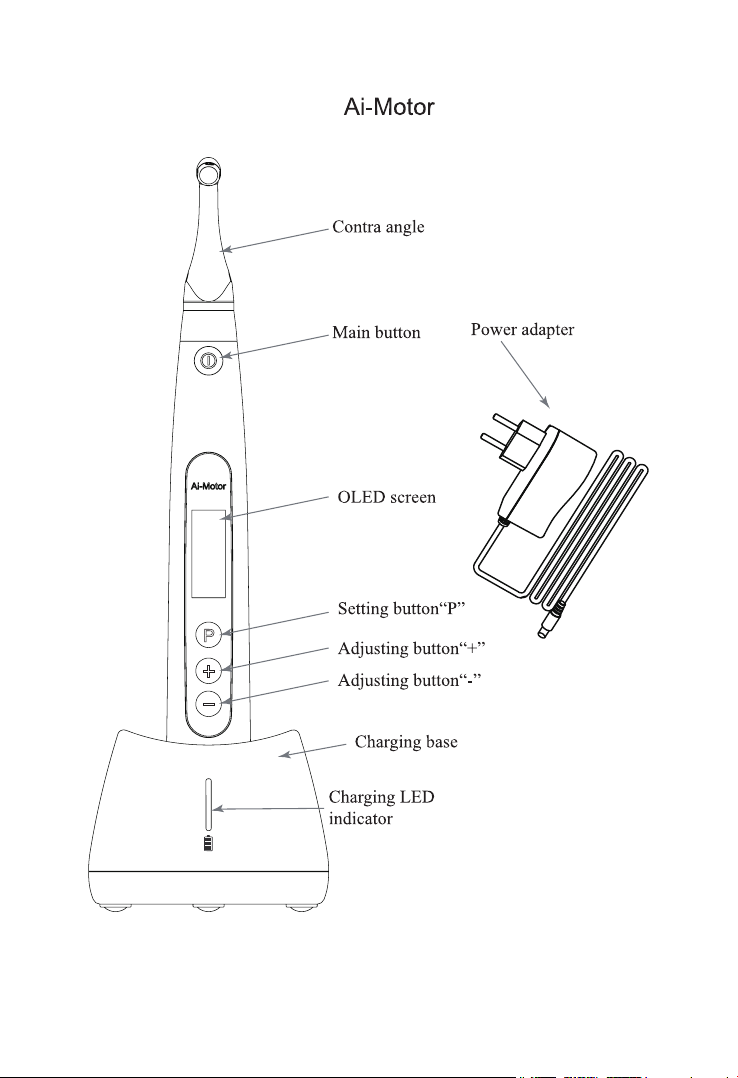
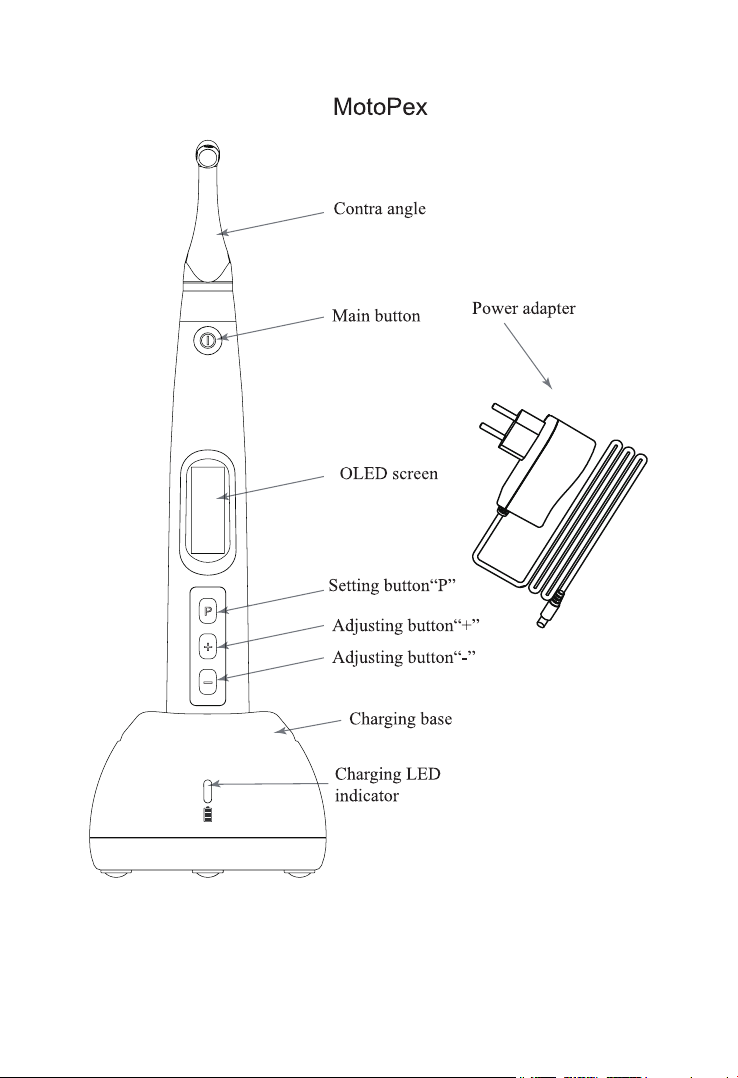
The device is composed of charging base, motor handpiece, contra
angle, measuring wire, lip hook, file clip, power adapter, protective
silicon cover, etc.
1
234

1.5 Scope of application
1.5.1 The device can be used for preparation and enlargement of root
canals, or device for measuring canal length.
1.5.2 The device must be operated in hospital and clinic by the qualied
dentists.
1.6 Contraindication
a) The doctor with a pacemaker is disabled.
b) patients with cardiac pacemakers (or other electrical equipment)
are warned not to use small appliances (such as Electric razors, hair
dryers, etc.) patients are disabled.
c) Hemophilia patients are banned.
d) Use with caution in patients with heart disease, pregnant women
and young children.
1.7 Warnings
1.7.1 Please carefully read this Instruction Manual before first
operation.
1.7.2 This device should be operated by professional and qualified
dentist in qualied hospital or clinic.
1.7.3 Do not directly or indirectly place this device near heat source.
Operate and store this device in reliable environment.
1.7.4 This device requires special precautions regarding
electromagnetic compatibility (EMC) and must be in strict accordance
with the EMC information for installation and use. Do not use this
equipment especially in the vicinity of fluorescent lamps, radio
transmitting devices, remote control devices, handheld and mobile highfrequency communication devices.
1.7.5 Long time use of Reciprocating Motion Mode may result in
motor handpiece overheat, thus it should be left to cool for use. If the
motor handpiece is overheated frequently, please contact local distributor.
1.7.6 Please use the original contra angle. Otherwise it will not be
used or cause adverse consequences.
1.7.7 Please do not make any changes to the device. Any changes
may violate safety regulations, causing harm to the patient. There will be
no promises of any modication.
1.7.8 Please use original power adapter. Other power adapter will
result in damage to lithium battery and control circuit.
1.7.9 The motor handpiece cannot be autoclaved. Use disinfectant of
neutral pH value or ethyl alcohol to wipe its surface.

1.7.10 Before the contra angle stopping rotating, do not press the
push cover of contra angle. Otherwise the contra angle will be broken.
1.7.11 Before the motor handpiece stopping rotating, do not remove
the contra angle. Otherwise the contra angle and the gear inside motor
handpiece will be broken.
1.7.12 Please confirm whether the file is well installed and locked
before starting the motor handpiece.
1.7.13 Please set torque and speed as per the recommended
specications of le manufacturer.
1.7.14 Error in replacing lithium batteries can lead to unacceptable
risks, so use the original lithium battery and replace the lithium battery
according to the correct steps in the instructions.
1.7.15 Not to position equipment to make it dicult to operate the
disconnection device.
1.7.16 Please remove the battery if the motor handpiece is not likely
to be used for some time.
1.7.17 Wireless charging will generate heat, and the surface
temperature of charging base and motor handpiece will rise. It is
recommended that the time of contacting motor handpiece and charging
base during wireless charging should not exceed 10 seconds(only for AiMotor).
1.8 Device safety classication
1.8.1 Type of operation mode: Continuous operating device
1.8.2 Type of protection against electric shock: Class II equipment
with internal power supply
1.8.3 Degree of protection against electric shock: B type applied part
1.8.4 Degree of protection against harmful ingress of water: Ordinary
equipment (IPX0)
1.8.5 Degree of safety application in the presence of a flammable
anesthetic mixture with air, oxygen, or nitrous oxide: Equipment cannot
be used in the presence of a flammable anesthetic mixture with air,
oxygen, or nitrous oxide.
1.8.6 Applied part: contra angle, lip hook, le clip, touch probe.
1.8.7 The contact duration of applied part: 1 to 10 minutes.
1.8.8 The temperature of the surface of applied part may reach
46.6℃.
5
1.9 Primary technical specications
1.9.1 Battery
Lithium battery in motor handpiece: 3.7V /2000mAh
1.9.2 Power adapter(Model: DJ-0500100-A5)
Input: ~100V-240V 50Hz/60Hz 0.5-0.2A
Output: DC5V/1A
1.9.3 Torque rang: 0.4Ncm-5.0Ncm(4mNm ~ 50mNm
1.9.4 Speed rang: 100rpm~1200rpm
1.9.5 Wireless charging(only for Ai-Motor)
Frequency range: 112-205KHz
Maximum RF output power of the product: 9.46dBuA/m@3m
)
1.10 Environment parameters
1.10.1 Environment temperature: +5℃ ~ +40℃
1.10.2 Relative humidity: 30% ~ 75%
1.10.3 Atmospheric pressure: 70kPa ~ 106kPa
2 Installation
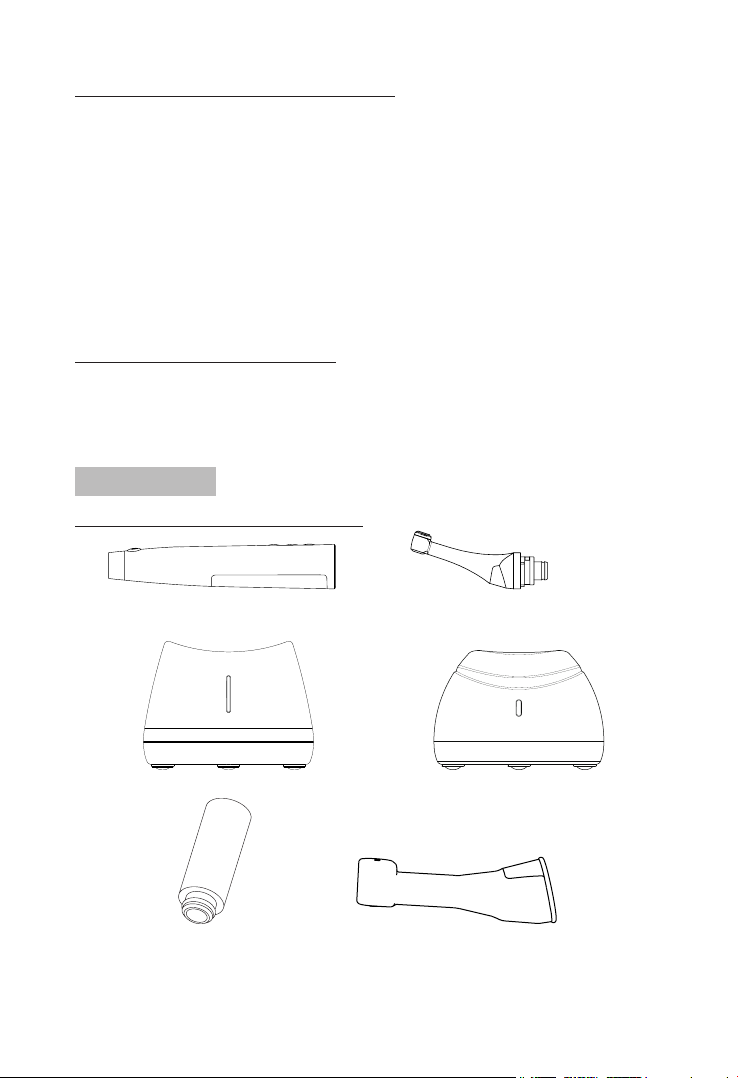
2.1 Basic accessories of product
Motor handpiece Contra angle
Ai-Motor Charging base MotoPex Charging base
Nozzle Protective silicon cover
6
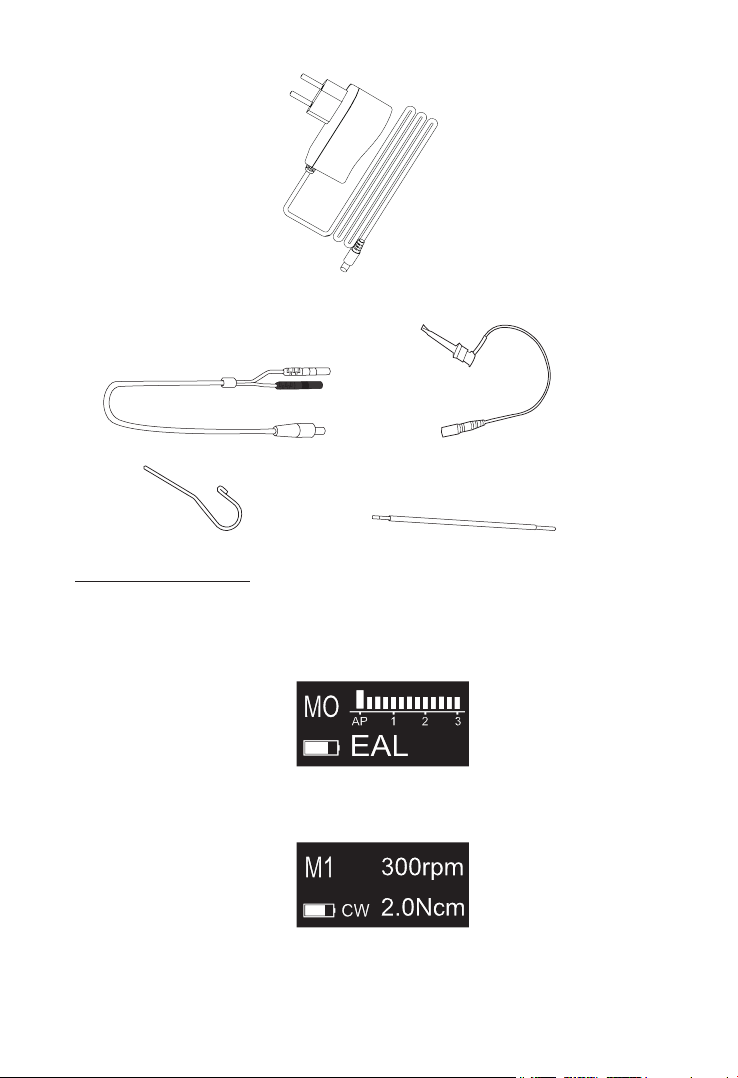
Power adapter
Measuring wire File clip
Lip hook Touch probe
2.2 Display Screens
2.2.1 Display Screens for 5 Operation Modes and Standby
2.2.1.1 EAL Mode
This mode is for canal measurement. The motor handpiece does not
run in this mode
2.2.1.2 CW Mode
The motor handpiece rotates forward 360º, clockwise direction. Used
rotaty les likes DENTSPLY Protaper or WOODPECKER W3-Pro
2.2.1.3 CCW Mode
The motor handpiece rotates counterclockwise direction only. This
.
7
.
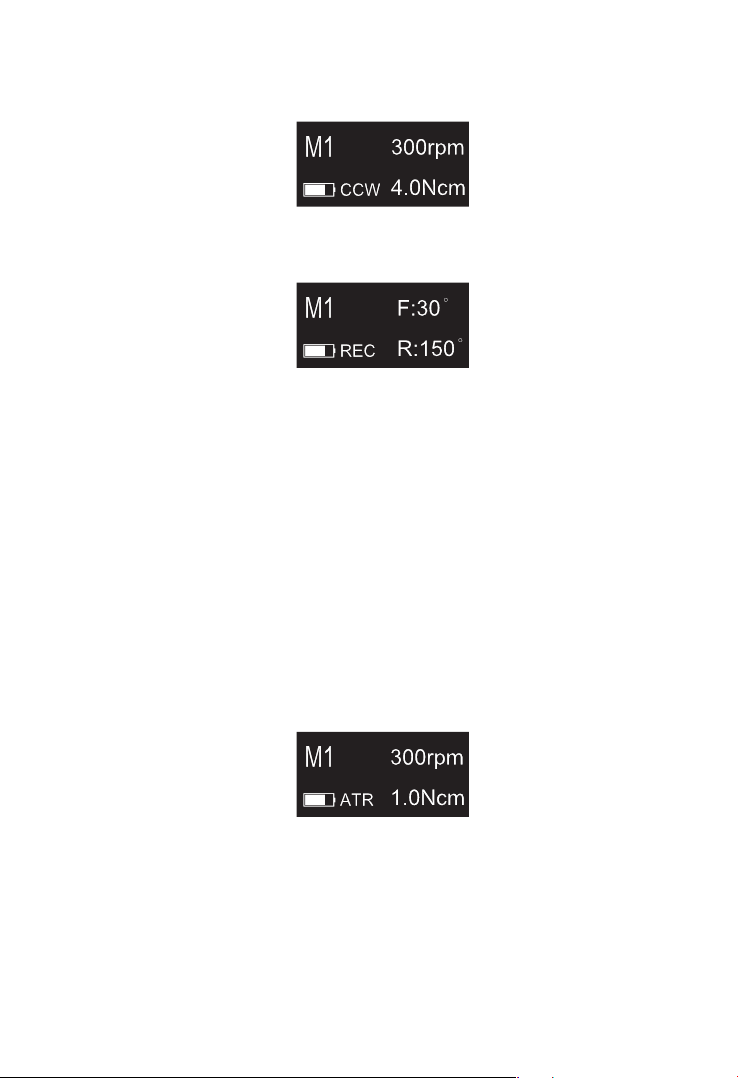
mode is used to inject calcium hydroxide and other medicant. When this
mode is being used, a double-beep sounds continuously.
2.2.1.4 REC Mode
Recprocating mode.
F: Forward angle, R: Reverse angle
Adjustable every 10 degrees, adjustment range: 20º-340º.
It is suggested that the difference between the forward angle and
reverse angle should be greater than or equal to 120 degrees, otherwise,
root canals cannot be prepared eectively.
Forward Angle<Reverse Angle, such as F: 30/R: 150, eective cutting
angle is Reverse Angle, it is suitable for used the reciprocating les likes
DENTSPLY WAVEONE or WOODPECKER W3-ONE.
Forward Angle>Reverse Angle, such as F: 180/R: 30, eective cutting
angle is Forward Angle, it is suitable for used the reciprocating les likes
SENDONELINE S1.
Torque limit: 2.0Ncm~5.0Ncm
Speed: 100rpm,150rpm, 200rpm, 250rpm, 300rpm, 350rpm, 400rpm,
450rpm, 500rpm.
2.2.1.5 ATR Mode
ATR: Adaptive Torque Reverse function.
Normal continuous forward rotation, the forward angle can be
stepped by 10°, the angle is set between 120°-340°, and the reverse angle
defaults to 90°. When the load of the le is greater than the set torque
limit, the le will start to rotate alternately at the set angle.
Trigger torque: 0.4Ncm, 0.6Ncm, 0.8Ncm, 1Ncm, 1.2Ncm, 1.5Ncm
Speed: 100rpm, 150rpm, 200rpm, 250rpm, 300rpm, 350rpm,
400rpm, 450rpm, 500rpm
8
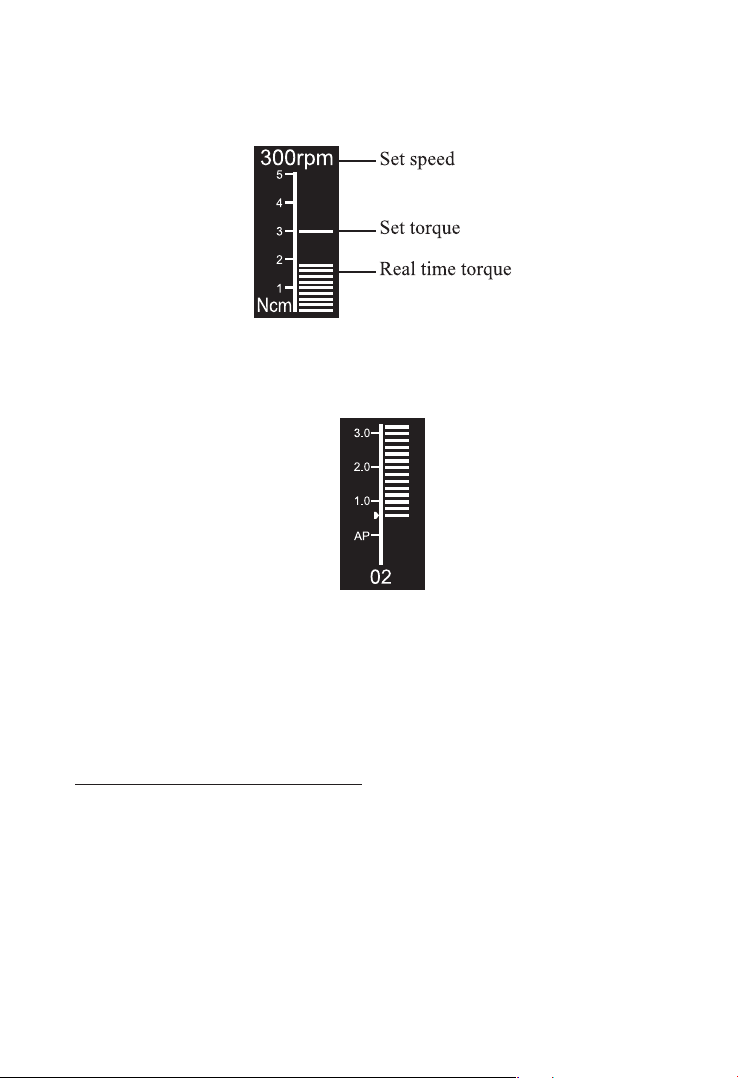
2.2.2 Torque Display
This appears when the motor is running. Meter shows the torque load
on the le.
2.2.3 Canal Measurement Display
This appears when a file is inside the canal and the lip hook is
contacting the patient mouth. Bars in meter show the location of the le
tip.
The meter numbers 1.0, 2.0, 3.0 and digital numbers 00-16 do not
represent the actual length from the apical foramen. It simply indicates
the file progression towards the apex. The digital numbers -1 and -2
indicate that the le has passed the apex foramen. The digital number “00”
indicate that the file has reached the apex foramen. Subtract 0.5-1mm
from the measured le length as the working length. These numbers are
used to estimate the canal’s working length.
2.3 Instructions for contra angle
2.3.1 The contra angle adopts precision gear transmission, and the
transmission ratio is 6:1.
2.3.2 Before the first use and after treatments, please clean and
disinfect contra angle with disinfectant of neutral PH value. After
disinfection, lubricate it with specific cleaning oil. Finally, sterilize
it under high temperature and high pressure (134℃, 2.0bar~2.3bar
(0.20MPa~0.23MPa)).
2.3.3 The contra angle can only be used cooperatively with this
9
device. Otherwise the contra angle will be damaged.
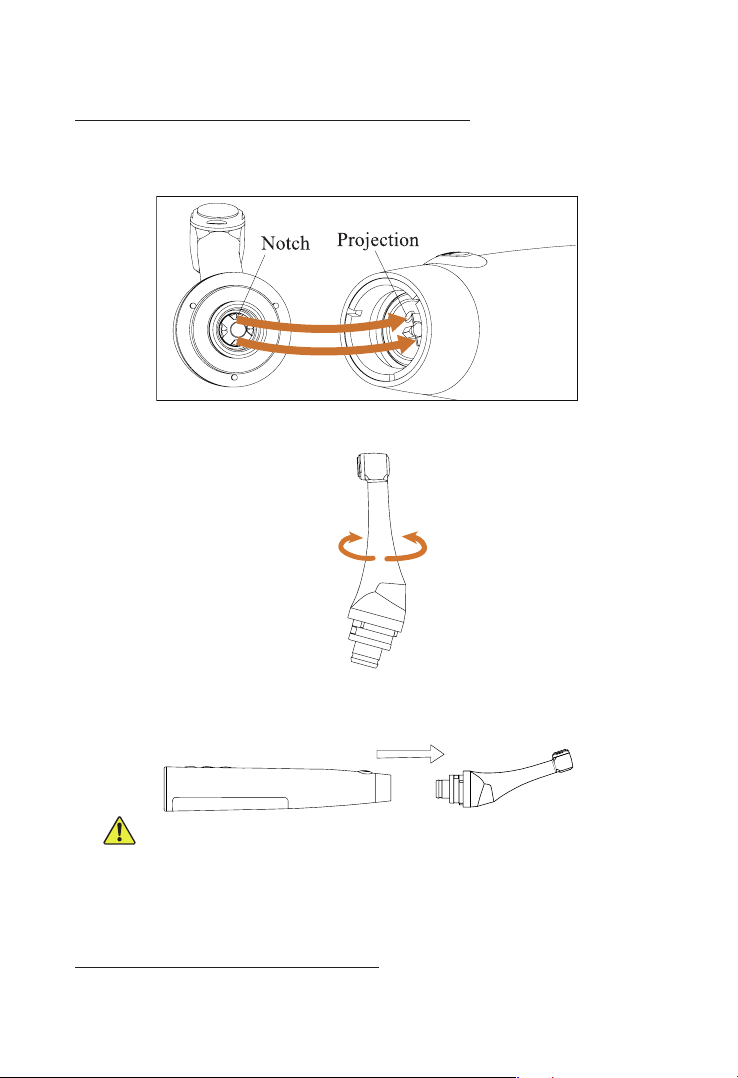
2.4 Installation and removal of contra angle.
2.4.1 Installation
Line up the notch inside the contra angle with the projection inside
the motor handpiece and slide it in until it clicks securely into place.
The contra angle rotates 360° so that the OLED display can always
be viewed easily.
2.4.2 Removal
Pull out the contra angle horizontally when the motor handpiece does
not run.
Warnings:
a) Before plugging in or pulling out contra angle, please rst stop the
motor handpiece.
b) After installation, please check and conrm that the contra angle
has been well installed.
2.5 Installation and removal of le
2.5.1 Installation of le
10
Before starting the device, plug the le into the hole of contra angle
head.
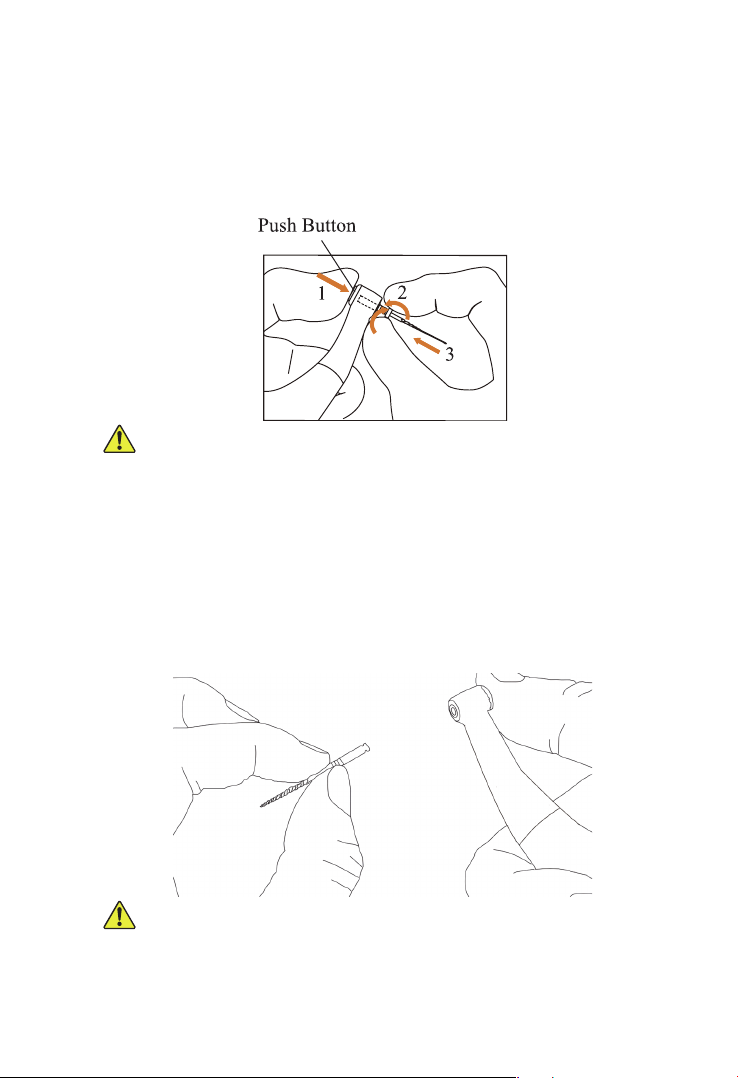
Hold down the push button on the contra angle and insert the file.
Turn the le back and forth until it is lined up with interior latch groove
and slips into place. Release the but-ton to lock the le into the contra
angle.
Warnings:
After plugging the file into contra angle, let go the hand on push
cover to assure that the le cannot be taken out.
Be careful when inserting les to avoid injury to ngers.
Inserting and removing files without holding the push button may
damage the chuck of contra angle.
Please use files with shanks meet the ISO standard. (ISO standard:
Ø2.334 – 2.350 mm)
2.5.2 Removal of le
Pressing the push cover, and then directly pull out the le.
Warnings:
Before plugging and pulling out the le, the motor handpiece must be
stopped.
11
Be careful when removing les to avoid injury to ngers.
Removing files without holding the push button will damage the
chuck of contra angle.
2.6 Canal measurement functional connection
This is not required if the canal measurement function will not be
used.
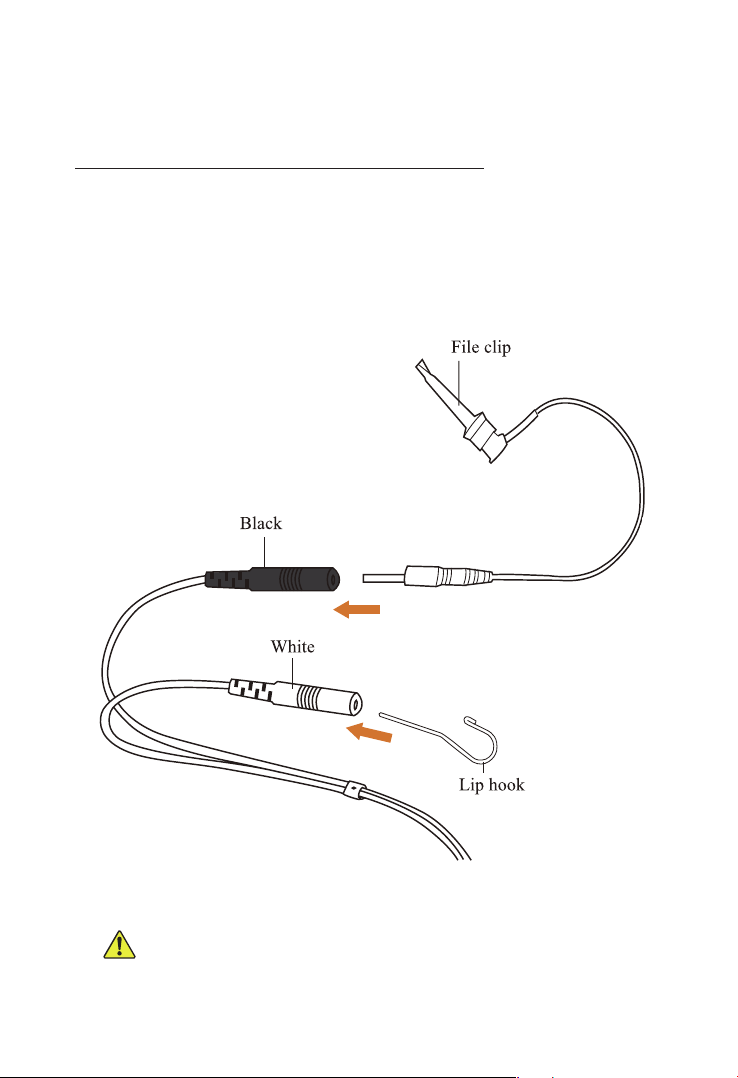
Connect the measuring wire to the motor handpiece. Line up the
measuring wire plug with the notch on the back of the motor and push it
all the way in.
Connect the file clip plug into the socket (black) on the measuring
wire. Connect the lip hook to the socket (white) on the measuring wire.
Warnings:
Connect the lip hook to the socket (white) on the measuring wire.
12
 Loading...