

GUILIN WOODPECKER Endo Smart Instruction Manual
Endo Smart Endo Motor
INSTRUCTION MANUAL

Contents
1 Product introduction .............................................................................. 1
2 Installation ............................................................................................. 5
3 Function and operation of product ........................................................ 7
4 Operation instruction ............................................................................ 8
5 Troubleshooting .................................................................................. 13
6 Cleaning and Sterilization ................................................................... 14
7 Storage, maintenance and transportation ........................................... 18
8 Environmental protection ................................................................... 18
9 After service ....................................................................................... 18
10 Symbol instruction ........................................................................... 19
11 European authorized representative ................................................. 19
12 Statement .......................................................................................... 19
13 EMC-Declaration of comformity ...................................................... 20

Preface
Guilin Woodpecker Medical Instrument Co., Ltd is a professional
manufacturer researching, developing, and producing dental products.
Woodpecker owns a sound quality control system. Guilin Woodpecker
Medical Instrument Co., Ltd has two brands, Woodpecker and DTE.
Its main products include Ultrasonic Scaler, Curing light, Apex locator,
Ultrasurgery, Endo Motor, etc.
1 Product introduction
1.1 Product description
Endo Smart is mainly used in Endodontic treatment. During root canal
preparation procedure, it is used to mold and clean the root canal.
Features:
a) Adopt real-time feedback technology and dynamic torque control,
eectively preventing needle breakage.
b) Wireless handpiece enables more convenient operation.
c) Wireless charging avoids poor contact problem of traditional contact
charging.
d) Storage of 9 user-dened modes allows invocation at any time.
Under each mode, Continuous Rotation Mode, Reciprocating Motion
Mode, and Reverse Rotation Mode are for options.
1.2 Model and specication
Endo Smart
Please refer to packing list for device congurations.
1.3 Scope of application
1.3.1 The device is suitable for root canal molding and cleaning in
endodontic treatment.
1.3.2 The device must be operated in hospital and clinic by the qualied
dentists.
1
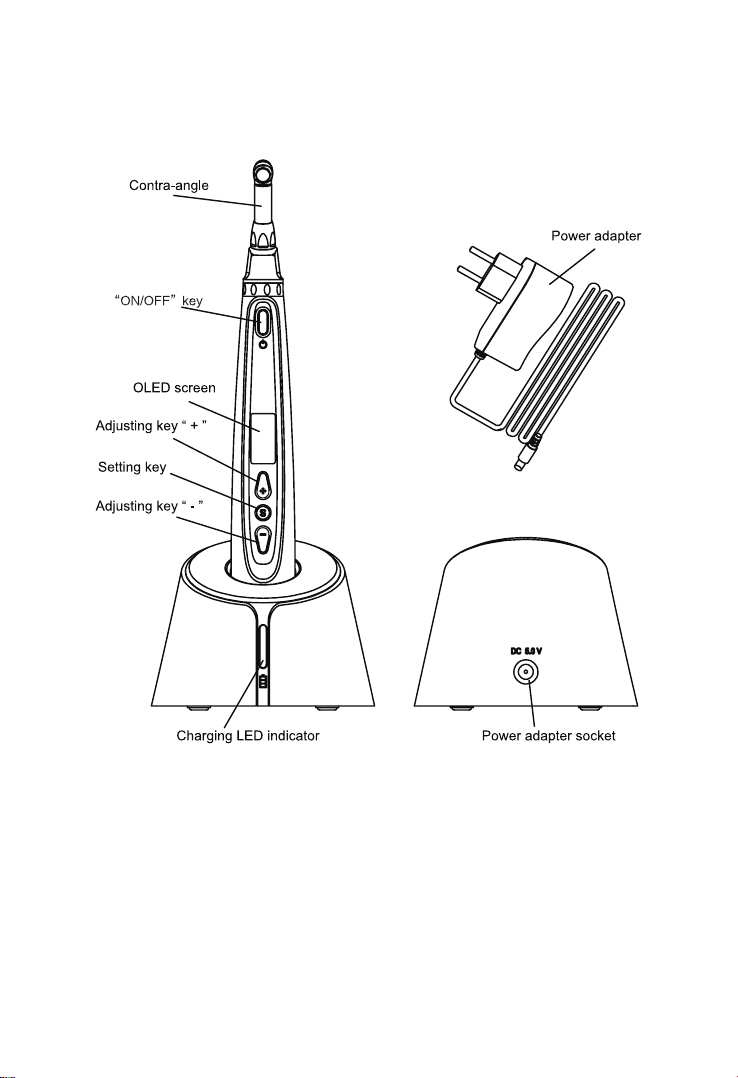
1.4 Performance and composition
The device is composed of charging base, handpiece, contra-angle, and
power adapter, etc.
The version of software is displayed on the OLED screen when starting
up.
1.5 Contraindication
Patients with implanted pacemakers (or other electrical equipment) who
are warned not to use household appliances such as electric razors, hair
dryers, etc. are not recommended to use this device.
1.6 Warnings
1.6.1 Please carefully read this Instruction Manual before first
2

operation.
1.6.2 This device should be operated by professional and qualified
dentist in qualied hospital or clinic.
1.6.3 Do not directly or indirectly place this device near heat source.
Operate and store this device in reliable environment.
1.6.4 This device requires special precautions regarding electromagnetic
compatibility (EMC) and must be in strict accordance with the EMC
information for installation and use. Do not use this equipment
especially in the vicinity of fluorescent lamps, radio transmitting
devices, remote control devices, handheld and mobile high-frequency
communication devices.
1.6.5 Long time use of Reciprocating Motion Mode may result
in handpiece overheat, thus it should be left to cool for use. If the
handpiece is overheated frequently, please contact local distributor.
1.6.6 Please use the original contra-angle. Otherwise it will not be used
or cause adverse consequences.
1.6.7 Please do not make any changes to the device. Any changes may
violate safety regulations, causing harm to the patient. There will be no
promises of any modication.
1.6.8 Please use original power adapter. Other power adapter will result
in damage to lithium battery and control circuit.
1.6.9 The handpiece cannot be autoclaved. Use disinfectant of neutral
pH value or ethyl alcohol to wipe its surface.
1.6.10 Before the contra-angle stopping rotating, do not press the push
cover of contra-angle. Otherwise the contra-angle will be broken.
1.6.11 Before the handpiece stopping rotating, do not remove the
contra-angle. Otherwise the contra-angle and the gear inside handpiece
will be broken.
1.6.12 Please confirm whether the file is well installed and locked
before starting the handpiece.
1.6.13 The le of Continuous Rotation Mode shall not be used under
Reciprocating Motion Mode and vice versa.
1.6.14 Please set torque and speed as per the recommended
3

specications of le manufacturer.
1.6.15 The Continuous Rotation Mode matches continuous rotating
files; the Reciprocating Motion Mode matches reciprocating files
(i.e. WAVE ONE); the Reverse Rotation Mode is adopted to pick the
continuous rotating les out while the le accidentally gets stuck in the
root canal.
1.6.16 Error in replacing lithium batteries can lead to unacceptable
risks, so use the original lithium battery and replace the lithium battery
according to the correct steps in the instructions.
1.6.17 Not to position equipment to make it difficult to operate the
disconnection device.
1.6.18 Please remove the battery if the motor handpiece is not likely to
be used for some time.
1.7 Device safety classication
1.7.1 Type of operation mode: Continuous operating device
1.7.2 Type of protection against electric shock: Class II equipment with
internal power supply
1.7.3 Degree of protection against electric shock: BF type applied part
1.7.4 Degree of protection against harmful ingress of water: Ordinary
equipment (IPX0)
1.7.5 Degree of safety application in the presence of a flammable
anesthetic mixture with air, oxygen, or nitrous oxide: Equipment cannot
be used in the presence of a flammable anesthetic mixture with air,
oxygen, or nitrous oxide.
1.7.6 Applied part: contra-angle.
1.7.7 The contact duration of applied part: 1 to 10 minutes.
1.7.8 The temperature of the surface of applied part may reach 46.6℃.
1.8 Primary technical specications
1.8.1 Battery
Lithium battery in handpiece: 3.6V /750mAh
1.8.2 Power adapter
Input: ~100V-240V 50Hz/60Hz 0.4A Max
4
Output: DC5V/1A
1.8.3 Torque: 0.6Ncm-5.0Ncm(6mNm ~ 50mNm)
1.8.4 Rotate speed: 100rpm~1000rpm
1.9 Environment parameters
1.9.1 Environment temperature: +5℃ ~ +40℃
1.9.2 Relative humidity: 30% ~ 75%
1.9.3 Atmospheric pressure: 70kPa ~ 106kPa
2 Installation
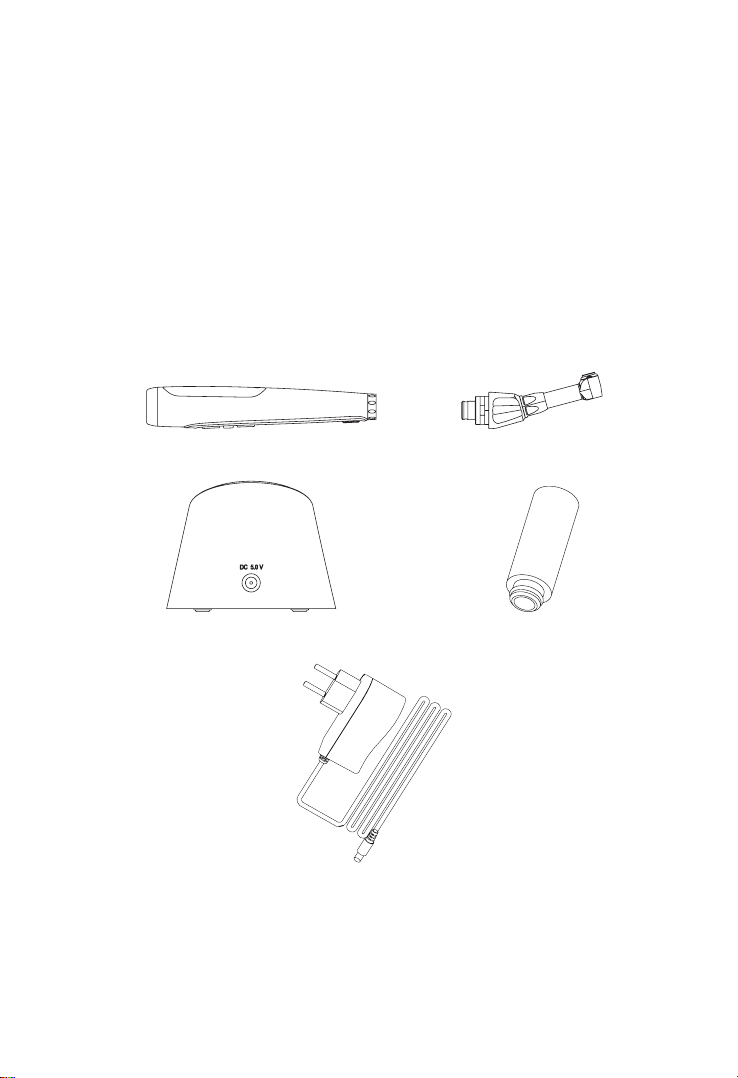
2.1 Basic accessories of product
Motor handpiece Contra-angle
Charging base Lubricator
Power adapter
2.2 Instructions for contra-angle
2.2.1 The contra-angle adopts precision gear transmission, and the
transmission ratio is 1: 1. The material for contra-angle is copper.
5
(Model: CA001)
2.2.2 Before the rst use and after treatments, please clean and disinfect
contra-angle with disinfectant of neutral PH value. After disinfection,
lubricate it with specific cleaning oil. Finally, sterilize it under high
temperature and high pressure (134℃, 2.0bar ~ 2.3bar (0.20MPa ~
0.23MPa)).
2.2.3 The contra-angle can only be used cooperatively with this device.
Otherwise the motor handpiece and the contra-angle will be damaged.
2.2.4 The service life of contra-angle is ONE year. But as a result of
dierent use frequency, operating time, and the treatment complexity,
the real service lives are dierent.
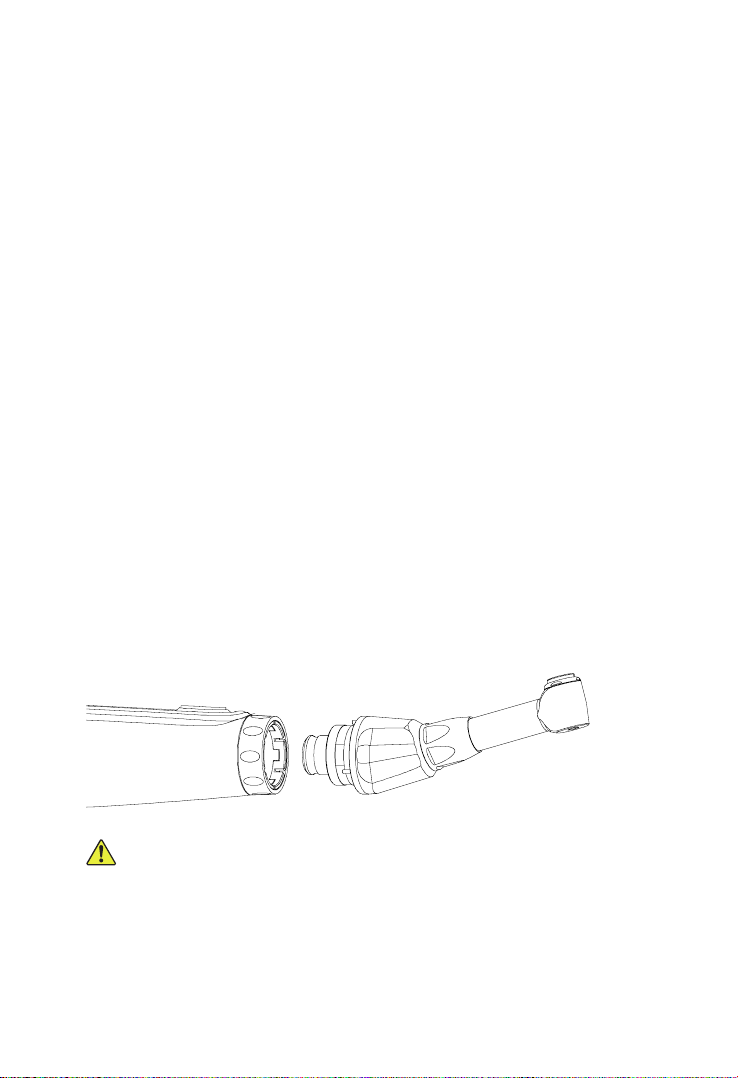
2.3 Installation and removal of contra-angle
2.3.1 Installation
Align the positioning pin of contra-angle with the positioning hole
of handpiece, horizontally pushing the contra-angle. A click sound
indicates that it is well installed. By aligning those three pins on contra-
angle with those six holes on handpiece, the contra-angle can be
installed in dierent angle. (As shown below)
2.3.2 Removal
Pull out the contra-angle horizontally when the motor handpiece does
not start.
Warnings
a) Before plugging in or pulling out contra-angle, please rst stop the
handpiece motor.
b) After installation, please check and conrm that the contra-angle has
been well installed.
6
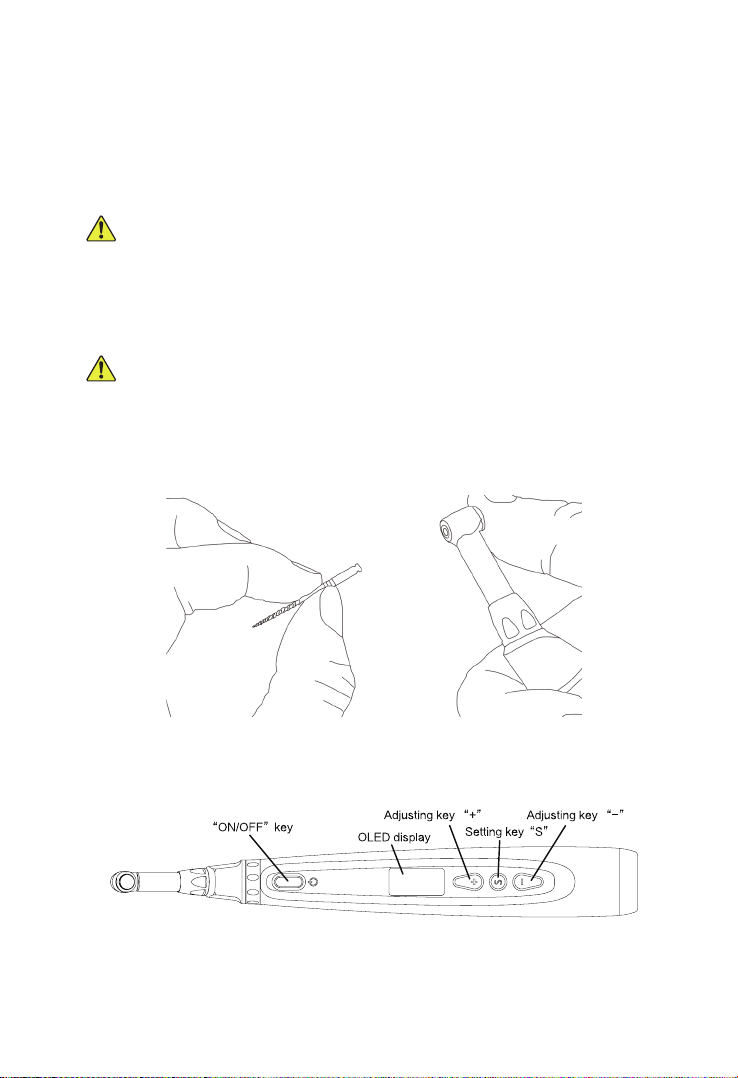
2.4 Installation and removal of le
2.4.1 Installation of le
Before starting the device, plug the file into the hole of contra-angle
head. While plugging, slightly screw the le with one hand, and press
the push cover of contra-angle with another hand.
Warnings
After plugging the le into contra-angle, let go the hand on push cover
to assure that the le cannot be taken out.
2.4.2 Removal of le
Pressing the push cover, and then directly pull out the le.
Warnings
a) Before plugging and pulling out the file, the handpiece must be
stopped.
b) After the le is well installed, without pressing the push cover, the
le should be rmly locked while slightly pulling the le.
3 Function and operation of product
3.1 Schematic drawing of handpiece
Schematic drawing of handpiece
3.2 OLED display
7
 Loading...