

Page 1
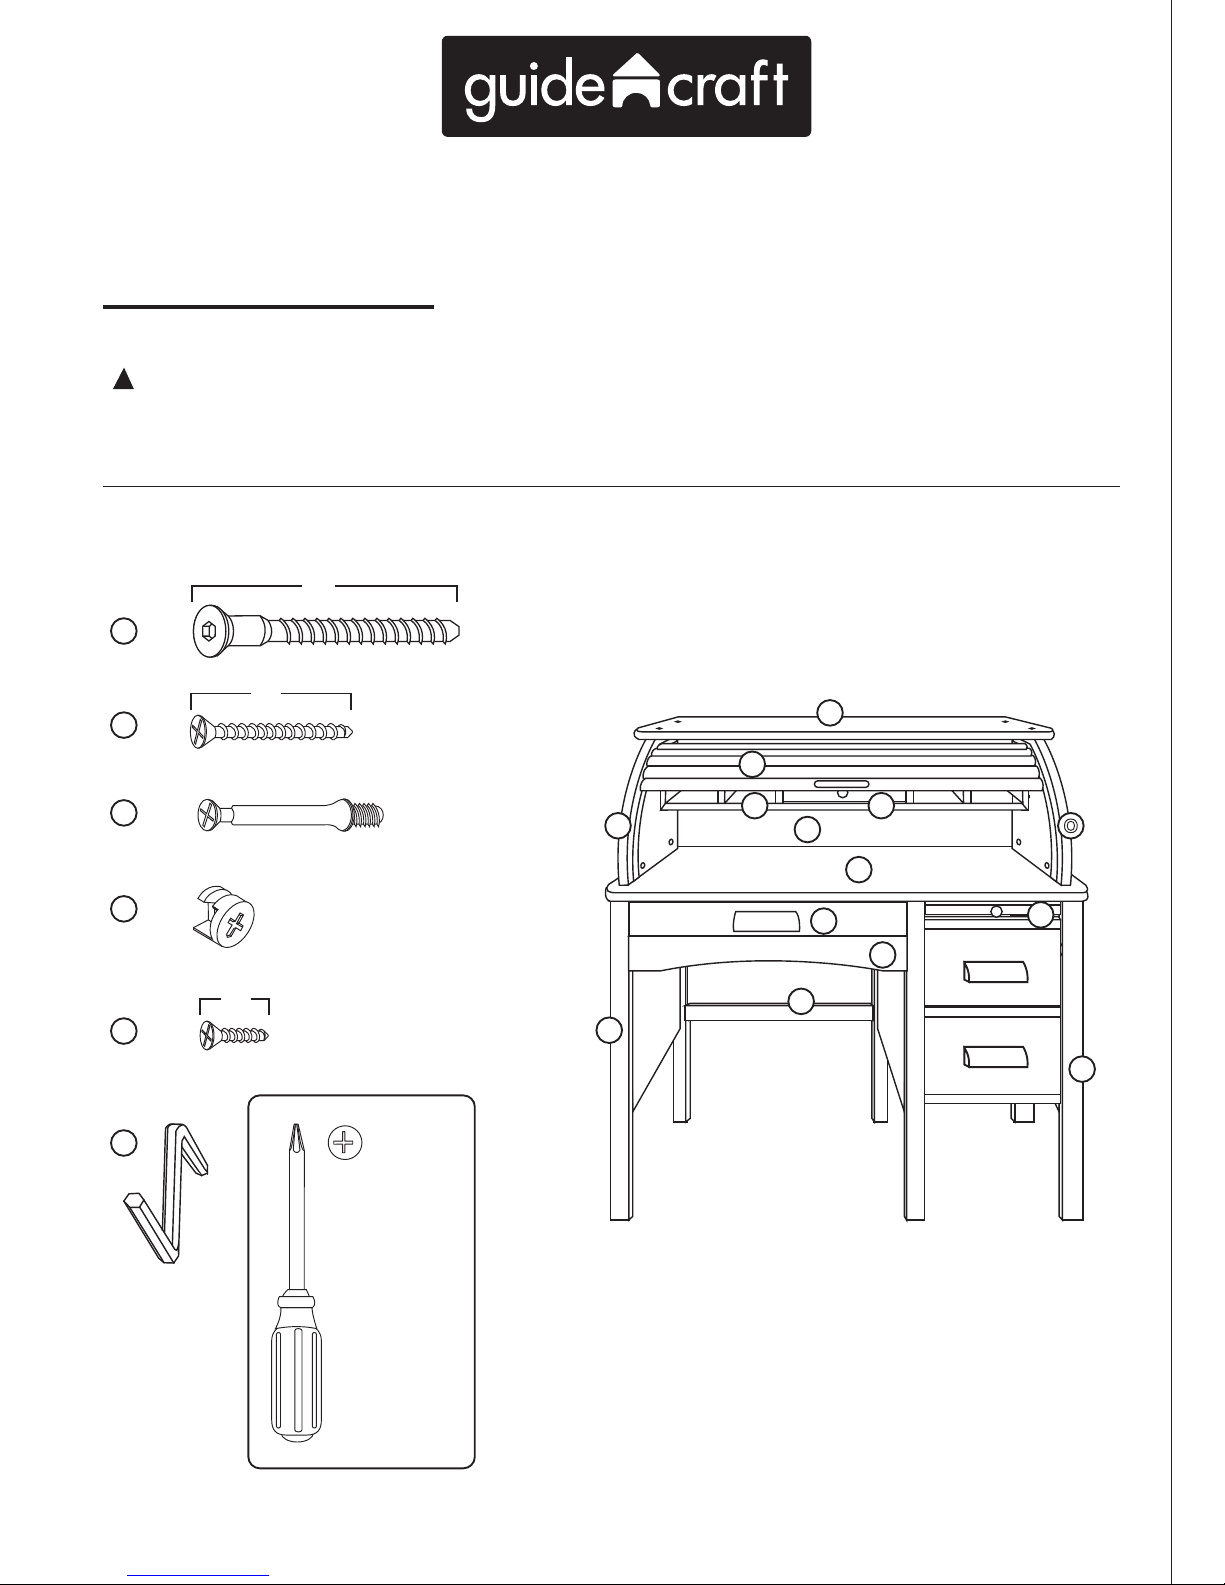
A
(4)
B
(4)
F
C
(10)
D
(10)
2"
(50mm)
Hardware and Parts
1"
(30mm)
E
(22)
.5"
(12mm)
You will also
need a Phillipshead screwdriver
(not included).
Care Instructions
To clean your product, use mild soap and
water on a damp cloth. Do not use window
cleaners or cleaning abrasives as they will
scratch the surface and could damage the
protective coating.
Customer Service
For questions regarding this product, or to
receive replacement or missing parts,
contact Customer Service at (800) 524-3555.
Please have the model number and part
number(s) located in this Assembly
Instruction sheet available for reference.
Limited Warranty
This Guidecraft product is warranted to
the original purchaser at the time of
purchase and for a period of one (1)
year thereafter. In order to provide you
with timely assistance, please
thoroughly inspect your product for
missing or defective parts immediately
after opening the carton. To receive
replacement or missing parts under this
warranty, contact Customer Service.
You will also need your sales receipt or
other proof of purchase.
G97300, G97301, G97302
Roll Top Desk
Assembly Instructions
Guidecraft • 55509 Highway 19 West, Winthrop, MN 55396 • (800) 524-3555 • www.guidecraft.com
M O
K
L
V G
N
P
Y
T
U
Q
R
Z
Page 1 of 6
For ages 3 and up. Adult assembly required.
!
WARNING
Small parts and sharp points may be present
prior to assembly.
Page 2
Guidecraft • 55509 Highway 19 West, Winthrop, MN 55396 • (800) 524-3555 • www.guidecraft.com
G97300, G97301
Roll Top Desk
Assembly Instructions
Page 2 of 5
T
U
U
Q
R
Q
R
Page 2 of 6
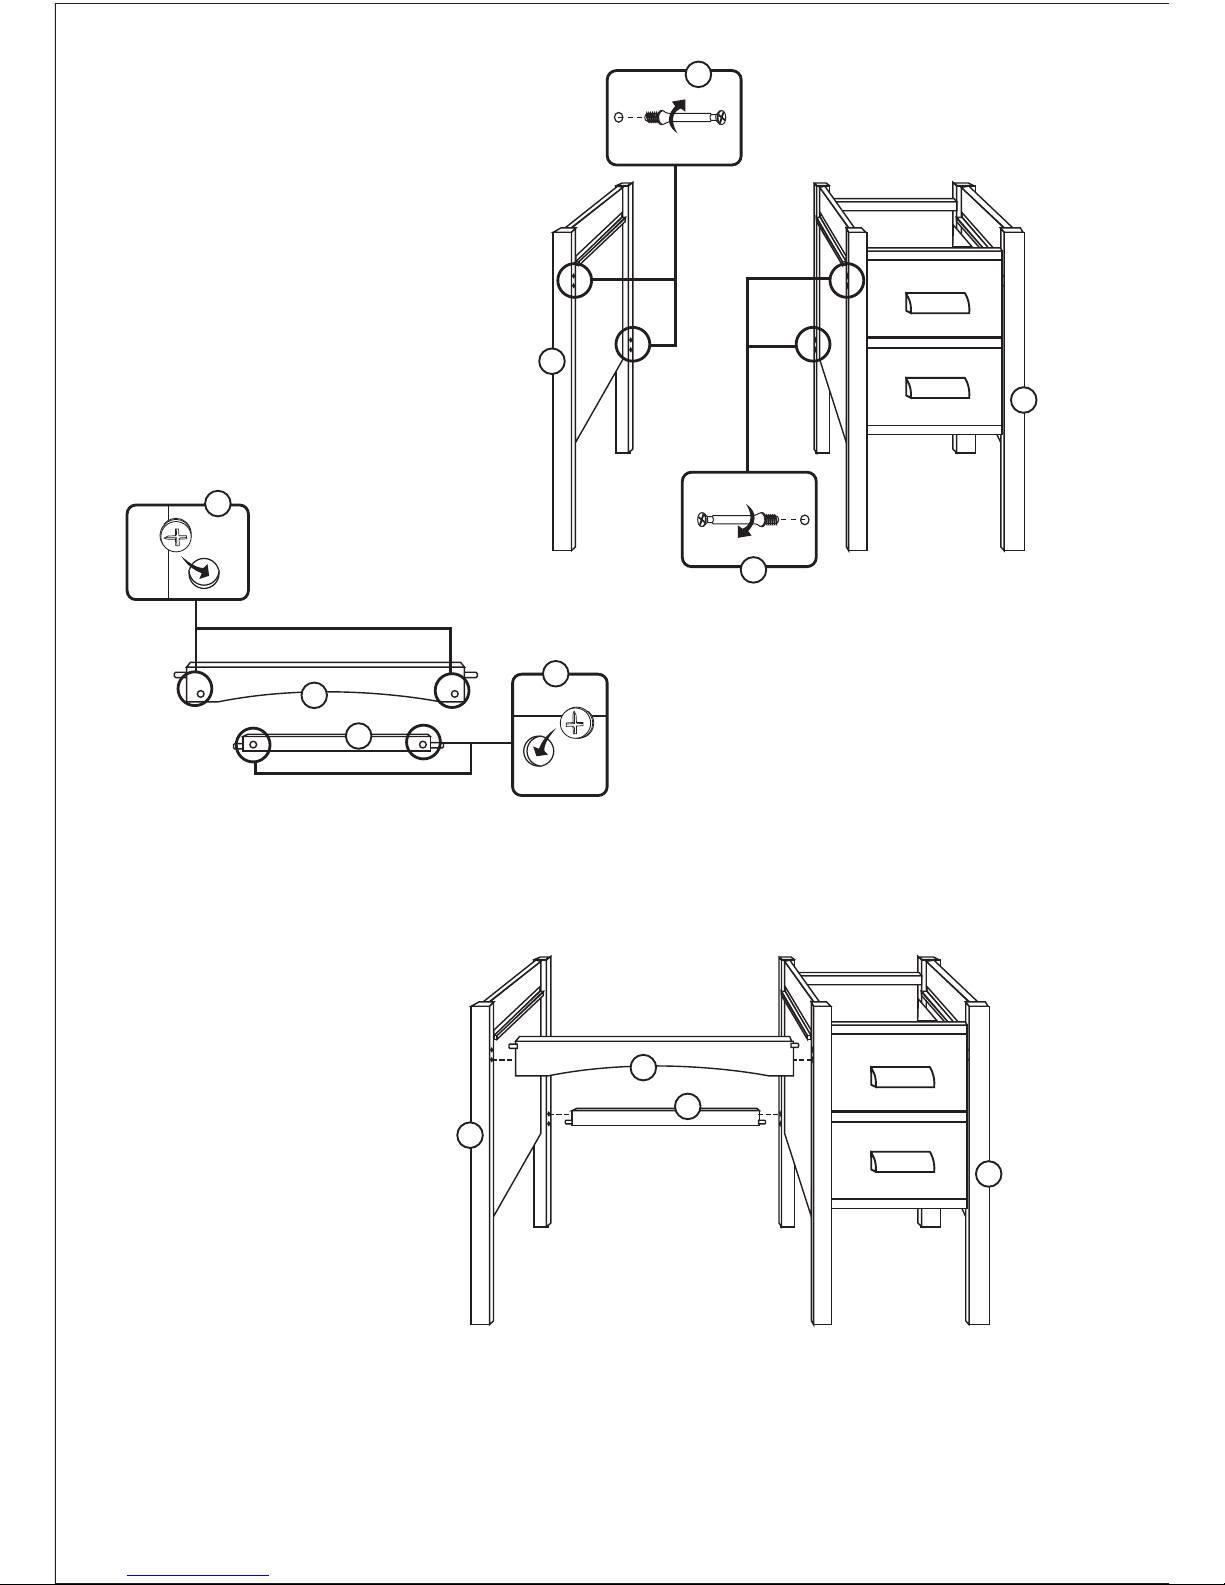
Step 1
Place cam pins (C) into holes shown above. Firmly
tighten all cam pins.
Step 2
Place cam nuts (D) into holes on Parts T and U so that
the arrow on the cam face is lined up with the opening.
Step 3
Once Parts T and U are attached to Parts Q and P, tighten cam nuts
by turning clock-wise until they’ve locked into place.
T
C
C
D
D
Page 3
Guidecraft • 55509 Highway 19 West, Winthrop, MN 55396 • (800) 524-3555 • www.guidecraft.com
G97300, G97301
Roll Top Desk
Assembly Instructions
Page 3 of 5
P
Page 3 of 6
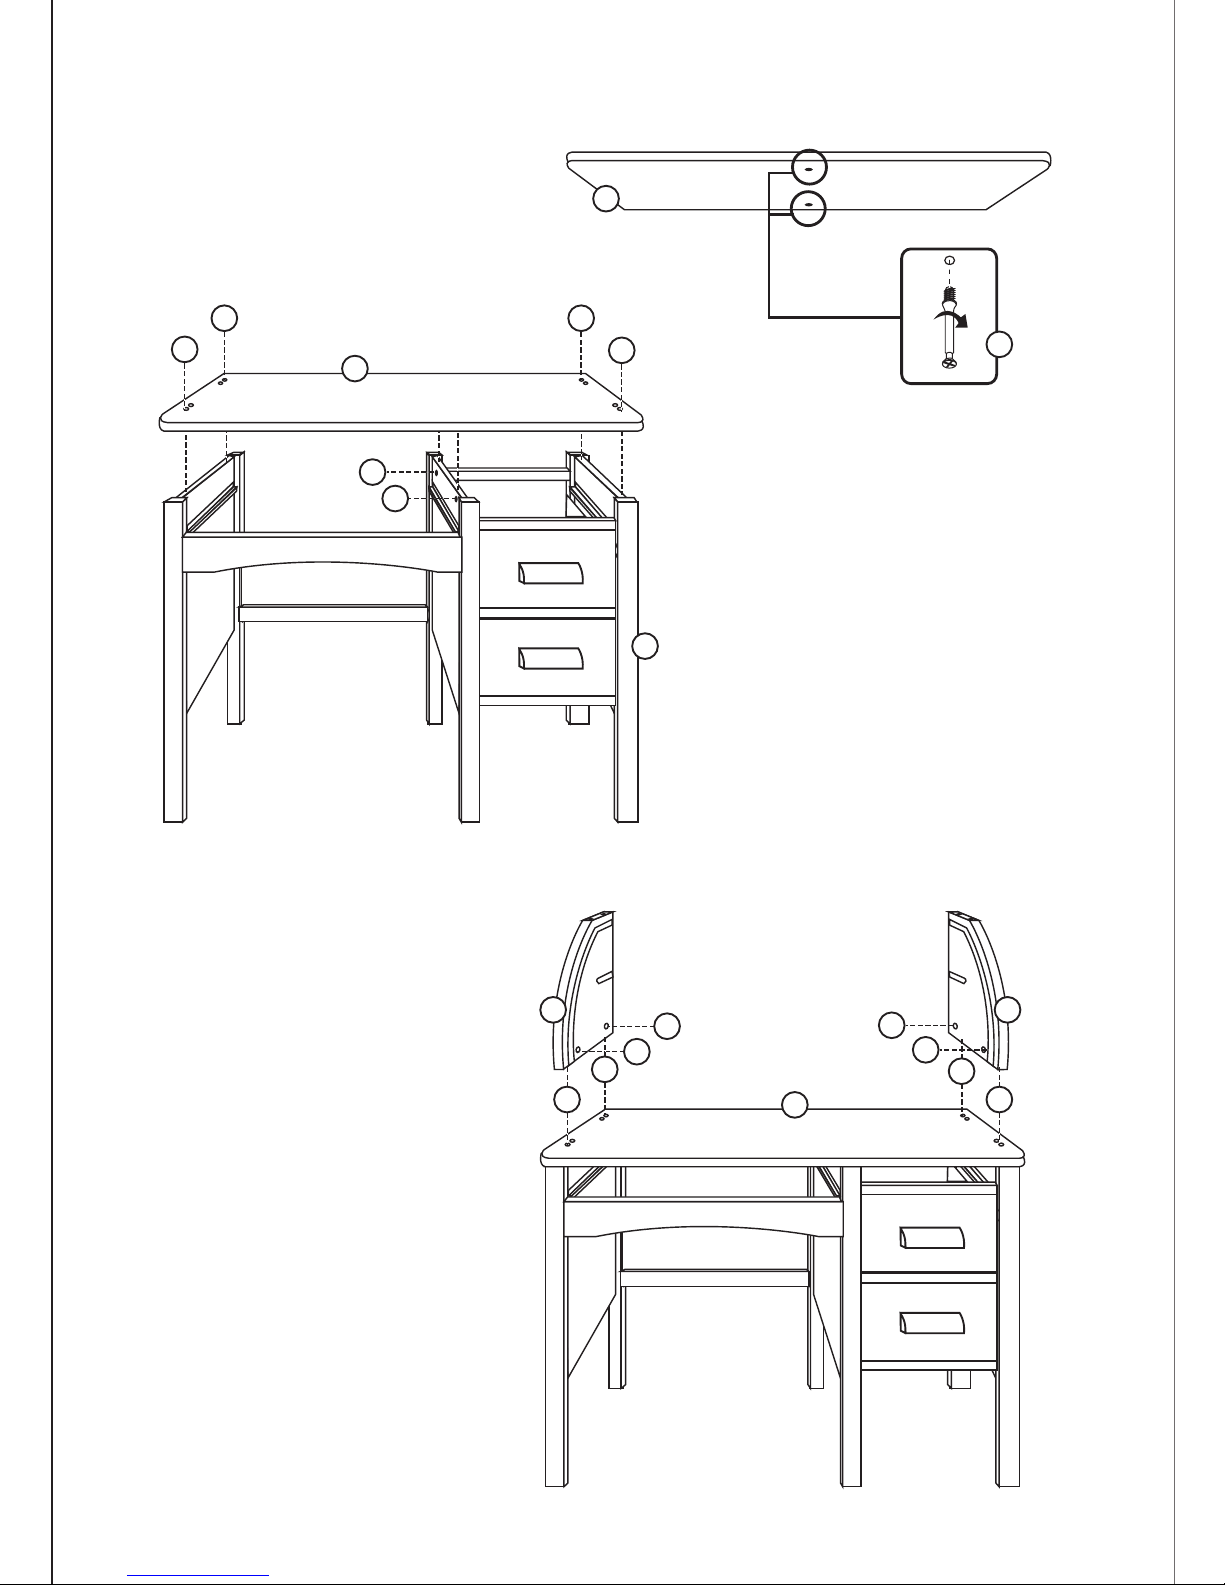
Step 4
Place cam pins (C) into holes shown below. Firmly tighten both cam pins.
C
P
R
M O
P
A
A A
A
D
D
D
D
D
D
C C
C
C
Step 6
Attach roll top sides (M and O) to desk
top (P), using cam pins (C) and cams
nuts (D).
Step 5
Place cam nuts (D) into holes on side (P) .
Attach desk top (P) to drawer unit (R), then
tighten cam nuts by turning until they’ve
locked into place. Attach sides of desk top to
lower frame using screw (A).
Page 4
Guidecraft • 55509 Highway 19 West, Winthrop, MN 55396 • (800) 524-3555 • www.guidecraft.com
G97300, G97301
Roll Top Desk
Assembly Instructions
Page 4 of 5
O
M
V
V
Page 4 of 6
B B
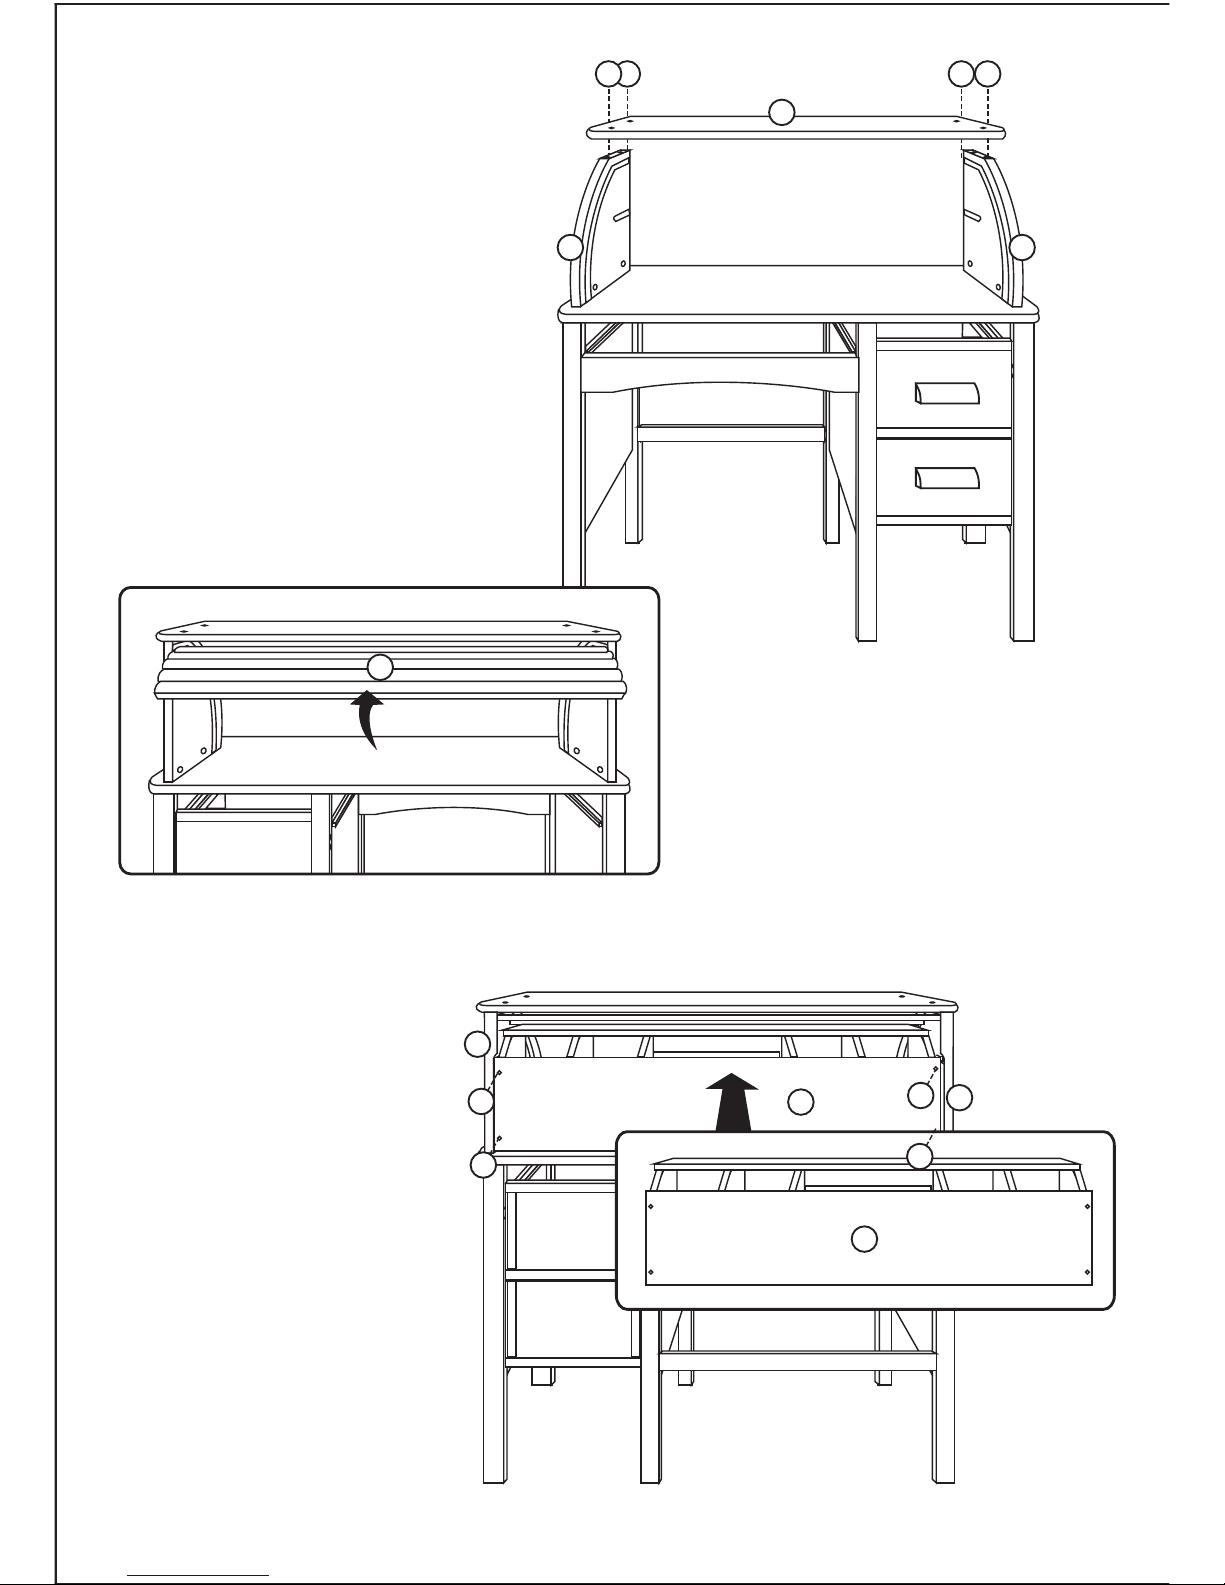
Step 7
Attach top (K) to roll top sides (parts M
and O) using screw (B).
Step 8
From the back of the unit, insert roll top slats
(L) into grooves in the roll top sides. Make
sure handle cutout (indentation) on the
front-most slat ends up on the front of the
desk.
M O
K
B B
L
E
E
E
E
Step 9
Insert storage compartment (V) from back of
unit. Ensure the brackets on the sides of the
storage compartment unit slip into the grooves
on the roll top sides (M and O). Attach using
screws (B).
Page 5
Guidecraft • 55509 Highway 19 West, Winthrop, MN 55396 • (800) 524-3555 • www.guidecraft.com
G97300, G97301
Roll Top Desk
Assembly Instructions
Page 5 of 5
Page 5 of 6
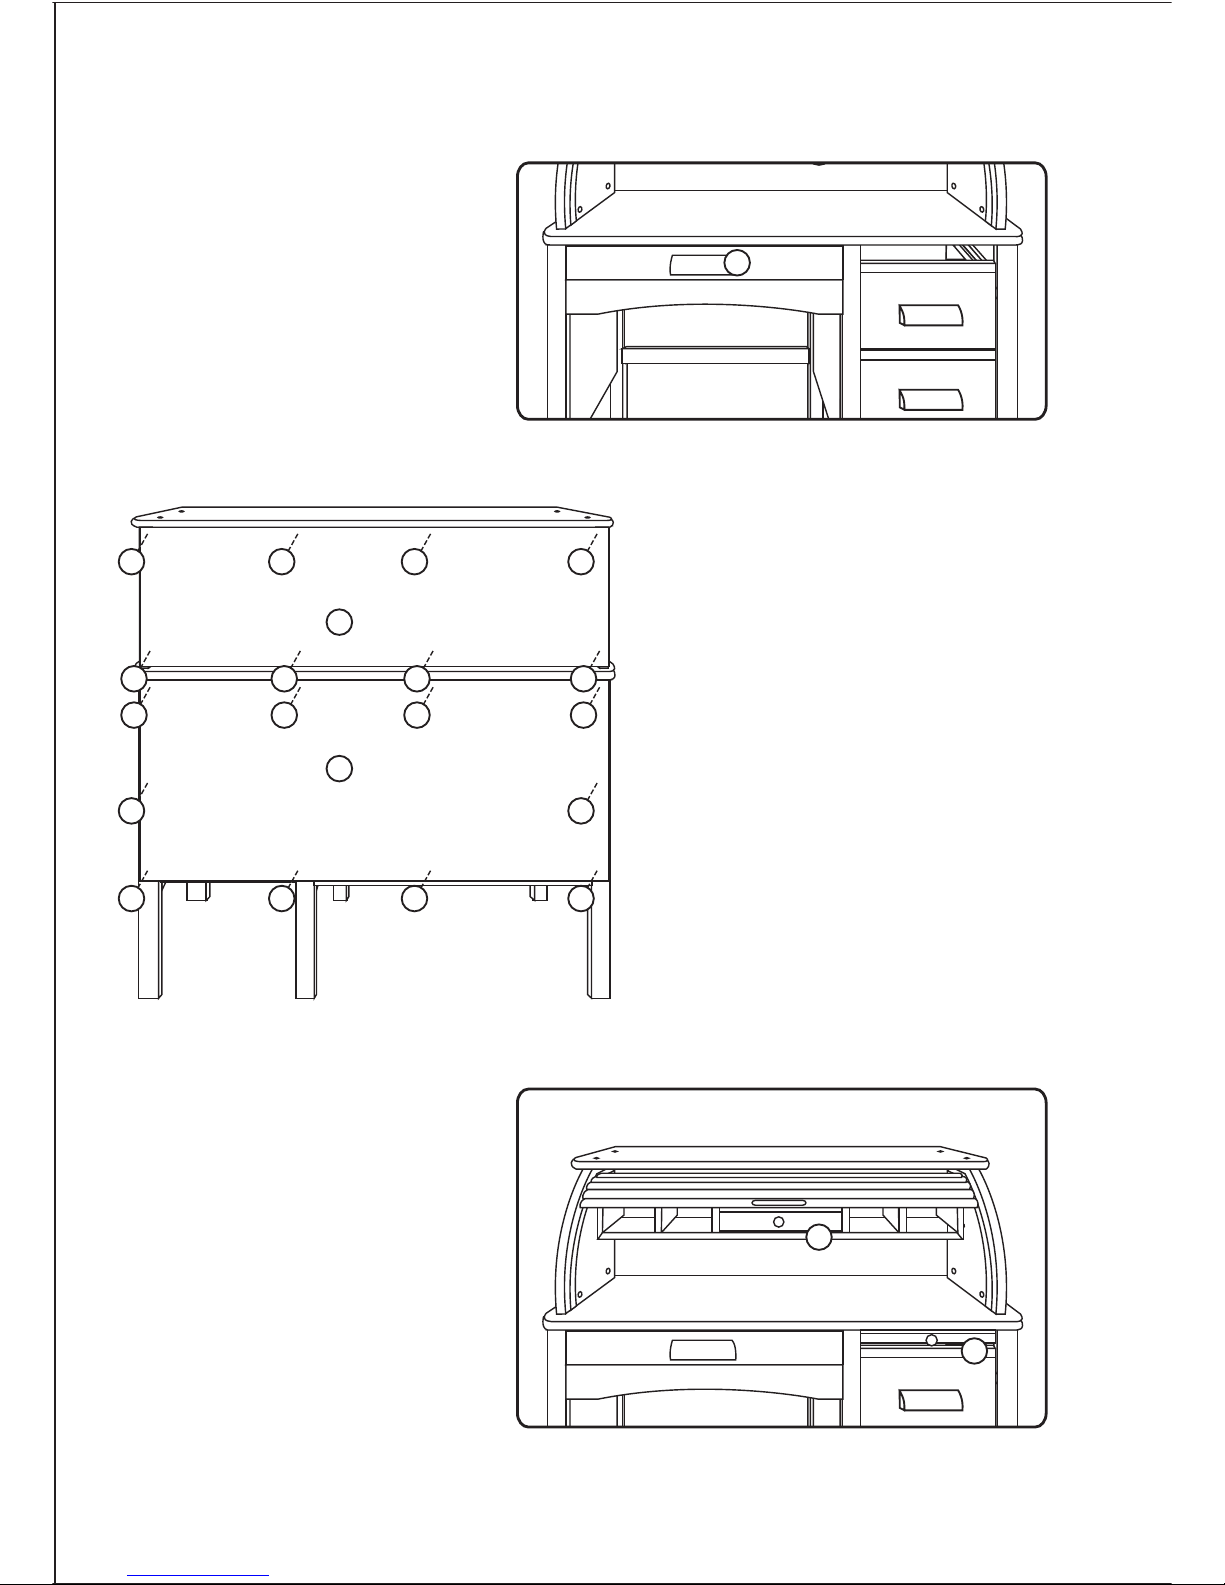
Step 10
Insert desk drawer (Y) from the front of the unit.
Step 11
Attach back panels W and S using screws (E).
When completed, insert the pull-out tray (Z) in
the front section and the small drawer (G) in
the storage compartment.
Step 12
Insert the pull-out tray (Z) in the front section
and the small drawer (G) in the storage
compartment.
Roll Top Slat
If at any time the pull-down slats of the roll top desk
stick in the grooves, or become hard to open and
close, rub a small amount of hand soap (Ivory soap
or similar) in the channels. Soap will not damage
the wood and will ensure a smooth opening and
closing of the roll top slats.
W
S
E E E E
E E E E
E E E E
E E E E
E E
Z
G
G
Y
Page 6
Page 6 of 6
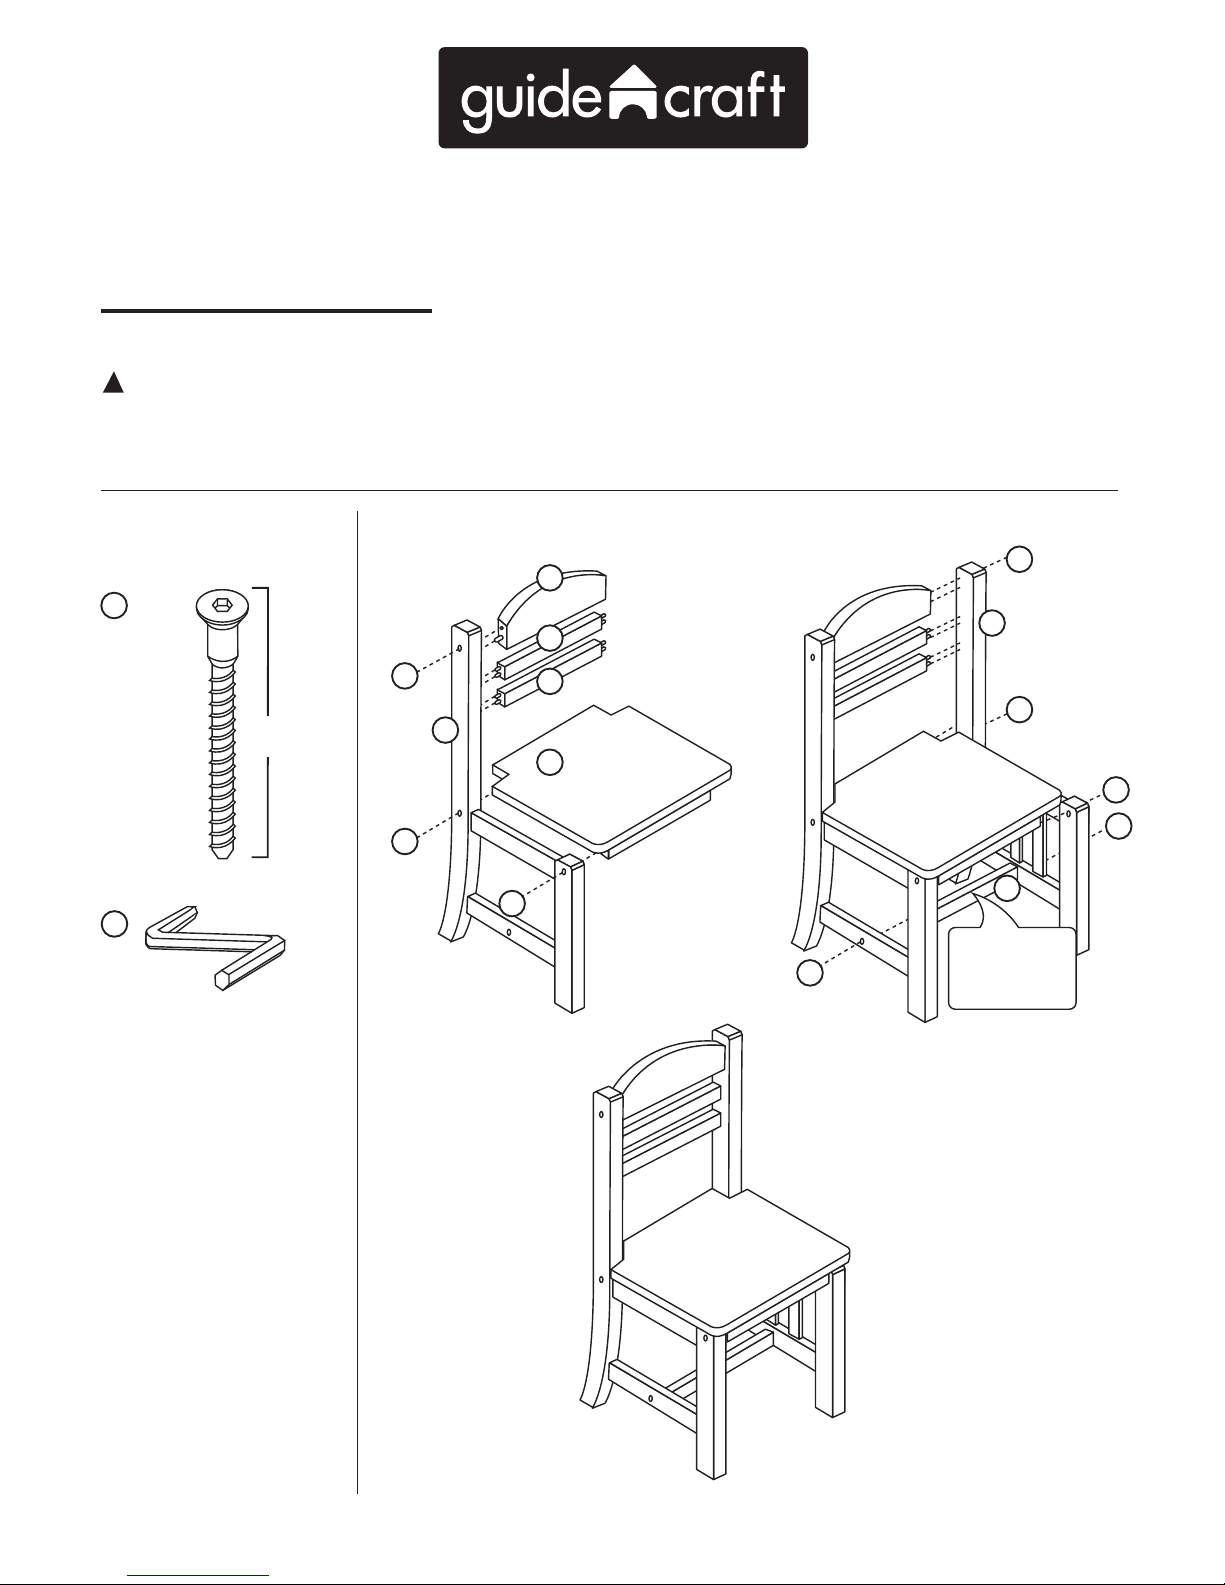
A
A
Hardware Assembly
B
A
(8)
2"
(50mm)
A
A
A
A
A
STEP 1 STEP 2
C
D
Care Instructions
To clean your product, use mild soap and
water on a damp cloth. Do not use window
cleaners or cleaning abrasives as they will
scratch the surface and could damage the
protective coating.
Customer Service
For questions regarding this product, or to
receive replacement or missing parts,
contact Customer Service at (800) 524-3555.
Please have the model number and part
number(s) located in this Assembly
Instruction sheet available for reference.
G97300, G97301, G97302
Roll Top Desk - Chair
Assembly Instructions
Don’t forget to
install Part H, the
center brace.
A
E
E
F
G
H
Guidecraft • 55509 Highway 19 West, Winthrop, MN 55396 • (800) 524-3555 • www.guidecraft.com
For ages 3 and up. Adult assembly required.
!
WARNING
Small parts and sharp points may be present
prior to assembly.
Limited Warranty
This Guidecraft product is warranted to
the original purchaser at the time of
purchase and for a period of one (1)
year thereafter. In order to provide you
with timely assistance, please
thoroughly inspect your product for
missing or defective parts immediately
after opening the carton. To receive
replacement or missing parts under this
warranty, contact Customer Service.
You will also need your sales receipt or
other proof of purchase.
 Loading...