

Page 1

G97013
Bookshelf Low 30"
Assembly Instructions
For ages 3 and up. Adult assembly required.
!
WARNING
Small parts and sharp points may be present
prior to assembly.
Care Instructions
To clean your product, use mild soap and
water on a damp cloth. Do not use window
cleaners or cleaning abrasives as they will
scratch the surface and could damage the
protective coating.
Customer Service
For questions regarding this product, or to
receive replacement or missing parts,
contact Customer Service at (800) 524-3555.
Please have the model number and part
number(s) located in this Assembly
Instruction sheet available for reference.
Limited Warranty
All Guidecraft products are warranted to
the original purchaser at the time of
purchase and for a period of one (1)
year thereafter. In order to provide you
with timely assistance, please
thoroughly inspect your product for
missing or defective parts immediately
after opening the carton. To receive
replacement or missing parts under this
warranty, contact Customer Service.
You will also need your sales receipt or
other proof of purchase.
Hardware and Parts
page 1 of 4
2"
(50mm)
A
(12)
.5"
(12mm)
B
(8)
C
(8)
K
J
L
D
N
I
F
You will also
need a Phillipshead screwdriver
(not included).
L
N
I
L
H
G
Guidecraft • 55509 Highway 19 We s t , W i n t h r o p , M N 5 5 3 9 6 • ( 8 0 0 ) 5 2 4 - 3 5 5 5 • w w w . g u i d e c r a f t . c o m
Page 2
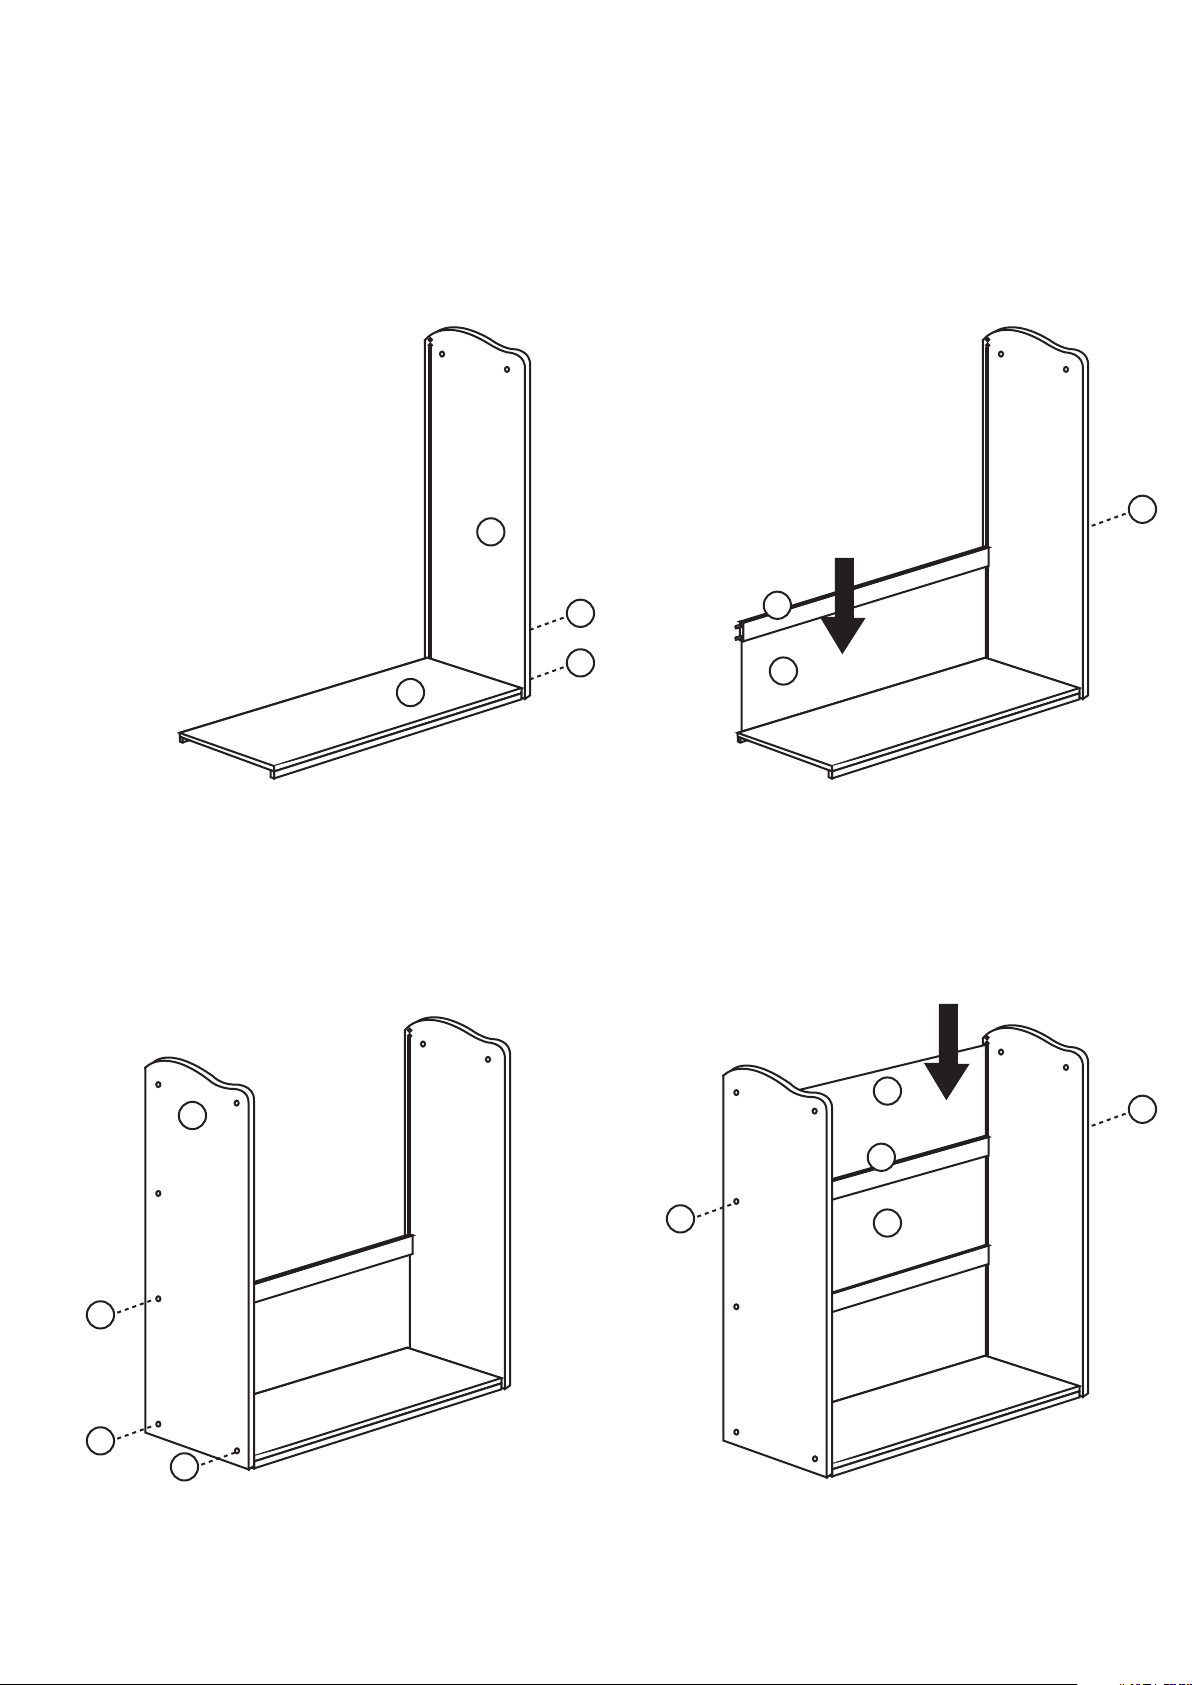
NOTE: You will be building this bookcase from the bottom up. Gradually tighten screws as you work
your way up. Do not fully tighten all screws until all the pieces are in place and aligned.
F
page 2 of 4
A
A
A
G
I
L
STEP 1 STEP 2
L
H
I
A
A
A
A
A
L
STEP 3 STEP 4
Guidecraft • 55509 Highway 19 We s t , W i n t h r o p , M N 5 5 3 9 6 • ( 8 0 0 ) 5 2 4 - 3 5 5 5 • w w w . g u i d e c r a f t . c o m
Page 3
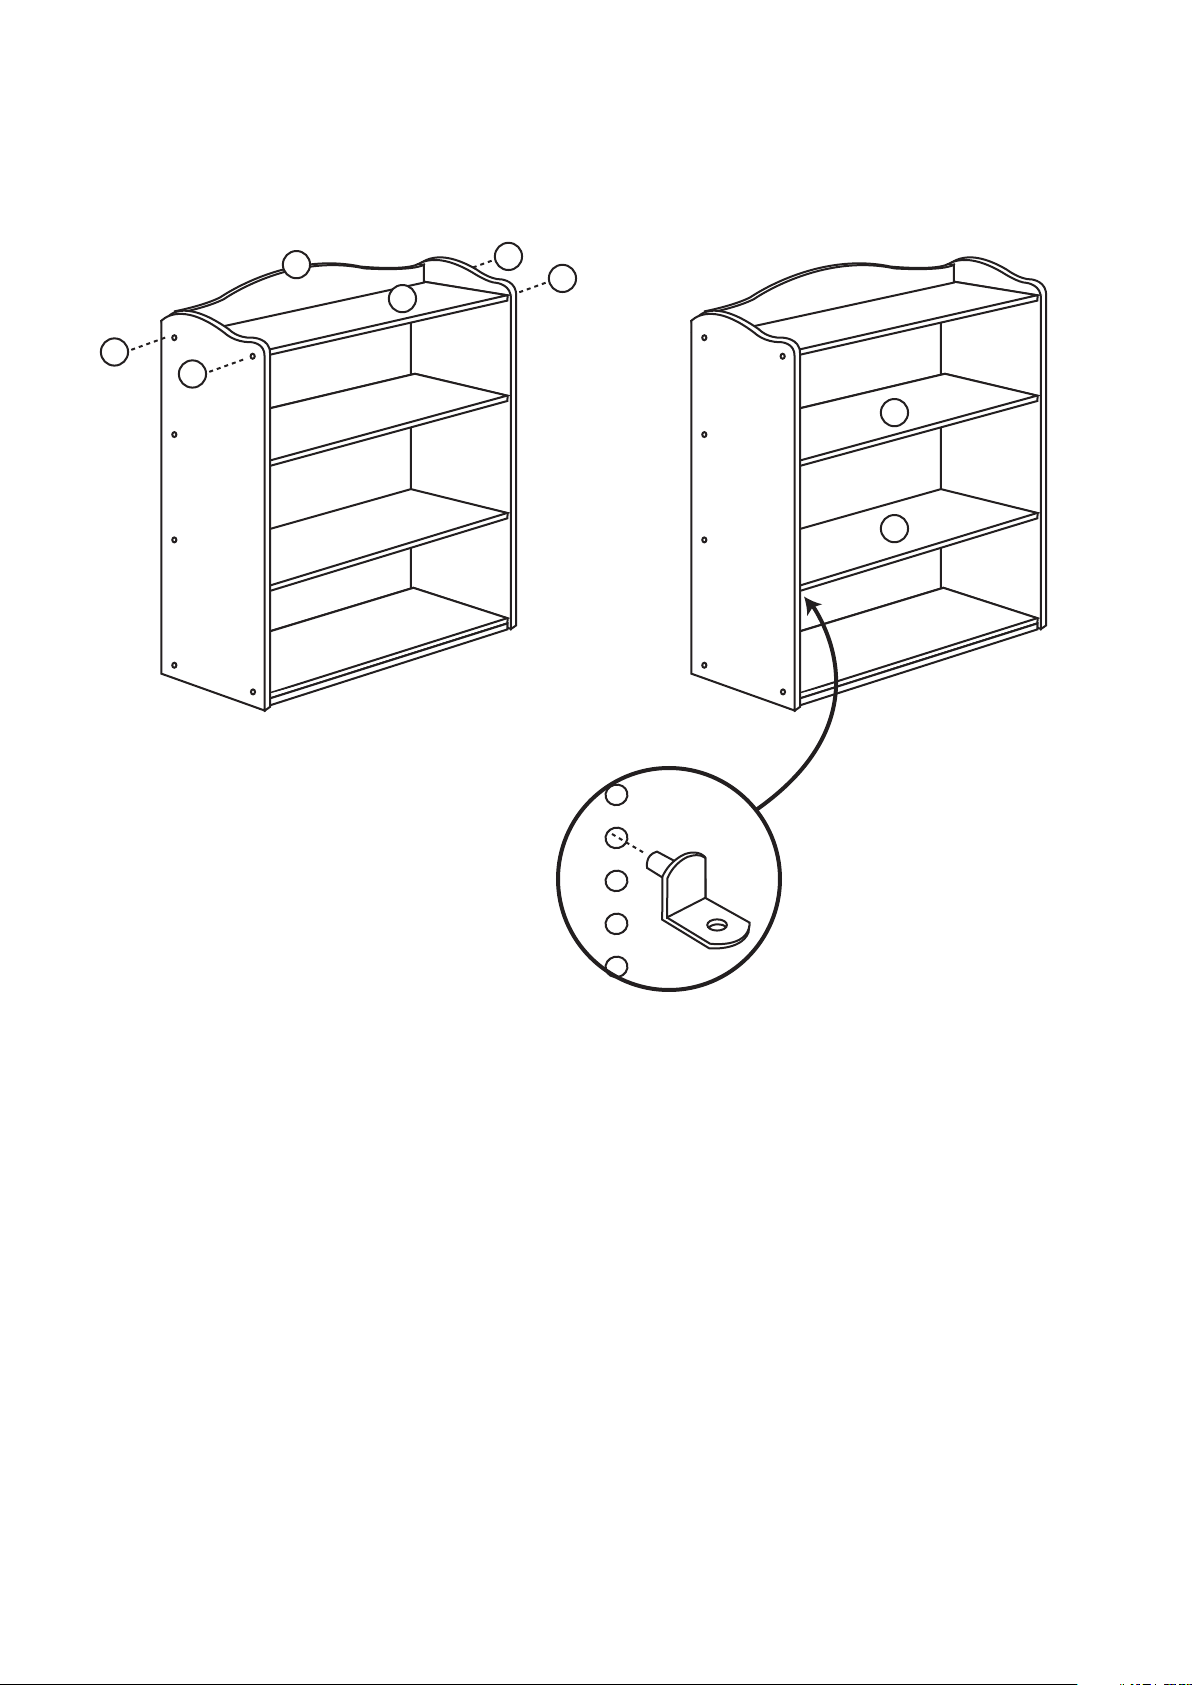
NOTE: You will be building this bookcase from the bottom up. Gradually tighten screws as you work
your way up. Do not fully tighten all screws until all the pieces are in place and aligned.
page 3 of 4
K
J
A
A
STEP 5
A
A
N
N
STEP 6
Insert shelf pins (C) in desired
location. Place shelf on pins and
secure with Screw (B).
Guidecraft • 55509 Highway 19 We s t , W i n t h r o p , M N 5 5 3 9 6 • ( 8 0 0 ) 5 2 4 - 3 5 5 5 • w w w . g u i d e c r a f t . c o m
Page 4
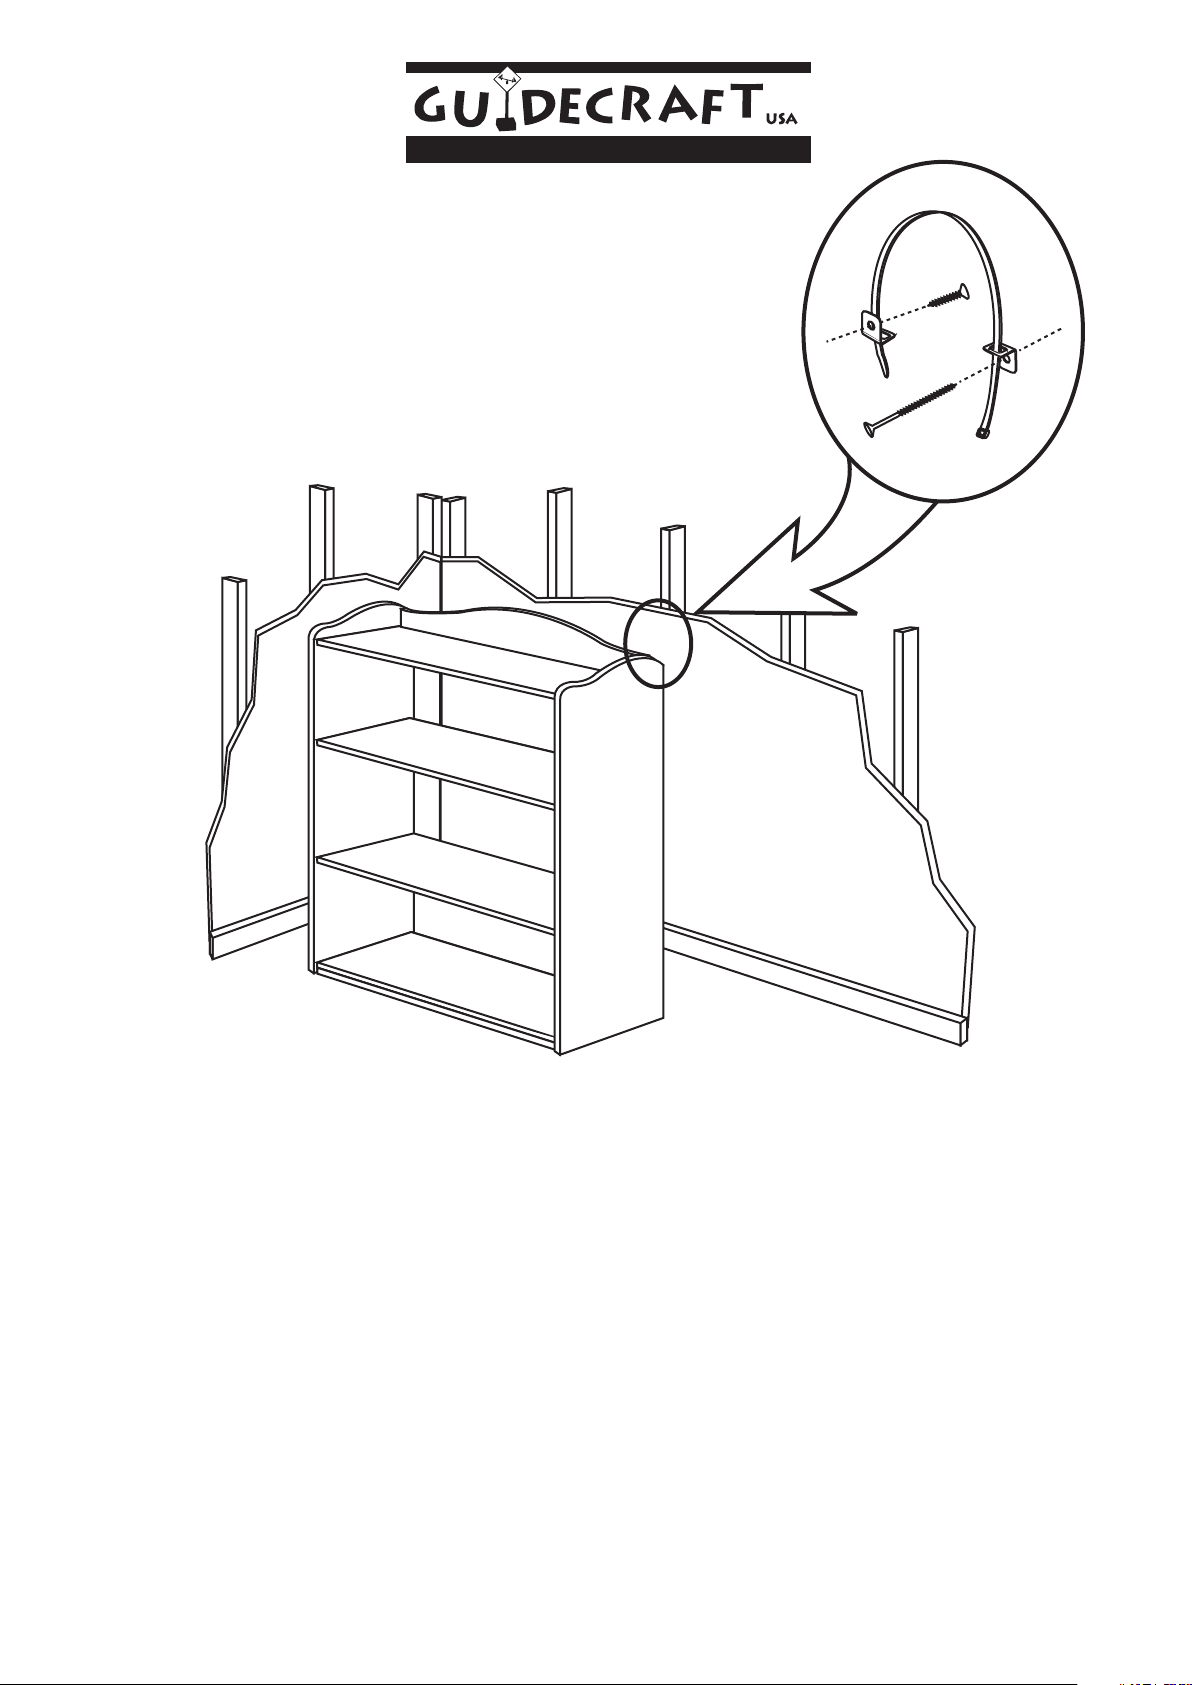
Bookcase Anti-Tipping Bracket
page 4 of 4
Tipping furniture may injure young children. Use of
this tipping restraint hardware is highly
recommended.
This hardware, when properly installed, could
provide protection against the unexpected tipping
of furniture due to improper use.
WARNING: This product is only a deterrent. It is not a
substitute for proper adult supervision.
1. Attach one of the mounting brackets securely to
the back top edge of the furniture using the short
screw.
2. Find the stud in the wall and mark the location on
the wall for the mounting of the second bracket.
Mount the bracket with a 2" wood screw,
approximately 2" below the bracket mounted to the
edge of the furniture.
Guidecraft • 55509 Highway 19 We s t , W i n t h r o p , M N 5 5 3 9 6 • ( 8 0 0 ) 5 2 4 - 3 5 5 5 • w w w . g u i d e c r a f t . c o m
3. If a stud cannot be found purchase a "Hollow-Wall
Anchor Bolt" and attach the second bracket to the
wall using that bolt.
4. Place the furniture so the bracket on the back
edge is in line with the bracket on the wall.
5. Lace an end of the nylon restraint strap down
through each bracket. Bring both ends together and
slide the beaded end of the strap through the
keyhole shaped slot in the other end unit until it is
snug. Pull down on the beaded end until it snap
locks into the keyhole.
6. Check to make sure the strap is securely laced and
locked to the brackets.
 Loading...