

Page 1
Deutsch D 3-7
Originalbetriebsanleitung
HOLZSPALTER
English GB 8-12
Translation of Original Operating Instructions
LOG SPLITTER
Français F 13-17
Traduction du mode d’emploi origina
FENDEUR DE BOIS
Čeština CZ 18-22
Překlad originálního návodu k obsluze
ŠTÍPAČ ŠPALKŮ
Slovenčina SK 23-27
Preklad originálneho návodu na obsluhu
ŠTIEPAČKA DREVA
Nederlands NL 28-32
Vertaling van de originele gebruiksaanwijzing
HOUTSPLIJTER
Italiano I 33-37
Traduzione del Manuale d’Uso originale
SPACCATRICE DEI TRONCHI IDRAULICA
Magyar H 38-41
Eredeti használati útmutató fordítása
HASOGATÓ
Slovenščina SLO 42-46
Prevod originalnih navodil za uporabo
CEPILEC DRV
Hrvatski HR 47-51
Prijevod originalnih uputa za korištenje
CJEPAČ DRVA
Bošnjački BIH 52-56
Prijevod originalnih uputstava za korištenje
CJEPAČ DRVA
Română RO 57-61
Mod de utilizare – traducerea versiunii originale
DESPICATOR DE LEMNE
Български BG 62-66
Превод на оригиналното упътване за обслужване
УСТРОЙСТВО ЗА ЦЕПЕНЕ НА ДЪРВА
© Güde GmbH & Co. KG - Birkichstrasse 6 - D-74549 Wolpertshausen - Deutschland
SPALTY W 370/4T
# 94698
Page 2
1
2
12
11
3 4
A
B
C
Page 3

Einleitung
Damit Sie an Ihrem neuen Gerät möglichst lange Freude
haben, bitten wir Sie, die Betriebsanweisung und die
beiliegenden Sicherheitshinweise vor Ingebrauchnahme
sorgfältig durchzulesen. Ferner wird empfohlen, die
Gebrauchsanweisung für den Fall aufzubewahren, dass
Sie sich die Funktionen des Artikels später nochmals ins
Gedächtnis rufen möchten.
Im Rahmen ständiger Produktweiterentwicklung
behalten wir uns vor zur Verbesserung technische
Änderungen umzusetzen.
Bei diesem Dokument handelt es sich um die
Originalbetriebsanweisung.
Lieferumfang
Nehmen Sie das Gerät aus der Transportverpackung und
prüfen Sie die Vollständigkeit und das Vorhandensein
folgender Teile:
1 Holzspalter
1 Originalbetriebsanweisung
Gewährleistungskarte
Sollten Teile des Lieferumfangs fehlen oder beschädigt
sein, wenden Sie sich bitte an Ihren Händler.
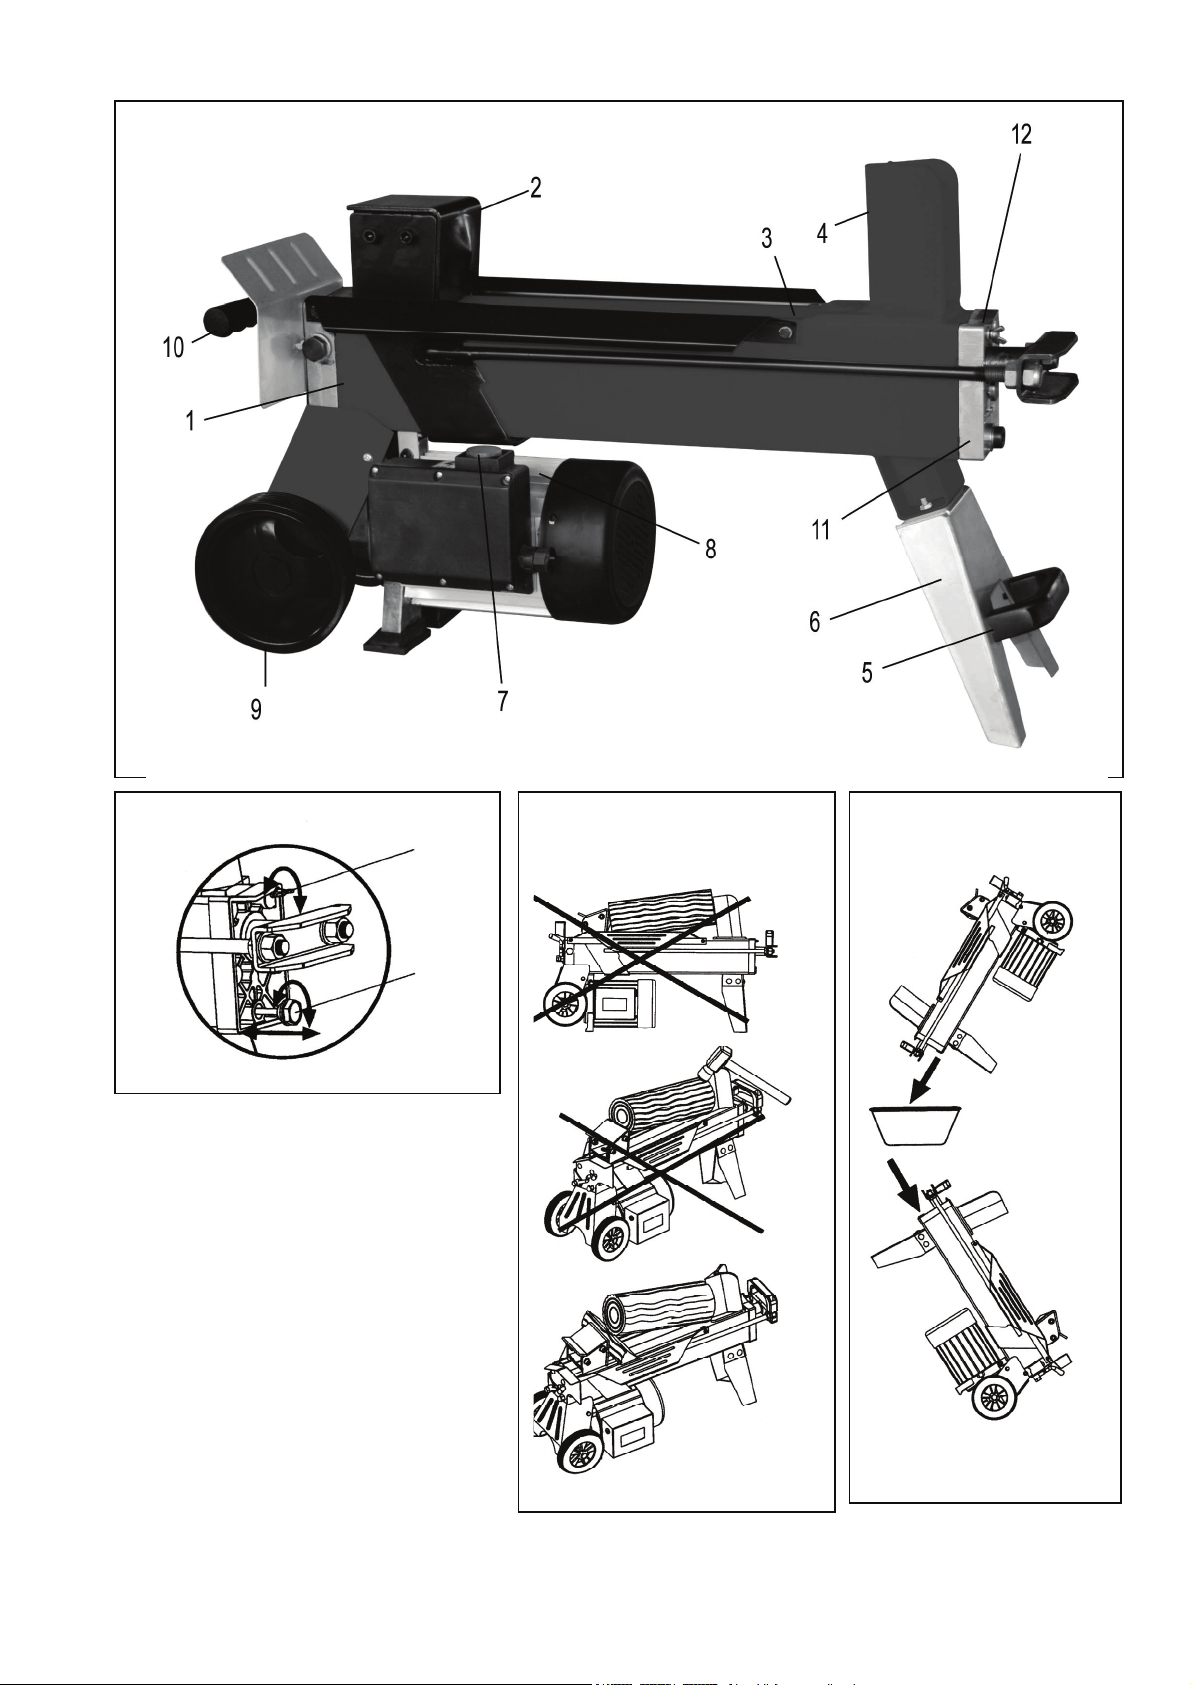
Gerätebeschreibung (Abb. 1)
1. Öltank
2. Druckplatte
3. Auflagefläche
4. Spaltkeil
5. Transportgriff
6. Standbein
7. Auslöseknopf
8. Motor
9. Transportrad
10. Hydraulik-Hebel
11. Öl-Abflussschraube
12. Entlüftungsschraube
Technische Daten
Anschluss/Frequenz: 230V~50Hz
Motorleistung: 1500 W/(P1, S6 40%)
Schutzklasse: IP 54
Isolationsklasse: B
Leerlaufdrehzahl: 2950 min-1
Max. Spaltdruck: 4 Tonnen
Hydraulikölmenge: 2,4 l/SAE 20/HPL 46
Max. Hydraulikdruck: 160 bar
max. Spalthub: 230 mm
Spaltgut-Ø min./max.: 50/250 mm
Spaltgutlänge min./max.: 250/370 mm
Vorlaufgeschwindigkeit: 0,04 m/s
Rücklaufgeschwindigkeit: 0,06 m/s
Aufbaumaße LxBxH: 810x270x460 mm
Gewicht: 38 kg
Allgemeine Hinweise
Überprüfen Sie nach dem Auspacken alle Teile auf
eventuelle Transportschäden.
Überprüfen Sie die Sendung auf Vollständigkeit.
Machen Sie sich vor dem Einsatz anhand der
Betriebsanleitung mit dem Gerät vertraut.
Verwenden Sie bei Zubehör sowie Verschleiß- und
Ersatzteilen nur Originalteile.
Betreiben Sie das Gerät nur mit einem
RCD (Fehlerstromschutzschalter) 30mA.
Sicherheitshinweise
Alle Sicherheits- und Gefahrenhinweise an der
Maschine beachten und in lesbarem Zustand halten.
Die Sicherheitseinrichtungen an der Maschine dürfen
nicht demontiert oder unbrauchbar gemacht werden.
Netzanschlussleitungen überprüfen. Keine
fehlerhaften Leitungen verwenden. Siehe Elektrischer
Anschluss.
Vor Inbetriebnahme die korrekte Funktion der
Zweihandbedienung prüfen.
Die Bedienungsperson muss mindestens 18 Jahre alt
sein. Auszubildende müssen mindestens 16 Jahre alt
sein, dürfen aber nur unter Aufsicht an der Maschine
arbeiten.
Beim Arbeiten Arbeitshandschuhe tragen.
Vorsicht beim Arbeiten: Verletzungsgefahr für Finger
und Hände durch das Spaltwerkzeug.
Zum Spalten von schweren oder unhandlichen Teilen
geeignete Hilfsmittel zum Anstutzen verwenden.
Umrüst-, Einstell-, Mess- und Reinigungsarbeiten nur
bei ausgeschaltetem Motor durchführen. Netzstecker
ziehen.
Installationen, Reparaturen und Wartungsarbeiten an
der Elektroinstallation dürfen nur von Fachleuten
ausgeführt werden.
Sämtliche Schutz- und Sicherheitseinrichtungen
müssen nach abgeschlossenen Reparatur- und
Wartungsarbeiten sofort wieder montiert werden.
Beim Verlassen des Arbeitsplatzes den Motor
ausschalten. Netzstecker ziehen.
Das Blockieren der Zweihandschaltung und/oder das
Umgehen der Stellteile der Zweihandschaltung ist
unzulässig, da hierdurch besondere
Verletzungsgefahren beim Bedienen der Maschine
drohen.
Eigenmächtige Veränderungen an der Maschine
schließen eine Haftung des Herstellers für daraus
resultierende Schäden aus.
Bestimmungsgemäße Verwendung
Der Hydraulik-Holzspalter ist nur für liegenden Betrieb
einsetzbar. Hölzer dürfen nur liegend in Faserrichtung
gespalten werden. Die Abmessung der zu spaltenden
Hölzer beträgt maximal 37 cm.
Jeder darüber hinausgehende Gebrauch gilt als nicht
bestimmungsgemäß. Für daraus resultierende Schäden
oder Verletzungen haftet der Hersteller nicht. Bitte
beachten Sie das unsere Geräte bestimmungsgemäß
nicht für den gewerblichen Einsatz konstruiert sind.
Montage
Aus Verpackungsgründen ist das Standbein (Abb.1/6) und
der Handgriff (Abb. 1/5) kundenseitig zu montieren.
Verwenden Sie hierzu die beiliegenden 2 SechskantSchrauben M6x16 mit Mutter für das Standbein sowie die
Innen-Sechskant-Schrauben M6x16 mit Mutter für den
Handgriff. Stellen Sie hierzu das Gerät waagrecht auf den
Boden und unterlegen Sie dieses an der Spaltkeilseite mit
dem Styroporpolster der Verpackung.
Vor dem Betrieb
Holz niemals stehend oder gegen die Faserrichtung
spalten!
Die Sicherheits-, Arbeits- und Wartungsvorschriften
des Herstellers sowie die in den technischen Daten
angegebenen Abmessungen müssen eingehalten
werden.
Die zutreffenden Unfallverhütungsvorschriften und
die sonstigen, allgemein anerkannten
Page 4
sicherheitstechnischen Regeln müssen beachtet
werden.
Die Maschine darf nur von sachkundigen Personen
Die Maschine darf nur mit Originalzubehör und
Jeder darüber hinausgehende Gebrauch gilt als nicht
Aufstellen
Bitte beachten Sie, dass Ihre Maschine auf festem Grund
gerade, standsicher und mit ausreichender Beleuchtung
aufgestellt ist.
Schaffen Sie ausreichend Platz, um sicheres und
störungsfreies Arbeiten zu ermöglichen.
Restrisiken
Die Maschine ist nach dem Stand der Technik und den
Anerkannten sicherheitstechnischen Regeln gebaut.
Dennoch können beim Arbeiten einzelne Restrisiken
auftreten.
Verletzungsgefahr für Finger und Hände durch das
Verletzungsgefahr durch das wegschleudernde
Gefährdung durch Strom bei Verwendung nicht
Desweiteren können trotz aller getroffener
Restrisiken können minimiert werden, wenn die
Elektrischer Anschluss
Elektrische Anschlussleitung regelmäßig auf Schäden
überprüfen. Vorher Netzstecker ziehen!
Elektrische Anschlussleitungen müssen den einschlägigen
VDE- und DIN-Bestimmungen entsprechen. Verwenden
Sie nur Anschlussleitungen mit Kennzeichnung H 07-RN.
Ein Aufdruck der Typenbezeichnung auf der
Anschlussleitung ist Vorschrift.
Schadhafte Elektroanschlussleitungen
An elektrischen Anschlussleitungen entstehen oft
Isolationssschäden.
Mögliche Ursachen:
Druckstellen, wenn Anschlussleitungen durch Fensteroder Türspalte geführt werden.
Knickstellen durch unsachgemäße Befestigung oder
Führung der Anschlussleitung.
Schnittstellen durch Überfahren der Anschlussleitung.
Isolationsschäden durch Herausreißen aus der
Wandsteckdose.
Risse durch Alterung der Isolation.
Solche schadhaften Elektroanschlussleitungen dürfen
nicht verwendet werden und sind auf Grund der
Isolationsschäden lebensgefährlich!
genutzt, gewartet oder repariert werden, die damit
vertraut und über die Gefahren unterrichtet sind.
Eigenmächtige Veränderungen an der Maschine
schließen eine Haftung
resultierende Schaden aus.
Originalwerkzeugen des Herstellers genutzt werden.
bestimmungsgemäße Verwendung. Für daraus
resultierende Schaden haftet der Hersteller nicht, das
Risiko dafür trägt allein der Benutzer
Spaltwerkzeug bei unsachgemäßer Führung oder
Auflage des Holzes.
Werkstück bei unsachgemäßer Haltung oder
Führung.
ordnungsgemäßer Elektroanschlussleitungen.
Vorkehrungen nicht offensichtliche Restrisiken
bestehen.
Sicherheitshinweise und die Bestimmungsgemäße
Verwendung, sowie die Bedienungsanweisung
insgesamt beachtet werden.
des Herstellers für daraus
Bedienung Abb. 3
Vor Arbeitsbeginn muss die Entlüfterschraube (Abb. 2/12)
unbedingt um einige Umdrehungen gelockert werden,
damit die Luftzirkulation im Öltank gewährleistet ist.
Bleibt sie beim Arbeiten angezogen, führt die hydraulische
Bewegung zu einem Überdruck.
Vor jedem Transport des Geräts ist diese Schraube
unbedingt fest anzuschrauben, um Ölaustritt zu
verhindern.
Nur gerade abgesägte Hölzer spalten.
1. Legen Sie das Spaltgut plan und gerade auf die
Auflagefläche (Abb. 1/3)
2. Der Holzspalter ist für eine Zwei-Hand-Bedienung
Ausgerüstet – die linke Hand bedient den
Hydraulikhebel (Abb. 1/10), die rechte den
Auslöseknopf (Abb. 1/7).
3. Drucken Sie den Hydraulikhebel (Abb. 1/10) in der
beschriebenen Weise nach unten und lösen den
Spaltvorgang durch Betätigen des Auslöseknopfes
(Abb. 1/7) aus.
Das Loslassen eines der Bedienteile führt zum sofortigen
Stopp der Maschine. Das Loslassen beider Bedienteile
führt dazu, dass die Druckplatte zurückgefahren wird. Ist
das Gerät innerhalb 5 Sekunden nicht in der Lage, ein
Stück Spaltgut zu spalten, stoppen Sie den Vorgang
unverzüglich. Das Spaltgut ist wahrscheinlich zu hart für
die Kapazität. Drehen Sie das Spaltgut um 90° und
versuchen es erneut einmal.
Vorsicht: bei andauerndem Betrieb von mehr als
5 Sekunden droht Überhitzung bzw. das Gerät zu
beschädigen. Brechen Sie den Vorgang ab.
Fehlerhafte Bestückung, Abb. 3/A
Legen Sie Spaltgut immer plan auf die Auflagefläche!
Es darf nicht verrutschen oder sich schräg stellen lassen.
Der Spaltkeil wird überstrapaziert, wenn ein Spaltvorgang
nicht auf der gesamten Schneide, sondern nur im oberen
Bereich erfolgt.
Spalten Sie niemals mehrere Stücke gleichzeitig!
Es besteht die Gefahr, dass eines der Teile
unkontrollierbare Beschleunigung erfährt.
Achtung! Hohe Verletzungsgefahr!
Verkeiltes Spaltgut, Abb. 3/B/C
Versuchen Sie niemals, verkeiltes Spaltgut der Maschine
heraus zu klopfen. Dies kann zu Unfällen und
Beschädigungen am Gerät führen.
Gehen Sie wie folgt vor:
1. Lassen Sie die Druckplatte in die Startposition
zurückfahren.
2. Legen Sie einen Keil unter das Spaltgut wie in der
Abbildung gezeigt.
3. Lösen Sie einen Spaltvorgang aus, so dass die
Druckplatte den Keil weit unter das herauszulösende
Spaltgut schiebt.
4. Wiederholen Sie die oberen Schritte mit neuen Keilen
so lange, bis das Spaltgut nach oben aus der
Maschine geschoben wird.
Page 5
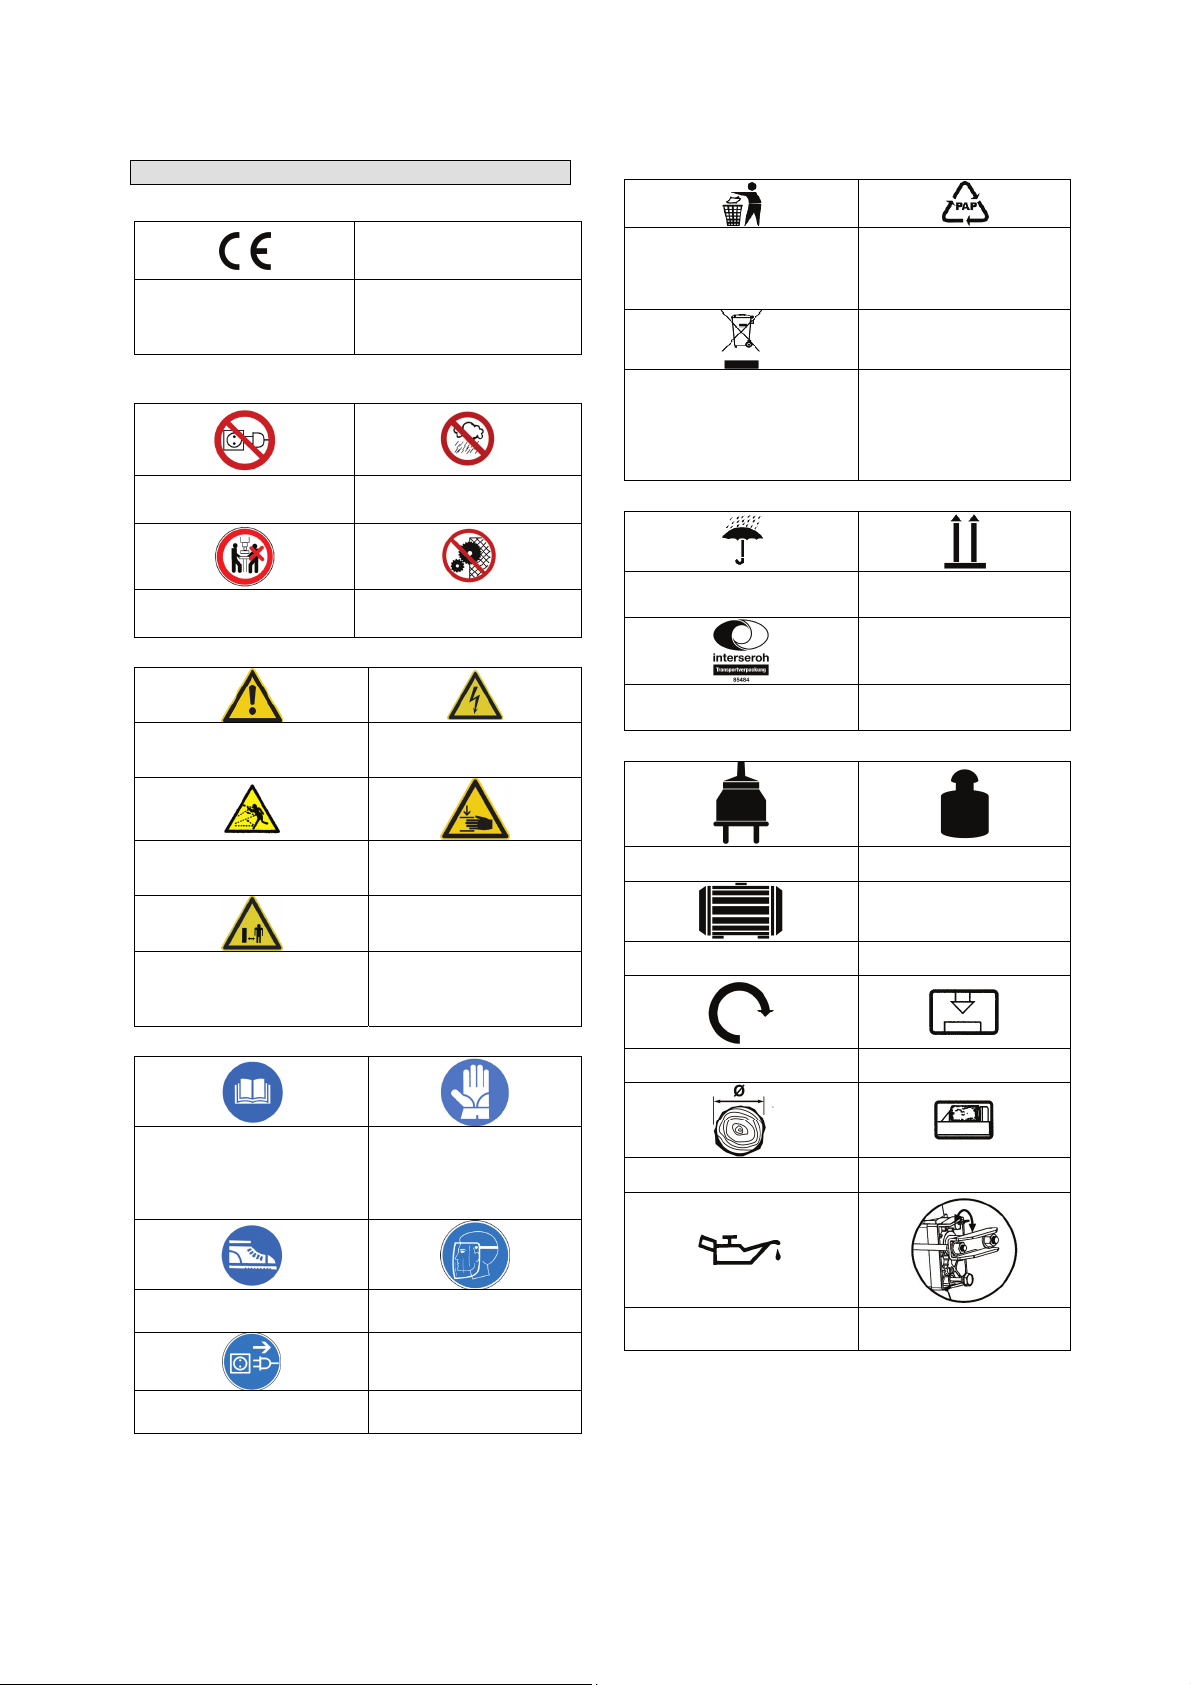
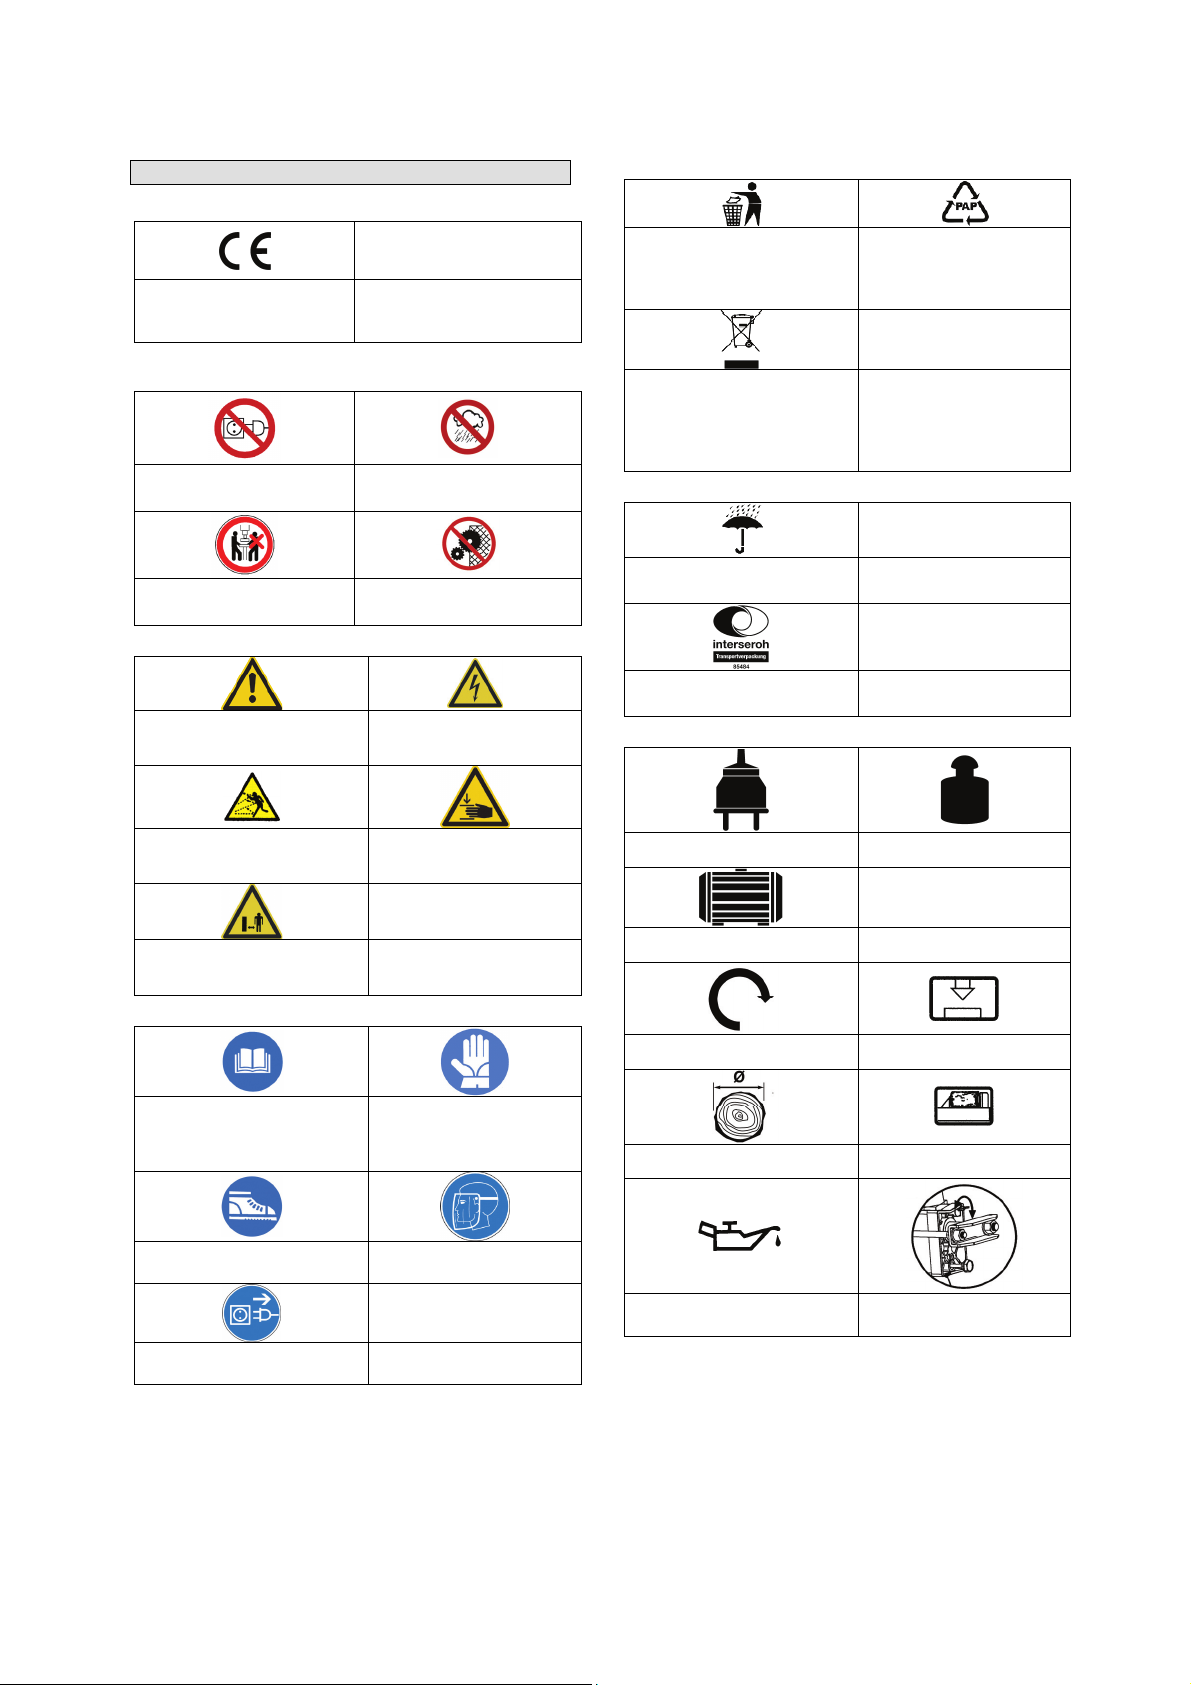
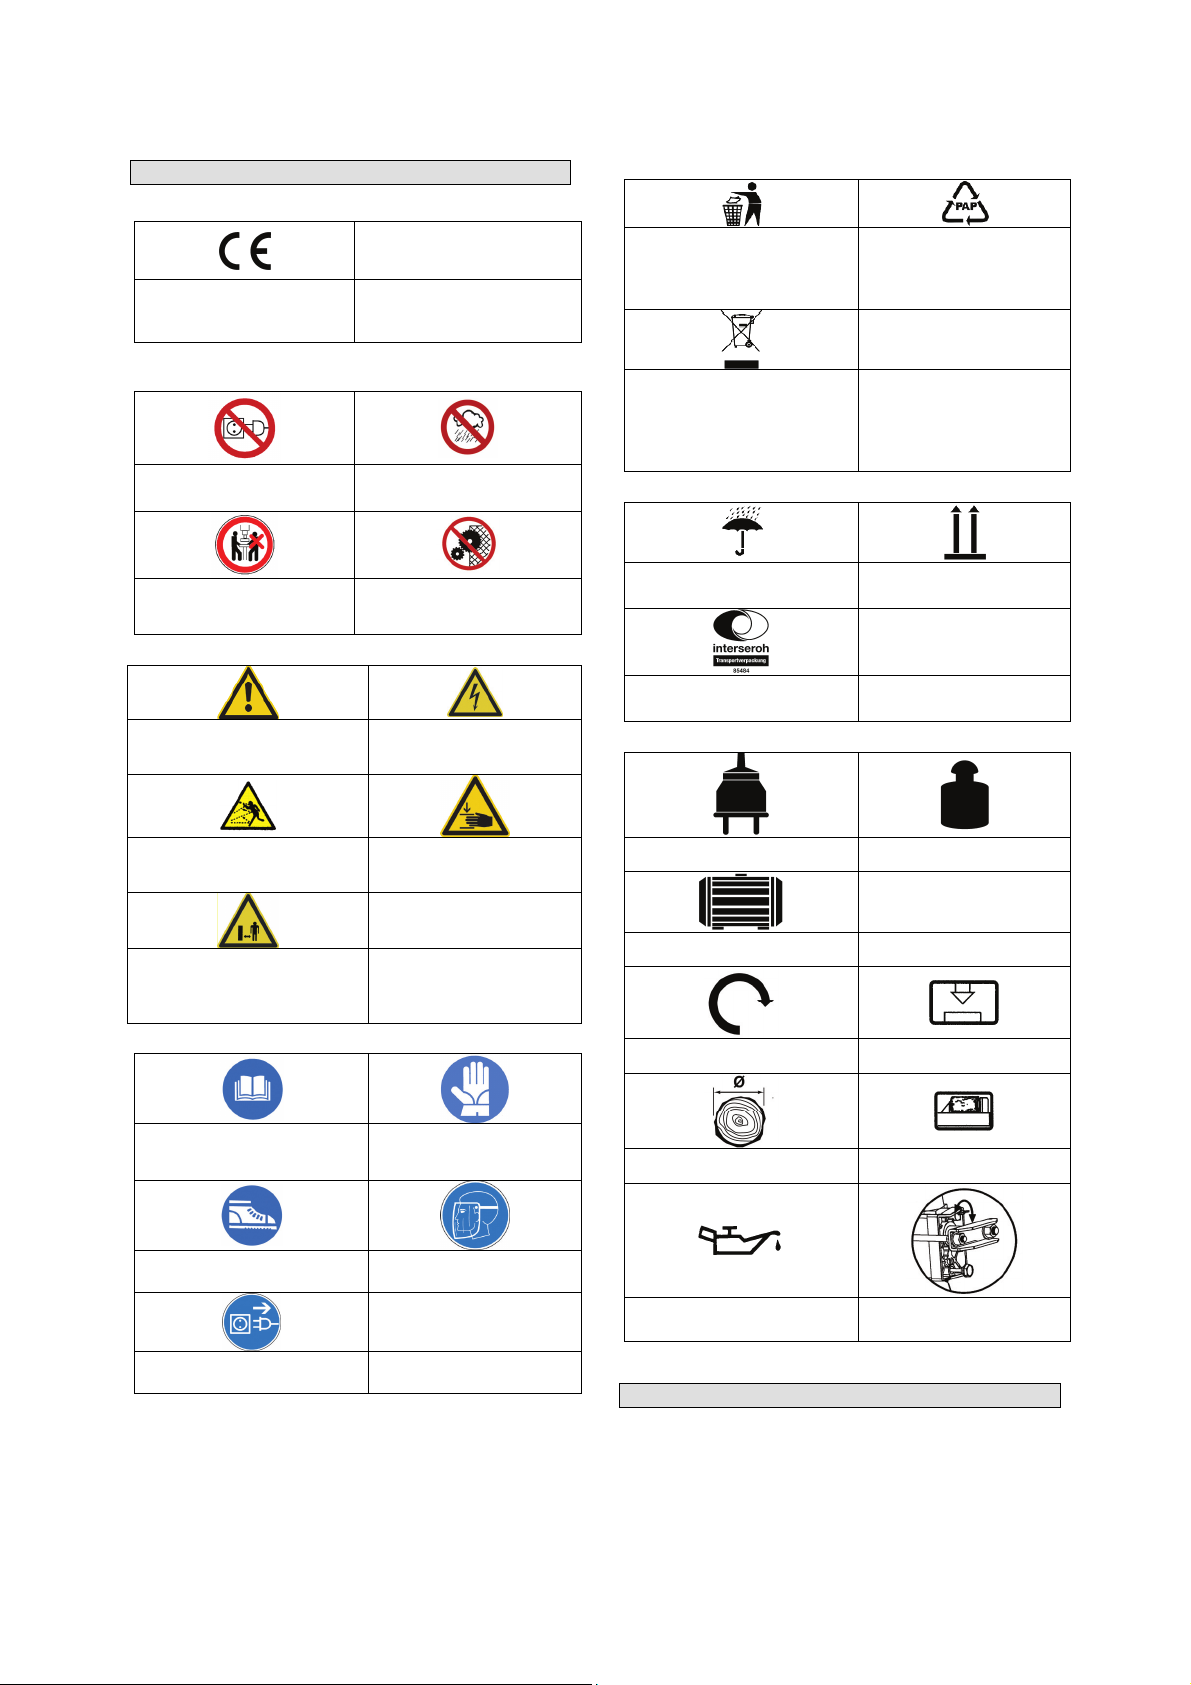
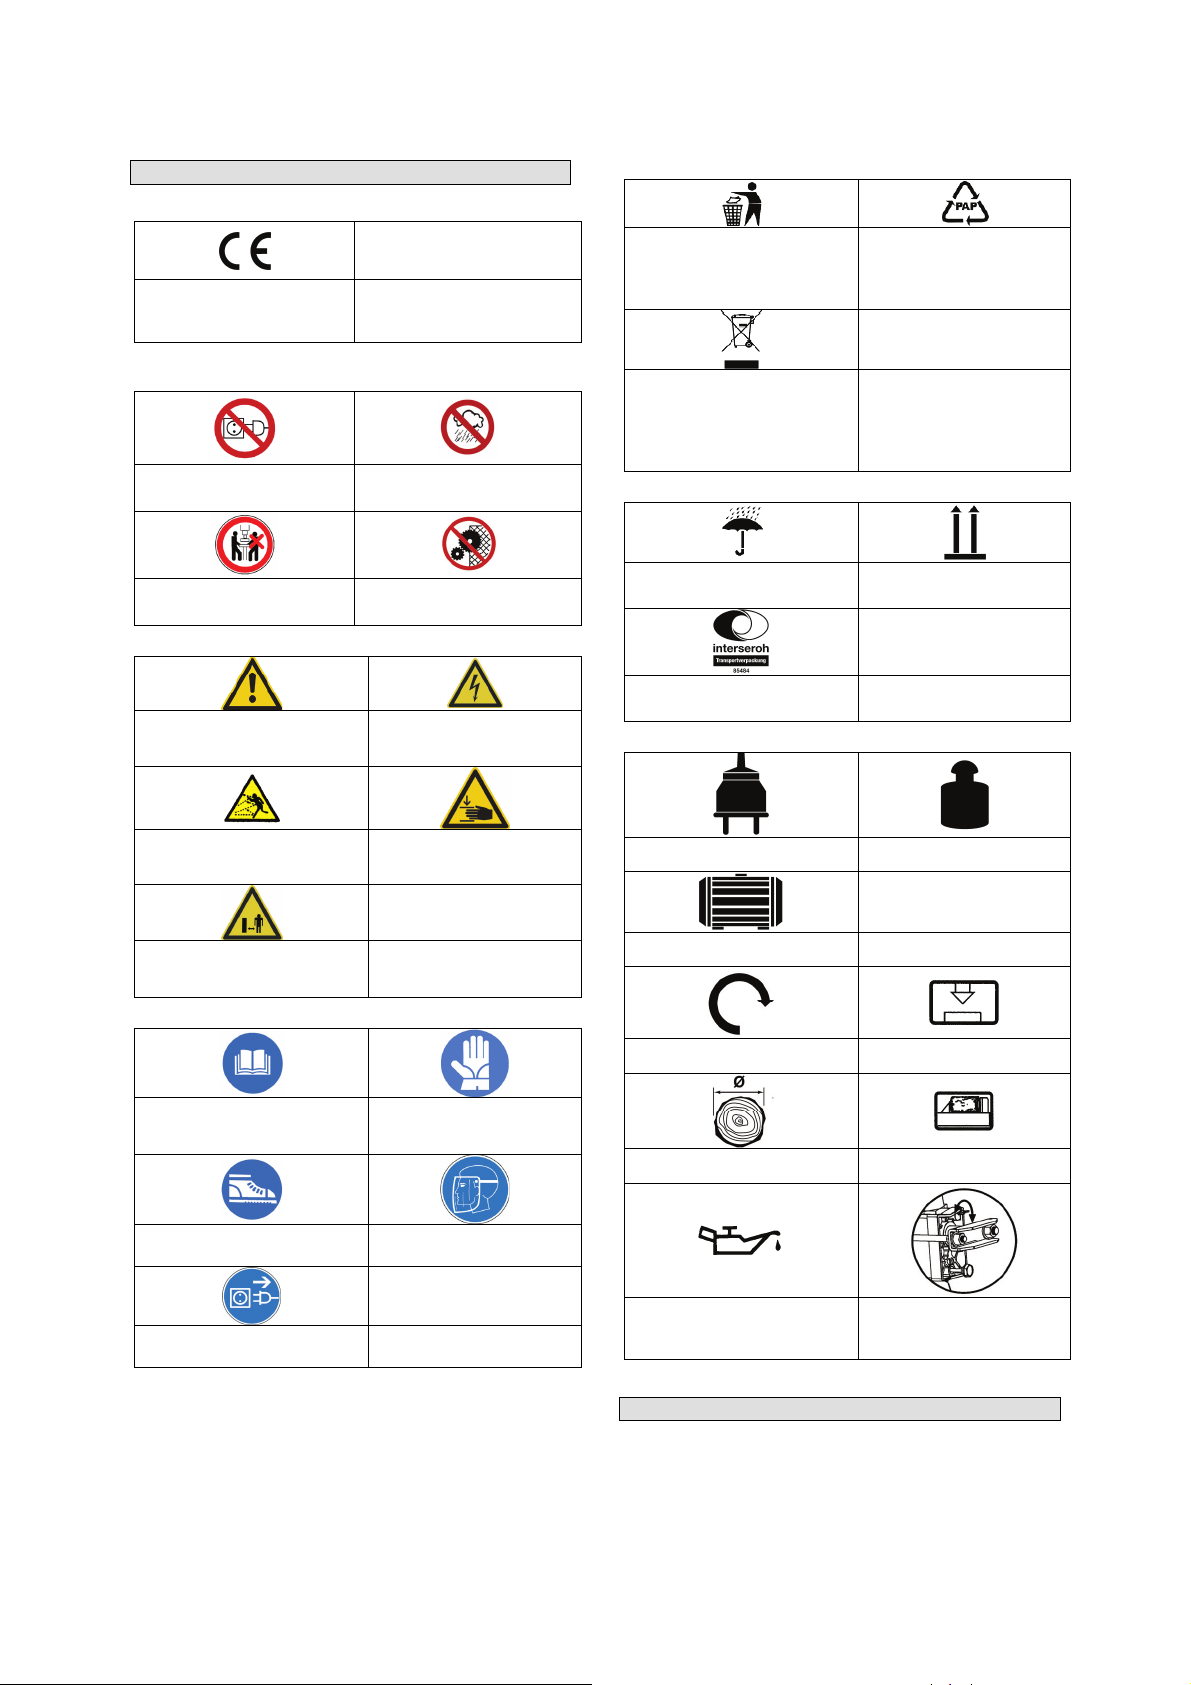
Kennzeichnungen
Produktsicherheit:
Produkt ist mit den
einschlägigen Normen der
Europäischen Gemeinschaft
konform
Verbote:
Am Netzstecker ziehen
verboten!
Vor Regen und Feuchtigkeit
schützen!
Umweltschutz:
Abfall nicht in die Umwelt
sondern fachgerecht
entsorgen.
Schadhafte und/oder zu
entsorgende elektrische oder
elektronische Geräte müssen
an den dafür vorgesehen
Recycling-Stellen abgegeben
werden.
Verpackung:
Verpackungsmaterial aus
Pappe kann an den dafür
vorgesehen Recycling-
Stellen abgegeben werden.
Maschine darf nur von einer
Person bedient werden
Warnung:
Warnung/Achtung
Warnung vor
weggeschleuderten Teilen
Halten Sie in der Nähe
stehende Personen auf
sicheren Abstand zur
Maschine (mindestens 5m)
Gebote:
Lesen Sie die
Gebrauchsanleitung sorgfältig
durch. Machen Sie sich mit
dem Gebrauch des Gerätes
vorab sorgfältig vertraut.
Schutzeinrichtung entfernen
verboten
Warnung vor gefährlicher
elektrischer Spannung
Warnung vor
Handverletzungen
Schutzhandschuhe
benutzen
Vor Nässe schützen Packungsorientierung Oben
Interseroh-Recycling
Technische Daten:
Anschluss Gewicht
IP 54
Motorleistung Schutzart
Drehzahl Spaltdruck
Spaltgutdurchmesser Spaltgutlänge
Sicherheitsschuhe benutzen
Vor dem Öffnen Stecker
ziehen
Gesichtsschutzschild
benutzen
Hydrauliköltankinhalt
Entlüftungsschraube öffnen
Page 6
Gewährleistung
Die Gewährleistungszeit beträgt 12 Monate bei
gewerblicher Nutzung, 24 Monate für Verbraucher und
beginnt mit dem Zeitpunkt des Kaufs des Gerätes.
Die Gewährleistung erstreckt sich ausschließlich auf
Mängel, die auf Material- oder Herstellungsfehler
zurückzuführen sind. Bei Geltendmachung eines Mangels
im Sinne der Gewährleistung ist der Kaufbeleg - der das
Verkaufsdatum auszuweisen hat - mit Verkaufsdatum
beizufügen.
Von der Gewährleistung ausgeschlossen sind
unsachgemäße Nutzung, wie z. B. Überlastung des
Gerätes, Gewaltanwendung, Beschädigungen durch
Fremdeinwirkung, Fremdkörper, sowie Nichtbeachtung der
Gebrauchs- und Aufbauanleitung und normaler
Verschleiß.
Verhalten im Notfall
Leiten Sie die der Verletzung entsprechend notwendigen
Erste Hilfe Maßnahmen ein und fordern Sie schnellst
möglich qualifizierte ärztliche Hilfe an.
Bewahren Sie den Verletzten vor weiteren Schädigungen
und stellen Sie diesen ruhig.
Für einen eventuell eintretenden Unfall sollte immer
ein Verbandskasten nach DIN 13164 am Arbeitsplatz
griffbereit vorhanden sein. Dem Verbandskasten
entnommenes Material ist sofort wieder aufzufüllen.
Wenn Sie Hilfe anfordern,
machen Sie folgende Angaben:
1. Ort des Unfalls
2. Art des Unfalls
3. Zahl der Verletzten
4. Art der Verletzungen
Entsorgung
Die Entsorgungshinweise ergeben sich aus den
Piktogrammen die auf dem Gerät bzw. der Verpackung
aufgebracht sind. Eine Beschreibung der einzelnen
Bedeutungen finden Sie im Kapitel „Kennzeichnung“.
Entsorgung der Transportverpackung
Die Verpackung schützt das Gerät vor Transportschäden.
Die Verpackungsmaterialien sind in der Regel nach
umweltverträglichen und entsorgungstechnischen
Gesichtspunkten ausgewählt und deshalb recycelbar.
Das Rückführen der Verpackung in den Materialkreislauf
spart Rohstoffe und verringert das Abfallaufkommen.
Verpackungsteile (z.B. Folien, Styropor®) können für
Kinder gefährlich sein. Es besteht Erstickungsgefahr!
Bewahren Sie Verpackungsteile außerhalb der Reichweite
von Kindern auf und entsorgen Sie sie so schnell wie
möglich.
Anforderungen an den Bediener
Der Bediener muss vor Gebrauch des Gerätes
aufmerksam die Bedienungsanleitung gelesen haben.
Qualifikation
Außer einer ausführlichen Einweisung durch eine
sachkundige Person ist keine spezielle Qualifikation für
den Gebrauch des Gerätes notwendig.
Mindestalter
Das Gerät darf nur von Personen betrieben werden, die
das 18. Lebensjahr vollendet haben. Eine Ausnahme stellt
die Benutzung als Jugendlicher dar, wenn die Benutzung
im Zuge einer Berufsausbildung zur Erreichung der
Fertigkeit unter Aufsicht eines Ausbilders erfolgt.
Schulung
Die Benutzung des Gerätes bedarf lediglich einer
entsprechenden Unterweisung. Eine spezielle Schulung ist
nicht notwendig.
Service
Sie haben technische Fragen? Eine Reklamation?
Benötigen Ersatzteile oder eine Bedienungsanleitung?
Auf unserer Homepage www.guede.com im Bereich
Service helfen wir Ihnen schnell und unbürokratisch
weiter. Bitte helfen Sie uns Ihnen zu helfen. Um Ihr Gerät
im Reklamationsfall identifizieren zu können benötigen wir
die Seriennummer sowie Artikelnummer und Baujahr. Alle
diese Daten finden Sie auf dem Typenschild. Um diese
Daten stets zur Hand zu haben, tragen Sie diese bitte
unten ein.
Seriennummer:
Artikelnummer:
Baujahr:
Tel.: +49 (0) 79 04 / 700-360
Fax: +49 (0) 79 04 / 700-51999
E-Mail: support@ts.guede.com
Bevor Sie Wartungs/Reinigungs oder sonstige
Arbeiten am Gerät durch führen ist dieses immer vom
Stromnetz zu trennen. Lassen Sie das Gerät vor
dementsprechenden Arbeiten sowie einem Transport
ansteht Abkühlen.
Wartung
Umrüst-, Einstell-, Mess- und Reinigungsarbeiten nur bei
Ausgeschaltetem Motor durchführen. Netzstecker ziehen.
Reparatur- und Wartungsarbeiten an der elektrischen
Anlage nur von Elektrofachkräften ausführen lassen.
Sämtliche Schutz- und Sicherheitseinrichtungen müssen
nach abgeschlossenen Reparatur- und Wartungsarbeiten
sofort wieder montiert werden.
Wir empfehlen Ihnen:
Das Spaltmesser ist ein Verschleißteil, das bei Bedarf
nachgeschliffen werden soll.
Die kombinierte Zweihandschutzeinrichtung muss
leichtgängig bleiben. Gelegentlich mit wenigen
Tropfen Öl schmieren.
Auflagefläche sauber halten.
Gleitschienen mit Fett schmieren.
Hydraulik/Ölwechsel
Die Hydraulikanlage ist ein geschlossenes System mit
Öltank, Ölpumpe und Steuerventil. Es darf nicht verändert
oder manipuliert werden.
Anschlüsse und Verschraubungen regelmäßig auf
Dichtheit prüfen, bei Bedarf nachziehen.
Der Öltank ist werksseitig mit hochwertigem Hydrauliköl
der ISO Viskositätsstufe 20 gefüllt.
Ölwechsel nach je 150 Betriebsstunden durchführen
1. Die Druckplatte ist in Startposition. Nehmen Sie die
Maschine nun vom Netz.
2. Lösen Sie die Öl-Abfluss-Schraube (Abb. 1/11) und
legen diese beiseite.
3. Stellen Sie eine leere 4-l-Schale neben Gerät und
richten dieses auf, wie in (Abb. 4) gezeigt. Warten
Sie, bis das gesamte Altöl ausgeflossen ist.
Umweltgerecht entsorgen!
Page 7
4. Drehen Sie die Maschine auf den Kopf (Abb. 4), um
ca. 2,4 l Hydrauliköl (Viskosität 20) nach zu füllen.
5. In der Öl-Abfluss-Schraube (Abb. 1/11) ist ein
Ölmess-Stab integriert. Führen Sie diesen nun
gereinigt in die noch vertikal stehende Maschine ein.
Ziehen Sie ihn wieder heraus, es sollte ein Ölfilm
erreicht sein zwischen den beiden Kerben.
6. Schrauben Sie nun die Öl-Abfluss-Schraube (Abb.
1/11) wieder fest ein. Anschließend das Gerät einige
Male leer betätigen. Kontrollieren Sie in
regelmäßigen Abständen den Ölstand und füllen bei
Bedarf nach.
Transport
Zum Entnehmen aus dem Karton sind mindestens
2 Personen erforderlich.
Die Maschine lässt sich schräg auf die Räder gestellt
transportieren.
Tragegriff verwenden, hochheben und ziehen.
Lagerbedingungen: Trockener, überdachter Lagerort,
maximale Luftfeuchtigkeit 80 %, Temperaturbereich von
-20°C bis +60°C.
Vor jedem Transport des Geräts ist diese Schraube
unbedingt fest anzuschrauben, um Ölaustritt zu
verhindern.
Achten Sie auf einen stehenden Transport.
Fehlersuche
Die Tabelle zeigt mögliche Fehler, deren mögliche
Ursache und Möglichkeiten zur Abhilfe. Sollten Sie das
Problem trotzdem nicht beseitigen können, ziehen Sie eine
Fachkraft zu Rate.
Vor Wartung- oder Reinigungsarbeiten das Gerät
ausschalten und den Netzstecker ziehen.
Gefahr eines elektrischen Schlages.
Symptome Mögliche Ursache Abhilfe
Motor beendet
selbstständig
Spaltvorgang
Spaltgut wird
nicht
gespalten
Überspannungs-
Schutzvorrichtung
wurde ausgelöst
Maschine falsch
bestückt
Spaltgut-Umfang
übersteigt
Motorkapazität
Spaltkeil ist stumpf
Öl tritt aus
Elektrofachkr
aft
Spaltgut
richtig
einlegen,
siehe auch
Bedienung
Spaltgut in
passender
Größe sägen
Spaltkeil
schleifen
Undichte
Stelle
lokalisieren,
Fachkraft
aufsuchen
Druckplatte
vibriert,
erzeugt
Geräusche
Ölmangel und
Luftüberschuss im
Hydraulik-System
Ölstand
prüfen ggf. Öl
nachfüllen,
ansonsten
Fachkraft
kontaktieren
Ölaustritt am
Zylinder oder
an anderen
Stellen
Lufteinschluss im
Hydr.-System während
dem Betrieb
Entlüftungsschraube
vor Transport nicht
angezogen
Entlüftungssc
hraube vor
Gebrauch
einige Umdrehungen
lösen
Entlüftungssc
hraube vor
Transport fest
anziehen
Öl-Abfluss-Schraube
locker
Ölventil und/oder
Dichtungen defekt.
Öl-Abfluss-
Schraube fest
anziehen
Händler
anrufen
Page 8
Introduction
To enjoy your new appliance as long as possible, please
read carefully the Operating Instructions and the attached
safety instructions before using it. Further, we recommend
keeping the Operating Instructions to recall the product
features in the future.
Within the continuous product development, we
reserve the right to make technical changes to
improve it.
This document represents translation of the original
Operating Instructions.
Supply includes
Take the appliance out of the transport package and check
it whether there are the following parts:
1 log splitter
1 original Operating Instructions
Warranty Certificate
Please contact your dealer if any parts are missing or are
damaged.
Appliance description (pic. 1)
1. Oil tank
2. Pressure plate
3. Supporting surface
4. Splitting wedge
5. Maneuvering handle
6. Foot
7. Starter
8. Engine
9. Traversing wheel
10. Hydraulic lever
11. Oil drain screw
12. Air vent screw
Technical specifications
Voltage/frequency: 230V~50Hz
Engine output: 1,500 W/(P1, S6 40%)
Protection class: IP 54
Insulation class: B
Idle speed: 2,950 per min
-1
Max. splitting force: 4 tons
Hydraulic oil amount: 2.4 l/SAE 20/HPL 46
Max. hydraulic pressure: 160 bar
Max. splitting force: 230 mm
Min./max. Ø of wood splitting: 50/250 mm
Min./max. wood splitting length: 250/370 mm
Forward movement speed: 0.04 m per second
Backward movement speed: 0.06 m per second
Assembly dimensions LxWxH: 810x270x460 mm
Weight: 38 kg
General instructions
After unpacking, check all parts for any damage
caused during transport.
Check whether the shipment is complete.
Learn the appliance functions through the Operating
Instructions before using it.
Original accessory equipment and original wearable
and spare parts to be used only.
Appliance to be used with RCD (safety switch
against stray current) 30mA only!
Safety instructions
Follow all safety and warning instructions on the
appliance and keep them readable.
The safety equipment on the appliance must not be
disassembled or put out of operation.
Check the feeder cables. Do not use any defective
feeder cables. See the Plugging section.
Check whether the two-handed operation works
properly before putting the appliance into operation.
The operator must be at least 18 years old. Trained
persons must be at least 16 years of age; however,
they only may work when supervised.
Wear working gloves when operating the appliance.
Be caution when working: Risk of injury to fingers and
hands by the splitter.
Use appropriate supporting aids for splitting heavy or
difficult-to-process pieces of wood.
Any changeover, adjustment, measurement and
cleaning to be performed when the engine is off only.
Unplug the appliance.
Any installation, repair and servicing of the wiring
system may only be performed by professionals.
All protective and safety equipment must be
immediately refitted after finishing any repair and
servicing work.
Switch the engine off after leaving the place of your
work. Unplug the appliance.
Blocking the two-handed operation and/or bypassing
the adjustment parts of the two-handed operation is
inadmissible as a risk of injury when operating
appliance could arise as a result.
Any changes to the appliance exclude the liability of
the producer for any consequential damage.
Use as designated
The hydraulic log splitter may only be used in a horizontal
position. Wood may only be split in a horizontal position
along the fibre. The maximum split wood length is 37 cm.
Any other use will be considered a use in conflict with the
designation. The manufacturer will not be liable for any
consequential damage or injuries. Please be sure to know
that our appliances have not been designed for industrial
purposes.
Assembly
For simple packing, the foot (pic. 1/6) and handle (pic.
1/5) are installed by the customer.
For that purpose, use the 2 enclosed M6X16 hex screws
with a nut for the foot and M6x16 socket-head screws with
a nut for the handle. In doing so, put the appliance
horizontally on the floor and support it with the package
polystyrene on the splitting wedge side.
Before operation
Never split the wood when standing and against the
fibre!
The safety regulations and regulations applicable for
work and servicing issued by the manufacturer and
dimensions mentioned in the technical specifications
must be followed.
Applicable safety regulations and other, generally
recognised safety-technical regulations must also be
followed.
The appliance may only be used, serviced and
repaired by professionals familiarised with and
notified of the risks. Any changes to the appliance
exclude the liability of the manufacturer for any
consequential damage
The appliance may only be used with the original
.
accessory equipment and original tools of the
manufacturer.
Page 9
Any other use will be considered a use in conflict with
the designation. The manufacturer will not be liable
for any consequential damage. The risk is borne by
the user.
Installation
Please make sure the appliance is installed evenly and
steadily on a solid surface with adequate lighting.
Make sure you have enough room to work safely and
undisturbed.
Residual risks
The appliance has been designed according to the state of
the art and recognised safety-technical regulations.
However, there still may be some residual risks when
working with the appliance.
Risk of injury to fingers and hands by the splitter
when wood is guided or supported unprofessionally.
Risk of injury by a thrown-away piece of wood as a
result of unprofessional holding or guiding.
Risk of electric shock when unspecified feeder cables
are used.
Further, there may be some hidden residual risks
despite all the preventive measures taken.
Residual risks can be minimised if Safety
instructions and Use as designated and the entire
Operating Instructions are followed.
Plugging
Check regularly the feeder cables for any damage. Before
that, the appliance must be unplugged!
The feeder cable must be in accordance with applicable
provisions of VDE and DIN. Feeder cable with H 07-RN
marking to be used only. Sticking the type marking on the
feeder cable is mandatory.
Defective feeder cables
Insulation gets often damaged on the electric feeder
cables.
Possible causes:
Sores if feeder cables are guided in gaps under windows
or doors.
Breaks as a result of unprofessional fixing or guiding of
feeder cables.
Cutting-off as a result of the feeder cable being run over.
Insulation damage by pulling the cable out of wall socket.
Cracks as a result of insulation aging.
Feeder cables damaged in this way must not be used
– they are a risk to life due to the insulation damage!
Operation - pic. 3
Before starting your work, the air vent screw (pic. 2/12)
must be necessarily loosened by a few turns to enable air
circulation in the oil tank.
If it is kept tightened when working with the appliance, the
hydraulic movement would cause overpressure.
The screw must necessarily be tightened whenever the
appliance is to be transported to prevent oil leak.
Evenly cut pieces of wood to be split only.
1. Put the split wood flatways and evenly on the
supporting surface (pic. 1/3).
2. The log splitter has been fitted with two-handed
operation – left hand operates the hydraulic lever
(pic. 1/10) and right hand operates the starter (pic.
1/7).
3. Press the hydraulic lever (pic. 1/10) down as
specified and use the starter (pic. 1/7) to active the
splitting process.
If one operated part is released, the appliance stops
immediately. Releasing both operated parts makes the
pressure plate go back. If the appliance is unable to split
another piece of wood in 5 seconds, stop the process at
once. The wood to be split is probably too hard. Turn the
wood to be split by 90° and try once more.
Caution: For operation taking more than
5 seconds there is a risk of appliance overheating or
damage to be more specific. Interrupt the process.
Wrong fitting, pic. 3/A
The split wood to be put to the supporting surface flatways
at all times!
It must not slide down or be put askew. The splitting
wedge gets overloaded if splitting does not take place
along the entire edge but only in its upper part.
Never split more pieces at the same time!
There could be a risk that one of the pieces gets shot out
uncontrolled.
Caution! High risk of injury!
Stuck wood, pic. 3/B/C
Never try to knock the stuck wood out of the appliance.
This could lead to injuries and damage the appliance.
Proceed as follows:
1. Let the pressure plate get to the starting position.
2. Put a wedge under the wood to be split – see picture.
3. Perform one splitting cycle in a way the pressure
plate moves the wedge far under the wood you wish
to release.
4. Repeat the steps above with new wedges until the
wood is pushed up from the appliance.
Page 10
Marking
Product safety:
Product corresponds to
applicable EU standards
Prohibitions:
No pulling the plug!
Protect against rain and
moisture!
Environment protection:
Dispose waste professionally
so as not harm the
environment.
Any defective and/or disposed
electric or electronic devices
must be delivered to
respective collection centres.
Package:
Packing cardboard material
may be delivered to
collecting centres for
recycling.
Appliance to be operated by
one person only
Warning:
Warning/Caution
Warning against thrown-away
Keep bystanders in safe
distance from the appliance (at
Commands:
items
least 5 m)
Read carefully the Operating
Instructions. Learn carefully
how the appliance is used
before using it.
Do not remove the protective
equipment
Warning against dangerous
Warning against hand injury
voltage
Protective gloves to be
used
Protect against moisture This side up
Interseroh-Recycling
Technical specifications:
Connection Weight
IP 54
Engine output Protection type
Revolutions: Splitting force
Split wood diameter Split wood length
Safety shoes to be used
Pull the plug out before
opening.
Face protective shield to be
used
Hydraulic oil tank capacity
Open the air vent screw
Page 11
Warranty
A warranty period of 12 months applies to commercial use
and 24 months apply to private use and commences on
the day of purchase of the device.
Warranty applies exclusively to failures due to defective
material or workmanship. An original sale slip with
indication of date of sale must be presented in case of
claiming for the warranty rights.
Warranty does not cover unprofessional use such as
device overload, violent use, damage caused by third party
or foreign materials, failure to comply with operations and
assembly manual, and normal wear and tear.
Behaviour in case of emergency
Provide necessary first aid treatment corresponding to the
injury nature and seek qualified medical help as soon as
possible.
Protect the injured person from other injuries and calm
him/her down.
In case of accident, first aid kit must always be
available in the place of your work in accordance with
DIN 13164. Material taken out of the first aid kit needs
to be supplemented right away.
Please provide the following details
if help is needed:
1. Place of accident
2. Accident nature
3. Number of injured persons
4. Injury type
Disposal
The disposal instructions are based on icons placed on the
appliance or its package. The description of the meanings
can be found in the “Marking“ section.
Transport package disposal
The package protects the appliance against damage
during transport. Packing materials are usually chosen
depending on their environmental friendliness and disposal
method and can therefore be recycled.
Returning the package to material circulation saves raw
materials and reduces waste disposal costs.
Parts of packages (e.g. foils, styropor®) can be dangerous
to children. Risk of suffocation!
Keep parts of packages away from children and dispose
them as soon as possible.
Operator requirements
The operator must carefully read the Operating
Instructions before using the appliance.
Qualification
No special qualification is necessary for using the
appliance apart from detailed instruction by an expert.
Minimum age
The appliance can only be operated by persons over 18
years of age. An exception includes youngsters operating
the appliance within their professional education to
achieve necessary skills under trainer's supervision.
Training
Using the appliance only requires appropriate instructions
by a professional or reading the Operating Instructions.
No special training necessary.
Maintenance
Do you have any technical questions? A claim? Do you
need spare parts or the Operating Instructions?
You will be helped quickly and without needless
bureaucracy at our webpage www.guede.com in the
Services part. Please help us be able to assist you. To
identify your appliance when claimed, we need to know its
serial No., order No, and year of production. All these
details can be found on the type label. Enter the details
below for future reference.
Serial No.
Order No.
Year of production:
Tel. +49 (0) 79 04 / 700-360
Fax: +49 (0) 79 04 / 700-51999
Email: support@ts.guede.com
The appliance must always be unplugged before any
servicing/cleaning and other works on the appliance. Let
the appliance cool down before any work and transport.
Servicing
Any changeover, adjustment, measurement and cleaning
to be performed when the engine is off only. Unplug the
appliance.
Have any repairs and servicing of the electrical equipment
executed by electricians only.
All protective and safety equipment must be immediately
refitted after any repair or servicing is finished.
Our recommendations:
The splitting knife is a wearable part that must be
The combined two-handed protective equipment
Keep the supporting surface clean.
Lubricate the slide bars with grease.
Hydraulic equipment/oil change
The hydraulic equipment is a closed system with an oil
tank, oil pump and control valve. It must not be changed
or handled with.
At regular intervals, check the connections and screw
connections if tight and tighten them if necessary.
The oil tank has been factory-filled with high-quality
hydraulic oil with ISO 20 viscosity level.
Change the oil after every 150 hours of operation
additionally ground down if necessary.
must run smooth. To be lubricated with a few oil
drops from time to time.
1. The pressure plate is in the starting position. Unplug
the appliance now.
2. Loosen the oil drain screw (pic. 1/11) and put it aside.
3. Put an empty 4-litre bowl next to the appliance and
position it as shown in pic. 4). Wait until all the old oil
gets drained out. Dispose it in an environmentally
friendly manner!
4.
Turn the appliance upside down (pic. 4) to add app.
2.4 l of hydraulic oil (viscosity 20).
5. An oil gauge is fitted in the oil drain screw (pic. 1/11).
Clean it and insert it in the appliance that is still in the
vertical position. Pull it out again – the oil level should
be between both notches.
Page 12
6. Retighten the oil drain screw (pic. 1/11). Then, let the
appliance go idle several times. At regular intervals,
check the oil level and add some if necessary.
Transport
To take the appliance out of the package, at least 2
persons are necessary.
The appliance can be transported in an inclined position
on wheels.
Use the carrying handle – lift the appliance and pull it.
Storage conditions: A dry, roofed storage place, maximum
air humidity of 80%, temperature of -20°C to +60°C.
The screw must necessarily be tightened whenever the
appliance is to be transported to prevent oil leak.
Make sure the appliance is transported in a vertical
position.
Troubleshooting
The table shows possible failures, their causes and
remedy options. If the problem still cannot be removed,
contact a professional to help you.
Switch the appliance off and unplug it before any
servicing and cleaning.
Risk of electric shock.
Symptoms
Engine
automatically
finishing the
splitting cycle
Possible cause Remedy
Protective equipment
against overvoltage
has been activated
Appliance installed
improperly
Split wood length
exceeds the engine
Wood not
being split
capacity
Splitting wedge is blunt
Oil leaking
Lack of oil or excess of
air in the hydraulic
Pressure plate
system
Air in the hydraulic
system during
operation
Oil leaking on
the cylinder or
in any other
place
Bleeder valve not
tightened before
transport
Oil drain screw is
loosen
Defective oil valve
and/or sealing.
Electrician
Fit the split
wood
properly, see
the Operation
section
Cut the split
wood to
appropriate
size
Splitting
wedges
needs to be
ground down
Identify the
untight points
and contact a
professional
Check the oil
level. Add oil
if necessary.
Contact a
professional.
Loosen the
bleeder screw
a few turns
before use
Tighten the
air vent screw
before
transport
Tighten the oil
drain screw
Call the
dealer
Page 13
Introduction
Afin de pouvoir profiter le plus longtemps possible de votre
nouvel appareil, veuillez lire attentivement le mode
d’emploi et les consignes de sécurité jointes. Nous vous
recommandons également de conserver le mode d’emploi
pour une éventuelle consultation ultérieure.
Dans le cadre du développement continu de nos
produits, nous nous réservons le droit aux
modifications techniques dans le but d’améliorer nos
produits. Par conséquent, les images peuvent différer.
Ce document est un mode d’emploi original.
Contenu du colis
Sortez l’appareil de l’emballage de transport et contrôlez
l’intégralité et l’existence des pièces suivantes :
1 fendeuse de bûches
1 mode d’emploi original
Bulletin de garantie
Si certaines pièces manquent ou sont endommagées,
veuillez contacter votre vendeur.
Description de l‘appareil (fig. 1)
1. Réservoir à huile
2. Plaque d‘appui
3. Surface d’appui
4. Coin
5. Poignée de déplacement
6. Pied
7. Démarreur
8. Moteur
9. Roue de translation
10. Levier hydraulique
11. Vis de vidange d’huile
12. Vis de purge
Caractéristiques techniques
Tension/fréquence : 230V~50Hz
Puissance du moteur : 1500 W
/(P1, S6 40%)
Classe de protection : IP 54
Classe d’isolation : B
Tours à vide : 2950 min
-1
Puissance de fendage maxi : 4 tonnes
Quantité d’huile hydraulique : 2,4 l/SAE 20/HPL 46
Pression hydraulique maxi : 160 bars
Levée maxi lors du fendage: 230 mm
Ø du bois à fendre mini/maxi : 50/250 mm
Longueur du bois à fendre mini/maxi : 250/370 mm
Vitesse d’avancement : 0,04 m/s
Vitesse de recul : 0,06 m/s
Dimensions de montage LxLxH : 810x270x460 mm
Poids : 38 kg
Consignes générales
Après le déballage, contrôlez toutes les pièces du
point de vue d’un éventuel endommagement lors du
transport.
Contrôlez si le colis est complet.
Avant d’utiliser la machine, familiarisez-vous avec
son utilisation selon le mode d’emploi.
Utilisez uniquement des accessoires d’origine et des
pièces d’usure et détachées d’origine.
Utilisez la machine uniquement avec RCD
(disjoncteur différentiel) de 30mA.
Consignes de sécurité
Respectez toutes les consignes de sécurité et
d’avertissement figurant sur la machine et maintenezles en état visible.
Il est interdit de démonter ou de mettre hors service
les dispositifs de sécurité de la machine.
Contrôlez les câbles d’alimentation. N’utilisez pas de
câbles d’alimentation défectueux. Voir Branchement
au secteur.
Avant de mettre la machine en marche, contrôlez le
fonctionnement correct de la manipulation à deux
bras.
L’opérateur doit être âgé d’au minimum 18 ans. Les
personnes formées doivent être âgées d’au minimum
16 ans, néanmoins, elles peuvent utilisez la machine
uniquement sous surveillance.
Portez lors du travail des gants de travail.
Attention lors du travail : Risque de blessures des
doigts et des mains par l’outil de fendage.
Lors du fendage de morceaux de bois lourds ou
difficiles, utilisez des accessoires de soutien
adéquats.
Procédez aux modifications, au réglage et au
nettoyage uniquement lorsque le moteur est arrêté.
Retirez la fiche de la prise.
L’installation, les réparations et l’entretien doivent
être réalisés uniquement par des spécialistes.
Tous les dispositifs de protection et de sécurité
doivent être remontés immédiatement après les
réparations ou l’entretien.
Arrêtez le moteur lorsque vous quittez le lieu de
travail. Retirez la fiche de la prise.
Il est strictement interdit de bloquer le service à deux
bras et/ou de contourner les pièces de blocage du
service à deux bras – risque élevé de blessures lors
de la manipulation de la machine.
Toute modification volontaire exclut la garantie du
fabricant pour les dommages consécutifs.
Utilisation en conformité avec la destination
La fendeuse de bûches hydraulique peut être utilisée
uniquement en position couchée. Le bois peut être fendu
couché dans le sens de la fibre. La longueur maximale du
bois à fendre s’élève à 37 cm.
Toute autre utilisation est considérée comme contraire à la
destination. Le fabricant décline toute responsabilité pour
des dommages consécutifs à une telle utilisation. Notez
que nos appareils ne sont pas conçus pour l’utilisation
industrielle.
Montage
Afin d’en faciliter l’emballage, le pied (fig.1/6) et la poignée
(fig. 1/5) seront montés par le client lui-même.
Utilisez pour cela 2 vis à six pans M6x16 avec écrou pour
le pied et les vis hexagonales M6x16 avec écrou pour la
poignée fournis. Posez alors la machine horizontalement
par rapport au sol et calez-la du côté du coin de fendage
avec le polystyrène de l’emballage.
Avant l’utilisation
Ne fendez jamais le bois à la verticale et contre les
fibres !
Il est nécessaire de respecter les règles de sécurité
et les règles de travail et d’entretien éditées par le
fabricant, ainsi que les dimensions indiquées dans
les caractéristiques techniques.
Il est nécessaire de respecter les règles de sécurité
correspondantes et toutes les autres règles de
sécurité et techniques généralement reconnues.
Page 14

La machine peut être utilisée, entretenue et réparée
uniquement par des spécialistes ayant été
familiarisés et informés sur les dangers. Toute
modification volontaire exclut la garantie du fabricant
pour les dommages consécutifs.
La machine peut être utilisée uniquement avec des
accessoires et outils d’origine du fabricant.
Toute autre utilisation est considérée comme
contraire à la destination. Le fabricant décline toute
responsabilité des dommages consécutifs, seul
l’utilisateur en est responsable.
Installation
Veillez à installer votre machine sur une surface droite,
stable, avec un éclairage suffisant.
Veillez à un espace suffisant pour travailler de façon sûre
et sans être dérangé.
Risques résiduels
La machine est conçue selon l’état de l’art et les règles de
sécurité technique reconnues. Néanmoins, des risques
résiduels individuels persistent.
Risque de blessure des doigts et des mains par l’outil
de fendage en cas de guidage ou soutien
incompétent du bois.
Risque de blessure par morceau de bois projeté en
cas de guidage ou soutien incompétent du bois.
Risque d’électrocution en cas d’utilisation de câbles
d’alimentation non réglementaires.
Malgré des mesures de prévention adoptées, des
risques résiduels cachés peuvent exister.
Les risques résiduels peuvent être minimalisés en
respectant les Consignes de sécurité et l’Utilisation
en conformité avec la destination, ainsi que tout le
mode d’emploi.
Branchement au secteur
Contrôlez régulièrement l’état des câbles. Avant cela,
retirez la fiche de la prise. Les câbles d’alimentation
doivent répondre aux dispositions correspondantes VDE et
DIN. Utilisez uniquement des câbles d’alimentation
marqués H 07 RN. Le marquage du type sur le câble
d’alimentation est obligatoire.
Câbles d’alimentation défectueux
L’endommagement le plus fréquent des câbles
d’alimentation électrique concerne l’isolation.
Causes probables :
Marques sur le câble provoquées par son passage dans
les espaces sous les fenêtres ou portes.
Cassures consécutives à une fixation ou un guidage
incompétent des câbles d’alimentation.
Pincement ou coincement des câbles d’alimentation.
Endommagement de l’isolation suite à l’arrachement du
câble de la fiche murale.
Fissures consécutives au vieillissement de l’isolation.
Il est interdit d’utiliser de tels câbles d’alimentation, ils
sont dangereux pour la vie pour cause de l’isolation
endommagée !
Manipulation - fig. 3
Avant de commencer à travailler, desserrez de quelques
tours la vis de purge (fig. 2/12), ceci afin d’assurer la
circulation d’air dans le réservoir d’huile.
Si la vis reste serrée lors du travail, le mouvement
hydraulique entraînera uns surpression.
Avant tout transport de la machine, la vis doit être
resserrée afin d’éviter des fuites d’huile.
Fendez uniquement des morceaux de bois coupés droit.
1. Posez le bois à fendre à plat et droit sur la surface
d’appui (fig. 1/3)
2. La fendeuse de bûches est équipée d’un service à
deux bras – la bras gauche manipule le levier
hydraulique (fig. 1/10), le bras droit le démarreur (fig.
1/7).
3. Abaissez le levier hydraulique (fig. 1/10) de la
manière décrite et activez le fendage à l’aide du
démarreur (fig. 1/7).
Lorsque vous lâchez une partie de commande, la machine
s’arrête immédiatement. Lorsque vous lâchez les deux
parties de commande, la plaque d’appui revient. Lorsque
la machine n’est pas en mesure de fendre un autre
morceau de bois dans les 5 secondes, arrêtez
immédiatement le procédé. Le bois à fendre est
vraisemblablement trop dur. Tournez le bois à fendre de
90° et réessayez.
Attention : Le fonctionnement de la machine plus
de 5 secondes peut engendrer sa surchauffe ou
l’endommager. Interrompez le procédé.
Pose défectueuse, fig. 3/A
Posez toujours le bois à fendre sur la surface d’appui à
plat !
Il ne doit pas glisser ou être posé de travers. Le fendage
seulement avec la partie supérieure du coin et non sur
toute son arête entraînera la surcharge du coin de
fendage.
Ne fendez jamais plusieurs morceaux de bois en même
temps !
Risque de projection non contrôlée de l‘un des tronçons.
Attention ! Grand risque de blessures !
Bois coincé, fig. 3/B/C
N’essayez jamais de sortir le morceau de bois coincé en
tapant dessus. Cela peut engendrer des accidents ou
l’endommagement de la machine.
Procédez comme suit :
1. Laissez la plaque d’appui atteindre la position de
démarrage.
2. Insérez une cale sous le bois à fendre – voir image.
3. Réalisez un cycle de fendage de façon à ce que la
plaque d’appui déplace la cale loin sous le tronçon à
libérer.
4. Répétez les étapes indiquées ci-dessus jusqu’à ce
que le bois sorte de la machine vers le haut.
Page 15
Symboles
Sécurité du produit :
Protection de l’environnement :
Produit répond aux normes
correspondantes de la CE
Interdictions :
Défense de tirer sur la fiche !
La machine doit être
manipulée par une seule
personne
Avertissement :
Avertissement / attention
Avertissement – projection
d’objets
Les personnes situées aux
alentours doivent respecter une
distance de sécurité de la
machine (min. 5m)
Consignes :
Protégez de la pluie et de
l’humidité !
Défense de retirer les
dispositifs de protection
Avertissement – tension
électrique dangereuse
Avertissement – risque de
blessures des mains !
Liquidez les déchets de
manière à ne pas nuire à
l’environnement.
Déposez l’emballage en
carton au dépôt pour
recyclage.
Déposez les appareils
électriques ou électroniques
défectueux et/ou destinés à
liquidation au centre de
ramassage correspondant.
Emballage :
Protégez de l‘humidité Sens de pose
Interseroh-Recycling
Caractéristiques techniques :
Fiche Poids
IP 54
Puissance du moteur Type de protection
Tours Puissance de fendage
Lisez attentivement le mode
d’emploi. Familiarisez-vous
avec l’utilisation de l’appareil.
Portez des chaussures de
sécurité
Avant toute intervention,
retirez la fiche de la prise
Utilisez des gants de
protection
Utilisez un écran de
protection
Diamètre du tronçon Longueur du tronçon
Volume du réservoir d’huile
hydraulique
Ouvrez la vis de purge
Garantie
La durée de la garantie est de 12 mois en cas d’une
utilisation industrielle et de 24 mois pour le consommateur
final. La période de garantie commence à courir à compter
de la date d’achat de l’appareil.
Page 16
La garantie s’applique exclusivement sur les défauts de
matériel ou des défauts de fabrication. En cas de
réclamation pendant la durée de la garantie, veuillez
joindre l’original du justificatif d’achat comportant la date
d’achat.
La garantie ne couvre pas une utilisation incompétente,
telle que surcharge de l’appareil, utilisation de force,
endommagement par une personne étrangère ou un objet
étranger, non respect du mode d’emploi et du mode de
montage et usure normale.
Conduite en cas d’urgence
Effectuez les premiers gestes de secours et appelez
rapidement les premiers secours.
Protégez le blessé d’autres blessures et calmez-le.
Pour des raisons de risque d’accident, le lieu de
travail doit être équipé d’une armoire à pharmacie
selon DIN 13164. Il est nécessaire de compléter
immédiatement le matériel pris dans l’armoire à
pharmacie. Si vous appelez les secours, fournissez les
renseignements suivants :
1. Lieu d‘accident
2. Type d‘accident
3. Nombre de blessés
4. Type de blessure
Liquidation
Les consignes de liquidation résultent des pictogrammes
indiqués sur l’appareil ou sur l’emballage. La description
des significations individuelles se trouve dans le chapitre
« Indications sur l’appareil ».
Liquidation de l’emballage de transport
L’emballage protège l’appareil de l’endommagement lors
du transport. En général, le matériel d’emballage est choisi
de façon à ce qu’il réponde aux règles de protection de
l’environnement et de liquidation des déchets, par
conséquent, il peut être recyclé.
La remise de l’emballage dans le circuit de matières
permet d’économiser des matières premières et de réduire
les déchets.
Des parties de l’emballage (telles que films, styropore)
peuvent être dangereux pour les enfants. Danger
d’étouffement !
Rangez les parties de l’emballage hors de portée des
enfants et liquidez-les le plus rapidement possible.
Exigences à l’égard de l’opérateur
L’opérateur doit lire attentivement la notice avant d’utiliser
l’appareil.
Qualification
Mis à part l’instruction détaillée par un spécialiste, aucune
autre qualification spécifique n’est requise.
Âge minimal
L’appareil peut être utilisé uniquement par des personnes
de plus de 18 ans.
Exception faite des adolescents manipulant l’appareil dans
le cadre de l’enseignement professionnel sous la
surveillance du formateur.
Formation
L’utilisation de l’appareil nécessite uniquement l’instruction
par un spécialiste, éventuellement par la notice. Une
formation spéciale n’est pas nécessaire.
Service
Vous avez des questions techniques ? Une réclamation ? Vous
avez besoin de pièces détachées ou d’un mode d’emploi ?
Nous vous aiderons rapidement et sans bureaucratie inutile par
l’intermédiaire de nos pages Web www.guede.com dans la
rubrique Service. Aidez-nous pour que nous puissions vous aider.
Pour identifier votre appareil en cas de réclamation, nous avons
besoins du numéro de série, numéro de produit et l’année de
fabrication. Toutes ces informations se trouvent sur la plaque
signalétique. Pour avoir ces informations toujours à porté de main,
veuillez les inscrire ici :
Numéro de série :
N° de commande :
Année de fabrication
Tél.: +49 (0) 79 04 / 700-360
Fax: +49 (0) 79 04 / 700-51999
E-mail: support@ts.guede.com
Avant tout entretien/nettoyage de la machine,
débranchez-la toujours du secteur. Laissez la machine
refroidir avant les travaux et le transport.
Entretien
Toute modification, réglage, mesures et nettoyage doivent
être réalisés uniquement avec le moteur arrêté. Retirez la
fiche de la prise.
Confiez les réparations et l’entretien du dispositif
électrique à un électricien.
Tous les dispositifs de protection et de sécurité doivent
être remontés immédiatement après les réparations et
l’entretien.
Recommandations :
Le coin de fendage est une pièce d’usure qui doit être
affûté si nécessaire.
La marche du dispositif de protection combiné à deux
mains doit être facile. Graissez-le occasionnellement
avec quelques gouttes d’huile.
Maintenez la surface d’appui propre.
Graissez la glissière.
Dispositif hydraulique/remplacement d’huile
Le dispositif hydraulique est un système fermé avec un
réservoir d’huile, une pompe à huile et une soupape de
commande. Ils ne doivent être ni remplacés ni manipulés.
Contrôlez l’étanchéité des raccords et boulonnages,
resserrez si nécessaire.
Le réservoir d’huile est rempli à l’usine d’une huile
hydraulique avec degré de viscosité ISO 20.
Changez l’huile toutes les 150 heures de
fonctionnement
1. La plaque d’appui est en position de démarrage. À
présent, débranchez la machine du secteur.
2. Desserrez la vis de vidange d’huile (fig. 1/11) et
mettez-la de côté.
3. Placez à côté de la machine un récipient de 4 litres
vide de façon indiquée sur l’image 4. Attendez que
toute l’huile usée s’écoule. Liquidez-la de façon
écologique !
4. Retournez la machine (fig. 4) pour pouvoir verser
environ 2,4 l d’huile hydraulique (viscosité 20).
5. Une jauge d’huile est intégrée à la vis de vidange
d’huile (fig. 1/11). Nettoyez-la et insérez-la dans la
machine qui se trouve encore en position verticale.
Retirez-la à nouveau, le niveau d’huile doit être situé
entre les deux repères.
6. Resserrez la vis de vidange d’huile (fig. 1/11).
Ensuite, faites fonctionner la machine plusieurs fois à
Page 17

vide. Contrôlez régulièrement le niveau d’huile et
complétez si nécessaire.
Transport
Deux personnes au minimum sont nécessaires pour retirer
la machine de la boîte.
La machine peut être transportée uniquement en position
inclinée sur les roues.
Utilisez la poignée de translation, levez et tirez.
Conditions de stockage : lieu de stockage sec, abrité,
humidité de l’air maximale 80 %, température -20°C à
+60°C.
Avant tout transport de la machine, il est nécessaire de
resserrer la vis afin d’éviter les fuites d’huile.
Veillez à ce que l’appareil soit transporté en position
debout.
Recherche des pannes
Le tableau indique les pannes possibles, leur cause
probable et les possibilités de leur suppression. Si, malgré
cela, vous n’arrivez pas à supprimer le problème,
contactez un spécialiste.
Avant tout entretien et nettoyage, arrêtez la
machine et retirez la fiche de la prise.
Danger d’électrocution.
Symptôme Cause probable Suppression
Le moteur
arrête
automatiquem
ent le cycle de
Le dispositif de
protection contre la
surcharge est activé
Électricien
fendage
Le tronçon
n’est pas
fendu
Tronçon mal placé
La longueur du
tronçon dépasse la
capacité du moteur
Coin émoussé
Fuite d’huile
Placez
correctement
le tronçon,
voir
également
Manipulation
Coupez le
bois aux
dimensions
adéquates.
Affûtez le coin
Localisez les
endroits non
étanches,
contactez un
spécialiste
La plaque
d’appui vibre,
émet des
bruits
inhabituels
Manque d’huile ou
excès d’air dans le
système hydraulique
Contrôlez le
niveau
d’huile,
complétez si
nécessaire,
contactez un
spécialiste
Fuite d’huile
sur le cylindre
ou à d’autres
endroits
Air dans le système
hydraulique pendant le
fonctionnement.
La vis de purge n’a
pas été resserrée
avant le transport
Vis de vidange d’huile
desserrée
Soupape d’huile et/ou
joint défectueux.
Avant
l’utilisation,
desserrez la
vis de purge
de quelques
tours
Resserrez la
vis de purge
avant le
transport
Resserrez la
vis de
vidange
d’huile.
Contactez le
vendeur
Page 18
Úvod
Abyste ze svého nového přístroje měli co možná nejdéle
radost, přečtěte si prosím před uvedením do provozu
pečlivě návod k obsluze a přiložené bezpečnostní pokyny.
Dále doporučujeme, abyste si návod k použití uschovali
pro případ, že byste si později chtěli znovu připomenout
funkce výrobku.
V rámci neustálého dalšího vývoje výrobku si
vyhrazujeme právo provádět technické změny za
účelem vylepšení.
U tohoto dokumentu se jedná o překlad originálního
návodu k obsluze.
Objem dodávky
Přístroj vyjměte z přepravního obalu a zkontrolujte úplnost
a existenci těchto dílů:
1 štípač špalků
1 originální návod k obsluze
Záruční list
Pokud díly v dodávce chybí nebo jsou poškozené, obraťte
se prosím na svého prodejce.
Popis přístroje (obr. 1)
1. Olejová nádrž
2. Přítlačná deska
3. Opěrná plocha
4. Štípací klín
5. Rukojeť na pojíždění
6. Noha
7. Spouštěč
8. Motor
9. Pojízdné kolo
10. Hydraulická páka
11. Šroub pro vypouštění oleje
12. Odvzdušňovací šroub
Technické údaje
Napětí/frekvence: 230V~50Hz
Výkon motoru: 1500 W/(P1, S6 40%)
Třída ochrany: IP 54
Třída izolace: B
Volnoběžné otáčky: 2950 min-1
Max. štípací síla: 4 tuny
Množství hydr. oleje: 2,4 l/SAE 20/HPL 46
Max. hydraulický tlak: 160 bar
Max. zdvih při štípání: 230 mm
Ø štíp. dřeva min./max.: 50/250 mm
Délka štíp. dřeva min./max.: 250/370 mm
Rychlost posuvu vpřed: 0,04 m/s
Rychlost posuvu vzad: 0,06 m/s
Montážní rozměry DxŠxV: 810x270x460 mm
Hmotnost: 38 kg
Všeobecné pokyny
Po vybalení zkontrolujte všechny díly z hlediska
případného poškození při přepravě.
Zkontrolujte, zda je zásilka kompletní.
Před použitím se seznamte s přístrojem podle
návodu k obsluze.
Používejte jen originální příslušenství a originální
opotřebitelné a náhradní díly.
Přístroj používejte jen s
RCD (ochranný vypínač proti chybovému
proudu) 30mA.
Bezpečnostní pokyny
Dodržujte všechny bezpečnostní a výstražné pokyny
na stroji a udržujte je v čitelném stavu.
Bezpečnostní zařízení na stroji nesmí být ani
demontována, ani vyřazena z funkce.
Zkontrolujte přívodní kabely. Nepoužívejte vadné
přívodní kabely. Viz Zapojení do sítě.
Před uvedením do provozu zkontrolujte správnou
funkci obouruční obsluhy.
Obsluha musí mít minimálně 18 let. Školené osoby
musí mít minimálně 16 let, smí však na stroji pracovat
jen pod dohledem.
Při práci noste pracovní rukavice.
Pozor při práci: Nebezpečí úrazu pro prsty a ruce
hrozí ze strany štípacího nástroje.
Ke štípání těžkých nebo těžko zpracovatelných kusů
dřeva používejte vhodné pomůcky k podpírání.
Přestavbu, seřizování, měření a čištění provádějte
jen při vypnutém motoru. Vytáhněte zástrčku ze
zásuvky.
Instalaci, opravu a údržbu elektroinstalace smí
provádět jen odborníci.
Všechna ochranná a bezpečnostní zařízení musí být
po skončení oprav a údržby ihned namontována zpět.
Po odchodu z pracoviště vypněte motor. Vytáhněte
zástrčku ze zásuvky.
Zablokování obouruční obsluhy a/nebo obejití
stavěcích dílů obouruční obsluhy je nepřípustné,
protože v důsledku toho hrozí zvláštní nebezpečí
úrazu při obsluze stroje.
Svévolné změny na stroji vylučují ručení výrobce za
následné škody.
Použití v souladu s určením
Hydraulický štípač špalků lze použít jen v poloze naležato.
Dřevo lze štípat jen naležato po vlákně. Délka štípaného
dřeva činí maximálně 37 cm.
Každé jiné použití je považováno za použití v rozporu s
určením. Za následné škody či úrazy výrobce neručí.
Dbejte prosím na to, že naše přístroje nejsou v souladu s
určením zkonstruovány pro průmyslové použití.
Montáž
Kvůli snadnému balení si nohu (obr.1/6) a rukojeť (obr.
1/5) namontuje samotný zákazník.
K tomu použijte 2 přiložené šestihranné šrouby M6x16 s
maticí pro nohu a imbusové šrouby M6x16 s maticí pro
rukojeť. Přístroj přitom postavte vodorovně na podlahu a
podložte na straně štípacího klínu polystyrénem z obalu.
Před provozem
Dřevo nikdy neštípejte nastojato a proti vláknu!
Musí být dodržovány bezpečnostní předpisy a
předpisy pro práci a údržbu vydané výrobcem, jakož i
rozměry uvedené v technických údajích.
Musí být dodržovány příslušné bezpečnostní
předpisy a ostatní, všeobecně uznávané
bezpečnostně technické předpisy.
Stroj smí používat, udržovat a opravovat jen
odborníci, kteří s ním byli seznámeni a poučeni o
nebezpečích. Svévolné změny na stroji vylučují
ručení
výrobce za následné škody.
Stroj se smí používat jen s originálním příslušenstvím
a originálními nástroji výrobce.
Každé jiné použití je považováno za použití v rozporu
s určením. Za následné škody výrobce neručí, riziko
nese samotný uživatel.
Page 19
Instalace
Dbejte prosím na to, aby byl Váš stroj nainstalován na
pevném podkladu rovně, stabilně a s dostatečným
osvětlením.
Zajistěte si dostatek místa, abyste mohli bezpečně a
nerušeně pracovat.
Zbytková rizika
Stroj je zkonstruován podle stavu techniky a
uznávaných bezpečnostně technických předpisů. Při práci
však mohou přesto vznikat jednotlivá zbytková rizika.
Nebezpečí úrazu pro prsty a ruce hrozí ze strany
štípacího nástroje při neodborném vedení nebo
podpírání dřeva.
Nebezpečí úrazu odmrštěným kusem dřeva při
neodborném držení nebo vedení.
Ohrožení proudem při použití nepředpisových
přívodních kabelů.
Dále mohou i navzdory všem přijatým preventivním
opatřením existovat skrytá zbytková rizika.
Zbytková rizika lze minimalizovat, pokud budete
dodržovat Bezpečnostní pokyny a Použití v
souladu s určením, jakož i celý návod k obsluze.
Zapojení do sítě
Napájecí kabely kontrolujte pravidelně z hlediska
poškození. Předtím vytáhněte zástrčku ze zásuvky!
Napájecí kabely musí odpovídat příslušným ustanovením
VDE a DIN. Používejte jen napájecí kabely s označením H
07-RN. Natištění typového označení na napájecí kabel je
předpis.
Vadné napájecí kabely
Na elektrických přívodních kabelech dochází často k
poškození izolace.
Možné příčiny:
Otlaky, jsou-li napájecí kabely vedeny v mezerách pod
okny nebo dveřmi.
Zlomy v důsledku neodborného připevnění nebo vedení
napájecích kabelů.
Přeříznutí v důsledku přejetí napájecího kabelu.
Poškození izolace vytržením kabelu ze zásuvky na stěně.
Trhliny v důsledku stárnutí izolace.
Takovéto poškozené napájecí kabely se nesmí
používat a jsou kvůli poškození izolace životu
nebezpečné!
Obsluha - obr. 3
Před zahájením práce musíte odvzdušňovací šroub (obr.
2/12) bezpodmínečně povolit o několik otáček, aby byla
zaručena cirkulace vzduchu v olejové nádrži.
Zůstane-li při práci utažený, hydraulický pohyb způsobí
přetlak.
Před každou přepravou přístroje je třeba šroub
bezpodmínečně utáhnout, aby se zabránilo úniku oleje.
Štípejte jen rovně uříznuté kusy dřeva.
1. Štípané dřevo položte naplocho a rovně na opěrnou
plochu (obr. 1/3)
2. Štípač špalků je vybaven pro obouruční obsluhu –
levá ruka obsluhuje hydraulickou páku (obr. 1/10),
pravá spouštěč (obr. 1/7).
3. Hydraulickou páku (obr. 1/10) tlačte popsaným
způsobem dolů a spouštěčem (obr. 1/7) aktivujte
štípání.
Pokud jednu ovládací část pustíte, stroj se ihned zastaví.
Puštění obou ovládacích částí vede k tomu, že přítlačná
deska jede zpět. Pokud není přístroj do 5 sekund schopen
štípat další kus dřeva, proces ihne
d zastavte. Štípané
dřevo je pravděpodobně příliš tvrdé. Štípané dřevo otočte
o 90° a pokuste se ještě jednou.
Pozor: Při provozu delším než
5 sekund hrozí přehřátí resp. poškození přístroje. Přerušte
proces.
Vadné osazení, obr. 3/A
Štípané dřevo pokládejte na opěrnou plochu vždy
naplocho!
Nesmí sklouznout a ani být položeno nakřivo. Štípací klín
se přetíží, pokud nebudete štípat na celém ostří, ale jen v
jeho horní části.
Nikdy neštípejte více kusů najednou!
Hrozí nebezpečí, že se jeden z kusů nekontrolovatelně
vymrští.
Pozor! Velké nebezpečí úrazu!
Zaklíněné dřevo, obr. 3/B/C
Nikdy se nepokoušejte zaklíněné dřevo ze stroje vytloukat.
Může to vést k úrazům a poškození přístroje.
Postupujte takto:
1. Přítlačnou desku nechte najet do startovací pozice.
2. Pod štípané dřevo vložte klín - viz obrázek.
3. Jeden štípací cyklus proveďte tak, aby přítlačná
deska posunula klín daleko pod dřevo, které chcete
uvolnit.
4. Výše uvedené kroky opakujte s novými klíny tak
dlouho, až bude dřevo vysunuto ze stroje nahoru.
Page 20
Označení
Bezpečnost produktu:
Ochrana životního prostředí:
Produkt odpovídá
příslušným normám EU
Zákazy:
Zákaz tahání za zástrčku!
Stroj smí obsluhovat jen
jedna osoba
Výstraha:
Výstraha/Pozor
Výstraha před odmrštěnými
předměty
Chraňte před deštěm a
vlhkostí!
Zákaz odstraňování
ochranného zařízení
Výstraha před
nebezpečným elektrickým
napětím
Výstraha před poraněními
rukou
Odpad zlikvidujte odborně tak,
abyste neškodili životnímu
prostředí.
Obalový materiál z lepenky
lze odevzdat za účelem
recyklace do sběrny.
Vadné a/nebo likvidované
elektrické či elektronické
přístroje musí být odevzdány
do příslušných sběren.
Obal:
Chraňte před vlhkem Obal musí směřovat nahoru
Interseroh-Recycling
Technické údaje:
Přípojka Hmotnost
Udržujte okolostojící osoby v
bezpečné vzdálenosti od stroje
(minimálně 5m)
Příkazy:
Pročtěte si pečlivě návod k
použití. Předem se pečlivě
seznamte s použitím přístroje.
Používejte bezpečnostní obuv
Před otevřením vytáhněte
zástrčku
Používejte ochranné
rukavice
Používejte obličejový
ochranný štít
IP 54
Výkon motoru Typ ochrany
Otáčky Štípací síla
Průměr štípaného dřeva Délka štípaného dřeva
Obsah nádrže hydraulického
oleje
Záruka
Záruční doba činí 12 měsíců při průmyslovém použití, 24
měsíců pro spotřebitele a začíná dnem nákupu přístroje.
Otevřete odvzdušňovací
šroub
Page 21
Záruka se vztahuje výhradně na nedostatky způsobené
vadou materiálu nebo výrobní vadou. Při reklamaci v
záruční době je třeba přiložit originální doklad o koupi s
datem prodeje.
Do záruky nespadá neodborné použití jako např. přetížení
přístroje, použití násilí, poškození cizím zásahem nebo
cizími předměty, nedodržení návodu k použití a montáži a
normální opotřebení.
Chování v případě nouze
Zaveďte úrazu odpovídající potřebnou první pomoc a
vyzvěte co možná nejrychleji kvalifikovanou lékařskou
pomoc.
Chraňte zraněného před dalšími úrazy a uklidněte jej.
Kvůli případné nehodě musí být na pracovišti vždy po
ruce lékárnička první pomoci dle DIN 13164. Materiál,
který si z lékárničky vezmete, je třeba ihned doplnit.
Pokud požadujete pomoc,
uveďte tyto údaje:
1. Místo nehody
2. Druh nehody
3. Počet zraněných
4. Druh zranění
Likvidace
Pokyny pro likvidaci vyplývají z piktogramů umístěných na
přístroji resp. obalu. Popis jednotlivých významů najdete v
kapitole „Označení“.
Likvidace přepravního obalu
Obal chrání přístroj před poškozením při přepravě.
Obalové materiály jsou zvoleny zpravidla podle jejich
šetrnosti vůči životnímu prostředí a způsobu likvidace a lze
je proto recyklovat.
Vrácení obalu do oběhu materiálu šetří suroviny a snižuje
náklady na likvidaci odpadů.
Části obalu (např. fólie, styropor®) mohou být nebezpečné
pro děti. Existuje riziko udušení!
Části obalu uschovejte mimo dosah dětí a co nejrychleji
zlikvidujte.
Požadavky na obsluhu
Obsluha si musí před použitím přístroje pozorně přečíst
návod k obsluze.
Kvalifikace
Kromě podrobného poučení odborníkem není pro
používání přístroje nutná žádná speciální kvalifikace.
Minimální věk
Na přístroji smí pracovat jen osoby, jež dosáhly 18 let.
Výjimku představuje využití mladistvých, pokud se toto
děje během profesního vzdělávání za účelem dosažení
dovednosti pod dohledem školitele.
Školení
Používání přístroje vyžaduje pouze odpovídající poučení
odborníkem resp. návodem k obsluze. Speciální školení
není nutné.
Servis
Máte technické otázky? Reklamaci? Potřebujete
náhradní díly nebo návod k obsluze?
Na naší domovské stránce www.guede.com Vám v
oddílu Servis pomůžeme rychle a nebyrokraticky. Prosím
pomožte nám pomoci Vám. Aby bylo možné Váš přístroj v
případě reklamace identifikovat, potřebujeme sériové číslo,
objednací číslo a rok výroby. Všechny tyto údaje najdete
na typovém štítku. Abyste měli tyto údaje vždy po ruce,
zapište si je prosím dole.
Sériové číslo:
Objednací číslo:
Rok výroby:
Tel.: +49 (0) 79 04 / 700-360
Fax: +49 (0) 79 04 / 700-51999
E-Mail: support@ts.guede.com
Před údržbou/čištěním a ostatními pracemi na
přístroji je třeba tento vždy odpojit ze sítě. Nechte přístroj
před příslušnými pracemi a přepravou vychladnout.
Údržba
Přestavbu, seřizování, měření a čištění provádějte jen při
vypnutém motoru. Vytáhněte zástrčku ze zásuvky.
Opravy a údržbu elektrického zařízení nechte provést jen
elektrikáři.
Veškerá ochranná a bezpečnostní zařízení musí být
po dokončené opravě a údržbě opět ihned namontována
zpět.
Doporučujeme Vám:
Štípací nůž je opotřebitelný díl, který musí být v
případě potřeby dodatečně zbroušen.
Kombinované obouruční ochranné zařízení musí mít
lehký chod. Příležitostně namažte několika kapkami
oleje.
Opěrnou plochu udržujte v čistotě.
Kluznice namažte tukem.
Hydraulické zařízení/výměna oleje
Hydraulické zařízení je uzavřený systém s olejovou nádrží,
olejovým čerpadlem a řídicím ventilem. Nesmí se měnit,
ani se s ním nesmí manipulovat.
Přípojky a šroubení kontrolujte pravidelně z hlediska
těsnosti, v případě potřeby dotáhněte.
Olejová nádrž je ze závodu naplněna kvalitním
hydraulickým olejem se stupněm viskozity ISO 20.
Olej vyměňte každých 150 provozních hodin
1. Přítlačná deska je ve startovací pozici. Stroj nyní
odpojte ze sítě.
2. Povolte šroub pro vypouštění oleje (obr. 1/11) a
položte ho stranou.
3. Vedle přístroje položte prázdnou 4-litrovou misku a
umístěte ji tak, jak je to znázorněno na (obr. 4).
Počkejte, až vyteče všechen starý olej. Ekologicky
zlikvidujte!
4. Stroj otočte vzhůru nohama (obr. 4), abyste mohli
doplnit cca 2,4 l hydraulického oleje (viskozita 20).
5. Ve šroubu pro vypouštění oleje (obr. 1/11) je
zabudována měrka oleje. Očistěte ji a vsuňte do
stroje, který je ještě ve vertikální poloze. Opět ji
vytáhněte, hladina oleje by měla být mezi oběma
zářezy.
6. Šroub pro vypouštění oleje (obr.
1/11) nyní opět
utáhněte. Poté přístroj několikrát pusťte naprázdno.
Pravidelně kontrolujte stav oleje a v případě potřeby
jej doplňte.
Přeprava
K vyjmutí z krabice jsou zapotřebí minimálně
2 osoby.
Stroj lze přepravovat v šikmé poloze na kolech.
Použijte rukojeť na pojíždění, zvedněte a táhněte.
Page 22
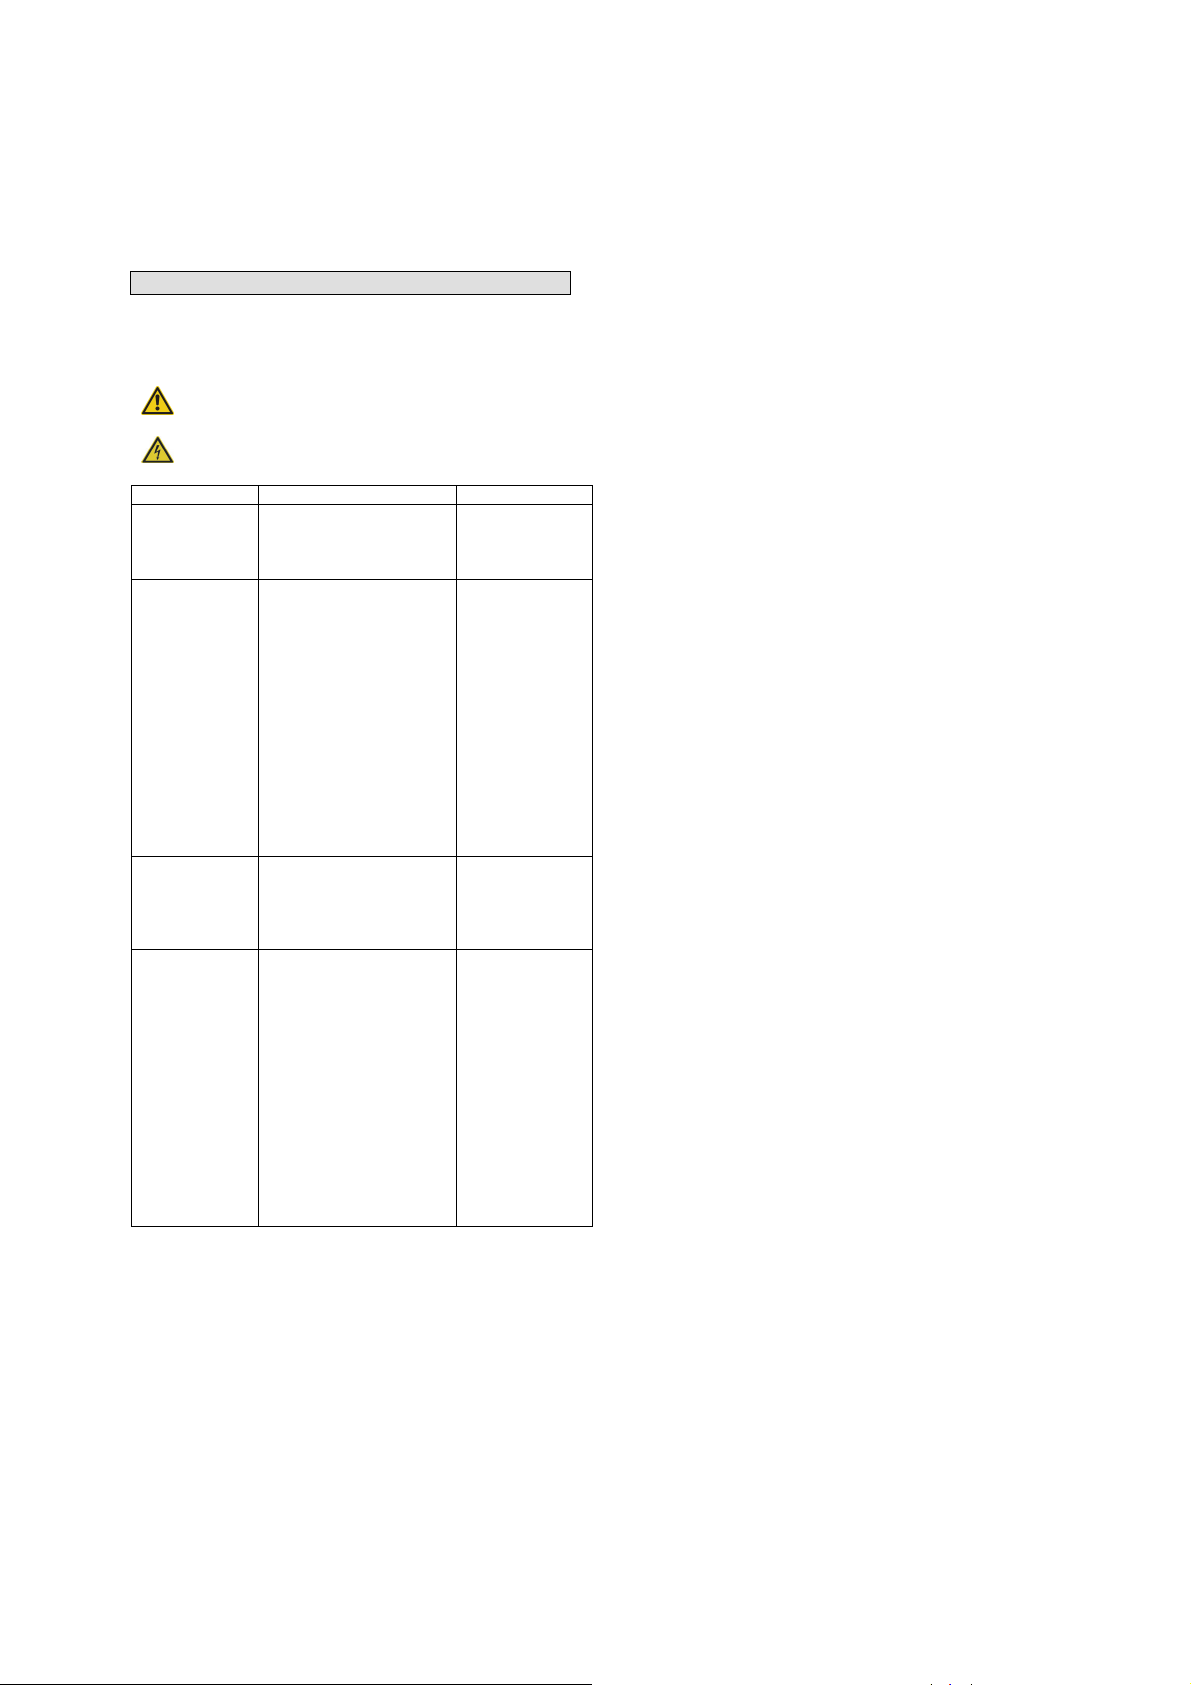
Skladovací podmínky: Suché, zastřešené skladovací
místo,maximální vlhkost vzduchu 80 %, teplota
-20°C až +60°C.
Před každou přepravou přístroje je třeba šroub
bezpodmínečně utáhnout, aby se zabránilo úniku oleje.
Dbejte na to, aby se stroj přepravoval v poloze nastojato.
Vyhledávání poruch
Tabulka ukazuje možné poruchy, jejich možné příčiny a
možnosti jejich odstranění. Pokud problém přesto
nemůžete odstranit, přizvěte odborníka.
Před údržbou a čištěním přístroj vypněte a vytáhněte
zástrčku ze zásuvky.
Nebezpečí úderu elektrickým proudem.
Symptomy Možná příčina Náprava
Motor
automaticky
ukončuje
štípací cyklus
Dřevo není
štípáno
Aktivovalo se
ochranné zařízení proti
přepětí
Stroj je špatně osazen
Délka štípaného dřeva
přesahuje kapacitu
motoru
Štípací klín je tupý
Vytéká olej
Elektrikář
Štípané dřevo
vložte
správně, viz
také Obsluha
Štípané dřevo
nařežte na
vhodnou
velikost
Štípací klín je
třeba zbrousit
Netěsná
místa
lokalizujte,
vyhledejte
odborníka
Přítlačná
deska vibruje,
vydává
neobvyklé
zvuky
Na válci nebo
jiných místech
vytéká olej
Nedostatek oleje nebo
nadbytek vzduchu v
hydraulickém systému
Vzduch v
hydraulickém systému
během provozu
Odvzdušňovací šroub
nebyl před přepravou
utažen
Povolený šroub pro
vypouštění oleje
Vadný olejový ventil
Zkontrolujte
stav oleje, olej
příp. doplňte,
spojte se s
odborníkem
Odvzdušňova
cí šroub před
použitím
povolte o
několik otáček
Odvzdušňova
cí šroub před
přepravou
utáhněte
Šroub pro
vypouštění
oleje utáhněte
Zavolejte
prodejci
a/nebo těsnění.
Page 23

Úvod
Aby ste zo svojho nového prístroja mali čo možno
najdlhšie radosť, prečítajte si, prosím, pred uvedením do
prevádzky pozorne návod na obsluhu a priložené
bezpečnostné pokyny. Ďalej odporúčame, aby ste si návod
na použitie uschovali pre prípad, že by ste si neskôr chceli
znovu pripomenúť funkcie výrobku.
V rámci neustáleho ďalšieho vývoja výrobku si
vyhradzujeme právo vykonávať technické zmeny s
cieľom vylepšenia.
Pri tomto dokumente ide o preklad originálneho
návodu na obsluhu.
Objem dodávky
Prístroj vyberte z prepravného obalu a skontrolujte úplnosť
a existenciu týchto dielov:
1 štiepačka klátov
1 originálny návod na obsluhu
Záručný list
Ak diely v dodávke chýbajú alebo sú poškodené, obráťte
sa, prosím, na svojho predajcu.
Popis prístroja (obr. 1)
1. Olejová nádrž
2. Prítlačná doska
3. Oporná plocha
4. Štiepací klin
5. Rukoväť na posúvanie
6. Noha
7. Spúšťač
8. Motor
9. Pojazdné koleso
10. Hydraulická páka
11. Skrutka na vypúšťanie oleja
12. Odvzdušňovacia skrutka
Technické údaje
Napätie/frekvencia: 230 V ~ 50 Hz
Výkon motora: 1 500 W/(P1, S6 40 %)
Trieda ochrany: IP 54
Trieda izolácie: B)
Voľnobežné otáčky: 2 950 min
-1
Max. štiepacia sila: 4 tony
Množstvo hydr. oleja: 2,4 l/SAE 20/HPL 46
Max. hydraulický tlak: 160 bar
Max. zdvih pri štiepaní: 230 mm
Ø štiep. dreva min./max.: 50/250 mm
Dĺžka štiep. dreva min./max.: 250/370 mm
Rýchlosť posuvu vpred: 0,04 m/s
Rýchlosť posuvu vzad: 0,06 m/s
Montážne rozmery D × Š × V: 810 × 270 × 460 mm
Hmotnosť: 38 kg
Všeobecné pokyny
Po vybalení skontrolujte všetky diely z hľadiska
prípadného poškodenia pri preprave.
Skontrolujte, či je zásielka kompletná.
Pred použitím sa oboznámte s prístrojom podľa
návodu na obsluhu.
Používajte iba originálne príslušenstvo a originálne
opotrebiteľné a náhradné diely.
Prístroj používajte len s RCD (ochranný vypínač
proti chybovému prúdu) 30 mA.
Bezpečnostné pokyny
Dodržujte všetky bezpečnostné a výstražné pokyny
na stroji a udržujte ich v čitateľnom stave.
Bezpečnostné zariadenia na stroji nesmú byť ani
demontované, ani vyradené z funkcie.
Skontrolujte prívodné káble. Nepoužívajte chybné
prívodné káble. Pozrite Zapojenie do siete.
Pred uvedením do prevádzky skontrolujte správnu
funkciu obojručnej obsluhy.
Obsluha musí mať minimálne 18 rokov. Školené
osoby musia mať minimálne 16 rokov, smú však na
stroji pracovať len pod dohľadom.
Pri práci noste pracovné rukavice.
Pozor pri práci: Nebezpečenstvo úrazu pre prsty a
ruky hrozí zo strany štiepacieho nástroja.
Na štiepanie ťažkých alebo ťažko spracovateľných
kusov dreva používajte vhodné pomôcky na
podopieranie.
Prestavbu, nastavovanie, meranie a čistenie
vykonávajte len pri vypnutom motore. Vytiahnite
zástrčku zo zásuvky.
Inštaláciu, opravu a údržbu elektroinštalácie smú
vykonávať len odborníci.
Všetky ochranné a bezpečnostné zariadenia sa
musia po skončení opráv a údržby ihneď namontovať
späť.
Po odchode z pracoviska vypnite motor. Vytiahnite
zástrčku zo zásuvky.
Zablokovanie obojručnej obsluhy a/alebo obídenie
nastavovacích dielov obojručnej obsluhy je
neprípustné, pretože v dôsledku toho hrozí zvláštne
nebezpečenstvo úrazu pri obsluhe stroja.
Svojvoľné zmeny na stroji vy
lučujú ručenie výrobcu
za následné škody.
Použitie v súlade s určením
Hydraulickú štiepačku klátov je možné použiť len v polohe
naležato. Drevo je možné štiepať len naležato po vlákne.
Dĺžka štiepaného dreva je maximálne 37 cm.
Každé iné použitie je považované za použitie v rozpore s
určením. Za následné škody či úrazy výrobca neručí.
Dbajte, prosím, na to, že naše prístroje nie sú v súlade s
určením skonštruované na priemyselné použitie.
Montáž
Kvôli jednoduchému baleniu si nohu (obr. 1/6) a rukoväť
(obr. 1/5) namontuje samotný zákazník.
Na to použite 2 priložené šesťhranné skrutky M6×16 s
maticou pre nohu a inbusové skrutky M6×16 s maticou pre
rukoväť. Prístroj pritom postavte vodorovne na podlahu a
podložte na strane štiepacieho klina polystyrénom z obalu.
Pred prevádzkou
Drevo nikdy neštiepajte nastojato a proti vláknu!
Musia sa dodržiavať bezpečnostné predpisy a
predpisy na prácu a údržbu vydané výrobcom, ako aj
rozmery uvedené v technických údajoch.
Musia sa dodržiavať príslušné bezpečnostné
predpisy a ostatné, všeobecne uznávané
bezpečnostno-technické predpisy.
Stroj smú používať, udržiavať a opravovať len
odborníci, ktorí s ním boli oboznámení a poučení o
nebezpečenstvách. Svojvoľné zmeny na stroji
vylučujú ručenie
výrobcu za následné škody.
Stroj sa smie používať len s originálnym
príslušenstvom a originálnymi nástrojmi výrobcu.
Každé iné použitie je považované za použitie v
rozpore s určením. Za následné škody výrobca
neručí, riziko nesie samotný používateľ.
Page 24

Inštalácia
Dbajte, prosím, na to, aby bol váš stroj nainštalovaný na
pevnom podklade rovno, stabilne a s dostatočným
osvetlením.
Zaistite si dostatok miesta, aby ste mohli bezpečne a
nerušene pracovať.
Zvyškové riziká
Stroj je skonštruovaný podľa stavu techniky a
uznávaných bezpečnostno-technických predpisov. Pri
práci však môžu napriek tomu vznikať jednotlivé zvyškové
riziká.
Nebezpečenstvo úrazu pre prsty a ruky hrozí zo
strany štiepacieho nástroja pri neodbornom vedení
alebo podopieraní dreva.
Nebezpečenstvo úrazu odmršteným kusom dreva pri
neodbornom držaní alebo vedení.
Ohrozenie prúdom pri použití nepredpisových
prívodných káblov.
Ďalej môžu i napriek všetkým prijatým preventívnym
opatreniam existovať skryté zvyškové riziká.
Zvyškové riziká je možné minimalizovať, ak budete
dodržiavať Bezpečnostné pokyny a Použitie v
súlade s určením, ako aj celý návod na obsluhu.
Zapojenie do siete
Napájacie káble kontrolujte pravidelne z hľadiska
poškodenia. Pred tým vytiahnite zástrčku zo zásuvky!
Napájacie káble musia zodpovedať príslušným
ustanoveniam VDE a DIN. Používajte len napájacie káble
s označením H 07-RN. Natlačenie typového označenia na
napájací kábel je predpísané.
Chybné napájacie káble
Na elektrických prívodných kábloch dochádza často k
poškodeniu izolácie.
Možné príčiny:
Otlaky, ak sú napájacie káble vedené v medzerách pod
oknami alebo dverami.
Zlomy v dôsledku neodborného pripevnenia alebo vedenia
napájacích káblov.
Prerezanie v dôsledku prejdenia napájacieho kábla.
Poškodenie izolácie vytrhnutím kábla zo zásuvky na stene.
Trhliny v dôsledku starnutia izolácie.
Takéto poškodené napájacie káble sa nesmú používať a sú
kvôli poškodeniu izolácie životu nebezpečné!
Obsluha – obr. 3
Pred začatím práce musíte odvzdušňovaciu skrutku (obr.
2/12) bezpodmienečne povoliť o niekoľko otáčok, aby bola
zaručená cirkulácia vzduchu v olejovej nádrži.
Ak zostane pri práci utiahnutá, hydraulický pohyb spôsobí
pretlak.
Pred každou prepravou prístroja je potrebné skrutku
bezpodmienečne utiahnuť, aby sa zabránilo úniku oleja.
Štiepajte len rovno odrezané kusy dreva.
1. Štiepané drevo položte naplocho a rovno na opornú
plochu (obr. 1/3)
2. Štiepačka klátov je vybavená na obojručnú obsluhu –
ľavá ruka obsluhuje hydraulickú páku (obr. 1/10),
pravá spúšťač (obr. 1/7).
3. Hydraulickú páku (obr. 1/10) tlačte opísaným
spôsobom dole a spúšťačom (obr. 1/7) aktivujte
štiepanie.
Ak jednu ovládaciu časť pustíte, stroj sa ihneď zastaví.
Pustenie oboch ovládacích častí vedie k tomu, že prítlačná
doska ide späť. Ak nie je prístroj do 5 sekúnd schopný
štiepať ďalší kus dreva, proces ihneď zastavte. Štiepané
drevo je pravdepodobne príliš tvrdé. Štiepané drevo otočte
o 90° a pokúste sa ešte raz.
Pozor: Pri prevádzke dlhšej než
5 sekúnd hrozí prehriatie, resp. poškodenie prístroja.
Prerušte proces.
Chybné osadenie, obr. 3/A
Štiepané drevo ukladajte na opornú plochu vždy naplocho!
Nesmie skĺznuť a ani byť položené nakrivo. Štiepací klin
sa preťaží, ak nebudete štiepať na celom ostrí, ale len v
jeho hornej časti.
Nikdy neštiepajte viac kusov naraz!
Hrozí nebezpečenstvo, že sa jeden z kusov
nekontrolovateľne vymrští.
Pozor! Veľké nebezpečenstvo úrazu!
Zaklinené drevo, obr. 3/B/C
Nikdy sa nepokúšajte zaklinené drevo zo stroja vytĺkať.
Môže to viesť k úrazom a poškodeniu prístroja.
Postupujte takto:
1. Prítlačnú dosku nechajte prejsť do štartovacej
pozície.
2. Pod štiepané drevo vložte klin – pozrite obrázok.
3. Jeden štiepací cyklus vykonajte tak, aby prítlačná
doska posunula klin ďaleko pod drevo, ktoré chcete
uvoľniť.
4. Vyššie uvedené kroky opakujte s novými klinmi tak
dlho, až bude drevo vysunuté zo stroja nahor.
Označenie
Bezpečnosť produktu:
Produkt zodpovedá
príslušným normám EÚ
Zákazy:
Zákaz ťahania za zástrčku!
Stroj smie obsluhovať len
jedna osoba
Výstraha:
Výstraha/Pozor
Výstraha pred odmrštenými
predmetmi
Chráňte pred dažďom a
Zákaz odstraňovania
ochranného zariadenia
nebezpečným elektrickým
Výstraha pred poraneniami
vlhkosťou!
Výstraha pred
napätím
rúk
Page 25

Udržujte okolostojace osoby v
bezpečnej vzdialenosti od
stroja (minimálne 5 m)
Príkazy:
Prečítajte si pozorne návod na
použitie. Vopred sa dôkladne
oboznámte s použitím
Používajte ochranné
rukavice
prístroja.
Používajte bezpečnostnú obuv
Používajte tvárový
ochranný štít
Pred otvorením vytiahnite
zástrčku
Ochrana životného prostredia:
Odpad zlikvidujte odborne tak,
aby ste neškodili životnému
prostrediu.
Obalový materiál z lepenky
je možné odovzdať s
cieľom recyklácie do
zberne.
Chybné a/alebo likvidované
elektrické či elektronické
prístroje sa musia odovzdať do
príslušných zberní.
Obal:
Chráňte pred vlhkom Obal musí smerovať hore
Interseroh-Recycling
Technické údaje:
Prípojka Hmotnosť
IP 54
Výkon motora Typ ochrany
Otáčky Štiepacia sila
Priemer štiepaného dreva Dĺžka štiepaného dreva
Obsah nádrže hydraulického
oleja
Otvorte odvzdušňovaciu
skrutku
Záruka
Záručná lehota je 12 mesiacov pri priemyselnom použití,
24 mesiacov pre spotrebiteľa a začína dňom nákupu
prístroja.
Záruka sa vzťahuje výhradne na nedostatky spôsobené
chybou materiálu alebo výrobnou chybou. Pri reklamácii v
záručnej lehote je potrebné priložiť originálny doklad o
kúpe s dátumom predaja.
Do záruky nepatrí neodborné použitie, ako napr.
preťaženie prístroja, použitie násilia, poškodenie cudzím
zásahom alebo cudzími predmetmi, nedodržanie návodu
na použitie a montáž a normálne opotrebenie.
Správanie v prípade núdze
Zaveďte úrazu zodpovedajúcu potrebnú prvú pomoc a
vyzvite čo možno najrýchlejšie kvalifikovanú lekársku
pomoc.
Chráňte zraneného pred ďalšími úrazmi a upokojte ho.
Pre prípadnú nehodu musí byť na pracovisku vždy
poruke lekárnička prvej pomoci podľa DIN 13164.
Materiál, ktorý si z lekárničky vezmete, je potrebné
ihneď doplniť.
Ak požadujete pomoc, uveďte tieto údaje:
1. Miesto nehody
2. Druh nehody
3. Počet zranených
4. Druh zranenia
Likvidácia
Pokyny na likvidáciu vyplývajú z piktogramov
umiestnených na prístroji, resp. obale. Popis jednotlivých
významov nájdete v kapitole „Označenia“.
Likvidácia prepravného obalu
Obal chráni prístroj pred poškodením pri preprave.
Obalové materiály sú zvolené spravidla podľa ich šetrnosti
voči životnému prostrediu a spôsobu likvidácie a je možné
ich preto recyklovať.
Vrátenie obalu do obehu materiálu šetrí suroviny a znižuje
náklady na likvidáciu odpadov.
Časti obalu (napr. fólia, styropor®) môžu byť nebezpečné
pre deti. Existuje riziko udusenia!
Časti obalu uschovajte mimo dosahu detí a čo
najrýchlejšie zlikvidujte.
Požiadavky na obsluhu
Obsluha si musí pred použitím prístroja pozorne prečítať
návod na obsluhu.
Page 26

Kvalifikácia
Okrem podrobného poučenia odborníkom nie je na
používanie prístroja nutná žiadna špeciálna kvalifikácia.
Minimálny vek
Na prístroji smú pracovať len osoby, ktoré dosiahli 18
rokov. Výnimku predstavuje využitie mladistvých, ak sa to
deje počas profesijného vzdelávania s cieľom dosiahnutia
zručností pod dohľadom školiteľa.
Školenie
Používanie prístroja vyžaduje iba zodpovedajúce poučenie
odborníkom, resp. návodom na obsluhu. Špeciálne
školenie nie je nutné.
Servis
Máte technické otázky? Reklamáciu? Potrebujete
náhradné diely alebo návod na obsluhu?
Na našej domovskej stránke www.guede.com vám v
oddiele Servis pomôžeme rýchlo a nebyrokraticky.
Pomôžte nám, prosím, aby sme mohli pomôcť vám. Aby
bolo možné váš prístroj v prípade reklamácie identifikovať,
potrebujeme sériové číslo, objednávacie číslo a rok
výroby. Všetky tieto údaje nájdete na typovom štítku. Aby
ste mali tieto údaje vždy poruke, zapíšte si ich, prosím,
dole.
Sériové číslo:
Objednávacie číslo:
Rok výroby:
Tel.: +49 (0) 79 04 / 700-360
Fax: +49 (0) 79 04 / 700-51999
E-mail: support@ts.guede.com
Pred údržbou/čistením a ostatnými prácami na
prístroji je potrebné ho vždy odpojiť od siete. Nechajte
prístroj pred príslušnými prácami a prepravou vychladnúť.
Údržba
Prestavbu, nastavovanie, meranie a čistenie vykonávajte
len pri vypnutom motore. Vytiahnite zástrčku zo zásuvky.
Opravy a údržbu elektrického zariadenia nechajte vykonať
len elektrikárovi.
Všetky ochranné a bezpečnostné zariadenia sa musia
po dokončenej oprave a údržbe opäť ihneď namontovať
späť.
Odporúčame vám:
Štiepací nôž je opotrebiteľný diel, ktorý musí byť v
prípade potreby dodatočne zbrúsený.
Kombinované obojručné ochranné zariadenie musí
mať ľahký chod. Príležitostne namažte niekoľkými
kvapkami oleja.
Opornú plochu udržujte v čistote.
Klznice namažte tukom.
Hydraulické zariadenie/výmena oleja
Hydraulické zariadenie je uzatvorený systém s olejovou
nádržou, olejovým čerpadlom a riadiacim ventilom. Nesmie
sa meniť,
ani sa s ním nesmie manipulovať.
Prípojky a skrutkové spoje kontrolujte pravidelne z
hľadiska tesnosti, v prípade potreby dotiahnite.
Olejová nádrž je zo závodu naplnená kvalitným
hydraulickým olejom so stupňom viskozity ISO 20.
Olej vymeňte každých 150 prevádzkových hodín
1. Prítlačná doska je v štartovacej pozícii. Stroj teraz
odpojte od siete.
2. Povoľte skrutku na vypúšťanie oleja (obr. 1/11) a
položte ho bokom.
3. Vedľa prístroja položte prázdnu 4-litrovú misku a
umiestnite ju tak, ako je to znázornené na (obr. 4).
Počkajte, až vytečie všetok starý olej. Ekologicky
zlikvidujte!
4. Stroj otočte hore nohami (obr. 4), aby ste mohli
doplniť cca 2,4 l hydraulického oleja (viskozita 20).
5. V skrutke na vypúšťanie oleja (obr. 1/11) je
zabudovaná mierka oleja. Očistite ju a vsuňte do
stroja, ktorý je ešte vo vertikálnej polohe. Opäť ju
vytiahnite, hladina oleja by mala byť medzi oboma
zárezmi.
6. Skrutku na vypúšťanie oleja (obr. 1/11) teraz opäť
utiahnite. Potom prístroj niekoľkokrát pustite
naprázdno. Pravidelne kontrolujte stav oleja a v
prípade potreby ho doplňte.
Preprava
Na vybratie zo škatule sú potrebné minimálne
2 osoby.
Stroj je možné prepravovať v šikmej polohe na kolesách.
Použite rukoväť na pohyb, zdvihnite a ťahajte.
Skladovacie podmienky: Suché, zastrešené skladovacie
miesto, maximálna vlhkosť vzduchu 80 %, teplota
-20 °C až +60 °C.
Pred každou prepravou prístroja je potrebné skrutku
bezpodmienečne utiahnuť, aby sa zabránilo úniku oleja.
Dbajte na to, aby sa stroj prepravoval v polohe nastojato.
Page 27

Vyhľadávanie porúch
Tabuľka ukazuje možné poruchy, ich možné príčiny a
možnosti ich odstránenia. Ak problém napriek tomu
nemôžete odstrániť, prizvite odborníka.
Pred údržbou a čistením prístroj vypnite a vytiahnite
zástrčku zo zásuvky.
Nebezpečenstvo úrazu elektrickým prúdom.
Symptómy Možná príčina Náprava
Motor
automaticky
ukončuje
štiepací
Aktivovalo sa
ochranné zariadenie
proti prepätiu
Elektrikár
cyklus
Drevo nie je
štiepané
Stroj je zle osadený
Dĺžka štiepaného
dreva presahuje
kapacitu motora
Štiepací klin je tupý
Vyteká olej
Štiepané
drevo vložte
správne,
pozrite tiež
Obsluha
Štiepané
drevo narežte
na vhodnú
veľkosť
Štiepací klin
je potrebné
nabrúsiť
Netesné
miesta
lokalizujte,
vyhľadajte
odborníka
Prítlačná
doska vibruje,
vydáva
neobvyklé
zvuky
Na valci alebo
iných
miestach
vyteká olej
Nedostatok oleja alebo
nadbytok vzduchu v
hydraulickom systéme
Vzduch v
hydraulickom systéme
počas prevádzky
Odvzdušňovacia
skrutka nebola pred
prepravou utiahnutá
Povolená skrutka na
vypúšťanie oleja
Chybný olejový ventil
a/alebo tesnenie.
Skontrolujte
stav oleja, olej
príp. doplňte,
spojte sa s
odborníkom
Odvzdušňova
ciu skrutku
pred použitím
povoľte o
niekoľko
otáčok
Odvzdušňova
ciu skrutku
pred
prepravou
utiahnite
Skrutku na
vypúšťanie
oleja utiahnite
Zavolajte
predajcovi
Page 28

Inleiding
Om van uw nieuwe apparaat zo lang mogelijk plezier te
hebben, bevelen wij u aan de gebruiksaanwijzing en de
bijgesloten veiligheidsinstructies voor het in bedrijf stellen
zorgvuldig te lezen. Verder wordt aanbevolen de
gebruiksaanwijzing te bewaren voor het geval dat de
functies van het apparaat later nogmaals in het geheugen
ververst moeten worden.
In het kader van een continue productontwikkeling
behouden wij ons het recht voor technische
wijzigingen aan te brengen.
Dit document betreft de originele gebruiksaanwijzing.
Levering
Neem het apparaat uit de transportverpakking en
controleer de volledigheid en de aanwezigheid van de
volgende onderdelen:
1 houtsplijter
1 originele gebruiksaanwijzing
Garantiekaart
Indien onderdelen uit de levering beschadigd zijn, neem
contact met uw handelaar.
Beschrijving van het apparaat (afb. 1)
1. Olietank
2. Drukplaat
3. Oplegvlak
4. Splijtwig
5. Transportgreep
6. Voet
7. Schakelknop
8. Motor
9. Transportwiel
10. Hydraulische hendel
11. Olieaftapplug
12. Ontluchtingsschroef
Technische gegevens
Aansluiting/Frequentie: 230 V~50 Hz
Motorvermogen: 1500 W/(P1, S6 40%)
Beveiligingsklasse: IP 54
Isolatieklasse: B
Onbelast toerental: 2950 min-1
Max. splijtdruk: 4 ton
Hoeveelheid hydr. olie: 2,4 l/SAE 20/HPL 46
Max. hydraulische druk: 160 bar
Max. splijtslag: 230 mm
Splijtgoed-Ø min./max.: 50/250 mm
Splijtgoedlengte min./max.: 250/370 mm
Voorloopsnelheid: 0,04 m/s
Terugloopsnelheid: 0,06 m/s
Buitenafmetingen (LxBxH): 810x270x460 mm
Gewicht: 38 kg
Algemene aanwijzingen
Controleer na het uitpakken alle onderdelen op
eventuele transportschade.
Controleer de zending op zijn volledigheid.
Maakt u zich vóór het gebruik, op basis van de
gebruiksaanwijzing, met het apparaat vertrouwd.
Gebruik als accessoires, evenals voor versleten- en
reserveonderdelen, uitsluitend originele onderdelen.
Gebruik de machine uitsluitend met een RCD
(veiligheidsschakelaar voor foutstroom) 30 mA.
Veiligheidsinstructies
Alle veiligheids- en gevaarinstructies van de machine
opvolgen en in leesbare toestand houden.
De veiligheidsonderdelen aan de machine mogen niet
gedemonteerd of onbruikbaar gemaakt worden.
Aansluitsnoeren controleren. Geen defecte snoeren
gebruiken. Zie elektrische aansluiting.
Voor inbedrijfstelling de correcte functie van de
tweehandbediening controleren.
De bedienende persoon moet tenminste 18 jaar oud
zijn. De op te leiden personen moeten tenminste 18
jaar oud zijn; zij mogen uitsluitend onder toezicht met
de machine werken.
Tijdens werkzaamheden werkhandschoenen dragen.
Voorzichtig bij werkzaamheden: letselgevaar voor
vingers en handen door het splijtwerktuig.
Voor het splijten van zware of onhandige delen een
geschikt hulpmiddel als steun gebruiken.
Ombouw-, instel-, meet- en
reinigingswerkzaamheden slechts bij uitgeschakelde
motor uitvoeren. Netstekker uitnemen.
Installaties, reparaties en
onderhoudswerkzaamheden aan de elektrische
installatie mogen enkel door vakmensen uitgevoerd
worden.
Alle bescherming- en veiligheidsinrichtingen moeten
na voltooide reparatie of onderhoudswerkzaamheden
onmiddellijk weer gemonteerd worden.
Bij het verlaten van de werkplek moet de motor
uitgeschakeld zijn. Netstekker uitnemen.
Het blokkeren van de tweehandschakeling als ook
het omzeilen van de instelonderdelen voor de
tweehandschakeling is niet toegestaan omdat
hierdoor bijzondere letselgevaren bij de bediening
van de machine dreigen.
Wijzigingen aan het apparaat sluiten een
verantwoordelijkheid van de producent voor hieruit
resulterende schades uit.
Gebruik volgens de bepalingen
De hydraulische houtsplijter is uitsluitend voor liggend
gebruik inzetbaar. Houtstukken mogen slechts liggend in
de nerfrichting gespleten worden. De afmeting van de te
splijten houtstukken bedraagt maximaal 37 cm.
Ieder ander gebruik geldt als niet volgens deze
gebruiksregels. De producent is voor de eventuele hieruit
ontstane schades niet aansprakelijk. Let er op dat onze
apparaten niet voor industrieel gebruik zijn bestemd.
Montage
Om verpakkingsredenen moeten de voet (afb.1/6) en de
handgreep (afb. 1/5) bij de gebruiker gemonteerd worden.
Gebruik hiervoor de bijgesloten 2 stuks zeskantschroeven
M6x16 met moer voor de voet en de inbusbouten M6x16
met moer voor de handgreep. Plaats het apparaat
horizontaal op de grond en onderleg deze aan de kant van
de splijtwig met het styropor kussen van de verpakking
Vóór de werkzaamheden
Hout nooit liggend of tegen de nerfrichting splijten!
De veiligheids-, werk- en onderhoudsvoorschriften
van de producent evenals de in de “Technische
gegevens” aangegeven afmetingen moeten
nagekomen worden.
De desbetreffende voorschriften ter voorkoming van
ongevallen en andere, algemeen erkende
veiligheidstechnische regels, moeten opgevolgd
worden.
De machine mag slechts door vakkundige personen
gebruikt, onderhouden of gerepareerd worden die
daarmee vertrouwd zijn en over de gevaren op de
Page 29

hoogte zijn gebracht. Wijzigingen aan het apparaat
sluiten een verantwoordelijkheid van de producent
voor hieruit resulterende schades uit.
De machine mag slechts met originele onderdelen en
originele werktuigen van de producent gebruikt
worden.
Ieder ander gebruik geldt als niet volgens deze
gebruiksregels. Voor daaruit ontstane schades is de
producent niet verantwoordelijk; het risico ligt geheel
bij de gebruiker.
Opstellen
Let er op dat uw machine op een vaste ondergrond recht,
stabiel en met voldoende verlichting is opgesteld.
Zorg voor voldoende plaats om veilig en storingsvrij te
kunnen werken.
Restrisico’s
De machine is naar de huidige stand van de techniek en
de erkende veiligheidstechnische regels gebouwd. Toch
kunnen bij werkzaamheden enkele restrisico’s optreden.
Letselgevaar voor vingers en handen door het
splijtwerktuig bij een verkeerde bediening of
ondersteuning van het hout.
Letselgevaar door een weggeslingerd houtstuk bij
een verkeerde houder of geleiding.
Gevaar door stroom bij gebruik van onjuiste
elektrische aansluitingen.
Verder kunnen ondanks alle genomen
voorzorgmaatregelen niet zichtbare restrisico’s
bestaan.
Restrisico’s kunnen geminimaliseerd worden, als de
Veiligheidsinstructies en het Gebruik volgens
voorschriften, evenals de gebruiksaanwijzing
worden opgevolgd.
Elektrische aansluiting
Elektrische aansluitkabels regelmatig op schade
controleren. Eerst netstekker uitnemen!
Elektrische aansluitkabels dienen in overeenstemming met
de gebruikte VDE-en DIN bepalingen te zijn. Gebruik enkel
aansluitkabels met het kenmerk H 07 RN. Een afdruk van
de typeaanduiding op de aansluitkabel is verplicht.
Beschadigde elektrische aansluitingen
Aan elektrische aansluitkabels ontstaan vaak
isolatieschaden.
Mogelijke oorzaken:
Drukplaatsen, indien aansluitkabels door een kier van een
venster of een deur worden geleid.
Knikplaatsen door onjuiste bevestiging of leiden van de
aansluitkabel.
Inkervingen door het overrijden van de aansluitkabel.
Isolatieschaden door uittrekken uit het stopcontact.
Scheuren door het ouder worden van de isolatie.
Dergelijk beschadigde elektrische aansluitingen
mogen niet gebruikt worden en zijn door
isolatieschade levensgevaarlijk!
Bediening (afb. 3)
Voor het aanvangen van de werkzaamheden dient de
ontluchtingsschroef (afb. 2/12) beslist met enige
omwentelingen gelost te worden, zodat een luchtcirculatie
in de olietank wordt verkregen.
Indien de schroef tijdens werkzaamheden aangedraaid
blijft, leiden de hydraulische bewegingen tot een overdruk.
Voor ieder transport van het apparaat moet deze schroef
beslist weer vast aangedraaid worden om olielekkage te
verhinderen.
Alleen recht afgezaagde houtstukken splijten.
1. Leg het splijtgoed vlak en recht op het oplegvlak (afb.
1/3).
2. De houtsplijter is voor tweehandbediening uitgerust –
de linker hand bedient de hydraulische hendel (afb.
1/10), de rechter hand de schakelknop (afb. 1/7).
3. Druk de hydraulische hendel (afb. 1/10) op de
beschreven wijze naar beneden en start het
splijtproces door bediening van de schakelknop (afb.
1/7).
Het loslaten van een van de bedieningsdelen leidt tot een
directe stop van de machine. Door loslaten van beide
bedieningsdelen trekt de drukplaat zich terug. Indien het
apparaat binnen 5 seconden niet in staat is een stuk
splijtgoed te splijten, stop het proces onmiddellijk. Het
splijtgoed is waarschijnlijk te hard voor de capaciteit. Draai
het splijtgoed 90° en probeer het opnieuw te splijten.
Let op: Bij blijvend bedrijf van meer dan 5 seconden
dreigt oververhitting en/of beschadiging van het apparaat.
Onderbreek het splijtproces.
Foutieve plaatsing (afb. 3/A)
Plaats het splijtgoed altijd vlak op het oplegvlak!
Het mag niet wegglijden of schuin geplaatst worden. De
splijtwig wordt te veel belast (overbelast), als een
splijtproces niet op de gehele snede maar slechts in het
bovenste deel plaatsvindt.
Splijt nooit meerdere werkstukken tegelijk!
Er bestaat het gevaar dat een van de delen
oncontroleerbare bewegingen maakt.
Let op! Hoog letselgevaar!
Vastgeraakt splijtgoed (afb. 3/B/C)
Probeer nooit vastgeraakt splijtgoed uit de machine met
kloppen te verwijderen. Dit kan tot ongevallen of schaden
aan het apparaat leiden.
Ga als volgt te werk:
1. Laat de drukplaat in de startpositie terug glijden.
2. Leg een wig onder het splijtgoed zoals in de
afbeelding aangegeven.
3. Begin een splijtproces zodanig dat door de drukplaat
de wig ver onder het te verwijderen splijtgoed schuift.
4. Herhaal de boven omschreven stappen zo lang tot
het splijtgoed naar boven uit de machine wordt
geschoven.
Page 30

Aanduidingen
Productveiligheid:
Het product is conform de
desbetreffende normen van
de Europese Gemeenschap
Verboden:
Aan de netkabel trekken is
verboden!
Tegen regen en vocht
beschermen!
Milieubescherming:
Afval niet in het milieu maar
vakkundig verwijderen
Beschadigde en/of te
verwijderen elektrische of
elektronische apparaten bij de
daarvoor bestemde
recyclingplaatsen inleveren
Verpakking:
verpakkingsmateriaal bij de
Kartonnen
daarvoor bestemde
recyclingplaatsen inleveren
De machine mag slechts
door één persoon bediend
Waarschuwing:
Waarschuwing/Let op
Waarschuwing voor
weggeslingerde delen
Houd in de omgeving staande
personen op een veilige
afstand van de machine
(minimaal 5 m)
Aanwijzingen:
Lees deze gebruiksaanwijzing
zorgvuldig door. Maakt u zich
met het gebruik van de
machine vertrouwd
worden
Verboden de
veiligheidsinrichting te
verwijderen
Waarschuwing voor
gevaarlijke elektrische
spanning
Waarschuwing voor
handletsels
Beschermende
handschoenen gebruiken
Tegen vocht beschermen
Interseroh-Recycling
Technische gegevens:
Aansluiting Gewicht
Motorvermogen Beveiligingsaard
Toerental Splijtdruk
Diameter splijtmateriaal Lengte splijtmateriaal
Verpakkingsoriëntering -
boven
IP 54
Veiligheidsschoenen
gebruiken
Voor openen stekker uitnemen
Beschermschild voor
gezicht dragen
Tankinhoud hydraulische olie
Garantie
De garantieperiode is 12 maanden bij commercieel gebruik
en 24 maanden voor eindgebruikers en begint met de
datum van aankoop van het apparaat.
Ontluchtingsschroef
openen
Page 31

De garantie heeft uitsluitend betrekking op
onvolkomenheden die op materiaal- en/of productiefouten
zijn terug te voeren. Bij een claim betreffende een
onvolkomenheid, in de zin van garantie, dient de
aankoopfactuur - die de verkoopdatum bewijst - met de
aankoopdatum bijgesloten te worden.
Uitgesloten van garantie zijn verkeerd gebruik, zoals bijv.
overbelasting van het apparaat, gebruik van geweld,
beschadigingen door vreemde invloeden of vreemde
voorwerpen evenals het niet naleven van gebruiks- en
montageaanwijzingen en normale slijtage.
Handelswijze in noodgeval
Tref de noodzakelijke maatregelen om eerste hulp te
verlenen, die met het letsel overeenkomt en vraag zo snel
mogelijk gekwalificeerde medische hulp aan.
Bescherm gewonde personen voor overig letsel en stel ze
gerust.
Voor het eventueel plaatsvinden van een ongeval zou
altijd een verbandtrommel, volgens DIN 13164, in de
werkplaats beschikbaar moeten zijn. Het uit de
verbandtrommel genomen materiaal dient direct weer
aangevuld te worden.
Indien u hulp vraagt, geef dan de volgende gegevens
door:
1. Plaats van het ongeval
2. Soort van het ongeval
3. Aantal gewonde mensen
4. Soort verwondingen
Verwijdering
De verwijderinginstructies zijn met pictogrammen
aangegeven die op de machine, resp. op de verpakking, te
vinden zijn. Een beschrijving van de afzonderlijke
betekenissen is in het hoofdstuk “Aanduiding” te vinden.
Verwijdering van de transportverpakking
De verpakking beschermt de machine tegen
transportschades. De verpakkingsmaterialen zijn meestal
volgens milieuvriendelijke en verwijderingtechnische
standpunten gekozen en derhalve recyclebaar.
Het retour brengen van de verpakking in de
materiaalomloop spaart grondstoffen en verlaagt de
afvalhoeveelheden.
Verpakkingsdelen (bijv. folies, styropor) kunnen voor
kinderen gevaarlijk zijn. Er bestaat verstikkingsgevaar!
Bewaar de verpakking buiten het bereik van kinderen en
verwijder deze zo snel mogelijk.
Eisen aan de bedienende persoon
De bedienende persoon moet, vóór ingebruikname van de
machine, de gebruiksaanwijzing goed gelezen hebben.
Kwalificatie
Behalve een uitvoerige instructie door vakkundig
verkooppersoneel is er geen speciale kwalificatie voor het
gebruik van de machine nodig.
Minimale leeftijd
Het apparaat mag slechts door personen gebruikt worden
van 18 jaar of ouder. Uitzondering hierop is het gebruik
door jeugdige personen bij een beroepsopleiding ter
verkrijging van vaardigheid en indien dit onder toezicht van
een instructeur plaats vindt.
Scholing
Voor het gebruik van de machine is passend onderricht
voldoende. Een speciale scholing is niet noodzakelijk.
Service
Hebt u technische vragen? Een reclamatie? Hebt u
reserveonderdelen of een gebruiksaanwijzing nodig?
Op onze website www.guede.com in Service helpen wij u
snel en niet-bureaucratisch verder. Help ons om u te
helpen, a.u.b. Om uw machine in geval van reclamatie te
kunnen identificeren hebben wij het serienummer evenals
artikelnummer en productiejaar nodig. Deze gegevens
vindt u op het typeplaatje. Vul deze gegevens hieronder in
om deze altijd bij de hand te hebben.
Serienummer:
Artikelnummer:
Productiejaar:
Tel.: +49 (0) 79 04 / 700-360
Fax: +49 (0) 79 04 / 700-51999
E-mail: support@ts.guede.com
Voordat er onderhouds-/reinigings- of andere
werkzaamheden aan het apparaat worden uitgevoerd
moet dit altijd van het stroomnet afgekoppeld worden. Laat
het apparaat voor de genoemde werkzaamheden en/of
transport altijd afkoelen.
Onderhoud
Ombouw-, instel-, meet- en reinigingswerkzaamheden
slechts bij uitgeschakelde motor uitvoeren. Netstekker
uitnemen.
Reparatie- en onderhoudswerkzaamheden aan de
elektrische installatie slechts door vaklieden laten
uitvoeren.
Alle bescherming- en veiligheidsinrichtingen moeten na
voltooide reparatie of onderhoudswerkzaamheden
onmiddellijk weer gemonteerd worden.
Wij adviseren:
Het kloofmes is een slijtonderdeel dat naar behoefte
nageslepen moet worden.
De gecombineerde, met twee handen bediende
beveiligingsinrichting moet lichtlopend blijven. Af en
toe met weinig oliedruppels smeren.
Oplegvlak schoon houden.
Geleiderails met vet insmeren.
Hydraulische olie verversen
De hydraulische eenheid is een gesloten systeem met
olietank, oliepomp en stuurventiel. Het mag niet gewijzigd
of gemanipuleerd worden.
Aansluitingen en schroefverbindingen regelmatig op
dichtheid controleren, naar behoefte aandraaien.
De olietank is met hoogwaardige hydraulische olie met de
ISO viscositeitgraad 20 gevuld.
Na 150 bedrijfsuren de olie verversen.
1. De drukplaat is in startpositie. Sluit de machine nu
van het net af.
2. Maak de olieaftapplug los (afb. 1/11) en leg deze
apart.
3. Zet een lege bak met een inhoud van ten minste 4
liter naast het apparaat zoals in afb. 4 is aangegeven.
Wacht tot de olie compleet afgetapt is.
Milieuvriendelijk verwijderen!
4. Draai de machine op zijn kop (afb. 4) om ca. 2,4 liter
hydraulische olie (viscositeit 20) aan te vullen.
5. In de olieaftapplug (afb. 1/11) is een oliepeilstok
ingebouwd. Voer deze, schoongemaakt, in de noch
verticaal staande machine in Trek deze weer er uit;.
Page 32

tussen de beide inkepingen moet een oliefilm
zichtbaar zijn.
6. Plaats en schroef nu de olieaftapplug (afb. 1/11) weer
terug. Aansluitend het apparaat enkele malen “loos”
bedienen. Controleer regelmatig de oliestand en vul
naar behoefte olie bij.
Transport
Voor het uit het karton nemen van de machine zijn
tenminste 2 personen benodigd.
De machine kan schuin, op de wielen gesteld,
getransporteerd worden.
De draaggreep gebruiken, optillen en trekken.
Opslagcondities: een droge, overdekte opslagplaats,
maximale luchtvochtigheid 80 %, temperatuur van -20°C
tot +60°C.
Voor ieder transport van het apparaat moet de plug beslist
vast aangedraaid worden om olielekkage te verhinderen.
Let op een rechtop staand transport.
Oplossen van storingen
De tabel geeft mogelijke fouten aan evenals een mogelijke
oorzaken en oplossingen daarvan. Indien u het probleem
toch niet kunt verhelpen, kunt u een vakman raadplegen.
Voor onderhoud- en schoonmaakwerkzaamheden het
apparaat uitschakelen en de netstekker uitnemen.
Gevaar van een elektrische schok.
Verschijnselen Mogelijke oorzaak Oplossing
Motor
beëindigt
zelfstandig het
splijtproces
Splijtgoed
wordt niet
gespleten
Beveiligingsinrichting
voor overspanning
werd geactiveerd
Onjuiste plaatsing op
de machine
Splijtgoedomvang
overschrijdt de
motorcapaciteit
Splijtwig is bot
Olie lekt
Elektricien
Splijtgoed
juist plaatsen,
zie ook
“Bediening”
Splijtgoed in
passende
afmetingen
zagen
Splijtwig
slijpen
Ondichte plek
vaststellen,
vakman
opzoeken
Drukplaat
vibreert,
maakt
geluiden
Luchtoverschot in het
hydraulische systeem
Oliestand
controleren,
eventueel olie
bijvullen,
anders
vakman
consulteren
Olielekkage
aan de cilinder
of op andere
plaatsen
Luchtinsluiting in het
hydraulische systeem
tijdens het gebruik
Ontluchtingsschroef
voor transport niet
aangedraaid
Olie aftapplug los
Olieventiel en/of
afdichtingen defect
Ontluchtingss
chroef vóór
het gebruik
met enkele
omwentelinge
n losmaken
Ontluchtingss
chroef voor
transport vast
draaien
Olieaftapplug
vast draaien n
Handelaar
bellen
Page 33

Premessa
Per poter essere soddisfatti del Vostro nuovo apparecchio
per il periodo più lungo possibile, prima di metterlo in
funzione leggere attentamente il Manuale d'Uso e le
istruzioni di sicurezza in allegato, per favore. Consigliamo
tra l’altro di conservare il Manuale d’Uso per caso in cui
avreste i dubbi sulle funzioni dell’apparecchio in futuro.
Per i motivi dello sviluppo continuo del prodotto ci
riserviamo il diritto di esecuzione delle modifiche
tecniche per lo scopo di miglioramento dello stesso.
Questo documento rappresenta il Manuale d’Uso
originale.
Volume della fornitura
Estrarre l'apparecchio dall’imballo da trasporto e
controllare la sua l’integrità e la presenza delle seguenti
parti:
In caso delle parti mancanti nella fornitura oppure
difettose, rivolgersi al Vostro venditore, per favore.
Descrizione dell’apparecchio (fig. 1)
1. Serbatoio dell’olio
2. Piastra premente
3. Superficie d’appoggio
4. Cuneo da spaccatura
5. Manico da spostamento
6. Piede
7. Avviatore
8. Motore
9. Ruota da trasporto
10. Leva idraulica
11. Vite di scarico dell’olio
12. Vite di deaerazione
Dati tecnici
Tensione/frequenza: 230V~50Hz
Potenza del motore: 1500 W/(P1, S6 40%)
Classe di protezione: IP 54
Classe d'isolamento: B
Giri a vuoto: 2.950 min-1
Max. forza di spaccatura: 4 tonn.
Quantità dell’olio idr.: 2,4 l/SAE 20/HPL 46
Max. pressione idraulica: 160 bar
Max. alzata in spaccatura: 230 mm
Ø legna spaccata min./max.: 50/250 mm
Lungh. legna spaccata min./max.: 250/370 mm
Velocità d'avanzamento: 0,04 m/s
Velocità di scorrimento dietro: 0,06 m/s
Dimensioni di montaggio: 810x270x460 mm
Peso: 38 kg
Istruzioni generali
Dopo l’estrazione dall’imballo, controllare tutte le parti
Controllare l’integrità del pacchetto.
Prima di utilizzare la macchina, prenderla in
Utilizzare esclusivamente gli accessori, ricambi e
(interruttore di protezione alla corrente errata) 30 mA.
1 spaccatrice dei tronchi
1 originale del Manuale d’Uso
Lista di garanzia
dal punto di vista dei danni dovuti dal trasporto.
conoscenza leggendo il Manuale d’Uso.
materiali di consumo originali.
Utilizzare l’apparecchio solo con RCD
Istruzioni di sicurezza
Rispettare tutte le istruzioni di sicurezza ed
avvertenze applicate sulla macchina e mantenerle
leggibili.
I dispositivi di sicurezza sull’apparecchio non devono
essere né smontati né messi fuori funzione.
Controllare i cavi d’alimentazione. Non utilizzare i cavi
d’alimentazione danneggiati. Vedi la “Connessione
alla rete”.
Prima di messa in funzione, controllare la giusta
funzione del comando bimanuale.
L’operatore deve avere minimi 18 anni. Le persone
istruite devono avere minimi 16 anni, devono però
lavorare solo sotto la sorveglianza.
Durante lavoro utilizzare i guanti di protezione.
Durante lavoro attendersi a: Pericolo delle lesioni
sulle dita e mani da parte dell’utensile da spaccatura.
Per spaccare i pezzi pesanti oppure difficilmente
lavorabili utilizzare gli attrezzi adatti al sostegno.
Il cambio, regolazione, misurazione e pulizia devono
essere svolti solo con motore spento. Sconnettere la
spina dalla presa.
L’installazione, riparazioni e manutenzione
dell’impianto elettrico devono svolgere solo i
professionisti.
Terminata la riparazione oppure manutenzione, tutti
dispositivi di protezione e di sicurezza devono essere
rimontati immediatamente al suo posto.
Abbandonando il luogo di lavoro spegnere il motore.
Sconnettere la spina dalla presa.
Non è ammissibile bloccare il comando bimanuale
oppure disabilitare gli arresti di comando bimanuale
che la conseguenza di ciò è un pericolo particolare
delle ferite nella manovra della macchina.
Le modifiche maliziose sulla macchina escludono la
garanzia del costruttore dei danni successivi.
Uso in conformità alla destinazione
La spaccatrice dei tronchi può essere utilizzata solo in
posizione orizzontale. La legna può essere spaccata solo
orizzontalmente in senso delle fibre. La lunghezza della
legna da spaccare sono i massimi 37 cm.
Ogni altro uso è considerato per controverso alla
destinazione. Il costruttore non assume la responsabilità
dei successivi danni e delle ferite. Tenere presente che i
nostri apparecchi non sono costruiti per l’uso industriale.
Montaggio
Per un imballaggio comodo, il piede (fig. 1/6) ed il manico
(fig. 1/5) dovrà montarsi il Cliente solo.
Utilizzare perciò le 2 viti esagonali M6x16 con il dado per il
piede e le viti a brugola M6x16 con il dado per il manico.
Appoggiare l’apparecchio sul pavimento in posizione
orizzontale e sul lato del cuneo da spaccatura spessorarlo
con il polistirolo dall’imballo.
Prima dell’esercizio
Mai spaccare la legna in verticale e contro le fibre!
Devono essere rispettare le prescrizioni di sicurezza
e le prescrizioni per lavoro e manutenzione emesse
dal Costruttore, contemporaneamente le dimensioni
indicate nei Dati tecnici.
Osservare le prescrizioni di prevenzione ad infortunio
ed altre prescrizioni tecniche di sicurezza
generalmente applicate.
La macchina può essere manovrata, mantenuta e
riparata solo dai professionisti, informati ed istruiti sui
pericoli. Le modifiche maliziose sulla macchina
escludono la garanzia del costruttore dei danni
successivi.
Page 34

La macchina deve essere utilizzata solo con gli
accessori ed utensili del Costruttore originali.
Ogni altro uso è considerato per controverso alla
destinazione. Il costruttore non assume la
responsabilità dei danni di conseguenza; il rischio è a
carico dell’Utente proprio.
Installazione
Attendersi, per favore, a che la vostra macchina sia
installata sul suolo rigido, piano, stabile e con
l’illuminazione sufficiente.
Assicurarsi lo spazio sufficiente per poter lavorare con la
sicurezza e senza i disturbi.
Rischi residuali
L’apparecchio è stato costruito secondo le conoscenze
tecniche e regole tecniche di sicurezza. Possono però
originare i rischi residuali durante lavoro.
C’è il pericolo delle ferite per le dita e le mani dalla
parte dell’utensile da spaccatura in caso di manovra
profana oppure posizione instabile della legna.
Incidenti dovuti dal pezzo di legna lanciato in caso di
manovra scorretta.
Pericolo della scossa elettrica in uso dei cavi elettrici
non adatti.
Malgrado tutte le misure preventive possono
persistere i rischi residuali invisibili.
I rischi residuali possono essere minimizzati
mantenendo le Istruzioni di sicurezza ed Uso in
conformità alla destinazione, ovviamente il
Manuale d’Uso intero.
Connessione alla rete
Controllare periodicamente i cavi d’alimentazione dal
punto di vista dei danni. Sconnettere prima la spina dalla
presa!
I cavi d’alimentazione devono corrispondere alle relative
istituzioni di VDE e DIN. Utilizzare solo i cavi con
identificazione H 07 RN. L’indicazione di tipo sul cavo
d’alimentazione è la norma.
Cavi d’alimentazione difettosi
Sui cavi d’alimentazione avviene spesso il
danneggiamento dell’isolamento.
Cause possibili:
Schiacciamenti, se i cavi d’alimentazione passano nelle
fessure sotto le finestre oppure porte.
Piegature per causa di fissaggio oppure la posa dei cavi
d’alimentazione profani.
Pericolo dal cavo d’alimentazione danneggiato.
Danneggiamento dell’isolamento dal tiro forte del cavo
dalla presa sul muro.
Rotture dovute dall’invecchiamento dell’isolamento.
I cavi d’alimentazione così danneggiati non devono
essere utilizzati e per causa dell’isolamento
danneggiato sono pericolosi per la vita!
Manovra - fig. 3
Prima di iniziare lavoro è indispensabile allentare la vite
(fig. 2/12) di alcuni giri perché sia garantita la circolazione
dell’aria nel serbatoio d’olio.
In caso che rimanga serrata il movimento idraulico
provoca la sovrappressione.
Prima di trasportare la macchina bisogna sempre serrare
bene la vite per evitare la fuga dell’olio.
Spaccare solo i pezzi di legna tagliati in piano.
1. Appoggiare la legna da spaccare orizzontalmente e
dritta sulla superficie d’appoggio (fig. 1/3)
2. La spaccatrice dei tronchi è dotata per la manovra
bimanuale – la mano destra manovra la leva idraulica
(fig. 1/10), la destra l’avviatore (fig. 1/7).
3. Spingere la leva idraulica (fig. 1/10) giù in modo
descritto ed attivare la spaccatura con avviatore (fig.
1/7).
Lasciando una delle parti di comando, la macchina si
ferma immediatamente. Lasciare entrambe le parti di
comando provoca la retromarcia della piastra premente. In
caso che la macchina, entro 5 secondi, non è capace di
spaccare un altro pezzo della legna, fermare subito il
processo. La legna da spaccare è probabilmente troppo
dura. Girare il pezzo da spaccare di 90° e provarlo ancora
una volta.
Attenzione: All’esercizio superiore a 5 secondi c’è il
pericolo di surriscaldo ed i seguenti danni sulla macchina.
Interrompere il processo.
Appoggio scorretto – fig. 3/A
Appoggiare la legna da spaccare sempre piano sulla
superficie d’appoggio!
Non deve scivolare né appoggiata storta. Il cuneo da
spaccatura subirà il sovraccarico in caso che non spacchi
con il tagliente intero ma solo nella sua parte superiore.
Mai spaccare più pezzi insieme!
C’è il pericolo che uno di essi potrebbe essere lanciato
inattendibilmente.
Attenzione! Grande pericolo dell’infortunio!
Legna incuneata – fig. 3/B/C
Mai tentare liberare la legna dalla macchina battendola.
Potrebbero essere provocati gli incidenti ed i danni sulla
macchina.
Procedere come segue:
1. Far arrivare la piastra premente alla posizione
2. Inserire il cuneo sotto la legna da spaccare – vedi la
3. Eseguire un ciclo di spaccatura che la piastra
4. Ripetere i passi sopra indicati con altri cunei finché la
Segnaletica
Sicurezza del prodotto:
iniziale.
figura.
premente spinga il cuneo lontano sotto la legna da
liberare.
legna non viene spinta fuori dalla macchina.
Prodotto è conforme alle
relative norme CE
Page 35

Divieti:
Imballo:
umidità!
Vietato tirare il cavo
L’apparecchio può essere
manovrato solo da unica
Avviso:
persona.
Proteggere alla pioggia ed
Divieto di smontaggio dei
dispositivi di protezione
Avviso/attenzione
Avviso agli oggetti lanciati Avviso alle ferite delle mani
Avviso alla pericolosa
tensione elettrica
Tenere le persone circostanti
in distanza sicura
dall’apparecchio (minimo 5 m)
Direttive:
Leggere attentamente le
istruzioni d’uso. Prendere in
perfetta conoscenza l’uso della
macchina
Usare i guanti di protezione
Usare la calzatura di
protezione
Utilizzare lo scudo facciale
Prima di aprire, sconnettere la
Tutela dell’ambiente:
spina
Smaltire i rifiuti in modo
professionale, che non sia
inquinato l'ambiente.
Il materiale d’imballo di
cartone può essere
consegnato al Centro di
raccolta allo scopo di
riciclo.
Gli apparecchi
elettrici/elettronici difettosi e/o
da smaltire devono essere
consegnati ai centri autorizzati.
Proteggere all’umidità
Interseroh Recycling
Dati tecnici:
L’imballo deve essere
rivolto verso alto
Attacco Peso
IP 54
Potenza del motore Tipo di protezione
Giri Forza di spaccatura
Diametro della legna
Volume del serbatoio d’olio
Garanzia
Il periodo di garanzia è di 12 mesi in caso di uso
industriale, di 24 mesi per i consumatori, e inizia a
decorrere dalla data dell’acquisto dell’apparecchio.
La garanzia si riferisce esclusivamente ai difetti dovuti a
difetti di materiale o di fabbricazione. Nel caso di reclamo
durante il periodo di garanzia occorre allegare il
documento originale d’acquisto con la data di vendita.
Non rientra nella garanzia l’uso improprio quale ad es.
sovraccarico dell’apparecchio, applicazione di una forza
eccessiva, danneggiamento dovuto ad un intervento dei
terzi o oggetti estranei, mancato rispetto del manuale
d’uso e di montaggio e usura
Comportamento nel caso d’emergenza
Applicare il pronto soccorso concernente l’incidente e
rivolgersi rapidamente al medico qualificato.
Proteggere il ferito agli ulteriori incidenti e tranquillizzarlo.
Con riferimento alla DIN 13164, il luogo di lavoro deve
essere sempre dotato della cassetta di pronto
soccorso per eventuali incidenti. Il materiale utilizzato
deve essere aggiunto immediatamente.
idraulico
Lunghezza della legna da
spaccare
Aprire la valvola di sfiato
normale.
Page 36

In caso di richiesta del pronto soccorso comunicare le
seguenti informazioni:
1. Luogo dell’incidente
2. Tipo dell’incidente
3. Numero dei feriti
4. Tipo della ferita
Smaltimento
Le istruzioni per lo smaltimento derivano dai pittogrammi
attaccati sull’apparecchio e sull’imballo. La descrizione dei
singoli significati riporta il capitolo "Segnaletica”.
Smaltimento dell’imballo da trasporto
L’imballo protegge l’apparecchio contro i danni durante il
trasporto. I materiali d’imballo sono scelti a seconda la
tutela dell’ambiente ed il modo di smaltimento, perciò
possono essere riciclati.
Il ritorno dell’imballo in circolazione dei materiali risparmia
le materie prime e diminuisce i costi di lavorazione dei
rifiuti.
Le singole parti dell’imballo (es. fogli, styropor®) possono
essere pericolosi per i bambini. Esiste il pericolo di
soffocamento!
Tenere le parti dell’imballo fuori portata dei bambini e
smaltirli prima possibile.
Requisiti all'operatore
L’operatore è obbligato, prima di usare l’apparecchio,
leggere attentamente il Manuale d’Uso.
Qualifica
Oltre le istruzioni dettagliate del professionista, per uso
dell’apparecchio non č necessaria alcuna qualifica
speciale.
Età minima
Con apparecchio possono lavorare solo le persone che
hanno raggiunto 18 anni.
L’eccezione rappresenta lo sfruttamento dei minorenni per
lo scopo dell’addestramento professionale per raggiungere
la pratica sotto controllo dell‘istruttore.
Istruzioni
Utilizzo dell’apparecchio richiede solo le istruzioni
adeguate del professionista rispettivamente leggere il
Manuale d’Uso. Non sono necessarie le istruzioni speciali.
Assistenza tecnica
Avete le domande tecniche? Contestazioni? Avete
bisogno dei ricambi oppure del Manuale d’Uso?
Sul nostro sito www.guede.com, nel settore Assistenza
tecnica, Vi aiuteremo velocemente ed in via non
burocratica. Ci dareste la mano, per favore, per poter
aiutar Vi? Per poter identificare il Vostro apparecchio nel
caso di contestazione abbiamo bisogno del numero di
serie, cod. ord. e l’anno di produzione. Tutte queste
indicazioni troverete sulla targhetta della macchina. Per
avere questi dati sempre disponibili, indicarli qui sotto, per
favore:
N° serie:
Cod. ord.:
Anno di produzione:
Tel.: +49 (0) 79 04 / 700-360
Fax: +49 (0) 79 04 / 700-51999
E-Mail: support@ts.guede.com
Prima di manutenzione/pulizia ed altri lavori
sull’apparecchio bisogna sconnetterlo sempre dalla rete.
Prima di tutti i lavori e di trasporto attendere che si
raffreddi.
Manutenzione
Il cambio, regolazione, misurazione e pulizia devono
essere svolti solo con motore spento. Sconnettere la spina
dalla presa.
Le riparazioni e la manutenzione dell’impianto elettrico far
fare solo dall’elettricista.
Terminata la riparazione oppure manutenzione, tutti
dispositivi di protezione e di sicurezza devono essere
rimontati immediatamente al suo posto.
Vi consigliamo:
Il cuneo da spaccatura è la parte di usura rapida che,
Il dispositivo di comando bimanuale combinato deve
Mantenere pulita la superficie d’appoggio.
Le slitte lubrificare con olio.
Impianto idraulico/cambio d’olio
L’impianto idraulico è il sistema chiuso, dotato del
serbatoio d’olio, della pompa ad olio e della valvola di
comando. Non deve essere modificato né si deve
manipolare.
I raccordi idraulici e nipple controllare periodicamente per
la tenuta, serrarli eventualmente.
Il serbatoio d’olio è riempito da casa madre dell’olio
idraulico di qualità con la viscosità ISO 20.
Cambiare l’olio ogni 150 ore d’esercizio.
1. La piastra premente è in posizione iniziale.
2. Allentare la vite di scarico dell’olio (fig. 1/11) e
3. Appoggiare accanto alla macchina un serbatoio vuoto
4. Rovesciare la macchina con i piedi su (fig. 4) per
5. All’interno della vite di scarico dell’olio (fig. 1/11) è
6. Serrare la vite di scarico dell’olio (fig. 1/11). Far girare
Trasporto
Per l’estrazione dall’imballo bisogna che ci siano minime 2
persone.
La macchina può essere trasportata sulle ruote in
posizione inclinata.
Utilizzare il manico da trasporto; sollevarlo e tirare.
Condizioni di stoccaggio: Un luogo asciutto, coperto,
l’umidità dell’aria max. 80%, temperatura -20°C – +60°C.
Prima di trasportare la macchina bisogna sempre serrare
bene la vite per evitare la fuga dell’olio.
Attendersi a che la macchina sia trasportata in posizione in
posizione giusta.
in caso di necessità, deve essere affilato
ulteriormente.
funzionare facilmente. Trattarlo occasionalmente di
alcune gocce dell’olio.
Scollegare la macchina dalla rete.
deporla a parte.
da 4 litri, in posizione illustrata sulla figura (fig. 4).
Attendere a che si svuota tutto l’olio esausto.
Smaltirlo ecologicamente!
poter versare 2,4 l cca dell'olio idraulico (viscosità
20).
incorporata la stecca di misura olio. Pulirla ed infilarla
nella macchina finché sta ancora in posizione
verticale. Tirarla fuori; il livello d'olio dovrebbe essere
fra entrambi i segni.
la macchina alcune volte a vuoto. Controllare livello
d’olio, aggiungerlo in caso di necessità.
Page 37

Ricerca dei guasti
La tabella indica i guasti possibili, la causa degli stessi e le
possibilità di rimozione. Se invece il problema persiste e
non è possibile eliminarlo, rivolgersi al professionista.
Prima di manutenzione e pulizia sconnettere la spina
dalla presa.
Pericolo della scossa elettrica!
Sintomi
Causa eventuale Rimozione
Motore
spegne in
automatico il
Intervento del termico Elettricista
ciclo di
spaccatura
La legna non
viene
spaccata
Macchina preparata
scorrettamente
Lunghezza del tronco
supera la capacità del
motore
Cuneo da spaccatura
ottuso
Fuga dell’olio
Inserire la
legna
giustamente,
vedi anche
Manovra /
Uso.
Tagliare la
legna in
tronchi giusti.
Affilare il
cuneo da
spaccatura.
Trovare i
punti di fuga e
rivolgersi al
professionista
.
Controllare
l’olio,
aggiungerlo
event.,
rivolgersi al
professionista
Prima dell’uso
allentare di
alcuni giri la
vite di sfiato
Serrare la vite
di sfiato prima
di trasporto
Serrare la vite
di scarico
dell’olio
Rivolgersi al
Venditore
Piastra
premente
vibra ed
emette il
rumore strano
Fuga dell’olio
sul cilindro ed
in altri punti
Insufficienza dell’olio
oppure l’aria nel
sistema idraulico
L’aria nel sistema
idraulico in esercizio
La vite di sfiato non
era serrata prima di
trasporto
Allentata la vite di
scarico dell’olio
Difetto sulla valvola
d’olio o guarnizione
Page 38

Bevezetés
Azért, hogy a készülékének legtovább tudjon örülni,
olvassa el kérem üzembeállítása előtt a használati
útmutatót és a mellékelt üzembiztonsági utasításokat.
Továbbá azt ajánljuk, hogy a használati útmutatót jól
őrizze meg ha esetleg később szeretné a termék
funkcióira visszaemlékezni.
A termék állandó fejlesztése végett fenntartjuk
jogunkat a műszaki változtatásokra a termék
jobbítására.
Ez a dokumentum eredeti használati útmutató
fordítása.
Szállítás terjedelme
Készüléket vegye ki a szállító csomagolásból és
ellenőrizze teljességét és a következő részek létezését:
1 rönk hasító
1 eredeti használati útmutató
Garancia levél
Amennyiben a szállítmányból hiányzik valamilyen darab
vagy sérült, forduljon kérjük az eladóhoz.
Készülék leírása (. ábra) 1)
1. Olaj tartály
2. Nyomó deszka
3. Támasztó felület
4. Hasító ék
5. Hordozó fogantyú
6. Láb
7. Indító:
8. Motor
9. Járókerék
10. Hidraulika kar
11. Olaj kieresztő szelep
12. Légtelenítő csavar
MŰSZAKI ADATOK
Feszültség /frekvencia 230V~50Hz
Motor teljesítménye 1500 W/(P1, S6 40%)
Védelmi osztály: IP 54
Szigetelési osztály: B
Szabadon futási fordulatszám 2950 perc-1
Max. hasító erő: 4 tonna
Hidraulika olajmennyisége: 2,4 l/SAE 20/HPL 46
Max. hidraulikai nyomás: 160 bar
Max. hasítólöket: 230 mm
Hasított fa min./max. Ø: 50/250 mm
Hasított fa min./max. hossza: 250/370 mm
Előretolás sebessége: 0,04 m/mp
Hátratolás sebessége 0,06 m/mp
Méretek H x Sz x M: 810×270×460 mm
Tömeg: 38 kg
Általános utasítások
Kicsomagolás után a sisak minden részét ellenőrizze
nem-e sérültek meg. szállításközben
Ellenőrizze a szállítás teljességét.
Használat előtt ismerkedjen meg a használati
útmutatóval.
Csak eredeti tartozékokat és elkapható
pótalkatrészeket használjon.
Gépet kizárólag 30mA. RCD-vel (hibaáram
kioldóval )rendelkező bevezetésre kapcsolja.
Biztonsági utasítások
Tartsa be a gépen található összes biztonsági
utasítást, tartsa olvasható állapotban.
Biztonsági berendezést nem szabad leszerelni, vagy
funkcióját kivonni.
Ellenőrizze a bevezető kábeleket. Ne használjon
hibás bevezető kábeleket. Lásd. A hálózati bekötést
Üzembehelyezés előtt ellenőrizze a kétkezes kezelés
helyes funkcióját.
Kezelő életkora – minimálisan 18 év. Kiképzés alatt
lévő személy életkora min. 16 év, gépen csak
felügyelet mellet dolgozhat.
Munkaközben viseljen védő kesztyűt
Munkaközben vigyázni: Hasító szerszám kéz és ujjak
megsebesítését okozhatja.
Nehéz és nehezen feldolgozható darabok
hasításához használjon megfelelő segédeszközöket
a támasztáshoz.
Átépítést, beállítást, mérést és tisztítást mindig
kikapcsolt motor mellet végezze. Dugót húzza mindig
ki a dugaszaljból.
Elektromos részek javítását, karban tartását csak
szakképzett villanyszerelő végezheti.
Minden védelmi és biztonsági berendezést a javítás
vagy karbantartás után ismét fel kell szerelni.
Munkahely elhagyása előtt kapcsolja ki a motort
Dugót húzza mindig ki a dugaszaljból.
A kétkezes kezelés leblokkolása vagy a kétkezi
kezelés beállító részeinek kikerülése tilos, mert ebből
a kezelésnél különleges baleset veszély fenyeget.
Gépen végzet önkényes változtatásból eredő
károkért a gyártó nem vállal garanciát.
Rendeltetés szerinti használat.
Hidraulikus rönk hasogatót csak fekve helyzetben
használható. A fát csak fekve és szál irányba lehet
hasítani. A hasított fa maximális hosszúsága max. 37 cm.
Minden más használat rendeltetés elleni használatnak
minősül. Kifolyó károkért és balesetekért a gyártó nem
felel. Vegyék figyelembe azt, hogy a mi termékeink
nincsenek ipari felhasználásra szerkesztve.
Szerelés:
Egyszerűbb csomagolás végett a lábat (1/6 ábra) és a
fogantyút (1/5 ábra) a vevő szereli fel.
Erre használja a 2 mellékelt hatélű csavart M6×16-os
anyával a lábakra és M6×16 imabuszcsavart az anyával a
fogantyúra. A készüléket állítsa vízszintesen a padlóra és
támassza alá a hasítóék alatt polisztirénnel a
csomagolásból.
Üzemelés előtt
A fát sose hasítsa állva és keresztbe a szállal!
Munkaközben és karbantartásnál be kell tartani a
gyártó előírásit ugyan úgy a műszaki leírásban adott
méreteket.
A baleset megelőzési előírásokat és általánosan
érvényes műszaki biztonsági szabályokat be kell
tartani.
Gép kezelését, javítását, karbantartását csak a gépet
ismerő és a biztonsági előírásokról kioktatott
szakember végezheti. Gépen végzet önkényes
változtatásból eredő károkért a gyártó nem vállal
garanciát.
A gépet csak a gyártó eredeti tartozékaival és
szerszámaival szabad használni.
Minden más használat rendeltetés elleni
használatnak minősül. Ebből kifolyó károkért és
balesetekért a gyártó nem felel, kockázatot a
felhasználó viseli.
Page 39

Felállítás
Ügyeljen arra, hogy az Ön gépe szilárd, vízszintes alapra
legyen stabilan felszerelve, jó megvilágítással.
Biztosítson elegendő helyet, hogy biztonságosan és
háborgatás mentesen dolgozhasson.
Maradék kockázatok
A gép a műszaki ismeretek és elismert műszaki biztonsági
előírások szerint van szerkesztve. Ennek ellenére mégis
keletkezhetnek maradék kockázatok.
Ujjak és kezek balesete fenyeget a gép hasító
szerszámától ha a fa vezetése és alátámasztása nem
szakszerű.
Baleset veszélye kihajított fadarabtól, nem
szakszerűen tartott és vezetett fától.
Áromütés veszélye nem előírás szerinti bevezető
kábel használatából.
Továbbá keletkezhetnek rejtett maradék kockázatok
minden preventív intézkedés betartása mellet.
Maradék kockázatokat minimalizálni lehet
amennyiben betartja a Biztonsági utasításokat és
Rendeltetés szerinti használatot és az egész
útmutatót.
Hálózati bekötés
Bevezető kábelt rendszeresen ellenőrizze sérülés
szempontjából. Előtte a dugót húzza ki a dugaszaljból!.
A bevezető kábeleknek meg kell felelniük a VDE és DIN
előírásoknak. Használjon H 07-RN megjelölésű bevezető
kábelt. A bevezető kábel nyomtatott megjelölése előírott.
Hibás bevezető kábel
A bevezető elektromos kábeleken gyakori a szigetelés
megsérülése.
Lehető okok:
Megnyomás, ha a bevezető kábel ablakok és ajtók közein
vannak vezetve.
Törések a kábel szakszerűtlen felerősítése vagy vezetése.
Átvágás a bevezető kábelen való átmenés következtében.
Szigetelés megsérülése a kábel kitépésével a
dugaszaljból.
Repedések a szigetelés öregedése végett.
Ilyen megsérült bevezető kábelt nem szabad
használni, megsérült szigetelés életveszélyes lehet!
Kezelés (ábra) 3
A munka megkezdése előtt feltétlenül a légtelenítő csavart
fel kell lazítani néhány fordulattal (2/12 ábra), hogy
biztosítva legyen a levegő cirkulációja az olajtartályba.
Amennyiben munkaközben le van zárva a hidraulika
mozgás túlnyomást okoz.
A készülék minden szállítása előtt a csavart feltétlenül be
kell húzni, hogy meg legyen akadályozva az olaj kifolyása.
Csak egyenesen levágott fadarabokat hasogasson.
1. Hasított fát fektesse laposan és egyenesen a
támasztó felületre (1/3 ábra).
2. A rönk hasogató kétkezes kezelésre készült- bal
kéz kezeli a hidraulikus kart (ábra 1/10), jobb kéz az
indítót (1/7).
3. Hidraulika karját (1/10 ábra) nyomja leírt módon
lefelé és az indítóval (1/7 ábra) aktiválja a hasítást.
Amennyiben egyik kezelő részt elengedi, a gép azonnal
leáll. Mindkét kezelő rész elengedése a nyomó deszka
vissza indulását idézi elő. Amennyiben a készülék nem
képes 5 másodpercig új fadarab hasítására, azonnal
állítsa le a menetet. A hasított fadarab valószínűleg
nagyon kemény. A hasított fadarabot fordítsa el 90° és
próbálkozzon ismét.
Vigyázz: Több mint egy másodperccel több idejű
üzemelés készülék túlhevülését okozza. Szakítsa meg a
folyamatot.
Hibás felszerelés 3/Az ábra.
Hasított fát fektesse mindig laposan!
Nem csúszhat le és nem lehet görbén letéve. A hasító ék
túlterhelődik ha nem fog az egész élén hasítani, de csak a
felső részén.
Sose hasítson több darabot egyszerre!
Fenn áll annak a veszélye, hogy egyik darab
ellenőrizetlenül kirepül.
VIGYÁZZ! Nagy baleseti veszély!
Beszorult fa, ábra 3/B/C
Sose próbálja a beszorult fát a gépből kiverni. A készülék
megsérüléséhez és balesethez vezethet.
Eljárás:
1. A nyomó lemezt engedje start helyzetbe.
2. A hasított fa alá tegyen éket – lásd az ábrát
3. Egy hasító ciklus végezzen el úgy, hogy a
nyomó lemez tolja el az éket tovább a fa alá, melyet
fel akarunk lazítani.
4. Ezeket a lépéseket addig ismételje új ék-kekkel
míg a fa a gépből felfelé ki van tolva.
Megjelölés
Termék biztonsága:
Termék megfelel az EK
szabványainak
Tilalmak:
Tilos a kábelt húzni! Védje eső és nedvesség ellen
A fűrészt csak egy személy
kezelheti
Tilos a védelmi berendezések
Intelmek:
Figyelmeztetés/vigyázz!
Figyelmeztetés veszélyes
Figyelmeztetés elhajított
tárgyak
Más személyeket tartsa
biztonságos távolságban a
munkaterülettől. (min 5 m)
Figyelmeztetés a kéz
sebesülésének veszélyére
eltávolítása
villamos feszültség
Page 40

Utasítások:
Gondosan olvassa a használati
útmutatót Először gondosan
ismerkedjen meg a készülék
helyes használatával.
Használjon védőkeksztűt
Viseljen biztonsági lábbelit Viseljen védő arcpajzsot
Felnyitás előtt húzza ki a dugót
Környezetvédelem:
Hulladékot szakszerűen
likvidálja, ne ártson a
környezetnek
Hibás vagy javíthatatlan
villamos készüléket megfelelő
gyűjtőhelyen leadni
Csomagolás:
Védje nedvesség ellen Csomagolás felfelé irányul
Interseroh-Recycling
Műszaki adatok:
Elektromos csatlakozás Tömeg
Csomagló kartonpapírt adja
le gyűjtőhelyre újra
felhasználásra
IP 54
Motor teljesítménye Védelem típusa
Fordulat Hasító erő
A hasított fa átmérője. A hasított fa hosszúsága
Hidraulika olaj tartály térfogata
Légtelenítő csavart lazítsa fel
Jótállás
Jótállás időtartalma 12 hónap ipari használat esetén,
fogyasztó esetén 24 hónap, jótállás a készülék megvétele
napján kezdődik.
A jótállás kizárólag anyag vagy gyártási hibából eredő
hibákra vonatkozik. A garancia idő alatt történt reklamáció
esetén mellékelni kell az eredeti vételt igazoló nyugtát az
eladás dátumával.
Jótállás nem vonatkozik szakszerűtlen használatra pl.
készülék túlterhelése, idegen beavatkozás vagy tárgy
okozta sérülésekre, használati és szerelési útmutató be
nem tartására, normális kopásra.
Viselkedés vészhelyzetben
Balesetnél biztosítson megfelelő elsősegély nyújtást és
lehető leggyorsabban hívjon kvalifikált orvosi segítséget.
A sebesültet óvja további sebesüléstől és nyugtassa meg.
Esetleges baleset végett a munkahelyen mindig kéznél
kell lenni a DIN 13 164 szerinti elsősegély doboznak.
Az élősegélydobozból kivett anyagot azonnal pótolni
kell.
1. Amennyiben segítségre van szüksége adja meg:
Baleset helyét
2. Baleset típusát
3. Sebesültek számát
4. Sebesülés mértékét
Kiselejtezés:
A kiselejtezésre vonatkozó utasításokat a gépen vagy a
csomagoláson elhelyezett piktogramok jelzik Jelentésük
leírását a „Megjelölés” fejezet tartalmazza.
Csomagolóanyag megsemmisítése
A csomagolás védi a készüléket a sérüléstől. A
csomagolóanyag rendszerint környezetkímélő anyagból
készült ezért anyaga újrafelhasználható.
A csomagolóanyag újrafelhasználása csökkenti a hulladék
megsemmisítésére használt kiadásokat.
A csomagolóanyag része (pl. fólia, sztiropor®) veszélyes
lehet a gyerekekre. Megfulladás veszélye áll fenn.
A csomagolóanyaghoz ne jussanak gyerekek, lehető
leggyorsabban semmisítse meg.
Követelmények a kezelőre
A készülék használata előtt a kezelő figyelmesen olvassa
el a használati útmutatót.
Képzettség
Szakemberrel végzett részletes oktatáson kívül a készülék
használatához nincs szükség különleges felkészítésre.
Minimális életkor
Géppel csak 18 évesnél idősebb személy dolgozhat.
Kivételt képeznek azok serdülők akik szakkiképzés közben
oktató felügyelete alatt dolgoznak a géppel
Kiképzés
Készülék használatához elég szakember által végzett
oktatás illetve a használati útmutató. Speciális oktatás
nem szükséges.
Szerviz
Vannak műszaki kérdései? Reklamáció? Szüksége van
pótalkatrészre vagy használati útmutatóra?
Page 41

A mi honlapunkon www.guede.coma Szerviz részlegben
A
gyorsan és bürokrácia nélkül segítünk . Kérjük segítsen
nekünk segíteni Önnek. Hogy az Ön készülékét
reklamáció esetén azonosítani tudjuk, szükségünk van a
széria számra, megrendelő számra és gyártási évre.
Ezeket az adatokat megtalálja a gép típus címkéjén. Hogy
ezek az adatok mindig kéznél legyenek, kérjük jegyezzék
fel lent.
Széria szám:
Megrendelési szám:
Gyártás éve:
Tel. +49 (0) 79 04 / 700-360
Fax: +49 (0) 79 04 / 700-51 999
E-mail: support@ts.guede.com
Karbantartás/tisztítás előtt a készüléket mindig le kell
kapcsolni a hálózatról. A készüléket hozzávaló munkák és
szállítás előtt hadja kihűlni.
KARBANTARTÁS
Átépítést, beállítást, mérést és tisztítást mindig kikapcsolt
motor mellet végezze. Dugót húzza mindig ki a
dugaszaljból.
Villamos berendezés javítását, karbantartását végeztesse
villanyszerelővel.
Minden védelmi és biztonsági berendezést a javítás vagy
karbantartás után ismét azonnal fel kell szerelni.
Tanácsoljuk Önnek:
A hasító kés lekophat, ezért szükség esetén meg kell
köszörülni.
A kombinált kétkezes védelmi berendezésnek
könnyen kell mozogni. Alkalmilag kenje meg néhány
csepp olajjal.
Támasztó felületet tartsa tisztán.
Csúszdát kenje zsírral
Hidraulikai berendezés/olaj csere
A hidraulika berendezés zárt rendszer olaj tartállyal, olaj
pumpával és vezérlő szeleppel. Nem szabad cserélni és
manipulálni vele. Csatlakozások és csavarmenetek
rendszeresen ellenőrizze tömörség szempontjából, szükség
szerint cserélje. Az olajtartály gyárban jó minőségű hidraulika
olajjal van feltöltve, viszkozitása ISO 20.
Az olajat cserélje ki minden 150 munka óra után
1. Nyomó lemez start helyzetben van. A gépet kapcsolja le a
hálózatról.
2. Olaj kieresztő csavart lazítsa fel (1/11 ábra) és tegye félre.
3. A készülék mellé tegyen üres 4 literes tálat és tegye úgy
ahogy az ábrán látható (ábra 4) Várja meg míg kifolyik az
öreg olaj. Környezetvédelemnek megfelelő módon
semmisítse meg.
4. Gépet fordítsa lábaival felfelé (ábra 4), hogy feltudja tölteni
kb.2,4 l hidraulika olajjal (viszkozitása 20)
5. Olaj kieresztő csavarban (ábra 1/11) olajmérce van építve.
Tisztítsa le és nyomja a gépbe, amely vertikális helyzetben
van. Ismét húzza ki, olaj szintnek két bevágás között kell
lennie.
6. Olaj kieresztő csavar (ábra 1/11) csavart ismét húzza be.
Azután a készüléket néhányszor mentesse üresjáratba. rend
szeressen ellenőrizze az olajat, szükség esetén töltse fel.
Szállítása
Dobozból való kivételhez minimálisan 2 személy kell. Gép
kerekeken ferde helyzetbe szállítható.Fogantyút használja
hordozásra emelje és húzza.
Tárolási feltételek: Száraz, fedett tároló hely, levegő
maximális nedvessége 80%, hőmérséklet -20°C – +60°C
A készülék minden szállítása előtt a csavart feltétlenül be
kell húzni, hogy meg legyen akadályozva az olaj kifolyása.
Ügyeljen arra, hogy a gép álló helyzetbe szállítsa.
Hiba keresés
Táblázatban megtalálhatók a lehetséges hibák, hibák okai
és a hibák elhárítása. Ha ennek ellenére nem tudja a hibát
elhárítani, kérjen tanácsot szakembertől.
Készüléket tisztítás és karbantartás előtt kapcsolja ki
és húzza ki a dugaszát.
Áramütés veszélye.
Tünetek LEHETŐ OKOK Helyreállítás
Motor
automatikusan
befejezi a vágási
ciklust
Fa nincs hasítva
Nyomó lemez
vibrál szokatlan
hangot ad
hengeren vagy
más helyeken
kifolyok az olaj
Túlfeszültség elleni
védelem aktiválódót
gép rosszul van
felillesztve
Hasított fa hosszúsága
meghaladja a motor
kapacitását
Tompa hasító ék
Kifolyik az olaj
Kevés olaj vagy
levegő az olaj
rendszerben.
Levegő van a
hidraulika rendszerben
A légtelenítő csavar
szállítás előtt nem volt
behúzva.
Olaj kieresztő csavar
fellazulva.
Hibás olajszelep vagy
tömítés
Villanyszerelő
A hasított fát tegye
be helyesen, lásd
Kezelés
Hasított fát vágja
megfelelő nagyságra
Tompa hasító éket
köszörülje meg
Keresse meg a
tömörtelen részeket
hívjon szakembert.
Ellenőrizze az
olajat, szükség
esetén töltse fel,
hívjon szakembert.
A légtelenítő
csavart használat
előtt néhány
fordulattal lazítsa fel.
A légtelenítő
csavar szállítás előtt
húzza be.
Olaj kieresztő
csavart húzza be.
Hívja az eladót
Page 42

Uvod
Še pred uporabo naprave natančno preberite priložena
navodila za uporabo in varnostne napotke; le tako bo Vaša
naprava služila dolgo časa svojemu namenu. Priporočamo
Vam, da navodila shranite na varno, da jih lahko vedno in
ponovno uporabite, kadar jih boste potrebovali.
V okviru stalnega izboljševanja in razvijanja naših
izdelkov si pridržujemo pravico do tehničnih
sprememb izdelka.
Ta dokument se smatra za original navodil za uporabo.
1. Obseg dobave
Napravo vzemite iz ovitka in preverite, če so prisotni vsi
njeni sestavni deli:
1 cepilinik drv
1 originalna navodila za uporabo
Garancijski list
Če kateri od zgoraj opisanih delov v paketu manjka ali je
poškodovan, se prosim obrnite na svojega prodajalca.
Opis naprave (slika 1)
1. Oljni rezervoar
2. Pritisna plošča
3. Naslonska površina
4. Razcepni klin
5. Ročaj za premeščanje
6. Noga
7. Zaganjač
8. Motor
9. Kolesce
10. Hidravlična ročica
11. Vijak za dolivanje olja
12. Vijak za odzračevanje
2. Tehnični podatki
Napetost in frekvenca: 230V~50Hz
Zmogljivost motorja: 1500 W/(P1, S6 40%)
Razred zaščite: IP 54
Izolacijski razred : B
Vrtljaji v prostem teku : 2950 min
Maks. cepilna moč: 4 tone
Količina hidr. olja: 2,4 l/SAE 20/HPL 46
Najvišji hidravlični tlak: 160 barov
Maksimalni dvig med cepljenjem: 230 mm
Ø polena min./maks.: 50/250 mm
Dolžina polena min./maks.: 250/370 mm
Hitrost premika naprej: 0,04 m/s
Hitrost premika nazaj: 0,06 m/s
Montažne dimenzije DxŠxV: 810x270x460 mm
Teža: 38 kg
Splošna navodila
Žago vzemite iz ovitka in preglejte posamezne dele,
če niso poškodovani.
Preverite, če je vsebina kompletna.
Pred uporabo se seznanite z napravo po navodilih za
uporabo.
Uporabljajte samo originalne rezervne hitro obrabljive
dele in originalno opremo.
Napravo uporabljajte le skupaj z
RCD (zaščitnim stikalom proti nihanju napetosti)
30mA.
-1
Varnostni napotki
Upoštevajte vse varnostne in opozorilne napotke na
stroju in poskrbite, da bodo le-te vedno ostale v
čitljivem stanju.
Nikoli ne demontirajte in ne izključujte varnostnega
sistema naprave.
Preverite stanje električnih kablov. Ne uporabljajte
poškodovanih kablov. Glej Priključitev na omrežje.
Preden napravo vključite, preverite pravilno delovanje
funkcije za cepljenje z obema rokama.
Uporabnik ne sme biti mlajši 18 let. Izurjene osebe
morajo biti stare več kot 16 let, na stroju pa lahko
delajo samo pod nadzorom.
Med delom uporabljajte delovne rokavice.
Pri delu ravnajte previdno: Nevarnost poškodbe rok in
prstov v bližini cepilnega orodja.
Za cepljenje težjih kosov ali lesa posebnih oblik,
uporabljajte posebne pripomočke za podpiranje.
Motor izklopite, preden se lotite čiščenja, merjenja,
nastavljanja ali rekonstrukcije naprave. Izvlecite vtič iz
vtičnice.
Elektroinstalacijo, popravila in vzdrževalna dela lahko
izvaja le strokovno osebje.
Vse zaščitne in varnostne naprave montirajte na
svoje mesto takoj, ko dokončate servisna ali
vzdrževalna dela na napravi.
Preden zapustite delovno mesto ugasnite motor.
Izvlecite vtič iz vtičnice.
Blokiranje funkcije za cepljenje z obema rokama in/ali
ignoriranje prestreznih delov naprave za dvoročno
uporabo ni dopustno, kajti pri uporabi takšnega stroja
posledično obstaja specifična nevarnost poškodbe.
Svojevoljno spreminjanje oblike ali delovanja naprave
ni v skladu z uveljavljanjem garancijskih pravic in
odgovornostjo za posledične škode.
Uporaba v skladu z namenom
Napravo lahko uporabljate le v ležečem položaju. Les
lahko cepite le v ležečem položaju in v smeri vlakna.
Dolžina polena naj znaša največ 37 cm.
Vsaka druga uporaba tj. izven okvira se smatra kot
uporaba, ki je v navzkrižju z namenom. Proizvajalec ne
odgovarja za posledične škode. Ne pozabite, da naši
izdelki niso konstruirani za industrijsko pač pa samo za
privatno rabo.
Montaža
Zaradi enostavnega ovitka si bo vsak uporabnik peto (slika
1/6) in ročaj (slika 1/5) sestavil sam.
V ta namen bo uporabil 2 priložena šestkotne vijake
M6x16 z matico za nogo in imbus vijake M6x16 z matico
za ročaj. Nato napravo namestite vodoravno na pod in jo
podložite na strani cepilnega noža s stiroporom iz
embalaže.
Pred uporabo
Hloda nikoli ne cepite pokonci oz. proti vlaknu!
Upoštevani morajo biti varnostni predpisi ter predpisi
za delo in vzdrževanje, ki jih je izdal proizvajalec,
prav tako kot tudi dimenzije, navedene v tehničnih
podatkih.
Prav tako upoštevajte tudi varnostne predpise in vse
ostale splošno veljavne varnostne in tehnične
predpise.
Stroj smejo uporabljati, vzdrževati in popravljati samo
strokovno usposobljene osebe, ki so z njim bile
seznanjene in poučene o nevarnostih. Svojevoljno
spreminjanje oblike ali delovanja naprave ni v skladu
z uveljavljanjem garancijskih pravic in odgovornostjo
za posledične škode.
Page 43

Uporaba stroja je dovoljena samo z originalnimi
sestavnimi deli in originalnimi orodji proizvajalca.
Vsaka druga uporaba tj. izven okvira se smatra kot
uporaba, ki je v navzkrižju z namenom. Proizvajalec
ne odgovarja za posledične škode; za vse posledice
odgovarja uporabnik sam.
Namestitev
Poskrbite, prosim, da bo Vaš stroj na čvrsti podlagi
nameščen ravno, stabilno in z zadostno osvetlitvijo.
Zagotovite si dovolj prostora, da bi lahko delali varno in
nemoteno.
Preostala tveganja
Stroj je konstruiran skladno s stanjem tehnike in
priznanih varnostno tehničnih predpisov. Pri delu pa lahko
kljub temu nastajajo posamezna nevsakdanja tveganja.
Nevarnost poškodovanja prstov ali roke preži s strani
cepilnega stroja med nestrokovnim vodenjem ali
podpiranja lesa.
Nevarnost poškodbe z odbitim kosom lesa, pri
nestrokovnem prijemu oziroma vodenju.
Ogroženost z električnim tokom pri uporabi dovodnih
kablov, ki ne odgovarjajo predpisom.
Kljub vsem varnostnim in preventivnim ukrepom pa
obstajajo tudi skrite in nepričakovane nevarnosti.
Sekundarne nevarnosti znižate s tem, da upoštevate
»Varnostne napotke« in »Uporabo v skladu z
namenom«, kot tudi celo navodilo za uporabo.
Priključitev na omrežje
Električni kabel naprave redno preverjajte, če ni
poškodovan Pred tem izvlecite vtič iz vtičnice!
Električni kabli morajo ustrezati pripadajočim določilom
VDE in DIN. Uporabljajte izključno le kable z oznako H 07RN. Predpisana je namestitev tipske etikete na napajalni
kabel.
Poškodovani električni kabli
Na električnih dovodnih kablih se pogosto poškoduje
izolacija.
Možni vzroki:
Poškodbe s pritiskom, če so kabli napeljani v špranjah pod
okni ali vrati.
Zlomi kot posledica nestrokovnega pritrjevanja oziroma
vodenja napajalnih kablov.
Razrezanje, kot posledica vožnje preko kabla.
Poškodovanje izolacije z iztrganim kablom iz vtičnice na
zidu.
Razpoke kot posledica staranja izolacije.
Uporaba omenjenih poškodovanih kablov je
prepovedana, saj so zaradi poškodovane izolacije so
smrtno nevarni!
Rokovanje - slika 3
Pred začetkom dela morate odzračevalni vijak (slika 2/12)
brezpogojno popustiti za nekaj zasukov, da bi zagotovili
cirkulacijo zraka v oljnem rezervoarju.
Če bi le-ta ostal med delom privit, bi hidravličen premik
povzročil nadpritisk.
Pred vsakim prevozom naprave je potrebno vijak
brezpogojno priviti, da se prepreči odtekanje olja.
Cepite samo ravno odrezane komade lesa.
1. Cepljeni les polagajte vodoravno na delovno površino
(slika 1/3)
2. Cepilni stroj za drva je skonstruiran za uporabo z
obema rokama – leva roka upravlja hidravličen vzvod
(slika 1/10), desna vžig (slika 1/7).
3. Hidravlično ročico (slika 1/10) potiskajte na
priporočen način navzdol in z mehanizmom za
spuščanje (slika 1/7) razcepite material.
Če kateri od upravljalnih delov spustite, se naprava takoj
zaustavi. Če sprostite oba upravljalna dela, se pritisna
plošča pomakne nazaj. V kolikor naprava v 5 sekundah ne
zmore razcepiti naslednjega kosa, takoj ustavite postopek.
Cepljeni les je najbrž pretrd. Cepljeni les obrnite za 90° in
poskusite še enkrat.
Opozorilo: Pri obratovanju, ki traja dlje kot
5 sekund, grozi pregretje oz. poškodovanje naprave.
Proces prekinite.
Napačno nameščeno, slika 3/A
Cepljeni les polagajte na delovno površino vedno le
vodoravno!
Ta ne sme zdrseti, niti biti položen poševno. Cepilni nož
boste preobremenili, če ne boste cepili po celi dolžini
rezila, ampak samo v njegovem zgornjem delu.
Nikoli ne cepite več kosov hkrati !
Obstaja nevarnost, da bo kateri od njih nekontrolirano
odletel.
Opozorilo! Velika nevarnost poškodb!
Zagozden les, slika 3/B/C
Zagozdenega lese nikoli ne poskušajte izbijati iz stroja. S
tem bi lahko povzročili telesne poškodbe oziroma
poškodbe naprave.
Ravnajte takole:
1. Pustite, da se pritisna plošča pripelje do začetnega
položaja.
2. Pod cepljeni les vložite klin – glej sliko.
3. Eden cepilni ciklus izvedite tako, da bo pritisna plošča
premaknila klin daleč pod les, ki ga želite sprostiti.
4. Zgoraj navedene korake ponavljajte z novimi klini
tako dolgo, da bo les iztisnjen iz stroja navzgor.
Oznake
Varnost izdelka:
Naprava odgovarja
standardom EU
Prepovedi:
Ne vlecite za vtič!
Napravo lahko uporabljajo le
ena sama oseba.
Opozorilo:
Opozorilo/Previdno
Zaščitite pred vlago in
dežjem!
Odstranjevanje varnostnega
sistema naprave je
prepovedano
Opozorilo pred nevarnostjo
električnega udara.
Page 44

Zavarujte se pred odbitimi in
letečimi predmeti
Osebe v bližini morajo stati v
varni razdalji od naprave (tj.
najmanj 5 metrov)
Ukazi:
Roke si zaščitite pred
poškodbami
Zmogljivost motorja Tip zaščite
Vrtljaji Cepilna moč
Premer cepljenega lesa Dolžina cepljenih polen
Natančno preberite napotke za
uporabo. Še pred vklopom
natančno spoznajte način
delovanja naprave.
Uporabljajte zaščitne
rokavice.
Uporabljajte varnostno obutev
Uporabljate zaščitno masko
za obraz
Pred demontažo izvlecite vtič
iz vtičnice na zidu
Varovanje bivanjskega okolja:
Odpadke odvrzite odgovorno -
tako da ne škodujete
bivanjskemu okolju
Kartonski ovitek je
namenjen za reciklažo, zato
ga odnesite v surovino.
Poškodovane in/ali dotrajane
električne naprave oddajte v
surovino ali odložite na
ustrezno mesto.
Ovitek:
Zavarujte pred vlago. Ovitek mora stati navpično.
Interseroh-Recycling-
Reciklaža
Tehnični podatki :
Priključek Teža
IP 54
Zmogljivost rezervoarja
hidravličnega olja
arancija
Garancija traja 12 mesecev v primeru industrijske rabe ali
24 mesecev pri potrošniku in se začne na dan prodaje
naprave.
Garancija velja le za tovarniške napake oz. napake,
nastale na materialih, iz katerih je naprava izdelana. Če
zahtevate popravila v okviru garancije vedno priložite
veljaven račun, ki mora vsebovati datum prodaje in podpis
prodajalca.
Garancija ne velja, v kolikor napravo uporablja oseba, ki ni
strokovno usposobljena, ali če do okvare pride zaradi
nestrokovnega posega v napravo ali stika s tujki oz.
neupoštavanja navodil ter kot posledica običajne uporabe.
Ukrepi v zasilnih primerih
Poškodovani osebi začnite čimprej dajati ustrezno prvo
pomoč in pokličite zdravnika specialista v najkrajšem
možnem času.
Zavarujte jo pred drugimi nevarnostmi in jo pomirite.
Zaradi morebitne nezgode mora biti na delovnem
mestu vedno pri roki škatla prve pomoči kot narekuje
standard DIN 13164. Material, ki ga porabite, takoj
dopolnite.
V kolikor potrebujte pomoč,
vnesite sledeče podatke:
1. Kraj nezgode
2. Vrsta nezgode
3. Število ranjenih oseb
4. Vrsta poškodbe
Odstranjevanje
Napotki za odstranjevanje izhajajo iz ideogramov, ki se
nahajajo na napravi oziroma na ovitku. Njihov pomen je
razložen v poglavju »Oznake na napravi«.
Način odstranjevanja ovitka
Ovitek ščiti napravo, da se med transportom ne poškoduje.
Ovitek izbiramo glede na način njegove ponovne uporabe
ali načina odlaganja. Večinoma je embalaža namenjena za
reciklažo.
Ponovna uporaba ovitka kot surovine zmanjšuje stroške
nastale z odstranjevanjem odpadkov.
Deli ovitka (npr. folije , Styropor®), so lahko nevarni za
otroke. Obstaja nevarnost zadušitve!
Dele ovitka shranjujte izven dosega majhnih otrok; čimprej
jih odstranite.
Odvijte odzračevalni vijak
Page 45

Zahteve, ki jih mora spolnjevati uporabnik
Uporabnik je pred uporabo naprave dolžan natančno
prebrati navodilo za uporabo.
Izobrazba
Za uporabo ni potrebna nobena posebna izobrazba, razen
strokovnih napotkov v zvezi z uporabo naprave.
Minimalna starost
Mladoletniki lahko uporabljajo napravo, ko dopolnijo 18.
leto starosti. Izjema so mladoletniki, ki se kot vajenci
udeležijo del z namenom, da se naučijo pravilne uporabe;
morajo pa biti pod stalnim nadzorom učitelja.
Šolanje
Glede pravilne uporabe se posvetujte z izkušeno osebo in
natančno preberite navodilo za uporabo. Posebno šolanje
zato ni potrebno.
Servis
Ali imate tehnična vprašanja? Reklamacijo? Ali
potrebujete rezervne dele ali nova navodila za
uporabo?
Na naši spletni strani www.guede.com Vam bomo
v oddelku Servis hitro pomagali. Pomagajmo si vzajemno
in hitro. Da lahko Vašo napravo v primeru reklamiranja
identificiramo, pošljite nam serijsko številko, kataloško št.
in leto izdelave. Vse te podatke boste našli na tipski etiketi
izdelka. Vse navedene podatke prosim vnesite tu, da jih
imate pri roki:
Serijska številka:
Kataloška številka:
Leto izdelave:
Telefon: +49 (0) 79 04 / 700-360
Telefaks: +49 (0) 79 04 / 700-51999
E-pošta: support@ts.guede.com
Pred vzdrževanjem/čiščenjem in drugimi posegi
poskrbite, da se ne dotikate el. omrežja. Pred poseganjem
vanjo , počakajte, da se naprava popolnoma ohladi.
Vzdrževanje
Motor izklopite, preden se lotite čiščenja, merjenja,
nastavljanja ali rekonstrukcije naprave. Izvlecite vtič iz
vtičnice.
Popravila in vzdrževanje električne opreme naj izvaja
izključno le za to usposobljena oseba (električar).
Po končanem popravilu oziroma vzdrževanju je potrebno
vso
varovalno in zaščitno opremo nemudoma namestiti nazaj.
Priporočamo Vam:
Cepilni nož je potrošni del (se obrabi), ki se ga po
potrebi mora zadostno nabrusiti.
Kombinirana zaščita za obe roki mora delovati
nemoteno. Občasno namažite z nekaj kapljicami olja.
Naslonsko ploskev vzdržujte v čistem stanju.
Drsne površine namažite z mazivom.
Hidravlična naprava/zamenjava olja
Hidravlična naprava je zaprt sistem z oljnim rezervoarjem,
oljno črpalko in krmilnim ventilom. Ne sme se spreminjati,
niti se z njim ne sme rokovati.
Priključke in vijačenje redno preverjajte, če so zatesnjeni in
jih po potrebi privijte.
Oljni rezervoar je tovarniško napolnjen s kakovostnim
hidravličnim oljem, viskoznosti ISO 20.
Olje menjavajte vsakih 150 obratovalnih ur.
1. Pritisna plošča se nahaja v izhodiščnem položaju.
Sedaj stroj izklopite iz omrežja.
2. Vijak za dolivanje olja je popustite (slika 1/11) in ga
odložite na stran.
3. Zraven naprave postavite prazno 4-litrsko skledo in jo
namestite tako, kot kaže (slika 4). Počakajte, da vso
staro olje izteče. Odstranite na ekološki način!
4. Stroj obrnite s spodnjim delom navzgor (slika 4), da bi
lahko dopolnili kakšnih 2,4 l hidravličnega olja
(viskoznost 20).
5. Za izpuščanje olja je v vijaku nameščen (slika 1/11)
merilec za olje. Očistite ga in vstavite v stroj, ki je še
vedno v navpični legi. Ponovno ga potegnite ven,
gladina olja naj bo med obema oznakama.
6. Vijak za izpuščanje olja (slika 1/11) sedaj ponovno
pritrdite. Nato napravo nekajkrat poženite na prazen
tek. Redno pregledujte stanje olja in ga po potrebi
dopolnite.
Transport
Da bi jo dvignili iz škatle, boste potrebovali najmanj
2 osebi.
Stroj je možno premeščati v poševni legi na koleščkih.
Uporabite ročaj za prevažanje, dvignite in vlecite.
Pogoji skladiščenja: Suh, skladiščni prostor pod streho,
maksimalna važnost zraka 80 %, temperatura
-20°C do +60°C.
Pred vsakim prevozom naprave je potrebno vijak
brezpogojno priviti, da se prepreči odtekanje olja.
Poskrbite, da boste stroj prevažali v navpičnem položaju.
Page 46

Morebitne okvare
Tabela prikazuje možne okvare, možen vzrok za nastanek,
ter način odpravljanje le teh. Če problema kljub temu ne
morete odstraniti, pokličite strokovnjaka.
Preden odložite napravo in se lotite čiščenja naprave,
vedno izvlecite vtič iz vtičnice na zidu.
Nevarnost poškodb zaradi električnega udara.
Simptomi
Možen vzrok Rešitev
Motor
samodejno
prekine
proces
cepljenja
Les se ne cepi
Aktivirana je zaščita
proti prenapetosti
Naprava je napačno
nameščena
Dolžina polena
presega zmogljivost
motorja
Cepilni klin je top
Olje izteka
Električar
Poleno
namestite
pravilno, glej
tudi
Rokovanje
Poleno
razrežite na
ustrezno
velikost
Klin zbrusite
Poiščite
netesna
mesta,
posvetujte se
s
strokovnjako
m
Plošča vibrira,
slišijo se
nevsakdanji
zvoki
Odvečno olje ali
prekomerna količina
zraka v hidravličnem
sistemu
Preverite
stanje olja in
ga po potrebi
dolijte pokličite
strokovnjaka
Na cilindru ali
na drugem
mestu izteka
olje
V delujočem
hidravličnem sistemu
je prisoten zrak
Niste pritrdili vijaka za
izpuščanje zraka (ki ga
popuščamo pred
izdobavo)
Vijak za dolivanje olja
je popuščen
Poškodovan je ventil
za olje in/ali tesnilo
Vijak za
izpuščanje
zraka odvijte
še pred
uporabo za
par vrtljajev
Pred
transportom
pritrdite vijak
za izpuščanje
zraka
Vijak za
izpuščanje
olja pritrdite
Pokličite
prodajalca
Page 47

Uvod
Da biste postigli najduži mogući radni vijek Vašeg
električnog postrojenja, prije prvog puštanja uređaja u rad
pažljivo pročitajte sve upute navedene u priručniku za
korištenje snježnog pluga i priložene sigurnosne upute.
Osim toga Vam preporučujemo, da naputak za upotrebu
čuvate za slučaj potrebe odnosno za slučaj bilo kakvih
sumnja ili pitanja u vezi korištenja višenamjenskog uređaja
za oštrenje.
Iz razloga postepenog tehničkog razvoja proizvoda
pridržavamo pravo na tehničke izmjene u svrhu
poboljšanja performansa istog.
Ovaj dokument se smatra za originalan naputak za
upotrebu.
1. Opseg isporuke
Uređaj izvadite iz ambalaže i provjerite da li su uređaj i
njegovi dijelovi kompletni:
Ukoliko gore navedeni dijelovi nedostaju ili ako su
oštećeni, obratite se svome prodavaču.
Popis uređaja (vidi sliku 1)
1. Rezervoar za ulje
2. Pritisna daska
3. Potporna površina
4. Klin za cijepanje
5. Drška za guranje
6. Nogara
7. Gumb za uključivanje
8. Motor
9. Kotač za kretanje
10. Hidraulička poluga
11. Vijak za ispuštanje ulja
12. Vijak za odzračivanje
2. Tehnički podaci
Napon/frekvencija: 230V~50Hz
Snaga motora: 1500 W/(P1, S6 40%)
Zaštitna klasa: IP 54
Klasa izolacije: B
Slobodan hod obrtaja: 2950 min-1
Maksimalna jačina cijepanja: 4 tone
Količina hidr. ulja: 2,4 l/SAE 20/HPL 46
Maks. hidraulički tlak: 160 bara
Maks. podizaj kod cijepanja: 230 mm
Ø drva min./maks.: 50/250 mm
Dužina min./maks.: 250/370 mm
Brzina pomicanja naprijed: 0,04 m/s
Brzina pomicanja natrag: 0,06 m/s
Montažne dimenzije DxŠxV: 810x270x460 mm
Težina: 38 kg
Opće upute
1 stroj za cijepanje drva
1 originalne upute za korištenje
Jamstveni list
Nakon raspakiranja provjerite tehničko stanje
odnosno eventualna oštećenja svih dijelova tijekom
prijevoza.
Provjerite, da li je pošiljka kompletna.
Prije uporabe pročitajte upute i upoznajte funkcije
uređaja.
Koristite samo originalnu opremu i originalne
rezervne dijelove, koji podliježu habanju.
Uređaj koristite samo sa
RCD (zaštitom protiv variranja struje) 30mA.
Mjere sigurnosti
Pridržavajte se svih sigurnosnih upozorenja i simbola
navedenih na stroju i održavajte ih u čitkom stanju.
Zabranjeno je demontirati i deaktivirati zaštitne
elemente stroja.
Provjerite električne kablove. Ne upotrebljavajte
oštećene električne kablove. Vidi priključenje na el.
mrežu
Prije puštanja stroja u rad provjerite ispravno
funkcioniranje mehanizma za oboručno rukovanje.
Stroj smiju koristiti samo osobe starije od 18 godina.
Osobe koje prolaze obuku za rad sa strojem moraju
biti starije od 16 godina, međutim, ove osobe smiju
raditi na stroju samo pod nadzorom odrasle osobe.
Pri radu uvijek nosite zaštitne radne rukavice.
Oprezno pri radu: Kod rada sa strojem postoji
opasnost od ozljeda prstiju i ruku.
Za cijepanje teških ili teško obradivih komada drva
koristite odgovarajuća sredstva za podupiranje.
Pregradnja, podešavanje, mjerenje i čišćenje smiju se
vršiti samo ako je motor pile isključen. Izvadite utikač
priključnog kabla iz utičnice.
Popravke elektroinstalacije i održavanje uređaja
može vršiti samo stručnjak.
Nakon završetka popravka ili radova na održavanju
neophodno je ponovo montirati sve zaštitne i
sigurnosne elemente uređaja.
Prije napuštanja radnog mjesta obavezno isključite
motor. Izvadite utikač priključnog kabla iz utičnice.
Blokada dvoručnog upravljača i/ili nekorištenje
elemenata za dvoručno upravljanje strogo su
isključeni, u protivnom postoji opasnost od ozljeda
prilikom upotrebe stroja.
U slučaju neovlaštenih izmjena i zahvata na stroju
proizvođač ne snosi nikakvu odgovornost za nastale
štete.
Korištenje uređaja sukladno njegovoj namjeni
Hidraulički stroj za cijepanje drva smije se koristiti samo u
ležećem položaju. Drvo se smije cijepati samo u ležećem
položaju, u smjeru ose vlakana. Duljina drva za cijepanje
je najviše 37 cm.
Svaka drugi način uporabe smatra se za nedozvoljenu
uporabu. Proizvođač ne snosi odgovornost za štete i
ozljede pri radu s postrojenjem. Vodite računa o tome da
naši proizvodi nisu namijenjeni za industrijsku upotrebu.
Montaža
Stroj se isporučuje rastavljen tako da kupac nakon
isporuke mora sam montirati potpornu nogu (slika br.1/6) i
dršku stroja (slika br. 1/5).
Za montažu koristite 2 šesterokutna vijka M6x16 (koji
dolaze sa strojem) i maticu za potpornu nogu, te imbus
vijke M6x16 s maticom za dršku. Postrojenje stavite u
vodoravnom položaju na pod i na strani klina za cijepanje
drva podmetnite komad ambalaže od stiropora.
Prije rada
Drvo nikada nemojte cijepati u vertikalnom položaju
niti okomito prema osi drvnih vlakana!
Korisnik je dužan pridržavati se sigurnosnih propisa
te propisa za rad i održavanje izdanih od strane
proizvođača, kao i uputa o dimenzijama drva
navedenim u specifikaciji postrojenja (tehnički
podaci).
Neophodno je pridržavati se sigurnosnih propisa kao i
ostalih opće prihvaćenih tehničkih propisa.
Page 48

Stroj smiju koristiti, popravljati i održavati samo
stručno osposobljene osobe koje su upoznate s
načinom upotrebe istog i s postojećim rizicima. U
slučaju neovlaštenih izmjena i zahvata na stroju
proizvođač ne snosi nikakvu odgovornost za nastale
štete.
Stroj se smije koristiti samo s originalnom opremom
(priborom) uz primjenu originalnih alata dostavljenih
od strane proizvođača.
Svaka drugi način uporabe smatra se za
nedozvoljenu uporabu. Proizvođač ne snosi nikakvu
odgovornost za štete, nego samo korisnik
postrojenja.
Instalacija
Vodite računa o tome da stroj mora biti instaliran na ravnoj
podlozi, u stabilnom položaju, s time da je neophodno
osigurati dovoljno osvjetljenje radnog mjesta.
Za nesmetan i siguran rad postrojenja neophodno je
osigurati dovoljno mjesta oko stroja.
Preostali rizici.
Stroj je konstruiran prema sadašnjem stanju tehnike i
u skladu s opće prihvaćenim sigurnosnim i tehničkim
propisima. Međutim, pri radu se ipak mogu pojaviti
određeni rizici.
Opasnost od ozljeda prstiju i ruku uslijed dodira s
alatom za cijepanje drva u slučaju nestručnog
vođenja ili podupiranja drva.
Opasnost od ozljeda uslijed izlijetanja izbačenog
komada drva zbog nestručnog držanja ili vođenja
drva kod cijepanja.
Opasnost od strujnog udara u slučaju korištenja
nepropisnih priključnih kablova.
Unatoč svim poduzetim mjerama zaštite opak mogu
postojati određeni rizici i opasnost od šteta i ozljeda.
Rizik od ozljeda može se minimalizirati poštivanjem
Sigurnosnih uputa i Korištenjem postrojenja u
skladu s njegovom namjenom te poštivanjem svih
uputa navedenih u naputku za upotrebu.
Priključenje na el. mrežu
Redovito provjeravajte eventualna oštećenja priključnih
kablova. Izvadite utikač priključnog kabla iz utičnice!
Priključni kablovi moraju odgovarati odredbama standarda
VDE i DIN. Koristite samo priključne kablove s oznakom H
07-RN. U skladu s važećim propisima na priključnom kablu
mora biti navedena odgovarajuća tipska oznaka.
Električni kablovi u kvaru
Pri radu često dolazi do oštećenja izolacije priključnih
električnih kablova za napajanje.
Mogući uzroci:
Oštećenja nastala uslijed tlaka ako priključni kablovi vode
ispod prozora ili vrata.
Lomovi kablova zbog nestručne instalacije ili neispravnog
polaganja priključnih kablova.
Presijecanje zbog pregaženja priključnog kabla.
Oštećenje izolacije uslijed istrgavanja kabla iz utičnice na
zidu.
Pukotine nastale uslijed starenja izolacije.
Oštećeni priključni kablovi s oštećenom izolacijom
više se ne smiju koristiti – opasno po život!
Rukovanje - slika 3
Prije početka radova neophodno je popustiti odušni vijak
(slika br. 2/12) za nekoliko okretaja kako bi bila
omogućena cirkulacija zraka u spremniku ulja.
Ako je odušni vijak tijekom rada stroja zatvoren, dolazi do
nastanka nadtlaka uslijed rada hidrauličkog sustava.
Prije transporta postrojenja neophodno je zategnuti vijak
kako ne bi došlo do istjecanja ulja.
Cijepajte samo ravno odsječene komade drva.
1. Drvo postavljajte na stroj u ležećem položaju i ravno
na potpornu površinu (slika br. 1/3)
2. Stroj za cijepanje drva opremljen je za upravljanje
objema rukama – lijeva ruka upravlja hidrauličkom
polugom (slika br. 1/10), desna ruka upravlja
pokretačem (slika br. 1/7).
3. Hidrauličku polugu (slika br. 1/10) pritišćite na opisan
način prema dole, i aktivirajte cijepanje (slika 1/7
pomoću pokretača.
Ako oslobodite jedan od navedenih upravljačkih
elemenata, stroj se odmah zaustavlja. U slučaju
oslobađanja upravljačkih dijelova pritisna ploča se vraća
natrag. Ako postrojenje do 5 sekundi ne može cijepati
naredni komad drva, odmah prekinite radni postupak. Drvo
je vjerojatno previše tvrdo. Okrenite komad drva za 90° i
probajte ponovo.
Upozorenje: Ako stroj radi dulje od
5 sekundi postoji opasnost od pregrijavanja odnosno
oštećenja postrojenja. Odmah prekinite rad.
Pogrešna instalacija, slika br. 3/A
Drvo uvijek polažite na površinu stroja u ležećem položaju!
Drvo ne smije potklizavati niti smije ležati u krivom
položaju. Ako za cijepanje koristite samo gornji dio klina za
cijepanje a ne cijelu oštricu, klin će biti previše opterećen.
Nikada nemojte istovremeno cijepati nekoliko komada
drva!
U protivnom postoji opasnost od izbacivanja nekog od
komada drva.
Upozorenje! Velika opasnost od ozljeda!
Drvo je zaglavljeno, slika br. 3/B/C
Nikada nemojte izbijati zaglavljeno drvo iz stroja. To može
uzrokovati ozljede i oštećenje stroja.
Postupajte na slijedeći način:
1. Pustite pritisnu ploču da se vrati u polazni položaj.
2. Ispod drva podmetnite klin - vidi sliku.
3. Izvršite jedan radni ciklus cijepanja tako da pritisna
ploča pomakne klin daleko ispod zaglavljenog drva
koje želite osloboditi.
4. Gore navedene korake ponavljajte s novim klinovima
sve dok drvo ne bude istisnuto iz stroja (prema gore).
Oznaka
Sigurnost proizvoda:
Proizvod ispunjava zahtjeve
odgovarajućih normi EU
Page 49

Zabrane:
Ne vucite za kabao! Čuvajte od kiše i vlage!
Ambalaža:
Zaštitite od vlage.
Ambalaža mora biti
okrenuta prema gore.
Uređaj mogu koristiti samo
jedna osoba.
Upozorenje!
Upozorenje/Pažnja
Opasnost od letećih dijelova.
Osobe u okolnom prostoru
moraju se zadržavati na
sigurnoj udaljenosti od uređaja
(najmanje 5 metara)
Naredbe:
Najprije pažljivo pročitajte
upute za uporabu. Prije
upotrebe proizvoda proučite
upute za upotrebu istog.
Upotrebljavati sigurnosnu
obuću
Prije otvaranja izvucite utikač
Zaštita životne sredine:
iz utičnice
Osigurajte stručnu likvidaciju
otpada kako ne bi došlo do
oštećenja okoliša.
Električne ili elektronske
uređaje u kvaru i/ili likvidirane
uređaje odnesite u
odgovarajuće centre za
skupljanje otpada.
Strogo je zabranjeno
otklanjanje
sigurnosnih/zaštitnih
elemenata.
Upozorenje na opasnost od
ozljeda uslijed strujnog
udara
Opasnost od fizičkih
povrjeda ruku
Koristite zaštitne rukavice.
Koristite odgovarajući štitnik
za zaštitu lica.
Ambalažu od ljepenke
odnesite na recikliranje u
odgovarajući centar za
skupljanje otpada.
Interseroh-Recycling
Tehnički podaci:
Priključak Težina
IP 54
Snaga motora Tip zaštite od prekostruje
Obrtaji Snaga cijepanja
Presjek drva za cijepanje Duljina cijepanog drva
Sadržaj spremnika
hidrauličnog ulja
Jamstvo
Garantni rok je 12 mjeseci prilikom industrijske uporabe, a
24 mjeseca za potrošača i počinje na dan prodaje uređaja.
Jamstvo se odnosi samo na nedostatke, koji su nastali
zbog kvarnog materijala ili putem proizvodnje. Neophodno
je, da se prilikom reklamacije dopremi i račun, koji mora
biti potpisan od strane prodavača i obilježen datumom te
pečatom prodavaonice.
U okvir jamstva ne spadaju kvarovi, koji bi nastali putem
nepravilne uporabe kao npr.: preopterećenje stroja,
rukovanje silom odnosno zbog štetnog dodira sa stranim
predmetima.
Upute za slučaj nužde
Osigurajte prvu pomoć prema vrsti ozljeda i što najbrže
potražite stručnu liječničku pomoć.
Oštećenu osobu čuvajte od drugih opasnosti i pomirite je.
Za slučaj eventualnih nezgoda i ozljeda na radu, na
radnom mjestu mora biti uvijek na raspolaganju
priručna ljekarna za pružanje prve pomoći u skladu sa
standardom DIN 13164. Nakon korištenja određenog
materijala iz priručne ljekarne neophodno je isti
odmah dopuniti.
Otvorite odušni vijak
Page 50

Ako zahtijevate pomoć,
navedite slijedeće podatke:
1. Mjesto nezgode
2. Vrsta nezgode
3. Broj ozlijeđenih osoba
4. Vrsta ozljede
Likvidacija
Upute za likvidaciju ovog uređaja proizlaze iz navedenih
piktograma, koji se nalaze na njegovom kućištu na stroju
na omotaču. Objašnjenja značenja pojedinačnih
ideograma ćete naći u poglavlju „Oznake na stroju“.
Likvidacija transportne ambalaže
Ambalaža štiti uređaj od oštećenja tijekom prijevoza.
Materijal ambalaže odabran je s obzirom na zaštitu okoliša
i način likvidacija, što znači da materijal ambalaže može
biti recikliran.
Vraćanjem ambalaže u novi ciklus ponovne upotrebe štitite
sirovine i doprinosite smanjenju troškova likvidacije i
postupanja s otpadom.
Dijelovi ambalaže (npr. folije Styropor®) mogu biti opasne
za djecu. Postoji opasnost od gušenja!
Dijelove ambalaže čuvajte van dosega djece i što prije
likvidirajte.
Preporuke prije upotrebe
Prije upotrebe uređaja mora korisnik pažljivo pročitati ove
upute za korištenje.
Kvalifikacija
Osim detaljne upute od strane stručnjaka u vezi korištenja
ovog uređaja nije potrebna druga kvalifikacija.
Minimalna starost osoblja stroja
Sa uređajem smiju raditi samo osobe koje su napunile 18
godina. Jedina iznimka jest rad maloljetnih osoba, uz uvjet
da ove osobe rade s uređajem u okviru praktičnih vježbi
pod nadzorom stručnog voditelja obuke.
Obuka
Korištenje uređaja zahtijeva samo odgovarajuću pouku od
strane stručne osobe odnosno upoznavanje sa uputama
navedenim u naputku za korištenje. Specijalna obuka nije
neophodna.
Servis
Da li imate tehnička pitanja ? Reklamaciju? Da li Vam
trebaju rezervni dijelovi ili upute za uporabu?
Na našem home page www.guede.com u odjeljenju
„Servis“ ćemo Vam pružiti pomoć brzo i bez nepotrebne
birokracije. Pomozite nam kako bismo Vam mogli pomoći.
Radi identifikacije Vašeg aparata u slučaju reklamacije
potreban nam je serijski broj, broj narudžbe i godina
proizvodnje. Sve ove podatke naći ćete na tipskoj pločici.
Kako biste ove podatke uvijek imali pri ruci, napišite je
molim ovdje:
Serijski broj:
Kataloški broj:
Godina proizvodnje:
Telefon: +49 (0) 79 04 / 700-360
Telefaks: +49 (0) 79 04 / 700-51999
E-mail: support@ts.guede.com
Prije izvođenja radova na održavanju/čišćenju i drugih
radova neophodno je odspojiti uređaj od izvora napona.
Prije izvođenja predmetnih radova pričekajte dok se uređaj
ne ohladi.
Održavanje
Pregradnja, podešavanje, mjerenje i čišćenje smiju se
vršiti samo ako je motor pile isključen. Izvadite utikač
priključnog kabla iz utičnice.
Popravke i radove na održavanju električnih dijelova smiju
izvoditi samo stručno osposobljeni električari.
Nakon popravaka i radova na održavanju neophodno je
vratiti sve sigurnosne i zaštitne elemente.
Preporučujemo:
Nož za cijepanje je potrošni materijal koji je
neophodno dobro obrusiti prema potrebi.
Neophodno je osigurati lagani hod kombiniranog
dvoručnog zaštitnog elementa. Prema potrebi
podmazati s nekoliko kapljica ulja.
Potpornu površinu održavajte u čistom stanju.
Klizne dijelove podmažite mazivom.
Hidraulički uređaj/zamjena ulja
Hidrauličko postrojenje je zatvoreni sistem s uljnim
spremnikom, uljnom pumpom i upravljačkim ventilom. Ne
smije se zamjenjivati
niti se smije manipulirati sa njim.
Redovito provjeravajte zabrtvljenost i zategnutost
priključaka i vijčanih spojeva, prema potrebi ih zategnite.
Uljni spremnik je tvornički napunjen kvalitetnim
hidrauličkim uljem, stupanj viskoznosti ISO 20.
Ulje zamijenite nakon svakih 150 radnih sati.
1. Pritisna ploča se sada nalazi u polaznom položaju.
Stroj sada odspojite od mreže.
2. Popustite vijak za ispuštanje ulja (slika br. 1/11) i
stavite ga na stranu.
3. Pored postrojenja stavite praznu zdjelu zapremine od
4 litra i smjestite je prema slici (slika br. 4). Pričekajte
dok ne iscuri sve staro ulje. Ekološki likvidirajte!
4. Uređaj okrenite naopako (slika 4), kako biste mogli u
njega naliti 2,4 l hidrauličkog ulja (viskoznosti 20).
5. U vijku za ispuštanje ulja (slika 1/11) ugrađena je
skala za mjerenje visine ulja. Očistite je i stavite u
stroj koji se još nalazi u vertikalnom položaju. Ponovo
je izvadite, razina ulja se treba nalaziti između oba
ureza.
6. Vijak za ispuštanje ulja (slika br. 1/11) ponovno
zavrnite (slika Zatim izvršite nekoliko radnih ciklusa u
praznom hodu. Redovito provjeravajte stanje ulja,
prema potrebi ga dopunite.
Transport
Za vađenje stroja iz kutije potrebne su najmanje
2 osobe.
Stroj se može premještati u kosom položaju na kotačima.
Za premještanje koristite dršku, podignite je i povucite.
Uvjeti za skladištenje: Suho mjesto za skladištenje, s
nadstrešnicom, najveća dopuštena vlažnost zraka 80 %,
temperatura
od -20°C do +60°C.
Prije transporta postrojenja neophodno je zategnuti vijak
kako ne bi došlo do istjecanja ulja.
Stroj se smije premještati samo u vertikalnom položaju.
Page 51

Utvrđivanje kvarova
U tablici su navedeni mogući kvarovi, mogući uzroci ovih
kvarova i način otklanjanja. Ako ipak ne možete otkloniti
postojeći problem, obratite se stručnom servisu.
Prije održavanja i čišćenja isključite uređaj i izvucite
utikač iz utičnice.
Postoji opasnost od udara električne struje.
Pojave
Vjerojatan uzrok Rješenje
Motor
automatski
završava radni
ciklus
cijepanja drva.
Drvo se ne
cijepa
Aktivirana je zaštita od
nadnapona.
Uređaj nije pravilno
namješten
Duljina drva
prekoračuje kapacitet
motora.
Klin za cijepanje je
otupljen.
Istjecanje ulja
Električar
Drvo stavljajte
na stroj na
ispravan
način, vidi
poglavlje
Rukovanje.
Prije cijepanja
drvo narežite
na komade
odgovarajuće
duljine.
Klin treba
naoštriti.
Utvrdite
propusna
mjesta,
obratite se
stručnjaku.
Pritisna ploča
vibrira i
proizvodi
neuobičajene
zvuke.
Nedovoljna količina
ulja ili prevelika
količina zraka u
hidrauličkom sustavu.
Provjerite
stanje ulja,
ulje prema
potrebi
dopunite,
obratite se
stručnjaku.
Istjecanje ulja
na cilindru ili
na drugim
mjestima.
Zrak u hidrauličkom
sustavu tijekom rada
postrojenja.
Odušni vijak nije bio
zategnut prije
prijevoza.
Vijak za ispuštanje ulja
je popušten
Kvar uljnog ventila i/ili
brtvila.
Prije upotrebe
popustite
odušni vijak
za nekoliko
okretaja.
Prije prijevoza
zategnite
odušni vijak.
Zavrnite vijak
za ispuštanje
ulja
Nazovite
prodavača
Page 52

Uvod
Kako biste postigli što najduži radni vijek ovog postrojenja,
prije prvog puštanja istog u rad pažljivo, pročitajte sva
uputstva navedena u priručniku za korištenje istog i
priložena sigurnosna uputstva. Osim toga preporučujemo
Vam da upute za upotrebu sačuvate za slučaj kasnije
potrebe odnosno za slučaj bilo kakvih sumnja ili daljih
pitanja u vezi korištenja višenamjenskog uređaja za
oštrenje.
U vidu postepenog tehničkog razvoja pridržavamo
pravo na tehničke izmjene zbog poboljšanja
karakteristika proizvoda.
Ovaj dokument se smatra za originalno uputstvo za
upotrebu.
1. Opseg isporuke
Uređaj izvadite iz omotača i provjerite da li su uređaj i
njegovi dijelovi u kompletu:
Ako gore navedeni dijelovi nedostaju ili u slučaju da su
oštećeni, obratite se prodavaču, kod kojeg ste uređaj
kupili.
Popis uređaja (vidi sliku 1)
1. Uljni rezervoar
2. Pritisna ploča
3. Potporna površina
4. Klin za cijepanje
5. Drška za guranje
6. Nogara
7. Gumb za uključivanje
8. Motor
9. Kolut za kretanje
10. Hidraulička poluga
11. Vijak za ispuštanje ulja
12. Vijak za ispuštanje zraka
2. Tehnički podaci
Napon/frekvencija: 230V~50Hz
Snaga motora: 1500 W/(P1, S6 40%)
Klasa zaštite: IP 54
Klasa izolacije: B
Slobodan hod okretaja: 2950 min-1
Maksimalna jačina cijepanja: 4 tone
Količina hidr. ulja: 2,4 l/SAE 20/HPL 46
Maks. hidraulički tlak: 160 bara
Maks. podizaj kod cijepanja: 230 mm
Ø drva min./maks.: 50/250 mm
Dužina min./maks.: 250/370 mm
Brzina pomicanja naprijed: 0,04 m/s
Brzina pomicanja nazad: 0,06 m/s
Montažne dimenzije DxŠxV: 810x270x460 mm
Težina: 38 kg
Opća uputstva
1 uređaj za cijepanje drva
1 originalna uputstva za upotrebu
Garantni list
Poslije raspakiranja provjerite stanje odnosno
eventualna oštećenja svih dijelova tijekom prijevoza.
Provjerite, da li je pošiljka kompletna.
Prije uporabe pročitajte uputstva i upoznajte funkcije
uređaja.
Upotrebljavajte samo originalnu opremu i rezervne
dijelove, koji podliježu habanju.
Uređaj koristite samo sa
RCD (zaštitom protiv variranja struje) 30mA.
Bezbjednosne mjere
Pridržavajte se svih bezbjednosnih upozorenja i
simbola na stroju i održavajte ih u čitkom stanju.
Zabranjeno je demontirati i deaktivirati zaštitne
elemente uređaja.
Provjerite električne kablove. Ne upotrebljavajte
električne kablove, ako su oštećeni. Vidi priključenje
na el. mrežu
Prije puštanja uređaja u rad provjerite ispravno
funkcionisanje mehanizma za oboručno korištenje.
Uređaj smiju upotrebljavati samo lica starija od 18
godina. Lica koja prolaze obuku za rad sa strojem
moraju biti starije od 16 godina, međutim, ova lica
smiju raditi na uređaju samo pod nadzorom odrasle
osobe.
Pri radu uvijek upotrebljavajte zaštitne rukavice.
Pažljivo pri radu: Prilikom rada s uređajem postoji
opasnost od ozljeda prstiju i ruku.
Za cijepanje težih ili teže obradivih drva koristite
odgovarajuće podupirače.
Pregradnja, podešavanje, mjerenje i čišćenje mogu
se vršiti samo ukoliko je motor isključen. Izvadite
utikač kabla iz utičnice!
Popravke elektroinstalacije i održavanje uređaja
može vršiti samo stručnjak.
Poslije završetka popravke ili održavanja uređaja
neophodno je ponovo montirati sve zaštitne i
sigurnosne elemente.
Prije napuštanja radnog mjesta obavezno ugasite
motor. Izvadite utikač kabla iz utičnice!
Blokiranje dvoručnog upravljača i/ili nekorištenje
elemenata za dvoručno upr
zabranjeni, jer postoji opasnost od ozljeda prilikom
upotrebe uređaja.
U slučaju neovlaštenih izmjena i zahvata na uređaju
proizvođač ne snosi odgovornost za nastale štete.
Korištenje uređaja u skladu sa njegovom namjenom
Hidraulički uređaj za cijepanje drva može se koristiti samo
u ležećem položaju. Drvo se može cijepati samo u
ležećem položaju, u smjeru ose vlakana. Dužina drva za
cijepanje je najviše 37 cm.
Svaki drugi način korištenja se smatra za nedozvoljenu
upotrebu. Proizvođač ne odgovara za štete i ozljede
nastale prilikom korištenja uređaja. Vodite računa o tome,
da naši proizvodi nisu namijenjeni za industrijsku upotrebu.
Montaža
Uređaj se isporučuje rastavljen tako da kupac poslije
isporuke mora sam montirati potpornu nogaru (slika br.1/6)
i dršku stroja (slika 1/5).
Za montažu upotrebljavajte 2 šesterokutna vijka M6x16
(koja dolaze sa strojem), maticu za potpornu nogaru i
imbus vijaka M6x16 s maticom za dršku. Uređaj stavite u
vodoravnom položaju na pod i na strani klina za cijepanje
drva podmetnite komad ambalaže od stiropora.
Prije rada
Drvo nikad ne cijepajte u okomitom položaju niti
okomito prema osi drvnih vlakana!
Korisnik je dužan pridržavati se bezbjednosnih
propisa te propisa za rad i održavanje izdanih od
strane proizvođača, kao i uputa o dimenzijama drva
navedenim u specifikaciji postrojenja (tehnički
podaci).
Neophodno je pridržavati se bezbjednosnih propisa
kao i ostalih opće prihvaćenih tehničkih propisa.
avljanje strogo su
Page 53

Uređaj mogu upotrebljavati, popravljati i održavati
samo stručno osposobljena lica koja su upoznata s
načinom upotrebe istog i sa svim potencijalnim
rizicima. U slučaju neovlaštenih izmjena i zahvata na
uređaju proizvođač ne snosi odgovornost za nastale
štete.
Uređaj se može upotrebljavati samo s originalnom
opremom (priborom) uz primjenu originalnih alata
dostavljenih od strane proizvođača.
Svaki drugi način korištenja se smatra za
nedozvoljenu upotrebu. Proizvođač ne odgovara za
nastalu štetu. Za istu odgovara samo korisnik
uređaja.
Instalacija
Vodite računa o tome da uređaj mora biti namješten na
ravnoj podlozi, u stabilnom položaju, s time da je
neophodno obezbjediti dovoljno osvjetljenje radnog
mjesta.
Za nesmetan i bezbjedan rad postrojenja neophodno je
obezbjediti dovoljno mjesta oko uređaja.
Preostale potencijalne opasnosti.
Uređaj je konstruisan prema sadašnjem stanju tehnike i
u skladu s opće prihvaćenim bezbjednosnim i tehničkim
propisima. Međutim, pri radu se ipak mogu pojaviti
određeni rizici.
Opasnost od ozljeda prstiju i ruku zbog kontakta s
alatom za cijepanje drva u slučaju nestručnog
vođenja ili podupiranja drva.
Opasnost od ozljeda zbog izlijetanja izbačenog
komada drva i nestručnog držanja ili vođenja drva
kod cijepanja.
Opasnost od strujnog udara u slučaju upotrebe
nepropisnih priključnih kablova.
Unatoč svim poduzetim mjerama zaštite ipak mogu
postojati određeni rizici i opasnost od šteta i ozljeda.
Rizik od ozljeda može se smanjiti poštivanjem
Bezbjednosnih uputstava i Korištenjem
postrojenja u skladu s njegovom namjenom te
poštivanjem svih preporuka navedenih u uputstvima
za upotrebu.
Priključenje na el. mrežu
Redovito provjeravajte eventualna oštećenja priključnih
kablova. Izvadite utikač kabla iz utičnice!
Priključni kablovi moraju odgovarati odredbama standarda
VDE i DIN. Upotrebljavajte samo priključne kablove s
oznakom H 07-RN. U skladu s važećim propisima na
priključnom kablu mora biti navedena odgovarajuća tipska
oznaka.
Električni kablovi u kvaru
Pri radu često dolazi do oštećenja izolacije priključnih
električnih kablova za napajanje.
Mogući uzroci:
Štete nastale zbog tlaka ukoliko priključni kablovi vode
ispod prozora ili vrata.
Lomovi kablova zbog nestručne instalacije ili neispravnog
polaganja priključnih kablova.
Presijecanje prilikom pregaženja električnog kabla.
Oštećenje izolacije uslijed istrgavanja kabla iz utičnice na
zidu.
Pukotine nastale zbog starenja izolacije.
Oštećeni priključni kablovi s oštećenom izolacijom
više se ne smiju koristiti – opasno po život!
Rukovanje - slika 3
Prije početka radova neophodno je popustiti odušni vijak
(slika br. 2/12) za nekoliko obrtaja da bi bilo omogućeno
kruženje zraka u rezervoaru za ulje.
Ukoliko je odušni vijak tijekom rada uređaja zatvoren,
dolazi do nastanka nadtlaka zbog rada hidrauličkog
sustava.
Prije transporta postrojenja neophodno je zategnuti vijak
da ne bi došlo do istjecanja ulja.
Cijepajte samo ravno odsječene komade drva.
1. Drvo postavljajte na uređaj u ležećem položaju i
ravno na potpornu površinu (slika br. 1/3)
2. Uređaj za cijepanje drva opremljen je za upravljanje
sa obje ruke – lijeva ruka upravlja hidrauličkom
polugom (slika br. 1/10), a desna ruka pokretačem
(slika br. 1/7).
3. Hidrauličku polugu (slika br. 1/10) pritišćite na opisan
način prema dolje, i aktivirajte funkciju cijepanja (slika
1/7 pomoću pokretača.
Ukoliko oslobodite jedan od navedenih upravljačkih
elemenata, uređaj se odmah zaustavlja. U slučaju
oslobađanja upravljačkih dijelova ploča se vraća nazad.
Ukoliko uređaj u roku od 5 sekundi ne može cijepati
naredni komad drva, odmah prekinite radni postupak. Drvo
je vjerojatno previše tvrdo. Okrenite komad drva za 90° i
probajte ponovo.
Upozorenje: Ukoliko uređaj radi dulje od
5 sekundi postoji opasnost od pregrijavanja odnosno
oštećenja uređaja. Odmah prekinite rad.
Pogrešna instalacija, slika br. 3/A
Drvo uvijek polažite na površinu uređaja u ležećem
položaju!
Drvo ne smije potklizavati niti smije ležati u krivom
položaju. Ukoliko za cijepanje upotrebljavate samo gornji
dio klina umjesto cijele oštrice, klin će biti preopterećen.
Nikad nemojte istovremeno cijepati nekoliko komada drva!
U protivnom postoji opasnost od izbacivanja nekog od
komada drva.
Upozorenje! Velika opasnost od ozljeda!
Drvo je zaglavljeno, slika 3/B/C
Nikad nemojte izbijati zaglavljeno drvo iz uređaja. To može
uzrokovati ozljede i štete na uređaju.
To se vrši na slijedeći način:
1. Pustite pritisnu ploču da se vrati u polazni položaj.
2. Ispod drva podmetnite klin - vidi sliku.
3. Uključite jedan radni ciklus da pritisna ploča pomakne
klin dalje ispod zaglavljenog drva koje želite izvaditi.
4. Gore navedene korake ponavljajte s novim klinovima
sve dok ne izvadite drvo iz stroja (prema gore).
Oznaka
Bezbjednost proizvoda:
Proizvod ispunjava
naređenja odgovarajućih
direktiva EU
Page 54

Zabrane:
Zaštita životne okoline:
Ne vucite za kabel! Čuvajte od kiše i vlage!
Uređaj može koristiti samo
jedna osoba.
Upozorenje!
Upozorenje/Pažnja
Strogo je zabranjeno
otklanjanje
bezbjednosnih/zaštitnih
elemenata.
Upozorenje na opasnost od
ozljeda zbog strujnog udara
Opasnost od letećih dijelova.
Osobe u blizini moraju se
zadržavati na sigurnoj
udaljenosti od uređaja
(najmanje 5 metara).
Naredbe:
Opasnost od fizičkih
povrjeda ruku
Osigurajte stručnu likvidaciju
otpada kako ne bi došlo do
oštećenja okoliša.
Električne ili elektronske
uređaje u kvaru i/ili stare
uređaje odnesite u
odgovarajuće centre za
skupljanje otpada.
Ambalaža:
Zaštitite od vlage.
Interseroh-Recycling
Tehnički podaci:
Priključak Težina
Ambalažu od ljepenke
odnesite u recilažu ili u
odgovarajući centar za
skupljanje otpada.
Ambalaža mora biti
okrenuta prema gore.
Najprije pažljivo pročitajte
upute za uporabu. Prije
korištenja proizvoda proučite
uputstva za upotrebu istog.
Upotrebljavati sigurnosnu
obuću!
Prije otvaranja izvucite utikač
iz utičnice
Koristite zaštitne rukavice.
Upotrebljavajte
odgovarajući štitnik za
zaštitu lica.
IP 54
Snaga motora Tip zaštite od prekostruje
Okretaji Snaga cijepanja
Presjek drva za cijepanje Dužina cijepanog drva
Sadržaj rezervoara
hidrauličnog ulja
Otvorite odušni vijak
Page 55

Garancija
Garancija važi 12 mjeseci u slučaju industrijske upotraebe,
a 24 mjeseca za potrošača; počinje važiti na dan prodaje
uređaja.
Garancija se odnosi samo na nedostatke, koji su nastali
zbog kvarnog materijala ili prilikom proizvodnje.
Neophodno je, da se u slučaju reklamacije dopremi i račun
ili faktura, koja mora biti potpisana od strane prodavca i
obilježena datumom i pečatom prodavaonice.
U okvir garancije ne spadaju kvarovi, koji bi nastali putem
nepravilne uporabe kao npr.: preopterećenje uređaja,
rukovanje silom odnosno zbog štetnog kontakta sa drugim
predmetima.
Uputstva za slučaj nužde
Obezbjedite prvu pomoć prema vrsti ozljeda i što prije
potražite stručnu pomoć ljekara.
Oštećenu osobu zaštitite od drugih opasnosti i pomirite je.
Za slučaj eventualnih nesreća i ozljeda na radu, na
radilištu mora biti uvijek na raspolaganju kutija za
pružanje prve pomoći u skladu sa standardom DIN
13164. Poslije korištenja određenog materijala iz
priručne ljekarne neophodno je isti odmah dopuniti.
Ukoliko zahtijevate pomoć,
navedite slijedeće podatke:
1. Mjesto nesreće
2. Vrsta nesreće
3. Broj ozlijeđenih osoba
4. Vrsta ozljede
Likvidacija
Uputstva za likvidaciju ovog uređaja proizlaze iz navedenih
ideograma, koji se nalaze na njegovom kućištu na uređaju
i na ambalaži. Objašnjenja značenja pojedinačnih
ideograma ćete naći u poglavlju „Oznake na stroju“.
Likvidacija originalne ambalaže
Originalna ambalaža štiti uređaj od oštećenja prilikom
prijevoza. Materijal ambalaže odabran je s obzirom na
zaštitu okoliša i način likvidacije, što znači da taj materijal
može biti recikliran.
Vraćanjem ambalaže u novi ciklus (reciklažu) štitite
sirovine i doprinosite smanjenju troškova likvidacije i
rukovanja s otpadom.
Dijelovi ambalaže (npr. folije Styropor®) mogu biti opasne
za djecu. Postoji opasnost od gušenja!
Ambalažu čuvajte van dosega djece ili je što prije
likvidirajte.
Preporuke prije korištenja
Prije korištenja uređaja mora korisnik pažljivo pročitati ova
uputstva za korištenje.
Kvalifikacija
Osim detaljnih uputstava od strane stručnjaka u vezi
korištenja ovog uređaja nije potrebna druga kvalifikacija.
Minimalna starost osoblja, koje koristi uređaj
Uređaj mogu koristiti samo osobe koje su napunile 18
godina. Jedina iznimka je rad maloljetnih osoba, pod
uslovom da ove osobe rade s uređajem u okviru praktičnih
vježbi pod nadzorom stručnog voditelja.
Obuka
Primjena uređaja zahtijeva samo odgovarajuću pouku od
strane stručnjaka odnosno upoznavanje sa uputama
navedenim u uputstvu za korištenje. Specijalna obuka nije
potrebna.
Servis
Da li imate tehnička pitanja ? Reklamaciju? Da li Vam
trebaju rezervni dijelovi ili nova uputstva za upotrebu?
Na našim stranicama www.guede.com u odjeljenju
„Servis“ pružamo pomoć brzo i bez suvišne birokracije.
Pomozite nam kako bismo mi Vama mogli pomoći. Radi
identifikacije Vašeg uređaja za slučaj reklamacije
neophodan nam je serijski broj, broj narudžbe i godina
proizvodnje. Sve gore spomenute podatke naći ćete na
tipskoj etiketi. Da biste ove podatke uvijek imali pri ruci,
zapišite ih molim tu:
Serijski broj:
Kataloški broj/broj narudžbe:
Godina proizvodnje:
Telefon: +49 (0) 79 04 / 700-360
Telefaks: +49 (0) 79 04 / 700-51999
E-mail: support@ts.guede.com
Prije početka održavanja/čišćenja i drugih radova
neophodno je isključiti uređaj od izvora napona. Prije
vršenja radova pričekajte dok se uređaj ne ohladi.
Održavanje
Pregradnja, podešavanje, mjerenje i čišćenje mogu se
vršiti samo ukoliko je motor isključen. Izvadite utikač kabla
iz utičnice!
Samo stručno osposobljeni električari mogu popravljati i
održavati električne dijelove uređaja.
Poslije popravaka i radova na održavanju neophodno je
vratiti sve bezbjednosne i zaštitne elemente.
Preporučujemo:
Nož za cijepanje je potrošni materijal koji je
neophodno povremeno dobro naoštriti.
Neophodno je obezbjediti besprijekoran rad
kombiniranog dvoručnog zaštitnog elementa. Prema
potrebi podmažite s nekoliko kapi ulja.
Potporna površina mora biti uvijek u čistom stanju.
Klizne dijelove podmažite mazivom.
Hidraulički uređaj/zamjena ulja
Hidrauličko postrojenje je zatvoreni sistem s uljnim
rezervoarom, uljnom pumpom i upravljačkim ventilom. Ne
smije se zamjenjivati
niti se smije rukovati s njim.
Redovito provjeravajte zabrtvljenost i zategnutost
priključaka i vijčanih spojeva, prema potrebi ih zategnite.
Uljni rezervoar je tvornički napunjen kvalitetnim
hidrauličkim uljem viskoznosti ISO 20.
Ulje zamijenite novim svakih 150 radnih sati.
1. Pritisna ploča se sada nalazi u polaznom položaju.
Izvadite utikač uređaja iz utičnice.
2. Odvrnite vijak za ispuštanje ulja (slika 1/11) i stavite
ga na stranu.
3. Pored uređaja stavite praznu posudu od 4 litra i
smjestite je prema slici (slika 4). Sačekajte dok ne
iscuri sve staro ulje. Ekološki likvidirajte!
4. Uređaj okrenite naopako (slika 4), da biste mogli u
njega naliti 2,4 l hidrauličkog ulja (viskoznosti 20).
5. U vijku za ispuštanje ulja (slika 1/11) ugrađena je
skala za mjerenje visine ulja. Očistite je i stavite u
Page 56

uređaj koji se još nalazi u okomitom položaju. Ponovo
je izvadite, razina ulja mora biti između oba ureza.
6. Vijak za ispuštanje ulja (slika 1/11) ponovno zavrnite
(slika Zatim izvršite nekoliko radnih ciklusa u
praznom hodu. Redovito provjeravajte stanje ulja i
prema potrebi ga dopunite.
Transport
Za vađenje uređaja iz kutije potrebne su najmanje
2 osobe.
Uređaj se smje premještati u kosom položaju na kolutima.
Za premještanje upotrebljavajte dršku, podignite je i
povucite.
Uvjeti skladištenja: Suho mjesto za skladištenje, s
nadstrešnicom, najveća dopuštena vlažnost vazduha je 80
%, a temperatura između
-20°C i +60°C.
Prije transporta postrojenja neophodno je zategnuti vijak
da ne bi došlo do istjecanja ulja.
Uređaj se može premještati samo u okomitom položaju.
Utvrđivanje kvarova
U tablici su navedeni mogući kvarovi, mogući uzroci ovih
kvarova i način otklanjanja. Ukoliko ipak ne možete
otkloniti postojeći problem, obratite se stručnom servisu.
Prije održavanja, čišćenja obavezno izvucite utikač iz
utičnice.
Postoji opasnost od udara električne struje.
Pojave Vjerojatan uzrok Rješenje
Motor
automatski
završava radni
ciklus cijepanja
Uključena je zaštita od
variranja napona.
Električar
drva.
Drvo se ne
cijepa
Uređaj nije pravilno
namješten
Dužina drva
prekoračuje kapacitet
motora.
Klin za cijepanje je
otupljen.
Istjecanje ulja
Trupac stavite
na uređaj
pravilno, vidi
poglavlje
Rukovanje.
Prije cijepanja
trupac isijecite
na komade
odgovarajuće
dužine.
Naoštrite
sječivo klina.
Utvrdite
propusna
mjesta,
obratite se
stručnjaku.
Pritisna ploča
vibrira i
proizvodi
neuobičajene
zvuke.
Istjecanje ulja
na cilindru ili na
drugim
mjestima.
Nedovoljna količina
ulja ili prevelika
količina vazduha u
hidrauličkom sustavu.
U hidrauličkom
sustavu se nalazi
vazduh tijekom rada
uređaja.
Odušni vijak nije bio
zategnut prije
prijevoza.
Vijak za ispuštanje ulja
je popušten
Kvar uljnog ventila i/ili
Provjerite
stanje ulja,
prema potrebi
dopunite ili se
obratite
stručnjaku.
Prije upotrebe
popustite
odušni vijak
za nekoliko
okretaja.
Prije prijevoza
zategnite
odušni vijak.
Zavrnite vijak
za ispuštanje
ulja
Nazovite
prodavača
brtvila.
Page 57

Introducere
Pentru ca să vă bucuraţi cât mai mult de noul
dumneavoastră utilaj, vă rugăm ca, înainte de a-l pune în
funciune, să citiţi cu atenţie modul de utilizare şi
instrucţiunile de securitate ataşate. Vă mai recomandăm
de asemeni ca să puneţi la loc sigur modul de utilizare
pentru cazul în care, mai târziu, veţi dori să vă
reîmprospătaţi cunoştinţele referitoare la funcţiunile
produsului.
Ne străduim permanent să îmbunătăţim produsele
noastre. De aceea ne rezervăm dreptul de a efectua
modificări tehnice în scopul optimizării produsului.
Acest document reprezintă versiunea originală a
modului de utilizare a produsului.
Volumul livrării
Scoateţi utilajul din ambalaj şi verificaţi prezenţa acestor
componente:
1 despicător de lemne
1 mod de utilizare – versiune originală
Certificat de garanţie
În cazul în care componentele lipsesc sau sunt deteriorate,
vă rugăm să apelaţi la furnizorul dumneavoastră.
Descrierea produsului (fig. 1)
1. Rezervor ulei
2. Placă de apăsare
3. Suprafaţă de sprijin
4. Pană pentru despicat
5. Mâner de deplasare
6. Picior
7. Demaror
8. Motor
9. Roată de deplasare
10. Manetă hidraulică
11. Şurub de evacuare ulei
12. Şurub aerator
Date tehnice
Tensiune/frecvenţă: 230V~50Hz
Putere motor: 1500 W/(P1, S6 40%)
Clasă de protecţie : IP 54
Clasă de izolaţie: B
Turaţii în gol: 2950 min-1
Putere max. de despicare: 4 tone
Cantitate ulei hidr.: 2,4 l/SAE 20/HPL 46
Presiune hidraulică max.: 160 bar
Viteză avans înainte: 230 mm
Ø lemnului de despicat
min./max.: 50/250 mm
Lungimea lemnului de
despicat min./max.: 250/370 mm
Viteză deplasare înainte: 0,04 m/s
Viteză deplasare înapoi: 0,06 m/s
Dimensiuni de montaj LxLxÎ: 810x270x460 mm
Greutate: 38 kg
Instrucţiuni generale
După dezambalare, verificaţi toate componentele sub
aspectul unei eventuale deteriorări pe timpul
transportului.
Controlaţi dacă livrarea este completă.
Faceţi cunoştinţă cu utilajul, studiind manualul de
utilizare înainte de a-l pune în funcţiune.
Utilizaţi numai accesorii originale şi piese de uzură şi
de schimb originale.
Folosiți utilajul numai cu RCD (întrerupător de
protecţie împotriva curentului fals) de 30mA.
Instrucţiuni de securitate
Respectaţi toate instrucţiunile de securitate şi de
avertizare de pe utilaj şi întreţinţi-le mereu în stare
lizibilă.
Este interzisă demontarea instalaţiilor de protecţie de
pe utilaj şi scoaterea lor din funcţiune.
Verificaţi cablurile de alimentare. V. conectarea la
reţea.
Înaintea punerii în funcţiune, controlaţi
funcţionalitatea corectă a operării cu două mâini.
Persoana de deservire trebuie să aibă minimum 18
ani. Persoanele instruite trebuie să aibă cel puţin 16
ani, trebuie însă să lucreze numai sub supraveghere.
Purtaţi mănuşi de lucru în timpul muncii.
Atenţie în timpul lucrului: Pericol de accidentare a
degetelor de la mâini din partea sculei de despicat.
La despicarea bucăţilor de lemn mari sau greu de
prelucrat, folosiţi accesorii de sprijin adecvate.
Transformarea, reglarea, măsurarea şi curăţarea
trebuie făcute nu
mai cu motorul deconectat. Scoateţi
ştecherul din priză.
Instalarea, reparaţiile şi întreţinerea instalaţiei
electrice poate fi efectuată numai de specialişti.
Toate instalaţiile de protecţie şi de securitate trebuie,
la încheierea operaţiilor de reparaţii şi întreţinere,
montate imediat la loc.
La părăsirea locului de muncă, opriţi motorul.
Scoateţi ştecherul din priză.
Este absolut inadmisibilă blocarea operării cu ambele
mâini şi/sau eliminarea componentelor care servesc
la operarea cu ambele mâini – în consecinţă există
pericolul grav de accidentare în timpul operării
utilajului.
Modificări arbitrare pe utilaj exclud garanţia acordată
de producător pentru daune ulterioare.
Utilizare în conformitate cu destinaţia
Despicătorul de butuci hidraulic se poate utiliza numai în
poziţie culcată. Lemnul poate fi despicat numai culcat, dea lungul fibrei. Lungimea lemnului despicat poate fi de
maximum 37 cm.
Orice altă utilizare este considerată a fi contrară
destinaţiei. Producătorul nu garantează de daunele
ulterioare şi de eventualele accidente. Vă rugăm să aveţi
în vedere faptul că utilajele noastre, în conformitate cu
destinaţia, nu sunt construite pentru scopuri industriale.
Montaj
În scopul ambalării facile, piciorul (fig.1/6) şi maneta (fig.
1/5) se vor monta de către client.
În acest scop se vor utiliza cele 2 şuruburi hexagonale
M6x16 cu piuliţe pentru picior şi şuruburile imbus M6x16
cu piuliţe pentru manetă, toate anexate la livrare. În acest
scop amplasaţi utilajul pe pardoseală, pe partea penei de
despicat puneţi dedesubt polistirenul din ambalaj.
Înainte de operare
Nu despicaţi niciodată lemnul poziţionat în picioare şi
contra fibrei!
Trebuie respectate prescripţiile de securitate şi
prescripţiile pentru muncă şi întreţinere editate de
producător, ca şi dimensiunile cuprinse în datele
tehnice.
Page 58

Trebuie respectate prescripţiile de securitate
aferente, precum şi celelalte prescripţii tehnice de
securitate general valabile.
Utilajul poate fi utilizat, întreţinut şi reparat numai de
specialişti cărora li s-a făcut cunoscut utilajul şi care
au fost instruiţi sub aspectul pericolelor. Modificări
arbitrare pe utilaj exclud garanţia daunelor ulterioare.
Utilajul poate fi utilizat numai cu accesorii şi scule
originale ale producătorului.
Orişice altă utilizare va fi considerată contrarie
destinaţiei, riscul fiind purtat numai de utilizatorul
însuşi.
Instalare
Aveţi grijă ca utilajul să fie instalat pe o bază plană şi
solidă şi cu lumină suficientă.
Asiguraţi-vă spaţiu suficient pentru a putea lucra sigur şi
nederanjat.
Riscuri remanente
Utilajul este construit conform stadiului de dezvoltare a
tehnicii şi a prescripţiilor tehnice de securitate general
valabile. În timpul lucrului, însă, pot apărea unele riscuri
remanente.
Există pericol de accidentare din partea sculei de
despicat pentru degete şi mâini în cazul unei
deplasări sau sprijiniri neprofesionale a lemnului.
Pericol de accidentare prin proiectarea unei bucăţi de
lemn în caz de ţinere sau deplasare neprofesională.
Pericol de accidentare cu curent electric în cazul
folosirii cablurilor de alimentare nereglementare.
Deşi au fost luate măsuri preventive, mai pot exista
pericole remanente ascunse.
Riscurile remanente pot fi minimalizate dacă veţi
respecta Instrucţiunile de securitate şi Utilizarea în
conformitate cu destinaţia, ca şi întreg manualul de
operare.
Conectarea la reţea
Cablurile de alimentare trebuie controlate cu regularitate
din punct de vedere al deteriorării. Înainte, însă, scoateţi
ştecherul din priză!
Cablurile de alimentare trebuie să corespundă prevederilor
aferente VDE şi DIN. Utilizaţi numai cabluri de alimentare
marcate H 07-RN. Imprimarea marcării de tip pe cablul de
alimentare este o prescripţie.
Cabluri de alimentare defecte
La cablurile de alimentare, izolaţia se defectează în mod
frecvent.
Cauze posibile:
Rosăturile se formează atunci când cablurile de alimentare
sunt trase prin interspaţiul de sub fereastră sau uşă.
Rupturi ca urmare a fixării sau tragerii neprofesionale a
cablurilor de alimentare.
Tăiere ca urmare a trecerii peste cablul de alimentare.
Deteriorarea izolaţiei în urma tragerii cablului din priza din
perete.
Fisuri ca urmare a îmbătrânirii izolaţiei.
Este interzisă utilizarea unor astfel de cabluri de
alimentare deteriorate, acestea periclitând viaţa
datorită izolaţiei deteriorate!
Deservire - fig. 3
Înainte de a începe lucrul pe utilaj trebuie să deşurubaţi
neapărat şurubul de aerare (fig. 2/12) cu câteva rotaţii,
aceasta pentru a asigura circulaţia aerului în rezervorul cu
ulei. Dacă acesta rămâne strâns în timpul lucrului,
mişcarea hidraulică duce la suprapresiune.
Înaintea oricărei deplasări a utilajului trebuie neapărat
strâns acest şurub, aceasta pentru a evita pierderile de
ulei. Despicaţi numai bucăţi de lemn tăiate drept.
1. Puneţi lemnul de despicat drept, în poziţie culcată pe
suprafaţa de sprijin (fig. 1/3)
2. Despicătorul de butuci este prevăzut cu deservire cu
ambele mâini – mâna stângă deserveşte maneta
hidraulică (fig. 1/10), cea dreaptă – demarorul (fig.
1/7).
3. Împingeţi maneta hidraulică (fig. 1/10) în jos iar cu
demarorul (fig. 1/7) activaţi despicarea.
Dacă părăsiţi una din părţile de comandă, utilajul se va
opri imediat. Părăsirea ambelor părţi de comandă face ca
placa de apăsar
e să revină în poziţia iniţială. Dacă utilajul
nu este capabil să despice în următoarele 5 secunde un
alt butuc, opriţi imediat procesul. Probabil că lemnul de
despicat este prea tare. Întoarceţi butucul de despicat cu
90° şi încercaţi încă o dată.
Atenţie: O operare care depăşeşte 5 secunde duce
la supraîncălzirea utilajului, respectiv la deteriorarea
acestuia. Întrerupeţi procesul.
Aşezare eronată, fig. 3/A
Puneţi întotdeauna lemnul de despicat pe suprafaţa de
sprijin de-a latul!
Nu trebuie să alunece şi nici poziţionat strâmb. Pana de
despicat va fi suprasolicitată dacă nu va despica cu
întreaga lamă ci numai cu partea de sus a acesteia.
Niciodată nu despicaţi mai multe bucăţi deodată!
Există pericolul că una din bucăţi va fi proiectată pe
neaşteptate.
Atenţie! Pericol mare de accidentare!
Lemn împănat, fig. 3/B/C
Nu încercaţi niciodată să scoateţi cu forţa lemnul împănat
în utilaj. Poate provoca accidente şi deteriorarea utilajului.
Procedaţi în felul următor:
1. Faceţi să vină placa de apăsare în poziţia de start.
2. Introduceţi pana sub lemnul de despicat – v.
imaginea.
3. Efectuaţi un ciclu
apăsare să deplaseze pana departe sub lemnul pe
care doriţi să-l degajaţi.
4. Repetaţi paşii de mai sus cu pene noi până veţi reuşi
să scoateţi afară lemnul din utilaj.
Marcare
Securitatea produsului:
Produsul corespunde
normelor UE aferente
de despicat astfel ca placa de
Page 59

Interdicţii:
Ambalaj:
Interdicţia de a trage de
ştecher!
Utilajul poate fi operat numai
de o singură persoană
Avertisment:
Avertisment/Atenţie
Avertisment împotriva
obiectelor proiectate
Menţineţi persoanele din jur la
o distanţă sigură de utilaj
(minimum 5m)
Comenzi:
Înainte de utilizare, citiţi cu
atenţie modul de operare.
Faceţi mai întâi cunoştinţă
temeinică cu operarea
utilajului.
Utilizaţi încălţăminte de
protecţie
Ocrotiţi împotriva ploii şi a
umezelii!
Interdicţie de înlăturare a
instalaţiilor de protecţie
Avertisment împotriva
pericolului prezentat de
tensiunea electrică
Avertisment / pericol de
rănire a mâinilor
Utilizaţi mănuşi de protecţie
Utilizaţi
vizor de protecţiei a feţei
Protejaţi de umezeală.
Direcţia ambalajului – în
sus.
Interseroh-Recycling
Date tehnice:
Cuplă Greutate
IP 54
Putere motor Tip protecţie
Turaţii Putere de despicare
Diametrul butucului de
despicat
Conţinutul rezervorului de ulei
hidraulic
Lungimea lemnului de
despicat
Deschideţi şurubul de aerat
Înainte de a deschide, scoateţi
din priză
Ocrotirea mediului ambiant:
Lichidaţi deşeurile în mod
profesional astfel, ca să evitaţi
poluarea mediul ambiant.
Aparatele electrice sau
electronice defecte şi /sau
lichidate trebuie să fie predate
la puncte de colectare
corespunzătoare.
Ambalajul din carton poate
fi predat la punctele de
colectare în scopul
reciclării.
Page 60

Garanţie
Perioadadegaranțieseextindepeoperioadade12lunilao
utilizareindustrială,24delunipentruconsumatori,începândcu
dataachiziționăriiaparatului.
Garanțiasereferănumailainsuficiențeleprovocatede
defecteledematerialsaudeundefectdeproducție.Încazde
amațieînperioadadegaranție,trebuieprezentat
recl
documentuloriginaldeachizițiecudatavânzării.
Garanțianusereferălaoutilizareimproprie,cadeexemplu
suprasolicitareaaparatului,utilizareaviolentă,deteriorareprin
intervențiestrăinăsaucuobiectestrăine,nerespectarea
moduluideutilizar
eșimontajșinicilauzuraobișnuită.
Comportament în cazuri extreme
Acordaţi rănitului primul ajutor şi chemaţi într-un timp cât
mai scurt ajutorul calificat al medicului.
Păziţi rănitul de alte accidente şi calmaţi-l.
În cazul unui eventual accident, la locul de muncă
trebuie să se găsească întotdeauna la îndemână o
trusă medicală de prim-ajutor, conform normei DIN
13164. Materialul pe care îl veţi consuma din trusa
medicală trebuie completat imediat.
În cazul în care solicitaţi ajutor, prezentaţi următoarele
date:
1. Locul accidentului
2. Tipul accidentului
3. Numărul răniţilor
4. Felul rănirilor
Lichidare
Instrucţiunile de lichidare reies din pictogramele amplasate
pe aparat, respectiv pe ambalaj. Descrierea semnificaţiilor
le veţi găsi la capitolul „Marcare “
.
Lichidarea ambalajului de transport
Ambalajul protejează utilajul în timpul transportului
împotriva deteriorărilor. Materialele de ambalaj sunt
utilizate de regulă în funcţie de modul lor de încadrare faţă
de mediul ambiant şi a modului de lichidare, de aceea
acestea pot fi reciclate.
Înapoierea ambalajelor în circuitul de materiale
economiseşte materiile prime şi reduce cheltuielile pentru
lichidarea deşeurilor.
Părţi ale ambalajului (de ex. folie, stiropor®) pot prezenta
pericol pentru copii. Există riscul de asfixiere!
Asiguraţi ca copiii să nu aibă acces la aceste părţi ale
ambalajului şi lichidaţi-le cât mai repede.
Exigenţe de operare
Persoana care deserveşte utilajul, înainte de a-l folosi,
trebuie să citească cu atenţie modul de utilizare.
Calificare
În scopul operării utilajului, în afară de o instruire
amănunţită din partea unui specialist, nu este necesară
nici o altă calificare specială.
Vârsta minimă
Utilajul poate fi operat de persoane care au împlinit vârsta
de 18 ani. Excepţie o fac minorii în cadrul pregătirii lor
profesionale pentru a obţine deprinderi, aceasta doar sub
supravegherea instructorului.
Instructaj
Utilizarea aparatului necesită numai o instruire adecvată
din partea unui specialist, respectiv de modul de operare.
Un instructaj special nu este necesar.
Servis
Aveţi întrebări de ordin tehnic? Reclamaţii? Aveţi
nevoie de piese de schimb sau de manualul de
deservire?
Pe site-ul nostru www.guede.com la secţia Servis, vă
vom ajuta repede şi nebirocratic . Vă rugăm să ne ajutaţi
să vă ajutăm. Pentru a putea, în caz de reclamaţii,
identifica utilajul dumneavoastră, avem nevoie de numărul
seriei, numărul comenzii şi anul de producţie. Toate aceste
date le veţi găsi pe plăcuţa de tip. Pentru ca să aveţi la
îndemână
Număr serie:
Număr comandă:
An de producţie:
aceste date, vă rugăm să le notaţi mai jos.
Tel.: +49 (0) 79 04 / 700-360
Fax: +49 (0) 79 04 / 700-51999
E-Mail: support@ts.guede.com
Înaintea operaţiilor de întreţinere/ curăţare şi a altora
pe utilaj, trebuie mai întâi ca acesta să fie deconectat de la
reţea. Înaintea acestor lucrări şi înainte de a fi transportat,
lăsaţi utilajul să se răcească.
Întreţinere
Efectuaţi reconstrucţia, reglarea, măsurarea şi curăţarea
utilajului numai cu motorul deconectat. Scoateţi ştecherul
din priză.
Reparaţiile şi întreţinerea instalaţiei electrice trebuie
efectuată numai de un electrician. La sfârşitul reparaţiilor şi
a lucrărilor de întreţinere, toate protecţiile şi instalaţiile de
securitate trebuie montate imediat la loc.
Vă recomandăm:
Lama de despicat este un component de uzură care
trebuie, în caz de necesitate, ascuţit din nou.
Instalaţia de protecţie combinată pentru ambele mâini
trebuie să funcţioneze uşor. Ungeţi ocazional cu
câteva picături de ulei.
Întreţineţi suprafaţa de sprijin curată.
Ungeţi glisiera cu grăsime.
Instalaţia hidraulică /înlocuirea uleiului
Instalaţia hidraulică este un sistem închis cu rezervor de
ulei, pompă de ulei şi o supapă de comandă. Aceasta nu
trebuie înlocuită şi nici manipulată.
Controlaţi cu regularitate conectările şi sistemul de
înşurubare sub aspectul etanşeităţii, la nevoie strângeţi
şuruburile.
Rezervorul de ulei este umplut la producător cu ulei de
calitate cu grad de viscozitate ISO 20.
Schimbaţi uleiul la 150 de ore de funcţionare
1. Placa de apăsare în poziţia de start. Acum
deconectaţi utilajul de la reţea.
2. Desfaceţi şurubul pentru evacuarea uleiului (fig. 1/11)
şi puneţi-l la o parte.
3. Puneţi lângă utilaj un vas gol de 4 litri şi amplasaţi-l
aşa cum se vede în imagine (fig. 4). Aşteptaţi să se
scurgă tot uleiul vechi. Lichidaţi-l pe cale ecologică!
4. Întoarceţi utilajul cu picioarele în sus (fig. 4), pentru
ca să introduceţi
circa 2,4 l de ulei hidraulic
(viscozitate 20).
Page 61

5. În şurubul de evacuare se află joja de ulei (fig. 1/11).
Curăţaţi-o şi introduceţi-o în utilajul care se mai află
în poziţie verticală. Scoateţi din nou joja, nivelul
uleiului ar trebui să fie între cele două semne marcate
pe jojă.
6. Strângeţi acum din nou şurubul de evacuare Porniţi
apoi de câteva ori utilajul în gol. Controlaţi cu
regularitate starea uleiului şi completaţi-l în caz de
necesitate.
Transport
Pentru a scoate utilajul din cutie este nevoie de cel puţin 2
persoane.
Utilajul poate fi transportat în poziţie oblică, pe roţi.
Folosiţi mânerul pentru deplasare, ridicaţi şi trageţi.
Condiţii de depozitare: Loc de depozitare uscat, acoperit,
umiditate maximă a aerului 80 %, temperatura de la
-20°C până la +60°C.
Este absolut necesar ca înaintea fiecărei deplasări,
transportări a utilajului, să se strângă şurubul pentru a
evita pierderile de ulei.
Aveţi grijă ca utilajul să se transporte numai în poziţia în
picioare.
Depistarea defecţiunilor
Tabelul prezintă posibile defecţiuni, cauzele lor posibile şi
posibilităţile de înlăturare a acestora. Dacă totuşi problema
nu a fost înlăturată, apelaţi la un specialist.
Înaintea lucrărilor de întreţinere şi curăţare a utilajului,
deconectaţi-l şi scoateţi ştecherul din priză.
Pericol de curentare.
Simptome Cauză posibilă Remediere
Motorul
încheie
automat ciclul
de despicat
Lemnul nu
este despicat
S-a activat instalaţia
de protecţie împotriva
supratensiunii
Utilajul este prost
amplasat
Lungimea lemnului de
despicat depăşeşte
capacitatea motorului
Pana de despicat este
tocită
Pierderi de ulei
Electrician
Introduceţi
corect lemnul
de despicat,
v. şi cap.
Operare
Tăiaţi lemnul
de despicat la
mărime
adecvată
Trebuie
ascuţită pana
de despicat
Localizaţi
punctele
neetanşe,
apelaţi la un
specialist
Placa de
apăsare
vibrează,
scoate
zgomote
neobişnuite
Scurgeri de
ulei pe cilindru
sau în alte
locuri
Insuficient ulei sau
prea mult aer în
sistemul hidraulic
Aer în sistemul
hidraulic în timpul
funcţionării
Şurubul de aerat nu a
fost strâns înainte de
deplasare
Verificaţi
starea
uleiului,
event.
Completaţi,
apelaţi la un
specialist
Înainte de
utilizare,
desfaceţi
şurubul de
aerat cu
câteva rotaţii
Strângeţi
şurubul de
aerat înainte
de a deplasa
utilajul
Şurubul de evacuare a
uleiului este degajat
Supapă de ulei şi/sau
garnitură de
Strângeţi
şurubul de
evacuare a
uleiului
Contactaţi
furnizorul
etanşeitate defectă.
Page 62

Увод
За да можете да се радвате колкото се може по-дълго
на своя нов уред, преди пускане в действие прочетете
моля, старателно упътването за обслужване и
приложените инструкции за безопасност.
Препоръчваме също, да съхранявате упътването за
обслужване, в случай, че по-късно бихте искали отново
да си припомните функционирането напродукта.
В ра
мките на непрекъснатото по-нататъшно
развитие на продукта си запазваме правото да
извършваме технически изменения с цел
подобряване
При този документ се касае за оригинално
упътване за обслужване.
Обем на доставката
Извадете уреда от транспортната опаковка и
проверете комплектността и наличието на тези части:
1 устройство за цепене на пънове
1 оригинално упътване за обслужване
Гаранционна карта
Ако в доставката липсват части или са повредени,
моля обърнете се към своя продавач.
Описание на уреда (карт. 1)
1. Резервоар за масло
2. Притискаща плоча
3. Опорна повърхност
4. Цепещ клин
5. Дръжка за придвижване
6. Крак
7. Спусквател (спусък)
8. Мотор
9. Придвижващо колело
10. Хидравличен лост
11. Болт за източване на маслото
12. Болт за обезвъздушаване
Технически данни
Напрежение/честота: 230V~50Hz
Мощност на мотора: 1500 W/(P1, S6 40%)
Клас на защита: IP 54
Клас на изолация: B
Обороти на свободен ход: 2950 min-1
Макс. сила на цепене: 4 тона
Количество хидр. масло: 2,4 л/SAE 20/HPL 46
Макс. хидравлично налягане: 160 бара
Макс.ход при цепене: 4: 230 мм
Ø на цеп. дърво мин./макс.: 50/250 мм
Дължина на цеп. дърво мин./макс.: 250/370 мм
Скорост на придвижване напред: 0,04 м/с
Ск
орост на придвижване назад: 0,06 м/с
Монтажни размери ДxШxВ: 810x270x460 мм
Тегло: 38 кг
Общи инструкции
След разопаковане проверете всички части от
гледна точка на евентуално повреждане при
транспортирането.
Проверетe, дали пратката е комплектна.
Преди употреба се запознайте с уреда според
упътването за обслужване.
Използвайте само оригинални принадлежности и
оригинални износващи и резервни части.
Инструкции за безопасност
Спазвайте всички инструкции за безопасност и
предупреждения на машината и ги поддържайте в
състояние годно за прочитане.
Съоръженията за безопасност не трябва да се
демонтирват от машината, нито пък да се
отстраняват от работа.
Проверете захранващите кабели. Не
употребявайте дефектни захранващи кабели. Виж
Включване към мрежата.
Преди пу
скане в действие проверете правилното
функциониране на обслужването за две ръце.
Обслужващия трябва да е навършил минимум 18
години. Обучаваните лица трябва да са
навършили минимум 16 години, могат да работят
с машината обаче само под надзор.
По време на работа носете работни ръкавици.
Внимание по време на работа: Съществ
ува
опасност от злополука за пръстите и ръцете от
страна на цепещия инструмент.
За цепене на тежки и трудно обработваеми
парчета дърва използвайте подходящи помагала
за подпиране.
Реконструкция, регулиране, измерване и
почистване извършвайте само при изключен
мотор. Извадете щепсела от щепселната кутия.
Инстралиране, ремонт и поддръжка на
електроинсталацията мог
ат да извършват само
специалисти.
Всички съоръжения за безопасност и предпазни
съоръжения след приключване на ремонт и
поддръжка трябва незабавно да бъдат монтирани
обратно.
След напускане на работното място изключете
мотора. Извадете щепсела от щепселната кутия.
Недопустимо е блокирането на обслужването за
две ръце и/или заобикаляне на застопорява
щите
елементи на обслужването за две ръце, понеже в
резултат на това съществува особена опасност за
злополука при обслужването на машината.
Своеволни изменения на машината изключват
гаранцията на производителя за последвали
щети.
Употреба в съответствие с предназначението
Хидравличното устройство за цепене на пънове може
да се използва само в легнало положение. Дървата
могат да се цепят само легнали по посока на влакната.
Дължината на цепеното дърво представлява максимум
37 см.
Всякаква друга употреба се счита за употреба в
противоречие с предназначението. Производителя не
гарантира за последвали щети или злопол
уки. Моля,
обърнете внимание на това, че нашите уреди в
съответствие с предназначението не са конструирани
за промишлена употреба.
Монтаж
Заради по лесно опаковане крака (карт.1/6) и дръжката
(карт. 1/5) ще монтира самия клиент.
За това използвайте 2-та прибавени шестоъгълни
болта M6x16 с гайка за крака и имбусови болтове
M6x16 с гайка за дръжката. При това поставете уреда
хоризонтално на пода и подложете от към страната на
цепещия клин с полистирен от опаковката.
Използвайте уреда само с RCD (предпазен
изключвател против погрешен ток) 30mA.
Page 63

Преди експлоатация (работа)
Никога не цепете дървото изправено и срещу
влакното!
Трябва да се спазват предписанията за
безопасност и предписанията за работа и
поддръжка издадени от производителя, както и
размерите посочени в техническите данни.
Трябва да се спазват съответните предписания за
безопасност и другите, общо признати
предписания за безопасност и технически
предписания.
Машината могат да използват, поддържат и
ремонтират само специалисти, които са били
запознати с нея и са били инструктирани относно
опасностите. Своеволни изменения на машината
изключват гаранцията на производителя за
последвали щети.
Машината може да се използва само с
оригинално оборудване и оригинални
инструменти на производителя.
Всякаква друга употре
противоречие с предназначението.
Производителя не гарантира за последвали щети,
риска носи самия потребител.
Инсталиране
Моля, обърнете внимание на това, Вашата машина да
бъде инсталирана на здрава основа равно, стабилно и
с достатъчно осветление.
Осигурете си достатъчно място, за да можете за
работите безопасно и без да бъдете смущавани.
Остатъчни рискове
Машината е конструирана според състоянието на
техниката и признатите предписания за техника на
безопасността.
Въпреки това по време на работа, обаче могат да
възникват отделни остатъчни рискове.
Съществува опасност от злополука за пръстите и
ръцете от страна на цепещия инструмент при
непрофесионално боравене и подпиране на
дървото.
Опасност за зло
дърво при непрофесионално държене или
боравене.
Заплаха от ел. ток при употреба на захранващи
кабели неотговарящи на предписанията.
Въпреки всички приети правантивни мерки също
магат да съществуват скрити остатъчни рискове.
Остатъчните рискове могат да се минимализират,
когато спазвате Инструкциите за безопасност и
Употреба в съ
както и цялото упътване за обслужване.
Включване в мрежата
Редовно контролирайте захранващите кабели от
гледна точка за увреждане. Преди това извадете
щепсела от щепселната кутия!
Захранващите кабели трябва да отговарят на
съответните разпоредби на VDE и DIN. Употребявайте
само захранващи кабели с обозначение H 07-RN.
Отпечатването на типовото обозначение на
захранващия кабел е предписание.
Дефектни захранващи кабели
Върху електрическите захранващи кабели се стига
често до нарушаване на изолацията.
ба се счита за употреба в
полука от отхвърлено парче
ответствие с предназначението,
Възможни причини:
Претърквания, когато захранващите кабели са
прекарани в пролуките под прозорците или вратите.
Пречупвания в резултат на непрофесионално
закрепяне или прокарване на електрическите кабели.
Прерязване в резултатна преминаване през
захранващия кабел.
Повреждане на изолацията с изтръгване на кабела от
щепс
елната кутия на стената.
Цепнатини в резултат на стареене на изолацията.
Така повредени захранващи кабели не може да се
използват и поради увреждането на изолацията са
опасни за живота!
Обслужване - карт. 3
Преди започване на работа непременно трябва да
разхлабите болта за обезвъздушаване (карт. 2/12) с
няколко оборота, за да бъде гарантирано
циркулирането на въздуха в резервоара за масло.
Ако по време на работа остане затегнат,
хидравличното движение ще причини свръхналягане.
Преди всяко преместване на уреда е необходимо
болта непременно да се затегне, за да се предо
изтичане на масло.
Цепете само равно отрязани парчета дърва.
1. Поставете цепеното дърво легнало и наравно на
опорната повърхност (карт. 1/3)
2. Устройството за цепене на пънове е оборудвано с
обслужване за две ръце – лявата ръка обслужва
хидравличния лост (карт. 1/10), дясната
спускателя (карт. 1/7).
3. Натиснете хидравличния лост (карт. 1/10) по
посочения н
1/7) активирайте цепенето.
Когато пуснете една от управляващите части,
машината веднага ще спре. Пускането на двете
управляващи части води до това, че притискащата
плоча тръгва обратно. Ако уреда до 5 секунди не е
способен да цепи следващо парче дърво, веднага
спрете процеса. Цепеното дърво вероятно е пр
твърдо. Завъртете цепеното дърво на 90° и се
опитайте още веднъж.
ачин надолу и със спускателя (карт.
тврати
екалено
Внимание: При работа по-продължителна от 5
секунди съществува опасност от прегряване респ.
повреждане на уреда. Прекъснете процеса.
Неправилен монтаж , карт. 3/A
Поставяйте цепеното дърво на опорната повърхност
винаги на плоско!
Не трябва да се плъзне нито пък да бъде поставено
накриво. Цепещия клин ще се претовари, ако не
цепите върху цялото острие, а са
част.
Никога не цепете повече парчета изведнъж!
Съществува опасност, че едно от парчетата
неконтролируемо ще бъде изхвърлено.
Внимание! Голяма опасност за злополука!
Заклещено дърво, карт. 3/B/C
Никога не се опитвайте да избиете заклещено дърво
от машината. Това може да доведе до злополуки и
повреждане на уреда.
Сле
двайте тези стъпки:
1. Оставете притискащата плоча да навлезе в
стартираща позиция.
2. Поставете клина под цепеното дърво – виж
картинката.
мо в неговата горна
Page 64

3. Един цепещ цикъл направете така, че
притискащата плоча да премести клина далеч под
дървото, което искате да освободите.
4. Горе посочените стъпки повтаряйте с нови
клинове така дълго, докато дървото от машината
бъде извадено нагоре.
Обозначение
Безопасност на продукта:
Продукта отговаря на
съответните норми на ЕС
Забрани:
Защита на жизнената среда:
Ликвидирайте отпадъка
професионално така, че да
не вредите на околната
среда.
Дефектните и/или
ликвидираните електрически
или електронни уреди
трябва да се предадат в
съответните събирателни
пунктове.
Опаковка:
Опаковъчен материал от
картон може да се
предаде с цел
рециклиране в
събирателен пункт.
Забранено е дърпането за
щепсела!
Машината може да
обслужва само едно лице
Предупреждение:
Предупреждение/Внимание
Предупреждение пред
отхвърляни предмети
Дръжте околостоящите лица
на безопасно разстояние от
машината (минимум 5м)
Нареждания:
Прочетете старателно
упътването за употреба.
Предварително старателно
се запознайте с употребата
на уреда.
Пазете пред дъжд и влага!
Забранено е да се
премахва предпазното
съоръжение
Предупреждение за
опасно електрическо
напрежение
Предупреждение пред
нараняване на ръцете
Използвайте предпазни
ръкавици
Пазете пред влага
Опаковката трябва да
бъде ориентирана нагоре
Interseroh-Recycling
Технически данни:
Присъединение Тегло
IP 54
Мощност на мотора Тип защита
Обороти Сила на цепене
Диаметър на цепеното
дърво
Дължина на цепеното
дърво
Използвайте безопасни
обувки
Преди отваряне извадете
щепсела
Използвайте предпазна
защита за лицето
Съдържание на резервоара
за хидравлично масло
Отворете болта за
обезвъздушаване
Гаранция
Гаранционния срок представлява 12 месеца при
промишлена употреба, 24 месеца за потребители и
започва от деня на закупуване на уреда.
Page 65

Гаранцията се отнася изключително за недостатъци
причинени поради дефект на материала или фабричен
дефект. При рекламация в гаранционния срок е
необходимо да се прибави оригинален документ за
покупка с дата на продажбата.
От право на гаранция са изключени непрофесионална
употреба като напр. претоварване на уреда, употреба
със сила, увреждане поради чужда на
меса или от
чужди предмети, незпазването на упътването за
употреба и монтаж и нормалното износване.
Поведение в случай на беда
Окажете при злополука съответната първа помощ и
повикайте колкото се може по бързо квалифицирана
медицинска помощ.
Предпазете пострадалия от други злополуки и го
успокойте.
Заради евентуална злополука на работното място
трябва винаги да има под ръка аптечка за първа
помощ според DIN 13164. Материала, който вземете
от аптечката трябва да бъде допълнен ве
днага.
Ако искате помощ,
посочете тези данни:
1. Място на злополуката
2. Вид на злополуката
3. Брой на ранените
4. Вид нараняване
Ликвидация
Инструкциите за ликвидация произлизат от
пиктограмите, които са разположени на уреда респ. на
опаковката. Описанието на отделните значения ще
намерите в раздел “Обозначения”.
Ликвидация на транспортната опаковка
Опаковката предпазва уреда пред увреждане при
транспортиране.
Опаковъчните материали обикновено са избрани
според тяхната грижа за околната среда и начина на
ликвидация и за
това могат да се рециклират.
Връщането на опаковката в обръщение спестява
суровини за материала и понижава разходите за
ликвидация на отпадъците. Части от опаковката (напр.
фолио, стиропор®) магат да представляват опасност
за деца. Съществува опасност от задушаване!
Съхранявайте части от опаковката на недостъпно за
деца място, и ги ликвидирайте колкото се мо
же по-
бързо.
.
Изисквания за обслужване
Преди употреба на уреда обслужващия трябва
внимателно да прочете упътването за обслужване.
Квалификация
Освен подробно поучение от специалист за
използването на уреда не е необходима никаква
специална квалификация.
Минимална възраст
С уреда могат да работят само лица, които са
навършили 18 години.
Изключения прави използването на непълнолетни
само, ако това става по време на професио-налното
обучение с цел постигане на умение под надзора на
обучаващото лице.
Обучение
Използването на уреда изисква само съответно
поучение от специалист, респ. от упътването за
обслужване . Специално обучение не е необходимо.
Сервиз
Имате ли технически въпроси? Рекламации?
Необходими ли Ви са резервни части или упътване
за обслужване?
На нашите страници www.guede.com в отдел Сервиз
ще Ви помогнем бързо и без излишна бюрокрация.
Помогнете ни, моля, за да можем да Ви помагаме. За
да можем да идентифицираме Вашия уред в случай на
рекламация, ни е необ
ходимо да знаем неговия сериен
номер, номера на продукта и година на производство.
Всички тези данни ще намерите на типовата табелка.
За да ги имате под ръка постоянно, запишете ги, моля,
тук.
Сериен номер:
Заявка номер:
Година на производство:
Тел.: +49 (0) 79 04 / 700-360
Факс: +49 (0) 79 04 / 700-51999
E-Mail: support@ts.guede.com
Преди поддръжка/чистене и други работи по
уреда е необходимо същия винаги да бъде изключен
от мрежата. Оставете уреда преди съответните
дейности и транспортиране да изстине.
Поддръжка
Реконструкции, регулиране, измерване и чистене
извършвайте само при изключен мотор. Извадете
щепсела от щепселната кутия.
Оставете само електротехник да извърши ремонти и
поддръжка на електрическото устройство.
Всички предпазни съоръжения и съоръжения за
безопасност сред приключване на ремонти и
поддръжка трябва веднага отнова да бъдат монтирани
обратно.
Препоръчваме Ви:
Цепещия но
ж е износваща се част, която в случай
на необходимост може допълнително да се
наточи.
Комбинираното предпазно съоръжение за двете
ръце трябва да е с лек ход. От време на време
намажете с няколко капки масло.
Поддържайте опорната повърхност чиста.
Намажете плъзгащата част с грес.
Хидравлично устройство/смяна на масло
Хидравличното устройство е затворена система с
резервоар за масло, маслена помпа и управляващ
клапан. Не може да се изменя нито пък да се
манипулира с нея.
Контролирайте присъединенията и завинтванията от
гледна точка за плътност, в случай на необходимост ги
затегнете.
Резервоара за масло от фабриката е напълнен с
качествено хид
равлично масло с клас на вискозитет
ISO 20.
Сменете маслото на всеки 150 работни часа
1. Притискащата плоча е в стартираща позиция.
Сега изключете машината от мрежата.
2. Разхлабете болта за източване на маслото (карт.
1/11) и го сложете настрана.
Page 66

3. Поставете до уреда празна 4-литрова купа и я
разположете така, както е изобразено на (карт. 4).
Изчакайте, докато всичкото старо масло изтече.
Ликвидирайте го екологично!
4. Обърнете машината нагоре с краката (карт. 4),за
да можете да допълните прибл. 2,4 л хидравлично
масло (вискозитет 20).
5. В болта за източване на масло (карт. 1/11) е
вграден нивопоказател на мас
лото. Почистете го
и го мушнете в машината, която все още е във
вертикално положение. Извадете отново, нивото
на маслото трябва да бъде между двете резки.
6. Сега отново затегнете болта за източване на
маслото (карт. 1/11). След това няколко пъти
пуснете уреда на празен ход. Контролирайте
редовно състоянието на маслото и в сл
учай на
необходимост го допълнете.
Транспортиране
За изваждане от кутията са необходими минимум 2
души.
Машината може да се транспортира в наклонено
положени на колела.
Използвайте дръжката за предвижване, вдигнете и
дърпайте.
Условия за съхранение: Сухо, покрито място за
складиране, максимална влажност на въздуха 80 %,
температура -20°C до +60°C.
Преди всяко транспортиране на уреда е необходимо
болта непременно да бъде затегнат, за да се
предотврати изт
ичане на масло.
Погрижете се за това, машината да се транспортира в
изправено положение.
Търсене на повреди
Таблицата показва възможни повреди, техните
възможни причини и възможностите за тяхното
отстраняване. Ако въпреки това не можете да
отстраните проблема, повикайте специалист.
Преди поддръжка и чистене изключете уреда и
извадете щепсела от щепселната кутия.
Опасност за удар от електрически ток.
Симптоми Възможна причина Ремонт
Мотора
автоматично
приключва
цепещия
цикъл
Дървото не
се цепи
Предпазното
съоръжение срещу
свръхнатоварване се
е активирало
Машината е
монтирана
неправилно
Дължината на
цепеното дърво
надвишава
капацитета на
мотора
Цепещия клин е
изтъпен
Изтича масло
Електротех-
ник
Поставете
правилно
цепеното
дърво, виж
също
Обслужване
Нарежете
цепеното
дърво на
подходяща
големина
Цепещия
клин трябва
да се наточи
Намерете
неуплътняващите места,
потърсете
специалист
Притискащата плоча
вибрира,
издава
Недостиг на масло
или излишен въздух
в хидравличната
система
Проверете
състоянието
на маслото,
евент.
необичайни
звуци
Върху
цилиндрите
или на други
места изтича
масло
Въздух в
хидравличната
система по време на
работа
Болта за
обезвъздушаване
преди
транспортиране не е
бил затегнат
Разхлабен болт за
източване на масло
Дефектен маслен
клапан и/или
уплътнение.
допълнете
масло,
свържете се
със
специалист
Преди
употреба
разхлабете с
няколко
оборота
болта за
обезвъздушаване
Преди транс-
портиране
затегнете
болта за
обезвъздушаване
Затегнете
болта за
източване на
маслото
Повикайте
продавача
Page 67

EG-KONFORMITÄTSERKLÄRUNG
Hiermit erklären wir, dass die nachfolgend
bezeichneten Geräte aufgrund ihrer Konzipierung und
Bauart sowie in den von uns in Verkehr gebrachten
Ausführungen den einschlägigen, grundlegenden
Sicherheits- und Gesundheitsanforderungen der EGRichtlinien entsprechen. Bei einer nicht mit uns
abgestimmten Änderung der Geräte verliert diese
Erklärung Ihre Gültigkeit.
EC-DECLARATION OF CONFORMITY
We, hereby declare the conception and construction of the
below mentioned appliances correspond - at the type of
construction being launched - to appropriate basic safety
and hygienic requirements of EC Directives. In case of any
change to the appliance not discussed with us the
Declaration expires.
DECLARATION CE DE CONFORMITE
Nous, Déclarons par la présente que les appareils indiqués
répondent du point de vue de leur conception,
construction ainsi que de leur réalisation mise sur le
marché, aux exigences fondamentales correspondantes
des directives de la CE en matière de sécurité et d’hygiène.
Cette déclaration perd sa validité après une modification
de l’appareil sans notre approbation préalable.
PROHLASENI O SHODE EU
Tímto prohlašujeme my, že koncepce a konstrukce
uvedených přístrojů v provedeních, která uvádíme do
oběhu, odpovídá příslušným základním požadavkům
směrnic EU na bezpečnost a hygienu. V prípade zmeny
prístroja, ktorá s nami nebola konzultovaná, stráca toho
vyhlásenie svoju platnosť.
VYHLASENIE O ZHODE EÚ
Týmto vyhlasujeme my, že koncepcia a konštrukcia
uvedených prístrojov vo vyhotoveniach, ktoré uvádzame
do obehu, zodpovedá príslušným základným požiadavkám
smerníc EÚ na bezpečnosť a hygienu. V případě změny
přístroje, která s námi nebyla konzultována, ztrácí toho
prohlášení svou platnost.
EG-CONFORMITEITVERKLARING
Hiermede verklaren wij, dat de genoemde machine, op
grond van zijn ontwerp en bouwwijze, evenals de door
ons in omloop gebrachte uitvoeringen, aan de
desbetreffende fundamentele veiligheids- en
gezondheidverordeningen van de EG-richtlijnen voldoen.
Bij een niet met ons overeengekomen wijziging aan
het apparaat verliest deze verklaring haar geldigheid.
DICHARAZIONE DI CONFORMITÁ CE
Dichiariamo con il presente noi, che la concezione e
costruzione degli apparecchi elencati, nelle realizzazioni
che stiamo introducendo alla vendita, sono conforme ai
requisiti principali delle direttive CE sulla sicurezza ed
igiene. Nel caso della modifica dell’apparecchio da noi
non autorizzata, la presente dichiarazione perde la
propria validità.
AZONOSSÁGI NYILATKOZAT EU
Ezzel kijelentjük mi, a hogy a lentiekben megjelölt gépipari
termék, koncepciója és tervezése, az általunk forgalomba
kerülő kivitelezésben, megfelel az EU illetékes biztonsági
és higiéniai szabályzatok alapkövetelményeinek. A gépen,
a velünk való konzultáció nélkül végzett változások esetén,
a jelen nyilatkozat érvényességét veszti.
IZJAVA O SUKLADNOSTI EU
Temeljem ove izjave, mi, proglašavamo da dole navedeni
uređaji, u pogledu njihove koncepcije i konstrukcije kao i u
pogledu izvedbi koje smo uveli u promet, ispunjavaju
odgovarajuće osnovne zahtjeve u vezi sigurnosti i zdravlja
prema smjernicama EU. Ako dođe do izmjene uređaja bez
naše suglasnosti, ova Izjava postaje nevažećom.
IZJAVA O ISTOVETNOSTI EU
S tem izjavljamo, da koncepcija in zgradba spodaj
navedenih naprav v izvedbah, ki jih uvajamo na trg,
odgovarja ustreznim osnovnim predpisom smernic EU za
varnost in higieno. V primeru spremembe naprave, o kateri
se niste posvetovali z nami, ta izjava izgubi svojo
veljavnost.
DECLARAŢIE DE CONFORMITATE UE
Prin prezenta declarăm că concepţia şi construcţia
utilajelor de mai jos, în execuţia în care sunt date în
circulaţie, corespund exigenţelor de bază ale directivelor
UE referitoare la siguranţă şi igienă. În cazul unei modificări
pe utilaj care nu a fost consultată cu noi, această declaraţie
îşi pierde valabilitatea.
ДЕКЛАРАЦИЯ ЗА СХОДСТВО С ЕС
С това декларираме ние, че концепцията и
конструкцията на долупосочените уреди в изпълнения,
които пускаме в обръщение, отговарят на съответните
на
изисквания
хигиена. В случай на изменение на уреда, което не е
било консултирано с нас, тази декларация губи своята
валидност.
инструкциите на ЕС за безопасност и
IZJAVA O SUKLADNOSTI EU
Temeljem ove izjave, mi, proglašavamo, da dole navedeni
uređaji, u pogledu njihove koncepcije i konstrukcije kao i u
pogledu izvedbi koje smo uveli u promet, ispunjavaju
odgovarajuće osnovne direktive bezbjednosti i zdravlja
prema smjernicama EU. Ako dođe do promjena na uređaju
bez naše suglasnosti, ova Izjava postaje nevažećom.
DEKLARACJA ZGODNOŚCI UE
Niniejszym oświadczamy, my że koncepcja i konstrukcja
przedstawionych poniżej urządzeń w wersji, która jest
wprowadzona do obiegu, odpowiada stosownym podstawowym wymogom dyrektyw UE dotyczących
bezpieczeństwa i higieny. Niniejsza deklaracji przestaje
obowiązywać w przypadku zmiany urządzenia, która nie
została z nami skonsultowana.
AB UYGUNLUK BEYANNAMESİ
Beyan ederiz ki aşağıda belirtilen piyasaya sürdüğümüz
modellerin tasarım ve yapıları itibariyle güvenlik ve hijyen
ile ilgili AB yönetmeliklerine uygun olduğunu beyan
ederiz. Aletlerde bize danışılmadan yapılacak bir değişiklik
durumunda işbu beyanname geçerliğini yitirir.
Page 68

Artikelnummer / Bezeichnung der Geräte
Article No. / Machine description | N° de commande /
Désignation de l’appareil | Obj. č. / Označení přístrojů | Obj. č. /
Označenie prístrojov | Artikel nr. / Benaming van de machine |
Cod. ord. / Identificazione degli apparecchi | Megrendelési
szám. / A gép jelzése | Kat br. / Oznaka uređaja | Nar. št. /
Označitev naprav | Nr. com. / Însemnarea maşinilor | Заявка №.
/ Обозначение на уредите | Kat br. / Oznaka uređaja | Nr zam.
/ Oznaczenie urządzenia | Ürün no. / Cihaz bilgileri
# 94698 / Holzspalter Spalty W 370/4T
Einschlägige EG-Richtlinien
Appropriate EU Directives | Directives de la CE applicables |
Prohlášení o shodě EU | Vyhlásenie o zhode EÚ |
Desbetreffende EG-Richtlijnen | Direttive CE applicabili |
Illetékes EU előírások | Primjenjive smjernice EU | Uporabne
smernice EU | Directivele UE aferente | Съответни наредби на
ЕС | Primjenjive smjernice EU | Stosowne dyrektywy UE | İlgili
AB yönetmelikleri
2006/42 EG
2004/108 EG
2011/65 EG
Angewandte harmonisierte Normen
Harmonised standards used | Normes harmonisées applicables
| Použité harmonizované normy | Použité harmonizované
normy | Gebruikte harmoniserende normen | Applicate norme
armonizzate | Használt harmonizált normák | Primijenjeni
harmonizirani standardi | Uporabljeni usklajeni standardi |
Norme armonizate folosite | Използвани хармонизирани
норми | Primijenjeni harmonizirani standardi | Wykorzystane
zharmonizowane normy | Kullanılan uyum normları
EN 62233:2009
GÜDE GmbH & Co. KG
Birkichstrasse 6
74549 Wolpertshausen
Deutschland
Joachim Bürkle
Technische Dokumentation
Technical documentation | gérant Documents techniques |
Technická dokumentace | Technická dokumentácia |
Technische documentatie | Documentazione tecnica | Műszaki
dokumentáció | Tehnička dokumentacija | Tehnična
dokumentacija | Documentaţie tehnică | Техническа
документация | Tehnička dokumentacija | Dokumentacja
techniczna | Teknik dokümentasyon
Helmut Arnold
Geschäftsführer
Managing Director | Titre du signataire | jednatel | konateľ |
bedrijfsleider | Amministratore delegato | ügyvezető igazgató |
direktor | direktor | administrator | управител | direktor |
Durektor | Şirket temsilcisi
Wolpertshausen, 2011-06-17
EN 60335-1:2002+A11A1:04+A12, A2:06+A13:08
EN 60335-1:2002+FprAF:09
EN 60204-1:2006+A1:09
EN 609-1:1999+A1:03+A2:09
EN 55014-1:2006
EN 55014-2:1997/+A1:2001/+A2:2008
EN 61000-3-2:2006EN 61000-3-3:2008
Garantierter Schallleistungspegel
Guaranteed sound power level | Niveau de puissance
acoustique garanti | zaručená hladina akustického výkonu |
Garantovaná hladina akustického výkonu | Gegarandeerd
geluidsdrukniveau | Livello di potenza sonora garantito |
Garantált akusztikus teljesítményszint | Garantirana razina
akustičke snage | zajamčena ravan akustične zmogljivosti |
Nivelul garantat al puterii sunetului | гарантирано ниво на
звукова мощност | Garantovani nivo akustične snage |
zagwarantowany poziom mocy akustycznej | Garanti edilen
ses gücü seviyes
L
: 89 dB
wa
Page 69

Page 70

Page 71

Page 72

GÜDE GmbH & Co. KG
Birkichstrasse 6
74549 Wolpertshausen
Deutschland
Tel.: +49-(0)7904/700-0
Fax.: +49-(0)7904/700-250
eMail: info@guede.com
www.guede.com
 Loading...