

Page 1

AC6000_3L rev: Hygia 6.0 3L rev 8/30/07 1:50 PM Page 1
ESPECIFICACIONES TÉCNICAS
Voltaje de entrada: 120 V
Corriente de entrada: 0.85 A
Dimensiones de la unidad: 15" w x 8" d x 20" h (38,1 cm de ancho x
20,32 cm de profundidad x 50,8 cm de alto)
Peso de la unidad: 15 lbs (6, 81 kg)
Longitud del cable eléctrico: 9 pies. (2,74 m)
PIEZAS DE REPUESTO
Paquete de repuesto del Filtro FLT6000
Incluye: Filtros HEPA y de carbón activado
GARANTÍA LIMITADA
Guardian Technologies LLC garantiza al cons umidor que este producto está libre de defectos en
materiales y mano de obra a partir de la fecha de compra original. Consulte la duración de la
garantía en la caja del producto y guarde el recibo de compra original para validar el inicio del
período de garantía.
Si durante el período de garantía se encuentra que el producto tiene algún defecto, repararemos o
reemplazaremos las piezas defectuos as sin ningún costo. El aparato completo debe enviarse con
porte pagado por anticipado a cualquier centro de servicio de garantía au
Technologies LLC. Incluya la información completa sobre el problema, fecha de compra, una copia
del recibo de compra original y su nombre, dirección y número de teléfono. S i su domicilio no se
encuentra cerca de una estación de garantía y requiere atención en los EE.UU. y Canadá, llame a la
fábrica al 1-866-603-5900. Use sólo piezas de repuesto genuinas de Guardian Technologies.
torizado por Guardian
Germ Guardian
™
Complete Air
Cleansing System
USE & CARE INSTRUCTIONS
La garantía no cubre los problemas ocasionados por desgaste inusual, da
accidente o el uso no razonable del producto. Esta garantía no cubre las reparaciones no
autorizadas. Esta garantía le otorga derechos legales específicos y usted pudiera tener otros
derechos adicionales (los cuales varían en cada estado en los EE.UU.).
Consideramos que el proceso de registro es importante para garantizar el servicio superior a nuestros clientes, sin embargo, el envío de esta tarjeta a Guardian Technologies LLC es opcional y no
a
fecta sus derechos para utilizar la garantía de acuerdo a las condiciones estipuladas anteriormente.
Si tiene preguntas o comentarios acerca de nuestro producto llame sin costo al 1- 866-603-5900 o
envíe sus comentarios a: Attn: Customer Service, Guardian Technologies LLC, 26201 Richmond
Road, Unit A3, Bedford Heights, Ohio 44146.
ños que resulten por un
www. germguardian. com
1-866-603-5900
Guardian Technologies LLC
P.O. Box 21135 · Beachwood, OH 44122
1-866-603-5900 · www.germguardian
S-16
.com
© 2006 Guardian Technologies LLC
English Manual............. .........................................E-1
French Manual .......................................... ............F-1
Spanish Manual ....................................................S-1
MODEL NO. AC6000
2 Year Limited Warranty
www. germguardian. c om
1-866-603-5900
REV0807
Date Purchased
month
year
E-1
Page 2
AC6000_3L rev: Hygia 6.0 3L rev 8/30/07 1:50 PM Page 2
Complete Air Cleansing System
Model Number: AC6000
CONTENTS
Safety Precautions ..............................................3
Identification of Parts............................................4
Installation ........................................................7
Operation ..........................................................9
Maintenance ....................................................12
Trouble Shooting................................................15
Technical Specifications ......................................16
Replacement Parts ............................................16
Limited Warranty ..............................................16
The Germ Guardian™ Complete Air Cleansing System™ offers six stages of
air purification, to help create a healthier indoor breathing environment. It
purifies the air in your home while destroying germs and odors.
SAFETY PRECAUTIONS
Please read the following precautions carefully before operating
the Complete Air Cleansing System. Failure to do so could result in
a fire hazard, electrical shock, bodily injury or damage to the unit.
• Do not damage, pull, twist, bend or place heavy objects on the electrical cord.
• Never handle the electrical cord with wet hands.
• To reduce the risk of electric shock, this equipment has a polarized plug
(one blade is wider than the other). This plug will fit in a polarized outlet
only one way. If the plug does not fit fully in the outlet, reverse the plug.
If it still does not fit, contact qualified personnel to install the proper
outlet. Do not alter the plug in any way.
• Never tug on the electrical cord to unplug the unit from the outlet.
• Unplug the unit before cleaning, installing or replacing filters.
• If the electrical cord becomes damaged, please contact a qualified
technician for repair.
• Do not place fingers or foreign objects into the airflow openings of the unit.
• Operate the unit in a well-ventilated area.
• Do not operate the unit outdoors.
• Do not operate near flammable gases.
• Do not operate the unit in humid or wet places such as a bathroom.
• Do not use chemical sprays near the unit, they will accumulate on the filter
and potentially cause harmful fumes.
• Do not operate the unit in an area with high oil content, such as mechanical
oil or cooking oil, over time it will deteriorate the filter.
• Never look directly at the UV light bulb when lit.
• Make sure all filters are correctly installed before running the unit.
E-2
E-3
Page 3

AUTO
QUIET
L
H
TURBO
SPEED TIMER
ON/OFF
HOME DUST MICRO DUST
TIMER
1
2 4
8
hr hr hr hr
CHECK
RESET
F
ILTER
UV
IONIZER
AC6000_3L rev: Hygia 6.0 3L rev 8/30/07 1:50 PM Page 3
Main Unit
1. Front Cover
2. Control Panel
3. Pre-Filter
4. Charcoal Filter
5. HEPA Filter
6. PCO Filter
7. Dust Sensor Cover
8. UV Light Bulb
9. Electrical Cord
10. Ionizer
4
3
2
IDENTIFICATION OF PARTS
6
5
IDENTIFICATION OF PARTS (cont.)
Control Panel
A. Ionizer Indication Light
B. Auto Mode Indication Light
C. Fan Speed Indication Lights
D. Home Dust Indication Lights
E. Clean Air Indication Light
F. Micro Dust Indication Lights
G. Timer Setting Indication Lights
H. Filter 'Check' Indication Light
I. 'UV' Indication Light
J. Remote Control Receiver Window
K. 'Ionizer' On/Off Button
L. Fan 'Speed' Button
M. Power On/Off Button
N. 'Timer' Setting Button
O. Filter Check 'Reset' Recessed Indicator
7
8
AB C D E F G H I
1
9
10
E-4 E-5
J
K
L
M
N
O
Page 4

ON/OFF
SPEED
IONIZER
TIMER
Clean Air Delivery Rate
Cer tie d R atin g
AC6000_3L rev: Hygia 6.0 3L rev 8/30/07 1:50 PM Page 4
IDENTIFI CATION OF PARTS (cont. )
Remote Control
1. Power 'On/Off' Button
2. Fan 'Speed' Button
3. 'I onizer' On/Off Button
4. 'Timer' Setting Button
INSTALLATION
1
2
3
4
The filters can be found packaged inside the air purifier.
Installing the Filters
1. Unplug from the electrical outlet.
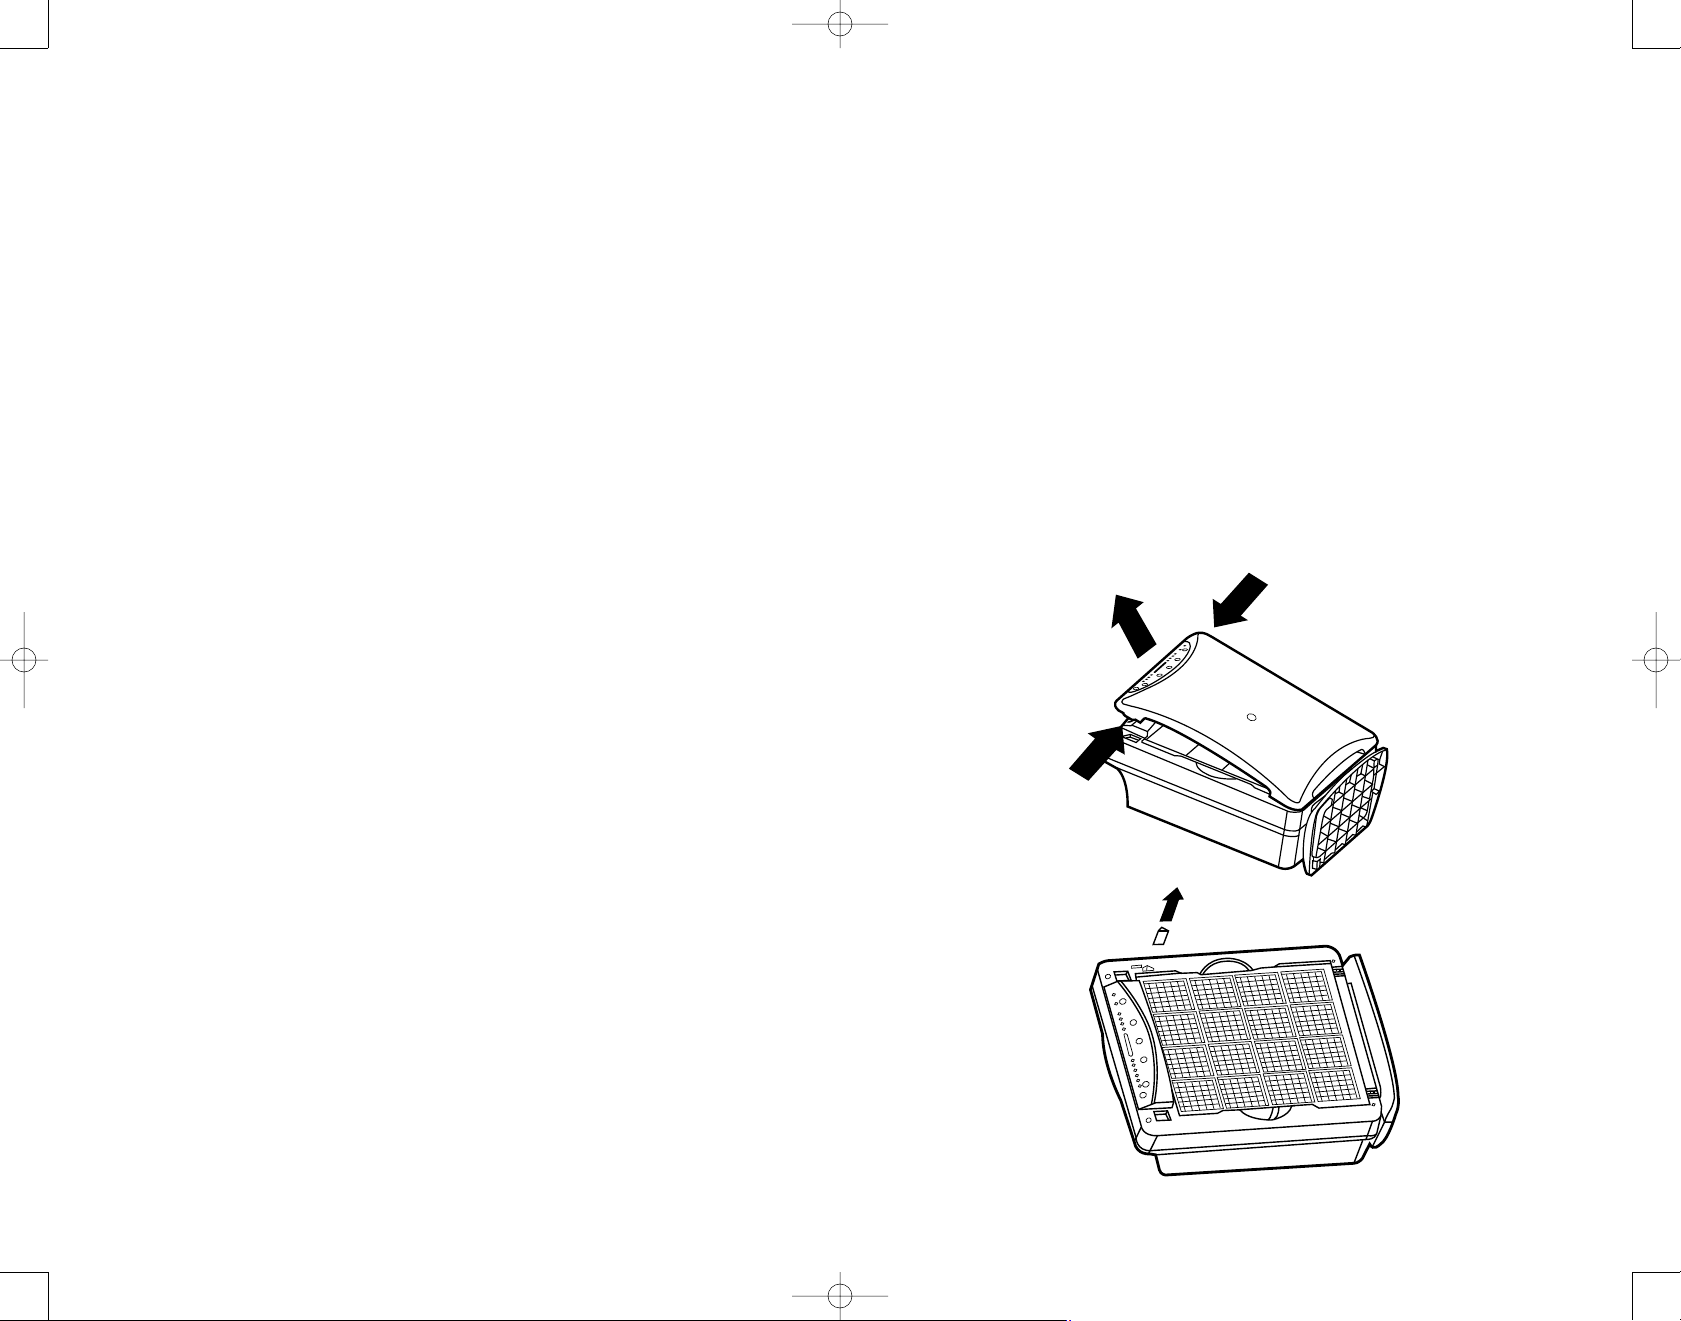
2. Place the unit flat, with the front cover pointing upwards.
3. Remove the front cover by carefully A) pushing the release buttons
and then B) lifting up the cover.
B
A
What is CADR?
CADR stands for “Clean Air Delivery Rate” which
indicates the volume of filtered air delivered by
an air purifier. CADR ratings show the effectiveness
of how efficient the air purifier is at capturing fine
particles from things like tobacco smoke and plant
pollens from the room.
E-7E-6
Page 5

AC6000_3L rev: Hygia 6.0 3L rev 8/30/07 1:50 PM Page 5
INSTALLATION (cont.)
4. Remove the filters from the air purifier and discard the plastic bags.
5. Fill in the installation date on the “Filter Replacement Reminder” sticker
located on the HEPA filter box.
6. Put the PCO filter into the compartment of the main body. (1)
7. Put the HEPA filter into the filter compartment. Follow the arrow
direction on the side of the box for the correct direction. (2)
8. Put the Charcoal filter on top of the HEPA filter box. (3)
9. Put the pre-filter on top of the Charcoal filter. Slip the four tabs
on the pre-filter into the corresponding location slots on the filter
compartment. (4)
10. Insert the two bottom hinges of the front cover into the two
grooves located at the bottom of the main body. Gently press the upper
portion of the front cover towards the main body to close it. (5)
Note: The unit is equipped with a safety lock that allows it to operate only
when the front cover is properly closed.
1
2
3
5
4
INSTALLATION (cont.)
Installing batteries into the remote control.
1. Press and slide out the back cover.
2. Insert two AAA batteries according to the instructions shown
inside the battery compartment.
3. Close the back cover.
2
1
3
OPERATION
A. Power On/Off
1. Plug the electrical cord into an outlet.
2. Press the main ‘On/Off’ button to turn the unit on.
The power of the air purifier will be turned on.
The UV light bulb and the green ‘UV’ indication light will illuminate.
They will remain lit up while the unit is on.
E-8 E-9
Page 6

AC6000_3L rev: Hygia 6.0 3L rev 8/30/07 1:50 PM Page 6
OPERATION (cont.)
The unit is preset to automatic operation mode.
a. The green ‘Clean Air’ indication light in the center of the ‘Home
Dust/ Micro Dust’ indication light region will be turned on.
b. The ‘Auto’ mode indication light in the fan speed selection
region will be turned on.
c. The dust sensor device will determine the air quality and will
indicate the dust level by illuminating the ‘Home Dust’/’Micro
Dust’ lights.
d. The unit will adjust the fan speed automatically according to the
air quality level if it is in ‘Auto’ mode. The unit will not adjust
the fan speed if it is set to any other fan speed mode.
Press the main ’On/Off’ button again to turn the unit off.
B. Selection of Fan Speed
1. Press the fan ‘Speed’ button to select from one of the following:
Auto – Automatically selects fan speed according to the air
quality level
Quiet – Use for quiet, nighttime operation
Low – Use for constant low-speed filtration
High – Provides a higher fan speed for quality filtration of dust,
pollen, smoke, etc.
Turbo – Provides superior filtration
2. Each time the fan ‘Speed’ button is depressed, it changes the speed
according to the following sequence:
Auto - Quiet - Low - High - Turbo
C. Selection of Timer Setting
1. Press the ‘Timer’ button to set a desired run time.
OPERATION (cont.)
2. Each time the ‘Timer’ button is depressed, it switches the run time in
the following sequence:
1-Hour - 2-Hours - 4-Hours - 8-Hours - Off (without indication
light on).
The power off preset indication light will automatically switch to the
next lowest setting to indicate the remaining run time.
Timer setting switches in the following order: 1-hour, 2-hour, 4-hour,
8-hour, OFF (without indication light on).
D. Selection of Ionizer
1. Press the ‘Ionizer’ On/Off button to turn on the ionizer device.
The green ionizer indication light will illuminate and the unit will release
a small amount of negative ions along with out-flowing air to enhance
the cleaning process.
2. Press the ‘Ionizer’ On/Off button again to turn the ionizer function off.
E. Resetting the Filter Check Indication Light
1. When the filter ‘Check’ light is illuminated, it is time to check the
quality of the filters especially the HEPA and the charcoal filters.
2. Do the necessary cleaning and/or replacement of the filter.
3. Press the filter check ‘Reset’ button with a pin after installing the
new filters into the unit.
The Micro-Dust indication light represents the total level of small dust
particles, while the Home-Dust Indication light represents the level of
large size particles that exist in the air. The less red lights that are
illuminated, the better the air quality.
E-10 E-11
Page 7
AC6000_3L rev: Hygia 6.0 3L rev 8/30/07 1:50 PM Page 7
MAINTENANCE
A. Front Cover
Wipe the front cover with a soft, damp cloth.
Do not use detergents or chemicals of any kind.
Do not submerse in water.
B. Pre-Filter
Wash the pre-filter thoroughly with warm water.
Make sure the pre-filter is completely dry before it is installed
back in the unit.
The pre-filter captures large dust particles like pet hair and lint, it is
recommended to clean the filter every 2-3 months.
C. Charcoal Filter
Do not wash the charcoal filter in water.
Replace with a new charcoal filter when the filter begins to
turn grey in color.
The charcoal filter removes odors and cigarette smoke, it is
recommended to change the filter every 6-12 months.
MAINTENANCE (cont.)
Dry the PCO filter under sunlight.
Do not put the PCO filter back into the unit until it is
completely dry.
The PCO (photocatalyst oxidizer) filter captures and oxidizes airborne
bacteria, molds and fungus, etc., it is recommended to clean the PCO
filter at least once every 2-3 months.
F. Dust Sensor
Keep the area around the dust sensor in good, clean condition.
Clean the dust sensor lens regularly to maintain the effectiveness
of the device.
Follow the instructions outlined below on how to clean the
dust sensor.
1. Remove the front cover of the unit.
D. HEPA Filter
Do not wash the HEPA filter in water.
Do not use a vacuum cleaner to clean the filter’s surface.
Replace with a new HEPA filter when the current filter is in
poor condition.
HEPA filters capture dust, mites, debris, mold, spores, pollen, pet
dander, etc., it is recommended to change the HEPA filter every
6-12 months.
2. Take out the cleaning pad.
E. PCO Filter
Wash the PCO filter thoroughly in slow running water.
Do not scrub the filter as it may damage the surface.
E-12 E-13
Page 8

AC6000_3L rev: Hygia 6.0 3L rev 8/30/07 1:50 PM Page 8
MAINTENANCE (cont.)
3. Open the sensor door.
4. Insert the cleaning pad into the dust sensor slot and clean the dust
sensor by moving the cleaning pad IN and OUT as illustrated.
TROUBLESHOOTING GUIDE
PROBLEM SOLUTION
Unit does not operate. Outlet: Make sure the electrical cord is plugged firmly
Odors and smoke are not easily
being removed.
The discharged air has an odor. Filters: Check to see if the charcoal and HEPA filters
Filter 'Check' remains on even
after a new HEPA filter has been
replaced.
into the outlet.
Front Cover:
Filters: Follow the installation directions carefully for each
filter. Clean or replace filters as needed.
Air Flow Openings:
the air inlet and outlet openings.
need replacement.
Filter Check 'Reset' Button: After changing the HEPA filter
make sure to trigger the Filter Check 'Reset' button with
a pin.
Install the front cover properly.
Make sure to keep objects away from
G. UV Light Bulb
Do not wash the UV light bulb
with water.
Do not use detergent or chemicals of
any kind on the UV light bulb.
The UV light bulb is extremely fragile,
use caution when cleaning. A feather
duster is recommended.
The UV light bulb should only be replaced
by a qualified technician when needed.
E-14 E-15
Remote Control does not work. Batteries: Replace the batteries with new ones.
Receiver:
main unit.
Is there an object blocking the receiver on the
Page 9

AC6000_3L rev: Hygia 6.0 3L rev 8/30/07 1:50 PM Page 9
TECHNICAL SPECIFICATIONS
Input Voltage: 120 V
Input Current: 0.85 A
Unit Dimension: 15" w x 8" d x 20" h
Unit Weight: 15 lbs.
Power Cord Length: 9 feet
REPLACEMENT PARTS
FLT6000 Filter Replacement Pack
Includes: Hepa and Charcoal Filters
LIMITED WARRANTY
To the consumer, Guardian Technologies LLC warrants this product to be free of defects in
materials or workmanship commencing upon the date of the original purchase. Refer to your
product carton for the length of warranty and save your original sales receipt to validate start of
warranty period.
If this product should become defective within the warranty period, we will repair or replace any
defective parts free of charge. The complete machine must be delivered pre-paid to any authorized
Guardian Technologies LLC warranty service center. Please include complete information on the
problem, day of purchase, copy of original sales receipt and your name, address and telephone
number. If you are not near a warranty station, call the factory for assistance in the US and Canada
at 1-866-603-5900. Use only genuine Guardian Technologies replacement parts.
Germ Guardian
™
Système complet
d’assainissement de l’air
UTILISATION ET INSTRUCTIONS D’ENTRETIEN
The warranty does not include unusual wear, damage resulting from accident, or unreasonable
use of the product. This warranty does not cover unauthorized repairs. This warranty gives you
specific legal rights and you may also have other rights (other rights may vary from state to state
in the U.S.A).
We consider the registration process important to ensuring superior service to our customers,
however submitting this card to Guardian Technologies LLC is optional and does not affect your
rights to utilize this warranty according to the conditions stated above. If you have any questions or
comments about our product call toll free at 1-866-603-5900 or send comments to: Attn: Customer
Service, Guardian Technologies LLC, 26201 Richmond Road, Unit A3, Bedford Heights, Ohio 44146.
www.germguardian.com
1-866-603-5900
Guardian Technologies LLC
P.O. Box 21135 · Beachwood, OH 44122
1-866-603-5900 · www.germguardian.com
©2006 Guardian Technologies LLC
E-16
Manuel anglais ......................................................E-1
Manuel français ....................................................F-1
Manuel espagnol ..................................................S-1
NO DE MODÈLE : AC6000
Garantie limitée de 2 ans
www.germguardian.com
1-866-603-5900
Date d'achat
mois
année
F-1
Page 10

AC6000_3L rev: Hygia 6.0 3L rev 8/30/07 1:50 PM Page 10
F-2
système complet
d’assainissement de l’air
Numéro de modèle : AC6000
TABLE DES MATIÈRES
Mesures de sécurité ........................................3
Identification des pièces ....................................4
Installation ....................................................7
Fonctionnement ..............................................9
Entretien ......................................................12
Dépannage....................................................15
Spécifications techniques ..................................16
Pièces de rechange ........................................16
Garantie limitée..............................................16
Le Germ Guardian™ Complete Air Cleansing System™ est un système de
filtration de l’air en six étapes qui permet de créer un environnement
intérieur plus sain. Il purifie l’air de votre maison et élimine les germes
et les odeurs.
MESURES DE SÉCURITÉ
Veuillez lire attentivement les mesures de sécurité avant de mettre en
marche le système complet d’assainissement de l’air, à défaut de quoi
vous vous exposez à un risque d’incendie, à une électrocution, à des
blessures ou à un endommagement de l’appareil.
• N’endommagez pas, ni ne tordez, ni ne pliez le cordon électrique. Ne tirez pas
dessus et ne posez pas d’objets lourds sur celui-ci.
• Ne manipulez jamais le cordon électrique avec les mains mouillées.
• Pour réduire le risque de choc électrique, l’appareil est équipé d’une fiche
polarisée. (une tige de la fiche est plus large que l’autre). La fiche ne peut
s’installer que d’une seule façon dans la prise de courant. Si la fiche n’entre
pas dans la prise de courant, inversez le sens des tiges de la fiche et
recommencez. Si la fiche n’entre toujours pas dans la prise, demandez à
un professionnel qualifié d’installer une prise de courant adéquate. Ne
modifiez pas la fiche de quelque façon que ce soit.
• Ne tirez jamais sur le cordon électrique pour débrancher l’appareil de la prise.
• Débranchez l’appareil avant de le nettoyer ou d'installer ou remplacer
les filtres.
• Si le cordon électrique est endommagé, veuillez communiquer avec un
technicien qualifié pour effectuer la réparation.
• N’insérez jamais vos doigts ou des objets étrangers dans les ouvertures de
l’appareil servant à la circulation de l’air.
• Faites fonctionner l’appareil dans un espace bien aéré.
• Ne faites pas fonctionner l’appareil à l’extérieur.
• Ne faites pas fonctionner l’appareil à proximité de gaz inflammables.
• Ne faites pas fonctionner l’appareil dans les endroits humides tels que les
salles de bain.
• Ne vaporisez pas de produits chimiques à proximité de l’appareil, car ils vont
s’accumuler sur le filtre et pourraient produire des vapeurs nocives.
• Ne faites pas fonctionner l’appareil dans une aire présentant un contenu élevé
d’huile dans l’air, comme de l’huile mécanique ou de l’huile à cuisson, car
avec le temps l’huile détériore le filtre.
• Ne regardez jamais directement l’ampoule UV lorsqu’elle est allumée.
• Assurez-vous que tous les filtres sont bien en place avant de faire fonctionner
l’appareil.
F-3
Page 11

AUTO
QUIET
L
H
TURBO
SPEED TIMER
ON/OFF
HOME DUST MICRO DUST
TIMER
1
2 4
8
hr hr hr hr
CHECK
RESET
FILTER
UV
IONIZER
AC6000_3L rev: Hygia 6.0 3L rev 8/30/07 1:50 PM Page 11
IDENTIFICATION DES PIÈCES
Unité principale
1. Couvercle avant
2. Panneau de commande
3. Préfiltre
4. Filtre au charbon
5. Filtre HEPA
6. Filtre PCO
7. Couvercle du capteur de poussières
8. Tube à rayons ultraviolets
9. Cordon électrique
10. Ionisateur
6
5
4
3
2
IDENTIFICATION DES PIÈCES (suite)
Panneau de commande
A. Indicateur lumineux de l’ionisateur
B. Indicateur lumineux du mode automatique
C. Indicateurs lumineux de la vitesse du ventilateur
D. Indicateurs lumineux de poussières de maison
E. Indicateur lumineux d’air pur
F. Indicateurs lumineux de micro-poussières
G. Indicateurs lumineux de réglage de la minuterie
H. Indicateur lumineux de vérification des filtres
I. Indicateur lumineux de lumière UV
J. Fenêtre du récepteur de télécommande
K. Interrupteur de l’ionisateur
L. Bouton de réglage de la vitesse du ventilateur
M. Interrupteur de l’appareil
N. Bouton de réglage de la minuterie
O. Indicateur encastré de réinitialisation de la
7
vérification des filtres
8
AB C D E F G H I
1
9
10
F-4 F-5
J
K
L
M
N
O
Page 12

ON/OFF
SPEED
IONIZER
TIMER
Nettoyer du Taux de Livraison d'Air
rapide l'unité ltre l'air.
Ce
pièce fermée augmente à _________ les pieds carrés.
La
d'opération. L'usage subséquent peut changer selon l'usage.
144
95
107
129
AC6000_3L rev: Hygia 6.0 3L rev 8/30/07 1:50 PM Page 12
IDENTIFI CATION DES PIÈCES (suite)
Télécommande
1. Interrupteur de l’appareil
2. Bouton de réglage de la vites se
du ventilateur
3. Interrupteur de l’ionisateur
4. Bouton de réglage de la minuterie
INSTALLATION
1
2
3
4
Les filtres sont dans leur emballage, à l'intérieur du purificateur d’air.
Installation des filtres
1. Débranchez l’appareil de la prise.
2. Placez l’appareil à plat, le couvercle avant pointant en l’air.
3. Retirez le couvercle avant avec précaution A)
boutons d'ouverture et B) en soulevant le couvercle.
B
A
en poussant sur les
Quel est CADR?
CADR représente « Nettoie du Taux de Livraison
d'Air » qui indique le volume d'air filtré livré par un
purificateur d'air. Les clas sements de CADR montrent
l'efficacité de comment efficace le purificateur d'air est
à capturer les belles particules des chos es comme
la fumée de tabac et les pollens de plante de la pièce.
F-7F-6
Page 13

AC6000_3L rev: Hygia 6.0 3L rev 8/30/07 1:50 PM Page 13
INSTALLATION (suite)
4. Retirez les filtres du purificateur d’air et jetez les emballages de
plastique.
5. Indiquez la date d’installation sur l’autocollant portant la mention
« Filter Replacement Reminder » (rappel pour le remplacement du
filtre) situé sur la boîte du filtre HEPA.
6. Placez le filtre PCO dans le compartiment de l’unité principale. (1)
7. Placez le filtre HEPA dans le compartiment du filtre. Insérez-le dans le
sens de la flèche située sur le côté de la boîte. (2)
8. Placez le filtre au charbon au dessus de la boîte du filtre HEPA. (3)
9. Placez le préfiltre au dessus du filtre au charbon. Glissez les quatre
pattes du préfiltre dans les fentes correspondantes situées dans le
compartiment du filtre. (4)
10. Insérez les deux charnières situées au bas du couvercle avant dans les
deux rainures situées au bas de l’unité principale. Appuyez doucement
sur la partie supérieure du couvercle avant vers l’unité principale pour
fermer le couvercle. (5)
Remarque : Cet appareil est équipé d’un verrou de sécurité qui ne permet
de le faire fonctionner que si le couvercle est correctement fermé.
INSTALLATION (suite)
Installation des piles dans la télécommande.
1. Appuyez dur le couvercle arrière et faites-le glisser.
2. Insérez deux piles AAA en suivant les instructions indiquées
dans le compartiment des piles.
3. Refermez le couvercle arrière.
2
1
3
FONCTIONNEMENT
A. Mise en marche et arrêt de l'appareil
1
2
3
5
F-8 F-9
4
1. Branchez la fiche du cordon électrique dans une prise de courant.
2. Appuyez sur le bouton pour mettre en marche l’appareil.
Le purificateur d’air se met en marche.
La lampe à rayons UV et l’indicateur lumineux vert de la lampe UV
s’allument. Ils restent allumés tant que l’appareil est en marche.
Page 14

AC6000_3L rev: Hygia 6.0 3L rev 8/30/07 1:50 PM Page 14
FONCTIONNEMENT (suite)
L’appareil est préréglé pour fonctionner en mode automatique.
a. L’indicateur lumineux vert « d’air pur » situé au centre des
indicateurs lumineux « Home dust » (poussières de maison)
et « Micro dust » (micro-poussières) s’allume.
b. L’indicateur lumineux du mode automatique, situé à côté des
indicateurs de sélection de la vitesse du ventilateur, s’allume.
c. Le capteur de poussières détermine la qualité de l’air et indique
le niveau de poussière en allumant les indicateurs lumineux de
la section « Home Dust/Micro Dust ».
d. L’appareil règle la vitesse du ventilateur automatiquement en
fonction du niveau de qualité de l’air, lorsqu’il est en mode
automatique. Mais il ne règle pas automatiquement la vitesse
du ventilateur si celle-ci est déjà réglée dans un mode autre
que le mode automatique.
Appuyez à nouveau sur le bouton pour arrêter l’appareil.
B. Sélection de la vitesse du ventilateur
1. Appuyez sur le bouton « Speed » pour sélectionner une vitesse pour
le ventilateur parmi les suivantes :
Auto – La vitesse est sélectionnée automatiquement en fonction du
niveau de qualité de l’air
Quiet – Fonctionnement silencieux, pour la nuit
Low – Basse vitesse, pour une filtration continue
High – Vitesse plus élevée, pour une filtration de qualité des
poussières, du pollen, de la fumée, etc.
Turbo – Fournit une filtration de qualité supérieure
2. Chaque fois que vous appuyez sur le bouton « Speed », la vitesse
change en suivant la séquence suivante :
Auto - Quiet - Low - High - Turbo
C. Réglage de la minuterie
1. Appuyez sur le bouton « Timer » pour régler la durée de
fonctionnement.
FONCTIONNEMENT (suite)
2. Chaque fois que vous appuyez sur le bouton « Timer », la durée de
fonctionnement change en suivant la séquence suivante :
1-Hour - 2-Hours - 4-Hours - 8-Hours - Off (soit 1 heure, 2 heures,
4 heures, 8 heures et Arrêt). Aucun indicateur lumineux allumé
indique la position d’arrêt.
Les indicateurs lumineux de la minuterie s’allument et s’éteignent
automatiquement pour indiquer la durée restante de fonctionnement.
Les indicateurs lumineux s’allument et s’éteignent en suivant la
séquence suivante : 1-hour, 2-hour, 4-hour, 8-hour, OFF (soit 1 heure,
2 heures, 4 heures, 8 heures et Arrêt). Aucun indicateur lumineux
allumé indique la position d’arrêt.
D. Mise en marche du ionisateur
1. Appuyez sur le bouton « On/Off » de l’ionisateur pour le mettre en
marche.
L’indicateur vert de l’ionisateur s’allume et l’unité émet une petite
quantité d’ions négatifs dans le flux d’air sortant pour améliorer le
processus de nettoyage.
2. Appuyez à nouveau sur le bouton « On/Off » pour arrêter l’ionisateur.
E. Réinitialisation de l’indicateur lumineux de vérification
des filtres
1. Lorsque l’indicateur lumineux « Check » de vérification des filtres
s’allume, il est temps de vérifier la qualité des filtres, particulièrement
celle des filtres HEPA et au charbon.
2. Procédez au nettoyage ou, au besoin, au remplacement de chacun
des filtres.
3. À l’aide d’une épingle, appuyez sur le bouton « Reset » de
réinitialisation de la fonction de vérification des filtres après
l’installation des nouveaux filtres dans l’appareil.
L’indicateur lumineux « Micro-Dust » indique le niveau global de
petites particules de poussières, alors que l’indicateur lumineux
« Home-Dust » indique le niveau global de grosses particules
présentes dans l’air. Moins il y a de voyants rouges allumés,
meilleure est la qualité de l’air.
F-10 F-11
Page 15

AC6000_3L rev: Hygia 6.0 3L rev 8/30/07 1:50 PM Page 15
ENTRETIEN
A. Couvercle avant
Essuyez le couvercle avant avec un chiffon doux et humide.
N’utilisez aucun détergent, ni produit chimique.
N’immergez pas le couvercle dans l’eau.
B. Préfiltre
Nettoyez bien le préfiltre à l’eau chaude.
Assurez-vous que le préfiltre est bien sec avant de le réinstaller
dans l’appareil.
Le préfiltre retient les grosses particules de poussière, notamment les
poils d’animaux et les peluches. Il est recommandé de nettoyer le filtre
tous les 2 ou 3 mois.
C. Filtre au charbon
Ne lavez pas le filtre au charbon dans l’eau.
Remplacez-le par un nouveau filtre lorsqu'il prend une couleur
grisâtre.
Le filtre au charbon élimine les odeurs et la fumée de cigarette. Il est
recommandé de le changer après 6 à 12 mois d’utilisation.
FONCTIONNEMENT (suite)
Laissez sécher le filtre PCO au soleil.
Attendez que le filtre PCO soit complètement sec avant de le
remettre en place dans l’appareil.
Le filtre PCO (oxydation photocatalytique) retient et oxyde les
bactéries, les moisissures et les champignons en suspension dans l’air,
etc. Il est recommandé de nettoyer le filtre PCO au moins tous les 2
à 3 mois.
F. Capteur de poussières
Gardez propre et en bonne condition la zone entourant le capteur
de poussières.
Nettoyez les lentilles du capteur à intervalles réguliers afin
d’assurer son efficacité.
Pour nettoyer le capteur de poussières, suivez les instructions
indiquées ci-dessous.
1. Retirez le couvercle avant de l’appareil.
D. Filtre HEPA
Ne lavez pas le filtre HEPA dans l’eau.
N’utilisez pas d’aspirateur pour nettoyer la surface du filtre.
Remplacez-le par un nouveau filtre HEPA lorsqu'il est en
mauvais état.
Le filtre HEPA retient la poussière, les acariens, les débris, les
moisissures, les spores, le pollen, les squames animales, etc.
Il est recommandé de le changer après 6 à 12 mois d’utilisation.
2. Retirez le tampon nettoyeur.
E. Filtre PCO
Nettoyez bien le filtre PCO sous le robinet avec un faible
débit d’eau.
Ne frottez pas le filtre car cela pourrait endommager sa surface.
F-12 F-13
Page 16

AC6000_3L rev: Hygia 6.0 3L rev 8/30/07 1:50 PM Page 16
FONCTIONNEMENT (suite)
3. Ouvrez la porte du capteur.
4. Insérez le tampon nettoyeur dans la fente du capteur et nettoyez le
capteur en INSÉRANT et en RETIRANT le tampon nettoyeur, tel
qu’illustré.
GUIDE DE DÉPANNAGE
PROBLÈME SOLUTION
L’appareil ne fonctionne pas. Prise de courant : Assurez-vous que l’appareil est bien
Les odeurs et la fumée ne sont
pas éliminées adéquatement.
L’air sortant de l’appareil a une
odeur.
L'indicateur lumineux « Check »
pour la vérification des filtres
reste allumé même si le filtre
HEPA a été remplacé.
branché.
Couvercle avant
avant de l’appareil.
Filtres : Suivez attentivement les instructions
d’installation s’appliquant à chacun des filtres. Nettoyez ou
remplacez les filtres, au besoin.
Ouvertures de circulation de l’air
ouvertures d’entrée et de sortie d’air ne sont pas obstruées.
Filtres : Vérifiez si les filtres au charbon et HEPA ont
besoin d’être remplacés.
Bouton « Reset » de réinitialisation de la vérification des
filtres : Après avoir remplacé le filtre HEPA, assurez-vous
de presser le bouton « Reset » de réinitialisation de la
vérification des filtres à l’aide d’une épingle.
: Installez correctement le couvercle
: Assurez-vous que les
G. Ampoule à rayons ultraviolets
Ne lavez pas l’ampoule à rayons
La télécommande ne fonctionne
pas.
Piles : Remplacez les piles.
Récepteur de la télécommande
interfère avec le récepteur de l’appareil.
: Vérifiez si un objet
ultraviolets à l’eau.
N’utilisez aucun détergent ni produit
chimique pour la nettoyer.
L’ampoule à rayons ultraviolets est
extrêmement fragile. Nettoyez-la avec
précaution. L’utilisation d’un plumeau
est recommandée.
L’ampoule à rayons ultraviolets ne doit
être remplacée que par un technicien
qualifié, lorsque nécessaire.
F-14 F-15
Page 17

AC6000_3L rev: Hygia 6.0 3L rev 8/30/07 1:50 PM Page 17
SPÉCIFICATIONS TECHNIQUES
Tension d’entrée : 120 V
Courant d’entrée : 0,85 A
Dimensions de l’appareil : 15 po L x 8 po P x 20 po H
Poids de l’apparei l: 6,8 kg (15 lb)
Longueur du cordon électrique :2,75 m (9 pieds)
PIÈCES DE RECHANGE
Ensemble de filtres de rechange FLT6000
Comprend : Filtres HEPA et au charbon
GARANTIE LIMITÉE
Guardian Technologies LLC garantit au consommateur que ce produit est exempt de défauts
matériels ou de fabrication, à partir de la date d’achat d’origine. Référez-vous à
l’emballage du produit pour obtenir la durée de la garantie et gardez votre reçu de vente original
pour valider le début de la période de garantie.
Si le produit s’avère défectueux pendant la période de garantie, nous réparerons ou remplacerons
toutes les pièces défectueuses gratuitement. La machine complète doit être livrée en port payé à
n’importe quel centre de service de garantie Guardian Technologies LLC autorisé. Veuillez inclure les
renseignements complets sur le problème, la date d’achat, une copie du reçu de vente original et
votre nom, adresse et numéro de téléphone. Si vous êtes situé loin de tout centre de garantie,
communiquez directement avec la manufacture, au 1-866-603-5900, pour obtenir de l’aide aux
États-Unis ou au Canada. Utilisez seulement des pièces de remplacement Guardian Technologies
authentiques.
Germ Guardian
™
Sistema Completo
de Purificación de Aire
INSTRUCCIONES DE USO Y CUIDADO
La garantie ne couvre pas l’usure inhabituelle et les dommages causés par accident ou par une
utilisation déraisonnable du produit. Cette garantie ne couvre pas les réparations non autorisées.
Cette garantie vous donne certains droits juridiques et vous pouvez avoir aussi d’autres droits (les
droits peuvent varier d’un état à l’autre aux États-Unis).
Nous considérons le processus d’enregistrement comme important afin d’assurer un service
supérieur à notre clientèle. Cependant, l’envoi de cette carte à Guardian Technologies LLC est facultatif et si vous ne l’envoyez pas, cela n’affecte en rien vos droits d’utiliser cette garantie en accord
avec les conditions mentionnées ci-dessus. Si vous avez des questions ou des commentaires au
sujet du produit, communiquez avec nous sans frais au numéro 1-866-603-5900 ou envoyez vos
commentaires à : Attention : Customer Service, Guardian Technologies LLC, 26201 Richmond Road
Unit A3, Bedford Heights, Ohio 44146, ÉTATS-UNIS
www.germguardian.com
1-866-603-5900
Guardian Technologies LLC
P.O. Box 21135 · Beachwood, OH 44122, ÉTATS-UNIS
1-866-603-5900 · www.germguardian.com
F-16
©2006 Guardian Technologies LLC
Manual en Inglés ..................................................E-1
Manual en Francés ................................................F-1
Manual en Español................................................S-1
MODELO Nº AC6000
Garantía limitada por 2 años
www.germguardian.com
1-866-603-5900
Fecha de compra
mes
año
S-1
Page 18

AC6000_3L rev: Hygia 6.0 3L rev 8/30/07 1:50 PM Page 18
Sistema Completo de Purificación de Aire
Número de modelo: AC6000
CONTENIDO
Precauciones de seguridad ................................3
Identificación de partes ....................................4
Instalación ....................................................7
Funcionamiento ..............................................9
Mantenimiento ..............................................12
Resolución de problemas ..................................15
Especificaciones técnicas ..................................16
Piezas de repuesto ..........................................16
Garantía limitada ............................................16
El sistema para la limpieza del aire Complete Air Cleansing System™
Germ Guardian™ ofrece seis pasos para la purificación del aire, que ayudan a crear un ambiente más puro y saludable. Purifica el aire de su
hogar y elimina los gérmenes y los olores.
PRECAUCIONES DE SEGURIDAD
Lea detenidamente las siguientes advertencias de precaución antes de
utilizar el Sistema Completo de Purificación de Aire. En caso contrario,
se podrían producir incendios, choques eléctricos, lesiones corporales
o daños a la unidad.
• No dañe, tire, enrosque, doble ni coloque objetos pesados sobre el cable
eléctrico.
• Nunca toque el cable eléctrico con las manos húmedas.
• Para reducir el riesgo de choque eléctrico, este equipo tiene una clavija
polarizada (una espiga plana es más ancha que la otra). Esta clavija se puede
insertar en un tomacorriente polarizado de una sola manera. Si la clavija no
entra completamente en el tomacorriente, inviértala. Si aún así no se puede
insertar, comuníquese con un electricista calificado para que instale un
tomacorriente adecuado. No modifique la clavija de ninguna manera.
• Nunca tire del cable eléctrico para desconectar la unidad del tomacorriente.
• Desconecte la unidad antes de limpiar, instalar o reemplazar los filtros.
• Si se producen daños en el cable eléctrico, comuníquese con un
electricista calificado para que lo repare.
• No inserte los dedos u objetos extraños en las aberturas del flujo de aire de
la unidad.
• Haga funcionar la unidad en un área bien ventilada.
• No haga funcionar la unidad al aire libre.
• No la haga funcionar cerca de gases inflamables.
• No haga funcionar la unidad en lugares húmedos o mojados como un baño.
• No utilice aerosoles químicos cerca de la unidad, se acumularán en el filtro
y posiblemente causarán emanaciones nocivas.
• No haga funcionar la unidad en un área con alto contenido de aceite, como
aceite para máquinas o de cocina, con el paso del tiempo esto deteriorará
el filtro.
• Nunca mire directamente el foco de luz UV cuando está encendido.
• Asegúrese de que todos los filtros estén correctamente instalados antes de
utilizar la unidad.
S-2
S-3
Page 19

AUTO
QUIET
L
H
TURBO
SPEED TIMER
ON/OFF
HOME DUST MICRO DUST
TIMER
1
2 4
8
hr hr hr hr
CHECK
RESET
FILTER
UV
IONIZER
AC6000_3L rev: Hygia 6.0 3L rev 8/30/07 1:50 PM Page 19
IDENTIFICACIÓN DE PARTES (Continuación)
Unidad principal
1. Cubierta frontal
2. Panel de Control
3. Prefiltro
4. Filtro de carbón activado
5. Filtro HEPA
6. Filtro PCO
7. Cubierta del sensor de polvo
8. Foco de luz UV
9. Cable eléctrico
10. Ionizador
5
4
3
2
IDENTIFICACIÓN DE PARTES (Continuación)
Panel de Control
A. Luz indicadora del ionizador
B. Luz indicadora del modo automático
C. Luces indicadoras de la velocidad del ventilador
D. Luces indicadoras de polvo doméstico
E. Luz indicadora de aire limpio
F. Luces indicadoras de polvo microscópico
G. Luces indicadoras del ajuste del temporizador
H. Luz indicadora ‘Check’ (Inspección) del filtro
I. Luz indicadora de "UV"
J. Ventana del receptor del control remoto
K. Botón de encendido / apagado del Ionizador
L. Botón indicador “Speed” (Velocidad) del ventilador
6
7
M. Botón de encendido / apagado
N. Botón de ajuste ‘Timer’ (Temporizador)
O. Indicador empotrado de ‘reajuste’ de verificación
del filtro
8
AB C D E F G H I
1
9
10
S-4 S-5
J
K
L
M
N
O
Page 20

ON/OFF
SPEED
IONIZER
TIMER
Limpie la Tasa Aérea de la Entrega
AC6000_3L rev: Hygia 6.0 3L rev 8/30/07 1:50 PM Page 20
IDENTIFI CACIÓN DE PARTES (Continuación)
Control remoto
1. Botón de encendido / apagado eléctrico
2. Botón ‘Speed’ (Velocidad del ventilador)
3. Botón de encendido / apagado del Ionizador
4. Botón de ajus te ‘Timer' (Temporizador)
INSTALACIÓN
1
2
3
4
Es pos ible que los filtros estén embalados dentro del purificador de aire.
Cómo instalar los filtros
1. Desconecte el del tomacorriente.
2. Coloque la unidad en posición horizontal con la cubierta frontal
hacia arriba.
3. Quite la cubierta frontal cuidadosamente A) presionando los botones
de abertura y luego B) levantando la cubierta.
B
A
¿Qué es CADR?
CADR s ignifica "Limpia la Tasa Aérea de la Entrega"
que indica el volumen de aire filtrado entregado por
un purificador de aire. Las calificaciones de CADR
muestran la eficacia de cuán eficiente el purificador
de aire está en capturar las partículas de multa de
cosas como el humo de tabaco y pólenes de
planta del cuarto.
S-7S-6
Page 21

AC6000_3L rev: Hygia 6.0 3L rev 8/30/07 1:50 PM Page 21
INSTALACIÓN (continuación)
4. Quite los filtros del purificador de aire y deseche las bolsas plásticas.
5. Escriba la fecha de instalación en el autoadhesivo "Recordatorio de
cambio de filtro" ubicado en la caja del filtro HEPA.
6. Coloque el filtro PCO en el compartimiento de la carcasa principal. (1)
7. Ponga el filtro HEPA en el compartimiento del filtro. Siga la dirección
de la flecha al costado de la caja que indica la dirección correcta. (2)
8. Coloque el filtro de carbón activado en la parte superior de la caja del
filtro HEPA. (3)
9. Coloque el prefiltro sobre el filtro de carbón activado. Deslice las
cuatro pestañas del filtro previo en las ranuras correspondientes del
compartimiento del filtro. (4)
10. Inserte las dos bisagras inferiores de la cubierta frontal en las dos
guías ubicadas en la parte inferior de la carcasa principal. Presione con
suavidad la parte superior de la cubierta frontal en dirección a la
carcasa principal para cerrarla. (5)
Nota: La unidad está equipada con un cierre de seguridad que sólo permite
que ésta funcione cuando la cubierta frontal está correctamente cerrada.
INSTALACIÓN (continuación)
Cómo instalar las baterías en el control remoto.
1. Presione y deslice hacia afuera la cubierta trasera.
2. Coloque dos baterías tamaño AAA de acuerdo con las instrucciones
que aparecen dentro del compartimiento de las baterías.
3. Cierre la cubierta trasera.
2
1
3
FUNCIONAMIENTO
1
2
3
5
S-8 S-9
4
A. Encendido/Apagado
1. Conecte el cable eléctrico en un tomacorriente.
2. Presione el botón principal "On/Off" (Encendido/Apagado) para
encender la unidad.
Se conectará la electricidad del purificador de aire.
Se encenderán el foco de luz UV y la luz indicadora verde de ‘UV’.
Permanecerán prendidos mientras la unidad está encendida.
Page 22

AC6000_3L rev: Hygia 6.0 3L rev 8/30/07 1:50 PM Page 22
FUNCIONAMIENTO (continuación)
La unidad está preajustada para comenzar a funcionar en modo
de operación automático.
a. Se encenderá la luz indicadora verde de ‘Aire limpio’ en el
centro del área de la luz indicadora de ‘Polvo doméstico /
micropolvo’.
b. Se encenderá la luz indicadora de modo ‘Auto’ (Automático) en
la zona de selección de la velocidad del ventilador.
c. El dispositivo del sensor de polvo determinará la calidad del
aire e indicará el nivel de polvo mediante las luces de ‘Home
Dust’ / ‘Micro Dust’ (Polvo doméstico/Polvo microscópico).
d. La unidad ajustará la velocidad del ventilador automáticamente
en el nivel de calidad del aire si está configurada en modo
‘Auto’ (Automático). La unidad no ajustará la velocidad del
ventilador si se ha configurado en cualquier otro modo de
velocidad del ventilador.
Presione el botón principal ‘On/Off’ (Encendido/Apagado) para
apagar la unidad.
B. Cómo seleccionar la velocidad del ventilador
1. Presione el botón ‘Speed’ (Velocidad) del ventilador para seleccionar
uno de los siguientes:
Auto – Selecciona automáticamente la velocidad del ventilador de
acuerdo con el nivel de calidad del aire.
Silencioso – Se usa para obtener un funcionamiento silencioso,
durante la noche.
Bajo – Se utiliza para una filtración continua a baja velocidad.
Alto – Proporciona una velocidad de ventilador más alta para una
filtración de calidad de polvo, polen, humo, etc.
Turbo – Proporciona una filtración superior.
2. Cada vez que se presiona el botón ‘Speed' (Velocidad) del ventilador,
cambia la velocidad de acuerdo con la siguiente secuencia:
Auto - Silencioso - Bajo - Alto - Turbo
C. Cómo seleccionar el ajuste del temporizador
FUNCIONAMIENTO (continuación)
2. Cada vez que se presiona el botón ‘Timer’ (Temporizador), el tiempo de
funcionamiento cambia según la siguiente secuencia:
1 hora - 2 horas - 4 horas - 8 horas - Apagado (con la luz indicadora
apagada).
La luz indicadora predeterminada de apagado se cambiará
automáticamente al ajuste más bajo siguiente a fin de indicar el tiempo
de funcionamiento restante.
El ajuste del temporizador cambia en el siguiente orden: 1 hora,
2 horas, 4 horas, 8 horas, APAGADO (con la luz indicadora apagada).
D. Cómo seleccionar el ionizador
1. Presione el botón de Encendido/Apagado del Ionizador para encender
este dispositivo.
La luz indicadora verde del ionizador se encenderá y la unidad liberará
una cantidad pequeña de iones negativos junto con el aire que sale
para mejorar el proceso de limpieza.
2. Presione el botón de Encendido/Apagado del Ionizador para apagar la
función ionizador.
E. Cómo reactivar la luz indicadora de inspección del filtro
1. Cuando la luz ‘Check’ (Inspección) del filtro se ilumina, es tiempo de
inspeccionar la calidad de los filtros, especialmente el filtro HEPA y los
filtros de carbón activado.
2. Realice la limpieza y/o sustitución necesaria del filtro.
3. Presione el botón ‘Reset’ (Reactivar) de la inspección del filtro con un
alfiler después de instalar los filtros nuevos en la unidad.
La luz indicadora de Polvo microscópico representa el nivel total de
partículas pequeñas de polvo, mientras que la luz indicadora de Polvo
doméstico representa el nivel de partículas grandes que existen en el
aire. Cuanto menos se iluminan las luces rojas, mejor es la calidad
del aire.
1. Presione el botón ‘Timer’ (Temporizador) para establecer el tiempo de
funcionamiento deseado.
S-10 S-11
Page 23

AC6000_3L rev: Hygia 6.0 3L rev 8/30/07 1:50 PM Page 23
MANTENIMIENTO
A. Cubierta frontal
Limpie la cubierta frontal con un trapo suave y húmedo.
No use detergentes o productos químicos de ninguna clase.
No la sumerja en el agua.
B. Prefiltro
Lave el prefiltro completamente con agua tibia.
Cerciórese de que esté completamente seco antes de instalarlo
nuevamente en la unidad.
El filtro previo atrapa las partículas grandes de polvo, el pelo de las
mascotas y la pelusa. Se recomienda limpiar el filtro cada 2 a 3 meses.
C. Filtro de carbón activado
No lave con agua el filtro de carbón activado.
Reemplácelo por un nuevo filtro de carbón activado cuando
comience a ponerse de color gris.
El Filtro de carbón activado elimina olores y humo del cigarrillo, se
recomienda cambiarlo cada 6-12 meses.
MANTENIMIENTO (continuación)
Seque el Filtro PCO con luz del sol.
No vuelva a colocar el Filtro PCO en la unidad hasta que esté
completamente seco.
El filtro PCO (oxidante fotocatalítico) atrapa y oxida las bacterias, moho
y hongos, etc. suspendidos en el aire. Se recomienda limpiar el filtro
PCO al menos cada 2 a 3 meses.
F. Sensor de polvo
Mantenga el área que rodea al sensor de polvo limpia y en buenas
condiciones.
Limpie la lente del sensor de polvo regularmente para mantener la
eficacia del dispositivo.
Siga las instrucciones detalladas debajo acerca de cómo limpiar el
sensor de polvo.
1. Quite la cubierta frontal de la unidad.
D. Filtro HEPA
No lave el filtro HEPA con agua.
No utilice una aspiradora para limpiar la superficie del filtro.
Reemplácelo por un Filtro HEPA nuevo cuando el filtro actual esté
en malas condiciones.
Los Filtros HEPA absorben polvo, ácaros, desechos, moho, esporas,
polen, caspa de mascotas, etc., se recomienda cambiarlos cada
6-12 meses.
2. Saque la almohadilla de limpieza.
E. Filtro PCO
Lave el Filtro PCO completamente en agua corriente lenta.
No refriegue el filtro porque puede dañar la superficie.
S-12 S-13
Page 24

AC6000_3L rev: Hygia 6.0 3L rev 8/30/07 1:50 PM Page 24
MANTENIMIENTO (continuación)
3. Abra la puerta del sensor.
4. Coloque la almohadilla de limpieza dentro de la ranura del sensor de
polvo y límpielo moviendo la almohadilla hacia ADENTRO y hacia
AFUERA tal como se indica en la ilustración.
GUÍA DE SOLUCIÓN DE PROBLEMAS
PROBLEMA SOLUCIÓN
La unidad no funciona. Tomacorriente: Cerciórese de que el cable eléctrico esté
Los olores y el humo no se
eliminan fácilmente.
El aire de descarga tiene olor. Filtros: Verifique si los Filtros de carbón activado y HEPA
La luz indicadora ‘Check’
(Inspección) del filtro continúa
encendida aún después de que
se ha colocado un Filtro HEPA
nuevo.
conectado firmemente al tomacorriente.
Cubierta frontal:
correcta.
Siga las indicaciones de instalación para cada
Filtros:
filtro detenidamente. Limpie y reemplace los filtros según
se requiera.
Aberturas de flujo de aire:
objetos alejados de las aberturas de entrada y salida
de aire.
deben reemplazarse.
Botón Reset (Reactivación) de inspección del filtro:
Después de cambiar el Filtro HEPA, asegúrese de disparar
el botón ‘Reset’ (Reactivación) de inspección del Filtro con
una clavija.
Instale la cubierta frontal de manera
Cerciórese de mantener los
G. Foco de luz UV
No lave el Foco de luz UV con agua.
El Control remoto no funciona. Baterías: Reemplace las baterías por unas nuevas.
Receptor:
unidad principal?
¿Hay un objeto que bloquea el receptor en la
No use detergentes o productos químicos
de ninguna clase sobre el Foco de luz UV.
El Foco de Luz UV es extremadamente
frágil, límpielo con precaución. Se
recomienda utilizar un plumero.
El foco de luz UV sólo debería ser
reemplazado por un técnico calificado
cuando sea necesario.
S-14 S-15
 Loading...