

Page 1
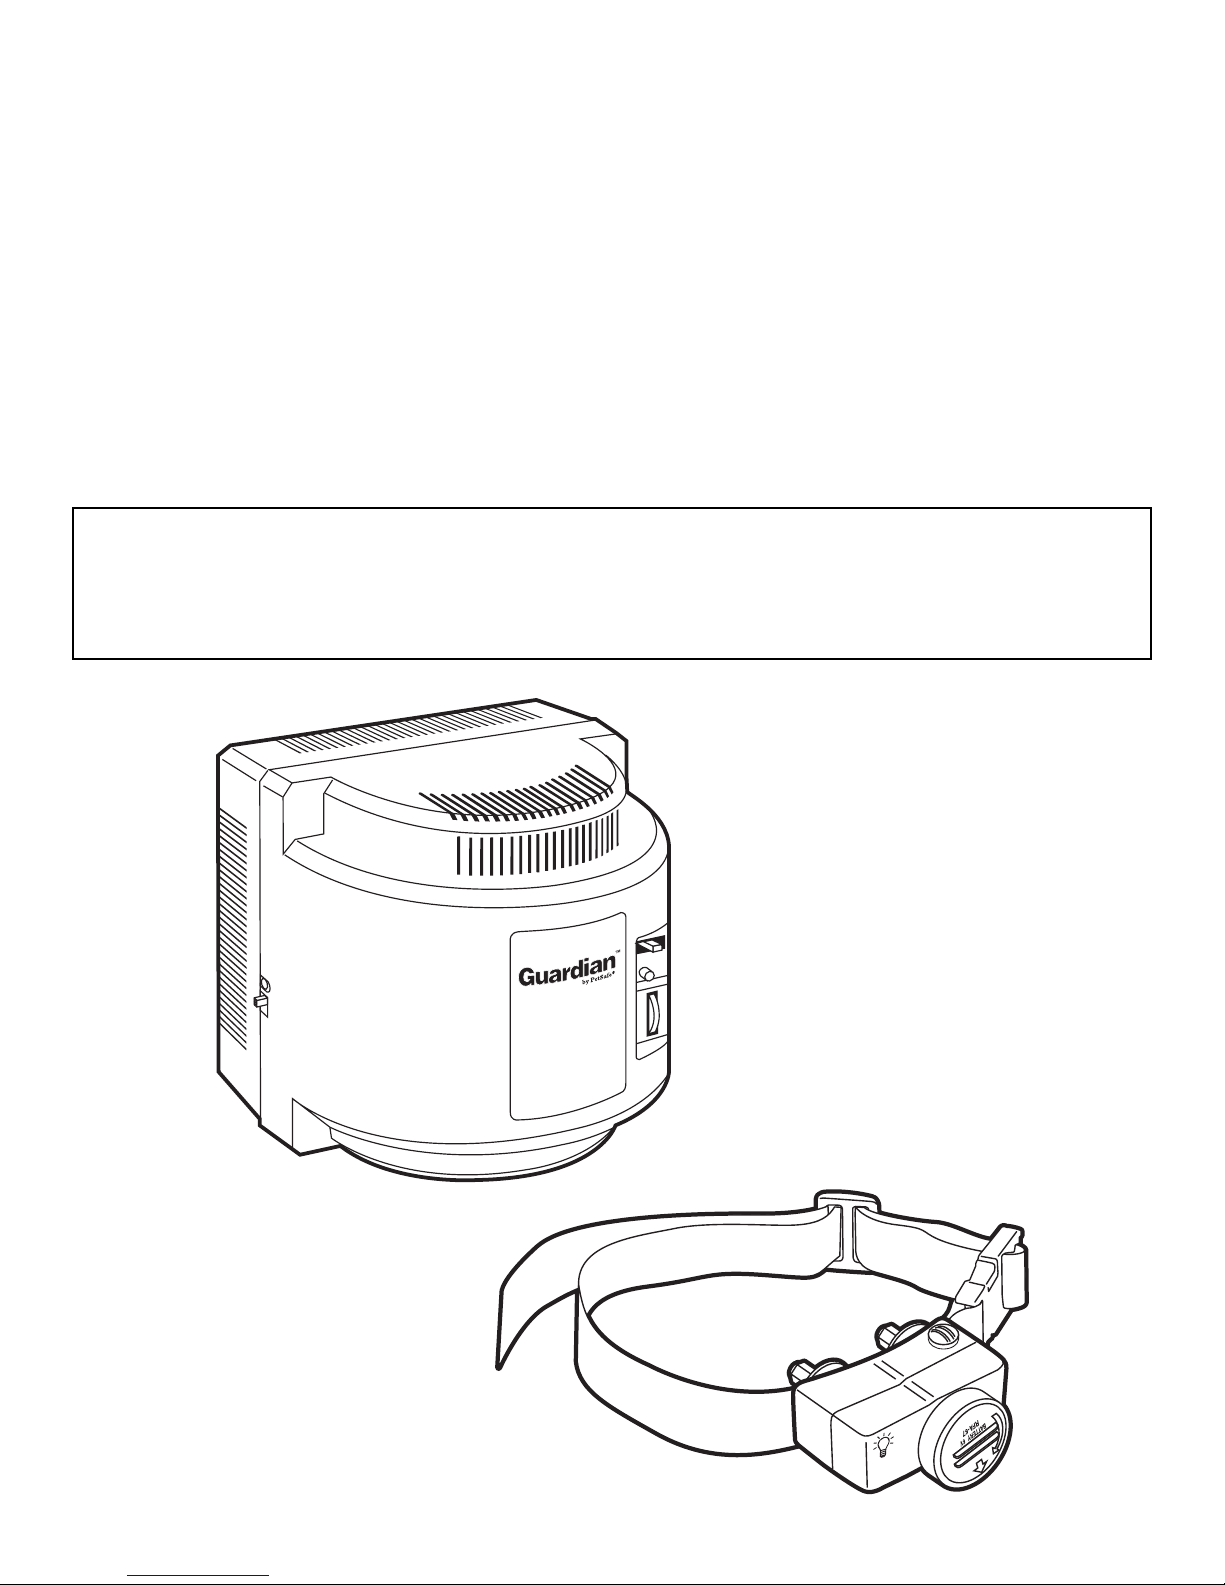
™
Guardian
Wireless
™
Pet Containment System
Operating and Training Guide
Manuel d’utilisation et de dressage
Manual de adiestramiento y funcionamiento
Please read this entire guide before beginning
Veuillez lire ce manuel en entier avant de commencer
Por favor, lea este manual completo antes de empezar
Page 2

Thank you for choosing Guardian™. Our mission is to ensure your pet’s safety by providing you
the tools and techniques to successfully train your pet. If you have any questions, please contact the
Customer Care Center at 1-800-457-3911 or visit our website at www.guardianpet.net.
___________________________________________
Table of Contents
Components ....................................................................................................................................3
Other Items You May Need ...............................................................................................................3
How the System Works .....................................................................................................................4
Key Defi nitions ................................................................................................................................4
Operating Guide
Set Up the Transmitter ...................................................................................................................5
Prepare the Receiver Collar ............................................................................................................5
Adjust the Pet Area to Desired Size ................................................................................................6
Transmitter Range Chart ...............................................................................................................7
Place the Boundary Zone Flags ......................................................................................................7
Fit the Receiver Collar ...................................................................................................................8
Training Guide
Be Patient With Your Pet ................................................................................................................9
Day 1 – Boundary Flag Awareness ..................................................................................................9
Days 2 thru 4 – Continue Boundary Flag Awareness .....................................................................10
Days 5 thru 8 – Distraction Phase ................................................................................................10
Days 9 thru 14 – Unleashed Supervision ....................................................................................... 11
Taking Your Pet Out of the Pet Area .............................................................................................. 11
Wireless - To - Go ........................................................................................................................12
Accessories ....................................................................................................................................12
Frequently Asked Questions ........................................................................................................... 12
Troubleshooting .............................................................................................................................14
Test Light Instructions ...................................................................................................................15
Terms of Use and Limitation of Liability .........................................................................................15
Caution .........................................................................................................................................15
Français .......................................................................................................................................16
Español ........................................................................................................................................30
FCC ..............................................................................................................................................44
Mounting Template ........................................................................................................................44
2 1-800-457-3911
Page 3
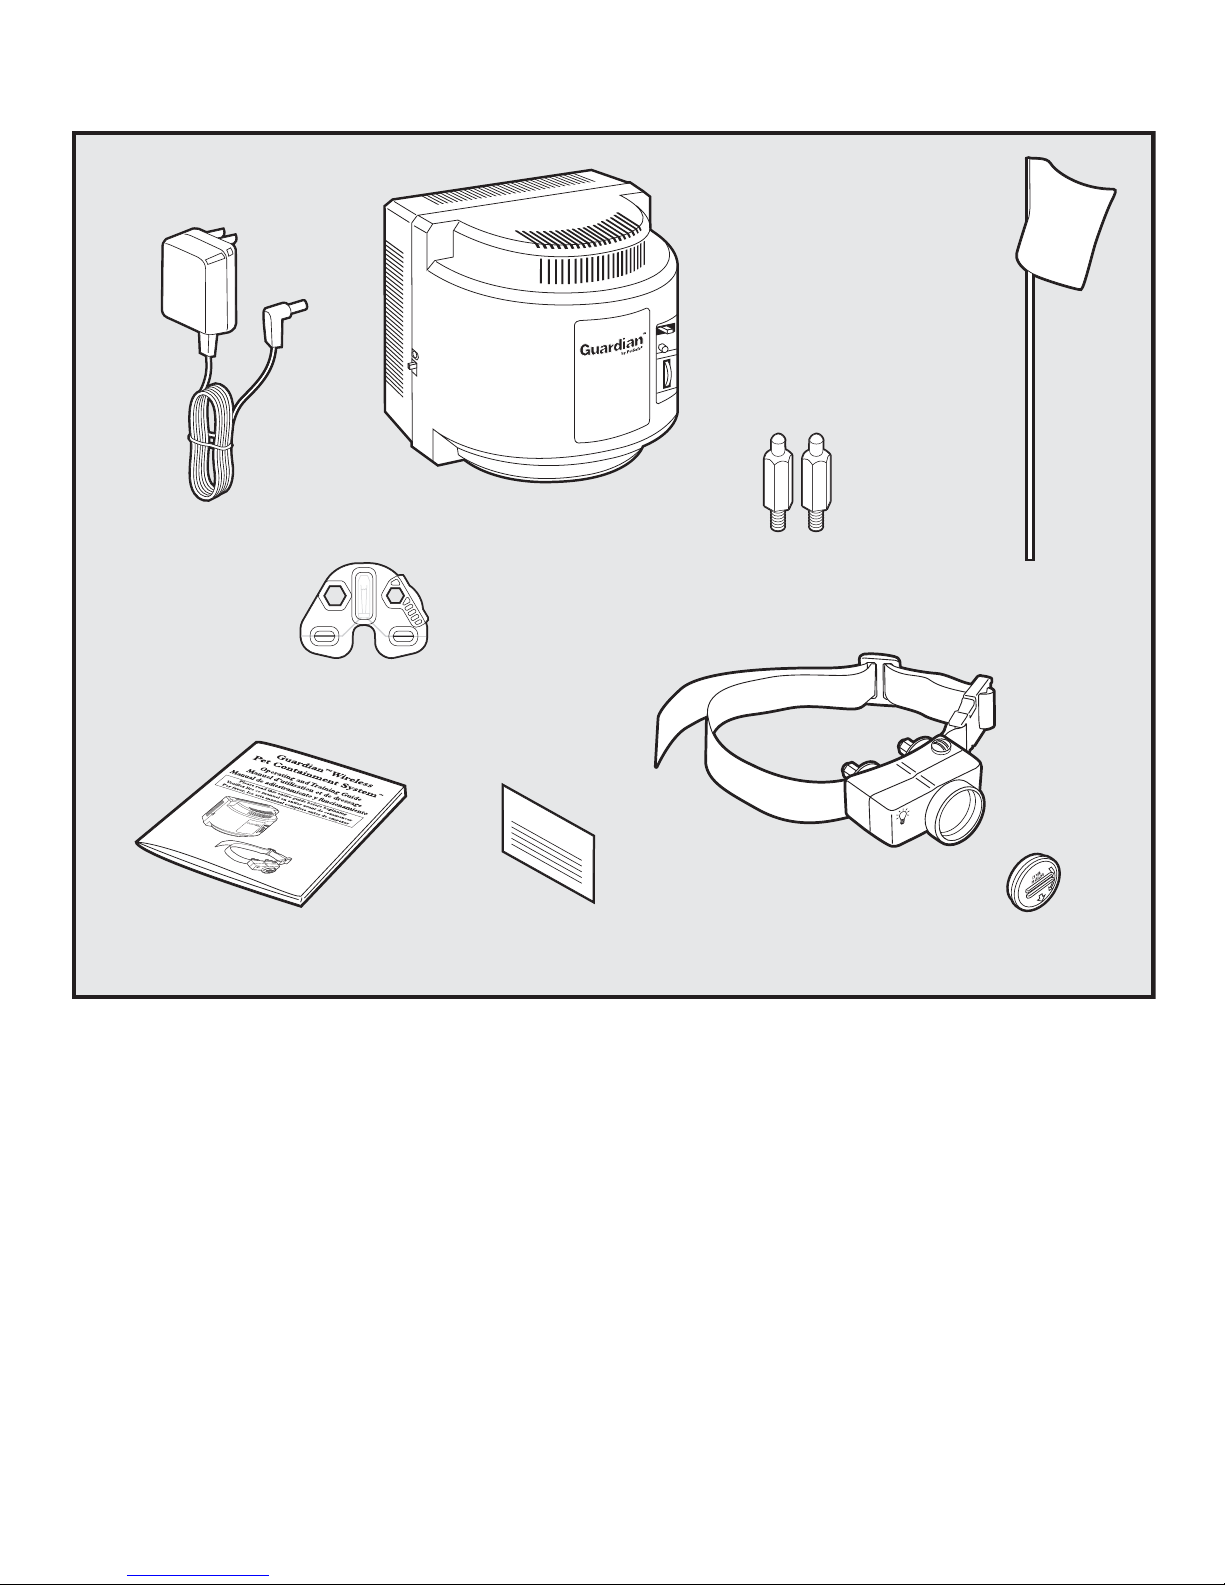
Components
Power
Adapter
Transmitter
E
P
T
E
S
F
A
S
S
H
R
E
A
N
P
P
W
Y
O
Long
Contact Points
Boundary Flags - 50
Test Light Tool
Warranty
Operating and
Training Guide
Warranty
Card
Other Items You May Need
• Pliers
• Scissors
• Lighter
• Drill & mounting hardware
• Tape measure
• Non-metallic collar and leash
Receiver
Collar w/Short
Contact Points
Battery
(PetSafe® RFA-67)
www.guardianpet.net 3
Page 4
How the System Works
The Guardian Wireless Pet Containment SystemTM has been proven safe, comfortable, and effective for all pets over 8
pounds. The system works by transmitting a radio signal up to 90 feet in all directions. You temporarily defi ne the Pet
Area with Boundary Flags for a visual aid in training your pet. Your pet wears a Receiver Collar with Contact Points that
touch his neck, and, once trained, is allowed to roam freely in the Pet Area. When your pet reaches the Boundary Zone,
the Receiver Collar gives a warning beep before delivering a safe Static Correction through the Contact Points to get his
attention until he returns to the Pet Area.
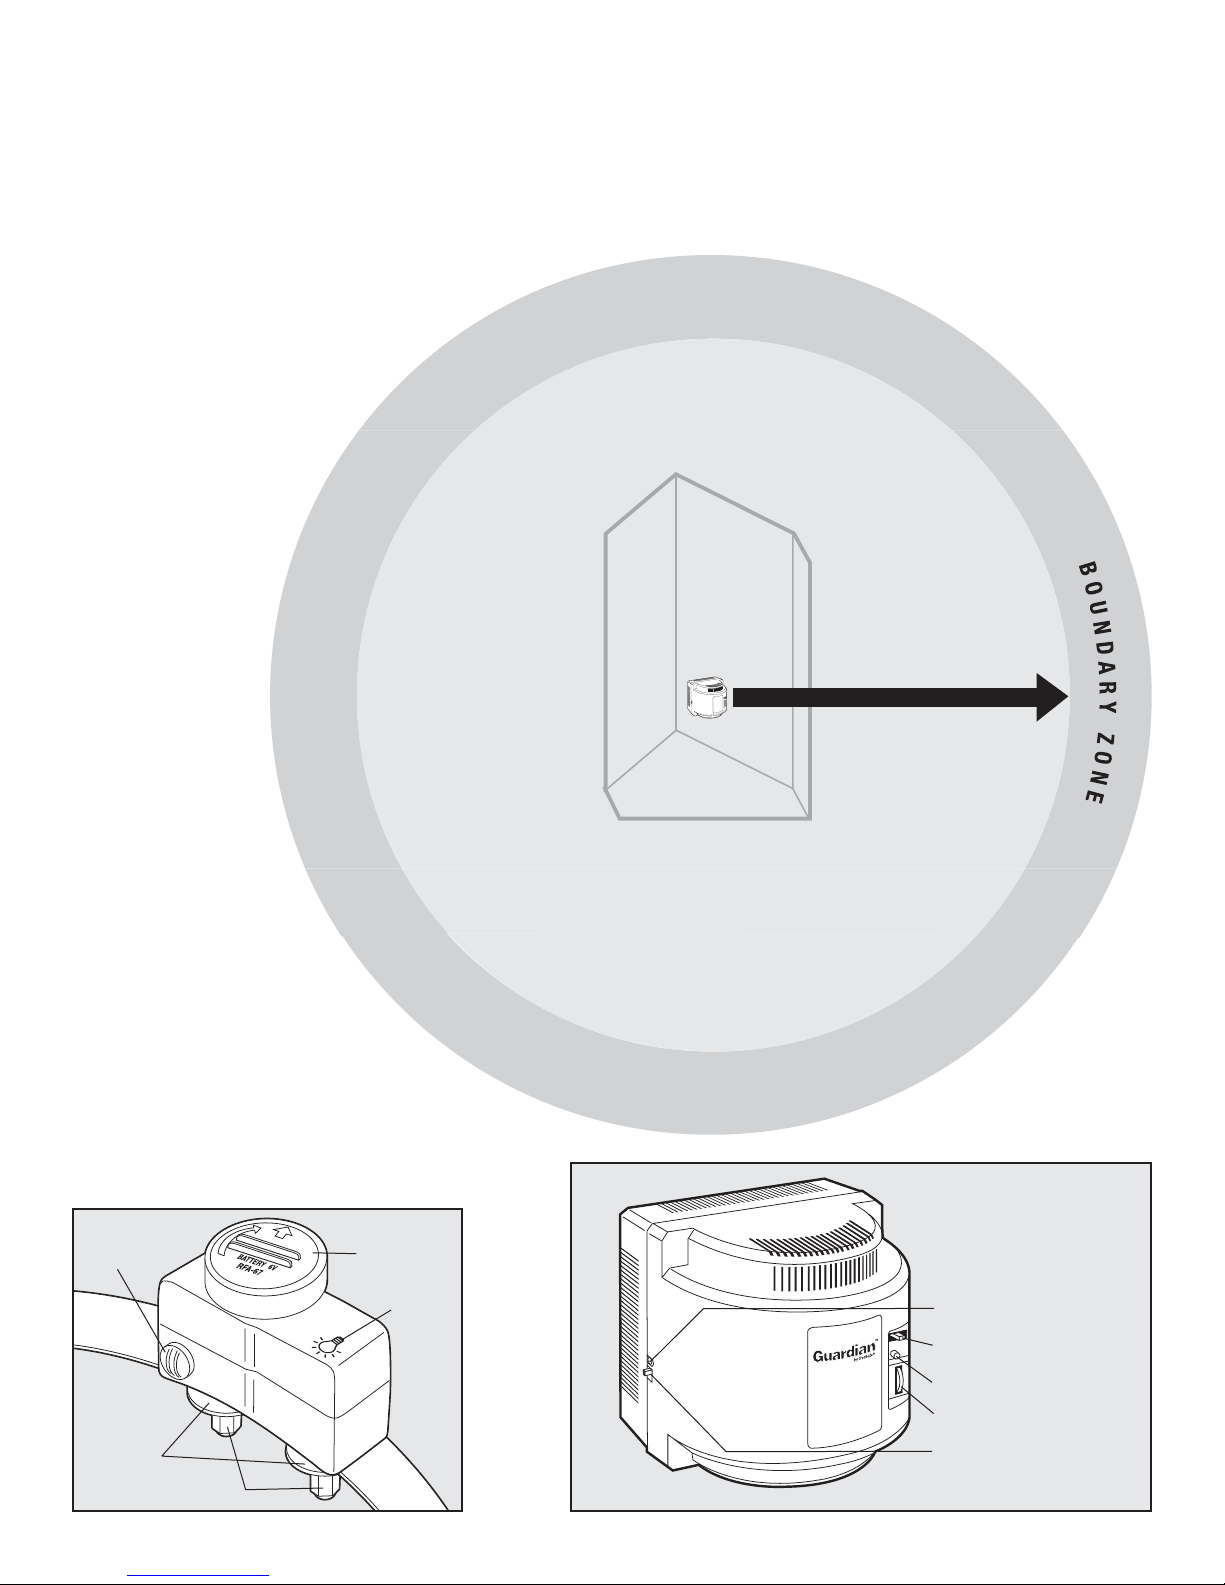
Key Definitions
Transmitter: Transmits the radio signal and is the center
of the Pet Area.
Pet Area: Distance from the Transmitter where your pet
can roam freely.
Boundary Zone: 2 to 3 foot wide area outside the
Pet Area where your pet’s Receiver Collar will begin to
beep and then begin to deliver a Static Correction. The
correction will start in the Boundary Zone and continue
anywhere beyond the Pet Area. Note: The Receiver Collar is
equipped with a safety time-out feature that will stop correcting
after 30 seconds if your pet remains outside the Pet Area.
Receiver Collar: Receives the radio signal from the
Transmitter.
Correction Level Button: Adjusts the level of Static
Correction your pet receives outside the Pet Area.
Receiver Indicator Light: Indicates the level of
correction at which the Receiver Collar is set. This light
also serves as a low battery indicator.
Contact Points: Deliver the safe Static Correction when
your pet moves into the Boundary Zone.
Power Jack: Where the Power Adapter plugs into the
Transmitter. The Transmitter is powered by a standard
120-volt outlet.
Boundary Switch: Adjust according to the size of the Pet
Area desired.
Power Light: Indicates when the Transmitter is on.
Boundary Control Dial: Adjusts the distance from the
Transmitter to the Boundary Zone. Note: Adjusting the dial
does not change the level of Static Correction on the Receiver
Collar.
Transmitter
Note: In many
neighborhoods, nearby
property lines may limit how
large the Pet Area can be.
PET AREA
Maximum 90 ft. range
(45 average steps)
Receiver Collar
Correction
Level
Button
Washers
Contact Points
Battery
Receiver
Indicator
Light
4 1-800-457-3911
Transmitter
Power Jack
Boundary Switch
Power Light
Boundary Control Dial
On/Off Switch
Page 5
Operating Guide
BOUNDARY
CONTROL
7
8
Power
Boundary Switch
Low
High
8
Step
1
Step
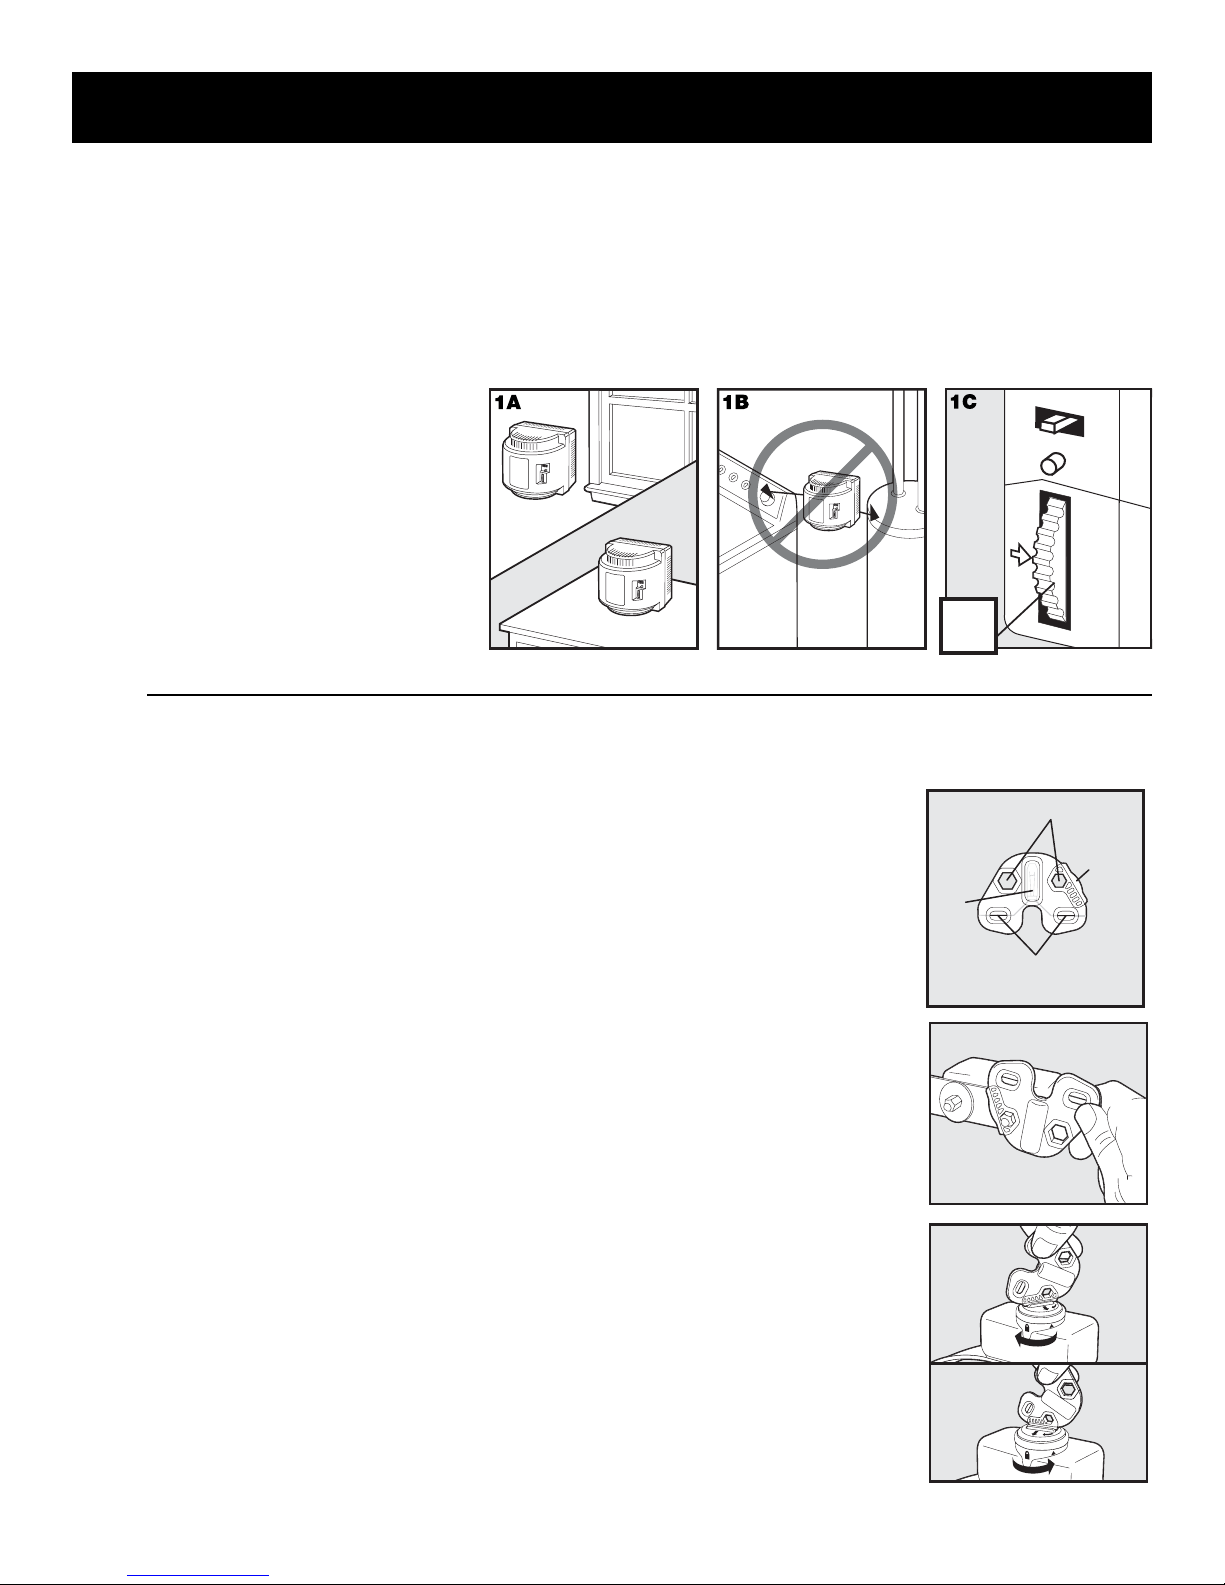
Set Up the Transmitter
Important: You may need to move the Transmitter several times before determining the final location.
The Transmitter is located at the exact center of the Pet Area. Place the Transmitter:
• 2 to 4 feet above the floor.
• In a dry, well ventilated, protected area.
• In an area where temperatures do not fall below freezing (e.g., garage, basement, shed, closet).
• On a non-metal table or mount on a wall (1A). A mounting template is included on the back of this guide.
• At least 3 feet from large metal objects, as these items may reduce the size and shape of your Pet Area (1B).
To maximize your Pet Area, make sure
the Boundary Switch is on “High”
and the Boundary Control Dial is set
to “8” (1C). Plug Power Adapter into
Power Jack and standard 120-volt
outlet. Turn the Transmitter on.
Wall
Mount
Tabletop
1m
(3ft)
Prepare the Receiver Collar
2
Your Receiver Collar comes with short Contact Points installed. Use the long Contact
Points for pets with long or thick hair. Tighten the Contact Points with the Contact Point
Wrench portion of the Test Light Tool (2A) one-half turn beyond fi nger tight (2B). Check
the tightness weekly.
To Insert and Remove the Receiver Collar Battery
Note: Do not install the battery while the Receiver Collar is on your pet.
This Receiver Collar utilizes a replaceable PetSafe® battery (RFA-67). This unique battery
is designed to make battery replacement easier and increase water protection.
To insert the battery, align the symbols on the battery (arrow) and Receiver Collar
(triangle) (3C). Use the Battery Wrench portion of the Test Light Tool (2A) to turn the
battery clockwise until the arrow lines up with the lock symbol on the housing.
To remove the battery, turn the battery counter-clockwise using the Battery Wrench
portion of the Test Light Tool (2D). DO NOT attempt to cut into or pry open the
battery. Be sure to discard the used battery properly.
A replacement PetSafe® battery (RFA-67) can be found at many retailers. Contact the
Customer Care Center at 1-800-457-3911 or visit our web site at www.guardianpet.net
to locate a retailer near you.
2A
Contact Point Wrench
Te s t
Light
2B
2C
2D
Battery
Wrench
Test Light
Contacts
www.guardianpet.net 5
Page 6
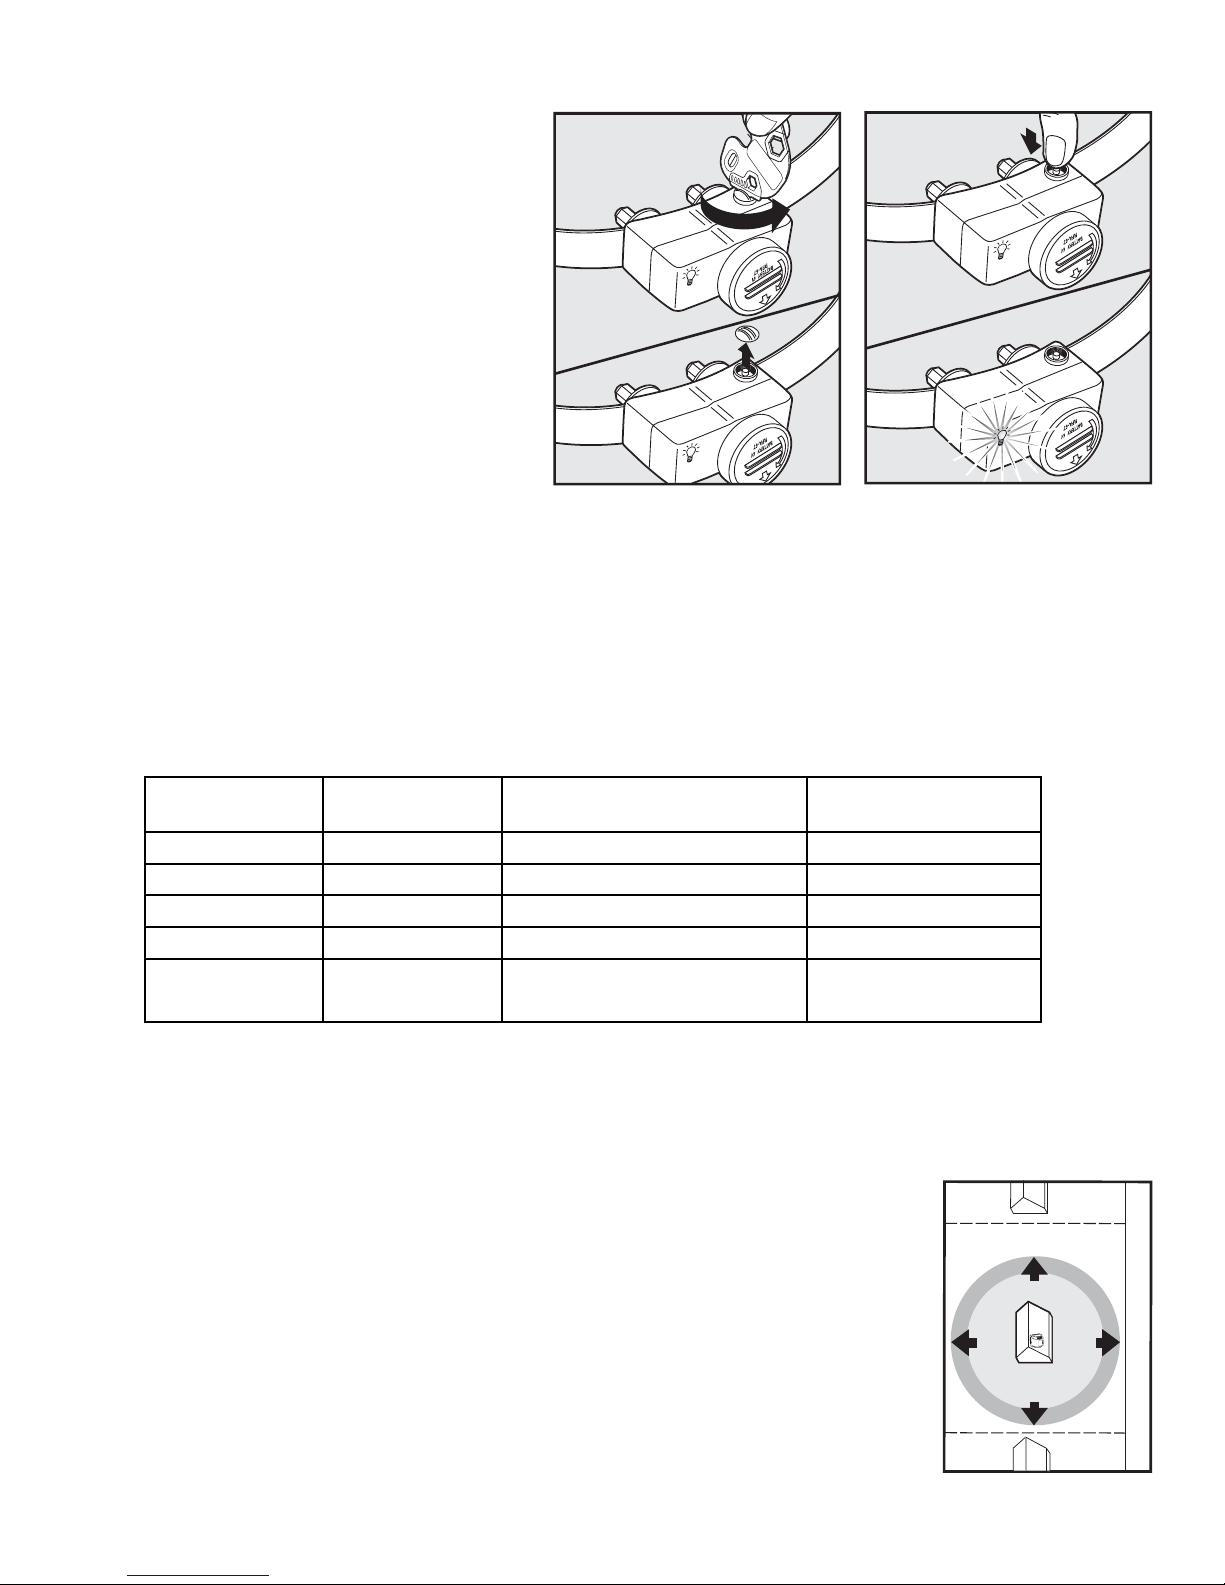
To Set the Static Correction Level
Read all steps before attempting to set the
Static Correction Level.
1. Remove the clear plastic cover with the Battery
Wrench portion of the Test Light Tool (2A) to
expose the Correction Level Button (2E).
2. With the battery installed, press the
Correction Level Button and release when
the Receiver LED Indicator Light lights up
(2F).
3. The Receiver LED Indicator Light will
emit a series of fl ashes representing the
Static Correction Level.
4. Increase the Static Correction Level by
pressing and releasing the Correction Level
Button within 5 seconds of the previous
series of fl ashes.
5. After setting the Static Correction Level,
replace the cover to protect the Correction Level Button.
The Static Correction levels increase in strength from 1 to 4. Pushing the Correction Level Button while the
Receiver Collar is on level 4 will cause the Receiver Collar to revert to level 1. Refer to the Function and Response
Table to choose the Static Correction level that best fi ts your pet.
The Receiver Indicator Light acts as a low battery indicator, fl ashing every 4 to 5 seconds when replacement is
required.
2E 2F
Step
3
Function and Response Table
Indicator Light
Response
1 Flash 1 No Static Correction, Beep Only
2 Flashes 2 Low Static Correction Timid
3 Flashes 3 Medium Static Correction Timid or Average
4 Flashes 4 High Static Correction High Energy
Flashes once every
4 to 5 seconds
Note: Begin training with Static Correction Level 2 and only increase if your pet does not respond to the Static Correction.
__________________________________________________
Static
Correction Level
Receiver Collar Function Temperament of Pet
Indicates Low Battery
Adjust the Pet Area to Desired Size
Make sure the entire Pet Area lies within your property boundaries (3A). Always start
determining the Boundary Zone at the shortest distance from Transmitter. Place the
Boundary Switch on “Low” if the Boundary Zone will be less than 45 feet from the
Transmitter.
Two-Person Method
Hold the Receiver Collar at your pet’s neck height (3B) with logo side facing away from
the Transmitter (3C). Walk to the edge of the desired Pet Area. Facing away from the
Transmitter, hold the Receiver Collar at the edge of the desired Pet Area (3D).
Starting with the Boundary Control Dial set to “8”, have a second person turn the dial
down SLOWLY. When the Receiver Collar starts to beep, tell the person to stop turning
the Boundary Control Dial. Record your settings below for future reference.
3A
Pet
Area
STREET
6 1-800-457-3911
Page 7
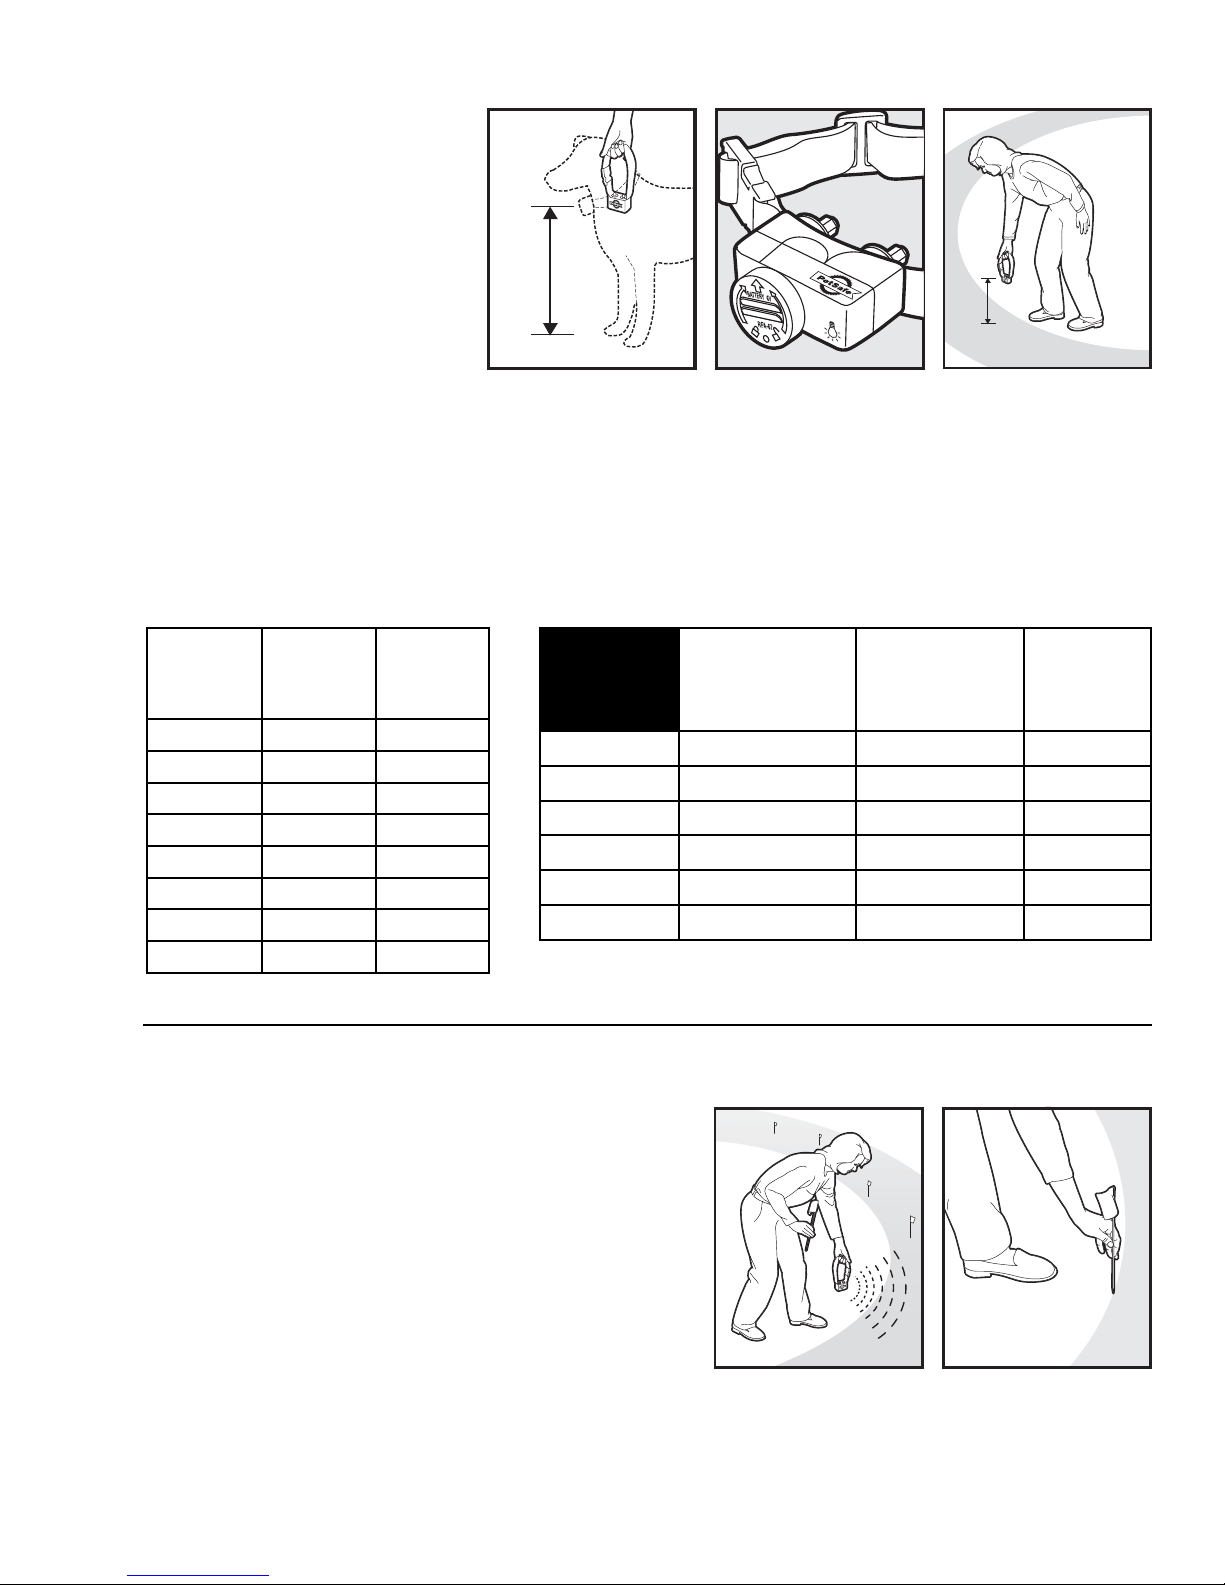
One-Person Method
Measure the shortest distance from
3B
3C
the desired Boundary Zone to the
Transmitter. Find the distance on
the Transmitter Range Chart below
and set the Boundary Switch and
Boundary Control Dial. Take the
Receiver Collar to the Boundary Zone
with the Receiver Collar at your pet’s
neck height (3B) with logo side facing
away from the Transmitter (3C).
Determine where the Receiver Collar
begins to beep. If the Receiver Collar beeps before or after the desired Boundary Zone, return to the Transmitter
and adjust the Boundary Control Dial. Repeat this process until the Receiver Collar is beeping at the desired
location. Record your settings below for future reference.
Note: If you cannot hear the beep, refer to the “Test Light Instructions” section.
3D
Pet
Area
Boundary
Zone
Transmitter
Step
4
Range Chart
Boundary
Control
Dial
Position
1
2
3
4
5
6
7
8
Boundary
Boundary
Switch
LOW
5-10 ft 5-10 ft
5-10 ft 5-10 ft
15-20 ft 25-35 ft
20-25 ft 42-55 ft
25-30 ft 55-65 ft
35-40 ft 75-85 ft
40-45 ft 85-90 ft
40-45 ft 85-90 ft
Switch
HIGH
Record Your Settings
Final Boundary
Switch Setting
(HIGH or LOW)
Home
Camping
Vacation
Other
Note: These distances are approximate.
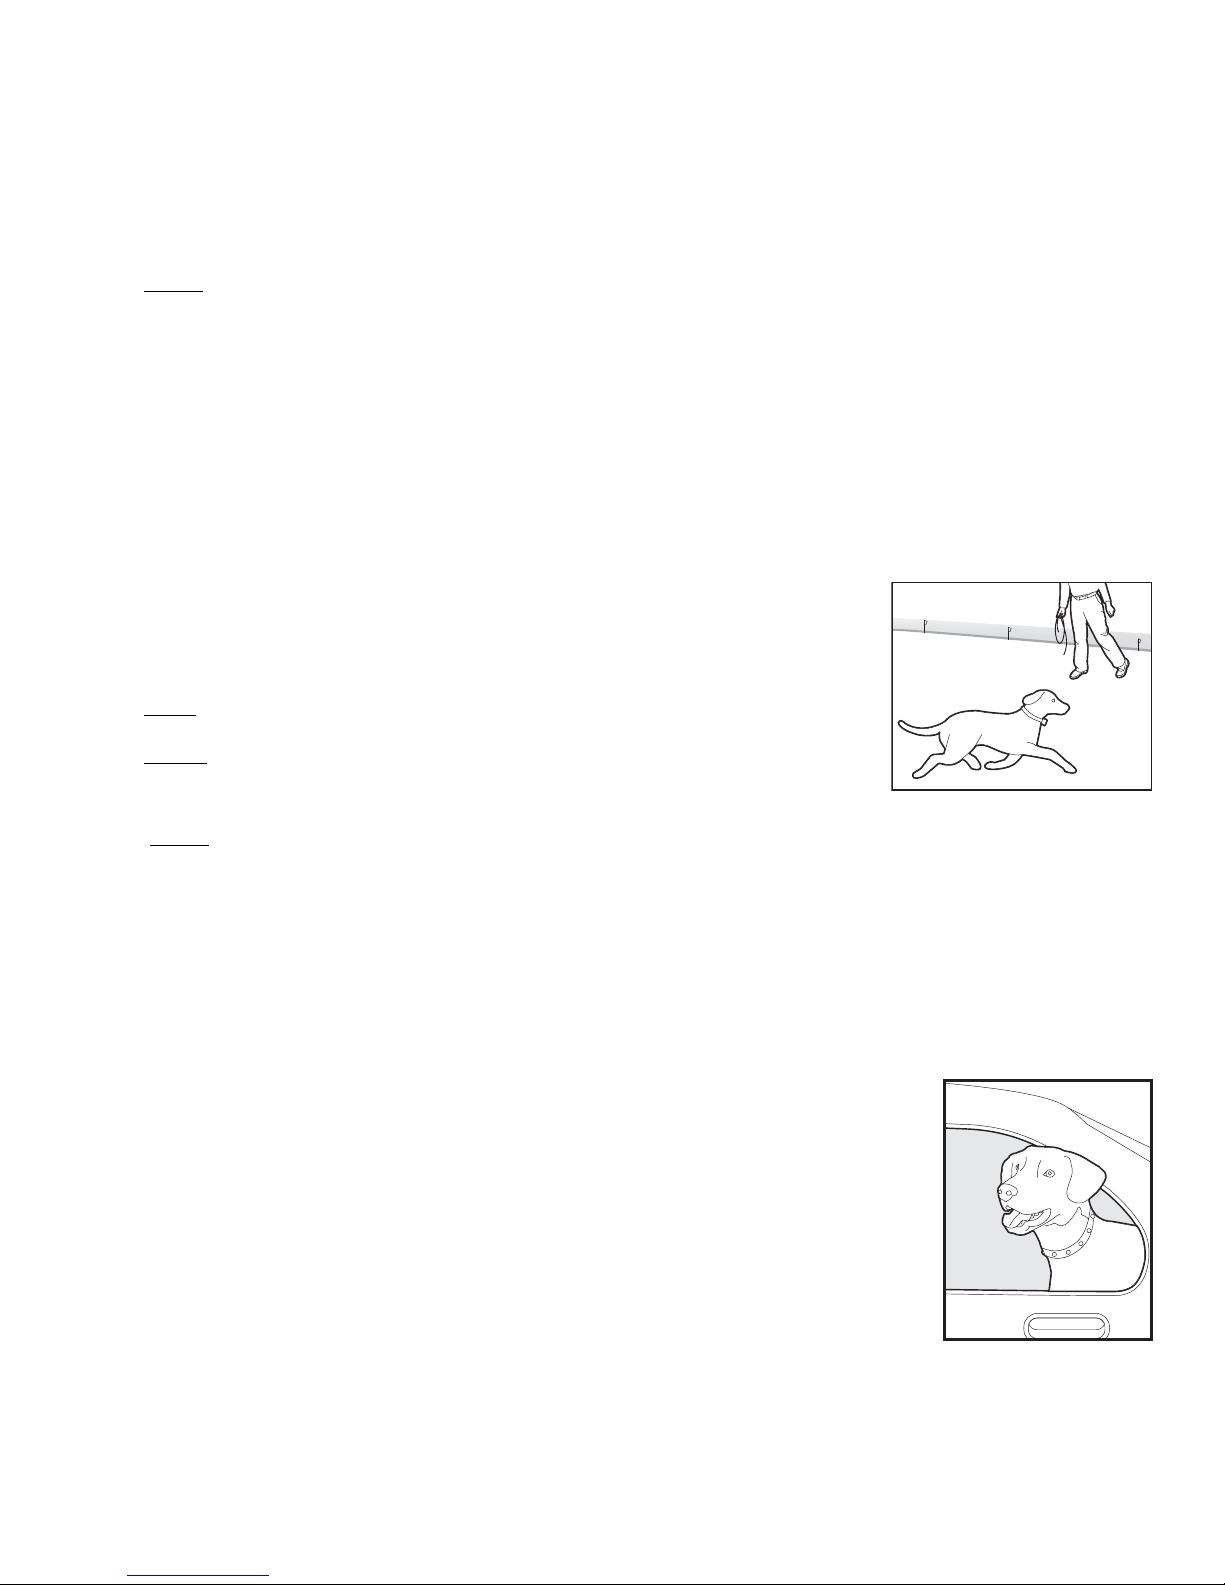
Place the Boundary Flags
The Boundary Flags are visual reminders for your pet of where
the Boundary Zone is located. The Receiver Collar will activate
within 2 to 3 feet of the Boundary Flags.
1. Hold the Receiver Collar at your pet’s neck height with logo
side facing away from the Transmitter.
2. Walk towards the Boundary Zone until the Receiver Collar
beeps (4A).
3. Place a Boundary Flag in the ground (4B).
4. Walk back into the Pet Area until the beeping stops.
5. Repeat this process around the Boundary Zone until it is
marked with Boundary Flags every 10 feet.
The Boundary Flags may be in different parts of the Boundary
Zone and may not be in a line. The Boundary Zone is 2 to 3 feet wide.
Note: If you cannot hear the beep, refer to the “Test Light Instructions” section.
4A
Final Boundary
Control Dial
Position (1-8)
4B
E
P
T
S
E
F
A
S
S
R
H
E
A
N
P
W
P
O
Y
Receiver
Static
Correction
Level (1-6)
www.guardianpet.net 7
Page 8
Step
5
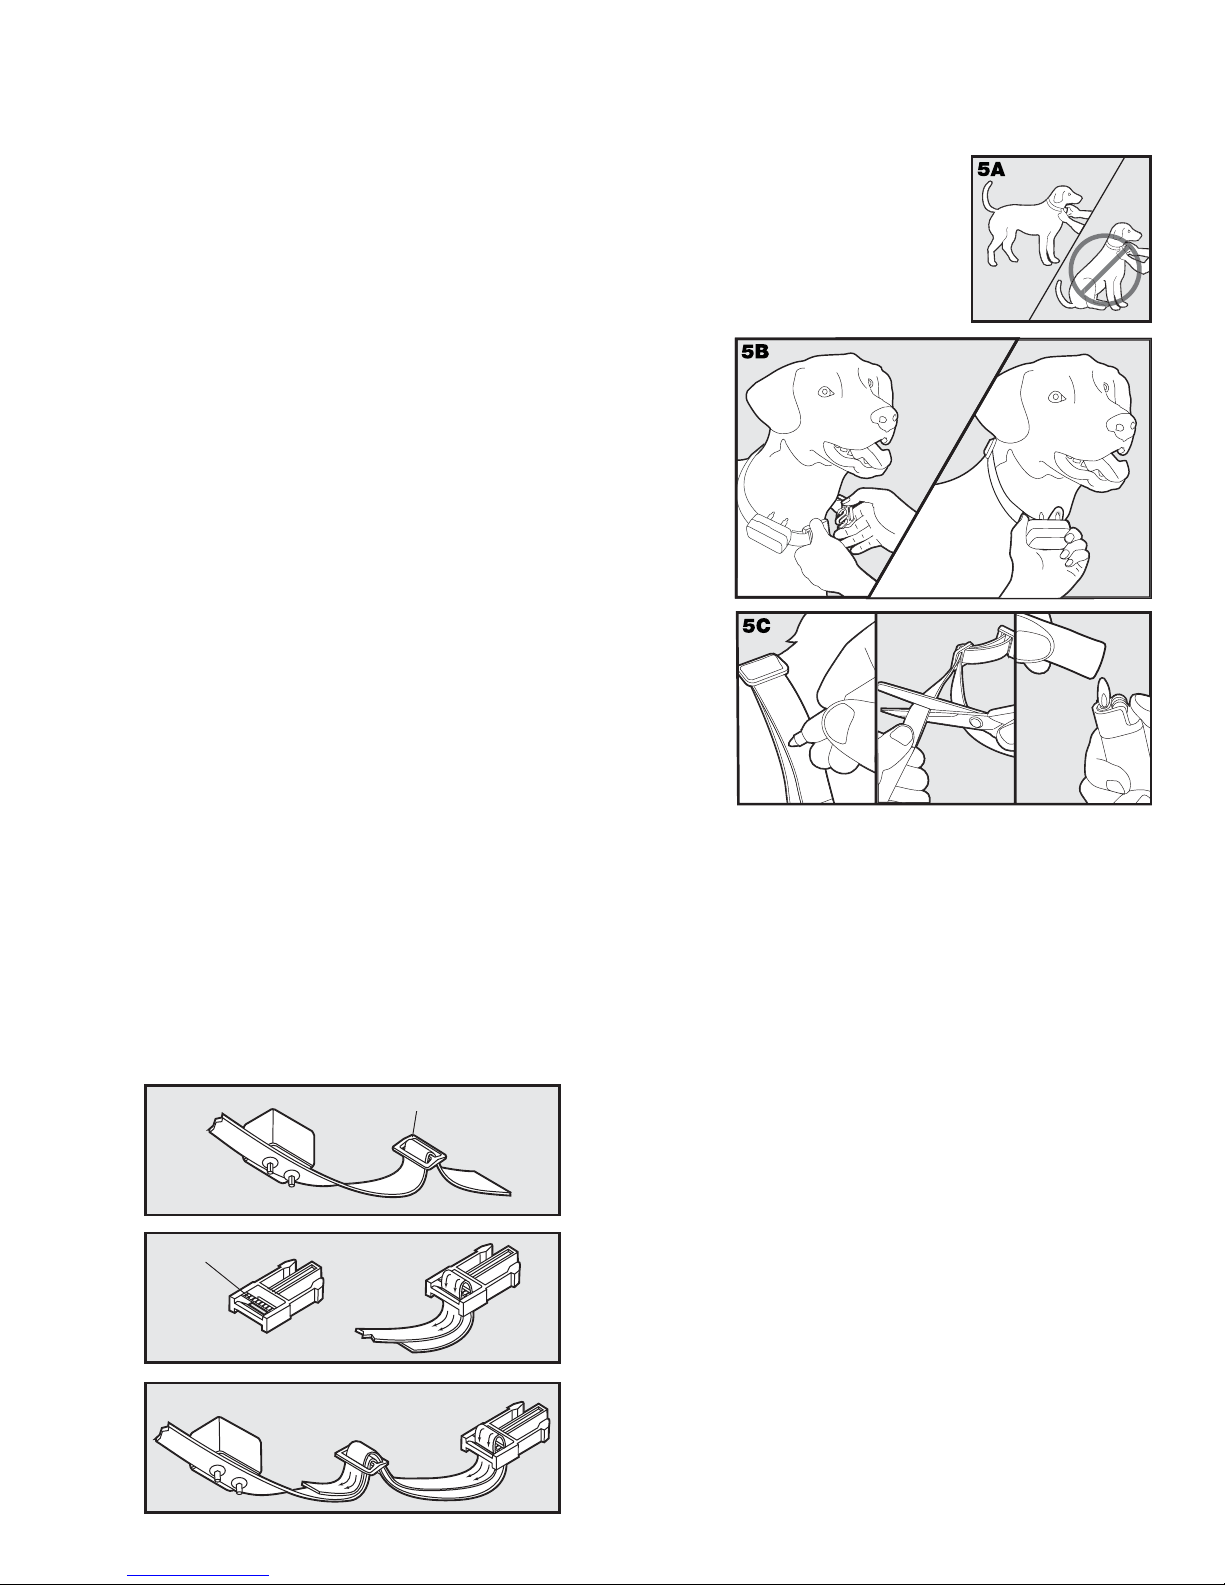
Fit the Receiver Collar
Important: The proper fit and placement of your Receiver Collar is important for effective training. The Contact
Points must have direct contact with your pet’s skin on the underside of his neck.
To assure a proper fit, please follow these steps:
1. Make sure that the battery is not installed in the Receiver Collar.
2. Start with your pet standing comfortably (5A).
3. To make it easier to hear the warning beep, place the Receiver Collar on your pet with
the logo side of Receiver facing up.
4. Center the Contact Points underneath your pet’s neck, touching the skin. If your pet has a
long or thick coat, use the enclosed long Contact Points to reach
through the hair. Note: It is sometimes necessary to trim the hair
around the Contact Points to make sure that contact is consistent.
5. Check the tightness of the Receiver Collar by inserting one
finger between the end of a Contact Point and your pet’s neck.
The fit should be snug but not constricting (5B).
6. Allow your pet to wear the collar for several minutes then
recheck the fit. Check the fit again as your pet becomes more
comfortable with the Receiver Collar.
7. Trim the collar as follows (5C):
a.
Mark the desired length of the Receiver Collar with a pen. Allow
for growth if your pet is young or grows a thick winter coat.
b.
Remove the Receiver Collar from your pet and cut off the excess.
c. Before placing the Receiver Collar back onto your pet, seal the
edge of the cut collar by applying a flame along the frayed edge.
Important: For comfort, safety and effectiveness of product,
please ensure the following:
• During the fi rst 2 weeks of training, do not use the training
device on your pet without direct supervision.
• Check the fi t to prevent excessive pressure by being able to
insert one fi nger between the Contact Point and your pet’s skin.
• Your pet must be carefully examined daily for any signs of a rash or sore.
• If a rash or sore is observed, discontinue the use of the Receiver Collar for a few days.
• If the condition persists beyond 48 hours, see your veterinarian.
• Your pet’s neck and the Contact Points must be washed weekly with a wash cloth and mild hand soap,
then rinsed thoroughly.
A condition called Pressure Necrosis, which is a devitalization of the skin due to excessive and
prolonged contact against the Contact Points, may occur if the steps above are not followed.
To Re-Thread the Collar
Slide Buckle
Ridges
8 1-800-457-3911
The slide buckle prevents the collar from becoming loose around
your pet’s neck.
The ridges must be facing up; the collar will slip if it is not properly threaded.
Page 9
Training Guide
Be Patient With Your Pet
Important: Proper training of your pet is essential to the success of the Guardian Wireless Pet
Containment System™. Read this section completely before beginning to train your pet. Remember that
the Guardian Wireless Pet Containment System™ is not a solid barrier.
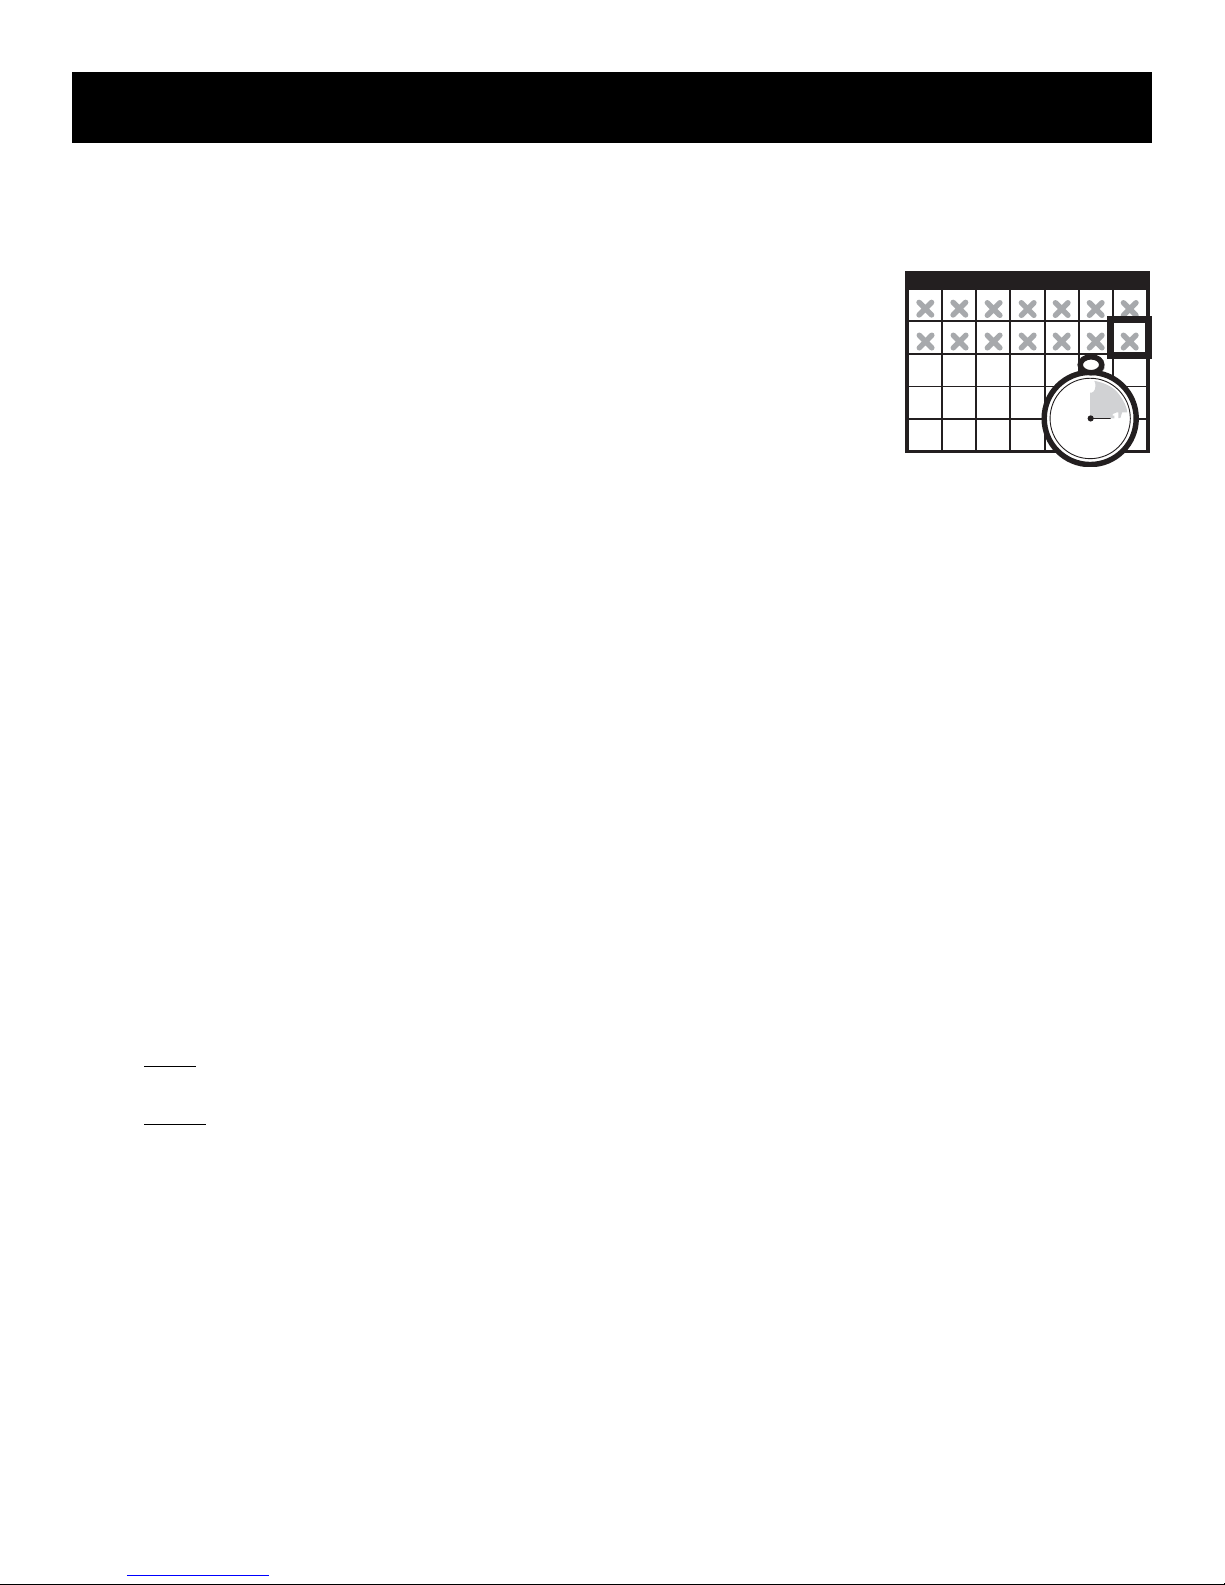
• Have fun with your pet throughout the training process. Training should be fun,
fair, firm and consistent.
• Train for 10 to 15 minutes at a time. Don’t try to do too much too quickly. More-
frequent short sessions are better than less-frequent longer sessions.
• We suggest a minimum of 14 days of training. Depending on your pet and how he
learns, the training could take more or less time.
• If your pet shows signs of stress, slow down the training schedule, add additional days
of training, or increase the amount of play time with your pet in the Pet Area. Common stress signals include:
- Pet pulling on leash toward the house
- Ears tucked
- Tail down
- Body lowered
- Nervous / frantic movement or stiffening of pet’s body
• Your pet must be completely comfortable near the Boundary Flags at the end of every training session. Spend at
least 5 minutes of “play time” at the completion of each session within 10 feet of the Boundary Flags.
SMTWT F S
12345
8 9 10 11 12
15 16 17 18 19
22 23 24 26
29 30 31
25
45
67
13 14
20 21
0
27 28
15
min.
30
Phase
1
• Finish each training session on a positive note with lots of praise and play.
• Remove the Receiver Collar after each training session.
• Be sure to contain your pet by another means during the training period (e.g. pen, tie-out, leash, etc.).
• During training, if you need to take your pet out of the Pet Area, remove the Receiver Collar and either pick
your pet up or put him in the car to pass out of the Pet Area.
•
Even if you think your pet is responding well to the training, complete the entire training. Reinforcement is important!
__________________________________________________
Day 1 - Boundary Flag Awareness
Perform three sessions on day 1, each training session lasting 10-15 minutes.
Goal:
To have your pet learn that the Boundary Flags and warning beep from the Receiver Collar defi ne the new Pet Area.
Setup:
• Program the Static Correction Level on the Receiver Collar depending on the size and temperament of your pet.
• Put a separate non-metallic collar on your pet’s neck ABOVE the Receiver Collar and attach a leash. Note: Be sure
the extra collar does not put pressure on the Contact Points.
• Have tiny pieces of treats that your pet will fi nd desirable available (hot dogs or lunch meat work well).
• Have your pet’s favorite play toy available.
www.guardianpet.net 9
Page 10
Steps:
1. Begin by walking your pet on a leash in the Pet Area. Calmly praise and talk to your pet, occasionally giving
treats.
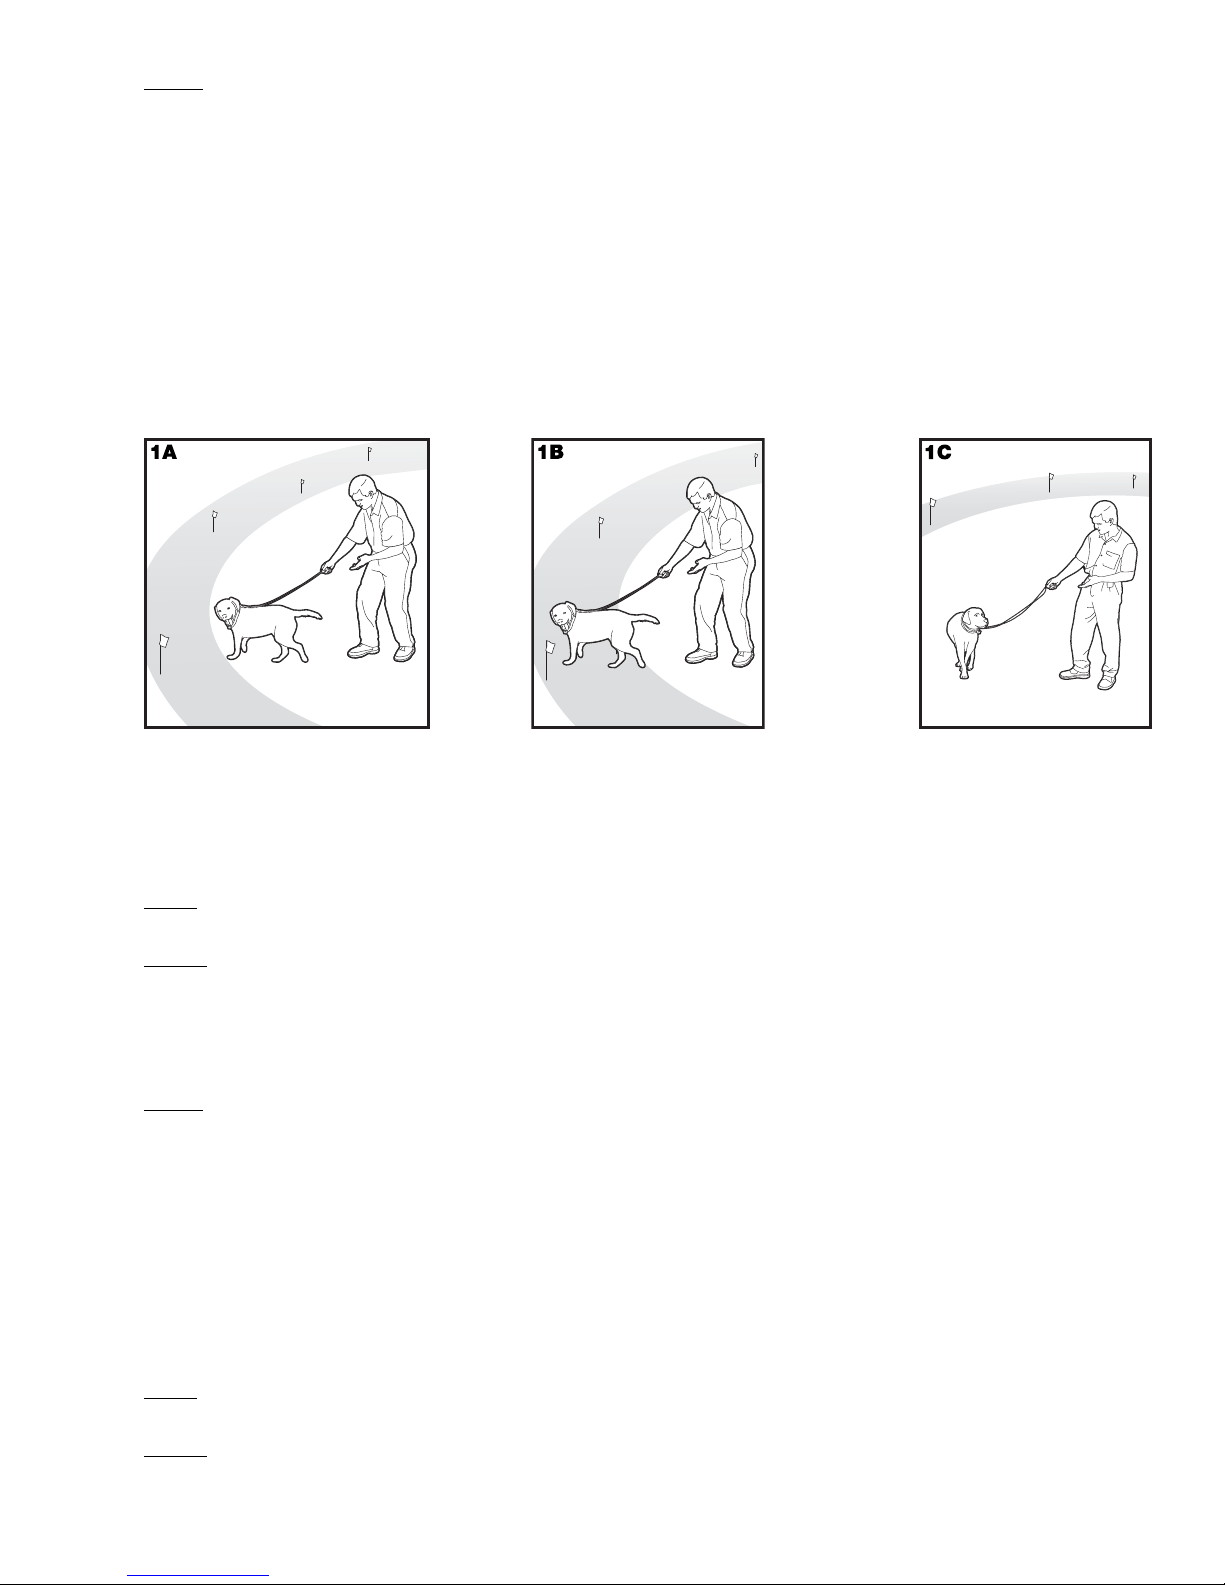
2. Move toward the Boundary Flags (1A). Keep your mood happy and throw treats to the ground.
3.
With full control of your pet on a leash, toss a treat on the outside edge of the fl ags. As your pet enters the Boundary
Zone to receive the treat, the receiver collar will begin to beep (1B). As your pet remains in the Boundary Zone, he will
receive a mild Static Correction. Allow your pet to stay in the Boundary Zone for 2 seconds then gently help him back
into the Pet Area (1C). Immediately praise and offer your pet a treat as he enters the Pet Area, even if you have helped
with the leash. Wiggle a Boundary Flag to help your pet understand that the discomfort of the Static Correction happens
around the fl ags.
4. Repeat this process at several different Boundary Flags. Your pet should start to resist going after the treat in the
Boundary Zone. If your pet continues to enter the Boundary Zone, check the fi t of his Receiver Collar and allow
him 2-3 seconds in the zone before pulling him back to the Pet Area.
Note: Never allow your pet to eat the treat in the Boundary Zone.
Phase
2
Phase
3
__________________________________________________
Days 2 thru 4 -
Perform three sessions per day, each lasting 10-15 minutes.
Goal:
To train your pet to stay in the Pet Area and respect the boundary while you are outside of it.
Setup:
• Program the Static Correction Level on the Receiver Collar depending on the size and temperament of your pet.
• Put a separate non-metallic collar on your pet’s neck ABOVE the Receiver Collar and attach a leash. Note: Be sure
the extra collar does not put pressure on the Contact Points.
• Have tiny pieces of treats available (hot dogs or lunch meat work well).
• Have your pet’s favorite play toy available.
Steps:
1. Repeat steps 1-4 in Phase One
2. Drop the leash, leaving your pet in the Pet Area.
3. Walk outside the boundary and wiggle the Boundary Flags facing your pet.
4. Continue around the entire boundary doing this, tossing treats to your pet in the Pet Area and praising him.
5. If your pet does not respond to the Static Correction, increase the Static Correction Level by 1.
Continue Boundary Flag Awareness
__________________________________________________
Days 5 thru 8 - Distraction Phase
Perform three training sessions per day, each lasting 10 to 15 minutes.
Goal:
To train your pet to stay within the Pet Area with distractions outside of the Pet Area.
Setup:
• Program the Static Correction Level on the Receiver Collar depending on the size and temperament of your pet.
10 1-800-457-3911
Page 11
• Put a separate non-metallic collar on your pet’s neck ABOVE the Receiver Collar and attach a leash. Note: Be sure
the extra collar does not put pressure on the Contact Points.
• Have tiny pieces of treats available (hot dogs or lunch meat work well).
• Have your pet’s favorite play toy available.
• Create distractions to tempt your pet to enter the Boundary Zone, such as:
- Have a family member cross from inside the Pet Area to outside of it.
- Throw a ball outside of the Pet Area.
- Have a neighbor walk their pet outside of the Pet Area.
Steps:
1.
With full control of your pet on a leash, have the distraction presented.
2. If your pet does not move toward the distraction, praise and offer a treat.
3. If your pet does react to the distraction, allow him to go into the Boundary Zone.
4. Help your pet back into the Pet Area if he does not turn back after 3 seconds.
5. Treat and praise your pet anytime he comes back into the Pet Area with or without help.
6. Repeat this process with other distractions. Use other family members during this process.
7. If your pet does not respond to the Static Correction, increase the Static Correction Level by 1.
__________________________________________________
Phase
4
Days 9 thru 14 - Unleashed Supervision
Training sessions should start at 10-15 minutes, gradually increasing to over an hour.
Your pet is ready for this step only when he clearly avoids the entire Boundary
Zone, regardless of any distractions or temptations. During this step, do not leave
your pet unattended.
Goal:
To give your pet free run of the Pet Area off the leash.
Setup:
Adjust the Receiver Collar to the permanent setting appropriate for your pet
depending on his size and temperament.
Steps:
1. Enter the Pet Area with your pet wearing the Receiver Collar.
2. Walk around the yard and play with your pet, staying within the Pet Area at all times.
3. Preoccupy yourself with another task in the yard while watching your pet.
4. Should your pet escape, take the Receiver Collar off or turn the system off at the Fence Transmitter and lead him
back into the Pet Area.
__________________________________________________
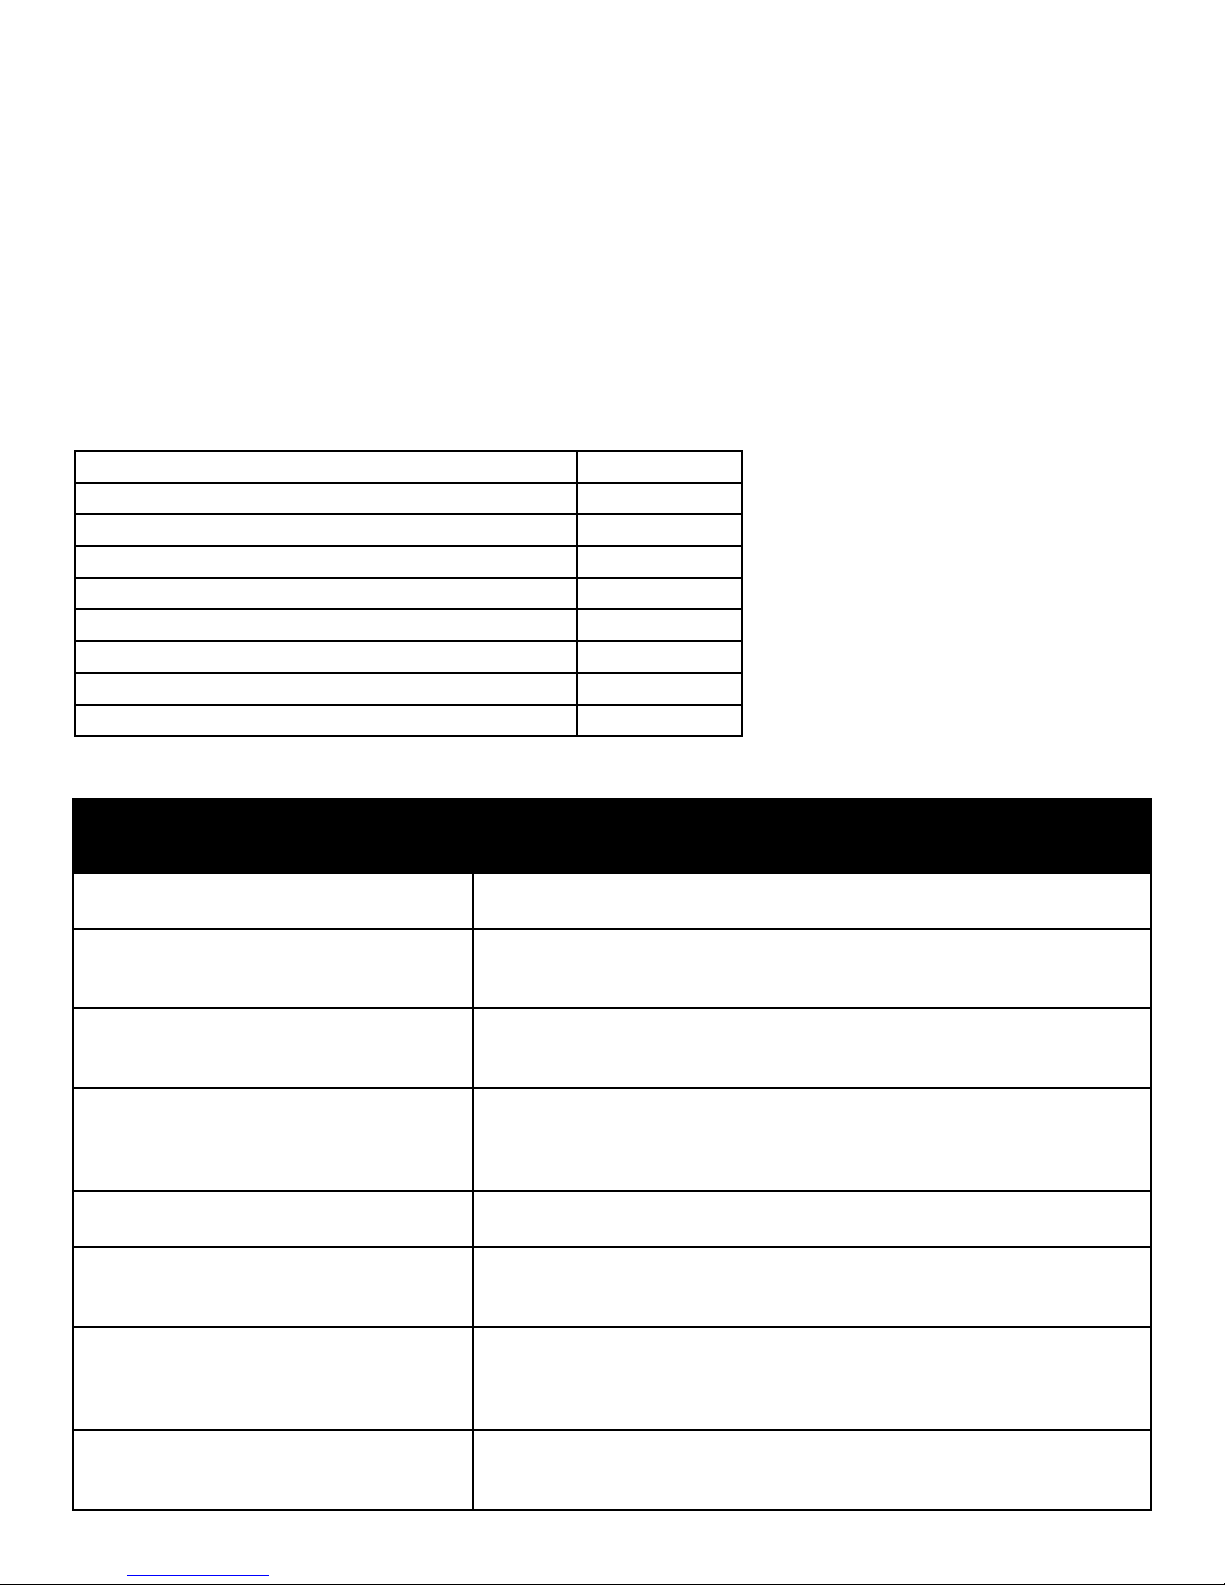
Taking Your Pet Out of the Pet Area
Important: Remove the Receiver Collar and leave it in the Pet Area.
Once your pet learns the Boundary Zone, he will be reluctant to cross it for walks or car
rides.
Option 1: Replace the Receiver Collar with a regular collar. Put your pet in a car that is
within the Pet Area and drive him out of the Pet Area.
Option 2: Replace the Receiver Collar with a regular collar and leash. Walk your pet out
of the Pet Area while giving a command such as “OK” at a specific place of the Boundary
Zone (the end of your driveway, sidewalk, etc.). Always leave the Pet Area with a leash
at this place and your pet will associate leaving the Pet Area only on a leash, only at this
place, and only with a person. You may initially need to convince your pet to leave the Pet
Area with a food treat and lots of praise.
Note: You may also carry your pet out of the Pet Area.
www.guardianpet.net 11
Page 12
Wireless - To - Go
Your Guardian Wireless Pet Containment SystemTM is completely portable. Follow the set-up procedures (steps 1 through
4) wherever you wish to have containment of your pet. Reestablish the Pet Area and mark it with Boundary Flags so
your pet knows his Boundary Zone. Note: If setting up in a metal building or vehicle, the maximum size of the Pet Area may
be reduced. Be sure to remove the Receiver Collar battery before turning off the Transmitter. If you want to power the
Transmitter from a car or other DC source, use an inverter rated for 50 watts or more.
_____________________________________________________
Accessories
To purchase additional accessories for your Guardian Wireless Pet Containment System™, contact the Customer Care
Center at 1-800-457-3911 or visit our website at www.guardianpet.net to locate a retailer near you.
Component Part Number
Battery - two pack RFA-67D-11
Extra Receiver Collar PIF-275
Power Adapter 300-475
Replacement Collar RFA-48
Extra Flags RFA-2
Extra Wireless Transmitter IF-100
Accessory Pack RFA-135
Battery Back-Up RFA-157
Frequently Asked Questions
Is the Receiver Collar waterproof?
Will the Guardian Wireless Pet
Containment System™ cover a larger
circle than 180 feet across?
Will a sloping yard affect the Pet Area?
Can I use more than one Receiver
Collar with the Wireless System?
Will the Wireless System keep other
pets out of my yard?
Is there a hand-held remote Transmitter
that will work with the Wireless System
Receiver Collar?
Is there a smaller Receiver Collar or
another compatible Receiver Collar
that I can use with the Wireless
Transmitter?
If I have a question about my Wireless
System or need replacement parts,
where can I get answers or service?
• Yes. When changing the battery, be sure to keep the battery area free from
dirt and debris.
• You can use another Wireless Transmitter with overlapping boundaries of
at least 5-10 feet to get a larger Pet Area.
• The Transmitter signal extends 90 feet in all directions. A sloping yard
can cause the Pet Area to appear less or more than expected. Consider
repositioning the Transmitter to maximize your Pet Area.
• Yes. There is no limit to the number of pets you can contain with the
Wireless System. You must purchase an additional Receiver Collar for
each pet. Contact the Customer Care Center at 1-800-457-3911 or visit
our website at www.guardianpet.net to locate a retailer near you.
• No. The Wireless System is only effective on pets who wear the Receiver
Collar.
• No. You would need to purchase a separate Remote Training System.
Contact the Customer Care Center at 1-800-457-3911 or visit our
website at www.guardianpet.net to locate a retailer near you.
• No. Contact the Customer Care Center at 1-800-457-3911 or visit our
website at www.guardianpet.net for additional ideas or solutions.
• Contact the Customer Care Center at 1-800-457-3911 or visit our web
site at www.guardianpet.net.
12 1-800-457-3911
Page 13

Can I use the Wireless System on an
aggressive pet?
Can I use the Wireless System on a cat?
What happens if the power goes out?
What if I lose the clear plastic cover for
the Correction Level Button?
If my pet leaves the Pet Area, how long
will he be corrected?
How often do I need to replace the
Receiver Collar battery?
Can I place the Receiver on another
collar?
Do I need to perform maintenance on
my Wireless System?
How do I know the battery in the
Receiver Collar is still working?
Will buildings and landscape features
(trees, shrubs, etc.) affect the
performance of the Wireless System?
What do I do if my pet’s neck becomes
red and irritated?
Can I attach a leash to the Receiver
Collar?
Why does my Receiver Collar have a
beep only mode?
• We do not recommend using any electronic training devices on
aggressive pets. If you are unsure if your dog is aggressive, please consult
your veterinarian or a certifi ed trainer.
• The Wireless System can be used as long as the cat can comfortably wear
the Receiver Collar.
• The Wireless System is designed to recognize power outages and shuts
down without activating the Receiver Collar. However, if your pet is near
the Boundary Zone during the power failure, he may receive a Static
Correction. To lessen this chance, you may consider a battery backup device for the Transmitter if your area experiences frequent power
outages.
• The clear plastic cover prohibits the Static Correction Level from
accidentally being changed and also helps keep the Receiver waterproof.
Contact the Customer Care Center at 1-800-457-3911 for a replacement.
• Your pet will receive Static Correction as long as he is outside the Pet
Area, for up to 30 seconds. The Receiver Collar has a safety time-out to
stop correcting and beeping after 30 seconds until it is returned to the Pet
Area.
• Battery life depends on how frequently your pet tests the Boundary Zone.
The Receiver Indicator Light acts as a low battery indicator, flashing
every 4 to 5 seconds when replacement is required.
• Yes, any non-metallic collar. Make 2 holes in the collar to attach the
Receiver. Use the collar in the kit as a template to locate the holes on the
new collar.
• Check your pet’s neck daily for irritation from the Contact Points.
• Check the Contact Points on the Receiver Collar weekly to make sure
they are tight and clean.
• Check the fit of the Receiver Collar weekly.
• The Receiver Indicator Light acts as a low battery indicator, flashing every
4 to 5 seconds when replacement is required.
• Take the Receiver Collar off your pet and walk into the Boundary Zone.
The Receiver Collar should beep. If not, replace the battery.
• No. However, placing the Transmitter inside a metal building or vehicle
can reduce the maximum range of the Wireless System.
• This condition is due to the Contact Points irritating the skin.
Discontinue use of the Receiver Collar for a few days. If the condition
persists beyond 48 hours, see your veterinarian. Once the skin returns
to normal, replace the Receiver Collar and monitor the skin condition
closely.
• No. This can result in pulling the Contact Points too tightly against your
pet’s neck. Attach a leash to a separate, non-metallic collar positioned
above the Receiver Collar.
• The beep only mode can be used in training your pet to his boundary or
for well-trained pets that no longer require Static Correction.
www.guardianpet.net 13
Page 14

Troubleshooting
The Receiver Collar is not beeping
when setting up the Boundary Zone.
The Receiver Collar is not beeping or
administering a Static Correction.
The Receiver Collar is beeping
everywhere.
The Receiver Collar is beeping inside
the house.
The Boundary Zone seems to fluctuate.
The Receiver Collar activates in the
middle of the yard.
The Receiver Collar is beeping but
my pet is not responding to the Static
Correction.
My pet reacts strongly to the Static
Correction and has become fearful.
The Power Light is not on.
I was setting up the Pet Area and after
I turned down the Boundary Control
Dial, the Receiver Collar would no
longer beep or correct.
• The beep may be difficult to hear in a noisy environment.
• Install Test Light as explained in the “Test Light Instructions” section,
and use it to determine the location of Boundary Zone.
• Check that the Transmitter is set up according to directions and install a
new battery within 5 feet of the Transmitter.
• Check that the Transmitter is plugged into a working 120-volt outlet,
turned on, the Power Light is on, and the Transmitter controls are set at
your desired settings.
• Check Receiver battery to make sure it is installed properly.
• When replacing the battery, do so within 5 feet of the Transmitter.
• Check that the Transmitter is plugged into a working standard 120-volt
outlet, turned on, the Power Light is on, and the Transmitter controls are
set at your desired settings.
• Bring Receiver Collar within 5 feet of the Transmitter to reset.
• Make sure the Transmitter is on and set up according to the directions.
• Ensure the entire house is within the Pet Area. The Transmitter may need
to be moved to adjust the Pet Area to include the entire house.
• If relocating the Transmitter, remove the Receiver Collar from your pet
before turning the Transmitter off.
• This is normal for the electro magnetic field of the Wireless System. The
field may be affected by surrounding “electronic noise,” which can cause it
to fluctuate up to 5%.
• Where the Receiver Collar activates is influenced by the speed and
orientation of the Receiver Collar as your pet enters the Boundary Zone.
• The Receiver Collar activates when it loses the Transmitter signal. This
sometimes occurs if a large metal object is between the Receiver Collar
and Transmitter, if the orientation of the Receiver Collar changes near the
Boundary Zone, or if the surrounding “electronic noise” interferes with
the signal. If this continues to occur, consider relocating the Transmitter
and resetting the Pet Area.
• Make sure the Static Correction Level is set at 2 or above.
• Test the Receiver Collar with the Test Light.
• If the Test Light fl ashes, check the fi t of the Receiver Collar.
• Trim your pet’s fur where the Contact Points touch the neck and/or
switch to the longer Contact Points.
• Increase the Static Correction Level.
• Repeat training steps to reinforce training.
• Lower the Static Correction Level.
• Make sure you are in control of the situation when your pet receives his
first Static Corrections (have him on a leash attached to a separate, nonmetallic collar) and lead him into the Pet Area and praise him. If your pet
remains fearful, suspend training and start again the next day. Make sure to
end all training sessions on a positive note with lots of praise and play.
• Make sure the Transmitter On/Off Switch is on and the Power Adapter is
plugged into the Transmitter and a working standard 120-volt outlet.
• You may have turned the Boundary Control Dial down too quickly,
causing the Receiver Collar to go into power-fail mode. This is a safety
feature designed to protect your pet when power to the Transmitter goes
out. With the Receiver Collar within 5 feet of the Transmitter, turn the
Boundary Control Dial to “8” and reset the Boundary Zone, making sure
to turn the dial down slowly.
14 1-800-457-3911
Page 15

Test Light Instructions
1. If your Receiver Collar has adjustable Correction Levels, set the Correction Level to 2 or above.
2. Hold the Test Light Contacts to the Contact Points.
3. Walk toward the Boundary Wire holding the Receiver collar at your pet’s neck level until the Test
Light flashes.
Save the Test Light for future testing.
Note: If the Test Light does not flash, install a new battery and re-test. If Test Light still does not flash,
contact the Customer Care Center at 1-800-457-3911.
_____________________________________________________
Terms of Use and Limitation of Liability
1. Terms of Use
This Product is offered to you conditioned upon your acceptance without modification of the terms, conditions and
notices contained herein. Usage of this Product implies acceptance of all such terms, conditions, and notices.
2. Proper Use
This Product is designed for use with pets where training is desired. The specific temperament of your pet may not
work with this Product. We recommend that you not use this Product if your pet is less than 8 pounds or if your pet
is aggressive. If you are unsure whether this is appropriate for your pet please consult your veterinarian or certified
trainer.
Proper use includes reviewing the entire Guide provided with your Product and any specific Caution statements.
3. No Unlawful or Prohibited Use
This Product is designed for use with pets only. This pet training device is not intended to harm, injure or provoke.
Using this Product in a way that is not intended could result in violation of Federal, State or local laws.
4. Limitation of Liability
In no event shall Radio Systems Corporation be liable for any direct, indirect, punitive, incidental, special or
consequential damages, or any damages whatsoever arising out of or connected with the use or misuse of this Product.
Buyer assumes all risks and liability from the use of this Product.
5. Modification of Terms and Conditions
Radio Systems Corporation reserves the right to change the terms, conditions and notices under which this Product is
offered.
_____________________________________________________
Caution
The Guardian Wireless Pet Containment System™ is NOT a solid barrier. The system is designed to act as a deterrent
to remind pets by Static Correction to remain in the boundary established. It is important that you reinforce training
with your pet on a regular basis. Since the tolerance level to Static Correction varies from pet to pet, Radio Systems
Corporation CANNOT guarantee that the system will, in all cases, keep a pet within the established boundary. Not all pets
can be trained to avoid crossing the boundary! Therefore, if you have reason to believe that your pet may pose a danger
to others or harm himself if he is not kept from crossing the boundaries, you should NOT rely solely upon the Guardian
Wireless Pet Containment System™ to confine your pet. Radio Systems Corporation shall NOT be liable for any property
damage, economic loss or any consequential damages, sustained as a result of any animal crossing the boundary.
www.guardianpet.net 15
Page 16

Français
Merci d’avoir choisi GuardianMC. Notre mission est de garantir la sécurité de votre animal en vous
offrant les moyens et les techniques pour le dresser avec succès. Si vous avez des questions, veuillez
contacter notre service à la clientèle au 1-800-457-3911 ou visiter notre site Web à l’adresse www.
guardianpet.net.
___________________________________________
Table des matières
Contenu de l’emballage ..................................................................................................................17
Autres éléments nécessaires ............................................................................................................17
Fonctionnement .............................................................................................................................18
Définitions principales ....................................................................................................................18
Manuel d’utilisation
Positionnement de l’émetteur .......................................................................................................19
Préparation du collier récepteur ....................................................................................................19
Ajustement de la zone réservée à l’animal domestique aux dimensions souhaitées ...........................20
Tableau de portée de l’émetteur ...................................................................................................21
Positionnement des fanions de délimitation ................................................................................... 21
Mise en place du collier récepteur.................................................................................................22
Manuel de dressage
Faire preuve de patience avec l’animal domestique ........................................................................23
Jour 1: Prise de conscience des fanions de délimitation ..................................................................23
Jours 2 à 4: Suite de la prise de conscience des fanions de délimitation ...........................................24
Jours 5 à 8: Phase de distraction ...................................................................................................24
Jours 9 à 14: Supervision sans laisse ..............................................................................................25
Faire sortir l’animal de la zone qui lui est réservée .........................................................................25
Portabilité ...................................................................................................................................26
Accessoires.....................................................................................................................................26
Foire aux questions ........................................................................................................................26
Résolution des problèmes ............................................................................................................... 28
Instructions relatives à la lampe témoin ...........................................................................................29
Conditions d’utilisation et limitation de responsabilité .....................................................................29
Mise en garde.................................................................................................................................29
Gabarit de montage ........................................................................................................................44
16 1-800-457-3911
Page 17

Contenu de l’emballage
E
P
T
E
S
F
A
S
S
H
R
E
A
N
P
P
W
Y
O
Adaptateur
secteur
Lampe témoin
Manuel d’utilisation
et de dressage
Emetteur
Warranty
Carte de garantie
Points de contact longs
Collier récepteur
avec points
de contact courts
Fanions
de délimitation (50)
Pile
(PetSafeMD RFA-67)
Autres éléments nécessaires
• Pince
• Ciseaux
• Briquet
• Perceuse et matériel de montage
• Mètre ruban
• Collier non métallique et laisse
www.guardianpet.net 17
Page 18

Fonctionnement
Le système de retenue sans fi l pour animaux domestiques Guardian Wireless Pet Containment SystemMC est un système sûr, confortable
et effi cace qui convient pour tous les animaux domestiques de plus de 3,6 kg. Son fonctionnement est simple: il envoie un signal
radio dans toutes les directions avec une portée maximale de 27 mètres. Vous déterminez provisoirement la zone réservée à l’animal
domestique à l’aide des fanions de délimitation qui constituent un support visuel au dressage de votre animal. Ce dernier porte un collier
récepteur muni de points de contact qui touchent son cou. Une fois l’animal dressé, il peut se promener librement dans la zone qui lui
est réservée. Lorsque votre animal arrive au niveau des limites prédéterminées, le collier récepteur émet un signal d’avertissement avant
d’administrer une correction statique inoffensive pour attirer son attention et le faire retourner dans la zone qui lui est réservée.
Définitions principales
Emetteur: émet le signal radio et correspond au centre de la
zone réservée à l’animal domestique.
Zone réservée à l’animal domestique: distance par rapport à
l’émetteur à laquelle l’animal peut circuler librement.
Zone de délimitation: zone de 60 à 90 cm de large située
au-delà de la zone réservée à l’animal dans laquelle le collier
récepteur de votre animal commence à émettre un signal sonore
d’avertissement avant d’administrer une correction statique.
Cette dernière est administrée dans la zone de délimitation et
en tout endroit situé au-delà de la zone réservée à l’animal.
Remarque: le collier récepteur intègre une fonction d’arrêt de sécurité
qui interrompt la correction dès que votre animal reste en dehors de la
zone qui lui est réservée pendant plus de 30 secondes.
Collier récepteur: reçoit le signal radio transmis par l’émetteur.
Bouton de réglage de l’intensité de la correction: permet
de régler l’intensité de la correction statique administrée à votre
animal en dehors de la zone qui lui est réservée.
Voyant lumineux du récepteur: indique l’intensité de la
correction définie pour le collier récepteur. Ce voyant signale
également lorsque la pile est plate.
Points de contact: administrent une correction statique
inoffensive lorsque l’animal pénètre dans la zone de délimitation.
Prise d’alimentation: point de raccord entre l’adaptateur
secteur et l’émetteur. L’émetteur est alimenté par une prise de
120 volts standard.
Commutateur de délimitation: à régler en fonction de la taille
souhaitée de la zone réservée à l’animal domestique.
Voyant de mise sous tension: indique que l’émetteur est sous
tension.
Molette de réglage des limites: permet de définir la distance
entre l’émetteur et la zone de délimitation. Remarque: le réglage de
cette molette ne modifie pas l’intensité de la correction statique envoyée
par le collier récepteur.
Emetteur
Emetteur
Zone réservée à l’animal
Remarque: de manière générale,
les limites des propriétés voisines
peuvent servir pour déterminer
la taille de la zone réservée à
l’animal domestique.
Portée maximale de 27 m
(45 pas moyens)
Collier récepteur
Bouton de
réglage de
l’intensité de
la correction
Rondelles
Points de contact
Pile
Voyant
lumineux
du récepteur
18 1-800-457-3911
Prise d’alimentation
(Power Jack)
Commutateur
de délimitation
(Boundary Switch)
Voyant de mise sous tension
(Power Light)
Molette de réglage
des limites
(Boundary Control)
Interrupteur de mise
sous/hors tension
(On/Off Switch)
Page 19

Manuel d’utilisation
BOUNDARY
CONTROL
7
8
Power
Boundary Switch
Low
High
8
Etape
1
Positionnement de l’émetteur
Important: il peut s’avérer nécessaire de déplacer l’émetteur à plusieurs reprises avant de trouver l’emplacement définitif.
L’émetteur est situé au centre de la zone réservée à l’animal domestique. Placez l’émetteur:
• à une hauteur de 60 à 120 cm.
• dans un endroit sec, bien aéré et protégé.
• dans un endroit où la température ne descend jamais en dessous de 0°C (par exemple, dans un garage, une cave,
un abri, un débarras).
• sur une table non métallique ou au mur (1A) (vous trouverez un gabarit de montage au dos du présent manuel).
• à une distance minimale de 1 m de tout objet métallique et de tout appareil de grande taille dans la mesure où
ces derniers peuvent réduire la taille et la configuration de la zone réservée à votre animal domestique (1B).
Pour optimiser la zone réservée
à l’animal, veillez à ce que le
commutateur de délimitation soit réglé
sur « High » et que la molette de réglage
des limites soit réglée sur « 8 » (1C).
Branchez l’adaptateur secteur dans la
prise d’alimentation standard de 120
volts. Mettez l’émetteur sous tension.
Montage
mural
Sur une table
1 m
Etape
2
Préparation du collier récepteur
Les points de contact courts sont installés d’origine sur le collier récepteur. Utilisez les
points de contact longs si votre animal domestique a un pelage long ou épais. À l’aide
de la clé de serrage des contacteurs se trouvant sur la clé multifonctions, resserrez les
contacteurs (2A) d’un demi tour après les avoir serrés au maximum avec les doigts
(2B). Une fois par semaine, assurez-vous que les points de contact sont bien serrés.
Insertion et retrait de la pile
Remarque: n’insérez jamais la pile lorsque votre animal porte le collier récepteur.
Le collier récepteur fonctionne à l’aide d’une pile jetable PetSafeMD (RFA-67). Cette pile
spécifi que garantit une plus grande facilité de remplacement de la pile et une meilleure
étanchéité.
Pour installer la pile, alignez la fl èche de la pile sur le triangle du récepteur. Utilisez la clé
pour tourner la pile dans le sens des aiguilles d’une montre jusqu’à ce que la fl èche soit
placée en vis-à-vis du symbole représentant un cadenas sur le récepteur (2C).
À l’aide de la clé de serrage de la pile se trouvant sur la clé multifonctions, tournez la pile
dans le sens des aiguilles d’une montre jusqu’à ce que la fl èche soit placée en vis-à-vis
du symbole représentant un cadenas sur le récepteur (2D). Veillez à jeter la pile usagée
comme il se doit.
Vous trouverez une pile de rechange PetSafeMD (RFA-67) chez la plupart des distributeurs.
Pour connaître le distributeur le plus proche, veuillez contacter notre service clientèle au
numéro 1-800-457-3911 ou visitez notre site Web à l’adresse www.guardianpet.net.
2A
Lampe
test
2B
2C
Clé de serrage
des contacteurs
Electrodes
Clé de
serrage
de la pile
2D
www.guardianpet.net 19
Page 20

Réglage de l’intensité de la correction statique
Remarque: le collier récepteur est réglé d’usine uniquement pour l’émission du signal sonore.
Veuillez lire toutes les étapes ci-dessous avant de régler
l’intensité de la correction statique.
1.
À l’aide de la clé de serrage de la pile se trouvant sur
la clé multifonctions
transparent pour exposer le bouton de réglage de l’intensité
de la correction statique (2E).
2. Une fois la pile insérée, appuyez sur le bouton de réglage de
l’intensité de la correction statique et maintenez-le enfoncé
jusqu’à ce que le voyant lumineux du collier s’allume (2F).
3. Le voyant lumineux du collier récepteur émet alors une
série de clignotements refl étant l’intensité de la correction
statique.
4. Augmentez l’intensité de la correction statique en appuyant
puis en relâchant le bouton de réglage de l’intensité de
correction statique dans les cinq secondes suivant la série de clignotements précédente.
5. Une fois l’intensité de la correction statique réglée, remettez la protection en place afi n de protéger le bouton de
réglage de l’intensité de la correction statique.
Les niveaux d’intensité de la correction statique vont de 1 à 4. Si vous appuyez sur le bouton de réglage de l’intensité de la
correction statique alors que le collier récepteur est réglé sur le niveau 4, le collier repasse au niveau 1. Reportez-vous au tableau
des fonctions et réactions ci-dessous pour choisir le niveau d’intensité de la correction statique le mieux adapté à votre animal.
Le voyant lumineux du collier récepteur indique également lorsque la pile est plate. Lorsqu’il clignote toutes les 4 à
5 secondes, la pile doit être remplacée.
, retirez la protection en plastique
2E 2F
la
Etape
3
Tableau des fonctions et réactions
Réaction du
voyant lumineux
1 clignotement 1 Pas de correction statique, émission d’un
2 clignotements 2 Correction statique faible Calme
3 clignotements 3 Correction statique moyenne Calme ou moyen
4 clignotements 4 Correction statique élevée Excité
Clignotement
toutes les 4 à 5
secondes
Remarque: Commencez le dressage au niveau de correction 2 et n’augmentez l’intensité que si votre animal ne réagit pas à la correction statique.
__________________________________________________
Niveau d’intensité de
la correction statique
Fonction du collier récepteur Tempérament de
l’animal
signal sonore uniquement
Indique que la pile est faible
Ajustement de la zone réservée à l’animal domestique
aux dimensions souhaitées
Veillez à ce que la zone réservée à l’animal domestique se situe entièrement dans les limites de
votre propriété (3A). Commencez toujours par déterminer la zone de délimitation en fonction de
la distance la plus courte par rapport à l’émetteur. Réglez le commutateur de délimitation sur la
position « Low » si la zone de délimitation est inférieure à une distance de 13,5 m de l’émetteur.
Ajustement à deux personnes
Tenez le collier récepteur à hauteur du cou de votre animal (3B) de sorte que le logo soit
orienté dans la direction opposée de l’émetteur (3C). Allez à la limite souhaitée de la zone
réservée à l’animal. Tout en regardant dans la direction opposée à l’émetteur, tenez le collier
récepteur à l’extrémité de la zone réservée à l’animal (3D).
Après avoir réglé la molette de réglage des limites sur « 8 », demandez à une autre personne
de diminuez LENTEMENT la molette. Lorsque le collier récepteur émet un signal sonore,
dites à l’autre personne de ne plus toucher à la molette de réglage des limites. Notez vos
réglages ci-dessous pour toute référence ultérieure.
3A
Zone
réservée à
l’animal
RUE
20 1-800-457-3911
Page 21

Ajustement à une personne
Mesurez la plus courte distance entre la zone réservée à l’animal souhaitée et l’émetteur. Consultez le tableau de portée de
l’émetteur pour y trouver cette distance, puis réglez le commutateur de délimitation et la molette de réglage des limites de
(3B)
manière appropriée. Entrez dans la zone de délimitation en tenant le collier récepteur à hauteur du cou de l’animal
de sorte que le logo soit orienté dans
(3C)
la direction opposée à l’émetteur
Identifiez l’endroit à partir duquel le
collier récepteur doit émettre un signal
.
3B
3C
3D
Zone
réservée à
l’animal
sonore. Si le collier émet un signal
sonore en deçà ou au-delà de la zone de
délimitation souhaitée, retournez jusqu’à
l’émetteur et ajustez la molette de réglage
des limites. Répétez cette procédure
jusqu’à ce que l’émetteur émette le
signal sonore à l’endroit de votre choix.
Notez vos réglages ci-dessous pour toute
Zone de
délimitation
référence ultérieure.
Remarque: si vous n’entendez pas le signal sonore, reportez-vous à la section « Instructions relatives à la lampe témoin ».
Tableau
de portée de l’émetteur
Position
de la
molette
de réglage
des
limites
1
2
3
4
5
6
7
8
Commutateur
Commutateur
de
délimitation
LOW
délimitation
HIGH
1,5-3 m 1,5-3 m
1,5-3 m 1,5-3 m
4,5-6 m 7,5-12 m
6-7,5 m 13,5-16,5 m
7,5-9 m 16,5-19,5 m
10,5-12 m 23-26 m
12-13,5 m 26-27 m
12-13,5 m 26-27 m
de
Notez ci-dessous vos réglages
Réglage
défi nitif du
commutateur
de délimitation
(HIGH ou
LOW)
Domicile
Camping
Vacances
Autre
Position
défi nitive de
la molette de
réglage des
limites (1-8)
Niveau
d’intensité
de la
correction
statique
(1-6)
Remarque: ces distances sont approximatives.
Etape
Positionnement des fanions de délimitation
Les fanions de délimitation constituent un rappel visuel pour votre
animal de l’emplacement de la zone de délimitation. Le collier
4A
4B
récepteur s’active à une distance de 60-90 cm des fanions de
délimitation.
4
1. Tenez le collier récepteur à hauteur du cou de l’animal de sorte que
le logo soit orienté dans la direction opposée de l’émetteur.
2. Marchez en direction de la zone de délimitation jusqu’à ce que le
E
P
T
S
E
F
A
collier récepteur émette un signal sonore (4A
).
3. Enfoncez à cet endroit un fanion dans le sol (4B
).
S
S
R
H
E
A
N
P
W
P
O
Y
4. Retournez dans la zone réservée à l’animal jusqu’à ce que le signal
sonore s’arrête.
5. Répétez cette procédure jusqu’à ce que la zone de délimitation soit
marquée à l’aide d’un fanion tous les 3 m.
Les fanions de délimitation peuvent se trouver en différents endroits de la zone de délimitation, alignés ou non. La largeur
de la zone de délimitation est comprise entre 60 et 90 cm.
Remarque: si vous n’entendez pas le signal sonore, reportez-vous à la section « Instructions relatives à la lampe témoin ».
www.guardianpet.net 21
Page 22

Etape
5
Mise en place du collier récepteur
Important: il est important de mettre en place et de régler le collier récepteur de manière appropriée pour
garantir un dressage efficace. Les points de contact doivent être en contact direct avec la
peau du cou de l’animal, au niveau de sa gorge.
Pour une mise en place appropriée du collier récepteur, veuillez suivre les étapes suivantes:
1
. Vérifiez que la pile n’est pas installée dans le collier récepteur.
2. L’animal doit être debout, dans une position confortable (5A).
3. Pour faciliter l’écoute du signal sonore d’avertissement, veillez à placer le logo du collier récepteur
vers le haut.
4. Centrez les points de contact sur la gorge de l’animal et vérifiez qu’ils
sont en contact avec sa peau. Si le pelage de l’animal est long ou épais,
utilisez les points de contact longs fournis dans l’emballage. Remarque:
dans certains cas, il peut s’avérer nécessaire de couper les poils de votre animal
domestique au niveau des points de contact afin de garantir un contact
valable.
5. Assurez-vous que le collier récepteur n’est pas trop serré. Vous devez
pouvoir introduire un doigt entre l’extrémité du point de contact et le
cou de l’animal. Le collier récepteur doit être bien ajusté mais ne doit
pas gêner l’animal (5B).
6. Laissez le collier récepteur au cou de l’animal pendant quelques minutes
avant de vérifier qu’il est toujours bien ajusté. Vérifiez régulièrement
l’ajustement du collier récepteur.
7. Coupez le collier de la manière suivante (5C
a. A l’aide d’un feutre, indiquez d’un trait la longueur souhaitée du
collier récepteur. Si l’animal est encore jeune ou que son pelage
s’épaissit en hiver, prévoyez une marge de croissance.
b. Retirez le collier récepteur du cou de l’animal et coupez l’excédent.
c. Avant de remettre le collier récepteur au cou de l’animal, brûlez
l’extrémité que vous venez de couper à l’aide d’un briquet pour éviter
qu’il ne s’effiloche.
Important: pour des raisons de confort, de sécurité et d’effi cacité du produit, veuillez respecter les
consignes suivantes:
• Au cours des 2 premières semaines de dressage, n’utilisez jamais le système de dressage sans supervision directe de
l’animal.
• Assurez-vous que le collier est bien ajusté au cou de l’animal. Vous devez pouvoir introduire un doigt entre l’extrémité
du point de contact et le cou de l’animal.
• Examinez quotidiennement l’animal pour déceler une éventuelle éruption ou irritation cutanée.
• Si vous constatez une éruption ou une irritation cutanée, cessez d’utiliser le collier récepteur pendant quelques jours.
• Si l’éruption ou l’irritation cutanée persiste au-delà de 48 heures, consultez un vétérinaire.
• Il est important de laver, chaque semaine, le cou de l’animal et les points de contact à l’aide d’un gant de toilette et
d’un savon doux, puis de les rincer abondamment.
Si vous ne respectez pas les consignes ci-dessus, il est possible que l’animal souffre d’une nécrose par
compression, c’est-à-dire une dévitalisation de la peau survenant suite à un contact prolongé et excessif
avec les points de contact du collier récepteur.
):
Pour renfiler le collier
Boucle coulissante
Crans
22 1-800-457-3911
La boucle empêche que le collier ne se desserre du cou de l’animal.
Les crans doivent être dirigés vers le haut. Si le collier n’est pas enfi lé
comme il se doit, il se desserrera.
Page 23

Manuel de dressage
Faire preuve de patience avec l’animal domestique
Important: il est essentiel de dresser correctement l’animal pour une utilisation efficace du système
Guardian Wireless Pet Containment SystemMC. Veuillez lire attentivement cette section avant de commencer le dressage de votre animal. N’oubliez pas que le système Guardian
Wireless Pet Containment SystemMC est une barrière virtuelle.
• Rendez le dressage de votre animal domestique divertissant. Amusez-vous tout en
étant juste, ferme et constant.
• Organisez des séances de dressage de 10 à 15 minutes. N’essayez pas de brûler les
étapes. En règle générale, de courtes séances fréquentes engendrent de meilleurs
résultats que de longues séances plus espacées.
• Nous recommandons un dressage de minimum 14 jours. Cette durée peut être
raccourcie ou prolongée en fonction de votre animal et de son apprentissage.
• Si l’animal montre des signes de stress, ralentissez le rythme du dressage, prévoyez davantage de jours de
dressage ou passez plus de temps à jouer avec l’animal dans la zone qui lui est réservée. Les signes habituels de
stress sont les suivants:
- l’animal tire sur sa laisse
- l’animal a les oreilles rabattues
- l’animal a la queue abaissée
- l’animal est recroquevillé
- l’animal est nerveux ou frénétique ou son corps est tendu.
SMTWT F S
12345
8 9 10 11 12
15 16 17 18 19
22 23 24 26
29 30 31
25
45
67
13 14
20 21
0
27 28
15
min.
30
Phase
1
• Au terme de chaque séance de dressage, l’animal doit se sentir à l’aise à proximité des fanions de délimitation.
Consacrez-lui au minimum 5 minutes de jeu au terme de chaque séance de dressage dans un périmètre de 3 m
des fanions de délimitation.
• Concluez chaque séance de dressage sur une note positive, félicitez l’animal et jouez avec lui.
• Retirez le collier récepteur au terme de chaque séance de dressage.
• Prévoyez d’autres moyens de contrôle de l’animal pendant la période de dressage (par exemple, cage, chaîne
extérieure, laisse, etc.).
• Lors du dressage, si vous devez faire sortir l’animal de la zone qui lui est réservée, ôtez-lui le collier récepteur et
portez l’animal ou installez-le dans votre voiture pour quitter la zone qui lui est réservée.
• Même si vous estimez que votre animal réagit de manière positive au dressage, n’interrompez pas le dressage et
allez jusqu’au bout. Il est important de persévérer!
__________________________________________________
Jour 1: Prise de conscience des fanions de délimitation
Pour cette première journée de dressage, organisez trois séances de 10 à 15 minutes chacune.
Objectif:
Apprendre à l’animal que les fanions de délimitation et le signal sonore d’avertissement émis par le collier récepteur
délimitent la zone qui lui est réservée.
Préparation:
• Réglez le niveau d’intensité de la correction statique du collier récepteur en fonction de la taille et du tempérament
de votre animal.
• Placez un autre collier non métallique au cou de votre animal, juste AU-DESSUS du collier récepteur et attachezy une laisse. Remarque: assurez-vous que ce collier n’exerce aucune pression sur les points de contact.
• Prévoyez de petites récompenses que votre animal aime particulièrement (os ou petits biscuits, par exemple).
• Tenez également le jouet favori de votre animal à portée de main.
www.guardianpet.net 23
Page 24

Etapes:
1. Promenez votre animal en laisse dans la zone qui lui est réservée. Félicitez-le et parlez-lui d’une voix calme. Donnez-lui
une récompense de temps à autre.
2. Dirigez-vous vers les fanions de délimitation (1A). Adoptez une attitude joviale et lancez quelques récompenses sur le sol.
3. Tout en maîtrisant votre animal en laisse, jetez une récompense au-delà des fanions. Lorsque votre animal pénètre dans la
zone de délimitation, le collier récepteur émet un signal sonore
il reçoit une correction statique de faible intensité. Laissez votre animal dans la zone de délimitation pendant 2 secondes,
puis tirez-le doucement dans la zone qui lui est réservée (1C). Félicitez immédiatement votre animal lorsqu’il pénètre
dans la zone qui lui est réservée et offrez-lui une récompense, même si vous l’y avez aidé en tirant sur la laisse. Agitez l’un
des fanions de délimitation pour permettre à votre animal d’associer la correction statique aux fanions.
4. Après avoir répété cette procédure au niveau de différents fanions, votre animal devrait ne plus vouloir attraper
la récompense que vous lancez dans la zone de délimitation. Si votre animal continue à pénétrer dans la zone de
délimitation, vérifi ez que le collier récepteur est bien ajusté au cou de votre animal et laissez-le 2-3 secondes dans la zone
de délimitation avant de le tirer dans la zone qui lui est réservée.
Remarque: n’autorisez jamais votre animal à manger la récompense dans la zone de délimitation.
(1B)
. Si votre animal ne quitte pas la zone de délimitation,
Phase
2
__________________________________________________
Jours 2 à 4: Suite de la prise de conscience des
fanions de délimitation
Organisez trois séances de dressage par jour, de 10 à 15 minutes chacune.
Objectif:
Apprendre à votre animal à rester dans la zone qui lui est réservée lorsque vous êtes en dehors de cette zone.
Préparation:
• Réglez le niveau d’intensité de la correction statique du collier récepteur en fonction de la taille et du tempérament
de votre animal.
• Placez un autre collier non métallique au cou de votre animal, juste AU-DESSUS du collier récepteur et attachezy une laisse. Remarque: assurez-vous que ce collier n’exerce aucune pression sur les points de contact.
• Prévoyez de petites récompenses pour votre animal (os ou petits biscuits, par exemple).
• Tenez également le jouet favori de votre animal à portée de main.
Etapes:
1. Répétez les étapes 1 à 4 de la première phase.
2. Ôtez la laisse de votre animal et laissez-le dans la zone qui lui est réservée.
3. Passez au-delà de la zone de délimitation et agitez les fanions de délimitation situés en face de votre animal.
4. Agitez tous les fanions de la zone de délimitation tout en jetant des récompenses à votre animal, toujours dans la
zone qui lui est réservée, et en le félicitant.
5. Si votre animal ne réagit pas à la correction statique qui lui est administrée, augmentez le niveau d’intensité de la
correction d’un cran.
___________________________________________________
Phase
Jours 5 à 8: Phase de distraction
Organisez trois séances de dressage par jour, de 10 à 15 minutes chacune.
Objectif:
Apprendre à votre animal à rester dans la zone qui lui est réservée en dépit des distractions extérieures.
3
24 1-800-457-3911
Page 25

Préparation:
• Réglez le niveau d’intensité de la correction statique du collier récepteur en fonction de la taille et du tempérament
de votre animal.
• Placez un autre collier non métallique au cou de votre animal, juste AU-DESSUS du collier récepteur et attachez-y
une laisse. Remarque: assurez-vous que ce collier n’exerce aucune pression sur les points de contact.
• Prévoyez de petites récompenses pour votre animal (os ou petits biscuits, par exemple).
• Tenez également le jouet favori de votre animal à portée de main.
• Créez des distractions susceptibles d’attirer l’animal dans la zone de délimitation, par exemple:
- Demandez à l’un des membres de la famille de quitter la zone réservée à l’animal.
- Jetez un ballon en dehors de la zone réservée à l’animal.
- Demandez à l’un de vos voisins de promener son chien en dehors de la zone réservée à l’animal.
Etapes:
1. Tout en maîtrisant votre animal en laisse, présentez-lui une distraction.
2. Si l’animal ne se dirige pas vers la distraction, félicitez-le et offrez-lui une récompense.
3. Si l’animal réagit à la distraction, laissez-le pénétrer dans la zone de délimitation.
4. Si l’animal n’est pas sorti de la zone de délimitation dans un délai de 3 secondes, tirez-le dans la zone qui lui est
réservée.
5. Chaque fois que l’animal revient dans la zone qui lui est réservée, de son propre gré ou parce que vous l’y tirez,
félicitez-le et offrez-lui une récompense.
6. Répétez cette procédure avec les autres distractions prévues. Demandez l’aide des autres membres de la famille pour
cette étape.
7. Si votre animal ne réagit pas à la correction statique qui lui est administrée, augmentez le niveau d’intensité de la
correction d’un cran.
__________________________________________________
Phase
4
Jours 9 à 14: Supervision sans laisse
Les premières séances de dressage doivent durer de 10 à 15 minutes pour atteindre
progressivement une durée de plus d’une heure.
L’animal n’est prêt pour cette phase que lorsqu’il évite expressément la zone de
délimitation, en dépit de toute distraction ou tentation. Pour cette phase, ne laissez
jamais votre animal sans surveillance.
Objectif:
Permettre à l’animal de courir librement dans la zone qui lui est réservée, sans laisse.
Préparation:
Réglez le collier récepteur sur le niveau d’intensité défi nitif correspondant à la taille
et au tempérament de votre animal.
Etapes:
1. Pénétrez avec l’animal portant le collier récepteur dans la zone qui lui est réservée.
2. Promenez-vous avec l’animal et jouez avec lui, tout en restant toujours à l’intérieur de la zone qui lui est réservée.
3. Attelez-vous à une autre tâche dans le jardin, tout en surveillant votre animal.
4. Si l’animal tente de quitter la zone qui lui est réservée, ôtez le collier récepteur et éteignez le système et
l’émetteur, puis ramenez l’animal dans la zone qui lui est réservée.
__________________________________________________
Faire sortir l’animal de la zone qui lui
est réservée
Important: ôtez le collier récepteur et laissez-le dans la zone réservée à l’animal.
Une fois que l’animal est devenu familier avec la zone de délimitation, il hésitera à la
traverser pour aller se promener ou monter en voiture.
Option 1: Remplacez le collier récepteur par un collier traditionnel. Faites monter
l’animal dans le véhicule garé dans la zone réservée à l’animal et conduisez le véhicule en
dehors de la zone.
Option 2: Remplacez le collier récepteur par un collier traditionnel et une laisse. Emmenez
l’animal en dehors de la zone qui lui est réservée tout en lui disant une phrase de type « Bien » en un
endroit spécifi que de la zone de délimitation (au bout de l’allée, au niveau du trottoir, etc.). Quittez
toujours la zone réservée à l’animal à cet endroit spécifi que tout en tenant l’animal en laisse pour qu’il associe le départ de la
zone qui lui est réservée à la laisse, à un endroit spécifi que et à une personne spécifi que. Il vous faudra peut-être tout d’abord
convaincre votre animal de quitter la zone qui lui est réservée en lui offrant une récompense et en le félicitant à plusieurs reprises.
Remarque: vous pouvez également porter l’animal dans vos bras pour quitter la zone qui lui est réservée.
www.guardianpet.net 25
Page 26

Portabilité
Le système Guardian Wireless Pet Containment SystemMC est un système portable. Il vous suffi t de suivre les procédures de
préparation (étapes 1 à 4) pour tout endroit dans lequel vous souhaitez retenir votre animal. Redéfi nissez la zone réservée à
l’animal et délimitez-la à l’aide des fanions de délimitation afi n que l’animal prenne conscience de la zone de délimitation
qu’il ne peut franchir. Remarque: si vous utilisez ce système dans un bâtiment métallique ou dans un véhicule, vous devrez
certainement réduire la taille maximale de la zone réservée à l’animal. Veillez à retirer la pile du collier récepteur avant d’éteindre
l’émetteur. Si vous souhaitez alimenter l’émetteur à partir de votre véhicule ou de toute autre source de courant continu,
utilisez un onduleur de 50 watts ou plus.
_____________________________________________________
Accessoires
Si vous souhaitez acquérir des accessoires supplémentaires pour le système Guardian Wireless Pet Containment SystemMC,
veuillez contacter le service clientèle au numéro 1-800-457-3911 ou visitez notre site Web à l’adresse www.guardianpet.net
afi n de connaître le distributeur le plus proche.
Composant Référence
Paquet de deux piles RFA-67D-11
Collier récepteur supplémentaire PIF-275
Adaptateur secteur 300-475
Collier de remplacement RFA-48
Fanions supplémentaires RFA-2
Emetteur sans fil supplémentaire IF-100
Lot d’accessoires RFA-135
Batterie de secours RFA-157
Foire aux questions
Le collier récepteur est-il étanche?
Le système Guardian Wireless Pet
Containment SystemMC couvre-t-il une
circonférence supérieure à 54 m?
La zone réservée à l’animal peut-elle
être influencée par un jardin en pente?
Puis-je utiliser plusieurs colliers
récepteurs avec ce système sans fil?
Le système sans fil tiendra-t-il les autres
animaux à l’écart de mon jardin?
Existe-t-il un émetteur de poche à
distance pouvant être utilisé avec le
collier récepteur du système sans fil?
Existe-t-il un collier récepteur
de petite taille ou un autre collier
récepteur pouvant être utilisé avec
l’émetteur sans fil?
• Oui. Lorsque vous changez la pile, veillez à ce que le compartiment de la
pile ne contienne pas de poussières ni de débris.
• Vous pouvez utiliser un autre émetteur sans fil pour que les limites se
chevauchent de 1,5 à 3 m. Vous obtenez ainsi une zone réservée à l’animal
plus vaste.
• Le signal émis par l’émetteur s’étend à 27 m dans toutes les directions.
En cas de jardin en pente, la zone réservée à l’animal peut vous paraître
plus grande ou plus petite que prévu. Repositionnez éventuellement
l’émetteur afin d’optimiser la zone réservée à l’animal.
• Oui. Le nombre d’animaux que vous pouvez retenir à l’aide de ce
système sans fil est illimité. Il vous suffit d’acheter un collier récepteur
supplémentaire pour chaque animal que vous souhaitez retenir. Pour ce
faire, contactez notre service clientèle au numéro 1-800-457-3911 ou
visitez notre site Web à l’adresse www.guardianpet.net afin de connaître le
distributeur le plus proche.
• Non. Le système sans fil ne fonctionne efficacement que pour les
animaux portant un collier récepteur..
• Non. Dans ce cas, vous devez acheter un système de dressage à distance.
Pour ce faire, contactez notre service clientèle au numéro 1-800-4573911 ou visitez notre site Web à l’adresse www.guardianpet.net afin de
connaître le distributeur le plus proche
• Non. Contactez notre service clientèle au numéro 1-800-457-3911 ou
visitez notre site Web à l’adresse www.guardianpet.net pour connaître des
idées ou des solutions alternatives.
26 1-800-457-3911
Page 27

Si j’ai des questions sur mon système
sans fil ou si j’ai besoin de pièces de
rechange, où dois-je m’adresser?
Puis-je utiliser le système sans fil sur
un animal agressif?
Puis-je utiliser le système sans fil sur
un chat?
Que se passe-t-il en cas de panne de
courant?
Que se passe-t-il en cas de perte de la
protection en plastique transparent du
bouton de réglage de l’intensité de la
correction statique?
Lorsque mon animal quitte la zone
qui lui est réservée, combien de temps
dure la correction?
Quelle est la fréquence de changement
de la pile du collier récepteur?
Puis-je adapter le récepteur sur un
autre collier?
Quel est l’entretien du système sans fil?
Comment puis-je savoir si la pile du
collier récepteur fonctionne toujours?
Les bâtiments et l’environnement
(arbres, buissons, etc.) influent-ils sur
les performances du système sans fil?
Que faire si le cou de mon animal
rougit et est irrité?
Puis-je attacher une laisse au collier
récepteur?
Pourquoi le collier récepteur est-il
pourvu d’un mode de signal sonore
uniquement?
• Contactez notre service clientèle au numéro 1-800-457-3911 ou visitez notre
site Web à l’adresse www.guardianpet.net.
• Il est déconseillé d’utiliser les systèmes électroniques de dressage pour
animaux domestiques sur des animaux agressifs. Si vous avez des doutes
quant à l’agressivité de votre animal, veuillez contacter votre vétérinaire ou
un dresseur agréé.
• Oui, il vous suffit de vérifier que le collier récepteur est bien ajusté au cou du
chat.
• Le système sans fil a été conçu pour reconnaître les pannes et les coupures
de courant sans activation du collier récepteur. Toutefois, si votre animal se
trouve à proximité de la zone de délimitation lorsque la panne de courant
survient, il est possible qu’il reçoive une correction statique. Pour réduire
cette éventualité, envisagez un dispositif d’alimentation de secours pour
l’émetteur si les pannes de courant sont fréquentes dans votre quartier.
• La protection en plastique transparent empêche toute modification fortuite
du niveau d’intensité de la correction statique et garantit l’étanchéité du
récepteur. Contactez le service clientèle au numéro 1-800-457-3911 pour
obtenir une pièce de rechange.
• Votre animal reçoit une correction statique tant qu’il reste en dehors de la
zone qui lui est réservée, et ce pendant 30 secondes maximum. Le collier
récepteur est pourvu d’un système d’arrêt de sécurité qui interrompt la
correction et l’émission du signal sonore après 30 secondes et ce jusqu’au
retour dans la zone réservée à l’animal.
• La durée de vie de la pile dépend de la fréquence à laquelle votre animal
teste la zone de délimitation. Le voyant lumineux du récepteur vous indique
l’état de la pile et clignote toutes les 4 à 5 secondes lorsque celle-ci doit être
remplacée.
• Oui, sur n’importe quel collier non métallique. Percez deux trous dans le
collier afin d’y attacher le récepteur. Utilisez le collier fourni dans l’emballage
comme modèle avant de percer les trous dans le nouveau collier.
• Vérifiez quotidiennement le cou de votre animal afin d’y déceler toute trace
éventuelle d’irritation due aux points de contact.
• Vérifiez une fois par chaque semaine que les points de contact du collier
récepteur sont serrés et propres.
• Vérifiez une fois par chaque semaine que le collier récepteur est bien ajusté
au cou de votre animal.
• Le voyant lumineux du récepteur vous indique l’état de la pile et clignote
toutes les 4 à 5 secondes lorsque celle-ci doit être remplacée.
• Retirez le collier récepteur du cou de votre animal et pénétrez dans la zone
de délimitation. Le collier récepteur doit émettre un signal sonore. Dans le
cas contraire, remplacez la pile.
• Non. Cependant, la portée maximale du système peut être réduite si
l’émetteur est installé dans un bâtiment métallique ou dans un véhicule.
• Une telle réaction survient lorsque les points de contact irritent la peau de
votre animal. Cessez d’utiliser le collier récepteur pendant quelques jours. Si
l’irritation persiste au-delà de 48 heures, consultez un vétérinaire. Dès que
la peau est guérie, remettez le collier récepteur et surveillez attentivement la
peau de votre animal.
• Non. Les points de contact pourraient exercer une pression trop importante
sur le cou de votre animal. En cas de besoin, attachez une laisse à un autre
collier non métallique que vous mettrez au-dessus du collier récepteur.
• Le mode de signal sonore uniquement peut vous être utile lorsque vous
dressez votre animal à prendre conscience des limites ou pour les animaux
bien dressés qui n’ont plus besoin de correction statique.
www.guardianpet.net 27
Page 28

Résolution des problèmes
Le collier récepteur n’émet pas de signal
sonore lors de la détermination de la zone
de délimitation.
Le collier récepteur n’émet aucun signal
sonore et n’administre aucune correction.
Le collier récepteur émet un signal
sonore, peu importe l’endroit où on se
trouve.
Le collier récepteur émet un signal sonore
à l’intérieur de la maison.
Il semblerait que la zone de délimitation
soit variable.
Le collier récepteur s’active au milieu du
jardin.
Le collier récepteur émet un signal sonore
mais l’animal ne réagit pas à la correction
statique.
Mon animal réagit fortement à la
correction statique administrée et est
devenu craintif.
Le voyant de mise sous tension ne
s’allume pas.
Après avoir diminué la molette de réglage
des limites lors de la défi nition de la zone
réservée à l’animal, le collier récepteur
a cessé d’émettre un signal sonore et
d’administrer une correction.
• Le signal sonore peut être difficile à percevoir dans un environnement bruyant.
• Installez la lampe témoin comme expliqué dans la section « Instructions relatives
à la lampe témoin » et utilisez-la pour déterminer l’emplacement de la zone de
délimitation.
• Vérifiez que l’émetteur est réglé conformément aux instructions et installez une
nouvelle pile à une distance maximale de 1,5 m de l’émetteur.
• Vérifiez que l’émetteur est branché sur une prise en état de marche et est sous
tension, que le voyant de mise sous tension est allumé et que les réglages sont
appropriés à vos besoins.
• Vérifiez que la pile du collier récepteur est correctement installée.
• En cas de remplacement de la pile, veillez à vous placer à une distance maximale
de 1,5 m de l’émetteur.
• Vérifiez que l’émetteur est branché sur une prise en état de marche et est sous
tension, que le voyant de mise sous tension est allumé et que les réglages sont
appropriés à vos besoins.
• Réglez à nouveau le collier récepteur à une distance maximale de 1,5 m de
l’émetteur.
• Vérifiez que l’émetteur est allumé et réglé conformément aux instructions.
• Vérifiez que tout le bâtiment se trouve dans la zone réservée à l’animal. Vous
devrez peut-être repositionner l’émetteur afin d’inclure la maison entière dans la
zone réservée à l’animal.
• En cas de repositionnement de l’émetteur, enlevez le collier récepteur du cou de
votre animal avant d’éteindre l’émetteur.
• C’est normal étant donné le champ électromagnétique généré par le système
sans fil. Ce champ peut être affecté par les bruits électroniques environnants qui
peuvent induire une variation maximale de 5 %.
• L’activation du collier récepteur est influencée par la vitesse et l’orientation du
collier récepteur au moment où l’animal pénètre dans la zone de délimitation.
• Le collier récepteur s’active lorsqu’il perd le signal transmis par l’émetteur.
Cela peut notamment survenir lorsqu’un objet métallique de grande taille se
situe entre le collier récepteur et l’émetteur, si l’orientation du collier récepteur
change à proximité de la zone de délimitation ou lorsque des bruits électroniques
environnants interfèrent avec le signal. Si cette situation perdure, envisagez de
repositionner l’émetteur et de redéfinir la zone réservée à l’animal.
• Vérifiez que le niveau d’intensité de la correction statique correspond à 2 ou plus.
• Testez le collier récepteur à l’aide de la lampe témoin.
• Si la lampe témoin clignote, vérifiez que le collier récepteur est bien ajusté au cou
de votre animal.
• Coupez les poils de votre animal au niveau du contact entre les points de contact
du collier et la peau de votre animal et/ou utilisez les points de contact longs.
• Augmentez le niveau d’intensité de la correction statique.
• Répétez les étapes de dressage afin de renforcer l’apprentissage de votre animal.
• Diminuez le niveau d’intensité de la correction statique.
• Veillez à bien maîtriser votre animal lorsqu’il reçoit ses premières corrections
statiques (tenez-le à l’aide d’une laisse attachée à un autre collier non métallique).
Ensuite, ramenez-le vers la zone qui lui est réservée et félicitez-le. Si l’animal
demeure craintif, interrompez le dressage et reprenez le lendemain. Veillez à
toujours conclure les séances de dressage sur une note positive en félicitant
l’animal et en jouant avec lui.
• Vérifiez que l’interrupteur de mise sous/hors tension est allumé et que
l’adaptateur secteur est branché à l’émetteur et sur une prise de courant en état
de fonctionnement.
• Il se peut que vous ayez diminué la molette de commande des limites trop
rapidement, ce qui aura fait passer le collier récepteur en mode panne de courant.
Cette fonction de sécurité vise à protéger l’animal en cas de coupure de courant
de l’émetteur. Tenez le collier récepteur à une distance maximale de 1,5 m
de l’émetteur et tournez la molette de réglage des limites sur la position « 8 »,
puis redéfinissez la zone de délimitation tout en veillant à diminuer la molette
lentement.
28 1-800-457-3911
Page 29

Instructions relatives à la lampe témoin
1. Si le collier récepteur possède des niveaux de correction réglables, réglez le niveau de correction
sur 2 ou plus.
2. Placez les contacteurs sur les électrodes situées sur la clé.
3. Marchez vers le fil d’antenne en tenant le collier récepteur à la hauteur du cou de votre chien
jusqu’à ce que la lampe test clignote.
Conservez la lampe témoin pour tout test ultérieur.
Remarque: si la lampe témoin ne clignote pas, remplacez la pile et procédez à un nouvel essai. Si la lampe
témoin ne clignote toujours pas, contacter le service clientèle au numéro 1-800-457-3911.
_____________________________________________________
Conditions d’utilisation et limitation de responsabilité
1. Conditions d’utilisation
Ce produit vous est livré dans l’emballage que vous acceptez en l’état, sans modification des conditions, clauses et avis
joints. L’utilisation du produit implique l’acceptation de l’ensemble de ces conditions, clauses et avis.
2. Utilisation adéquate
Ce produit est destiné à être utilisé avec des animaux domestiques devant être dressés. Le tempérament propre de
votre animal peut être incompatible avec le produit. Il est déconseillé d’utiliser ce système avec des animaux de moins
de 3,6 kg ou avec des animaux agressifs. Si avez le moindre doute quant à l’utilisation adéquate de ce système pour
votre animal, veuillez consulter votre vétérinaire ou un dresseur agréé.
Il est essentiel de lire l’ensemble du manuel livré avec le produit et les mises en garde spécifiques.
3. Aucune utilisation illégale ou interdite
Ce produit est conçu pour être utilisé avec des animaux uniquement. Ce système de dressage d’animaux domestiques
n’est pas destiné à nuire, blesser ou provoquer les animaux. L’utilisation de ce système à des fins autres que celles
prévues peut entraîner le non-respect des lois nationales, régionales ou spécifiques de chaque Etat.
4. Limitation de responsabilité
La société Radio Systems Corporation ne peut en aucun cas être tenue pour responsable de tout dommage direct,
indirect, dissuasif, accidentel ou particulier ou de tout dommage de quelque nature que ce soit causé ou associé à
l’utilisation ou à l’utilisation inappropriée du produit. L’acquéreur assume tous les risques et l’entière responsabilité en
ce qui concerne l’utilisation du produit.
5. Modification des conditions
La société Radio Systems Corporation se réserve le droit de modifier les conditions, clauses et avis concernant le
produit en question.
_____________________________________________________
Mise en garde
Le système Guardian Wireless Pet Containment SystemMC est une barrière virtuelle. Les corrections statiques administrées
par le système visent à rappeler à l’animal de rester dans les limites défi nies. Il est important que vous renforciez
régulièrement le dressage de votre animal. Etant donné que le niveau de tolérance des corrections statiques varie d’un
animal à l’autre, Radio Systems Corporation NE PEUT garantir que l’animal restera, en toutes circonstances, dans les
limites défi nies grâce au système sans fi l. Sachez qu’il est impossible de dresser certains animaux à ne pas franchir les limites
défi nies ! Ainsi, si vous pensez que votre animal est susceptible de représenter une menace pour autrui ou de se blesser s’il
peut transgresser ces limites, NE vous fi ez PAS exclusivement au système Guardian Wireless Pet Containment SystemMC
pour contenir votre animal. La société Radio Systems Corporation NE peut en aucun cas être tenue pour responsable des
dommages immobiliers, des pertes fi nancières ou de tout dommage indirect causés par un animal ayant transgressé les
limites défi nies.
www.guardianpet.net 29
Page 30

Español
Gracias por elegir GuardianMR. Nuestra misión es garantizar la seguridad de su animal doméstico,
proporcionándole a usted las herramientas y técnicas para amaestrarlo con éxito. Si usted tiene alguna
pregunta, por favor contacte al centro de asistencia al cliente, en el número 1-800-457-3911, o visite
nuestro sitio en la red www.guardianpet.net.
___________________________________________
Índice de contenidos
Componentes .................................................................................................................................31
Otros artículos que puede necesitar ................................................................................................. 31
Cómo funciona el sistema ...............................................................................................................32
Defi niciones clave ...........................................................................................................................32
Manual de funcionamiento
Instalación del transmisor ............................................................................................................33
Prepare el collar receptor..............................................................................................................33
Ajuste la zona del perro al tamaño deseado ...................................................................................34
Gráfi ca de alcance del transmisor .................................................................................................35
Coloque las banderas de límites ....................................................................................................35
Ajuste del collar receptor ..............................................................................................................36
Manual de adiestramiento
Sea paciente con su perro .............................................................................................................37
Día 1 – Aprendizaje de las banderas de límites ..............................................................................37
Días 2 a 4 – Continuación del aprendizaje de las banderas de límites .............................................38
Días 5 a 8 – Fase de distracción ....................................................................................................38
Días 9 a 14 - Supervisión sin correa ..............................................................................................39
Llevar al perro fuera de su zona .................................................................................................... 39
Inalámbrico – para - llevar ............................................................................................................40
Accesorios ......................................................................................................................................40
Preguntas más frecuentes ................................................................................................................40
Solución de problemas ..................................................................................................................42
Instrucciones de luz de prueba ........................................................................................................43
Condiciones de uso y limitación de responsabilidad .........................................................................43
Precaución .....................................................................................................................................43
Plantilla de montaje ........................................................................................................................ 44
30 1-800-457-3911
Page 31

Componentes
E
P
T
E
S
F
A
S
S
H
R
E
A
N
P
P
W
Y
O
Adaptador
de corriente
Manual de adiestramiento
y funcionamiento
Transmisor
Luz de prueba
Warranty
Tarjeta
de garantía
Puntos de contacto
largos
Receptor
Collar con puntos
de contacto cortos
Banderas
de límites - 50
Pila
(PetSafeMR RFA-67)
Otros artículos que puede necesitar
• Alicates
• Tijeras
• Encendedor
• Taladrador & herramientas de montaje
• Cinta de medición
• Collar y correa no metálicos
www.guardianpet.net 31
Page 32

Cómo funciona el sistema
El Guardian Wireless Pet Containment SystemMC ha demostrado ser seguro, cómodo y efi caz para todos los perros de
más de 3,6 kg. El sistema funciona transmitiendo una señal de radio hasta 27 metros en todas direcciones. Se defi ne
temporalmente esta zona del animal doméstico con banderas de límites para visualizar la zona y para entrenar al animal. El
animal lleva un collar receptor con puntos de contacto con el cuello. Una vez esté entrenado, puede correr libremente por
su zona. Cuando el perro llega a la zona de límites, el collar receptor emite un pitido de aviso antes de proporcionar una
corrección estática de seguridad a través de los puntos de contacto para llamarle la atención hasta que vuelva a su área.
Defi niciones clave
Transmisor: Transmite la señal de radio y es el centro
del área del perro.
Zona del perro: Distancia desde el transmisor donde el
perro puede correr libremente.
Zona de límites: Área de 60 a 90 cm fuera de la zona
del perro donde el collar receptor empezará a emitir un
pitido para después proporcionar una corrección estática.
La corrección empezará en la zona de límites y seguirá
en cualquier sitio más allá de la zona del perro. Nota: El
collar receptor está equipado con un dispositivo de seguridad
que parará la corrección después de 30 segundos si el perro
permanece fuera de su zona.
Collar receptor: Recibe la señal de radio del transmisor.
Botón de nivel de corrección: Ajusta el nivel de
corrección estática que recibe el perro fuera de su zona.
Luz indicadora del receptor: Indica el nivel de
corrección en el que se establece el collar receptor. Esta
luz sirve también como un indicador de batería baja.
Puntos de contacto: Proporcionan la corrección estática
de seguridad cuando el perro entra en la zona de límites.
Toma de alimentación: Donde el adaptador de
corriente se enchufa al transmisor. El transmisor funciona
con una salida de 120 voltios estándar.
Conmutador de límites: Se ajusta en función del
tamaño de la zona del perro que se quiera.
Luz de alimentación: Indica que el transmisor está
encendido.
Selector de control de límites: Ajusta la distancia
desde el transmisor a la zona de límites. Nota: El ajuste del
selector no cambia el nivel de corrección estática en el collar
receptor.
Transmisor
Nota: En muchos vecindarios,
las líneas de propiedad cercanas
pueden limitar lo grande que
puede ser el área del perro.
ÁREA DEL PERRO
Alcance máximo 27 m
(45 pasos normales)
Collar receptor
Botón
de nivel
de correcció
Arandelas
Puntos de contacto
Pila
Luz
indicadora
del receptor
32 1-800-457-3911
Transmisor
Toma de alimentación
(Power Jack)
Conmutador de límites
(Boundary Switch)
Luz de alimentación
(Power Light)
Selector de control de límites
(Boundary Control)
Interruptor de
encendido/apagado
(On/Off Switch)
Page 33

Manual de funcionamiento
BOUNDARY
CONTROL
7
8
Power
Boundary Switch
Low
High
8
Paso
1
Paso
Instalación del transmisor
Importante: Puede que tenga que cambiar de sitio el transmisor varias veces antes de determinar su
emplazamiento final.
El transmisor se sitúa en el centro mismo de la zona del perro. Coloque el transmisor:
• De 60 a 120 cm por encima del suelo.
• En una zona seca, bien ventilada y protegida.
• En una zona en que las temperaturas no bajen de cero (por ejemplo garaje, sótano, cobertizo, armario).
• En una mesa no metálica o montado en una pared (1A). Hay una plantilla de montaje en el dorso de este manual.
• Como mínimo a 1 metro de grandes objetos metálicos, ya que estos elementos pueden reducir el tamaño y la
forma de la zona del perro (1B).
Para maximizar la zona del perro,
asegúrese de que el conmutador
de límites está en “High” y que el
selector de control de límites está en
“8” (1C). Conecte el adaptador de
corriente a la toma de alimentación
y a la salida estándar de 120 voltios.
Encienda el transmisor.
Montaje
de pared
Encima
de la mesa
1 m
Prepare el collar receptor
2
El collar receptor viene con puntos de contacto cortos instalados. Utilice los puntos de
contacto largos para perros con pelo largo o espeso. Con la llave para apretar los puntos
de contacto que está en la llave multifuncional (2A), apriete los puntos de contacto media
vuelta más de lo que se puede hacer con los dedos (2B).
Para instalar y extraer la pila
Nota: No instale la pila mientras el perro lleve el collar receptor.
Este collar receptor utiliza una pila PetSafeMR (RFA-67). Esta única pila está diseñada
para facilitar el cambio de pila y aumentar la impermeabilidad.
Para instalar la pila, alinee los símbolos de la pila (fl echa) y el collar receptor (triángulo)
(2C)
. Con la llave para apretar la pila que está en la llave multifuncional, gire la pila en
el sentido de las agujas del reloj hasta que la fl echa quede alineada con el símbolo del
candado en el receptor (2C).
Para extraer la pila, utilice la llave para girarla en sentido contrario a las agujas del reloj
(
2D). NO intente abrir la pila. Asegúrese de desechar adecuadamente la pila usada.
Los repuestos de pilas PetSafeMR (RFA-67) pueden encontrarse en muchas tiendas.
Póngase en contacto con el Centro de Asistencia al Cliente al 1-800-457-3911 o visite
nuestra página Web en www.guardianpet.net para localizar la tienda más cercana.
2A
Llave para apretar los
puntos de contacto
Luz
de prueba
2B
2C
2D
Electrodos
Llave
para
apretar
la pila
www.guardianpet.net 33
Page 34

Para ajustar el nivel de corrección estática
Lea todos los pasos antes de intentar ajustar
el nivel de corrección estática.
1. Quite la cubierta de plástico transparente
con la llave para apretar la pila que está en
la llave multifuncional
2. Con la pila instalada, pulse el botón de
nivel de corrección y suéltelo cuando se
encienda la luz indicadora del receptor
(2F)
.
3. La luz indicadora del receptor emite una
serie de parpadeos que representan el nivel
de corrección estática.
4. Aumente el nivel de corrección estática
pulsando y soltando el botón de nivel
de corrección antes de 5 segundos de la
anterior serie de parpadeos.
5. Después de ajustar el nivel de corrección
estática, vuelva a poner la tapa del botón para protegerlo
Los niveles de corrección estática aumentan de potencia de 1 a 4. Si se aprieta el botón de nivel de corrección
cuando el collar receptor está en el nivel 4, el collar receptor vuelve al nivel 1. Consulte la Tabla de Función y
Respuesta para elegir el nivel que mejor se adapte a su perro.
La luz indicadora del receptor actúa como un indicador de pila baja, parpadeando cada 4 ó 5 segundos cuando es
necesario cambiarla.
(2E)
.
2E 2F
Paso
3
Tabla de Función y Respuesta
Respuesta de luz
indicadora
1 Parpadeo 1 Sin corrección estática, Sólo pitido
2 Parpadeos 2 Corrección estática baja Tímido
3 Parpadeos 3 Corrección estática media Tímido o promedio
4 Parpadeos 4 Corrección estática alta Energía alta
Parpadea una vez cada
4 a 5 segundos
Nota: Inicie el adiestramiento con el nivel de corrección 2 y aumente sólo si su perro no responde a la corrección estática.
__________________________________________________
Nivel de corrección
estática
Función del collar receptor Carácter del perro
Indica pila baja
Ajuste la zona del perro al tamaño deseado
Asegúrese de que toda la zona del perro esté dentro de los límites de su propiedad (3A).
Empiece siempre determinando la zona de límites en la distancia más corta del transmisor.
Ponga el conmutador de límites en “Low” si la zona de límites es inferior a 13,5 metros desde
el transmisor.
Método de dos personas
Sostenga el collar receptor a la altura del cuello del perro (3B) con el lado del logo dirigido
hacia la dirección opuesta del transmisor (3C). Camine hacia el extremo de la zona del perro
deseada. Dirigiéndolo hacia el lado opuesto del transmisor, sostenga el collar receptor en el
extremo de la zona del perro deseada (3D).
Empiece con el selector de control de límites en “8”, haga que otra persona gire el selector hacia
SLOWLY. Cuando el collar receptor empiece a pitar, diga a la otra persona que deje de girar el
selector de control de límites. Registre los ajustes para futuras referencias en la siguiente tabla.
3A
CALLE
Zona
del perro
34 1-800-457-3911
Page 35

Método de una persona
Mida la distancia más corta desde la
zona de límites deseada al transmisor.
Encuentre la distancia en la siguiente
gráfica de alcance del transmisor y
ajuste el conmutador de límites y el
selector de control de límites. Lleve
el collar receptor a la zona de límites
con el collar receptor a la altura del
cuello del perro (3B) con el lado
del logo dirigido hacia la dirección
opuesta del transmisor (3C).
Determine dónde empieza a pitar el collar receptor. Si el collar receptor pita antes o después de la zona de límites
deseada, vuelva al transmisor y ajuste el selector de control de límites. Repita este proceso hasta que el collar
receptor pite en el lugar deseado. Registre los ajustes para futuras referencias en la siguiente tabla.
Nota: Si no puede oír el pitido, consulte la sección “Instrucciones de luz de prueba”.
3B
3C
3D
Zona del
perro
Zona de
límites
Gráfica de alcance
Paso
4
del transmisor
Posición
del
selector
de control
de límites
1
2
3
4
5
6
7
8
Conmutador
Conmutador
de límites
LOW
1,5-3 m 1,5-3 m
1,5-3 m 1,5-3 m
4,5-6 m 7,5-10,5 m
6-7,5 m 13-17 m
7,5-9 m 17-20 m
10,5-12 m 23-26 m
12-13,5 m 26-27,5 m
12-13,5 m 26-27,5 m
de límites
HIGH
Registre sus ajustes
Ajuste del
conmutador
de límites final
(HIGH o LOW)
Casa
Camping
Vacaciones
Otros
Posición de
selector de
control de
límites final
(1-8)
Nivel de
corrección
estática del
receptor
(1-6)
Nota: Estas distancias son aproximadas.
Coloque las banderas de límites
Las banderas de límites son recordatorios visuales para su perro
de dónde está la zona de límites. El collar receptor se activa a
una distancia de hasta 60 ó 90 cm de las banderas de límites.
1. Sostenga el collar receptor a la altura del cuello del perro
con el lado del logo dirigido hacia la dirección opuesta del
transmisor.
2. Camine hacia la zona de límites hasta que el collar receptor
pite (4A).
3. Coloque una bandera de límites en el suelo (4B).
4. Vuelva hacia la zona del perro hasta que el pitido se pare.
5. Repita este proceso alrededor de la zona hasta marcarla con
banderas de límites cada 3 metros.
Las banderas pueden estar en diferentes partes de la zona de límites y pueden no estar en línea. La zona de límites
es de 60 a 90 cm de ancho.
Nota: Si no puede oír el pitido, consulte la sección “Instrucciones de luz de prueba”.
4A
4B
E
P
T
S
E
F
A
S
S
R
H
E
A
N
P
W
P
O
Y
www.guardianpet.net 35
Page 36

Paso
5
Ajuste del collar receptor
Importante: El ajuste y la colocación adecuados del collar receptor son importantes para un
adiestramiento efectivo. Los puntos de contacto deben tocar directamente la piel del perro
debajo del cuello.
Para asegurar un ajuste correcto, siga los siguientes pasos:
1. Asegúrese de que la pila no esté instalada en el collar receptor.
2. Empiece con el perro cómodamente de pie (5A).
3. Para que sea más fácil oír el pitido de advertencia, coloque el collar receptor en el perro con
el lado del logo del receptor hacia arriba.
4. Centre los puntos de contacto debajo del cuello del perro, tocando
la piel. Si el perro tiene un pelo largo o espeso, utilice los puntos
de contacto largos que se incluye para el contacto a través del pelo.
Nota: A veces será necesario cortar un poco el pelo alrededor de los puntos
de contacto para asegurar que el contacto sea consistente.
5. Compruebe el ajuste del collar receptor introduciendo un dedo
entre el final del punto de contacto y el cuello del perro. El ajuste
debe ser ceñido pero sin que le apriete demasiado (5B).
6. Deje que el perro lleve el collar durante unos minutos, luego vuelva
a comprobar el ajuste. Cuando el perro esté más cómodo con el
collar receptor, compruebe otra vez el ajuste.
7. Recorte el collar de la siguiente forma (5C):
a. Marque la longitud deseada del collar receptor con un bolígrafo. Deje
un margen para el crecimiento si su perro es aún joven o si le crece
un pelo muy espeso.
b. Quite el collar receptor del perro y corte la parte sobrante.
c. Antes de volver a ponérselo, selle el extremo del collar cortado
aplicando una llama a lo largo del extremo deshilachado.
Importante: Para una comodidad, seguridad y efi cacia del producto, asegúrese de lo siguiente:
• Durante las 2 primeras semanas, no utilice el dispositivo de adiestramiento en el perro sin una
supervisión directa.
• Para evitar una presión excesiva, compruebe el ajuste introduciendo un dedo entre el punto de
contacto y la piel del perro.
• Examine con cuidado al perro diariamente para comprobar que no haya señales de erupciones
cutáneas o ulceraciones.
• Si observa una erupción cutánea o ulceración, deje de ponerle el collar receptor durante unos días.
• Si esta situación persiste durante más de 48 horas, consulte a su veterinario.
• Lave el cuello del perro y los puntos de contacto semanalmente con una toalla y jabón suave, luego
enjuáguelo totalmente.
Si no se siguen los anteriores pasos, puede producirse lo que se conoce como necrosis por presión, que es
una desvitalización de la piel debida a un excesivo y prolongado contacto contra los puntos de contacto.
Para volver a pasar el collar
Hebilla deslizable
Pliegues
36 1-800-457-3911
La hebilla evita que el collar se afloje alrededor del cuello del
perro.
Los pliegues deben estar hacia arriba; el collar resbalará si no se
ensarta correctamente.
Page 37

Manual de adiestramiento
Sea paciente con su perro
Importante: El entrenamiento adecuado de su perro es fundamental para el éxito del Guardian Wireless
Pet Containment SystemMC. Lea esta sección completamente antes de empezar a adiestrar a su perro.
Recuerde que el Guardian Wireless Pet Containment SystemMC no es una
barrera sólida.
• Disfrute con el perro durante el proceso de adiestramiento. El aprendizaje tiene
que ser divertido, justo, firme y coherente.
• Entrene de 10 a 15 minutos cada vez. No intente hacer demasiadas cosas ni
hacerlas demasiado deprisa. Es mejor hacer sesiones cortas más frecuentes que
sesiones largas menos frecuentes.
• Sugerimos hacer un mínimo de 14 días de adiestramiento. Dependiendo del perro
y de cómo aprenda, el adiestramiento puede tardar más o menos tiempo.
• Si el perro muestra señales de estrés, vaya más despacio en el proceso de adiestramiento, añada días de
aprendizaje o aumente la cantidad de tiempo de juego con el perro en su zona. Algunas de las señales de estrés
son las siguientes:
- El perro tira de la correa hacia la casa
- Orejas retraídas
- Cola hacia abajo
- Cuerpo bajado
- Nerviosismo o movimientos frenéticos o rigidez en el cuerpo
• El perro debe estar totalmente cómodo cerca de las banderas de límites antes del final de cada sesión de
adiestramiento. Dedique como mínimo 5 minutos de “juego” al final de cada sesión dentro de los 3 metros de
las banderas de límites.
• Termine cada sesión de adiestramiento con un tono positivo con mucho juego y felicitación.
• Quite el collar receptor después de cada sesión de adiestramiento.
• Asegúrese de contener al perro de otra forma durante el período de adiestramiento (por ejemplo en una jaula,
amarrado, en la correa, etc.).
• Durante el adiestramiento, si necesita sacar a su perro fuera de la zona, quítele el collar receptor y llévelo en
brazos o póngale en el coche para pasar por la zona.
• Aunque crea que su perro responde bien al aprendizaje, complete todo el proceso de adiestramiento. ¡Es muy
importante el refuerzo!
SMTWT F S
12345
8 9 10 11 12
15 16 17 18 19
22 23 24 26
29 30 31
25
45
67
13 14
20 21
0
27 28
15
min.
30
__________________________________________________
Fase
1
www.guardianpet.net 37
Día 1 – Aprendizaje de las banderas de límites
Realice tres sesiones de adiestramiento el primer día, cada una que dure de 10 a 15 minutos.
Objetivo:
El perro debe aprender que las banderas de límites y el pitido de advertencia del collar receptor definen su nueva zona.
Organización:
• Programe el nivel de corrección estática en el collar receptor según el tamaño y el carácter del perro.
• Coloque un segundo collar no metálico en el cuello del perro ENCIMA del collar receptor y ate una correa. Nota:
Asegúrese de que el segundo collar no presiona a los puntos de contacto.
• Tenga a mano pequeños trozos de obsequios que su perro encuentre apetecibles (las salchichas o los trozos de
carne van bien).
• Tenga a mano el juguete preferido del perro.
Page 38

Pasos:
1. Empiece andando con el perro en una correa por la zona. Felicite y hable tranquilamente al perro, y ocasionalmente
ofrézcale obsequios.
2. Vaya hacia las banderas de límites (1A). Manténgase de buen humor y tire obsequios al suelo.
3. Con un control total del perro en la correa, tire un obsequio en el extremo exterior de las banderas. Cuando el
perro entre en la zona de límites para recibir el obsequio, el collar receptor empezará a pitar
permanezca en la zona de límites, recibirá una corrección estática suave. Déjele estar en la zona durante 2 segundos,
luego ayúdele suavemente a volver a su zona (1C). Inmediatamente, prémiele y ofrézcale un obsequio cuando entre
en su zona, aunque le haya ayudado usted con la correa. Mueva una bandera para que el perro pueda entender que la
molestia de la corrección estática se produce alrededor de las banderas.
4. Repita este proceso con varias banderas de límites diferentes. El perro deberá empezar a resistir el ir tras el obsequio en
la zona de límites. Si el perro sigue entrando en la zona de límites, compruebe que el collar esté bien ajustado y déjele 23 segundos en la zona antes de llevarlo de vuelta a su área.
Nota: No deje nunca que el perro coma el obsequio en la zona de límites.
(1B)
. Cuando el perro
Fase
2
Fase
__________________________________________________
Día 2 a 4 - Continuación del aprendizaje de las
banderas de límites
Realice tres sesiones por día, cada una que dure de 10 a 15 minutos.
Objetivo:
Adiestrar al perro a permanecer en su zona y respetar los límites mientras usted está fuera de la misma.
Organización:
• Programe el nivel de corrección estática en el collar receptor según el tamaño y el carácter del perro.
• Coloque un segundo collar no metálico en el cuello del perro ENCIMA del collar receptor y ate una correa.
Nota: Asegúrese de que el segundo collar no presiona a los puntos de contacto.
• Tenga a mano pequeños trozos de obsequios (las salchichas o los trozos de carne van bien).
• Tenga a mano el juguete preferido del perro.
Pasos:
1. Repita los pasos 1-4 en la Fase Uno.
2. Deje ir la correa, y deje al perro en su zona.
3. Vaya fuera de los límites y ondee las banderas hacia el perro.
4. Siga andando alrededor de los límites haciendo esto, lanzando obsequios al perro en su zona y premiándolo.
5. Si el perro no responde a la corrección estática, aumente el nivel de corrección estática en 1.
__________________________________________________
Días 5 a 8 – Fase de distracción
Realice tres sesiones de adiestramiento por día, cada una que dure de 10 a 15 minutos.
Objetivo:
Adiestrar al perro a permanecer dentro de la zona con distracciones fuera de la zona.
3
38 1-800-457-3911
Page 39

Organización:
• Programe el nivel de corrección estática en el collar receptor según el tamaño y el carácter del perro.
• Coloque un segundo collar no metálico en el cuello del perro ENCIMA del collar receptor y ate una correa. Nota:
Asegúrese de que el segundo collar no presiona a los puntos de contacto.
• Tenga a mano pequeños trozos de obsequios (las salchichas o los trozos de carne van bien).
• Tenga a mano el juguete preferido del perro.
• Cree distracciones para tentar al perro a entrar en la zona de límites, como por ejemplo:
- Hacer que un miembro de la familia cruce desde dentro de la zona hacia fuera.
- Lanzar una pelota fuera de la zona del perro.
- Hacer que un vecino vaya con su perro por fuera del área.
Pasos:
1. Controle totalmente al perro con la correa y preséntele la distracción.
2. Si el perro no se mueve hacia la distracción, prémiele y ofrézcale un obsequio.
3. Si reacciona a la distracción, permítale ir hacia la zona de límites.
4. Ayude al perro a volver a su zona si no vuelve por sí solo después de 3 segundos.
5. Obsequie y premie al perro en cualquier momento que vuelva a su zona con o sin ayuda.
6. Repita este proceso con otras distracciones. Utilice a otros miembros de la familia durante este proceso.
7. Si el perro no responde a la corrección estática, aumente el nivel de corrección en 1.
__________________________________________________
Fase
4
Días 9 a 14 - Supervisión sin correa
Las sesiones de adiestramiento deben durar al principio de 10 a 15 minutos, y
luego aumentar gradualmente a más de una hora.
El perro estará listo para ello sólo cuando evite claramente toda la zona de
banderas, independientemente de cualquier distracción o tentación. Durante esta
fase, no deje al perro desatendido.
Objetivo:
Dejar que el perro pueda correr libremente por la zona sin la correa.
Organización:
Ajuste el collar receptor a la configuración permanente adecuada para su perro
según su tamaño y temperamento.
Pasos:
1. Entre en la zona con el perro llevando el collar receptor.
2. Camine por el terreno y juegue con el perro, estando siempre dentro de la zona.
3. Ocúpese en alguna otra tarea en el terreno mientras presta atención al perro.
4. Si el perro se escapa, quítele el collar receptor o desconecte el sistema en el transmisor de valla y conduzca al
perro de vuelta hacia la zona.
__________________________________________________
Llevar al perro fuera de su zona
Importante: Quítele el collar receptor y déjelo en la zona del perro.
Cuando el perro aprenda la zona de límites, no querrá cruzarla ni para pasear o ir en
coche.
Opción 1: Sustituya el collar receptor por un collar normal. Meta al perro dentro de un
coche que esté dentro de la zona y condúzcalo fuera de la misma.
Opción 2: Sustituya el collar receptor por un collar y correa normales. Saque al perro
fuera de su zona a la vez que le da una orden como “Vale” en un lugar específico de la
zona de límites (el final del camino de acceso, acera, etc.). Salga siempre de la zona con
una correa por el mismo lugar y el perro asociará salir de la zona sólo con correa, sólo
por este lugar, y sólo con una persona. Inicialmente puede que necesite convencer al
perro de salir de la zona con un obsequio de comida y mucho encomio.
Nota: Quizás tenga que sacar al perro en brazos de su zona.
www.guardianpet.net 39
Page 40

Inalámbrico – para - llevar
El Guardian Wireless Pet Containment SystemMC es totalmente portátil. Siga los procedimientos de instalación (pasos de 1
a 4) cuando quiera contener al perro. Reestablezca la zona del perro y márquela con banderas de límites para que el animal
sepa cuál es su zona de límites. Nota: Si se instala en un vehículo o construcción metálica, el espacio máximo de la zona del animal
doméstico puede reducirse. Asegúrese de extraer la pila del collar receptor antes de apagar el transmisor. Si quiere conectar el
transmisor a un coche u otra fuente de CC, utilice un invertidor de 50 vatios o superior.
_____________________________________________________
Accesorios
Para comprar accesorios adicionales para Guardian Wireless Pet Containment System™, póngase en contacto con el Centro
de Asistencia al Cliente al 1-800-457-3911 o visite nuestra página Web en www.guardianpet.net para localizar la tienda más
cercana.
Componente Número de pieza
Pila – paquete de dos RFA-67D-11
Collar receptor adicional PIF-275
Adaptador de corriente 300-475
Collar de sustitución RFA-48
Banderas adicionales RFA-2
Transmisor inalámbrico adicional IF-100
Paquete de accesorios RFA-135
Preguntas más frecuentes
¿El collar receptor es impermeable?
¿Cubre el Guardian Wireless Pet
Containment SystemMC un círculo más
grande de 55 metros de diámetro?
¿Un terreno inclinado afecta a la zona
del animal doméstico?
¿Puedo utilizar más de un collar
receptor con el sistema inalámbrico?
¿El sistema inalámbrico alejará a otros
animales domésticos de mi terreno?
¿Existe algún transmisor a distancia
portátil que funcione con el collar
receptor del sistema inalámbrico?
¿Hay un collar receptor más pequeño
u otro collar receptor compatible
que pueda usar con el transmisor
inalámbrico?
¿Si tengo alguna pregunta acerca de
mi sistema inalámbrico o necesito
cambiar algunas piezas, dónde puedo
obtener respuestas o servicio?
• Sí. Cuando cambie la pila, asegúrese de que el área de la pila esté limpia.
• Puede utilizarse otro transmisor inalámbrico con límites superpuestos de
como mínimo 1,5 a 3 metros para conseguir una zona más grande.
• La señal del transmisor se extiende 27 metros en todas direcciones. Un
terreno inclinado puede hacer que una zona parezca más o menos de lo
supuesto. Se puede recolocar el transmisor para maximizar la zona del
animal doméstico.
• Sí. El número de animales que se pueden contener con el sistema
inalámbrico es ilimitado. Debe comprarse un collar receptor adicional
para cada animal. Póngase en contacto con el Centro de Asistencia al
Cliente al 1-800-457-3911 o visite nuestra página Web en
www.guardianpet.net para localizar la tienda más cercana.
• No. El sistema inalámbrico sólo es efectivo para mascotas que lleven el
collar receptor.
• No. Hay que comprar un sistema de adiestramiento a distancia aparte.
Póngase en contacto con el Centro de Asistencia al Cliente al
1-800-457-3911 o visite nuestra página Web en www.guardianpet.net para
localizar la tienda más cercana.
• No. Póngase en contacto con el Centro de Asistencia al Cliente al
1-800-457-3911 o visite nuestra página Web en www.guardianpet.net para
obtener más ideas o soluciones.
• Llame al Centro de Asistencia al Cliente al 1-800-457-3911 o visite
nuestra página Web www.guardianpet.net.
40 1-800-457-3911
Page 41

¿Puedo utilizar el sistema inalámbrico
en un animal doméstico agresivo?
¿Puedo utilizar el sistema inalámbrico
en un gato?
¿Qué pasa si se corta la corriente?
¿Qué pasa si pierdo la tapa de plástico
transparente para el botón de nivel de
corrección?
Si el animal abandona su zona,
¿durante cuánto tiempo será
corregido?
¿Con qué frecuencia tengo que
cambiar la pila del collar receptor?
¿Puedo colocar el receptor en otro
collar?
¿Tengo que realizar servicio de
mantenimiento en mi sistema
inalámbrico?
¿Cómo puedo saber que la pila del
collar receptor funciona?
¿Afectan los edificios o los obstáculos
del paisaje (árboles, arbustos, etc.) al
rendimiento del sistema inalámbrico?
¿Qué debo hacer si el cuello del animal
se irrita?
¿Puedo poner una correa en el collar
receptor?
¿Por qué tiene mi collar receptor un
modo de sólo pitido?
• No es recomendable utilizar ningún dispositivo de adiestramiento
electrónico en animales domésticos agresivos. Si no está seguro de si su
perro es agresivo, consulte al veterinario o a un entrenador profesional.
• El sistema inalámbrico puede utilizarse siempre y cuando el gato pueda
llevar cómodamente el collar receptor.
• El sistema inalámbrico está diseñado para reconocer los cortes o bajadas
de corriente sin activar el collar receptor. Sin embargo, si el animal
doméstico está cerca de la zona de límites durante el corte de corriente,
puede que reciba una corrección estática. Para reducir esta posibilidad,
puede utilizarse un dispositivo de batería de reserva para el transmisor si
su zona experimenta frecuentes cortes de corriente.
• La tapa de plástico transparente impide que el nivel de corrección
estática se cambie accidentalmente y, además, ayuda a mantener la
impermeabilidad del receptor. Llame al Centro de Asistencia al Cliente al
1-800-457-3911 para obtener otra nueva.
• El animal recibirá corrección estática mientras esté fuera de su zona
durante 30 segundos. El collar receptor tiene una pausa de seguridad
para parar la corrección y el pitido después de 30 segundos hasta que el
animal vuelva a su zona.
• La vida de la pila depende de cuántas veces el perro pruebe los límites.
La luz indicadora del receptor actúa como un indicador de pila baja,
parpadeando cada 5 segundos cuando sea necesario cambiarla.
• Sí, cualquier collar no metálico. Haga 2 agujeros en el collar para
conectar el receptor. Utilice el collar en el kit como plantilla para localizar
los agujeros en el nuevo collar.
• Compruebe diariamente que no haya irritación en el cuello del perro por
los puntos de contacto.
• Compruebe semanalmente el ajuste del collar receptor.
• Compruebe semanalmente los puntos de contacto en el collar receptor
para asegurar que están limpios y bien ajustados
• La luz indicadora del receptor actúa como un indicador de pila baja,
parpadeando cada 4 ó 5 segundos cuando es necesario.
• Quite el collar receptor del perro y camine hacia la zona de límites. El
collar receptor deberá emitir un pitido. Si no lo hace, cambie la pila.
• No. Sin embargo, si se coloca el transmisor dentro de una construcción
metálica o de un vehículo puede reducirse el alcance máximo del sistema
inalámbrico.
• Esto se debe a que los puntos de contacto irritan la piel. Deje de utilizar
el collar receptor durante unos días. Si esta situación persiste durante más
de 48 horas, consulte a su veterinario. Cuando la piel vuelva a su estado
normal, cambie el collar receptor y vaya controlando muy de cerca el
estado de la piel.
• No. Esto puede hacer que los puntos de contacto estén demasiado
apretados contra el cuello del perro. Ate una correa a un collar separado y
no metálico colocado encima del collar receptor.
• El modo de sólo pitido puede usarse para adiestrar al perro a sus límites o
para perros bien adiestrados que ya no requieren corrección estática.
www.guardianpet.net 41
Page 42

Solución de problemas
El collar receptor no emite pitidos
cuando se instala la zona de límites.
El collar receptor no emite pitidos ni
produce corrección estática.
El collar receptor emite pitidos en
todas partes.
El collar receptor emite pitidos dentro
de la casa.
La zona de límites parece fluctuar.
El collar receptor se activa a mitad del
terreno.
El collar receptor emite pitidos pero
el perro no responde a la corrección
estática.
Mi perro reacciona mucho a la
corrección estática y se asusta.
La luz de alimentación no está
encendida.
Estaba instalando la zona del perro y,
cuando bajé el selector de control de
límites, el collar receptor dejó de pitar
y corregir.
• Puede ser difícil oír el pitido en un entorno ruidoso
• Instale la luz de prueba tal como se ha explicado en la sección
“Instrucciones de luz de prueba”, y utilícela para determinar el
emplazamiento de la zona de límites.
• Compruebe que el transmisor está instalado de acuerdo con las normas e
instale una nueva pila a menos de 1,5 m del transmisor.
• Compruebe que el transmisor esté enchufado a una salida, que esté
encendido, que la luz de alimentación esté encendida, y que los controles
del transmisor estén establecidos en los ajustes deseados.
• Compruebe la pila del receptor para asegurar que esté adecuadamente
instalada.
• Cuando cambie la pila, hágalo a menos de 1,5 m del transmisor.
• Compruebe que el transmisor esté enchufado a una salida, que esté
encendido, que la luz de alimentación esté encendida, y que los controles
del transmisor estén establecidos en los ajustes deseados.
• Lleve el collar receptor a menos de 1,5 m del transmisor para su reajuste.
• Asegúrese de que el transmisor esté encendido y ajustado de acuerdo con
las normas.
• Asegúrese de que toda la casa esté dentro de la zona del perro. Puede que
haya que trasladar el transmisor y ajustar la zona del perro para incluir toda
la casa.
• Si vuelve a resituar el transmisor, quite el collar receptor del perro antes de
apagar el transmisor.
• Esto es normal para el campo electromagnético del sistema inalámbrico. El
campo puede estar afectado por “ruido electrónico” del entorno que puede
hacerlo fluctuar hasta un 5%.
• Cuando el collar receptor se activa se ve influido por la velocidad y la
orientación del collar receptor cuando el perro entra en la zona de límites.
• El collar receptor se activa cuando pierde la señal del transmisor. Esto a
veces ocurre cuando hay un objeto metálico grande entre el collar receptor
y el transmisor, cuando la orientación del collar receptor cambia cerca de la
zona de límites, o cuando el “ruido electrónico” del entorno interfiere con
la señal. Si sigue produciéndose este fenómeno, considere la posibilidad de
resituar el transmisor y reajustar la zona del perro.
• Asegúrese de que el nivel de corrección estática esté en 2 o superior.
• Compruebe el collar receptor con la luz de prueba.
• Si la luz de prueba parpadea, compruebe el ajuste del collar receptor.
• Recorte el pelo del perro allí donde los puntos de contacto tocan con el
cuello y/o cambie a puntos de contacto más largos.
• Aumente el nivel de corrección estática.
• Repita los pasos del adiestramiento para reforzarlo.
• Disminuya el nivel de corrección estática.
• Asegúrese de que está en control de la situación cuando el perro recibe
sus primeras correcciones estáticas (llévelo en una correa unida a un collar
separado, no metálico), condúzcalo hacia su zona y felicítelo. Si el perro
sigue estando asustado, suspenda el adiestramiento y empiece otra vez el
próximo día. Asegúrese de terminar cada sesión de adiestramiento con un
tono positivo con mucho juego y felicitación.
• Compruebe que el interruptor de encendido/apagado del transmisor esté
encendido y que el adaptador de corriente esté enchufado al transmisor y a
una salida.
• Puede que haya bajado el selector de control de límites demasiado deprisa,
lo cual ha hecho que el collar receptor haya pasado al modo de fallo de
alimentación. Esto es un dispositivo de seguridad diseñado para proteger al
perro cuando se corta la corriente del transmisor. Con el collar receptor a
menos de 1,5 m del transmisor, ponga el selector de control de límites a “8”
y reajuste la zona de límites, bajando lentamente el selector.
42 1-800-457-3911
Page 43

Instrucciones de luz de prueba
1. Si el collar receptor tiene niveles de corrección ajustables, ponga el nivel de corrección en 2 o
superior.
2. Sujete los electrodos en los puntos de contacto.
3. Camine hacia el cable de antena sujetando el collar receptor al nivel del cuello del animal
doméstico hasta que la luz de prueba parpadee.
Guarde la luz de prueba para otras comprobaciones.
Nota: Si la luz de pr ueba no parpadea, instale una nueva pila y vuelva a hacer la comprobación. Si la luz
de prueba sigue sin parpadear, contacte con el Centro de Asistencia al Cliente al 1-800-457-3911.
_____________________________________________________
Condiciones de uso y limitación de responsabilidad
1. Condiciones de uso
Este producto se ofrece bajo condición de su aceptación sin modificación de los términos, condiciones y avisos aquí
contenidos. El uso de este producto implica la aceptación de estos términos, condiciones y avisos.
2. Uso adecuado
Este producto está diseñado para su uso con animales domésticos a los que se quiera adiestrar. El carácter específico de
su animal doméstico puede impedir que este producto funcione. No recomendamos utilizar este producto si el animal
doméstico pesa menos de 3,6 kg o si es agresivo. Si no está seguro de que este producto sea adecuado para su animal
doméstico, consulte al veterinario o a un entrenador profesional.
El uso adecuado incluye examinar todo el Manual proporcionado con el producto y cualquier advertencia que se haga.
3. Uso ilegal o prohibido
Este producto está diseñado para su uso exclusivo con animales domésticos. Este dispositivo de adiestramiento de
animales domésticos no está pensado para dañar, lastimar ni provocar. El uso de este producto para otros fines para los
que no esté destinado puede representar una violación de las leyes estatales, autonómicas o locales.
4. Limitación de responsabilidad
Radio Systems Corporation no será en ningún caso responsable por ningún perjuicio directo, indirecto, punitivo,
incidental, especial o consecuente, ni por ningún otro perjuicio, sea cual sea, que se produzca como consecuencia de o
relacionado con el uso o mal uso de este producto. El comprador asume todos los riesgos y toda la responsabilidad del
uso de este producto.
5. Modificación de los términos y condiciones
Radio Systems Corporation se reserva el derecho de cambiar los términos, condiciones y avisos bajo los que se ofrece
este producto.
_____________________________________________________
Precaución
El Guardian Wireless Pet Containment SystemMC NO es una barrera sólida. El sistema está pensado para actuar como un
impedimento que recuerde a los animales domésticos, mediante la corrección estática, a que permanezcan dentro de los
límites establecidos. Es importante reforzar de forma regular el adiestramiento del animal doméstico. Dado que el nivel
de tolerancia de la corrección estática varía de un animal a otro, Radio Systems Corporation NO PUEDE garantizar que,
en cualquier caso, el sistema mantendrá a un animal doméstico dentro de los límites establecidos. ¡No todos los animales
domésticos pueden ser adiestrados a evitar cruzar los límites! Por tanto, si tiene motivos para pensar que su animal
doméstico puede ser un peligro para los demás o puede dañarse a sí mismo si no se le impide cruzar los límites, NO debe
confiar solamente en el Guardian Wireless Pet Containment System
se hace responsable de ningún daño a la propiedad, pérdida económica, o por cualquier otro daño resultante de que un
animal cruce los límites.
www.guardianpet.net 43
MC
para confinarlo. Radio Systems Corporation NO
Page 44

FCC
General
In 1991, the Institute of Electrical and Electronics Engineers (IEEE), and in
1992, the American National Standards Institute (ANSI) update the 1982
ANSI Standard for safety level with respect to human exposure to RF energy.
Over 120 scientists, engineers and physicists from universities, government
health agencies and industry developed this updated standard after reviewing
the available body of research. In March 1993, the Federal Communications
Commission (FCC) proposed the adoption of this updated standard. The
design of your pet containment system meets all the recommended guidelines
established by IEEE, ANSI and the FCC.
Electro Magnetic Field Warning Statement
The Wireless System Transmitter emits an electro magnetic field (EMF)
similar to many household appliances. The Transmitter emits EMF at 3 feet
equivalent to a television at 1 foot. While there are no laws or conclusive
studies on EMF, Radio Systems Corporation recommends taking the
following precaution: We advise consumers to place the Transmitter away
from places where they would be within 3 feet of the unit for prolonged
periods, such as next to a bed. Recommended locations include closets or a
Plantilla de montaje
Gabarit de montage
Mounting Template
garage.
171 mm (6.75 Inches)
Radio Standards Specifications
(RSS)
The frequency of operation for this device is 27.145 MHz. The field strength
is 138 uV/m @ 3m. Operation is subject to the following two conditions: (1)
this device may not cause interference, and (2) this device must accept any
interference, including interference that may cause undesired operation of the
device. This unit is in compliance with the limits found in RSS-310.
Cahier des charges sur les
normes radioélectriques (RSS)
La fréquence de fonctionnement de ce dispositif est de 27,145MHz.
L’intensité du champ est de 138 uV/m à 3 mètres. Son fonctionnement est
soumis aux 2 conditions suivantes: (1) Ce produit ne risque pas de causer
d’interférences nuisibles. (2) Ce produit doit accepter toutes les interférences
reçues, y compris celles qui risquent d’entraîner un fonctionnement indésirable. Ce dispositif est conforme aux dispositions reprises dans le RSS-310.
Radio Systems Corporation
10427 Electric Avenue
Knoxville, TN 37932
1-800-457-3911
www.guardianpet.net
400-741-11
©Copyright 2006, Radio Systems Corporation
 Loading...