

Page 1
Guardian
®
Tr e k
Trek 3, Trek 3 Ultra, Trek 4, Trek 4 Ultra
SUPPLIER: THIS MANUAL MUST BE GIVEN TO THE RIDER OF THIS SCOOTER.
RIDER: BEFORE USING THIS SCOOTER READ THIS ENTIRE MANUAL AND SAVE FOR FUTURE
REFERENCE.
Indications for Use: To provide an optional means of mobility
for physically challenged people.
Guardian
®
Tr e k
Trek 3, Trek 3 Ultra, Trek 4, Trek 4 Ultra
FOURNISSEUR : CE MANUEL DOIT ÊTRE REMIS À L’USAGER DE CE SCOOTER.
L’USAGER: AVANT D'UTILISER CE SCOOTER, LISEZ ENTIÈREMENT CE MANUEL ET CONSERVEZ-LE
POUR LE CONSULTER ULTÉRIEUREMENT.
Conseils d’utilisation : Pour procurer un autre moyen de locomotion aux
personnes aux prises avec des difficultés physiques.
Guardian
®
Tr e k
Trek 3, Trek 3 Ultra, Trek 4, Trek 4 Ultra
DISTRIBUIDOR: ESTE MANUAL DEBE ENTREGARSE AL CONDUCTOR DE ESTE CICLOMOTOR.
CONDUCTOR: ANTES DE UTILIZAR ESTE CICLOMOTOR, LEA ESTE MANUAL Y GUÁRDELO POR SI
NECESITA CONSULTARLO EN EL FUTURO.
Uso para el que está destinado: Como medio alternativo de movilidad
para personas con algún tipo de limitación física.
User Instruction Manual
& Warranty
Mode d’emploi
et garantie
Garantía y Manual
de instrucciones para
el Usuario
Page 2

930490 Rev. C
2
English
I. Introduction
I. INTRODUCTION
SUNRISE LISTENS
Thank you for choosing a Guardian scooter. We want to hear your questions or comments
about this manual, the safety and reliability of your scooter, and the service you receive
from your Sunrise supplier. Please feel free to write or call us at the address and telephone
number below:
SUNRISE MEDICAL
Customer Service Department
7477 East Dry Creek Parkway
Longmont, Colorado 80503
(800) 333-4000 or (303) 218-4500
FOR ANSWERS TO YOUR QUESTIONS
Your authorized supplier knows your scooter best and can answer most of your questions
about scooter safety, use and maintenance. For future reference, fill in the following:
Supplier: ______________________________________________________________________________
Address: _______________________________________________________________________________
______________________________________________________________________________________
Telephone:_____________________________________________________________________________
Serial #: _______________________________________ Date/Purchased: ________________________
Page 3

930490 Rev. C
II. Table of Contents
3
English
II. TABLE OF CONTENTS
I. INTRODUCTION .............................................................................. 2
II. TABLE OF CONTENTS ....................................................................... 3
III. YOUR SCOOTER AND ITS PARTS ........................................................ 5
IV. NOTICE - READ BEFORE USE............................................................. 6
V. EMI (ELECTROMAGNETIC INTERFERENCE) .......................................... 7
A.What is EMI ................................................................................ 7
B.What Effect Can EMI Have ............................................................. 7
C.Sources of EMI............................................................................. 7
D.Distance From the Source.............................................................. 8
E.Immunity Level............................................................................ 8
F. Report All Suspected EMI Incidents ................................................ 8
VI. GENERAL WARNINGS ...................................................................... 9
A.Notice to Rider ............................................................................ 9
B.Notice to Attendants .................................................................... 9
C.Weight Limit ............................................................................... 9
D.EMI............................................................................................ 10
E.Safety Check-List ......................................................................... 10
F. Changes & Adjustments................................................................. 10
G.When Seated in a Parked Scooter ................................................... 10
H.Environmental Conditions.............................................................. 10
I. Terrain........................................................................................ 11
J. Street Use................................................................................... 11
K.Motor Vehicle Safety..................................................................... 11
L. Center of Balance......................................................................... 11
M.Transfers..................................................................................... 12
N.Reaching or Leaning..................................................................... 12
O.Dressing or Changing Clothes......................................................... 13
P. Obstacles .................................................................................... 13
Q.Driving in Reverse ........................................................................ 13
R.Ramps, Slopes & Sidehills.............................................................. 13
S To Reduce the Risk of Falls, Tip-over or Loss of Control ..................... 14
T. Ramps at Home & Work................................................................. 14
U.Wheelchair/Scooter Lifts ............................................................... 14
V. Curbs & Single Steps .................................................................... 15
W.Stairs ......................................................................................... 15
X.Escalators ................................................................................... 15
VII. WARNINGS: COMPONENTS & OPTIONS ............................................... 16
A.Armrests ..................................................................................... 16
B.Batteries..................................................................................... 16
C.Cushions ..................................................................................... 16
D.Fasteners .................................................................................... 16
F. Motor Locks ................................................................................ 16
G.Key On/Off Switch........................................................................ 16
H.Seating Systems........................................................................... 17
I. Upholstery Fabric ......................................................................... 17
J. Wiring........................................................................................ 17
Page 4

VIII. TIPS FOR ATTENDANTS .................................................................... 18
A.To Climb a Curb or Single Step....................................................... 18
B.To Descend a Curb or Single Step ................................................... 18
IX. SET UP, ADJUSTMENT & USE ............................................................ 19
Notes ............................................................................................ 19
Tools You Will Need ......................................................................... 19
A.Battery Case Removal ................................................................... 20
B.Armrest Installation and Width Adjustment...................................... 20
C.Tiller .......................................................................................... 20
D.Seat Removal............................................................................... 21
E.Seat Swivel ................................................................................. 21
F. Seat Height Adjustment ................................................................ 21
G.Basket Installation and Removal .................................................... 21
H.Disassembly ................................................................................ 22
X. OPERATING GUIDE.......................................................................... 23
A.Circuit Breakers............................................................................ 23
B.Tiller Control Functions................................................................. 23
C.Motor Locks ................................................................................ 24
XI. BATTERIES ..................................................................................... 25
A.Introduction................................................................................ 25
B.Battery Charger............................................................................ 25
C.Acid Burns .................................................................................. 26
D.Connecting Batteries in Battery Well............................................... 26
E.Charging Batteries........................................................................ 26
F. Disposing of Batteries................................................................... 27
XII. MAINTENANCE ............................................................................... 28
A.Notes ......................................................................................... 28
B.Cleaning ..................................................................................... 28
C.Storage Tips ................................................................................ 28
D.Battery Maintenance..................................................................... 28
E.Ordering Parts.............................................................................. 29
F. Maintenance Chart ....................................................................... 29
XIII. SUNRISE LIMITED WARRANTY .......................................................... 30
930490 Rev. C
4
English
II. Table of Contents
Page 5
930490 Rev. C
III. YOUR SCOOTER AND ITS PARTS
III. Your Scooter and Its Parts
5
English
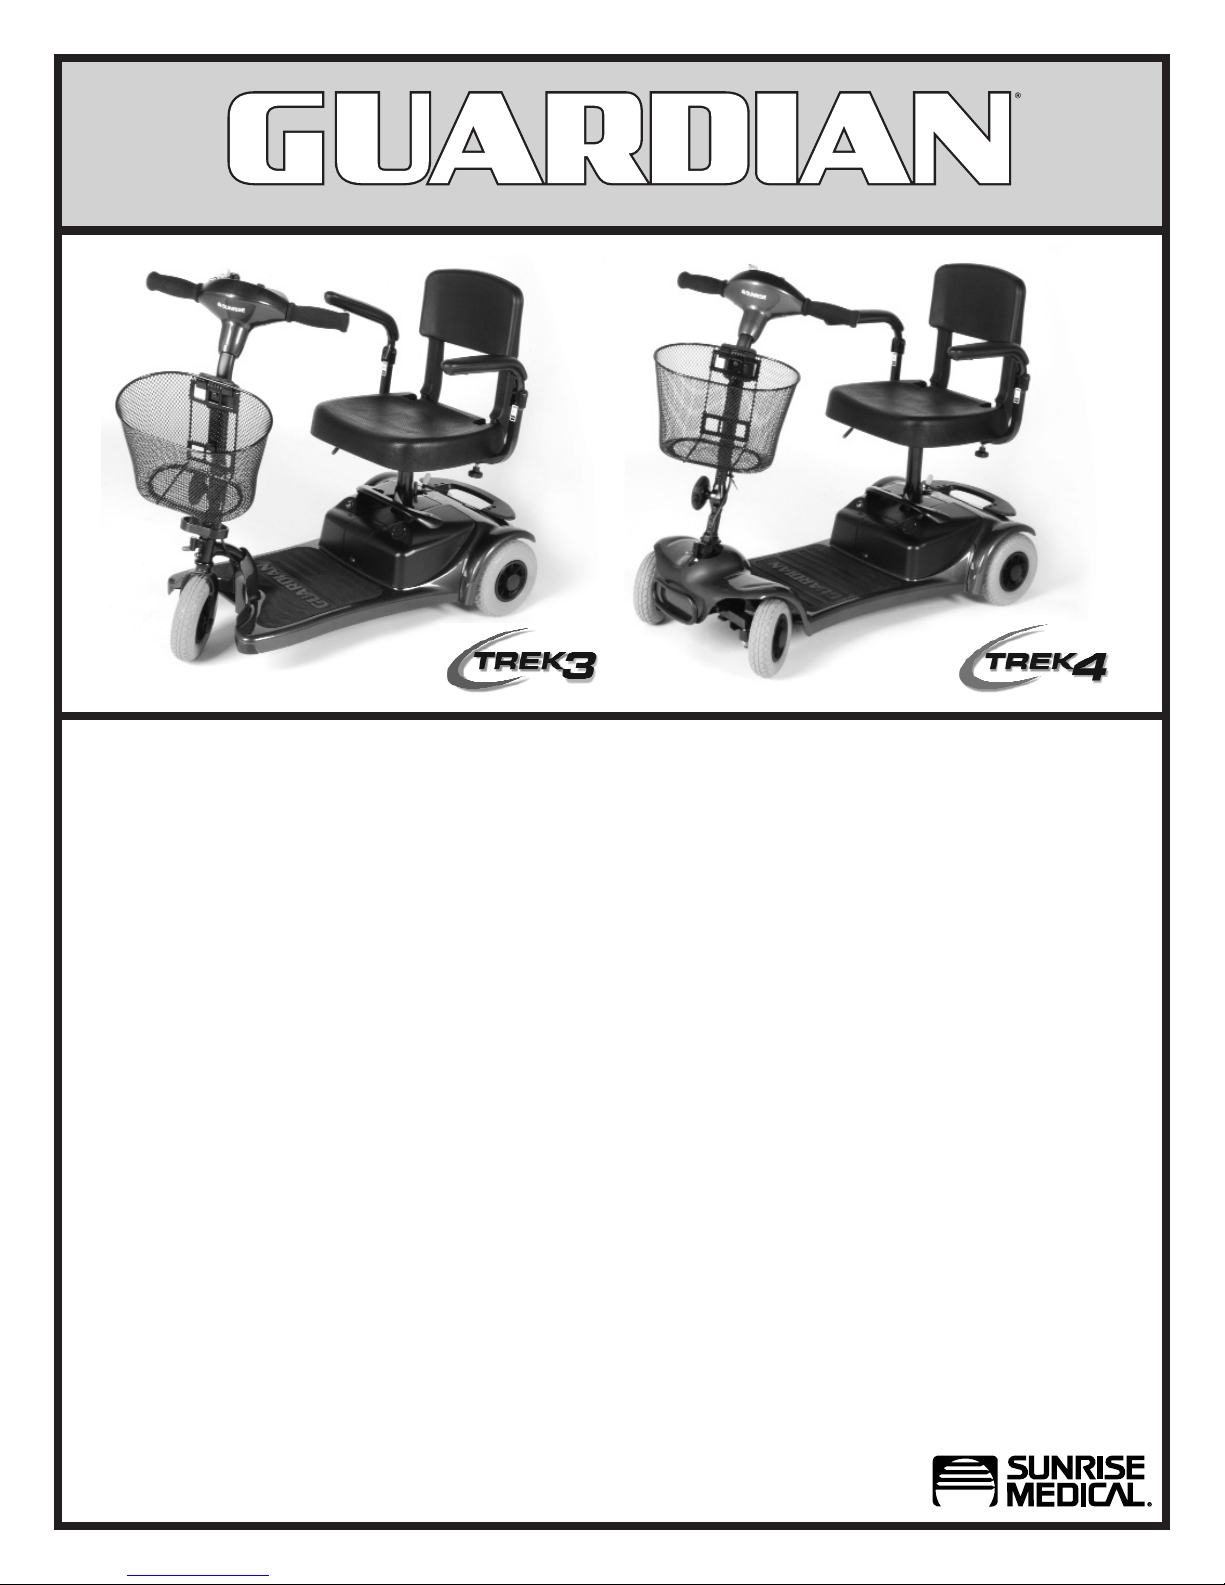
1. Basket
2. Tiller Adjustment Knob
3. Tiller Lock
4. Handle
5. Tire
6. Circuit Breaker
7. Battery Charger Port
8. Battery Case
9. Width-Adjustable, Flip-Back Armrest
10. Seat
11. Seat Height and Swivel
Adjustment Lever
12. Seat Post
13. Armrest Width Adjustment Knob
14. Motor Lock Lever
15. Rear Wheel Assembly Release
Lever
16. Rear Wheel Assembly
17. Tiller/Control Panel
1
3
6
11
7
9
4
12
8
5
2
Trek 4
Weight
Trek 3– 47.3 lbs (base)
14.2 lbs (seat)
22.6 lbs (battery)
Trek 3 Ultra– 47.3 lbs (base),
18.8 lbs (seat)
22.6 lbs (battery)
Trek 4– 56.3 lbs (base),
14.2 lbs (seat)
22.6 lbs (battery)
Trek 4 Ultra– 56.3 lbs (base),
18.8 lbs (seat)
22.6 lbs (battery)
Drive Wheels
7" Mag: Std, airless insert
Batteries
2 X 12 AH battery pack
Battery Charger
off board 1.5 AMP
Seats, Upholstery and Style
Trek 3/4 - standard
Trek 3/4 Ultra - Fish-on comfort
Material: vinyl
Color: black
Width: Trek 3/4 - 15, 17"
Depth: Trek 3/4 - 15, 17"
Armrests
Flip back 10" arm pad
All features may not be available with
some scooter setups or in conjunction with
another scooter feature. Please consult
your supplier for more information. Your
authorized supplier can also provide you
with more information on accessories.
GUARDIAN TREK
1
3
6
11
12
13
13
14
15
16
16
14
15
7
5
9
17
17
8
10
10
2
Trek 3
Page 6

IV. NOTICE– READ BEFORE USE
A. CHOOSE THE RIGHT SCOOTER & SAFETY OPTIONS
Sunrise provides a choice of many power mobility devices to meet the needs of the rider.
However, final selection of a scooter rests solely with you and your health care professional. Choosing the best scooter for you depends on such things as:
1. Your size, disability, strength, balance and coordination.
2. Your intended use, and your level of activity.
3. The types of hazards you must overcome in daily use (in areas where you are likely to
use your scooter).
4. The need for options for your safety and comfort (such as positioning belts or special
seat systems).
B. ADJUST SCOOTER TO YOUR ABILITY
You need to work with your doctor, nurse or therapist, and your supplier, to fit this scooter
and adjust the controller settings for your level of function and ability.
C. REVIEW THIS MANUAL OFTEN
Before using this scooter you, and each person who may assist you, should read this entire
Manual and make sure to follow all instructions. Review the warnings often, until they are
second nature to you.
D. WARNINGS
The word “WARNING” refers to a hazard or unsafe practice that may cause severe injury or
death to you or to other persons. The “Warnings” are in four main sections, as follows:
1. V — EMI
Here you will learn about electromagnetic interference and how it can affect your
scooter.
2. VI — GENERAL WARNINGS
Here you will find a safety checklist and a summary of risks you need to be aware of
before you ride this scooter.
3. VII — WARNINGS — COMPONENTS & OPTIONS
Here you will learn about your scooter. Consult your supplier and your health care
professional to help you choose the best set-up and options for your safety.
4. XI — BATTERIES
Here you will learn about battery and charger safety, and how to avoid injury.
NOTE– Where they apply, you will also find “Warnings” in other sections of this Manual.
930490 Rev. C
6
English
IV. Notice– Read Before Use
Page 7

930490 Rev. C
V. EMI (ELECTROMAGNETIC INTERFERENCE)
Heed all warnings to reduce the risk of unintended brake release or scooter movement:
1. Beware of the danger from hand-held transceivers. Never turn on or use a
hand-held transceiver while power to your scooter is on. Use extra care
if you believe that such a device may be in use near your scooter.
2. Be aware of nearby radio or TV stations, and avoid coming close to them.
3. If unintended movement occurs, turn your scooter off as soon as it is safe to
do so.
A. WHAT IS EMI?
1. EMI means: electromagnetic (EM) interference (I). EMI comes from radio wave sources
such as radio transmitters and transceivers. (A “transceiver” is a device that both
sends and receives radio wave signals).
2. There are a number of sources of intense EMI in your daily environment.
Some of these are obvious and easy to avoid. Others are not, and you may not be
able to avoid them.
3. Powered scooters may be susceptible to electromagnetic interference (EMI) emitted
from sources such as radio stations, TV stations, amateur radio (HAM) transmitters,
two way radios, and cellular phones.
4. EMI can also be produced by conducted sources or electro-static discharge (ESD).
B. WHAT EFFECT CAN EMI HAVE?
1. EMI can cause your scooter, without warning, to:
• Release its brakes
• Move by itself
• Move in unintended directions
If any of these occurs, it could result in severe injury to you or others.
2. EMI can damage the control system of your scooter. This could create a safety hazard,
and lead to costly repairs.
C. SOURCES OF EMI
The sources of EMI fall into three broad types:
1. Hand-Held Transceivers:
The antenna is usually mounted directly on the unit. These include:
• Citizens band (CB) radios
• “Walkie-talkies”
• Security, fire and police radios
• Cellular phones
• Lap-top computers with phone or fax
• Other personal communication devices
NOTE– These devices can transmit signals while they are on, even if not in use.
2. Medium-Range Mobile Transceivers:
These include two-way radios used in police cars, fire trucks, ambulances and taxi cabs. The
antenna is usually mounted on the outside of the vehicle.
3. Long-Range Transceivers:
These include commercial radio and TV broadcast antenna towers and amateur (HAM) radios.
Note: The following are not likely to cause EMI problems: Lap-top computers (without
phone or fax), Cordless phones, TV sets or AM/FM radios, CD or tape players.
V. EMI (Electromagnetic Interference)
7
English
Page 8

D. DISTANCE FROM THE SOURCE
EM energy rapidly becomes more intense as you get closer to the source. For this
reason, EMI from hand-held devices is of special concern. (See C.1) A person
using one of these devices can bring high levels of EM energy very close to your
scooter without you knowing it.
E. IMMUNITY LEVEL
1. The level of EM energy is measured in volts per meter (V/m). Every power scooter can
resist EMI up to a certain level. This is called its “immunity level”.
2. The higher the immunity level, the less the risk of EMI. It is believed that a
20 V/m immunity level will protect the power scooter user from the more common
sources of radio waves.
Individuals with physical limitations requiring the use of a specialty control
input device known not to be immune to 20V/m, or not known, should exercise
extra care around known sources of EMI.
There is no way to know the effect on EMI if you add accessories or modify this
scooter. Any change to your scooter may increase the risk of EMI. Parts from
other suppliers have unknown EMI properties.
F. REPORT ALL SUSPECTED EMI INCIDENTS
You should promptly report any unintended movement or brake release. Be sure
to indicate whether there was a radio wave source near your scooter at the time.
Contact: Sunrise Medical Customer Service Department at (800) 333-4000.
930490 Rev. C
8
English
V. EMI (Electromagnetic Interference)
Page 9

930490 Rev. C
VI. GENERAL WARNINGS
Heed all warnings in this section. If you fail to do so a fall, tip-over or loss of
control may occur and cause severe injury to you or others.
A. NOTICE TO RIDER
1. Before using this scooter, you should be trained in its safe use by your health care
professional.
2. Every scooter is different. Take the time to learn the feel of this scooter before you
begin riding.
3. Be aware that you must develop your own methods for the safe use of this scooter
that are best suited to your level of function and ability.
4. Have someone help you practice bending, reaching and transferring until you learn
how to do them safely.
5. Never try a new maneuver on your own unless you are sure it is safe.
6. Get to know the areas where you plan to use your scooter. Look for hazards and learn
how to avoid them.
7. Do not allow additional riders on the scooter, armrests or chassis. Doing so may
result in injury or damage.
B. NOTICE TO ATTENDANTS
Make sure you heed all warnings and follow all instructions in each section of this
manual. (Be aware that warnings that apply to the rider also apply to you).
Notes:
1. You need to work with the rider and the rider’s doctor, nurse or therapist, to
develop safe methods best suited to your abilities and those of the rider.
2. To manually push the scooter you must release the motor locks.
•Make sure you have full control over the scooter when you release the motor locks.
When you do so the scooter will not have brakes.
3. Propel this scooter by the armrest supports only. If using a seat frame, propel the
scooter by the push handles on the top of the backrest posts. They provide secure
points for you to hold the rear of the scooter to prevent a fall or tip-over.
C. WEIGHT LIMIT
1. Never exceed a total weight of 250 lbs/113.6 kg for rider plus items carried.
2. Never use this scooter for weight training if the total weight (rider plus additional
weights) exceeds 250 lbs/113.6 kg.
3. Exceeding the weight limit is likely to damage the seat, frame, or fasteners and may
cause severe injury to you or others from scooter failure.
4. Exceeding the weight limit will void the warranty.
VI. General Warnings
9
English
Page 10

D. EMI
Read Section V to learn about EMI. To reduce the risk of unintended brake release
or scooter movement:
1. Never turn on or use a hand-held transceiver while power to your scooter is on.
Use extra care if you believe that such a device may be in use near your scooter.
2. Be aware of nearby radio or TV stations, and avoid coming close to them.
3. If unintended movement or brake release occurs, turn your scooter off as soon as it
is safe.
E. SAFETY CHECK-LIST
Before each use of this scooter:
1. Make sure the scooter operates smoothly. Check for noise, vibration, or a change in
ease of use. (They may indicate low tire pressure, loose fasteners, or damage to your
scooter). If you detect a problem, make sure to repair or adjust the scooter.
Deferring repair or adjustment could increase the risk for injury. Your supplier can
help you find and correct the problem.
2. Make sure batteries are charged. Green lights on charge indicator will light up (or
charge indicator will indicate a full charge) when charge is full. Yellow lights indicate
battery charge level is getting low. Red lights indicate batteries are in immediate
need of charging.
F. CHANGES & ADJUSTMENTS
Never use non-Guardian parts or make changes to your scooter unless authorized
by Sunrise. (Doing so will void the Warranty and may create a safety hazard).
1. If you modify or adjust this scooter it may increase the risk of a fall or tip-over.
2. Modifications unauthorized by Sunrise constitutes remanufacturing of the scooter.
This voids the warranty. The rider then assumes all future liability for the scooter.
G. WHEN SEATED IN A PARKED SCOOTER
1. Always turn off all power to your scooter when you are parked, even for a moment. This
will prevent:
•Accidental movement from contact with the control pod by you or others.
•Unintended brake release or movement from EMI sources. (See Section V)
2. Make sure that persons who help you (for example, store clerks) are aware of the
control pod and do not touch it. If they do, your scooter may move suddenly when
you do not expect it.
H. ENVIRONMENTAL CONDITIONS
Your scooter is not designed for use in a heavy rain storm, or in snowy or
icy conditions.
1. Contact with water or excessive moisture can cause an electrical malfunction. The
frame, motors and other scooter parts are not watertight and may rust or corrode
from the inside. To avoid a scooter failure:
• Minimize exposure of your scooter to a rain storm or very wet conditions.
• Never take your scooter into a shower, tub, pool or sauna.
• Do not use your scooter in fresh or salt water (such as at the edge of a stream,
lake, or ocean).
• Make sure shroud cover is secure.
• Make sure all electrical connections are secure.
• Dry the scooter as soon as you can if it gets wet, or if you use water to clean it.
930490 Rev. C
10
English
VI. General Warnings
Page 11

930490 Rev. C
2. Proceed slowly and use extra care if you must operate your scooter on a wet or slick
surface.
• Do so only if you are sure it is safe.
• Stop if one or both main wheels lose traction. If this occurs, you may lose control
of your scooter or fall.
• Never operate your scooter on a slope or ramp if there is snow, ice, water or oil
film present.
• When in doubt, have someone help you.
3. When not in use, keep your scooter in a clean, dry place.
I. TERRAIN
1. This scooter is designed for use on firm, even surfaces such as concrete, asphalt and
indoor flooring.
2. Do not operate your scooter in sand, loose soil or over rough terrain. Doing so may
damage wheels, bearings, axles or motors, or loosen fasteners.
J. STREET USE
In most states, power scooters are not legal for use on public roads. Be alert to
the danger of motor vehicles on roads or in parking lots.
1. At night, or when it is hard to see, use reflective tape on your scooter and clothing.
2. It may be hard for drivers to see you. Make eye contact with drivers before you proceed. When in doubt, yield until you are sure it is safe.
K. MOTOR VEHICLE SAFETY
To date, the U.S. Department of Transportation has not approved any tie down
system for transporting a scooter in a motor vehicle.
1. Never sit in this scooter while in a moving vehicle. In an accident or sudden stop you
may be thrown from the scooter.
2. Always move to an approved vehicle seat. You must be secured with proper motor
vehicle restraints.
3. Never transport this scooter in the front seat of a vehicle. It may shift and interfere
with the driver.
4. Always secure this scooter so that it cannot roll or shift.
L. CENTER OF BALANCE
The point where this scooter will tip forward, back or to the side depends on its
center of balance and stability.
The Center Of Balance Is Affected By:
1. The seat height and seat angle.
2. A change in your body position, posture or weight distribution.
3. Using this scooter on a ramp or slope.
4. The use of a back pack or other options, and the amount of added weight.
To Reduce The Risk Of A Fall Or Tip-Over:
1. Consult your supplier for information on modifications authorized by Sunrise before
you modify or adjust this scooter.
NOTE– You may need to make additional changes to correct the center of balance.
2. Use extreme care until you know the balance points of this scooter and how to avoid
a fall or tip-over.
VI. General Warnings
11
English
Page 12

M. TRANSFERS
It is dangerous to transfer on your own. It requires good balance and agility. Be
aware that there is a point during every transfer when the scooter seat is not
below you. To avoid a fall:
1. Always turn off power before you transfer to or from your scooter. If you fail to do so
you may touch the joystick/control pod and cause your scooter to move when you do
not expect it.
2. Make sure motor locks are engaged. This keeps the scooter from moving when you
transfer.
3. Work with your health care professional to learn safe methods.
• Learn how to position your body and how to support yourself during a transfer.
• Have someone help you until you are sure you can do a safe transfer on your own.
4. Move your scooter as close as you can to the seat you are transferring to.
If possible, use a transfer board.
5. Make sure armrests do not interfere.
6. Transfer as far back onto the seat surface as you can. This will reduce the risk
that you will miss the seat or fall.
N. REACHING OR LEANING
Reaching or leaning affects the center of balance of your scooter. If done improperly, a fall or tip-over is likely. When in doubt, ask for help or use a device to
extend your reach.
To Reduce the Risk of Injury and/or Damage to the Scooter:
1. Never reach or lean if you must shift your weight sideways or rise up off the seat.
2. Never reach or lean if you must move forward in your seat to do so. Always keep your
buttocks in contact with the backrest.
3. Never reach with both hands (you may not be able to catch yourself to prevent a fall
if you lose your balance).
4. Never try to pick up an object from the floor by reaching down between your knees.
5. Never put pressure on the foot platform while reaching. This may cause the scooter
to tip if you lean too far.
6. Never reach or lean over the top of the seat back. This may damage the backrest and
cause you to fall.
IF YOU MUST REACH OR LEAN, DO SO AT YOUR OWN RISK.
Remember to:
1. Move your scooter as close as you can to the object you wish to reach.
2. Turn off all power to your scooter. If you fail to do so, you may touch the control
pod and cause your scooter to move when you do not expect it.
3. Firmly grasp an armrest with one hand. This will help to prevent a fall if the scooter
tips.
930490 Rev. C
12
English
VI. General Warnings
Page 13

930490 Rev. C
O. DRESSING OR CHANGING CLOTHES
Be aware that your weight will shift if you dress or change clothes while seated
in this scooter.
P. OBSTACLES
Obstacles you may have to overcome in daily use include door thresholds, lifts,
ramps and hazards such as potholes and broken pavement. These can damage your
scooter and may cause a fall, tip-over or loss of control.
1. Be aware that thresholds are very dangerous. (Even a small change in height may
stop a caster wheel and cause your scooter to tip). You may need to:
• Remove or cover threshold strips between rooms.
• Install a ramp at entry or exit doors.
2. Keep your eyes moving when you ride; scan the area well ahead of your scooter.
3. Make sure the floor areas where you use this scooter are level and free of obstacles.
4. To help correct your center of balance:
• Lean your upper body forward slightly as you go up over an obstacle.
• Press your upper body backward as you go down from a higher to a lower level.
Q. DRIVING IN REVERSE
Use extra care when you drive your scooter in reverse. You may lose control or fall
if one of the rear wheels hits an object.
1. Operate your scooter slowly and at an even speed.
2. Stop often and check to make sure your path is clear of obstacles.
R. RAMPS, SLOPES & SIDEHILLS
The center of balance of your scooter changes when you are on a slope.
NOTE– “Slope” includes a ramp or sidehill. Your scooter is less stable when it is at an angle. Never use
this scooter on a slope unless you are sure it is safe.
When in doubt, have someone help you.
Beware Of:
1. Steep slopes. Do Not use this scooter on a slope steeper than 10%. (A 10% slope
means: One foot in elevation for every ten feet of slope length).
2. Wet or slippery surfaces (such as when ice, snow, water or oil film is present). A loss
of traction may cause a fall or tip-over.
3. A change in grade on a slope (or a lip, bump or depression). These may cause a fall
or tip-over.
4. A drop-off at the bottom of a slope. (A drop-off of as small as 3/4 inch can stop a
front caster and cause the scooter to tip forward).
VI. General Warnings
13
English
Page 14

S. TO REDUCE THE RISK OF A FALL, TIP-OVER OR LOSS OF CONTROL
1. Never use your scooter on a slope unless you are sure you can do so without losing
traction.
2. Always go as straight up and as straight down as you can.
• Do not “cut the corner” on a slope or ramp.
• Do not turn or change direction on a slope.
3. Always stay in the center of the ramp. Make sure ramp is wide enough that you are
not at risk that a wheel may roll off the side.
4. Lean or press your body uphill. This will help adjust for a change in the center of
balance caused by the slope.
5. Keep your scooter moving at a slow, steady speed. Keep control over the scooter at all
times.
• On a descent, do not let your scooter accelerate beyond its normal speed.
• If the scooter picks up speed, center the joystick to slow down or stop.
NOTE– The solid state controller of your scooter has a logic system that will help control your speed
when driving on a slope or uphill.
• If you stop, re-start slowly.
T. RAMPS AT HOME & WORK
Make sure ramps meet all Building Codes for your area.
1. For your safety, have a licensed contractor build or remodel ramp to meet all standards.
2. NOTE– The proper design will vary, depending on such things as: the length and
height of the ramp; the need for an intermediate platform; landing size; doors and
the direction of swing; and whether the ramp includes a turn or angle.
At A Minimum:
1. Open sides of ramp must have side rails to prevent your scooter from going over the
edge.
2. Slope must not be steeper than one inch in height for every one foot of slope length.
3. Ramp surface must be even, and have a non-skid surface.
4. You may need to add a section at the top or bottom to avoid a lip or drop-off.
5. Ramp must be sturdy. Add bracing if needed, so ramp does not “bow” when you ride
on it.
U. WHEELCHAIR/SCOOTER LIFTS
Wheelchair/Scooter lifts are used in vans, buses, and buildings to help you move
from one level to another.
1. Always turn off all power to your scooter when you are on a lift. If you fail to do so,
you may touch the control pod by accident and cause your scooter to drive off the
platform. (Be aware that a “roll-stop” at the end of the platform may not prevent this).
2. Make sure there is not a lip or drop-off at the top or bottom of the platform. These
may cause a fall or tip-over. When in doubt, have someone help you.
3. Always secure the rider with a positioning belt to help prevent falls during transfers.
4. Avoid moving forward if a wheel is “hung up” on the lip of the ramp. Backup, reposition the caster for a more direct approach and slowly try again.
930490 Rev. C
14
English
VI. General Warnings
Page 15

930490 Rev. C
V. CURBS & SINGLE STEPS
1. Your scooter is not designed to drive up or down a curb or step more than 1/2 inch
high. Doing so may:
• Result in a fall or tip-over.
• Damage the frame, wheels, axles or other scooter parts, or loosen fasteners.
2. To prevent a fall or tip-over, use wheelchair/scooter access ramps or have someone
help you.
3. If you must climb or descend a curb or step alone do so at your own risk and use
extreme care.
• Go as straight up or straight down as you can. Never turn or climb or descend at
an angle as a fall or tip-over is likely.
• Proceed slowly, at a steady speed.
4. Make sure that persons who assist you review the “Tips For Attendants” and heed all
warnings.
5. Avoid driving along curb edges and drop-offs. A minimum distance from the edge of
18” is recommended.
W. STAIRS
Never use this scooter to go up or down stairs, even with an attendant. Doing so
is likely to cause a fall or tip-over.
X. ESCALATORS
Never take this scooter on an escalator, even with an attendant. Doing so is likely
to cause a fall or tip-over.
VI. General Warnings
15
English
Page 16

930490 Rev. C
16
English
VII. Warnings: Components & Options
VII. WARNINGS: COMPONENTS & OPTIONS
Note: If you use parts or make changes not authorized by Sunrise it may create a
safety hazard and will void the Warranty.
A. ARMRESTS
Armrests flip back/down and cannot be used to lift scooter or the seat.
1. Never lift this scooter by its armrests.
2. Lift this scooter only by non-detachable parts of the main frame.
B. BATTERIES
1. Only an approved battery case should be used in this device.
2. To prevent an acid spill, always keep battery case upright. (wet cell batteries only)
3. Never smoke or hold an open flame near battery case. They are a known
explosion hazard.
4. Read all of section XI Batteries before attempting to change or charge batteries.
5. Always remove batteries using straps or handle provided. Pinched fingers may occur if
the batteries are removed by grasping the battery casings.
C. CUSHIONS
1. Guardian seats are designed for comfort, not specifically for the relief of pressure.
2. If you suffer from pressure sores, or if you are at risk that they will occur, you may
need a special seat system such as can be provided by the Seat Frame, or a device to
control your posture.
• Consult your doctor, nurse or therapist to find out if you need such a device for
your well-being.
D. FASTENERS
Many of the screws, bolts and nuts on this scooter are special high-strength
fasteners. Use of improper fasteners may cause your scooter to fail.
1. Only use fasteners provided by Sunrise.
2. If fasteners become loose, tighten them as soon as you can.
3. Over- or under-tightened fasteners may fail or cause damage to scooter parts.
• See Section IX, “Set-Up, Adjustment & Use”, for proper torque settings.
F. MOTOR LOCKS
1. Do not engage or disengage motor locks unless power to the scooter is off.
2. Be aware that the scooter will not have brakes when motor locks are in the freewheel position.
3. Make sure that the person pushing the scooter has full control when motor locks are
disengaged.
G. KEY ON/OFF SWITCH
1. Never use the Key ON/OFF switch to stop the scooter except in an emergency. This
will result in an abrupt stop and may cause you to fall.
2. To slow your scooter to a stop, return the control pod to neutral.
Page 17

930490 Rev. C
VII. Warnings: Components & Options
17
English
H. SEATING SYSTEMS
1. Use of a seating system not approved by Sunrise may alter the center of balance of
this scooter. This may cause a fall or tip-over.
2. Never change the seating system of your scooter unless you consult your supplier
first.
I. UPHOLSTERY FABRIC
1. Replace worn or torn fabric of the seat as soon as you can. If you fail to do so, the seat
may fail and cause you to fall. Worn fabrics may increase the potential for a fire hazard.
2. Fabric will deteriorate with age and use. Look for fraying, thin spots, or stretching of
fabric at rivet holes. Replace fabric as required.
3. Be aware that washing may reduce flame retardation of the fabric.
J. WIRING
Never pull on cables directly. This can result in wires breaking inside the connector or harness. To remove a plug or connector, always grasp the plug or connector
itself.
Page 18

930490 Rev. C
18
English
VIII. Tips For Attendants
VIII. TIPS FOR ATTENDANTS
1. Persons who help a rider do one of the following tasks should review and
heed the warnings “Notice to Attendants” and all warnings in this Manual for
that task.
2. The “Tips” that follow are suggestions only. Be aware that you will need to
learn safe methods best suited to the rider and to your abilities. Consult
your health care professional for instructions.
A. TO CLIMB A CURB OR SINGLE STEP
The following is one way to safely help a rider climb a curb or single step going
FORWARD:
1. Stay behind the scooter.
2. Face the curb and tilt the scooter up on the rear wheels so that the front caster
clears the curb or step.
3. Move forward, placing the front caster on the upper level as soon as you are sure
they are past the edge.
4. Continue forward until the rear wheels contact the face of the curb or step. Lift and
roll the rear wheels to the upper level.
B. TO DESCEND A CURB OR SINGLE STEP
The following is one way to safely help a rider descend a curb or single step
going BACKWARD:
1. Stay at the rear of the scooter.
2. Several feet before you reach the edge of the curb or step, turn the scooter around
and pull it backward.
3. Proceed carefully. Look over your shoulder and carefully step back until you are off
the curb or stair and standing on the lower level.
4. Pull the scooter toward you until the rear wheels reach the edge of the curb or step.
Then allow the rear wheels to slowly roll down onto the lower level.
5. When the rear wheels are safely on the lower level, tilt the scooter back to its balance point. This will lift the front casters off the curb or step.
6. Keep the scooter in balance and take small steps backward. Be sure to look where
you are going. Turn the scooter around and gently lower front casters to the ground.
Page 19

930490 Rev. C
IX. Set-Up, Adjustment & Use
19
English
IX. SET-UP, ADJUSTMENT & USE
NOTES:
1. Work Surface For Set-Up:
Use a flat surface, such as a table, to assemble, adjust and check your scooter. This makes
the steps easier and helps ensure a correct set-up.
2. Fasteners:
• Many of the screws and bolts on this scooter are special high-strength fasteners and
may have special coatings.
• Many nuts are of the Nylock type. They have a plastic insert to help prevent loosening.
1. Use of improper fasteners may cause the scooter to fail.
2. Over- or under-tightened fasteners may fail or cause damage to parts.
3. If bolts or screws become loose, tighten them as soon as you can. Loose
bolts or screws can cause damage to other parts causing them to fail.
3. Washers & Spacers:
• Note the position of washers and spacers before disassembly.
• To avoid damage to the frame, replace all washers and spacers when you reassemble
parts.
4. Torque Settings:
• A torque setting is the optimal tightening for a particular fastener. Use a torque
wrench that measures 120 inch-pounds to secure screws, nuts and bolts on this
scooter.
NOTE– Unless otherwise noted, use a torque setting of 120 inch-pounds for all fasteners.
TOOLS YOU WILL NEED
1. Basic Tool Kit:
To set-up, adjust and maintain your scooter you will need the following tools:
• 4mm Allen Wrench
• 10mm Open-end Wrench
• Phillips or Flathead screwdriver
You can obtain a multi-purpose tool kit from Sunrise, or buy the tools you need from a hardware store.
2. Torque Wrench:
If you plan to adjust and maintain this scooter yourself, Sunrise recommends that you use
a torque wrench.
NOTE– The wrench must measure inch-pounds. You can buy a torque wrench and proper sockets from a
hardware store.
When properly set up, this scooter will operate smoothly. Check to see that all
components work properly. If you detect a problem, be sure to correct it before
use.
Page 20
930490 Rev. C
20
English
IX. Set-Up, Adjustment & Use
3
4
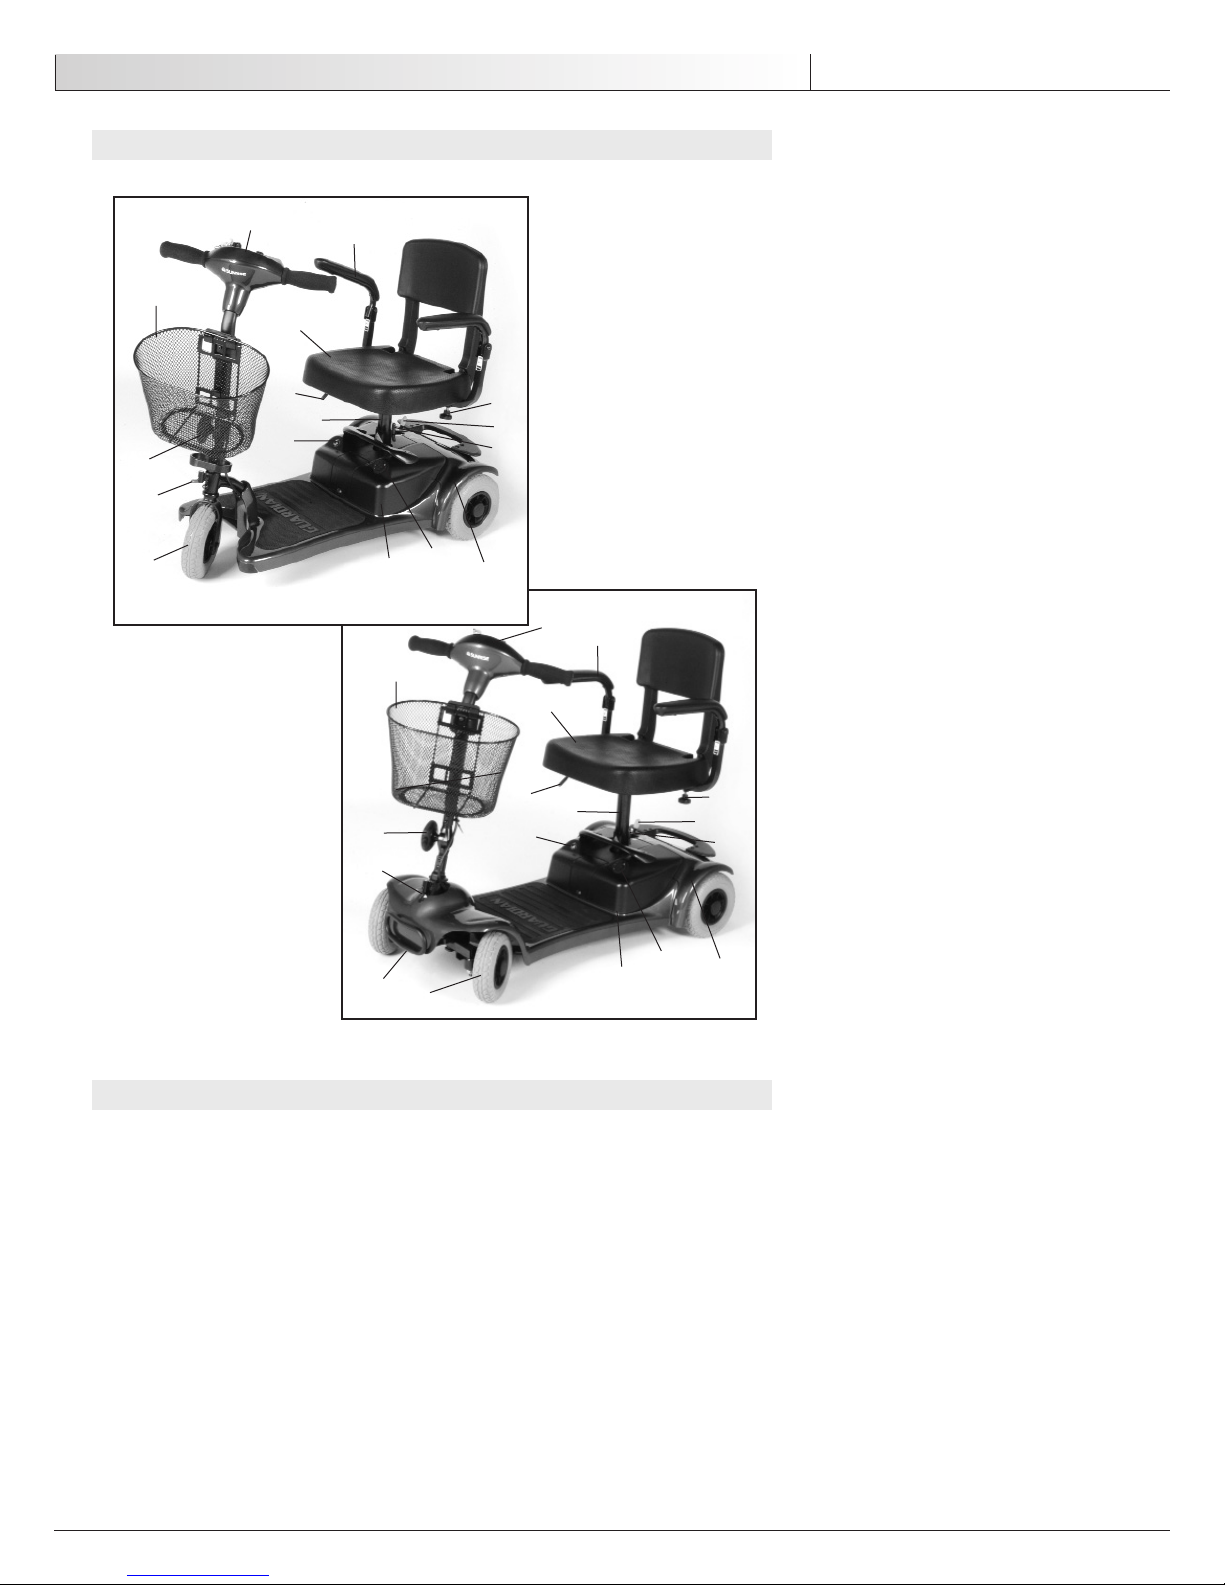
A. BATTERY CASE REMOVAL (Figure 1)
To remove the batteries for transporting or servicing:
Pull up on battery pack handle (A), disengaging Velcro®.
NOTE– Removing the scooter seat may provide better access to the battery case.
Batteries may weigh up to 55 lbs. Care must be taken to avoid injury when lifting
up on battery case.
B. ARMREST INSTALLATION AND WIDTH ADJUSTMENT (Figure 2)
a. Insert armrest support inside of 1" square tube (B) located on the
underside of the seat.
b. Repeat for other side of seat.
c. Position armrest at appropriate width.
d. Tighten knob screws (C) on square tube.
Avoid pinching fingers in the flip-back armrest.
C. TILLER
1. Tiller Adjustment (Figure 3)
The scooter features an adjustable tiller which allows you to lock the tiller in the most
comfortable driving position. This feature also lets you fold the tiller down fully, for transportation and stowage.
1. Support the tiller with one hand.
2. Loosen soft-sided tiller knob (D) to release teeth integration.
3. Move the tiller to the desired angle.
4. Tighten tiller knob until teeth are fully engaged.
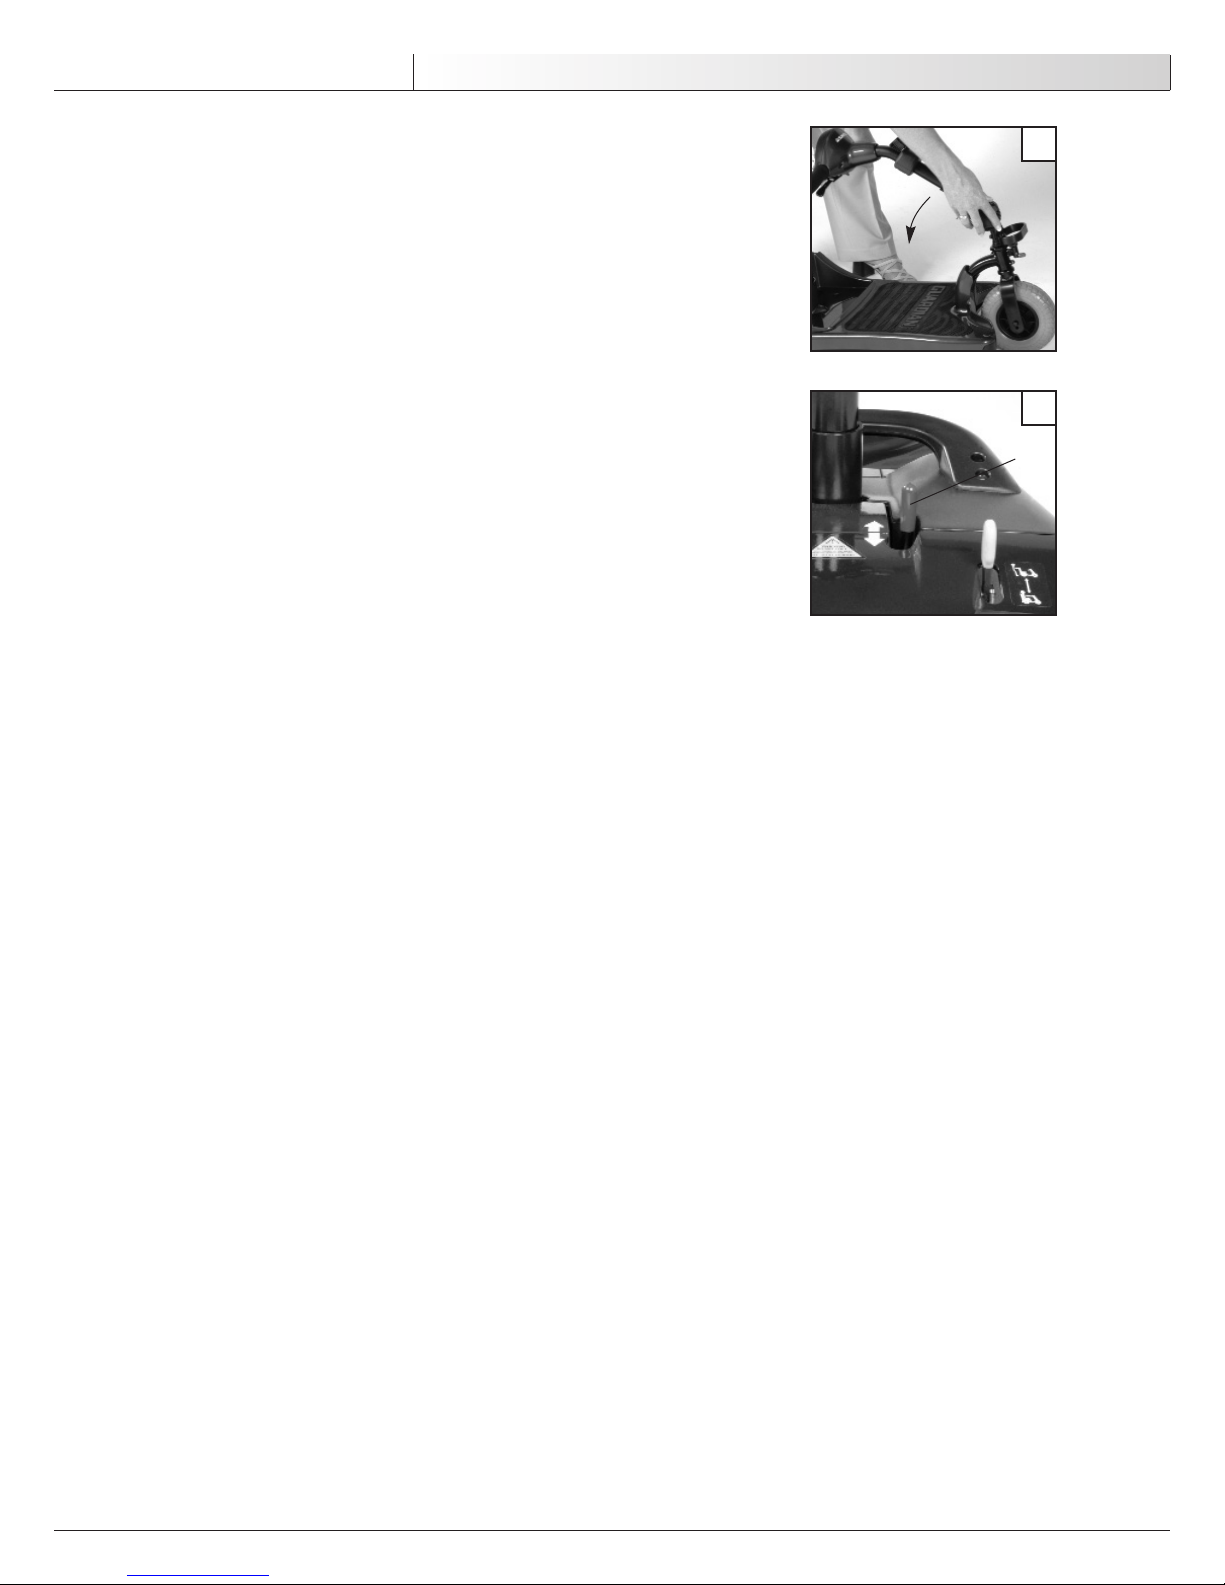
2. Tiller Lock Mechanism (Figures 3 & 4)
The tiller lock mechanism locks the tiller and front wheels in a fixed position. Locking the
tiller will ease assembly/disassembly and transportation of the scooter.
a. Locate the red tiller lock (E) on the front of the tiller.
b. Push the lock up and over to lock the tiller. (Fig. 4)
c. Reverse to unlock.
1
2
A
D
E
B
C
Page 21
930490 Rev. C
IX. Set-Up, Adjustment & Use
21
English
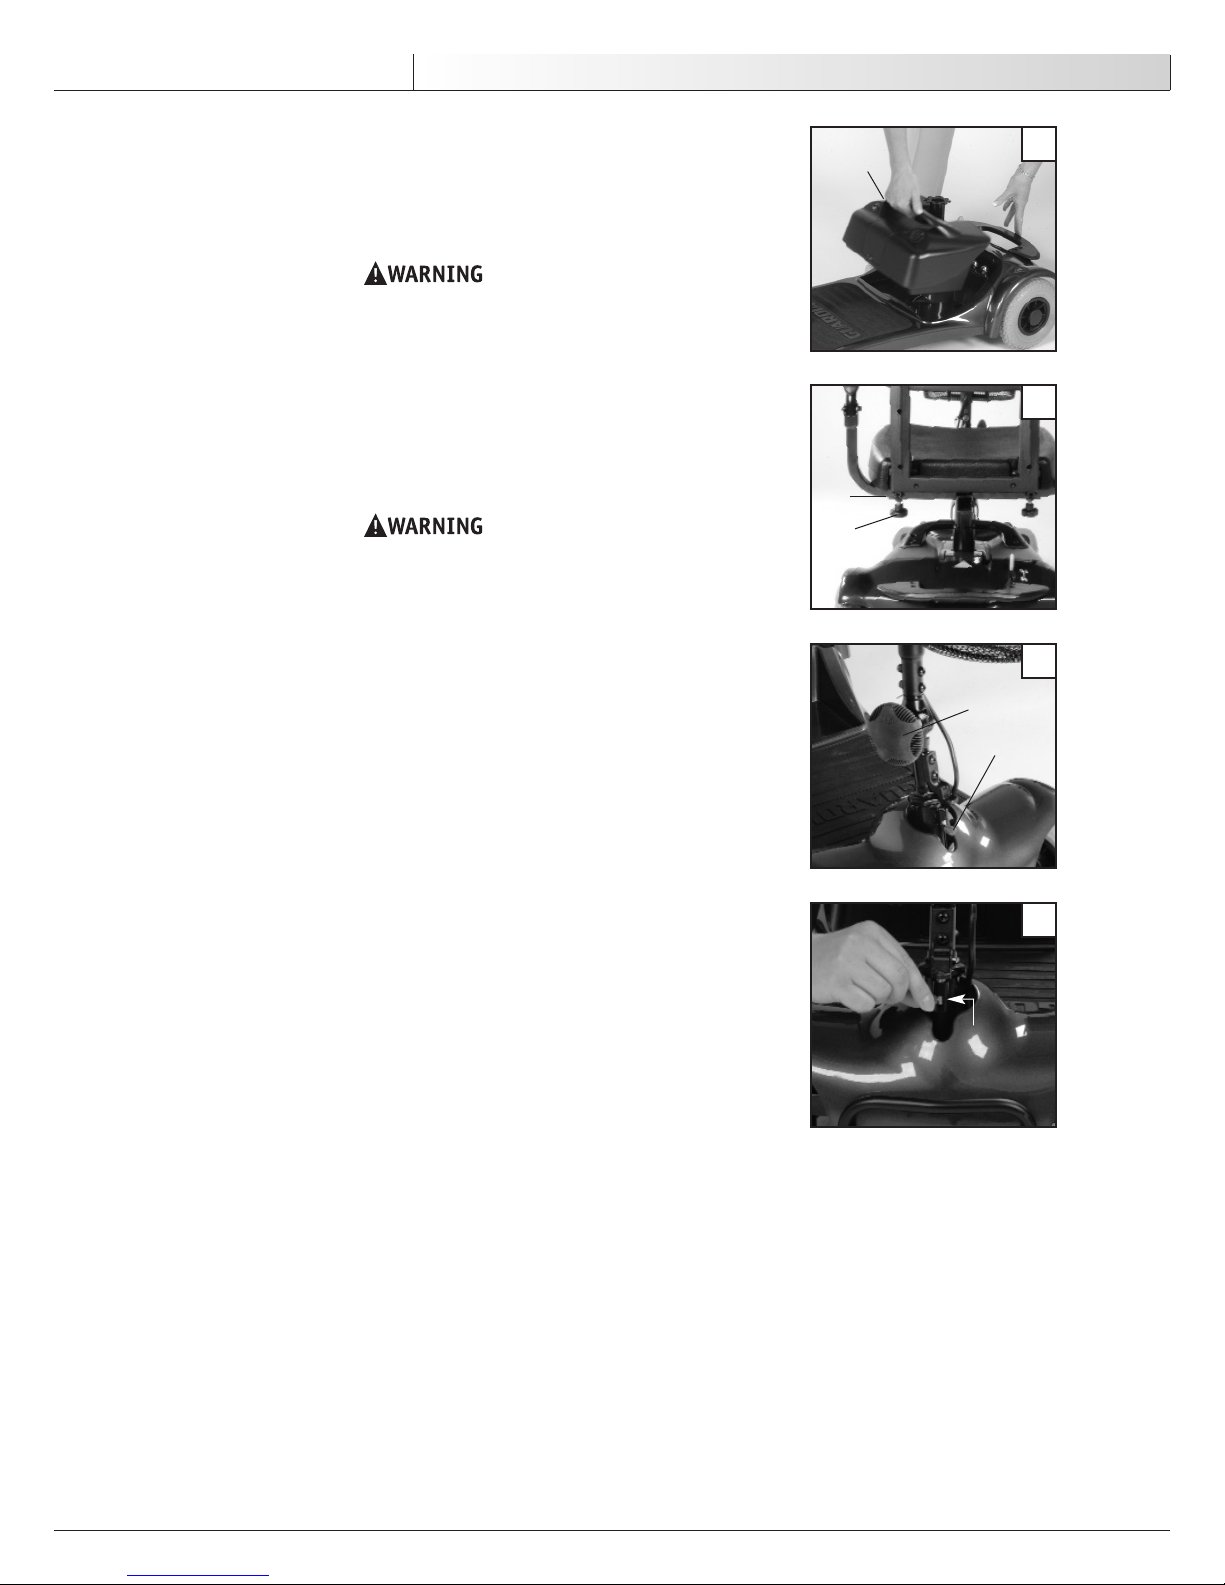
D. SEAT REMOVAL (Figure 5)
1. Lift red lever on right side of seat (A).
2. Lift seat off.
E. SEAT SWIVEL (Figure 6)
1. Lift red lever on right side of seat (A).
2. Swivel seat to desired position.
3. Release red lever when seat clicks into one of four swivel positions.
F. SEAT HEIGHT ADJUSTMENT (Figure 7)
1. Remove seat and lift off battery case to access the seat post pin.
2. Remove pin (B) from seat post.
3. Move the post up or down to select the desired seat height.
4. Reinsert the seat post pin.
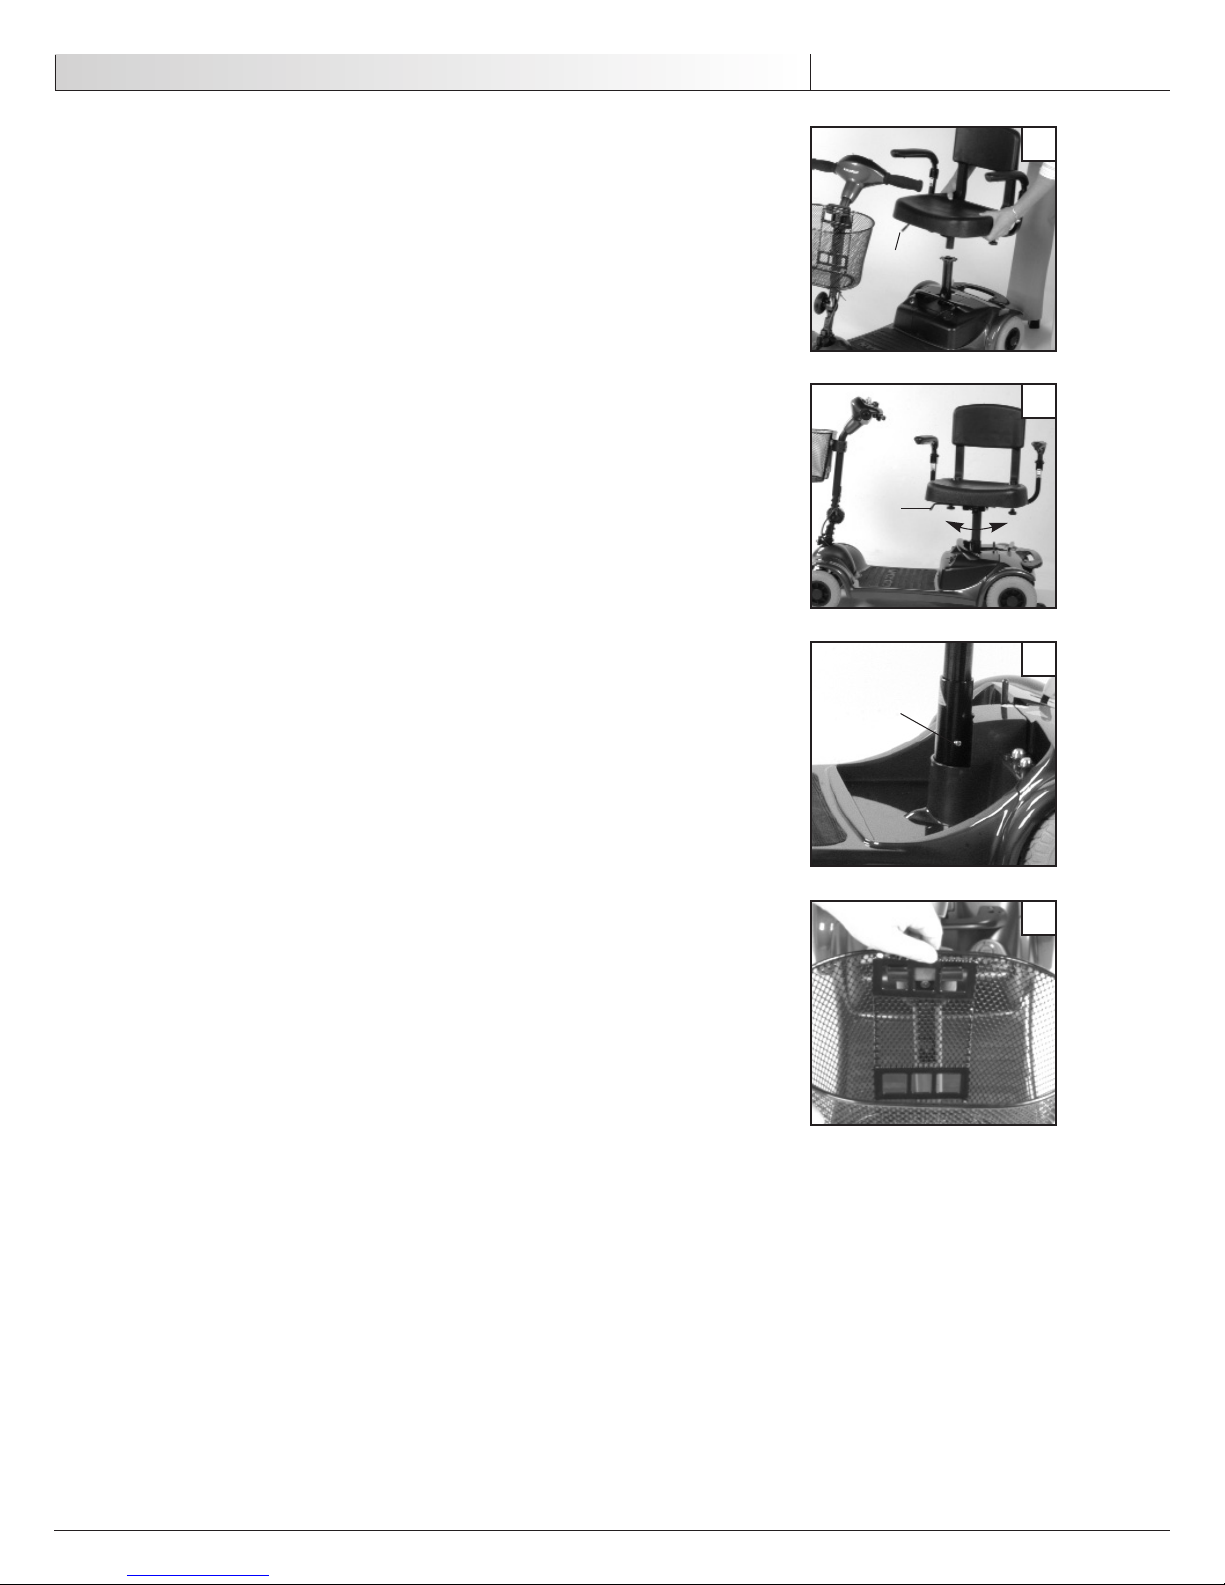
G. BASKET INSTALLATION AND REMOVAL (Figure 8)
1. To install the basket, place the openings in the back of the basket over the hooks on
the front of the tiller as shown.
2. To remove, lift the basket up and off the hooks.
5
6
A
A
7
B
8
Page 22
930490 Rev. C
22
English
IX. Set-Up, Adjustment & Use
H. DISASSEMBLY (Figures 9 & 10)
Your scooter disassembles quickly and easily for transportation or storage.
1. Remove seat.
2. Lift off the battery.
3. Lower the tiller and then lock in place. (Fig. 9) (Locking the tiller stabilizes the unit
making assembly, disassembly and transportation easier. The lowered and locked tiller
also provides a grip point to easily lift the main body off the rear wheel assembly.)
4. Push the red quick-release lever (A) rearward and lift the main body off the rear
wheel assembly.
9
10
A
Page 23
930490 Rev. C
X. Operating Guide
23
English
X. OPERATING GUIDE
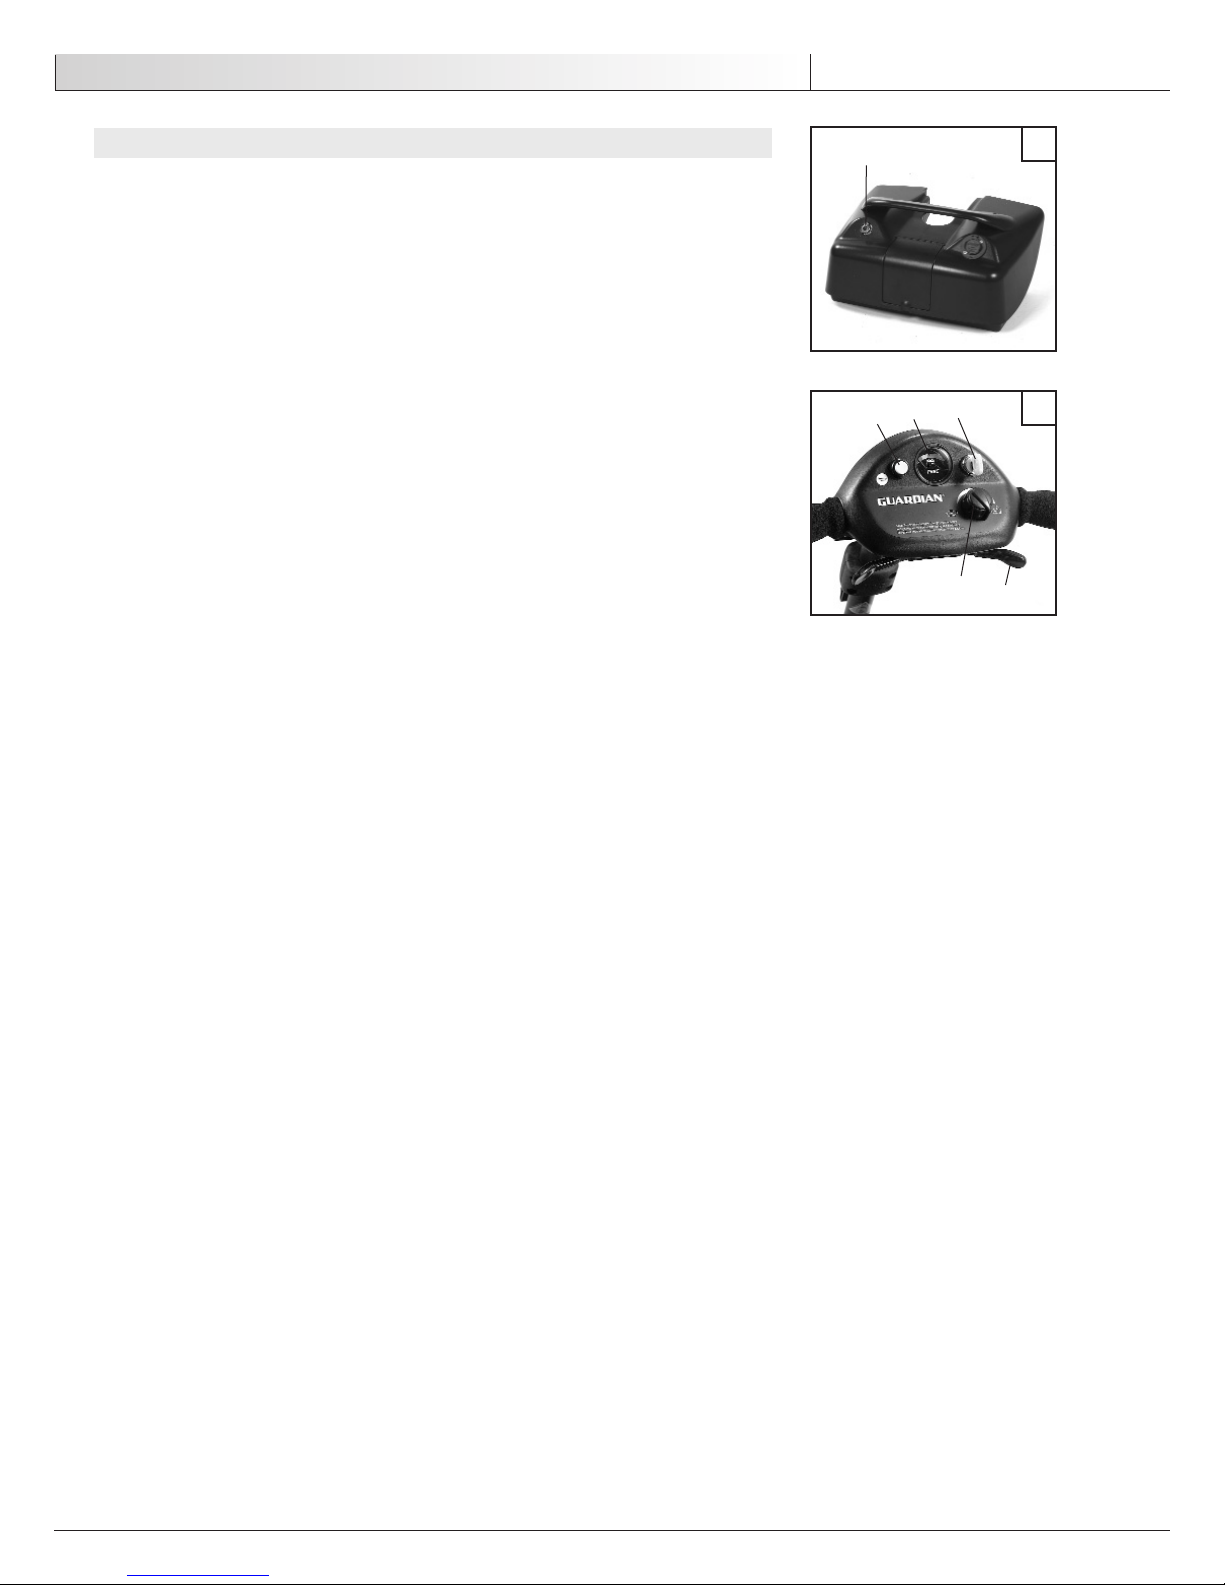
A. CIRCUIT BREAKERS (Figure 1)
1. Notes:
Your Guardian Trek has a circuit breaker on the battery case (A).
• In the unlikely event of a short circuit or heavy overload, all power to your scooter
will be shut off.
• To reset your scooter, depress the circuit breaker button located on the front of the
battery case. A few minutes wait is required before the circuit breaker will reset.
2. Repeated Shutdown:
If the scooter continues to shut down after resetting, have it serviced by a supplier.
B. TILLER CONTROL FUNCTIONS (Figure 2)
NOTE– To preserve battery charge, your scooter will go into sleep mode after being left idle 5 minutes.
To remove from sleep, turn key off and then back on.
1. Hand Controls
All of the drive controls for the scooter are to be found on the Tiller Control Box.
2. The Pre-Set Speed Knob
Turning the knob to the left reduces your available maximum speed. Turning it to the right
increases the available maximum speed.
3. The Battery Gauge
This gives an approximation of battery charge.
The gauge is marked from “E” empty to “F” full. For extra clarity there is a colored graduated scale ranging from RED (Empty) through YELLOW to GREEN (Full).
As the scooter moves over differing terrain, the battery gauge will dip up and down. This is
normal. For a more accurate indication, stop the scooter and note the reading.
GREEN indicates ready for use.
YELLOW indicates batteries to be charged as soon as possible.
RED indicates charge batteries immediately.
NOTE– If you find that your battery gauge has gone into the red while you are out and about, you can
increase the remaining range of your scooter by reducing your maximum available speed, but
you MUST charge your scooter as soon as you can.
4. Throttle Lever
The throttle lever offers finger-tip control of your scooter. It controls the speed as well as
forward and reverse motion. Pushing the right-hand side of the lever away from you moves
the scooter forwards. Pushing the left-hand side of the lever away from you moves the
scooter in reverse and sounds a reversing beeper. The more you move the lever the more
your speed increases up to its pre-set maximum. It is possible to operate your scooter
using one side of the throttle lever. To do this you must PUSH and PULL on the chosen side
of the throttle lever.
NOTE– One-hand operation requires careful concentration and is more tiring than normal operation.
5. Horn Button
Pressing the yellow horn button operates an audible beep. Use this function to warn pedestrians of your presence when necessary.
6. Key On-Off Switch
Make sure that this switch is in the OFF position BEFORE getting on or off the scooter.
Switching this switch to OFF while driving will cause the scooter to stop very abruptly. This
is not recommended.
1
2
3
5
6
2
4
A
Page 24

930490 Rev. C
24
English
X. Operating Guide
C. MOTOR LOCKS (Figure 3)
Disconnect the motor locks when you need to manually push the scooter.
(For example, in an emergency, or if batteries fail).
1. Do not disengage motor locks unless power to the scooter is off.
2. With either one or both brakes released, the scooter will not operate.
3. Be aware that the scooter will not have brakes in the free-wheel position.
4. Make sure that the person pushing the scooter has full control when
motor locks are disengaged.
Engage/Release Motor Locks
1. The yellow motor lock lever is located on the rear of the scooter (A).
2. To release the motor locks, push the motor lock lever forward.
3. To engage the motor locks, push the motor lock lever backward.
3
A
Page 25

930490 Rev. C
XI. Batteries
25
English
XI. BATTERIES
A. INTRODUCTION
1. Notes:
• Batteries supply the power for your scooter. They contain a finite amount of energy
and have limits on how long they can store and supply energy.
• You can charge batteries only a certain number of times before they will fail and no
longer hold a charge.
• For answers to questions about batteries, consult your supplier.
2. Use Proper Battery Case:
Your scooter operates on two 12/10 A batteries in a battery case.
• Only use a battery case.
3. Breaking In:
• A battery requires “breaking-in” for the first 6 to 12 charges. It will not accept a full
charge for this period.
• It is best to limit the length of your trips until you break the batteries in and you
know the range of your scooter.
4. Discharged Batteries:
• Never allow a battery to completely discharge. If you operate your scooter until it
has almost stopped, you will greatly reduce the life of your batteries.
• Never let a battery sit in a discharged condition. Give unused or stored batteries a
full charge once per month.
• Always fully charge the batteries. Avoid “topping off” with frequent charges.
Never connect a life support or auxiliary device to a scooter battery. The electrical system may fail and result in severe injury to or death of rider.
B. BATTERY CHARGER
A battery charger produces a direct current (DC). When applied to a discharged battery,
this reverses the chemical reaction that led to its discharge.
1. Charge Rate. How fast a battery will charge depends on:
• Its electrical capacity, state of charge, electrolyte temperature, and internal condition.
• The DC output of the charger. (The charge rate will vary if the alternating current
(AC) supply is higher or lower than 110 volts).
2. CAUTION– To Avoid Damage to the Charger
• Never expose charger to rain or snow.
• Never unplug charger by pulling on the electrical cord. This will damage the cord.
• Never open a charger or attempt to repair it yourself. Return charger to Sunrise or
have repairs made only by a qualified person.
• Keep cord out of the way, where it will not be stepped on, tripped over, or damaged.
3. CAUTION– To Avoid Damage to the Battery
• Make sure you use the correct setting for sealed (gel) batteries (located on the offboard charger).
• Never charge a frozen battery. A fully charged battery will rarely freeze, but the fluid
in a discharged battery can freeze at 16 degrees Fahrenheit (minus 9 degrees
Centigrade). If you suspect a battery is frozen, thaw it before charging.
Lead acid batteries generate explosive gas while charging. Completely read and
follow all warnings about the batteries in this user instruction manual and any
labels applied to the product. Failure to do so could result in fire, explosion,
injury and/or death.
Page 26

930490 Rev. C
26
English
XI. Batteries
C. ACID BURNS (UNSEALED WET CELL BATTERIES)
1. Use extreme care not to spill acid when you handle wet cell batteries.
Keep batteries upright.
2. Avoid contact of acid with bare skin or clothing.
3. Always wear rubber gloves and safety glasses when you handle batteries.
4. If acid contacts your skin or clothing, wash immediately with soap and water.
5. If acid contacts your eyes, immediately flood eyes with cold running water
for at least 15 minutes. Seek medical attention immediately.
Sunrise Medical does not recommend the use of wet cell batteries on this scooter.
D. CONNECTING BATTERIES IN BATTERY WELL
1. Each battery weighs up to 22 lbs. Take care to avoid injury when lifting.
2. Keep batteries upright. Take care not to spill acid (wet cell batteries).
3. Always wear rubber gloves and safety glasses when you handle batteries.
4. Before working around batteries, remove all metal personal effects, such as
necklaces, rings, watches, pins, and other metal jewelry that might contact
battery terminal and cause a short.
Never make direct contact across both battery terminals, as an explosion may occur.
A spark may result in an explosion and/or fire resulting in severe injury or death.
E. CHARGING BATTERIES
To avoid the risk of severe injury or death from electrical shock, fire or explosion
while charging:
1. Never connect charger to a 240 volt source. The main input voltage is 110 volts.
2. Never touch the charger after it is connected to an electrical outlet. This may cause
electrical shock.
• Never connect or disconnect charger from battery while there is power to
the charger.
3. Never use an extension cord. Use of an improper cord could damage the charger or
cause a fire or electrical shock.
4. A battery emits explosive hydrogen gas during charging. To reduce the risk of fire
or explosion:
• Make sure area is well vented. Never charge battery in a closed-in area.
• Never smoke or allow a spark, flame or high heat near battery during charging.
• Never allow metal tools or scooter parts to make direct contact across both bat-
tery terminals.
5. Never look directly into cells when charging battery (wet cell batteries).
ALWAYS:
1. Use the charger that comes with your scooter. Read and follow all instructions and
warnings.
2. Make sure room is well ventilated.
3. Turn off all power to your scooter.
4. Connect and disconnect battery cables with caution.
5. Make sure to allow enough time to fully charge batteries.
NOTE– Batteries should never be left for long periods in the discharged state.
Unused or stored batteries should be given a charge once per month.
6. Or, use the off-board charger by plugging it into the charger port on the
battery case (A).
Off-board charger port
A
Page 27

930490 Rev. C
XI. Batteries
27
English
F. DISPOSING OF BATTERIES
1. All batteries once they have reached the end of their useful life are deemed to be
hazardous waste.
2. For further information on handling and recycling contact your local
recycling authority.
3. Always dispose of product through a recognized agent.
Page 28

930490 Rev. C
28
English
XII. Maintenance
XII. MAINTENANCE
A. NOTES
1. Proper maintenance will improve performance and extend the useful life
of your scooter.
2. Clean your scooter regularly. This will help you find loose or worn parts and will make
your scooter easier to use.
3. To protect your investment, have all major service and repair work done by your supplier.
1. Your scooter needs regular maintenance for peak performance and to
avoid injury from scooter failure, damage or premature wear.
2. Inspect and maintain this scooter strictly per the “Maintenance Chart”.
3. If you detect a problem, make sure to service or repair the scooter
before use.
4. At least once a year, have a complete safety check and service of your scooter performed by a supplier.
B. CLEANING
1. Frame:
• Clean the frame with mild soapy water monthly.
2. Motors:
• Clean around motor area weekly with a slightly damp (not wet) cloth.
• Wipe off or blow away any fluff, dust, or dirt on or around the motors.
• Note: You do not need to grease or oil the scooter.
3. Upholstery:
• Hand-wash only as needed. Machine washing may damage fabric.
• Drip-dry only. Heat from a dryer may damage fabric.
NOTE– Washing the fabric may decrease fire retardant properties.
C. STORAGE TIPS
1. Store your scooter in a clean, dry area. If you fail to do so, parts may rust or corrode.
2. Before using your scooter, make sure it is in proper working order. Inspect and
service all items on the “Maintenance Chart”.
3. If you store this scooter for more than three months, have it inspected by a
supplier before use.
D. BATTERY MAINTENANCE
1. To prevent an acid spill, always keep batteries upright. (wet cell batteries)
2. Never smoke or hold an open flame near batteries.
3. Always wear rubber gloves and safety glasses when you handle batteries.
1. Cleaning Battery Contacts
To prevent intermittent power shortage caused by build-up of foreign matter, use a dry
cloth lightly moistened with rubbing alcohol to gently wipe over battery contacts and
power pick-ups.
Allow time for all contacts to dry thoroughly before operating or charging your
scooter again.
2. Maintenance Schedule:
This varies for different types of batteries. Always follow the instructions supplied with your
batteries.
NOTE– Always wear rubber gloves and safety glasses when you handle or service batteries.
3. For Answers To Questions: Contact your supplier.
Page 29

930490 Rev. C
XII. Maintenance
29
English
E. ORDERING PARTS
When you order parts, provide the following:
1. Model of scooter
2. Serial number of scooter
3. Left hand or right hand control
4. Part number, description and quantity of parts you need.
5. State reason for replacement.
F. MAINTENANCE CHART
You should check the items on this chart at the indicated intervals. If any of the items are
loose, worn, bent or distorted, immediately have them checked and/or repaired by your
authorized Sunrise supplier. Frequent maintenance and servicing will improve performance
and extend scooter life, and help prevent injuries.
Charge batteries
Check all moving parts for wear
Inspect all nuts, bolts and fasteners for looseness or wear
Inspect upholstery for wear
Service by authorized supplier
Daily
Weekly
Monthly
Quarterly
Annually
CHECK...
Page 30

930490 Rev. C
30
English
XIII. Sunrise Limited Warranty
XIII. SUNRISE LIMITED WARRANTY
1. FOR FIVE YEARS
We warrant the main frame of this scooter against defects in materials and workmanship for
5 years use of the first consumer purchaser.
2. ADDITIONAL WARRANTY
We warrant Sunrise-made components of this scooter against defects in materials and workmanship as follows:
a. Motors, gear boxes and charger— For one (1) year from the date of first consumer
purchase.
b. All other original components (such as wheels, upholstery, plastic, rubber parts and
painted surfaces)—For three (3) months from the date of first consumer purchase.
3. LIMITATIONS
a. We do not warrant damage due to:
• Neglect, misuse, or improper installation or repair.
• Use of parts or changes not authorized by Sunrise.
• Exceeding the weight limit of 250 lbs.
b. This warranty is void if the original scooter serial number tag is removed or altered.
c. This warranty applies in the USA only. Check with your supplier to find out if interna-
tional warranties apply.
4. WHAT WE WILL DO
Our sole liability is to repair or replace covered parts. This is your only remedy for consequential damages.
5. WHAT YOU MUST DO
a. Return the warranty card.
b. Obtain from us, while this warranty is in effect, prior approval for return or repair of
covered parts.
c. Return the scooter or part(s), freight pre-paid, to Sunrise Mobility Products Division
at: 2842 Business Park Ave., Fresno, CA 93727-1328.
d. Pay the cost of labor to install or repair parts.
6. NOTICE TO CONSUMER
There are no other express warranties. To the extent permitted by law, any implied warranty
(including a warranty of merchantability or fitness for a particular purpose) is limited to:
a. One (1) year from the first consumer purchase, and
b. Repair or replacement of the defective part only.
This warranty gives you certain legal rights. You may also have other rights that vary from
state to state.
Page 31

930490 Rev. C
I. Introduction
31
Français
I. INTRODUCTION
SUNRISE À L’ÉCOUTE
Merci d'avoir choisi un scooter Guardian. Nous sommes à l’écoute de vos questions et commentaires sur ce manuel, la sécurité et la fiabilité de votre scooter et le service offert par
votre fournisseur Sunrise. N’hésitez pas à nous écrire ou à nous appeler à l’adresse et au
numéro de téléphone ci-dessous :
Sunrise Medical
Service à la clientèle
7477 East Dry Creek Parkway
Longmont, CO 80503, États-Unis
(800) 333-4000 ou (303) 218-4500
RÉPONSES À VOS QUESTIONS
Votre fournisseur agréé est la personne qui connaît le mieux les caractéristiques de votre
scooter et peut répondre à la plupart de vos questions sur la sécurité, l’usage et l’entretien.
À titre de référence, veuillez remplir les renseignements suivants :
Fournisseur : ________________________________________________________________
Adresse : ___________________________________________________________________
Téléphone :_________________________________________________________________
Nº de série : ________________________________________________________________
Date d’achat : _______________________________________________________________
Page 32

930490 Rev. C
32
Français
II. Table des Matières
II. TABLE DES MATIÈRES
I. INTRODUCTION ..............................................................................
II. TABLE DES MATIÈRES ......................................................................
III. VOTRE SCOOTER ET SES PIÈCES.........................................................
IV. NOTICE – À LIRE AVANT TOUTE UTILISATION.....................................
V. EMI (INTERFÉRENCE ÉLECTROMAGNÉTIQUE) ......................................
A.Qu’est-ce que l’EMI.......................................................................
B.Quels sont les effets possibles d’une EMI ? ......................................
C.Sources d’EMI ..............................................................................
D.Distance de la source....................................................................
E.Niveau de protection ....................................................................
F. Signalez tout incident présumé d’EMI..............................................
VI. AVERTISSEMENTS D’ORDRE GÉNÉRAL.................................................
A.Notice aux utilisateurs..................................................................
B.Notice aux accompagnateurs..........................................................
C.Limite de poids............................................................................
D.EMI............................................................................................
E.Liste des vérifications de sécurité...................................................
F. Changements et réglages...............................................................
G.Lorsque vous êtes dans un scooter à l’arrêt......................................
H.Conditions environnementales........................................................
I. Terrain........................................................................................
J. Utilisation dans la rue ..................................................................
K Sécurité en voiture.......................................................................
L. Centre d’équilibre .........................................................................
M.Transferts ...................................................................................
N.Pour saisir un objet ou vous pencher ..............................................
O.Habillage ou changement de vêtements...........................................
P. Obstacles ....................................................................................
Q.Déplacement à reculons ................................................................
R.Rampes, pentes et descentes .........................................................
S.Pour réduire le risque de chute, de basculement
ou de perte de contrôle ................................................................
T. Rampes à la maison et au travail....................................................
U.Élévateurs de fauteuil/scooter ......................................................
V. Trottoirs et marches .....................................................................
W.Escaliers .....................................................................................
X.Escaliers roulants .........................................................................
VII. AVERTISSEMENTS : COMPOSANTS ET OPTIONS ....................................
A.Appui-bras ..................................................................................
B.Batteries.....................................................................................
C.Coussins .....................................................................................
D.Attaches .....................................................................................
E.Mécanismes de blocage du moteur..................................................
F. Interrupteur Marche/arrêt..............................................................
G.Système d’assise ..........................................................................
H.Tissu de rembourrage....................................................................
I. Câblage ......................................................................................
31
32
34
35
36
36
36
36
37
37
37
38
38
38
38
39
39
39
39
40
40
40
41
41
41
42
42
42
43
43
43
44
44
44
45
45
46
46
46
46
46
47
47
47
47
47
Page 33

930490 Rev. C
II. Table des Matières
33
Français
VIII. CONSEILS AUX ACCOMPAGNATEURS ..................................................
A.Monter un trottoir ou une seule marche ..........................................
B.Descendre d’un trottoir ou d’une seule marche..................................
IX. MONTAGE, RÉGLAGE ET UTILISATION ................................................
Remarques .....................................................................................
Outillage requis ..............................................................................
A.Retrait du boîtier de batterie.........................................................
B.Installation des appui-bras et réglage de la largeur...........................
C.Poignée de guidage......................................................................
D.Retrait du siège ...........................................................................
E.Pivotement du siège.....................................................................
F. Réglage de la hauteur du siège ......................................................
G.Installation et retrait du panier......................................................
H.Démontage..................................................................................
X. GUIDE D’UTILISATION .....................................................................
A.Disjoncteurs ................................................................................
B.Fonctions de commande de la poignée de guidage ............................
C.Mécanismes de blocage du moteur..................................................
XI. BATTERIES .....................................................................................
A.Introduction................................................................................
B.Chargeur de batterie.....................................................................
C.Brûlures d’acide ...........................................................................
D.Branchement des batteries dans leur logement.................................
E.Charge des batteries .....................................................................
F. Mise au rebut des batteries ...........................................................
XII. ENTRETIEN.....................................................................................
A.Remarques ..................................................................................
B.Nettoyage ...................................................................................
C.Conseils de rangement ..................................................................
D.Entretien des batteries..................................................................
E.Commande de pièces ....................................................................
F. Diagramme d’entretien..................................................................
XIII. GARANTIE LIMITÉE SUNRISE............................................................
48
48
48
49
49
49
50
50
50
51
51
51
51
52
53
53
53
54
55
55
55
56
56
56
57
58
58
58
58
59
59
59
60
Page 34

930490 Rev. C
34
Français
III. Votre Scooter et ses Pièces
III. VOTRE SCOOTER ET SES PIÈCES
1. Panier
2. Bouton de réglage de la poignée de
guidage
3. Dispositif de blocage de la poignée
de guidage
4. Poignée
5. Pneu
6. Disjoncteur
7. Port de chargeur de batterie
8. Boîtier de batterie
9. Accoudoirs rabattables, à largeur
réglable
10. Siège
11. Levier pivotant de réglage de la
hauteur du siège
12. Montant de siège
13. Bouton de réglage de la largeur des
appui-bras
14. Levier de blocage du moteur
15. Levier de déblocage de la roue
arrière
16. Assemblage des roues arrière
17. Poignée de guidage/Panneau de
commande
1
3
6
11
7
9
4
12
8
5
2
Trek 4
Poids
Trek 3 – 21,45 kg (47,3 lb) (base)
6,4 kg (14,2 lb) (siège)
10,25 kg (22,6 lb) (batterie)
Trek 3 Ultra– 21,45 kg (47,3 lb) (base),
8,5 kg (18,8 lb) (siège)
10,25 kg (22,6 lb) (batterie)
Trek 4 – 25,53 kg (56,3 lb) (base)
6,4 kg (14,2 lb) (siège)
10,25 kg (22,6 lb) (batterie)
Trek 4 Ultra– 25,53 kg (56,3 lb) (base),
8,5 kg (18,8 lb) (siège)
10,25 kg (22,6 lb) (batterie)
Roues motrices
Roues en alliage léger 17,5 cm (8 po)
standard, aver. Bande ant-crevaison
Batteries
Bloc batteries 2 X 12 AH
Chargeur de batterie
non transporté 1,5 A
Sièges, rembourrage et modèle
Trek 3/4 - standard
Trek 3/4 Ultra – siège de pêcheur
tout confort
Matériau : vinyle
Couleur : noir
Largeur : Trek 3/4 - 15, 17 po
Profondeur : Trek 3/4 - 15, 17 po
Appui-bras
Appui-bras escamotable avec garniture de 10 po
Il est possible que tous ces dispositifs ne
soient pas disponibles sur certains scooters
ou en conjonction avec d’autres dispositifs.
Veuillez consulter votre fournisseur pour
plus de détails. Votre fournisseur agréé
peut également vous donner plus
d’informations sur les accessoires.
GUARDIAN TREK
1
3
6
11
12
13
13
14
16
16
14
7
5
9
17
17
8
10
10
2
Trek 3
Page 35

930490 Rev. C
IV. Notice– À Lire Avant Toute Utilisation
35
Français
IV. NOTICE – À LIRE AVANT TOUTE UTILISATION
A. CHOISISSEZ LE SCOOTER ET LES OPTIONS DE SÉCURITÉ LES MIEUX ADAPTÉS
À VOTRE CAS
Sunrise propose de nombreux modèles d’aides de locomotion pour répondre aux besoins des
utilisateurs. Toutefois, la sélection finale d’un scooter repose entièrement sur vous et votre
médecin. Pour choisir le scooter le mieux adapté à vos besoins, tenez compte des éléments
suivants :
1. Votre taille, invalidité, force physique, sens de l’équilibre et coordination
2. L’usage prévu et le niveau d’activité.
3. Le type de risques que vous devez surmonter quotidiennement (sur les lieux où il est
probable que vous utiliserez votre scooter).
4. Le besoin d’options pour votre sécurité et votre confort (ex : sangles de maintien ou
sièges spéciaux).
B. RÉGLEZ LE SCOOTER SELON VOS CAPACITÉS PHYSIQUES
Veillez à obtenir l’aide de votre médecin, aide-soignant(e) ou thérapeute et de votre fournisseur, pour adapter ce scooter et en régler les commandes à votre niveau de fonction et
de capacité.
C. CONSULTEZ CE MANUEL RÉGULIÈREMENT
Avant d’utiliser ce scooter, nous vous conseillons ainsi qu’à toute personne susceptible de
vous aider, de lire entièrement ce manuel et d’en suivre toutes les instructions. Consultez
régulièrement les avertissements jusqu’à ce que vous les observiez automatiquement.
D. AVERTISSEMENTS
Le terme « AVERTISSEMENT » indique un risque ou une pratique dangereuse pouvant
vous causer, ainsi qu'à d'autres personnes, des blessures graves, voire mortelles. Les
« Avertissements » sont répartis sous les quatre catégories suivantes :
1. V - EMI
Cette section explique la notion d’interférences électromagnétiques et comment ces
dernières peuvent affecter votre scooter.
2. VI – AVERTISSEMENTS D’ORDRE GÉNÉRAL
Dans cette section, vous trouverez une liste de vérifications de sécurité et un résumé
des risques dont vous devez être conscient avant d’utiliser ce scooter.
3. VII - AVERTISSEMENTS – COMPOSANTS ET OPTIONS
Cette section décrit votre scooter. Demandez à votre fournisseur agréé et à votre conseiller en soins de santé de vous aider à choisir la meilleure configuration et les
meilleures options pour une utilisation sécuritaire.
4. XI - BATTERIES
Cette section énumère les précautions à prendre lors de l’utilisation de la batterie et
du chargeur, et comment éviter de vous blesser.
REMARQUE -
Dans les cas applicables, vous trouverez également des « Avertissements » dans d'autres
sections de ce manuel.
Page 36

930490 Rev. C
36
Français
V. EMI (Interférence Électromagnétique)
V. EMI (INTERFÉRENCE ÉLECTROMAGNÉTIQUE)
AVERTISSEMENT
Observez tous les avertissements afin de réduire tout risque de relâchement des
freins ou de mouvement involontaire du scooter.
1. Soyez conscient(e) du danger posé par les émetteurs-récepteurs portables. N'allumez
ou n'utilisez jamais
d’émetteur-récepteur portable lorsque votre scooter est sous tension. Redoublez de
prudence
lorsque vous pensez qu’il est possible qu’un tel appareil soit utilisé à proximité de
votre scooter.
2. Soyez conscient(e) de la proximité de stations de radio ou de télévision et évitez de
vous en approcher.
3. En cas de mouvement involontaire, arrêtez le moteur du scooter dès que cela ne pose
pas de risque.
A. QU’EST-CE QUE L’EMI ?
AVERTISSEMENT
1. EMI signifie : interférence (I) électromagnétique (EM). Les interférences
électromagnétiques sont émises par des sources d’ondes radio telles que les
transmetteurs et les émetteurs-récepteurs radio. (Un « transmetteur » est un
appareil qui émet et reçoit à la fois des signaux d’ondes radio).
2. Chaque jour, nous côtoyons un certain nombre de sources d’EMI intenses.
Certaines sont évidentes et peuvent être aisément évitées. D’autres ne le sont pas et il
est possible que vous ne puissiez pas les éviter.
3. Les scooters électriques peuvent être affectés par les interférences électromagnétiques (EMI) émises par les stations de radio, les stations de télévision, les transmetteurs radio amateur, les émetteurs-récepteurs et les téléphones portables.
4. Une EMI peut également être émise par des sources de conduction ou des décharges
électrostatiques (ESD).
B. QUELS SONT LES EFFETS POSSIBLES D’UNE EMI ?
AVERTISSEMENT
1. Une EMI peut provoquer sans signal préalable les effets suivants sur votre scooter :
•Desserrage des freins
•Déplacement involontaire.
•Déplacement dans des directions imprévues. Un de ces incidents peut vous causer de
graves blessures ou en causer à autrui.
2. Une EMI peut endommager le système de commande de votre scooter Cela peut créer
un danger et entraîner des réparations coûteuses.
C. SOURCES D’EMI
AVERTISSEMENT
Les sources d’EMI se classent en trois grandes catégories :
1. Émetteurs-récepteurs portables :
L’antenne est généralement fixée directement sur l’appareil. Parmi ceux-ci, on distingue :
•Radios CB (« Citizens band »)
•« Talkies-walkies »
•Radios utilisées par les agences de sécurité, par les pompiers et la police
•Téléphones portables (cellulaires)
•Ordinateurs portables munis d’un téléphone ou d’un télécopieur
•Autres appareils de communication individuels
REMARQUE -
Ces appareils peuvent transmettre des signaux lorsqu’ils sont en marche, même s’ils ne
sont pas utilisés.
Page 37

930490 Rev. C
V. EMI (Interférence Électromagnétique)
37
Français
2. Émetteurs-récepteurs mobiles à moyenne portée :
Parmi ceux-ci on distingue les émetteurs-récepteurs radio utilisés dans les véhicules de
police, de pompiers, les ambulances et les taxis. L’antenne est généralement fixée à l’extérieur du véhicule.
3. Émetteurs-récepteurs longue portée :
Cette catégorie comprend les pylônes d’antennes d’émission de radios et de télévisions
commerciales, ainsi que des radio-amateurs. Remarque : les appareils suivants ne sont pas
considérés comme pouvant causer de problèmes d’interférences électromagnétiques :
Ordinateurs portables (sans téléphone ou télécopieur), téléphones sans fil, postes de télévision ou radios AM/FM, lecteurs CD ou magnétophones.
D. DISTANCE DE LA SOURCE
AVERTISSEMENT
L’énergie électromagnétique s’intensifie rapidement à mesure que l’on se rapproche de la source. Pour cette raison, les interférences émises par les appareils
portables méritent une attention particulière. (Voir C.1) Une personne utilisant
l’un de ces appareils peut émettre, à votre insu, des niveaux d’énergie électromagnétique élevés à une distance très proche de votre scooter.
E. NIVEAU DE PROTECTION
AVERTISSEMENT
1. Le niveau d’énergie électromagnétique se mesure en volts/mètre (V/m). Chaque
scooter électrique peut résister à l’EMI jusqu’à un certain point. Il s’agit du « niveau
de protection ».
2. Plus le niveau de protection est élevé, moins les risques d’EMI sont importants. Il est
généralement admis qu’un niveau de protection de 20 V/m protège l’utilisateur du
scooter électrique des sources d’ondes radio les plus courantes.
AVERTISSEMENT
Les personnes aux capacités physiques réduites nécessitant l’usage d’un dispositif
d’entrée de commande spécialisé reconnu pour ne pas être protégé à 20 V/m ou
si le niveau de cette protection n’est pas connu, doivent redoubler de prudence à
proximité de sources d’EMI connues.
AVERTISSEMENT
Il n’existe aucun moyen de connaître les effets des EMI si vous ajoutez des accessoires ou si vous modifiez ce scooter. Toute modification apportée à votre scooter
peut augmenter le risque d’EMI. Les pièces d’autres fournisseurs ont des propriétés d’EMI inconnues.
F. SIGNALEZ TOUT INCIDENT PRÉSUMÉ D’EMI
AVERTISSEMENT
Il est fortement conseillé de signaler tout déplacement involontaire ou relâchement des freins. Veillez à indiquer si une source d’ondes radios se trouvait à
proximité de votre scooter au moment de l’incident. Contactez : le service à la
clientèle de Sunrise Medical au (800) 333-4000.
Page 38

930490 Rev. C
38
Français
VI. Avertissements d’Ordre Général
VI. AVERTISSEMENTS D’ORDRE GÉNÉRAL
AVERTISSEMENT
Tenez compte de tous les avertissements de cette section. Si vous ne les observez
pas, une chute, un basculement ou une perte de contrôle peut se produire et
causer aux utilisateurs ou à d'autres personnes des blessures graves.
A. NOTICE AUX UTILISATEURS
AVERTISSEMENT
1. Avant d’utiliser ce scooter, il est fortement conseillé de suivre une formation dispensée par votre médecin sur l’utilisation sécuritaire de ce scooter.
2. Chaque scooter est différent. Prenez le temps de vous familiariser avec le scooter
avant de l’utiliser.
3. Vous devrez savoir qu’il vous faut développer vos propres méthodes d’utilisation sécuritaire du scooter, adaptées à votre niveau de fonction et à vos capacités.
4. Faites-vous aider par quelqu’un pour vous exercer à vous pencher, à tendre le bras et
à effectuer les transferts jusqu’à ce que vous sachiez faire ces mouvements en toute
sécurité.
5. Ne tentez jamais une nouvelle manœuvre tout(e) seul(e) sans être sûr(e) qu’il n’y a
pas de danger.
6. Familiarisez-vous avec les lieux où vous prévoyez d’utiliser votre scooter. Repérez les
dangers éventuels et apprenez à les éviter.
7. N’autorisez aucun autre passager sur le scooter, les accoudoirs ou le châssis. Cela
pourrait causer des dommages corporels ou matériels.
B. NOTICE AUX ACCOMPAGNATEURS
AVERTISSEMENT
Veillez à observer tous les avertissements et à respecter toutes les instructions et
consignes de chaque section de ce manuel. (Notez que les avertissements qui
s’adressent aux utilisateurs s’adressent également à vous).
Remarques :
1. Vous devrez avec l’usager, son médecin, l'infirmier(ère) ou son thérapeute
développer les méthodes sécuritaires les mieux adaptées à vos capacités et à celles
de l’usager.
2. Pour pouvoir pousser le scooter manuellement, il faut débloquer les mécanismes de
blocage de moteur.
•Veillez à garder le contrôle total du scooter lorsque vous débloquez ces mécanismes.
Une fois ces mécanismes débloqués, le scooter n’aura plus de freins.
3. Faites avancer ce scooter par les supports d’appui-bras seulement. Si vous utilisez
une armature de siège, faites avancer le scooter par les poignées de manœuvre
situées en haut des montants du dossier. Ces poignées vous permettent de maintenir
l'arrière du scooter et d’empêcher sa chute ou son basculement.
C. LIMITE DE POIDS
AVERTISSEMENT
1. Ne dépassez jamais un poids total de 113,6 kg (250 lb), comprenant l’utilisateur et
les articles transportés.
2. N’utilisez jamais ce scooter pour faire des exercices de musculation si le poids total
(l’usager et poids supplémentaires) dépasse 113,6 kg (250 lb).
3. Tout dépassement de la limite de poids risque d’endommager le siège, l’armature ou
les attaches et peut, en raison d’une défaillance du scooter, causer un accident grave
autant pour vous que pour d’autres personnes.
4. Tout dépassement de la limite de poids annule la garantie.
Page 39

930490 Rev. C
VI. Avertissements d’Ordre Général
39
Français
D. EMI
AVERTISSEMENT
Lisez la section V pour vous informer sur les EMI et pour réduire tout risque de
relâchement des freins ou de mouvement involontaire du scooter.
1. N’allumez ou n’utilisez jamais d’émetteur-récepteur portable lorsque votre scooter est
sous tension. Redoublez de prudence lorsque vous pensez qu’il est possible qu’un tel
appareil soit utilisé à proximité de votre scooter.
2. Soyez conscient(e) de la proximité de stations de radio ou de télévision et évitez de
vous en approcher.
3. En cas de mouvement ou de relâchement involontaire des freins, mettez votre scooter
hors tension dès que vous pouvez le faire sans danger.
E. LISTE DES VÉRIFICATIONS DE SÉCURITÉ
AVERTISSEMENT
Avant chaque utilisation de ce scooter :
1. Assurez-vous que le scooter fonctionne sans problème. Prêtez attention aux bruits,
aux vibrations ou à tout changement dans la facilité d’emploi. (Ces signes peuvent
indiquer que les pneus ne sont pas assez gonflés, que des attaches sont desserrées,
ou que votre scooter est endommagé.) Si vous détectez un problème, veillez à faire
réparer ou régler votre scooter. Remettre une réparation ou un réglage à plus tard
peut augmenter les risques d’accident. Votre fournisseur peut vous aider à détecter
le problème et à y remédier.
2. Assurez-vous que les batteries sont chargées. Les voyants verts de l’indicateur de
charge s’allument (ou l’indicateur de charge signale une pleine charge), lorsque la
charge est complète. Les voyants jaunes indiquent que le niveau de charge de la batterie est en baisse. Les voyants rouges indiquent que les batteries doivent être
rechargées immédiatement.
F. CHANGEMENTS ET RÉGLAGES
AVERTISSEMENT
Utilisez uniquement les pièces Guardian ou ne faites jamais de modifications sur
votre scooter sans l’autorisation de Sunrise. (Le non respect de cette consigne
annulera la garantie et pourrait créer un risque d’accident.)
1. Modifier ou régler ce scooter peut augmenter les risques de chute ou de basculement.
2. Les modifications non autorisées par Sunrise sont considérées comme une reconstruction du scooter et entraînent l’annulation de la garantie. L’usager assume alors toute
responsabilité future pour le scooter.
G. LORSQUE VOUS ÊTES DANS UN SCOOTER À L’ARRÊT
AVERTISSEMENT
1. Coupez toujours l’alimentation de votre scooter lorsque vous êtes à l’arrêt, ne seraitce que pour un instant. Cela empêche :
•tout mouvement accidentel pouvant se produire si vous (ou d'autres personnes)
touchez le boîtier de commande.
•tout relâchement des freins ou mouvement involontaire causé par des sources d’EMI.
(Voir la section V)
2. Veillez à ce que les personnes qui vous aident (par exemple, les employés de magasins)
soient conscients du boîtier de commande et ne le touchent pas. S’ils le touchent, votre
scooter peut bouger brusquement, lorsque vous ne vous y attendez pas.
Page 40

930490 Rev. C
40
Français
VI. Avertissements d’Ordre Général
H. CONDITIONS ENVIRONNEMENTALES
AVERTISSEMENT
Le scooter n’est pas prévu pour être utilisé lorsqu’il pleut abondamment, qu’il
neige, ou qu’il y a du verglas.
1. Le contact avec l’eau ou avec une humidité excessive peut causer une panne électrique. L’armature, les moteurs et d’autres pièces du scooter ne sont pas étanches et
peuvent rouiller ou se corroder de l’intérieur. Pour éviter les pannes du scooter :
• Minimisez l’exposition de votre scooter à l’eau de pluie ou aux conditions d’hu-
midité extrême.
• Ne placez jamais votre scooter dans une douche, une baignoire, une piscine ou un
sauna.
• N’utilisez pas votre scooter dans de l’eau douce ou de l’eau salée (rive de rivière,
lac ou rivage marin).
• Veillez à bien fixer la housse du couvercle.
• Veillez à ce que tous les branchements électriques soient effectués correctement.
• Séchez votre scooter dès que possible s'il est mouillé ou si vous le nettoyez à l'eau.
2. Avancez lentement et redoublez de prudence si vous devez utiliser votre scooter sur
les surfaces mouillées ou glissantes.
• Ne vous aventurez sur ce type de surface que si vous êtes certain(e) de pouvoir le
faire sans danger.
• Arrêtez-vous si l’une des roues principales (ou les deux) perd de la traction Si cela
se produit, vous risquez de perdre le contrôle de votre scooter ou de tomber.
• N’utilisez jamais votre scooter sur une pente ou une rampe en présence de neige,
de verglas, d’eau ou d’huile.
• Dans le doute, faites-vous aider par quelqu'un.
3. Lorsqu’il est inutilisé, placez votre scooter dans un endroit propre et sec.
I. TERRAIN
AVERTISSEMENT
1. Ce scooter est conçu pour être utilisé sur des surfaces uniformes et fermes, comme le
béton, l'asphalte, et sur les planchers et moquettes à l'intérieur.
2. N'utilisez pas votre scooter sur des terrains sablonneux, meubles ou accidentés. Cela
pourrait endommager les roues, les roulements, les essieux, les moteurs, ou bien
desserrer les attaches.
J. UTILISATION DANS LA RUE
AVERTISSEMENT
Dans la plupart des états, les scooters électriques sont interdits sur la voie
publique. Soyez conscient(e) du danger que représentent les automobiles sur la
voie publique ou dans les parcs de stationnement.
1. Le soir ou lorsque l'éclairage est faible, utilisez un ruban réfléchissant sur votre
scooter et vos vêtements.
2. Il peut être difficile pour les automobilistes de vous voir. Regardez les automobilistes
dans les yeux avant d'avancer. En cas de doute, cédez le passage jusqu'à ce que vous
soyez sûr(e) de pouvoir avancer sans danger.
Page 41

930490 Rev. C
VI. Avertissements d’Ordre Général
41
Français
K SÉCURITÉ EN VOITURE
AVERTISSEMENT
À ce jour, le US Department of Transportation n’a approuvé aucun système d’attache pour transporter un scooter dans un véhicule.
1. Ne prenez jamais place dans ce scooter lorsqu’il est dans un véhicule en mouvement.
En cas d’accident ou d’arrêt brusque, vous risqueriez d’être éjecté(e) du scooter.
2. Asseyez-vous toujours sur un siège automobile approuvé. Vous devez être
maintenu(e) à l’aide des dispositifs appropriés.
3. Ne transportez jamais ce scooter sur le siège avant d'un véhicule. Il pourrait bouger
et gêner le conducteur.
4. Fixez toujours ce scooter de manière à ce qu'il ne puisse ni rouler ni être déplacé.
L. CENTRE D'ÉQUILIBRE
AVERTISSEMENT
Le point où ce scooter basculera vers l'avant, l'arrière ou sur le côté dépend de
son centre d'équilibre et de sa stabilité.
Le centre d'équilibre est affecté par :
1. la hauteur et l'angle du siège,
2. un changement de la position du corps ou de la répartition du poids,
3. l'utilisation du scooter sur une rampe ou une pente,
4. l'usage d'un sac à dos ou d’autres dispositifs, ainsi que le poids ajouté.
Pour réduire le risque de chute ou de basculement :
1. Consultez votre fournisseur pour tout renseignement concernant les modifications
autorisées par Sunrise avant de modifier ou de régler ce scooter.
REMARQUE -
Vous devrez probablement faire d’autres changements pour rectifier le centre d’équilibre.
2. Usez d’extrême prudence tant que vous ne connaissez pas les points d’équilibre de ce
scooter et la manière d’éviter une chute ou un basculement.
M. TRANSFERTS
AVERTISSEMENT
Il est dangereux d'effectuer le transfert seul(e). Cela exige un bon équilibre et de
l'agilité. N'oubliez pas qu'à un moment donné du transfert, le siège du scooter
n'est pas situé au-dessous de vous. Pour éviter une chute :
1. Coupez toujours l’alimentation avant d’effectuer un transfert dans l’un ou l’autre sens.
Si vous ne prenez pas cette précaution et si vous touchez le levier/boîtier de commande, votre scooter pourrait bouger de façon inattendue.
2. Assurez-vous que les dispositifs de blocage du moteur sont enclenchés. Cela empêche
le scooter de bouger durant votre transfert.
3. Apprenez les méthodes sécuritaires auprès de votre professionnel de la santé.
• Apprenez à placer votre corps et à vous soutenir lors d’un transfert.
• Faites-vous aider jusqu'à ce que vous puissiez effectuer seul(e) un transfert en
toute sécurité.
4. Placez votre scooter le plus près possible du siège sur lequel vous allez vous asseoir.
Si possible, utilisez une planche de transfert.
5. Veillez à ce que les appui-bras ne gênent pas.
6. Enfoncez-vous le plus possible sur le siège pour éviter de vous asseoir à côté du
siège ou de tomber.
Page 42

930490 Rev. C
42
Français
VI. Avertissements d’Ordre Général
N. POUR SAISIR UN OBJET OU VOUS PENCHER
AVERTISSEMENT
Si vous saisissez un objet ou si vous vous penchez, vous affectez le centre
d’équilibre de votre scooter. Un mouvement incorrect pourrait vous faire tomber
ou basculer. En cas de doute, demandez de l'aide ou utilisez un dispositif vous
permettant d’avoir une plus grande portée.
Pour réduire le risque de blessure et / ou de dommage au scooter :
1. Ne saisissez jamais un objet ou ne vous penchez jamais si vous devez déplacer votre
poids sur le côté ou vous lever du siège.
2. Ne saisissez jamais un objet ou ne vous penchez jamais si vous devez vous avancer
sur votre siège pour le faire. Gardez toujours le fessier en contact avec le dossier.
3. Ne saisissez jamais un objet avec les deux mains (vous risquez de ne pas pouvoir
vous rattraper pour prévenir une chute si vous perdez l’équilibre).
4. N'essayez pas de ramasser un objet sur le sol en tendant le bras vers le bas entre vos
genoux.
5. Ne vous appuyez jamais sur la plate-forme repose-pieds lorsque vous saisissez un
objet. Le scooter pourrait basculer si vous vous penchez trop.
6. Ne saisissez pas un objet ou ne vous penchez pas par-dessus le dossier. Cela pourrait
endommager le dossier et vous faire tomber.
SI VOUS DEVEZ TENDRE LE BRAS OU VOUS PENCHER, VOUS LE FAITES À VOS
RISQUES ET PÉRILS.
N’oubliez pas :
1. Amenez votre scooter aussi près que possible de l'objet que vous voulez atteindre.
2. Coupez l’alimentation de votre scooter. Si vous ne prenez pas cette précaution et si
vous touchez le boîtier de commande, votre scooter pourrait bouger de façon inattendue.
3. D’une main, saisissez fermement un appui-bras. Cela vous empêchera de tomber si le
scooter bascule.
O. HABILLAGE OU CHANGEMENT DE VÊTEMENTS
AVERTISSEMENT
Il est important de savoir que la répartition de votre poids peut varier lorsque
vous vous habillez ou changez de vêtements dans ce scooter.
P. OBSTACLES
AVERTISSEMENT
Les seuils de porte, les élévateurs, les rampes et les obstacles tels que les nids
de poule et les chaussées fissurées comptent parmi les obstacles que vous pourrez avoir à surmonter quotidiennement. Ils peuvent endommager votre scooter et
causer une chute, un basculement ou une perte de contrôle.
1. Il faut savoir que les seuils sont très dangereux. (Le moindre changement de hauteur
peut arrêter une roulette et faire basculer votre scooter.) Vous devrez peut-être :
• enlever ou recouvrir les bandes de seuil entre les pièces,
• installer une rampe aux portes d'entrée ou de sortie.
2. Regardez autour de vous lorsque vous êtes dans le scooter ; regardez bien les alentours sur une longue distance devant vous
3. Assurez-vous que le plancher des lieux où vous utilisez ce scooter est plat et
dépourvu d'obstacles.
4. Pour aider à rectifier votre centre d'équilibre :
• Penchez le haut du corps légèrement en avant lorsque vous franchissez un obstacle.
• Appuyez le haut du corps en arrière lorsque vous passez à un niveau inférieur.
Page 43

930490 Rev. C
VI. Avertissements d’Ordre Général
43
Français
Q. DÉPLACEMENT À RECULONS
AVERTISSEMENT
Redoublez de prudence lorsque vous reculez votre scooter. Vous pourriez perdre
contrôle ou tomber si l’une des roues arrière heurte un objet.
1. Faites marcher votre scooter lentement et à une vitesse uniforme.
2. Arrêtez-vous souvent pour vous assurer que la voie est libre.
R. RAMPES, PENTES ET DESCENTES
AVERTISSEMENT
Le centre d’équilibre de votre scooter change lorsque vous êtes sur une pente.
REMARQUE -
Le terme « pente » peut désigner une rampe ou une descente. Votre scooter est moins
stable s'il est en biais. N’utilisez jamais ce scooter sur une pente à moins d’être certain(e) de pouvoir le faire sans danger. Dans le doute, faites-vous aider par quelqu'un.
Faites attention :
1. Aux pentes abruptes. N'utilisez pas ce scooter sur une pente à plus de 10 %. (Une
pente à 10 % signifie : un pied d'élévation pour chaque longueur de pente de 10
pieds.)
2. Aux surfaces mouillées ou glissantes (par exemple, couvertes de verglas, de neige,
d’eau ou d’huile). Une perte de traction peut causer une chute ou un basculement.
3. Aux changements d'inclinaison sur une pente (ou un rebord, une bosse ou un creux).
Ils peuvent causer une chute ou un basculement.
4. À la déclivité au bas d'une pente. (Une déclivité aussi faible que 1,90 cm (3/4 po)
peut bloquer une roulette avant et faire basculer le scooter en avant.)
S. POUR RÉDUIRE LE RISQUE DE CHUTE, DE BASCULEMENT OU DE PERTE DE
CONTRÔLE :
AVERTISSEMENT
1. N’utilisez jamais votre scooter sur une pente à moins d’être certain(e) de pouvoir le
faire sans perte de traction.
2. Déplacez-vous le plus possible en ligne droite, vers le haut ou vers le bas.
• Ne « coupez pas trop court » sur les pentes ou les rampes.
• Ne tournez pas ou ne changez pas de direction alors que vous vous trouvez sur
une pente.
3. Restez toujours au milieu de la rampe. Assurez-vous que la rampe est suffisamment
large pour qu'aucune roue ne risque d’être en dehors.
4. Penchez-vous ou faites pression avec votre corps vers l'amont. Cela vous permet de
vous adapter au changement de centre d'équilibre causé par la pente.
5. Maintenez une vitesse de déplacement lente et régulière. Gardez le contrôle de votre
scooter à chaque instant.
• En descente, ne laissez pas votre scooter accélérer au-delà de sa vitesse normale.
• Si le scooter prend de la vitesse, centrez le levier de commande de manière à
ralentir ou à vous arrêter.
REMARQUE -
La commande à semi-conducteurs de votre scooter est dotée d’un système logique qui
aide à contrôler votre vitesse lors d’un déplacement sur une pente ou en montée.
• Si vous vous arrêtez, redémarrez lentement.
Page 44

930490 Rev. C
44
Français
VI. Avertissements d’Ordre Général
T. RAMPES À LA MAISON ET AU TRAVAIL
AVERTISSEMENT
Assurez-vous que les rampes sont conformes aux codes de construction de votre région.
1. Pour votre sécurité, faites construire ou modifier une rampe conforme à toutes les
normes par un entrepreneur licencié.
2. REMARQUE - La conception d’une telle rampe varie, selon les critères suivants : la
longueur et la hauteur de la rampe, le besoin d’une plate-forme intermédiaire ; la
taille de l’aire de réception ; la présence éventuelle de portes et le sens de leur
ouverture ; et la présence éventuelle d’un tournant ou d’un angle dans la rampe.
Au minimum :
1. Les côtés ouverts de la rampe doivent être dotés de garde-fous pour empêcher votre
scooter de tomber du bord.
2. La pente ne doit pas dépasser un pouce de hauteur par pied de longueur de pente.
3. La surface de la rampe doit être uniforme et antidérapante.
4. L’addition d’une section au dessus ou au dessous peut être nécessaire pour éviter les
rebords ou les déclivités.
5. La rampe doit être solide. L’installation de renforts peut être nécessaire pour que la
rampe ne « fléchisse » pas sous votre poids.
U. ÉLÉVATEURS DE FAUTEUIL/SCOOTER
AVERTISSEMENT
Les élévateurs pour fauteuils roulants / scooters sont utilisés dans les fourgonnettes,
les autobus, et les immeubles pour vous aider à passer d’un niveau à un autre.
1. Coupez toujours l’alimentation de votre scooter lorsque vous êtes sur un élévateur.
Sans cette précaution, votre scooter peut tomber de la plate-forme si vous touchez
accidentellement le boîtier de commande. (N’oubliez pas que le dispositif prévu pour
arrêter un scooter qui roule au bout de la plate-forme peut ne pas suffire à empêcher
un tel accident.)
2. Assurez-vous qu’il n’y a ni rebord ni déclivité en haut ou en bas de la plate-forme. Ils
peuvent causer une chute ou un basculement. Dans le doute, faites-vous aider par
quelqu'un.
3. L’utilisateur doit toujours être maintenu par des courroies pour ne pas tomber durant
son transfert.
4. Évitez d’avancer si une roue est « accrochée » sur le rebord d’une rampe. Reculez,
re-positionnez la roue avant pour une approche plus directe et faites lentement une
seconde tentative.
V. TROTTOIRS ET MARCHES
AVERTISSEMENT
1. Votre scooter n’est pas conçu pour escalader ou descendre un trottoir ou une marche
de plus de 1/2 pouce de haut. De telles tentatives peuvent :
• faire chuter ou basculer le scooter
• endommager l’armature, les roues, les essieux ou les autres parties du scooter, ou
bien desserrer les attaches.
2. Pour prévenir une chute ou un basculement, utilisez les rampes d’accès pour scooter
ou faites-vous aider par quelqu’un.
3. Si vous devez monter ou descendre d’un trottoir ou d’une marche seul(e), faites-le à
vos risques et périls et faites preuve d’extrême prudence.
• Montez ou descendez en ligne droite dans la mesure du possible. Ne tournez, ne
montez ou ne descendez jamais en biais, car une chute ou un basculement pourrait se produire.
• Avancez lentement, à une vitesse régulière.
4. Veillez à ce que les personnes qui vous aident consultent les « Conseils aux accompagnateurs» et respectent tous les avertissements.
5. Évitez de vous déplacer le long des bords de trottoirs et des déclivités. Une distance
minimum de 45 cm (18 po) à partir du bord est recommandée.
Page 45

930490 Rev. C
VI. Avertissements d’Ordre Général
45
Français
W. ESCALIERS
AVERTISSEMENT
N’utilisez jamais ce scooter pour monter ou descendre un escalier, même si
quelqu’un vous aide. Vous pourriez tomber ou basculer.
X. ESCALIERS ROULANTS
AVERTISSEMENT
N'utilisez jamais ce scooter sur un escalier roulant, même si quelqu'un vous aide.
Vous pourriez tomber ou basculer.
Page 46

930490 Rev. C
46
Français
VII. Avertissements : Composants et Options
VII. AVERTISSEMENTS : COMPOSANTS ET OPTIONS
AVERTISSEMENT
Remarque : L’utilisation de pièces ou des modifications non autorisées par
Sunrise peuvent créer un danger et annuler la garantie.
A. APPUI-BRAS
AVERTISSEMENT
Les accoudoirs sont rabattables vers l’arrière / le bas et ne peuvent pas servir à
soulever le scooter ou le siège.
1. Ne soulevez jamais ce scooter par ses appui-bras.
2. Soulevez ce scooter uniquement par les parties non détachables de l'armature principale.
B. BATTERIES
AVERTISSEMENT
1. Seul un boîtier de batterie approuvé doit être utilisé sur cet appareil.
2. Pour éviter que l’acide ne se renverse, gardez toujours le boîtier de batterie à la verticale. (batteries hydro-électriques uniquement)
3. Ne fumez ou n'approchez jamais une flamme vive du boîtier de batterie. Cela présente
des risques d’explosion.
4. Lisez entièrement la section XI Batteries avant d'essayer de remplacer ou de charger
les batteries.
5. Enlevez toujours les batteries à l’aide des sangles ou de la poignée fournie(s). Vous
risquez de vous pincer les doigts si vous retirez les batteries par leur boîtier.
C. COUSSINS
AVERTISSEMENT
1. Les sièges Guardian sont conçus pour votre confort, et non pas pour soulager la pression.
2. Si vous souffrez d’escarres, ou si vous croyez que cela peut se produire, vous aurez
peut-être besoin d’un système de posture spéciale ou d’un mécanisme de contrôle de
posture.
• Consultez votre médecin, votre infirmier(ère) ou votre thérapeute pour savoir si
vous avez besoin d'un tel dispositif pour votre bien-être.
D. ATTACHES
AVERTISSEMENT
Un grand nombre des vis, boulons et écrous de ce scooter sont des attaches spéciales à haute résistance. L'utilisation d'attaches inadéquates peut causer un
mauvais fonctionnement de votre scooter.
1. Utilisez uniquement les attaches fournies par Sunrise.
2. Si des attaches se desserrent, resserrez-les dès que possible.
3. Des attaches serrées excessivement ou insuffisamment peuvent se rompre ou endommager certaines pièces du scooter.
• La Section IX, « Montage, réglage et utilisation » indique les couples de serrage
corrects.
Page 47

930490 Rev. C
VII. Avertissements : Composants et Options
47
Français
E. MÉCANISMES DE BLOCAGE DU MOTEUR
AVERTISSEMENT
1. N’enclenchez ou ne désenclenchez pas les dispositifs de blocage à moins que l’alimentation du scooter ne soit coupée.
2. N’oubliez pas que le scooter n’aura pas de freins une fois que les dispositifs de
blocage sont en position roue libre.
3. Veillez à ce que la personne qui pousse le scooter le contrôle totalement lorsque les
mécanismes de blocage sont désenclenchés.
F. INTERRUPTEUR MARCHE / ARRÊT
AVERTISSEMENT
1. N’utilisez jamais l’interrupteur MARCHE / ARRÊT pour arrêter le scooter sauf en cas
d’urgence. Cela causerait un arrêt brusque et pourrait vous faire tomber.
2. Pour ralentir votre scooter jusqu’à l’arrêt, remettez le levier de commande au point
mort.
G. SYSTÈME D’ASSISE
AVERTISSEMENT
1. L'usage d'un système d’assise non approuvé par Sunrise peut altérer le centre d'équilibre de ce scooter Cela peut causer une chute ou un basculement.
2. Ne changez jamais le système d’assise de votre scooter sans avoir préalablement consulté votre fournisseur.
H. TISSU DE REMBOURRAGE
AVERTISSEMENT
1. Remplacez le tissu usé ou déchiré du siège le plus tôt possible. Sinon, le siège peut céder
et vous pourriez tomber. Les matériaux usés peuvent accroître les risques d’incendie.
2. Le tissu s'affaiblit avec le temps et l'usage. Assurez-vous de l'absence de tissu effiloché,
mince, ou étiré au niveau des trous à rivets Remplacez le tissu lorsque nécessaire.
3. Notez que laver le tissu peut en réduire les propriétés ininflammables.
I. CÂBLAGE
AVERTISSEMENT
Ne tirez jamais directement sur les câbles. Cela pourrait avoir pour résultat la rupture des fils situés à l’intérieur du connecteur ou du faisceau. Pour enlever une
fiche ou un connecteur, tenez toujours la fiche ou le connecteur proprement dit.
Page 48

930490 Rev. C
48
Français
VIII. Conseils aux Accompagnateurs
VIII. CONSEILS AUX ACCOMPAGNATEURS
AVERTISSEMENT
1. Les personnes aidant un utilisateur à l'une des tâches suivantes sont invitées à
consulter et à observer les avertissements « Notice aux Accompagnateurs » et
tous les avertissements de ce manuel concernant la tâche en question.
2. Les « conseils » qui suivent ne sont que des suggestions. Notez que vous devrez
apprendre les méthodes satisfaisant aux conditions de sécurité les plus adaptées
à l'utilisateur et à vos propres capacités. Consultez votre professionnel de la
santé pour des instructions à ce sujet.
A. MONTER UN TROTTOIR OU UNE SEULE MARCHE
AVERTISSEMENT
Voici une méthode pour aider un utilisateur à monter en toute sécurité un trottoir ou une seule marche, en progressant vers l’avant.
1. Restez derrière le scooter.
2. En faisant face au trottoir, inclinez le scooter vers le haut sur les roues arrière, de
manière à ce que les roues avant ne touchent plus le trottoir ou la marche.
3. Avancez, en plaçant les roues avant sur le trottoir ou la marche dès que vous êtes
certain(e) qu'elles ont dépassé le bord.
4. Continuez à avancer jusqu'à ce que les roues arrière touchent le trottoir ou la marche.
Soulevez puis faites rouler les roues arrière sur le trottoir ou la marche.
B. DESCENDRE UN TROTTOIR OU UNE SEULE MARCHE
AVERTISSEMENT
Voici une méthode pour aider un utilisateur à descendre en toute sécurité un
trottoir ou une seule marche à reculons.
1. Restez derrière le scooter.
2. Environ un mètre avant d'arriver au bord du trottoir ou de la marche, tournez le
scooter et tirez-le vers l’arrière.
3. Procédez avec précaution. Tout en regardant vers l’arrière, reculez avec précaution
jusqu’à ce que vous ayez descendu le trottoir ou la marche.
4. Tirez le scooter vers vous jusqu'à ce que les roues arrière touchent le bord du trottoir
ou de la marche. Laissez alors les roues arrière rouler lentement et descendre le trottoir ou la marche.
5. Une fois les roues arrière descendues et en sécurité, inclinez le scooter en arrière
pour le ramener à son point d'équilibre. Cela soulève les roues avant du trottoir ou de
la marche.
6. Maintenez le scooter en équilibre et reculez à petits pas. Regardez bien où vous vous
dirigez. Tournez le scooter dans l'autre sens et abaissez doucement les roues avant sur
le sol.
Page 49

930490 Rev. C
IX. Montage, Réglage et Utilisation
49
Français
IX. MONTAGE, RÉGLAGE ET UTILISATION
REMARQUES :
1. Surface de travail pour l’installation :
Utilisez une surface plate, comme une table, pour monter, régler et vérifier le scooter. Une
telle surface facilite le déroulement des opérations et assure une installation correcte.
2. Attaches :
• Un grand nombre des vis et des boulons de ce scooter sont des attaches spéciales à
haute résistance et peuvent être recouverts d’enduits spéciaux.
• De nombreux écrous sont du type « Nylock ». Ils sont munis d’un encart en plastique
prévu pour les empêcher de se desserrer.
AVERTISSEMENT
1. L'utilisation d'attaches inadéquates peut causer un mauvais fonctionnement de
votre scooter.
2. Des attaches serrées excessivement ou insuffisamment peuvent se rompre ou
endommager certaines pièces.
3. Si des boulons ou vis se desserrent, resserrez-les dès que possible. Des boulons
ou des vis desserrés peuvent endommager d'autres pièces et provoquer leur
mauvais fonctionnement.
3. Rondelles et pièces d'écartement
• Notez la position des rondelles et des pièces d’écartement avant le démontage.
• Pour la protection de l’armature, changez toutes les rondelles et les pièces d’écartement lorsque vous remontez les pièces.
4. Couples de serrage :
• La mesure du couple de serrage est la meilleure méthode de serrage pour une attache
particulière. Utilisez une clé dynamométrique de 120 pouces-livres pour fixer correctement les vis, écrous et boulons de ce scooter.
REMARQUE -
Sauf mention contraire, utilisez un couple de serrage de 120 pouces-livres pour toutes
les attaches.
OUTILLAGE REQUIS
1. Trousse à outils élémentaires :
Pour monter, régler et entretenir votre scooter, vous aurez besoin des outils suivants :
• Clé hexagonale de 4 mm
• Clé à fourche de 10 mm
• Tournevis cruciforme ou à lame plate
Vous pouvez obtenir une trousse multi-usage auprès de Sunrise ou acheter les outils dont
vous avez besoin dans une quincaillerie.
2. Clé dynamométrique :
Si vous prévoyez de régler et d’entretenir vous-même ce scooter, Sunrise vous conseille d’utiliser une clé dynamométrique.
REMARQUE -
La clé doit mesurer les pouces-livres. Vous pouvez acheter une clé dynamométrique et
les douilles adéquates dans une quincaillerie.
AVERTISSEMENT
Lorsqu’il est correctement monté, ce scooter fonctionne sans problèmes. Assurezvous que tous ses composants fonctionnent correctement. Si vous détectez un
problème, veillez à le corriger avant d'utiliser le scooter.
Page 50

930490 Rev. C
50
Français
IX. Montage, Réglage et Utilisation
A. RETRAIT DU BOÎTIER DE LA BATTERIE (FIGURE 1)
Pour retirer les batteries en vue du transport ou de l’entretien :
Soulevez la poignée (A), et décrochez le Velcro®.
REMARQUE–
Pour accéder plus facilement au boîtier des batteries, enlevez le siège du scooter.
AVERTISSEMENT
Les batteries peuvent peser jusqu’à 25 kg (55 lb). Vous devrez prendre des précautions pour éviter de vous blesser en tirant sur les sangles du boîtier.
B. INSTALLATION DES APPUI-BRAS ET RÉGLAGE DE LA LARGEUR. (FIGURE 2)
a. Insérez le support de l’appui-bras à l’intérieur du tube carré de 1 po (B) situé
sous le siège.
b. Répétez cette procédure de l’autre côté du siège.
c. Positionnez l’appui-bras à la largeur appropriée.
d. Serrez les vis (C) sur le tube carré.
AVERTISSEMENT
Évitez de vous pincer les doigts avec l’appui-bras rabattable.
C. POIGNÉE DE GUIDAGE
1. Réglage de la poignée de guidage (Figure 3)
Le scooter électrique comporte une poignée de guidage réglable qui peut être verrouillée
dans la position de conduite la plus confortable. Ce dispositif permet également de replier
la poignée à fond vers le bas pour le transport et l'arrimage.
a. Soutenez la poignée de guidage de la main.
b. Desserrez le côté souple du bouton de la poignée de guidage (D) pour désenclencher
les dents.
c. Déplacez la poignée de guidage à l’angle désiré.
d. Serrez le bouton de la poignée de guidage jusqu’à ce que les dents soient bien
enclenchées.
2. Mécanisme de blocage de la poignée de guidage (Figures 3 et 4)
Le mécanisme de blocage bloque la poignée de guidage et les roues avant dans une position fixe. Lorsque la poignée de guidage est bloquée cela facilite le montage, le démontage
et le transport du scooter.
a. Localisez le dispositif de blocage rouge (E) à l’avant de la poignée de guidage.
b. Poussez le dispositif vers le haut et par-dessus pour bloquer la poignée de guidage.
(Fig. 4)
c. Inversez l’étape pour débloquer le dispositif.
3
4
1
2
A
D
E
B
C
Page 51

930490 Rev. C
IX. Montage, Réglage et Utilisation
51
Français
D. RETRAIT DU SIÈGE (FIGURE 5)
1. Relevez le levier rouge à droite du siège (A).
2. Retirez le siège.
E. PIVOTEMENT DU SIÈGE (FIGURE 6)
1. Relevez le levier rouge à droite du siège (A).
2. Faites pivoter le siège dans la position souhaitée.
3. Relâchez le levier rouge lorsque le siège s’enclenche dans l’une des quatre positions.
F. RÉGLAGE DE LA HAUTEUR DU SIÈGE (FIGURE 7)
1. Retirez le siège et soulevez le boîtier de batterie pour pouvoir accéder à la goupille
du montant de siège.
2. Enlevez la goupille (B) du montant du siège.
3. Déplacez le montant vers le haut ou vers le bas pour sélectionner la hauteur de siège
souhaitée.
4. Réinsérez la goupille du montant du siège.
G. INSTALLATION ET RETRAIT DU PANIER (FIGURE 8)
1. Pour installer le panier, placez les ouvertures qui se trouvent à l’arrière du panier sur
les crochets à l’avant de la poignée de guidage tel qu’illustré.
2. Pour l’enlever, soulevez le panier et retirez-le des crochets.
5
6
A
A
7
B
8
Page 52

930490 Rev. C
52
Français
IX. Montage, Réglage et Utilisation
H. DÉMONTAGE (FIGURES 9 ET 10)
Il est facile de démonter votre scooter pour le transporter ou le ranger.
1. Enlevez le siège.
2. Soulevez la batterie.
3. Baissez la poignée de guidage, puis bloquez-la. (Fig. 9) (Lorsque vous bloquez la
poignée de guidage, le scooter est stabilisé, ce qui facilite le montage, le démontage
et le transport. Lorsque la poignée de guidage est abaissée et bloquée, cela offre un
point d’arrimage pour soulever facilement la partie principale et la séparer des roues
arrière.)
4. Poussez le levier rouge de dégagement rapide (A) vers l’arrière et soulevez la partie
principale des roues arrière.
9
10
A
Page 53

930490 Rev. C
X. Guide d’Utilisation
53
Français
X. GUIDE D’UTILISATION
A. DISJONCTEURS (FIGURE 1)
1. Remarques :
Votre modèle Guardian Trek est équipé d’un disjoncteur, situé sur le boîtier de la batterie (A).
• Dans le cas improbable d’un court-circuit ou d’une forte surcharge, toute l’alimentation parvenant à votre scooter sera coupée.
• Pour réarmer votre scooter, appuyez sur le bouton du disjoncteur situé à l’avant du boîtier de la batterie. Il faut attendre quelques minutes pour que le disjoncteur se réarme.
2. Arrêts répétés :
Si le scooter continue à s’arrêter après avoir été réarmé, faites le réparer par votre fournisseur.
B. FONCTIONS DE COMMANDE DE LA POIGNÉE DE GUIDAGE (FIGURE 2)
REMARQUE– Pour conserver la charge de la batterie, votre scooter se met en mode sommeil au bout
de 5 minutes de marche au ralenti. Pour désactiver le mode sommeil, mettez l’interrupteur en position arrêt, puis en position marche.
1. Commandes manuelles
Toutes les commandes du scooter se trouvent sur le boîtier de commande de la poignée de
guidage.
2. Bouton de pré-réglage de vitesse
Pour réduire la vitesse maximale disponible, tournez le bouton à gauche. Pour augmenter la
vitesse maximale disponible, tournez le bouton à droite.
3. Indicateur de batterie
Il fournit une indication approximative de l’état de charge de la batterie.
Il porte des repères allant de « E » (V=vide) à « F » (P=plein) Par souci de clarté il porte
également une échelle graduée allant du ROUGE (vide) au JAUNE et au VERT (plein).
Lorsque le scooter se déplace sur différents terrains, l’indicateur monte et descend. Cela est
normal. Pour une indication plus précise, arrêtez le scooter et inscrivez les chiffres relevés.
VERT signifie que les batteries sont prêtes à l’usage.
JAUNE signifie que les batteries doivent être rechargées le plus tôt possible.
ROUGE signifie que les batteries doivent être rechargées immédiatement.
REMARQUE –
Si vous constatez que votre batterie est passée dans la zone rouge pendant que vous
vous déplaciez, vous pouvez accroître la portée restante de votre scooter en réduisant
votre vitesse maximale disponible, mais vous DEVEZ charger votre scooter électrique
dès que possible.
4. Levier d’accélération
Ce levier permet de contrôler votre scooter électrique d’un doigt. Il contrôle la vitesse ainsi
que le mouvement vers l’avant ou l’arrière. Poussez le côté droit du levier loin de vous et le
scooter électrique avance. Poussez le côté gauche du levier loin de vous, le scooter recule
et fait retentir un avertisseur de marche arrière. Plus vous bougez le levier et plus votre
vitesse augmente, jusqu'à son maximum pré-réglé Il est possible de faire fonctionner votre
scooter à l’aide d’un côté du levier d’accélération. Pour ce faire, vous devez POUSSER et
TIRER sur le côté choisi du levier d’accélération.
REMARQUE –
L'utilisation d’une seule main exige une grande concentration et est plus fatigante que
l’utilisation normale.
5. Bouton de l’avertisseur
Appuyez sur le bouton jaune pour activer l’avertisseur sonore. Utilisez cette fonction pour
avertir les piétons de votre présence lorsque nécessaire.
6. Interrupteur marche / arrêt
Assurez-vous que cet interrupteur est en position ARRÊT AVANT de monter ou de descendre
du scooter. La mise de cet interrupteur en position ARRÊT pendant la conduite provoquera
l’arrêt brusque du scooter. Cela est déconseillé.
1
2
3
5
6
2
4
A
Page 54

930490 Rev. C
54
Français
X. Guide d’Utilisation
C. MÉCANISMES DE BLOCAGE DU MOTEUR (FIGURE 3)
Déconnectez les mécanismes de blocage du moteur lorsque vous devez pousser le scooter à
la main. (Par exemple, en cas d’urgence ou si les batteries se déchargent.)
AVERTISSEMENT
1. Ne désenclenchez pas les mécanismes de blocage à moins que l’alimentation du
scooter ne soit coupée.
2. Si l’un ou les deux freins sont débloqués, le scooter ne fonctionnera pas.
3. N’oubliez pas que le scooter n’aura pas de freins une fois les mécanismes de
blocage en roue libre.
4. Veillez à ce que la personne qui pousse le scooter le contrôle totalement lorsque
les mécanismes de blocage sont désenclenchés.
Enclenchez / Désenclenchez les mécanismes de blocage du moteur
1. Le levier jaune de blocage du moteur est situé à l’arrière du scooter (A).
2. Pour désenclencher les mécanismes de blocage du moteur, poussez le levier vers l’avant.
3. Pour enclencher les mécanismes de blocage du moteur, tirez le levier vers l’arrière.
3
A
Page 55

930490 Rev. C
XI. Batteries
55
Français
XI. BATTERIES
A. INTRODUCTION
1. Remarques :
• Les batteries alimentent votre scooter en énergie. Elles renferment des quantités
limitées d’énergie et la durée pendant laquelle elles peuvent rester entreposées et
fournir de l’énergie est également limitée.
• Les batteries ne peuvent être rechargées qu’un certain nombre de fois, après quoi
elles tombent en panne et ne restent pas chargées.
• Pour toute question concernant les batteries, adressez-vous à votre fournisseur.
2. Utilisez des boîtiers de batterie adéquats :
Votre scooter électrique est alimenté par deux batteries de 10 / 12 A dans un boîtier.
• N’utilisez qu’un boîtier de batterie.
3. Rodage :
• Une batterie nécessite un « rodage » pour les 6 à 12 premières charges. Elle n’accepte pas la pleine charge durant cette période.
• Il est préférable de limiter la longueur de vos déplacements jusqu’à ce que les
batteries soient rodées et que vous connaissiez la portée de votre scooter.
4. Batteries déchargées
• Ne laissez jamais une batterie se décharger complètement. Si vous faites marcher
votre scooter jusqu’à ce qu’il soit presque arrêté, vous réduirez considérablement la
vie utile de vos batteries.
• Ne laissez jamais reposer une batterie déchargée. Donnez une charge complète aux
batteries inutilisées ou entreposées une fois par mois.
• Chargez toujours les batteries à fond. Évitez des charges fréquentes mais partielles.
AVERTISSEMENT
Ne branchez jamais un équipement de soutien vital ou un dispositif auxiliaire sur
la batterie du scooter. Une défaillance du circuit électrique pourrait se produire
et blesser gravement, voire mortellement, l’utilisateur.
B. CHARGEUR DE BATTERIE
Un chargeur de batterie produit un courant continu (CC). Appliqué sur une batterie
déchargée, il inverse la réaction chimique qui a provoqué sa décharge.
1. Taux de charge. La vitesse à laquelle une batterie charge dépend :
• de sa capacité électrique, de son état de charge, de la température de l’électrolyte et
de son état interne.
• du courant continu sortant du chargeur. (Le taux de charge varie si l’alimentation en
courant alternatif (CA) est supérieure ou inférieure à 110 volts)
2. Attention – Pour éviter d’endommager le chargeur :
• Ne l’exposez jamais à la pluie ou à la neige.
• Ne débranchez jamais le chargeur en tirant sur le cordon Cela l’endommagerait.
• N’ouvrez jamais ou n’essayez jamais de réparer vous-même un chargeur. Rapportez le
chargeur à Sunrise ou faites-le réparer par une personne qualifiée.
• Maintenez le cordon d’alimentation dans un endroit où il ne sera ni piétiné ni endommagé et où il ne fera trébucher personne.
3. Attention – Pour éviter d’endommager la batterie :
• Veillez à utiliser le réglage correct pour les batteries scellées (à électrolyte gélifié)
(situées sur le chargeur non transporté).
• Ne chargez jamais une batterie gelée. Une batterie pleinement chargée gèle rarement,
mais le fluide d’une batterie déchargée peut geler à moins 9 degrés Celsius (16
degrés Fahrenheit). Si vous pensez qu’une batterie est gelée, dégelez-la avant de la
recharger.
Page 56

930490 Rev. C
56
Français
XI. Batteries
AVERTISSEMENT
Les batteries au plomb-acide génèrent des gaz explosifs durant leur charge. Lisez
entièrement ce manuel et suivez tous les avertissements concernant les batteries,
ainsi que toutes les étiquettes apposées sur le produit. Toute négligence à cet
égard pourrait résulter en incendie, explosion et blessures graves, voire mortelles.
C. BRÛLURES D’ACIDE (BATTERIES HYDRO-ÉLECTRIQUES NON SCELLÉES)
AVERTISSEMENT
1. Faites très attention à ne pas renverser d'acide lorsque vous manipulez ce type
de batterie. Maintenez les batteries à la verticale.
2. Évitez que l’acide ne touche votre peau ou vos vêtements.
3. Portez toujours des gants en caoutchouc et des lunettes de sécurité pour
manipuler les batteries.
4. Si de l’acide touche votre peau ou vos vêtements, lavez-les immédiatement à
l’eau savonneuse.
5. En cas de contact avec les yeux, rincez-les immédiatement à l’eau courante
froide pendant au moins 15 minutes. Obtenez de l’aide médicale sans tarder.
Sunrise Medical déconseille l’usage de batteries hydro-électriques sur ce scooter.
D. BRANCHEMENT DES BATTERIES DANS LEUR LOGEMENT
AVERTISSEMENT
1. Chaque batterie peut peser jusqu’à 11 kg (22 lb). Veillez à éviter toute blessure
lorsque vous soulevez une batterie.
2. Maintenez les batteries à la verticale. Veillez à ne pas renverser d’acide
(batteries hydro-électriques).
3. Portez toujours des gants en caoutchouc et des lunettes de sécurité pour
manipuler les batteries.
4. Avant de travailler sur des batteries, enlevez vos effets personnels en métal tels
que colliers, bagues, montres, broches et autres bijoux en métal susceptibles de
toucher les bornes de batterie et de causer un court-circuit.
AVERTISSEMENT
Ne faites jamais de contact direct avec les bornes de batterie, car une explosion
pourrait se produire. Une étincelle peut causer une explosion et / ou un incendie,
E. CHARGE DES BATTERIES
AVERTISSEMENT
Pour éviter tout risque de blessure grave, voire mortelle, due à un choc électrique,
un incendie ou une explosion durant la charge :
1. Ne reliez jamais un chargeur à une source de 240 volts. La tension d’entrée principale
est de 110 volts.
2. Ne touchez jamais le chargeur une fois qu’il est branché sur une prise électrique. Cela
pourrait causer un choc électrique.
• Ne branchez ou ne débranchez jamais le chargeur de la batterie si le chargeur est
sous tension.
3. N’utilisez jamais de prolongateur. L’usage d’un cordon inadéquat pourrait endommager
le chargeur ou causer un incendie ou un choc électrique.
4. Une batterie émet du gaz hydrogène explosif durant sa charge. Pour réduire les
risques d’incendie ou d’explosion :
• Veillez à ce que la zone soit bien aérée. Ne chargez jamais une batterie dans un
endroit fermé.
• Ne fumez jamais ou ne laissez jamais d’étincelles, de flammes ou de forte chaleur
à proximité de la batterie durant sa charge.
• Ne laissez jamais des outils ou des pièces métalliques entrer en contact avec les
deux bornes de la batterie.
Point d’accès du chargeur
non transporté
A
Page 57

930490 Rev. C
XI. Batteries
57
Français
5. Ne regardez jamais directement dans les batteries durant leur charge (batteries hydroélectriques).
SUIVEZ TOUJOURS CES CONSEILS :
1. Utilisez le chargeur fourni avec votre scooter. Lisez et observez toutes les instructions et tous les avertissements.
2. Veillez à ce que la pièce soit bien aérée.
3. Coupez l’alimentation de votre scooter.
4. Branchez et débranchez les câbles de la batterie avec précaution.
5. Veillez à laisser assez de temps aux batteries pour se charger complètement.
REMARQUE -
Les batteries ne doivent jamais rester déchargées pendant de longues périodes.
Les batteries inutilisées ou entreposées doivent être rechargées une fois par mois.
6. Ou bien, utilisez le chargeur non transporté et branchez-le au port de chargeur
du boîtier de la batterie (A).
F. MISE AU REBUT DES BATTERIES
AVERTISSEMENT
1. Une fois qu’elles ont atteint la fin de leur vie utile, toutes les batteries sont
considérées comme des déchets dangereux.
2. Pour plus de détails sur leur manipulation et leur recyclage, contactez les
autorités locales compétentes en la matière.
3. Mettez toujours le produit au rebut par l’intermédiaire d’un agent autorisé.
Page 58

930490 Rev. C
58
Français
XII. Entretien
XII. ENTRETIEN
A. REMARQUES :
1. Un bon entretien permet d’améliorer les performances et de prolonger la durée d’utilisation de votre scooter.
2. Nettoyez votre scooter régulièrement. Cela vous permettra de déceler des pièces
desserrées ou usées et facilitera l’utilisation de votre scooter.
3. Pour protéger votre investissement, demandez à votre fournisseur d’effectuer tous les
travaux d’entretien et de réparation importants.
AVERTISSEMENT
1. Votre scooter électrique doit être entretenu régulièrement afin d'assurer une
performance optimale et d'éviter des blessures causées par des défaillances, des
dommages ou une usure prématurée.
2. Inspectez et entretenez ce scooter en vous conformant strictement au « Tableau
d’entretien ».
3. Si vous détectez un problème, veillez à faire réparer ou régler votre scooter
avant de l’utiliser.
4. Au moins une fois par an, faites effectuer la vérification de sécurité complète et
la révision de votre scooter par un fournisseur agréé.
B. NETTOYAGE
1. Armature :
• • Nettoyez l’armature avec de l’eau légèrement savonneuse une fois par mois.
2. Moteurs :
• Nettoyez la partie située autour des moteurs une fois par semaine avec un chiffon
légèrement humide (pas mouillé).
• Essuyez ou soufflez sur le moteur pour enlever les peluches, poussières ou saletés qui
se sont déposées.
• Remarque : il est inutile de graisser ou de lubrifier le scooter.
3. Garnissage :
• Nettoyez à la main, seulement si nécessaire. Le lavage en machine peut détériorer le
tissu.
• Faites sécher par égouttage seulement. La chaleur d’un séchoir peut endommager le
tissu.
REMARQUE -
Le lavage du tissu peut en réduire les propriétés ininflammables.
C. CONSEILS DE RANGEMENT
1. Rangez votre scooter dans un endroit propre et sec sinon, les pièces pourraient
rouiller ou se corroder.
2. Avant d’utiliser votre scooter, vérifiez s’il est en bon état de fonctionnement. Vérifiez
et réparez tous les éléments indiqués dans le « Tableau d’entretien ».
3. Si ce scooter est rangé pendant plus de trois mois, faites-le inspecter par un fournisseur avant de l’utiliser.
Page 59

930490 Rev. C
XII. Entretien
59
Français
D. ENTRETIEN DES BATTERIES
AVERTISSEMENT
1. Pour éviter que l’acide ne se renverse, gardez toujours les batteries à la
verticale. (batteries hydro-électriques)
2. Ne fumez ou n'approchez jamais une flamme vive des batteries
3. Portez toujours des gants en caoutchouc et des lunettes de sécurité pour
manipuler les batteries.
1. Nettoyage de la région de contact de la batterie
Afin de prévenir les pannes de courant causées par l’accumulation de corps étrangers,
utilisez un linge humidifié d’alcool à friction et doucement passer sur la région de contact
de la batterie ainsi que sur celle de la sortie et d’entrée de courant.
AVERTISSEMENT
Assurez-vous que les sections nettoyées ont eu le temps de sécher avant
d’utiliser ou de charger votre scooter à nouveau.
2. Périodicité d’entretien
Elle varie selon les différents types de batterie. Suivez toujours les instructions
accompagnant vos batteries.
REMARQUE -
Portez toujours des gants en caoutchouc et des lunettes de sécurité pour manipuler
ou entretenir les batteries.
3. Pour toute réponse à vos questions : contactez votre fournisseur.
E. COMMANDE DE PIÈCES
Lorsque vous commandez des pièces, veuillez fournir les informations suivantes :
1. Modèle de scooter
2. Numéro de série du scooter
3. Commande à gauche ou à droite.
4. Numéro de pièce, description et quantité de pièces requise.
5. Raison pour obtenir une pièce de rechange.
F. TABLEAU D’ENTRETIEN
Vous devez vérifier les articles de ce tableau aux intervalles indiqués. Si l’un de ces articles est
desserré, usé, tordu ou déformé, faites-le vérifier et (ou) réparer par votre fournisseur Sunrise
agréé dans les plus brefs délais. Un entretien et des révisions fréquents améliorent les performances, prolongent la durée d’utilisation du scooter et permettent d’empêcher les accidents.
Charger les batteries
Vérifier l’usure de toutes les pièces mobiles.
Inspecter le serrage et l’usure de tous les écrous,
boulons et attaches.
Inspecter l’état d’usure du rembourrage.
Révision par un fournisseur agréé.
Quotidiennement
hebdomadairement
Mensuellement
trimestriellement
annuellement
Vérifiez...
Page 60

930490 Rev. C
60
Français
XIII. Garantie Limitée Sunrise
XIII. GARANTIE LIMITÉE SUNRISE
1. PENDANT CINQ ANS
Nous garantissons l’armature principale de ce scooter contre tout défaut de matériau et de
fabrication pendant une période d’utilisation de 5 ans par le premier acheteur consommateur.
2. GARANTIE SUPPLÉMENTAIRE
Nous garantissons les composants de fabrication Sunrise de ce scooter contre tout défaut
de matériau et de fabrication, comme suit :
a. Moteurs, boîtes d’engrenages et chargeur– garantis pour une durée d’un (1) an à
compter de la date d’achat du premier consommateur.
b. Tous les autres composants d’origine (roues, rembourrage, pièces en plastique, en
caoutchouc et surfaces peintes) - pour une durée de trois (3) mois à compter de la
date d’achat par le première consommateur.
3. LIMITES
a. Nous ne garantissons pas les dommages consécutifs à :
• la négligence, une utilisation abusive, une installation ou une réparation incorrecte.
• l’utilisation de pièces ou les changements non autorisés par Sunrise.
• le dépassement de la limite de poids de 113,6 kg (250 lb).
b. Cette garantie est nulle et non avenue si le label d’origine affichant le numéro de
série du scooter est retiré ou modifié.
c. Cette garantie ne s’applique que pour les États-Unis. Vérifiez avec votre fournisseur si
les garanties internationales s’appliquent.
4. NOTRE RESPONSABILITÉ
Notre seule responsabilité est de réparer ou de remplacer les pièces couvertes par la
garantie. Cela constitue votre seul recours en dommages-intérêts indirects.
5. VOS OBLIGATIONS
a. Renvoyez la carte de garantie.
b. Obtenez de notre part, pendant la durée de validité de cette garantie, l’approbation
préalable avant de renvoyer ou de réparer les pièces couvertes.
c. Renvoyez le scooter ou la (les) pièce(s), fret payé, à Sunrise Mobility Products
Division, à l’adresse suivante : 2842 Business Park Ave., Fresno, CA 93727-1328.
d. Réglez les frais de main-d’œuvre pour l’installation ou la réparation des pièces en
question.
6. NOTICE À L’ATTENTION DU CONSOMMATEUR
Il n’existe aucune autre garantie explicite. Dans les limites permises par loi, toute garantie
implicite (dont une garantie concernant la qualité marchande ou l’aptitude à une utilisation
particulière) se limite aux conditions suivantes :
a. Un (1) an à compter de la date d’achat par le première consommateur et
b. Réparation ou remplacement de la pièce défectueuse seulement.
Cette garantie vous accorde certains droits. Vous pouvez jouir d’autres droits pouvant varier
d’une province à l’autre.
Page 61

930490 Rev. C
I. INTRODUCCIÓN
SUNRISE ESCUCHA
Gracias por elegir un ciclomotor Guardian. Nos gustaría recibir sus preguntas o comentarios
acerca de este manual, de la seguridad y fiabilidad de su ciclomotor, o del servicio que ha
recibido de su distribuidor Sunrise. No dude en escribirnos o llamarnos al domicilio y teléfono que aparecen a continuación:
Sunrise Medical
Departamento de servicios al cliente
7477 East Dry Creek Parkway
Longmont, Colorado 80503
(303) 218-4600 u (800) 333-4000
PARA CONTESTAR A SUS PREGUNTAS
Su distribuidor autorizado es quien mejor conoce el ciclomotor, y sabrá responder a la mayoría de sus preguntas sobre la seguridad, el uso y el mantenimiento del ciclomotor. Como
información de referencia para el futuro, rellene los siguientes datos:
Distribuidor:_________________________________________________________________
Dirección:___________________________________________________________________
Teléfono: ___________________________________________________________________
Núm. Serie: _________________________________________________________________
Fecha de compra:_____________________________________________________________
I. Introducción
61
Español
Page 62

II. CONTENIDO
I. INTRODUCCIÓN ..............................................................................
II. CONTENIDO....................................................................................
III. PARTES DEL CICLOMOTOR ................................................................
IV. AVISO – LÉALO ANTES DE UTILIZAR EL CICLOMOTOR..........................
V. IEM (INTERFERENCIA ELECTROMAGNÉTICA).......................................
A.¿Qué es una IEM?.........................................................................
B.¿Qué efecto puede tener IEM?........................................................
C.Fuentes de IEM ............................................................................
D.Distancia de la fuente...................................................................
E.Nivel de inmunidad ......................................................................
F. Reporte cualquier incidente que pueda deberse a una IEM .................
VI. ADVERTENCIAS GENERALES .............................................................
A.Aviso al conductor .......................................................................
B.Aviso a los ayudantes ...................................................................
C.Límite de peso.............................................................................
D.IEM............................................................................................
E.Lista de verificación de seguridad...................................................
F. Cambios y Ajustes........................................................................
G.Cuando esté sentado en un ciclomotor estacionado...........................
H.Condiciones ambientales ...............................................................
I. Terreno.......................................................................................
J. Uso en la calle.............................................................................
K.Seguridad del vehículos motorizados...............................................
L. Centro de equilibrio......................................................................
M.Transferencias..............................................................................
N.Al estirarse o inclinarse ................................................................
O.Al vestirse o cambiarse de ropa......................................................
P. Obstáculos ..................................................................................
Q.Circulación marcha atrás ...............................................................
R.Rampas, planos inclinados y laderas................................................
S Para reducir el riesgo de caídas, volcaduras o pérdidas de control........
T. Rampas en casa y en el trabajo......................................................
U.Elevadores para ciclomotores o sillas de ruedas ................................
V. Aceras y escalones únicos..............................................................
W.Escaleras.....................................................................................
X.Escaleras mecánicas......................................................................
VII. AVISOS: COMPONENTES Y OPCIONES .................................................
A.Reposabrazos...............................................................................
B.Baterías......................................................................................
C.Cojines .......................................................................................
D.Sujeciones ..................................................................................
E.Seguros del motor ........................................................................
F. Interruptor de encendido/apagado..................................................
G.Sistemas de asiento......................................................................
H.Tejido de la tapicería....................................................................
I. Cableado.....................................................................................
930490 Rev. C
62
Español
II. Contenido
61
62
64
65
66
66
66
66
67
67
67
68
68
68
68
69
69
69
69
70
70
70
71
71
71
72
72
72
73
73
73
73
74
74
74
74
75
75
75
75
75
75
76
76
76
76
Page 63

930490 Rev. C
VIII. CONSEJOS PARA LOS AYUDANTES.....................................................
A.Para subir una acera o un escalón único..........................................
B.Para bajar una acera o un escalón único..........................................
IX. COLOCACIÓN, AJUSTE Y USO............................................................
Notas ............................................................................................
Herramientas necesarias...................................................................
A.Desmontaje del compartimiento de las baterías ................................
B.Instalación del reposabrazos y ajuste de anchura..............................
C.Barra del manillar ........................................................................
D.Remoción del asiento ...................................................................
E.Inclinación del asiento .................................................................
F. Ajuste de la altura del asiento .......................................................
G.Instalación y remoción de la canasta ..............................................
H.Desmontaje.................................................................................
X. GUÍA DE OPERACIÓN ......................................................................
A.Cortacorrientes ............................................................................
B.Funciones de control de la barra del manillar ...................................
C.Seguros del motor ........................................................................
XI. BATERÍAS ......................................................................................
A.Introducción ...............................................................................
B.Cargador de baterías.....................................................................
C.Quemaduras por ácido...................................................................
D.Conexión de las baterías en el compartimiento de las baterías............
E.Carga de las baterías ....................................................................
F. Cómo deshacerse de las baterías ....................................................
XII. MANTENIMIENTO............................................................................
A.Notas .........................................................................................
B.Limpieza.....................................................................................
C.Sugerencias para el almacenamiento ...............................................
D.Mantenimiento de las baterías .......................................................
E.Cómo pedir piezas de repuesto.......................................................
F. Tabla de mantenimiento................................................................
XIII. GARANTÍA LIMITADA SUNRISE.........................................................
II. Contenido
63
Español
77
77
77
78
78
78
79
79
79
80
80
80
80
81
82
82
82
83
84
84
84
85
85
85
86
87
87
87
87
87
88
88
89
Page 64

III. PARTES DEL CICLOMOTOR
930490 Rev. C
64
Español
III. Partes del Ciclomotor
1. Canasta
2. Mando de ajuste del manillar
3. Seguro del manillar
4. Mango
5. Neumático
6. Cortacorrientes
7. Conector para el cargador de batería
8. Compartimiento de las baterías
9. Reposabrazos plegable hacia atrás y
ajustable en anchura
10. Asiento
11. Palanca de ajuste de altura e inclinación del asiento
12. Poste del asiento
13. Reposabrazos con mando de ajuste
14. Palanca de bloqueo del motor
15. Palanca de liberación del conjunto
de ruedas traseras
16. Conjunto de ruedas traseras
17. Barra del manillar/Cuadro de mandos
1
3
6
11
7
9
4
12
8
5
2
Trek 4
Peso
Trek 3– 21,45 kg (47,3 lbs) (base)
8,53 Kg. (14,2 libras) (asiento)
10,25 Kg (22,6 lbs) (batería)
Trek 3 Ultra– 25,54 (56,3 lbs) (base),
8,53 Kg. (18,8 libras) (asiento)
10,25 Kg (22,6 lbs) (batería)
Trek 4– 25,54 Kg (56.3 lbs) (base),
8,53 Kg. (14,2 libras) (asiento)
10,25 Kg (22,6 lbs) (batería)
Trek 4 Ultra– 25,54 (56,3 lbs) (base),
8,53 Kg. (18,8 libras) (asiento)
10,25 Kg (22,6 lbs) (batería)
Ruedas de tracción
7" Mag: Estándar, sin aire
Baterías
Bloque de 2 baterías de 12 AH
Cargador de baterías
externo 1,5 AMP
Asientos, tapicería y estilo
Trek 3/4 – de serie
Trek 3/4 Ultra - Fish-on comfort
Material: vinilo
Color: negro
Anchura: Trek 3/4 – 15, 17"
Profundidad Trek 3/4 – 15, 17"
Reposabrazos
Cojín para brazo de 25,4 cm (10") reple-
gable hacia atrás
Puede haber características que no estén
disponibles en determinados modelos de
ciclomotores o combinadas con alguna otra
característica. Si desea más información,
consulte con su distribuidor. Su distribuidor
autorizado también puede ofrecerle más
información acerca de los accesorios
disponibles.
GUARDIAN TREK
1
3
6
11
12
13
13
14
16
16
14
7
5
9
17
17
8
10
10
2
Trek 3
Page 65

930490 Rev. C
IV. AVISO – LEA ESTE MANUAL ANTES DE USAR EL CICLOMOTOR
A. ELIJA LAS OPCIONES DE SEGURIDAD Y EL MODELO DE CICLOMOTOR ADECUADOS
Sunrise ofrece una amplia gama de vehículos de movilidad motorizados, para resolver las
necesidades de cada usuario. No obstante, la elección final de un modelo de ciclomotor
recae exclusivamente en usted y en su proveedor de servicios médicos La elección del ciclomotor ideal dependerá de aspectos como:
1. Su tamaño corporal, tipo de discapacidad, fortaleza, equilibrio y coordinación.
2. El uso que le va a dar y su nivel de actividad.
3. El tipo de riesgos que habrá de sortear durante su uso diario (en las zonas más probables de uso del ciclomotor).
4. La necesidad de opciones para su seguridad y comodidad (tales como los cinturones
posicionadores o sistemas especiales de asiento).
B. AJUSTE EL CICLOMOTOR A SU PROPIA CAPACIDAD
Con la ayuda de su médico, enfermera o terapeuta, deberá usted adaptar y ajustar el ciclomotor a su nivel funcional o de capacidad.
C. REVISE ESTE MANUAL CON FRECUENCIA
Antes de utilizar este ciclomotor, tanto usted como cualquier persona que vaya a ayudarlo
deberán leer todo este manual y asegurarse de seguir todas sus instrucciones. Repase con
frecuencia las advertencias, hasta que las aprenda de memoria.
D. ADVERTENCIAS
La palabra “ADVERTENCIA” se refiere a un peligro o una práctica insegura que pueden provocarle a usted o a otras personas lesiones graves o incluso la muerte. Las “Advertencias” se
dividen en cuatro secciones principales:
1. V — IEM
Ofrecen información sobre las interferencias electromagnéticas y el efecto que pueden
tener sobre el ciclomotor.
2. VI - ADVERTENCIAS GENERALES
Se trata de una lista de comprobaciones de seguridad y un resumen de los riesgos que
debe tener presentes antes de montar en este ciclomotor.
3. VII - ADVERTENCIAS - COMPONENTES Y OPCIONES
Informan sobre diversos aspectos acerca del ciclomotor. Su distribuidor y su asistente
médico le ayudarán a seleccionar la mejor configuración y las opciones más adecuadas para su seguridad.
4. XI - BATERÍAS
Información acerca de la seguridad de las baterías y del cargador, y sobre cómo evitar
lesiones.
NOTA–
Allí donde sea necesario, aparecerán también “Advertencias” en otras secciones de este Manual.
IV. Aviso– Lea Este Manual Antes de Usar el Ciclomotor
65
Español
Page 66

V. IEM (INTERFERENCIA ELECTROMAGNÉTICA)
ADVERTENCIA
Preste atención a todas las advertencias, para reducir el riesgo de que el freno se
suelte o el ciclomotor se ponga en movimiento inesperadamente:
1. Preste atención al peligro que representan los transmisores - receptores
portátiles. No encienda nunca un transmisor-receptor portátil mientras el ciclomotor está encendido. Tenga mucho cuidado si cree que alguien puede estar utilizando uno de estos dispositivos cerca de su ciclomotor.
2. Tenga cuidado de las estaciones de radio o TV cercanas y procure no acercarse a ellas.
3. Si se produce algún movimiento inesperado, apague el ciclomotor en cuanto
pueda hacerlo sin riesgo.
A. ¿QUÉ SIGNIFICA IEM?
ADVERTENCIA
1. IEM significa: interferencia (I) electromagnética (EM). Las interferencias electromagnéticas provienen de fuentes de ondas de radio tales como transmisores y “transmisores – receptores” de radio. (Un “transmisor - receptor” es un dispositivo que
envía y recibe señales de ondas de radio.)
2. En su entorno cotidiano existen ciertas fuentes intensas de IEM.
Algunas de ellas son evidentes y fáciles de evitar. Otras no, y quizás no pueda evitarlas.
3. Los ciclomotores eléctricos pueden verse afectados por interferencias electromagnéticas (IEM) emitidas por diversas fuentes, como emisoras de radio o de televisión,
transmisores de radioaficionados, radios bidireccionales, o teléfonos celulares.
4. Estas interferencias también pueden estar producidas por fuentes que las transmitan
por conducción, o por descargas electrostáticas (ESD).
B. ¿QUÉ EFECTO PUEDEN TENER LAS INTERFERENCIAS ELECTROMAGNÉTICAS?
ADVERTENCIA
1. Las interferencias IEM pueden provocar que su ciclomotor, sin previo aviso:
•Libere los frenos
•Se mueva por sí solo
•Se mueva en direcciones no intencionadas
Si ocurriera cualquiera de estas situaciones, usted u otras personas podrían sufrir graves
lesiones.
2. Las interferencias IEM pueden dañar el sistema de control de su ciclomotor. Ello
podría suponer un riesgo para su seguridad, y provocar costosas reparaciones.
C. FUENTES DE IEM
ADVERTENCIA
En líneas generales, las fuentes de interferencia electromagnética (IEM) pueden ser
de tres tipos:
1. Transmisores - receptores portátiles:
Por lo general, la antena va montada directamente sobre el dispositivo. He aquí algunos
ejemplos:
• Radios de banda ciudadana (CB)
• “Emisores-Receptores portátiles” (Walkie-talkies)
• Radios de seguridad, bomberos y policía
• Teléfonos celulares
• Computadoras portátiles con teléfono o fax
• Otros dispositivos personales de comunicación
NOTA–
Estos dispositivos pueden transmitir señales mientras estén encendidos, incluso aunque no se
estén utilizando.
930490 Rev. C
66
Español
V. IEM (Interferencia Electromagnética)
Page 67

930490 Rev. C
2. Transmisores-receptores móviles de alcance intermedio:
Esto incluye las radios bidireccionales utilizadas en los vehículos de policía, camiones de
bomberos, ambulancias y taxis. Por lo general, la antena va montada en el exterior del vehículo.
3. Transmisores-receptores de largo alcance:
Esto incluye las torres de transmisión de radio y TV comercial y las emisoras de radioaficionado. Nota: Los siguientes dispositivos es poco probable que causen problemas de IEM:
Computadoras portátiles (sin teléfono ni fax), teléfonos inalámbricos, aparatos de TV o
radios de AM / FM, reproductores de CD o de cintas.
D. DISTANCIA DE LA FUENTE
La energía EM se intensifica rápidamente a medida que usted se acerca a la fuente. Por
esta razón, la IEM de los aparatos portátiles es de especial preocupación. (Ver C.1) Una
persona que utilice uno de estos dispositivos podría traer consigo niveles elevados de
energía electromagnética muy cerca de su ciclomotor, sin que usted se dé cuenta.
E. NIVEL DE INMUNIDAD
1. El nivel de energía EM se mide en voltios por metro (V/m). Todo ciclomotor eléctrico
puede resistir un determinado nivel de interferencias electromagnéticas (IEM). Esto se
conoce como “nivel de inmunidad.”
2. Cuando más alto es el nivel de inmunidad, menor es el riesgo de IEM. Se considera
que un nivel de inmunidad de 20 V/m protege al ciclomotor eléctrico de las fuentes
de ondas radioeléctricas más comunes.
ADVERTENCIA
Las personas con limitaciones físicas que les obliguen a utilizar algún dispositivo
especializado de introducción de órdenes cuyo nivel de inmunidad no alcance los
20 V/m o sea desconocido deberán tener mucho cuidado cuando se encuentren
alrededor de fuentes conocidas de IEM.
ADVERTENCIA
Si añade algún accesorio al ciclomotor o modifica alguno de los existentes, no
habrá manera de conocer el efecto de las interferencias electromagnéticas.
Cualquier modificación en el ciclomotor podría aumentar el riesgo de interferencia electromagnética (IEM). Las propiedades IEM de las partes fabricadas por
otros proveedores no se conocen.
F. REPORTE TODOS LOS INCIDENTES QUE PUDIERAN DEBERSE A INTERFERENCIAS ELECTROMAGNÉTICAS
ADVERTENCIA
Debe reportar con prontitud cualquier movimiento no comandado o liberación del
freno. No olvide indicar si había en ese momento alguna fuente de ondas de radio
en las proximidades de su ciclomotor. Póngase en contacto con el: Departamento
de Servicios al Cliente de Sunrise Medical al (800) 333-4000.
V. IEM (Interferencia Electromagnética)
67
Español
Page 68

VI. ADVERTENCIAS GENERALES
ADVERTENCIA
Obedezca todas las advertencias de esta sección. De lo contrario, podría caerse,
volcar o perder el control, y usted u otras personas podrían sufrir graves lesiones.
A. AVISO AL CONDUCTOR
1. Antes de utilizar este ciclomotor, el profesional que le esté prestando asistencia
médica debería enseñarle a utilizarlo con seguridad.
2. Cada ciclomotor es diferente. Antes de empezar a conducirlo, tómese el tiempo que
necesite para familiarizarse con él.
3. Tenga en cuenta que deberá usted desarrollar sus propios métodos para la utilización
segura de este ciclomotor, teniendo en cuenta su nivel personal de capacidad y funcionalidad.
4. Pida que alguien le ayude a practicar las operaciones de flexión, alcance y cambio de
silla, hasta que usted aprenda a hacerlo en forma segura.
5. Nunca intente una nueva maniobra estando solo a menos que esté convencido de que
puede hacerlo con seguridad.
6. Familiarícese con las zonas por donde tiene previsto utilizar el ciclomotor. Tenga
cuidado con los peligros y aprenda a evitarlos.
7. No permita que nadie más viaje con usted en su silla, en los reposabrazos o el bastidor. Podría provocar lesiones o daños.
B. AVISO A LOS AYUDANTES
ADVERTENCIA
Asegúrese de respetar todas las advertencias y siga todas las instrucciones de
cada sección de este manual. (Tome en cuenta que las advertencias que se aplican al conductor también se aplican a usted.)
Notas:
1. Deberá usted definir, junto con el usuario del ciclomotor y con su médico, enfermera
o terapeuta, métodos seguros e indicados para sus propias capacidades y las del
usuario.
2. Para empujar el ciclomotor manualmente, debe liberar los seguros del motor.
• Asegúrese de tener un control total sobre el ciclomotor cuando libere los seguros
del motor. Una vez que los haya liberado, el ciclomotor no tendrá frenos.
3. Empuje el ciclomotor sólo por los soportes de los reposabrazos. Si usa un bastidor de
asiento, impulse la silla empujando los asideros que se encuentran encima de los
postes del respaldo. Ofrecen puntos seguros para que usted sostenga la parte posterior de la silla para evitar una caída o volcadura.
C. LÍMITE DE PESO
ADVERTENCIA
1. El peso total de la silla más el conductor y los objetos transportados no debe superar
los 113,6 kg (250 lbs).
2. Nunca use esta silla para ejercitarse levantando pesas si el peso total (del conductor
y de las pesas) sobrepasa los 136,3 Kg. (250 libras.)
3. Si se sobrepasa el límite de peso, podría dañarse el asiento, el bastidor o los sujetadores, y usted u otras personas podrían sufrir graves lesiones por fallo de la silla.
4. Si se sobrepasa el límite de peso, quedará anulada la garantía.
930490 Rev. C
68
Español
VI. Advertencias Generales
Page 69

930490 Rev. C
D. IEM
ADVERTENCIA
En la Sección V encontrará más información sobre las interferencias electromagnéticas (IEM). Para reducir el riesgo de liberación del freno o movimiento no
intencionado del ciclomotor.
1. Nunca encienda ni utilice un transmisor - receptor portátil estando encendido el
ciclomotor.
Tenga mucho cuidado si cree que cerca de su ciclomotor puede estar utilizándose un
aparato de este tipo.
2. Tenga cuidado de las estaciones de radio o TV cercanas y procure no acercarse a ellas.
3. Si ocurre un movimiento o liberación del freno no intencionados, apague el ciclomotor en cuanto pueda hacerlo sin correr riesgos.
E. LISTA DE VERIFICACIÓN DE SEGURIDAD
ADVERTENCIA
Cada vez que vaya a utilizar este ciclomotor:
1. Asegúrese de que funcione con normalidad. Compruebe si hay algún ruido, vibración o
variación en su uso corriente. (Lo cual podría indicar que algún neumático tiene poca
presión, que hay alguna fijación suelta, o que el ciclomotor está averiado.) Si detecta
algún problema, asegúrese de repararlo o ajustar el ciclomotor. Posponer la reparación
o el ajuste podría aumentar el riesgo de lesiones. Su distribuidor le ayudará a corregir el problema.
2. Asegúrese de que las baterías estén cargadas. Cuando la batería esté totalmente cargada, se encenderán las luces verdes del indicador de carga (o el indicador de carga
señalará plena carga). Las luces amarillas indican que la batería se está quedando sin
carga. Las luces rojas indican que las baterías necesitan cargarse de inmediato.
F. CAMBIOS Y AJUSTES
ADVERTENCIA
No utilice nunca partes que no sean Guardian ni realice ninguna modificación en
el ciclomotor a menos que esté autorizada por Sunrise. (De lo contrario, anularía
la garantía y podría crear un riesgo de seguridad.)
1. Si modifica o ajusta este ciclomotor, podría aumentar el riesgo de caídas o volcaduras.
2. Las modificaciones no autorizadas por Sunrise se considerarán como refabricación del
ciclomotor. Esto anula la garantía. En tal caso, el usuario asumirá toda la responsabilidad futura sobre el ciclomotor.
G. CUANDO ESTÉ SENTADO EN UN CICLOMOTOR ESTACIONADO
1. Apague el ciclomotor siempre que esté estacionado, incluso si es sólo por un momento. Con ello evitará:
• Que el ciclomotor pueda ponerse en movimiento accidentalmente si usted u otra
persona tocan la palanca de mando.
• La liberación involuntaria del freno o el movimiento debido a interferencias elec-
tromagnéticas (IEM). (Vea la Sección V)
2. Asegúrese de que las personas que lo ayudan (por ejemplo, empleados de una tienda)
sepan dónde está la palanca de mando y no la toquen. Si lo hacen, su silla podría
entrar en movimiento súbitamente de manera inesperada.
VI. Advertencias Generales
69
Español
Page 70

H. CONDICIONES AMBIENTALES
ADVERTENCIA
Este ciclomotor no está diseñado para utilizarlo bajo lluvia intensa o en presencia
de nieve o hielo.
1. El contacto con el agua, o una humedad excesiva, pueden provocar averías eléctricas.
Ni el bastidor ni los motores y otras partes del ciclomotor son impermeables al agua,
por lo que podrían oxidarse o corroerse por dentro. Para evitar averías del ciclomotor:
• Procure exponerlo lo mínimo posible a la lluvia o a condiciones muy húmedas.
• No introduzca nunca el ciclomotor en una regadera, tina, alberca o sauna.
• No utilice el ciclomotor en agua dulce o salada (por ejemplo, a la orilla de un río,
un lago, o el océano.)
• Asegúrese de que la cubierta protectora esté bien sujeta.
• Asegúrese que todas las conexiones eléctricas estén bien apretadas.
• Seque el ciclomotor tan pronto como pueda en caso que se moje, o si usa agua
para limpiarlo.
2. Circule muy despacio y tenga especial cuidado si necesita usar el ciclomotor sobre
una superficie húmeda o resbalosa.
• Hágalo solamente si está seguro de que puede hacerlo con seguridad.
• Pare si una de las ruedas principales, o ambas, pierden tracción. Si eso ocurriera,
podría caerse o perder el control del ciclomotor.
• No circule nunca con el ciclomotor por una pendiente o rampa si hay nieve, hielo,
agua o aceite.
• En caso de duda, pida ayuda a alguien.
3. Cuando no esté utilizando el ciclomotor, guárdelo en un lugar limpio y seco.
ADVERTENCIA
Tenga especial cuidado si utiliza un interruptor de disco o un grupo de proximidad para la cabeza como dispositivo de control. Estos dos dispositivos pueden
sufrir fallos de funcionamiento si se mojan.
I. TERRENO
1. Este ciclomotor está diseñado para usarse sobre una superficie firme y nivelada, tal
como el cemento, asfalto, o pisos interiores.
2. No lo utilice sobre arena, ripio o terreno accidentado. Podría dañar las ruedas,
rodamientos, ejes o motores, o aflojar las fijaciones.
J. USO EN LA CALLE
ADVERTENCIA
En la mayoría de los estados no está permitido utilizar ciclomotores eléctricos en
las vías públicas. Esté alerta del peligro que representan los vehículos de motor
en los caminos y estacionamientos.
1. Por la noche, o en condiciones de baja visibilidad, use una cinta reflectante en el
ciclomotor y en su ropa.
2. Los conductores podrían tener dificultad para verlo. Establezca contacto visual con
los conductores antes de proseguir. En caso de duda, ceda el paso hasta que esté
seguro de que puede pasar sin peligro.
930490 Rev. C
70
Español
VI. Advertencias Generales
Page 71

930490 Rev. C
K. SEGURIDAD DE VEHÍCULOS MOTORIZADOS
ADVERTENCIA
Hasta la fecha, el Departamento de Transporte de los Estados Unidos no ha
homologado ningún sistema de amarre para transportar un ciclomotor en un
vehículo motorizado.
1. Nunca se siente en el ciclomotor cuando éste se encuentre sobre un vehículo en
movimiento. En caso de accidente o parada súbita, podría salir proyectado del ciclomotor.
2. Cámbiese siempre a un asiento de vehículo homologado. Debe estar asegurado con los
restrictores de movimiento apropiados del vehículo de motor.
3. Nunca transporte este ciclomotor en el asiento delantero de un vehículo. Podría
moverse e interferir con el conductor.
4. Asegure siempre el ciclomotor para evitar que pueda moverse o rodar.
L. CENTRO DE EQUILIBRIO
ADVERTENCIA
El punto donde esta silla se volcará hacia delante, atrás o lateralmente depende
de su centro de equilibrio y estabilidad.
La posición del centro de equilibrio depende de:
1. La altura del asiento y su ángulo.
2. Los cambios de posición del cuerpo, de postura, o de distribución del peso.
3. El uso del ciclomotor en una rampa o plano inclinado.
4. El uso de una mochila u otras opciones, y la cantidad del peso añadido.
Para reducir el riesgo de caída o volcadura:
1. Consulte con su distribuidor para informarse acerca de las modificaciones autorizadas
por Sunrise antes de modificar o ajustar este ciclomotor.
NOTA–
Puede que necesite realizar otras modificaciones para corregir el centro de equilibrio.
2. Tenga mucho cuidado hasta que conozca los puntos de equilibrio de este ciclomotor y
la manera de evitar una caída o volcadura.
M. CAMBIOS DE ASIENTO
ADVERTENCIA
Es peligroso realizar un cambio de asiento sin ayuda. Se necesita buen equilibrio
y agilidad. Tenga en cuenta que existe un punto durante cada cambio en que el
asiento del ciclomotor no está debajo de usted. Para evitar una caída:
1. Apague el ciclomotor antes de cambiarse al ciclomotor, o de éste a otro asiento. De
lo contrario, podría tocar la palanca de mando y hacer que el ciclomotor se pusiera en
movimiento inesperadamente.
2. Asegúrese de que los seguros del motor estén accionados. Así evitará que el ciclomotor pueda moverse mientras usted se cambia de asiento.
3. Trabaje con el profesional que le presta asistencia médica para aprender métodos
seguros.
• Aprenda a colocar su cuerpo y a sujetarse durante un cambio de asiento.
• Pida que alguien le ayude hasta que esté seguro de que es capaz de hacerlo usted
solo.
4. Coloque el ciclomotor lo más cerca posible del asiento al cual se está cambiando.
Si es posible, utilice una tabla para cambiarse.
5. Asegúrese de que los reposabrazos no interfieran.
6. Al cambiarse, acérquese todo lo posible a la superficie del asiento de destino antes
de soltarse. Así correrá menos riesgo de caerse o no llegar al asiento.
VI. Advertencias Generales
71
Español
Page 72

N. AL ESTIRARSE O INCLINARSE
ADVERTENCIA
Estirarse o inclinarse altera el centro de equilibrio del ciclomotor. Si lo hace de
manera inapropiada, lo más probable es que se caiga o que el ciclomotor vuelque.
En caso de duda, pida ayuda o use un dispositivo para aumentar su alcance.
Para reducir el riesgo de lesiones y/o daños al ciclomotor:
1. Nunca se estire o incline si debe desplazar su peso lateralmente o levantarse del
asiento.
2. Nunca se estire o incline si para ello ha de moverse hacia delante del asiento.
Mantenga siempre sus glúteos en contacto con el respaldo.
3. Nunca estire ambos brazos (podría no poderse sujetar para evitar caerse si perdiera el
equilibrio).
4. Nunca intente levantar un objeto del piso accediendo a él por entre sus rodillas.
5. Al estirarse, no aplique presión sobre el estribo. Si se estira demasiado, el ciclomotor
podría volcar.
6. Nunca se estire o incline por encima el tope del respaldo. Podría dañarse el respaldo
y provocar que usted caiga.
SI NECESITA ESTIRARSE O INCLINARSE, HÁGALO BAJO SU PROPIO
RESPONSABILIDAD.
Recuerde:
1. Coloque el ciclomotor lo más cerca posible del objeto que desee alcanzar.
2. Apague totalmente el ciclomotor. De lo contrario, podría tocar la palanca de mando y
hacer que el ciclomotor entrase en movimiento inesperadamente.
3. Agarre con fuerza el reposabrazos con una mano. Así evitará caerse si volcase el
ciclomotor.
O. AL VESTIRSE O CAMBIARSE DE ROPA
ADVERTENCIA
Tenga en cuenta que su peso se desplazará de posición si se viste o cambia de
ropa estando sentado en este ciclomotor.
P. OBSTÁCULOS
ADVERTENCIA
Durante el uso usuario, deberá superar obstáculos como el umbral de las puertas,
elevadores, rampas, así como otros puntos peligrosos como baches o roturas en el
pavimento. Estos obstáculos pueden dañar el ciclomotor y provocar una caída,
volcadura o pérdida de control.
1. Tenga en cuenta que los umbrales son muy peligrosos. (Incluso una pequeña
variación de altura puede detener una de las ruedecillas y provocar la volcadura del
ciclomotor). Tal vez necesite:
• Quitar o cubrir las tiras de los umbrales entre habitaciones.
• Instalar una rampa en las puertas de entrada o salida.
2. No fije la vista en solo lugar mientras esté circulando; observe con suficiente
antelación todo lo que hay hasta muy por delante del ciclomotor.
3. Asegúrese de que las superficies de los lugares por donde vaya a pasar con el ciclomotor estén niveladas y libres de obstáculos.
4. Para ayudar a corregir su centro de equilibrio:
• Incline la parte superior de su cuerpo ligeramente hacia delante cuando suba un
obstáculo.
• Incline la parte superior de su cuerpo hacia atrás cuando descienda desde un
nivel más elevado a uno más bajo.
930490 Rev. C
72
Español
VI. Advertencias Generales
Page 73

930490 Rev. C
Q. AL CIRCULAR MARCHA ATRÁS
ADVERTENCIA
Tenga mucho cuidado cuando circule con el ciclomotor en marcha atrás. Si una de
las ruedas traseras golpease un objeto, podría usted perder el control o caerse.
1. Maneje el ciclomotor despacio y a una velocidad uniforme.
2. Pare con frecuencia y asegúrese de que no haya obstáculos en su camino.
R. RAMPAS, PLANOS INCLINADOS Y LADERAS
ADVERTENCIA
El centro de equilibrio del ciclomotor cambia cuando éste se encuentra sobre una
pendiente.
NOTA–
el término “Pendiente” incluye las rampas y las laderas. El ciclomotor es menos estable cuando
está inclinado. No circule nunca con este ciclomotor por una pendiente a menos que esté
seguro de que puede hacerlo sin peligro. En caso de duda, pida ayuda a alguien.
Tenga cuidado de:
1. Las pendientes pronunciadas. No utilice este ciclomotor sobre pendientes de más del
10%. (Una pendiente del 10% significa: Una elevación de un metro por cada diez
metros recorridos por la pendiente.
2. Las superficies mojadas o resbalosas (por ejemplo, con hielo, nieve, agua o aceite).
Una pérdida de tracción puede provocar una caída o volcadura.
3. Un cambio en el grado de inclinación (o un bordillo, bache o depresión.) Pueden
provocar una caída o volcadura.
4. Un escalón al llegar abajo de una pendiente. (Un escalón de tan sólo 2 cm puede bloquear las ruedas pivotantes delanteras y hacer volcar el ciclomotor hacia delante).
S. PARA REDUCIR EL RIESGO DE CAÍDAS, VOLCADURAS O PÉRDIDAS DE CONTROL
1. No utilice nunca el ciclomotor sobre una pendiente a menos que esté seguro de que
puede hacerlo sin perder tracción.
2. Muévase siempre lo más recto que pueda, tanto subiendo como bajando.
• No “tome atajos” cuando circule por una pendiente o rampa.
• No vire ni cambie de dirección sobre una pendiente.
3. Permanezca siempre en el centro de la rampa. Asegúrese de que la rampa sea lo suficientemente ancha como para que no exista riesgo de que una rueda se salga por
alguno de sus lados.
4. Inclínese o cargue su cuerpo cuesta arriba. Esto ayudará a compensar el cambio del
centro de equilibrio provocado por la pendiente.
5. Mantenga el ciclomotor a una velocidad lenta y uniforme. Mantenga controlado el
ciclomotor en todo momento.
• Al descender una cuesta, no deje que el ciclomotor acelere por encima de su
velocidad normal.
• Si el ciclomotor adquiriese velocidad, ponga la palanca de mando en la posición
central para reducir la velocidad o parar.
NOTE–
El controlador electrónico del ciclomotor tiene un sistema lógico que ayuda a controlar su
velocidad al circular por una pendiente o cuesta arriba.
• Si se detiene, reanude la marcha lentamente.
T. RAMPAS EN CASA Y EN EL TRABAJO
ADVERTENCIA
Asegúrese de que todas las rampas cumplan todos los Códigos de Construcción de
su área.
1. Por su seguridad, encargue a un contratista con licencia la construcción o remodelación de una rampa que cumpla todas las normas.
2. NOTA– El diseño más adecuado dependerá de aspectos como: la longitud y altura de
la rampa; la necesidad de una plataforma intermedia; el tamaño del rellano o descanso; las puertas y su dirección de apertura, y si la rampa presenta algún ángulo o cambio de dirección.
VI. Advertencias Generales
73
Español
Page 74

Como mínimo:
1. Los lados abiertos de la rampa deben tener rieles laterales para evitar que el ciclomotor pueda caerse por los lados.
2. La pendiente no debe subir más de 2,5 cm por cada 30 cm recorridos sobre la rampa.
3. La superficie de la rampa debe ser uniforme y antideslizante.
4. Quizás necesite agregar una sección en la parte superior o inferior para salvar un
reborde o escalón.
5. La rampa debe ser resistente. Si es preciso, agregue refuerzos para que la rampa no
ceda bajo su peso al pasar por encima de ella.
U. ELEVADORES PARA CICLOMOTORES O SILLAS DE RUEDAS
ADVERTENCIA
Los elevadores de ciclomotores o sillas de ruedas se usan en camionetas, autobuses y edificios para facilitar el paso de un nivel a otro.
1. Siempre que el ciclomotor esté sobre un elevador, apáguelo totalmente. De lo contrario, podría tocar accidentalmente la palanca de mando y provocar la caída del
ciclomotor de la plataforma. (Tenga en cuenta que el “tope” situado en el extremo de
la plataforma podría resultar insuficiente para evitar la caída).
2. Asegúrese que no haya un reborde o escalón en la parte superior o inferior de la
plataforma. Podría provocar una caída o volcadura. En caso de duda, pida ayuda a
alguien.
3. Asegure siempre al conductor con el cinturón posicionador, para evitar caídas durante
los cambios de asiento.
4. Procure no moverse hacia delante si hay una rueda colgando “suspendida” por el
borde de la rampa. Retroceda, dirija la ruedecilla delantera para una aproximación
más directa, y vuelva a intentarlo lentamente.
V. ACERAS Y ESCALONES ÚNICOS
ADVERTENCIA
1. Este ciclomotor no ha sido diseñado para subir o bajar aceras o escalones de más de
1,25 cm (1/2 pulgada) Si intentase hacerlo, podría:
• Provocar una caída o volcadura.
• Dañar el bastidor, las ruedas, los ejes o alguna otra parte de la silla, o aflojar los
sujetadores.
2. Para evitar una caída o volcadura, use las rampas de acceso para sillas de ruedas o
ciclomotores, o pida ayuda a alguien.
3. Si necesita subir o bajar sin ayuda una acera o un escalón, hágalo bajo su propia
responsabilidad, y tenga mucho cuidado.
• Siga una trayectoria lo más recta posible, tanto hacia arriba como hacia abajo.
Nunca vire ni suba o baje en ángulo, pues podría volcar o caerse.
• Muévase lentamente y a una velocidad uniforme.
4. Asegúrese de que las personas que lo ayudan hayan leído los “Consejos para los ayudantes” y obedezcan todas las advertencias.
5. Evite circular a lo largo de los bordillos de las aceras. Se recomienda mantener una
distancia mínima de 46 cm (18 pulgadas) del bordillo.
W. ESCALERAS
ADVERTENCIA
No utilice nunca este ciclomotor para subir o bajar escaleras, ni siquiera con
ayuda. Podría caerse o volcar.
X. ESCALERAS MECÁNICAS
ADVERTENCIA
No utilice nunca este ciclomotor en una escalera mecánica, ni siquiera con ayuda.
Podría caerse o volcar.
930490 Rev. C
74
Español
VI. Advertencias Generales
Page 75

930490 Rev. C
VII. ADVERTENCIAS: COMPONENTES Y OPCIONES
ADVERTENCIA
Nota: Si utiliza partes o realiza cambios no autorizados por Sunrise, podría provocar un riesgo de seguridad, lo cual anularía la garantía.
A. REPOSABRAZOS
ADVERTENCIA
Los reposabrazos se repliegan hacia atrás o hacia abajo, y no pueden utilizarse
para levantar el ciclomotor o el asiento.
1. No levante nunca este ciclomotor tomándolo por los reposabrazos.
2. Para levantar el ciclomotor, tómelo solamente de partes del bastidor principal que no
puedan desprenderse.
B. BATERÍAS
ADVERTENCIA
1. En este dispositivo sólo deben utilizarse compartimientos de las baterías homologados.
2. Para evitar derrames de ácido, mantenga las baterías siempre en posición vertical.
(baterías húmedas solamente)
3. Nunca fume ni pase una llama abierta cerca de las baterías. Ese es uno de los riesgos
de
explosión conocidos.
4. Antes de intentar cambiar o cargar las baterías, lea toda la sección XI Baterías.
5. Para retirar las baterías, utilice siempre correas o el asa que incorporan. Si intenta
retirar las baterías tomándolas de su carcasa, podría aplastarse los dedos.
C. COJINES
ADVERTENCIA
1. Los asientos Guardian están diseñados para ofrecer comodidad, pero no específicamente para el alivio de la presión.
2. Si usted sufre ulceraciones por presión o tiene riesgo de padecerlas, quizás necesite
un sistema de asiento especial como el proporcionado por el Bastidor de Asiento, o
un dispositivo para controlar su postura.
• Consulte a su doctor, enfermera o terapeuta para saber si necesita tal dispositivo
para su bienestar.
D. FIJACIONES
ADVERTENCIA
La mayoría de los tornillos, pernos y tuercas de este ciclomotor son fijaciones
especiales de alta resistencia. El uso de fijaciones inadecuadas puede provocar
averías en el ciclomotor.
1. Utilice únicamente fijaciones provistas por Sunrise.
2. Si las fijaciones se aflojan, apriételas tan pronto como pueda.
3. Una fijaciones demasiado flojas o demasiado apretadas pueden fallar o provocar
averías en determinadas partes del ciclomotor.
• En la Sección IX, “Preparación, Ajuste y Uso” se detallan los valores de apriete
adecuados.
E. SEGUROS DEL MOTOR
1. No accione ni libere los seguros del motor a menos que el ciclomotor esté apagado.
2. Tenga en cuenta que, cuando los seguros del motor estén desactivados, el ciclomotor
no tendrá frenos.
3. Asegúrese de que la persona que empuja el ciclomotor tenga un control total en el
momento en que desactive los seguros del motor.
VII. Advertencias: Componentes y Opciones
75
Español
Page 76

F. INTERRUPTOR DE APAGADO / ENCENDIDO
ADVERTENCIA
1. No utilice nunca el interruptor de APAGADO / ENCENDIDO para detener el ciclomotor,
excepto en caso de emergencia. La parada será brusca, y podría usted caerse.
2. Para aminorar la velocidad del ciclomotor hasta detenerse, vuelva a colocar la palanca
de mando en la posición de punto muerto (neutral).
G. SISTEMAS DE ASIENTO
ADVERTENCIA
1. El uso de un sistema de asiento no aprobado por Sunrise puede alterar el centro de
equilibrio de este ciclomotor. Ello puede provocar una caída o volcadura.
2. No cambie nunca el sistema de asiento de su ciclomotor sin antes consultar con su
distribuidor.
H. TEJIDO DE LA TAPICERÍA
ADVERTENCIA
1. Reemplace el tejido desgastado o roto del cojín del asiento tan pronto como pueda.
Si no lo hace, el asiento podría fallar y usted caerse. Un tejido desgastado pueden
aumentar el riesgo de incendio.
2. El tejido se deteriora con el paso del tiempo y con el uso. Busque indicios de desgaste, afinamiento o estiramiento del tejido en los orificios de los remaches.
Reemplace el tejido si fuera necesario.
3. Tenga en cuenta que el lavado puede reducir el efecto pirorretardante (retraso de la
propagación del fuego) del tejido.
I. CABLEADO
ADVERTENCIA
Nunca tire directamente de los cables. Podría provocar su rotura dentro del
conector o arnés. Para quitar un enchufe o conector, tire siempre del propio
enchufe o conector.
930490 Rev. C
76
Español
VII. Advertencias: Componentes y Opciones
Page 77

930490 Rev. C
VIII. CONSEJOS PARA LOS AYUDANTES
ADVERTENCIA
1. Toda persona que vaya a ayudar a un usuario a realizar cualquiera de las siguientes acciones deberá leer y prestar atención a las advertencias que llevan el
título “Aviso para los ayudantes”, y todas las advertencias que aparezcan en este
Manual acerca de esa operación.
2. Los “Consejos” que se ofrecen a continuación son sólo sugerencias. No olvide
que debe usted aprender los métodos de seguridad más adecuados para el
usuario y para sus capacidades. Consulte con el profesional responsable de su
asistencia médica para recibir instrucciones.
A. PARA SUBIR UNA ACERA O UN ÚNICO ESCALÓN
ADVERTENCIA
A continuación se describe una manera de ayudar al usuario a subir con seguridad
una acera o un único escalón, avanzando hacia delante:
1. Permanezca detrás del ciclomotor.
2. De frente a la acera, incline la silla hacia arriba sobre sus ruedas traseras, de modo
que las ruedas pivotantes delanteras rebasen la acera o escalón.
3. Muévase hacia delante, depositando las ruedas pivotantes delanteras sobre la superficie superior en cuanto esté seguro de que han sobrepasado el borde.
4. Continúe avanzando hasta que las ruedas traseras hagan contacto con la acera o
escalón. Levante las ruedas traseras y hágalas rodar hasta el nivel superior.
B. PARA BAJAR UNA ACERA O UN ÚNICO ESCALÓN
ADVERTENCIA
A continuación se describe una manera de ayudar al usuario a bajar con seguridad
una acera o un único escalón, avanzando hacia atrás:
1. Permanezca detrás del ciclomotor.
2. Unos metros antes de llegar al borde de la acera o escalón, gire completamente el
ciclomotor y tire de él hacia atrás.
3. Proceda con cuidado. Mire sobre su hombro y camine hacia atrás con cuidado hasta
que usted haya bajado la acera o escalón y se encuentre parado en el nivel inferior.
4. Tire del ciclomotor hacia usted hasta que las ruedas traseras lleguen al borde de la
acera o escalón. En ese momento, deje que las ruedas traseras rueden lentamente
hasta el nivel inferior.
5. Cuando las ruedas traseras estén firmemente apoyadas en el nivel inferior, incline el
ciclomotor hacia atrás hasta alcanzar su punto de equilibrio. Con ello se levantarán
las ruedas pivotantes delanteras de la acera o escalón.
6. Mantenga la silla equilibrada y camine con pasos cortos hacia atrás. Asegúrese de ver
por dónde va. Gire el ciclomotor y deposite cuidadosamente las ruedas pivotantes
delanteras sobre el suelo.
VIII. Consejos Para Los Ayudantes
77
Español
Page 78

IX. PREPARACIÓN, AJUSTE Y USO
NOTAS:
1. Superficie de trabajo para la preparación:
Use una superficie plana, como una mesa, para ensamblar, ajustar y revisar el ciclomotor.
Esto facilita la operación y ayuda a asegurar una preparación correcta.
2. Sujeciones:
• Muchos de los tornillos y pernos de este ciclomotor son sujeciones especiales de alta
resistencia, que pueden tener revestimientos especiales.
• Muchas tuercas son tipo Nylock. Tienen una pieza de plástico que ayuda a evitar que
se aflojen.
ADVERTENCIA
1. La utilización de fijaciones inadecuadas puede provocar averías en el ciclomotor.
2. Unas sujeciones demasiado apretadas o demasiado flojas pueden fallar o provocar averías en determinadas piezas.
3. Si se aflojan los tornillos o los pernos, apriételos tan pronto como pueda. Unos
tornillos o pernos flojos pueden provocar daños en otras piezas y ocasionar
averías.
3. Arandelas y espaciadores:
• Observe la posición de las arandelas y espaciadores antes de desmontarlos.
• Para evitar daños en el bastidor, vuelva a colocar todas las arandelas y espaciadores
cuando ensamble de nuevo las piezas.
4. Valores de apriete:
• El valor de apriete es el par óptimo con que debe apretarse una determinada fijación.
Para apretar los tornillos, tuercas y pernos de este ciclomotor, utilice una llave
dinamométrica capaz de medir pares de hasta 13,6 Nm (120 pulg – libra).
NOTE–
A menos que se indique lo contrario, utilice un par de apriete de 13,6 Nm (120 pulg. – libra)
para todas las fijaciones.
HERRAMIENTAS NECESARIAS
1. Kit básico de herramientas:
Para la preparación, ajuste y mantenimiento del ciclomotor, necesitará las siguientes herramientas:
• Llave Allen de 4mm
• Llave inglesa de 10 mm
• Destornillador de cabeza plana o de estrella (Phillips)
Puede adquirir un kit de herramientas de usos múltiples de Sunrise o comprar las herramientas que necesite en una ferretería.
2. Llave dinamométrica:
Si tiene intención de realizar por usted mismo las operaciones de ajuste y mantenimiento
del ciclomotor, Sunrise le recomienda que utilice una llave dinamométrica.
NOTA–
La llave dinamométrica debe medir Nm (pulg.-libras). Puede adquirir la llave dinamométrica y
las llaves tubulares apropiadas en una ferretería.
ADVERTENCIA
Bien configurado, este ciclomotor funcionará sin problemas. Compruebe que
todos los componentes funcionan adecuadamente. Si detecta algún problema,
asegúrese de corregirlo antes de utilizarlo.
930490 Rev. C
78
Español
IX. Preparación, Ajuste y Uso
Page 79

930490 Rev. C
A. REMOCIÓN DEL COMPARTIMIENTO DE LAS BATERÍAS (FIGURA 1)
Para desmontar las baterías para su transporte o revisión:
Tire del asa de la batería (A), despegando el Velcro®.
NOTA–
Si retira el asiento del ciclomotor, le resultará más fácil el acceso al compartimiento de las
baterías.
ADVERTENCIA
Las baterías pueden pesar hasta 24,9 Kg. (55 lb.) Tenga cuidado de no lesionarse
al levantar la batería por las correas.
B. INSTALACIÓN DEL REPOSABRAZOS Y AJUSTE DE ANCHURA (FIGURA 2)
a. Inserte el soporte del reposabrazos dentro del tubo cuadrado de 1 pulg. (B) de sec-
ción que va ubicado en la
parte inferior del asiento.
b. Repita la operación para el otro lado del asiento.
c. Ajuste el reposabrazos a la anchura apropiada.
d. Apriete los tornillos (C) del tubo cuadrado.
ADVERTENCIA
Tenga cuidado de no pillarse los dedos con el reposabrazos replegable hacia atrás.
C. BARRA DEL MANILLAR
1. Ajuste de la barra del manillar (Figura 3)
El ciclomotor tiene una barra del manillar ajustable, que puede dejarse bloqueada en la
posición que resulte más cómoda para conducir. Esta característica permite también replegar completamente la barra del manillar, para facilitar el transporte y remolcado.
a. Sujete la barra del manillar con una mano.
b. Afloje la perilla de la barra del manillar de lados suaves (D), para liberar el engranaje.
c. Coloque la barra del manillar en el ángulo que desee.
d. Apriete la perilla de la barra del manillar hasta que el engranaje quede perfectamente
acoplado.
2. Mecanismo de bloqueo de la barra del manillar (Figuras 3 y 4)
El mecanismo de bloqueo de la barra del manillar deja la barra y las ruedas delanteras en
una posición fija. Desbloqueando el manillar le resultará más fácil montar y desmontar el
ciclomotor y transportarlo.
a. Localice el mecanismo de bloqueo de la barra de manillar (E), de color rojo, situado
en la parte delantera de la barra.
b. Presione hacia arriba y por encima el bloqueador, para bloquear la barra del manillar.
(Fig. 4)
c. Para desbloquearla, realice el procedimiento inverso.
IX. Preparación, Ajuste y Uso
79
Español
3
4
1
2
A
D
E
B
C
Page 80

D. REMOCIÓN DEL ASIENTO (FIGURA 5)
1. Levante la palanca roja situada en el lado derecho del asiento (A).
2. Tire del asiento hacia arriba para extraerlo.
E. INCLINACIÓN DEL ASIENTO (FIGURA 6)
1. Levante la palanca roja del lado derecho del asiento (A).
2. Oriente el asiento en la posición deseada.
3. Suelte la palanca roja cuando note que el asiento hace “clic” en una de las cuatro
posiciones de inclinación.
F. AJUSTE DE LA ALTURA DEL ASIENTO (FIGURA 7)
1. Retire el asiento y extraiga el compartimiento de las baterías para acceder al pasador
del poste del asiento.
2. Retire el pasador (B) del poste del asiento.
3. Mueva el poste hacia arriba o hacia abajo hasta que el asiento quede a la altura que
desee.
4. Vuelva a insertar el pasador del poste del asiento.
G. INSTALACIÓN Y REMOCIÓN DE LA CANASTA (FIGURA 8)
1. Para instalar la canasta, sitúe los orificios de la parte posterior de la canasta sobre
los ganchos delanteros de la barra del manillar, como se ve en la figura.
2. Para retirar la canasta, tire de ella hacia arriba hasta que se desprenda de los ganchos.
930490 Rev. C
80
Español
IX. Preparación, Ajuste y Uso
5
6
A
A
7
B
8
Page 81

930490 Rev. C
H. DESMONTAJE (FIGURAS 9 Y 10)
Este ciclomotor puede desmontarse de una forma rápida y sencilla para su transporte o
almacenamiento.
1. Retire el asiento
2. Levante la batería y retírela.
3. Baje la barra del manillar y déjela bloqueada. (Fig. 9) (bloqueando la barra del manillar, el vehículo ganará estabilidad, lo que facilitará su montaje, desmontaje y transporte. Además, la barra bajada y bloqueada sirve como un punto de agarre que permite levantar fácilmente el cuerpo principal para separarlo del conjunto de las ruedas
traseras.)
4. Presione hacia atrás la palanca de desmontaje rápido (A) y levante el cuerpo principal
hasta separarlo del conjunto de las ruedas traseras.
IX. Preparación, Ajuste y Uso
81
Español
9
10
A
Page 82

X. GUÍA DE OPERACIÓN
A. CORTACORRIENTES (FIGURA 1)
1. Notas:
El modelo Guardian Trek incorpora un cortacorrientes o interruptor eléctrico en el compartimiento de las baterías (A).
• En el caso improbable de cortocircuito o sobrecarga, se desconectará toda la corriente del ciclomotor.
• Para reactivar el ciclomotor, oprima el botón del cortacorrientes, situado en la parte
delantera del compartimiento de las baterías. Deberá esperar unos minutos antes de
rearmar el cortacorrientes.
2. Desconexiones reiteradas:
Si el ciclomotor sigue desconectándose después de rearmarlo, llévelo a su distribuidor para
que lo revise.
B. FUNCIONES DE CONTROL DE LA BARRA DEL MANILLAR (FIGURA 2)
NOTA– Para ahorrar batería, el ciclomotor entrará en modo de desconexión parcial cuando esté 5 min-
utos sin utilizarlo. Para salir de ese modo, quite el contacto y vuelva a encenderlo.
1. Controles manuales
Todos los controles de conducción del ciclomotor se encuentran en la caja de control del
manillar.
2. Mando de velocidad prefijada
Girando el mando hacia la izquierda reducirá la velocidad máxima disponible. Girándolo a la
derecha, aumentará esa velocidad máxima.
3. El indicador de batería
Muestra una indicación aproximada del nivel de carga de la batería.
El indicador muestra una escala que va desde la “E”, que indica que la batería está descargada, a la “F”, que indica que está totalmente cargada. Para mayor claridad, hay una escala
graduada en color, que va desde el ROJO (sin carga), pasando por el AMARILLO, hasta el
VERDE (batería totalmente cargada).
Cuando el ciclomotor circule por terreno irregular, la aguja del indicador de batería oscilará
hacia arriba o hacia abajo. Este es normal. Si necesita una indicación más precisa, pare el
ciclomotor y observe el valor medido.
VERDE indica que la batería está lista para ser utilizada.
AMARILLO indica que la batería debe recargarse lo antes posible.
ROJO indica que la batería debe recargarse de inmediato.
NOTA–
Si observa que el indicador de batería se pone en rojo antes de que usted haya llegado a su destino, puede aumentar la distancia que aún puede recorrer con el ciclomotor reduciendo la velocidad máxima disponible, pero, en cualquier caso, DEBE recargar el ciclomotor lo antes posible.
4. Palanca del acelerador
La palanca del acelerador permite controlar el ciclomotor con la punta de los dedos. Sirve
para controlar tanto la velocidad como el sentido de avance, hacia delante o hacia atrás. Si
oprime el lado derecho de la palanca hacia fuera, el ciclomotor avanzará hacia adelante. Si
oprime el lado izquierdo de la palanca hacia fuera, el ciclomotor se desplazará marcha
atrás, y sonará un pitido de aviso de movimiento hacia atrás. Cuanto más mueva la palanca, más aumentará la velocidad, hasta alcanzar el máximo prefijado. Es posible manejar el
ciclomotor utilizando un solo lado de la palanca del acelerador. Para ello deberá PRESIONAR
y TIRAR del lado elegido de la palanca del acelerador.
NOTA–
El manejo con una sola mano requiere mucha concentración, y resulta más cansado que el
manejo normal.
930490 Rev. C
82
Español
X. Guía de Operación
1
2
3
5
6
2
4
A
Page 83

930490 Rev. C
5. Botón del claxon
Si presiona el botón amarillo del claxon, se escuchará un pitido. Esta función sirve para
avisar de su presencia a los viandantes, si fuera necesario.
6. Interruptor de encendido/apagado
ANTES de subir o bajar del ciclomotor, asegúrese de que el interruptor esté en posición de
apagado (OFF). Si apaga este interruptor mientras está circulando, el ciclomotor se
detendrá de una manera muy brusca. No se recomienda hacerlo.
C. SEGUROS DEL MOTOR (FIGURA 3)
Desconecte los seguros del motor cuando necesite empujar manualmente el ciclomotor.
(Por ejemplo, en caso de emergencia o de falla de la batería).
ADVERTENCIA
1. No desactive los seguros del motor a menos que el ciclomotor esté apagado.
2. El ciclomotor no funcionará si está suelto cualquiera de los dos frenos, o ambos.
3. Tenga en cuenta que la silla no tendrá frenos cuando esté en la posición de
desembrague.
4. Asegúrese de que la persona que esté empujando el ciclomotor lo tenga perfectamente controlado en el momento en que se liberen los seguros del motor.
Liberación de los seguros del motor
1. La palanca amarilla de bloqueo del motor está situada en la parte posterior del ciclomotor (A).
2. Para liberar los seguros del motor, presione hacia delante la palanca de bloqueo del
motor.
3. Para activar los seguros del motor, presione hacia atrás la palanca de bloqueo del
motor.
X. Guía de Operación
83
Español
3
A
Page 84

XI. BATERÍAS
A. INTRODUCCIÓN
1. Notas:
• Las baterías suministran la energía eléctrica que el ciclomotor necesita. Contienen
una cantidad determinada de energía, y el tiempo durante el cual pueden almacenarla
y suministrarla está limitado.
• Las baterías solamente pueden recargarse un determinado número de veces hasta que
fallan y pierden la capacidad de retener carga.
• Para obtener respuestas a sus preguntas acerca de las baterías, consulte con su distribuidor.
2. USO DE BATERÍAS APROPIADAS:
Este ciclomotor funciona con dos baterías de 12/10 , que van alojadas dentro de un compartimiento de las baterías.
• Sólo puede utilizarse un compartimiento de las baterías.
3. Acondicionamiento:
• Una batería requiere un proceso de “acondicionamiento” durante las primeras 6 a 12
cargas. Durante ese período, la batería no llegará a cargarse completamente.
• Lo mejor es limitar la duración de sus viajes hasta que termine el período de acondicionamiento de su batería y usted conozca el alcance máximo del ciclomotor.
4. Baterías descargadas:
• No deje nunca que una batería se descargue completamente. Si utiliza su ciclomotor
hasta que casi se detenga por completo, reducirá enormemente la vida útil de las
baterías.
• No deje nunca una batería descargada guardada e inactiva. Cargue completamente
una vez al mes las baterías guardadas o sin usar.
• Cargue siempre las baterías al máximo. Evite “sobrecargarlas” con recargas demasiado
frecuentes.
ADVERTENCIA
No conecte nunca un dispositivo auxiliar o de apoyo vital a la batería de la silla
de ruedas. El sistema eléctrico podría fallar y provocar graves lesiones, o incluso
la muerte del usuario.
B. CARGADOR DE BATERÍAS
Un cargador de baterías produce corriente continua (CC). Al aplicar esa corriente a una
batería descargada, se invierte la reacción química que provocó su descarga.
1. Velocidad de carga. La rapidez con que se cargue una batería dependerá de:
• Su capacidad eléctrica, su estado de carga, la temperatura del electrolito y las condiciones internas.
• La salida de CC del cargador. (La velocidad de carga variará si el voltaje de corriente
alterna (CA) es mayor o menor de 110 voltios).
2. Precaución - Para evitar dañar el cargador:
• No exponga nunca el cargador a la lluvia o nieve.
• No desenchufe nunca el cargador tirando del cordón eléctrico. Podría dañar el cordón.
• No abra nunca un cargador ni intente repararlo usted mismo. Devuelva el cargador a
Sunrise o encargue la reparación a una persona cualificada.
• Mantenga el cordón eléctrico fuera del camino, donde no pueda ser pisado, ni donde
pueda tropezarse con él o dañarlo.
930490 Rev. C
84
Español
XI. Baterías
Page 85

930490 Rev. C
3. Precaución - Para evitar dañar la batería:
• Asegúrese de estar usando el valor correcto para las baterías estancas (de gel) (localizado en el cargador externo).
• No recargue nunca una batería congelada. Una batería completamente cargada raramente se congelará, pero el líquido de una batería descargada puede congelarse a
menos 9 grados centígrados (16 grados Fahrenheit). Si sospecha que una batería está
congelada, descongélela antes de cargarla.
ADVERTENCIA
Las baterías de plomo-ácido generan gases explosivos durante el proceso de carga.
Lea completamente y siga todas las advertencias acerca de las baterías de este
manual de instrucciones, y todas las etiquetas que van pegadas al producto. De lo
contrario, podría provocar un incendio, explosión, lesiones o incluso la muerte.
C. QUEMADURAS POR ÁCIDO (BATERÍAS HÚMEDAS NO ESTANCAS)
ADVERTENCIA
1. Tenga muchísimo cuidado de no derramar el ácido cuando manipule baterías
húmedas. Mantenga las baterías en posición vertical.
2. Evite el contacto del ácido con la piel desnuda o la ropa.
3. Use siempre guantes de goma y gafas de seguridad cuando manipule baterías.
4. Si el ácido entra en contacto con la piel o la ropa, lávese inmediatamente con
agua y jabón.
5. Si el ácido entra en contacto con los ojos, lávese inmediatamente los ojos con
abundante agua fría del grifo por lo menos durante 15 minutos. Acuda a un
médico inmediatamente.
Sunrise Medical no recomienda utilizar baterías húmedas con este ciclomotor.
D. CONEXIÓN DE LAS BATERÍAS EN EL COMPARTIMIENTO DE LAS BATERÍAS
ADVERTENCIA
1. Cada batería puede pesar hasta 10 Kg (22 lb.) Tenga cuidado de no lesionarse
cuando la levante.
2. Mantenga las baterías en posición vertical. Tenga cuidado de no derramar el
ácido (baterías húmedas).
3. Use siempre guantes de goma y gafas de seguridad cuando manipule baterías.
4. Antes de trabajar alrededor de las baterías, quítese todos los artículos personales de metal, como collares, anillos, relojes, pasadores u otras piezas metálicas
de joyería que pudieran entrar en contacto con el terminal de la batería y provocar un cortocircuito.
ADVERTENCIA
No conecte nunca directamente los dos terminales de la batería, pues podría
provocar una explosión. Cualquier chispa podría ocasionar una explosión y/o un
incendio, con consecuencias graves o incluso mortales.
E. CÓMO CARGAR LAS BATERÍAS
ADVERTENCIA
Para evitar el riesgo de lesiones graves o mortales por descarga eléctrica, incendio
o explosión al cargar la batería:
1. No conecte nunca un cargador a una fuente de electricidad de 240 voltios. El voltaje
principal de entrada es de 110 voltios.
2. No toque nunca el cargador después de haberlo conectado a una toma de corriente.
Podría provocar una descarga eléctrica.
• Nunca conecte ni desconecte de la batería el cargador mientras éste tenga corriente.
3. No utilice nunca un cable alargador. El uso de un cordón eléctrico inapropiado puede
dañar el cargador o provocar un incendio o descarga eléctrica.
XI. Baterías
85
Español
Page 86

4. Una batería emite gas hidrógeno explosivo mientras se carga. Para reducir el riesgo
de incendio o explosión:
• Asegúrese de que el área esté bien ventilada. No cargue nunca una batería dentro
de un recinto cerrado.
• Nunca fume ni permita que haya chispas, llamas o calor intenso cerca de la
batería mientras se está cargando.
• No permita nunca que ninguna herramienta metálica o pieza del ciclomotor haga
contacto con ambos terminales de la batería.
5. Nunca mire directamente hacia el interior de las celdas de la batería mientras se está
cargando (baterías húmedas).
SIEMPRE:
1. Use el cargador que viene incluido con el ciclomotor. Lea y siga todas las instrucciones y advertencias.
2. Asegúrese de que la habitación esté bien ventilada.
3. Apague totalmente el ciclomotor.
4. Conecte y desconecte con cuidado los cables de la batería.
5. Asegúrese de haber esperado el tiempo suficiente para que las baterías hayan quedado completamente cargadas.
NOTE–
Las baterías nunca deben dejarse descargadas durante largos períodos. Las baterías guardadas
o que no se estén utilizando deben recargarse por completo una vez al mes.
6. También puede utilizar el cargador externo enchufándolo al conector de carga del
compartimiento de las baterías (A).
F. CÓMO DESHACERSE DE LAS BATERÍAS
ADVERTENCIA
1. Todas las baterías que han alcanzado el fin de su vida útil se convierten en residuos
peligrosos.
2. Si necesita más información acerca de su manipulación y reciclado, póngase en contacto con su autoridad local de reciclado.
3. Deshágase siempre de este producto a través de un agente reconocido.
930490 Rev. C
86
Español
XI. Baterías
Conector para cargador
externo
A
Page 87

930490 Rev. C
XII. MANTENIMIENTO
A. NOTAS
1. Un mantenimiento apropiado mejorará el rendimiento y prolongará la vida útil
de su ciclomotor.
2. Limpie el ciclomotor periódicamente. Eso le ayudará a encontrar partes sueltas o desgastadas y hará su ciclomotor más fácil de usar.
3. Para proteger su inversión, confíe a su distribuidor todas las revisiones y reparaciones
de importancia.
ADVERTENCIA
1. Su ciclomotor necesita un mantenimiento periódico para funcionar a pleno
rendimiento y evitar posibles lesiones como consecuencia de averías, daños o
desgaste prematuro.
2. Revise el ciclomotor y realice su mantenimiento siguiendo estrictamente la
“Tabla de mantenimiento”.
3. Si detecta algún problema en el ciclomotor, asegúrese de revisarlo o repararlo
antes de su utilización.
4. Al menos una vez al año, acuda a su distribuidor para que realice una comprobación de seguridad a fondo y una revisión de su ciclomotor.
B. LIMPIEZA
1. Bastidor
• Limpie el bastidor una vez al mes con agua ligeramente jabonosa.
2. Motores:
• Una vez a la semana, limpie los alrededores del motor con un trapo ligeramente
húmedo (no mojado).
• Limpie o sacuda la pelusa, el polvo o la suciedad que se hayan acumulado sobre los
motores o a su alrededor.
• Nota: Este ciclomotor no necesita engrase ni aceite.
3. Tapicería:
• Lávela a mano solamente cuando sea necesario. El lavado a máquina puede dañar la tela.
• Seque la tapicería simplemente colgándola. El calor de una secadora podría dañar el
tejido.
NOTA–
Lavar el tejido puede reducir su capacidad pirorretardante (retraso de la propagación del fuego).
C. CONSEJOS PARA SU ALMACENAMIENTO
1. Guarde el ciclomotor en un lugar limpio y seco. De lo contrario, sus piezas podrían
oxidarse o sufrir corrosión.
2. Antes de usar el ciclomotor, de asegúrese de que funcione correctamente. Inspeccione
y revise todos los elementos detallados en la “Tabla de mantenimiento.”
3. Si ha mantenido guardado el ciclomotor durante más de tres meses, haga que sea
inspeccionado por su distribuidor antes de utilizarlo.
D. MANTENIMIENTO DE LA BATERÍA
ADVERTENCIA
1. Para evitar un derrame de ácido, mantenga las baterías siempre en posición
vertical. (baterías húmedas)
2. Nunca fume o pase una llama abierta cerca de las baterías.
3. Use siempre guantes de goma y gafas de seguridad cuando manipule baterías.
1. Limpieza de los contactos de las baterías
Para prevenir paros intermitentes de corriente causados por la acumulación de material
extraño use un trapo seco ligeramente humedecido con alcohol para limpiar suavemente los
contactos de las baterías y postes de corriente.
ADVERTENCIA
Deje un tiempo razonable para que todos los contactos se sequen por completo
antes de operar o cargar de nuevo su silla de ruedas/escúter.
XII. Mantenimiento
87
Español
Page 88

2. Calendario de mantenimiento:
El calendario de mantenimiento dependerá del tipo de baterías. Siga siempre las instrucciones incluidas con sus baterías.
NOTE–
Use guantes de goma y gafas de seguridad siempre que manipule o revise baterías.
3. Para obtener contestación a sus preguntas: Póngase en contacto con su distribuidor.
E. CÓMO PEDIR PIEZAS AL FABRICANTE
Si necesita pedir piezas de repuesto al fabricante, deberá facilitarle los siguientes datos:
1. Modelo de ciclomotor
2. Número de serie del ciclomotor
3. Control para la mano derecha o la izquierda
4. Número de parte, descripción y cantidad de repuestos que necesita.
5. Razón del reemplazo.
F. TABLA DE MANTENIMIENTO
Debe revisar los elementos indicados en esta tabla con la periodicidad especificada. Si
alguno de estos elementos está suelto, desgastado, doblado o deformado, solicite inmediatamente a su distribuidor autorizado Sunrise su revisión y/o reparación. Un mantenimiento
y unas revisiones frecuentes mejorarán el rendimiento del ciclomotor, prolongarán su vida
útil y ayudarán a evitar lesiones.
930490 Rev. C
88
Español
XII. Mantenimiento
Recargue la batería
Revise el desgaste de todas las partes móviles
Inspeccione el apriete o desgaste de todas las tuercas,
pernos y fijaciones
Inspeccione el desgaste de la tapicería
Revisión por parte de un distribuidor autorizado
Diariamente
Semanalmente
Mensualmente
Trimestralmente
Anualmente
COMPROBACIONES...
Page 89

930490 Rev. C
XIII. GARANTÍA LIMITADA DE SUNRISE
1. POR CINCO AÑOS
Garantizamos al comprador original el bastidor principal de este ciclomotor contra defectos
de materiales y mano de obra por 5 años de uso.
2. GARANTÍA ADICIONAL
Garantizamos los componentes de este ciclomotor, fabricados por Sunrise, contra defectos
de materiales y mano de obra, según se establece a continuación:
a. Motores, cajas de engranajes y cargador– Por un (1) año a partir de la fecha de com-
pra por el primer usuario.
b. Todos los demás componentes originales (tales como ruedas, la tapicería, partes de
plástico y caucho y superficies pintadas) - Por tres (3) meses a partir de la fecha de
compra por el primer usuario.
3. LIMITACIONES
a. Nuestra garantía no cubre daños debidos a:
• Negligencia, uso indebido o instalación o reparación inapropiadas.
• Uso de partes o modificaciones no autorizadas por Sunrise.
• Sobrepasar el límite de peso de 113 Kg (250 libras).
b. Esta garantía quedará anulada en caso de alteración o desaparición de la etiqueta
original del número de serie del ciclomotor.
c. Esta garantía solamente es válida en los Estados Unidos. Compruebe con su dis-
tribuidor si se aplica alguna garantía internacional.
4. LO QUE HAREMOS
Nuestra única responsabilidad es reparar o reemplazar las partes cubiertas por la garantía.
Este es el único resarcimiento por daños emergentes al que usted tendrá derecho.
5. LO QUE USTED DEBE HACER
a. Hacernos llegar la tarjeta de garantía.
b. Obtener de nosotros, mientras esta garantía esté en vigor, la autorización previa para
el retorno o reparación de las partes cubiertas por la garantía.
c. Hacer llegar el ciclomotor o la(s) parte(s), a portes pagados, a Sunrise Mobility
Products Division, en la dirección: 2842 Business Park Ave., Fresno, CA 93727-1328.
d. Pagar el costo de la mano de obra necesaria para instalar o reparar las partes.
6. AVISO AL CONSUMIDOR
Queda excluida cualquier otra garantía expresa. Hasta donde lo permite la ley, cualquier
garantía implícita (incluida la garantía de comerciabilidad o idoneidad para un propósito en
particular) se limita a:
a. Un (1) año a partir de la fecha de compra por el primer usuario y
b. La reparación o sustitución de la parte defectuosa exclusivamente.
Esta garantía le otorga ciertos derechos legales. Es posible que usted posea también otros
derechos, que pueden variar de un estado a otro.
XIII. Garantía Limitada de Sunrise
89
Español
Page 90

Page 91

Page 92

© 2006 Sunrise Medical Inc. 4.06
930490 Rev. C
Sunrise Medical, Inc.
7477 East Dry Creek Pkwy.
Longmont, CO 80503
USA
800-333-4000
Sunrise Medical Canada, Inc.
237 Romina Drive, Unit 3
Concord, Ontario L4K 4V3
CANADA
905-660-2459
800-563-3390
Sunrise Medical Ltd.
Sunrise Business Park
High Street
Wollaston, West Midlands DY8 4PS
ENGLAND
44-138-444-6688
Sunrise Medical Pty. Limited
15 Carrington Road, Unit 7
Castle Hill NSW 2154
AUSTRALIA
61-2-9899-3144
Sunrise Medical
13 Rue de la Painguetterie
37390 Chanceaux sur Choisille
FRANCE
33-2-47-55-44-00
Sunrise Medical
Industriegebiet
69254 Malsch/Heidelberg
GERMANY
49-7253-980-460
 Loading...