

Page 1
1
pureguardian
2-in-1
Upright & Canister
with Silver Clean Technology
USE & CARE INSTRUCTIONS
™
Upright to Canister Model No. GGU300
1 Year Limited Warranty
www.guardiantechnologies.com
1-866-603-5900
REV0411
Replacement Parts:
HEPA Dirt Cup Filter: FLTB
Exhaust Filter: FLTA
Belt Style: BLT1
!
WARNING:
Cleaner assembly may include
small parts. Small parts can
present a choking hazard.
English Manual..................E-1
French Manual ..................F-1
Spanish Manual ................S-1
©2010 Guardian Technologies LLC
Guardian Technologies LLC
7700 St. Clair Avenue · Mentor, Ohio 44060
1-866-603-5900 · www.guardiantechnologies.com
LIMITED WARRANTY
To the consumer, Guardian Technologies LLC warrants this product to be free of defects in materials
or workmanship commencing upon the date of the original purchase. Refer to your product carton
for the length of warranty and save your original sales receipt to validate start of warranty period.
If this product should become defective within the warranty period, we will repair or replace any
defective parts free of charge. The complete machine must be delivered pre-paid to any authorized
Guardian Technologies LLC warranty service center. Please include complete information on the
problem, day of purchase, copy of original sales receipt and your name, address and telephone
number. If you are not near a warranty station, call the factory for assistance in the US and Canada
at 1-866-603-5900. Use only genuine Guardian Technologies replacement parts.
The warranty does not include unusual wear, damage resulting from accident, or unreasonable use
of the product. This warranty does not cover unauthorized repairs. This warranty gives you specific
legal rights and you may also have other rights (other rights may vary from state to state in the
U.S.A).
We consider the registration process important to ensuring superior service to our customers,
however submitting this card to Guardian Technologies LLC is optional and does not affect your
rights to utilize this warranty according to the conditions stated above. If you have any questions
or comments about our product call toll free at 1-866-603-5900 or send comments to: Attn:
Customer Service, Guardian Technologies LLC, 7700 St. Clair Avenue, Mentor, OH 44060.
Warranty registration is also available online at www.guardiantechnologies.com
All manuals and user guides at all-guides.com
all-guides.com
Page 2
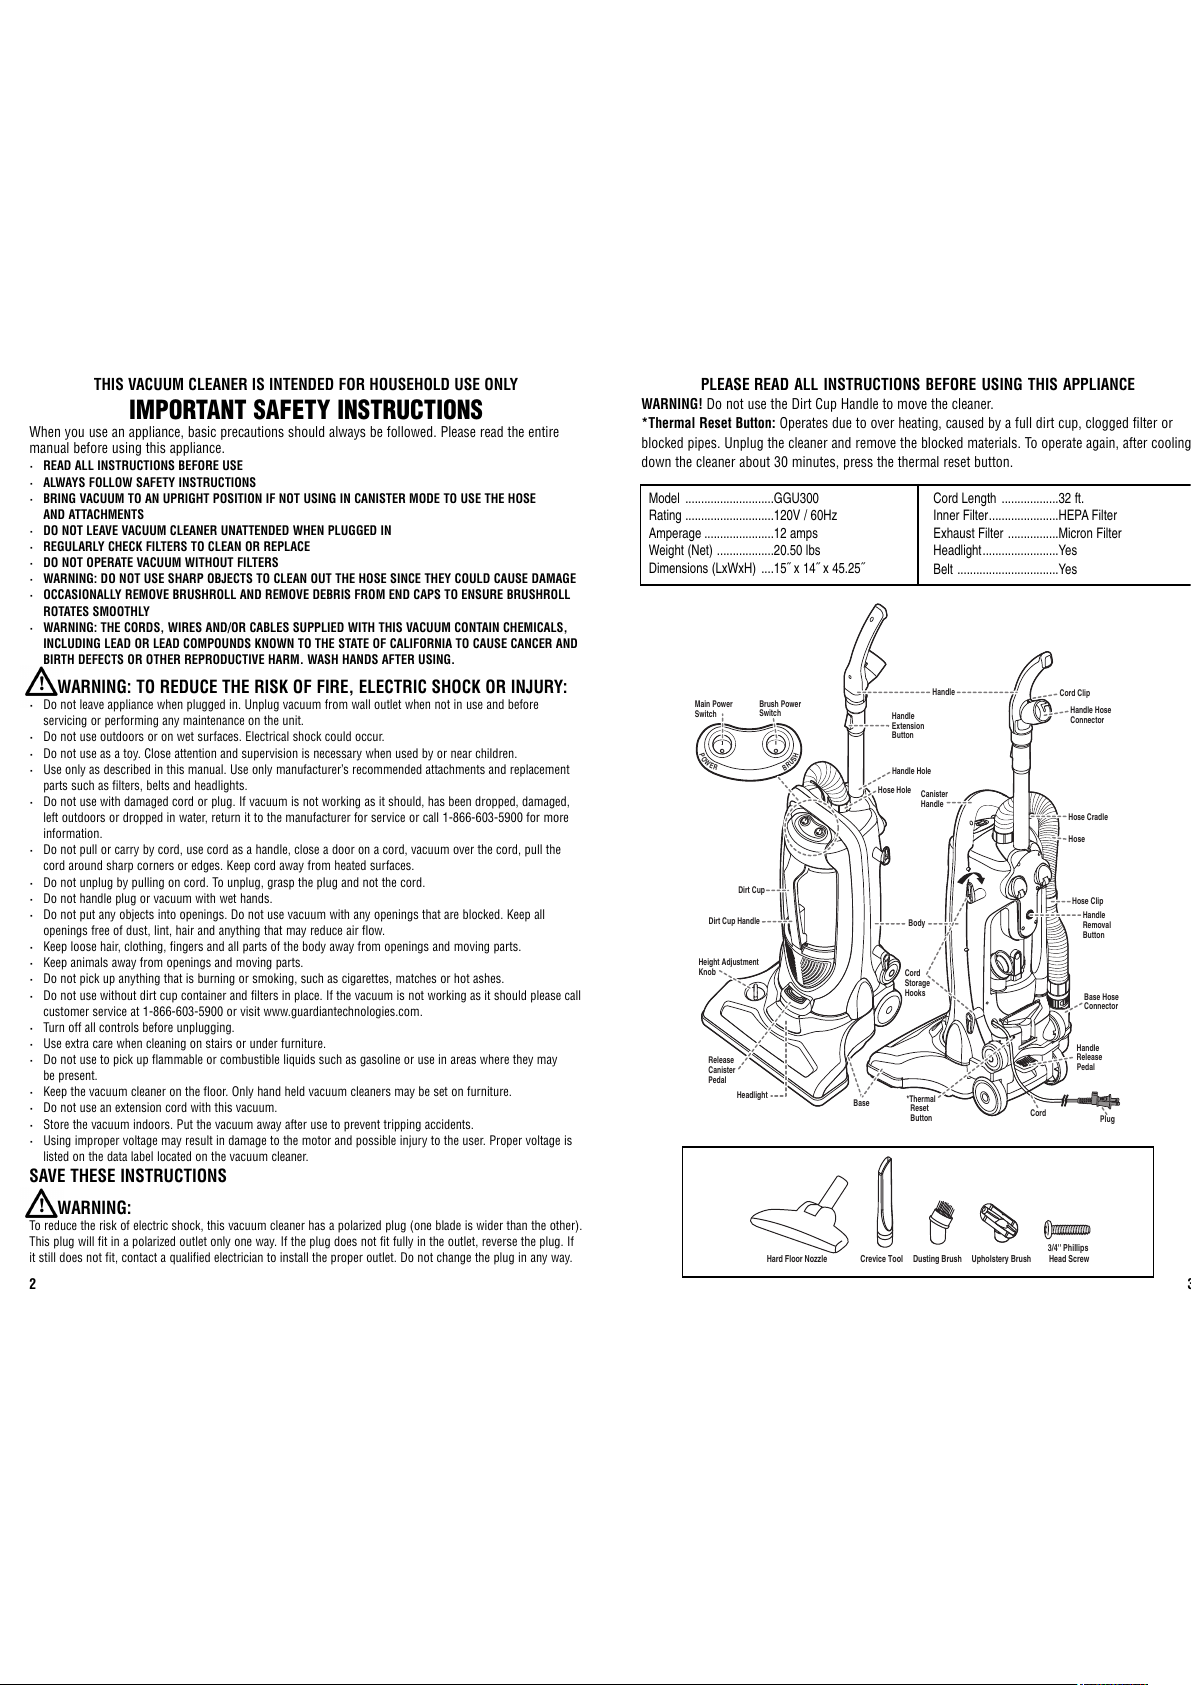
PLEASE READ ALL INSTRUCTIONS BEFORE USING THIS APPLIANCE
WARNING! Do not use the Dirt Cup Handle to move the cleaner.
*Thermal Reset Button: Operates due to over heating, caused by a full dirt cup, clogged filter or
blocked pipes. Unplug the cleaner and remove the blocked materials. To operate again, after cooling
down the cleaner about 30 minutes, press the thermal reset button.
3
Height
Setting
Control
P
O
W
E
R
Cord
Handle
Release
Pedal
*Thermal
Reset
Button
Hose Clip
Cord
Storage
Hooks
Handle
Extension
Button
Dirt Cup Handle
Release
Canister
Pedal
Headlight
Main Power
Switch
Brush Power
Switch
Body
Dirt Cup
B
R
U
S
H
Base
Height Adjustment
Knob
Hose
Hose Cradle
Handle
Removal
Button
Cord Clip
Base Hose
Connector
Plug
Canister
Handle
Handle Hose
Connector
Hose Hole
Handle Hole
Handle
Model ............................GGU300
Rating ............................120V / 60Hz
Amperage ......................12 amps
Weight (Net) ..................20.50 lbs
Dimensions (LxWxH) ....15˝ x 14˝ x 45.25˝
Cord Length ..................32 ft.
Inner Filter......................HEPA Filter
Exhaust Filter ................Micron Filter
Headlight........................Yes
Belt ................................Yes
2
Hard Floor Nozzle Crevice Tool Dusting Brush
Upholstery Brush
3/4'' Phillips
Head Screw
!
!
THIS VACUUM CLEANER IS INTENDED FOR HOUSEHOLD USE ONLY
IMPORTANT SAFETY INSTRUCTIONS
When you use an appliance, basic precautions should always be followed. Please read the entire
manual before using this appliance.
· READ ALL INSTRUCTIONS BEFORE USE
· ALWAYS FOLLOW SAFETY INSTRUCTIONS
· BRING VACUUM TO AN UPRIGHT POSITION IF NOT USING IN CANISTER MODE TO USE THE HOSE
AND ATTACHMENTS
· DO NOT LEAVE VACUUM CLEANER UNATTENDED WHEN PLUGGED IN
· REGULARLY CHECK FILTERS TO CLEAN OR REPLACE
· DO NOT OPERATE VACUUM WITHOUT FILTERS
· WARNING: DO NOT USE SHARP OBJECTS TO CLEAN OUT THE HOSE SINCE THEY COULD CAUSE DAMAGE
· OCCASIONALLY REMOVE BRUSHROLL AND REMOVE DEBRIS FROM END CAPS TO ENSURE BRUSHROLL
ROTATES SMOOTHLY
· WARNING: THE CORDS, WIRES AND/OR CABLES SUPPLIED WITH THIS VACUUM CONTAIN CHEMICALS,
INCLUDING LEAD OR LEAD COMPOUNDS KNOWN TO THE STATE OF CALIFORNIA TO CAUSE CANCER AND
BIRTH DEFECTS OR OTHER REPRODUCTIVE HARM. WASH HANDS AFTER USING.
WARNING: TO REDUCE THE RISK OF FIRE, ELECTRIC SHOCK OR INJURY:
· Do not leave appliance when plugged in. Unplug vacuum from wall outlet when not in use and before
servicing or performing any maintenance on the unit.
· Do not use outdoors or on wet surfaces. Electrical shock could occur.
· Do not use as a toy. Close attention and supervision is necessary when used by or near children.
· Use only as described in this manual. Use only manufacturer’s recommended attachments and replacement
parts such as filters, belts and headlights.
· Do not use with damaged cord or plug. If vacuum is not working as it should, has been dropped, damaged,
left outdoors or dropped in water, return it to the manufacturer for service or call 1-866-603-5900 for more
information.
· Do not pull or carry by cord, use cord as a handle, close a door on a cord, vacuum over the cord, pull the
cord around sharp corners or edges. Keep cord away from heated surfaces.
· Do not unplug by pulling on cord. To unplug, grasp the plug and not the cord.
· Do not handle plug or vacuum with wet hands.
· Do not put any objects into openings. Do not use vacuum with any openings that are blocked. Keep all
openings free of dust, lint, hair and anything that may reduce air flow.
· Keep loose hair, clothing, fingers and all parts of the body away from openings and moving parts.
· Keep animals away from openings and moving parts.
· Do not pick up anything that is burning or smoking, such as cigarettes, matches or hot ashes.
· Do not use without dirt cup container and filters in place. If the vacuum is not working as it should please call
customer service at 1-866-603-5900 or visit www.guardiantechnologies.com.
· Turn off all controls before unplugging.
· Use extra care when cleaning on stairs or under furniture.
· Do not use to pick up flammable or combustible liquids such as gasoline or use in areas where they may
be present.
· Keep the vacuum cleaner on the floor. Only hand held vacuum cleaners may be set on furniture.
· Do not use an extension cord with this vacuum.
· Store the vacuum indoors. Put the vacuum away after use to prevent tripping accidents.
· Using improper voltage may result in damage to the motor and possible injury to the user. Proper voltage is
listed on the data label located on the vacuum cleaner.
SAVE THESE INSTRUCTIONS
WARNING:
To reduce the risk of electric shock, this vacuum cleaner has a polarized plug (one blade is wider than the other).
This plug will fit in a polarized outlet only one way. If the plug does not fit fully in the outlet, reverse the plug. If
it still does not fit, contact a qualified electrician to install the proper outlet. Do not change the plug in any way.
All manuals and user guides at all-guides.com
Page 3
4 5
HOSE CRADLE & HOSE ASSEMBLY
Protrusion
to lock
H
andle
Removal
Button
Handle
Hole
H
andle
Release
Canister
Pedal
Base
Body
Guides
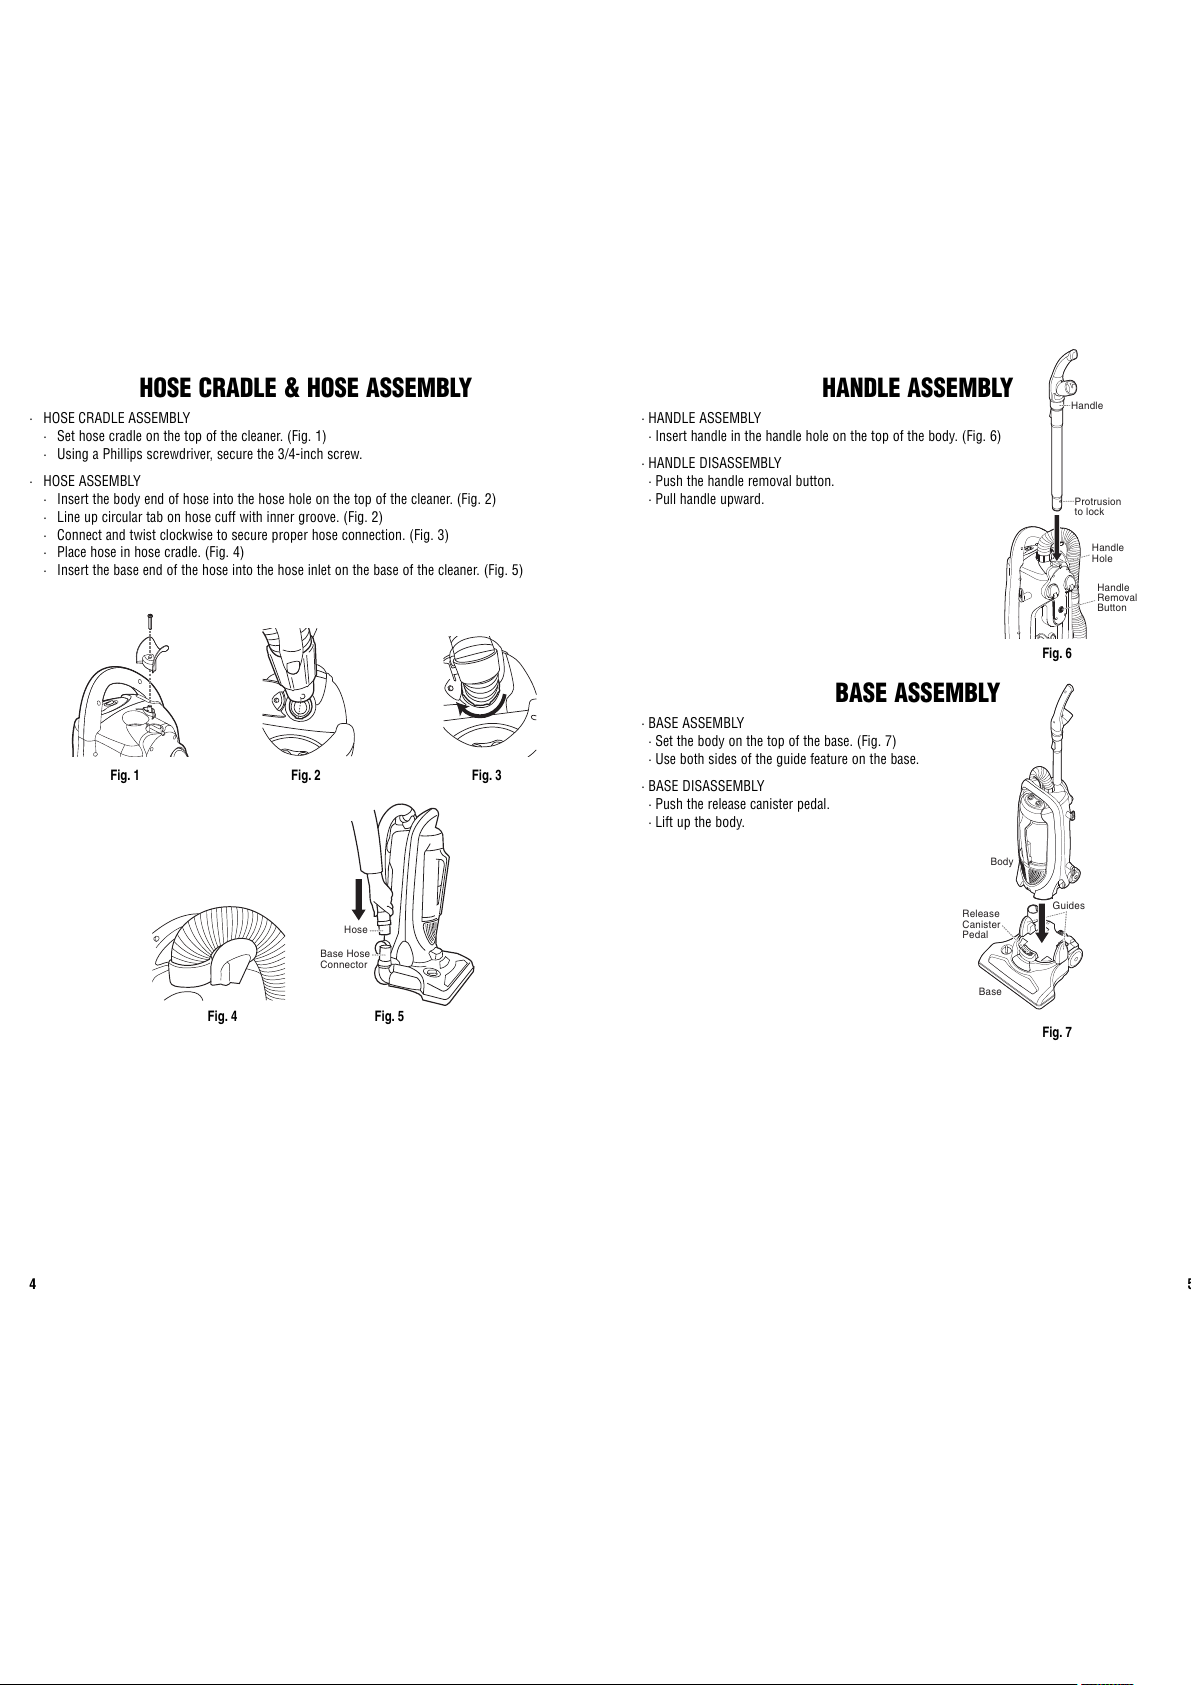
· HOSE CRADLE ASSEMBLY
· Set hose cradle on the top of the cleaner. (Fig. 1)
· Using a Phillips screwdriver, secure the 3/4-inch screw.
· HOSE ASSEMBLY
· Insert the body end of hose into the hose hole on the top of the cleaner. (Fig. 2)
· Line up circular tab on hose cuff with inner groove. (Fig. 2)
· Connect and twist clockwise to secure proper hose connection. (Fig. 3)
· Place hose in hose cradle. (Fig. 4)
· Insert the base end of the hose into the hose inlet on the base of the cleaner. (Fig. 5)
HANDLE ASSEMBLY
BASE ASSEMBLY
· HANDLE ASSEMBLY
· Insert handle in the handle hole on the top of the body. (Fig. 6)
· HANDLE DISASSEMBLY
· Push the handle removal button.
· Pull handle upward.
· BASE ASSEMBLY
· Set the body on the top of the base. (Fig. 7)
· Use both sides of the guide feature on the base.
· BASE DISASSEMBLY
· Push the release canister pedal.
· Lift up the body.
Fig. 7
Fig. 1
Hose
Base Hose
Connector
Fig. 5
Fig. 6
Fig. 2 Fig. 3
Fig. 4
All manuals and user guides at all-guides.com
Page 4
6 7
Fig. 13 Fig. 14
Fig. 15
Handle
Removal
Button
Handle
Handle
Handle
H
ose
Connector
Hose
Telescoping
Button
Handle
Hard Floor
Nozzle
CONVERTING TO CANISTER MODE (cont.)
Fig. 16
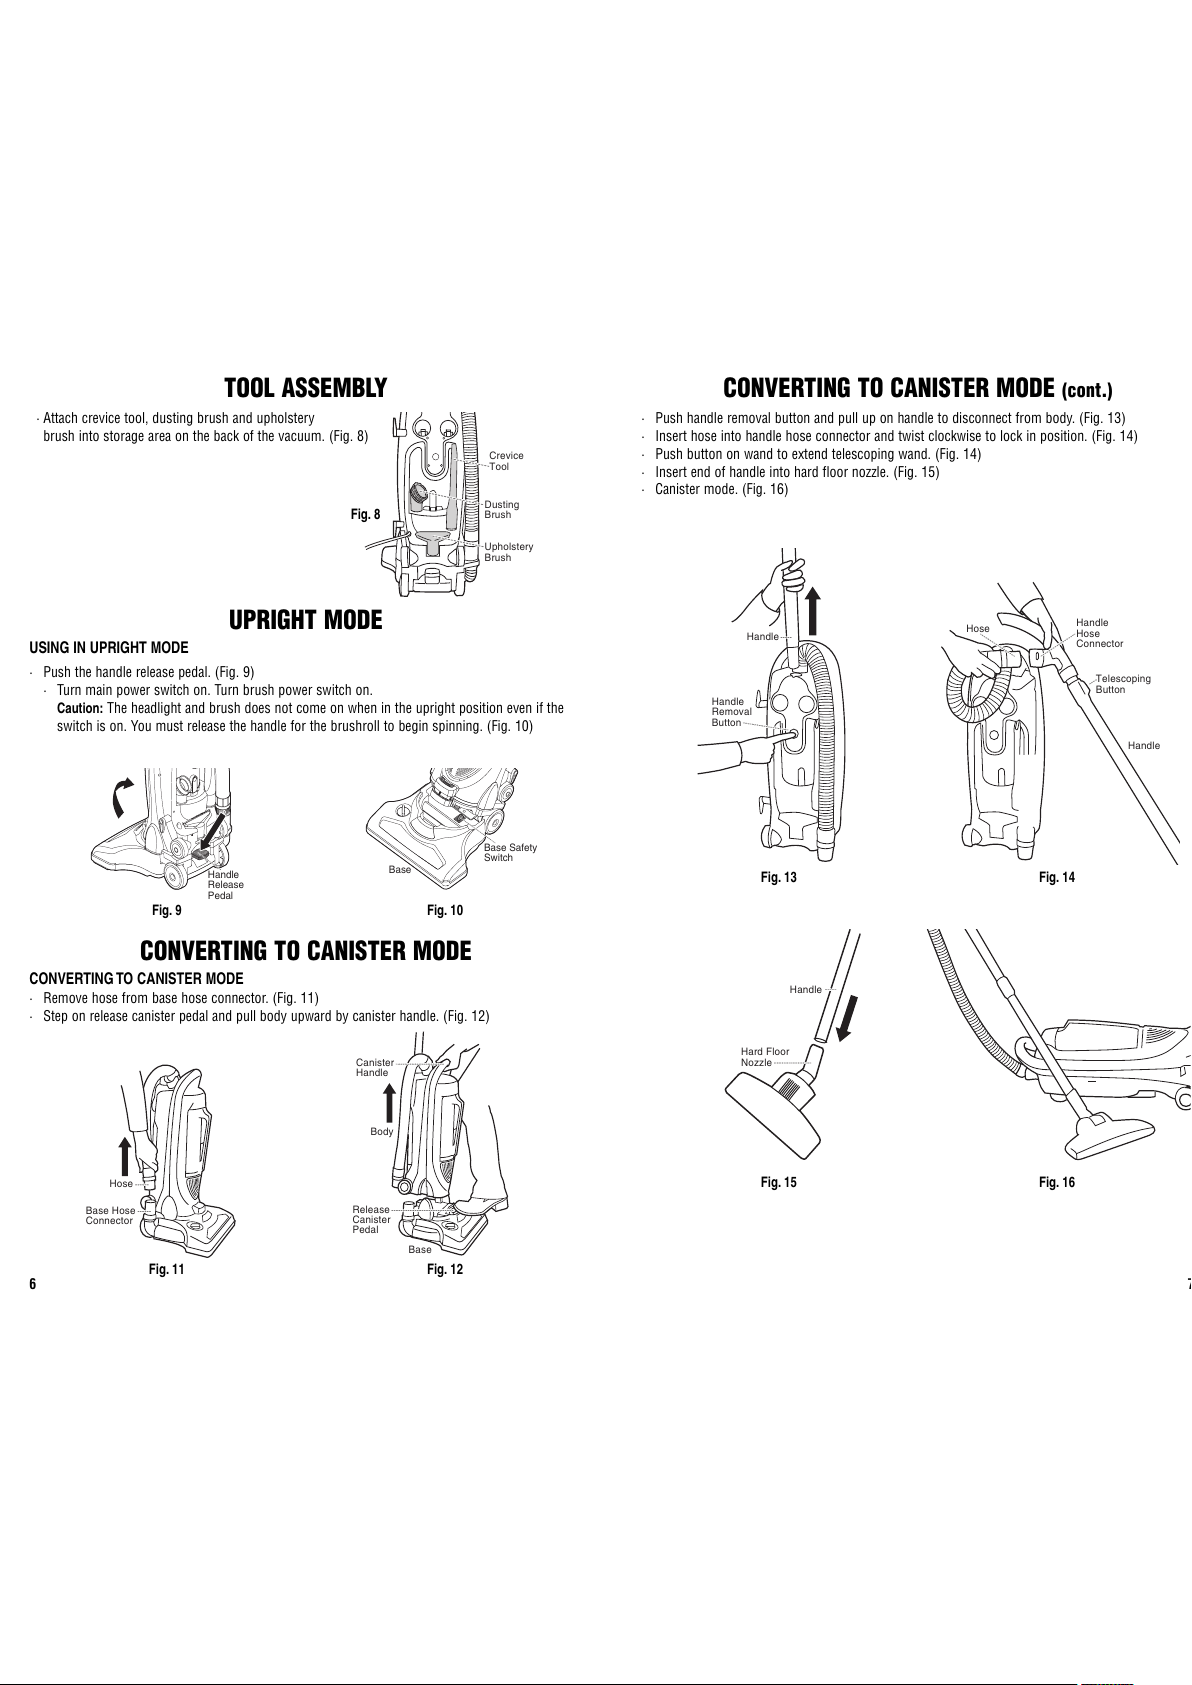
· Push handle removal button and pull up on handle to disconnect from body. (Fig. 13)
· Insert hose into handle hose connector and twist clockwise to lock in position. (Fig. 14)
· Push button on wand to extend telescoping wand. (Fig. 14)
· Insert end of handle into hard floor nozzle. (Fig. 15)
· Canister mode. (Fig. 16)
Base Safety
Switch
Base
Handle
Release
Pedal
B
USING IN UPRIGHT MODE
· Push the handle release pedal. (Fig. 9)
· Turn main power switch on. Turn brush power switch on.
Caution: The headlight and brush does not come on when in the upright position even if the
switch is on. You must release the handle for the brushroll to begin spinning. (Fig. 10)
Fig. 9
Fig. 11 Fig. 12
Hose
Base Hose
Connector
Base
Body
Release
Canister
Pedal
Canister
Handle
CONVERTING TO CANISTER MODE
· Remove hose from base hose connector. (Fig. 11)
· Step on release canister pedal and pull body upward by canister handle. (Fig. 12)
CONVERTING TO CANISTER MODE
Fig. 10
TOOL ASSEMBLY
· Attach crevice tool, dusting brush and upholstery
brush into storage area on the back of the vacuum. (Fig. 8)
Crevice
Tool
Dusting
Brush
Upholstery
Brush
Fig. 8
UPRIGHT MODE
All manuals and user guides at all-guides.com
Page 5
8 9
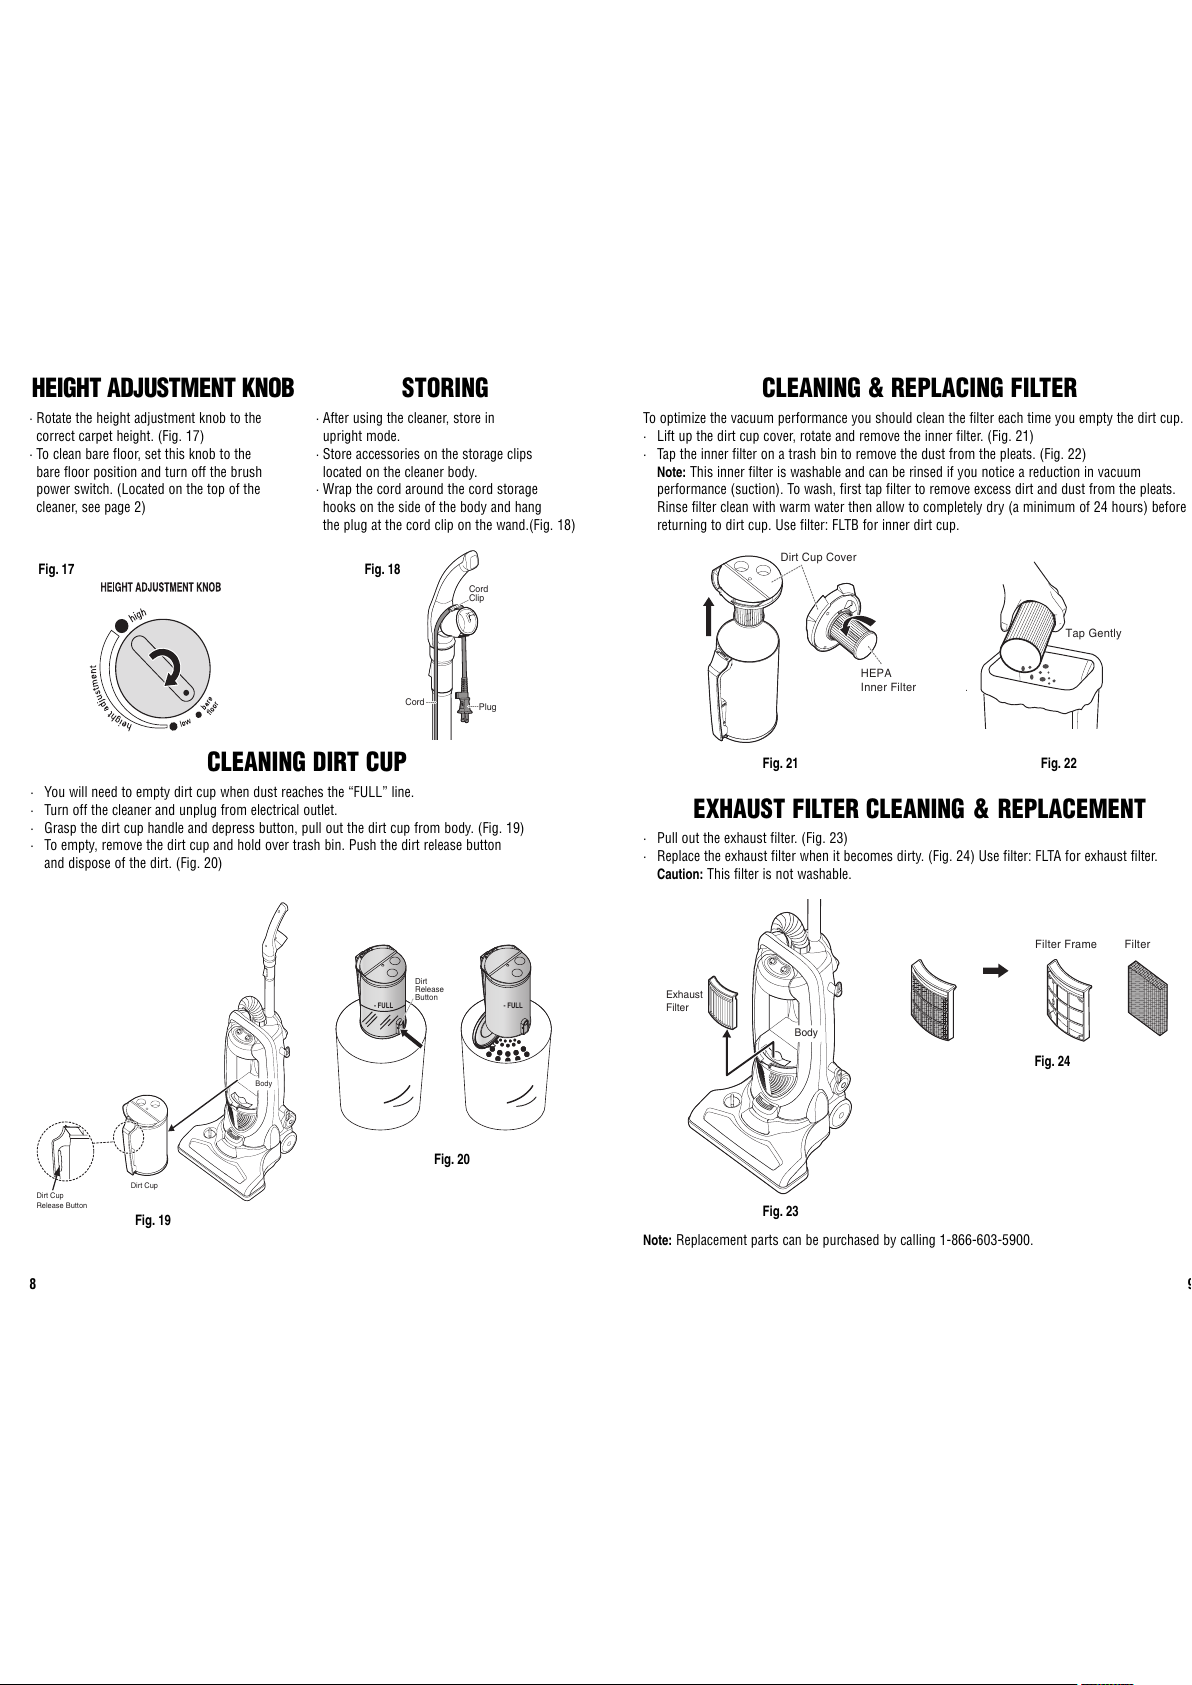
Dirt Cup
Release Button
Dirt Cup
Body
CLEANING DIRT CUP
· You will need to empty dirt cup when dust reaches the “FULL” line.
· Turn off the cleaner and unplug from electrical outlet.
· Grasp the dirt cup handle and depress button, pull out the dirt cup from body. (Fig. 19)
· To empty, remove the dirt cup and hold over trash bin. Push the dirt release button
and dispose of the dirt. (Fig. 20)
Fig. 19
- FULL - FULL
Dirt
Release
Button
Fig. 20
Cord
Clip
Plug
Cord
HEIGHT ADJUSTMENT KNOB STORING
· Rotate the height adjustment knob to the
correct carpet height. (Fig. 17)
· To clean bare floor, set this knob to the
bare floor position and turn off the brush
power switch. (Located on the top of the
cleaner, see page 2)
· After using the cleaner, store in
upright mode.
· Store accessories on the storage clips
located on the cleaner body.
· Wrap the cord around the cord storage
hooks on the side of the body and hang
the plug at the cord clip on the wand.(Fig. 18)
Fig. 18
Fig. 17
CLEANING & REPLACING FILTER
To optimize the vacuum performance you should clean the filter each time you empty the dirt cup.
· Lift up the dirt cup cover, rotate and remove the inner filter. (Fig. 21)
· Tap the inner filter on a trash bin to remove the dust from the pleats. (Fig. 22)
Note: This inner filter is washable and can be rinsed if you notice a reduction in vacuum
performance (suction). To wash, first tap filter to remove excess dirt and dust from the pleats.
Rinse filter clean with warm water then allow to completely dry (a minimum of 24 hours) before
returning to dirt cup. Use filter: FLTB for inner dirt cup.
Dirt Cup Cover
HEPA
Inner Filter
Fig. 21
EXHAUST FILTER CLEANING & REPLACEMENT
· Pull out the exhaust filter. (Fig. 23)
· Replace the exhaust filter when it becomes dirty. (Fig. 24) Use filter: FLTA for exhaust filter.
Caution: This filter is not washable.
Filter Frame Filter
Fig. 24
Fig. 22
Tap Gently
Exhaust
Filter
Body
Fig. 23
Note: Replacement parts can be purchased by calling 1-866-603-5900.
All manuals and user guides at all-guides.com
Page 6
10 11
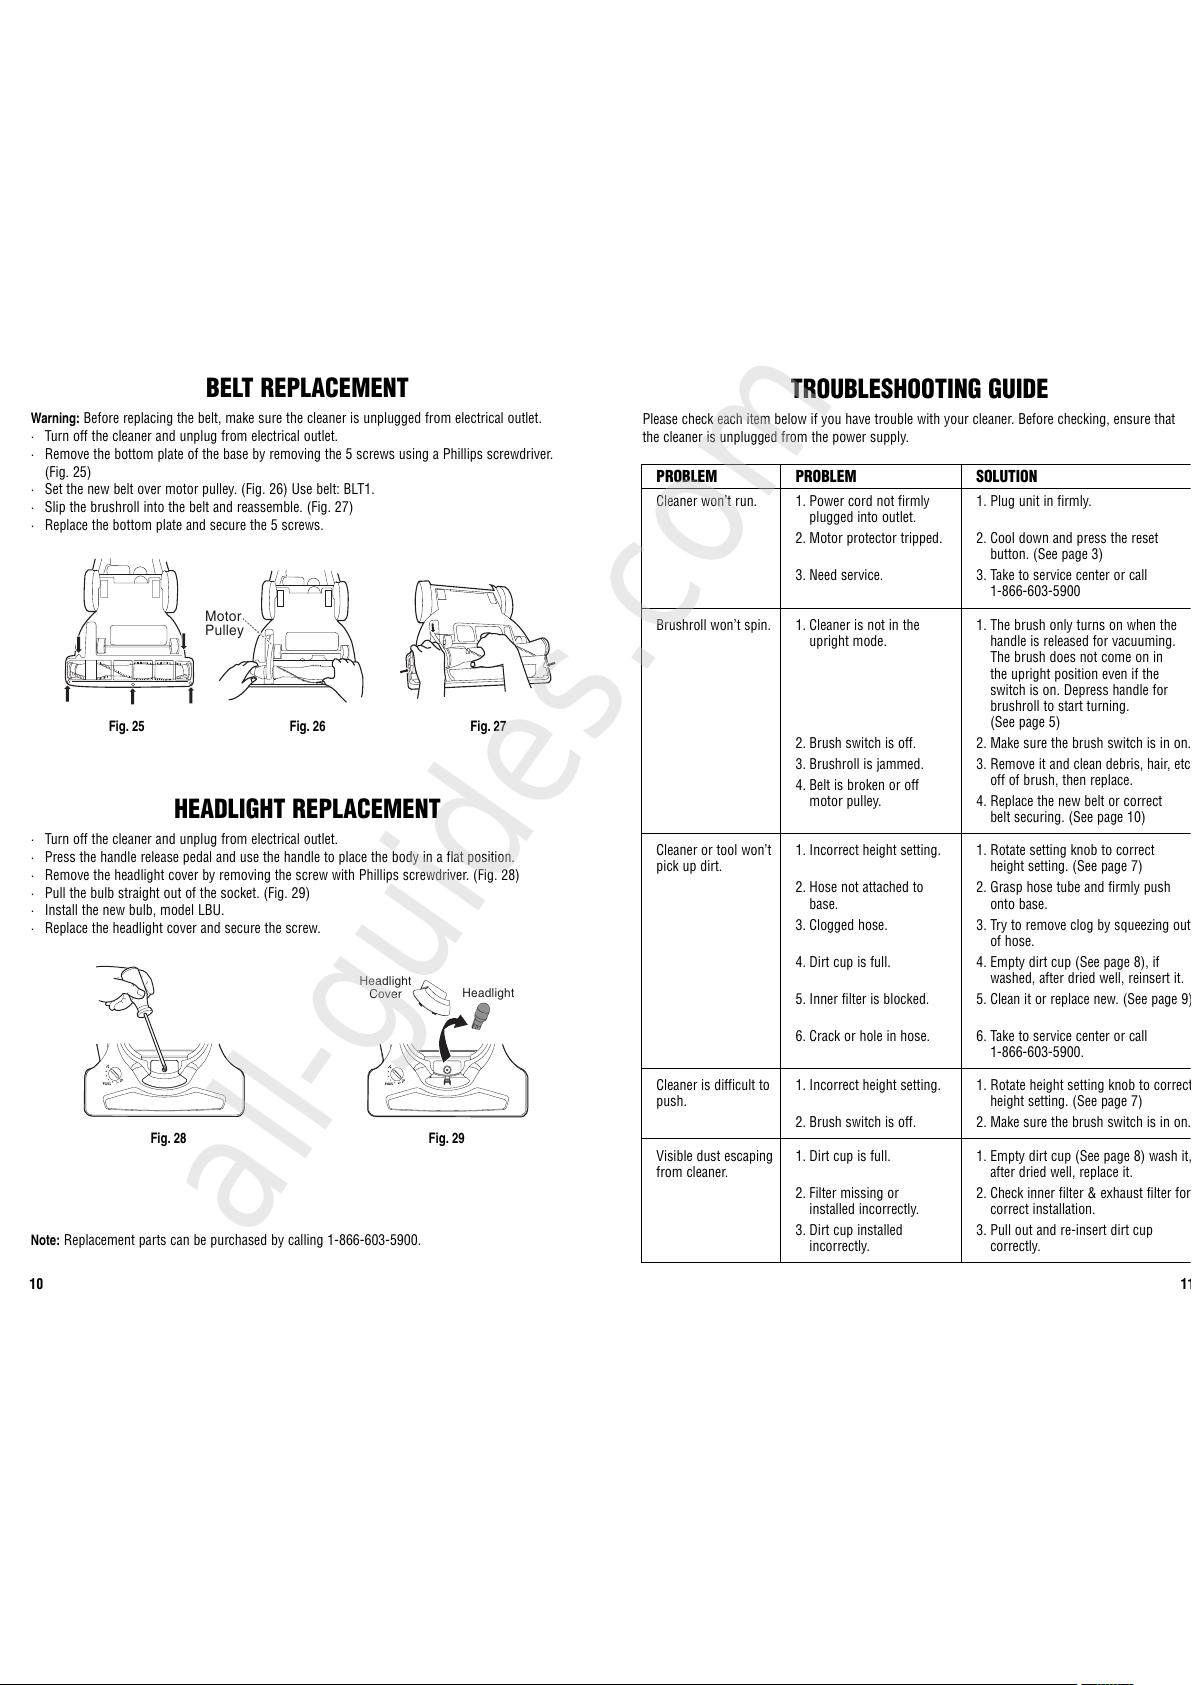
BELT REPLACEMENT
Warning: Before replacing the belt, make sure the cleaner is unplugged from electrical outlet.
· Turn off the cleaner and unplug from electrical outlet.
· Remove the bottom plate of the base by removing the 5 screws using a Phillips screwdriver.
(Fig. 25)
· Set the new belt over motor pulley. (Fig. 26) Use belt: BLT1.
· Slip the brushroll into the belt and reassemble. (Fig. 27)
· Replace the bottom plate and secure the 5 screws.
Motor
Pulley
Fig. 25 Fig. 26 Fig. 27
HEADLIGHT REPLACEMENT
· Turn off the cleaner and unplug from electrical outlet.
· Press the handle release pedal and use the handle to place the body in a flat position.
· Remove the headlight cover by removing the screw with Phillips screwdriver. (Fig. 28)
· Pull the bulb straight out of the socket. (Fig. 29)
· Install the new bulb, model LBU.
· Replace the headlight cover and secure the screw.
Fig. 28 Fig. 29
Headlight
Headlight
Cover
Note: Replacement parts can be purchased by calling 1-866-603-5900.
Please check each item below if you have trouble with your cleaner. Before checking, ensure that
the cleaner is unplugged from the power supply.
TROUBLESHOOTING GUIDE
PROBLEM PROBLEM
Cleaner won’t run. 1. Power cord not firmly
plugged into outlet.
2. Motor protector tripped.
3. Need service.
Brushroll won’t spin.
Cleaner or tool won’t
pick up dirt.
SOLUTION
1. Plug unit in firmly.
2. Cool down and press the reset
button. (See page 3)
3. Take to service center or call
1-866-603-5900
1. Cleaner is not in the
upright mode.
2. Brush switch is off.
3. Brushroll is jammed.
4. Belt is broken or off
motor pulley.
1. Incorrect height setting.
2. Hose not attached to
base.
3. Clogged hose.
4. Dirt cup is full.
5. Inner filter is blocked.
6. Crack or hole in hose.
1. Rotate setting knob to correct
height setting. (See page 7)
2. Grasp hose tube and firmly push
onto base.
3. Try to remove clog by squeezing out
of hose.
4. Empty dirt cup (See page 8), if
washed, after dried well, reinsert it.
5. Clean it or replace new. (See page 9)
6. Take to service center or call
1-866-603-5900.
Cleaner is difficult to
push.
1. Incorrect height setting.
2. Brush switch is off.
1. Rotate height setting knob to correct
height setting. (See page 7)
2. Make sure the brush switch is in on.
Visible dust escaping
from cleaner.
1. Dirt cup is full.
2. Filter missing or
installed incorrectly.
3. Dirt cup installed
incorrectly.
1. Empty dirt cup (See page 8) wash it,
after dried well, replace it.
2. Check inner filter & exhaust filter for
correct installation.
3. Pull out and re-insert dirt cup
correctly.
1. The brush only turns on when the
handle is released for vacuuming.
The brush does not come on in
the upright position even if the
switch is on. Depress handle for
brushroll to start turning.
(See page 5)
2. Make sure the brush switch is in on.
3. Remove it and clean debris, hair, etc.
off of brush, then replace.
4. Replace the new belt or correct
belt securing. (See page 10)
All manuals and user guides at all-guides.com
all-guides.com
 Loading...