

Page 1
USE & CARE INSTRUCTIONS
Start
pureguardian
Ultrasonic Digital
Humidier
Model No. H3010
3-Year Limited Warranty
www.guardiantechnologies.com
1.866.603.5900
REV0411
TM
English E - 1
French F - 1
Spanish S - 1
Date Purchased
month ________
year _________
E-1
Page 2
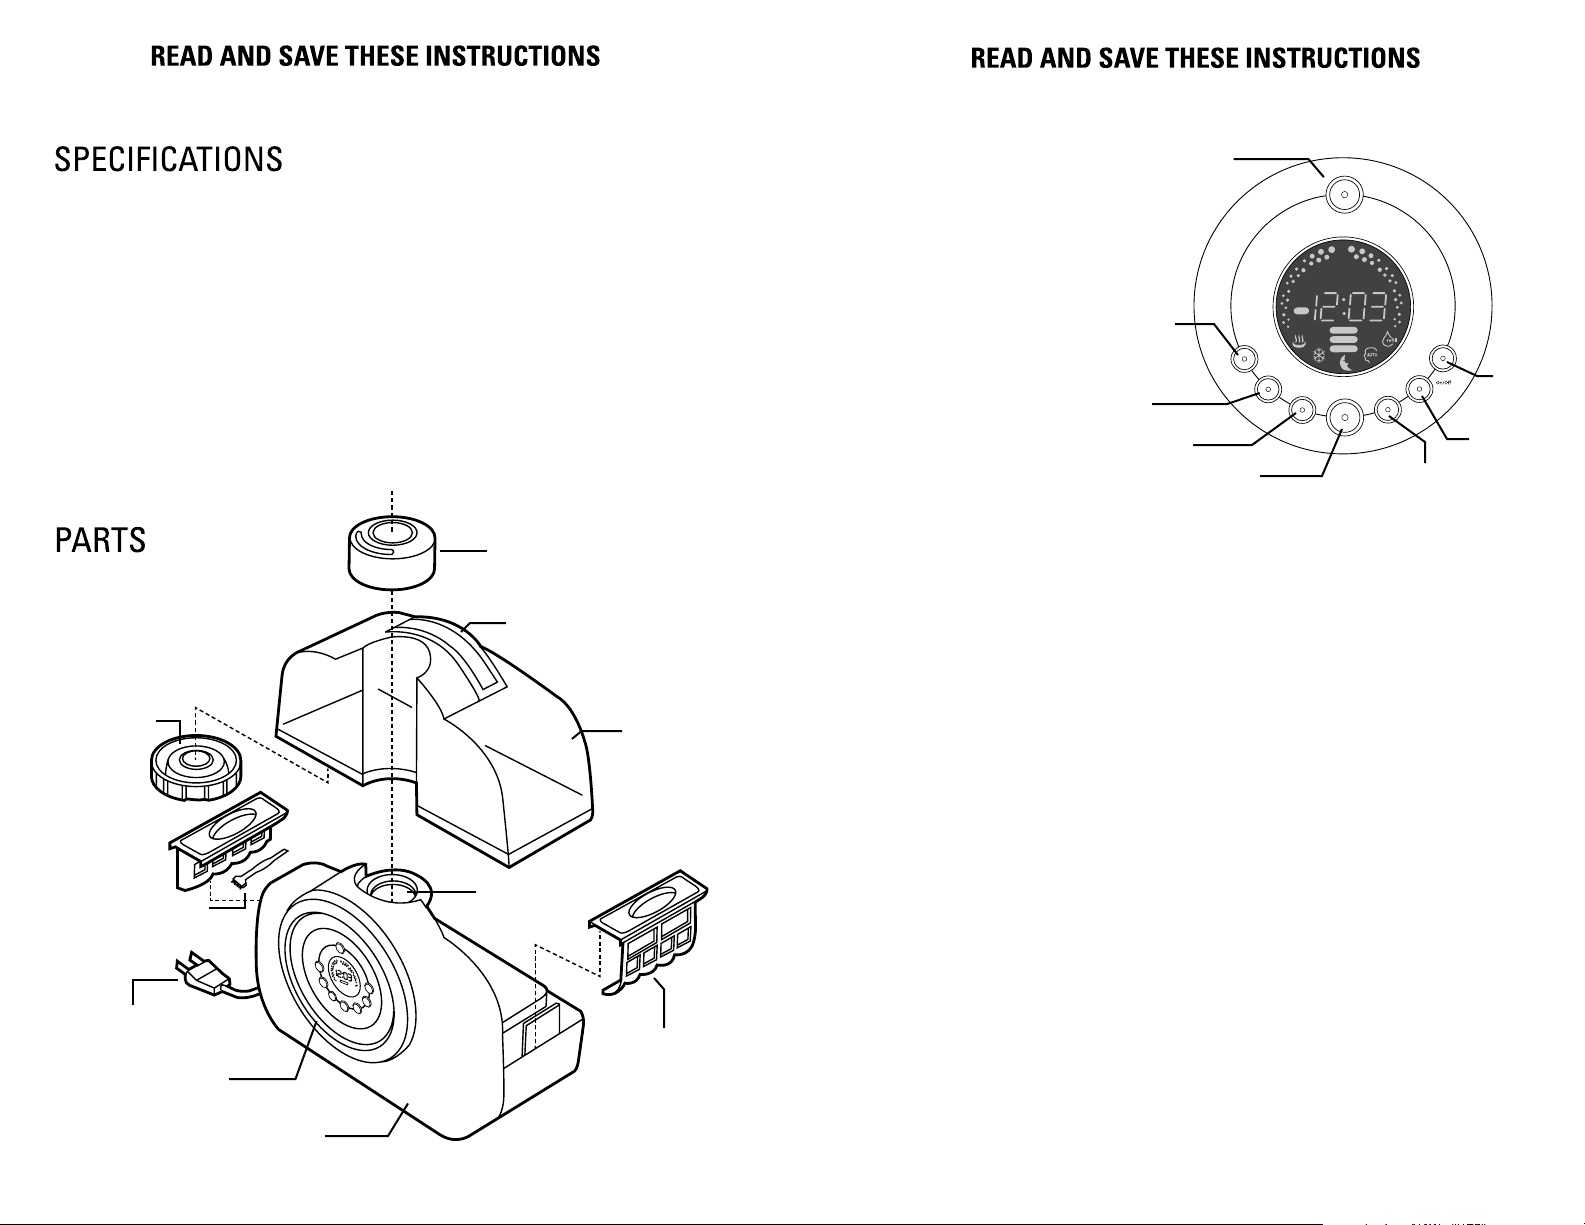
PRODUCT SPECIFICATIONS AND PARTS
CONTROL PANEL BUTTON FUNCTIONS
Model Number: H3010
Humidifying Mode: Combination
Power Supply: AC120V, 60Hz
Power Consumption: 140W (40W at cool humidication)
Humidity Capacity: About 350 cc/hr. (at highest setting and warm humidication)
Tank Capacity: 1.4 gallons
Successive Humidity Hours: Up to approximately 72-hours depending on
environmental conditions
Dimensions: Width 14.5 inches - Height 12 inches - Depth 9 inches
Weight: 8.8 pounds (not including packaging)
Spout
Handle
Tank Lid
*To access
cleaning brush,
pull up on lid.
Tank
Night Light/Lamp
Provides a soft ring of blue light
Night Light/Lamp
with ON/OFF switch.
Select/Set
Change between programming
mode and normal mode.
Hour
Select the hour for timer start/off
or clock (actual time).
Minute
Select the minute for timer start/
off or clock (actual time).
Power
Turns humidier on/off for normal
usage and programming mode.
Select/Set
Hour
Minute
Select/Set
Hour
Minute
Power Warm or Cool
Warm or Cool Mist Selection
Select humidifying temperature based on need. Warm humidity
will use more power but will humidify your room quicker.
Spray Control
Adjusts spray between low, medium, high and turbo.
Display On/Off
Turns off display lights.
Water Shortage Indicator
When the unit is low on water the Rell LED on the front panel will light
up, and the unit will shut off. Simply add more water to continue use.
Lamp
Start
Stop
Time
Display
Spray
C ontrol
Cool/Warm
Power
Mist Selection
Display
On/Off
Spray
Control
ADDITIONAL FEATURES
Cleaning Brush
Spout Guide
Silver Clean Technology
Unlike other humidiers that grow slimy mold and mildew, the pureguardianTM ultrasonic humidier uses
Silver Clean technology embedded in the tank to ght the growth of mildew and mold on the surface of
the water tank.
Power Plug
Air-Cleaning Filter
Silent Operation
Uses ultrasonic technology for quiet operation while you sleep.
Night Lamp
E-2 E-3
Body
Page 3

WARNINGS
This product should be used only in accordance with the specications outlined in this manual.
Usage other than what has been specied here may result in serious injury.
• Disassembly, repair or remodeling by an unauthorized person may result in serious harm.
• Do not use if plug is damaged or loose.
• Keep this product out of the reach of children and away from pets.
• Be careful not to put water in the humidity spout.
• Before lling or cleaning the unit, make sure it is unplugged.
• Once the humidier has been turned on, do not move it.
• Do not move when in operation.
• Do not remove the water tank from the unit while it is on.
• Do not handle the adapter plug with wet hands.
• Do not excessively bend, twist or pull the power cord.
• Avoid placing this product where the humidity is pointed directly at an electrical object.
• Do not directly inhale the humidity.
• Do not place this product on a sloped or unstable surface.
• When not in use, unplug the unit.
• Do not ll the water tank with hot or boiling water.
• Do not use this product in direct sunlight, or near a gas stove or heater.
• Do not use if the water tank becomes cracked or damaged.
• Do not keep this product running for an extended period of time.
• Do not clean the unit or water tank with detergents or chemicals of any kind.
• Do not use this product near any other electronic device.
• Do not cover the humidity opening at any time during use.
• Do not use this product near a sink.
• Do not drink water from the water tank.
• Do not place this product on an absorbent surface (ie carpet, towels, blankets, etc).
• Do not pour anything but water into the water tank.
• Children cannot recognize the hazards associated with the usage of electrical appliances. For this
reason, always supervise children when they are near the humidier.
• If the mist comes in contact with the oor prior to evaporating, the oor surface may be damaged.
We do not accept any liability for damage in the case of the unit being placed incorrectly.
• The use of water additives, such as ethereal/essential oils, fragrances, eucalyptus, water conditioners, etc will damage the appliance materials and as a consequence the whole unit. Any use of
such additives will void the manufacturer's warranty.
• IMPORTANT: Neither humans nor animals can hear the high frequency vibrations.
Failure to comply with the warnings listed above may result in electric shock or serious injury.
Make sure the unit is unplugged.
1. Separate the tank from the body
of the unit.
3. Pour cool, clean water directly
into the tank. Do not pour anything
but water into the water tank.
5. Attach the tank to the body of
the unit.
2. Open the tank lid, turning it to
the left.
4. Close the tank lid, turning it to
the right.
WARNING: DO NOT BLOCK ANY AIR VENTS LOCATED ON BOTTOM AND/OR SIDE OF UNIT.
E-4 E-5
Page 4

1. Power Button
p
C
Before turning on make sure there is water in the unit.
Press the Power Button.
The programmable mode allows you to set the timer to turn the humidier both on/off
at a daily predetermined time. This mode also allows the clock to be programmed.
FIRST TURN POWER BUTTON ON.
Power
Cool/Warm
Spray
Control
Display
2. Warm or Cool Mist Button
Press to select warm or cool mist. Water
S
temperature is maintained at room temperature for cool
setting and 80 degrees for warm.
3. Spray Control Button
When you press the Spray Control Button
Dim
there are four options to choose from:
Press once for WEAK
Press twice for MIDDLE
Press three times for STRONG
Press four times for TURBO
*You will notice the lights get higher as the spray increases.
4A. Light Options - Display Button
Press the Display Button to turn the display lights ON or OFF.
4B. Light Options - Night Light Feature
Press the Lamp Button at the top of the unit to illuminate
the night light feature.
one
set
Hour
Minute
Select/Set
Start
Stop
Time
Program Start
1. Push Select/Set Button until "START" is blinking on display.
2. While "START" is blinking, select the desired start time using Hour and
Minute buttons (AM or PM as indicated).
3. Select Cool/Warm preference.
4. Select Spray Control preference.
5. "START" indicator will remain lit once programmed.
Program Stop
1. Push Select/Set Button until "STOP" is blinking on display.
2. While "STOP" is blinking, select the desired end time using Hour and
Minute buttons (AM or PM as indicated).
3. "STOP" indicator will remain lit once programmed.
4. To cancel program, press and hold select/set button for two seconds
(START and STOP buttons will not be lit).
Clock Set
1. Clock must be set in order for timer to work properly.
2. Push Select/Set Button until "TIME" is blinking on display.
3. Select actual time using Hour and Minute Buttons (AM or PM as indicated).
Lamp
5. Water Rell Button
When the Water Rell Button lights up it is time to rell
the water tank.
E-6 E-7
Page 5

• Always unplug the unit before servicing it in any way.
• The temperature of the water remaining in the unit after use may be HIGH.
• Do not submerse the unit in water, or allow water to enter anywhere on the unit
except the designated water tank.
INSIDE THE BODY OF THE UNIT
Pour excess water out of the unit, but do not allow it to enter the hole where the water
vapor comes out. Wash out the unit with fresh water, using the cleaning brush and a
soft cloth as needed.
OUTER SURFACE OF THE UNIT
Wipe the surface of the unit with a soft, damp cloth if needed.
WATER TANK
If water spots remain in the water tank, wipe the inside with a soft cloth.
DO NOT use soap or detergents.
PROBLEM SOLUTION
Water vapor & humidity are
not produced.
Air blows but water vapor is
not produced.
Power Plug: Unplug and then try again.
Power Failure: When the power is returned, try again.
Tank Installation: Make sure the water tank is
correctly attached. Make sure spring on tank
cap moves freely when pushed.
Excessive Water: Remove a certain amount of water
from the tank.
The desired humidity is lower than the current temperature: Increase the desired humidity.
Detergent residue in the tank: Wash the tank out and
try again.
AIR FILTER
Gently wipe away debris from the lter with a soft cloth.
This lter does NOT need to be replaced.
ULTRASONIC DISK
Remove spray spout (Fig. 1) and use the enclosed cleaning brush to regularly remove build up
and deposits from this area (Fig. 2). Diluted vinegar will help to prevent this build up.
Fig. 1
• Fully dry the inside and outside of the unit before storing it.
• DO NOT leave water in the unit.
• Store in a cool, dry place.
Fig. 2
The surface of the ultrasonic metal disk may be dirty:
Humidity level is low.
Warm humidity is not produced. It may take 10-15 minutes before warm
The humidity has a bad smell. Poor maintenance or dirty water: Clean the product
White dust is forming on
nearby furniture.
Wipe it off with a dry, soft cloth. Clean with diluted
vinegar.
The water in the unit is too cold: Replace with cool,
but not cold water.
humidity is created. The mist may not feel
warm to the touch.
Check to see if base of unit feels warm to the touch.
If so then warm mist is being produced.
thoroughly, and ll it with fresh water.
Hard water will deposit a certain amount of
dust. Dust in the air settles because of the
added humidity in the room.
*Use distilled water if this becomes a nuisance.
E-8
E-9
Page 6

To the consumer, Guardian Technologies LLC warrants this product to be free of defects in
materials or workmanship commencing upon the date of the original purchase. Save your
original sales receipt to validate start of the warranty period.
If this product should become defective within the warranty period, we will repair or replace
any defective parts free of charge. The complete machine must be delivered pre-paid to any
authorized Guardian Technologies LLC warranty service center. Please include complete
information on the problem, date of purchase, copy of original sales receipt and your name,
address and telephone number. If you are not near a warranty center, call the factory for
assistance in the US and Canada at 1.866.603.5900. Use only genuine Guardian Technologies
replacement parts.
The warranty does not include unusual wear, damage resulting from accident or
unreasonable use of the product. This warranty does not cover unauthorized repairs.
This warranty gives you specic legal rights and you may also have other rights (other rights
may vary from state to state in the U.S.A.).
We consider the registration process important to ensuring superior service to our
customers, however submitting the warranty card to Guardian Technologies LLC is optional
and does not affect your rights to utilize this warranty according to the conditions stated
above. If you have any questions or comments about our product call toll free at 1.866.603.5900
or send comments to:
ATTN Customer Service
Guardian Technologies LLC
7700 St Clair Avenue
Mentor, Ohio 44060
This warranty can also be registered online at www.guardiantechnologies.com.
Guardian Technologies LLC
7700 St Clair Avenue | Mentor, Ohio 44060
1.866.603.5900 | www.guardiantechnologies.com
E-10
©2007 Guardian Technologies LLC
 Loading...