

Guardair Corporation N301BC User Manual
OPERATING INSTRUCTIONS
FOR GUARDAIR STANDARD AND STATIC CONDUCTIVE COMPRESSED AIR-POWERED VACUUMS
DO NOT DISCARD THESE INSTRUCTIONS
FOR YOUR SAFETY
Turn off all compressed air connections to the compressed
air source at the nearest valve. Disconnect compressed
air connections only after the compressed air supply has
been turned off and the air supply hose has been vented
by opening the valve on the vacuum head. NEVER disconnect
a pressurized compressed air hose.
AIR SUPPLY
An adequate supply of compressed air is essential
for the proper performance of your Guardair vacuum.
Compressed air requirements for vacuum units and
vacuum generating heads equipped with the following
Venturi types are listed below:
“Dual B” Venturi
N552B Series ..................................................................... 110 cfm
“B” Type Venturi
N551B Series, N301B Series ................................................68 cfm
“D” Type Venturi
N551D Series, N301D Series, N201DC, N101DC ..................47 cfm
“S” Type Venturi
N201SC, N101SC ................................................................20 cfm
“M” Type Venturi
N101MC, N051MC ............................................................... 20 cfm
industrial interchange male connector. 3⁄8" ID or
larger compressed air supply hose is recommended
for these models.
FOR ALL MODELS: To ensure maximum performance,
clean or replace the internal filter as necessary. In
addition, clean or replace the exhaust silencer (inside
the exhaust housing) as necessary. Inspect the cover
gasket for deterioration and replace if necessary. On
all vacuum units, use of a smaller diameter air supply
hose or smaller diameter air fittings will seriously restrict
performance. Use the recommended hoses and fittings.
Be certain that the drum has no dents along the seams
and is airtight. The cover gasket under the vacuum
generating head must form a complete seal with the
top edge of the drum.
CAUTION: Drums used with Guardair vacuum generating
heads must meet the gauge (thickness) requirements in
the table below. Thinner gauges of steel run the risk of
drum collapse.
DRUM 55 gal 30 gal 20 gal 10 gal 5 gal
GAUGE 19 18 18 20 20
Please note that these requirements are for compressed air volume, not
pressure. The recommended compressed air inlet operating pressure is
100 psi for all vacuum units. All units will function at lower operating
pressures, but with a corresponding reduction in performance.
Units featuring a “Dual B”, “B” or “D” Type Venturi
include a Chicago-style connector. 3/4" ID or larger
compressed air supply hose is recommended for
these models.
Units featuring an “S” Type Venturi include a 1⁄2"
industrial interchange male connector. 1⁄2" ID or larger
compressed air supply hose is recommended for these
models. Units featuring an “M” Type Venturi include a 3⁄8"
REPLACING GASKETS
On 55, 30 & 20 Gallon Models, remove the gasket to
be replaced. Remove the protective tape covering the
adhesive on the new gasket, then apply to lid.
On 10 & 5 Gallon Models, the lid gasket is adhered to
the lid by hot glue. The hot glue can easily be removed
with rubbing alcohol. Let the rubbing alcohol sit for one
minute, then peel off with a flat head screwdriver. We
recommend using hot glue when installing new gasket.
1
SET-UP AND OPERATION, 55-GALLON, 30-GALLON
HEX BOLT
AND 20-GALLON MODELS:
Place the vacuum generating head on the drum. There
are no clamps required to form an airtight seal. When
the vacuum is in operation, the negative pressure within
the drum will create the airtight seal between the head
and drum.
Connect the vacuum hose to the vacuum generating head
by inserting the hose adapter into the inlet elbow. Slip the
hose end onto the adapter. Connect vacuum attachments
to the vacuum hose.
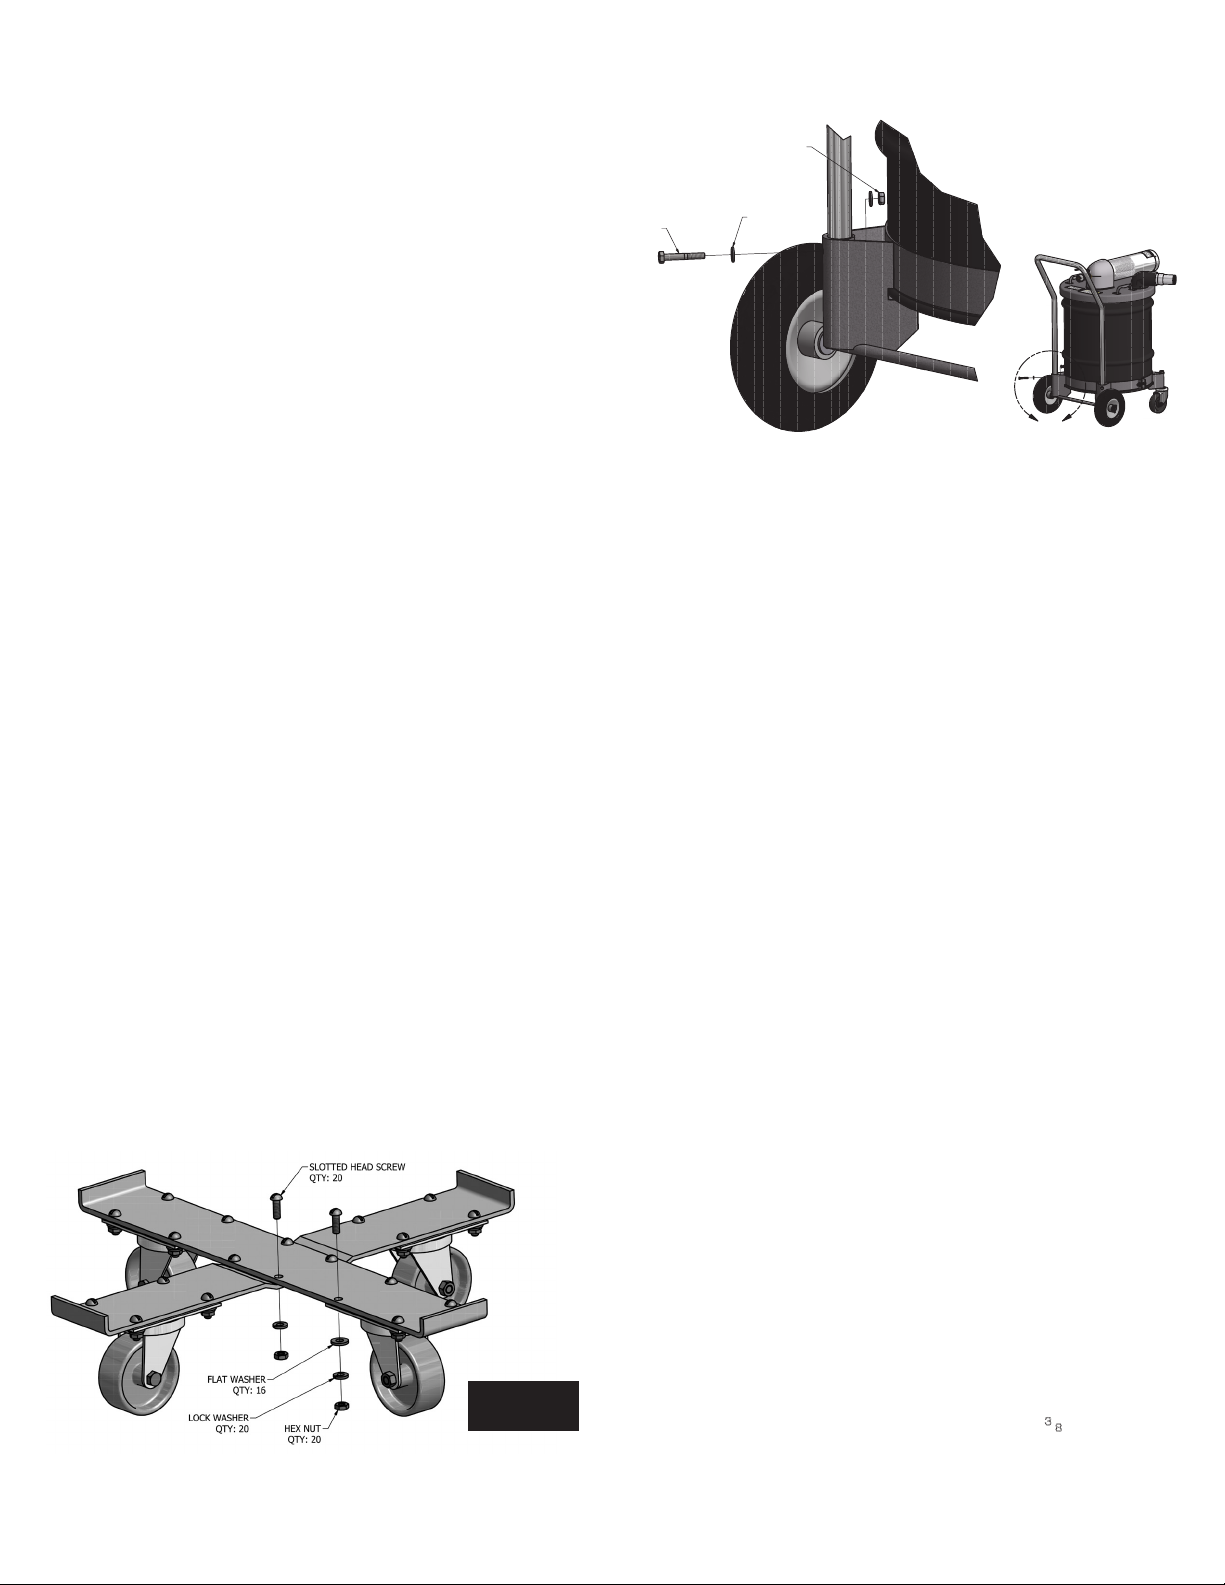
20 Gallon Drum Dolly: Assemble the drum dolly for
20-gallon model as shown below (Compatible with 30 gallon).
HEX NUT
QTY: 2
FLAT WASHER
QTY: 2
QTY: 4
Turn off the compressed air supply valve at the compressor.
Dual B, B & D Venturis
Connect the compressed air supply hose to the vacuum
generating head via the Chicago-style coupler. Twist together and be sure they lock. Install the safety clips.
Connect the compressed air supply hose to the compressor.
Turn on the compressed air supply. Open the shut-off
valve to operate.
S Venturis
Connect the compressed air supply hose to the vacuum
generating head via the ½” industrial interchange male
connector. Connect the compressed air supply hose to the
compressor. Turn on the compressed air supply. Open the
shut-off valve to operate.
Liquid Shut-off Accessory
Before picking up liquids, remove the internal filter, which
is held in place by three springs. For continuous liquid
pick-up, the liquid shut-off accessory (optional) should be
installed in place of the internal filter and held in place by
the same three springs.
55 & 30 Gallon Drum Dolly Assemble the drum dolly for
55-gallon and 30-gallon models as shown below.
A
Caution: Dolly maximum load capacity is 1,000 pounds.
SET-UP & OPERATION, 10-GALLON MODELS:
The vacuum generating head, which mounts on top of the
drum, seals to the drum via the lid clamps.
Connect the vacuum hose to the vacuum hose inlet by
slipping the hose end onto the connector. This is an
intentionally tight fit. Connect vacuum attachments to
the vacuum hose.
The vacuum comes with a liquid shutoff assembly built
internally within the cartridge filter. The cartridge filter
can be removed for maintenance or replacement by
removing the wing nut and washer on the bottom of
the filter.
Turn off the compressed air supply valve at the compressor.
Model N101DC - Connect the compressed air supply
hose to the vacuum generating head via the Chicago-style
coupler. Twist together, making sure that they lock. Install
the safety clips. Connect the compressed air supply hose
to the compressor. Turn on the compressed air supply.
Open the shut-off valve to operate.
55 gallon: N668
30 gallon: N667
Caution: Dolly maximum load capacity is 1,000 pounds.
Model N101SC - Connect the compressed air supply
hose to the vacuum generating head via the ½” industrial
interchange male connector. Connect the compressed air
supply hose to the compressor. Turn on the compressed
air supply. Open the shut-off valve to operate.
Model N101MC - Connect the compressed air supply
hose to the vacuum generating head via the 3⁄8" industrial
interchange male connector. Connect the compressed air
supply hose to the compressor. Turn on the compressed
2

air supply. Open the shut-off valve to operate.
SET-UP & OPERATION, 5-GALLON MODELS:
The vacuum generating head, which mounts on top of the
drum, seals to the drum via the lid clamps.
Connect the vacuum hose to the vacuum hose inlet by
slipping the hose end onto the connector. This is an
intentionally tight fit. Connect vacuum attachments to
the vacuum hose.
The vacuum comes with a liquid shutoff assembly built
internally within the cartridge filter. The cartridge filter
can be removed for maintenance or replacement by
removing the wing nut and washer on the bottom of
the filter.
Turn off the compressed air supply valve at the compressor.
Connect the compressed air supply hose to the vacuum
generating head via the 3⁄8" industrial interchange male
connector. Connect the compressed air supply hose to the
compressor. Turn on the compressed air supply. Open the
shut-off valve to operate.
STATIC CONDUCTIVE MODELS:
Guardair also manufactures Static Conductive, also
known as NED (non-electrical discharge) models, designed
to eliminate static electricity by incorporating static
conductive components to suppress static electricity
charges. Should stray static charges become generated,
these charges are immediately dissipated through the
electrically interconnected, static conductive components.
For an added measure of protection, users can ground
the vacuum by connecting the grounding lug to an external
electrical ground using a grounding clamp and cable
(available as an accessory item).
To ensure proper electrical bonding (connectivity between
components), make sure that only static conductive,
factory-supplied parts and accessories are used with
Guardair NED vacuums. All components must fit together
firmly, including the static conductive vacuum hose, which
must mount securely on the vacuum hose inlet, and all
static conductive vacuum accessories.
Always inspect all static conductive vacuum components
before use, and replace worn or rusted parts as needed.
If you have questions about the necessity for grounding,
consult with a qualified safety engineer.
WARNING
FIRE/EXPLOSION DANGER
Guardair vacuums, like all other pneumatic and electric
vacuums, generate static electric charges. Factory
installed kits to control static electricity, the use of
static conductive hoses and grounding straps, and
Guardair Static Conductive Pneumatic Vacuums are
intended to control and eliminate static electric shocks
only to the operators of the vacuums. Guardair vacuums
are NOT APPROVED OR SAFE to use in any hazardous
(classified) location, such as locations determined under
NFPA 70 (National Electrical Code) to be Class I
(flammable liquids, gases and vapors – includes all Class
I Divisions and IEC Zones), Class II (combustible dust –
includes all Class II Divisions and IEC Zones) and Class III
(ignitable fibers and flyings – includes all Class III Divisions
and IEC Zones).
FOREVER WARRANTY:
Guardair Corporation (“Guardair”) warrants that its
compressed air-powered vacuums are free from defects
in materials and workmanship for as long as the original
end-user purchaser owns the product, except as provided
below. Guardair will, at its option, repair or replace with
a comparable product, any product, part, or component
that fails under normal use as a result of such defect.
This warranty does not apply to damage caused by the
carrier; normal wear and tear; deterioration due to
solvents, corrosives, environmental conditions, or harsh
vacuumed material; soiling, saturation, or perforation of
filters or exhaust silencers; consumable components;
modifications to the product; attachments to the product
not sold by Guardair; or any product not installed, used,
or maintained in accordance with the foregoing and other
published Guardair instructions and warnings. Consumables
purchased from Guardair, including attachments, vacuum
hose, filters, exhaust silencers, and cover gaskets are
warrantied for a period of 90 days against defects in
materials and workmanship, subject to the same
exclusions noted above.
This warranty covers the original purchase of a new
product by an end-user for normal industrial or
commercial use only when installed and used as specified
and in accordance with published operating instructions
and within all applicable regulatory rules, limits,
and guidelines.
3
 Loading...