

Guangzhou Panyu Juda Car Audio Equipment ASC400 User Manual
TY-ASC400
Toshiba Wireless Sound System
Operation Manual
Thank you for purchasing this Portable Sound System.
To use this product safely, read and understand this operation manual thoroughly before using.
After reading this manual, keep it in a safe place so that it can be referred to when necessary.
5016800
Safety precautions
The information you need to prevent danger to the user and other people as well as property damage is described
below. “Description of signs” shows different levels of danger or damage that may occur due to wrong handling.
Important notes
• This book is only a guide for user's operation, not a criterion for configuration.
• Only use attachments/accessories specified by the manufacturer.
The lightning flash is intended to alert the user to the presence of dangerous voltage within the
product's enclosure, and touching the internal components may result in a risk of electric shock to
persons.
The exclamatory mark is intended to alert the user to the presence of important operating
instructions.
To reduce the risk of elec tric shock or fire, do not op en the cover. Refer servicing to qualified service
personnel.
Description of signs
Indicates that there is a risk of death or
serious injury.
What to do in the case of an abnormality
• Stop using the device immediately in the case of an abnormality or failure.
• Remove the power plug from the receptacle immediately when water or any foreign object
enters the interior of the device.
It may cause a fire or electric shock. Remove the power plug immediately, and contact your dealer
for a repair.
Power cord and power plug
To reduce the risk of fire, electric shock or product damage,
• Insert the power plug fully into an AC receptacle.
• If you find dust on the power plug pin or pin installation surface, remove the power plug and
remove the dust.
• The mains plug or an appliance coupler is used as a disconnecting device, the disconnecting
device shall remain readily operable.
• Do not insert or remove the power plug with a wet hand.
• Observe the following when handling the power cord.
• Do not damage it. • Do not modify it (e.g. extension). • Do not heat it.
• Do not pull it. • Do not place a heavy object on it. • Do not pinch it.
• Do not bend it forcefully. • Do not twist it. • Do not bundle it.
• If the device will not be used for a long time, remove the power plug from the receptacle.
• Do not use any power cord other than the one that comes with the device.
• Do not use the power cord that comes with the device for any other product.
Usage
To reduce the risk of fire, electric shock or product damage,
• Do not disassemble, repair, or modify the device.
• Do not insert any foreign object into the device.
• In case of lightning, do not touch the power cord.
• Before carrying the device, remove the power plug from the receptacle.
• Do not place a heavy object on the device.
• To prevent possible hearing damage, do not listen at high volume levels for long periods.
Installation
To reduce the risk of fire, electric shock or product damage,
• Place the unit on a flat surface away from sources of direct sunlight or excessive heat.
• Do not install the device in a confined or build-in space such as a b ook case or similar area , and
keep it under a well-ventilated condition. The ventilation should not be impeded by covering
the ventilation openings with items such as newspaper, table-cloths, curtains, etc.
• Do not expose the device to rain, moisture, dripping, or splashing.
• Do not place objects filled with liquids, such as vases, on the device.
Note
• If any color shift occurs on a nearby TV or the radio of the device picks up noise from the TV, keep the device away
from the TV.
Important Safety Instructions
1. Read these instructions.
2. Keep these instructions.
3. Heed all warnings.
4. Follow all instructions.
5. Do not use this apparatus near water.
6. Clean only with dry cloth.
7. Do not block any ventilation openings. Install in accordance with the manufacturer's instructions.
8. Do not install near a ny heat s ources such as radiators, heat registers, stoves, or other apparatus (including amplifie rs)
that produce heat.
9. Do not defeat the safety purpose of the polarized or grounding-type plug. A p olarized plug has two blades with one
wider than the other. A grounding type plug has two blades and a third grounding prong. The wide blade or the
third prong are provided for your safety. If the provided plug does not fit into your outlet, consult an electrician for
replacement of the obsolete outlet.
10. Protect the power cord from being walked on or pinched particularly at plugs, convenience receptacles, and the
point where they exit from the apparatus.
11. Only use attachments/accessories specified by the manufacturer.
12. Use only with the cart, stand, tripod, bracket, or table specified by the manufacturer, or sold with the
apparatus. When a cart is used, use caution when moving the cart/apparatus combination to avoid
injury from tip-over.
13. Unplug this apparatus during lightning storms or when unused for long periods of time.
14. Refer all ser vicing to qualified service personnel. Servicing is required when the apparatus has been damaged in any
way, such as power-supply cord or plug is damaged, liquid has been spilled or objects have fallen into the apparatus,
the apparatus has been exposed to rain or moisture, does not operate normally, or has been dropped.
This equipment is a Class II or double insulated electrical appliance. It has been designed in such a way that it
15.
does not require a safety connection to electrical earth.
16. No naked flame sources, such as lighted candles, should be placed on the apparatus.
17. Attention should be drawn to environmental aspects of battery disposal.
18. The product is designed to use in moderate climates.
Indicates that there is a risk of minor
injury or property damage.
FCC Statement :
This device complies with Part 15 of the FCC Rules. Operation is subject to the following two conditions:
1) This device may not cause harmful interference, and 2) This device must accept any interference received,
including interference that may cause undesired operation.
Note: This equipment has been tested and found to comply with the limits for a Class B digital device, pursuant
to part 15 of the FCC Rules. These limits are designed to provide reasonable protection against harmful
interference in a residential installation. This equipment generates, uses, and can radiate radio frequency
energy and, if not installed and used in accordance with the instructions, may cause harmful interference to
radio communication. However, there is no guarantee that interference will not occur in a particular installation.
If this equipment does cause harmful interference to radio or television reception, which can be determined by
turning the equipment off and on, the user is encouraged to try to correct the interference by one or more of
the following measures:
• Reorient or relocate the receiving antenna.
• Increase the separation between the equipment and receiver.
• Connect the equipment into an outlet on a circuit different from that to which the receiver is connected.
• Consult the dealer or an experienced radio/TV technician for help.
Caution: Changes or modifications not expressly approved by the party responsible for compliance could void
the user’s authority to operate the equipment.
IC-CANADA :
This device com plies with Industr y Canada license -exempt RSS stand ard(s). Operation is subjec t to the following
two conditions: (1) this device may not cause interference, and (2) this device must accept any interference,
including interference that may cause undesired operation of the device.
This Class [B] digital apparatus complies with Canadian ICES-003.
Cet appareil s’accorde avec Industrie Canada licence-exempte RSS standard. (1) cet appareil ne peut pas causer
l’intervention, et (2) cet appareil doit accepter de l’intervention, y compris l’intervention qui peut causer
l’operation non desiree de.
Cet appareil numerique de la classe B est conforme a la norme NMB-003 du Canada.
California Prop 65 Warning :
This product contains chemicals, including lead, known to the State of California to cause
cancer and birth defects or other reproductive harm. Wash hands after handling.
Disclaimer
• Toshiba shall not be responsible for any damage caused by an earthquake, thunderstorm, flood damage, fire
for which Toshiba is not responsible, acts of a third party, other accidents, or damages caused by the user's
willful acts or negligence, misuse, or use in abnormal conditions.
• Toshiba shall not be responsible for any damage caused by failure to observe the information described in the
operation manual.
Disposal
• When disposing of the device, observe the laws, or ordinances and rules of the local government.
About using Bluetooth®
This unit is designed for use with Bluetooth® wireless devices compatible with the A2DP and AVRCP streaming audio
profiles. Refer to your Bluetooth® device’s user manual or technical support to determine if your Bluetooth® device
supports these profiles.
Frequency band used
This unit uses the 2.4 GHz frequency band. However other wireless devices may use 2.4 GHz frequency band as well
and may cause interference with each other. To avoid interference, please refrain from the use of the unit at the same
time with other wireless devices.
Certification of this device
This unit conforms to frequency restrictions and has received certification based on frequency laws, so a wireless
permit is not necessary.
However, the following action is punishable by law in some countries:
• Taking apart/modifying the unit.
Usage restrictions
• Wireless transmission and/or use with all Bluetooth® equipped devices is not guaranteed.
• A device featuring the Bluetooth® function is required to conform to the Bluetooth® standard specified by Bluetooth
SIG, and be authenticated. Even if the connec ted device conforms to the above mentioned Bluetooth® standard, some
devices may not be connected or work correctly, depending on the features or specifications of the device.
Range of use
Use this device within an unobstructed 10 m range. The range of use or perimeter may be shortene d depending on any
obstructions, devices causing interference, other people in the room, or the construction of the building. Please note
that the range mentioned above is not guaranteed.
The Bluetooth® word mark and logos are owned by the Bluetooth SIG, Inc. and are used under license.
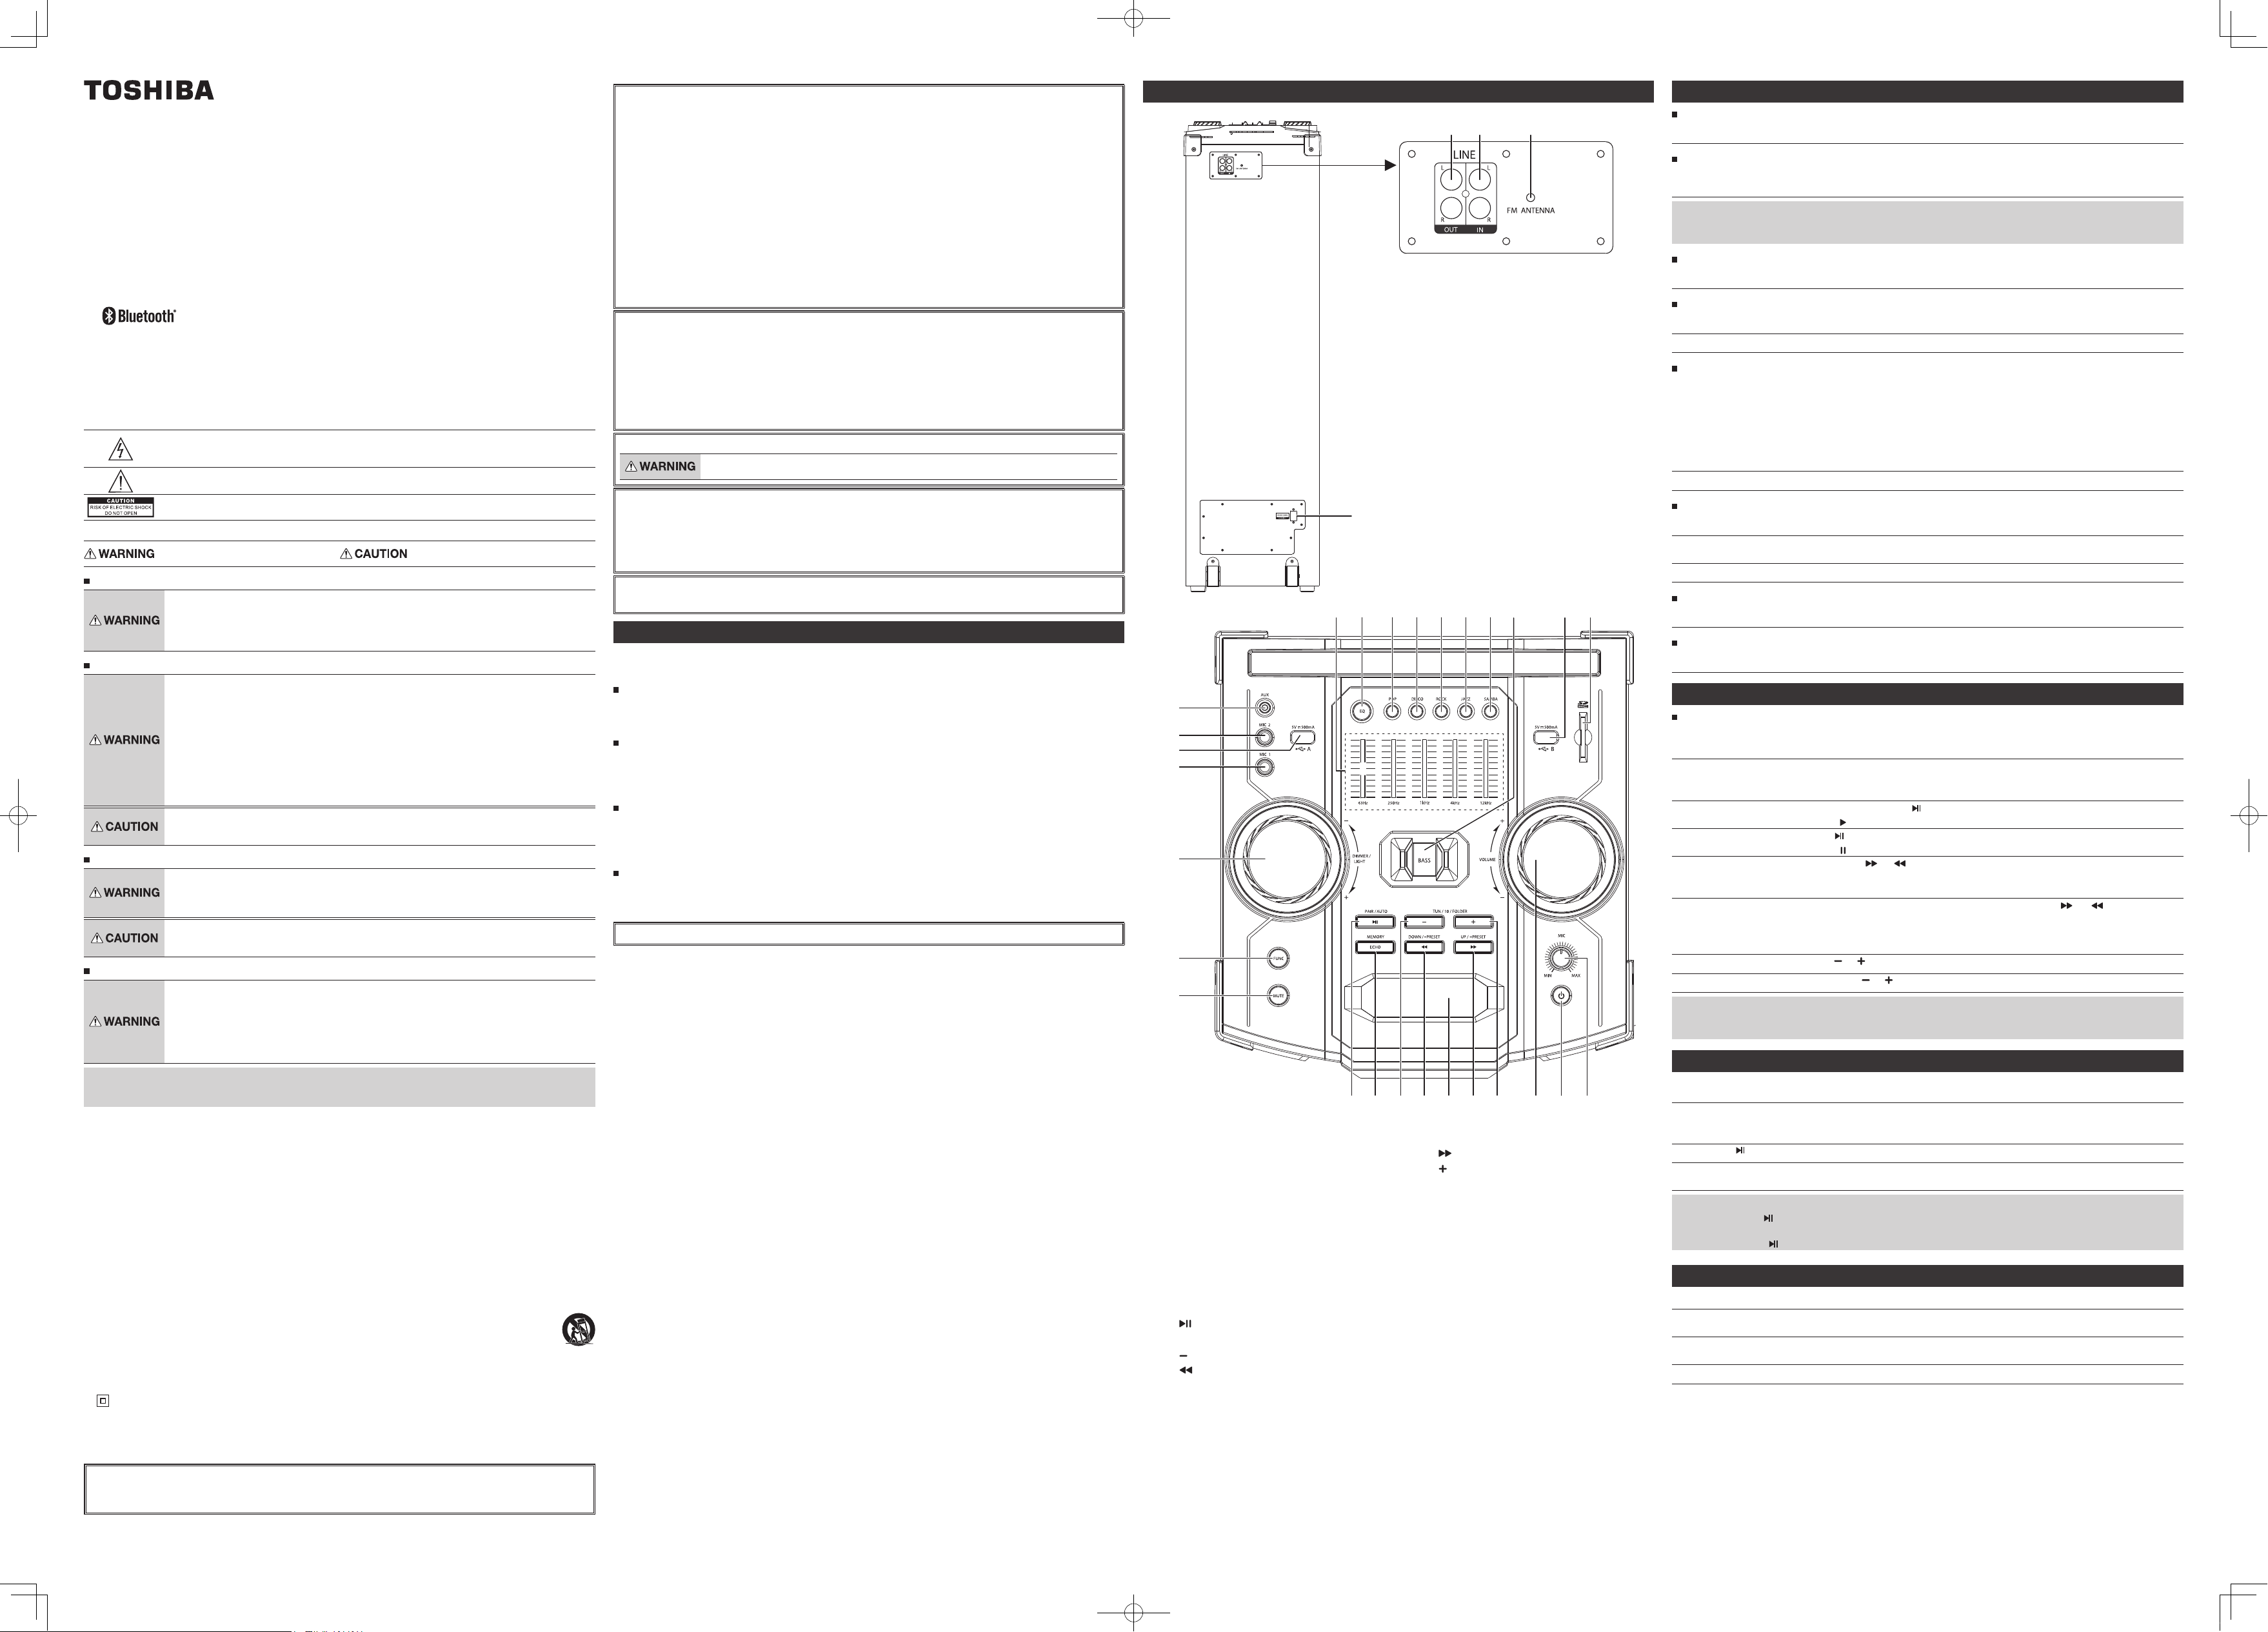
Part names
5
6
7
8
9
10
11
1 LINE OUT jack L/R
2 LINE IN jack L/R
3 FM ANTENNA
4 AC POWER SOCKET
5 3.5mm AUX INPUT jack
6 6.3 mm MIC.2 jack
7 USB port A
8 6.3 mm MIC.1 jack
9 DIMMER/LIGHT knob
10 FUNC button
11 MUTE button
12 /PAIR/AUTO button
13 ECHO button
14 (TUN/10/FOLDER) button
15 (DOWN/-PRESET) button
16 DISPLAY
321
4
13 15 17 19 201612 14 18 21
17 (UP/+PRESET) button
18 (TUN/10/FOLDER) button
19 VOL. knob
20 POWER button
21 MIC. VOL. knob
22 SD card slot
23 USB port B
24 SAMBA mode button
25 JAZZ mode button
26 ROCK mode button
27 DISCO mode button
28 POP mode button
29 EQ button
30 EQUALIZER Slide Volume
31 Extra Bass button
Basic functions
Turning the unit on/off
Press the POWER button to switch the unit on/off.
1
Setting the function mode
To change the function mode, press the FUNC button on the unit to choose the USB A/USB B/SD/
1
AUX/Bluetooth®/LINE/FM function.
Note
• In USB A/USB B/SD/AUX/Bluetooth®/LINE mode, when no operation is performed for 30 minutes, the unit will
automatically enter standby mode. To resume operation, press POWER button to switch the unit on again.
Adjusting the volume
Rotate the VOL. knob on the unit to increase or decrease the music volume.
1
Muting the Volume
Press MUTE button to switch the sound off temporary.
1
To switch the sound on, press the MUTE button again.
2
Light function
Press the DIMMER/LIGHT knob repeatedly to switch the different lighting mode (L1~L4 and OFF) of
1
LED indicator light on the speaker.
L1: Turning the light on. Hold down the LIGHT knob on the unit to choose BLUE/YELLOW/CYAN/PINK/WHITE/RED/
GREEN color.
L2: Blinking the light slowly. The color changes to BLUE/YELLOW/CYAN/PINK/WHITE/RED/GREEN automatically.
L3:
Blinking the l ight a little faster. The col or changes to BLUE/ YELLOW/CYAN/PIN K/WHIT E/RED/GREEN automatical ly.
L4: Flashing the light.
Rotate the DIMMER/LIGHT knob on the unit to adjust brightness of the display screen.
2
Equalizer function
Press the EQ button to enter to equalizer manual mode.
1
Adjust the EQUALIZER Slide Volume for five frequencies (63Hz, 250Hz, 1kHz, 4kHz, 12kHz) on the
2
unit to adjust the equalizer volume.
To select the preset equaliser modes, press the POP/DISCO/ROCK/JAZZ/SAMBA button.
3
Extra Bass
22233124282930 27 26 25
Press Extra bass button to switch the extra bass on/off.
1
Microphone echo
Press ECHO button repeatedly to switch to microphone ECHO ON/OFF mode.
1
USB/SD operation
Listening to a USB device/SD card
This unit provides a USB port for music playback.
Press the FUNC button on the unit to select USB A/USB B/SD mode.
1
USB: Connect a USB memory stick to the USB port A/USB port B on the front of the unit.
2
SD: Insert an SD memory card into the SD card slot on the front of the unit.
The display will show the total number of playable tracks on the USB device/SD card.
To playback and resume playback, press the /PAIR button.
3
The current track number and the " " will be shown on the display.
To pause playback, press the /PAIR button on the unit.
4
The current track number and the " " will be shown on the display.
To select a desired track, press the or button either while playing or while paused until the
5
desired track appears on the display.
The unit will start playing automatically.
To search for a particular passage during playback, press and hold the or button to fast
6
forward and fast backward until the desired point (passage) is reached, then release the button
for normal playback.
Playback will start again from this point.
To jump to +/- 10 track, press or (TUN/10/FOLDER) button.
7
To select +/- folder, press and hold or (TUN/10/FOLDER) button.
8
Caution
• To prevent harmful interference, always connect USB devices/SD card directly to the unit. Do not use a USB/SD card
extension cable to connect USB devices/SD card to the unit.
Bluetooth® operation
Press the FUNC button on the unit to switch to the Bluetooth® mode.
1
The display will show "NO BT".
Following the instructions in your device's user manual, activate Bluetooth® on your device and
2
search for the unit "TY-ASC400" and connect. Input the password "0000" if required.
The display will show "BT".
Press the /PAIR button on the unit to start playback.
3
Rotate the VOL. knob on the unit or adjust the volume on the external device to increase or
4
decrease the music volume as desired.
Notes
• Press and hold the /PAIR button to disconnect the Bluetooth®.
• The Bluetooth® works best within 10 meters.
• In bluetooth mode," /PAIR", "VOLUME", "MUTE" etc. are also active.
AUX IN/LINE operation
Press the FUNC button on the unit to select "AUX"/"LINE" mode.
1
Connect your audio device to the input terminal AUX LINE INPUT on the front panel/on the rear
2
panel of the unit with an audio cable.
Rotate the VOLUME knob on the unit or adjust the volume on the external device to increase or
3
decrease the music volume as desired.
Control playback with your audio device.
4
FCC Radiation Exposure Statement
This equipment complies with FCC radiation exposure limits set forth for an uncontrolled environment. This
equipment should be installed and operated with minimum distance 20CM between the radiator & your body.
170417c1_TY-ASC400_EN.indd 1 2017/04/17 10:42:42

FM operation
Listening to the FM
Press the FUNC button on the unit to select "FM" mode.
1
Press or (TUN/10/FOLDER) button to tune in the station.
2
Press and hold the
automatically when a station is received.
• Automatic tuning may stop due to reception noise. In such a case, perform the automatic tuning again.
Rotate the VOLUME knob on the unit to increase or decrease the FM volume.
3
Automatic tuning preset
Press and hold the /PAIR/AUTO button. The device will automatically tune in and preset all of the stations that can be
received in your area up to 50 preset channel.
Manual tuning preset
Select the desired station by manual tuning or auto stop tuning.
1
Press and hold the MEMORY button. Preset number will be displayed and blinked.
2
Presss - or + PRESET button to select the preset number.
Note
• If you do not perform the operation within 5 seconds, the device will automatically return to the normal reception
mode.
Press the MEMORY button again. Preset number is lighting. The preset numbers will be preset.
3
Select the preset radio stations
When radio signals are received, press the - or + PRESET button.
• Each time you press the button, the Preset number and frequency of the radio station is displayed.
(UP) or (DOWN) button to perform automatic tuning. Tuning stops
MIC jack operation
Microphone input is available in all modes.
Connect your microphone to the 6.3 mm MIC.1 or MIC.2 jack of the unit.
1
Rotate the MIC VOL. knob on the unit to increase or decrease the microphone volume.
2
Maintenance
Maintenance of the main unit
Wipe off stains lightly with a soft cloth. If a stain is severe, wipe it off with a cloth dampened with neutral detergent
solution and wrung tightly, and dry it with a dry cloth.
• Do not use benzene or thinner, etc. Do not spray any volatile chemical such as insecticide on the cabinet.
When you suspect a failure
Phenomenon Cause Remedy
Common unit
No sound is output. • The power plug is disconnected.
• The volume level is low.
• The source is not switched properly.
USB memory section
Replay does not start. • The MP3 file is not playable. • Make sure the file is a playable MP3 file.
Device cannot be detected. • The device is not connected properly. • Connect the device properly.
Notes
• If the device does not operate or display properly while the USB device is played back, press the POWER ON/OFF
switch once to turn off the power, and remove the AC cord and connect it again. Then, set the device back to the USB
mode and play back the USB device.
• The cabinet becomes slightly hot in some parts when the device has been used for a long period of time, it is not a
failure.
• Insert the plug fully.
• Adjust the volume level.
• Switch the device to the proper source.
Specifications
USB memory section
Playback format MP3
Memory 32 MB to 32 GB
Supported memory USB1.1 or USB2.0
Playable USB memory USB-IF certified product
Bluetooth® section
Bluetooth® specification Ver. 2.1+EDR
Wireless equipment classification Class 2
Supported profile A2 DP, AVR CP
Frequency 2.402-2.480 GHz (2.4 GHz ISM segment)
Service distance Up to 10 m
Terminal
Input/Output
General
Power supply AC 100-240 V~, 50/60 Hz
Power consumption 200 W
Max. output power 4 × 100 W
USB port DC output 5 V, 500 mA
Dimension Approx. 281 (W) × 350 (D) × 964 (H) mm
Weight Approx. 15.3 kg
Accessories AC cord,
The specifications and appearance may be subject to modification without prior notice.
3.5 mm AUX input jack,
LINE IN jack (L/R),
6.3 mm Microphone input jack × 2,
LINE OUT Jack (L/R)
Operation manual
1-1-8, Sotokanda, Chiyoda-ku Tokyo 101-0021, Japan
170417c1_TY-ASC400_EN.indd 2 2017/04/17 10:42:43
 Loading...