

GuangDong YuanFeng Electronic Technology Co.,Ltd. GPS PF11 User Manual

User Manual
GPS PF11

Thanks for using YF GPS PF11!
YF reserves the rights of final interpr etation of the manual.
The manual content is subject to change without notice. Please accept our
apology for your inconvenience.
Please back up your data of the GPS navigator. YF assumes no responsibility for
any loss caused by data loss.
The manual might contain a few mistakes though it has been chec ked. If mistak es
are found, you are welcome to contact t he YF customer service center.

Please read the instructions in this manual and use only accessories of YF to
avoid unpredicted damage. Failure to follow the instructions will invalidate
warranty and might endanger personnel safety, for which YF assumes no
responsibility.
Data of navigation electronic maps might be inconsistent with actual traffic signals
due to transportation developm ent. Please follo w traffic regulations and signs and
drive according to road situation. Operating the GPS navigator device while
driving might cause serious accidents. YF assumes no responsibility for acc idents
and loss due to improper use.
For information of software update and upgrade, please go to our website
www.yftech.com
.
The pictures in the manual are subject to t he material object.

Welcome ................................................................ 1
Chapter I Beginning Use ......................................... 2
1.1 APPEARANCE ............................................................ 2
1.2 POWER SUPPLY & CHARGING ....................................... 2
1.3 BASIC USE ............................................................... 3
1.4 SYSTEM MAIN INTERFACE AND MAJOR FUNCTIONS ............. 5
Chapter II Navigation .............................................. 7
2.1 INSTRUCTION ............................................................ 7
2.2 OPERATION ............................................................... 7
2.3 THE PLAYER OF DVR .................................................. 10
Chapter III Function Operation ................................ 11
3.1 MUSIC PLAYER .......................................................... 11
3.2 VIDEO PLAYER ........................................................... 13
3.3 PHOTO BROWSER ...................................................... 15
3.4 E-BOOK READER ........................................................ 18
3.5 FLASH PLAY .............................................................. 22
3.6 THEME ..................................................................... 22
3.7 WALLPAPER .............................................................. 23
3.8 FAVORITES ............................................................... 24
3.9 EXPLORER ................................................................ 25
3.10 CALENDAR .............................................................. 26
3.12 SYSTEM RESOURCE .................................................. 27
3.13 CALCULATOR ........................................................... 27

3.14
UNIT ...................................................................... 28
3.15 GPS INFO .............................................................. 28
3.17 VOLUME ................................................................. 29
3.18 BACKLIGHT ............................................................. 30
3.19 LANGUAGE .............................................................. 30
3.20 DATE& TIME ............................................................ 31
3.21 CALIBRATION ........................................................... 31
3.22 RESTORE FACTORY SETTING ...................................... 32
3.23 USB SETTING .......................................................... 33
3.24 SYSTEM INFO .......................................................... 35
3.25 NAVIGATION PATH ..................................................... 35
3.26 OTHELLO ................................................................ 35
3.27 BOXMAN ................................................................ 36
3.28 RUSSIA BLOCK ......................................................... 36
Appendix Troubleshooting ..................................... 37
4 FCC statement .................................................. 37

Welcome
Thanks for using GPS PF11-5001. It is featured with navigation function , audio & video
play, photo browsing and e-book functions.
SiRF Atlas-Ⅴ CPU with high performance and low power consumption
Friendly user interface for simple operation
Power management for longer and more stable operation
Data transmission with computer via Mini USB
Quality reception, accurate positioning and satisfactor y nav igation service
Leisure friend with audio/video/amusement functions
You may use the GPS navigator anytime anywhere, for example while driving, walking or
cycling. Let its navigation and amusem ent functions enrich your life and work!
To realize the functions of GPS PF11-5001 and to understand the operation details, please
read the manual carefully.
You may see the following supplemental information in the manual.
[Note]: Explanation of relevant subject s
[Relevant Information]: Extr a information of relevant subjects
[Attention]: Precautions or warnings of relevant subjects. Please pay attention to this
information and follow the instructions to avoid devastating influence on yourself and
others.
[*]: Optional function
This manual is applicable only to the GPS PF11-5001.
1
Chapter I Beginning Use
This chapter introduces the basic operat ions of GPS PF11-5001.
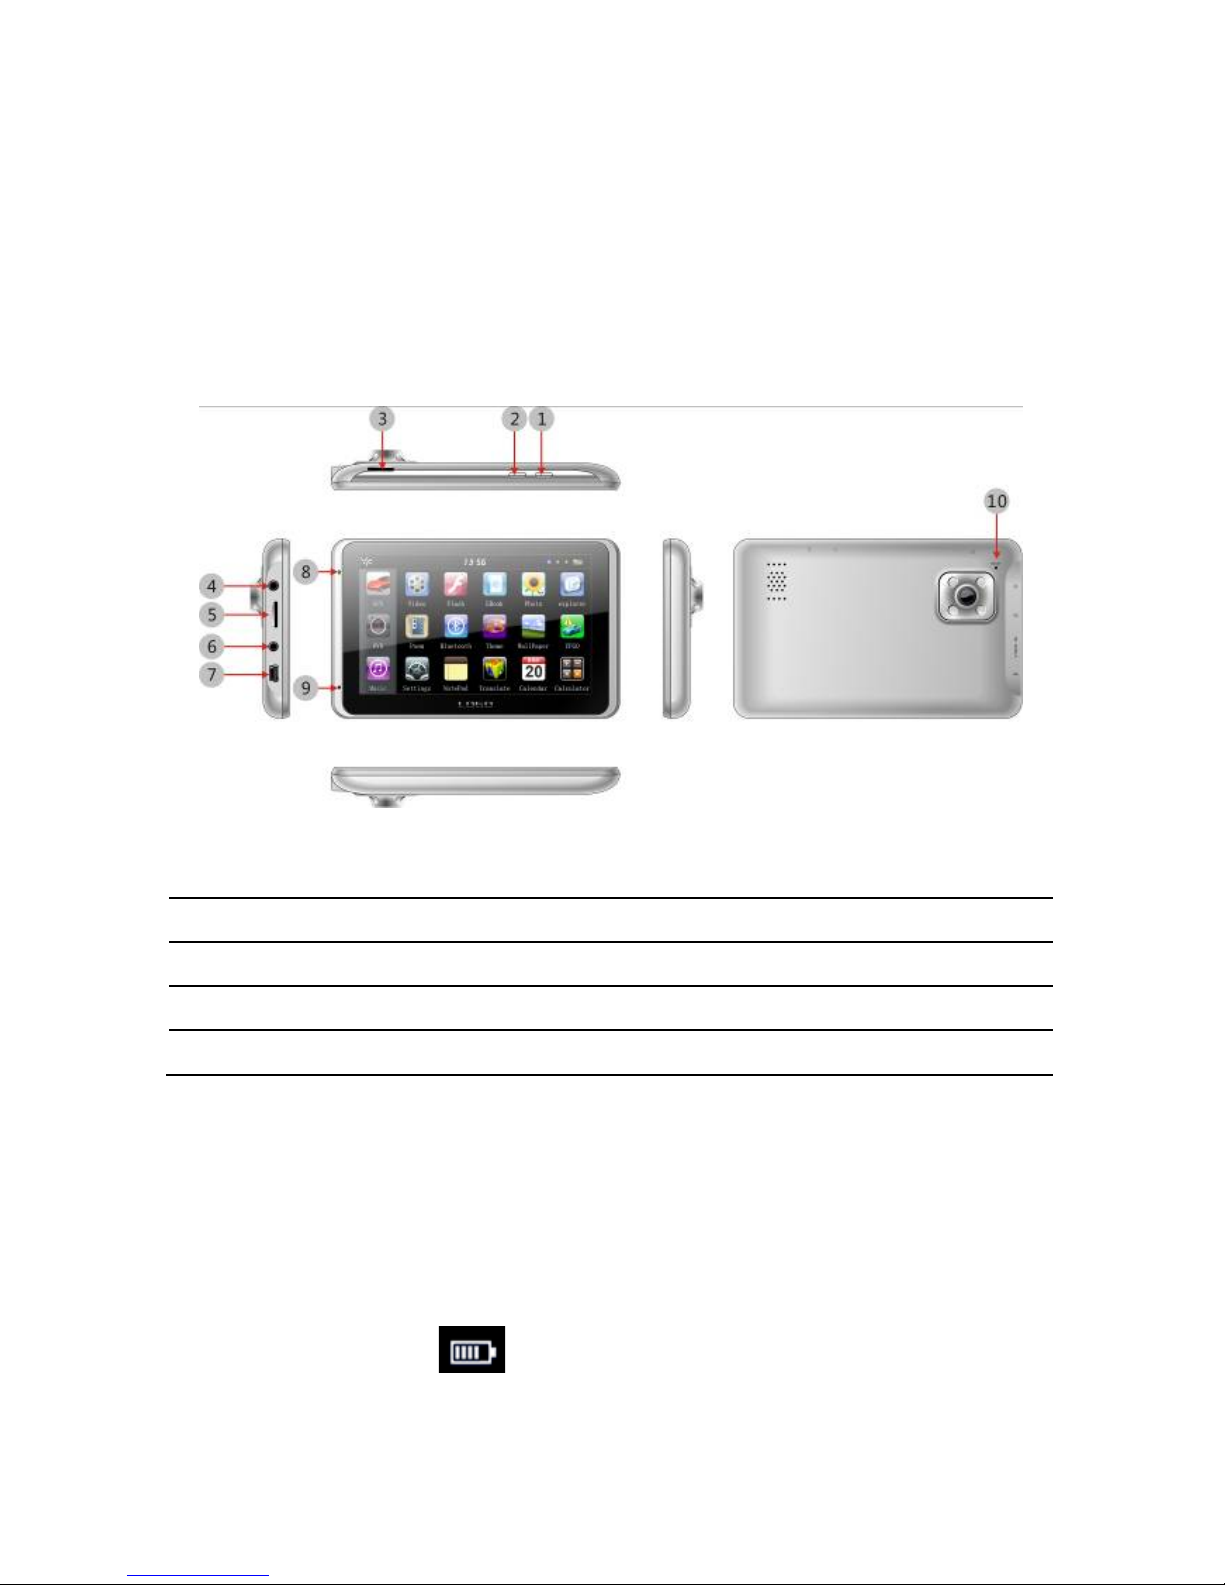
1.1 Appearance
The product picture below is subject to the material object.
1. Lock Key
6. VIDEO-IN Port
2. Power key
7. MINI USB Port
3. T-Flash slot for DVR only
8. Indicator light
4. Earphone Port
9. Microphone
5. T-Flash Port
10. Reset key
1.2 Power Supply & Charging
Charge the GPS navigator fully with the charger bef ore first use.
1.2.1 Power Supply
The GPS PF08 can be powered by the built-in battery or exter nal power s upply.
When the GPS navigator is unconnected to the charger, it is powered by the Li-polymer
battery.
The battery capacity icon
in the system main interface shows current residual
battery capacity.
When the GPS navigator is connected t o the charger, it is powered by external power and
2

the battery is charged.
[Attention] The GPS navigator adopt s internal non-removable Li-polymer battery. To avoid
battery rupture, explosion, release of hazardou s s ubstanc e or burn, do not unpac k, pierce,
strike on or discard the battery in fire or water.
1.2.2 Charging by DC Charger
The GPS navigator must be charged with the DC charger bef ore first use.
Plug the USB terminal of the DC charger int o the USB port of the GPS navigator and the
other to the power socket to supply power and charge the GPS navigator.
[Note] The charging indicator light is red during charging. Do not unplug the charge until
the battery is fully charged and the indicator light turns green. Please charge the GPS
navigator when the battery is low or used up.
1.2.3 Charging by Car Charger
Plug one terminal of the car charger into the USB port of the GPS navigator and the other
to the charging port to supply power and charge the GP S nav igator.
[Note] To avoid damage due to current surge, plug in the car charger after the automobile
is started.
1.3 Basic Use
1.3.1 Powering on/off & Slee p
1.3.1.1 Powering on
Press the power key of the GPS navigator and let go after at least t wo seconds to pow er it
on.
[Note] Great humidity fluctuat ion may lead to short circuit of the GPS navigator. Power on
the navigator after it has accommodated to new environment.
1.3.1.2. Powering off & Sleep
Press the power key and let go after at least two seconds to power off the GPS navigator.
The following interface will be prompted. If
is selected, the navigator will
automatically resume the state before entering sleep mode when it is powered again.
3

1.3.2 Restarting the System
When the system does not response, press the reset key on the back of the GPS
navigator to restart the system.
[Relevant Information] The following situations m ight lead to no response of the system.
1. Delay or pause in interface switching;
2. Failure of function activation with over long ex ec ution;
3. Failure to power on/off the GPS navigator by pressing the power key.
[Note] Restarting the system by pressing the reset key will result in loss of unsaved data.
Please backup your data regularly.
1.3.3 Fixing the GPS Navigator with Mounting Kit
The mounting kit is composed of a back splint and a bracket . To use the GPS navigator in
an automobile, fix it on the dashboard under the front windshield.
[Note] Do not place the GPS navigator in posit ions obstructing the driver ’s vision. Do not
place it without fixing it or in the place of air bag or the ar ea after the air bag is inflated.
1.3.4 Using T-FLASH Card
Copy mapping applications, map data and media files in a T-FLASH card. Insert the card
in the corresponding slot.
[Note]
1. Do not take out the T-FLASH card while a navigation program is be ing run or
a media file is being played.
2. To avoid drop or crash of the T-FLASH card, do not exert heavy pressure on
it or bend it.
3. Avoid using or storing the T-FLASH card in high temperature, high humidity
or direct sunlight.
4
Keep the card away from liquid or corrosive subs tance.
4. Mind the direction w hile inserting the T-FLASH card to avoid damaging the
slot or the card.
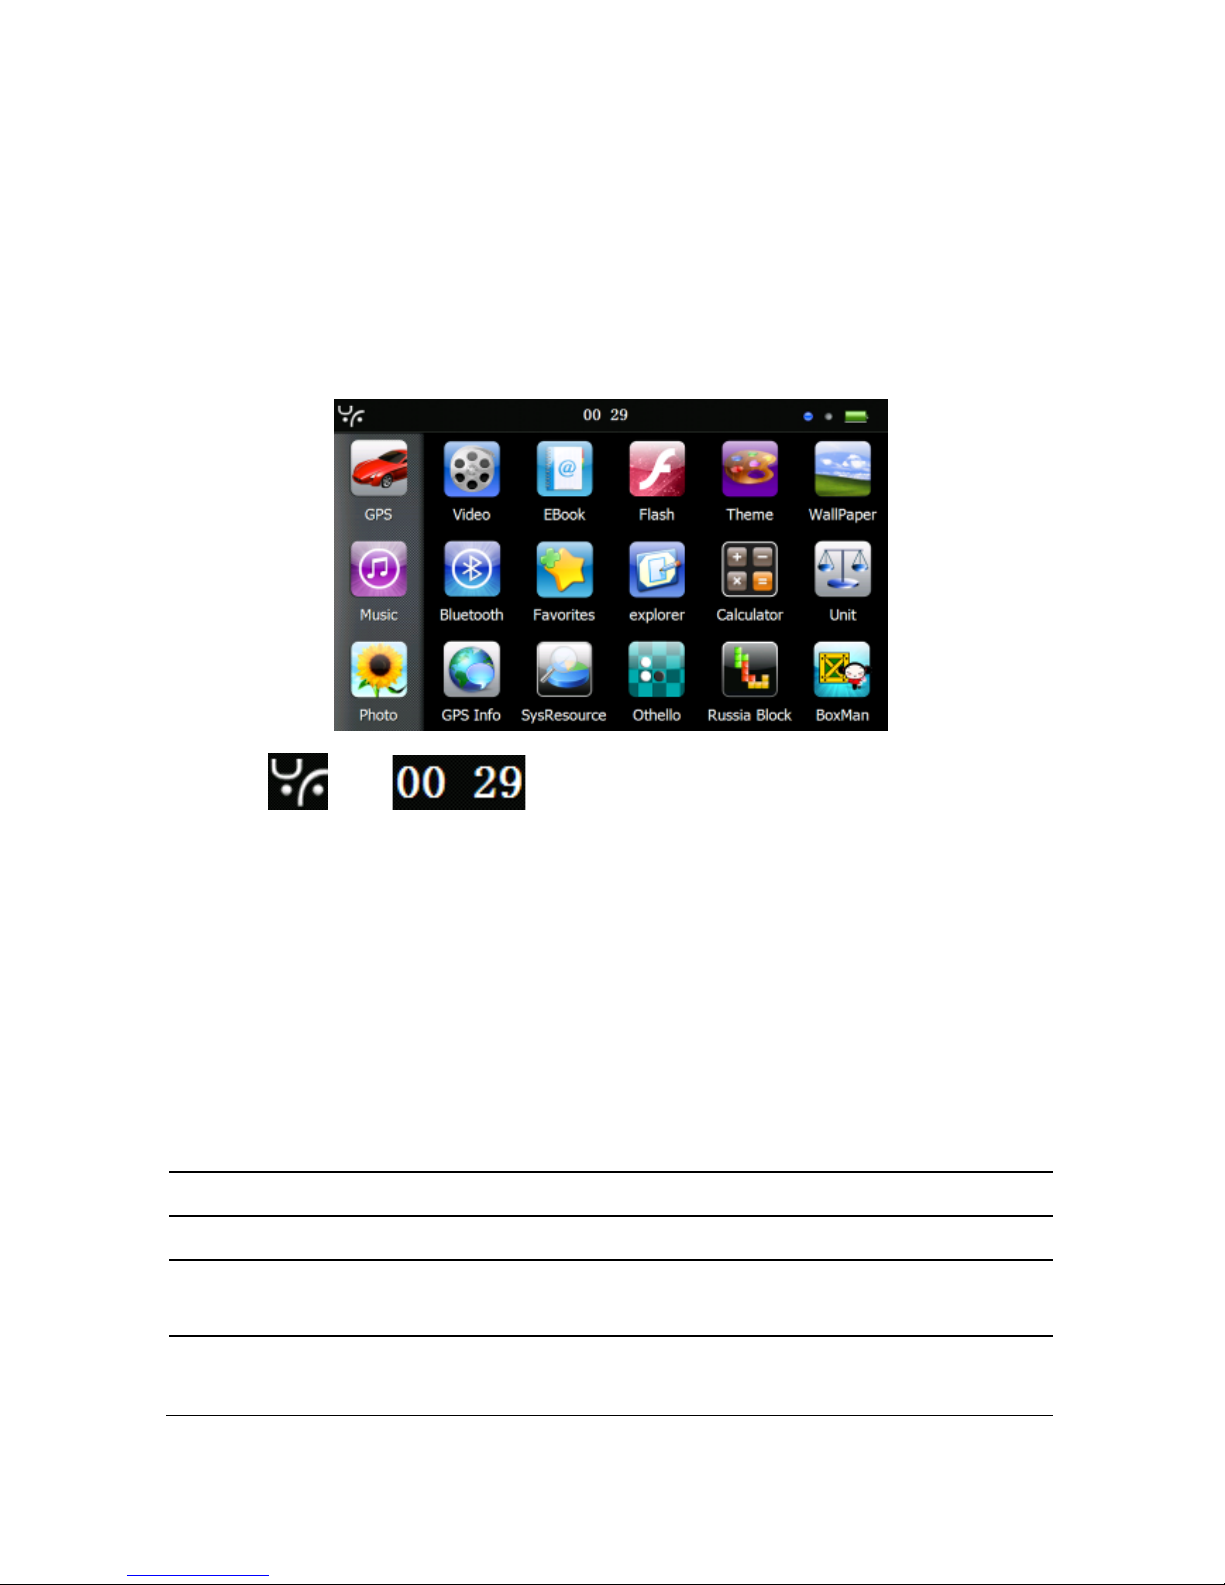
1.4 System Main Interface and Major Functions
Long press the power key on the top side of the G PS navigator to enter the syst em main
interface shown below.
The icon and are shortcuts to view system information and set
time & date for the device. For details, please refer to relevant chapter and section.
[Relevant Information]: In the abov e interface, the icon style is set as “left”, and the icons
at the left remain during page scrolling. To change the style of icon layout, refer to 3.6
Theme.
[Relevant Information]: To r earrange icons at will, tap on an icon and s tay until a four -way
arrow appears at the upper left of it, and then drag the ic on to a wanted place.
Function
Explanation
GPS
Tap to enable nav igation function
DVR
Tap to enable DV R function
Tool
Calculator , Unit, system information, favorite, calendar ,GPS
information
Media
JPG,GIF,BMP and PNG files supported;
Photo rotation, zoom in/out and auto play supported
5

Setting
Volume, backlight, language, date& time, calibration, system info,
USB setting and Factory reset
Game
Othello, DuiDuiPeng, Russia Block
6

Chapter II Navigation
Tap the icon in the system main interface to start the navigation program. For
detail usage, please refer to the elect ronic map instruction.
Due to transportation development, inconformity between products and
real traffic information will occur a period after product release. Please
drive according to road condition and abide by traffic regulations.
Navigation paths are for reference only, and the user may decide whether
to follow them.
High and crowded structures (such as inside of tunnels, space bet ween
high buildings, underground car parks and under viaducts), weather
change or satellite signals turnoff may influence signal reception,
resulting in positioning failure, inaccurat e positioning, navigati on failure or
system function abnormity.
With stereoscopic maps, instant animat ion, v oice prom pt and t ext pr ompt of t he navigat ion
system, you will appreciate its unique char m and enjoy a gr eat trip.
Function of DV recorder (Drive video record)
This section introduces the usage of t he DV R.
2.1 Instruction
1、The function of DVR need match with TF card
2、Requirement of TF card is 4 grade; Capacity should be 4G at least.
3、Format the TF by special form at 1
st
time usage,, you can choose it under t he format
setting
4、The player of DVR will create automatically aft er form att ed
5、There are 3 lock manner (hand-driven lock, top lock on device ,G-sensor lock) for
DVR’s video ,
2.2 Operation
2.2.1 Interface of DVR。
Tap the ic on in the system main interface to enter the DVR interface as follows:
7
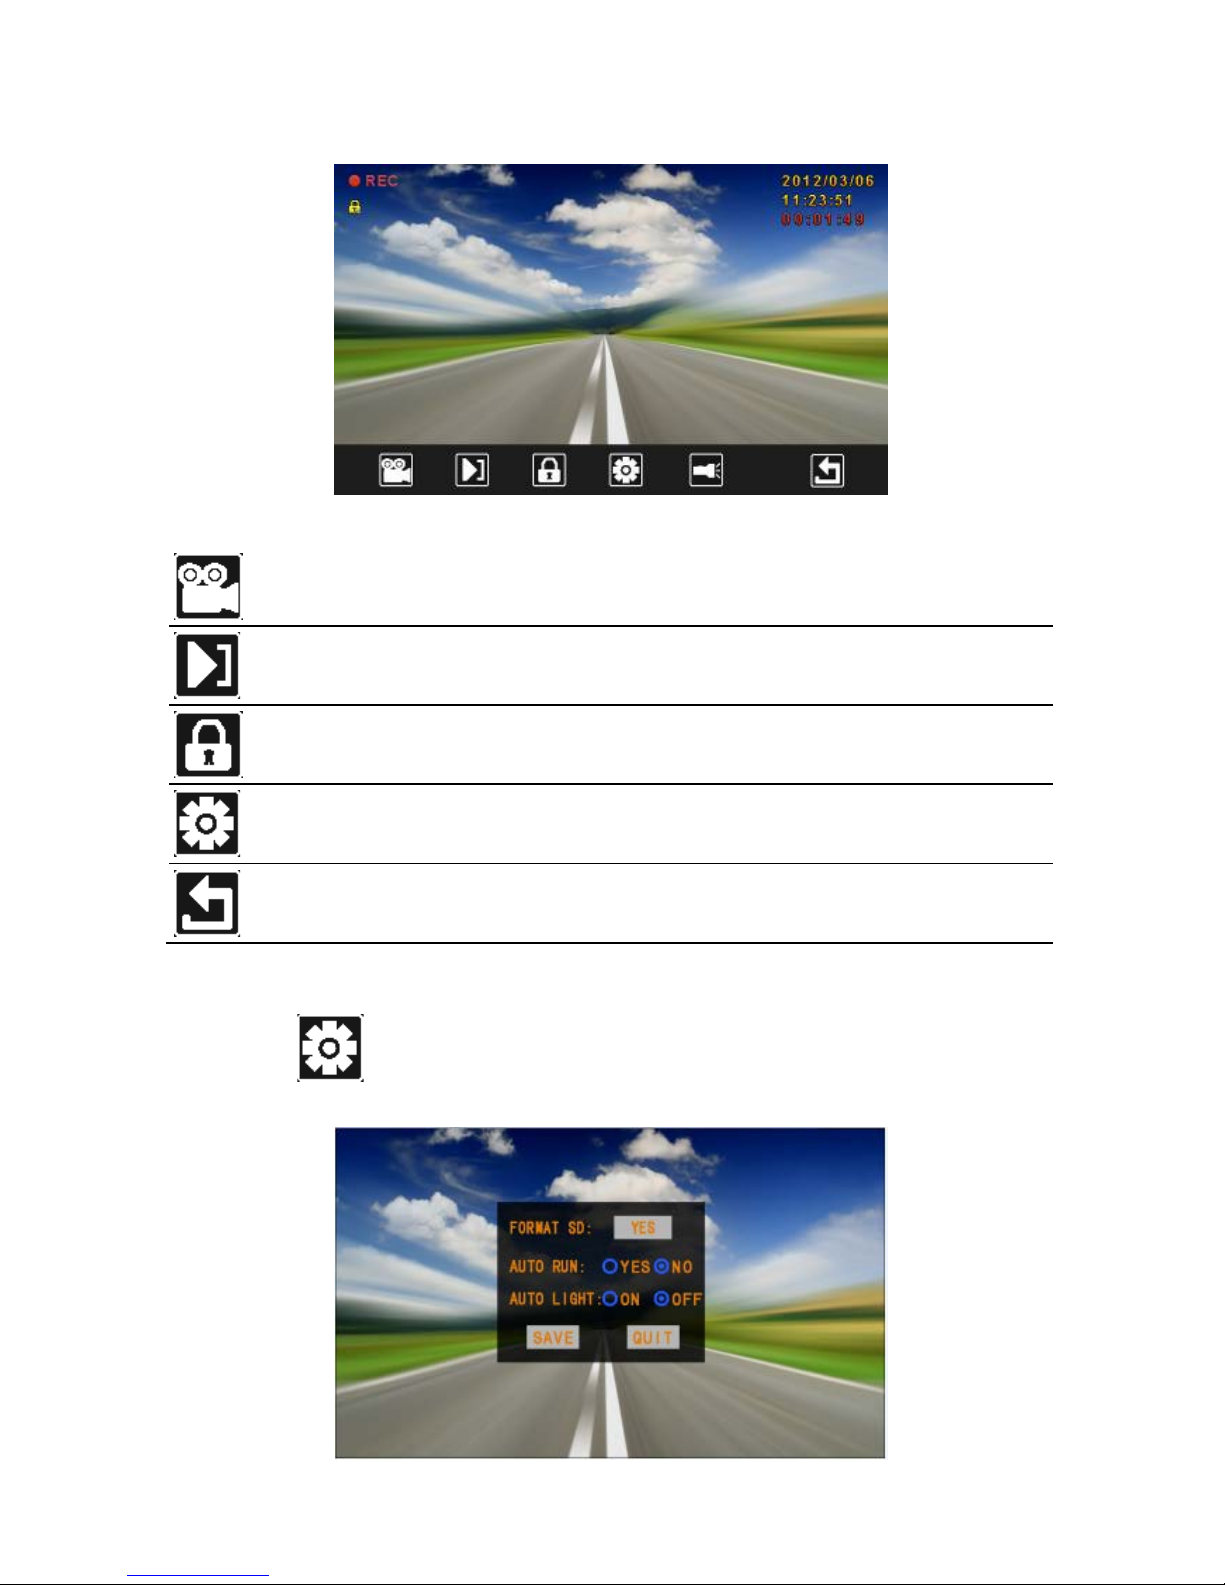
Turn
No/off
Tap to s tart-up& turn off video
Playback
Tap to play er the recorded video
Lock
Tap to lock the recording video (Avoid erased during the period of
cycling video)
Setting
Tap to s et ting / format the TF card/ setting startup method of video
Return
Tap to quit the DVR interface(if you did not turn off video for quit, it
will still run behind)
2.2.2 Setting interface of DVR
Tap the ic on
in the DVR main interface to enter the setting interface as follows:
8
 Loading...