


GuangDong Oppo Mobile Telecommunications N5116 User Manual

Contents in this user manual may differ from the actual mobile device, and is subject to software
service providers.
Thank you for choosing the fashionable and cool OPPO N5116.
OPPO N5116 is a touch-controlled mobile device. A tap on the screen allows you to enable corresponding
function, as is intuitive and handy. With a wealth of entertaining apps accessible, a tap will trigger
the magic for marvelous experience.
Music becomes simple and easy for your enjoyment with a dedicated music player supporting
multiple audio formats; a13 megapixel digital camera assists you to capture every memorable
moment of your life; and WiFi provide you with fabulous net surfing GPRS/EDGE/3G WCDMA/LTE-FDD
experience; any fancied app can be installed to your heart's content with the latest Android
technology, which is of superb compatibility, extensibility and reliability; not to mention
Bluetooth 4.0, perfect audio quality and ultra-large screen, get ready for ceaseless fun and joy!
Please read this user manual carefully before using this device.
V1.0

Declaration
No part of this user manual may be reproduced, transmitted, distributed or stored in any form or by
any means without prior written permission of OPPO.
OPPO operates a policy of ongoing development. Thus, OPPO reserves the right to make changes and
modifications to any of the products described in this document without prior notice.
The contents of this document are provided "as is". Except as required by applicable laws, no
warranties of any kind, express or implied, are made in relation to the accuracy, reliability or
contents of this document.
Please make sure backups or written records are made for important contents and data stored in your
device since loss or damage could be caused in use, maintenance, battery replacement or for other
reasons. To the maximum extent permitted by applicable law, under no circumstances shall OPPO or
any of its licensors be liable for any loss of data or income or any special, incidental, consequential
or indirect damages howsoever caused.
The third-party software provided with this device may have been created and may be owned by
persons or entities not affiliated with or related to OPPO. OPPO does not own the copyrights or
intellectual property to the third-party applications. As such, OPPO does not take any responsibility
for end-user support, functionality of the applications, or the information provided in the applications
or associated materials. OPPO does not provide any warranty for the third-party applications.
By using the applications you acknowledge that the applications are provided "as is" with no warranty
of any kind, neither express nor implied, to the maximum extent permitted by applicable law.
You further acknowledge that OPPO makes no representation or warranty, express or implied, including
but not limited to warranties of title, merchantability or fitness for a particular purpose or that the
applications will not infringe any third-party patent, copyright, trademark or other rights.
Product supplies as well as related applications and accessories may vary by region.
Please check with your the dealers appointed by OPPO for details.
This device may contain commodity, technology or software subject to export laws and regulations
from Thailand and other countries. Diversion contrary to law is prohibited.
2
Safety
Please familiarize yourself with the following
concise regulations. Not following these
regulations might be dangerous or illegal.
Further information about safety is provided
in this user manual.
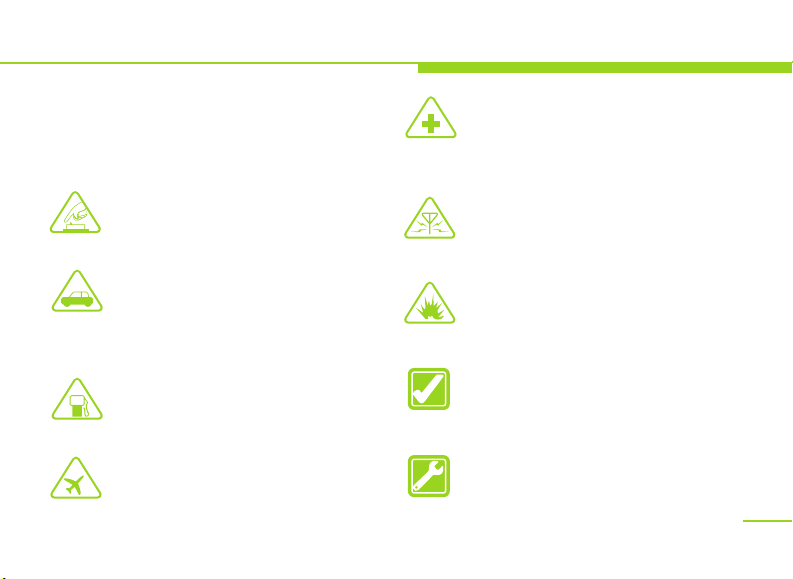
Switch on safely
Do not switch the device on when
phone use is prohibited or when it
may cause interference or danger.
Road safety comes first
Please obey all local laws and
regulations. It's best to drive the
vehicle with both hands. Road safety
shall come first before mobile device
use while driving.
Switch off at gas station
Please do not use the device at gas
station (service station) or places in
close proximity to fuel or chemicals.
Switch off when taking an airplane
Your device may cause interference.
Phone use on airplane is dangerous
and illegal.
Switch off around medical equipment
Hospitals or healthcare organizations
might own equipments which are
sensitive to wireless frequency.
Please obey all regulations or rules.
Interference
All wireless devices might be
susceptible to interference and effected
in performance.
Switch off around blasting areas
Please obey all related rules and
regulations. Do not use this device
around blasting areas.
Appropriate use
Use the device only at appropriate places.
Please do not touch the antenna area
after it is switched on if unnecessary.
Qualified service
The device can only be installed or
maintained by qualified service staff.
3

Safety
4
Accessories and battery
Please use the exclusive accessories
and battery provided by OPPO.
Accessories not provided by OPPO might
cause phone damage and danger.
Water resistance
Your device is not water-resistant.
Please keep it dry.
Connect to another device
When connecting to another device,
please check the instructions of the
device for safety details. Please do not
connect to incompatible products.
Introduction
About This User Manual
This user manual provides concise information
about how to use the device. Please refer to "Use
Introduction" and "Basic functions" for basic
operations of the device.
You will see the following instructional icons in this
user manual:
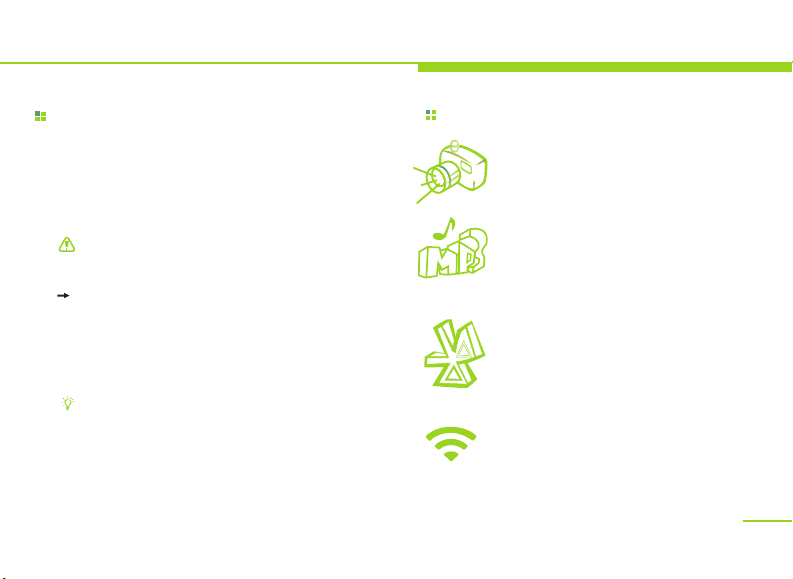
【 】Cautions about safety or device functions.
【 】An option of submenu you should select
to perform a function.
【[ ]】A key on the device. For example:
【Function key】.
【 】Tips about phone use.
Special Functions
Camera and video recorder
Use the device as a camera or a
video recorder.
Media player
Use the device to play music and
videos of MP3, MP4 and other
formats.
Bluetooth
Use Bluetooth wireless technology
to transmit photos, video records
or other personal data, or to
connect to other devices.
WLAN
Access to internet via WIFI will be
easier, better and faster.
5

Contents
Accessories
Your Device
Menu index
Use Introduction
Basic steps for phone operation
Install the SIM card and battery
Switch on/off
Device password and unlock
Charge the device
Network modes
Operating system 13
Touch control and keys 14
Landscape mode and backlight 15
Indicators 16
Main interface 17
Main menu 18
Input methods 18
Basic Functions
Calling 20
Phonebook 20
Messaging 21
Settings 21
Life assistant
Clock 24
.........................................................7
.........................................................8
.........................................................9
.............................................10
.................................................................11
.......................................................13
............................................................13
.......................................................
........................................................................
...............................................................
.....................................................................
..............................................................
...............................................................................
..................................................................................
...............................................20
......................................................................
.......................................................................
............................................................................
....................................................24
..........................10
..................................12
............................................
............................
6
..........................................................................24
Calendar
Calculator
Multimedia Applications
Music player 25
Video 25
Camera 25
File management 25
PC connections 26
Wireless connections 26
Network 27
Email 27
Browser 27
Others
SIM application 29
Troubleshooting
Health and Safety
Battery security 33
Care and maintenance 38
Fundamental Performance Parameters.41
Help you get to know this device 41
........................................................................24
...................................................................
.................................................................................
.............................................................................
..........................................................
.............................................................
...........................................................................
.................................................................................
...........................................................................
.................................................................29
............................................................
............................................................
...............................25
.................................................
..............................................30
...........................................33
..............................................
........................

Accessories
You are provided with the following standard
accessories:
Mobile device
User manual
Data Cable
Charger
Quick Guide
Earphone
Standard configurations of this device include:
one phone device, one charger, one USB data
cable, on earphone, one user manual and one
warranty card.
Additional accessories can be purchased from
local dealers.
Note: accessories shown in the above
illustration may vary differ from actual
accessories.。
Accessories (battery, charger, etc.) can
only be used on matched original OPPO
products. To protect your benefit, please
conduct battery true-false inquiry and
register your product in time.
Warranty maintenance is unavailable when
troubles are caused for using the accessories
on other products.
7
Your device
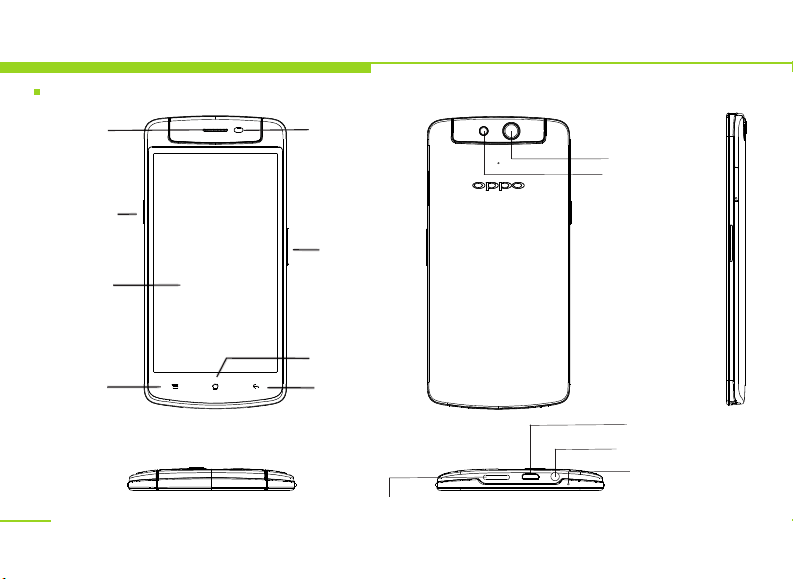
Keys and parts
8
Earpiece
Power/
lock key
Touch
screen
Menu
key
Front
Light sensor
Volume key
Home key
Back key
Loudspeaker
Back
Camera lens
Camera flash
USB Cable and
charger connector
Earphone connector
Microphone

Menu Index
..................................................................20
Calling
........................................................................
Dialpad 20
Call history 20
Contacts 20
Favorites 20
Phonebook
Contacts 20
Favorites 20
Groups 20
Messaging
Saving settings 21
SMS settings...................................................................21
MMS settings.................................................................21
Notification settings...............................................21
Settings
General settings 21
Sound settings 22
Display..............................................................................23
Security.............................................................................23
Life assistant........................................24
clock 24
calendar............................................................................24
calculator..................................................................24
FM radio...........................................................................24
....................................................................
.......................................................................
.......................................................................
........................................................20
.......................................................................
......................................................................
.........................................................................
.........................................................21
...........................................................
..............................................................21
............................................................
.............................................................
.............................................................................
Multimedia applications 25
Music player 25
Playlist 25
Setting as ringtone 25
Player settings 25
video 25
Camera 25
File management
creating new folder 25
editing..................................................
Micro SD card extension suppor
...............................................................
..........................................................................
......................................................
.............................................................................
.........................................................................
PC connections
Wireless connections 26
Email....................................................................27
Browser...............................................................27
...................................
..............................................
............................................25
..................................................
.............................................26
.........................................
..................25
t.....................25
..
9
Use Introduction
Basic steps for phone operation
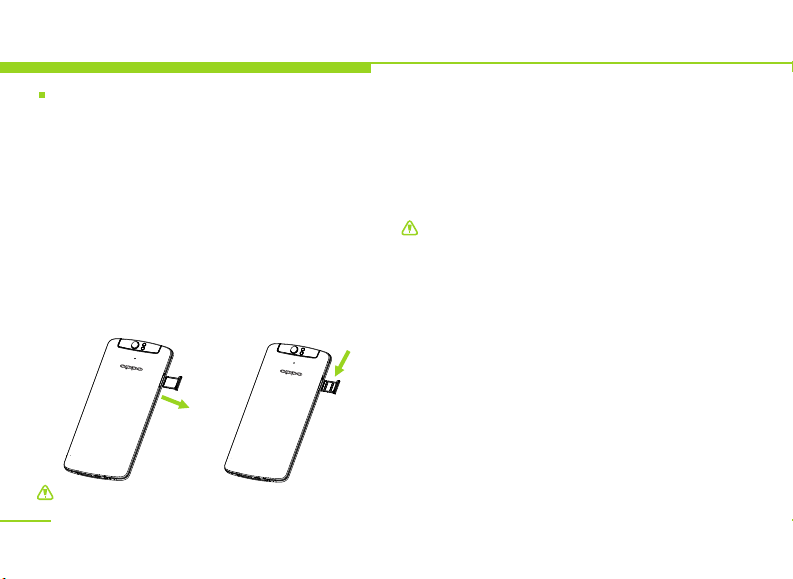
SIM card Information
When subscribing for network access, you will get a
plug-type SIM card, which carries your information,
such as PIN code and available service options.
Install the SIM card
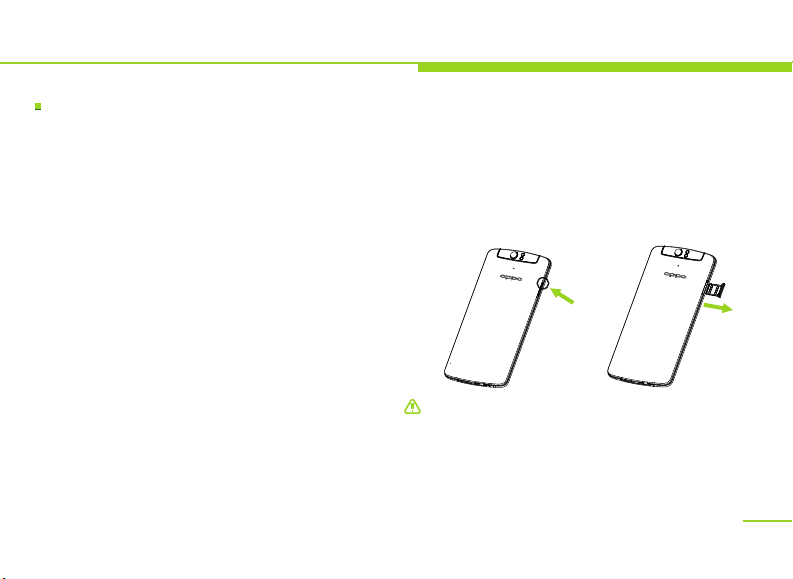
Please turn off the phone, the SIM card, as shown
in the following figure SIM card gap outwards, the
metal face up: from the side with the size of the
pins and other objects into the SIM card tray at the
top of the hole, the SIM card tray will automatically
pop up,Insert the tray. As shown below SIM card
gap outward, metal face-up:
Warning: Please switch off the device before
removing the battery.
10
All information in relation to network
connection, as well as your call log initialization,
contacts stored in the SIM card phonebook,
communication logs and some SMS messages
are all saved in the metal plane area of the SIM
card.
Warning: To avoid card data loss and damage,
please avoid touching the metal plane area of
the SIM card. Keep the SIM card away from
electricity and magnet.
Service network will be unable to access once
the SIM card is damaged.
The SIM card can be removed from your device
and placed in any other device in support of
corresponding network service, and the device
will automatically reads data on the card.
Switch on/off
Switch on
Insert the SIM card, TF card and battery following
the instructions above, press and hold the power
key until it gives a response of vibration.
Once a SIM card is inserted in, the device will check
automatically the availability of the SIM card.
Switch off
First make sure you have properly saved your data.
Press and hold the power key and then select power
off in the pop-up menu, or press and hold the power
key to switched off.
Crash reset
If the phone freezes, long press the power button
(about 8 seconds) can operate after the finger is
released again after long by 3 seconds to reboot.
If you long press the power button for too long
(about 15 seconds), you need to use the USB
connection to activate the machine.
Use Introduction
Remove SIM card
When you need to remove the SIM card.Turn off
your computer, insert the SIM card tray at the
top of the hole with the size of the pins and other
objects from the side, the SIM card tray will
automatically pop up, and then remove the SIM
card slot, as shown below:
Warning: You must switch off the device before
removing the SIM card and the memory card.
Do not insert or remove the SIM card or memory
card with external power supply connection,
otherwise it may cause data loss or damage.
11

Use Introduction
Device password and unlock
Standby screen and unlock
In power-on status, press the power key once, the
device would switch off the screen backlight and
enter standby mode to save power; the backlight
would be switched on by pressing the power key
once again. The screen would be locked to prevent
unintended touches, so you need unlock it manually.
If no operation is conducted for a specified time, the
device would enter standby mode and you need
unlock it again for further operations.
Set password
To prevent illegal use, you can set device password
for protection. If this feature is activated, you must
enter the password each time you switch it on to
unlock the device.
In case you have forgotten your device password,
you are supposed to contact your dealer or the local
authorized service center to unblock it.
Unblock SIM card
To prevent illegal use, you may adopt PIN
(personal identification number) code to
protect your SIM card.
12
When this feature is activated, you must enter
the PIN code each time you switch on the
device to unlock the SIM card and make or
answer a phone call. You may cancel SIM card
protection, in which mode illegal use cannot
be prevented.
Warning: Your SIM card would be blocked by
the network if you enter incorrect passwords
continuously for three times, and the device
would inquire your PUK code.
Do not enter anything if you do not know,
bring the SIM card to your network service
provider for solution, or ten times' incorrect
entering will cause your SIM card to go
useless. Your network service provider will set
a standard PIN for your SIM card.
You need to modify it to be your private
password as soon as possible.

Use Introduction
Charge the device
Connect the charger with the power supply, or
connect the device to a PC via USB cable, plug the
end of the USB cable into the charger connector of
the device to start charging.
The power icon on the upper-right corner of the
screen will keep scrolling. If your device has been
switched off, the display will show a image
indicating charging status.
The power icon on the upper-right corner of the
screen will keep scrolling. If your device has been
switched off, the display will show a image
indicating charging status. If the device has been
overused under low power, it may take a while for
the charging indicator to appear on the screen.
When the power indicator on the upper-right corner
shows full and stops scrolling, the battery is fully
charged. The screen will show a battery full image
if the device is charged in power-off mode. While
charging, the device may heat up, as is normal.
Warning: Please ensure the battery is properly
placed and use OPPO-approved data cable and
adaptor.
For your security, if you need to talk on the
device in process of charging, please disconnect
the charger before you use the device and
continue to charge after you are finished.
When the battery is fully charged, disconnect
the AC power outlet with the device and charger.
Charging time shall not exceed 12 hours.
Please follow the security specifications strictly.
Network modes
The device supports both 2G GSM and 3G
WCDMA as well as data transmission /LTE FDD
mode of /LTEGPRS/EDGE/WCDMA/HSDPA , allowing
access to wireless network whenever and wherever
possible.
Operating system
The device employs Android operating system
with superb compatibility, extensibility and
reliability, allowing you to install software,
games and other applications according to
your preference and enjoy cooler experience.
13

Use Introduction
Touch control and keys
This device uses the latest capacitive touch screen.
Corresponding operations can be enabled by a tap
on the screen, as is more intuitive and convenient.
Before you start:
1. Please make sure that your hands are clean and
dry.
2. Please use fingertips to press the intended screen
icons or feather-touch keys precisely. There is no
need to press hard.
3. To prevent scratching, please do not use pen,
pencil or other sharp objects to tap or write on
the screen.
Basic touch actions
1. Tap
Use fingertips to touch icons or options on the
screen to enable actions.
2. Tap and hold
If other actions are to be performed on a file or
application, please tap and hold the icon until the
option list pops up.
14
3. Drag
Use fingers to tap and hold an icon and drag
the icon. Any icon on the desktop can be
moved by holding and dragging.
4. Slide
Slide your finger quickly to scroll the screen.
Dragging your finger to slide will not select or
activate anything on the screen. You can wait
until the scrolling stops or touch any area of
the screen to stop it. Touching the screen to
stop scrolling will not select or activate
anything. In the contact list, you can slide up
or down to scroll the screen and find certain
numbers. While viewing photos, you can slide
left or right to view the previous or next photo.
5. Double-tap
Tap the screen twice quickly. While viewing
photos, you can double-tap the touch screen
to zoom in, and double-tap again to zoom out.
6. Zoom in/out
While viewing photos, web pages, emails or
maps, you can zoom in or out by pinching your
fingers.

Landscape mode and backlight
Portrait and landscape orientation modes
A lot of applications such as browser, SMS editing,
photo viewing are in support of screen in portrait
or landscape orientation to match your using habits
or to make the device more handy and more suitable
for your needs. You much enable the Auto Rotation
mode before using this feature by selecting Settings
Display Auto rotate screen. Rotate the device,
for certain applications the screen layout will also
rotate correspondingly, and adjust automatically to
suit the new screen orientation.
Adjust the backlight
You can use Settings to activate screen brightness
auto adjustment, by which the screen of your device
can adjust its backlight brightness automatically
according to the ambient light. Thus, the device
can provide you with much clearer outdoor viewing
conditions, and reduce its brightness under dark
conditions for less eye irritation as well as lower
power consumption.
Select Settings Display Brightness Automatic
brightness. Moreover, while you are using the
calling function with the device in close proximity to
your face, your device will lock the screen and turn
off the backlight automatically for battery power
saving.
Use Introduction
15
Use Introduction
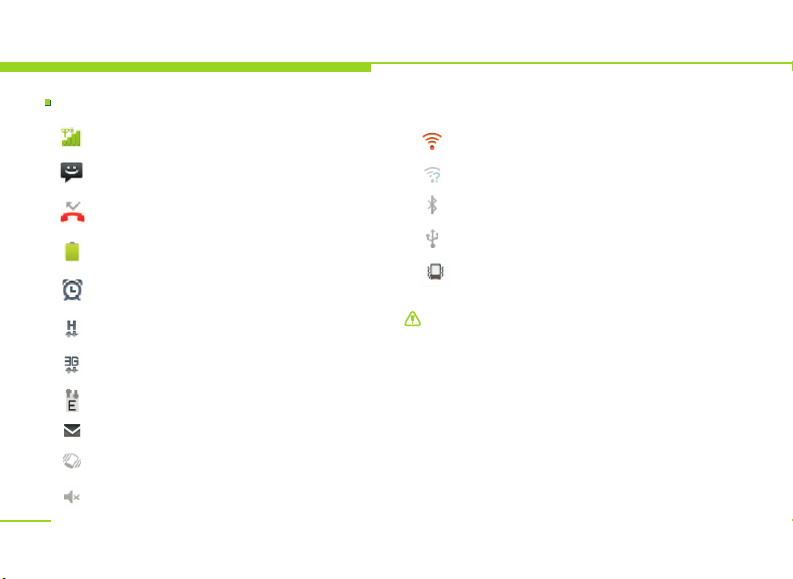
Indicators
Signal strength
You have new SMS.
You have missed calls.
Battery power level.
Clock alarm is activated.
HSDPA is activated.
3G network is connected.
EDGE function is activated.
You have new emails.
Vibration mode is activated.
The sound is muted.
16
WiFi is connected.
WiFi is available but not connected.
Bluetooth is activated.
USB connection is activated.
Silent mode is activated.
Note: The pictures used in this manual are for
illustration only, and may differ from your
device. These shall be subject to actual display
of the device.
Use Introduction
Main Interface
Idle screen
Status bar
Main menu
Call
shortcut
Tap the Menu key in the operating area to access
idle screen. The desktop display include basic
status of the device and shortcuts for some of the
programs.
shortcut
Message shortcut
Basic actions
Tap the status bar at the top of the screen and drag
your finger down to open the notifications panel.
You can bring up the main menu by tapping the
icon in the transparent bar at the bottom of
screen.
Tap the shortcuts for speedy access of the
programs you need; Tap and hold the selected
shortcut icons to move or delete them.
The desktop has a larger scope than singlepanel screen display for more shortcuts and
widgets.
By sliding left or right on the screen you your
can view more panels. Location of the current
panel is indicated in the scrollbar at the bottom
of the screen.
Tap the left icon in the transparent bar at the
bottom of the screen, you can access calling
function; tap the right icon in the transparent
bar, you can access messaging function.
Customizing
The desktop allows certain customized settings.
You can open the main screen interface by
tapping the [Main screen key], set wallpapers
and add widgets as well as new shortcuts to the
desktop. You can also add application icons you
want to the desktop by holding and dragging
the icons from the menu page.
17
Use Introduction
Main menu
Tap the central [Shortcut] icon at the bottom of the
screen. The menu contains built-in tools, settings
and all the applications you have installed. You can
slide up or down to view more panels.
18
Input methods
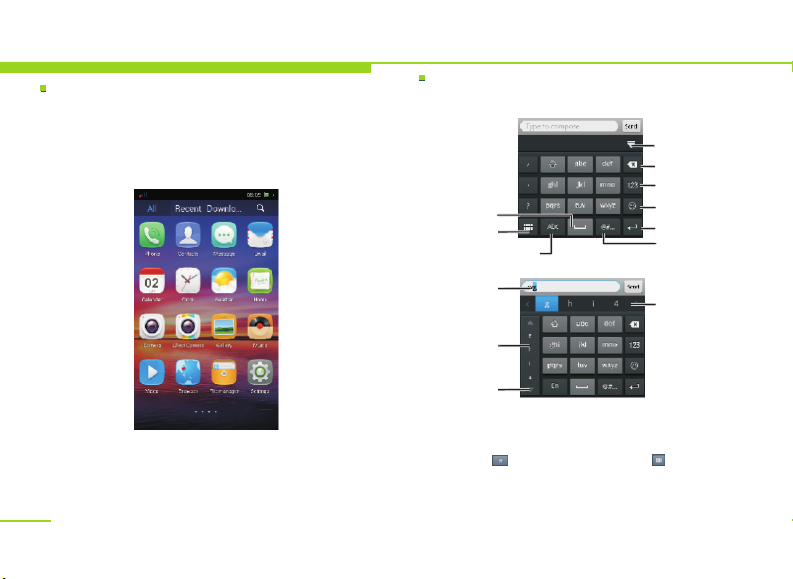
Traditional keypad input (9-key input method)
Hide input interface
Delete
Number
Space
Change input
method
Change input
language
Previous
A vailable conbinations
o f input content
Next
By taping and holding the input language switch
key you can access the input language options
list; by tapping and holding the input mode
switch key you can access the key pad type
options list.
While inputting Chinese, associated alternative
characters and words are shown in the
alternatives column.
Insert emoticon
Start a new line
Insert symbol
Alternative
word list
Qwerty keypad input
Actions can be performed in a similar method to
9-key input. The keypad interface is as followed:
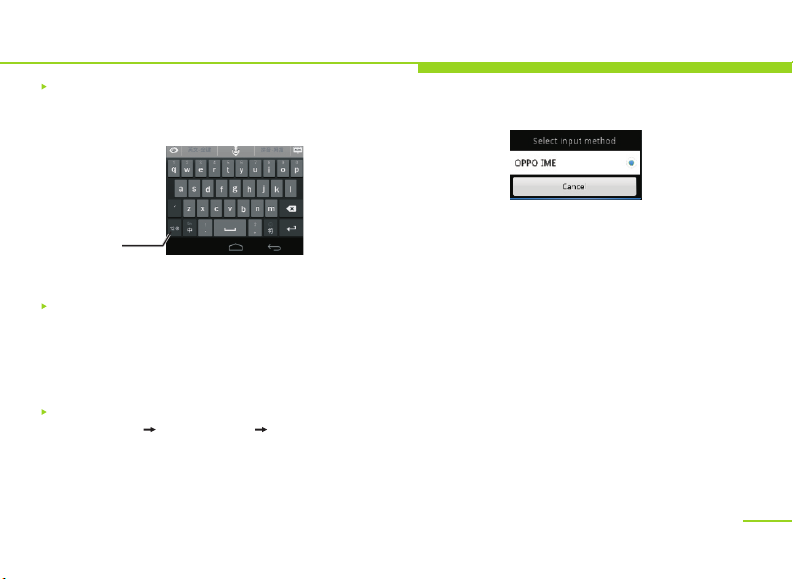
Use Introduction
Input method setting: to set the input methods
through input method setting.
Switch to
number/symbol
input keypad
Switch input methods
To input or edit a text, you can use OPPO input
method or other input methods installed into your
device. You can tap and hold the text input field and
select "Input methods" in the options list to view
available input methods.
Set input method
Select Settings General settings Input methods
settings to access corresponding input method
setting interface, which includes the following
options:
Current input method: to view the currently used
input method.
The input method setting menu includes the
following options:
1. English input habit: set operating habits for
English input, including Auto add space and
Auto capitalize initial letter.
2. Vibrate when tapped: set the keypad to
vibrate when tapped.
3. Play touch tone when tapped: set the keypad
to play touch tone when tapped.
19

Basic functions
Calling
You can access the calling function by tapping the
phone icon at the lower left corner of the screen in
standby mode, or select the dial tab in the menu.
If you have missed calls, the phone icon in the
transparent bar at the bottom of the screen will
show the number of missed calls.
keypad
You can enter the number you want to call directly
on the dialpad, the entered number will match
contact history automatically. You can also add the
entered number directly to existed contacts, or add
a new contact to phone or SIM card.
Call history
Your call logs are recorded in the call history module,
including missed calls, received calls, dialed calls,
etc. You can also view the call history by tapping the
call key in the standby screen; Tap to enter, then you
can view details of logs as well as perform actions
including calling, deleting and sending messages.
Contacts
Search for contact: Tap the [Search] icon at the
upper right corner to search for a contact. Select the
contact found and you can view contact detail, call,
or send message.
New contact: Tap the [New] icon at the upper right
corner to add a new contact.
20
Favorites
Synchronized with phonebook favorites.
Phonebook
You can save names and numbers to both phone
and SIM card.
In the phonebook settings, you can set display
status (Phone, SIM, Only show contacts with
numbers), export contacts to T card or import
VCard files from T card to contacts list, or copy
contacts between SIM and phone.
Contacts
Managing function is provided for all contacts
stored in the device. You can add new contacts,
search for specified contact, and select the
contact found to call, edit, send message, add
to Favorites, etc.
Favorites
You can add certain contact to Favorites, and
adjust its location in Favorites according to your
preference.
Groups
Provide default groups (Friends, Family, VIPs).