

GU?A LAVA Installation Manual
Concern“FARMAKOM M.B.“Šabac Industrijski kombinat“ GUČA“ AD Guča
Installation Manual
Model: LAVA
Owners Manual
for
Lava
Imported by:
Sopka Inc
4181 Plymouth Road
Cleveland, OH 44109
USA
www.sopkainc.com
tested to UL 1482, ULC-S627
Solid Fuel Room Heater
PLEASE READ ALL INSTRUCTIONS BEFORE YOU INSTALL YOUR NEW STOVE.
FAILURE TO FOLLOW INSTRUCTIONS MAY RESULT IN PROPERTY DAMAGE,
BODILY INJURY, OR EVEN DEATH.
SAFETY NOTICE: FOR YOUR SAFETY, CONTACT LOCAL BUILDING OR FIRE
OFFICIAL ABOUT PERMITS, RESTRICTIONS, AND INSTALLATION REQUIREMENTS FOR YOUR AREA. PLEASE CHECK WITH YOUR INSURANCE BEFORE
USING IN YOUR HOME. USE PROFESSIONAL INSTALLER.
CAUTION
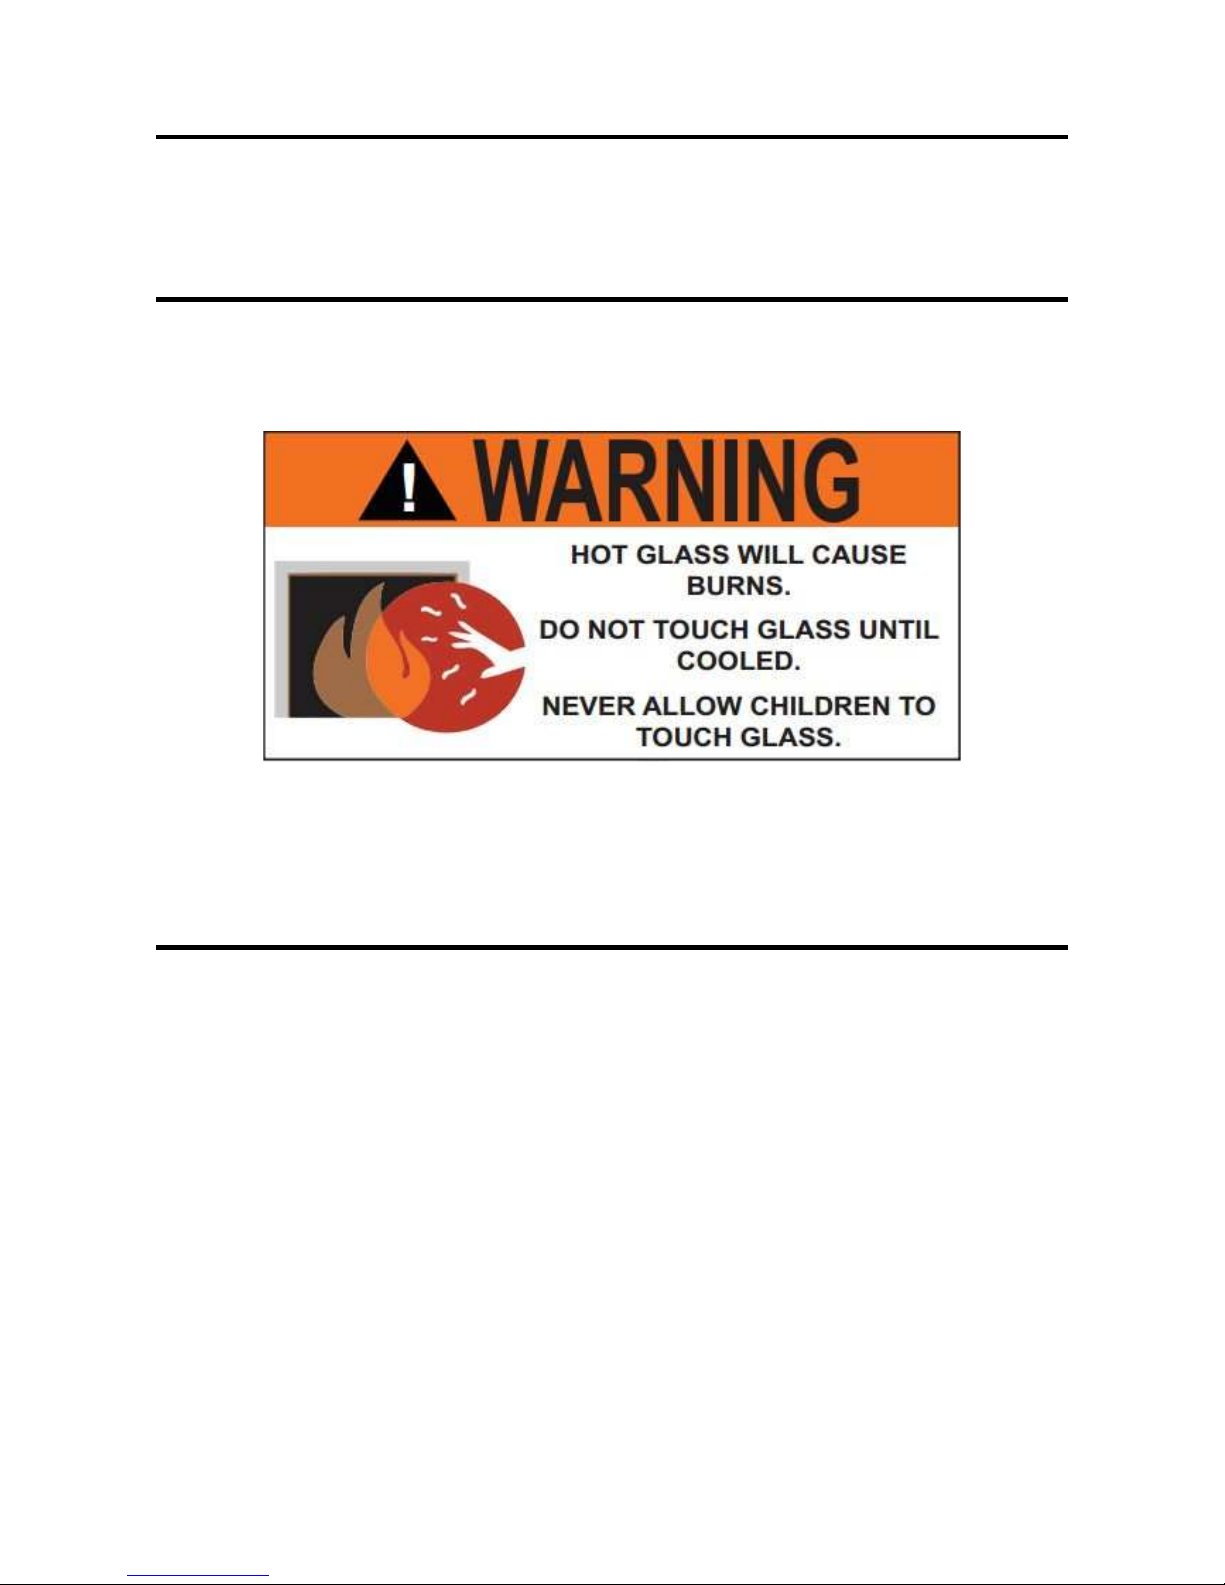
Hot while in operation- do not touch
Contact may cause skin burns
Keep children and clothing away
Keep furnishing and other combustible materials a
considerable distance away from stove.
Do not overfire. If stove or chimney connector glows, you are overfiring
DO NOT INSTALL IN MOBILE HOME OR TRAILER
1
Dear customer,
First of all we would like to thank you for having chosen us and your trust in us will not be failed.
You will be satisfied with your choice, as our stove is in the leading category of the similar products
due to its features and design.
Yours sincerely,
GUČA
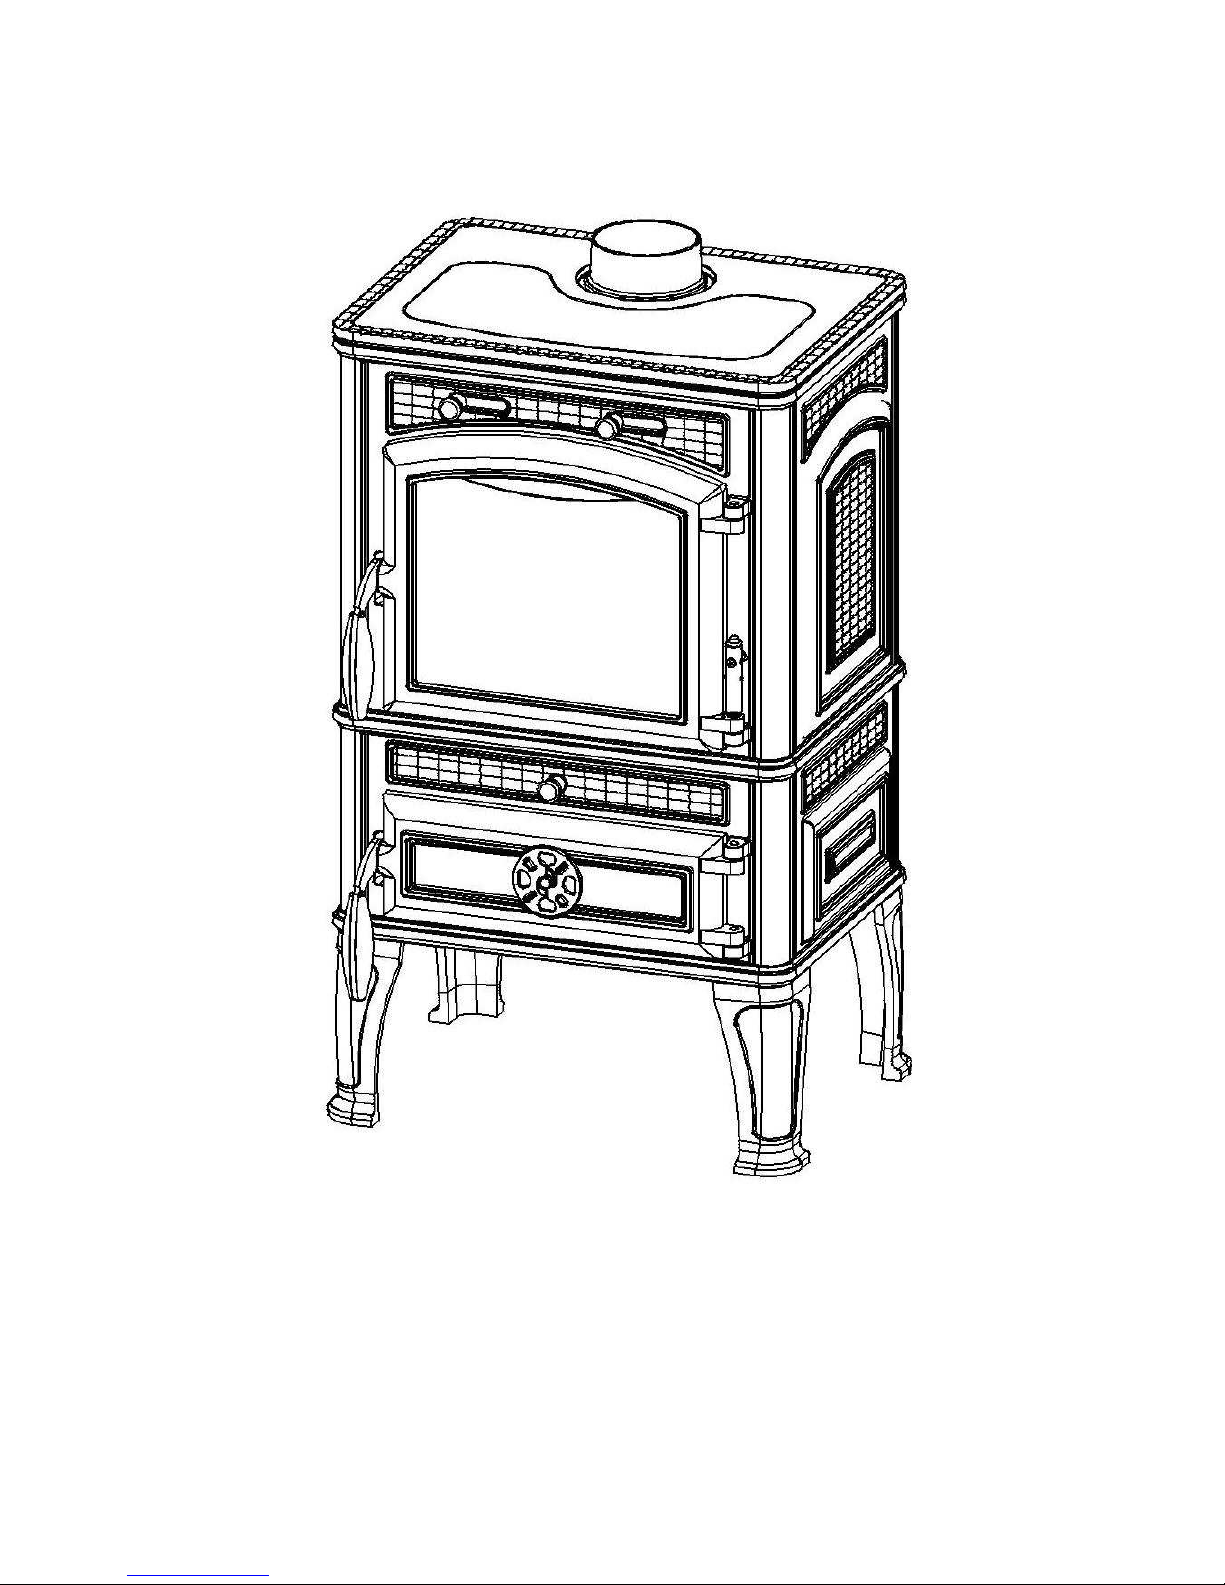
2. TECHNICAL FEATURES
Definition: solid fuel-burning stove tested according to: EN 13240
Constructive System
*
Rating power in kW 12.5 44,000 btu
Efficiency in % 78.1
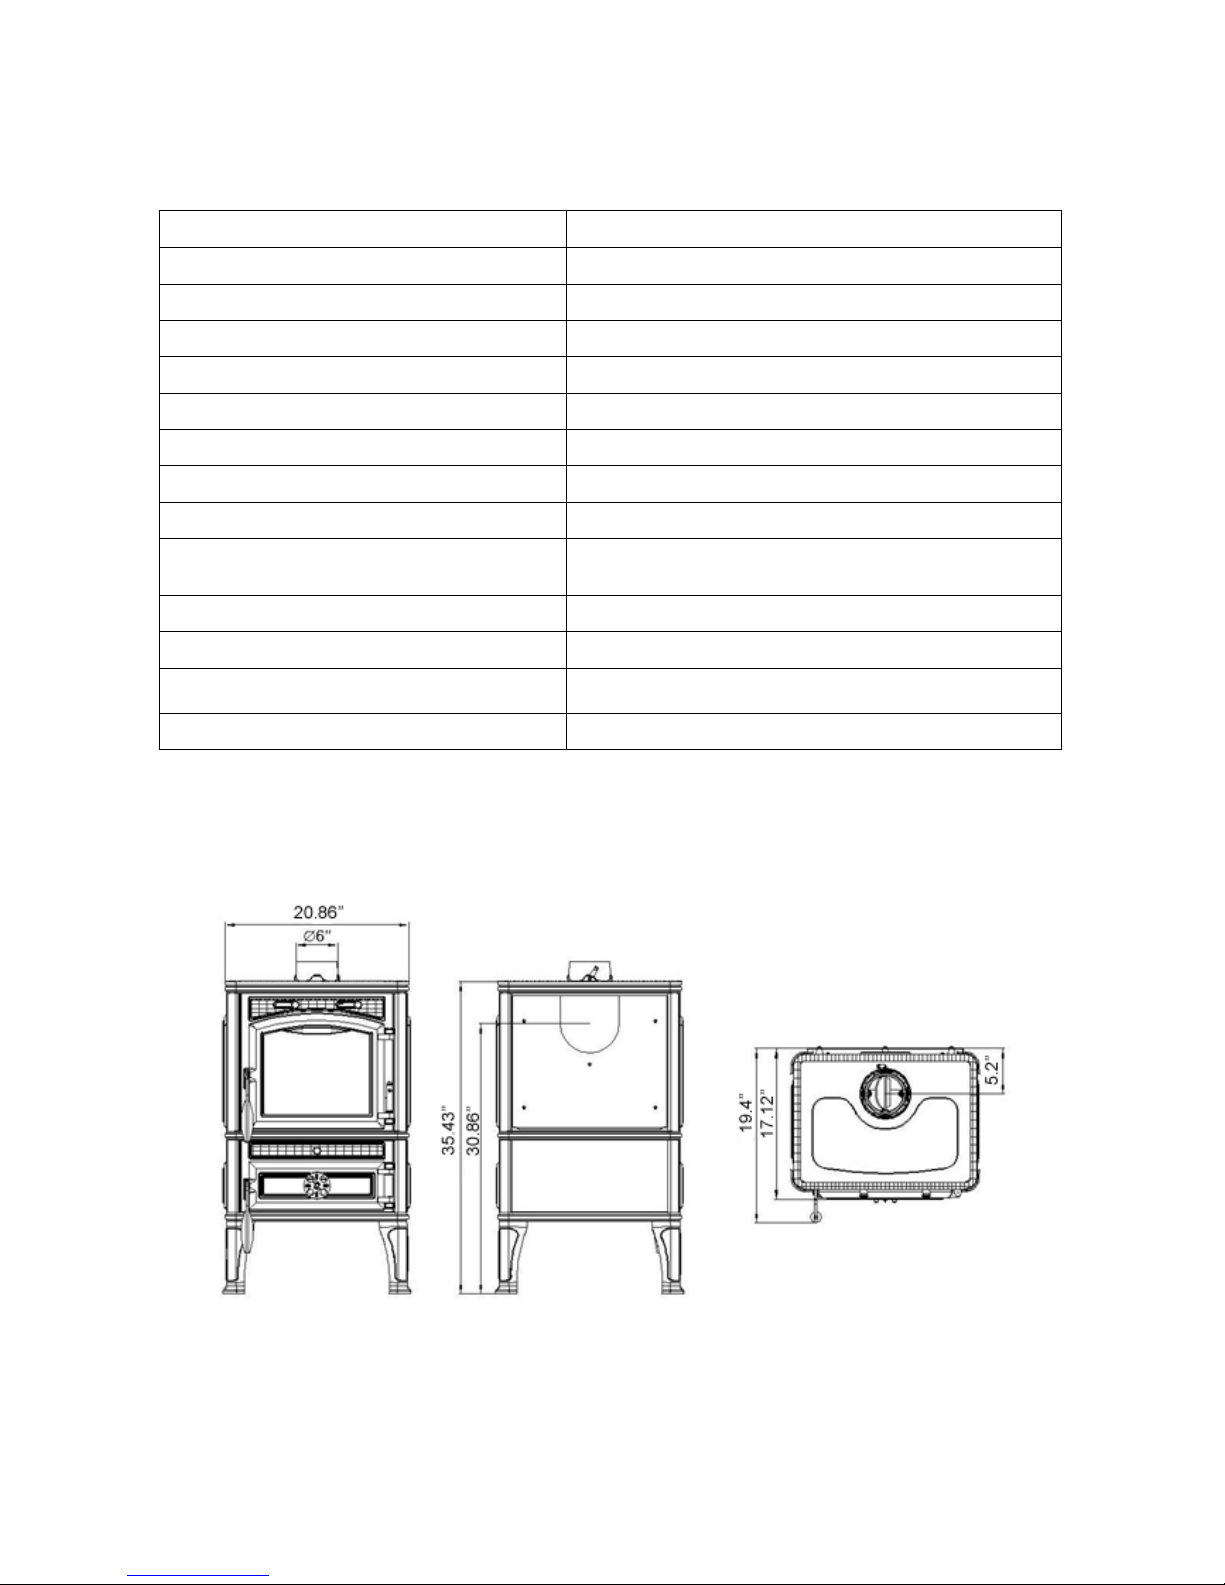
Pipe diameter in mm 120 150……(6”)
Maximum quantity of fuel-wood in kg 3.3 7 lbs
Mean content of CO to 13% O2 in % 0.2667
Emission of exhaust gasses in C° - wood
283.3
Size of hearth opening in mm (W x H) 340x286………………(13.4”x11.25”)
Hearth body size (W x H x P) 450x230 x 334………..(17.7”x9”x13.15”)
Stove height in mm 946…………………….(35.43”)
Stove width in mm 540……………………(21.25”)
Stove depth (with handles) in mm 493…………………….(19.4”)
Weight in kg 155…………………….(341lbs)
Outer smoke output in mm 900…………………….(37.24”)
Accessory: glove
* Hearth door is closed automatically (there is the system for automatic door closing with a spring)
□ *
Hearth door is closed automatically
□ *
Hearth door is not closed automatically

SAFETY INSTRUCTIONS
Read all instructions carefully.
1. The installation of this stove must comply with your local building codes. Please observe
the clearance to combustible. Stove must be 27.6"(70 cm)-side, and 16" (40cm)-back, from
any combustible material, wall, wood, furniture, paper, etc. Note: Drywall faced with bricks
or stone should be consider a combustible surface.
2. Always connect this stove to a chimney and vent outside. This stove requires approved ma-
sonry or factory build 6" diameter UL 103 Type HT chimney, that is high enough to give
good draft.
3. Do NOT connect this stove to a chimney flue serving another appliance.
4. Be sure that your chimney is safely constructed and in good repair. Have chimney inspected
by the fire department or a qualified inspector.
5. Creosote or soot may build up in the chimney connector and chimney and may cause a
house or building fire. Inspect the chimney connector and chimney twice monthly during
the heating season and clean if necessary.
6. Burning any kind of fuel uses oxygen from the dwelling. Provide fresh air for proper com-
bustion from outside the house into the room where the stove is located.
7. To prevent injury, do NOT allow anyone to use this stove who is unfamiliar with the correct
operation of the stove. Do not operate stove while under the influence of drugs or alcohol.
8. Flue connector pipe should be 6" diameter, minimum single wall 24 msg black or 25 msg
blued steel. (Listed to UL 103, Type HT and evaluated to CAN/ULC-S629-M87)
9. Do Not overfire. The special paint used on stove may give off some smoke and an odor
while they are curing during first few fires. Open windows and doors as needed to clear
smoke and odor. Overfiring may cause some damage to the stove.
10. Use only dry, seasoned, natural untreated wood. Do not burn garbage or flammable fluids,
such as gasoline, naphtha, kerosene or engine oil.
11. Use the metal ash drawer only to dispose of ashes. Dispose of ashes in a metal container
with a tight fitting lid. Keep the closed container on a non-combustible floor, well away
from all combustible materials. Keep ashes in the closed container until all cinders have
thoroughly cooled. The ashes may be buried in the ground or picked up by a refuse collector.
12. CAUTION: Hot while in operation. All person, especially young children should be alerted
and trained to stay a safe distance from the stove. Small children should be all the time carefully supervised when they are in the same room with the stove.
13. This stove requires non-combustible floor protection.
14. Keep stove area clear and free from all combustible materials such as gasoline and/or other
flammable vapors and liquids at minimum 40".
15. Never leave an unattended woodstove burning on high.
16. It is highly recommended to install smoke and carbon monoxide detectors in the home when
installing a wood stove.
SAVE THESE INSTRUCTIONS
INSTALLATION INSTRUCTION
NOTE: Floor-Ember protection is required for spark and ash shielding, not for limiting
floor temperatures from the radiant heat of the appliance.
1. Proper clearances must be maintained for adequate air circulation. Adequate ventilation
must be provided while operating this stove.
2. The stove must be placed on solid masonry, solid concrete, or when installing on combus-
tible floor, floor must be protected by insulating plate ( steel, brass, marble, stone, ceramic
tiles, etc.) or on UL1618 listed floor protector. The base must extend at least 18" (46 cm)
beyond the front of the stove and 8"(20 cm) to the sides, and MUST extend under the stove
pipe. (Check local building codes and fire protection ordinances.) Floor protector minimum
size; 37"W x 44"D
3. The stove must have its own flue. DO NOT CONNECT THIS UNIT TO A CHIMNEY
SERVING OTHER APPLIANCES.
4. Connect flue collar to the stove and adapter . The crimped end of the stove pipe must be in-
stalled facing down to fit inside the adapter. Figure 1, page
5. Use three (3) sheet metal screws at each joint of stove pipe and adapter to firmly hold stove
pipe together. Use 6" round black/blue stove pipe (Listed to UL 103, Type HT and evaluat-
ed to CAN/ULC-S629-M87) NOT galvanized pipe. DO NOT CONNECT THIS STOVE
TO ANY AIR DISTRIBUTUIN OR DUCT SYSTEM.
6. Slope any horizontal stove pipe upward toward the chimney at least 1/4 inch for each foot
of horizontal run.
7. You must have at least 18" of clearance between any horizontal pipe and ceiling. 8.
The stove pipe must NOT extend to far into the chimney flue.
9. It is recommended that no more than two (2) 90 degree bends be used in the stove pipe in-
stallation.
10. Connect to 6" inspected masonry chimney or 6" UL Type HT listed chimney.
A PROFESSIONAL, LICENSED HEATHING AND COOLING CONTRACTOR SHOULD
BE CONSULTED IF YOU HAVE QUESTIONS REGARDING THE INSTALLATION OF
THIS SOLID FUEL BURNING APPLIANCE.
MASONRY CHIMNEY
Before using an existing masonry chimney, clean the chimney, inspect the flue liner and make
any repair needed to be sure it is safe to use.
If connector stove pipe must go through a combustible wall before entering the masonry chim-
ney, consult a qualified mason or chimney dealer. The installation must conform to local fire
codes, and NFPA 211.
Do NOT connect this stove into the same chimney flue as the fireplace or flue from another
stove. If there is a cleanout opening in the base of the chimney, close it tightly.
UL LISTED CHIMNEY
Carefully follow chimney manufacturer's instructions. Us only a UL 103 Type HT Listed Resi-
dential Type and Building Heating Appliance Chimney. The top of the chimney must be at least
three (3) feet above the roof and be at least two (2) feet higher than any point of the roof within
ten (10) feet.
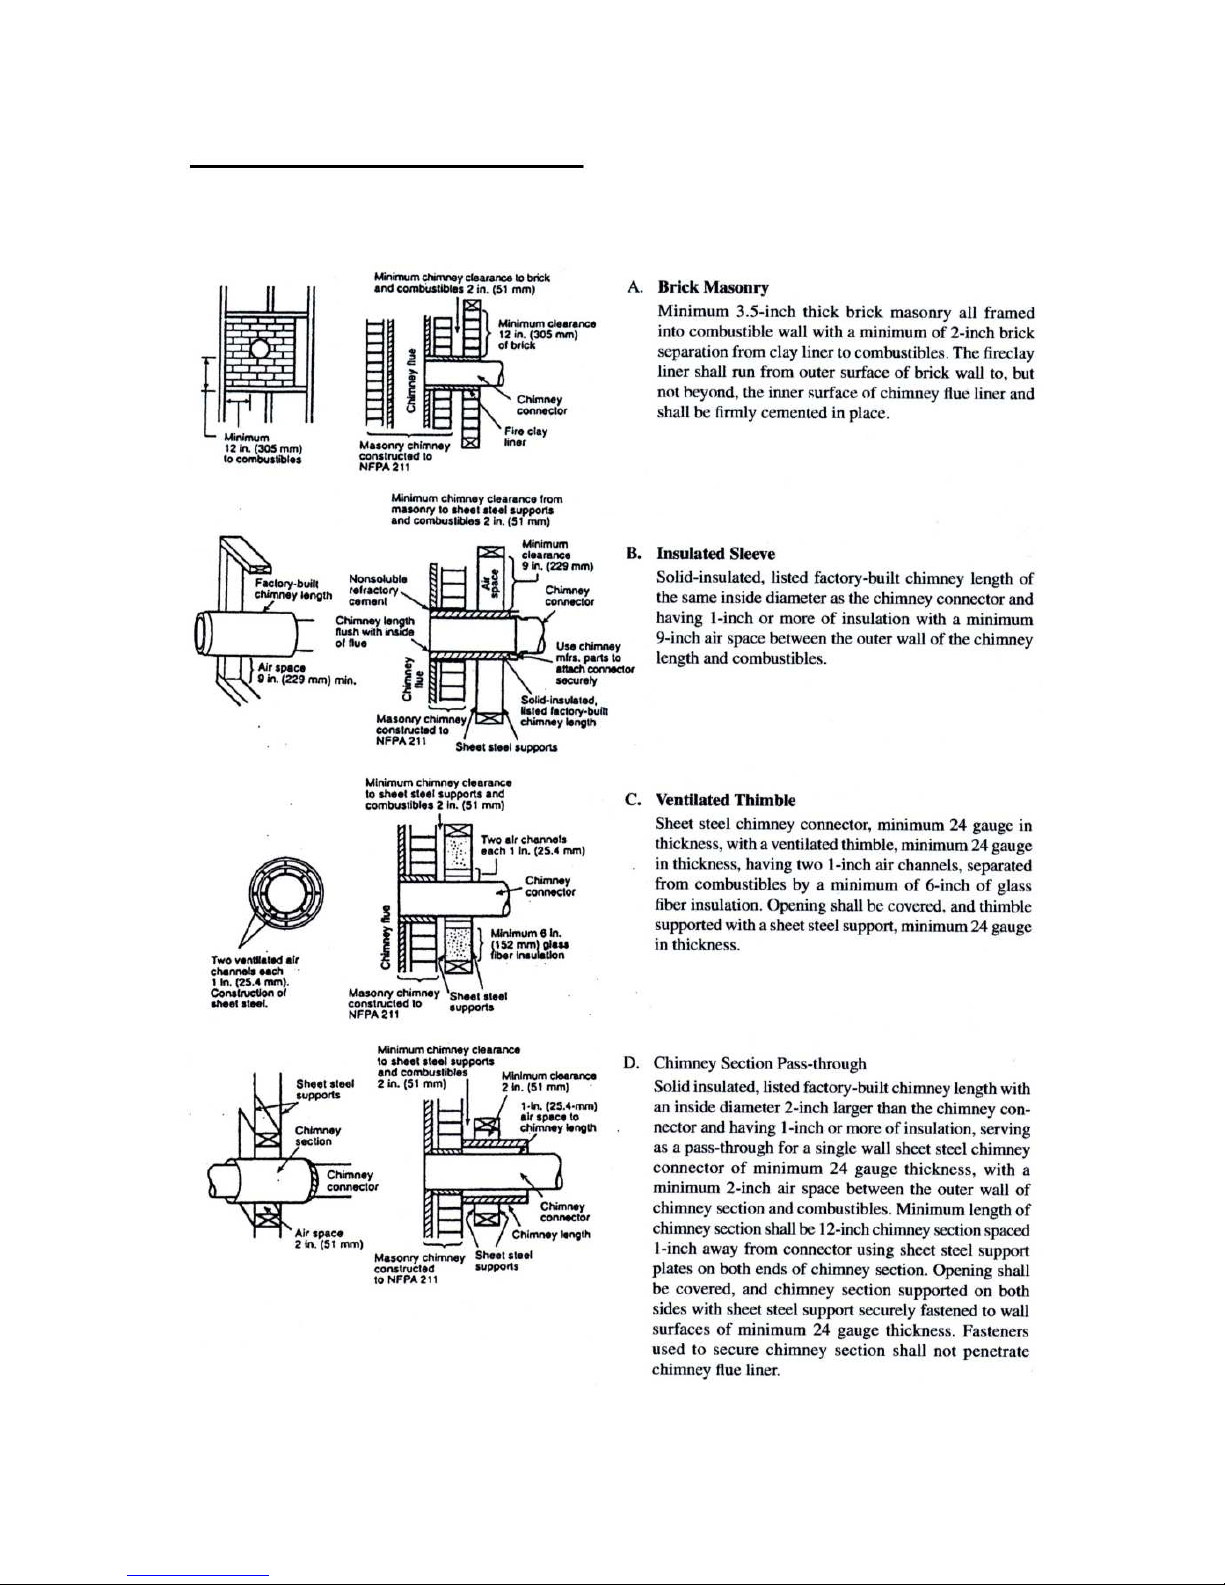
Chimney connector systems and clearances
Chimney connector shall not pass through attic or roof space, closet or similar concealed space, or a floor,
or ceiling. When passage through a wall, or partition of combustible is desired, the installation shall conform to CAN/CSA-B365, Installation Code for Solid-Fuel-Burning Appliances and Equipment:
APPLIANCE PLACEMENT
Have an authorized dealer install the appliance. If you install the appliance yourself, have your dealer review
your installation plans and/or installation.
Draw out a detailed plan of the installation including dimensions and verify the dimensions with the
requirements listed in this manual.
You may wish to adjust the appliance position slightly to ensure the vent does not intersect with a framing
member. Appliance must be positioned so that no combustibles are within, or can swing within (e.g. drapes,
doors), 48” of the front of the appliance.
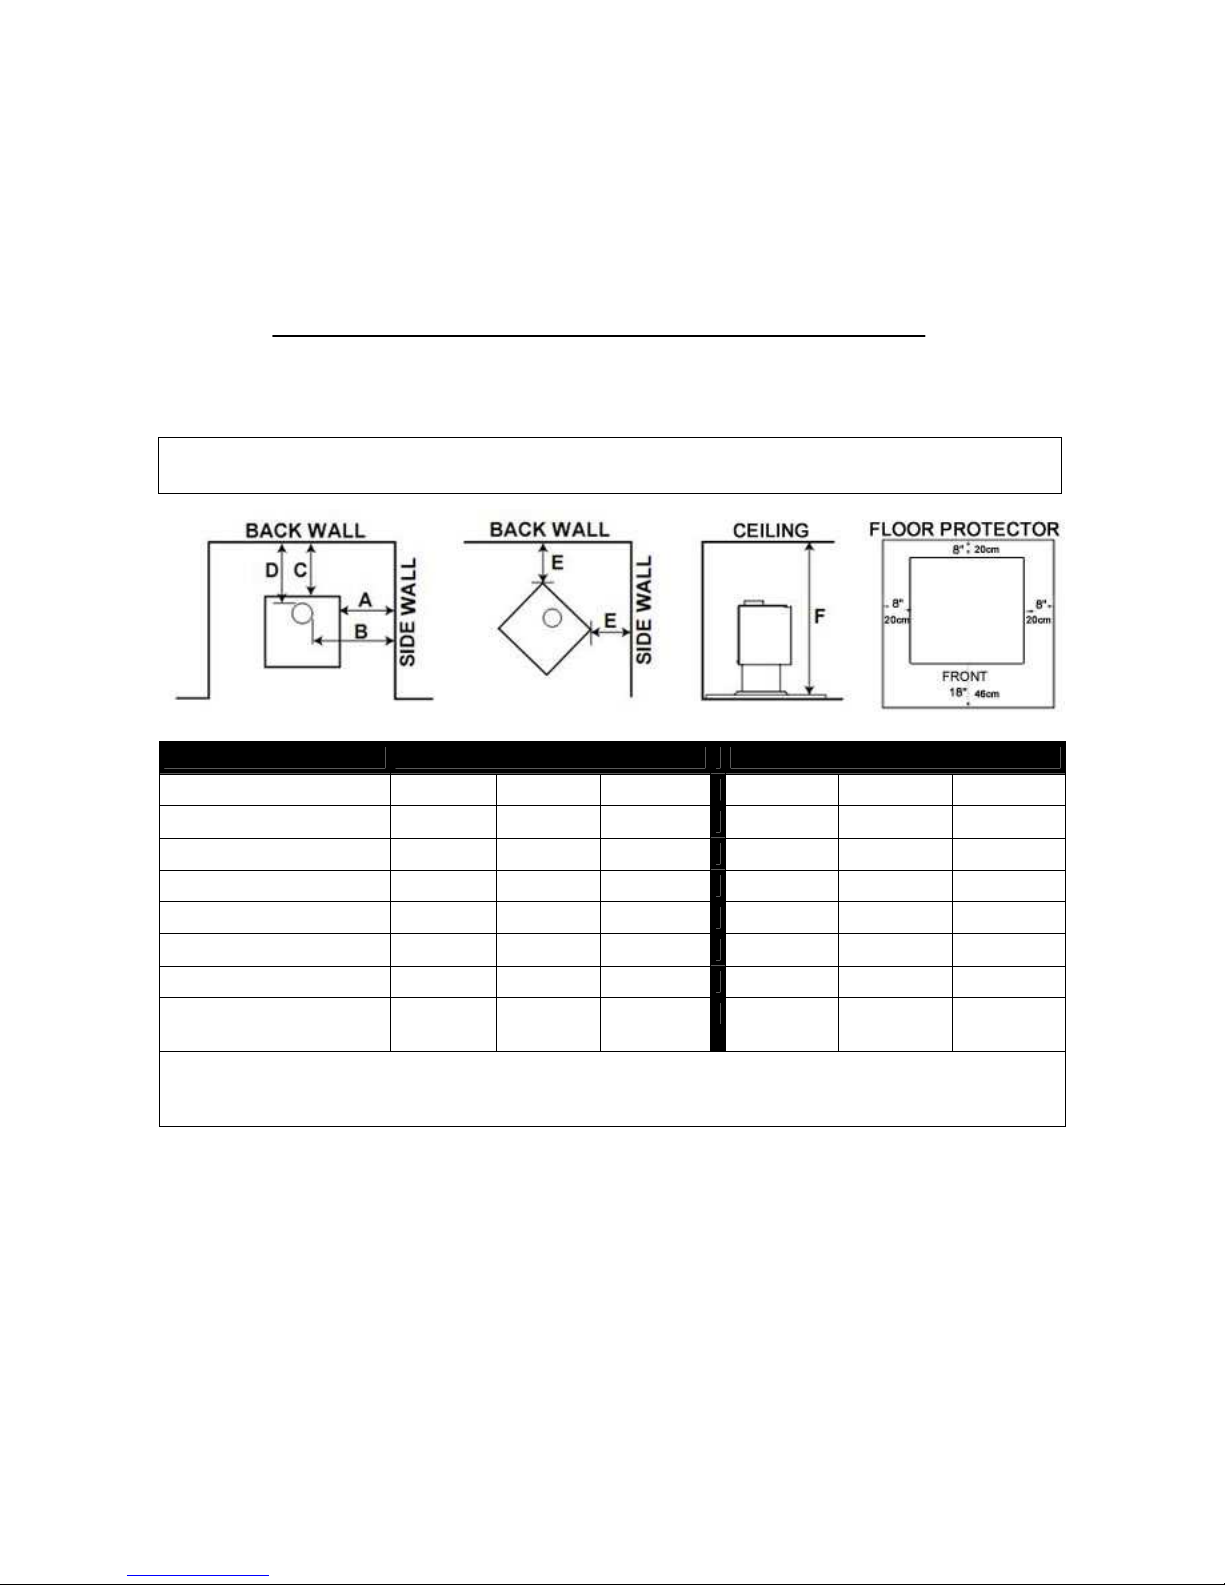
CLEARANCE TO COMBUSTIBLES
DO NOT INSTALL INTO ANY AREA HAVING A HEIGHT LESS THAN 7 FEET (CEILING OF
ENCLOSURE TO APPLIANCE BOTTOM EXCLUDING HEARTH HEIGHT).
PARALLEL & CORNER SINGLE WALL CONNECTOR
DOUBLE WALL CONNECTOR
Lava
Lava
SIDEWALL (A)
SIDEWALL TO FLUE (B)
BACKWALL (C)
BACKWALL TO FLUE (D)
CORNER (E)
CEILING (F) 84”
84”
FLOOR PROTECTOR
SIZE (MIN)
37" x 44"
Clearances can be reduced with shielding acceptable to local authorities. Reduced installation must comply
with NFPA 211 or CAN/CSA-B365.
BACK WALL / MUR ARRIERE
SIDE WALL / MUR ADJACENT
CEILING / PLAFOND
FLOOR PROTECTOR / PROTECTION DE SOL

MINIMUM CLEARANCES TO
COMBUSTIBLE SURFACES
Unit to Sidewall - - - - - - - - - - - 27.6"(70 cm)
Unit to Backwall - - - - - - - - - - - -16" (40 cm)
Unit Corner to wall - - - - - - - - 27.6"( 70 cm)
Pipe Connector to Ceiling - - - - - 18" (46 cm)
NOTE: DRYWALL FACED WITH BRICK OR
STONE SHOULD BE CONSIDER A COMBUSTIBLE SURFACE.
CAUTION: KEEP FURNISHING AND OTHER
COMBUSTIBLE MATERIALS AWAY FROM
THE STOVE.
Clearances may only be reduced by means approved by regulatory authority.
OPERATION OF THE STOVE
1. Burn wood only. The wood should be natural, air dried (seasoned) for at least six (6)
months. Before lighting open draft, located on front left or right side of stove. Light wood
using paper, twigs, etc. NEVER USE ANY FLAMMABLE LIQUIDS OR GASOLINE
TO START OR FRESHEN UP A FIRE IN THE STOVE.
2. After the fire has been started, adjust the rate of burning by opening or closing the draft con-
trol.
3. Do NOT touch the stove after firing until is has cooled.
4. Never overfire this stove by building excessively hot fires.
5. If stove begins to glow or turn red, you are overfiring the stove.
6. Inspect stovepipe every 60 days. Replace immediately if stove pipe is rusting or leaking
smoke.
7. Inspect the stove pipes, connectors, and chimney twice monthly during the heating season
and clean if necessary.
CAUTION: SLOW BURNING FIRES AND EXTENDED USE MAY CAUSE EXCESSIVE CREOSOTE BUILDUP. IGNITION OF CREOSOTE/SOOT OR OVERFIRING
MAY CAUSE CHIMNEY FIRE. CHIMNEY FIRES BURN EXTREMELY HOT AND
MAY IGNITE SURROUNDING MATERIALS. IN CASE OF CHIMNEY FIRE CALL
THE FIRE DEPARTMENT IMMEDIATELY.
CHIMNEY MAINTENANCE - Creosote/Soot Formation and Need for Removal
When wood is burned slowly, it produces tar and other organic vapors which combine with ex-
pelled moisture to form creosote. The creosote vapors condense in relatively cool chimney flue
of a slow burning fire. As a result, creosote residue accumulates on the flue lining. When ignited, this soot/creosote makes an extremely hot fire.
The chimney and the chimney connector should be inspected at least twice monthly.
If creosote/soot has accumulated, it should be removed. Failure to remove creosote/soot may
cause a house or building fire. Creosote/soot may be removed by using chimney brush.
Chimney fires burn very hot. If the chimney connector glows red, immediately call the fire de-
partment.
PROVIDE AIR INTO THE ROOM FOR PROPER COMBUSTION.
 Loading...